
LCDXR-65A80L - Television SONY - Free user manual and instructions
Find the device manual for free LCDXR-65A80L SONY in PDF.
 FR
FR
 BG
BG
 CS
CS
 DA
DA
 DE
DE
 EL
EL
 EN
EN
 ES
ES
 ET
ET
 FI
FI
 HE
HE
 HU
HU
 ID
ID
 IT
IT
 KK
KK
 LT
LT
 LV
LV
 NL
NL
 NO
NO
 PL
PL
 PT
PT
 RO
RO
 RU
RU
 SK
SK
 SL
SL
 SV
SV
 TH
TH
 TR
TR
 UK
UK
 VI
VI
 ZH
ZH
| Product type | OLED 4K HDR TV |
| Brand | Sony |
| Model | XR-65A80L (LCDXR-65A80L) |
| Screen size | 65 inches (165 cm diagonal) |
| Display technology | OLED with Cognitive Processor XR |
| Resolution | 4K Ultra HD (3840 x 2160 pixels) |
| Dimensions (with stand) | 1448 × 851 × 342 mm (W × H × D) |
| Dimensions (without stand) | 1448 × 836 × 52 mm (W × H × D) |
| Weight (with stand) | Approximately 24.5 kg |
| Weight (without stand) | Approximately 22.5 kg |
| Power supply | 220-240 V AC, 50/60 Hz |
| Power consumption | 359 W (max), 0.5 W standby |
| Main features | Smart TV (Google TV), Dolby Vision, Dolby Atmos, AirPlay 2, built-in Chromecast, Alexa compatible |
| Connectivity | 4x HDMI (1 eARC), 2x USB, Wi-Fi, Bluetooth, Ethernet, optical audio output, headphone jack |
| Wall mount | VESA 300 × 300 mm (specific bracket SU-WL850 required) |
| Wall installation | Installation by a certified professional mandatory |
| Maintenance and cleaning | Clean with a soft, dry cloth. Do not use chemical products. |
| Safety | Do not block ventilation openings. Avoid shocks. Do not expose to water. |
| Spare parts and repairability | Repairability score: 7.9/10. Parts available for 7 years after end of production. |
| General information | Manual available in 30 languages. Manufacturer warranty 2 years. |
Frequently Asked Questions - LCDXR-65A80L SONY
User questions about LCDXR-65A80L SONY
0 question about this device. Answer the ones you know or ask your own.
Ask a new question about this device
Download the instructions for your Television in PDF format for free! Find your manual LCDXR-65A80L - SONY and take your electronic device back in hand. On this page are published all the documents necessary for the use of your device. LCDXR-65A80L by SONY.
USER MANUAL LCDXR-65A80L SONY
- In the actual model names, the "x"/"xx" indicates numbers and/or characters specific to each model.
XR-77A8xL / 77A8xEL / 65A8xL / 65A8xEL / 55A8xL / 55A8xEL
To Customers
For product protection and safety reasons, Sony strongly recommends that installation of your TV be performed by Sony dealers or licensed contractors. Do not attempt to install it yourself.
To Sony Dealers and Contractors
Provide full attention to safety during the installation, periodic maintenance and examination of this product.
Sufficient expertise is required for installing this product, especially to determine the strength of the wall for withstanding the TV's weight. Be sure to entrust the attachment of this product to the wall to Sony dealers or licensed contractors and pay adequate attention to safety during the installation. Sony is not liable for any damage or injury caused by mishandling or improper installation.
For Safety and proper installation, follow the Wall-Mount Bracket Operation Instructions, TV Setup Guide and the directions in this manual.
Wall-Mount Bracket
On Safety
Thank you for purchasing this product.
To Customers
Installing the TV to the Wall

WARNING
PROFESSIONAL INSTALLATION REQUIRED
This product should only be installed by a professional installer who is trained to determine the strength of the wall for withstanding the TV's weight. If it is not properly secured during installation, the TV may fall and cause serious injury. Sony is not liable for any damage or injury caused by mishandling or improper installation, or installing any other than the specified product. Your Statutory Rights (if any) are not affected.
To Sony Dealers
Sufficient expertise is required for installing this product. Be sure to read this instruction manual thoroughly to do the installation work safely. Sony is not liable for any damages or injury caused by mishandling or improper installation. Please give this manual to the customer after installation.
This instruction manual shows the correct handling of the product and important precautions necessary to prevent accidents. It is your responsibility to read, thoroughly understand, and follow all instructions in this instruction manual. Failure to do so may result in serious personal injury or property damage, and may void the warranty. Keep this manual available for future reference.
Products by Sony are designed with safety in mind. If the products are used incorrectly, however, it may result in a serious injury through fire, electric shock, the product toppling over, or the product dropping. Be sure to observe the precautions for safety to prevent such accidents.
CAUTION
Specified products
This Wall-Mount Bracket is designed for use with the products specified TVs. For TVs, refer to their Reference Guide to verify that the Wall-Mount Bracket can be used.
To Customers
WARNING
If the following precautions are not observed, serious injury or death through fire, electric shock, or the product dropping can result.
Be sure to subcontract the installation to licensed contractors and keep small children away during the installation.
If the Wall-Mount Bracket or the TV is not installed correctly, the following accidents may occur. Be sure licensed contractors carry out installation.
- The TV may fall and cause a serious injury such as a bruise or a fracture.
- If the wall on which the Wall-Mount Bracket is installed is unstable, uneven, or not perpendicular to the floor, the unit may fall and cause injury or property damage. The wall should be capable of supporting a weight of at least six times the TV weight. (Refer to your TV's Reference Guide for its weight.)
- If the installation of the Wall-Mount Bracket on the wall is not sufficiently sturdy, the unit may fall and cause injury or property damage.
Be sure to subcontract moving or dismounting of the TV to licensed contractors.
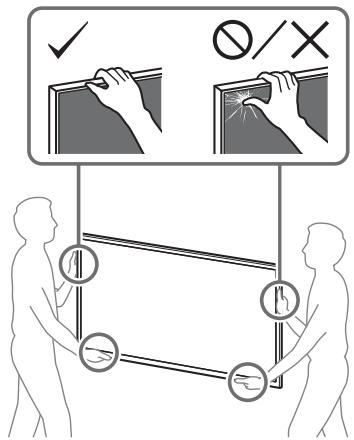
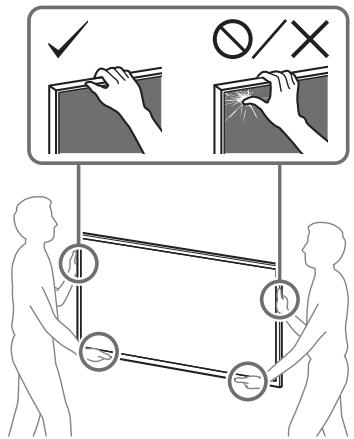
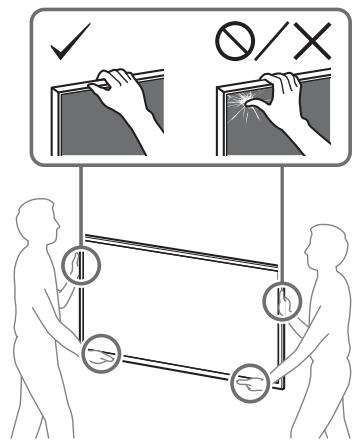
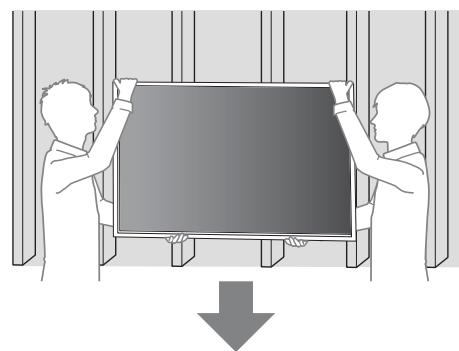
If persons other than licensed contractors transport or dismount the TV, it may fall and cause injury or property damage. Two or more persons (three or more persons for 75 inches (189.3 cm) and above TV) are needed to transport a large TV set (except Egypt).
Two or more persons (three or more persons for 75 inches (189.3 cm) and above TV) are needed to transport a large TV set (Egypt only).
Do not remove screws, etc., after mounting the TV.
If you do so, the TV may fall and cause injury or property damage.
Do not make alterations to the parts of the Wall-Mount Bracket.
If you do so, the Wall-Mount Bracket may fall and cause injury or property damage.
Do not mount any equipment other than the specified product.
This Wall-Mount Bracket is designed for use with the specified product only. If you mount equipment other than specified, it may fall or break, and cause injury or property damage.
Do not apply any load other than the TV on the Wall-Mount Bracket. Do not shake the TV left/right, up/down.
If you do so, the TV may fall and cause injury or property damage.
Do not lean on or hang from the TV.
Do not lean on or hang from the TV as it may fall on you and cause serious injury.
CAUTION
If the following precautions are not observed, injury or property damage may occur.
- Be careful not to pinch your fingers while handling the Wall-Mount Bracket or swiveling the TV set.
- While swiveling the TV set, handle it with caution and take care not to hit any people nearby.
- Be sure to store the unused parts in a safe place for future use.
- Keep them away from children.
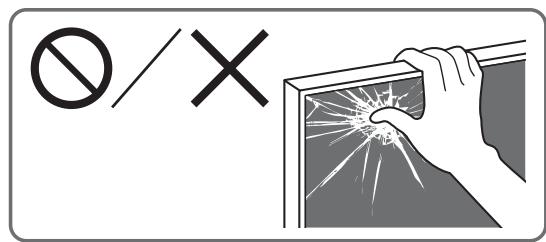
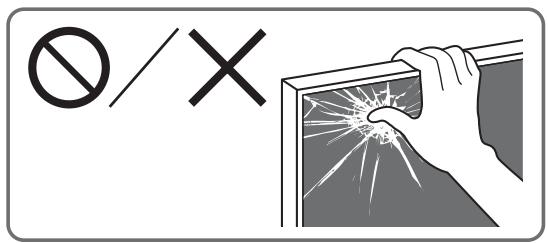
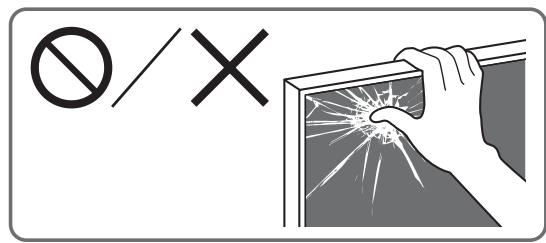
Do not handle the product with excessive force during cleaning or maintenance.
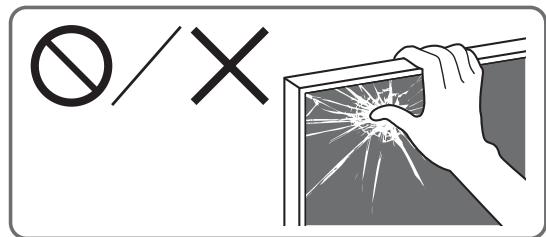
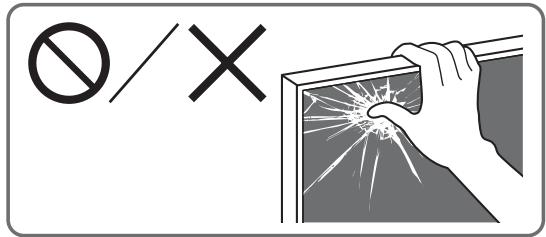
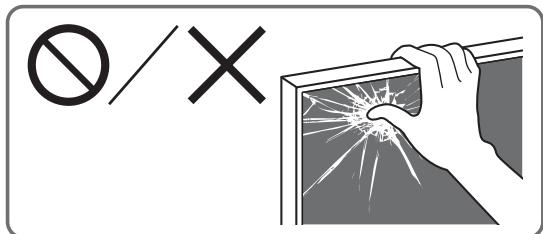
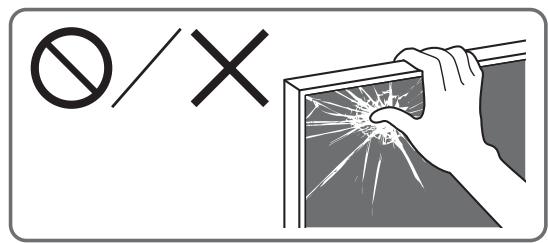
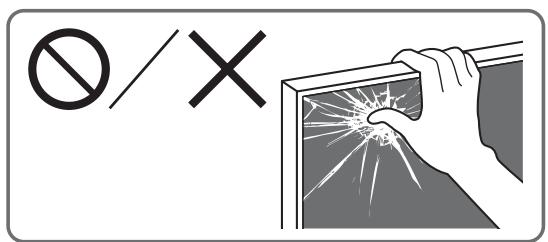
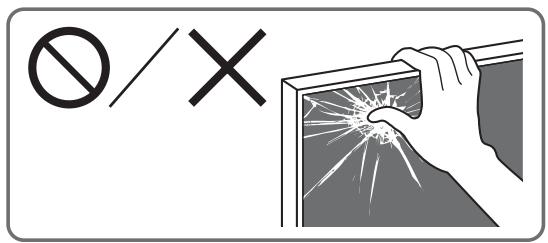
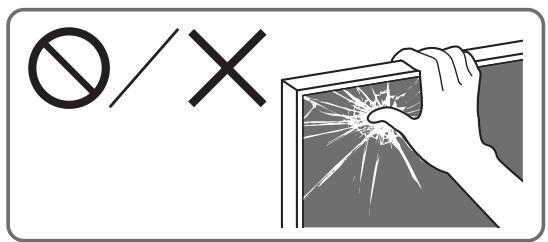
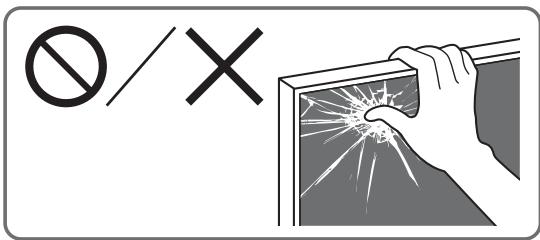
Do not apply excessive force on the topside of the TV. If you do so, the TV may fall and cause injury or property damage.
Do not place this product close to medical devices.
This product (including accessories) has magnet(s) which may interfere with pacemakers, programmable shunt valves for hydrocephalus treatment, or other medical devices. Do not place this product close to persons who use such medical devices. Consult your doctor before using this product if you use any such medical device.
Keep out of the reach of children or the supervised individuals.
This product (including accessories) has magnet(s). Swallowing magnet(s) could cause serious harm, such as choking hazard or intestinal injuries. If magnets (or a magnet) were swallowed, consult a doctor immediately.
Precautions
- If you use the TV installed on the Wall-Mount Bracket for a long time, the wall behind or above the TV may become discolored or the wallpaper may come unstuck, depending on the material of the wall.
- If the Wall-Mount Bracket is removed after installing it on the wall, the screw holes are left.
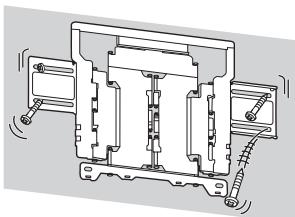
- Do not use the Wall-Mount Bracket in a place where it is subjected to mechanical vibrations.
Installing the WallMount Bracket
To Sony Dealers
WARNING
The following instructions are for Sony dealers only. Be sure to read the safety precautions described above and pay special attention to safety during the installation, maintenance, and checking of this product.
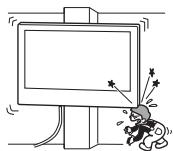
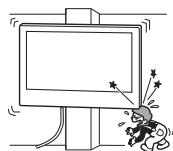
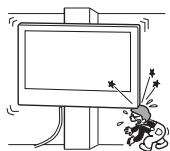
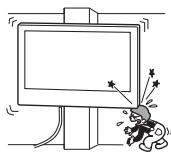
Do not install the WallMount Bracket on wall surfaces where the corners or the sides of the TV protrude away from the wall surface.
Do not install the Wall-Mount Bracket on wall surfaces such as a pillar, where the corners or the sides of the TV protrude away from the wall surface. If a person or object happens to hit the protruded corner or side of the TV, it may cause injury or property damage.
Do not install the TV over or under an air-conditioner.
If the TV is exposed to water leaks or air current from an air conditioner for a long time, it may cause a fire, an electric shock, or a malfunction of the TV.
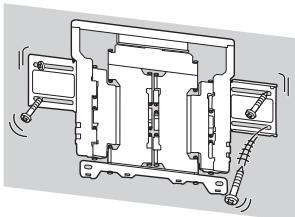
Be sure to install the Wall-Mount Bracket securely to the wall following the instructions in this instruction manual.
If any of the screws are loose or fall out, the Wall-Mount Bracket may fall and cause injury or property damage. Be sure to use the appropriate screws for the material of the wall and install the unit securely using four screws of 8 mm diameter (or equivalent).
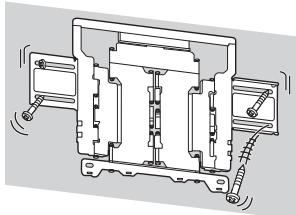
Be sure to use the supplied screws and attachment parts properly following the instructions given in this instruction manual. If you use substitute items, the TV may fall and cause bodily injury to someone or damage to the TV.
Be sure to assemble the bracket properly following the instructed procedure explained in this instruction manual.
If any of the screws are loose or fall out, the TV may fall and cause bodily injury to someone or damage to the TV.
Be sure to tighten the screws securely in the designated position.
If you fail to do so, the TV may fall and cause bodily injury to someone or damage to the TV.
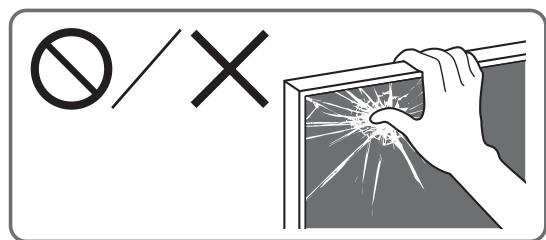
Be careful not to subject the TV to shock during installation.
If the TV is exposed to shock, it may fall or break apart. This may cause injury.
Be sure to install the TV on a wall that is both perpendicular and flat.
If you fail to do so, the TV may fall and cause injury.
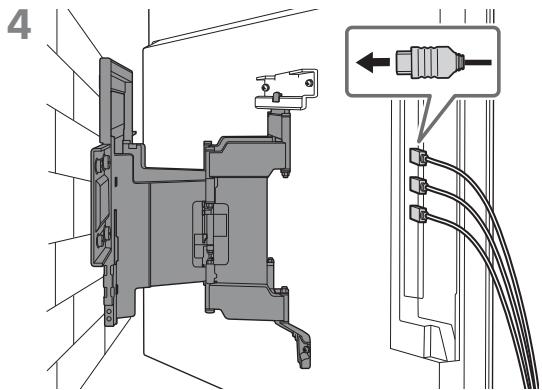
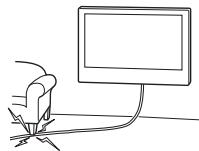
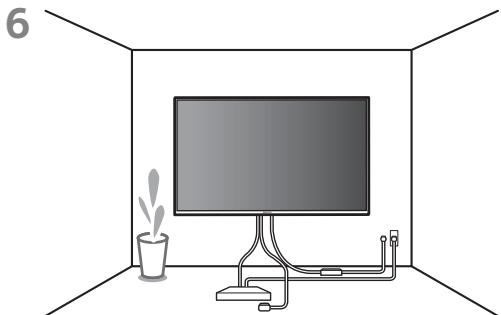
After proper installation of the TV, secure the cables properly.
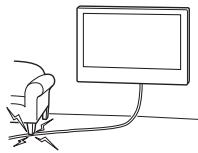
If people or objects get tangled with cables, this may result in injury or damage to the TV.
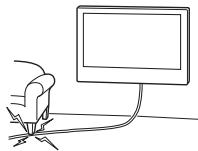
Do not allow the AC power cord (mains lead) or the connecting cable to be pinched.
If the AC power cord (mains lead) or the connecting cable is pinched between the unit and the wall or is bent or twisted by force, the internal conductors may become exposed and cause a short circuit or an electrical break. This may cause a fire or an electric shock.
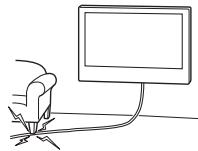
The screws needed to secure the Wall-Mount Bracket to the wall are not supplied.
Use the appropriate screws for the wall material and structure when mounting the Wall-Mount Bracket.
Before Getting Started
- The TV illustrations shown in this manual are examples used to provide clear explanations of the operations. For this reason, the illustrations may appear different from your actual TV.
What Is Your Wall Made Of?
Firstly, check the type of the wall to install the TV.
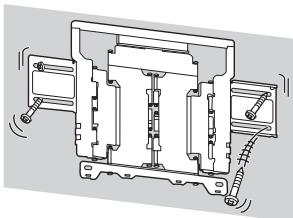
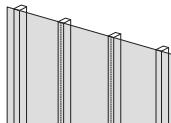
Dry wall with studs
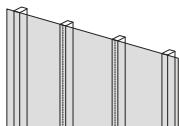
Precautions
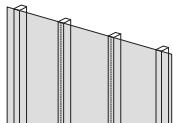
Maximum dry wall thickness: 16 mm - Ensure that the inner wood stud size is at least 51 mm × 102 mm for common or 38 mm × 89 mm for nominal. - Keep minimum 406 mm horizontal space between fasteners.
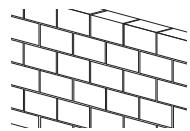
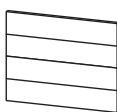
Solid concrete or concrete block
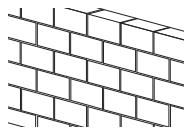
Precautions
- Mount the Wall-Mount Bracket directly onto the solid concrete wall.
- Ensure that the thickness of solid concrete wall is at least 203 mm.
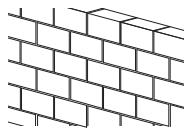
- Ensure that the size of each concrete block is at least 203 mm × 203 mm × 406 mm.
Checking the Parts
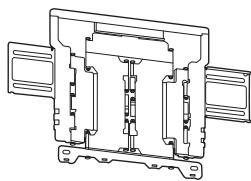
Supplied with SU-WL850
- Verify that all the parts are included.
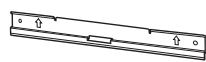
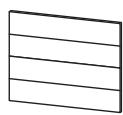
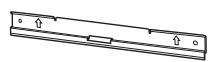
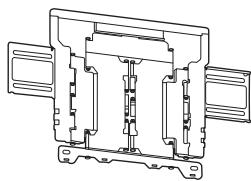
| WM1 (×1) | WM2 (×1) | WM3 (×4) |
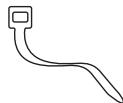
| M6 (×4) | WT1 (×6) |
Supplied with the TV
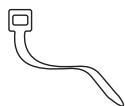
| Wall-Mount Attachment VS (×4)* |
- Only for limited region/country/model.
Preparing for Installation
- Have the TV's Reference Guide and Setup Guide at hand before installation.
- Confirm the installing position of your TV.
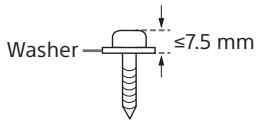
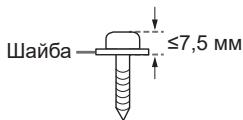
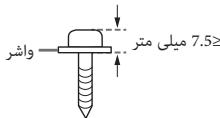
- Prepare four screws of 8 mm diameter and four proper washers (not supplied). Select screws suitable for the material of the wall.
- Prepare the following tools:
| *1 | 5.5 mm 10 mm | ||
| *2 | 1.5 N·m {15 kgf·cm} | *3 | |
| 1.5 N·m {15 kgf·cm} | |||
| *2 (x4) | *4 (x4) 8 mm × 60 mm | *4 (x4) | |
*1 Only for dry wall with studs
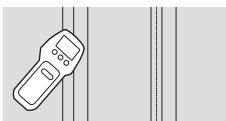
2 Only for solid concrete or concrete block 3 Depending on models *4 Be careful when selecting screws and washers
A Attaching the Wall-Mount Bracket to the Dry Wall with Studs
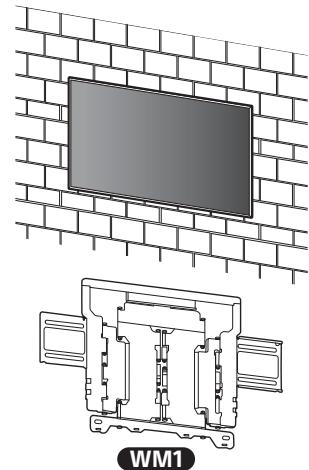
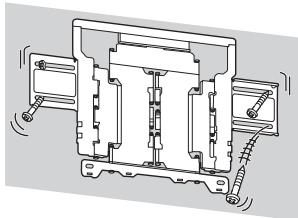
WM1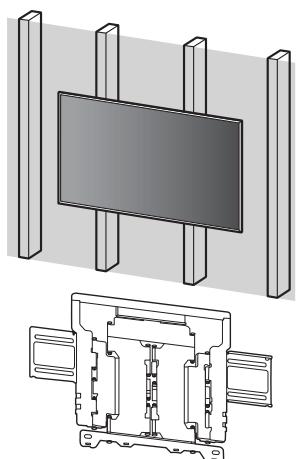
Installing the Wall-Mount Bracket to the Wall
1 Decide on the installation location.
Make sure that the wall has enough space for the TV and is capable of supporting a weight of at least six times that of the TV.
Refer "Measurement for Wall-Mount Bracket installation on the wall" on page 18. - Refer to your TV's Reference Guide for the TV's weight.
Note
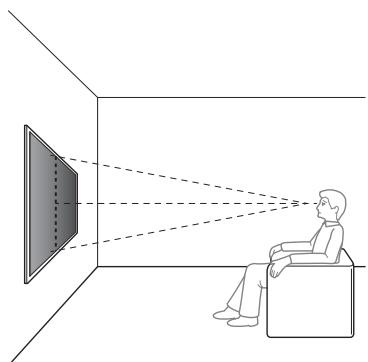
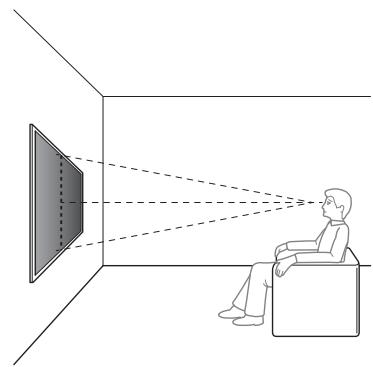
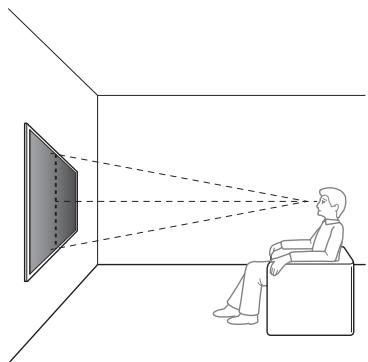
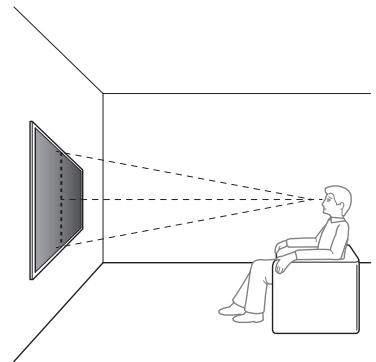
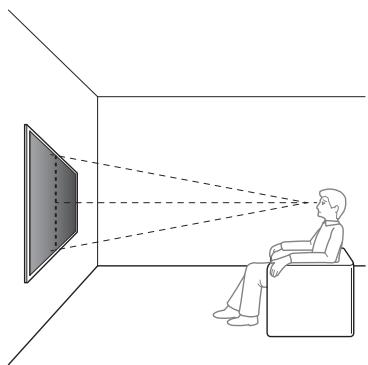
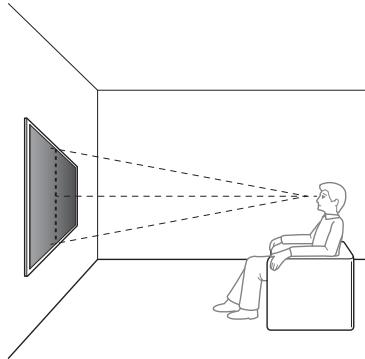
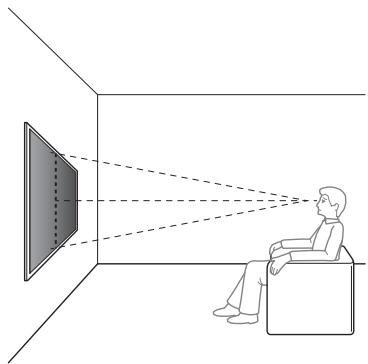
- When your TV is installed on the wall, the upper side of the TV slightly leans forward.
- We recommend you to check the position of TV in the viewing environment.
2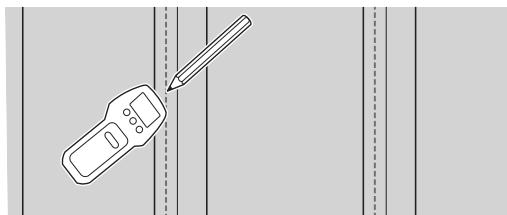
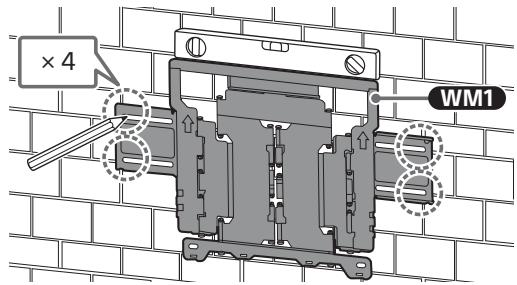
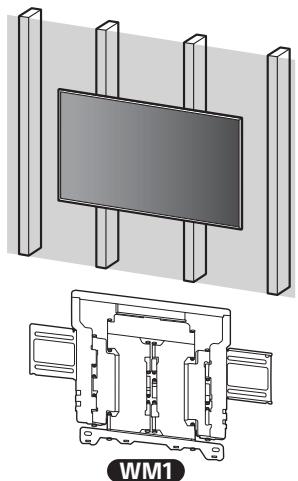
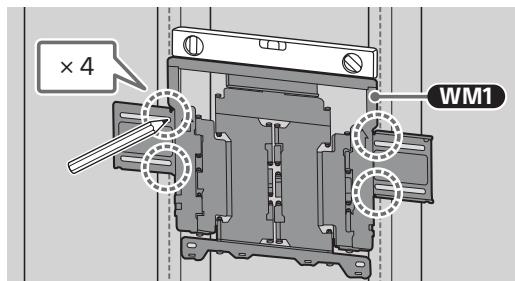
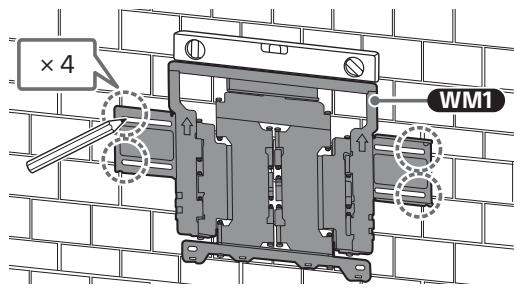
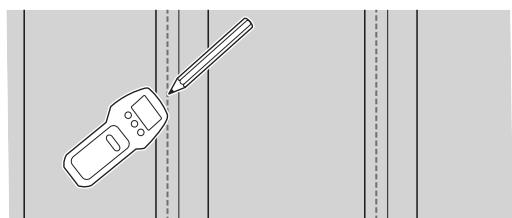
3 Align WM1 to the wall and make four marks aligned with the studs.
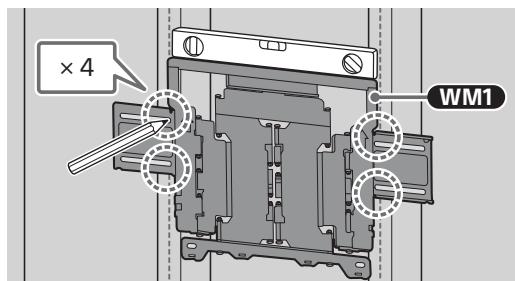
Note
- Use a level to check whether WM1 is level.
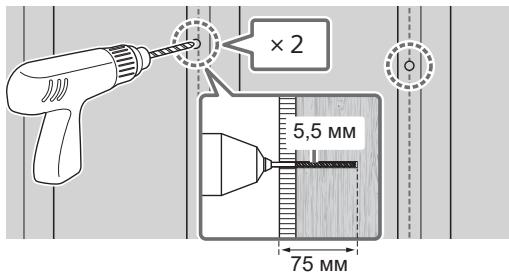
4 Drill upper pilot holes on the marks.
Make sure the location on the wall to drill the holes are strong enough to support a weight of at least six times that of the TV.
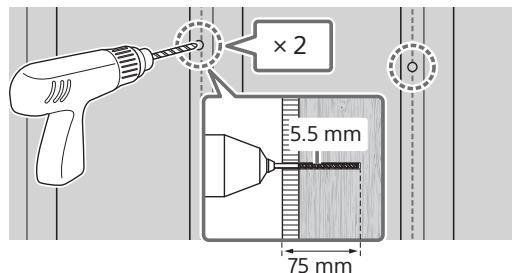
Note
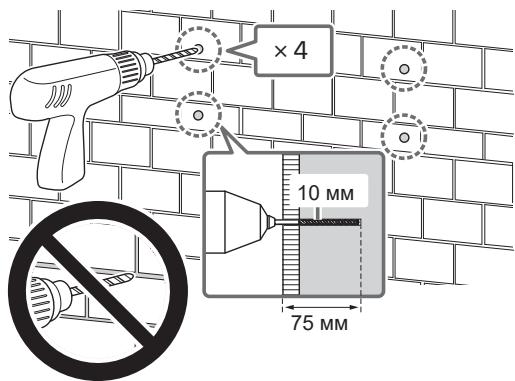
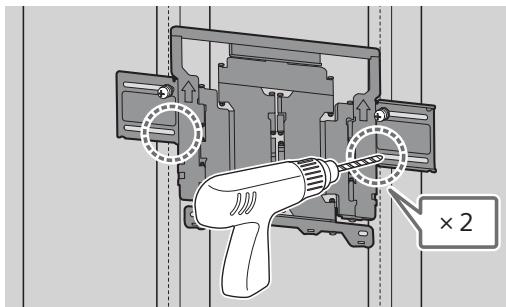
- Pilot holes must be drilled to a depth of 75 mm using a 5.5 mm diameter drill bit.
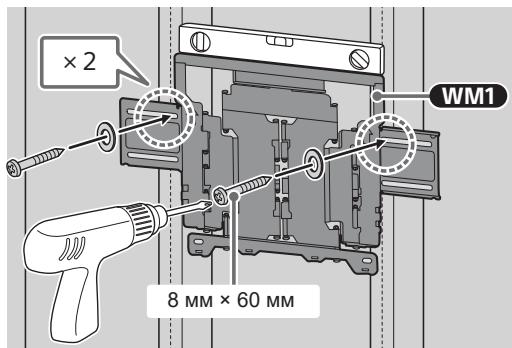
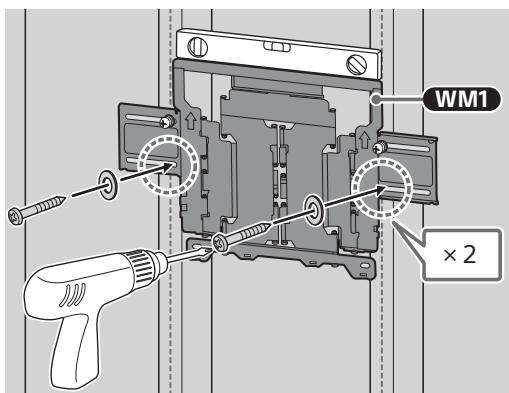
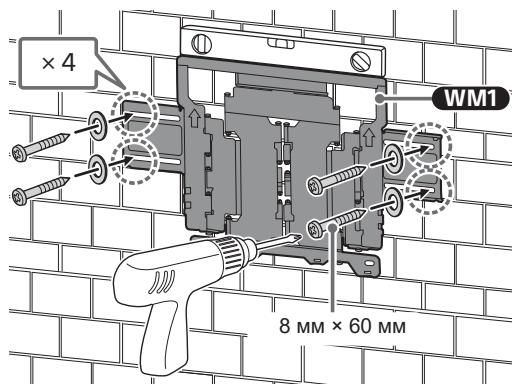
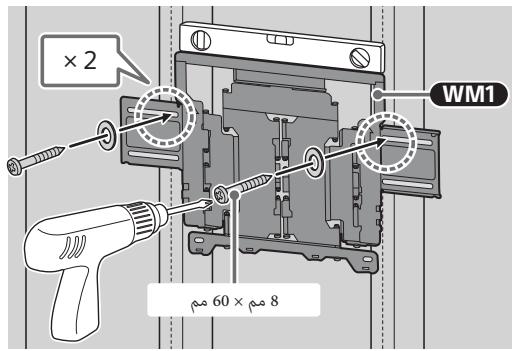
5 Install WM1 on the wall using suitable screws (not supplied) and washers (not supplied).
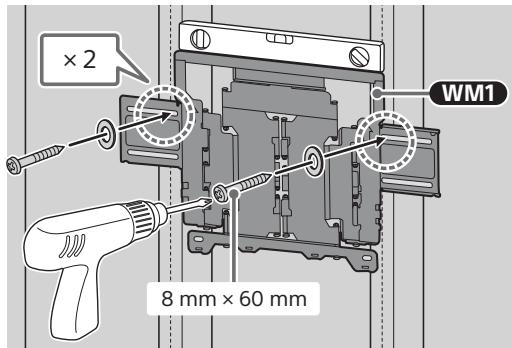
Note
- Use a level to check whether WM1 is level.
Precaution
- Do not over-tighten wooden screw 8 mm x 60 mm. Improper tightening could reduce the holding power of wooden screw 8 mm x 60 mm.
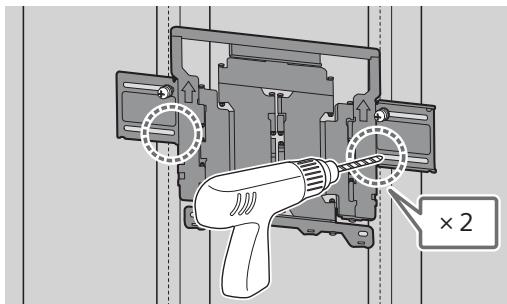
6 Drill lower pilot holes on the marks. (Refer step 4 for the drill instruction.)
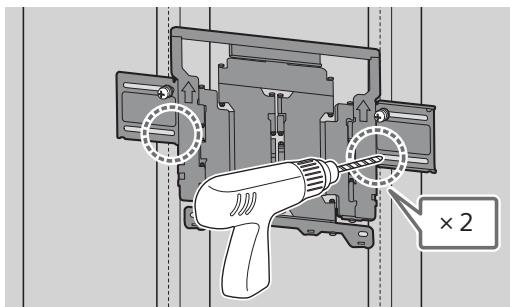
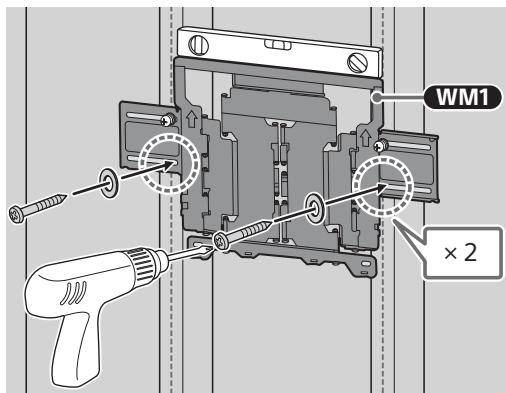
7 Fit the suitable screws and washers to the holes.
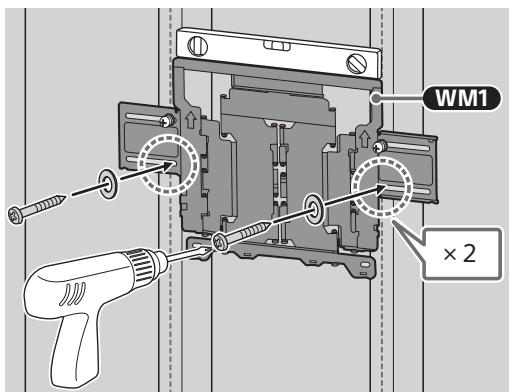
Note
- Use a level to check whether WM1 is level.
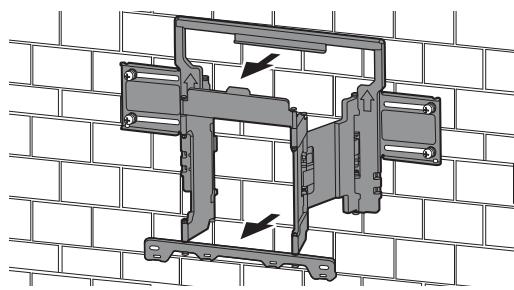
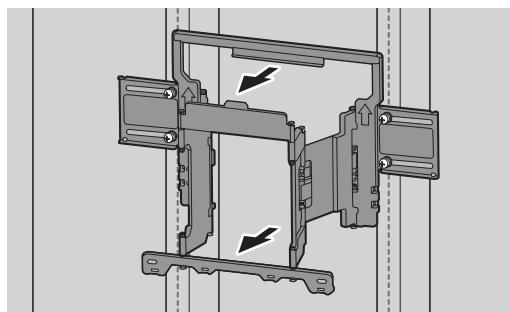
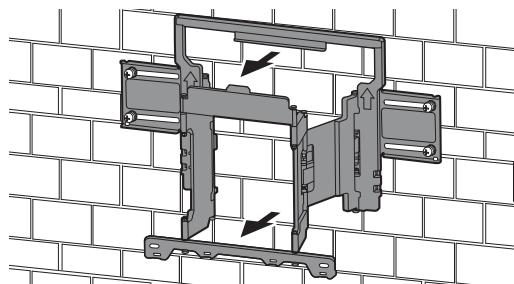
8 Pull out the arm of the bracket to the end.
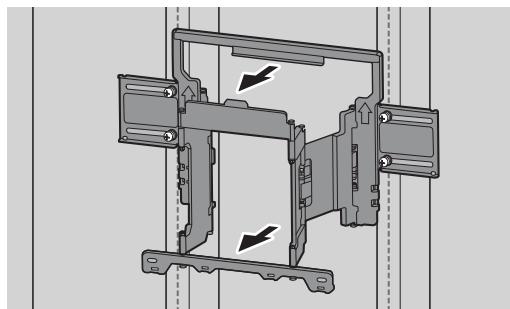
Preparing for the Installation of the TV
Note
- Be sure to store the removed screws and unused parts in a safe place, keeping them away from children.
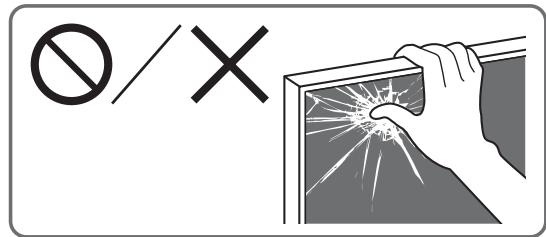
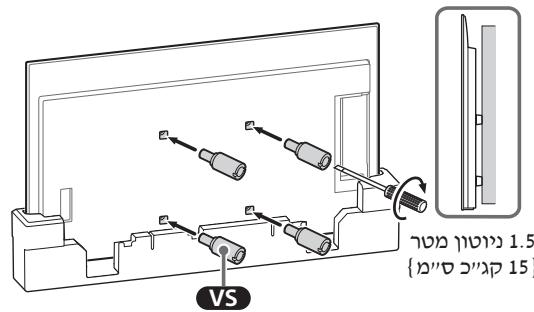
Installing the TV to the Wall from Carton*
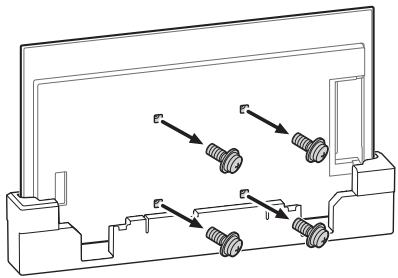
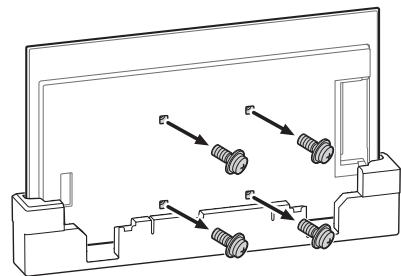
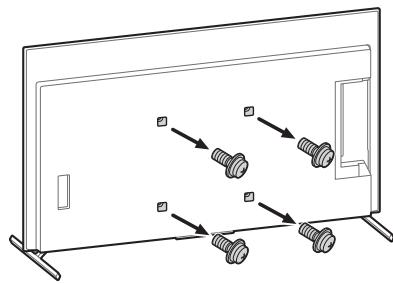
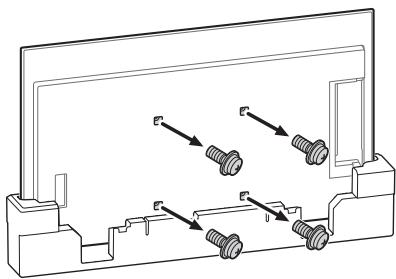
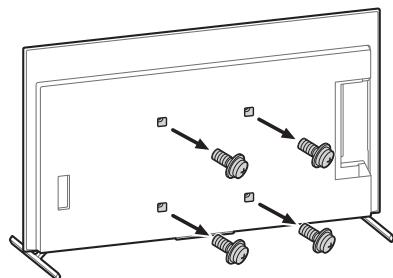
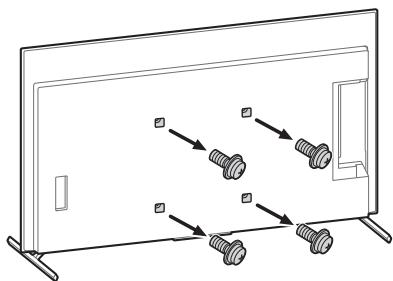
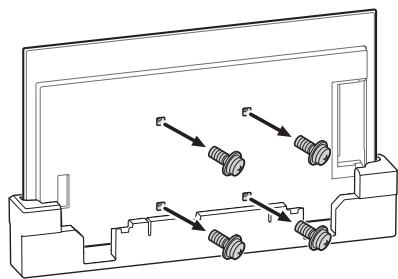
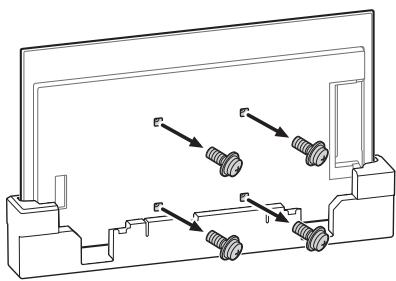
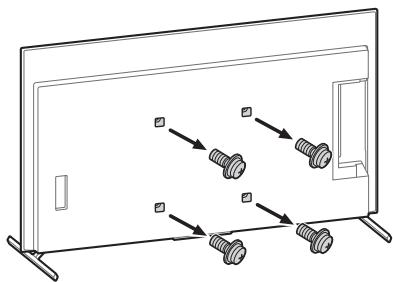
- Only for limited region/country/model. 1 Remove the screws from the rear of the TV.
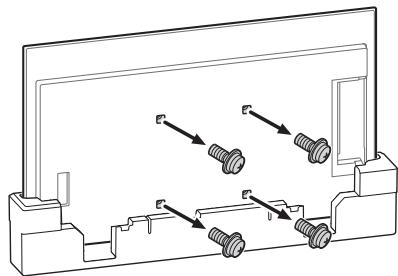
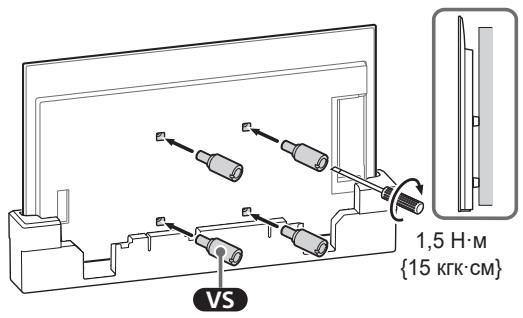
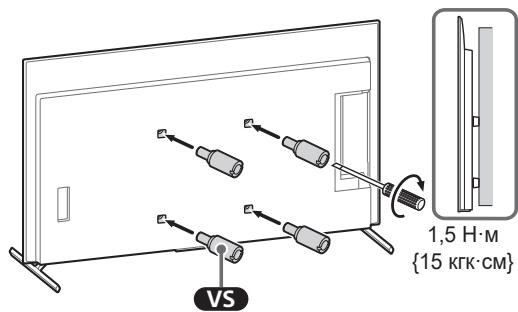
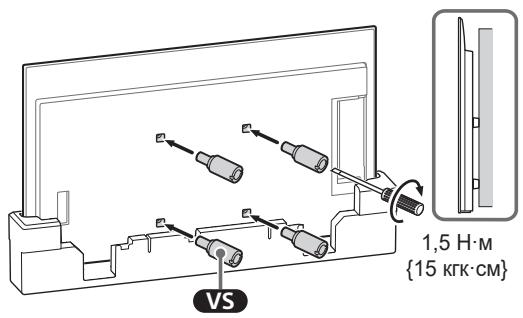
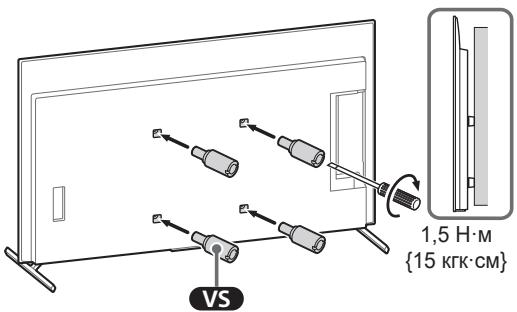
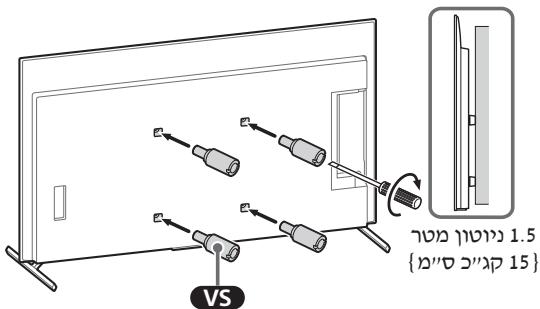
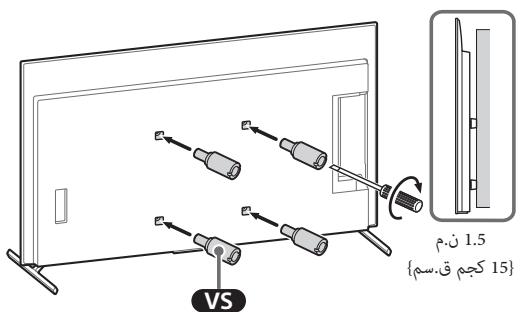
2 Attach the Wall-Mount Attachment VS (supplied with the TV) to the rear of the TV (to make it parallel with the wall).
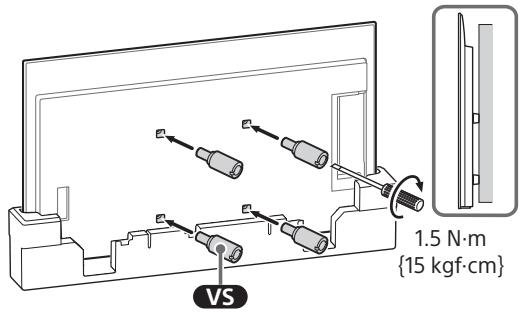
Note
- Be sure to fasten the Wall-Mount Attachment VS when attaching them to the TV. Use only a flat head screwdriver to install the Wall-Mount Attachment VS. Use of another tool might result in over torqueing the Wall-Mount Attachment VS and damaging the TV.
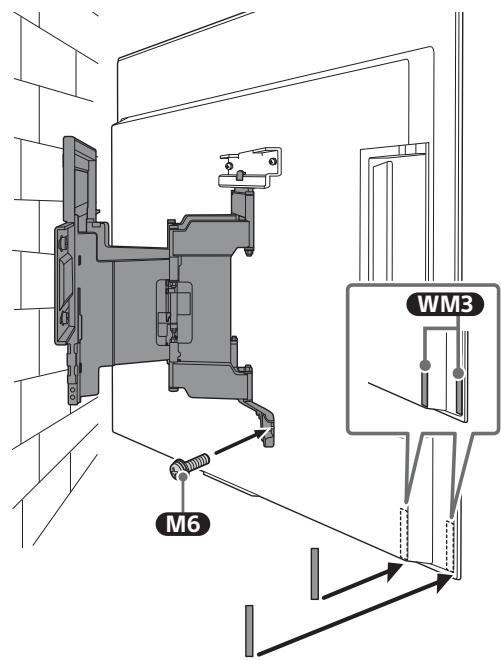
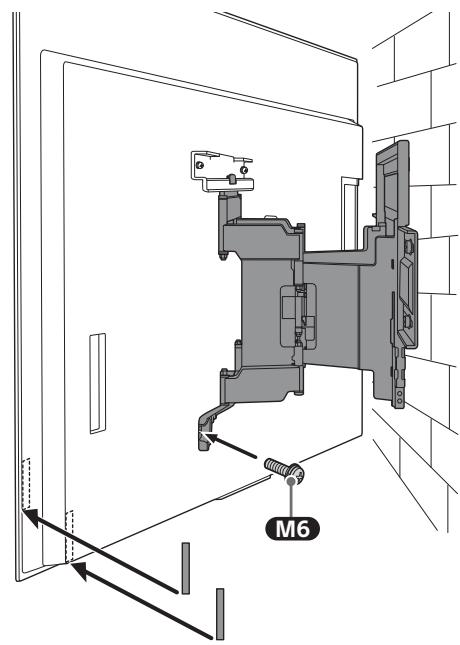
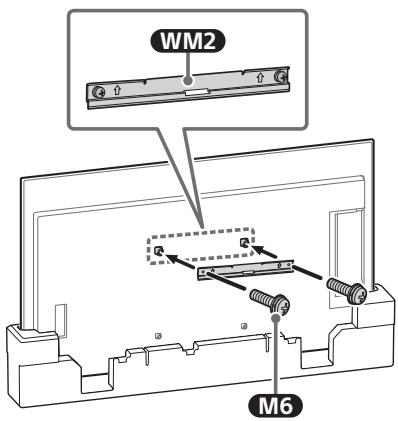
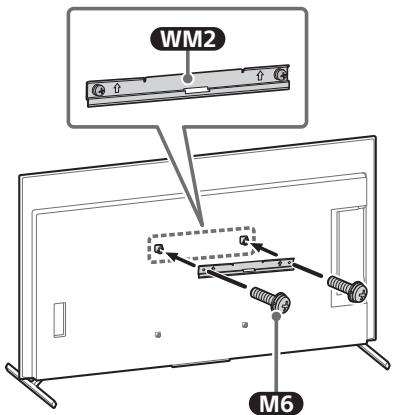
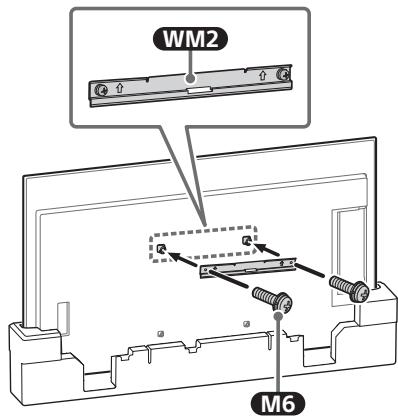
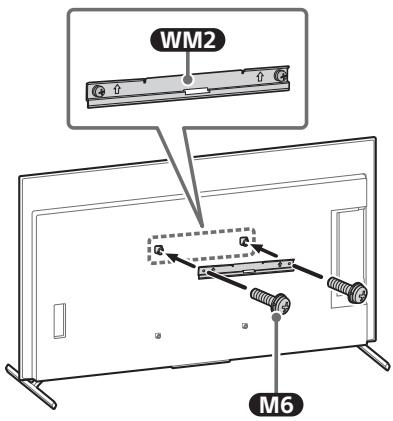
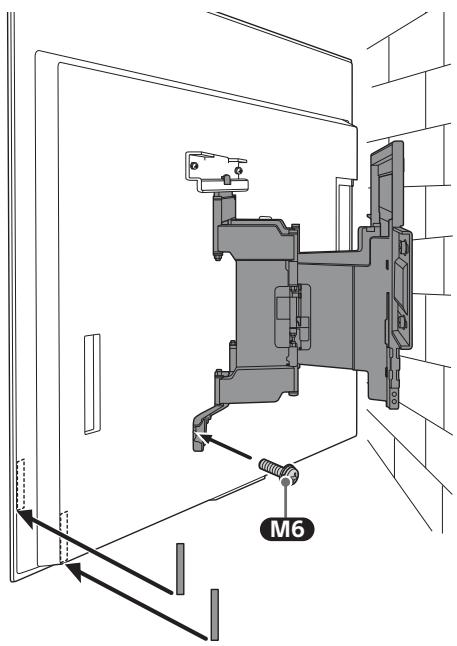
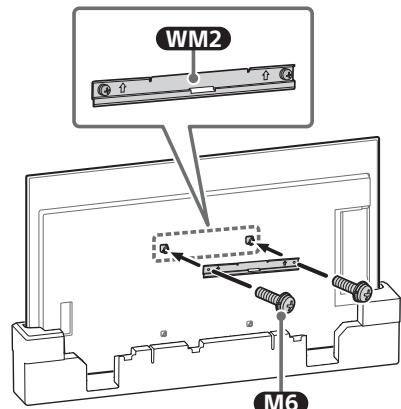
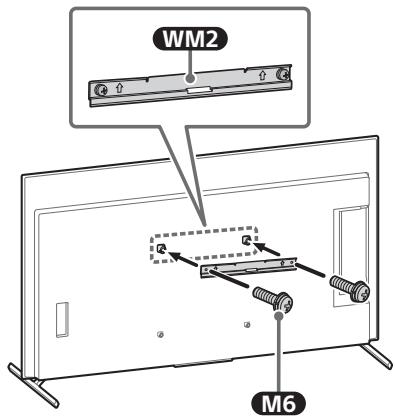
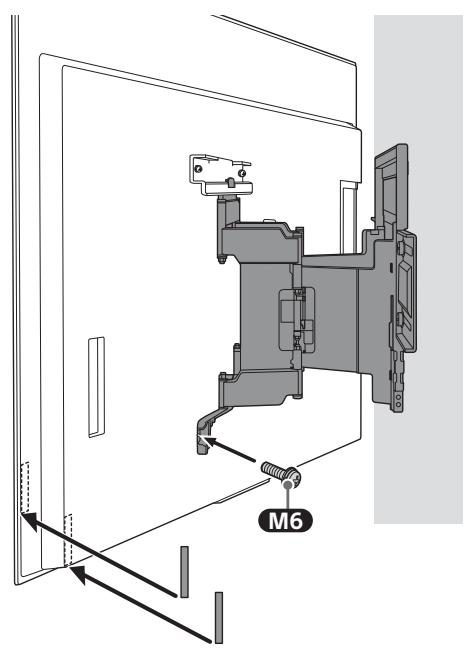
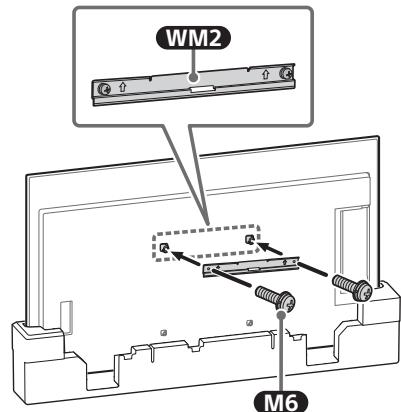
3 Attach the WM2 to the TV using M6.
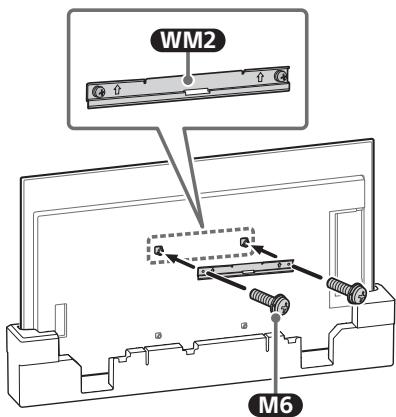
Installing the TV to the Wall from Table-Top Stand
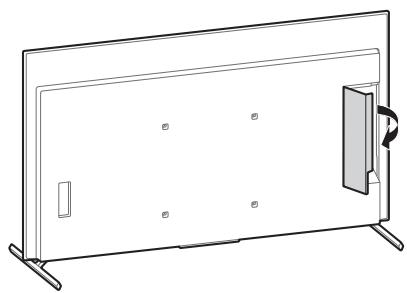
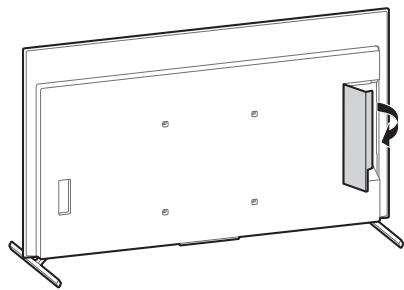
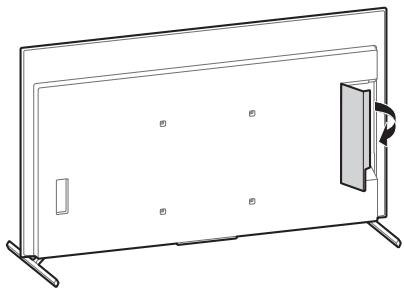
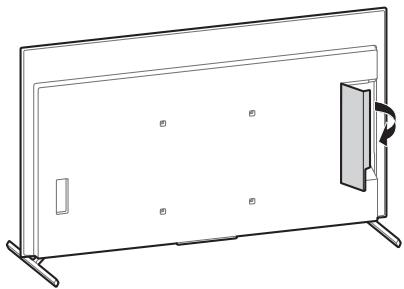
1 Remove the terminal cover.
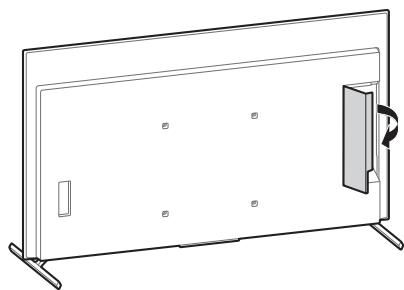
2 Remove the screws from the rear of the TV.
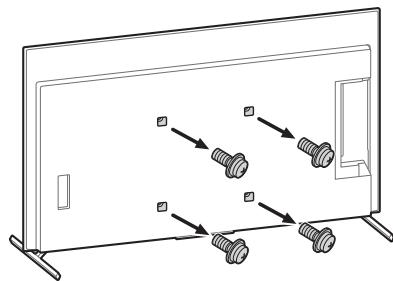
3 Attach the Wall-Mount Attachment VS (supplied with the TV) to the rear of the TV (to make it parallel with the wall).
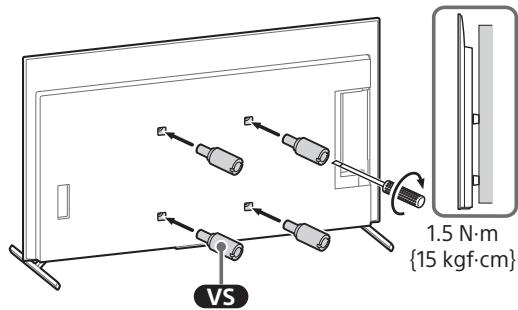
Note
- Be sure to fasten the Wall-Mount Attachment VS when attaching them to the TV. Use only a flat head screwdriver to install the Wall-Mount Attachment VS. Use of another tool might result in over torqueing the Wall-Mount Attachment VS and damaging the TV.
4 Attach the WM2 to the TV using M6.
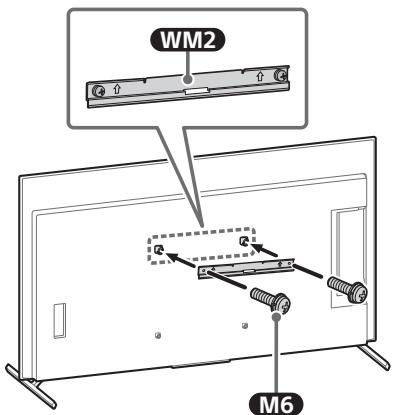
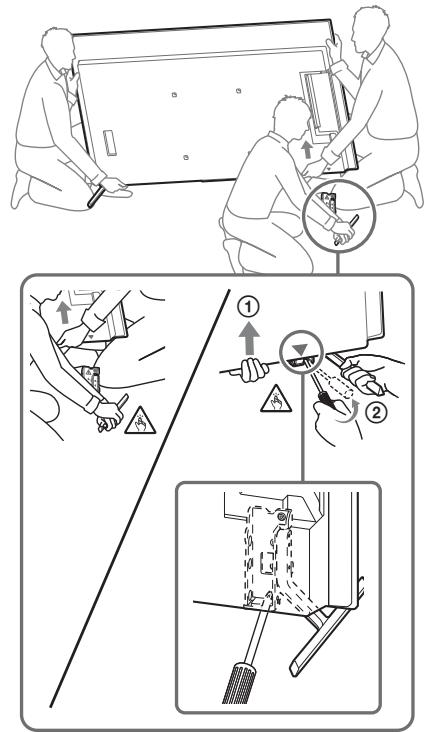
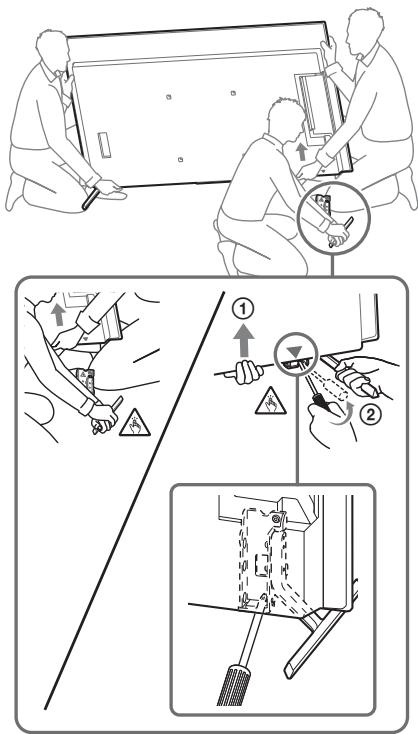
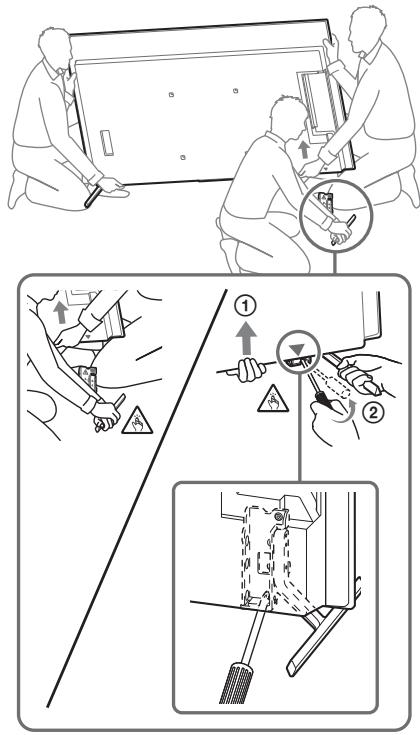
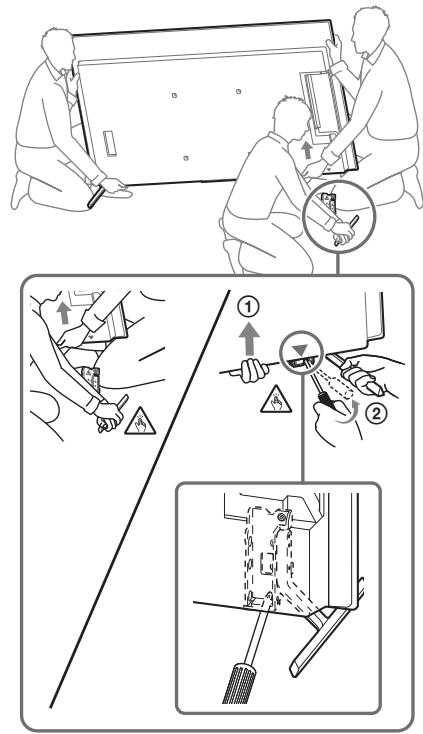
5 Detach the Table-Top Stand from the TV.
- Remove one side of the Table-Top Stand at a time. Firmly hold the Table-Top Stand securely with both hands while the other people lift up the TV.
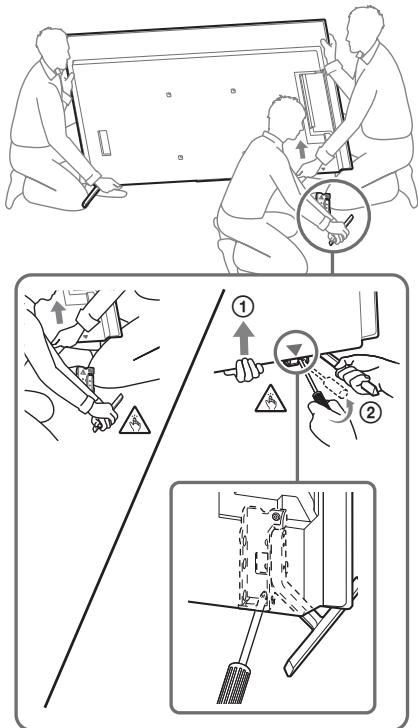
- Repeat the previous step and remove the other side of the Table-Top Stand.
Note
- Three or more people are required to detach the Table-Top Stand.
- Be careful not to use excessive force while detaching the Table-Top Stand from the TV as it may cause the TV set to fall resulting in personal injury or physical damage to the TV.
- Take care when handling the Table-Top Stand to prevent damage to the TV.
- Be careful when lifting the TV as the Table-Top Stand is detached, the Table-Top Stand may topple over and cause personal injury. Take care when removing the Table-Top Stand from the TV to prevent it from falling over and damaging the surface that the TV is sitting on.
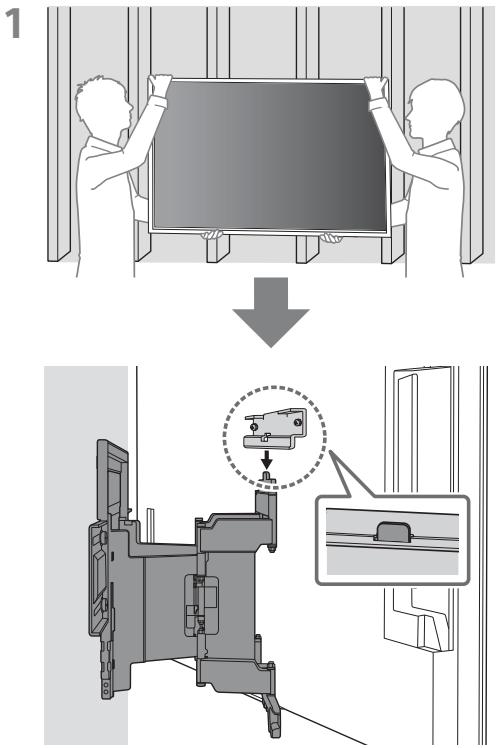
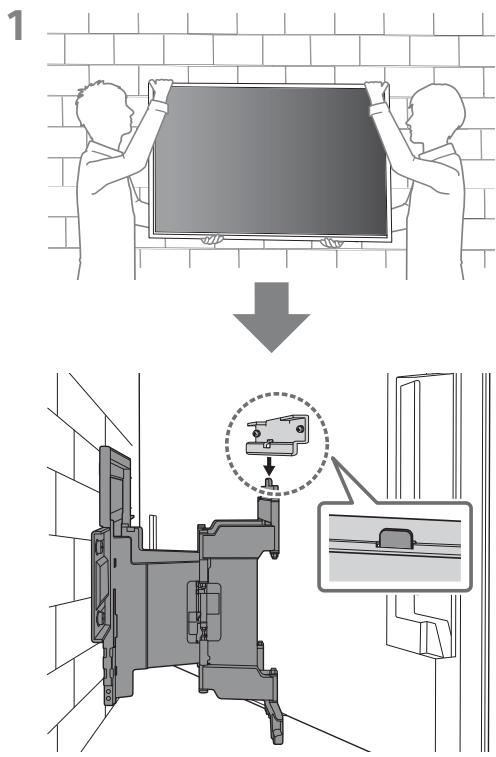
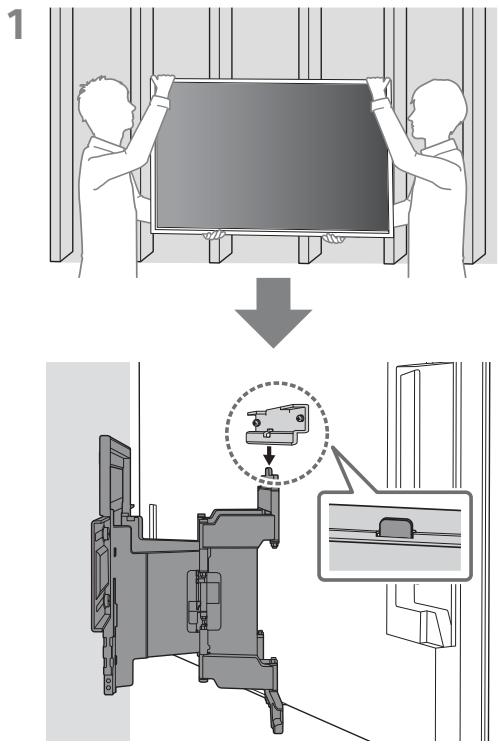
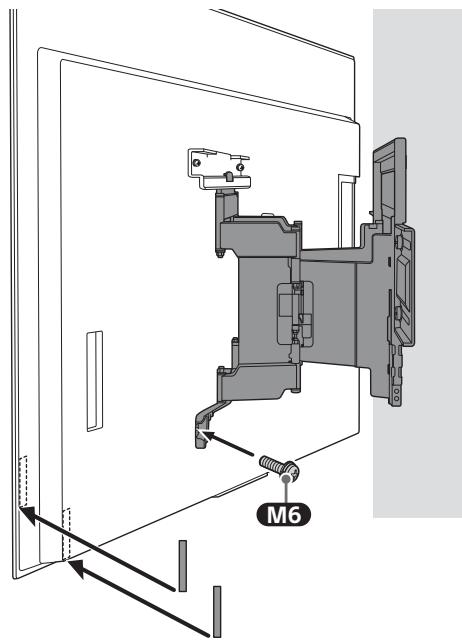
Installing the TV on the Wall
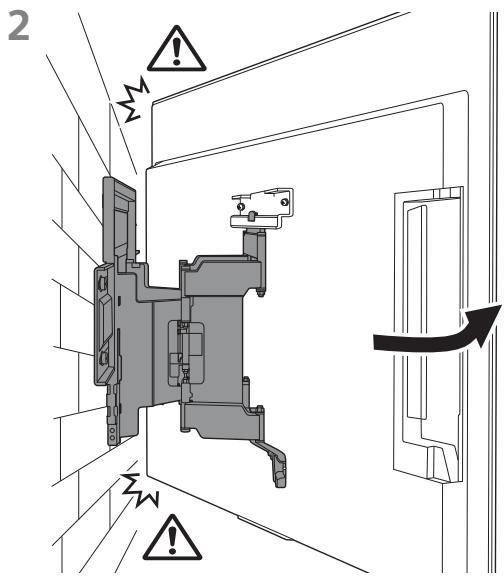
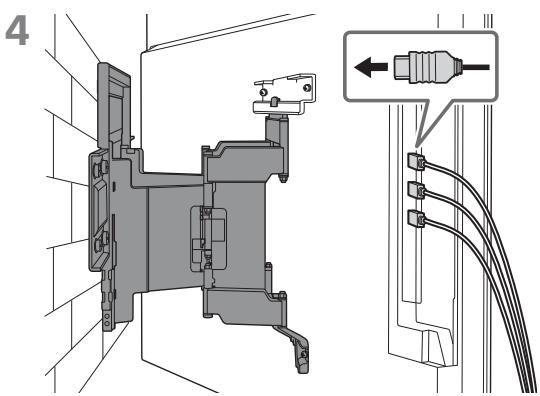
1
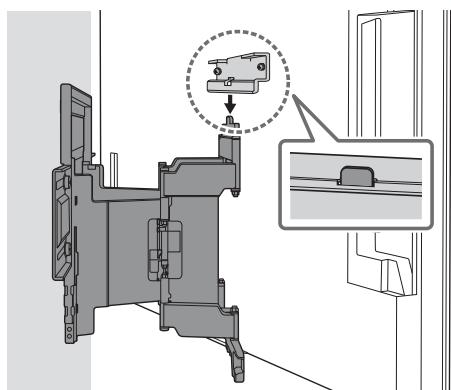
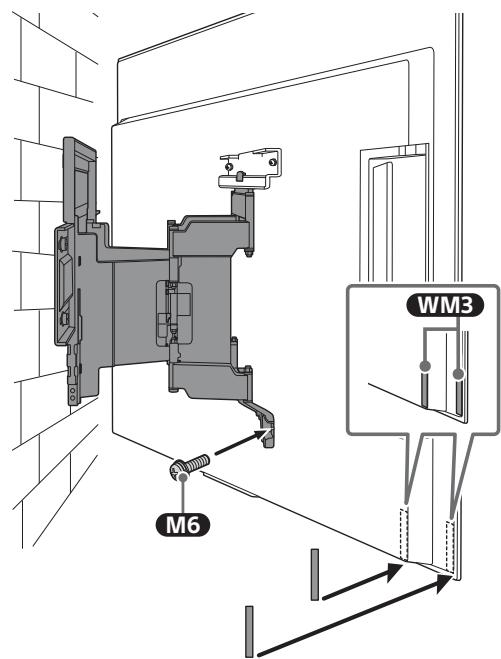
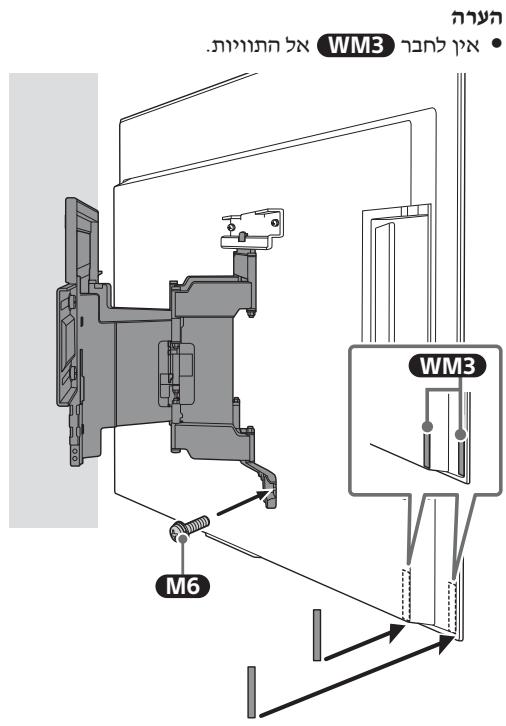
2 - Do not attach WM3 on the labels.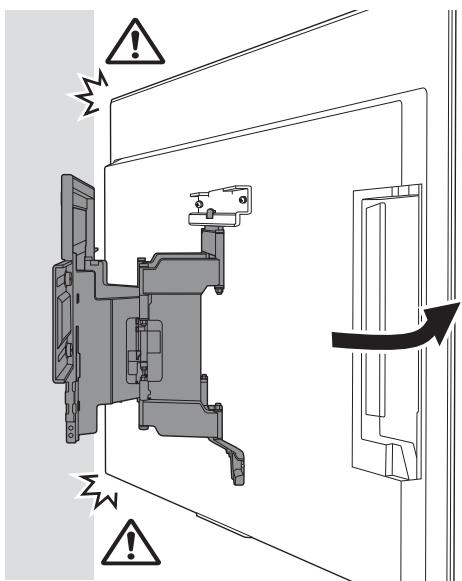
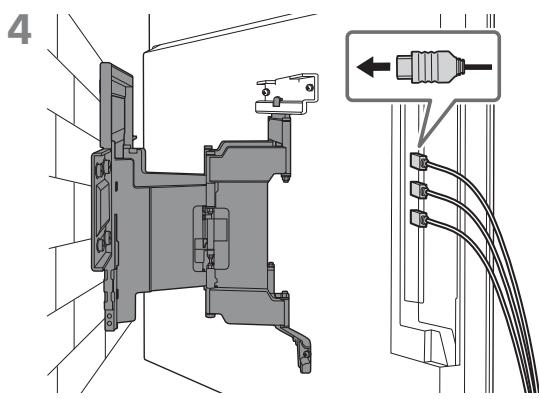
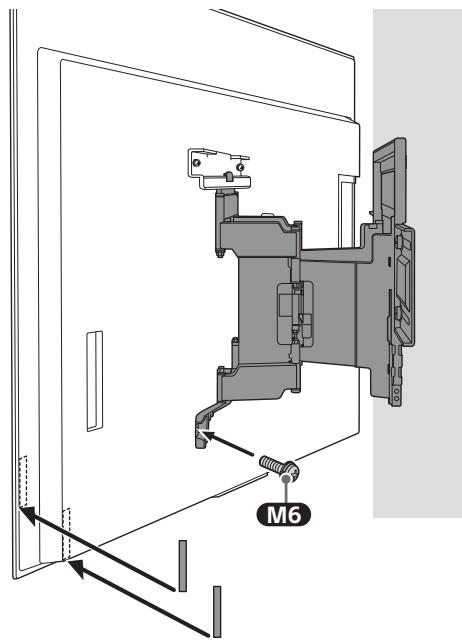
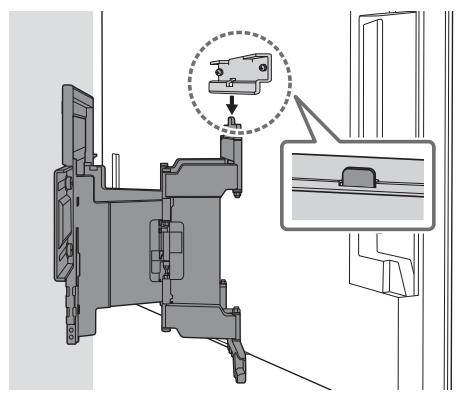
3 Screw the left and right side of the Wall-Mount Bracket using M6 and attach WM3.
Note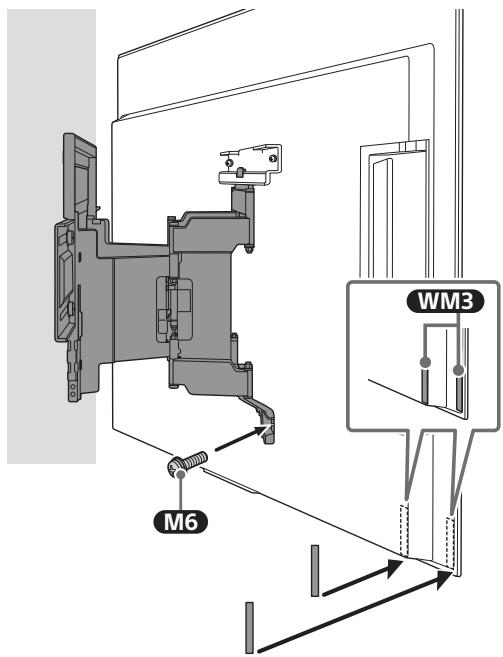
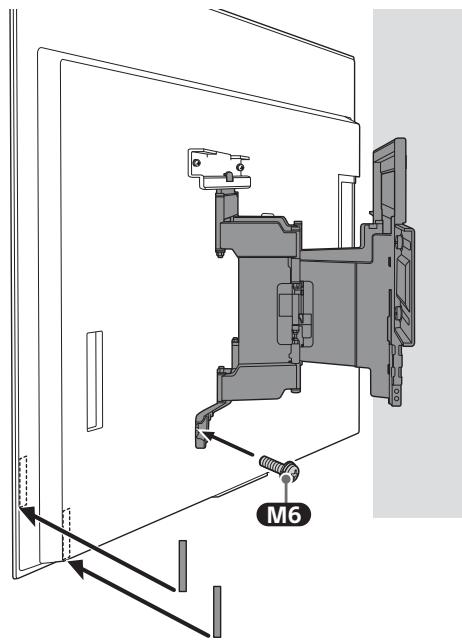
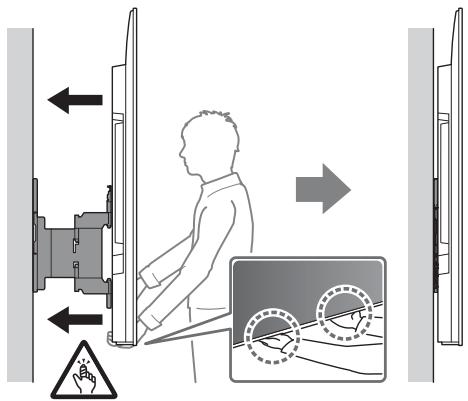
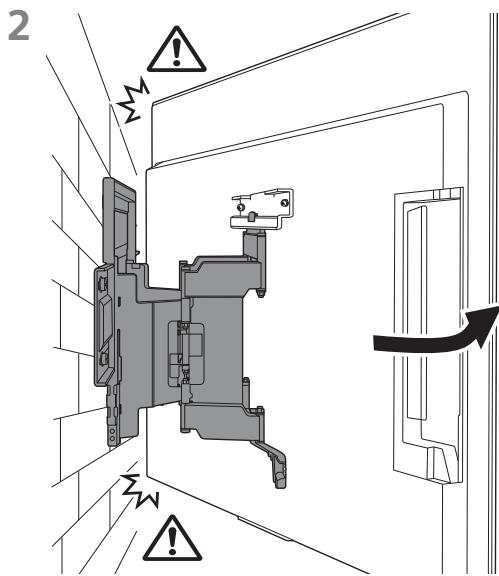
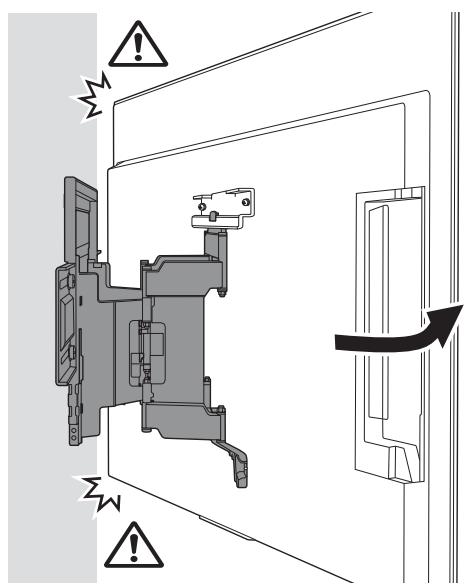
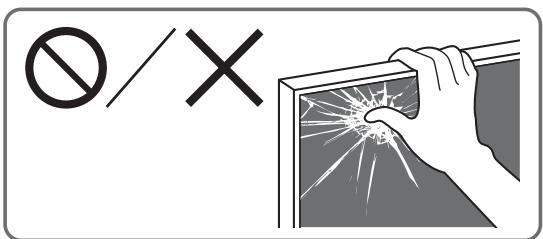
5 When moving the TV, hold it firmly from the bottom.
Note: The TV may not move close to the wall depending on the type and number of cables attached. This is not a malfunction.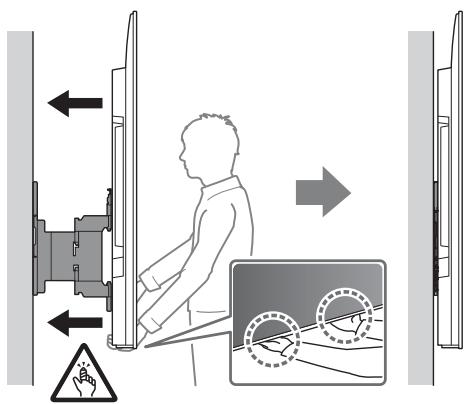
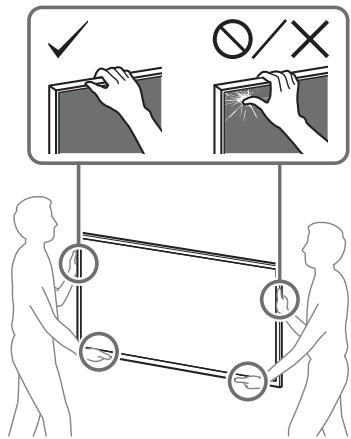
WARNING
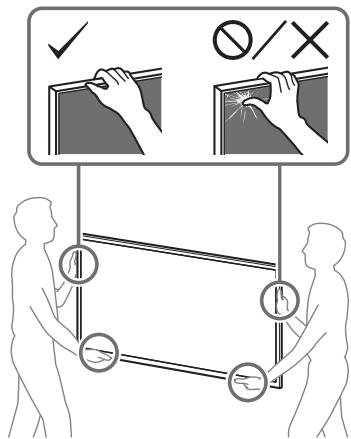
- Two or more persons (three or more persons for 189.3 cm (75 inches) and above TV) are needed to transport a large TV set (except Egypt). Two or more persons (three or more persons for 75 inches (189.3 cm) and above TV) are needed to transport a large TV set (Egypt only).
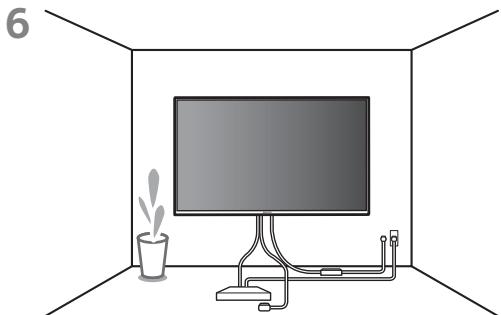
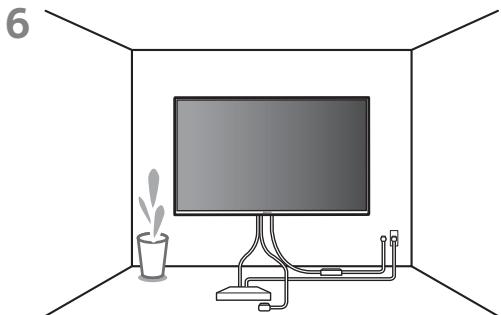
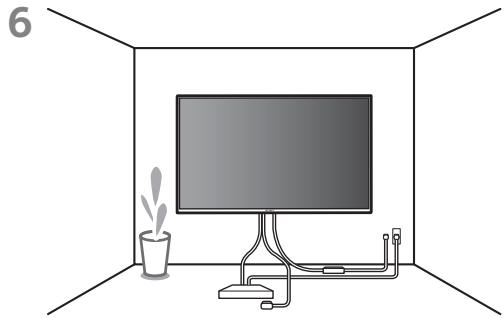
Confirming the Completion of the Installation
Check the following points.
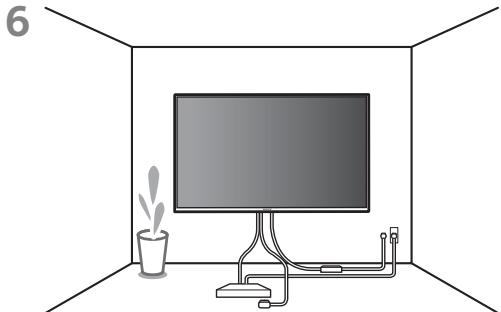
- The cord and the cable are not twisted or pinched.
WARNING
- Improper placement of the AC power cord (mains lead), etc. may cause fire or electric shock through a short circuit. Be sure to confirm the completion of the installation for safety.
Other Information
When removing the TV, reverse the previous installation procedure.
WARNING
- Two or more persons (three or more persons for 189.3 cm (75 inches) and above TV) are needed to transport a large TV set (except Egypt). Two or more persons (three or more persons for 75 inches (189.3 cm) and above TV) are needed to transport a large TV set (Egypt only).
B Attaching the Wall-Mount Bracket to the Solid Concrete or Concrete Block
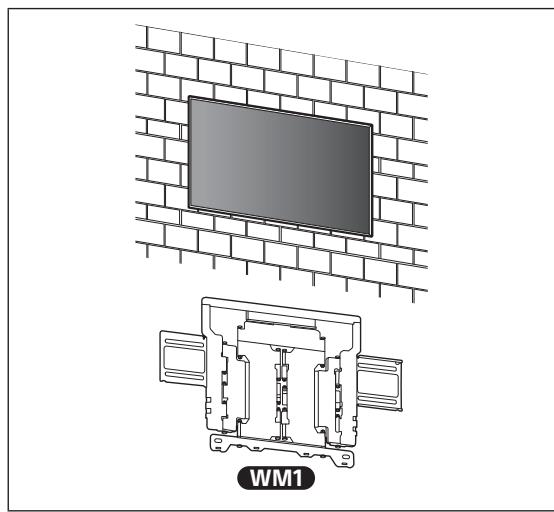
Installing the Wall-Mount Bracket to the Wall
1 Decide on the installation location.
Make sure that the wall has enough space for the TV and is capable of supporting a weight of at least six times that of the TV.
Refer to "Measurement for Wall-Mount Bracket installation on the wall" on page 18. Refer to your TV's Reference Guide for the TV's weight.
Note
- When your TV is installed on the wall, the upper side of the TV slightly leans forward.
- We recommend you to check the position of TV in the viewing environment.
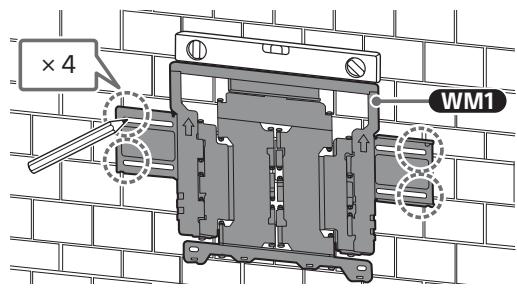
2 Align WM1 to the wall and make four marks.
Note
- Use a level to check whether WM1 is level.
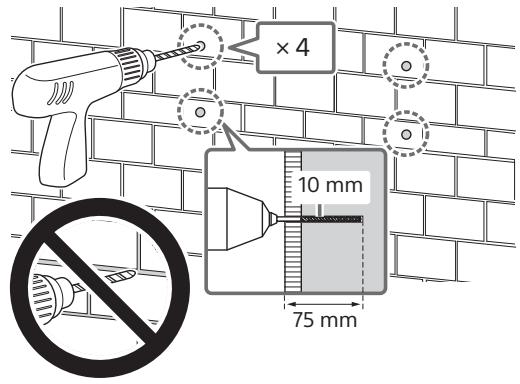
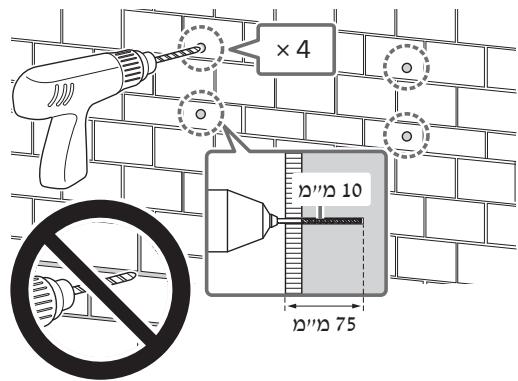
3 Drill pilot holes on the marks.
Make sure the location on the wall to drill the holes are strong enough to support a weight of at least six times that of the TV.
Note
- Pilot holes must be drilled to a depth of 75 mm using a 10 mm diameter drill bit.
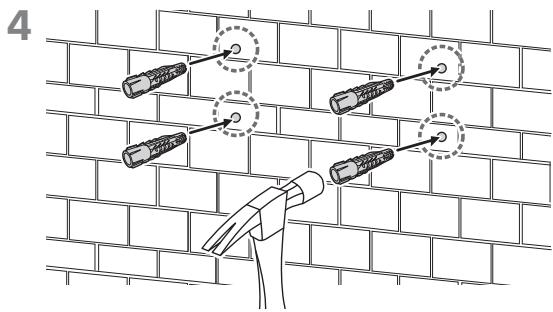
5 Install WM1 on the wall using suitable screws (not supplied) and washers (not supplied).
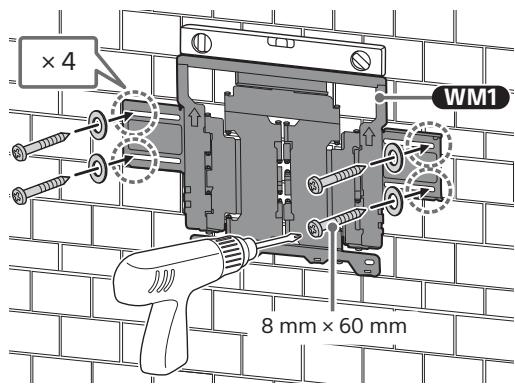
Note
- Use a level to check whether WM1 is level.
Precaution
- Do not over-tighten wooden screw 8mm x 60mm. Improper tightening could reduce the holding power of wooden screw 8mm x 60mm.
6 Pull out the arm of the bracket to the end.
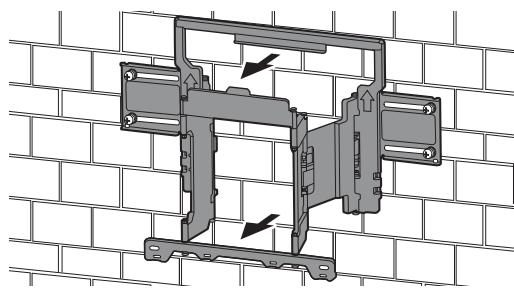
Preparing for the Installation of the TV
Note
- Be sure to store the removed screws and unused parts in a safe place, keeping them away from children.
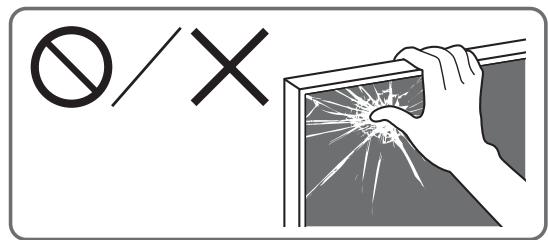
Installing the TV to the Wall from Carton*
- Only for limited region/country/model. 1 Remove the screws from the rear of the TV.
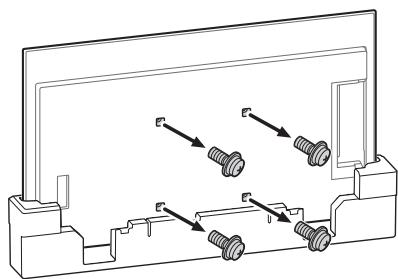
2 Attach the Wall-Mount Attachment VS (supplied with the TV) to the rear of the TV (to make it parallel with the wall).
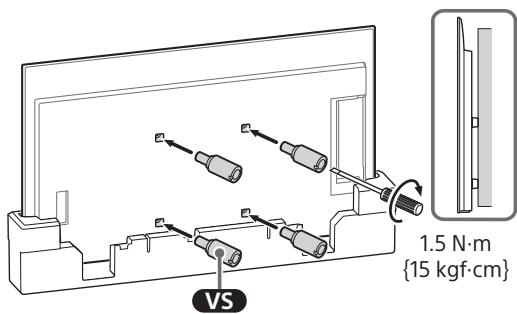
Note
- Be sure to fasten the Wall-Mount Attachment VS when attaching them to the TV. Use only a flat head screwdriver to install the Wall-Mount Attachment VS. Use of another tool might result in over torqueing the Wall-Mount Attachment VS and damaging the TV.
3 Attach the WM2 to the TV using M6.
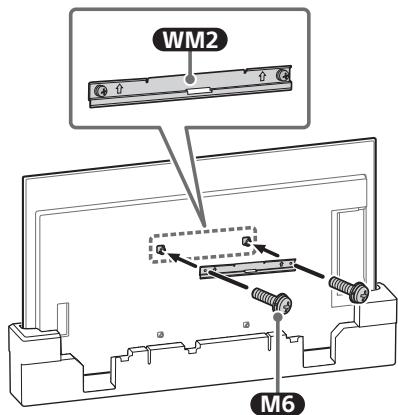
Installing the TV to the Wall from Table-Top Stand
1 Remove the terminal cover.
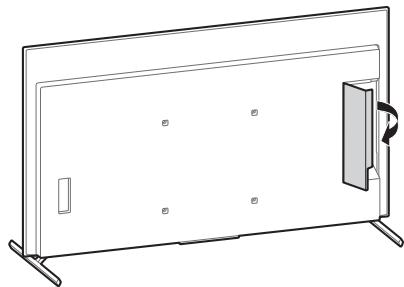
2 Remove the screws from the rear of the TV.
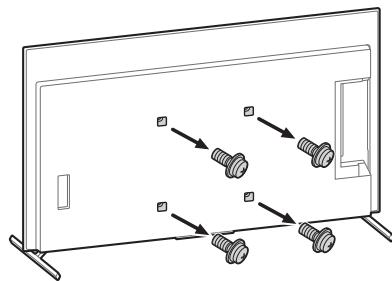
3 Attach the Wall-Mount Attachment VS (supplied with the TV) to the rear of the TV (to make it parallel with the wall).
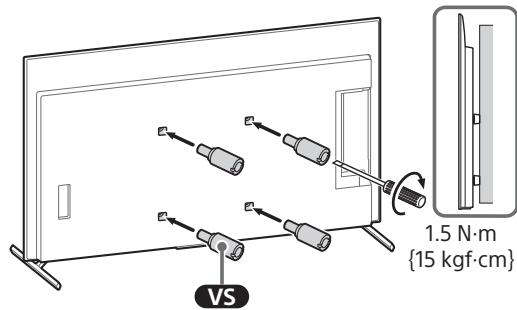
Note
- Be sure to fasten the Wall-Mount Attachment VS when attaching them to the TV. Use only a flat head screwdriver to install the Wall-Mount Attachment VS. Use of another tool might result in over torqueing the Wall-Mount Attachment VS and damaging the TV.
4 Attach the WM2 to the TV using M6.
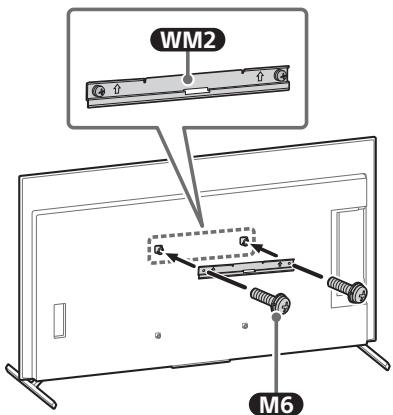
5 Detach the Table-Top Stand from the TV.
- Remove one side of the Table-Top Stand at a time. Firmly hold the Table-Top Stand securely with both hands while the other people lift up the TV.
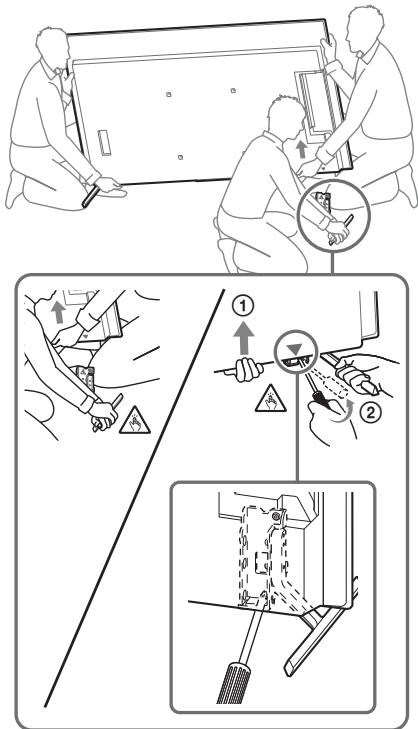
- Repeat the previous step and remove the other side of the Table-Top Stand.
Note
- Three or more people are required to detach the Table-Top Stand.
- Be careful not to use excessive force while detaching the Table-Top Stand from the TV as it may cause the TV set to fall resulting in personal injury or physical damage to the TV.
- Take care when handling the Table-Top Stand to prevent damage to the TV.
- Be careful when lifting the TV as the Table-Top Stand is detached, the Table-Top Stand may topple over and cause personal injury. Take care when removing the Table-Top Stand from the TV to prevent it from falling over and damaging the surface that the TV is sitting on.
Installing the TV on the Wall
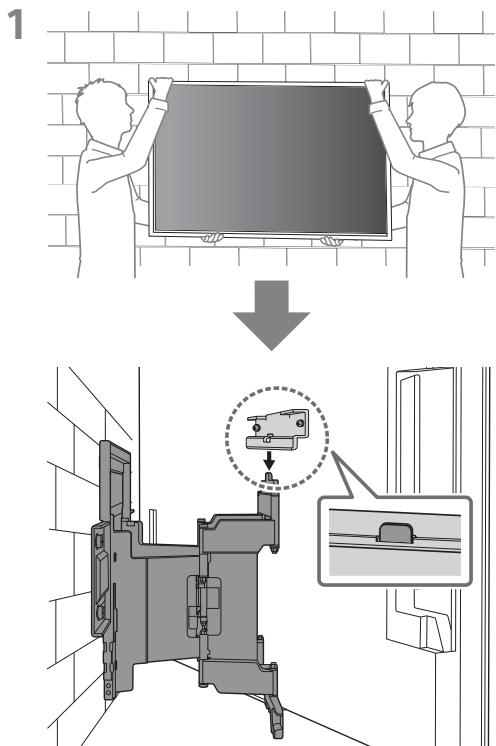
3 Screw the left and right side of the Wall-Mount Bracket using M6 and attach WM3. Note - Do not attach WM3 on the labels.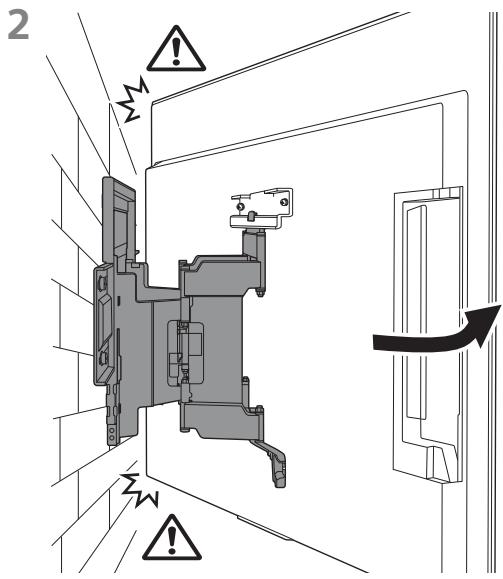
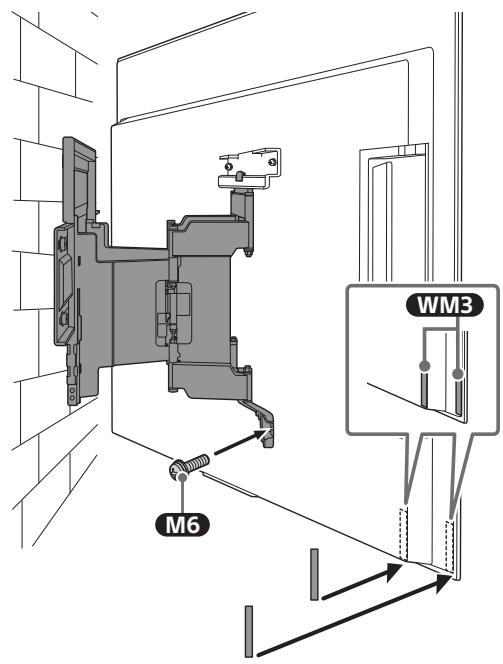
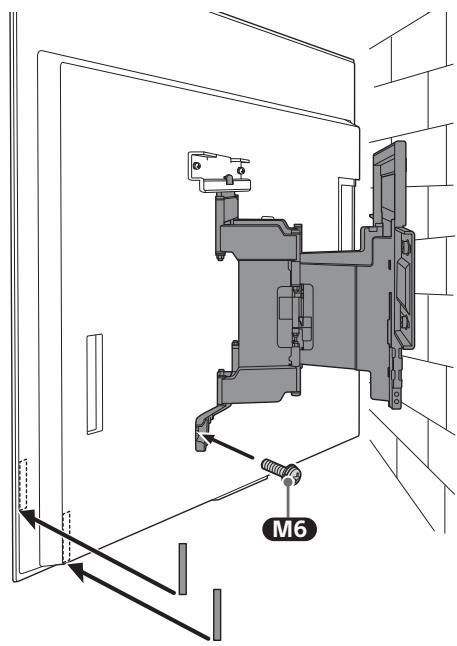
5 When moving the TV, hold it firmly from the bottom.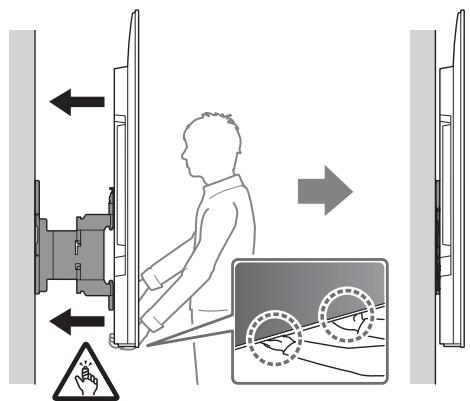
Note
- The TV may not move near close to the wall depending on the type and number of cables attached. This is not a malfunction.
WARNING
- Two or more persons (three or more persons for 189.3 cm (75 inches) and above TV) are needed to transport a large TV set (except Egypt). Two or more persons (three or more persons for 75 inches (189.3 cm) and above TV) are needed to transport a large TV set (Egypt only).
Confirming the Completion of the Installation
Check the following points.
- The cord and the cable are not twisted or pinched.
WARNING
- Improper placement of the AC power cord (mains lead), etc. may cause fire or electric shock through a short circuit. Be sure to confirm the completion of the installation for safety.
Other Information
When removing the TV, reverse the previous installation procedure.
WARNING
- Two or more persons (three or more persons for 189.3 cm (75 inches) and above TV) are needed to transport a large TV set (except Egypt). Two or more persons (three or more persons for 75 inches (189.3 cm) and above TV) are needed to transport a large TV set (Egypt only).
Specifications
WM1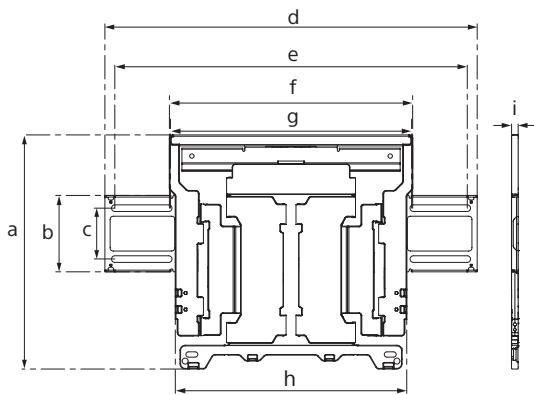
Dimensions: (Approx.) [mm]
a: 354
b: 116
c: 77
d: 563
e: 533
f: 370
g: 368
h: 350
i: 11
Mass (base only): (Approx.) [kg] 3.0
Design and specifications are subject to change without notice.
References
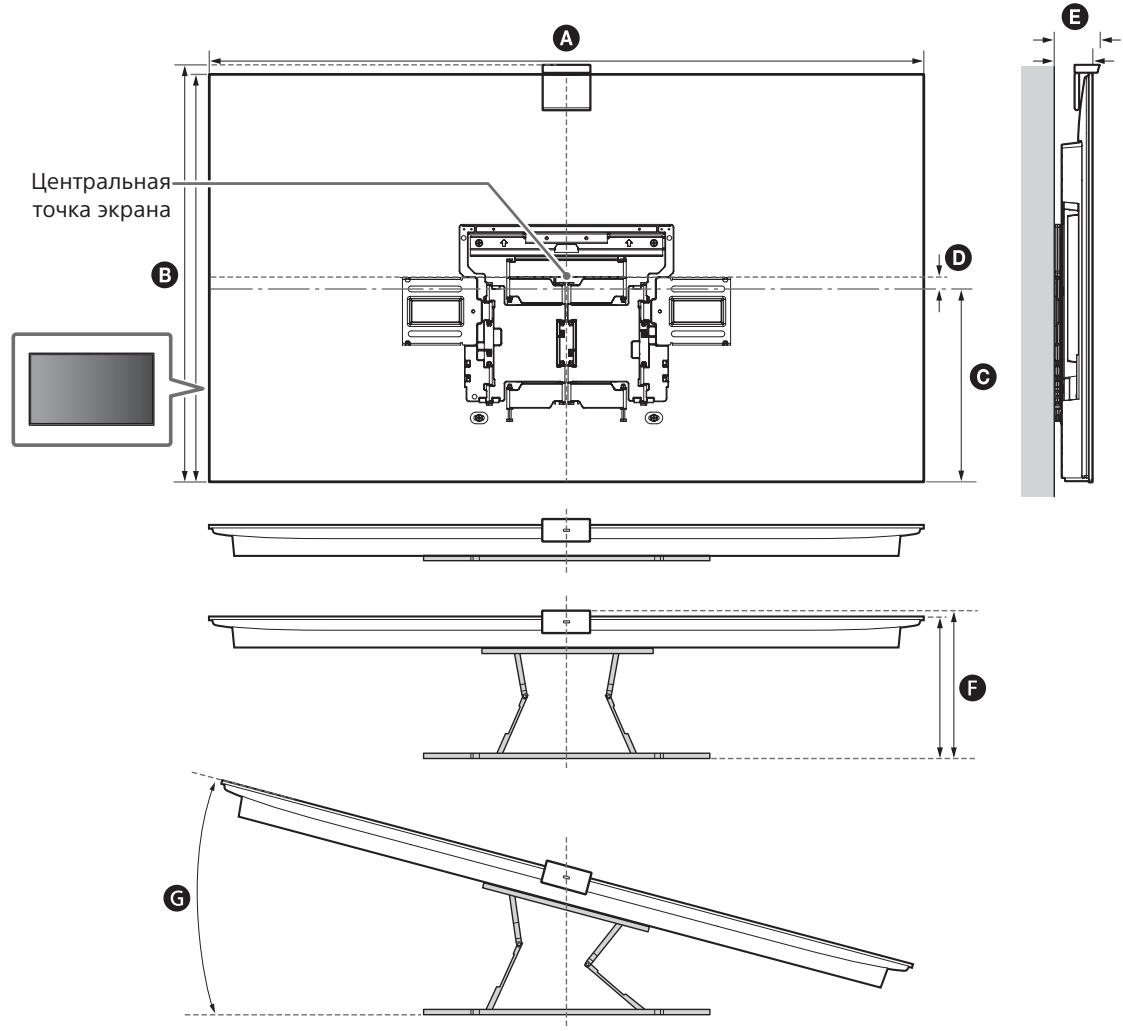
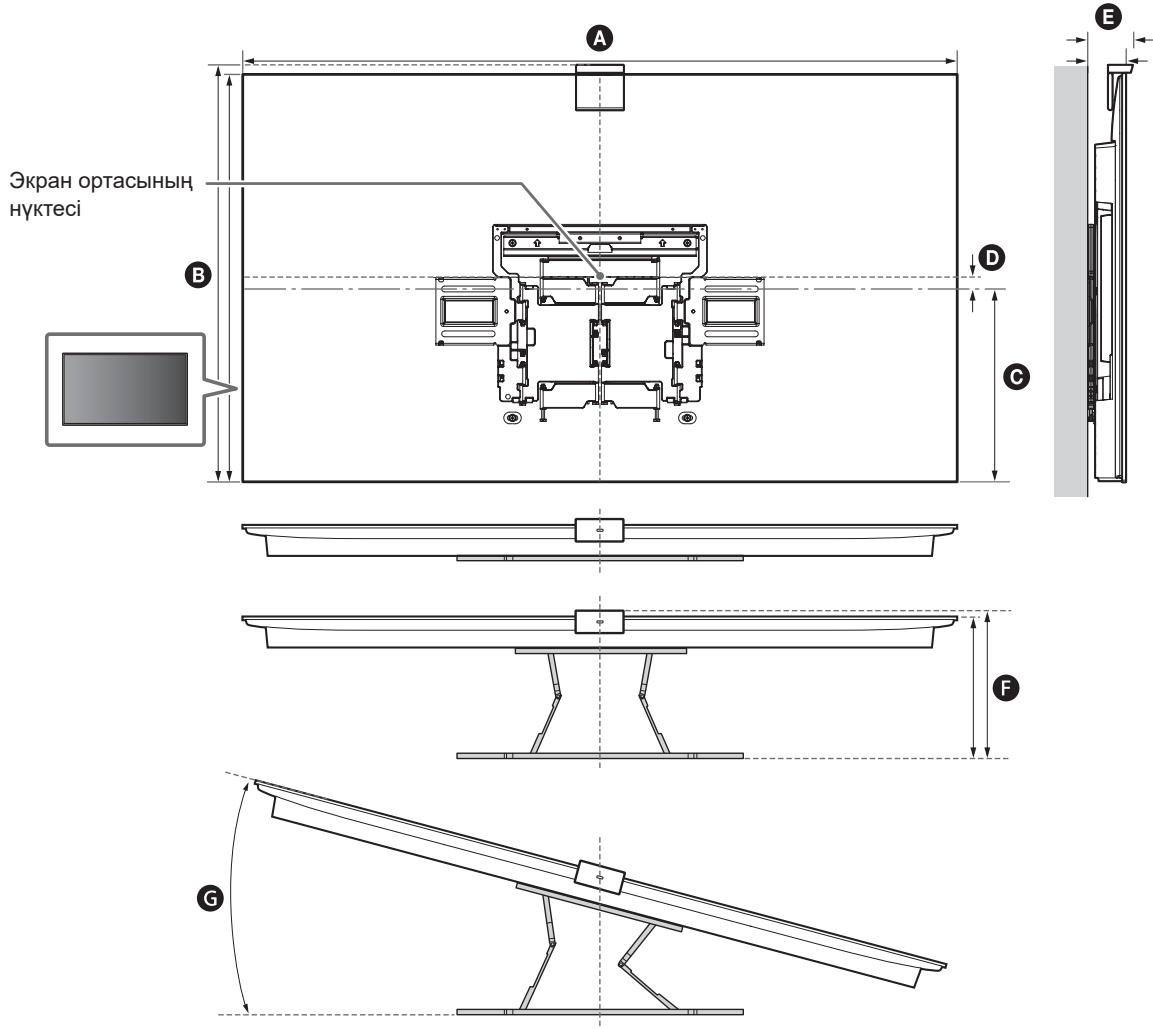
Measurement for Wall-Mount Bracket installation on the wall
Figures in the table may differ slightly depending on the installation.
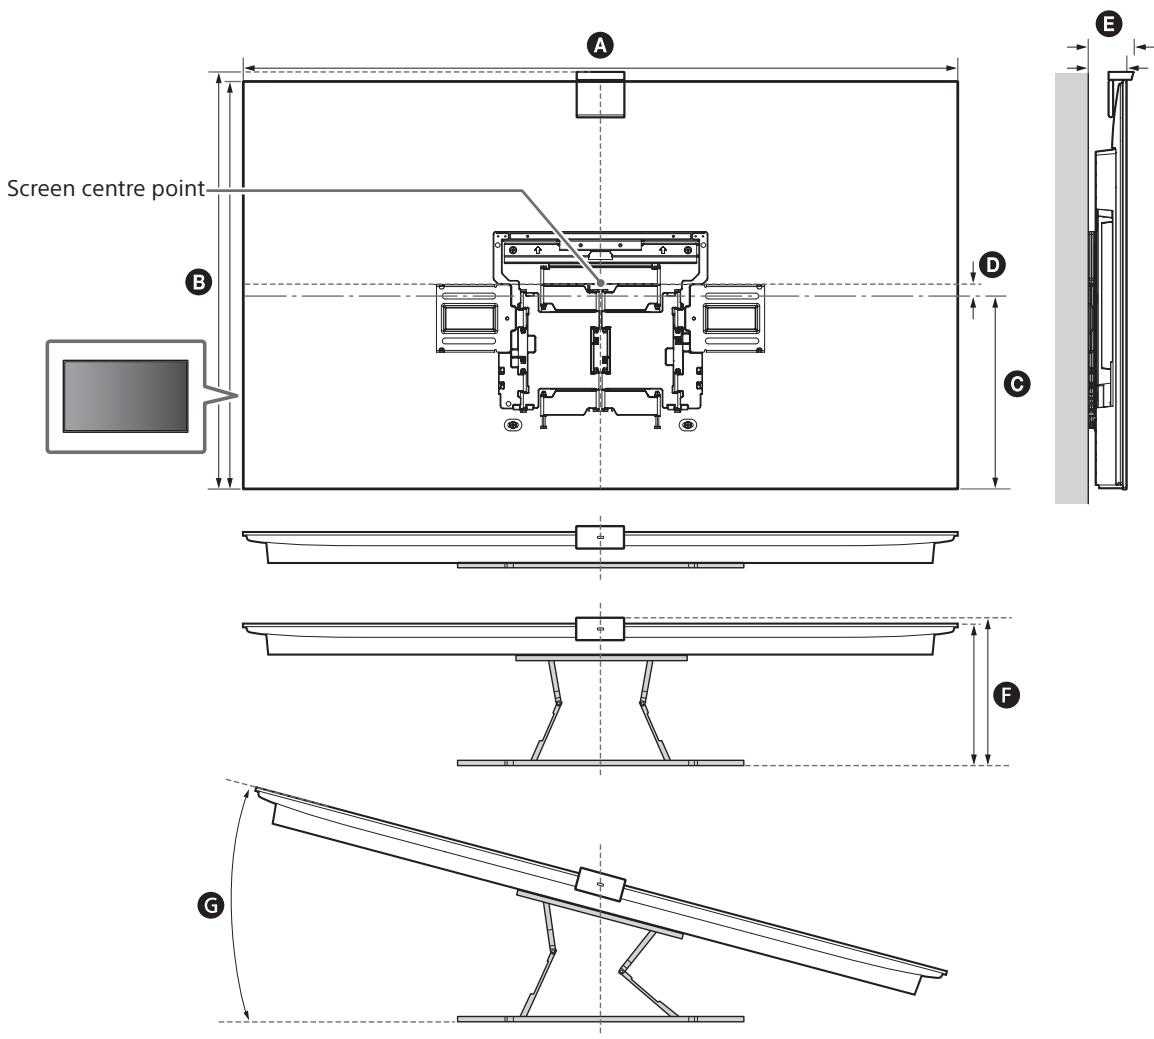
With Camera
(mm)
| Model Name | A | B | C | D | E | F* | G* (°) |
| XR-77A8xEL | 1722 | 1013 | 340 | 165 | 78 | 281 | 15 |
| XR-65A8xEL | 1448 | 851 | 342 | 82 | 77 | 281 | 18 |
| XR-55A8xEL | 1227 | 727 | 342 | 20 | 77 | 281 | 19 |
* (Approx.)
Without Camera
(mm)
| Model Name | A | B | C | D | E | F* | G* (°) |
| XR-77A8xL | 1722 | 998 | 340 | 165 | 66 | 269 | 15 |
| XR-65A8xL | 1448 | 836 | 342 | 82 | 66 | 269 | 18 |
| XR-55A8xL | 1227 | 712 | 342 | 20 | 66 | 269 | 19 |
* (Approx.)
Dimensions: (Approx.) [mm]
a: 354, b: 116, c: 77, d: 563, e: 533, f: 370, g: 368, h: 350, i: 11
Dimensions: (Approx.) [mm]
Weight (base only): (Approx.) [kg] 3.0
Specifications producer
Preparation for installation
1. Find the TV's location.
1 Find the TV's location.
- For limited region/country/model only.
- For limited region/country/model only.
Greek text
Do not place the WM3 on any surface.
Dimensions: (approx.) [mm]
Contact Sony
For the installation of this product, please read this instruction manual carefully to perform the installation safely. Sony is not responsible for damages or injuries caused by incorrect use or installation. Keep this manual for future reference after installation.
This instruction manual shows the correct way to operate the product and important precautions to be taken to prevent accidents. You are requested to read and follow the instructions in this manual carefully. Failure to do so may cause serious damage to the product or materials and may void the warranty. Keep this manual for future reference.
Sony products are designed with safety in mind. However, if you use the product incorrectly, it may cause serious injury due to fire, electric shock, falling, or product emission. Follow the safety precautions to prevent such accidents.
WARNING
Product description
This wall-mount bracket is designed for use only with the specified televisions. Check the TV's product information to verify if this wall-mount bracket can be used with it.
For customers
PRECAUTION
If the wall-mounting screws are not tightened properly, this could lead to serious injury or death due to electric shock or fire hazard.
Perform the installation of the wall-mount bracket and the wall plate during installation.
If the wall-mount bracket is not installed correctly, the following incidents may occur. Make sure the bracket is installed by a qualified installer.
The TV may fall and cause serious injury, including electric shock or fire. - If the wall on which the wall-mount bracket is installed is not sturdy, flat, or perpendicular to the floor, the structure may fall and cause injury or property damage. The wall must be able to support the weight of the TV, at least four times the weight of the TV. (See the information about the TV's weight in the product specifications.) If the wall-mount bracket is not installed securely, the structure may fall and cause injury or property damage.
Make sure you have performed the installation of the TV on the wall-mount bracket.
If other people, other than the qualified installer, transport or disassemble the TV, it may fall and cause injury or property damage. Two people are required (three people for TVs with screens 75 inches (189.3 cm) or larger) to transport a large TV (except for Egypt). Two people are required (three people for TVs with screens larger than 75 inches (189.3 cm)) to transport a large TV (only for Egypt).
Do not tighten the screws and other parts of the TV installation.
If you do, the TV may fall and cause injury or property damage.
Do not remove the parts of the wall-mount bracket.
If you do, the wall-mount bracket may fall and cause injury or property damage.
Do not install other equipment, except for the specified product.
The wall-mount bracket is designed for use only with the specified product. If you install equipment different from the specified one, it may fall or be damaged and cause injury or property damage.
Do not place the wall-mount bracket on any other load, except for the TV. Do not place the TV on top of or below the bracket.
If you do, the TV may fall and cause injury or property damage.
Do not lean on or hang from the TV.
This device may fall and cause serious injury if it is not properly secured.
WARNING
If the safety measures are not followed, it may cause injury or damage to property.
Be careful not to pinch your fingers when handling the wall mount bracket or when turning the TV. Be careful when lifting the TV and make sure you do not hit it against anything. Always secure the unused cables safely for future use. Keep the cables away from children.
Do not treat the product with excessive force during installation or removal.
Do not apply excessive force to the top part of the TV. If you do, the TV may fall and cause injury or damage to property.
Do not place this product near medical devices.
This product (including accessories) contains magnets that may interfere with pacemakers, programmable shunt valves, or other medical devices. Do not place this product near such devices. Consult your doctor before using this product if you use such medical devices.
Keep the product in a place where it cannot be reached by children or pets.
This product (including accessories) contains magnets. The magnets may cause injury, such as pinching or damage to the skin. If the magnets are damaged (or missing), consult your doctor.
Precautions
If you use the TV for a long time, the wall mount bracket may cause the wall to weaken and the TV to fall, depending on the wall material. - Wall mount bracket - All screws for mounting - The screws will remain exposed. Do not use the wall mount bracket in places where mechanical vibration may occur.
Mounting the wall mount bracket
To Sony dealers
WARNING
Read the Sony wall-mount bracket safety instructions carefully before use. Pay special attention to safety during installation, maintenance, and inspection of the product.
Do not mount the wall-mount bracket on a wall surface where the TV's sides or edges protrude from the wall surface.
Do not mount the wall-mount bracket on a wall surface where the TV's sides or edges protrude from the wall surface. For example, if the TV is installed on a pillar or protrudes from the wall, it may cause injury or property damage.
Do not mount the TV over an air conditioner.
If the TV is placed in a location with airflow from an air conditioner, it may cause a fire, electric shock, or malfunction of the TV.
Mount the wall-mount bracket securely to the wall by following the instructions in this operating manual.
If any of the screws become loose or fall out, the wall-mount bracket may fall and cause injury or property damage. Make sure to use the appropriate screws for the wall material and mount the unit securely with four 8 mm diameter screws (not supplied).
Use the correctly installed screws and parts as you follow the instructions in this operating manual. If you use substitute elements, the TV may fall and cause serious injury or be damaged.
Make sure to use the bracket correctly by following the procedure described in this operating manual.
If any of the screws become loose or fall out, the TV may fall and cause serious injury or be damaged.
Tighten the screws firmly in the indicated position.
If you do not tighten them, the TV may fall and cause serious injury or be damaged.
Be careful not to hit the TV during installation.
If the TV is subjected to a shock, it may fall or be damaged. This may cause injury.
Mount the TV on a wall that is perpendicular and flat.
If you hang the TV, make sure to use the appropriate mounting hardware and follow the instructions carefully.
Follow the TV installation instructions and route the cables correctly.
If you place the TV in a cabinet, this may cause overheating or damage to the TV.
Do not pinch the power cable or the connecting cable.
If the power cable or connecting cable is pinched between the structure and the wall, or if it is bent or twisted sharply, the internal conductors may be damaged and cause a short circuit or fire. This may lead to fire or electric shock.
The screws required for securing the wall mount bracket to the wall are not included in the package.
Use appropriate screws for the material of the wall and the structure when mounting the wall mount bracket.
Before you begin
- The illustrations of the TV shown in this manual are examples and are used to explain the operations more clearly. Depending on the model, the illustrations may differ from your TV.
What is the wall made of?
First, check what the wall is made of where the TV will be mounted.
Drywall (e.g., plasterboard) with wooden studs

Pre-measurements
- Maximum thickness of the drywall: 16 mm.
- Ensure that the dimensions of the internal wooden studs are at least 51 mm × 102 mm for standard or 38 mm × 89 mm for thin studs.
- OctaBeTe MInHmym 406 MM xOpu3oHTaJIHo pa3CTOraHHe mExd KypeNexKHNte eJeMeENTn.
Пьтен 6еToH Ил 6eToHH6JIokYeTa
Ipepa3Hm Mepkn
- MoHTnpaIte KOH3OJaTa 3a 3aKpeINBaHe KbM CTeHa HApabo Bbpxy CTeHaT O TJIbTeH 6eToH.
- Ybepete ce, Ye DebeJIInHaTa Ha CTeHaTa OT NJIbTeH 6eToH e Hau-MaJIko 203 MM.
- YBepTe ce, Ye pa3MepnTe Ha BCaKO 6eToHNo 6IokHe ca HaN-MaKo 203 MM × 203 MM × 406 MM.
Пювера на частerte
DoctaBeHo c SU-WL850
- He 3aIenBaIte WM3 Bbpye etIkTeIte.
3a6eJekka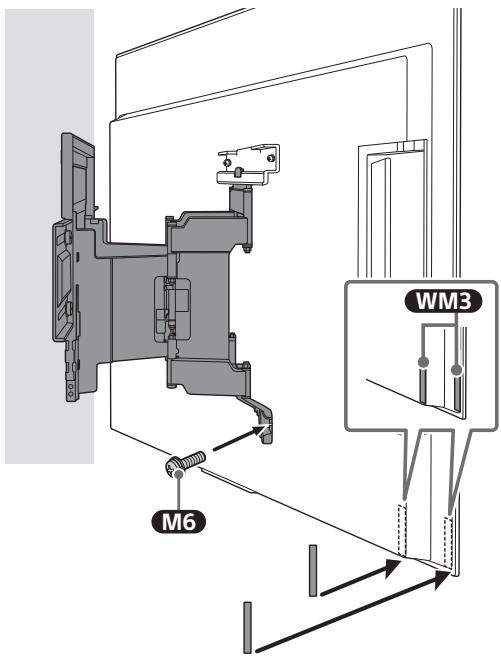
4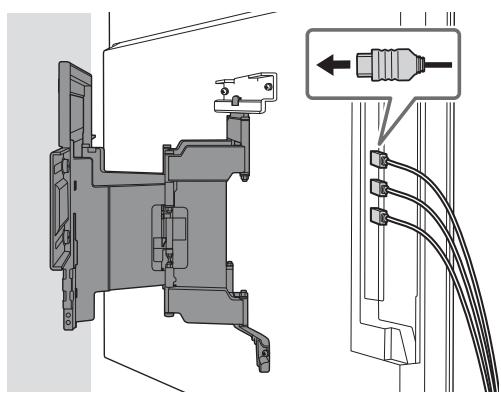
5 KOraTo MeCTIte TeJIeBn3Opa, IpbXTe rO 3IpaBO OT dOJHaTa CTpaHa.
3a6eJexkka
TeIeBn3OpbT MoKe da He ce npnbupa nIbTHO do CTeHaTb 3aBucmocT OT Tnna N6pOHa CBbp3aHnTE Ka6eJIn. ToBa He e Hen3npabHOCT.
IPEUYIPEXKDEHNE
- Two people are required to carry this TV (three people are required for TVs with a screen size of 189.3 cm (75 inches) or larger) for transporting a heavy TV (excluding the stand). Two people are required to carry this TV (three people are required for TVs with a screen size of 175 inches (189.3 cm) or larger) for transporting a heavy TV (stand only).
Supported Models*:
Wall-Mount Installation Instructions
Safety
Thank you for purchasing this product.
For the Customer
Installing the TV on a Wall

WARNING
PROFESSIONAL INSTALLATION REQUIRED
This product must be installed by a qualified professional who can determine the strength of the walls that must support the weight of the TV. If the TV is not properly secured, it may fall and cause serious injury or damage. Sony is not responsible for any damage or injury caused by improper installation or installation of any product other than the specified one. This does not affect your statutory rights (if any).
For Sony dealers
For installation of this product, sufficient expertise is required. For safety, be sure to carefully read this instruction manual. Sony is not responsible for any damage or injury caused by improper installation or inadequate installation. After installation, give this manual to the customer.
In this instruction manual, the following safety precautions are described.
Precautions and information to ensure safe use of the product, which are necessary to prevent accidents. You are required to read, understand, and follow the instructions in this manual. Failure to comply with this requirement may result in serious injury or damage to property and may void the warranty. Keep this manual for future reference.
Sony products are designed with safety in mind. However, improper use of the product may result in serious injury due to electric shock, fire, or damage to the product. To avoid such accidents, be sure to follow the appropriate safety precautions.
The production date is indicated on the product label with a barcode in the following format: YYYYY/MM, where YYYYY is the year and MM is the month of production.
Manufacturer: Sony Corporation, 1-7-1 Konan Minato-ku, Tokyo, 108-0075 Japan. Made in China.
Authorized organization to accept claims from consumers in the territory of Kazakhstan: LLP "Sony Electronics" Representative Office in Kazakhstan, 050010, Republic of Kazakhstan, Almaty, Dostyk Ave., building 117/7.
Importer on the territory of the Customs Union countries: LLP "Sony Electronics", Russia, 123103, Moscow, Karamyshevsky proezd, 6.
WARNING
The specified products
After installing the TV, do not remove the screws, etc.
In this case, the TV may fall and cause injury or damage to property.
Do not disassemble or modify the parts of the wall-mount bracket.
Otherwise, the wall-mount bracket may fall and cause injury or damage to property.
Do not install any other equipment on the bracket other than the specified one.
This wall-mount bracket is intended for use only with the specified products. If you attach equipment not intended for such installation to this mounting bracket, it may fall and be damaged, and may also cause injury or damage to property.
To avoid overloading the wall-mount bracket, do not install anything other than the TV on it. Do not shake the TV left/right or up/down.
In this case, the TV may fall and cause injury or damage to property.
Do not lean on the TV or hold onto it.
Do not place the TV on an unstable surface and do not move it, as it may fall and cause serious injury.
WARNING
The following precautions reduce the likelihood of injury or property damage.
Be careful and keep your fingers away from the wall mount when installing or turning the TV. - When turning the TV, handle it with care to avoid pinching your fingers. - Always store unused accessories in a safe place for future use. Keep them out of reach of children.
When cleaning the device, do not apply excessive force.
Do not overload the wall mount. Otherwise, the TV may fall and cause injury or property damage.
Do not place this product near medical devices.
This product (including accessories) contains magnets, which may affect the operation of pacemakers, defibrillators, or other medical devices. Keep this product away from people who use such medical devices. Consult your doctor before using this product if you use a medical device.
Keep in places out of reach of children or those under supervision.
This product (including accessories) contains magnets. Swallowing magnets may cause serious harm, such as choking or damage to the digestive tract. If magnets are swallowed, seek medical attention immediately.
Precautions
- If the TV is installed on a wall mount, depending on the wall material, screws may loosen or the TV may fall. After installation, holes will remain in the wall. Do not use the wall mount in places with mechanical vibrations.
Do not install the wall mount on walls where the TV edges will protrude beyond the wall edges.
Do not install the wall mount on wall surfaces (e.g., columns) where the TV edges will protrude beyond the wall surface edges. Hitting the protruding TV edges may cause injury or property damage.
Do not place the TV under an air conditioner or near a heater.
Continuous operation of the TV for a long period of time may be affected by the constant flow of air from the air conditioner, which can cause the TV to fall, electric shock, or malfunction.
Be sure to securely attach the wall mount bracket to the wall, following the instructions provided in this operating manual.
If any of the screws are loose, the wall mount bracket may fall and cause injury or property damage. Use screws that match the wall material and securely fasten the device with the supplied screws of 8 mm diameter (or equivalent).
Be sure to use the supplied screws and parts for mounting and strictly follow the instructions provided in this operating manual. If other mounting materials are used during TV installation, the TV may fall and be damaged or cause injury.
Be sure to perform the bracket assembly, strictly following the instructions provided in this operating manual.
If any of the screws are loose, the TV may fall, which can cause damage to the TV or injury.
Securely tighten the screws in the designated mounting holes.
Otherwise, the TV may fall, which can cause damage to the TV or injury.
Make sure that the TV is not subjected to impacts during installation.
Impacts may cause the TV to fall and break. This can lead to injury.
Install the TV on the wall only if it is flat and perpendicular to the floor. Otherwise, the TV may fall and cause injury.
After securely installing the TV, ensure that the cables are arranged safely.
Cables that present a tripping hazard or obstruction can cause serious injury or damage to the TV.
Do not allow the power cord and connecting cables to be pinched.
If the power cord or connecting cables are pinched between the device and the wall or are sharply bent or twisted, the insulation of the internal wires may be damaged, which can cause a short circuit or breakage. This can lead to fire or electric shock.
Screws, wall-mounting brackets for wall installation are not included in the delivery package.
When mounting the bracket for wall installation, use screws that match the material and structure of the wall.
Preparation for installation
- Do not overtighten the wood screws 8 mm x 60 mm. Incorrect tightening may lead to a reduction in the holding force of the wood screw 8 mm x 60 mm.
- The power cord is not twisted or pinched.
WARNING
- Incorrect placement of the power cord may lead to fire or electric shock due to a short circuit. To ensure safety, make sure that all installation points are completed.
Disassembly
To remove the TV, perform the installation procedure described above in reverse order.
WARNING
Mounting the bracket for wall installation on the wall
1. Determine the installation location.
Make sure that there is enough space on the wall for the TV and that it can support a weight at least six times the TV's weight.
- See the section "Dimensions for the bracket for wall installation on the wall" on page 20.
- See the TV manual for information about the TV's weight.
PpimueaHne
Mepbl npedoctopoKHOCTN
- He nepeTaeBaiTe DepeBHHbIe BUNtI 8 MM × 60 MM. HeBepHa3aTJKa MoKET npuBecTu K CHNXeHIO CnIbI φNKCauni DepeBHHORO BUNTa 8 MM × 60 MM.
6 ПОЛноctbIO BblBnHbTe KOHcOJIb KPOHшTeиHa.
ПодгOTOBКУCTaHOBKe TeJIeВиЗОра
Приимechаиме
XpaHnTe n3BJIeHeHbIe BnHTbI n HeuCNoJb3yEmbldeTaJIIN BaHaJExKHOM HeNOCTYINOM dJa DeTeMceTe.
YcTaHOBKa TeJeBn3opa Ha cTeHy n3 KOpO6Kn*
- I3BLeKaIte CTOpOHbI HaCTOJIbHOI NOCTaBKn NooUepeIHo. KpeNko YdeprKINBaIte HAcTOnbHyIO NODCTaBky IByMa pyKaMn, NOKa DpyrIe npuNoDnHmAmOT TeJeBn3Op.
- Lhnp n ka6eIb He nepekpyeHb I n He 3aUeMJIeHbI.
IPEDYIPEKDEHME
- HenpaBnIbHoe paCnoJIoXeHne ceTeBoro Ka6eJIa n.T.d. MoKET npuBecT N BO3rOpaHIno nn IopaxeHIO 3JIeKTPnuECKm TOKOM B pe3yIbTaTe KOPOTKO 3aMbIkaHn.IIra OBeCneHnIe 6e3OnaCHOCTn y6eINTeCb B TOM, YTO BCE PYNKTbl YCTAHOBKn BbINOLHeHbl.
PpOaHΦopMaZnA
PnCnTnTeIeBn3Opa BbIOnHnTe OINcaHHyU BblSe npOceDpyu B o6paTHoN IocJeIOBaTeJbHOCTn.
IPEDYIPEXKDEHNE
To carry a large TV, you need at least two people (or three or more people for carrying a TV with a screen size of 189.3 cm (75 inches) or more) (except for the stand).
Weight (stand only): (approx.) [kg] 3.0
Design and specifications are subject to change without notice.
References
Dimensions for wall-mount bracket for wall installation on the wall
Figures in the table may differ slightly depending on the installation.
With camera (mm)
| НазBABе модени | A | В | C | D | E | F* | G* (°) |
| XR-77A8xEL | 1722 | 1013 | 340 | 165 | 78 | 281 | 15 |
| XR-65A8xEL | 1448 | 851 | 342 | 82 | 77 | 281 | 18 |
| XR-55A8xEL | 1227 | 727 | 342 | 20 | 77 | 281 | 19 |
* (approx.)
Without camera (mm)
| Названные м odeели | A | B | C | D | E | F* | G* (°) |
| XR-77A8xL | 1722 | 998 | 340 | 165 | 66 | 269 | 15 |
| XR-65A8xL | 1448 | 836 | 342 | 82 | 66 | 269 | 18 |
| XR-55A8xL | 1227 | 712 | 342 | 20 | 66 | 269 | 19 |
* (approx.)
Installation information for using the wall-mount bracket for wall mounting Sony (SU-WL850)
Models that are supported*:
Do not tighten the screws until after mounting the TV.
If you do, the TV may fall and cause serious injury or damage.
Do not modify the parts of the wall-mount bracket.
If this bracket is not installed correctly, it can fall and cause serious injury or lead to death.
Do not install any devices other than those specified in the product.
This wall mount bracket is intended for use only with the specified products. Installing other devices, other than those specified, may cause the bracket to fall and cause serious injury or lead to death.
Do not use the wall mount bracket for any load other than a television. Do not tilt the television up/down or left/right.
If you do, the television may fall and cause serious injury or lead to death.
Do not lean on the television or hang from it.
Do not lean on the television or hang from it, as it may fall on you and cause serious injury.
WARNING
Failure to follow the safety precautions listed above may lead to serious injury or death.
Be careful not to pinch your fingers while adjusting the wall mount bracket or changing the tilt angle of the television. Move the television slowly to avoid pinching. Store unused parts in a safe place. Keep them out of reach of children.
Installing the Wall Mount Bracket
Installing the Wall Mount Bracket on a Drywall Stud

Installing the Wall Mount Bracket on a Solid Wall
1. Determine the installation location. Make sure it is large enough for the television and can support the weight, which is at least four times the weight of the television.
- See "Installing the Wall Mount Bracket on a Solid Wall" on page 20. - The weight of the television can be found in the television's user manual.
Note
- If the TV is installed on a wall, the top of the TV will tilt slightly forward. - Be sure to check if it is difficult to plug the TV into the selected location.
2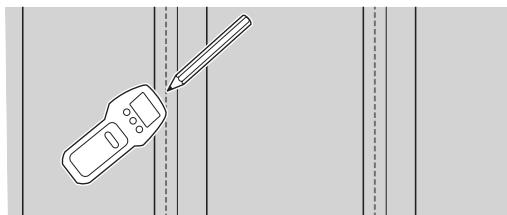
Do not overtighten the wood screws into 8 mm x 60 mm. Tightening with excessive force may damage the wall or the screws.
- Keep the screws and unused parts in a safe place out of reach of children.
Installing the TV on a wall from the box*
- Only for certain regions/countries/models. 1 Remove the screws from the back panel of the TV.
Installing the TV on a wall
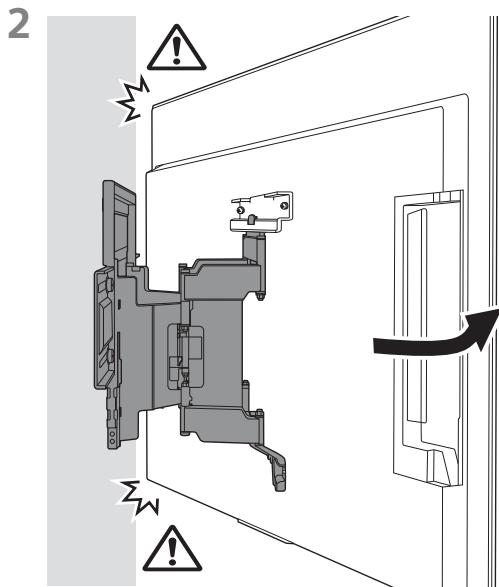
Remove the left and right parts of the bracket for wall mounting using M6 screws and remove them.
- Do not tighten the M6 screws on the labels.
Note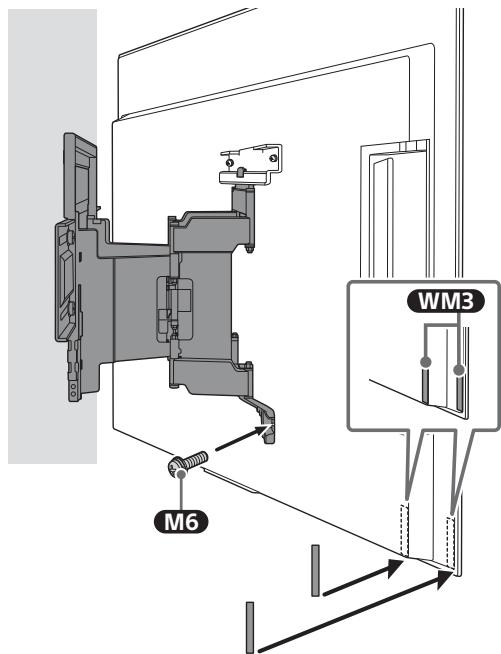
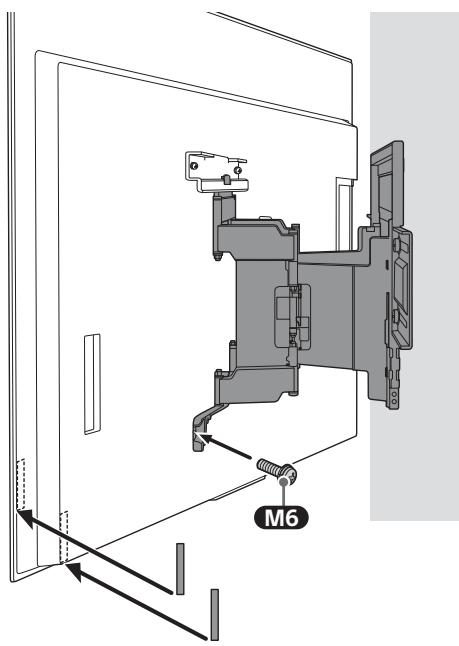
4
5 Reconnect the TV and turn it on from the bottom.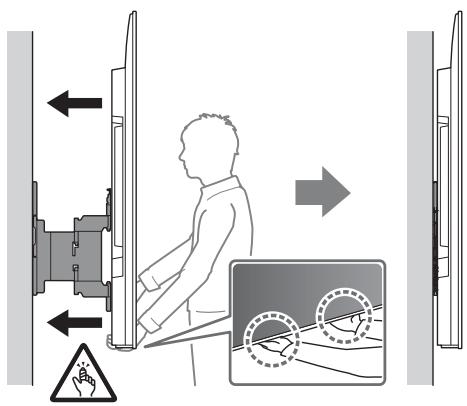
Note
Depending on the type and number of connected cables, the TV may not be able to be placed close to the wall. Do not consider this a problem.
6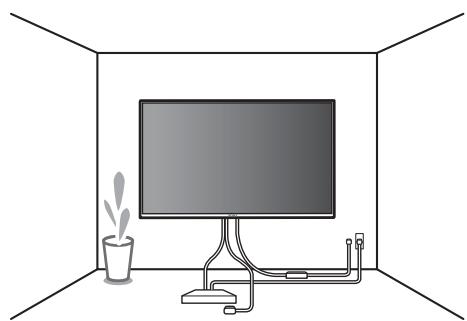
3ACTEPEXEHH
-Для песен ВЕЛИКОГО телевизора не подходит Двойное основание (тройное основание для телевизора диагональю 189,3 см (75 дюймов) или больше) (крепление). Для песен ВЕЛИКОГО телевизора не подходит Двойное основание (тройное основание для телевизора диагональю 75 дюймов (189,3 см) или больше) (крепление).
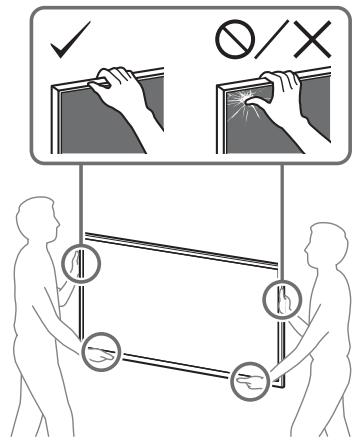
Проверка после завершения установки
Проверьте заданные ниже пункты.
Установка кронштейна на стену
1. Выберите место установки.
Убедитесь, что стена имеет достаточные размеры для телевизора и в состоянии выдержать вес, который в несколько раз больше веса телевизора.
- См. «Измерение установки кронштейна на стену» на стр. 20. - Вес телевизора можно узнать в руководстве пользователя к телевизору.
Примечание
- Если телевизор установлен на стену, верхняя часть телевизора будет немного наклонена вперед. - Обязательно проверьте, что телевизор не упадет с выбранного места.
2. Приложите WM1 к стене и сделайте отметки.
Примечание
- Используйте уровень, чтобы расположить
WM1 горизонтально.
The wall anchor for the wood screw is 8 mm x 60 mm. The anchor is designed to be screwed into the wall to secure the wood screw 8 mm x 60 mm.
Installing the TV on the wall
- The cord and cable are not crossed or pinched.
WARNING
- Incorrect placement of the power cord or the flow of electric current can cause fire or electric shock. For safety, be sure to check all parts after installation.
Other information
When moving the TV, follow the installation instructions in reverse order.
WARNING
To lift the large TV, you need two or more people (three or more people for TVs with a diagonal of 189.3 cm (75 inches) or more) (except for the stand).
To lift the large TV, you need two or more people (three or more people for TVs with a diagonal of 75 inches (189.3 cm) or more) (except for the stand).
Technical specifications
WM1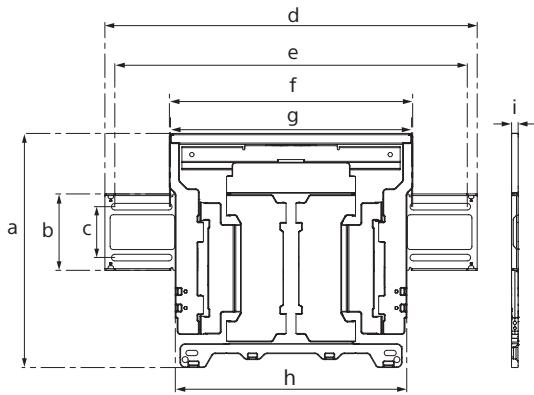
Dimensions: (approx.) [mm]
a : 354
b : 116
c: 77
d: 563
e: 533
f: 370
g: 368
h: 350
i: 11
Bara (Tilbkn 6a3a): (npn6JI.) [Kr] 3,0
KoHCTpykciT a Te xehiHi xapaKTepeNCTnKn MoKyTb 6yTu3mHeHi 6e3 nonepeJxKeHH.
Reference materials
Installation of the bracket for wall mounting on a wall
These tables may vary depending on the model.
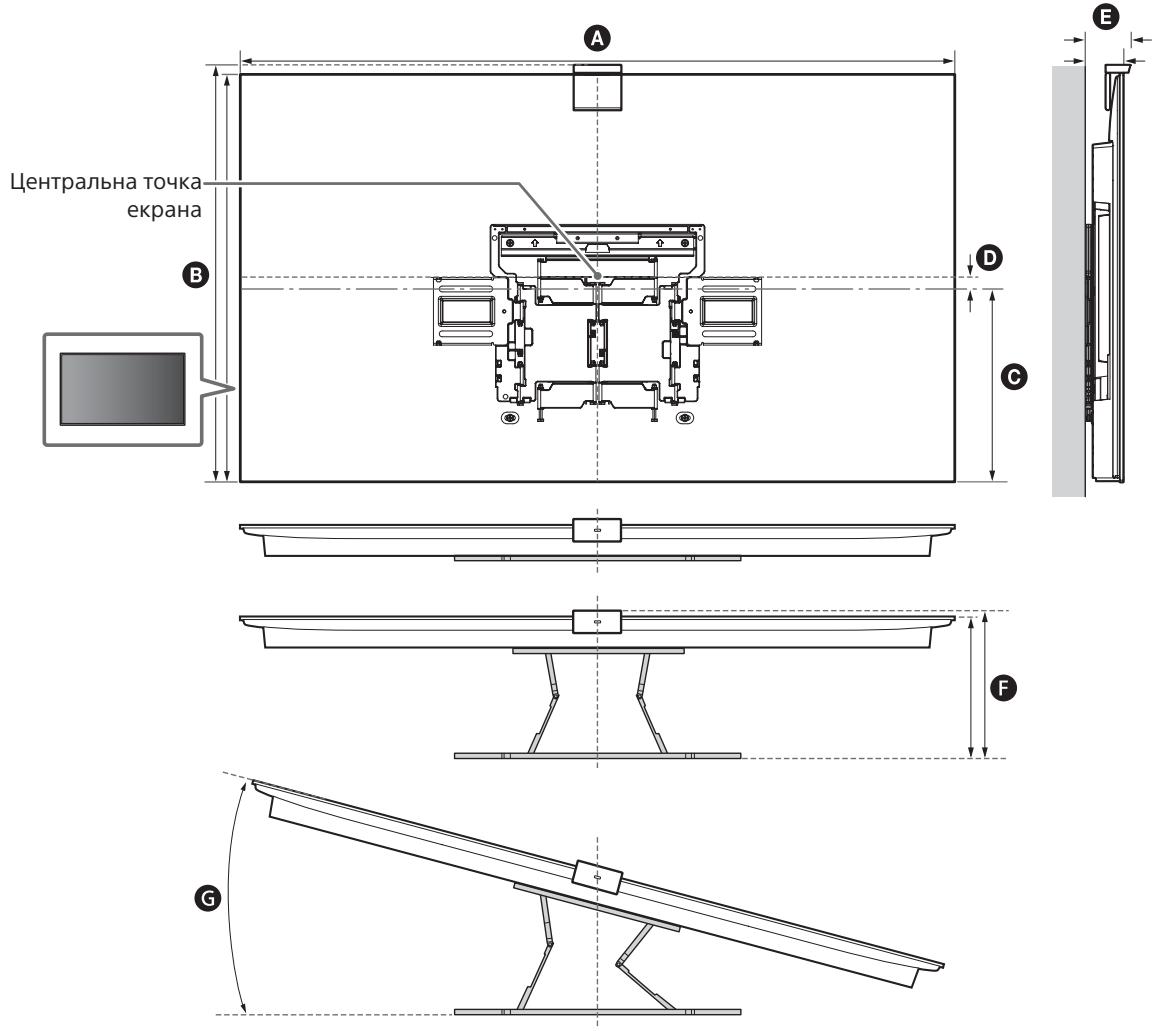
With camera (mm)
| Назва моделя | A | В | C | D | E | F* | G* (°) |
| XR-77A8xEL | 1722 | 1013 | 340 | 165 | 78 | 281 | 15 |
| XR-65A8xEL | 1448 | 851 | 342 | 82 | 77 | 281 | 18 |
| XR-55A8xEL | 1227 | 727 | 342 | 20 | 77 | 281 | 19 |
* (approx.)
Without camera (mm)
| Назва модени | A | В | C | D | E | F* | G* (°) |
| XR-77A8xL | 1722 | 998 | 340 | 165 | 66 | 269 | 15 |
| XR-65A8xL | 1448 | 836 | 342 | 82 | 66 | 269 | 18 |
| XR-55A8xL | 1227 | 712 | 342 | 20 | 66 | 269 | 19 |
Mass (only base): (approx.) [kg] 3.0
Install the mounting bracket
Safety instructions
Read this manual carefully before use.
Keep this manual
For TV bracket installation

WARNING
MUST BE INSTALLED IN A HORIZONTAL POSITION
This product is intended for use only with the specified TV models. If the TV is not installed correctly, it may fall and cause injury or damage. Sony is not liable for any damage or injury caused by incorrect installation or use of this product. Please keep this manual (for future reference).
For Sony TVs
Install the bracket securely to the wall. Ensure that the wall is strong enough to support the TV. If the wall is not strong enough, reinforce it before installation. Do not install the bracket on a wall that is not strong enough.
When installing the bracket, use the appropriate screws and anchors for the wall material. If you are unsure about the wall strength, consult a qualified professional. Do not install the bracket on a wall that is not strong enough.
This product is for indoor use only. Do not use it outdoors or in areas with high humidity, dust, or oil. Do not install it near heat sources or in direct sunlight. When cleaning, use a soft dry cloth.
Do not touch the TV during installation.
These devices are intended for grinding flour. They must be used for their intended purpose.
The devices must be connected to the mains and ground in accordance with the instructions.
If the device is damaged, it must not be used for grinding flour.
The devices must be disconnected from the mains before cleaning.
If the data or instructions are unclear, contact the manufacturer.
The devices must be protected from moisture.
The power cord must not be pinched or come into contact with sharp objects.
If the power cord or plug is damaged, or if the device falls or is damaged, it must be disconnected from the mains and repaired by a qualified specialist. This may cause electric shock or fire.

When connecting to the mains, use only properly grounded outlets.
When connecting to the mains, ensure that the device's material and plug are not damaged.
Old electrical appliances
- The illustrations in this manual are for illustrative purposes only and may differ from the actual device. Therefore, the illustrations may differ from the actual device.
What is the device used for?
The device must be connected to the mains in accordance with the instructions.
Profile cross-sections
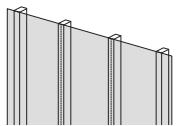
Maximum card size: 16 mm. - For vertical format, the card size should be at least 51 mm × 102 mm, and for horizontal format, at least 38 mm × 89 mm. - Leave a space of at least 406 mm between the brackets.
Concrete or concrete block
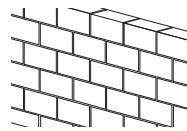
For reinforced concrete, use reinforced concrete. The concrete thickness should be at least 203 mm. - For each concrete block, the minimum size should be 203 mm × 203 mm × 406 mm.
Parts list
Included with the SU-WL850 structure
- All parts are included.
| WM1 (×1) | WM2 (×1) | WM3 (×4) |
| M6 (×4) | WT1 (×6) |
Included accessories
Reinforcement bracket VS (×4)*

- For installation on walls/ceilings/floors.
Installation height
Before installation, take the necessary measurements and installation measurements. - Mark the positions of the brackets. - Prepare the drill bits and washers for the 8 mm diameter holes (not included). - Select the drill bits according to the material. - Plan the next steps:
| *1 | 5,5 MM 10 MM | ||
| *2 | 1,5 H·M {15 kR·cm} | *3 | |
| *2 (x4) | *4 (x4) 8 MM × 60 MM | *4 (x4) | |
*1 For installation on plasterboard
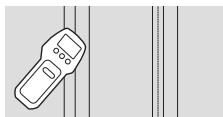
2 For concrete or concrete block 3 For wood studs *4 If you select the screws and washers
Install the profile into the slot on the cabinet.
Cabinet installation
1. Check the installation location.
In the cabinet, there is a place for the TV and the TV must be installed so that it does not protrude beyond the front edge.
See section 20 "Cabinet installation guide". To check the TV's tilt, see "Tilt adjustment".
Note
When installing the TV, the TV's warning label will be hidden. - We recommend checking the placement of the TVs before installation.
2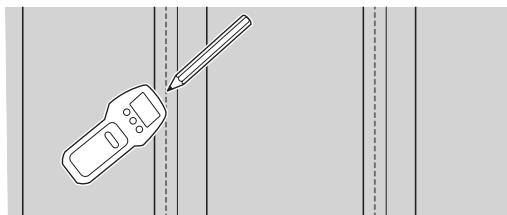
3. Attach the WM1 bracket to the cabinet, and the profile to the TV.
Note
To check the WM1, start the WM1 check procedure.
4. Test the warning labels on the profile.
The test labels on the cabinet must be checked to ensure they are not damaged before installation.
Note
- The test labels must be tested with a 75 mm deep, 5.5 mm diameter drill.
5. Install the WM1 control cable with clamps (without screws) and brackets (without screws).
Instruction
To test the WM1 device, connect the device test cable.
Safety measures
- 8 mm × 60 mm holes must be drilled. After drilling, installation of 8 mm × 60 mm holes is possible.
6. Check the tension of the belts on all pulleys. (See the tensioning instructions in section 4.)
7. Install the clamps and brackets on the belts.
Instruction
To test the WM1 device, connect the device test cable.
8. Clean the brushes with a brush.
Replacing the belts
Instruction
- Keep the device away from children and do not operate it in areas where it may be exposed to water.
Attaching the belts to the pulley (from the rear)*
- Only in certain areas/places/units. 1. Remove the old belts from the rear of the pulleys.
2. Attach the wall-mounted air conditioner VS (supplied with the remote control) to the top of the remote control (where it protrudes from the wall-mounted unit).
Note
- When operating the remote control, attach the wall-mounted air conditioner VS and secure it. To install the wall-mounted air conditioner VS, you only need the text and data provided. The base plate data can be installed on the wall-mounted air conditioner VS and the remote control can be closed.
3. Secure the remote control with the two screws provided.
Installing the wall-mounted unit after placing the remote control
1. Remove the cover of the terminal block.
2. Remove the screws on the sides of the unit.
2. Attach the wall-mounted air conditioner VS (supplied with the remote control) to the top of the remote control (where it protrudes from the wall-mounted unit).
Note
When operating the remote control, attach the wall-mounted air conditioner VS and secure it. To install the wall-mounted air conditioner VS, you only need the text and data provided. The base plate data can be installed on the wall-mounted air conditioner VS and the remote control can be closed.
4. Secure the remote control with the two screws provided.
5. Remove the protective film from the display.
- Remove the protective film from the display in one piece. Do not install the protective film on the display of other devices.
- Remove the protective film and install the display protective film on the display.
Note
- The device must be installed by qualified personnel. The installation must be carried out in accordance with the manufacturer's instructions, and the device must be grounded. It is necessary to use the device only for its intended purpose. For grounding the device, use the terminals provided.
- Do not use the device if it is damaged, and do not operate it with wet hands.
- Before using the device, read the instructions carefully and do not use the device in places where it may be exposed to water or moisture.
Installing the device on a wall
2 3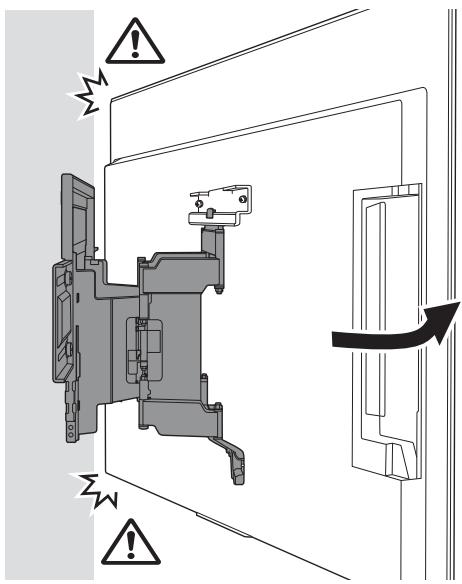
To install the device on a wall, use the mounting bracket. The bracket must be securely attached to the wall.
Use the screws provided for mounting.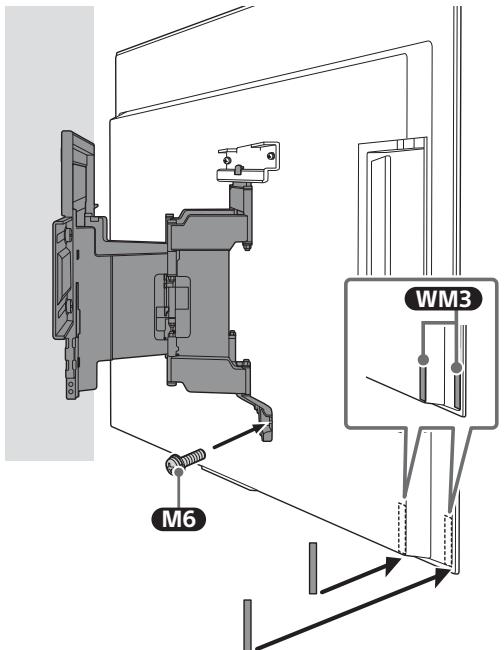
4 5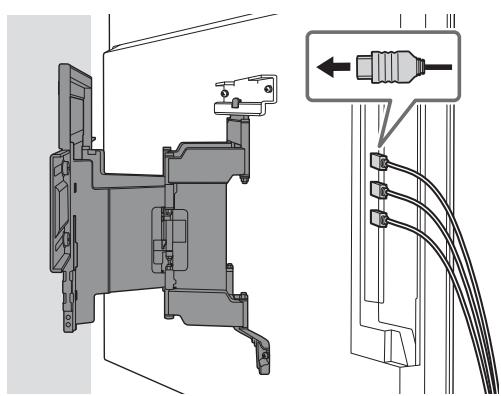
When installing the device, place it on the mounting bracket.

Use
The cables must be routed so that they do not interfere with the device installation. This is important.
EXPERT
- For a large TV, two or more people are needed (189.3 cm (75 inches) and larger for a large TV, three or more people are needed (only for the model).
Installation instructions
See the instructions.
- The cable must be laid without kinks.
CHECK
It is possible to lay the cable in a straight line or with bends, depending on the installation conditions. The installation must be carried out in accordance with the cable's bending radius specifications.
Fastening
Before installation, check the installation procedure.
CHECK
For large TV, two or more brackets (189.3 cm (75 inches) and for larger TV, two or more brackets) are required (depending on the model). For large TV, two or more brackets (75 inches (189.3 cm) and for larger TV, two or more brackets) are required (only for the model).
Fastening the bracket to a concrete wall or concrete block
Fastening the bracket to the wall
1. Check the installation location.
Make sure there is a suitable place for the cables in the wall, and do not damage the cables when drilling.
See the section "Drilling for fastening the bracket to the wall" on page 20. For cable routing, see the section "Cable routing".
Note
When the TV is mounted on the wall, the TV's top edge should be slightly tilted forward. - We recommend checking the cable connections before installation.
2. Place the wall mount on the wall and mark the holes.

Before drilling, mark the drilling and drilling locations on the surface.
Use the appropriate drill bits for the holes to be drilled.
The holes to be drilled must be at least 10 mm deep for the screws to be installed.
Drill the holes with a 75 mm depth and 10 mm diameter drill bit.

Install the screws (not included) and dowels (not included) into the drilled holes.
Before drilling, mark the drilling and drilling locations on the surface.
Safety instructions
- Drill a hole with a diameter of 8 mm and a depth of 60 mm. The drilled hole must be 8 mm in diameter and 60 mm deep.
Tighten the bracket screws with a wrench.
Installing the brackets
- Check that the brackets are securely fastened and do not wobble; install them away from children.
Remove the cable from the bracket (ship's pin)*
- According to the instructions, in the brackets/on the brackets/on the brackets. 1. Remove the excess cables from the bracket.
2. Attach the cable to the bracket using the supplied clamp (provided together with the cables) on the back side of the cables (perpendicular to the bracket).
Note
When attaching the cable, attach the supplied clamp to the bracket. To install the supplied clamp, use only the provided screws. Do not use other tools; the clamp may be damaged and the cables may be short-circuited.
3. Attach the cable to the bracket using the 2M2 screws.
Attaching the cable to the bracket from the top
1. Remove the protective film from the adhesive tape.
2. Remove the excess cables from the bracket.
3. Attach the cable to the bracket using the supplied clamp (provided together with the cables) on the back side of the cables (perpendicular to the bracket).
Note
- When attaching the cable, attach the supplied clamp to the bracket. To install the supplied clamp, use only the provided screws. Do not use other tools; the clamp may be damaged and the cables may be short-circuited.
4. Attach the cable to the bracket using the 2M2 screws.
5. Tighten the top screws from the TD.
- Tighten the top screws, but do not overtighten them. If the cables are pulled, tighten the top screws again.
- __SUPPIMER__
- Place it on a flat surface.
Note
- To avoid damage to the top surface, do not place heavy objects on it. When moving the top surface, lift it carefully to avoid scratching or damaging the surface. To prevent damage to the surface, handle the top with care.
- When moving the top, lift it straight up, and be careful not to scratch it.
- When lifting the top, hold it by the edges and place it on a soft cloth to protect the surface.
Installing the top

With the help of another person, carefully place the top onto the cabinet, aligning it with the left and right edges.
Note: Do not use force to install it.
When installing the top, push it firmly into place.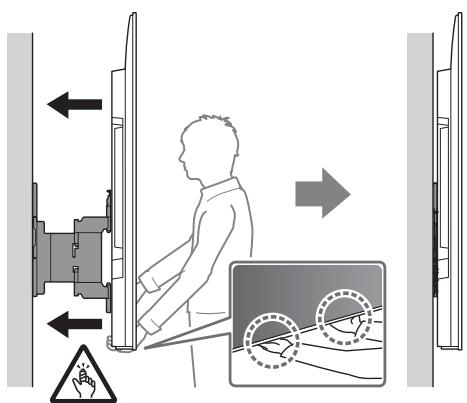
Note
The cabinet may be slightly damaged during installation, but this is normal and not a defect.
WARNING
- For a large TV, you need two or more people (for TVs up to 75 inches (189.3 cm) and larger). For a large TV, you need two or more people (for TVs up to 75 inches (189.3 cm) and larger).
WARNING
If the product is not used or stored as specified in the operating instructions, it may be damaged. The manufacturer is not responsible for damage caused by improper use or storage.
Before use
Before using the device, read the operating procedure carefully.
WARNING
- For mounting a large TV, two or more people are required (75 inches (189.3 cm) and larger TVs require two or more people). For mounting a large TV, two or more people are required (75 inches (189.3 cm) and larger TVs require two or more people) (only for large TVs).
Technical specifications
WM1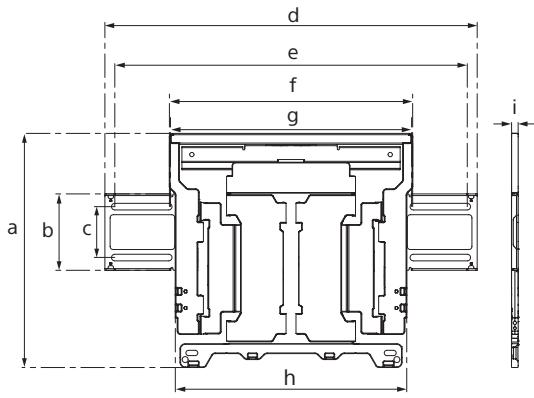
Weight (only the mount): (approx.) [kg] 3.0
Design and technical specifications are subject to change without notice.
Accessories
Wall mount bracket for mounting on the wall
The wall-mount bracket is suitable for the following models.
Camera distance (mm)
| Улгінemipi | A | B | C | D | E | F* | G*(°) |
| XR-77A8xEL | 1722 | 1013 | 340 | 165 | 78 | 281 | 15 |
| XR-65A8xEL | 1448 | 851 | 342 | 82 | 77 | 281 | 18 |
| XR-55A8xEL | 1227 | 727 | 342 | 20 | 77 | 281 | 19 |
- (Model name)
Without camera (mm)
| Улгінemірі | A | B | C | D | E | F* | G* (°) |
| XR-77A8xL | 1722 | 998 | 340 | 165 | 66 | 269 | 15 |
| XR-65A8xL | 1448 | 836 | 342 | 82 | 66 | 269 | 18 |
| XR-55A8xL | 1227 | 712 | 342 | 20 | 66 | 269 | 19 |
- (Model name)
Installation and use information for Sony Wall-Mount Bracket (SU-WL850)
Supported models*:
- In specific model names, "x"/"xx" indicates numbers and/or letters specific to each model.
XR-77A8xL / 77A8xEL / 65A8xL / 65A8xEL / 55A8xL / 55A8xEL
2 1
y
y
a
201733
y
mnnnynnoaonnnaeynnnn
.
,yn npn npnn npn on
TNN,nnn nn n n nn
- 1000000000000000000000000000000
nwnnnnne nnnnne nnne
.
y
(1)
pyn npn by npn npnpn on
n nn nnnn
.07
IN NnNn nnynu npn
- -y ynnn nn

Sony
77
VS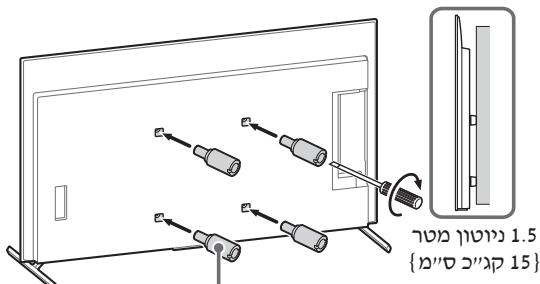
__SUPPIMER__

2
3 WM3
WM1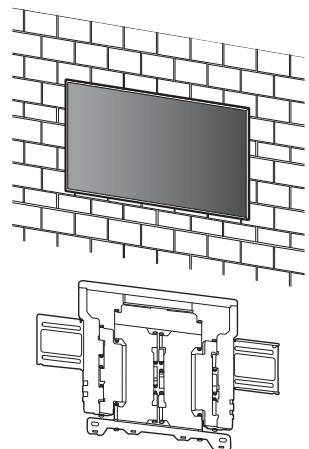
1
- 1.1.1.1
.
111
.
yINIOYNVv)INIOYNV77v 77 (TINN (O'ON75)189.3
(1)
yIN OYN NvN) IN OYN YN 77 (TNNN (189.3) 75
(1)
WMM
pT (pN N) DNN
(pan)nnn
in 5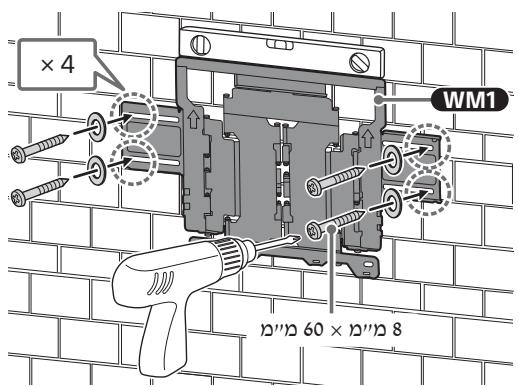
WIM
.
WM1 ON pTb Tgwnwn
.
.
y
Pn 60 x 8 n nn Pn
yNynnnn nn nnnn nn
60x8y
Tynnn np nn nn 6
.9107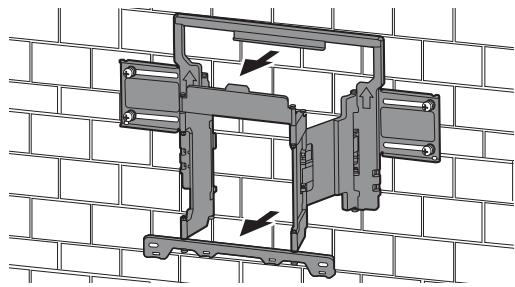
nbnn npnnn nn
NOnO pnnn nn nnnnnn N
75 77 77 77 77 77 77
2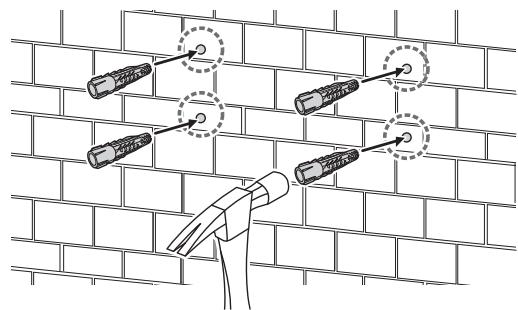
1
2
.
.
1
.
Sony
Sony
406×203 203
89 x 00 38 102 x 51
.00 406
SU-WL850
.0000 0000
(×4)WM3
WM2
(×1) WM1
(×4)M6
(×6) WT1

sJdU 1

jzjzulgo
AR
- = ( x 1,y 1) , = ( x 2,y 2)
.
.
jka g aalaaow yu yu yu yu yu yu yu yu yu yu yu yu yu yu yu yu yu yu
Quadrilateral AOBC is a square.
Quadrilateral AOBC is a square.
1
.2
3 3
Quadrilateral AOBC is a square
.
a 5 c uai (g) uublae g jil (j) pjl (j) Uga a 5 yu buiy juii iia gglg, iuii g s u yu iuiu qauu aoi pui yu g sia gao ula e i liu uuaa o uallae g yu olauu yuo alue uue jil d ayol g suiy i Uya aai yiu duai uue jui i agi jil ai yuyu o u uuuu
Therefore, the area of triangle OBC equals the area of triangle COD plus the area of triangle BOC.
Therefore, the area of triangle OBC is equal to one half times OB times BC, which is one half times CD times 5.
124 135 136 137 138 139 140 141 142 143 144 145 146 147 148 149 150
(1)
Therefore, cos α = b/c = 3/5
1.8g 2.9g 3.0g 4.0g
Therefore, the area of triangle AOB is equal to the area of triangle AOB plus the area of triangle AOB.
3g 5g 5g 5g 5g
4 44
.0000 4000 1999
G
Sony 日 1
Jua
ygaoo jbiiaojgogaoa laa jj gaoa
aalba 1 rill ggs glg blaio laio. CwI Sony
.8w 8y8y8dy doyo gao
laaw gai jyjgbl b cwi Jkssyglai jn 1Jy d a. .iisss lssykae glaw ggi ay jraiaa jraiaa jraiaa jraiaa
wolowdla jI loj y
a
y 50
108
Jg 203 Jg 1 g 1 g 1 g 1 g 1 g 1 g 1 g 1 g 1 g 1 g 1 g
xjoo 203 jJoo ySgJy Joo 406 xoo 203
Cui ju 1
10
10 16:5 10 10
JdU 102x 51 89 x 38
406 421 431
SU-WL850 1
(×4) WM3
(×1) WM2
(×1) WM1
(×4) M6

(×4) VS 425

| 1* | 2* | 3* | 4* | 5* |
| + 1/2 + 1/3 + 1/4 + 1/5 + 1/6 + 1/7 + 1/8 + 1/9 + 1/10 + 1/11 + 1/12 + 1/13 + 1/14 + 1/15 + 1/16 + 1/17 + 1/18 + 1/19 + 1/20 + 1/21 + 1/22 + 1/23 + 1/24 + 1/25 + 1/26 + 1/27 + 1/28 + 1/29 + 1/30 + 1/31 + 1/32 + 1/33 + 1/34 + 1/35 + 1/36 + 1/37 + 1/38 + 1/39 + 1/40 + 1/41 + 1/42 + 1/43 + 1/44 + 1/45 + 1/46 + 1/47 + 1/48 + 1/49 + 1/50 + 1/51 + 1/52 + 1/53 + 1/54 + 1/55 + 1/56 + 1/57 + 1/58 + 1/59 + 1/60 + 1/61 + 1/62 + 1/63 + 1/64 + 1/65 + 1/66 + 1/67 + 1/68 + 1/69 + 1/70 + 1/71 + 1/72 + 1/73 + 1/74 + 1/75 + 1/76 + 1/77 + 1/78 + 1/79 + 1/80 + 1/81 + 1/82 + 1/83 + 1/84 + 1/85 + 1/86 + 1/87 + 1/88 + 1/89 + 1/90 + 1/91 + 1/92 + 1/93 + 1/94 + 1/95 + 1/96 + 1/97 + 1/98 + 1/99 + 1/100 + 1/101 + 1/102 + 1/103 + 1/104 + 1/105 + 1/106 + 1/107 + 1/108 + 1/109 + 1/110 + 1/111 + 1/112 + 1/113 + 1/114 + 1/115 + 1/116 + 1/117 + 1/118 + 1/119 + 1/120 + 1/121 + 1/122 + 1/123 + 1/124 + 1/125 + 1/126 + 1/127 + 1/128 + 1/129 + 1/130 + 1/131 + 1/132 + 1/133 + 1/134 + 1/135 + 1/136 + 1/137 + 1/138 + 1/139 + 1/140 + 1/141 + 1/142 + 1/143 + 1/144 + 1/145 + 1/146 + 1/147 + 1/148 + 1/149 + 1/150 + 1/151 + 1/152 + 1/153 + 1/154 + 1/155 + 1/156 + 1/157 + 1/158 + 1/159 + 1/160 + 1/161 + 1/162 + 1/163 + 1/164 + 1/165 + 1/166 + 1/167 + 1/168 + 1/169 + 1/170 + 1/171 + 1/172 + 1/173 + 1/174 + 1/175 + 1/176 + 1/177 + 1/178 + 1/179 + 1/180 + 1/181 + 1/182 + 1/183 + 1/184 + 1/185 + 1/186 + 1/187 + 1/188 + 1/189 + 1/190 + 1/191 + 1/192 + 1/193 + 1/194 + 1/195 + 1/196 + 1/197 + 1/198 + 1/199 + 1/200 + 1/201 + 1/202 + 1/203 + 1/204 + 1/205 + 1/206 + 1/207 + 1/208 + 1/209 + 1/210 + 1/211 + 1/212 + 1/213 + 1/214 + 1/215 + 1/216 + 1/217 + 1/218 + 1/219 + 1/220 + 1/221 + 1/222 + 1/223 + 1/224 + 1/225 + 1/226 + 1/227 + 1/228 + 1/229 + 1/230 + 1/231 + 1/232 + 1/233 + 1/234 + 1/235 + 1/236 + 1/237 + 1/238 + 1/239 + 1/240 + 1/241 + 1/242 + 1/243 + 1/244 + 1/245 + 1/246 + 1/247 + 1/248 + 1/249 + 1/250 + 1/251 + 1/252 + 1/253 + 1/254 + 1/255 + 1/256 + 1/257 + 1/258 + 1/259 + 1/260 + 1/261 + 1/262 + 1/263 + 1/264 + 1/265 + 1/266 + 1/267 + 1/268 + 1/269 + 1/270 + 1/271 + 1/272 + 1/273 + 1/274 + 1/275 + 1/276 + 1/277 + 1/278 + 1/279 + 1/280 + 1/281 + 1/282 + 1/283 + 1/284 + 1/285 + 1/286 + 1/287 + 1/288 + 1/289 + 1/290 + 1/291 + 1/292 + 1/293 + 1/294 + 1/295 + 1/296 + 1/297 + 1/298 + 1/299 + 1/300 + 1/301 + 1/302 + 1/303 + 1/304 + 1/305 + 1/306 + 1/307 + 1/308 + 1/309 + 1/310 + 1/311 + 1/312 + 1/313 + 1/314 + 1/315 + 1/316 + 1/317 + 1/318 + 1/319 + 1/320 + 1/321 + 1/322 + 1/323 + 1/324 + 1/325 + 1/326 + 1/327 + 1/328 + 1/329 + 1/330 + 1/331 + 1/332 + 1/333 + 1/334 + 1/335 + 1/336 + 1/337 + 1/338 + 1/339 + 1/340 + 1/341 + 1/342 + 1/343 + 1/344 + 1/345 + 1/346 + 1/347 + 1/348 + 1/349 + 1/350 + 1/351 + 1/352 + 1/353 + 1/354 + 1/355 + 1/356 + 1/357 + 1/358 + 1/359 + 1/360 + 1/361 + 1/362 + 1/363 + 1/364 + 1/365 + 1/366 + 1/367 + 1/368 + 1/369 + 1/370 + 1/371 + 1/372 + 1/373 + 1/374 + 1/375 + 1/376 + 1/377 + 1/378 + 1/379 + 1/380 + 1/381 + 1/382 + 1/383 + 1/384 + 1/385 + 1/386 + 1/387 + 1/388 + 1/389 + 1/390 + 1/391 + 1/392 + 1/393 + 1/394 + 1/395 + 1/396 + 1/397 + 1/398 + 1/399 + 1/400 + 1/401 + 1/402 + 1/403 + 1/404 + 1/405 + 1/406 + 1/407 + 1/408 + 1/409 + 1/410 + 1/411 + 1/412 + 1/413 + 1/414 + 1/415 + 1/416 + 1/417 + 1/418 + 1/419 + 1/420 + 1/421 + 1/422 + 1/423 + 1/424 + 1/425 + 1/426 + 1/427 + 1/428 + 1/429 + 1/430 + 1/431 + 1/432 + 1/433 + 1/434 + 1/435 + 1/436 + 1/437 + 1/438 + 1/439 + 1/440 + 1/441 + 1/442 + 1/443 + 1/444 + 1/445 + 1/446 + 1/447 + 1/448 + 1/449 + 1/450 + 1/451 + 1/452 + 1/453 + 1/454 + 1/455 + 1/456 + 1/457 + 1/458 + 1/459 + 1/460 + 1/461 + 1/462 + 1/463 + 1/464 + 1/465 + 1/466 + 1/467 + 1/468 + 1/469 + 1/470 + 1/471 + 1/472 + 1/473 + 1/474 + 1/475 + 1/476 + 1/477 + 1/478 + 1/479 + 1/480 + 1/481 + 1/482 + 1/483 + 1/484 + 1/485 + 1/486 + 1/487 + 1/488 + 1/489 + 1/490 + 1/491 + 1/492 + 1/493 + 1/494 + 1/495 + 1/496 + 1/497 + 1/498 + 1/499 + 1/500 + 1/501 + 1/502 + 1/503 + 1/504 + 1/505 + 1/506 + 1/507 + 1/508 + 1/509 + 1/510 + 1/511 + 1/512 + 1/513 + 1/514 + 1/515 + 1/516 + 1/517 + 1/518 + 1/519 + 1/520 + 1/521 + 1/522 + 1/523 + 1/524 + 1/525 + 1/526 + 1/527 + 1/528 + 1/529 + 1/530 + 1/531 + 1/532 + 1/533 + 1/534 + 1/535 + 1/536 + 1/537 + 1/538 + 1/539 + 1/540 + 1/541 + 1/542 + 1/543 + 1/544 + 1/545 + 1/546 + 1/547 + 1/548 + 1/549 + 1/550 + 1/551 + 1/552 + 1/553 + 1/554 + 1/555 + 1/556 + 1/557 + 1/558 + 1/559 + 1/560 + 1/561 + 1/562 + 1/563 + 1/564 + 1/565 + 1/566 + 1/567 + 1/568 + 1/569 + 1/570 + 1/571 + 1/572 + 1/573 + 1/574 + 1/575 + 1/576 + 1/577 + 1/578 + 1/579 + 1/580 + 1/581 + 1/582 + 1/583 + 1/584 + 1/585 + 1/586 + 1/587 + 1/588 + 1/589 + 1/590 + 1/591 + 1/592 + 1/593 + 1/594 + 1/595 + 1/596 + 1/597 + 1/598 + 1/599 + 1/600 + 1/601 + 1/602 + 1/603 + 1/604 + 1/605 + 1/606 + 1/607 + 1/608 + 1/609 + 1/610 + 1/611 + 1/612 + 1/613 + 1/614 + 1/615 + 1/616 + 1/617 + 1/618 + 1/619 + 1/620 + 1/621 + 1/622 + 1/623 + 1/624 + 1/625 + 1/626 + 1/627 + 1/628 + 1/629 + 1/630 + 1/631 + 1/632 + 1/633 + 1/634 + 1/635 + 1/636 + 1/637 + 1/638 + 1/639 + 1/640 + 1/641 + 1/642 + 1/643 + 1/644 + 1/645 + 1/646 + 1/647 + 1/648 + 1/649 + 1/650 + 1/651 + 1/652 + 1/653 + 1/654 + 1/655 + 1/656 + 1/657 + 1/658 + 1/659 + 1/660 + 1/661 + 1/662 + 1/663 + 1/664 + 1/665 + 1/666 + 1/667 + 1/668 + 1/669 + 1/670 + 1/671 + 1/672 + 1/673 + 1/674 + 1/675 + 1/676 + 1/677 + 1/678 + 1/679 + 1/680 + 1/681 + 1/682 + 1/683 + 1/684 + 1/685 + 1/686 + 1/687 + 1/688 + 1/689 + 1/690 + 1/691 + 1/692 + 1/693 + 1/694 + 1/695 + 1/696 + 1/697 + 1/698 + 1/699 + 1/700 + 1/701 + 1/702 + 1/703 + 1/704 + 1/705 + 1/706 + 1/707 + 1/708 + 1/709 + 1/710 + 1/711 + 1/712 + 1/713 + 1/714 + 1/715 + 1/716 + 1/717 + 1/718 + 1/719 + 1/720 + 1/721 + 1/722 + 1/723 + 1/724 + 1/725 + 1/726 + 1/727 + 1/728 + 1/729 + 1/730 + 1/731 + 1/732 + 1/733 + 1/734 + 1/735 + 1/736 + 1/737 + 1/738 + 1/739 + 1/740 + 1/741 + 1/742 + 1/743 + 1/744 + 1/745 + 1/746 + 1/747 + 1/748 + 1/749 + 1/750 + 1/751 + 1/752 + 1/753 + 1/754 + 1/755 + 1/756 + 1/757 + 1/758 + 1/759 + 1/760 + 1/761 + 1/762 + 1/763 + 1/764 + 1/765 + 1/766 + 1/767 + 1/768 + 1/769 + 1/770 + 1/771 + 1/772 + 1/773 + 1/774 + 1/775 + 1/776 + 1/777 + 1/778 + 1/779 + 1/780 + 1/781 + 1/782 + 1/783 + 1/784 + 1/785 + 1/786 + 1/787 + 1/788 + 1/789 + 1/790 + 1/791 + 1/792 + 1/793 + 1/794 + 1/795 + 1/796 + 1/797 + 1/798 + 1/799 + 1/800 + 1/801 + 1/802 + 1/803 + 1/804 + 1/805 + 1/806 + 1/807 + 1/808 + 1/809 + 1/810 + 1/811 + 1/812 + 1/813 + 1/814 + 1/815 + 1/816 + 1/817 + 1/818 + 1/819 + 1/820 + 1/821 + 1/822 + 1/823 + 1/824 + 1/825 + 1/826 + 1/827 + 1/828 + 1/829 + 1/830 + 1/831 + 1/832 + 1/833 + 1/834 + 1/835 + 1/836 + 1/837 + 1/838 + 1/839 + 1/840 + 1/841 + 1/842 + 1/843 + 1/844 + 1/845 + 1/846 + 1/847 + 1/848 + 1/849 + 1/850 + 1/851 + 1/852 + 1/853 + 1/854 + 1/855 + 1/856 + 1/857 + 1/858 + 1/859 + 1/860 + 1/861 + 1/862 + 1/863 + 1/864 + 1/865 + 1/866 + 1/867 + 1/868 + 1/869 + 1/870 + 1/871 + 1/872 + 1/873 + 1/874 + 1/875 + 1/876 + 1/877 + 1/878 + 1/879 + 1/880 + 1/881 + 1/882 + 1/883 + 1/884 + 1/885 + 1/886 + 1/887 + 1/888 + 1/889 + 1/890 + 1/891 + 1/892 + 1/893 + 1/894 + 1/895 + 1/896 + 1/897 + 1/898 + 1/899 + 1/900 + 1/901 + 1/902 + 1/903 + 1/904 + 1/905 + 1/906 + 1/907 + 1/908 + 1/909 + 1/910 + 1/911 + 1/912 + 1/913 + 1/914 + 1/915 + 1/916 + 1/917 + 1/918 + 1/919 + 1/920 + 1/921 + 1/922 + 1/923 + 1/924 + 1/925 + 1/926 + 1/927 + 1/928 + 1/929 + 1/930 + 1/931 + 1/932 + 1/933 + 1/934 + 1/935 + 1/936 + 1/937 + 1/938 + 1/939 + 1/940 + 1/941 + 1/942 + 1/943 + 1/944 + 1/945 + 1/946 + 1/947 + 1/948 + 1/949 + 1/950 + 1/951 + 1/952 + 1/953 + 1/954 + 1/955 + 1/956 + 1/957 + 1/958 + 1/959 + 1/960 + 1/961 + 1/962 + 1/963 + 1/964 + 1/965 + 1/966 + 1/967 + 1/968 + 1/969 + 1/970 + 1/971 + 1/972 + 1/973 + 1/974 + 1/975 + 1/976 + 1/977 + 1/978 + 1/979 + 1/980 + 1/981 + 1/982 + 1/983 + 1/984 + 1/985 + 1/986 + 1/987 + 1/988 + 1/989 + 1/990 + 1/991 + 1/992 + 1/993 + 1/994 + 1/995 + 1/996 + 1/997 + 1/998 + 1/999 + 1/900 + 1/901 + 1/902 + 1/903 + 1/904 + 1/905 + 1/906 + 1/907 + 1/908 + 1/909 + 1/910 + 1/911 + 1/912 + 1/914 + 1/915 + 1/916 + 1/917 + 1/918 + 1/919 + 1/920 + 1/921 + 1/922 + 1/923 + 1/924 + 1/925 + 1/926 + 1/927 + |

Therefore, the area of triangle AOB equals the area of triangle COD plus the area of triangle BOC.
Therefore, sin alpha equals y over x.
4.5
3
Therefore, the area of triangle OBC equals the area of triangle COD plus the area of triangle BOC.
3
Therefore, (g + 4/3 g) cos 2 =
45
saa jgsa 4j05 Jg pia 1 VS sgs wai aaba Iao olaaw VS sgswai aaba wai gj ylo wj jI baa .uS sgs wai aaba cwi Jsaa olaaw sgsy jI jI sI .uS .uS yJ uWJ ggs 4g dya uJ VS
4:53
1 1
1/2
45 2g jg jgglj g kgl cwl jkss oj jg ssi oslzai ojl jl
cawwSaaolglaolaljyagglal jllai jllai jllai jllai jllai jllai jllai jllai jllai jllai jllai jllai jllai jllai jllai jllai jllai jllai jllai jllai jllai jllai jllai jllai jllai jllai jllai jllai jllai jllai jllai jllai jllai jllai
.
50 ÷ | 12 × 12|
a a a a a a a a a a a a a a a a a a a
jua
(yj jai ()
.(yj)(g)(g75)yul 189.3glu
∴ m = 3/11
4:53
1/2
- TO CUSTOMERS
- TO SONY DEALERS AND CONTRACTORS
- WALL-MOUNT BRACKET
- ON SAFETY
- WARNING
- PROFESSIONAL INSTALLATION REQUIRED
- TO SONY DEALERS
- CAUTION
- SPECIFIED PRODUCTS
- BE SURE TO SUBCONTRACT THE INSTALLATION TO LICENSED CONTRACTORS AND KEEP SMALL CHILDREN AWAY DURING THE INSTALLATION
- BE SURE TO SUBCONTRACT MOVING OR DISMOUNTING OF THE TV TO LICENSED CONTRACTORS
- DO NOT REMOVE SCREWS, ETC., AFTER MOUNTING THE TV
- DO NOT MAKE ALTERATIONS TO THE PARTS OF THE WALL-MOUNT BRACKET
- DO NOT MOUNT ANY EQUIPMENT OTHER THAN THE SPECIFIED PRODUCT
- DO NOT APPLY ANY LOAD OTHER THAN THE TV ON THE WALL-MOUNT BRACKET. DO NOT SHAKE THE TV LEFT/RIGHT, UP/DOWN
- DO NOT LEAN ON OR HANG FROM THE TV
- DO NOT HANDLE THE PRODUCT WITH EXCESSIVE FORCE DURING CLEANING OR MAINTENANCE
- DO NOT PLACE THIS PRODUCT CLOSE TO MEDICAL DEVICES
- KEEP OUT OF THE REACH OF CHILDREN OR THE SUPERVISED INDIVIDUALS
- PRECAUTIONS
- INSTALLING THE WALLMOUNT BRACKET
- DO NOT INSTALL THE WALLMOUNT BRACKET ON WALL SURFACES WHERE THE CORNERS OR THE SIDES OF THE TV PROTRUDE AWAY FROM THE WALL SURFACE
- DO NOT INSTALL THE TV OVER OR UNDER AN AIR-CONDITIONER
- BE SURE TO ASSEMBLE THE BRACKET PROPERLY FOLLOWING THE INSTRUCTED PROCEDURE EXPLAINED IN THIS INSTRUCTION MANUAL
- BE SURE TO TIGHTEN THE SCREWS SECURELY IN THE DESIGNATED POSITION
- BE SURE TO INSTALL THE TV ON A WALL THAT IS BOTH PERPENDICULAR AND FLAT
- AFTER PROPER INSTALLATION OF THE TV, SECURE THE CABLES PROPERLY
- DO NOT ALLOW THE AC POWER CORD (MAINS LEAD) OR THE CONNECTING CABLE TO BE PINCHED
- THE SCREWS NEEDED TO SECURE THE WALL-MOUNT BRACKET TO THE WALL ARE NOT SUPPLIED
- BEFORE GETTING STARTED
- WHAT IS YOUR WALL MADE OF
- DRY WALL WITH STUDS
- SOLID CONCRETE OR CONCRETE BLOCK
- CHECKING THE PARTS
- SUPPLIED WITH SU-WL
- SUPPLIED WITH THE TV
- PREPARING FOR INSTALLATION
- A ATTACHING THE WALL-MOUNT BRACKET TO THE DRY WALL WITH STUDS
- INSTALLING THE WALL-MOUNT BRACKET TO THE WALL
- DECIDE ON THE INSTALLATION LOCATION
- NOTE
- ALIGN WM1 TO THE WALL AND MAKE FOUR MARKS ALIGNED WITH THE STUDS
- DRILL UPPER PILOT HOLES ON THE MARKS
- PRECAUTION
- PREPARING FOR THE INSTALLATION OF THE TV
- INSTALLING THE TV TO THE WALL FROM CARTON
- INSTALLING THE TV TO THE WALL FROM TABLE-TOP STAND
- ATTACH THE WM2 TO THE TV USING M
- DETACH THE TABLE-TOP STAND FROM THE TV
- INSTALLING THE TV ON THE WALL
- CONFIRMING THE COMPLETION OF THE INSTALLATION
- OTHER INFORMATION
- SPECIFICATIONS
- DIMENSIONS: (APPROX.) [MM]
- MASS (BASE ONLY): (APPROX.) [KG]
- REFERENCES
- MEASUREMENT FOR WALL-MOUNT BRACKET INSTALLATION ON THE WALL
- WITH CAMERA
- WITHOUT CAMERA
- WEIGHT (BASE ONLY): (APPROX.) [KG]
- SPECIFICATIONS PRODUCER
- PREPARATION FOR INSTALLATION
- FIND THE TV'S LOCATION
- GREEK TEXT
- CONTACT SONY
- PRODUCT DESCRIPTION
- FOR CUSTOMERS
- PERFORM THE INSTALLATION OF THE WALL-MOUNT BRACKET AND THE WALL PLATE DURING INSTALLATION
- MAKE SURE YOU HAVE PERFORMED THE INSTALLATION OF THE TV ON THE WALL-MOUNT BRACKET
- DO NOT TIGHTEN THE SCREWS AND OTHER PARTS OF THE TV INSTALLATION
- DO NOT REMOVE THE PARTS OF THE WALL-MOUNT BRACKET
- DO NOT INSTALL OTHER EQUIPMENT, EXCEPT FOR THE SPECIFIED PRODUCT
- DO NOT PLACE THE WALL-MOUNT BRACKET ON ANY OTHER LOAD, EXCEPT FOR THE TV. DO NOT PLACE THE TV ON TOP OF OR BELOW THE BRACKET
- DO NOT TREAT THE PRODUCT WITH EXCESSIVE FORCE DURING INSTALLATION OR REMOVAL
- DO NOT PLACE THIS PRODUCT NEAR MEDICAL DEVICES
- KEEP THE PRODUCT IN A PLACE WHERE IT CANNOT BE REACHED BY CHILDREN OR PETS
- MOUNTING THE WALL MOUNT BRACKET
- DO NOT MOUNT THE WALL-MOUNT BRACKET ON A WALL SURFACE WHERE THE TV'S SIDES OR EDGES PROTRUDE FROM THE WALL SURFACE
- DO NOT MOUNT THE TV OVER AN AIR CONDITIONER
- MOUNT THE WALL-MOUNT BRACKET SECURELY TO THE WALL BY FOLLOWING THE INSTRUCTIONS IN THIS OPERATING MANUAL
- USE THE CORRECTLY INSTALLED SCREWS AND PARTS AS YOU FOLLOW THE INSTRUCTIONS IN THIS OPERATING MANUAL. IF YOU USE SUBSTITUTE ELEMENTS, THE TV MAY FALL AND CAUSE SERIOUS INJURY OR BE DAMAGED
- MAKE SURE TO USE THE BRACKET CORRECTLY BY FOLLOWING THE PROCEDURE DESCRIBED IN THIS OPERATING MANUAL
- TIGHTEN THE SCREWS FIRMLY IN THE INDICATED POSITION
- BE CAREFUL NOT TO HIT THE TV DURING INSTALLATION
- MOUNT THE TV ON A WALL THAT IS PERPENDICULAR AND FLAT
- FOLLOW THE TV INSTALLATION INSTRUCTIONS AND ROUTE THE CABLES CORRECTLY
- DO NOT PINCH THE POWER CABLE OR THE CONNECTING CABLE
- THE SCREWS REQUIRED FOR SECURING THE WALL MOUNT BRACKET TO THE WALL ARE NOT INCLUDED IN THE PACKAGE
- BEFORE YOU BEGIN
- WHAT IS THE WALL MADE OF
- DRYWALL (E.G., PLASTERBOARD) WITH WOODEN STUDS
- PRE-MEASUREMENTS
- ПЬТЕН 6ЕTOH ИЛ 6ETOHH6JIOKYETA
- IPEPA3HM MEPKN
- ПЮВЕРА НА ЧАСТERTE
- DOCTABEHO C SU-WL
- A6EJEXKKA
- IPEUYIPEXKDEHNE
- SUPPORTED MODELS
- WALL-MOUNT INSTALLATION INSTRUCTIONS
- SAFETY
- FOR THE CUSTOMER
- FOR SONY DEALERS
- THE SPECIFIED PRODUCTS
- AFTER INSTALLING THE TV, DO NOT REMOVE THE SCREWS, ETC
- DO NOT DISASSEMBLE OR MODIFY THE PARTS OF THE WALL-MOUNT BRACKET
- DO NOT INSTALL ANY OTHER EQUIPMENT ON THE BRACKET OTHER THAN THE SPECIFIED ONE
- TO AVOID OVERLOADING THE WALL-MOUNT BRACKET, DO NOT INSTALL ANYTHING OTHER THAN THE TV ON IT. DO NOT SHAKE THE TV LEFT/RIGHT OR UP/DOWN
- DO NOT LEAN ON THE TV OR HOLD ONTO IT
- WHEN CLEANING THE DEVICE, DO NOT APPLY EXCESSIVE FORCE
- KEEP IN PLACES OUT OF REACH OF CHILDREN OR THOSE UNDER SUPERVISION
- DO NOT INSTALL THE WALL MOUNT ON WALLS WHERE THE TV EDGES WILL PROTRUDE BEYOND THE WALL EDGES
- DO NOT PLACE THE TV UNDER AN AIR CONDITIONER OR NEAR A HEATER
- BE SURE TO SECURELY ATTACH THE WALL MOUNT BRACKET TO THE WALL, FOLLOWING THE INSTRUCTIONS PROVIDED IN THIS OPERATING MANUAL
- DISASSEMBLY
- MOUNTING THE BRACKET FOR WALL INSTALLATION ON THE WALL
- PPIMUEAHNE
- MEPBL NPEDOCTOPOKHOCTN
- ПОЛНОCTBIO BBLBNHBTE KOHCOJIB KPOHШTEИHA
- ПОДГOTOBКУCTAHOBKE TEJIEВИЗОРА
- ПРИИМECHАИМЕ
- YCTAHOBKA TEJEBN3OPA HA CTEHY N3 KOPO6KN
- IPEDYIPEKDEHME
- PPOAHΦOPMAZNA
- IPEDYIPEXKDEHNE
- DIMENSIONS FOR WALL-MOUNT BRACKET FOR WALL INSTALLATION ON THE WALL
- INSTALLATION INFORMATION FOR USING THE WALL-MOUNT BRACKET FOR WALL MOUNTING SONY (SU-WL850)
- MODELS THAT ARE SUPPORTED
- DO NOT TIGHTEN THE SCREWS UNTIL AFTER MOUNTING THE TV
- DO NOT MODIFY THE PARTS OF THE WALL-MOUNT BRACKET
- DO NOT INSTALL ANY DEVICES OTHER THAN THOSE SPECIFIED IN THE PRODUCT
- DO NOT USE THE WALL MOUNT BRACKET FOR ANY LOAD OTHER THAN A TELEVISION. DO NOT TILT THE TELEVISION UP/DOWN OR LEFT/RIGHT
- DO NOT LEAN ON THE TELEVISION OR HANG FROM IT
- INSTALLING THE WALL MOUNT BRACKET
- INSTALLING THE WALL MOUNT BRACKET ON A SOLID WALL
- INSTALLING THE TV ON A WALL FROM THE BOX
- INSTALLING THE TV ON A WALL
- ACTEPEXEHH
- ПРОВЕРКА ПОСЛЕ ЗАВЕРШЕНИЯ УСТАНОВКИ
- УСТАНОВКА КРОНШТЕЙНА НА СТЕНУ
- ВЫБЕРИТЕ МЕСТО УСТАНОВКИ
- ПРИМЕЧАНИЕ
- ПРИЛОЖИТЕ WM1 К СТЕНЕ И СДЕЛАЙТЕ ОТМЕТКИ
- TECHNICAL SPECIFICATIONS
- BARA (TILBKN 6A3A): (NPN6JI.) [KR]
- REFERENCE MATERIALS
- INSTALLATION OF THE BRACKET FOR WALL MOUNTING ON A WALL
- INSTALL THE MOUNTING BRACKET
- SAFETY INSTRUCTIONS
- KEEP THIS MANUAL
- MUST BE INSTALLED IN A HORIZONTAL POSITION
- FOR SONY TVS
- DO NOT TOUCH THE TV DURING INSTALLATION
- THE DEVICES MUST BE CONNECTED TO THE MAINS AND GROUND IN ACCORDANCE WITH THE INSTRUCTIONS
- THE DEVICES MUST BE DISCONNECTED FROM THE MAINS BEFORE CLEANING
- THE POWER CORD MUST NOT BE PINCHED OR COME INTO CONTACT WITH SHARP OBJECTS
- WHEN CONNECTING TO THE MAINS, USE ONLY PROPERLY GROUNDED OUTLETS
- OLD ELECTRICAL APPLIANCES
- WHAT IS THE DEVICE USED FOR
- PROFILE CROSS-SECTIONS
- CONCRETE OR CONCRETE BLOCK
- PARTS LIST
- INCLUDED WITH THE SU-WL850 STRUCTURE
- INCLUDED ACCESSORIES
- INSTALLATION HEIGHT
- CABINET INSTALLATION
- CHECK THE INSTALLATION LOCATION
- ATTACH THE WM1 BRACKET TO THE CABINET, AND THE PROFILE TO THE TV
- TEST THE WARNING LABELS ON THE PROFILE
- INSTRUCTION
- SAFETY MEASURES
- REPLACING THE BELTS
- ATTACHING THE BELTS TO THE PULLEY (FROM THE REAR)
- INSTALLING THE WALL-MOUNTED UNIT AFTER PLACING THE REMOTE CONTROL
- SECURE THE REMOTE CONTROL WITH THE TWO SCREWS PROVIDED
- REMOVE THE PROTECTIVE FILM FROM THE DISPLAY
- INSTALLING THE DEVICE ON A WALL
- USE
- EXPERT
- INSTALLATION INSTRUCTIONS
- CHECK
- FASTENING
- FASTENING THE BRACKET TO A CONCRETE WALL OR CONCRETE BLOCK
- FASTENING THE BRACKET TO THE WALL
- PLACE THE WALL MOUNT ON THE WALL AND MARK THE HOLES
- USE THE APPROPRIATE DRILL BITS FOR THE HOLES TO BE DRILLED
- INSTALL THE SCREWS (NOT INCLUDED) AND DOWELS (NOT INCLUDED) INTO THE DRILLED HOLES
- TIGHTEN THE BRACKET SCREWS WITH A WRENCH
- INSTALLING THE BRACKETS
- REMOVE THE CABLE FROM THE BRACKET (SHIP'S PIN)
- ATTACHING THE CABLE TO THE BRACKET FROM THE TOP
- INSTALLING THE TOP
- BEFORE USE
- ACCESSORIES
- WALL MOUNT BRACKET FOR MOUNTING ON THE WALL
- INSTALLATION AND USE INFORMATION FOR SONY WALL-MOUNT BRACKET (SU-WL850)
- Y
- A
- JUA
- WOLOWDLA JI LOJ Y
- CUI JU
- ÷ | 12 ×
Brand : SONY
Model : LCDXR-65A80L
Category : Television