TOG800CL PERSONA - Toaster KENWOOD - Free user manual and instructions
Find the device manual for free TOG800CL PERSONA KENWOOD in PDF.
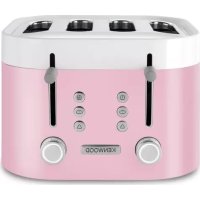
| Product type | Toaster |
| Brand | Kenwood |
| Model | TOG800CL PERSONA |
| Power supply | 230 V, 50 Hz |
| Number of slots | 2 |
| Functions | Browning control (6 levels), defrost, reheat, bagel, cancel |
| Hi-Rise™ function | Lifts toast higher |
| Removable glass plate | Yes |
| Removable crumb tray | Yes |
| Indicator lights | Cancel, bagel, reheat buttons |
| Automatic shut-off | Yes (ejection at end of cycle) |
| Cord storage | Under the appliance |
| Exterior materials | Metal and glass |
| Cleaning | Exterior: damp cloth; crumb tray: hand washable; glass plate: wipe clean |
| Safety | Do not immerse, do not use metal objects, do not cover |
| Warranty | Complies with legal requirements |
| Country of manufacture | China |
| After-sales service | Kenwood authorized service center |
Frequently Asked Questions - TOG800CL PERSONA KENWOOD
User questions about TOG800CL PERSONA KENWOOD
0 question about this device. Answer the ones you know or ask your own.
Ask a new question about this device
Download the instructions for your Toaster in PDF format for free! Find your manual TOG800CL PERSONA - KENWOOD and take your electronic device back in hand. On this page are published all the documents necessary for the use of your device. TOG800CL PERSONA by KENWOOD.
USER MANUAL TOG800CL PERSONA KENWOOD
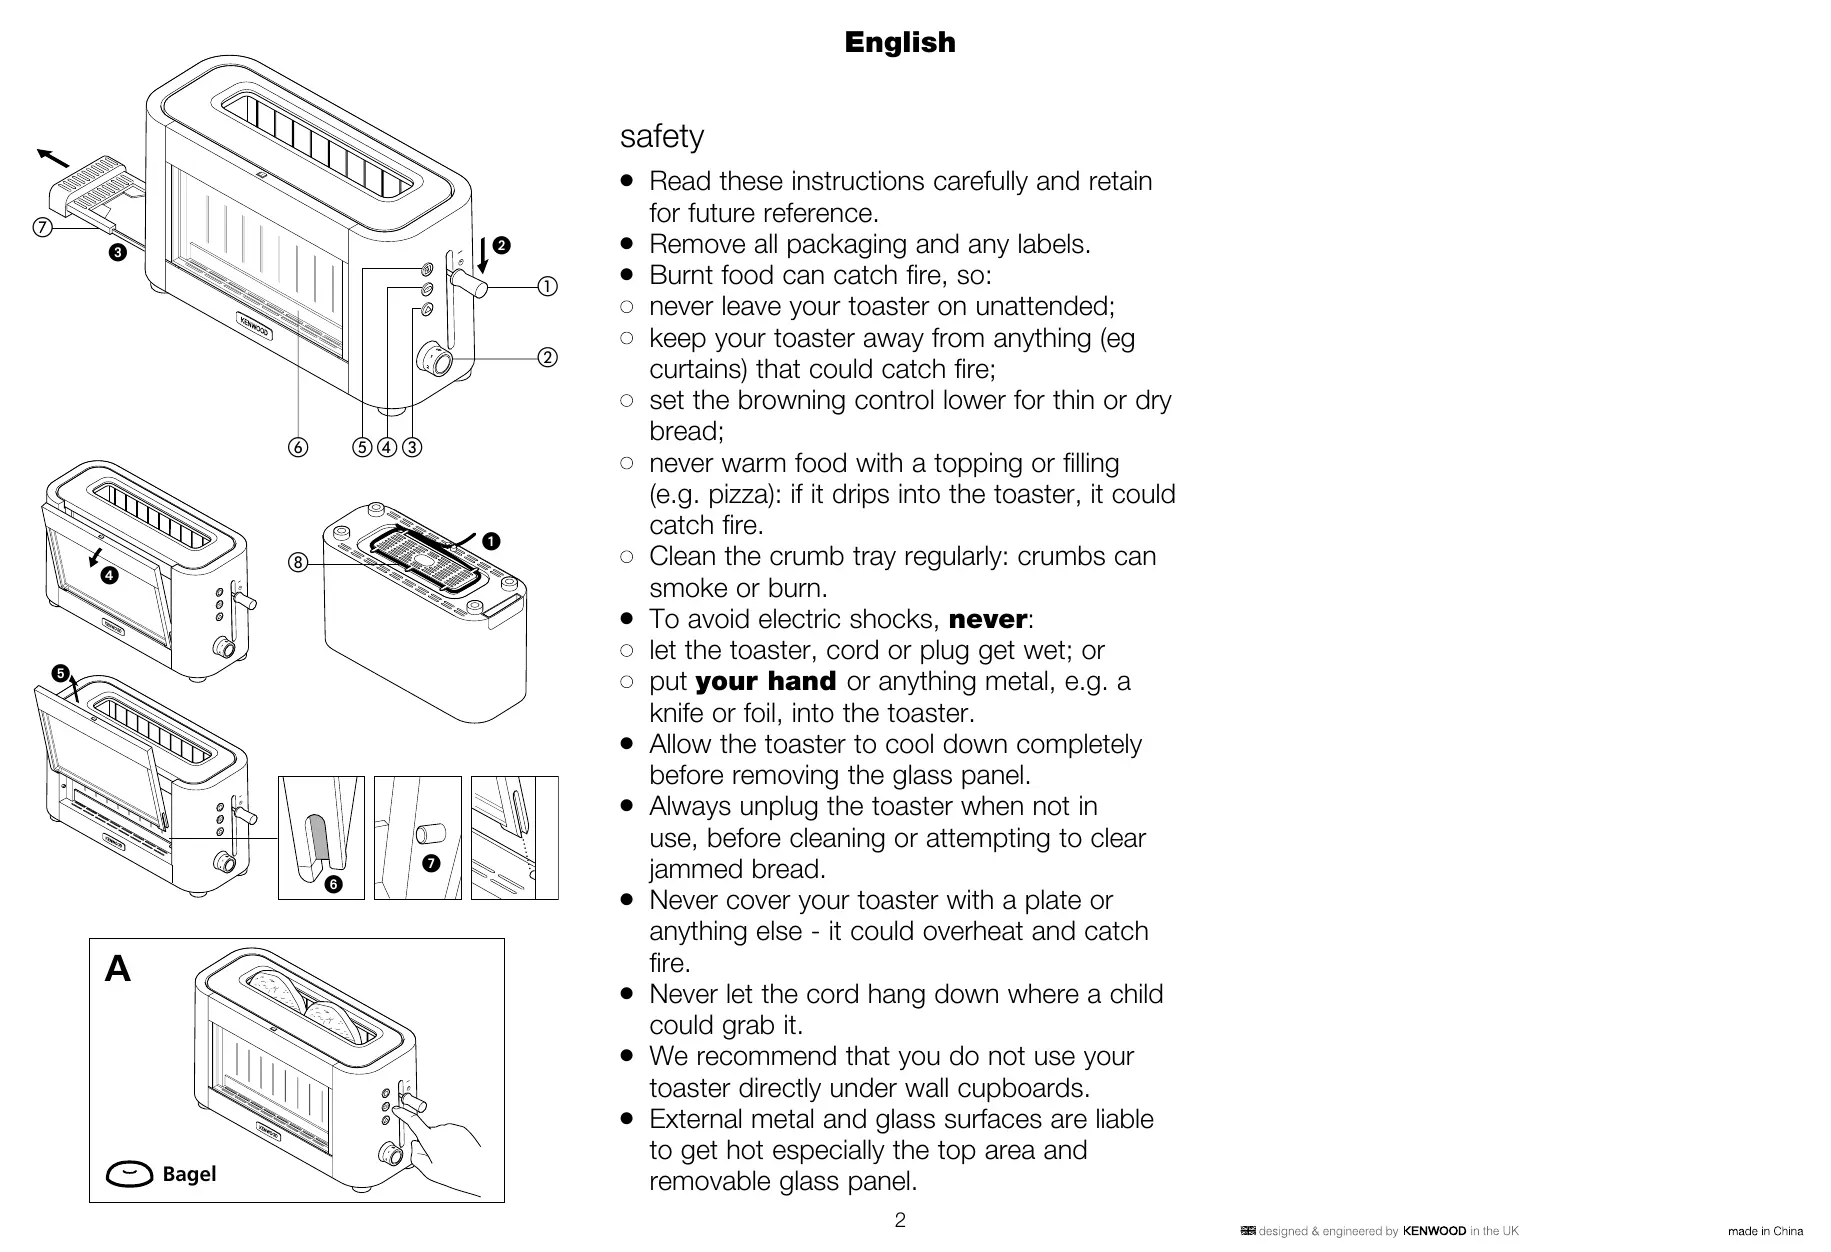
- Read these instructions carefully and retain for future reference.
- Remove all packaging and any labels.
- Burnt food can catch fire, so:
never leave your toaster on unattended; - keep your toaster away from anything (eg curtains) that could catch fire;
- set the browning control lower for thin or dry bread;
- never warm food with a topping or filling (e.g. pizza): if it drips into the toaster, it could catch fire.
Clean the crumb tray regularly: crumbs can smoke or burn. - To avoid electric shocks, never:
- let the toaster, cord or plug get wet; or
- put your hand or anything metal, e.g. a knife or foil, into the toaster.
- Allow the toaster to cool down completely before removing the glass panel.
- Always unplug the toaster when not in use, before cleaning or attempting to clear jammed bread.
- Never cover your toaster with a plate or anything else - it could overheat and catch fire.
- Never let the cord hang down where a child could grab it.
- We recommend that you do not use your toaster directly under wall cupboards.
-
External metal and glass surfaces are liable to get hot especially the top area and removable glass panel.
-
Do not touch hot surfaces. Use the handles and knobs.
- Do not move the toaster whilst it is in operation.
- Never use an unauthorised attachment or accessory.
- We do not recommend using the toaster for non bread items. For non bread items that are specifically recommended for use in a toaster follow the manufacturer's guidelines and cooking instructions. Remove loose crumbs and clean the crumb tray before and after use.
- To prevent damage to the glass panel avoid contact with hard surfaces and objects.
- Do not use if the glass panel has been damaged i.e. cracked or chipped.
- Do not invert the toaster or shake it to remove crumb whilst the glass panel is fitted.
- Never use a damaged toaster. Get it checked or repaired: see 'Service & Customer Care'.
- This appliance is not intended to be operated by means of an external timer or separate remote-control system.
- Misuse of your appliance can result in injury.
-
Children from 8 years and above can use, clean and perform user maintenance on this appliance in accordance with the User Instructions provided they are supervised by a person responsible for their safety and have been given instruction concerning the use of the appliance and are aware of the hazards.
-
Persons with reduced physical, sensory or mental capabilities or lack of knowledge using this appliance must have been given supervision or instruction on its safe use and are aware of the hazards.
- Children must not play with the appliance and both appliance and cord must be out of reach of children less than 8 years.
- Wipe the outside of the toaster with a damp cloth, then dry. Do not use abrasives.
- Only use the appliance for its intended domestic use. Kenwood will not accept any liability if the appliance is subject to improper use, or failure to comply with these instructions.
before plugging in
- Make sure your electricity supply is the same as the one shown on the underside of your toaster.
- WARNING: THIS APPLIANCE MUST BE EARTHED.
- This appliance conforms to EC Regulation 1935/2004 on materials and articles intended to come into contact with food.
before using for the first time
- Clip excess cord into the cord storage clips in the base 1.
- Operate the toaster once on a medium setting without bread. (The lever will not stay down unless the toaster is plugged in).
- As with all new heating elements, your toaster may emit a slight burning smell when it is first switched on. This is normal and not a cause for concern.
key
① carriage lever (with 'Hi-RiseTM' for extra lift)
② browning control
③ cancel button with indicator light
④ bagel button with indicator light
⑤ reheat button with indicator light
⑥ removable glass panel
⑦ crumb tray
⑧ cord storage
to use your toaster
1 Plug the toaster into the power supply.
2 Turn the browning control until the desired setting aligns with the line up mark on the body of the toaster. Use a lower setting for light toasting and for thin or dry bread.
3 Insert the bread, muffins, bagels etc.
4 Lower the lever 2 until it locks. (The lever will not stay down unless the toaster is plugged in). The 'cancel' button will illuminate.
- To stop toasting during the cycle, press the 'cancel' button, the toast will pop up and the 'cancel' button light will go off.
5 Your toast will pop up automatically, to raise it higher, lift the lever.

Defrost position
- To defrost frozen bread, select the defrost position on the browning control.

Reheat
- To warm toast that has popped up but gone cold, lower the toast then press the 'reheat' button. The 'reheat' button will illuminate.

Bagel (A)
- To toast bagels the cut face should be facing the front of the toaster. Select the desired browning setting and lower the carriage lever. Press the 'Bagel' button and it will illuminate.
Note: when toasting using the bagel button, the front element will toast with a higher heat than the element at the back of the toaster. This will result in only one side of the item being toasted.
hintson using yourtoaster
- Select a lower setting for light browning or for dry bread.
- When toasting a single slice of bread, you may notice a variation in toast colour from one side to the other - this is normal.
- Dry/stale bread toasts more quickly than fresh bread and thinly sliced bread toasts more quickly than thickly sliced bread. Therefore the browning control should be set at a lower setting than usual.
- For best results ensure that the bread slices are of an even thickness, freshness and size.
- In order to achieve uniform browning we recommend you wait a minimum of 30 seconds between each toasting so that the control can automatically reset.
Alternatively select a lower setting when additional toasting is carried out.
care and cleaning
1 Before cleaning, unplug your toaster and let it cool down.
2 Wipe the outside of the toaster with a damp cloth, then dry. Do not use abrasives.
crumb tray
- Slide out the crumb tray ③. Clean, then replace. Do this regularly: crumbs can smoke or even burn.
- Do not dishwash the crumb tray.
glass panel
- Remove the glass panel for cleaning by opening forward 4 and lift off 5. Wipe with a damp cloth and dry.
- Replace the panel by aligning the slots ⑥ on the side of the panel with the hinge pins ⑦ and close. Note: the toaster will not operate if the glass panel is not fitted and locked correctly.
- Do not dishwash or immerse the glass panel in water.
heating tubes
- Do not touch or wipe the heating tubes as this will damage them.
- Any loose crumbs found under the heating tube should be cleared by remove the glass panel and gently shaking the toaster to allow them to drop into the crumb tray.
service & customer care
- If the cord is damaged it must, for safety reasons, be replaced by KENWOOD or an authorised KENWOOD repairer.
- If you experience any problems with the operation of your appliance, before requesting assistance refer to the "troubleshooting guide" section in the manual or visit www.kenwoodworld.com.
- Please note that your product is covered by a warranty, which complies with all legal provisions concerning any existing warranty and consumer rights in the country where the product was purchased.
- If your Kenwood product malfunctions or you find any defects, please send it or bring it to an authorised KENWOOD Service Centre. To find up to date details of your nearest authorised KENWOOD Service centre visit www.kenwoodworld.com or the website specific to your Country.
- Designed and engineered by Kenwood in the UK.
Made in China.
IMPORTANT INFORMATION FOR CORRECT DISPOSAL OF THE PRODUCT IN ACCORDANCE WITH THE EUROPEAN DIRECTIVE ON WASTE ELECTRICAL AND ELECTRONIC EQUIPMENT (WEEE)
At the end of its working life, the product must not be disposed of as urban waste.
It must be taken to a special local authority differentiated waste collection centre or to a dealer providing this service.
Disposing of a household appliance separately avoids possible negative consequences for the environment and health deriving from inappropriate disposal and enables the constituent materials to be recovered to obtain significant savings in energy and resources. As a reminder of the need to dispose of household appliances separately, the product is marked with a crossed-out wheeled dustbin.
troubleshooting guide
| Problem | Cause | Solution |
| Toaster does not operate. | No power. Glass panel not fitted or closed correctly. | Check toaster is plugged in. Check glass panel is locked into position. |
| Carriage lever not staying down. | Toaster not plugged in. | The lever will not stay down unless the toaster is plugged in. |
| Uneven Browning. | 1 Slice of bread being toasted. Bread slices of different size, freshness or thickness being toasted at same time. | For best results ensure that the bread slices are of an even thickness, freshness and size. In order to achieve uniform browning we recommend you wait a minimum of 30 seconds between each toasting so that the control can automatically reset. Alternatively select a lower setting when additional toasting is carried out. |
| Toast colour too light or too dark. | Wrong browning setting used. | Select a higher or lower browning setting. Refer to “hint” section. |
| Burning smell or smoke from slots. | Crumb tray full. Food particles stuck to element or loose in toasting slots. | Unplug before checking the slots. Remove any loose food particles. Remove and clean the crumb tray. |
| Vertical white lines on front face of toast. | Bread coming into contact with the side of the toaster. This is more likely to occur with thicker slices of bread. | Normal operation. |
| Heating tube dimmed in centre of tube. | The elements have been adjusted to optimise the heat distribution resulting in the centre area looking less bright. | Normal operation. |
| If none of the above see “Service & Customer Care”. | ||
Nederland
WAARSCHUWING: DIT APPARAAT MOET GEAARD ZIJN.
- To warm toast that has popped up but gone cold, lower the toast then press the 'reheat' button. The 'reheat' button will illuminate.

Baget (A)
IooNPiHnTuNoBnue,PiHIMtB Baxijb.
PonoxeHHn po3mOpoxyBaHHn
He MnTe i He 3aHpyoTe cKJIaHy naHb y BODy.
Harpibaibhi Tpy6kn
- He Topkaɪteča i He Bntɪpaɪte HarpiBɑnblhɪ Tpy6kɪ, Ockɪbʌkɪ Ze Moʊke nɒшkɔdɪtɪn IX.
- Byd-aki Kpxxtn, kri 3haxoTbCn iN HarpibalbHOIO Tpy6koH No6xIDNo BndaIHTn, DnA cyboro 3HIMtB CkJHy naHeNb i o6epexHo CTpyuWte TocTe, Uo6 BOHn Bnnapn B ILOTOK dnn Kpxxt.
O6cnyroByBaHnTa peMOHT
-ПошкдженишуржИВЛЕнгЯ
i3 MeToI6be3neKni piДяг
ЗamHi Na NiДпрсмCTbax
фipMn KENWOOD a6o B
aВТориЗовamy cepBICHOMy
цentpi KENWOOD.
- YksoB poboti npnady BHNKm6bIy-bI KHeNoIaIKN, nepe3 3BepHEnHm Do cIykbN NiITPMKn IPOuHTaTe po3dIn «UcyHHeH HeCnpabHocTeB» B CbOmy nociBHy a6o 3auiTb Ha caT www.kenwoodworld.com.
- Pam'yaTae, 10 Ha npilaanpownpOeTbCra pAHTi, 10 BiDnOBiJaE BCIM 3aKOHnMnONOXeHHa MIOo iChyUOJI rapaHTI Ta npab cnoXnBaaB Tii KpaHl, De npilaad 6yB npd6aHn.
-При ВИннКненHi HecnPapBnOCTi Bpo6oti npinady Kenwood a6o npin BnBnJIeHHi 6ybIb- kAnx DeΦeKtIb, 6ydI naCa, NaIIuJITb a6o npInHeCtIb npinad B aBTOpI3OBaHn cepBicHni ceHTp KENWOOD.AkTyaJIbHi KOHTaKTHi DaHI cepBichNx cHTpIB KENWOOD Bu 3naIdeTe Ha caTl www.kenwoodworld.com a6o Ha caTl dIra BaIoI KpaIHn.
CnpoeKToBaHo Ta po3pObeNo KOMnHaHcEO Kenwood, O6'EdHaHe KopoJIbCTBO.
3po6neHO B Kntai.
BAKJIIBA IHΦOPMAIJI CTOCOBHO HAIJEXHOOI YTNJI3AUJII PPOJyKTU 3ΓIHO I3 ДИPEKTOBOIO IPO YTNJI3AUJIIO EJEKTPNUHORO TA EJEKTPOHNO OBJAADHAHHA (WEEE)
Iicnna3akHcHnTepmHy ekcnnyataaJI He BnndaTe cei npnla3 iHnMMn N6yToBmN BiXoamn.
BIDnecitbpnnaDIOmcueboRO cneuaIbHoro aBTOpN3OBAHO rIeHTpy 3bnpaHnBaIXxOJDABo Do dInpepa, knn MoKe HaadTn Taki nocnyr.
BidokpemnaHa ytni3aia
nobyTOBnX npnndiB Do3B0nJe
yHNKHTM MOxNIBNX HeRaTNBHX
HacniKbI DnA HABKOINHbOro
cepeoBOuTa Ta 3doOp8' IIOHN,
kAi BnHKnKaIOb y pa3i HenpabNtboHoi
ytni3aui, a TAKOX Hadae
MOxNBIcTB nepeo6bTu MATEpiAni,
3 kNx 6yNo BnROTOBNeHO daHNI
npnad, 10, B CBOU Yepry, 36epira
eheprio Ta iHsi BaxNbi pecypcn.
Ipo HeobXdHicTB BiOKpemHeoi
ytni3aui nobyTOBnx npnndiB
Harady cnejaiNbHa No3NaCa Ha
npodKyt y BnIJI pepeKpcneHoro
cmITHNKy Ha KOncax.
a aall aalll gaaallaalagao 1 aaii iiai iin aaii iaii iaii iaii iaii iaii iaii iaii iaii iaii (WEEE)
jglll jglll jglll jglll jglll jglll jglll jglll jglll jglll jglll jglll jglll jglll jglll jglll jglll jglll jglll jglll jglll jglll jglll jglll jglll jglll jglll jglll jglll jglll jglll jglll jglll jglll jogl lgl lgl lgl lgl lgl lgl lgl lgl lgl lgl lgl lgl lgl lgl lgl lgl lgl lgl lgl lgl lgl lgl lgl lgl lgl lgl lgl lgl lgl lgl lgl lgl lgl lgl lgl lgl lgl lgl lgl lgl lgl lgl lgl lgl lgl lgl lgl lgl lgl lgl lgtg
Xoell
y j 1
J
J
J
J
J
J
J
J
J
J
J
J
J
J
J
J
J
J
J
J
J
J
J
J
J
J
J
J
J
J
J
J
J
J
J
J
J
J
J
J
J
J
J
J
J
J
J
J
J
J
KENWOOD .KENWOOD
Jiai iaiiaikai jia jao yao Jia 1
jiaiuiuil Jua Jia jia jia Jia
Jiaiuiuil Jua Jia jia jia Jia
. www.kenwoodworld.com Jg 1Jg jj 1a 11 11 11 11 11 11 11 11 11 11 11 11 11 11 11 11 11 11 11 11 11 11 11 11 11 11 1
Jen Kenwood Jnn Jn nn Jn Jn Jn Jn Jn Jn Jn Jn Jn Jn Jn Jn Jn Jn Jn Jn Jn Jn Jn Jn Jn Jn Jn Jn Jn Jn Jn Jn Jn Jn Jn Jn Jn Jn Jn Jn Jn Jn Jn Jn Jn Jn Jn Jn Jn Jn Jn Jn Jn Jn J. KENWOOD
Jnn nn nn nn nn nn nn nn nn nn nn nn nn nn nn nn nn nn nn nn nn nn nn nn nn nn nn nn nn nn nn nn nn nn nn nn nn nn nn nn nn nn nn nn nn nn nn nn nn nn nn nn nn nn nn nn nn nn nn nn nn nn nn nn nn nn nn nn nn nn nn nn nn nn nn nn nn nn nn nn nn nn nn nn nn nn nn nn nn nn nn nn nn nn nn nn nn nn nn nn nnnnnnnnnnnnnnnnnnnnnnnnnnnnnnnnnnnnnnnnnnnnnnnnnnnnnnnnnnnnnnnnnnnnnnnnnnnnnnnnnnnnnnnnnnnnnnnnnnnnnnnnnnnnnnnnnnnnnnnnnnnnnnnnnnnnnnnnnnnnnnnnn
Kenwood
.
a bllg liell
jie jiai l aao yai jil 1
yai sl k jg jil jil jil
jiall iianol jil chwll gao
yao jia jia jia jia jia jia jia jia jia jia jia jia jia jia jia jia jia jia jia jia jia jia jia jia jia jia jia jia jia jia jia jia jia jia jia jia jia jia jia jia jia jia
i 3 15
i 15
ii 15
ii 15
ii 15
ii 15
jll jll
i jll jll jll jll jll jll jll jll jll jll jll jll jll jll jll jll jll jll jll jll jll jll jll jll jll jll jll jll jll jll jll jll jll jll jll jll jll jll jll jll jll jll jll jll jll jll jll jll jll jll jill jll jll jll jll jll jll jll jll jll jll jll jll jll jll jll jll jll jll jll jll jll jll jll jll jll jll jll jll jll jll jll jll jll jll jll jll jll jll jll jll jll jll jll jll
Jn
Jnn Jn Jn Jn Jn Jn Jn Jn Jn Jn Jn Jn Jn Jn Jn Jn Jn Jn Jn Jn Jn Jn Jn Jn Jn Jn Jn Jn Jn Jn Jn Jn Jn Jn Jn Jn Jn Jn Jn Jn Jn Jn Jn Jn Jn Jn Jn Jn Jn Jn Jn J.
aJrJrJrJrJrJrJrJrJrJrJrJrJrJrJrJrJrJrJrJrJrJrJrJrJrJrJrJrJrJrJrJrJrJrJrJrJrJrJrJrJr
1
jz jz jz jz jz jz jz jz jz jz jz jz jz jz jz jz jz jz jz jz jz jz jz jz jz jz jz jz jz jz jz jz jz jz jz jz jz jz jz jz jz jz jz jz jz jz jz jz jz jz jz
1
jill 1000
i 1
j 1000000000000000000000000000000000000000000000000000
a a a a a a a a a a a a a a a a a a a a a a a a a a a a a a a a a a a a a a a a a a a a a a a a a a a a a aaa
JgSjgl jlll Jg 100000000000000000000000000000000000000000000000000000000000000000000
g jyj yj yj yj yj yj yj yj yj yj yj yj yj yj yj yj yj yj yj yj yj yj yj yj yj yj yj yj yj yj yj yj yj yj yj yj yj yj yj yj yj yj yj yj yj yj yj yj yj yj yj
a
jlll lssw ygog
1
y
j1
1
JgIe 1
J 1
a a
.
a
Kenwood Jnnn nn nnnnnnnnnnnnnnnnnnnnnnnnnnnnnnnnnnnnnnnnnnnnnnnnnnnnnnnnnnnnnnnnnnnnnnnnnnnnnnnnnnnnnnnnnnnnnnnnnnnnnnnnn
a
.
"Hi-RiseTM" (a) j ①
()
aannnnnnae
(20 ③
g j ④
j#s# j#o #j#
jll jla jz ⑥
a#
111 8
jill 1000 pJ
1
S = 24 < 11
gnnnll gnnnll 1
oolll co jilai buiy jlll
Gaaai. aasall puele dssgal
j j j j j j j j j j j j j j j
4a 2
()j()
Jusjy Pn Looiaaiei
()
"Cancel" jj j
y
(cill)“Cancel”
aall joo aalj jai
(1)“Cancel”
y
dall
gall
jlll jgsj
Jlalil 1aai jg jll lgl g
2004/1935
aal 1 a aalal
yj 1 j 1
L
aee aee
1 4
10
().j
100 100
Jill Jaaa Jaaa Jaaa Jaaa
jai a aaoa jae yaa
$$ \left. \right.\left. \right.\left. \right.\left. \right.\left.\left.\left.\left.\left.\left.\left.\left.\left.\left.\left.\left.\left.\left.\left.\left.\left.\left.\left.\left.\left.\left.\left.\left.\left.\left.\left.\left.\left.\left.\right.\right.\right.\right.\right.\right.\right.\right.\right.\right.\right.\right.\right.\right.\right.\right.\right.\right.\right.\right.\right.\right.\right.\right.\right.\right.\right.\right.\right.\right. $$
$$ \left. \right.\left. \right.\left. \right.\left.\left.\left.\left.\left.\left.\left.\left.\left.\left.\left.\left.\left.\left.\left.\left.\left.\left.\left.\left.\left.\left.\left.\left.\left.\left.\left.\left.\left.\left.\left.\right.\right.\right.\right.\right.\right.\right.\right.\right.\right.\right.\right.\right.\right.\right.\right.\right.\right.\right.\right.\right.\right.\right.\right.\right.\right.\right.\right.\right.\right.\right. $$
$$ \cdot \mathcal {S} \vdash \vdash j $$
$$ \therefore \text {l a l l} \quad \text {g o d i v i a l}. \quad \text {a d} \quad \text {l a l l} \quad \text {c h a r g e} \quad \text {g o d i v i a l}. $$
$$ \therefore \mathrm {L} = \mathrm {L} _ {\mathrm {g}} $$
$$ . \downarrow \downarrow \downarrow \downarrow \downarrow \downarrow \downarrow \downarrow \downarrow \downarrow \downarrow \downarrow \downarrow \downarrow \downarrow $$
$$ \therefore \lim _ {x \to 0} \frac {\sin {x}}{x} = \frac {\sin {x}}{2 x + 1} $$
$$ \therefore \dot {z} \dot {z} \dot {z} \dot {z} \dot {z} \dot {z} \dot {z} \dot {z} \dot {z} \dot {z} \dot {z} \dot {z} \dot {z} \dot {z} \dot {z} \dot {z} \dot {z} $$
$$ \begin{array}{l} \text {d i s t a n t} \ \text {d i s t a n t} \ \text {d i s t a n t} \ \text {d i s t a n t} \ \text {d i s t a n t} \ \text {d i s t a n t} \ \text {d i s t a n t} \ \text {d i s t a n t} \ \text {d i s t a n t} \ \text {f o r} \end{array} $$
$$ \begin{array}{l} \text {i d} \left| \right| \text {i d} \left| \right| \text {i d} \left| \right| \text {i d} \left| \right| \text {i d} \left| \right| \text {i d} \left| \right| \text {i d} \left| \right| \text {i d} \left| \right| \text {i d} \left| \right| \text {o u t} \end{array} $$
$$ \begin{array}{l} \text {a l l} \ \text {a l l} \ \text {a l l} \ \text {a l l} \ \text {a l l} \ \text {a l l} \ \text {a l l} \ \text {a l l} \ \text {a l l} \ \text {a l l} \ \text {a l l} \ \text {a l l} \ \text {a l l} \ \text {b i j .} \ \text {b i j .} \ \text {b i j .} \ \text {b i j .} \ \text {b i j .} \ \text {b i j .} \ \text {b i j .} \ \text {b i j .} \ \text {b i j .} \ \text {b i j .} \ \text {b i j .} \ \text {b i j .}. \end{array} $$
$$ \begin{array}{l} \text {d e g u l a r} \ \text {g r a d i a t i o n} \ \text {e x a c t i o n} \ \text {a b s i l o n} \ \text {j i d e n t} \ \text {c l a s s i o n} \ \text {g r a d i a t i o n} \ \text {f i g u r a t i o n} \ \text {i n t e r n a t i o n} \ \text {s y m b o l {t h e t a}} \ \text {f i g u r a t i o n} \ \text {f i g u r a t i o n} \ \text {f i g u r a t i o n} \ \text {f i g u r a t i o n} \ \text {f i g u r a t i o n} \ \text {f i g u r a t i o n} \ \text {f i g u r a t i o n} \ \text {f i g u r A l l} \ \text {f i g u r a t i o n} \ \text {f i g u r a t i o n} \ \text {f i g u r a t i o n} \ \text {f i g u r a t i o n} \ \text {f i g u r a t i o n} \ \text {f i g u r a t i o n} \ \text {f i g ur a t i o n} \ \text {f i g u r a t i o n} \ \text {f i g u r a t i o n} \ \text {f i g u r a t i o n} \ \text {f i g u r a t i o n} \ \text {f i g u r a t i o n} \ \text {f i g u r a t i o n} \ \text {\mathrm {f i g u r a t i o n}} \ \text {f i g u r a t i o n} \ \text {f i g u r a t i o n} \ \text {f i g u r a t i o n} \ \text {f i g u r a t i o n} \ \text {f i g u r a t i o n} \ \text {f i g u r a t i o n} \ \text {f i g ur e l e f t} \ \text {f i g u r e l e f t} \ \text {f i g u r e l e f t} \ \text {f i g u r e l e f t} \ \text {f i g u r e l e f t} \ \text {f i g u r e l e f t} \ \text {f i g u r e l e f t} \ \text {f i g u r e l e f t} \ \text {\mathrm {f i g u r e l e f t}} \ \text {\mathrm {f i g u r e l e f t}} \ \text {\mathrm {f i g u r e l e f t}} \ \text {\mathrm {f i g u r e l e f t}} \ \text {\mathrm {f i g u r e l e f t}} \ \text {\mathrm {f i g u r e l e f t}} \ \text {\mathrm {f i g u r e l e l e f t}} \ \text {\mathrm {f i g u r e l e l e f t}} \ \text {\mathrm {f i g u r e l e l e f t}} \ \text {\mathrm {f i g u r e l e l e f t}} \ \text {\mathrm {f i g u r e l e l e f t}} \ \text {\mathrm {f i g u r e l e l e f f}} \ \text {\mathrm {f i g u r e l e l e f f}} \ \text {\mathrm {f i g u r e l e l e f f}} \ \text {\mathrm {f i g u r e l e l e f f}} \ \text {\mathrm {f i g u r e l e l e f f}} \ \text {\mathrm {f i g u r e l e l e f f}} \ \text {f i g u r a t i o n} \ \text {\mathrm {f i g u r a t i o n}} \ \text {\mathrm {f i g u r a t i o n}} \ \text {\mathrm {f i g u r a t i o n}} \ \text {\mathrm {f i g u r a t i o n}} \ \text {\mathrm {f i g u r a t i o n}} \ \text {\mathrm {f i g u r a t i o n}} \ \text {\mathrm {f i g u r a t i 0 n}} \ \text {\mathrm {f i g u r a t i 0 n}} \ \text {\mathrm {f i g u r a t i 0 n}} \ \text {\mathrm {f i g u r a t i 0 n}} \ \text {\mathrm {f i g u r a t i 0 n}} \ \text {\mathrm {f i g u r a t i 0 n}} \ \text {\mathrm {f}} ^ {\prime} ^ {\prime} ^ {\prime} ^ {\prime} ^ {\prime} ^ {\prime} ^ {\prime} ^ {\prime} ^ {\prime} ^ {\prime} ^ {\prime} ^ {\prime} ^ {\prime} ^ {\prime} ^ {\prime} ^ {\prime} ^ {\prime} ^ {\prime} ^ {\prime} ^ {\prime} ^ {\prime} ^ {\prime} ^ {\prime} ^ {\prime} ^ {\prime} ^ {\prime} $$
$$ \cdot p | \dot {a} \dot {a} \dot {a} \dot {a} $$
$$ \left. \frac {1}{2} \frac {1}{2} \frac {1}{2} \frac {1}{2} \frac {1}{2} \frac {1}{2} \frac {1}{2} \frac {1}{2} \frac {1}{2} \frac {1}{2} \frac {1}{2} \frac {1}{2} \frac {1}{2} \frac {1}{2} \frac {1}{2} \right] $$
$$ \therefore \Delta L = \Delta L _ {1} = \Delta L _ {2} = \dots = \Delta L _ {g} $$
$$ \mathrm {J} _ {\mathrm {s}} \mathrm {s} _ {\mathrm {c}} \mathrm {d} _ {\mathrm {t}} \mathrm {d} _ {\mathrm {l}} \mathrm {d} _ {\mathrm {g}} \mathrm {d} _ {\mathrm {j}} \mathrm {d} _ {\mathrm {i}} \mathrm {d} _ {\mathrm {f}} \mathrm {d} _ {\mathrm {o}} \mathrm {d} _ {\mathrm {o}} \mathrm {d} _ {\mathrm {o}} \mathrm {d} _ {\mathrm {o}} $$
$$ . \circ r e s t i n g $$
$$ j _ {i} \dots j _ {1} \dots j _ {0} \dots j _ {2} \dots j _ {3} \dots j _ {4} \dots j _ {5} \dots j _ {6} \dots j _ {7} \dots j _ {8} \dots j _ {9} \dots j _ {1 0} \dots j _ {1 1} \dots j _ {1 2} \dots j _ {1 3} \dots j _ {1 4} \dots j _ {1 5} \dots j _ {1 6} \dots j _ {1 7} $$
$$ \therefore \mathrm {g} _ {\mathrm {i}} = \mathrm {j} _ {\mathrm {i}} \mathrm {c o n s t a n t i v e} \quad \mathrm {g} _ {\mathrm {j}} = \mathrm {k} _ {\mathrm {j}} $$
$$ j _ {i} \dot {s} _ {i} \dot {s} _ {i} \dot {s} _ {i} \dot {s} _ {i} j _ {i} \dot {s} _ {i} \dot {s} _ {i} \dot {s} _ {i} \dot {s} _ {i} j _ {i} \dot {s} _ {i} $$
$$ \left| \begin{array}{l l l l l l} \frac {1}{2} & \frac {1}{2} & \frac {1}{2} & \frac {1}{2} & \frac {1}{2} & \frac {1}{2} \ 0 & 0 & 0 & 0 & 0 & 0 \end{array} \right| $$
$$ \therefore \text {d e l l} \text {a l c r o w} \text {a l c r o w} \text {a l c r o w} \text {a l c r o w} $$
$$ \dots \dots \dots \dots \dots \dots \dots \dots \dots \dots \dots \dots \dots \dots \dots \dots \dots \dots \dots $$
$$ \therefore \lim _ {y \to 0} \frac {\sin {y}}{y} = \frac {1}{2} $$
$$ \therefore \text {l} _ {1} \text {l} _ {2} \text {l} _ {3} \text {l} _ {4} \text {l} _ {5} \text {l} _ {6} \text {l} _ {7} \text {l} _ {8} \text {l} _ {9} \text {l} _ {1 0} $$
$$ \log \omega_ {i} \omega_ {j} \wedge \dots \omega_ {n} \omega_ {l} \omega_ {c} \omega_ {d} \dots \omega_ {n} \omega_ {l} \omega_ {c} \dots \omega_ {n} $$
$$ \therefore \lim _ {g \to 0} \frac {\left| g \right|}{\left| g \right|} = \frac {1}{2} $$
$$ \lim _ {n \rightarrow \infty} \frac {\sin n}{n ^ {2}} $$
$$ j _ {i} i _ {j} \dots l _ {i} l _ {j} \dots p _ {i} p _ {j} \dots p _ {i} \dots x _ {i} j c j l _ {i} \dots $$
$$ \left. \frac {1}{2} \frac {1}{2} \frac {1}{2} \frac {1}{2} \frac {1}{2} \frac {1}{2} \frac {1}{2} \frac {1}{2} \frac {1}{2} \frac {1}{2} \frac {1}{2} \frac {1}{2} \frac {1}{2} \frac {1}{2} \frac {1}{2} \right] $$
$$ . d o l \dot {2} \dot {2} \dot {2} \dot {2} $$
Jlll l 1
. iayyall ayiauall lol ayu
.
:
1
(1)
eogall 1c jnnnnaa aagaae
()
a
aalbawll (Jlall Jw wlc 1jull)
1
i 1
:
1 111111111111111
1
J 1
J 1
J 1 J 1 1 1 1 1 1 1 1 1 1 1
J
y
1
yoo