TCM300 - Toaster KENWOOD - Free user manual and instructions
Find the device manual for free TCM300 KENWOOD in PDF.
User questions about TCM300 KENWOOD
0 question about this device. Answer the ones you know or ask your own.
Ask a new question about this device
Download the instructions for your Toaster in PDF format for free! Find your manual TCM300 - KENWOOD and take your electronic device back in hand. On this page are published all the documents necessary for the use of your device. TCM300 by KENWOOD.
USER MANUAL TCM300 KENWOOD
natural_image
Line drawing of a standard 100-wooden toaster with control knobs and a handle (no text or symbols on the device itself)English 2 - 6
Nederlands 7 - 12
Français 13 - 18
Deutsch 19 - 24
Italiano 25 - 30
Português 31 - 36
Español 37 - 42
Dansk 43 - 48
Svenska 49 - 54
Norsk 55 - 60
Suomi 61 - 66
Türkçe 67 - 72
Česky 73 - 78
Magyar 79 - 84
Polski 85 - 91
Ελληνικά 92 - 98
Slovenčina 99 - 104
HEAD OFFICE: Kenwood Limited, 1-3 Kenwood Business Park, New Lane, Howard, Hampshire POG 2NH
kenwoodworld.com
© Kenwood Ltd 2017
KENWOOD
CREATE MORE
135268/7

text_image
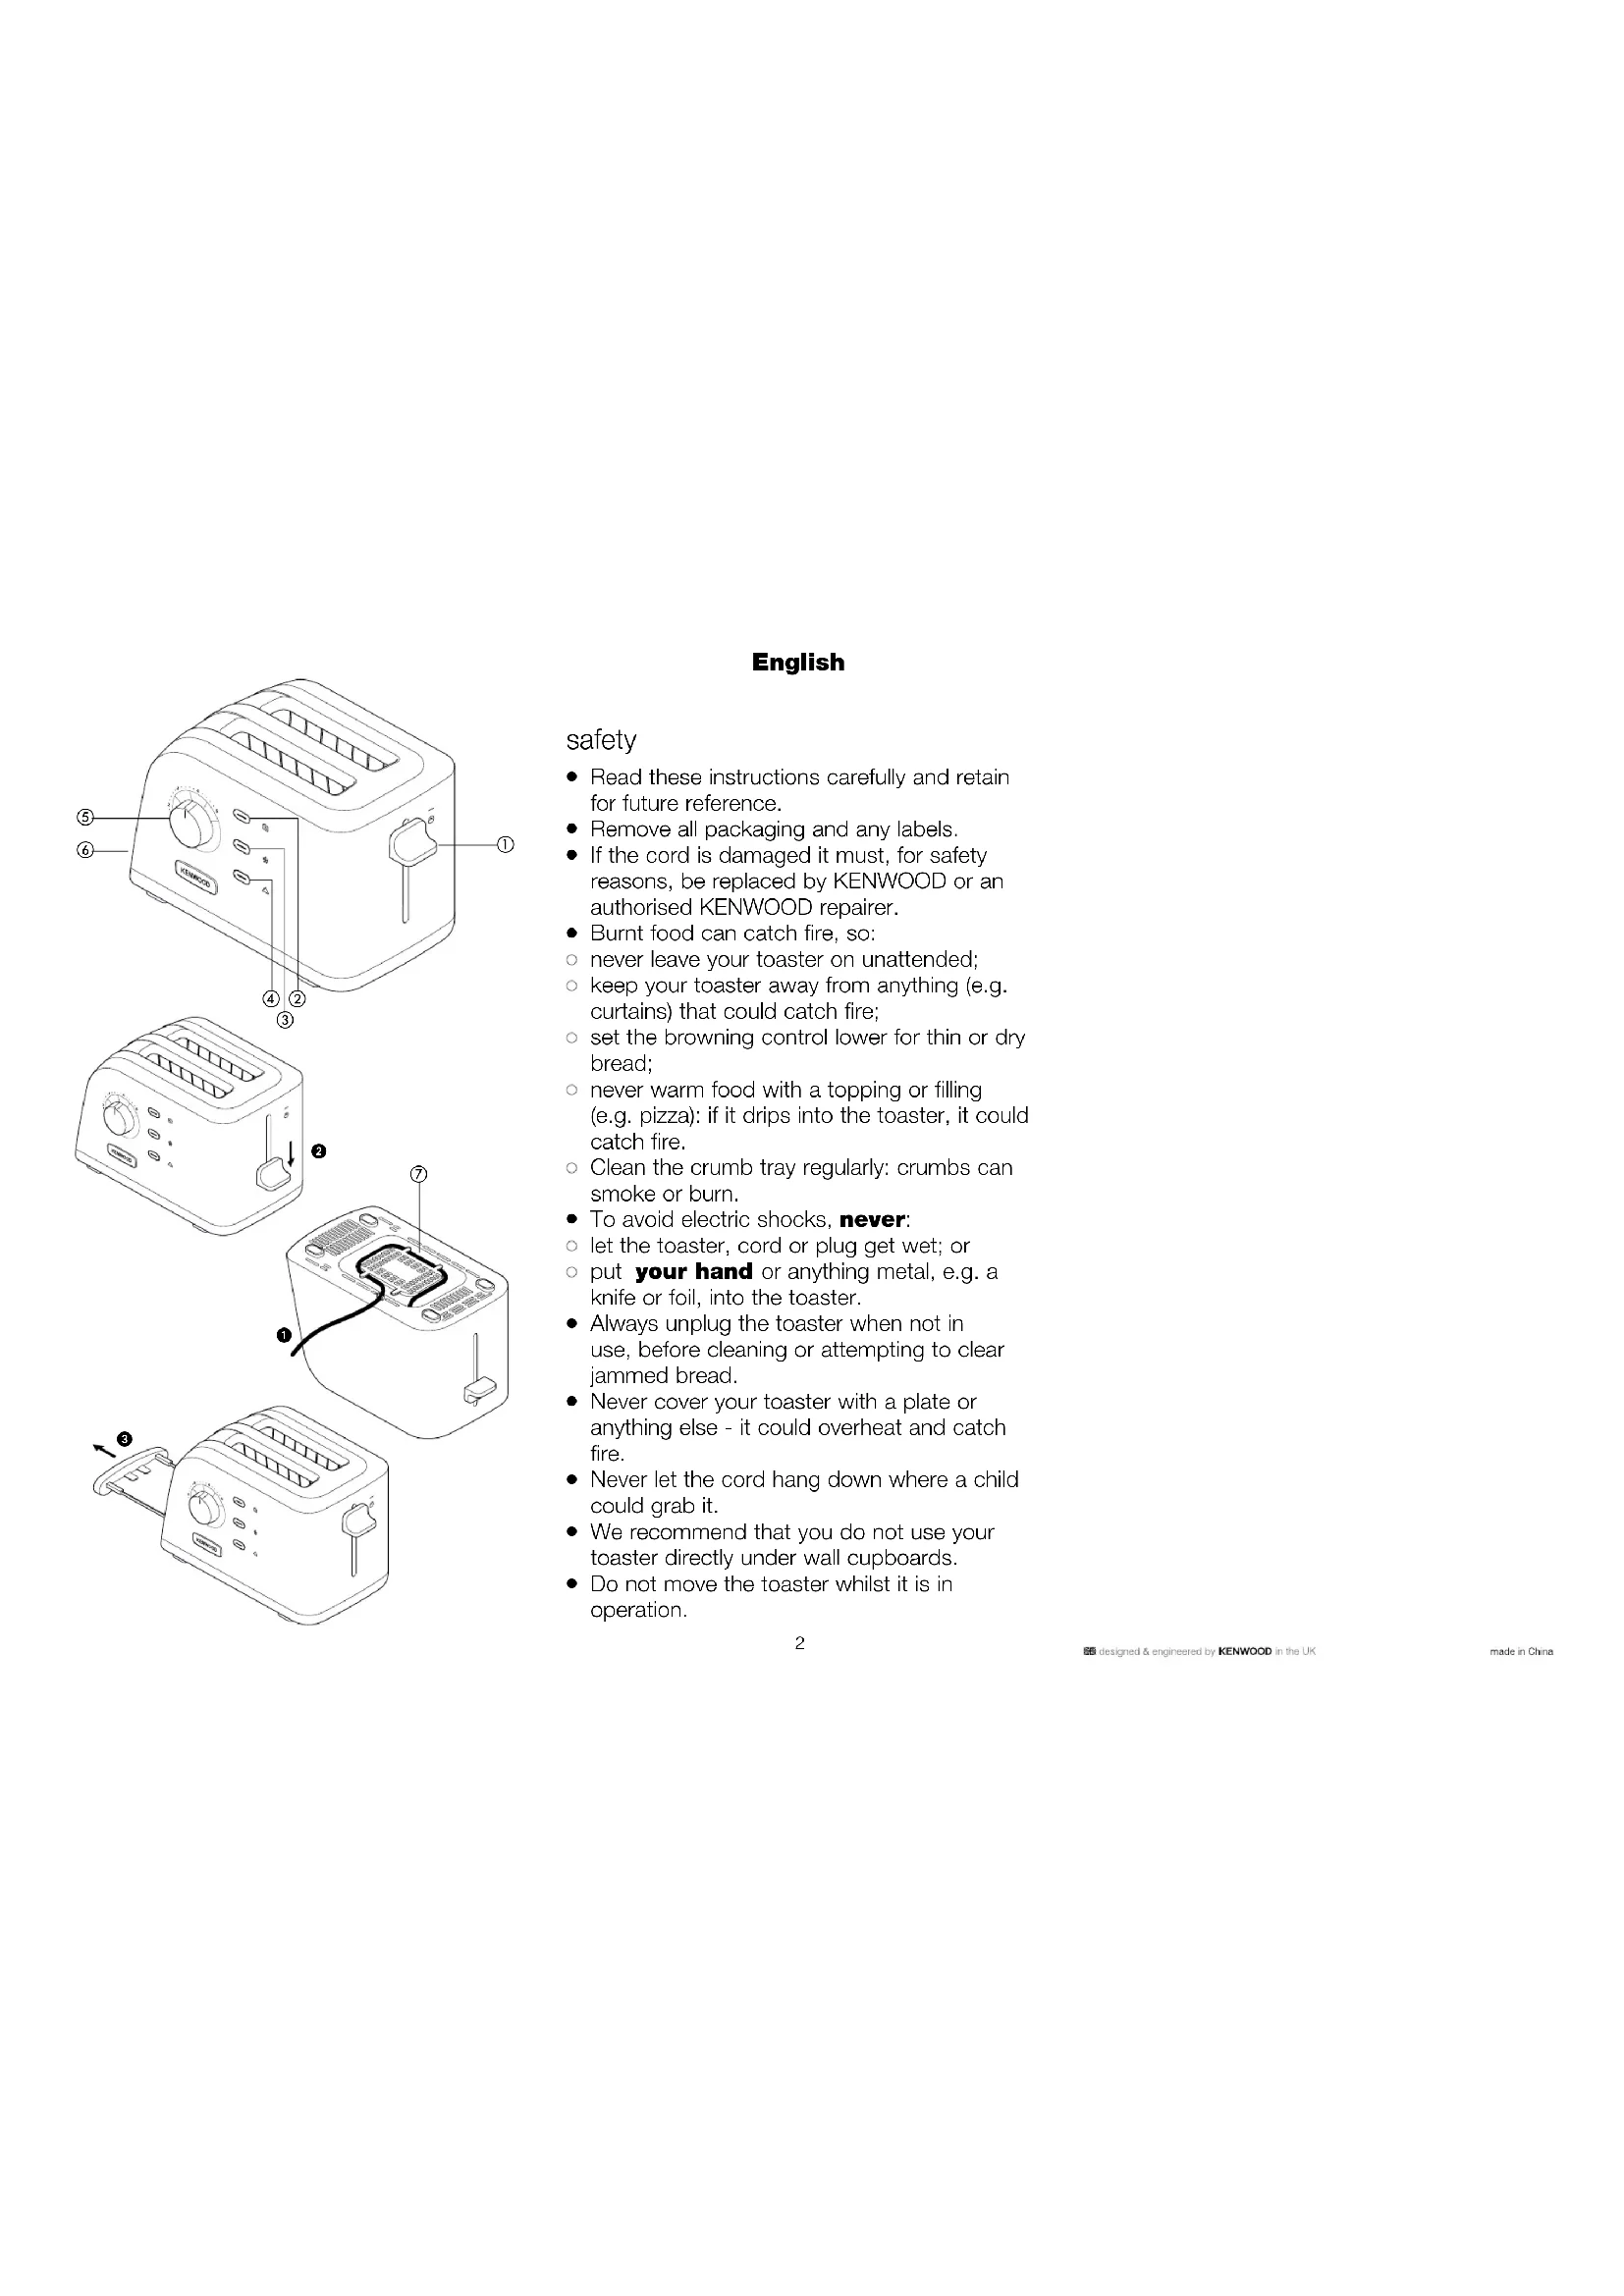
Technical diagram showing exploded view of a toaster with numbered parts for identification and assembly.English
safety
- Read these instructions carefully and retain for future reference.
- Remove all packaging and any labels.
- If the cord is damaged it must, for safety reasons, be replaced by KENWOOD or an authorised KENWOOD repairer.
- Burnt food can catch fire, so:
- never leave your toaster on unattended;
- keep your toaster away from anything (e.g. curtains) that could catch fire;
- set the browning control lower for thin or dry bread;
- never warm food with a topping or filling (e.g. pizza): if it drips into the toaster, it could catch fire.
- Clean the crumb tray regularly: crumbs can smoke or burn.
• To avoid electric shocks, never: - let the toaster, cord or plug get wet; or
- put your hand or anything metal, e.g. a knife or foil, into the toaster.
- Always unplug the toaster when not in use, before cleaning or attempting to clear jammed bread.
- Never cover your toaster with a plate or anything else - it could overheat and catch fire.
- Never let the cord hang down where a child could grab it.
- We recommend that you do not use your toaster directly under wall cupboards.
- Do not move the toaster whilst it is in operation.
- External metal surfaces are liable to get hot especially the top area.
- Never use an unauthorised attachment or accessory.
- We do not recommend using the toaster for non bread items. For non bread items that are specifically recommended for use in a toaster follow the manufacturer's guidelines and cooking instructions. Remove loose crumbs and clean the crumb tray before and after use.
- Never use a damaged toaster. Get it checked or repaired: see ‘Service & Customer Care’.
- This appliance is not intended to be operated by means of an external timer or separate remote-control system.
- Misuse of your appliance can result in injury.
- Children from 8 years and above can use, clean and perform user maintenance on this appliance in accordance with the User Instructions provided they are supervised by a person responsible for their safety and have been given instruction concerning the use of the appliance and are aware of the hazards.
- Persons with reduced physical, sensory or mental capabilities or lack of knowledge using this appliance must have been given supervision or instruction on its safe use and are aware of the hazards.
- Children must not play with the appliance and both appliance and cord must be out of reach of children less than 8 years.
- Wipe the outside of the toaster with a damp cloth, then dry. Do not use abrasives.
- Only use the appliance for its intended domestic use. Kenwood will not accept any liability if the appliance is subject to improper use, or failure to comply with these instructions.
before plugging in
- Make sure your electricity supply is the same as the one shown on the underside of your toaster.
- WARNING: THIS APPLIANCE MUST BE EARTHED.
- This appliance conforms to EC Regulation 1935/2004 on materials and articles intended to come into contact with food.
before using for the first time
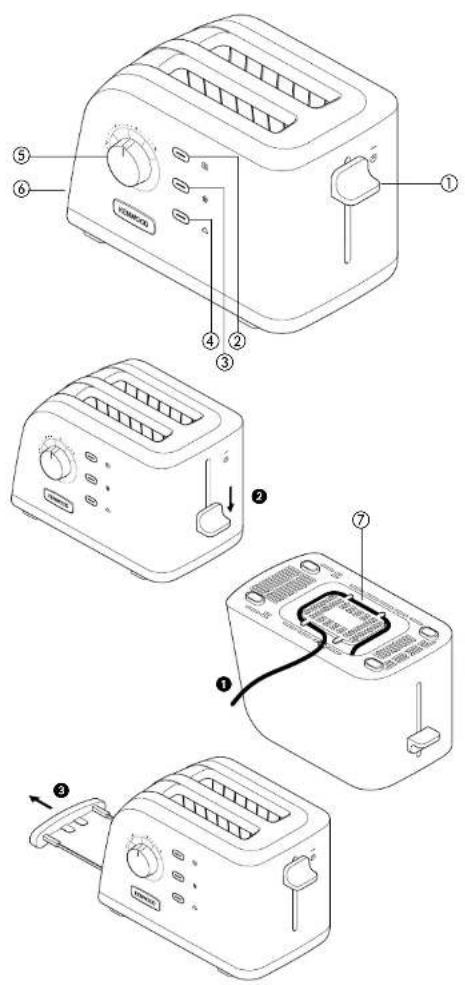
- Clip excess cord into the cord storage clips in the base 1.
- Operate the toaster once on a medium setting without bread. (The lever will not stay down unless the toaster is plugged in).
- As with all new heating elements, your toaster may emit a slight burning smell when it is first switched on. This is normal and not a cause for concern.
key
① carriage lever (with 'Hi-Rise™' for extra lift)
② reheat button with indicator light
③ defrost button with indicator light
④ cancel button with indicator light
⑤ browning control
⑥ crumb tray
⑦ cord storage
to use your toaster
1 Plug the toaster into the power supply.
2 Turn the browning control until the desired setting aligns with the line up mark on the body of the toaster. Use a lower setting for light toasting and for thin or dry bread.
3 Insert the bread, muffins, bagels etc.
4 Lower the lever 2 until it locks. (The lever will not stay down unless the toaster is plugged in).
- The browning control setting lights will illuminate up to the setting selected and gradually go out to show the toasting cycle progress.
- The 'cancel' button will also illuminate.
- The TURBO function is part of the toasting cycle and will automatically start when the carriage lever is lowered and locked.
- To stop toasting during the cycle, press the 'cancel' button, the toast will pop up and the 'cancel' button light will go off.
5 Your toast will pop up automatically, to raise it higher, lift the lever.

Defrost button
- To toast frozen bread - select the desired setting, then lower the bread and press the 'defrost' button. The 'defrost' button will illuminate.

Reheat
- To warm toast that has popped up but gone cold, lower the toast then press the 'reheat' button. The 'reheat' button will illuminate.
hints on using your toaster
- Select a lower setting for light browning or for dry bread.
- When toasting a single slice of bread, you may notice a variation in toast colour from one side to the other - this is normal.
- Dry/stale bread toasts more quickly than fresh bread and thinly sliced bread toasts more quickly than thickly sliced bread. Therefore
the browning control should be set at a lower setting than usual.
- Breads containing fruit or nuts can toast very quickly, use the lowest setting to get the best results.
- For best results ensure that the bread slices are of an even thickness, freshness and size.
- In order to achieve uniform browning we recommend you wait a minimum of 30 seconds between each toasting so that the control can automatically reset. Alternatively select a lower setting when additional toasting is carried out.
care and cleaning
1 Before cleaning, unplug your toaster and let it cool down.
2 Push to release and then slide out the crumb tray ③. Clean, then replace. Do this regularly: crumbs can smoke or even burn. Do not dishwash the crumb tray.
3 Wipe the outside of the toaster with a damp cloth, then dry. Do not use abrasives.
service and customer care
- If you experience any problems with the operation of your appliance, before requesting assistance refer to the “troubleshooting guide” section in the manual or visit www.kenwoodworld.com.
- Please note that your product is covered by a warranty, which complies with all legal provisions concerning any existing warranty and consumer rights in the country where the product was purchased.
- If your Kenwood product malfunctions or you find any defects, please send it or bring it to an authorised KENWOOD Service Centre. To find up to date details of your nearest authorised KENWOOD Service centre visit www.kenwoodworld.com or the website specific to your Country.
- Designed and engineered by Kenwood in the UK.
- Made in China.
IMPORTANT INFORMATION FOR CORRECT DISPOSAL OF THE PRODUCT IN ACCORDANCE WITH THE EUROPEAN DIRECTIVE ON WASTE ELECTRICAL AND ELECTRONIC EQUIPMENT (WEEE)
At the end of its working life, the product must not be disposed of as urban waste.
It must be taken to a special local authority differentiated waste collection centre or to a dealer providing this service.
Disposing of a household appliance separately avoids possible negative consequences for the environment and health deriving from inappropriate disposal and enables the constituent materials to be recovered to obtain significant savings in energy and resources. As a reminder of the need to dispose of household appliances separately, the product is marked with a crossed-out wheeled dustbin.
troubleshooting guide
| Problem Cause Solution | ||
| Toaster does not operate. | No power. Check toaster | is plugged in.Check the fuse/circuit breaker in your home. |
| Carriage lever not staying down | Toaster not plugged in. | The lever will not stay down unless the toaster is plugged in. |
| Uneven Browning. 1 Slice of bread being toasted.Bread slices of different size, freshness or thickness being toasted at same time. | For best results ensure that the bread slices are of an even thickness, freshness and size.In order to achieve uniform browning we recommend you wait a minimum of 30 seconds between each toasting so that the control can automatically reset.Alternatively select a lower setting when additional toasting is carried out. | |
| Toast colour too light or too dark. | Wrong browning setting used. | Select a higher or lower browning setting.Refer to “hint” section. |
| Burning smell or smoke from slots. | Crumb tray full.Food particles stuck to element or loose in toasting slots. | Unplug before checking the slots.Remove any loose food particles.Remove and clean the crumb tray. |
| If none of the above see “Service & Customer Care”. | ||
Nederlands
- WAARSCHUWING: DIT APPARAAT MOET GEAARD ZIJN.