USER MANUAL SAW 5266 SKIL
- This tool is intended for lengthways and crossways cutting of wood with straight cuts as well as angle cuts up to 45^ ; with the appropriate saw blades also non-ferrous metals, light building materials and plastics can be cut
This tool is not intended for professional use
- Read and save this instruction manual ②
TECHNICAL DATA ①
SAFETY
GENERAL SAFETY INSTRUCTIONS
WARNING! Read all safety warnings and all
instructions. Failure to follow the warnings and instructions may result in electric shock, fire and/or serious injury. Save all warnings and instructions for future reference. The term "power tool" in the warnings refers to your mains-operated (corded) power tool or battery-operated (cordless) power tool.
1) WORK AREA SAFETY
2) ELECTRICAL SAFETY
a) Keep work area clean and well lit. Cluttered or dark areas invite accidents.
b) Do not operate power tools in explosive atmospheres, such as in the presence of flammable liquids, gases or dust. Power tools create sparks which may ignite the dust or fumes.
c) Keep children and bystanders away while operating a power tool. Distractions can cause you to lose control.
a) Power tool plugs must match the outlet. Never modify the plug in any way. Do not use any adapter plugs with earthed (grounded) power tools.
Unmodified plugs and matching outlets will reduce risk of electric shock.
b) Avoid body contact with earthed or grounded surfaces such as pipes, radiators, ranges and refrigerators. There is an increased risk of electric shock if your body is earthed or grounded.
c) Do not expose power tools to rain or wet conditions.
Water entering a power tool will increase the risk of electric shock.
d) Do not abuse the cord. Never use the cord for carrying, pulling or unplugging the power tool. Keep cord away from heat, oil, sharp edges or moving parts. Damaged or entangled cords increase the risk of electric shock.
e) When operating a power tool outdoors, use an extension cord suitable for outdoor use. Use of a cord suitable for outdoor use reduces the risk of electric shock.
f) If operating a power tool in a damp location is unavoidable, use an earth leakage circuit breaker. Use of an earth leakage circuit breaker reduces the risk of electric shock.
3) PERSONAL SAFETY
a) Stay alert, watch what you are doing and use common sense when operating a power tool. Do not use a power tool while you are tired or under the influence of drugs, alcohol or medication. A moment of inattention while operating power tools may result in serious personal injury.
b) Use personal protective equipment. Always wear eye protection. Protective equipment such as dust mask, non-skid safety shoes, hard hat, or hearing protection used for appropriate conditions will reduce personal injuries.
c) Prevent unintentional starting. Ensure the switch is in the off-position before connecting to power source and/or battery pack, picking up or carrying the tool. Carrying power tools with your finger on the switch or energising power tools that have the switch on invites accidents.
d) Remove any adjusting key or wrench before turning the power tool on. A wrench or a key left attached to a rotating part of the power tool may result in personal injury.
e) Do not overreach. Keep proper footing and balance at all times. This enables better control of the power tool in unexpected situations.
f) Dress properly. Do not wear loose clothing or jewelry. Keep your hair, clothing and gloves away from moving parts. Loose clothes, jewelry or long hair can be caught in moving parts.
g) If devices are provided for the connection of dust extraction and collection facilities, ensure these are connected and properly used. Use of dust collection can reduce dust-related hazards.
a) Do not force the power tool. Use the correct power tool for your application. The correct power tool will do the job better and safer at the rate for which it was designed.
b) Do not use the power tool if the switch does not turn it on and off. Any power tool that cannot be controlled with the switch is dangerous and must be repaired.
c) Disconnect the plug from the power source and/or the battery pack from the power tool before making any adjustments, changing accessories, or storing power tools. Such preventive safety measures reduce the risk of starting the power tool accidentally.
d) Store idle power tools out of the reach of children and do not allow persons unfamiliar with the power tool or these instructions to operate the power tool. Power tools are dangerous in the hands of untrained users.
e) Maintain power tools. Check for misalignment or binding of moving parts, breakage of parts and any other condition that may affect the power tool's operation. If damaged, have the power tool repaired before use. Many accidents are caused by poorly maintained power tools.
f) Keep cutting tools sharp and clean. Properly maintained cutting tools with sharp cutting edges are less likely to bind and are easier to control.
g) Use the power tool, accessories and tool bits etc., in accordance with these instructions, taking into
account the working conditions and the work to be performed. Use of the power tool for operations different from those intended could result in a hazardous situation.
5) SERVICE
a) Have your power tool serviced by a qualified repair person using only identical replacement parts. This will ensure that the safety of the power tool is maintained.
SAFETY WARNINGS FOR CIRCULAR SAWS
1) CUTTING PROCEDURES
a) DANGER: Keep hands away from cutting area and the blade. Keep your second hand on auxiliary handle, or motor housing. If both hands are holding the saw, they can not be cut by the blade.
b) Do not reach underneath the workpiece. The guard cannot protect you from the blade below the workpiece.
c) Adjust the cutting depth to the thickness of the workpiece. Less than a full tooth of the blade teeth should be visible below the workpiece.
d) Never hold the workpiece being cut in your hands or across your leg. Secure the workpiece to a stable platform. It is important to support the work properly to minimize body exposure, blade binding, or loss of control.
e) Hold the power tool by insulated gripping surfaces only, when performing an operation where the cutting tool may contact hidden wiring or its own cord. Contact with a "live" wire will also make exposed metal parts of the power tool "live" and could give the operator an electric shock.
f) When ripping always use a parallel guide or straight edge guide. This improves the accuracy of cut and reduces the chance of blade binding.
g) Always use blades with correct size and shape (diamond versus round) of arbour holes. Blades that do not match the mounting hardware of the saw will run eccentrically, causing loss of control.
h) Never use damaged or incorrect blade washers or bolt. The blade washers and bolt were specially designed for your saw, for optimum performance and safety of operation.
2) KICKBACK CAUSES AND RELATED WARNINGS
- Kickback is a sudden reaction to a pinched, bound or misaligned saw blade, causing an uncontrolled saw to lift up and out of the workpiece toward the operator
- When the blade is pinched or bound tightly by the kerf closing down, the blade stalls and the motor reaction drives the unit rapidly back toward the operator
- If the blade becomes twisted or misaligned in the cut, the teeth at the back edge of the blade can dig into the top surface of the wood causing the blade to climb out of the kerf and jump back towards operator
- Kickback is the result of tool misuse and/or incorrect operating procedures or conditions and can be avoided by taking proper precautions as given below
a) Maintain a firm grip with both hands on the saw and position your arms to resist kickback forces. Position your body to either side of the blade, but not in line with the blade. Kickback could cause the saw to jump backwards, but kickback forces can be controlled by the operator, if proper precautions are taken.
b) When blade is binding, or when interrupting a cut for any reason, release the trigger and hold the saw
motionless in the material until the blade comes to a complete stop. Never attempt to remove the saw from the work or pull the saw backwards while the blade is in motion or kickback may occur. Investigate and take corrective actions to eliminate the cause of blade binding. Avoid cutting nails or screws.
c) When restarting a saw in the workpiece, centre the saw blade in the kerf and check that saw teeth are not engaged into the material. If saw blade is binding, it may walk up or kickback from the workpiece as the saw is restarted.
d) Support large panels to minimise the risk of blade pinching and kickback. Large panels tend to sag under their own weight. Supports must be placed under the panel on both sides, near the line of cut and near the edge of the panel.
e) Do not use dull or damaged blades. Unsharpened or improperly set blades produce narrow kerf causing excessive friction, blade binding and kickback.
f) Blade depth and bevel adjusting locking levers must be tight and secure before making cut. If blade adjustment shifts while cutting, it may cause binding and kickback.
g) Use extra caution when sawing into existing walls or other blind areas. The protruding blade may cut objects that can cause kickback.
3) LOWER GUARD FUNCTION
a) Check lower guard for proper closing before each use. Do not operate the saw if lower guard does not move freely and close instantly. Never clamp or tie the lower guard into the open position. If saw is accidentally dropped, lower guard may be bent. Disconnect the plug, raise the lower guard with the retracting handle and make sure it moves freely and does not touch the blade or any other part, in all angles and depths of cut.
b) Check the operation of the lower guard spring. If the guard and the spring are not operating properly, they must be serviced before use. Lower guard may operate sluggishly due to damaged parts, gummy deposits, or a build-up of debris.
c) Lower guard should be retracted manually only for special cuts such as plunge cuts and compound cuts. Raise lower guard by retracting handle and as soon as blade enters the material, the lower guard must be released. For all other sawing, the lower guard should operate automatically.
d) Always observe that the lower guard is covering the blade before placing saw down on bench or floor. An unprotected, coasting blade will cause the saw to walk backwards, cutting whatever is in its path. Be aware of the time it takes for the blade to stop after switch is released.
ADDITIONAL SAFETY WARNINGS
GENERAL
- This tool should not be used by people under the age of 16 years
-
This tool is not suitable for wet cutting
Always disconnect plug from power source before making any adjustment or changing any accessory
-
Never use the tool when cord is damaged; have it replaced by a qualified person
- Do not work materials containing asbestos (asbestos is considered carcinogenic)
- Dust from material such as paint containing lead, some wood species, minerals and metal may be harmful (contact with or inhalation of the dust may cause allergic reactions and/or respiratory diseases to the operator or bystanders); wear a dust mask and work with a dust extraction device when connectable
- Certain kinds of dust are classified as carcinogenic (such as oak and beech dust) especially in conjunction with additives for wood conditioning; wear a dust mask and work with a dust extraction device when connectable
- Follow the dust-related national requirements for the materials you want to work with
- Only use a saw table provided with a switch that prevents restarting of the motor after interruption of voltage
- Only use a saw table provided with a kerf guide ACCESSORIES
- SKIL can assure flawless functioning of the tool only when original accessories are used
- Use only accessories with an allowable speed matching at least the highest no-load speed of the tool
- Use only saw blades with a minimum diameter of 170mm , a maximum diameter of 170mm and a spindle hole of 16mm
- Never use saw blades made of high speed steel (HSS)
- Never use grinding/cutting discs with this tool BEFORE USE
Always check that the supply voltage is the same as the voltage indicated on the nameplate of the tool (tools with a rating of 230V or 240V can also be connected to a 220V supply)
- Avoid damage that can be caused by screws, nails and other elements in your workpiece; remove them before you start working
- Remove all obstacles on top of as well as underneath the cutting path before you start cutting
- Secure the workpiece (a workpiece clamped with clamping devices or in a vice is held more securely than by hand)
- Use suitable detectors to find hidden utility lines or call the local utility company for assistance (contact with electric lines can lead to fire or electrical shock; damaging a gas line can result in an explosion; penetrating a water pipe will cause property damage or an electrical shock)
- Use completely unrolled and safe extension cords with a capacity of 16 Amps (U.K. 13 Amps)
DURING USE
- The noise level when working can exceed 85 dB(A); wear ear protection
- Never use the tool without the original protection guard system
- Do not attempt to cut extremely small workpieces
- Do not work overhead with the tool
- In case of jamming or electrical or mechanical malfunction, immediately switch off the tool and disconnect the plug
- If the cord is damaged or cut through while working, do not touch the cord, but immediately disconnect the plug
AFTER USE
- When you put away the tool, switch off the motor and ensure that all moving parts have come to a complete standstill
After switching off your circular saw, never stop the rotation of the saw blade by a lateral force applied against it WHEN CONNECTING NEW 3-PIN PLUG (U.K. ONLY):
- Do not connect the blue (= neutral) or brown (= live) wire in the cord of this tool to the earth terminal of the plug
- If for any reason the old plug is cut off the cord of this tool, it must be disposed of safely and not left unattended
USE
! disconnect the plug
! push spindle-lock button C only when tool is at a standstill
- release spindle-lock button C
- remove flange E
- open lower guard F with lever G and hold it while you mount saw blade with saw teeth and arrow printed on saw blade pointing in same direction as arrow on upper guard
- release lower guard F
- mount flange E
! make sure that clamping surfaces H of flanges are perfectly clean and face the blade
- push spindle-lock button C and hold it while you tighten blade bolt with hex key 1/8 turn past finger tight (ensures slippage of saw blade when it encounters excessive resistance thus reducing motor overload and saw kickback)
- release spindle-lock button C
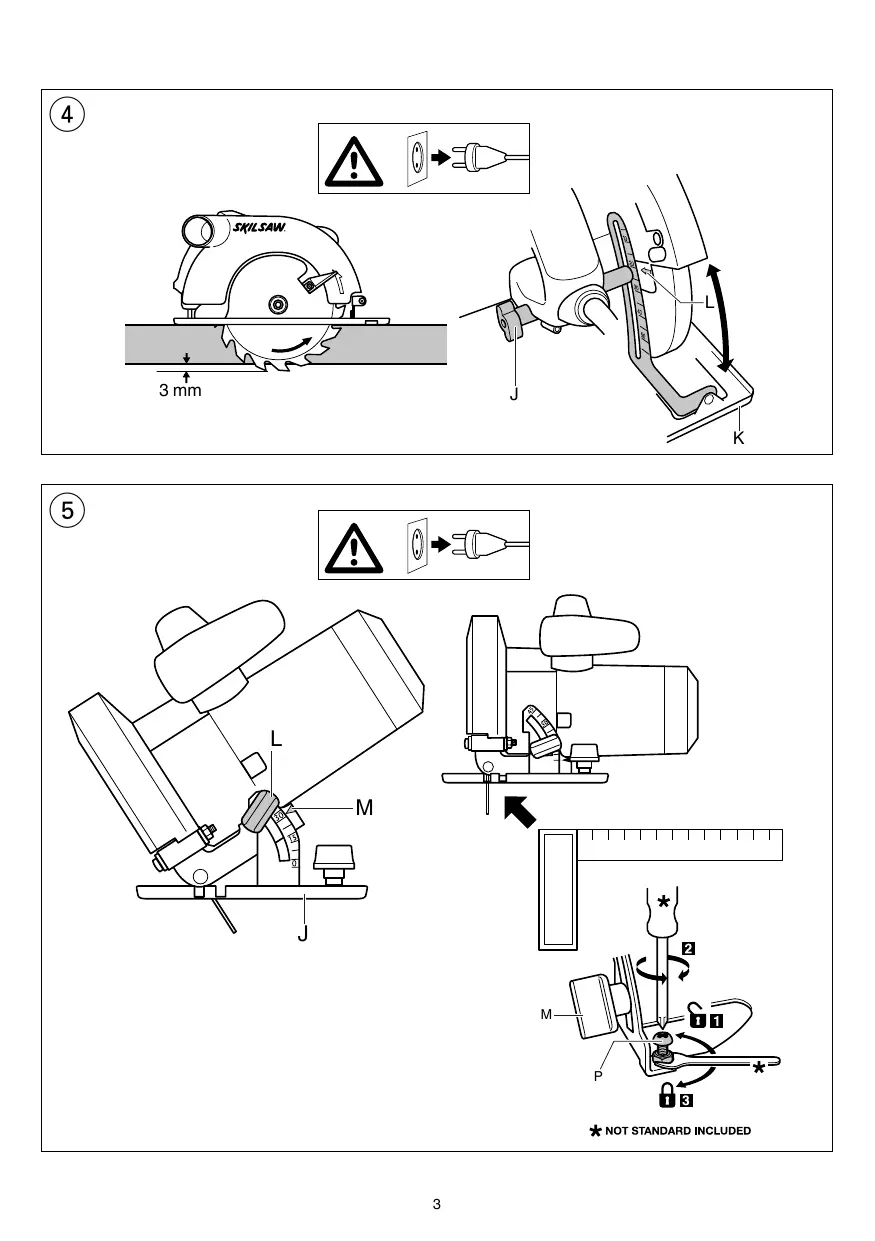
Adjusting cutting depth (0-55 mm) ④
- for an optimal quality cut the saw blade should not extend more than 3mm below the workpiece
- loosen knob J
- raise/ lower foot K until desired cutting depth is set on scale using indicator L
- tighten knob J
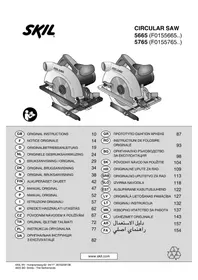
Adjusting cutting angle (0 - 45^) ⑤
- loosen knob M
- tilt tool until desired cutting angle is set on scale using indicator N
- tighten knob M
! when bevel cutting, cutting depth does not correspond with value on cutting depth scale
-
90^ Cutting angle check ⑤
-
adjust and tighten foot K to maximum cutting depth ④
- adjust and tighten cutting angle to 0^
- check for a 90^ angle between the blade and bottom of foot with a square
-
if adjustment is needed, loosen knob M and use adjustment screw P as illustrated
-
Adjustable saw line visor Q ⑥ a
-
for guiding tool along desired line of cut marked on the workpiece
- for a straight 0^ cut or a 45^ bevel cut use the indicator line concerned
! the wide part of the foot should rest on the supported part of the workpiece
- can be adjusted to allow you to choose whether waste material is on inner or outer side of blade ⑥ b
! cutting width is determined by width of blade teeth and not by width of blade body
! always make trial cuts first to verify actual line of cut
Dust suction
! ensure that the saw teeth are not engaged into the workpiece
- switch on tool by first pressing knob V (= safety switch which cannot be locked) and then pulling trigger W
! the tool should run at full speed before the blade enters into the workpiece
- lower guard F opens automatically when saw blade enters the workpiece (open lower guard manually by using lever G only for special cuts such as plunge cuts)
! do not force the tool (apply light and continuous pressure in order to avoid overheating the blade tips and, in case of cutting plastics, melting the plastic material)
! while working, always hold the tool at the grey-coloured grip area(s)
- after completing the cut switch off tool by releasing trigger W
! ensure that the blade has come to a complete standstill, before you lift the tool from the workpiece
APPLICATION ADVICE
- When using guide-rail (SKIL accessory 2610Z04064) in combination with adapter, the depth of cut will be reduced with 14mm for 90^ as well as 45^ cuts
Always face the good side of the workpiece down to ensure minimum splintering
Only use sharp saw blades of the correct type ⑧
Adjusting parallel guide
! never pull tool backwards
Cutting large panels 11
- support panel close to the cut either on floor, table or workbench
! set cutting depth so that you cut through panel and not through support
- in case parallel guide does not allow desired width of cut, clamp or nail straight piece of wood to workpiece as a guide, and use the right side of the foot against this guide
MAINTENANCE / SERVICE
- This tool is not intended for professional use
Always keep tool and cord clean (especially the ventilation slots)
! disconnect the plug before cleaning
Always keep the area around lower guard F ③ clean (remove dust and chips by blowing out with compressed air or with a brush)
- Clean saw blade immediately after use (especially from resin and glue)
- If the tool should fail despite the care taken in manufacturing and testing procedures, repair should be carried out by an after-sales service centre for SKIL power tools
- send the tool undismantled together with proof of purchase to your dealer or the nearest SKIL service station (addresses as well as the service diagram of the tool are listed on www.skil.com)
ENVIRONMENT
-
Do not dispose of electric tools, accessories and packaging together with household waste material (only for EU countries)
-
in observance of European Directive 2012/19/EC on waste of electric and electronic equipment and its implementation in accordance with national law, electric tools that have reached the end of their life must be collected separately and returned to an environmentally compatible recycling facility
symbol ⑫ will remind you of this when the need for disposing occurs
We declare under our sole responsibility that the product described under "Technical data" is in conformity with the following standards or standardization documents: EN 60745, EN 61000, EN 55014, in accordance with the provisions of the directives 2004/108/EC, 2006/42/EC, 2011/65/EU
Technical file at: SKIL Europe BV (PT-SEU/ENG1), 4825 BD Breda, NL
Operations & Engineering
Olaf Dijkgraaf
Approval Manager


SKIL Europe BV, 4825 BD Breda, NL
09.12.2013
NOISE/VIBRATION
-
Measured in accordance with EN 60745 the sound pressure level of this tool is 97 dB(A) and the sound power level 108 dB(A) (standard deviation: 3 dB), and the vibration * (hand-arm method; uncertainty K = 1.5 m/s^2 )
-
when cutting wood 2.6 ~m / s^2
-
when cutting metal 2.2m / s^2
-
The vibration emission level has been measured in accordance with a standardised test given in EN 60745; it may be used to compare one tool with another and as a preliminary assessment of exposure to vibration when using the tool for the applications mentioned
-
using the tool for different applications, or with different or poorly maintained accessories, may significantly increase the exposure level
- the times when the tool is switched off or when it is running but not actually doing the job, may significantly reduce the exposure level
! protect yourself against the effects of vibration by maintaining the tool and its accessories, keeping your hands warm, and organizing your work patterns
(F)
Scie circulaire
5255
INTRODUCTION
Operations & Engineering
Olaf Dijkgraaf
Approval Manager

SKIL Europe BV, 4825 BD Breda, NL
09.12.2013
BRUIT/VIBRATION
Operations & Engineering
Olaf Dijkgraaf
Approval Manager

SKIL Europe BV, 4825 BD Breda, NL
09.12.2013
GERÄUSCH/VIBRATION
Operations & Engineering
Olaf Dijkgraaf
Approval Manager

SKIL Europe BV, 4825 BD Breda, NL
09.12.2013

GELUID/VIBRATIE
Operations & Engineering
Olaf Dijkgraaf
Approval Manager

SKIL Europe BV, 4825 BD Breda, NL
09.12.2013
LJUD/VIBRATION
Operations & Engineering
Olaf Dijkgraaf
Approval Manager

SKIL Europe BV, 4825 BD Breda, NL
09.12.2013
STØJ/VIBRATION
1) SIKKERHET PÅ ARBEIDSPLASSEN
VEDLIKEHOLD / SERVICE
Operations & Engineering
Olaf Dijkgraaf
Approval Manager

SKIL Europe BV, 4825 BD Breda, NL
09.12.2013
MELU/TÄRINA
Operations & Engineering
Olaf Dijkgraaf
Approval Manager

SKIL Europe BV, 4825 BD Breda, NL
09.12.2013

RUIDOS/VIBRACIONES
Operations & Engineering
Olaf Dijkgraaf
Approval Manager


SKIL Europe BV, 4825 BD Breda, NL
09.12.2013
RUIDO/VIBRAÇÖES
Operations & Engineering
Olaf Dijkgraaf
Approval Manager


SKIL Europe BV, 4825 BD Breda, NL
09.12.2013
RUMOROSITA/VIBRAZIONE
Operations & Engineering
Olaf Dijkgraaf
Approval Manager

SKIL Europe BV, 4825 BD Breda, NL
09.12.2013
ZAJ/REZGÉS
Operations & Engineering
Olaf Dijkgraaf
Approval Manager

SKIL Europe BV, 4825 BD Breda, NL
09.12.2013
HLUCNOSTI/VIBRACI
Operations & Engineering
Olaf Dijkgraaf
Approval Manager


SKIL Europe BV, 4825 BD Breda, NL
09.12.2013
GÜRÜLTÜ/TITREŞIM
Ölçülen EN 60745 gore ses basinci bu makinanin seviyesi 97 dB(A) ve calisma sirasindaki gürültu 108 dB(A) (standart sapma: 3 dB), ve titresim * m/s² (el-kol metodu; tolerans K = 1,5 m/s²)
Operations & Engineering
Olaf Dijkgraaf
Approval Manager

SKIL Europe BV, 4825 BD Breda, NL
09.12.2013
HAASU/WIBRACJE
!pepeIHCTHOINHCTpMeHTaBbInbTeBNJIHyn3 p03ETK
CopehrnTe 6bIactb Bo3Je HINKHeRo HOJyXa F ③ BHCTOTE (yaJaJIte TbeNbIb N cTpyKnPy npn NOMOu ChATORO BO3Dyxa NIn NcTkn)
- PpOIN3BODnTE ChCTky peKyuIero DNcKa cpa3y Je nocLe HcPONb3OBaHnra (OCo6eHHO OT CMOnbl NKeJ)
- EcnIn INCTpyMeHNT, HecMOrTaHa TuaTeIbHbIe MeToDbl N3TOBNEHnI INCbITaHnIIBy, BByJET N3 CTPOR, TO peMOHT CJeDuYET IpoOn3BOIDntb CINJaMn ABTopN3OBAHHoCepBnCHO MaCTepcKOHdIe 3JIeKtpOnHCTpyMeHToB ΦIPMbSI SKIL
OTnpaBbTe Hepa3o6paHbI INHCTpyMeT CO CbUdTeJIbCTBOM NOKyHnB Bawaemy DInNepy NIN B 6bnKnaIyHO CTAnCnIO O6cLyHbAHBaHnΦpMbSI SKIL (aDpeca n CXema O6cLyHbAHBaHn INHCTpyMeT a npBBeHebHI B Be6caIte www.skil.com)
OXPAHA OKPYKHAIOUe CPEdbI
-
He biiHbIbaiTe 3JIeHTPOINCTPYMENT, pniHaIaJIeHHoCTn IyNAHOBY BmecTe C 6bITOBbIM MycopoM (ToIbKO IraI CTpaH EC)
-
BO INPONJIHHeHne EBPOneIckOДnpeKTHBbI 2012/19/EC 6bYTNIN3aun OTCNyHNBWeero CbOcspOK3JIeKTPINueCHORIO N3JIeKTPoHHOrO 6OBpyDobAHnI BCOOTBECTCBN C DeIcTBYoUIM 3aHOHOdATEJBCTBOM,YTIN3aUN3JIeKTPoHHCTpyMeHTOB PpOn3BOIDTCO TOpJELHO OT dpyTHX OTXoDB Ha ppeDpNIpyTHX COOTBECTBYIOUx yCLOBnM 3KOJOLrNECKO 6e3ONaCHOCTN
3NaOK 12 HaONMHIT Bam 06 3TOM, KOrJa NORBHTcH Heo6xOIMOCb CdaTb 3JIeKTPoINHCTpymENT HaYtJIN3aunIO
ДЕKHJIAPAUЦИ O COOTBETCTBи CTAHДAPTAM C€
C NOIHOI OTBETCTBEHOCTBIO MBI 3aABBLREM, YTO OIICAHNNI B pa3dJe "TexMHcECKne daHNbIE" PPOyKT COOTBETCTBYET HNHECEJNeDyoUIM CTaHdpTAM HIN HOPMaTHBnHbIM DOKymeHTam: EN 60745, EN 61000, EN 55014 corlaCHO pOLOKeHnM dIpeKtNB 2004/108/EC, 2006/42/EC, 2011/65/EC
- Texnuechka dohymenta y: SKIL Europe BV (PT-SEU/ENG1), 4825 BD Breda, NL
BHA3IBH N 3 TEXHIHN B63NEHN DJIY DnCHOBHX INJIOK
1)PO3ПИЛЮВАнг
a) HEB63NEHA:HeπiDcTaBnIe pyH B 30Hy po3tniIOBaHHr i πi dπiJIbHn Dnck.ДpyroO pyKIO TpIMaTeC3a DoaTHOBy pyKoTHy a6o 3a HopTyc MOTOPa. RkIo Bu 6yDeTe O6oma pyKaMn TpIMaTcH 3a pNHy, Bn 3axHCTte pyKn BiD TOpaHeHH.
b) He npocobyte pyu n iD Bnpi6, 0o po3nnIOeTbcA. O6mekyBaH ne 3axnCTnB Bac biJe3a nD Bnpo6om.
c) BldeperyIIOJIe rIi6HNY pO3NIy BIIIOBIAIDHO ToTOUHN BIVo6y, IOPO3NIIOEITcB.3y6ci NINMAOTb IINIe YCACTKOBO BVITJADATN 3-ⅢD IVBIO6y.
d) Hikoln He Tpmaite po3nnIObAHy DeTaIb B pyu i a6o HA KOJIHax. 3aIckSyte o6po6IIbAOhy DeTalb y cta6IbHomy KpinLeHHi. 106 3MeHNHTn pINK 6TyN 3aeyIeHIM, 3aCtPBAHn IINJIbHOrO DnCKa a60 BPTaN KOHTPOJIO Ha NHM, BAXJIbO, 106 6po6IObAHa DeTaIb 6yla Do6pe 3aKpInNeHa.
e)Пи роботax,ноли робочи inhctypмent MOHe 3auchnyЗхаobany eekrtponpoBdy a60 BlaChnshyржHbIeHnH,Трmaite eekrtponpuiJad 3a iOJIbOBAHI pyKoTHN.
3aueenIeHnEeKtPnpOboDNk 3apdNHy6 MeTaleBiaactHN eKeTPOpnIaDy i np3bOdtb Do ydpay eKeTpUHNM CTpyMOM.
f)PiI qac no3doBHHbOro po3nnHOBaHHra 3aBHN BnKOpncTOByte cnprMObyouy nlaHHy a60
CnpmaOByBaH KpaIB. Lc noKpaUye ToHicThb po3pi3y Ta 3MeHHUe BiporidHicTh 3aIdaHnJIe3a.
g) 3aBKnBn BnHOpNcOByIe NIIue PnIJIbHI IINCHN npabInbHoro po3MpIy i 3 BiINOBiHDHO FOpMOHO nocAoHOro TOBpy (HAp., 3IpJactoi a60 KpyrLoI FOPMN). PnIJIbHI DNCKN, lo He nacyIoT do MOHTaHHx DeTaJIeN PnIKN, o6ePaIObTcB HepiBHO i pIN3BOyA Tdo BTPATNI KOHTPOJIO.
h) HiiHOn He BnHOpNcOByTe yuHoDHei a6o HeiBnObiDi hai6n a6o 6oJItn, oTo TpMaotb Ie3o, 1o TpMaOTb Ie3o, Ta 6oI9 6yIi CneiaJbHO po3oPbIeHi y BiNobIDHocTi do BaIoI pIII JIINI JIINI JIINI JIINI JIINI JIINI JIINI JIINI JIINI JIINI JIINI JIINI JIINI JIINI JIINI JIINI JIINI JIINI JIINI JIINI JIINI JIINI JIINI JIINI JIINI JIHN I EKCNlyataqii.
2) BIDDAUA - PIPNUHH TA BIDNOBIDHI BHA3IBHN
Bidaua-ze Heoukybaha peakij Ha 3aueMlenHna 3aIdahna a6o HnpaBulhe ceHTpyBaHHa 3a nn, 0u BIKINkae HeKOHTPolboaHIn puy nn Bropy BiD BnO6b, 0u po3nHIOeTcB, ta B HanpAmHy onepaTopa
- Kolny le3o 3aueemlehe a6o Miuzho 3actprrlo y o03pi3i depeBvHn, BOHO nepectae o6eptatncb, ToK MOTOP cnpuHHRE WbUdkn pyx IHcTpymeHTa Ha3ad B HaprMy onepatopata
JHKUoJe3o 3irHyIocBpo3pi3i a6oNoraHO BiiDcHTPOBaHe,3y6ciB 3aAdHni YAcTHNI NnIMMOyTb rIn60Ko BXOHTu NBOpExHIO DepeBnH,N,Bpe3yIbTaTiYOroJe3uXoDNb3 po3p3iTy Ta BiDnIaE Ha3aD B HaprMky OnepatopA
BiiDdaua€pe3yIbTaTOMHeKOpEHTHO a6o HeiIbOBO RBNOPcSTAHN IHCTPymeHTa a6o o6CTaBH,RAHX MOJIINBO yHNHHTY,NKIO BKNITn BiNPOBIDHX 3axOIB 6e3neK,I K BN3AHO Dani
a) O6oma pyhAmi MiHo TpHMaIte nnny, npHnlaDauOu3yCnIaIra 3an06irAHnB iDdai. CtiTe 36Oy BiD CTOnA, a He nOChN liHi3 3 neom.B pe3yIbTaTi BiiDaai NiHaMoNe cTpi6HyTu H3aJ, aJe onepatop MOme KOHTpOJIbOATn CNIy BiDdai 3a yMOBN BHHBaHnR BiDnOBiHNX 3axoDiB 6e3neH.
b) RaHIO ne3o 3aCtprIIO, a6o RaHIO po3nHIOBaanH 6yIoo 3yUnHeNo 3 RaHOcb npuHHN, BiDnyctITb TpHrep Ta 3aJIHWe HepYXOMy NHy B MaTepiA Ido NOBHOI 3yUnHKn Ie3a. HIOJI He HamaarTec8 3a6paTH NHy BiD BVnp6O byo BNTaRITI Ha3aI, RaHIO ne3o 9e pyXaTbC8, a6o MOHNBa BiDaA. IpeBipTe BnPi6, 10o po3nHIOCTbC8, Ta yCyHbTe npuHHy 3aIIDAHN RAe3a. 3aOn6irte PO3nHIOBaanHIO CBHXIB a60 RBHTIB.
c)Пи NOBTOPHOMY BCTAHOBLeHHi ПИИ HA Bnpi6 BiDHeHTpyTe Ie3O ПИI B Po3pIi Ta BNEBHITcb, 么36uIпИн HeacTpaRy MATEpIani.Якso Ie3O 3aCtPraIyo,piJi HcA yBMKeHHeHЯ ПИI BOHO MOne pyXaTHCb Bropy a60 BHKInKaTH BiDdauy.
d) 3a6e3neutydoataKoby onopy Belenknx naheIe, 10o miHImi3yBATn pN3nK TOrO, 10o Je3o 3actpRHe Ta BHNIHAc BIDaCy. BeNki naneI moJyTb npOrnHaTcN iD vBaChIO BarOIO, ToK iD naneI 3 o6ox 6oKIB 6JIa LiHiPi o3pi3y Ta bJIa HpaIO naneI trpeBa noCTabITn ONOpI.
e) He BnHOpNCTObyTe nyT i abo yuHodHei ne3a. He 3aToCHeI aBO HnepabInbHO BCTaHOBJHEI ne3a YTBoPIOUb By3kNIO p03Pi Ta BnIHKeAIOb TaHmIpHe TEPr, CnpMHNIOHOn 3aJaHHNe3aTaBIDaYU.
f) 3aTnCHH bAHeni peryIIOBAA HrN6HH Ta haxNy le3a MaOTb 6yTH Do6pe Ta 6e3NeuHO 3aTARHeH, nepw HIX npCTynatn DO po3NHy. JkUO niD qac PO3NIIIOBAHNR HAcTPORIKA Le3a 3MiHIOE7bC8, CE MOJE BHKINKATN 3aJDAHN LE3A Ta BIduAa.
g) Bydte oco6blno 06pehhi npn po3nnIOBaHHI b CTiHX a6o B iHnx MlCzX, B rHI Bn He MoHete 3a3npyTHn. Pn pO3nnIOBAHHI B nPbXOBaHHx 6'kTxA 3aHypeHNPiJIbHbN dNcK MoHe 3a6IoHyBaTcNci PnPNHHT NIKOJET.
3)ФУHKUЯ HNHHbOTo OБМЕЖВАЧА
a)IpepeKoHHHm BnHOpncTahnnnepeBipte,HN do6pe 3aKnHbAcBcHnHHnO bMeHyBa. He BnHOPcTObyTe nny, RnIO nHHnHIO bMeHyBa HnepeCyBaCTBCBilHoTa He 3aKnHbAcTbc HeraHNo HikOnlHe fICyUte NHHN OMeHyBaYb Y BiHKpHTOMy NOJooHenHi. B pasi BNnAadKOBO r naDinHn IINn HnHHnIO bMeHyBa MOHe NORHyTncb. BnHnATn BVIny 3 PO3eTHN, NiDnMIb TnHHNIO bMeHyBa 3a DONOMOrOpyKn, 0u BIDBoNTbc Ha3a, Ta BNEBHtCB, 100 Bei BILHO pyXaTcBc, He YnAIOuN ne3a a60 By-PAKII INoI YaCTNH INCTPymENTy, NID BCima KytAmrTaHa6yB-ky rIn6hNy po3pi3y.
b) NepeBipte FynHcioHyBaHH npyHHn HnHbHoro 06MeHyBaay.B pa3i HeKopeHTHO FynHcIOHyBaHH 06MeHyBaay Ta npyHHn npepix BnHOpNCTAHm Tpe6a npObectx Texhniye 06CnyroByBaHH. HnHHo 06MeHyBaay MoKe npauBoTn NaTo NOBilHo BnACJIIOK NOnIKoJHeHH RAHXOCb DeTaIe, YTBOpEHn KLeHoro HaIbOTy a60 3acMieHH.
c) HnHHi o6MeHyBaMu OMe B7r4yBaTHCb BpyHy TINbH M IaBnHOHaHHo Oco6JIbHx PO3pi3IB, TaHIX Rk BpI3aHnTa CnlaDHi PO3pi3N. PidHIMtB HnHHi O6MeHyBaH, BiTyrHyBnPyHcy, Ta 0oiHoJe3o YbiIeB MaTePiA,IbNyCTITb HnHHi O6MeHyBaH. ByciHnX BnIadKax PO3niIIOBaHH HnHHi O6MeHyBaMa fOyHKIOHyBaTH B aBTOMaTHHOMy peKMI.
d) HoHHoro pa3y, nepu hiX noCTabHTn nHy ha BepCTa b6o nIpy, nepeBpIeTne, nnokPbAc HnnHni 6mEkyBaeJe3o. He3axHcene Ie3o, 10 pyxaetbca 3a iHepcieHb, BnKlnKae 3BopOTHi pyx nIIH, 10 po3nnIObATme BCE Ha CBOcMy IJxry. 3BaKaIte Ha Yac, HeO6XiDnI dIyNBOI 3yInHHNLe3a nicI TaTO, JHK BmMnKau 6JIo BiDnySeHc.
I niD qac paaeTyBaHn rIi6BnHa po3pi3y He BiNDoBlae 3NaeeHHr Ii6BnHn po3pi3y, OIO BCTAHOBHe H naHai
!hiKoHNeBiDtaryTeiHCTpyMeHTHa3a
- Po3pi3aHHaBENIKINx paHenei ⑪
3a6e3ne7e onopy nahei, hna Maé 8ytn po3taooba hai niihi po3piy ta cnpaTncs Ha ndy, ha cII a6b Ho bepctat
!BCTAHOBITbTIN6HNYpo3pi3y TAKHM YHOM,0o6 po3pi3aTNnaneHb,aHe onopy
Якsoнларьяча паннka He do3BOL8e BHKoHATn pO3I3 notpri6Hoi WpiHnPi, npKprinltb a60 np6bNte zuBXaXMdo BO rPo6y npMBy depeB'any PAnkUy B JOKCTI cnpMOBvBaay, Ta npTnckHaTe Do He I npabN 6iK npNTnCKHOI nactHHN
DOrJIAD/OBcJyROBYAHH
Ley iNCTpymeHT He npdaTHn DnI npOMcIOBOrO BHKOPNCtAHH
3aBKnD TpImaTe iHCTpyMeHT Ta Horo uHyp y NCTOTi (oc6JnBO BENTnJIaIHi OTbOpN)
!pepeuHcTHoIO hCtpymEny Heo6xIDHO po3'eHaTH wTeNceIbHN po3'IM
TPhMaJIe 6bAcbT HABHOJ NHHbIgO 6mEHyBaF ③ BHCTOTI (BINDAJIaTe NIIa TcPTyHKN 3a DOnOMoHO tCNCHEOHO NOITPRA a60 tIKTH)
-Почистовлесо пелу heraiho nicla ВИКОпstаннь (ocobino biv 3aikb pe3nTu KHeO)
- RaHIO He3BaKaJOnu Ha peTeIbHy TexHOJIIO BnROTOBLeHnHa I nepeBiPKn IHCTpyMeHT BCE-TaKu BnIe 3 Laay, Ioro pemOT D03BOJReTBCsB KHOHYBaTN Liue B aTOpIN3aHai cepBicHi MaNCTepHi dIy eJeNTPOPrnlaDskIL
- NaichiNtB Hepo3i6paHn IHCTpyMeHT pa30m 3
DOKA3OM KyniBNI do Baworo DInepa a60 do
Haib6lnKUO CEHTpy o6ClyroBvBAHH SKIL (adpecn,
a tAOK Diapama 06ClyroBvBAHH npIcTPOU,
noDAIObTcRa Ha caTI www.skil.com)
OXOPOHA HABKOLINHbO'CEPEI
He BnHuaTe eIeHTpoiHCTpymENT, npHaJnEHHocTi Ta ynaHObHy pa30 3i 3BnuaHm CMITAM (TilbKn dJa KpaIH EC)
BIDNOIBINO do EBPoneiCboKoi DnpeKTHBN 2012/19/EC
IIOO yTNII3aui CTAPHX eNEKTPNHHX TA
eNEKTPOHNHX nPiuaJB, B 3aJIeKHoCTI 3 MlCeEBM N
3AOKHOJdABCTBOM, eNEKTPoIHCTPymENT, kNk
PepeSyBaB B ECKPlyatau II NobINHeb 6TyN
yTNl3OBAHNI OKpEMO, 6e3NeHmD I
HABKOJIINHbORO CEpeDOBUNa OJI LIAxOM
MaJIIOHOK 12 HaIaJaE Bam npo ue
DEKHJIAPAUIII PPO BIDIOBIDHICTbCTAHdAPTAM C
Mn 3aBJIeMoPiHaNauBy BnKIIoUHy BiIIOBIAJbHICtB,Io OIINCAHNI B "TexHHi DaH" npOyHT BiIDNOBIAe TAKIM HOpMa m a6o HopmatBnHM DOKyMeTAM: EN 60745, EN 61000, EN 55014 y BiIOBIDHOCTI do IIOLOHeB dIpeKTIB 2004/108/EG, 2006/42/EG, 2011/65/EC
- Textнчни донументи B: SKIL Europe BV (PT-SEU/ENG1), 4825 BD Breda, NL
Operations & Engineering
Olaf Dijkgraaf
Approval Manager

SKIL Europe BV, 4825 BD Breda, NL
09.12.2013

UYM/BIBPAUI
3MiprHnB iDnOBiDnHO Do EN 60745 pIBeHb TnCKy 3ByHy daHoro IHCTpymEnHT y5(A) i NotyHnicTb 3Byky 108 dE(A) (ctaHapTbe BixnHeHHa: 3 dE), i BiBaPuaI M / c^2 (pyHa MeToDnHa; noxHbKa K = 1,5M / c^2 * npi pi3aHHi depeBHHn 2,6 M/c² * npi pi3aHHi MeTany 2,2 M/c²
PIBeHb Bi6paJIi 6IyO BmIPrHO y BiIDIOBIdHOCTi 3i CTaHdAPrTl3OBaHIM BnPiPo6ByaHHM, IIO MiCTNbCBA EN 60745; dana xapaKTepeNCTNa MoHe BVOKOPNCTOBaBATcI JIPOBHHN OJHOro IHCTpymeHTa 3IHUNM, a TAOH DJI NOpEpeHbOI OUIHN BNIJIYB Bi6paJIi NiD Yac 3actOCyBaHHN DaHOro IHCTpymeHTa DJI RBA3aHINUJIeI
- npn BnKOpNCTaHHi IHCtpymeHTa B IHxnx cIyNx a603 IHsHMn/HeCnpaBHNmDONOMiKhNmPiNCTOCyBaHNM pIBeH bNJIbBy Bi6paui MoKe 3NaHNo nIDBnUyBaTnca
- y nepiódi, KOJIHCTPymeT BIMMHNEHNI a60 ΦyHKIQUHOJE 63ФaKTNUHO BIKOHANHPO6OHTN, pIBeHB BLINHY B1BpauiJMOE 3NaUHO 3NHKyBaTHCA
!3axuataece6eBIDBnBByBbpauii, nIITprMHyOuH INCTpymEnT I OoroDOnomixHi npHCTOCyBaHH B CnpabHOMy CTaHI, nIITprMHyOu pyu H TepJI, a TaHOJ npABNbHO orpanH3OByUOc CBi pOboOH npOec
GR
AioKoPiOvo
5255
EIZAΓΩΓH
To epyaieio npoopiεtai yia thieaywyn επiunkwv
kai eykapoiw touow ΕUdo μe eUθeia diaδρouh n Εe
diδρouh uno γωvia εως 45° - aE TIC kataaληεs
πiovólaεc μntopouv va πiovioTouv κai μn noλιτua
μetαλa EKTOS iδnρou, ελaφpδoúkα uλικα kaθωc
kai πλaotká
AutoTo epyaaleioeV npooipetai yia enayylambdaikxon
- Aiaβaσε kai φιλαξε αυτές τις σθηγίες χρήσεως ②
TEXNIKA XAPAKTHPISTIKA ①
AΣΦAΛEIA
TENIKEZ YIIOAEIEEIS AΦAΛEIA
IPOEIOHOIHSH!AiaBaoTe oAcTIC npoeioontiKec unoBieEic. Aueeiesk kata TnV npnoT Twpoeioontikuv unoBieEevu mopoei va npokaleouv nEktponlanEia, kivduvo npukayiac n/kai obaapouc tpaumatouuc. OuaEte oEcTc npoeioontiKec unoBieEic kai odnyie cia kαθe eavovtkxpn. O opoioc "nEktpko epyaeeio" pou xnpouotoeiata icnpoeioontiKec unoBieEic avapepetai eNktpka epyaea iou tropofootoovtai anto nektpko diktuo (mu nektpko kaawdo) kaowk aei nektpka epyaea iou tropofootoovtai ano ptatapia (xwpi nektpko kaawdo).
1) AΣΦAΛEIA ΣTO XΩPO EPRΑΣIΔ
a) DiatnpieTe To xwpo Nou epyacceo8e Kahtapokai KaA foWtioevo.AtaEia 0to xwpo Nou epyacceo8e n mΦwtiouevespeipoxes epyaoiac mtopei va oynnoov o atuxnata.
b) Mny epyaee 8e To nAekpiko eyaiaio 8e πepiabaaovu npu npaxei kivdvoc ekpnEnc, sto onoio uapoxuv eukkta vypa, aepia n okvyn. Ta nAekpikcaeyaleia mnpei va dnmuoynouv onivnpiauo o oniooc mnpei va avaphEeTn okvyn n Tc avaBuaaoc.
c) Otav xpnoiotoieTo nEeKtpko epyaaleo Kpatate Taiaidia k aaaa TuXov npooWtaekpi ano To xwpo nou epyaceOe. Zepiinwnnou alaa atoa anaonaoov nTpvnooxoac mOpoe va xaoge Tov Eeyxo Tou mXavuatoC.
Operations & Engineering
Olaf Dijkgraaf
Approval Manager

SKIL Europe BV, 4825 BD Breda, NL
09.12.2013
OOPYBO/KPADAZMOYZ
Operations & Engineering
Olaf Dijkgraaf
Approval Manager

SKIL Europe BV, 4825 BD Breda, NL
09.12.2013
ZGOMOT/VIBRATII
Operations & Engineering
Olaf Dijkgraaf
Approval Manager


SKIL Europe BV, 4825 BD Breda, NL
09.12.2013
UYM/BNBPALIN
ИзмеренВсьтВЕТСВЕс EN60745НИБОТоHA 3BYKOBO hablaгане habTo3инСТРУМЕТ e97 dB(A)a HIBOTo HA 3BYKOBa MoUHOCt e108 dB(A)(CTaHApTHO OTHIOHENHe:3dB),a Bn6paUNITE ca M / c^2 (MeTOd pIbKa-pAMO; HeONPeDEJIeHOCt K =1,5M/c²)
npn p3aHe Ha dIbPBO 2,6 M/c²
ри рязане на метал 2,2 m/c²
HIBOTO Ha npedaeHEnTE Bn6paunE n 3mepeHO B CbTBTCTBNE CbC CTaHdapTN3HpaHnI TcT, ONpeJeHEN B EN 60745; TO MOKe De ca eN3noL3Ba 3a cpaBHeHne Ha EeHN INhCTpymENT C dpyr N KaTo pnpDeBapNIteHa OceHka HA POJaIraHETo Hn Bn6paunPn iN3noL3BaHeto Ha INhCTpymEHTA 3a NOOCueHNe PnpIOJKeHH
- I3N0JI3BaHEnTO Ha IHCTpyMeHTa 3a pa3JIyHn OT Te3n
IprIOJOHeHn HmC DpyH, HmNoIo NOIpDbPxHn
AHC6OCoAp MoKe 3HaChuTeHNO Da NOBUsn HNBOTo HA
KOeTO CTE NoJIOJeHn
-пенидente OTВрeme,КORAToИнст汞м enta e
ИЗКИLOЧЕН ИЛСБТВЕТHOВИLOЧЕH,НОСHERо He ce
pa60TN B MOMPHTe MOrAT 3HaUHTeHIO DA HAMAJT
HIBOTO HA KOETO CTe ПОДLOЖEHIN
I npedna3BaIte ce ot efeHTnte OT Bn6paHInTe, KATO noDbPbAte HNCTpyMeNTa n AkceCoapHTe My, na3nte PbIeTe CN ToTINn I opraHn3npaTe BaWInTe moJEL Na pa6ota

Okruzná pila
5255
UVOD
Operations & Engineering
Olaf Dijkgraaf
Approval Manager

SKIL Europe BV, 4825 BD Breda, NL
09.12.2013
BUCI/VIBRACIJAMA
Mjereno prema EN 60745 prag zvučnog tlaka ovog elektricnog alata iznosi 97 dB(A) a jakost zvuka 108 dB(A) (standardna devijacja: 3 dB), a vibracija * m/s² (postupkom na šaci-ruci; nesigurnost K = 1,5 m/s²)
* kodrezanja drva 2,6 m/s2
* kod rezanja metala 2,2 m/s²
Razina emitiranja vibracija izmjerena je sukladno normiranom testu danom u EN 60745; ona se moze koristiti za usporedbu jeder alatke s drugom, te preliminarnu procjenu izlozenosti vibracijama pri uporabi alatke za navedene namjene
- uporaba ove alatke za druge namjene ili s drugim ili slabo odrzavanim nestavcima, moze u značajnoj mjeri uvečati razinu izloženosti
- vrijeme tokom kojega ye alatka isklučena, il je uklučena ali se njome ne radi,MZe značajno umanjti razin izloženosti
! zašitite se od posljedica vibracija održavanjem alatke i njezinih nestavaka, održavanjem Vaših ruku toplima, te organiziranjem Vaših obrazaca rada
SRB
Kružna testera
5255
UPUTSTVO
-
Ovaj elektricni alat je namenjen za secenje drveta po duzini i po širini, pravolinjski i pod uglim do 45^ ; odgovarajućim testerama; mogu da se sek'u materijali koje nisu od gvožda, nego od lake grade i plastike
-
Ovaj alat{nije namenjen za profesionalnu upotrebu
Pažljivo pročitajte i sačuvajte ova uputstva za rukovanje ②
TEHNIICKI PODACI ①
SIGURNOST
OPSTA UPUTSTVA O SIGURNOSTI
PAZNJA! Citajte sva upozorenja i uputstva. Propusti kod pridržavanja upozorenja i uputstava mogu imati za poslediciu elektrichi udar, pozar i'ili teške povrede. Cuvaje sva upozorenja i uputstva za buducnost. Pojam upotrebljen u upozorenjima "elektrichi alat" odnosi se na elektriche alate sa radom na mrezi (sa mreznim kablam) i na elektriche alate sa radom na akumulator (bez mreznog kabla).
1) SIGURNOST NA RADNOM MESTU
a) Držite Vase područje rada Čisto i pospremljeno. Nered ili neosvetljena radna područja mogu voditi nasrećama.
b) Ne radite sa aparatom u okolini ugrozenoj od eksplozija u kojo se nalaze zapaljive tecnosti, gasovi ili prasei. Elektrioni alati proizvode varnice, koje mogu zapaliti prasinu ili isparenja.
c) Za vreme korišćenja elektricknéog alata držite podalji decu i druge osobe. Kod skretanja możete izgubiti kontrolu nad aparatom.
2) ELEKTRICNA SIGURNOST
3) SIGURNOST OSOBA
a) Utikač za prikljucak aparata mora odgovarati utićnoj kutijici. Utikač se nesme nikako menjati. Ne upotrebljavaje adaptere utikač za Jedno sa aparatima sa uzemljenom zašitom. Ne promenjeni utikač i odgovarajuće utćnice smanjuju rizik od elektrčnog udara.
b) Izbegavajte telesni kontakt sa uzemljenim gornjim povrsinama, kao sto su cevi, grejanja, sporeti i rashladni ormani. Postoji povecani rizik od elektricnog udara, ako je Vase telo uzemljeno.
c) Držite aparat podalje od kiše ili vlage. Prodiranje vode u elektrčni aparat povećava rizik od elektrčnog udara.
d) Ne koristite kabl da bi aparat nosili, obesili ili ga izvlačili iz uticnice. Držte kabl dalje od vreline, ulja, ostrih ivica ili Pokretnih delova aparata. Oštećeni ili zamršeni kablovi povecavaju rizik od elektrinog udara.
e) Ako sa nekim elektricnim alatom radite u prirodi, upotreblavajte samo produzne kablove koji su dozvoljeni za spoljno podruce. Upotreba produznog kabla pogodnog za spoljno podruce smanjije rizik od elektricnog udara.
f) Ako rad elektricnog alata ne moze da se izbegne u vlažnoj okolni, koristite prekidač strujne zašite pri kvaru. Upotreba prekidača strujne zašite pri kvaru smanjuve rizik od elektricnog udara.
a) Budite pažljivi, pazite na to, šta radite i idite razumno na posao sa elektricnim alatom. Ne upotrebljavte aparat, kada ste umorni ili pod uticajem droga, alkohola ili lekova. Momenat nepažnje kod upotrebe aparata moze voditi do ozbiljnih povreda.
b) Nosite ličnu zašitnu opremu i uvek zašitne naocare. Nosenje lične zašitne opreme, kao maske za prasinu, sigurnosne cipele koje ne klizaju, zašitni šlem ili zašitu za sluh, zaviso od vrste i upotrebe elektricnog alata, smanujete rizik od povreda.
c) Izbegavaje nenamerno pustanje u rad. Uverite se da je elektrichi na lat isklučen, pre nego što ga priključite na struju i/ili na akumulator, uzmite ga ili nosite. Ako prilikom nosenja elektrciñog alata držite prst na prekidaču ili aparat uklučen priključujete na struju, moze ovo voditi nesrećama.
d) Uklonite alate za podesavanje ili kluceve za zavrtnje, pre ngo sto uključite aparat. Alat ili kluč koji se nalazi u delu aparata koji se okrece, moze voditi povredama.
e) Ne precenjunte sebe. Pobrinite se da sigurno stojite i odrzavajte u svako doba ravnotze. Na taj nao inozete bolje kontrolisati aparat u neocekivanim situacijama.
f) Nosite pogodno odeo. Ne nosite siroko odeo ili nakit. Drzite kosu, odeo i rukavice podalje od Pokretnih delova. Opusteno odeo, nakit ili duza kosa mogu biti zahvaceni od rotirajucih delova.
g) Ako se mogu montirati uredjaji za usisavanje prasine i uredjaji za hvatanje prasine, uverite se da li su prikligeni i ispravno koriste. Upotreba usisavanja prasine moze smanjiti opasnosti od prasine.
4) BRIZLJIVO OPHODJENJE I KORISCENJE ELEKTRICNIH ALATA
a) Ne preopterećujte aparat. Upotrebljavajte za Vaš posno elektrčni ali odredjen za to. Sa odgovarajućim elektrčnimi alatom radiće bolje i sigurnije u naveneden području rada.
b) Ne upotreblijavaje elektrichi alat, ciji je prekidač u kvaru. Elektrichi alat koji vishe ne moze da se ukluči ili iskluč je opasan i mora da se popravì.
c) Izvucite utikač iz utičnice i/ili uklonite akumulator pre nego što preduzmete podesavanja na aparatu, promenu delova cribora ili ostavite aparat. Ova mera opreza sprečava nenameran start aparata.
d) Cuvajte nekorišcene elektricne alate izvan domašaja dece. Ne dopustite osobama da koriste aparat, koje ga ne poznaju ili nisu pročitali ova uputstva. Elektrici na latu so opasni, ak ih koriste neiskusne osobe.
e) Održavajte aparat bržljivo. Kontrolisite, da liPokretni delovi aparata fungkionisu besprekorno i ne slepljuju, da li su delovi slomljeni ili tako oštećeni, da je funkcjira aparata oštećena. Popravite oštećene delove pre upotrebe aparata. Mnoge nesreće imaju svoj uzrok u loše održavanim elektrčinem alatima.
f) Držirte alate za sečenja oštre i Čiste. Bržilivo negovani alati za sečenje sa oštrim sečivima manje slepljuji i lakse se vode.
g) Upotrebljavaje elektricne alate, pribor, alate koji se umecu itd. prema ovim uputstvima. Obratite pažnju pritom na uputstva za rad i posao koji treba izvesti. Upotreba elektricihih alata za druge od propisanih namenaMZe voditi opasnim situacijama.
5) SERVIS
a) Neka Vam Vas Āparat popravlja samo kvalifikovano stručno osoblje i samo sa originalnim rezervnim delovima. Na taj nacin se obežbedjupe da ostane sačuvana sigurnost aparata.
SIGURNOSNA UPUTSTVA ZA KRUZNE TESTERE
1) POSTUPAK TESTERISANJA
a) A OPASNOST: Ne idite sa Vasim rukama u područje testere i lista testere. Držite sa Vasom drugom rukom dodatnu dršku ili kucište motora. Ako obe ruke drže testeru, one se ne mogu povrediti od lista testere.
DODATNA SIGURNOSNA UPUTSTVA
OPŠTA
- Ovaj alat ne treba da koriste osobe ispod 16 godina
- Ovaj alat nije PODESAN za vlažno sečenje
- Obavezno iskopćajte alat iz elektrickne uticnice pre nego sto izvršite bilo kakva podesavanja ili zamenu pribora
- Nikada nemojte da koristite alat ako je kabl ostecen; zamenu kabla mora da obavi stručno lice
- Ne obradjute nikakav materijal koji sadrži azbest (azbest važi kao izazivać raka)
- Prašina od materijala, kao što su koja sadrži olovo, neke vrste driveta, minerali i metal, moze biti opasna (dodir ili udisanje praseine moze prouzrokovati alergijske reakcije i/ili respiratorna oboljenja rukovaoca i lica u blizini); nosite masku protiv praseine i radite uz uključeni urežaj za ekstrakcjiu praseine kada radite na mestima gde ju je moguce priklujčiti
- Odredene vrste prasine su klasifikovane kao kancerogene (kao sto su prasina hrastovine i bukovine), posebno u sadejstvu sa aditivima za priremu driveta; nosite masku protiv prasine i radite uz ukluceni uredaj za ekstrakciju prasine kadra radite na mestima gde ju je moguce priklujciti
- Prati nacionalne propise vezane za prasinu koja se proizvodi prilikom rada na obradivanim materijalima
- Koristiteismo sto za rad koji je opremljen prekidačem koji sprečava ponovnoPokretanje motora nakon prekida napona
- Koristiteismostoza rad koji je opremljen vodicem reza
PRIBOR
- SKILMZe priznati garanciju samu ukoliko je korijscen originalni pribor
- Koristite samo pribor cija je dozvoljena brzina u najmanju ruku jegnaka nejvecoj brzini pri praznom hodu elektrijnog alata
Koristite iskliucivo listove testere minimog precnika 170 mm, maksimalnog precnika 170 mm, i sa otvorom za vreteno sirine 16 mm
- Nemojte nikada da koristite testere napravljene od HSS Čelika
Uz ovaj elektrichi alat nikad nemojte da koristite diskove za osterreich/seechenje
PRE UPOTREBE
- Uvek se uverite da je napon struje isti kao i napon naveneden na ploci sa nazivom alatu (alati na kojima je naveneden napon od 230V ili 240V mogu da rade i na 220V)
- Izbegavaje ostecenja od srafova, ekseri i drugih predmeta na vašem području rada; uklonite ih pre nego što zapocnete rad
- PreNgu sto zapocnete secenje,uklonite sve prepreka na vrhu,kao i ispod putanje secenja
- Obezbedite radni predmet (radni predmet stegnut pomocu stega ili neceg slichnog je mnogo stabiliji neko kada se drzi rukom)
- Koristite odgovarajuće aparate za proveru dali se u zidu koji bušimo nalaze skrivene instalacije, ili za taj posao nadite odgovarajuće preduzće (kontakt sa elektrčimvodovima moze izavati požar ili elektrčni udar; oštecenje gasovoda moze izazvati eksploziju; probijanje cevi savodom uzrokuje štekte ili moze izazvati elektrčni udar)
Operations & Engineering
Olaf Dijkgraaf
Approval Manager

SKIL Europe BV, 4825 BD Breda, NL
09.12.2013
HRUP/VIBRACija
ÜLDISED OHUTUSJUHISED
Operations & Engineering
Olaf Dijkgraaf
Approval Manager

SKIL Europe BV, 4825 BD Breda, NL
09.12.2013
MURA/VIBRATSIOON
Vastavalt kooskolas normiga EN 60745 labi viidud mōtmtistele on tōrìsta heliðrk 97 dB(A) ja helitugevus 108 dB(A) (standardkörvalekalle: 3 dB), ja vibratsoon * m/s^2 (käe-randme-meetod; mōttemaāramatus K = 1,5 m/s²)
APKALPOŠANA / APKOPE
- Sis darbariks nav paredzets profesionälai lietošanai
- Uzturietiru instrumentu un elektrokabeli (ipasi ventililacijas atveres)
! pirms instrumenta tirisanas atvienojiet to no elektrotikla
Operations & Engineering
Olaf Dijkgraaf
Approval Manager

SKIL Europe BV, 4825 BD Breda, NL
09.12.2013

TROKSNIS/VIBRACIJA
TECHNINIAI DUOMENYS ①
SAUGA
BENDROSIOS DARBO SAUGOS INSTRUKCIJOS
Operations & Engineering
Olaf Dijkgraaf
Approval Manager

SKIL Europe BV, 4825 BD Breda, NL
09.12.2013
TRIUKSMINGUMAS/VIBRACija
ONIHTN YNATCTBA 3A BE3BEDHOCT
N PEPYPDEYBAHbE! Cte ynatCTBa Mopa da ce npoHTaT. HenoTuBaHBe Ha doLy habeDeHnTe ynaTcBA MoJe Da pneDn3BnHa cTpyeH yap, noKap n/Inn TeuHN NOpBei. CyBaJte rH cTne ppeDyPbBAba HanaTcBnJa 3a BO NduHa. POnMOT "eKeTpUeH anat", KOJ ce KOpCTn BO NoHaTaMoUHnO TkCT, ce OdHeCyBa Ha BauHOT eKeTpUeH anat (co pInKhUeH Ka6JI) n Ha eKeTpUHn anatn CO nOroH Na 6aTeprn (6e3 pInKhUeH Ka6JI).
1) B63E6H0CT HA PABOTHOTO MECTO
a) OndyBaeTo roBaWTe PO a60THO MeCTO N ypeNo. HeypEneH nI TEmeP a60TeH npocTOp MoHe Da pEeDn3BnKaat He3oDrn.
b) HemojTe da pa6oHTe co ypeoT O Bo cpeHnA BO Hoja mHa OnaNoCT OJ eHCpIOn3Ja, BO KoJa mHa 3anaJIiNbTeuHOCTn, racOBn I npaunHa. EJeKtpNHTe aIaNt npOIN3BeyBaat NCKPn KOI MOKAT Da 3anaIat npaUnHa nn NapeA.
c) 3a BpeMe Ha yonTope6ata Ha eIeHTpHnHnO anat, Deuata n octaHaTHe Iina dpHexe rnoJaaneHy oJ MecToTe Hae paobToHe. ODbpaKaHe, 6n MoKeHe da H3ry6bte KOHTpola Bp3ypeoT.
Operations & Engineering
Olaf Dijkgraaf
Approval Manager

SKIL Europe BV, 4825 BD Breda, NL
09.12.2013
БУСАВА/BИБРАЦИ
- Mepeno BO corlaacnoct co EN 60745 HNBOTo ha 3Buyen
- npTncoh e 97 dB(A) a HNBOTo ha 3BvyHa MOHocT 108
- dB(A) (cTaNdapnO oTcTaNyBaHe: 3 dB), n BvBpaunja*
- m/c² (hand-arm metoJa; heCnHyPnoCT K = 1.5 M/c²)
- kora ceyeTe dpBo 2,6 m/s²
-
kora ceyeTe metaI 2,2 m/s²
HnBOTO Ha emHTnpaBeHa Bn6paunu Koe e HabeDeHo Ha 3aHNOt DeHa Oba yNaTCTBO e N3MepeHO BO corlaCHOCT Co CTandapn3HpaHNO TcTe DaHe Hb EN 60745;MoKe Ja ce KopNCtN 3a Da ce CnpopeN edeH aIAT CO npYr, I KaKo npBnuHa OceHka 3a N3IOJHexOCTa Ha Bn6paunu Kora Ce KopNCtN aIaTOT 3a CNOMeHaNTte npImEHNI
-
KopriCTeTo Ha aIaTOT 3a pa3Hn IpMHeHn, NIn CO p3aJIHHN NIn HEnpaBnIHo CyBaHn DeIOBn, MOKe Da DOBeDe Do 3HaJahJO 3roJeMyBaHbe Ha HNBOTO Ha I3JOHOHeOCT
KORA aJATOT e NCKUYEN MHN KORA aJATOT e BKNYEN HO He BPNH NekKaBa pa60Ta, MoKeJa da JoJe Do3HaHTeNHO HAMALYBaHe HA HBOTO aN3LOXHEOCT
! 3aawTHTeTe ce od efeKTHte Ha Bn6paunH TepeHy ODPKyBaHe Ha aIaTOT N HerOBnTE DeIOBn, ODPKyBaBe Ha TOnJIInHa To BAwHTe paae, I orpAraHnIpaBe Ha BAwaTa pa6Ota
AL
Sharra rethore
5255
HYRJE
Operations & Engineering
Olaf Dijkgraaf
Approval Manager


SKIL Europe BV, 4825 BD Breda, NL
09.12.2013
ZHURMA/VIBRIMI
E matur né pērputhje me EN 60745, nivali i trysnisë sē tingullit i kësaj pajisje ᵓshté 97 dB(A) dhe nivali i fuqise sē tingullit 108 dB(A) (shmongia standarde: 3 dB) dhe vibrimi * m/s² (metoda e krahut-dorës; pasiguria K = 1,5 m/s²)
- kur prisni dru 2,6 m/s²
-
kur prisni metal 2,2 m/s²
-
Niveli i emetimit t vibritim eshte matur n perputhme nje provete standardizar te dhene ne EN 60745; ajo mundt pe perdoret pet krahasar nje vegel me nj tjeter dhe si njve vleresim paraprak i ekspozimit ndaj vibritim kur pardorni pajisjen per proceset e permendura
-
pēdorimī i pajisjes pēr procese tē ndryshme, osme aksesore tē ndryshēm dhe tē mirēmbajtur keq, mund tē rittiā ndjeshēm nivelin e ekspozimit
- kohet kur pajisja eshte e fikur dhe kur eshte ndezur por jo nè puné, mund tě zvogëlojne ndjeshem nivelin e ekspozimit
I mbroni veten nga efektet e vibrimit duke mirrembajtur pajisjen dhe aksesoret e saj, duke imbajtur duart e ngrohta dhe duke organizuar menyrren tuaj te punes
SLj j1,La aagaaa aas jy aalwai j 1 gajl aai (a)
aay y aay y aay g aygai y aay aay g aygai y aay g aygai y aay g aygai y aay g aygai y aay g aygai y aay g aygai y aay g aygai y aay g aygai y aay g aygai y aay g aygai y aay g aygai y aay g aygai y aay g aygai y aay g aygai y aay g aygai y ayy
中
clalalogjgluyglaolglyjyololai 1 yda aagglge gglgglgglgglgglg 10aaglglgglgglgglgglgglgglgglgglgglgglgglgglgglgglgglgglgglgglgglgglgglgglgglgglgglgglgglgglgglgglgglgglgglgglgglgglgglgglgglgglgglgglgglgglgglgglgglgglgglggl
VJyLJyS
-
Tgblgblgblgblgglgglgglgglgglgglgglgglgglgglgglgglgglgglgglgglgglgglgglgglgglgglgglgglgglgglgglgglgglgglgglgglgglgglgglgglgglgglgglgglgglgglgglgglgglgglgglgglgglgglg
jss j 1 J L 1 J 1 J 1 J 1 J 1 J 1 J 1 J 1 J 1
aie aegioj0jao
D. = , =
T 1
1 !
1234567890123456789012345678901234567890123456789012345678901234567890123456789012345678901234567890123456789
J L D a 100000000000000000000000000000000000000
Jgj
Jolcs a jol as jol C oas
12j1Caa0a1sJaoL
1E
a 1 a 1 a 1 a 1 a 1 a 1 a 1 a 1 a 1 a 1 a 1 a 1
L 1
S_ OBC = 12 · CD · BC = CD.
15gJgE
Gwag a g oogjue 3oLs Lgih Gwaw as agn jiabo
JjIy j 1 aai y aai jao g ool Jui C uoiuus Ja jolus
a
auioglao Ljggyg ples aia jai jL i Jy
(20 1
12j1Caaa0aaaJooL
②()
j12a jia 10 r j1 jai ydi ydi ydi ydi ydi ydi ydi ydi ydi ydi ydi ydi
2gh ②
x1 = 2516 x2 = - 2516 y = - 4516.
L L L L L L L L L L L L L L L L L L L L L L L L L L L L L L L L L L L L L L L L L L L L L L L L L L L L L L L L L L L L L L L
2g
iis iW J0g0
⑥ (a2j(-20 a²a²g;
S_ OBC = 12 · CO · BC
=
g 1
⑥ a2jg9. jyjg1; jiiS
15 00
50g 20g 1 g 4g
1j1j1j1j1j1j1j1j1j1j1j1j1j1j1j1j1j1j1j1j1j
j 150000000000000000000000000000000000000
usolaiwPoa hii
a①Q
gles aee bgh goh hghc oolc algh gghj jy
aBjg j1 20 Lg
isolai
gjw jaiu 5yds aabodn00d 1
C1iLjLjLjLjLjLjLjLjLjLjLjLjLjLjLjLjLjLjLjLjLjLjLjLjLjLjLjLjLjLjLjLjLjLjLjLjLjLjLjLj
b①
212 1
1
jG2s jS0
≤LgRJyJ
sddjdsjyLcLzJyLbLzLgj
J 10 J 10 J 10 J 10 J 10
Lolalwblbolo glo jg
s 1 s
aJlS aajil jj
g0s≤gogol1jyjy jyjy 000000000000000000000000000000000000000
中 1j jj
Jg 1000000000000000000000000000000000000000000000000000000000000000000000
y 1 y
40 1
jLg aaiiaa aaiy aaiiy aaiiy aaiiy aaiiy aaiiy aaiiy aaiiy aaiiy aaiiy aaiiy aaiiy aaiiy aaiiy aaiiy aaiiy aaiiy aaiiy aaiiy aaiiy aaiiy aaiiy aaiiy aaiiy aaiiy aaiiy aaiiy aaiiy aaiiy aaiiy aaiiy aaiiy aaiiy aaiiy aaiiy
a a a a a a a a a a a a a a a a a a a a a a a a a a a a a a a a a a a a a a a
aaii aaiiaaaai iaii jilj laiiaaiaiai gaiyai yai
5g 1 g 1 g 1 g 1 g 1 g 1 g 1 g 1 g 1 g 1 g 1 g 1 g 1 g 1 g 1 g 1 g 1 g 1 g 1 g 1 g 1 g 1 g 1 g 1 g 1 g 1 g
g 100000000000000000000000000000000000000000000000000000000000
a 1 a 1 a 1 a 1 a 1 a 1 a 1 a 1 a 1 a 1 a 1 a 1 a 1 a 1 a 1 a 1 a 1 a 1 a 1 a 1 a 1 a 1 a 1 a 1 a 1 a 1 a 1 a 1 a 1 a 1 a 1 a 1 a 1 a 1 a
jL jL jL jL jL jL jL jL jL jL jL jL jL jL jL jL jL jL jL jL jL jL jL jL jL jL jL jL jL jL jL jL jL jL jL jL jL jL jL jL jL jL jL jL jL jL jL jL jL jL jL
g 10000000000000000000000000000000000000000000000000000000000000000000
Lai aai ai j 45 Lai aai ai jai ai aai ai aai ai aai ai aai ai aai ai aai ai aai ai aai ai aai ai aai ai aai ai aai ai aai ai aai ai aai ai aai ai aai ai aai ai aai ai aai ai aai ai aai ai aai ai aai ai aai ai aai ai aai ai aai ai aai ai aai ai aai ai aai ai aai ai aal ai aai ai aai ai aai ai aai ai aai ai aai ai aai ai aai ai aai ai aai ai aai ai aai ai aai ai aai ai aai ai aai ai aai ai aai ai aai ai aai ai aai ai aai ai aai ai aai ai
a a a a a a a a a a a a a a a a a a a a a a a a a a a a
jolal joljglg jolj g jogjog jolj g jolj g jolj g jolj g jolj g jolj g jolj g jolj g jolj g jolj g jolj g jolj g jolj g jolj g jolj g jolj g jolj g jolj g jolj g jolj g
1 1
1
1
1
1
1
1
1
1
1
g 1 g 1 g 1 g 1 g 1 g 1 g 1 g 1 g 1 g 1 g 1 g 1 g 1 g 1 g 1 g 1 g 1 g 1 g 1 g 1 g 1 g 1 g 1 g 1 g 1 g 1 g 1 g 1 g 1 g 1 g 1 g 1 g 1 g 1 g
aaiis jjiaas aaiis gles aaii caiis wai jiy jgac ( 1
ggl y 1y 1y 1y 1y 1y 1y 1y 1y 1y 1y 1y 1y 1y 1y 1y 1y 1y 1y 1y 1y 1y
a a a a a a a a a a a a a a a a a a a a a a a a a a a a a a a a a a a a a a a a a a a a a a a a a
a 10000000000000000000000000000000000000000000000000
#
gogac gicl glial
aeg aaiia aaiia aaiia aaiia aaiia aaiia aaiia aaiia aaiia aaiia aaiia aaiia aaiia aaiia aaiia aaiia aaiia aaiia aaiia aaiia aaiia aaiia aaiia aaiia aaiia aaiia aaiia aaiia aaiia aaiia aaiia aaiia aaiia aaiia
jgl jll jll jll jll jll jll jll jll jll jll jll jll jll jll jll jll jll jll jll jll jll jll jll jll jll jll jll jll jll jll jll jll jll jll jll jll jll jll jll jll jll jll jll jll jll jll jll jll jll jll jell jll jll jll jll jll jll jll jll jll jll jll jll jll jll jll jll jll jll jll jll jll jll jll jll jll jll jll jll jll jll jll jll jll
Jxg jy 10000000000000000000000000000000000000000000000000000000000000000000000000000000000000000
absl aaill
aIyIyIyIyIyIyIyIyIyIyIyIyIyIyIyIyIyIyIyIyIyIyIyIyIyIyIyIyIyIyIyIyIyIyIyIyIyIyIyIyIyIyIyIyIyIyIyIyIyIyI y
C∈goljL
eAa#i## ## ## ## ## ## ## ## ## ## ## # ## ## ## ## ## ## ## ## ## ## # # # # # # # # # # # # # # # # # # # # # # # # # # # # # # # # # # # # # # # # # # # # # # # # # # # # # # # # # # # # # # # # # # # # # # # # # # # # # # # #
EN 00.12g EN 11.9: g EN 1.VE0.AJU JALI JALI JALI JALI JALI JALI JALI JALI JALI JALI JALI JALI JALI JALI JALI JALI JALI JALI JALI JALI JALI JALI JALI JALI JALI JALI JALI JALI JALI JALI JALI JALI JALI JALI
f.1/10/EUg f.1/Vf.ECg f.1/V/AEC b.1/10/BCB Breda, NLge
:5,0000000000000000000000000000000000000000000
Zjglal jaiai liy
1
gall glal glac
1g jz q 0 1j 2j 3j 4j 5j 6j 7j 8j 9j 10j 11j 12j
:JooJI aeHjIc Jauu wJbI IeHaJI Jn Go
G aJyI plaWuF yIwJgJyI cI
(aagglcnsa)lllglolal
1
JJIJIJIJIJIJIJIJIJIJIJIJIJIJIJIJIJIJIJIJIJIJIJIJIJIJIJIJIJIJIJIJIJIJIJIJIJIJIJIJIJIJIJIJIJIJIJIJIJIJIJIJIJIJIJIJIJIJIJIJIJIJIJIJIJIJIJIJIJIJIJIJIJIJIJIJIJIJIJIJIJIJIJIJIJIJIJIJIJIJIJIJIJIJIJIJIJIJIJIJIJ
(aLgjogagglgabwlgjdlJdJgJg
(1)
p1
s1j21g aagai j 5iig i31 jieai aegil lioe 1021 gao Lioic
pi j5 a5jnil
a
42jie 42jL> o8g plxu wyl juiill
pss
T
:J
B u jzaiI gao a A wsiill liai Igli
D aI J L aI J I cI L sI i C j g a
:wwll Claal pleswly
45.13 Jc Loe aagio 21C jlll jjj
C j1j1jjgcl
E aai jaij
a#s#y#j#p#Jl#i GgJl#j#F jwJgJl
Ii11 I i 11111111
Jawllglll 100000000000
FJwJgJjcl
E a:lll S y
A
a
pLsiu:jieiJlJusuoJy pKsI JsliaG C jgajgac Jej gas
Lioic jilll Jai jjol no slll 0) aJb aJ 1/An Jaoe wssll tlll
iLlililjgljllcjjlljll jll jll jll aolal
Cjz11Jz11jz11
(alo(-00gblallgocb)
Jc jz aLwJiI 1000
Joell aebjie Jwiojolo
Jgall
pkiwle gdlg wlllghaall gac bai K pall jj/ij
L
J1J2·s Jn - 1Jn
⑥ a(-)gaball a|j
Mjglal all jlc1
puiuuiy jaii jie aigbail gaiai ayjia xia 1211110
N
Mjglal jaiai Jg
y 1
chill joc
⑥ a.
1 gai jie 1 k
a2j a2g j Lg 10g gall
aall no gaaal sjgl aai jgagajgao
y0 p
LpIaJIyipssMJaaJIyJiaJIaJIy
:LL
a①QbJJIJIJIJIJIJIJIJIJIJIJIJIJIJIJIJIJIJIJIJIJIJIJIJIJIJIJIJIJIJIJIJIJIJIJIJIJIJIJIJIJIJIJIJIJIJIJIJIJIJIJIJIJIJIJIJIJIJIJIJIJIJIJIJIJIJIJIJIJIJIJIJIJIJIJIJIJIJIJIJIJIJIJIJIJIJIJIJIJIJIJIJIJIJIJIJIJIJIJIJIJ
Jae bieh jn wll glll hll slaiol gl 821 a
Lgawd aegyao ghe Jgauu uuuu
aLgawlaagjLlo ggl a
Joaell aebj no oalld jdl gdc pall no jnssll sddi i
y
b①JdJIJI
a 1
0.
1 !
jiei hao
V R Jggl gge aJgSll Jg
gawll gglg 2a yagsl aasl pgsjy Jaiy Lalbo cawy
g211 iloc g
J 1 J 1 J 1 J 1 J 1 J 1 J 1 J 1 J 1 J 1 J 1 J 1 J 1 J 1 J 1 J 1 J 1 J 1 J 1 J 1 J 1 J 1 J 1 J 1 J 1 J 1 J 1 J 1 J 1 J 1 J 1 J 1 J 1 J 1 J
a
olcLoglo
a a a a a a a a a a a a a a a a a a a a a a a a a a a a a a a a a a a a a a a a a a a
oLo yugunuun uus) yugunun u 1e Jauu slgo plasumlu Jauu 8
Jus Jus Jus Jus Jus Jus Jus Jus Jus Jus Jus Jus Jus Jus Jus Jus Jus Jus Jus Jus Jus Jus Jus Jus Jus Jus Jus Jus Jus Jus Jus Jus Jus Jus Jus Jus Jus Jus Jus Jus Jus Jus Jus Jus Jus Jus Jus Jus Jus Jus Jus
aIglllglllplaxuily Jauillnac Jauuulldal aIgllllcblzullpzzll .
aIgdljauusolc! no gnuuclueogllnuiil Iguu gauu paunu X y
a
:LaLlalllplsswIie JzaiolLLpawll SKIL gaa .
Jzai Ic zaiy jllg. 4j yswll acyyu wll Laii aas .
- g j 14. Lgj 14. j 14. j 14. j 14. j 14. j 14. j 14. j 14. j 14.
(HSS) acywl lle sglal go aegioa liuia ayo plazull Lgj bany . 1s21 oao gao glai /c/ jol yai /plazuln Lgj bany . plazuln J
aaii aaii aai iie ai iiaaiiaaiiaai gai gai gai gai gai gai gai gai gai gai gai gai gai gai gai gai gai gai gai gai gai gai gai gai gai gai gai
68gall 511 gull yllal glll aag uall agll lll . . . . . . . . . . . . . . . . . . . . . . . . . . . . . . . . . . . . . . . . . . . . . . . . . . . . . . . . . . . . . . . . . . . . . . . . . -
aJyLo ggl 1000 1000 1000
a15 a5 15 b1 15 b2 c15 c2 d15 d2 e15 f15 g15 h15 i15 j15 k15 l15 m15 n15 o15 p15 q15 r15 s15 t15 u15 v15 w15 x15 y15 z15
jolal plsiwi1eji
Lg 151y jai (1) Jusuys A0 a Jauil slui sliagwai ssu
aLgU LgU aLdU pU bU gU dU pU LgU
1234567890
jssggsa0x1
12 1381 140 141 142 143 144 145 146 147 148 149 150 151 152 153 154
Jusg Ulll JooJI .JooJI sI g I JI LlUll JooJI aLL.
aIg 100 g 100 g 100 g 100 g 100 g 100 g 100 g 100 g 100 g 100 g 100 g 100 g 100 g 100 g 100 g 100 g 100 g 100 g 100 g 100 g 100
Jus 1 Jus 1 Jus 1 Jus 1 Jus 1 Jus 1 Jus 1 Jus 1 Jus 1 Jus 1 Jus 1 Jus 1 Jus 1 Jus 1 Jus 1 Jus 1 Jus 1 Jus 1 Jus 1
JU 111111111111111111111111111111111111111111
Le Jauil l Jau d aaiu jau g i gai g aia Lao Jau ay slay 10
aLau Jauell aee o aayg auiu e c kll Jaui
Jusll aagaaagaaagaaagaaagaaagaaagaaagaaagaaagaaagaaagaaagaaagaaagaaagaaagaaagaaagaaagaaagaaagaaagaaagaaagaaagaaagaaagaaagaaagaaagaaagaaagaaagaaagaaagaaagaaagaaagaaagaaagaaagaaagaaagaaagaaagaaagaaagaaagaaagaaagaaa
1 1
1
1
1
1
1
1
1
y 100000000000000000000000000000000000000000000000000000000000000000000000000
j 1500000000000000000000000000000000000000000000000000000000000000000000
Jus: Juaa aagaa aagaa aagaa aagaa aagaa aagaa aagaa aagaa aagaa aagaa aagaa aagaa aagaa aagaa aagaa aagaa aagaa aagaa aagaa aagaa aagaa aagaa aagaa aagaa aagaa aagaa aagaa aagaa aagaa aagaa aagaa aagaa aagaa aagaa
1 1 1 1 1 1 1 1 1 1 1 1 1 1 1 1 1 1 1 1 1 1 1 1 1 1 1 1 1 1 1 1
Jiaaoa Juaa Juaa Juaa Juaa Juaa Juaa Juaa Juaa
"zaiy zai yai jiai jiai jiai jiai jiai jiai jiai jiai jiai jiai jiai jiai jiai jiai jiai jiai jiai jiai jiai jiai jiai jiai jiai jiai jiai jiai jiai jiai jiai jiai jiai jiai jiai jiai
aJUgJgBg (1
aagai jia jia jia jia jia jia jia jia jia jia jia jia jia jia jia jia jia jia jia jia jia jia jia jia jia jia jia jia jia jia jia jia jia jia jia jia jia jia
.aaegill
sclj gds
L 1
aJyill jyLjgall gllg aal all
aui g aiggagai jn a5i jiaai jia jia jia jia j
o o 1 h a i l y g plaii J Ia j 1 k
a
aIgSll plsiuWg ALoe jnn (2
aLgSll lolllglgcln 10s 10
aai j 10g a bgs lglb g lgl aee
Jaa Jg jda Jg g aal g / g aal no
aill jioi oiojolj21 1j 1j 1j 1j 1j 1j 1j 1j
gao 15
JlabeJI Jiaoc Jue: Igouusuui jai 8 gill ayyuyu
1 2 3 4 5 6 7 8 9 10
Jgolal Jgolal, jI aylaayy
.
jgl 1scls lloc jn a jnnn nn nnnn nnnn nnnn nnnn nnnn nnnn nnnn
jg i5d jiaaeimoo Lgih gauu Jieai 5y
aill jnnn lge gjg aai li ggsso slil cils
jglj Jzdi oLc! jz aillll 1000
15 15
ghall gghall scc lssg kagbghall sacc
15
a 1
pssai oaiy ai Jg jagjogj gci j
2L1 LgJgJgJgJgJgJgJgJgJgJgJgJgJgJgJgJgJgJgJgJgJgJgJgJgJgJgJgJgJgJgJgJgJgJgJgJgJgJgJgJgJgJgJgJgJgJgJgJg
a_3 = 12
左向右异
aag yannnnn Joo no ba a jyssll lccuai:
jolol jlc aiblsl Jj jooj. jolil joi jioi
aaii iiiia aiai iai
Jy g:JaiIg hiaiia 1
L 15 L 15 L 15 L 15 L 15 L 15 L 15 L 15 L 15 L 15 L 15 L 15 L 15 L 15 L 15 L 15 L 15 L 15 L 15 L 15 L 15 L 15 L 15 L 15 L 15 L 15
:Jauill ahwlg: Logohj jiei
JgJn Jn Jn Jn Jn Jn Jn Jn Jn Jn Jn Jn Jn Jn Jn Jn Jn Jn Jn Jn Jn Jn Jn Jn Jn Jn Jn Jn Jn
:Joell aebj Jaiwi
Joo JgLo gBj j:Joaill aebclaw gcbll gac b
LooJIaehoJauol
Lw jy g yg Lgab g Jaoell ae hjlln
Cusus JsJy Joell pco sjzjll jso:diiae daie Joell aebse yqilip
Sill j 1j 1jll a s g j 1j 1j
aIy aie aljell lalwol plaswnu yilg 121 clwol (
ailllllwwg jao cllw alao gaaaloljg jgsc
Jgog" Jll LjSjw w "sLjL Juaio" cll W go oolilis:
j 11 j 11 j 11 j 11 j 11
1.5,5 2.5,4

L
ao
JiJiJiJiJiJiJiJiJiJiJiJiJiJiJiJiJiJiJi
1 1
jg jgljgljgljgljgljgljgljgljgljgljglj
JcuiyjgSll JleaiuuiyaiLJIyjglJlglJlg
glll sic jgljglc ohrwll aaii adiygSll
y
J 1
aIgSlll 100 aIgSlll lglj 2. Jg31 jLg
aulll lallg aol jll gall jll
iiijjSlllloaalljdo
gdlg aedlglg jglgglg 2L gdo
gS2Loaic aIyrgSll Cooall bsl slycAabwgl yolll g
jfofofo
aLgSll Lssal sla aagbgl jlaol 0 aaiy
aLgSd 1
aJl JlJSJI JIgwi 8. JSLJ pIeWJdLwPac qy (
slej! 1c bala. jauall no jauai J uuiu g I giae Jg aic
aJ 1jg111 g111 g011 1g111 g011 g011
aLgSlllssll 100 aLilil gdlll l
Loric Lai jy JlaoWu ad Lall aolal cLs paasw (C
Jusss Jusss Jusss Jusss
aJySJIolal JIJIJIJIJIJIJIJI
aBjIgJy aJyJySsJy
Jll no aagll ciao ool 1.aaill Jll no aagll ciao ool
aLgSlllloalllj
Jolai 1
Jaei aieySJI aeil aeWg Jaoell pag alea lo jaiig li
1j 1 j 105i oic gSi Iocic iio ng Si Iocic ailuys 105 oia
aJyjgSll oell plaiiwi ic aolg abnol olaiy1 puc. gajg1 jgssll g
.
Aeglls
aIg 1g 2g 3g 4g 5g 6g 7g 8g 9g 10g 11g 12g 13g 14g 15g 16g 17g 18g 19g 20g 21g 22g 23g 24g 25g
CpOK DeIcTBnI CePTnΦnKaT O COOTBeTCTBnI
no 15.08.2018
OOO «LcEHTp no cepTnФикauи cTaHndapTn3aun
N CNTEM KaueCTBa 3JIeKtpo-MaunHOCTPOnteBHOI
npodykun»
141400,XHIMKNMOCKOBCKObjectn
yI.JIeHHrpaAdcka,29