
AD 4224 - Food Processor ADLER - Free user manual and instructions
Find the device manual for free AD 4224 ADLER in PDF.


| Product Type | Food Processor |
| Brand | Adler |
| Model | AD 4224 |
| Dimensions (L x W x H) | Approx. 30 x 20 x 40 cm |
| Weight | Approx. 4.5 kg |
| Power Supply | 220-240 V, 50-60 Hz |
| Rated Power | 1000 W |
| Bowl Capacity | 3.5 L |
| Speeds | 6 speeds + pulse function |
| Main Functions | Mix, chop, knead, whisk, grate |
| Included Accessories | Bowl, lid, chopper blade, whisk, dough hook |
| Bowl Material | Tempered glass |
| Blades | Stainless steel |
| Care and Cleaning | Bowl and accessories are dishwasher safe; housing wiped with a damp cloth |
| Safety | Safety lock on lid; automatic shut-off in case of overload |
| Spare Parts | Replacement bowl, blades, gaskets available |
| Repairability | Authorized Adler service center; repair possible |
| Warranty | 2 years |
| Energy Class | A |
| Color | White and black |
Frequently Asked Questions - AD 4224 ADLER
User questions about AD 4224 ADLER
0 question about this device. Answer the ones you know or ask your own.
Ask a new question about this device
Download the instructions for your Food Processor in PDF format for free! Find your manual AD 4224 - ADLER and take your electronic device back in hand. On this page are published all the documents necessary for the use of your device. AD 4224 by ADLER.
USER MANUAL AD 4224 ADLER
AD 4224
C.

D.
E.![graph TD A["Step 1: Opening"] --> B["Step 2: Peak Processing"] B --> C["Step 3: Close Processing"] style A fill:#f9f,stroke:#333 style B fill:#ccf,stroke:#333 style C fill:#cfc,stroke:#333](/content/2026/06/1375310/images/253b79e603cab0887cea9503f4ec97b66ae4bacdf07fbb5486c89aed05b938df.jpg)
F.

ENGLISH
SAFETY CONDITIONS. IMPORTANT INSTRUCTIONS ON SAFETY OF USE PLEASE READ CAREFULLY AND KEEP FOR FUTURE REFERENCE
The warranty conditions are different if the device is used for commercial purposes.
- Before using the product, please read carefully and always comply with the following instructions. The manufacturer is not responsible for any damages due to misuse.
- The product is only to be used indoors. Do not use the product for any purpose that is not compatible with its application.
- The applicable voltage is 220-240V, ~50/60Hz. For safety reasons, it is not appropriate to connect multiple devices to one power outlet.
- Please be cautious when using around children. Do not let children play with the product. Do not let children or people who do not know the device use it without supervision.
- WARNING: This device may be used by children over 8 years of age and persons with reduced physical, sensory or mental capabilities, or persons without experience or knowledge of the device, only under the supervision of a person responsible for their safety, or if they were instructed on the safe use of the device and are aware of the dangers associated with its operation. Children should not play with the device. Cleaning and maintenance of the device should not be carried out by children, unless they are over 8 years of age and these activities are carried out under supervision.
- After you are finished using the product, always remember to gently remove the plug from the power outlet holding the outlet with your hand. Never pull the power cable!!!
- Never leave the product connected to the power source without supervision. Even when use is interrupted for a short time, turn it off from the network, unplug the power.
- Never put the power cable, the plug, or the whole device into water. Never expose the product to atmospheric conditions such as direct sunlight or rain, etc. Never use the product in humid conditions.
- Periodically check the condition of the power cable. If the power cable is damaged, the product should be taken to a professional service location to be replaced in order to avoid hazardous situations.
- Never use the product with a damaged power cable, or if it was dropped or damaged in any other way, or if it does not work properly. Do not try to repair the defective product yourself because it can lead to electric shock. Always take the damaged device to a professional service location for repair. All repairs can only be done by authorized service professionals. Incorrect repair can cause hazardous situations for the user.
- Never put the product on or close to hot or warm surfaces or kitchen appliances like an electric oven or gas burner.
- Never use the product close to combustibles.
- Do not let the cord hang over the edge of the counter.
- For additional protection, it is advisable to install a residual current device (RCD) with a rated residual current in the electrical circuit.
- Do not immerse the motor unit in water.
- Before cleaning and removing accessories, set the speed control to the OFF position and unplug the power cable.
- Before operating the device, check that all parts and accessories are properly mounted.
- During mixing of hot products, exercise extreme caution to avoid burning. Do not exceed
the capacity of 2000 ml.
- The device has been designed to prepare small amounts of food products. The device is not intended for industrial food processing.
Product description – Food processor – Figure A
- Touch control panel 2. Motor base
- Bowl 4. Driving shaft (bigger)
- Disc holder 6. Slicing disc
- Shredding disc – for thick shavings 8. Shredding disc – for fine shavings
- Lid 10. Pusher (not for spiralizer function)
- Grinder blade unit 12. Grinder container
- Gear shaft (smaller) 14. Gear holder
- Gear 16. Slicing blade – for thick ribbons
- Shredding blade – for thicker threads (Linguine noodles size)
- Fine shredding blade – for thinner threads (Spaghetti noodles size)
- Pusher (for spiralizer function only) 20. Chopper blade plastic protectors
- Stainless steel chopper blade 22. Kneading blade
- Double beater 24. Spatula
TOUCH CONTROL PANEL (1):
1A. Start / Pause button 1B. Power button
1C. Smoothie function button 1D. Meat chopping function button
1E. Ice crush function button 1F. Pulse function button
1G. LCD screen for working time presentation 1H. Speed regulation knob
1J. Manual speed selection indicator (from MIN to MAX)
The touch buttons are: the Power button (1B), the Pulse function button (1F), Ice crushing button (1E), the Meat chopping button (1D), the Smoothie button (1C), and the Start / Pause button (1A).
You can also select speed manually by turning the knob (1H) from "MIN" – slowest speed to "MAX" – maximum speed, if you do not choose the auto mode functions.
Manual mode:
Press the Power button (1B). A single beep will be heard. Choose the related speed by rotating the knob (1H). 7 speeds can be used from "MIN" – slowest speed to "MAX" – maximum speed. The LED indicator (1J) shows the selected speed. Once the speed is confirmed, press the Start / Pause button (1A) to start the program. Press the Power button (1B) to stop the program and turn off the device.
Auto modes
Available for functions: Ice crush, Smoothie, Meat chopping.
Turn on the device by pressing the Power button (1B), then choose the related button among: Ice crush function (1E), Smoothie function (1C), or Meat chopping function (1D).
The blinking icon shows the function is selected. Press the Start / Pause button (1A) to start the selected program. Once the working starts, the LCD screen (1G) will show countdown working time until the program is finished. During the working process for auto mode, you can pause the program by pressing the Start / Pause button (1A). The device can resume to work once this button is touched again. The machine will continue to work till the program is finished.
The operation time of each mode:
Ice crush mode: 1 minute, time counts down from 60 seconds and stops at 0 second. Use food processor bowl.
Meat chopping mode: 30 seconds, time counts down from 30 seconds and stops at 0 second. Use food processor bowl.
Smoothie mode: 1 minute, time counts down from 60 seconds and stops at 0 second. Use food processor bowl.
Auto modes sometimes need to be repeated to reach the expected consistency of the food being processed.
Manual mode: 2 minutes, time counts up from 0 second and stops at 2 minutes.
Start / Pause button :
Press this button (1A) to pause during work, press this button again to continue the work, and enter standby mode without operation for period of 1 minute.
Pulse function :
Pulse function is operated in manual mode, just press Pulse button (1F) to start and release to stop working. During the period the Pulse button (1F) is pressed the motor works only.
Notice:
Once the auto mode is selected but not confirmed (before pressing the Start / Pause button (1A)), you can turn the knob (1H) to manual mode. Then choose the function you need, and start the function by pressing the Start / Pause button (1A). Please note that the device will turn off automatically if there is no further actions within 2 minutes.
PROTECTION DEVICE
This device is equipped with a protective device against high temperature. If the temperature becomes too high, the unit will turn off
automatically and resume operation after the motor has cooled down sufficiently (after about 30 minutes).
CHOPPER FUNCTION - Chopping blade (21) – installation according to Figure C.
Standard processing time is from 30 seconds to 1 minute. Suggested volume in one batch of food put into the bowl is:
Chocolate ≤ 200g
Cheese ≤ 350g
Meat ≤ 800g
Vegetable & Spice 100~150g
Fruit 300~500g
Onion ≤ 800g
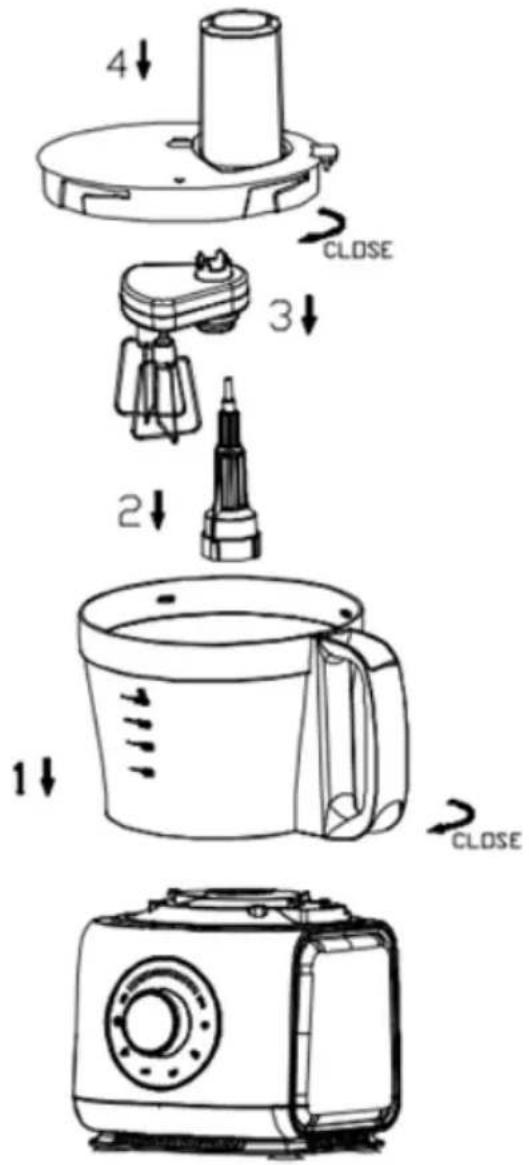
MIXING FUNCTION – Kneading blade (22) – installation according to Figure C.
Standard food processing time is from 20 seconds to 30 seconds. Suggested volume in one batch of food put into the bowl is:
Flour and other ingredients ≤ 800g (pizza dough, pancake dough)
Soft cheese ≤ 800g
Eggs ≤ 10pcs (mayonnaise)
The ratio of flour to water while mixing is 1 : 0.6, meaning 100g flour needs 60g water to make best effect.
SLICING AND SHREDDING FUNCTION – discs 6,7,8 - installation according to Figure D.
Assemble the slicing disc (6) to cut the food in slices or shred the cabbage.
Assemble the shredding disc (7) – for thick shavings.
Assemble the shredding disc (8) – for fine shavings.
Standard processing time is 1 minute.
After assembling, start the device to see if the device is working properly. Then stop the device and prepare food.
Choose the blade disc according to ingredients and the cutting shape required.
Put the selected disc into the plastic disc holder (5), then seat it on the driving shaft (4). Close the bowl cover (9) and lock it well until you hear a "click". You can start processing food when the device works normally. If the food pieces are small, place the pusher (10) on the feeding tube and push the food down with the pusher (10). If the food is larger than the cross-section of the feeding tube, cut it into smaller pieces before putting them into the feeding tube, and use the pusher (10) to press the food.
Do not press overly large pieces of food into the feeding tube, and do not apply force to the pusher (10). In such cases, cut the food into smaller pieces.
Tips:
In manual mode, you can select the speed from 1 to 7 using the rotary knob (1H). Speeds 1 to 7 range from slow to fast. Choose the appropriate speed based on the softness of the food and the processing needs. For soft fruits and vegetables, select a low-speed gear. If the food cannot be processed, immediately switch to a higher-speed gear.
WHIPPING FUNCTION - Double beater (23) - installation according to Figure E.
Suggested volume per batch for the double beater:
Eggs: 2~10 pieces, time: 30~70 seconds
Cream 30% (cold from refrigerator for best results): 200~550ml, time: 30~60~90~120 seconds
Egg whites: 3~5 pieces, time: 180~240 seconds
Make sure the knob (1H) is at position "0" speed, plug in, and use the pulse button (1F) 2-3 times for pre-mixing. Then select "max" speed for whipping.
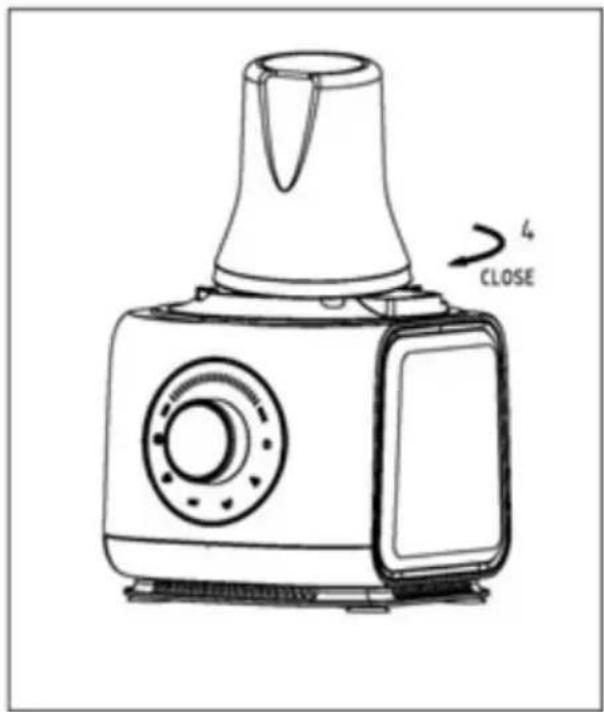
GRINDING FUNCTION - Grinder (11-12) - installation according to Figure F.
Using the grinder, you can grind coffee beans, nuts, almonds, seeds (linseed, sunflower, etc.), spices (pepper, cumin, etc.), and sugar into powdered sugar, etc.
- Hold the grinder blade unit (11) and turn it clockwise to separate it from the grinder container (12).
- Invert the grinder container (12) so the edge faces upward, then put the ingredients into the container (12) and fix it onto the grinder blade unit (11) by turning the blade unit (11) counterclockwise.
- Place the grinder (11 + 12) onto the motor base (2) and then turn it clockwise until it locks in place.
- Use the pulse setting 1-2 times as pre-grinding, then choose MAX speed for grinding.
- Do not continuously operate the grinder for more than 15 seconds. Allow the motor to cool down for 1 minute before next use.
Attention: Do not put too much ingredients exceeding half a cup (75g coffee bean), and make sure the grinder is fixed firmly, otherwise, the ingredients may spill out of the container during operation.
SPIRALIZER FUNCTION - Spiralizer (13-19) - installation according to Figure G.
The function of spiralizer is to cut the food into different shapes like: spaghetti pasta, Linguine pasta or vegetable spirals to decorate your dishes. The processing food types:
- boiled: beets, potatoes, carrots
- raw: cucumber, zucchini, etc.
Position the processing bowl (2) onto motor base (1), turn clockwise to make it fixed firmly. Place the gear shaft (smaller) (13) onto the rotor inside the bowl, seat it vertically. Place the gear holder (14) into the bowl, there is only one position that allows to fix it properly. Correct position is shown at picture with Figure G. The gear holder (14) should be located into the bowl on the concave side! The gear holder (14) has got 3 holes, the biggest hole should be located next to the bowl's holder.
Choose the spiralizer blades (16, 17 or 18) you want, slide it in the gear (15), then place the gear (15) into biggest circle hole in the gear holder (14), close the bowl cover. The position of spiralizer should be below the feeding tube.
Start the device to see if the device is working properly. Then choose MAX speed and start process spiralizer. First, cut the food into 80-100mm length with knife, cut both ends to flat. The food impale on end of the pusher (19) with convex ribs, then put the food into feeding tube, and press the pusher (19). The food will slowly drop down and cut out the desired food shape. If the food in bowl is full, need stop device and take it out.
Note: When processing different foods, clean the blade before changing food type. It is recommended that the device's continuous processing time should not exceed 2 minutes.
CLEANING AND STORAGE
- Please unplug the power cord to protect from electric shock while cleaning the device. Do not immerse the motor base (2) and power cord in water.
- All removable accessories can be cleaned in water except the motor base (2). Dry the wet parts after cleaning.
- For easy cleaning, you can put in some warm water and detergent and let it run for a while when cleaning the bowl (3).
- Always place the device in a dry and airy place.
- DO NOT use hard (solid) detergent to avoid scratching the product.
- DO NOT operate the device for more than 2 minutes at a stretch.
- TWO minutes ON and THREE minutes OFF, max. 5 cycles, then turn off the device and let it cool down to room temperature.
TROUBLESHOOTING
Problem 1: The device doesn't work.
Solution: Ensure correct assembly. Make sure the power plug is plugged in properly. Check if the mains have tripped, or if there is a power outage.
Problem 2: The device stops running suddenly.
Solution: The bowl may loosen during vigorous processing. Please re-install the bowl cover until you hear a "click".
Problem 3: Motor is running, while accessories do not run.
Solution: Make sure the shaft (4 or 13) is installed correctly / tightly on the rotor inside the bowl.
TECHNICAL SPECIFICATION
Max rotation: 16500 rpm +/-5%
Bowl max capacity 3.5 liters for dry food & 2.0 liters for liquids
Power: 1000W Max power: 2000W
Power supply: 220-240V~50-60Hz
Unit measurement: 28x24x42cm
Operation time: 2 minutes ON and 3 minutes OFF, max. 5 cycles, then turn off the device and let it cool down to room temperature.
To protect your environment: please separate carton boxes and plastic bags and dispose them in corresponding waste bins. Used appliance should be delivered to the dedicated collecting points due to hazardous components, which may affect the environment. Do not dispose this appliance in the common waste bin.
GERMAN
Max. 10 pcs (mayonnaise)
PROTECTIVE DEVICE
Max rotation: 16500 rpm +/- 5%

Standing Fan AD 7305
Sandwich Maker AD 3015

Oil Heater AD 7808
Hair Clipper AD 2823
Hair Clipper AD 2825

Drip Coffee Maker AD 4407

Kettle AD 1286
Hair Dryer AD 2252

Hair Clipper AD 2832

Hair Shaver AD 2932
Kitchen Scale AD 8121
Nut Cookie Maker AD 3039

Blender AD 4076


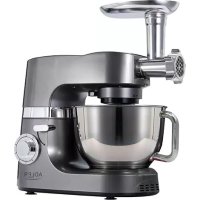

Brand : ADLER
Model : AD 4224
Category : Food Processor