
X9CH - Mouse KeepOut - Free user manual and instructions
Find the device manual for free X9CH KeepOut in PDF.


| Product type | Wired optical mouse |
| Brand | KeepOut |
| Model | X9CH |
| Dimensions (L x W x H) | 120 x 65 x 35 mm |
| Weight | 100 g (with cable) |
| Power supply | USB 5 V, 100 mA |
| Cable length | 1.5 m |
| Connection type | USB-A |
| Optical resolution | 1200 DPI (fixed) |
| Number of buttons | 3 (left click, right click, clickable scroll wheel) |
| Scroll wheel | Yes, with click function |
| Compatible operating systems | Windows, macOS, Linux |
| Installation | Plug & Play, no driver required |
| Maintenance and cleaning | Unplug then clean with a slightly damp soft cloth. Avoid solvents. |
| Safety | No special instructions. Normal use. |
| Spare parts and repairability | Not user repairable. In case of failure, replace the mouse. |
| Operating temperature | 0 to 40 °C |
| Operating humidity | 10 to 90 % without condensation |
| Package contents | X9CH mouse, user manual |
| Warranty | 2 years |
Frequently Asked Questions - X9CH KeepOut
User questions about X9CH KeepOut
0 question about this device. Answer the ones you know or ask your own.
Ask a new question about this device
Download the instructions for your Mouse in PDF format for free! Find your manual X9CH - KeepOut and take your electronic device back in hand. On this page are published all the documents necessary for the use of your device. X9CH by KeepOut.
USER MANUAL X9CH KeepOut
USER GUIDE
Посетете нашия сайт, за да изтеглите нашият водач www.keep-out.eu потребителя Navštivte naše webové stránky a stáhněte si náš průvodce www.keep-out.eu uživatele Besuchen Sie unsere Website, um unsere Führung www.keep-out.eu Benutzer downloaden Епиокефθείτε την ιστοσελίδα μας για να κατεβάσετε τον οδηγό χρήσης μας www.keep-out.eu Külasta meie kodulehel laadida meie giid www.keep-out.eu kasutaja Visitez notre site pour télécharger notre www.keep-out.eu guide d’utilisation Posjetite našu web stranicu za download našeg vodiča www.keep-out.eu korisnika Látogasson el honlapunkra, hogy töltse le a vezető www.keep-out.eu felhasználó Visita il nostro sito per scaricare il manuale d’uso www.keep-out.eu Bezoek onze website om onze gids www.keep-out.eu gebruiker downloaden Odwiedź naszą stronę internetową, aby pobrać nasz przewodnik użytkownika www.keep-out.eu Visite o nosso site para baixar o nosso guia www.keep-out.eu usuário Vizitați site-ul nostru pentru a descărca ghidul nostru www.keep-out.eu de utilizare Navštívte naše webové stránky a stiahnite si náš sprievodca www.keep-out.eu užívatel’a Rehberimiz www.keep-out.eu kullanıcı indirmek için web sitemizi ziyaret

bar
| Category | Value | | -------- | ----- | | Category1 | 0.00% | | Category2 | 0.00% | | Category3 | 0.00% | | Category4 | 0.00% | | Category5 | 0.00% | | Category6 | 0.00% | | Category7 | 0.00% | | Category8 | 0.00% | | Category9 | 0.00% | | Category10 | 0.00% | | Category11 | 0.00% | | Category12 | 0.00% | | Category13 | 0.00% | | Category14 | 0.00% | | Category15 | 0.00% | | Category16 | 0.00% | | Category17 | 0.00% | | Category18 | 0.00% | | Category19 | 0.00% | | Category20 | 0.00% | | Category21 | 0.00% | | Category22 | 0.00% | | Category23 | 0.00% | | Category24 | 0.00% | | Category25 | 0.00% | | Category26 | 0.00% | | Category27 | 0.00% | | Category28 | 0.00% | | Category29 | 0.00% | | Category30 | 0.00% | | Category31 | 0.00% | | Category32 | 0.00% | | Category33 | 0.00% | | Category34 | 0.00% | | Category35 | 0.00% | | Category36 | 0.00% | | Category37 | 0.00% | | Category38 | 0.00% | | Category39 | 0.00% | | Category40 | 0.00% | | Category41 | 0.00% | | Category42 | 0.00% | | Category43 | 0.00% | | Category44 | 0.00% | | Category45 | 0.00% | | Category46 | 0.00% | | Category47 | 0.00% | | Category48 | 0.00% | | Category49 | 0.00% | | Category50 | 0.00% | | Category51 | 0.00% | | Category52 | 0.00% | | Category53 | 0.00% | | Category54 | 0.00% | | Category55 | 0.00% | | Category56 | 0.00% | | Category57 | 0.00% | | Category58 | 0.00% | | Category59 | 0.00% | | Category60 | 0.00% | | Category61 | 0.00% | | Category62 | 0.00% | | Category63 | 0.00% | | Category64 | 0.00% | | Category65 | 0.00% | | Category66 | 0.00% | | Category67 | 0.00% | | Category68 | 0.00% | | Category69 | 0.00% | | Category70 | 0.00% | | Category71 | 0.00% | | Category72 | 0.00% | | Category73 | 0.00% | | Category74 | 0.00% | | Category75 | 1 |BG
ВЪВЕДЕНИЕ
16. Vytvoření makra

Thank you for choosing Keep Out's gaming mouse X9CH.
PRODUCT DESCRIPTION
The X9CH is a Laser Gaming Mouse that focuses on the essential needs of gamers who require programmable buttons to be the best in games. It works with the Avago 9800 optical sensor of extreme quality, adjustable DPI in 4 levels (its values are between 200-8200DPI), that can be easily changed with its DPI selection button. With its 6 programmable buttons, users can save different macros. This information is stored in the internal memory of the X9CH, which allows users to use their preferred settings on different computers without reinstalling the software or reconfiguration. It has 5 programmable profiles. The X9CH is ambidextrous and suitable for all types of players. Includes software to customize all settings.
PACKAGE CONTENTS
- Gaming Mouse X9CH
- Quick installation guide in multiple languages
- Software download card
Note: Make sure that your packaging contains the items described above. If any item is missing or damaged, please contact your dealer.
INSTALLATION
- Connection: Connect the X9CH to a free usb port on your pc, the computer will recognize the device.
- Software installation in Windows: Download the installation software from the address provided on the software download card.
- Restart your pc.
SOFTWARE
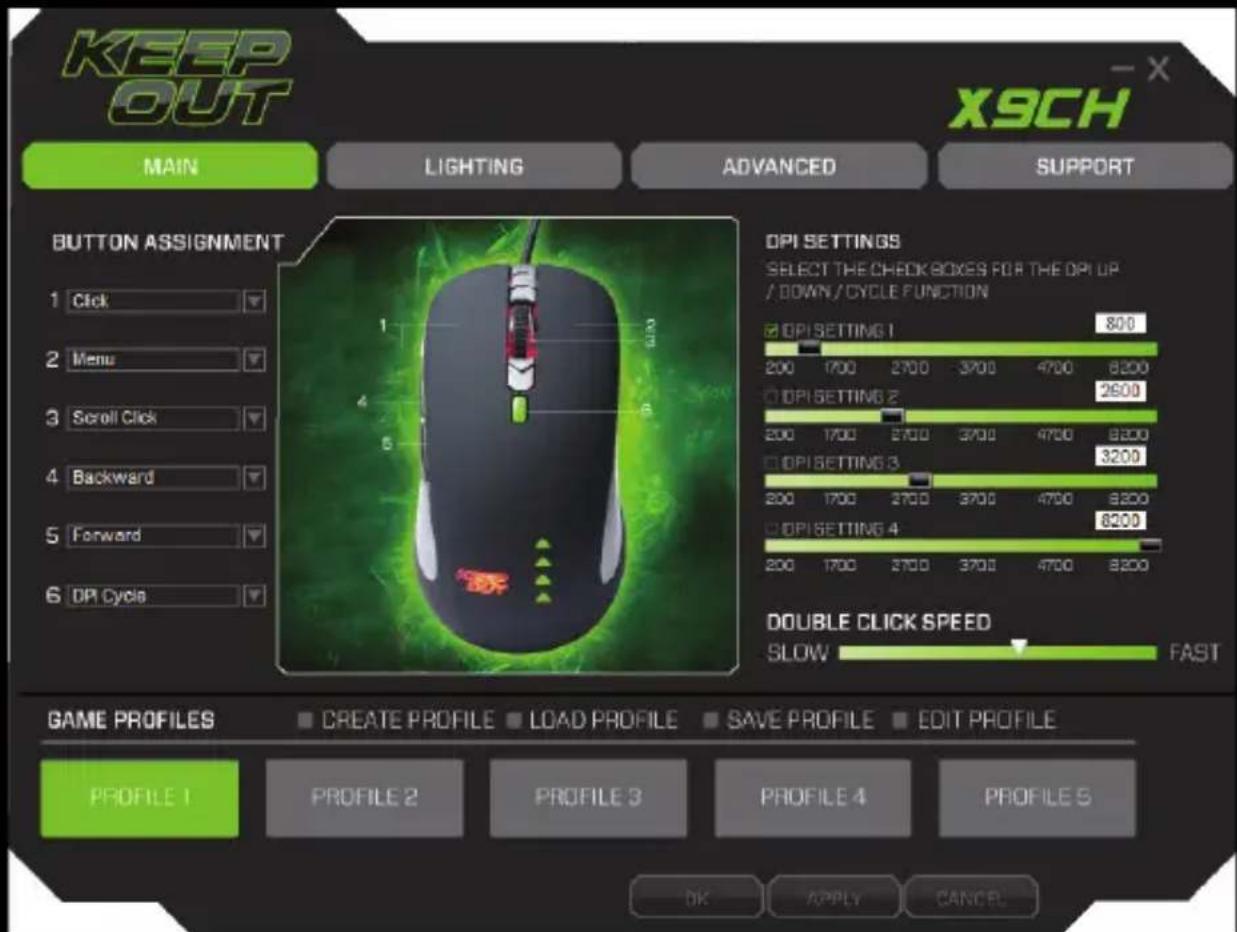
1. Main (Main Menu)
Open the software from Start - Programs or the taskbar icon in the lower right corner of the desktop. The main menu will appear.
EN
2. Simple Button Programming (Button Assignment)
Click the desired button and assign the desired function, finally click the APPLY button and then OK.

3. DPI Setting
This mouse allows you to select 4 different DPI levels. Select the desired DPI according to the number of the DPI button click.

bar
DPI SETTINGS SELECT THE CHECK BOXES FOR THE DPI UP / DOWN / CYCLE FUNCTION | DPI SETTING | 1950 | 8200 | | :--- | :--- | :--- | | DPI SETTING 1 | | | | 200 1700 2700 3700 4700 | | | | DPI SETTING 2 | 4250 | | | 200 1700 2700 3700 4700 | 8200 | | | DPI SETTING 3 | 5700 | | | 200 1700 2700 3700 4700 | 8200 | | | DPI SETTING 4 | 8200 | | | 200 1700 2700 3700 4700 | 8200 | | DPI SETTING 4 (not labeled) is marked with a checkmark.Finally press click on the APPLY button.
4. Double Click Speed
In Double Click Speed you can adjust the speed of the double click of the mouse button by clicking the SLOW / FAST scale, being Slow the slowest and Fast the fastest.

5. Game Profi les
You can select between fi ve profi les of Games and in each one of them have different confi gurations.
You can create profi les by clicking CREATE PROFILE.
You can upload profi les by clicking on LOAD PROFILE.
You can save profi les by clicking SAVE PROFILE.
You can edit profi les by clicking EDIT PROFILE.

EN
6. Lighting (backlight)
In this menu you can customize the colors of the backlight, intensity, speed, etc.

7. Press Led Settings (RGB color of the base and logo)
In this menu you can customize the colors and the base and logo in an RGB scale. If you want to change cyclically between 7 different colors, check the Color cycle function.
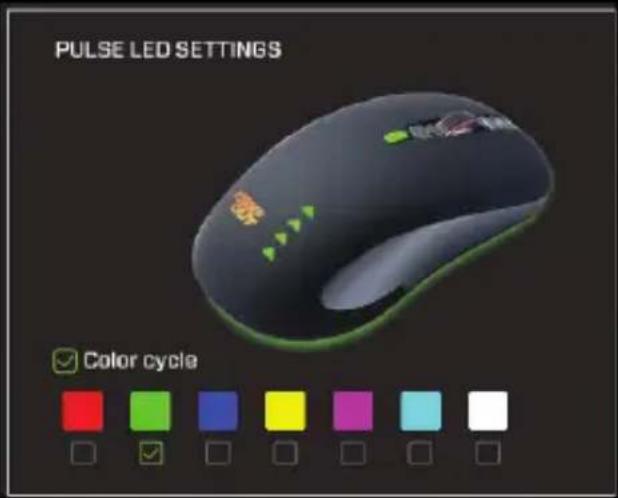
Press APPLY to save the changes.
8. Toggle, Intensity and Speed (LED switch, Intensity and Speed)
Allows you to set the lighting effect on base and logo. It has several configuration combinations.
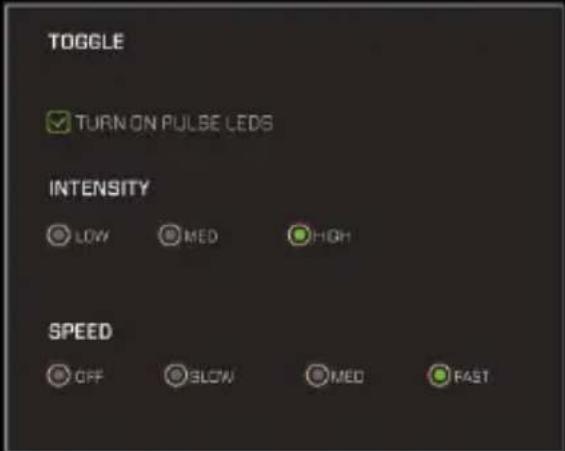
Toggle (Light Switch) If you press Turn ON the led pulsation, the lighting will be visible and the type of breath, but the lighting will be off.
Intensity You can select different types of lighting intensity. Low, Med, High, Speed can select the speed at which the breath light is displayed.
OFF (Off) Does not make the breath effect and quickly changes to the next color. Slow Makes the breathing effect slow. Med (Medium) Makes the breathing effect at medium speed. Fast Breathing at fast speed.
EN
9. Advanced (Advanced Mode)
Allows you to configure mouse sensitivity and accuracy settings.

10. Advanced Sensitivity
Allows you to configure sensitivity settings on the X and Y axis of the Mouse by varying the scale from 1 to 10.

bar
ADVANCED SENSITIVITY | Category | Value | |---|---| | X | 1 | | Y | 10 | ENABLE ADVANCED SENSITIVITYFinally click the APPLY button to save the changes.
11. Vertical Scroll Speed (Mouse Wheel) Scroll wheel speed.
Allows you to configure the speed settings of the scroll wheel of the mouse by varying the scale from 1 to 10.

Finally click the APPLY button to save the changes.
12. Polling Rate (Frequency with which the PC reads the mouse position)
In Polling Rate you can set the frequency between the following values.125Hz, 250Hz, 500Hz and 1000Hz.

Finally click the APPLY button to save the changes.
13. Windows Pointer Speed and Visibility (Pointer Speed and Visibility)
In these settings you can modify the speed and visibility of the mouse pointer by modifying their respective scales.

Finally click the APPLY button to save the changes.
EN
14. Driver Reset (Reset to factory settings)
This button allows you to return to the default values of the software by clicking on the Reset button
DRIVER RESET (RESET TO FACTORY DEFAULT)
RESET
15. Support
In this menu you have driver and technical contact information

16. Create a Macro
Select the desired button and click on Assign Macro – Macro Manager.
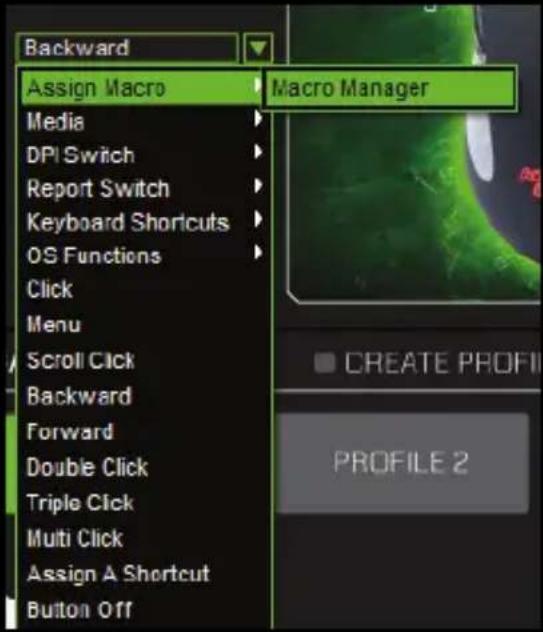
Click New and enter a name for the macro and press enter.
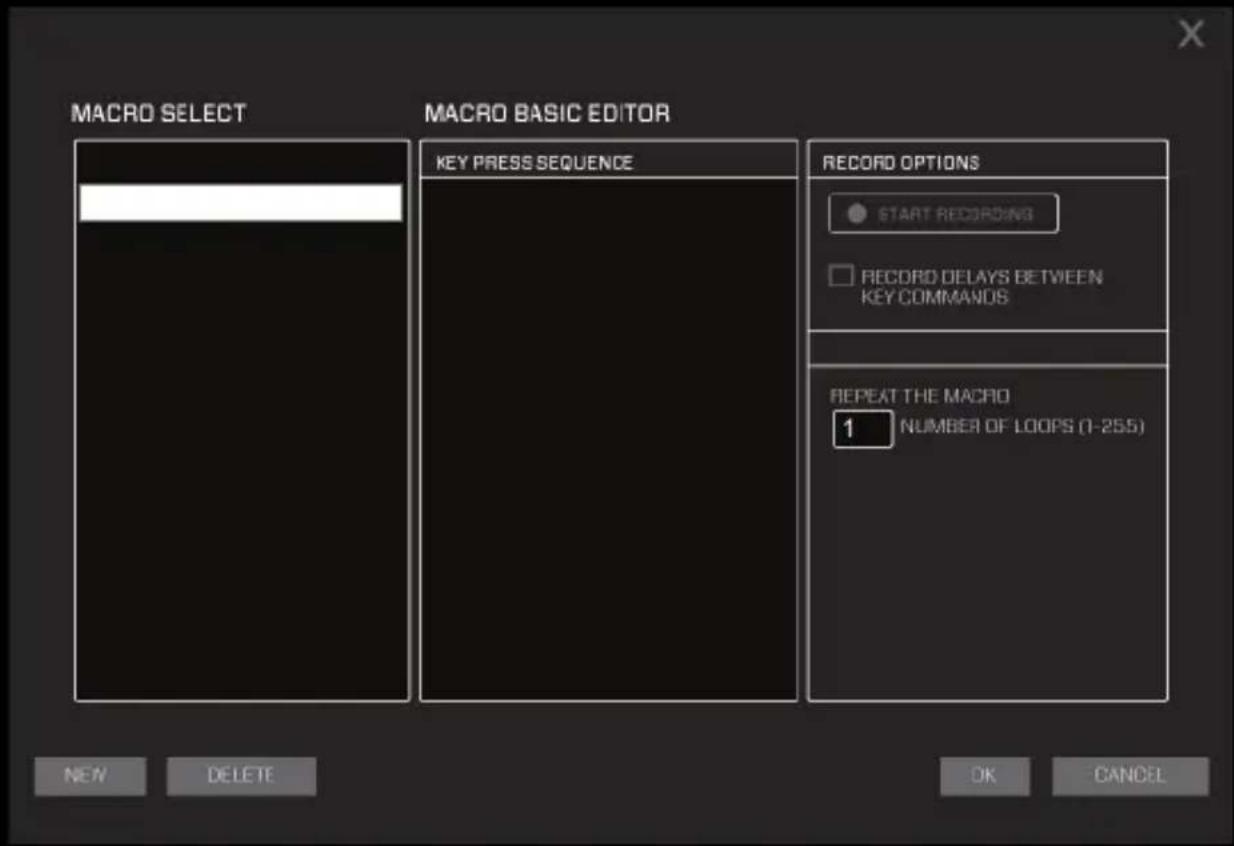
EN
Click on the created name and then on Start Recording (Start macro recording)

Perform the sequence of keys you want to record and press Stop (To record).

Finally press the OK button.
17. Selecting a Saved Macro
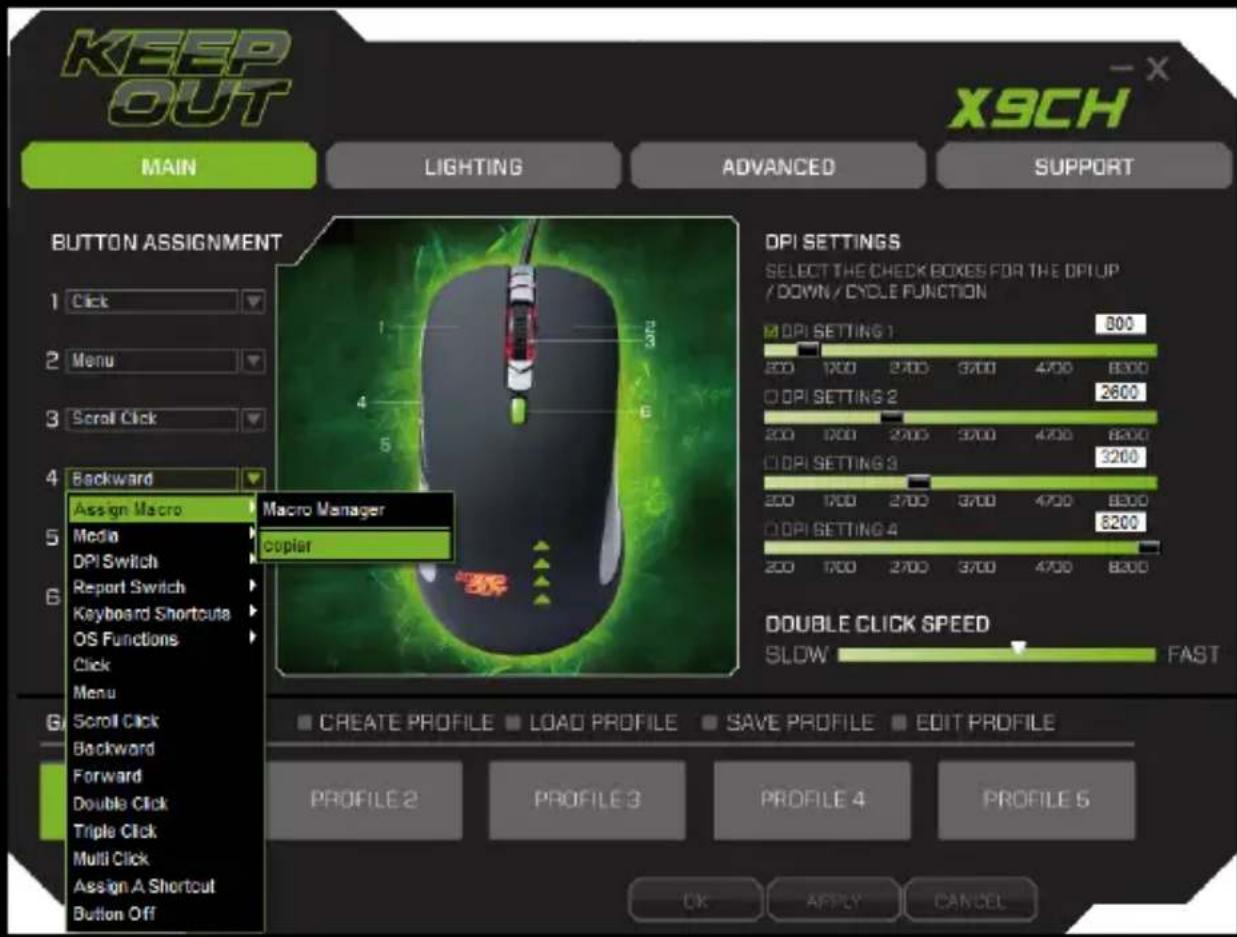
Select the desired button and click on Assign Macro - Macro Manager- (Name of the macro created)

Technical Support
For more information on the installation and configuration of this product please go to our website www.keep-out.eu or write an email to the following address: support@keep-out.eu
ES
INTRODUCCIÓN
Pulse APPLY para guardar los cambios.
16. Crear una Macro
9. Advanced (Advanced Mode)
16. Loo Macro
16. Créer une macro
Pritisnite Primijeni da biste spremili promjene.
16. Stvaranje makronaredbe
Odaberite željenu tipku i kliknite na Assign Macro - Macro Manager.

Kliknite New i unesite naziv za makro i pritisnite Enter.

HR
Kliknite na stvorio ime, a zatim se na početak snimanja (Početak makro snimanja)
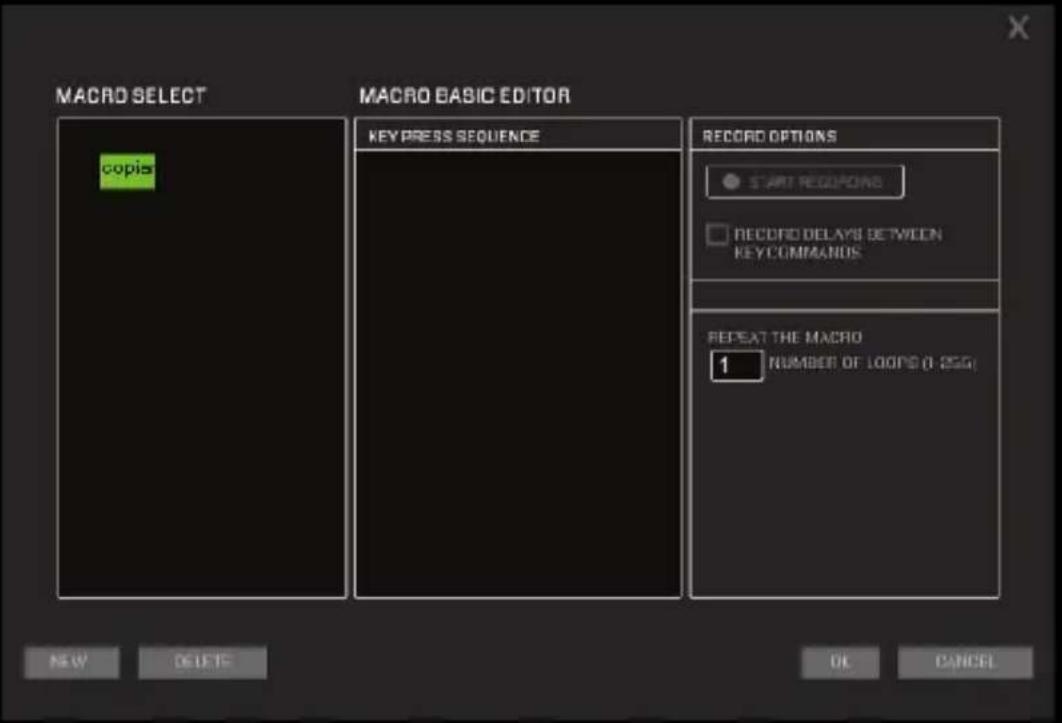
Izvođenje slijed tipki koje želite snimiti i pritisnite Stani (za snimanje).

Na kraju pritisnite tipku OK.
17. Odabir spremljenom Macro
Odaberite željenu tipku i kliknite na Assign Macro - Macro Manager- (naziv makro stvorio)
Tehnička podrška
Za više informacija o instalaciji i konfiguraciji ovog proizvoda potražite na našoj web stranici www.keep-out.eu ili pisati e-mail na adresu: support@keep-out.eu
BEVEZETÉS
16. Creare una macro
2. Eenvoudige Button Programming (Button Assignment)
16. Maak een Macro
16. Tworzenie makr
1. Principal (Menu Principal)
16. Criar uma Macro
9. Avansat (Advanced Mode)
16. Vytvorenie makra
AEE REI-RAEE 5548 In this manual, the container (bin) symbol indicates that the product is subject to the European directive 2002/96 / EC, electrical and electronic products, batteries, and batteries and other accessories must necessarily be subject to a selective collection.
At the end of the life of the device, make use of the recycling bins. This gesture Will help reduce the health risks and preserve the environment.
Municipalities and distributors, Will provide essential details on recycling your old device. If this device carries an internal battery, it must be removed and deposited separately for proper management.
Recyclage
natural_image
Symbol of a trash bin crossed out by two diagonal lines, no text or numbers present
Safety, Maintenance and Recycling Instructions
- Caution: Never open the device, the internal parts are danger, electrical shock.
- Do not install this unit near water, for example, in a wet basement, in an unprotected outdoor installation or in any area classified as a wet.
- Do not insert objects of any kind into this unit through openings as they may touch voltage points and short out parts that could result in fire or electric shock. Do not spill any liquid on the unit.
- Be sure to connect the connectors to the respective outputs of the device to be connected.
- Clean the product with a soft and dry cloth.
- Follow local regulations for disposing of the product.
APPROX IBERIA S.L. CIF: B-91202499
Keep Out is a registered brand of Approx Iberia, S.L. C/Tecnología 5, PO Box 15, 41120 Gelves, Sevilla (Spain). Keep Out is not associated to any manufacturer. All brands and registered trademarks are the property of their respective owners and are used for descriptive purposes only. Made in PCR
Soporte técnico/Technical support/ Support technique/ Technischer Support: support@keep-out.eu
El contenido de esta guía está sujeto a errores tipográficos The content of this guide is subject to typographical errors Le contenu de ce guide est sujette à des erreurs typographiques Der Inhalt dieser Anleitung unterliegt typographische Fehler


- BG
- ВЪВЕДЕНИЕ
- Vytvoření makra
- PRODUCT DESCRIPTION
- PACKAGE CONTENTS
- INSTALLATION
- SOFTWARE
- Main (Main Menu)
- EN
- Simple Button Programming (Button Assignment)
- DPI Setting
- Double Click Speed
- Game Profi les
- Lighting (backlight)
- Press Led Settings (RGB color of the base and logo)
- Toggle, Intensity and Speed (LED switch, Intensity and Speed)
- Advanced (Advanced Mode)
- Advanced Sensitivity
- Vertical Scroll Speed (Mouse Wheel) Scroll wheel speed.
- Polling Rate (Frequency with which the PC reads the mouse position)
- Windows Pointer Speed and Visibility (Pointer Speed and Visibility)
- Driver Reset (Reset to factory settings)
- Support
- Create a Macro
- Selecting a Saved Macro
- Technical Support
- ES
- INTRODUCCIÓN
- Crear una Macro
- Loo Macro
- Créer une macro
- Stvaranje makronaredbe
- HR
- Odabir spremljenom Macro
- Tehnička podrška
- BEVEZETÉS
- Creare una macro
- Eenvoudige Button Programming (Button Assignment)
- Maak een Macro
- Tworzenie makr
- Principal (Menu Principal)
- Criar uma Macro
- Avansat (Advanced Mode)
- Vytvorenie makra
- Recyclage
- Safety, Maintenance and Recycling Instructions
Brand : KeepOut
Model : X9CH
Category : Mouse