
ETG240 - Electric grill AEG-ELECTROLUX - Free user manual and instructions
Find the device manual for free ETG240 AEG-ELECTROLUX in PDF.
| Product type | Electric table grill |
| Brand | AEG-ELECTROLUX |
| Model | ETG240 |
| Power supply | 230 V, 2000 W |
| Heating plate | Non-stick coating, 2000 W heating element, insulated handles |
| Thermostat | Adjustable from 1 (low) to 5 (high), operation indicator light |
| Cooking surfaces | Grill (for meat, fish, poultry) and smooth plate (for eggs, vegetables) |
| Included accessories | Frame, drip tray, splash screen, thermostat with cord |
| Materials | Non-stick plate, plastic for frame and tray |
| Usage | Indoor use only |
| Care and cleaning | Plate and screen dishwasher-safe; frame and tray hand wash; thermostat wiped with damp cloth |
| Safety | Do not immerse thermostat, use on a flat surface, do not cover the plate, unplug before cleaning |
| Repairability | Repairs by approved specialist; power cord replaceable by manufacturer or after-sales service |
| General information | Complies with EU Low Voltage and EMC directives; disposal via recycling |
Frequently Asked Questions - ETG240 AEG-ELECTROLUX
User questions about ETG240 AEG-ELECTROLUX
0 question about this device. Answer the ones you know or ask your own.
Ask a new question about this device
Download the instructions for your Electric grill in PDF format for free! Find your manual ETG240 - AEG-ELECTROLUX and take your electronic device back in hand. On this page are published all the documents necessary for the use of your device. ETG240 by AEG-ELECTROLUX.
USER MANUAL ETG240 AEG-ELECTROLUX
natural_image
Line drawing of a grater with heat exchanger and side-mounted handle (no text or symbols)PAGE
⑤ Bruksanvisning .... 3
DK Brugsanvisning 7
N Bruksanvisning ..... 11
FIN Käyttöohje....15
GB Instruction book ..... 19
(D) Gebrauchsanweisung ..... 23
⑤ Mode d'emploi ..... 27
NL Gebruiksaanwijzing.....31
① Istruzione per l'uso ..... 35
E Instrucciones de uso..... 39
P Instruções de utilização ... 43
© CZ Návod k použití ..... 47
PL Instrukcja obsługi ..... 51
H Használati útmutató .....56
SK Návod na obsluhu .....60
SLO Navodilo za uporabo .....64
HR Priručnik....68
SRB Priročnik za navodila .....72
RO Instructiuni de utilizare .....76
LV Rokasgrāmata .....80
LT Instrukcija....84
EST Kasutusjuhend....88
TR Kullanma kılavuzu .....92
BG Упътване за работа.....96
RUS Инструкция по эксплуатации101
UA Інструкція з експлуатації ...106


The image contains no text. The OCR result "____" is a hallucination and does not correspond to any content in the source image. Therefore, the correct OCR output is an empty string.
(No text to output)
The image contains no text. The OCR result "____" is a hallucination and does not correspond to any content in the source image. Therefore, the correct OCR output is an empty string.
(No text to output)
The image contains no text. The OCR result "____" is a hallucination and does not correspond to any content in the source image. Therefore, the correct OCR output is an empty string.
(No text to output)
The image contains no text. The OCR result "____" is a hallucination and does not correspond to any content in the source image. Therefore, the correct OCR output is an empty string.
(No text to output)
The image contains no text. The OCR result "____" is a hallucination and does not correspond to any content in the source image. Therefore, the correct OCR output is an empty string.
(No text to output)
natural_image
Line drawing of a grater with heat exchanger and side-mounted fan (no text or symbols)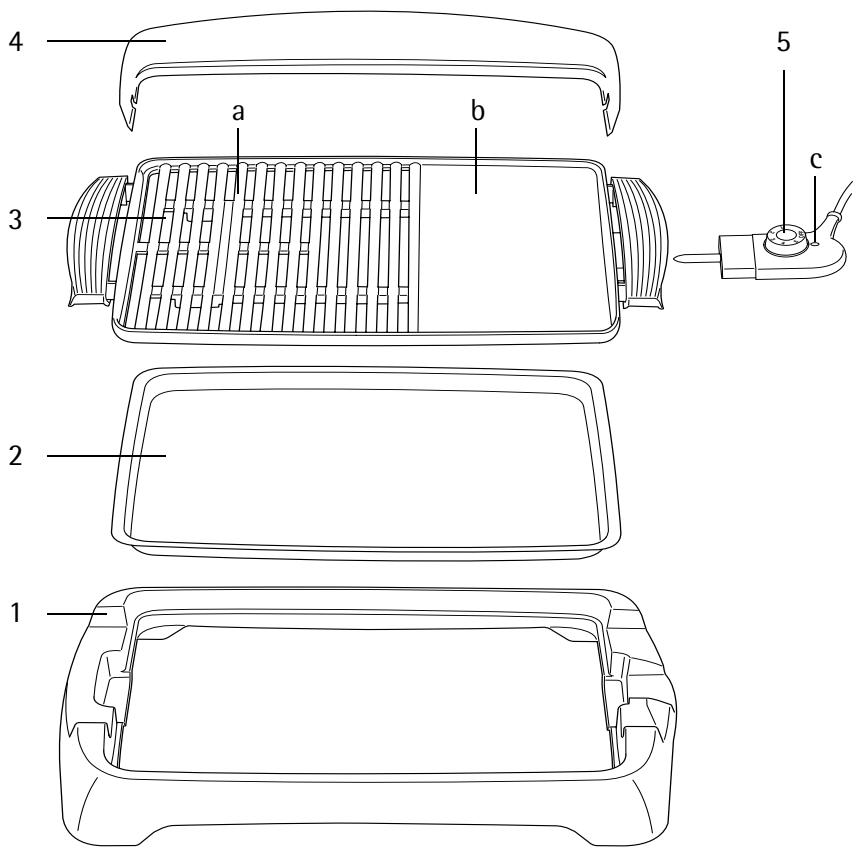
2


S
Bästa köpare,
Please read these operating instructions through carefully.
Above all please follow the safety instructions on the first few pages of these operating instructions! Please keep the operating instructions for future reference. If applicable pass these instructions on to the next owner of the appliance.
!
With the warning triangle and/or by means of key words (Danger!, Cauti- tion!, Attention!), information is emphasized which is important for your safety or the correct functioning of the appliance. It is essential that this information is observed.
[Non-Text]
This symbol guides you step by step through the operating procedure for your appliance.
i
After this symbol you receive supplementary information on the practical application and use of the appliance.
[NO TEXT]
Tips and information about the eco-nomical and environmentally friendly use of the appliance are marked with the clover.
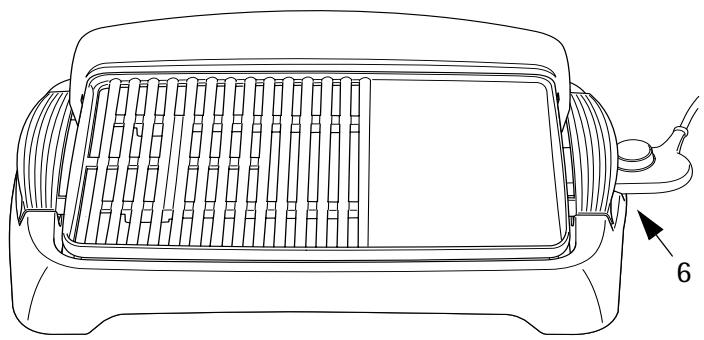
Description of the appliance
1 Base frame
2 Drip tray
3 Heater plate (non-stick coating) with 2000 W heating element and thermally insulated handles
a Grill bars
b Grill surface
4 Splash guard
5 Thermostat with mains cable c Operating lamp
6 Type plate (1 under heater plate and 1 under thermostat)
!
Safety instructions
This appliance corresponds to accepted technological standards with regards to safety and to the German Appliance Safety Law. Nevertheless as a manufacturer we are committed to familiarise you with the following safety instructions:
General safety
- The appliance may only be connected to a power supply whose voltage and frequency comply with the specifications on the rating plate!
- Never pick up the appliance if
- the lead is damaged,
- the housing is damaged.
- Never use the lead to pull the plug out from the socket.
- In order to avoid danger, if the connection lead of this appliance is damaged, it must be replaced by the manufacturer, its customer service department or a similarly qualified person.
- Repairs to this appliance may only be carried out by qualified service engineers. Considerable danger may result from improper repairs. If repairs become necessary, please contact the Customer Care Department or your authorised dealer.
- This appliance is not intended for use by persons (including children) with reduced physical, sensory or mental capabilities, or lack of experience and knowledge, unless they have been given supervision or instruction concerning use of the appliance by a person responsible for their safety.
- Never leave the appliance unattended when on and supervise particularly carefully if young children are around!
- Children should be supervised to ensure that they do not play with the appliance.
Safety of children
GB
To be noted when using the appliance
- Caution with hot surfaces! Danger of injury! Allow the appliance to cool sufficiently before cleaning or removing. Always lift only with the thermally insulated handles.
- The mains cable must not come into contact with any hot parts of the appliance. Never place the appliance over or near a naked flame, hot plate or hot oven.
- The mains cable with thermostat must never become wet. Never clean under running water or even in rinsing water.
- Only the appropriate mains cable with thermostat must be used.
- The appliance must only be connected to an earthed socket. If necessary an extension cable suitable for 10 A can be used.
- Avoid danger of tripping when connecting the power supply cable. This must never come into contact with water or other liquids.
- The grill plate must only be put into operation on the base frame and with the drip tray fitted.
- Never cover the heater plate with aluminium foil, pots, pans or similar objects, since this can result in an accumulation of heat, which can destroy the plastic components and coating.
- Appliance is for indoor use only.
- When used in closed rooms ensure adequate ventilation.
- It must be ensured each time after cleaning and each time before use that the plug contacts on the heater plate are dry.
- The appliance must be switched off and the mains plug withdrawn each time before cleaning and maintenance.
- The manufacturer cannot accept any liability for possible damage caused by improper or incorrect use.
Disposal

Packaging material
The packaging materials are environmentally friendly and can be recycled. The plastic components are identified by markings, e.g. >PE<, >PS<, etc. Please dispose of the packaging materials in the appropriate container at the community waste disposal facilities.

Old appliance

The symbol 🏠 on the product or on its packaging indicates that this product may not be treated as household waste. Instead it shall be handed over to the applicable collection point for the recycling of electrical and electronic equipment. By ensuring this product is disposed of correctly, you will help prevent potential negative consequences for the environment and human health, which could otherwise be caused by inappropriate waste handling of this product. For more detailed information about recycling of this product, please contact your local city office, your household waste disposal service or the shop where you purchased the product.
Operation
Before using for the first time remove any stickers on the appliance and clean it thoroughly (see "Cleaning and care").
Preparing the table-top grill

Place the appliance only on an absolutely flat, stable surface and not on sensitive surfaces.
Observe the necessary safe distances from walls and curtains and do not bring any easily inflammable material (e.g. plastic film, etc.) near the appli-ance.
Insert drip tray (2) in base frame (1).
To simplify cleaning, the drip tray should be covered with aluminium foil.
Inserting the heater plate (3) in the base frame.
Apply a little cooking oil to the surface of the heater plate each time before use with the aid of kitchen paper for better non-stick properties.
Place splash guard (4) on heater plate if necessary. The slots in the splash guard must engage securely in the lugs on the heater plate.
Use of the splash guard is particularly recommended for grilling items containing fat. The splash guard also serves as wind protection out of doors.
Insert the thermostat with mains cable (5) fully in the socket on the appliance.
Working with the table-top grill
Connect the mains cable (5) to the mains supply.
Turn the thermostat (5) to the desired setting (1 to 5).
1 = lowest temperature
5 = highest temperature
The operating lamp (5/c) on the thermostat is on while the grill is heating up. When the temperature is reached, heating takes place at intervals to maintain the temperature constant.
Do not cut food on the grilling surface to prevent damage to the non-stick coating!
Ensure that the non-stick coating is not damaged when turning the grilling items!
To switch off the appliance, turn the thermostat to "OFF".
Withdraw the mains plug every time after use! Allow the table-top grill to cool before removing and cleaning!
Practical tips
- The grill bars (3/a) are ideal for the preparation of meat, fish and poultry. Fat and juice can fall into the drip tray through the grill webs. This ensures a healthy, low-fat preparation.
- The grill surface (3/b) is ideal for example for the preparation of eggs, ham, mushrooms, tomatoes, onions, etc. It is also very well suited for keeping food warm.
- Tender pieces of meat are best suited for grilling.
- Pieces of meat such as from the shoulder or neck become more tender if marinated overnight.
- Grill tongs should be used but not forks to turn the grilling items. They will then remain juicy inside and not dry out.
- The grilled food should not be turned too frequently. When the items are browned on both sides, they should be finished at a lower temperature. The food does not dry out and is cooked more evenly.
Cleaning and care
Withdraw the mains plug every time before cleaning!
Dry all parts thoroughly before putting away. Ensure that the plug contacts of the heater plate are dry before connecting the thermostat to the heater plate. If necessary, wipe over with a cloth or shake out water thoroughly.
Thermostat
Note that water must not penetrate inside the thermostat under any circumstances! Never clean under running water or even in rinsing water.
Clean thermostat with a moist cloth.
Heater plate, splash guard
The components of the heater plate are fully sealed. This can therefore also be cleaned in a dishwasher.
GB
Clean heater plate and splash guard in rinsing water or in a dishwasher.
Under no circumstances use abrasive cleaning agents, abrasive general purpose scouring pads, metal wool, etc. since these can damage the non-stick coating of the heater plate.
i Thick dirt is best removed with a moistened cloth. A soft bottle brush is suitable for cleaning between the webs of the grill bars.
Base frame, drip tray
The base frame and drip tray should be cleaned with a damp cloth or in rinsing water.
Do not clean the base frame and drip tray in a dishwasher!
Do not use abrasive cleaning agents, abrasive general purpose scouring pads, metal wool, etc. since these could damage the surface.
Storage
It is best to store the table-top grill assembled.
⚠ Ensure in particular that the thermostat is not damaged.
Technical data
Mains voltage: 230 V Power consumption: 2000 W
CE This appliance conforms with the following EC Directives:
• Low Voltage Directive 2006/95/EC
• EMC Directive 89/336/EEC with amendments 92/31/EEC and 93/68/EEC
Chère cliente, Cher client,
- PAGE
- S
- Bästa köpare,
- !
- [Non-Text]
- i
- [NO TEXT]
- Description of the appliance
- Safety instructions
- General safety
- Safety of children
- GB
- To be noted when using the appliance
- Disposal
- Packaging material
- Old appliance
- Operation
- Preparing the table-top grill
- Working with the table-top grill
- Practical tips
- Cleaning and care
- Thermostat
- Heater plate, splash guard
- Base frame, drip tray
- Storage
- Technical data
- Chère cliente, Cher client,
Brand : AEG-ELECTROLUX
Model : ETG240
Category : Electric grill