
ASM450 - Food processor AEG-ELECTROLUX - Free user manual and instructions
Find the device manual for free ASM450 AEG-ELECTROLUX in PDF.
| Product Type | Food processor with stand mixer and hand blender |
| Brand | AEG-ELECTROLUX |
| Model | ASM450 |
| Power supply | 230-240 V ~ 50/60 Hz |
| Rated power | 380 W |
| Bowl capacity | 1.5 kg solid foods / 1.75 L liquids |
| Mixer speed | 5 speeds + Pulse button (maximum speed) |
| Bowl speed | 2 speeds (I: low, II: high) |
| Continuous operation time | 10 minutes maximum |
| Bowl material | Stainless steel with lid |
| Included accessories | Stainless steel bowl with lid, whisks, dough hooks, spatula |
| Main functions | Mixing, kneading, whisking, whipping egg whites, making mayonnaise and sauces |
| Safety | Accessory ejection button, automatic shut-off, safety lock |
| Cleaning | Stainless steel bowl dishwasher safe (except lid); whisks and dough hooks washable with water; base and hand blender cleaned with a damp cloth |
| Repairability | Repairs only by an authorized AEG-ELECTROLUX service center |
| Net weight | Approximately 4.5 kg (estimate) |
Frequently Asked Questions - ASM450 AEG-ELECTROLUX
User questions about ASM450 AEG-ELECTROLUX
0 question about this device. Answer the ones you know or ask your own.
Ask a new question about this device
Download the instructions for your Food processor in PDF format for free! Find your manual ASM450 - AEG-ELECTROLUX and take your electronic device back in hand. On this page are published all the documents necessary for the use of your device. ASM450 by AEG-ELECTROLUX.
USER MANUAL ASM450 AEG-ELECTROLUX
I have hastigher, ell
hoge hastigheder.

Trekkut stopslet for rengjoring.
Please read these operating instructions through carefully.
Above all please follow the safety instructions on the first few pages of these operating instructions! Please keep the operating instructions for future reference. If applicable pass these instructions on to the next owner of the appliance.

With the warning triangle and/or by means of key words (Danger!, Caution!, Attention!), information is emphasized which is important for your safety or the correct functioning of the appliance. It is essential that this information is observed.

This symbol guides you step by step through the operating procedure for your appliance.

After this symbol you receive supplementary information on the practical application and use of the appliance.

Tips and information about the economical and environmentally friendly use of the appliance are marked with the clover.
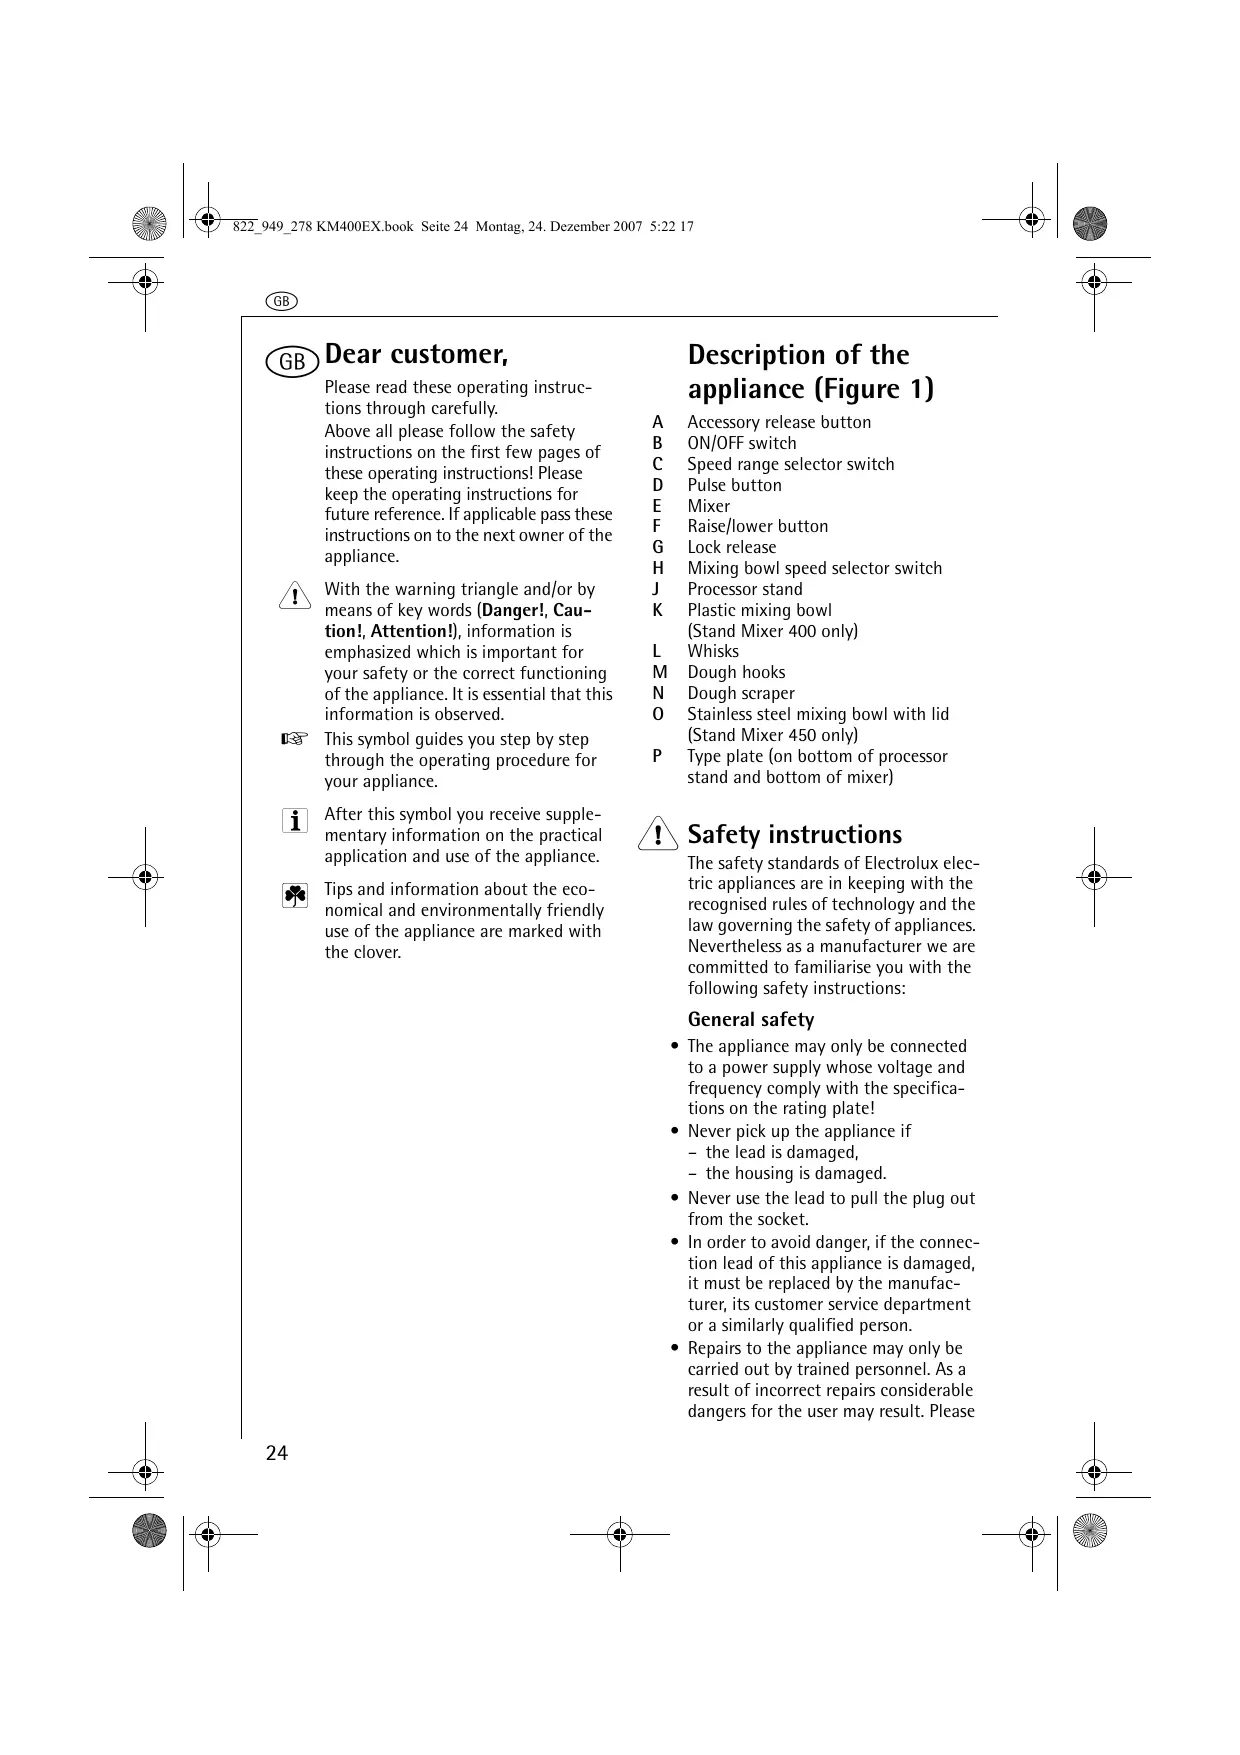
Description of the appliance (Figure 1)
A Accessory release button
B ON/OFF switch
C Speed range selector switch
D Pulse button
E Mixer
F Raise/lower button
G Lock release
H Mixing bowl speed selector switch
J Processor stand
K Plastic mixing bowl (Stand Mixer 400 only)
L Whisks
M Dough hooks
N Dough scraper
0 Stainless steel mixing bowl with lid (Stand Mixer 450 only)
P Type plate (on bottom of processor stand and bottom of mixer)

Safety instructions
The safety standards of Electrolux electric appliances are in keeping with the recognised rules of technology and the law governing the safety of appliances. Nevertheless as a manufacturer we are committed to familiarise you with the following safety instructions:
General safety
- The appliance may only be connected to a power supply whose voltage and frequency comply with the specifications on the rating plate!
- Never pick up the appliance if
- the lead is damaged,
- the housing is damaged.
- Never use the lead to pull the plug out from the socket.
- In order to avoid danger, if the connection lead of this appliance is damaged, it must be replaced by the manufacturer, its customer service department or a similarly qualified person.
- Repairs to the appliance may only be carried out by trained personnel. As a result of incorrect repairs considerable dangers for the user may result. Please
contact the Electrolux customer service department or your dealer in the event of repairs being necessary.
- This appliance is not intended for use by persons (including children) with reduced physical, sensory or mental capabilities, or lack of experience and knowledge, unless they have been given supervision or instruction concerning use of the appliance by a person responsible for their safety.
Safety of children
- Never leave the appliance unattended when on and supervise particularly carefully if young children are around!
- Children should be supervised to ensure that they do not play with the appliance.
When using your appliance
- Never release the accessories while the processor/mixer is running.
- Ensure fingers are kept away from moving whisks and dough hooks. This could result in injury!
- Never use the mixer if you have wet hands.
- Plastic parts may not be placed on or directly near to heaters.
- Do not use this appliance to stir paints (lacquers, polyesters etc.) This could result in an explosion!
- The appliance should be switched off and unplugged before any cleaning or maintenance work is done on it.
- Never clean the appliance under running water or submerge it in washing-up water.
- The manufacturer is not liable for any damages which are caused by using the appliance for any other purpose than that intended or incorrect use.
Installation, connection and initial use
- The attachments are only to be inserted into or removed from the appliance when it is switched off.
- The hand mixer can be used to mix food in any suitable bowl. You are
advised, however, to use the supplied mixing bowls.
- Never switch on the appliance until the working attachments are in the mixing bowl with the ingredients to be processed. Always wait until the attachments stop before you remove the bowl.
- Do not hold any hard objects (e.g. a spoon, knife or whisk) against the moving attachments and do not touch them with your hand. This could result in injury!
- When you have finished working with the appliance, switch it off and unplug it from the electricity supply.
Disposal

Packaging material
The packaging materials are environmentally friendly and can be recycled. The plastic components are identified by markings, e.g. >PE<, >PS<, etc. Please dispose of the packaging materials in the appropriate container at the community waste disposal facilities.

Old appliance

The symbol on the product or on its packaging indicates that this product may not be treated as household waste. Instead it shall be handed over to the applicable collection point for the recycling of electrical and electronic equipment. By ensuring this product is disposed of correctly, you will help prevent potential negative consequences for the environment and human health, which could otherwise be caused by inappropriate waste handling of this product. For more detailed information about recycling of this product, please contact your local city office, your household waste disposal service or the shop where you purchased the product.

Operation
You can use the processor/hand mixer to mix, knead and whisk food. The mixer and mixing bowl are each driven separately by their own motors, and the speeds of the mixer and mixing bowl can be individually adjusted. However the mixer/processor has a single ON/OFF switch.
The mixer can be easily removed from the processor stand in a moment and used as a standard hand mixer. When used in this way, move the hand mixer in a smooth circular motion around the inside of the bowl containing the ingredients.
The dough hooks (Figure 1/M) are used for heavy doughs, such as yeast dough, short crust pastry, potato batters and cake mixes.
The whisk (Figure 1/L) is suitable for light cake mixes, egg white, cream, mayonnaise, purees and for stirring sauces and dessert powders.
- Stand Mixer 400 models are supplied with a plastic mixing bowl.
- Stand Mixer 450 models are supplied with a stainless steel mixing bowl with lid.
Preparing for use
Fitting the mixer to/removing from the processor stand (Figure 2)
Before fitting or removing the mixer, switch off the processor/mixer and remove the plug from the mains socket!
To fit, push the mixer on to the processor stand (the two latches on the processor stand engage in the mixer) and press down to lock.
To remove, press the lock release (Figure 1/G) and pull the mixer upwards.
Inserting/removing accessories (Figure 3)
Before releasing the accessories, switch off the mixer and remove the plug from the mains socket!
Push the whisks or dough hooks into the accessory slots on the underside of the mixers, until they click into place.
The two dough hooks have different plug shapes and must be pushed into the correct slots. Insertion the wrong way round would lead to the dough being transported upwards!
One of the dough hooks has an additional small ring near the collar on the shaft. This dough hook will only fit in the slot for which it is intended. This is identified by a symbol.
To remove the accessories, hold firmly with one hand, while pressing the accessory release button (Figure 1/A).
Raising/lowering the mixer (Figure 4)
! Ensure that the mixer is switched off before raising/lowering!
Press the raise/ lower button (Figure 1/F) and swing the mixer up or down, until it clicks in place.
i With the mixer raised, the accessories can be easily changed and the mixing bowl located on the processor stand or removed.
Locating/removing the mixing bowl (Figure 5)
Locate the mixing bowl on the guide on the base and latch in place by gently turning clockwise.
To remove the mixing bowl, turn anticlockwise to unlatch.
It may be necessary to hold the base to prevent it rotating.
The off-centre position of the mixer makes it easy to add ingredients while the processor is in operation.
Working with the mixer/ processor

When the mixer is attached to the processor stand, the mixing bowl is automatically switched on when the mixer is switched on.

The appliance can be used for up to 10 minutes without stopping. It should be allowed to cool each time following prolonged, continuous operation (for at least 20 minutes after using for 10 minutes without stopping).

Maximum processing quantities: Processing in the mixing bowl must not exceed 1.5kg solid or 1.75 l liquid foodstuffs.
Switching the mixer ON (Figure 6)

Select the speed range with the speed range selector switch (Figure 1+6/C):
low speeds, or high speeds.

The ON/OFF switch (Figure 1+6/B) is used to:
- switch the mixer ON and OFF,
- control the mixer speed (5 speed settings) in the pre-selected speed range.

As long as the Pulse button (Figure 1+6/D) is pressed and held when the appliance is in operation, the mixer operates at its maximum speed.
Selecting the mixing bowl speed (Figure 7)
The mixing bowl has two speed settings.

The mixing bowl speed selector switch (Figure 1/H) is used to select the mixing bowl speed:
I = low speed
II = high speed
Switching the mixer OFF

Slide the ON/OFF switch (Figure 1+6/B) to "0".
- The mixer and mixing bowl are switched off.
Selecting the correct settings
The following notes can be used as a guide.
Mixer speed
| Speed range selector switch (Figure 1+6/C) | ON/OFF switch (Figure 1+6/B) | |
| • Kneading, Mixing: | J S | start with 1 or 2, than speed up to 5 |
| • Folding in: | J S | 3, 4 |
| • Stirring: | + D | start with 2 or 3, than speed up |
| • Whisking, Frothing: | + D | 4 or 5 |
| or Pulse button (Figure 1+6/D) | ||

Start all types of processing at a low speed. This will avoid powdery foods and liquids spraying out.

Mixing bowl speed
Use speed "II" for whisking egg white, cream and light cake mixtures. Use speed "I" for heavy dough and large quantities.
Cleaning and care
Residues of carrot and red cabbage juice can be removed from the plastic parts with cooking oil before the appliance is cleaned.
Mixer and processor stand
Remove the plug from the mains socket before cleaning. Ensure that no water penetrates into the inside of the appliance! Never clean the appliance under running water and never immerse in water.
Wipe the mixer and processor stand with a damp cloth.
Accessories
Whisks and dough hooks
Clean the whisks and dough hooks with a brush or a cloth under running water or in the dishwasher!
Stainless steel mixing bowl (Stand Mixer 450 only)
The stainless steel mixing bowl (not the lid!) can be washed in the dishwasher.
The lid of the stainless steel mixing bowl must not be washed in the dishwasher.
Plastic mixing bowl (Stand Mixer 400 only)
Wash the plastic mixing bowl in water with washing-up liquid.
If you wish to wash the plastic mixing bowl in the dishwasher, it must be placed in the upper basket.
Storage
Store the dough hooks and whisks in the mixing bowl located on the processor base. This will protect them from damage.
Technical data
Mains voltage: 230 - 240 V
Power consumption: 380 W
Maximum continuous operating time: 10 minutes
This appliance conforms with the following EC Directives:
Low Voltage Directive 2006/95/EC
EMC Directive 89/336/EEC with amendments 92/31/EEC and 93/68/EEC
D
Chere cliente, Cher client,
Installation, raccordement, mise en service
Ptorosnja snage: 380 W
Maksimalno vreme
stalnog rada: 10 minuta
= mazes atrums
II = liels ātrums
Miksera izslęgśana (OFF)

I = ma as greitis
II = didelis greitis
Maisytuvo isjungimas

I = Hncka ckopocT
II = Bncoka ckopocT
N3KJIIOUBaHe Ha MNIKcepa
ПлбзHeTe KЛIOча 3a BКЛIOчBaHe/ n3KЛIOчBaHe (ФИг.1+6/B)Ha "0".
- MmKcepbT n Kynata 3a pa36bPkBaHe ce n3KnHouBaT.
N36pahe Ha npabnHInte HacTpoKn
CneHnTe yka3aHnMa MORat Da ce n3non3BaT KaTO OTnpaBnI.
CKopoCT Ha MmKcepa
| Pergunatop Ha obXbata Ha KJIouc 3a BkIIoucbane/H3KJIoucbaneckopocTTa(Фигура 1+6/C)(Фигура 1+6/B) | ||
| • Mesehe, pa36bPKBaHe: | J S | Започete c 1 по 2, спед това ВкПочete Ha 5 |
| • Добаянe: | J S | 3, 4 |
| • Pa36bPKBaHe: | I D | Започete c 2 по 3, спед това уveлчete ckopocTTa |
| • Pa36bBaHе Ha пянa: | I D | 4 по 5 |
| Или PulsébytOH (Фигура 1+6/D) | ||

3anoyBaTe BCnUKN BnOBe 6bOToKa Ha HnCKa CkOpocT. TaKa Ue npEoTbPaTnTe pa3npbckBaHcToHa npaxoo6pa3Hn npOdykTu N TeuHOCTN.
BG
Ckopoct Ha kynata 3a 6bpkaHe
I3noJ3BaIte cKOpOCT "Il" 3a pa36bIbAne Ha 6eNTbUc, CMeTaHa n IeKn TecTa 3a CnAdkNsiu. I3noJ3BaIte cKOpOCT "I" 3a TeKKn TecTa n IToJIemN KOJIueCTBa.
Почистваши ПОДРьжka
OctaTbUIneOTcOKOTMOPKOBu N cepBeHO3ene MoRat da ce OTCTpaHrT OTПlaCTMaCOBInTe UactnCrotBapcKOONIOIpeDi N3PnAkaBaHeHaypeda.
MnKcep n cToiKa
I3BaJdaIe ⅢeNcEla OT KOHTaTa npedn noHCTBaHe Ha ypeDa. BHIMabaIe Da He nonaHHe Boda BBB TpeShocTtHa ypeDa! Hnkora He MnIte ypeDa nOd Teuasa BOda N HkORA He IOTanPaIte BBB BODa.
3a6bpyeTe MKNcepa N cToiKaTa C BnaXHa Kbpna.
PpncTaBkn
Бьркалки 3a pa36иbaheи 6ьркалки 3a TeCTO
I OounctBaIte 6bPKaJIKNTe 3a pa36nBaHe n Te3n 3a TcTeO C yeTka INI KbPna NOD Te4u7a BOda INI B CbDOMNHa MaUNHa!
Kyna 3a pa36bpkBaHe OT HepbXdaema CTOMHa (camo 3a Stand Mixer 450)
Kynata 3a pa36bpkBahe OT HepBXdaema CTOMHa (6e3 KaNAka!) MOKe Da Ce Mne B CbDOMNJaMaSHHa.
KanaKbT Ha Kynata 3a pa36bPkBaHe OT HepbXkaeMa CTOMHa He 6nBa Da ce Mne B CbDOMNJaHnA MaSHInHa.
ПлacrmaCoBa Kyna 3a pa36bPkBaHe (camo 3a Stand Mixer 400)
I3MnBaIte IJIaCTMaOBAt KaIpa 3a pa36bPKBaHe C B0da 3a I3IIaKBaHe.

AkoKeIaete Da I3MneTe
IInactMacobata Kyna 3a
pa36bPkBaHe B CbDOMnHa
MaunHa,ra NoCTabete B rOpHOTO
OTJeJIeHne.
CbXpaHeHne
CbxpahBaIte 6bpKaJknTe 3a TeCTO n Te3n 3a pa36nBaHe B Kynata 3a pa36bpKBAhe, NOCTaBeHa BbpxO OCHOBaTa Ha ypeJa. Taka Hma Da ce NobpeJrT.
TexHnueckn DaHHN
HansekeHe
Ha MPexkata: 230-240V
Kohcymaun
Ha eheprn: 380 W
MaKcImaJIHo BpeMe 3a pa6oTa 6e3
PpeKbcBaHe: 10 MInHyTu
To3n ypei OTROBapra Ha cIeIHNITE DInpeKtINbHa EC:
-ДиректINA3aHNUCKO
Hansehen 2006/95/EC
EMCДиректва89/336/EECc n3mehen92/31/EECn 93/68/EEC
Thinking of you
Electrolux


- Trekkut stopslet for rengjoring.
- Description of the appliance (Figure 1)
- Safety instructions
- General safety
- Safety of children
- When using your appliance
- Installation, connection and initial use
- Disposal
- Packaging material
- Old appliance
- Operation
- Preparing for use
- Fitting the mixer to/removing from the processor stand (Figure 2)
- Inserting/removing accessories (Figure 3)
- Raising/lowering the mixer (Figure 4)
- Locating/removing the mixing bowl (Figure 5)
- Working with the mixer/ processor
- Switching the mixer ON (Figure 6)
- Selecting the mixing bowl speed (Figure 7)
- Switching the mixer OFF
- Selecting the correct settings
- Mixing bowl speed
- Cleaning and care
- Mixer and processor stand
- Accessories
- Whisks and dough hooks
- Stainless steel mixing bowl (Stand Mixer 450 only)
- Plastic mixing bowl (Stand Mixer 400 only)
- Storage
- Technical data
- Chere cliente, Cher client,
- Installation, raccordement, mise en service
- Miksera izslęgśana (OFF)
- Maisytuvo isjungimas
- N36pahe Ha npabnHInte HacTpoKn
- CKopoCT Ha MmKcepa
- BG
- Ckopoct Ha kynata 3a 6bpkaHe
- Почистваши ПОДРьжka
- MnKcep n cToiKa
- PpncTaBkn
- Бьркалки 3a pa36иbaheи 6ьркалки 3a TeCTO
- Kyna 3a pa36bpkBaHe OT HepbXdaema CTOMHa (camo 3a Stand Mixer 450)
- ПлacrmaCoBa Kyna 3a pa36bPkBaHe (camo 3a Stand Mixer 400)
- CbXpaHeHne
- TexHnueckn DaHHN
- Electrolux
Brand : AEG-ELECTROLUX
Model : ASM450
Category : Food processor