
AFP750 - Food processor AEG-ELECTROLUX - Free user manual and instructions
Find the device manual for free AFP750 AEG-ELECTROLUX in PDF.
| Product type | Food processor |
| Brand | AEG-ELECTROLUX |
| Model | AFP750 |
| Power supply | 230-240 V, 700 W, 50-60 Hz |
| Main bowl capacity | 1.75 L (liquid) / 1.5 L (solid) |
| Blender capacity | 1.5 L |
| Speeds | Continuous variable speed + Pulse function |
| Included accessories | Metal blade, plastic blade, whisk disc, grating insert (6 types), citrus press, pusher with measuring cup |
| Main functions | Blending, chopping, grating, slicing, shredding, kneading, whisking, juicing citrus |
| Safety | Safety systems: bowl lock, motor protection, stop if bowl is unlocked |
| Maintenance and cleaning | Dishwasher-safe parts (except metal blade and motor unit); metal blade and motor unit hand wash only |
| Weight | Approx. 5 kg |
| Dimensions (W × D × H) | Approx. 35 × 25 × 28 cm |
| Cable length | Approx. 1 m |
| Storage | Accessory storage compartment on the appliance |
Frequently Asked Questions - AFP750 AEG-ELECTROLUX
User questions about AFP750 AEG-ELECTROLUX
0 question about this device. Answer the ones you know or ask your own.
Ask a new question about this device
Download the instructions for your Food processor in PDF format for free! Find your manual AFP750 - AEG-ELECTROLUX and take your electronic device back in hand. On this page are published all the documents necessary for the use of your device. AFP750 by AEG-ELECTROLUX.
USER MANUAL AFP750 AEG-ELECTROLUX
Assistant Food Processor 7..
PAGE
S Bruksanvisning 6
DK Brugsanvising 18
N Bruksanvisning 31
FIN Käyttoohje. 44
GB Instruction book. .57
D Gebrauchsanweisung . .69
PL Instrukcja obstugi. .82


2
3
4
5
6
7
8

9
10
11

12
13

14
15

Bästa köpare,
Electrolux 2004-02-09/ESH
Användningstips
Mixer
- Metalkniv (billed 1/P)
Electrolux 2004-02-09/ESH
Tips for bruK
Mikser
Skjaer kjottet for bearbeiding i ca. 2 cm store biter.
Gronnsaker
1 pose vanishjesukker
1 klype salt
4 egg
150 ml melk
Please read these operating instructions through carefully.
Above all please follow the safety instructions on the first few pages of these operating instructions! Please keep the operating instructions for future reference. If applicable pass these instructions on to the next owner of the appliance.

With the warning triangle and/or by means of key words (Danger!, Caution!, Attention!), information is emphasized which is important for your safety or the correct functioning of the appliance. It is essential that this information is observed.

This symbol guides you step by step through the operating procedure for your appliance.

After this symbol you receive supplementary information on the practical application and use of the appliance.

Tips and information about the economical and environmentally friendly use of the appliance are marked with the clover.
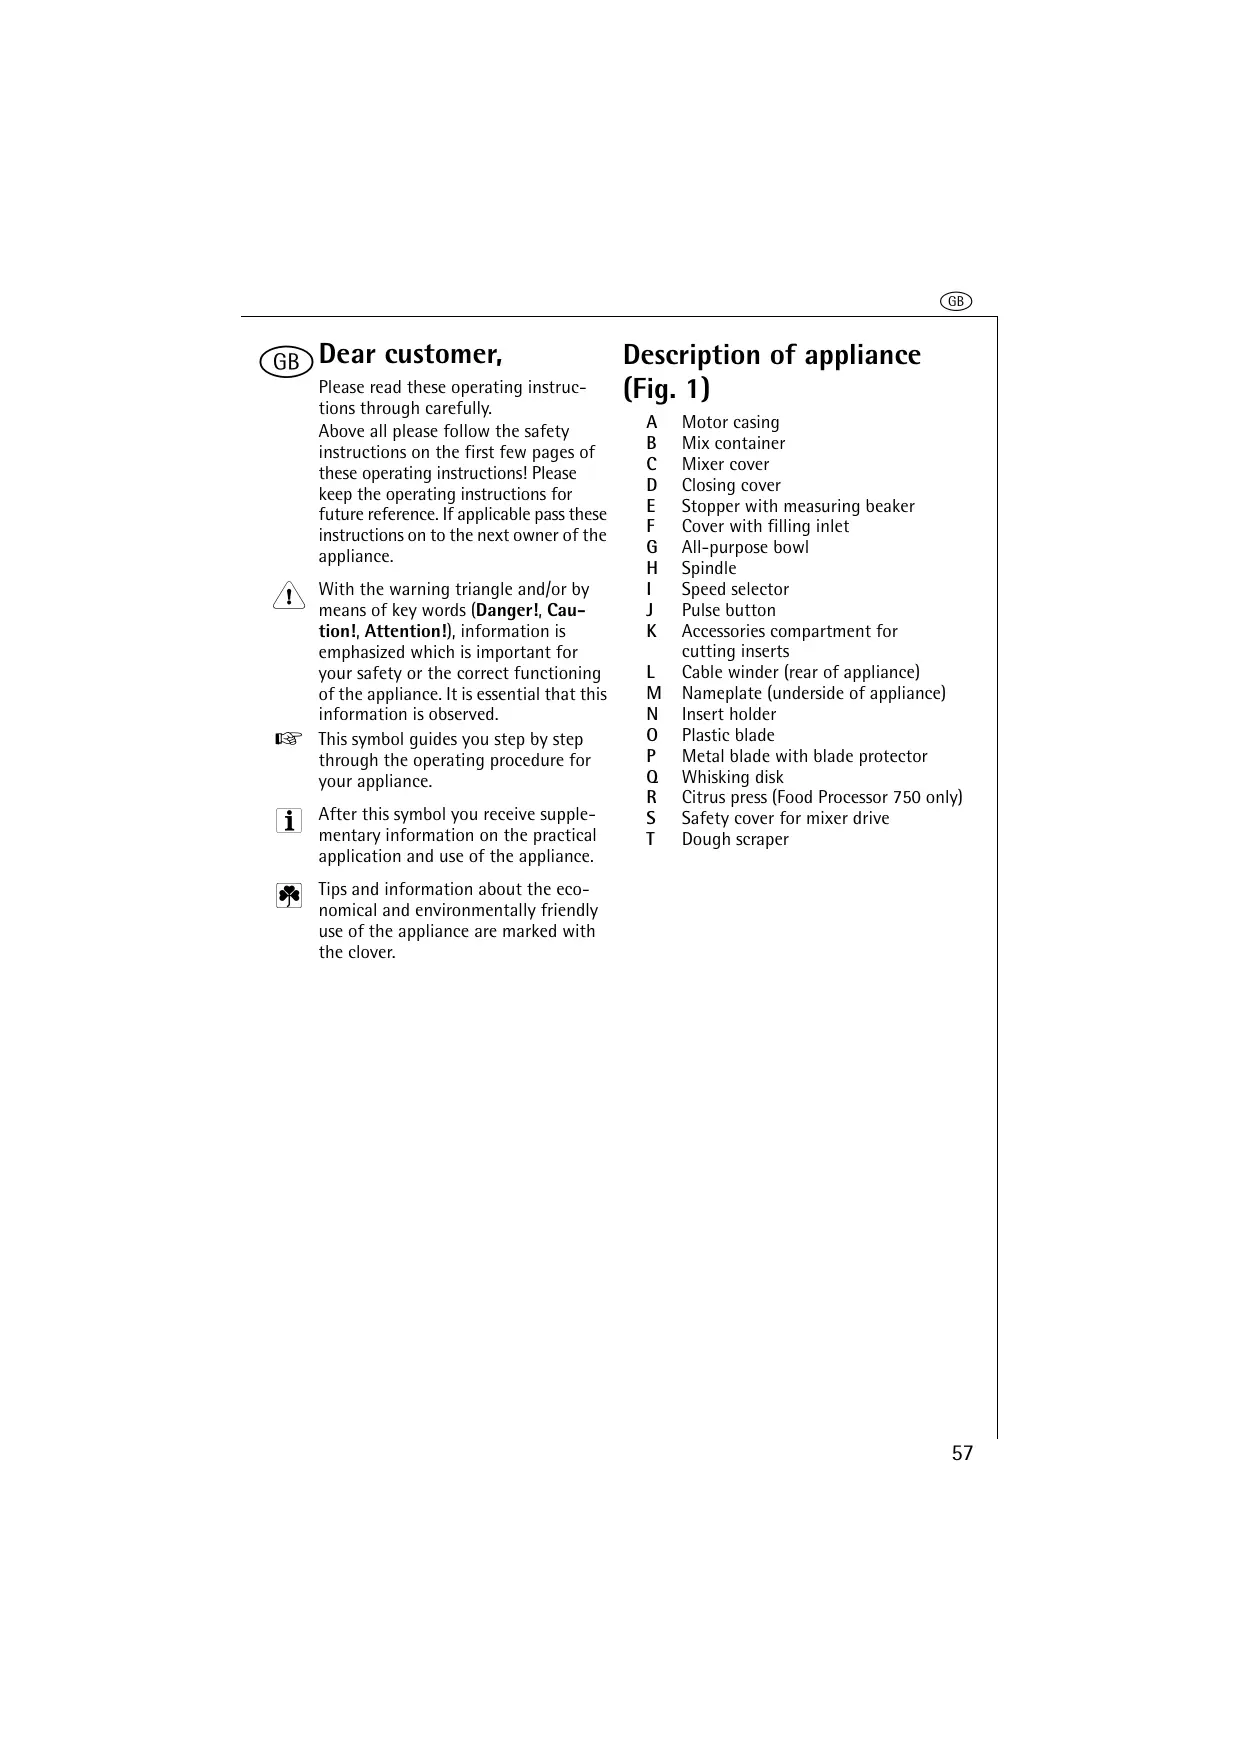
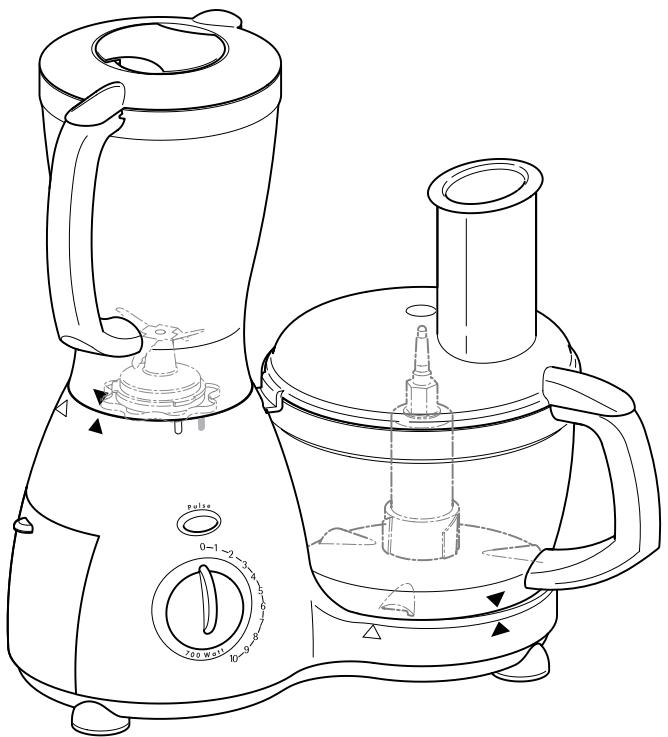
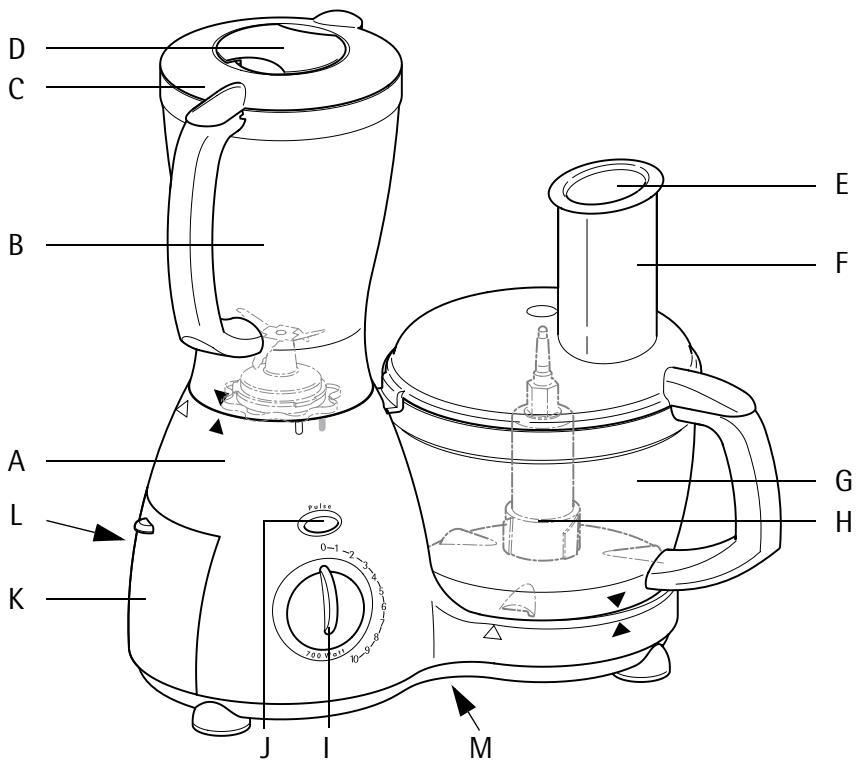
Description of appliance (Fig. 1)
A Motor casing
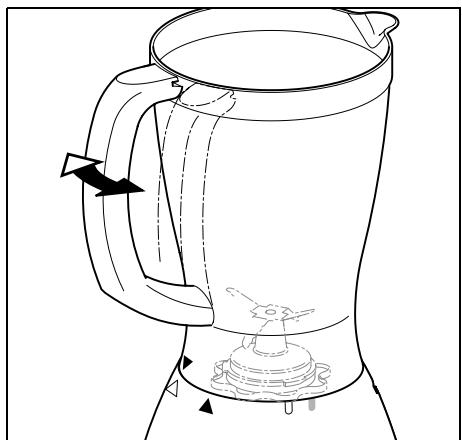
B Mix container
C Mixer cover
D Closing cover
E Stopper with measuring beaker
F Cover with filling inlet
G All-purpose bowl
H Spindle
I Speed selector
J Pulse button
K Accessories compartment for cutting inserts
L Cable winder (rear of appliance)
M Nameplate (underside of appliance)
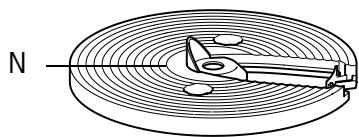
N Insert holder
0 Plastic blade
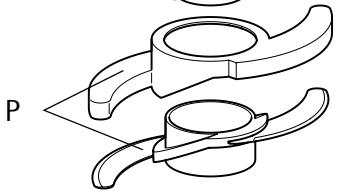
P Metal blade with blade protector
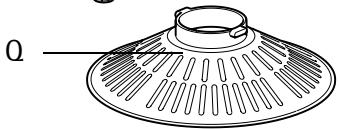
Q Whisking disk
R Citrus press (Food Processor 750 only)
S Safety cover for mixer drive
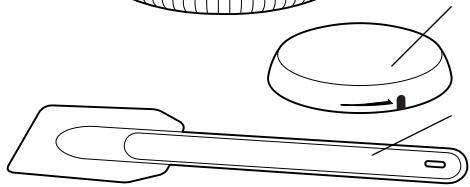
T Dough scraper

Safety instructions
The safety standards of Electrolux electric appliances are in keeping with the recognised rules of technology and the law governing the safety of appliances. Nevertheless as a manufacturer we are committed to familiarise you with the following safety instructions:
General safety
- The appliance may only be connected to a power supply whose voltage and frequency comply with the specifications on the rating plate!
- Never pick up the appliance if
- the lead is damaged,
- the housing is damaged.
- Never use the lead to pull the plug out from the socket.
- In order to avoid danger, if the connection lead of this appliance is damaged, it must be replaced by the manufacturer, its customer service department or a similarly qualified person.
- Repairs to the appliance may only be carried out by trained personnel. As a result of incorrect repairs considerable dangers for the user may result. Please contact the Electrolux customer service department or your dealer in the event of repairs being necessary.
- The appliance is only intended for processing foods in the home. The manufacturer accepts no liability for damage caused by improper use or use other than for the intended purpose.
Safety of children
- Never leave the appliance unattended when on and supervise particularly carefully if young children are around!
To be noted when using the food processor
- Never put the appliance into use when the hands are wet.
-
No paints (lacquer, polyester, etc.) must be stirred with the appliance - Explosion danger!
-
Switch the appliance off and withdraw the mains plug each time before cleaning and maintenance.
- Never dip the motor casing (fig. 1/A) in water or other liquids.
- The manufacturer accepts no liability for possible damage caused by improper or incorrect use.
- The tools must only be inserted or removed from the appliance when it is disconnected from the mains supply.
- Caution: The metal blade (fig. 1/P) is extremely sharp! Danger of injury! The metal blade should only be held by the handle and only stored with the blade protector fitted! Caution when rinsing!
- Caution: The cutting inserts (fig. 9) are very sharp! Danger of injury! Keep the inserts only in the accessories compartment provided (fig. 1/K). Caution when rinsing!
- Caution: The blade unit of the mixer (fig. 14/a) is very sharp. Danger of injury! Care should be taken when disassembling and assembling the mixer.
- Caution: Never reach with the fingers in the filling inlet (fig. 1/F)! Danger of injury!
- Caution: No hard objects (e.g. spoons) must be placed in the mixer while running and do not reach into the mix container with the hands. Danger of injury!
- The cover should only be removed when the tools are stationary.
- Do not hold long objects (blade, wooden spoon, dough scraper or the like) in the filling inlet. Danger of injury! Work only with the stopper (fig. 1/E) to compress the cut food.
-
Do not fill hot liquids (only cold or warm) in the mix container or all-purpose bowl.
Always place the all-purpose bowl (fig. 1/G) on the motor casing before inserting the spindle (fig. 1/H) and the tools. -
For normal work (stirring light doughs, etc.) the appliance can be used for up to 10 minutes without stopping. It should be allowed to cool each time following prolonged, continuous operation (for at least 20 minutes after using for 10 minutes without stopping). When processing very heavy items, e.g. 1.5kg dough, the appliance should not be switched on for longer than 1 minute without stopping.
- Always first remove the tools and spindle before removing the contents of the bowl.
- Do not exceed the maximum filling volume.
- Only use the appliance under supervision. The mains plug should be withdrawn even when leaving the room for a short time.
- After finishing work switch off the appliance and withdraw the mains plug.

Disposal
Dispose of the packaging!
Do not simply throw away the packaging. Please observe the following instructions:
Packaging can be put to the old paper collection.
Polyethylene plastic bags (PE) can be given to the PE collection points for recycling. Padding of expanded polystyrene (PS) is CFC free and can be given to the relevant collection points (recycling depot). Please contact your recycling depot through your municipal authorities.
Dispose of your old appliance!
When you eventually stop using your appliance please bring it to the nearest recycling centre or to your dealer who will take it back for a small fee.
General operating instructions
The food processor helps in many ways for the preparation of food:
- The mixer is used for the preparation of a wide range of mixed drinks, to crush ice, reduce fruit and vegetables, etc.
-
The multifunction unit can be used for example for
-
preparing dough ...
- chopping meat, nuts or similar items ...
- cutting, grating or rasping vegetables or fruit ...
- cutting French fries ...
- whisking cream or egg white ...
- and squeezing lemons, oranges, grapefruit (Food Processor 750 only)
Safety system
The appliance has various safety systems.
- The mixer or all-purpose bowl can only be put into operation when the relevant container and associated cover are correctly fitted.
- The all-purpose bowl can only be put into operation when the mix container is removed and the safety cover for the mixer drive (figs. 1/S and 4) is fitted.

Children should nevertheless be kept away from the appliance.

The appliance should only be operated on a level, dry working surface.
Mixer
The mixer is used to prepare a wide range of mixed drinks, to crush ice, reduce fruit and vegetables, etc.
Preparing mixer
In order to fit the mix container, the safety cover for the mixer drive (figs. 1/S and 4) must be removed.

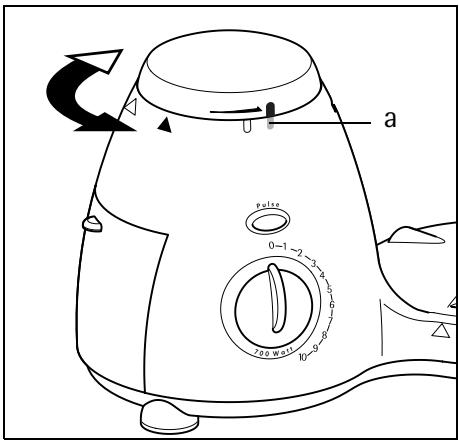
Turn the safety cover clockwise and remove.
- The red warning lamp (fig. 4/a) flashes.

Place the mix container (figs. 1/B and 2) on the mixer drive (arrow on arrow ) and turn counter-clockwise to the stop. The mix container is heard to engage. The two black arrows must coincide.
- The red warning lamp (fig. 4/a) extinguishes.

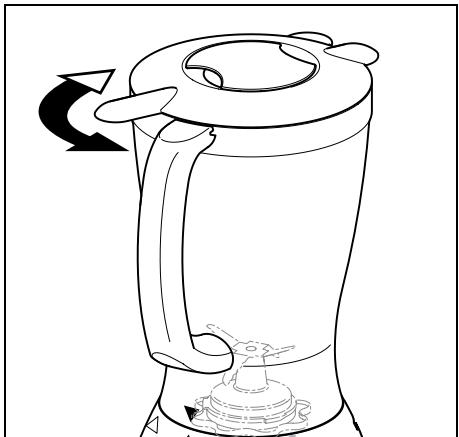
Place mixer cover (figs. 1/C and 3) on mix container and turn until the nose of the cover is directly above the handle. The cover can be heard to engage.

The mixer can only be switched on when the container and cover are fitted correctly.

Fit closing cover (fig. 1/D) and lock.
Operating mixer

Open cover (fig. 1/C) and fill all ingredients required in the container.
Caution: Do not exceed maximum filling volume of 1.5 litres!

During operation further ingredients can be added through the filling inlet. The sealing cover (fig. 1/D) can also be used as a filling beaker for this purpose. Close the filling inlet again immediately every time to avoid splashing.

Start the mixer: turn speed selector (fig. 1/l) to the right to the desired speed or press the pulse button (fig. 1/J).

It is recommended to start at a slow speed and then to increase the speed. The mixer operates at maximum speed by pressing the pulse button.
Refer to the section "Tips on using mixer" for reference values for setting the speed.

Switch off appliance: turn speed selector left to "0" position.

After mixing, turn container clockwise and remove. Then turn the cover and remove.
Multifunction section
Tools and their application possibilities
The following tools can be used in the multifunction section:
- Whisking disk (fig. 1/0)
Whisking cream and egg whites, preparation of cream and light doughs.
Metal blade (fig. 1/P)
For chopping raw meat, chocolate, nuts, etc.
- Plastic blade (fig. 1/0)
For kneading and blending heavy doughs.
- Insert holder (fig. 1/N) with cutting insert (fig. 10)
The inserts are marked by a number (1 to 6) on the handle. The desired insert is placed in the insert holder.
1 Fine cutter
For cutting fruit, vegetables, raw meat or sausage (e.g. salami) etc. in thin slices.
PG1 Potato grater
For grating potatoes.
3 French fries cutter
For cutting potatoes for French fries.
4 Cheese grater
For grating hard cheese, e.g.
Parmesan etc.
5 Coarse rasp For coarse rasping of vegetables and fruit, etc.
6 Fine rasp For fine rasping of vegetables, fruit, chocolate, garlic, etc.
Preparing multifunction section
Fit safety cover (fig. 4)
The multifunction section can only be put into operation when the mix container is removed and the safety cover for the mixer drive (figs. 1/S and 4) is fitted.
Remove mix container as described under "Mixer".
- The red warning lamp (fig 4/a) flashes.
Place safety cover on mixer drive (mark on mark 0) and turn counter-clockwise to the stop. The safety cover is heard to engage. The mark must be above the warning lamp (fig. 4).
- The red warning lamp (fig. 4/a) extinguishes.
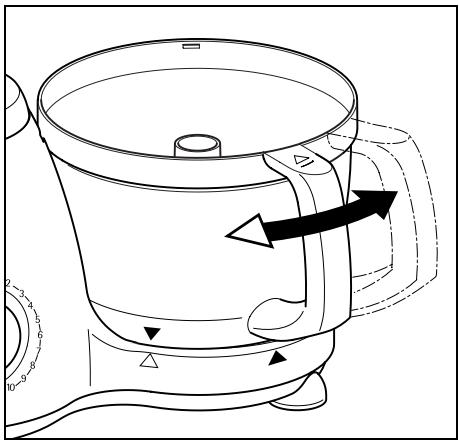
Fitting all-purpose bowl (fig. 5)
Place all-purpose bowl (fig. 1/G) on appliance (arrow on arrow ) and turn counter-clockwise to the stop. The all-purpose bowl can be heard to engage. The two black arrows must coincide.
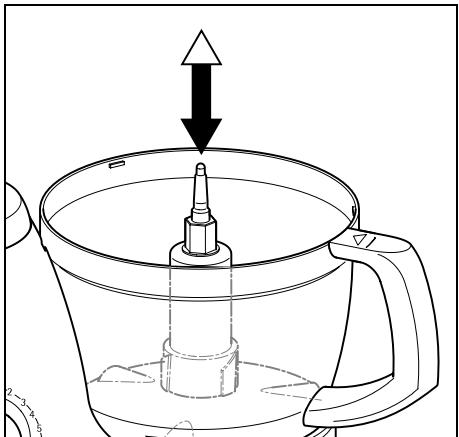
Inserting spindle (fig. 7)
Place spindle (fig. 1/H) on spigot in centre of all-purpose bowl.
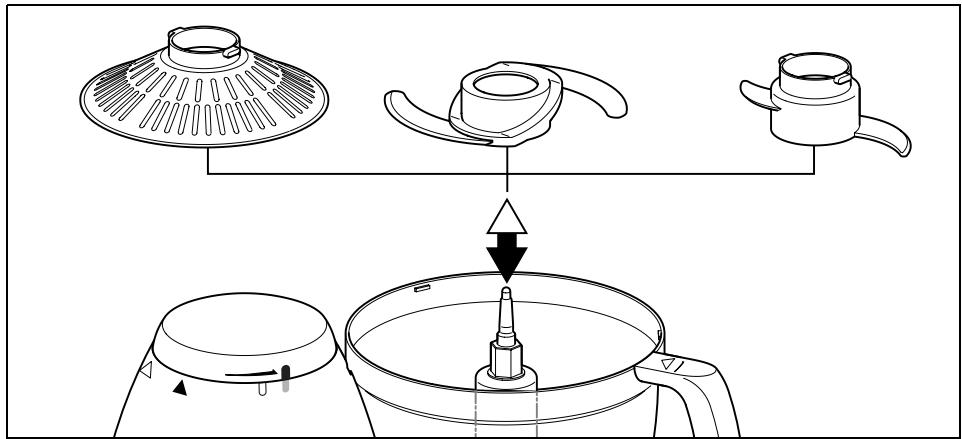
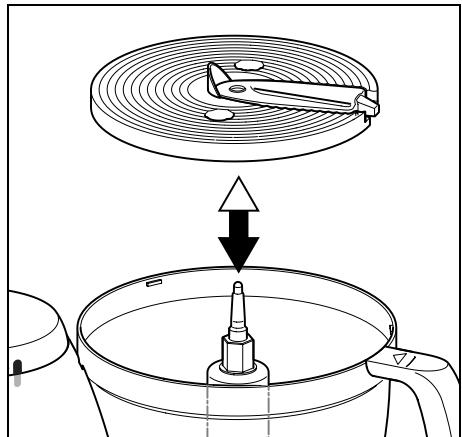
Inserting tools
The following tools can be selected for insertion:
- Whisking disk (fig. 1/Q) or
Metal blade (fig. 1/P) or - Plastic blade (fig. 1/0) or
- Insert holder (fig. 1/N) with cutting insert (fig. 9)
The insert holder must be fitted with the appropriate insert depending on the purpose of application (see "Inserting cutting insert in insert holder").
Place desired tool on spindle.
- Whisking disk, metal blade and plastic blade (fig. 8) mesh with the teeth underneath on the spindle.
- The insert holder (fig. 11) rests on the hexagonal spindle.
i Preferably hold the insert holder with two fingers in the two handle holes.
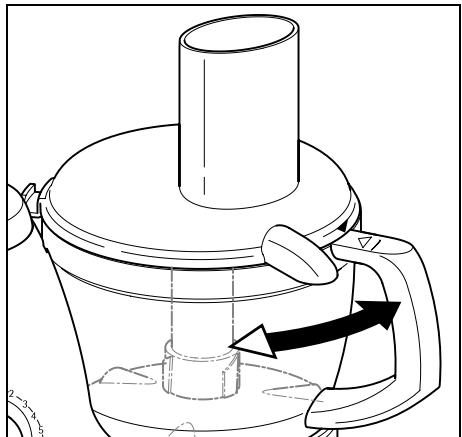
Fitting the cover (fig. 6)
Place cover (fig. 1/F) on the all-purpose bowl (arrow on arrow ) and turn counter-clockwise to the stop. The cover can be heard to engage. The nose of the cover is then directly above the handle, both black arrows must coincide.
Insert stopper (fig. 1/E) in filling inlet.
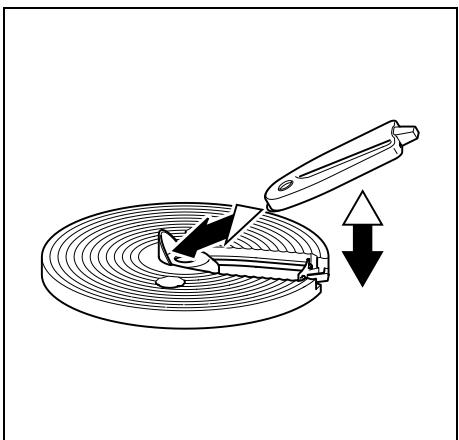
Inserting cutting insert in insert holder (fig. 10)
The appropriate insert must be placed in the insert holder depending on use.
The inserts are contained in the hinged accessories compartment (fig. 1/K) in the motor casing.
The inserts are very sharp. They should be held only with the handle!
Open accessories compartment by pulling the handle (fig. 9).
Take required insert by the handle from the accessories compartment (fig. 9).
Place the insert with the tip at the centre of the insert holder and place in the recess of the disk (fig. 10).
To remove the insert draw slightly outwards with the handle and raise.
Operating multifunction section

Open cover (fig. 1/F) and place all ingredients required in the all-purpose bowl.
Caution: Do not exceed maximum filling volume:
liquid 1.75 litres
- solid 1.5 litres

Further ingredients can be added during operation through the filling inlet.
The filling beaker in the stopper (fig.
1/E) can also be used for this purpose.
Close the filling inlet immediately each time to avoid splashes.

Use the stopper exclusively to compress the cutting items!

Start the appliance: turn speed selector (fig. 1/l) right to the desired speed setting or press the pulse button (fig. 1/J).

It is recommended to start at a slow speed and then to increase the speed.
The appliance operates at maximum speed by pressing the pulse button.
Refer to the section "Tips on using multifunction section" for reference values.

If the warning lamp (fig. 4/a) flashes and the appliance cannot be started, the safety cover for the mixer drive (figs. 1/S and 4) is not properly fitted.

Switch off appliance: turn speed selector left to the "0" position.

After using, turn cover clockwise and remove.

Only remove the cover when the tool has come to a complete stop!

Remove the tool and spindle.

Turn the all-purpose bowl clockwise and remove.
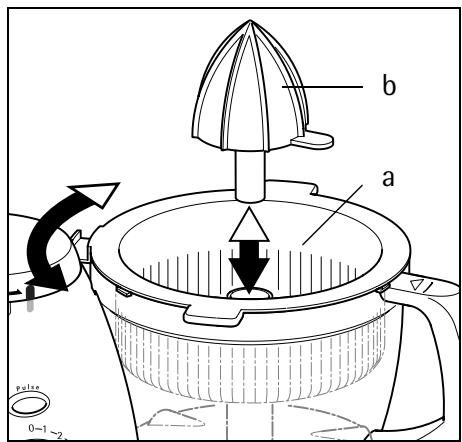
Citrus press
(Food Processor 750 only)
Preparation (fig. 13)

Fit all-purpose bowl as described above (fig. 5).

Place sieve insert of citrus press (fig. 13/a) on all-purpose bowl (arrow on arrow ) and turn cunter-clockwise to the stop. The sieve insert can be heard to engage, arrow must coincide with arrow .

Insert press cone (fig. 13/b) in sieve insert.
Operating citrus press

Start appliance: turn speed selector (fig. 1/J) right to position 1.

The citrus press must only be operated at the lowest speed.

Switch off appliance: turn speed selector left to the "0" position.

Remove press cone after use.

Turn sieve insert clockwise and remove.

Turn all-purpose bowl clockwise and remove.

The appliance can be used for up to 10 minutes without stopping. It should be allowed to cool each time following prolonged, continuous operation (for at least 20 minutes after using for 10 minutes without stopping).
Cleaning and care
Motor casing

Ensure that no liquid enters the motor casing!

Clean the motor casing with a moist cloth. Never immerse in water or hold under running water!
Mixer
i Container and blade can be cleaned easily and properly with the aid of the pulse position.
Fill the mix container half full with warm (not hot!) water and add a few drops of detergent.
Press the pulse button briefly.
Then rinse the container under running water.
Dismantle/fit blade unit (fig. 14)
If necessary, the blade unit can also be dismantled and cleaned separately.
Caution: The blade is very sharp! Danger of injury!
Release blade unit (fig. 14/a) from mix container by turning counter-clockwise and remove while holding slightly at an angle.
Remove gasket (fig. 14/b) from blade unit.
The blade unit is very sharp. The gasket can be damaged.
! Rinse the components carefully by hand (danger of injury!). Use only water and detergent for cleaning. Do not clean the blade unit in a dishwasher.
Insert gasket in blade unit.
Insert blade unit in container from below. Hold blade unit at a slight angle. Tighten blade unit by turning clockwise.
All-purpose bowl and tools
The all-purpose bowl and tools should be cleaned in rinsing water.
!Caution: The metal blade is extremely sharp! Danger of injury!
! Plastic parts age more quickly if cleaned frequently in a dishwasher. If they are nevertheless to be cleaned in a dishwasher, they must be placed in the upper basket.
Inserts
Clean inserts with brush or cloth under running water or in a dishwasher!
Caution: The inserts are very sharp! Danger of injury!
Storage
All accessories except the citrus press can be stored directly in the appliance.
- Store the inserts in the accessories compartment (fig. 1/K).
Caution: The inserts are very sharp. Danger of injury! They should only be held by the handle!
- Stow the accessories away in the all-purpose bowl as shown in fig. 12.
Caution: The metal blade (fig. 1/P) is extremely sharp! Danger of injury! Hold the metal blade only by the handle and store only with the blade guard fitted!
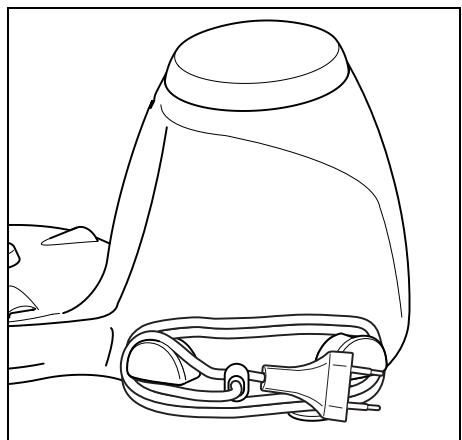
- Wind the cable round the two hooks at the rear of the appliance (fig. 15).
Technical data
Mains voltage: 230 - 240 V
Power consumption: 700 W
This appliance complies with the following EC directives:
- 73/23/EEC of 19/2/1973 "Low voltage directive", including the modification directive 93/68/EEC.
89/336/EEC of 3/5/1989 "EMC directive", including the modification directive 92/31/EEC.
Customer service
The highest quality standards apply for our appliances. If nevertheless a disturbance should arise, for which you can find no solution in the operating instructions, please contact your retailer or the Electrolux customer service.
Tips for use
Mixer
- The mixer is very well suited for chopping small amounts of food such as nuts, breadcrumbs or herbs.
- Sauces which have separated can be quickly saved again in the mixer.
- Cut or break up foods to be processed in the mixer into cubes of about 2 to 3cm .
-
Always remove the stones of fruit and bones from meat, since these can damage the blade unit.
-
Crushing ice: always add a little water to the container before crushing ice.
- When processing dry mixtures it may be necessary to switch off the appliance occasionally, to open the mixer lid and scrape the mixture from the walls of the container with the scraper.
- When mixing liquid and solid ingredients first mix the liquid items and then add the dry ingredients.
- Allow hot liquids to cool before processing in the mixer.
- If hot ingredients must be processed, the mix container must be aerated by removing the closing cover.
| Food | Speed* | Notes | |
| Mixing | Milk shakes | 5 – 10 | Use cold milk. |
| Chopping | Nuts, chocolate, garlic, herbs | Pulse | Only process 1/2 cup at a time to ensure everything is finely chopped |
| Making bread-crumbs | Bread roll, biscuits, toast | 5 – 10 | Crumble coarsely before processing |
| Crushing ice | Pulse | Add 1/4 cup water. Press pulse button 3-4 times | |
| Emulsifying | Salad dressing | 7 – 10 | Mix well. Oil can be added through the filling hole while mixing |
| Mixing | Cake mixes, pancake dough | 1 | Only mix ingredients well, do not whisk too long, |
| Pureeing | Soups, vegetables, fruit | 3 – 10 | Mix until the mixture is thick |
*Always start at a low speed and then increase the speed.
Multifunction section
Chopping
For a uniform result pieces of size as equal as possible should be processed. The food should be cut or broken up before processing into pieces of equal size.
Ensure that the container is not too full.
Minced meat
Cut the meat into cubes of approx. 2 cm before processing.
Vegetables
Peel and quarter vegetables such as onions for processing.
Mixing
The amount for processing varies according to the viscosity of the foods processed.
Adding ingredients
Place dry ingredients such as flour in the all-purpose bowl before processing. The ingredients do not have to be mixed before processing. Liquid ingredients can be added through the filling inlet while processing.
Liquid ingredients can be added through the filling inlet while processing.
Note: When processing sauces or semi-liquid ingredients it may be necessary to switch off the appliance occasionally, to open the cover of the all-purpose bowl and scrape the mixture from the wall of the bowl with the scraper.
Working with the insert holder
Correct supply of the foods through the filling inlet is very important.
Cut the prepared foods a little smaller if necessary, so that they pass easily through the filling inlet.
Add the items for filling as vertically as possible simultaneously in the filling inlet.
Compress the items evenly with the stopper. The degree of pressure influences the concentration of the cut food.
!
Use only the stopper for further additions. Never reach in the filling inlet with the fingers!
The appliance can be damaged by pressing too hard with the stopper!
i
There is always a little unprocessed food remaining between the stopper and the insert holder.
Grating cheese
Cool soft cheese such as Emmental or mozzarella well before grating.
Process hard cheese such as Parmesan at room temperature.
Note: Parmesan should be processed with little pressure on the stopper.
| Tool | Food | Max. amount | Speed | Notes | |
| Chopping | Metal blade | Vegetables, e.g. onions fruit fresh herbs nuts, almonds chocolate | 800 g 800 g 1 bunch 500 g 400 g | 3 - 5 3 2 5 4 | Fruit and vegetables should be fresh and firm, use pieces of roughly equal size |
| Chopping meat | Metal blade | Meat, fish fillets (filleted), bacon | 500 g | 4 - 6 | Remove bones and sinews, cut into cubes of approx. 2 cm |
| Making bread crumbs | Metal blade | Dry bread, biscuits | 125 g | 3 or 4 | Crumble coarsely before processing |
| Pureeing | Metal blade | Boiled fruit or vegetables | up to 1.75 l | 3 - 10 | Add a little water if necessary while processing |
| Mixing | Metal blade | Light cake mixes, pancake dough, etc. | 800 ml | 3 - 7 | Start with setting 1 to mix the ingredients, then increase speed |
| Mixing | Metal blade | Mayonnaise | 1 l | Pulse or 3 | Do not switch off appliance while adding oil |
| Kneading | Plastic blade | Heavy doughs, e.g. bread and pizza dough | 1.5 kg | 1 - 5 | Start with setting 1 to mix the ingredients, then increase speed |
| Cutting | Fine cutter (no. 1) | Vegetables, e.g. gherkins, zucchini, carrots, etc. Fruit, e.g. apples, tomatoes, meat, sausage, salami, etc. | 800 g | 1 - 2 | Select fruit and vegetables of roughly equal size Cut meat suitable for the filling inlet |
| Grating | Potato grater (no. PG1) | Potatoes | up to 1 kg | 1 - 2 | e.g. for potato dumplings |
| Cutting strips | French fries cutter (no. 3) | Potatoes, carrots, pansips | 1 kg | 1 - 2 | |
| Grating | Cheese grater (no. 4) | Parmesan cheese | 500 g | 1 - 2 | Do not press too hard with stopper |
| Rasping (coarse or fine) | Coarse, fine rasp (no. 5 or 6) | Block chocolate fruit, e.g. apples vegetables, e.g. carrots | 500 g 1 kg 1 kg | 1 - 2 | Break cooking chocolate into 2-3 pieces |
| Beating | Beating disk | Light cake mixes egg whites cream | 1 kg | 4 - 5 2 - 10 4 - 6 | Do not beat egg white too long |
Recipes
Basic recipe for sponge
4 white of egg
4 tbsp. cold water
200g sugar
1 pck. vanilla sugar
4 yolk of egg
80g flour
80 g cornflour
1 tsp. baking powder
i Accessories required: all-purpose bowl with whisking disk
Place white of egg and water in the all-purpose bowl and whisk on setting 5 for about 1 minute until stiff.
Add sugar and vanilla sugar through the filling inlet and whisk for a further 1 minute or so until the sugar has dissolved.
Add egg yolk and stir in with several pulses.
Mix flour, cornflour and baking powder, add to creamy mass and stir briefly with several pulses.
Fill dough in a spring mould and bake.
Basic recipe for cake mix
500g flour
1 pck. baking powder
250 g soft margarine or butter
250g sugar
1 pck. vanilla sugar
1 pinch salt
4 eggs
150 ml milk
i Accessories required: all-purpose bowl with plastic blade
Place all ingredients in the all-purpose bowl in the order stated.
Stir for 1 to 112 minutes on setting 3-4 until the dough is smooth and creamy.
If the dough is thrown too far outwards during processing, switch off the appliance, open the cover and move the dough inwards with the scraper from the edge of the bowl.
Fill the dough in a suitable baking tin and bake.
The dough can be modified slightly as required by the addition of other flavourings.
Example for marble cake:
Fill 2/3 of the dough in the tin. Add 1 tablespoon cocoa powder and 1 tablespoon milk to the remaining dough and stir in again briefly with several pulses.
Fill the dark dough over the light in the baking tin. Draw a fork in spiral motion through both layers of dough to obtain the marble pattern.
Basic recipe for short pastry
250 g flour
1 tsp. baking powder
125 g cold margarine or butter
60 g sugar
1 pinch salt
1 egg
1 tbsp. cold water
i Accessories required: all-purpose bowl with plastic blade
Place flour, baking powder, salt and sugar in the all-purpose bowl. Cut cold butter into pieces and add.
Stir for about 1 minute on setting 3-4, add the egg and cold water through the filling inlet and continue stirring until the dough forms a ball around the blade.
Take the dough from the bowl and continue kneading briefly with the hands.
Allow the dough to rest in the refrigerator for about 30 minutes before processing further.
Roll out dough, place in a well greased mould and add fruit, e.g. apples or plums, as desired
Basic recipe for yeast dough
500g flour
40 g yeast (fresh) or 1 pck. dry yeast
80 g sugar 1 pinch salt
80 g margarine, melted
i Accessories required: all-purpose bowl with plastic blade
Place all ingredients in the bowl in the order stated.
Stir for 1 to 112 minutes on setting 3-4 until the dough forms a ball around the blade.
Take dough from bowl and knead briefly further with the hands.
Then knead in ingredients with the hands which are not to be reduced, e.g. raisins.
Before further processing allow the dough to expand in a covered bowl in a warm place until about twice the size.
Application possibilities: plaited leavened bread, yeast fancy biscuits, fruit flans, hollow noodles. For spicy cakes,e.g.onion cake,prepare the yeast dough without sugar.

The Electrolux Group is the world's largest producer of powered appliances for kitchen, cleaning and outdoor use. More than 55 million Electrolux Group products (such as refrigerators, cookers, washing machines, vacuum cleaners, chain saws and lawn mowers) are sold each year to a value of approx. USD 14 billion in more than 150 countries around the world.
- Bästa köpare,
- Användningstips
- Mixer
- Tips for bruK
- Mikser
- Gronnsaker
- Description of appliance (Fig. 1)
- Safety instructions
- General safety
- Safety of children
- To be noted when using the food processor
- Disposal
- Dispose of the packaging!
- Dispose of your old appliance!
- General operating instructions
- Safety system
- Preparing mixer
- Operating mixer
- Multifunction section
- Tools and their application possibilities
- Preparing multifunction section
- Fit safety cover (fig. 4)
- Fitting all-purpose bowl (fig. 5)
- Inserting spindle (fig. 7)
- Inserting tools
- Fitting the cover (fig. 6)
- Inserting cutting insert in insert holder (fig. 10)
- Operating multifunction section
- Citrus press
- (Food Processor 750 only)
- Preparation (fig. 13)
- Operating citrus press
- Cleaning and care
- Motor casing
- Dismantle/fit blade unit (fig. 14)
- All-purpose bowl and tools
- Inserts
- Storage
- Technical data
- Customer service
- Tips for use
- Chopping
- Minced meat
- Vegetables
- Mixing
- Adding ingredients
- Working with the insert holder
- !
- i
- Grating cheese
- Recipes
- Basic recipe for sponge
- Basic recipe for cake mix
- Example for marble cake:
- Basic recipe for short pastry
- Basic recipe for yeast dough
Brand : AEG-ELECTROLUX
Model : AFP750
Category : Food processor