USER MANUAL MQ775 BRAUN
Our products are engineered to meet the highest standards of quality, functionality and design.
We hope you thoroughly enjoy your new Braun appliance.
Before use
Please read the use instructions carefully and completely before using the appliance.
Caution

The blades and the tools (15a,b) are very sharp! To avoid injuries, please handle them with utmost care.
- Always unplug the appliance when it is left unattended and before assembling, disassembling, cleaning and storing.
- The appliance is not intended for use by children or persons with reduced physical, sensory or mental capabilities, unless they are supervised by a person responsible for their safety. Keep the appliance out of reach of children to ensure that they do not play with it.
- Before operating the food processor attachment, make sure that the lid interlock (10d) is properly clicked in and that the pusher (10b) is in place.
- Do not insert other tools than the pusher (10b) into the filling tube during processing.
- Do not hold the motor part (4) nor the whisk gear box (8a) under running water, nor immerse them in water.
- The lid (10) can be cleaned under running water, but do not immerse it in water, nor clean it in a dishwasher.
- Braun electric appliances meet applicable safety standards. Repairs or the replacement of the mains cord must only be done by authorized service personnel. Faulty, unqualified repair work may cause considerable hazards to the user.
- Before plugging into a socket, check whether your voltage corresponds to the voltage indicated on the appliance.
- The appliance is constructed to process normal household quantities.
- The beaker (7) and the bowl (11) are not microwave-proof.
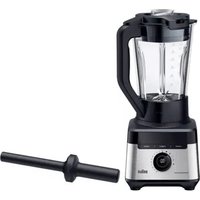
Description (see table on p. 3)
1 Safety button
2 Pilot light
3 Smartspeed switch / variable speeds
4 Motor part
5 Release buttons
6 Blender shaft
7 Beaker
8 a Gear box b Whisk
9 Compact kitchen machine accessory
10 Lid
10a Coupling for motor part
10b Pusher
10c Filling tube
10d Lid interlock
11 Bowl
12 Anti-slip ring
13 Blade
14 Kneading tool
15 Tool holder
15a Slicing tool
15b Shredding tools (fine, coarse)
Please clean all parts before using for the first time (see paragraph «Cleaning»/table C).
Pilot light
The pilot light (2) shows the status of the appliance, when it is connected to an electrical outlet.
| Pilot light | Appliance/operating status |
| Red flashing | Appliance is ready for use |
| Green | Appliance is released (switch release button is pressed) and can be switched on |
| Red | Appliance is overheated. Let it cool down. It is ready for use again when the pilot light flashes red |
Smartspeed technology
Smartspeed switch for variable speeds
One squeeze, all speeds. The more you press, the higher the speed (fig. A). The higher the speed, the faster and finer the blending and chopping results.
One handed operation: the Smartspeed switch (3) allows you to turn on the motor part and control the speed with one hand.
How to use the appliance
First use: Remove the transportation lock from the motor part (4) by pulling it at the red strap.
Switching on (see p.3/fig.A)
The appliance has a safety button. To safely switch it on, follow these points:
- First press the safety button (1) with your thumb and hold. The pilot light will light up permanently green.
- Then directly press the Smartspeed switch (3) according to the desired speed.
If the Smartspeed switch (3) is not pressed within 5 seconds, the appliance cannot be switched on for safety reasons. The pilot light flashes red. In order to switch the appliance on, start again with step 1.
- During operation you do not have to keep the safety button pressed.
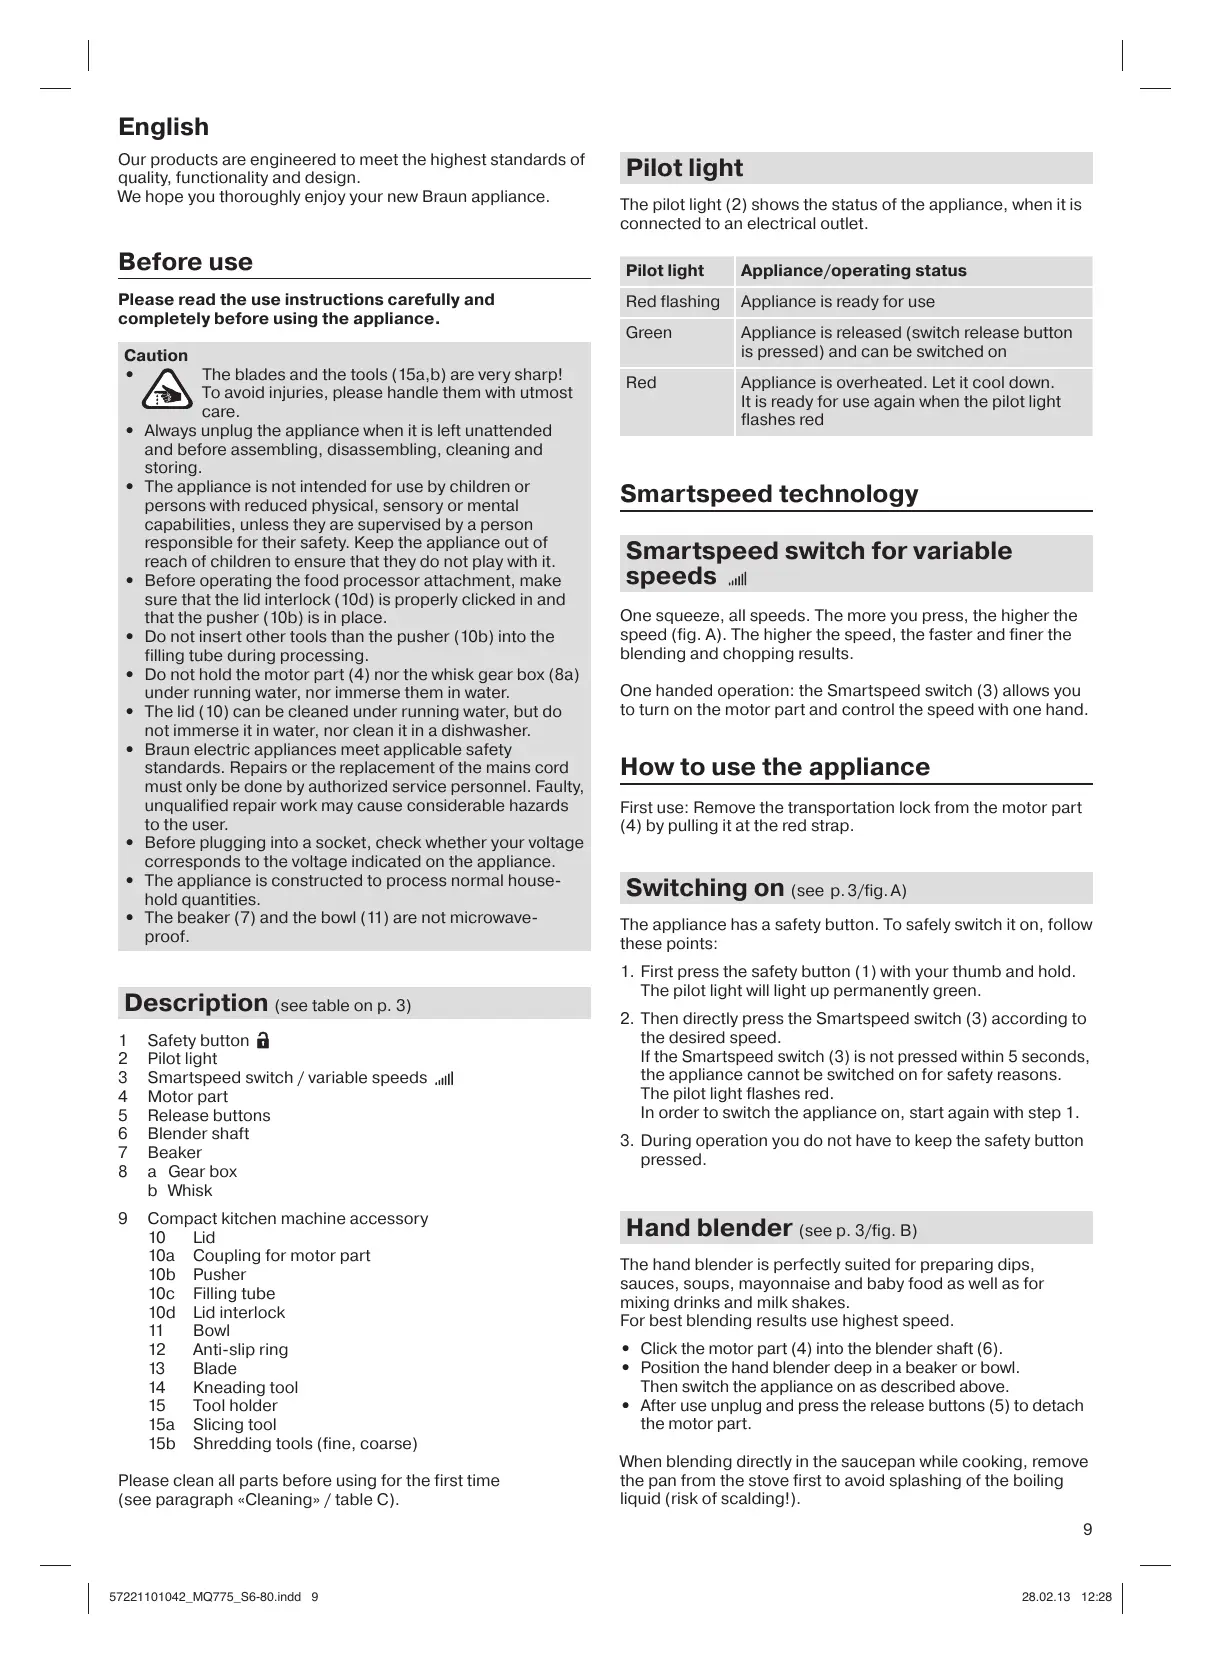
Hand blender (see p. 3/fig. B)
The hand blender is perfectly suited for preparing dips, sauces, soups, mayonnaise and baby food as well as for mixing drinks and milk shakes.
For best blending results use highest speed.
- Click the motor part (4) into the blender shaft (6).
- Position the hand blender deep in a beaker or bowl. Then switch the appliance on as described above.
- After use unplug and press the release buttons (5) to detach the motor part.
When blending directly in the saucepan while cooking, remove the pan from the stove first to avoid splashing of the boiling liquid (risk of scalding!).
Recipe example: Mayonnaise
250 g oil (e.g. sunflower oil), 1 egg and 1 extra egg yolk,
1-2 tbsp. vinegar (approx. 15 g), salt and pepper to taste
Place all ingredients (at room temperature) into the beaker in the a.m. order. Place the hand blender on the bottom of the beaker. Operate the hand blender at maximum speed, keep it in this position until the oil starts emulsifying. Then without switching off slowly raise the shaft to the top of the mixture and back down to incorporate the rest of the oil. Processing time: from 1 minute (for salad) up to 2 minutes for more stiffness (e.g. for dip).
Whisk (see p. 3/fig. B)
Use the whisk only for whipping cream, beating egg whites and mixing sponges and ready-mix desserts.
- Insert the whisk (8b) into the whisk gear box (8a) then click the motor part (4) into the gear box.
- Place the whisk in a bowl and only then switch the appliance on.
- After use, unplug and press the release buttons (5) to detach the motor part. Then pull the whisk out of the gear box.
Tips for best results
- Use a medium-sized bowl.
- Move the whisk clockwise, holding it slightly inclined.
- Whipped cream (max. 400 ml chilled cream, min. 30% fat content, 4 - 8^ ): Start with low speed (light pressure on the switch) and increase the speed (more pressure on switch) while whipping.
- Beaten egg whites (max. 4 eggs): Start with a medium speed (half way pressure on switch) and increase the speed (more pressure on switch) while whipping.
Compact kitchen machine accessory
The compact kitchen machine accessory (9) is perfectly suited for
- chopping and blending
- kneading dough (based on max. 250 g flour)
- slicing and shredding
Chopping (see p. 4/fig. D)
Using the blade (13) you can chop meat, cheese, onions, herbs, garlic, carrots, walnuts, hazelnuts, almonds etc.
For best results, please refer to the maximum quantities and speed settings indicated in the processing tables of section D and E.
Do not chop extremely hard food, such as ice cubes, nutmeg, coffee beans or grains.
Before chopping ...
- pre-cut meat, cheese, onions, garlic, carrots, chillies
- remove stems from herbs, shell nuts
- remove bones, tendons and gristle from meat
- always make sure that the anti-slip ring (12) is attached to the chopper bowl
Caution: The blade is very sharp! Always hold it by the upper plastic part and handle it carefully.
Carefully remove the plastic cover from the blade.
-
Place the blade on the centre pin of the bowl (11) and give it a turn so that it locks.
-
Fill the bowl with food. Attach the lid (10) onto the bowl with the interlock (10d) positioned next to the bowl handle.
- To lock the lid, turn it clockwise so that the interlock engages with a «click» above the handle.
- Insert the motor part (4) into the coupling (10a) until it locks.
- Plug in the appliance and make sure the pusher is in place.
- Switch the appliance on and hold the bowl with the other hand.
- After use unplug and press the release buttons (5) to remove the motor part. Remove the pusher.
- Press the lid interlock (10d) and hold it. Turn the lid (10) counter-clockwise to unlatch it.
- Lift the lid up.
- Carefully take out the blade before removing the processed food. To remove the blade, slightly turn it then pull it off.
Mixing light dough
Using the blade (13), you may also mix light dough like a pancake batter or a cake mixture based on up to 250 g flour.
Recipe example: Pancake batter
First pour 375 ml milk into the bowl, then add 250 g flour and finally 2 eggs. Using full speed, mix the batter until smooth.
Kneading dough
Picture section D also applies for the use of the kneading tool. The kneading tool (14) is ideal for kneading different dough types like yeast dough or pastry (based on max. 250 g flour).
- Place the kneading tool into the bowl (11).
- Fill the bowl with max. 250g flour, then add the other ingredients except liquids.
- Turn the appliance on at full speed.
- Add liquids through the filling tube while the motor is running.
Maximum kneading time: 1 minute - then allow the motor part to cool down for 10 minutes.
Recipe example: Pizza dough
250 g flour, 1/2 tsp salt, 1/2 tsp dried yeast, 5 tbsp olive oil, 150 ml water (lukewarm).
Recipe example: Pastry
250 g flour, 170 g butter (cold/hard, small pieces), 80 g sugar, 1 vanilla sugar, 1 small egg, 1 pinch salt
For good results, do not use warm, soft butter.
Stop kneading shortly after dough has formed a ball. Dough will become too soft from excessive kneading.
Slicing/shredding (see p. 5/fig. E)
Using the slicing tool (15a), you can slice e.g. cucumbers, onions, mushrooms, apples, carrots, radishes, raw potatoes, courgettes, cabbage.
Using the shredding tools (15b), you can shred e.g. apples, carrots, raw potatoes, beetroot, cabbage, cheese (soft to medium).
-
Place a tool (15a,b) into the tool holder (15) and snap into position. Place the tool holder on the centre pin of the bowl and make sure it locks into place.
-
Attach the lid (10) onto the bowl with the interlock (10d) positioned next to the bowl handle.
-
To lock the lid, turn it clockwise so that the interlock engages with a «click» above the handle.
-
Insert the motor part into the coupling (10a) until it locks.
- Plug in the appliance and insert the food to be processed into the filling tube.
- Switch the appliance on to operate. Never reach into the filling tube when the appliance is switched on. Always use the pusher (10a) to feed in food.
- After use unplug and press the release buttons (5) to detach the motor part.
- Press the lid interlock (10d) and hold it.
Turn the lid (10) counter-clockwise to unlatch it.
- Lift the lid up.
- Take out the tool holder before removing the processed food. To remove the tool (15a,b), push it up at the one end that protrudes at the bottom side of the tool holder.
Recipe example: Vanilla-Honey-Prunes
(as a pancake stuffing or spread):
- Fill the «hc» chopper bowl (MQ 20, see accessories) with 50g prunes and 70g creamy honey.
- Chop 4 seconds at maximum speed (fully press the Smartspeed button).
- Add 10 ml water (vanilla-flavoured).
- Resume chopping for another 1.5 seconds.
Cleaning (see p. 3/fig. C)
Clean the motor part (4) and the whisk gear box (8a) with a damp cloth only. The lid (10) can be cleaned under running water, but do not immerse it in water, nor clean it in a dishwasher. All other parts can be cleaned in a dishwasher.
You may remove the anti-slip rings from the chopper bowls for extra thorough cleaning.
When processing foods with a high pigment content (e.g. carrots), the plastic parts of the appliance may become discoloured. Wipe these parts with vegetable oil before cleaning them.
Accessories
can be bought individually, not available in every country
| MQ 20: | 350 ml compact chopper to chop herbs, onions, garlic, chillies, nuts etc. |
| MQ 30: | 500 ml chopper to chop carrots, meat, onions, etc. |
| MQ 40: | 1000 ml chopper to chop, mix, blend and crush ice |
Subject to change without notice.
This appliance conforms to EC directive 2004/108/EC on Electromagnetic Compatibility and EC regulation no. 1935/2004 on materials intended for contact with food.
Please do not dispose of the product in the household waste at the end of its useful life. Disposal can take place at a Braun Service Centre or at appropriate collection points provided in your country.

François
b Varilla monta-claras
Compact kitchen machine accessory
BkIIOUvBaHe (BnK. Ctp. 3/ΦnR. A)
UpeBt Nma 6ytoh 3a 3aunTa. 3a da ro BKJIOuHte 6e30nacHo, CJIeBaIte CJIeHNTE CTbPKI:
- Пьрно натус悔е 6утона за зашита (1) с поkaЗалец си злдяпхte. Инданка_TOPната лаима ще CBETHE B Зелени 6e3да мигra.
- CJIeT OBa IINPEKTHO HAInCHeTe IpeBkIIOUbATEJRA MHaCKOpocT (3) cNopeJKeJAnHATA CKOpocT. Ako IpeBkIIOUbATEJRA MHaCKOpocT (3) He 6bJe HATnCHaT BpaMKIne Ha5ceKHyDn, ypeJbT He MoXe Da 6bJe BKIOUcH NopaI INpUHNH 3a 6e30NaCHOCT.
INHnKaTOPHaTaJaMa3aNoUBaJaMnRaBYepeBHeO. 3a Da BkIIOHTe ypeDa,3aNoOHTe OTHOBOCbCtbnka1.
3. По врeme на pa6obota He e Heo6xOДIMO DA nbpxHte 6yToHa 3a 6e3OnaCHOCT HATnCHaT.
Pbueh nacaTop (BnK. Ctp. 3/ΦnR. B)
PbHnT nacatop e nideaJIen 3a pnproTBHe Ha nactn, COcOBe, cyu, MaioHe3n i6beEckx XpaHn, KaKTo n 3a CmecBaHe Ha HauNTKn IIN MLeUHN IeKObe.
3a ha-IO6pn pe3yIITATn npn nacipane, n3noI3BaIte MaKcImaHaCKOpOCT.
3aKpeTe Yepe3 UpaKaBaHe DnBraTeHaTa Yact (4) B NaKpaHnka Ha NaCaTopa (6).
- NocTaBeTe pBcHnI naCaTOp DJIb6Oko B MeH3ypa IINI Kyna. CJeI TOBa BkLIOUeTe ypeDa, KaKTo e OINiCaHo nO-rope.
CJIeI n3nO13BaHe n3KJIIOUcTe OT KOHTaHa HATNCHeTe 6yToHInTe 3a OCBO6OxJaBaHe (5), 3a Da OTDeJIInTe DBiRaTeHNHata Yact.
Korato nacipate dinpeKTHO B TeHJxepaT no BpeMe ha rotBeHe, Na-Hanpei OTTeRJIeTe TEHJxepaT oT KOJIOna, 3a da n36erHete pa3npbckBaHe Ha BrpuaTa TeHOCt (OnachocT ot n3rapaHe!).
PpimepHa peceenTa: MaOne3a
KbIaHe (BnX. cTp. 4/ΦnR. D)
C nomouta Ha Hoxa (13) mokeTe da Kbluata Meco, cupehe, Lyk, POnpapBkn, YecbH, MOpKOBn, OpeXn, JeeHHn, 6aJemn H T.H.
3a Na-Do6pnpe3yIITaN,MOJHaNpaBte CnpBaKb 3a MaKcImaJIHnTE KOINueCTBa N HAcTPOJKN 3a CKOpocT, yKa3aHN B Ta6JIuNTe 3a O6pa6OtKa B pa3JeIN D n E.
He KblzaiTe npekaleHo TBbpDn xpaHn -HaNPIMep JeDeHn Ky6yeta, INDniCKO opexYe, KafeHn 3bPNa IIN 3bPHeHn xpaHn.
Ppei Kbluane ...
-прееварително hapжete Ha eДро MecOTO, сирениTo, Лука, чьна, морковite, чьшкite
- npemaxheTe CTb6nataHa 3eJeHnTe NOpnpaBKn, YepynKnTe Ha JaDKnTe
- PnpeMaxHeTe KOCHTe, CyXOJINIyTa I XpyUJIInTe OT MECOTO
BINHAnI pNOBepRABaIe DaJI NpBCTeHbT nPoTnB nIb3raHe (12)e npIKpeHen KbM Kynata Ha pe3aKaTa.
PpeDynpexJeHHe: HoxbTe mHOro ocTbp! BnHaRr ro XBaUaIte 3a rOpHaTa pIaCTMaCOba Yact N BnMAbaTe npaPabota C Hero.
BhImateJIHO cBaJIeTe IIaIactMacOBnIpeJna3ITOn HOXa.
- NocTaBete Hoxa Bbpxu CEHTpaHnHa uΦT ha Kynata (11) I rO 3aBbPTeTe, 3a Da ce 3actOnOpn.
- HanbHHeTe Kynata C xpaHa. PpIKpeIeTe Kanaka (10) Bbpxy Kynata C MexaHn3Ma 3a 6Jokpuane (10d), no3uOnHpuan Do npBXkata Ha Kynata.
- 3a da 3akIIOUHTe KaIAPAka, 3aBbPTeTe ro nO nOcOKa Ha YacOBHnKOBaTcTpeJIka Taka, Ye MEXaHn3MbT 3a 6Ioku paHe IOnaIHe C «UpaK» HADДрьЖKaTa.
- Поставete Двигателнату act (4) в с蜱сенистя (10a) дokato ce застори.
- BkIIOUeTe ypeDa B eNEKtpnueckaTabeBepra n ce yBepTe, Ye n36yTBaayt E Ha MЯCTO.
- BkIIOUeTe ypea n 3aIpbXte Kynata C dpyraT a pbka.
- CJIeI n3nON3BaHe n3KJIOUHeTe OT KOHTaTaNHaTNCHeTe 6yToHInTe 3a OCBO6OxJaBaHe (5), 3a Da maxHeTe DnRaTeHnata Yact. MaxHeTe n36yTBaqa.
- HatncheTe MexaHn3Ma 3a 6JoknpaHe Ha KanaKa (10d) n ro 3a npbXte. 3aBbPteTe KanaKa (10) B nocoka obaTaHa Ha yacOBHnKOBaTa CTpeJIka, 3a Da Ro OTKJIouHtE.
- Повдигнөт e kaнак.
- BHIMATEJIHO n3BaTe HOKa, IIpeI Na I3BaJITe O6pa6oTeHaTa XpHa. 3a Da I3BaJITe HOKa, IeKO rO 3aBbPTeTne I rO n3DbPnaiTe.
CmecBaHe Ha JIeKO TECTO
Kato n3no13BaTe HOka (13), MOKeTe cBIoTo taka Da CMEcBaTe JIeKO TECTo KATo MEKO TECTo 3a IpaJauHKn IIN CMEc 3a KEKC, KOnTO ca Ha 6a3ata Ha do 250 rp. 6paWHo
PpimepHa peceenta: Meko Tecto 3a najaunkn
Hai-hanpei cinnete 375 ml mlyaKo B kynata, nocJe do6aBeTe 250 rp. 6paWHO hakpra 2 yuza. Pa3meTe TectOTO Ha nbJIHa ckopOCT DOkATO CTAHe rJaKO.
Mecehe Ha Tecto
Pa3dien KapTINH D Cbso e npuIooM 3a yIOTpe6aTa Ha INHCTpymeHTA 3a MeceHe.
Инстурмент STa Mecehe (14) e ndeJIeH 3a MeceHe Ha pa3JIuHn BnIOBe TcTeO KaTO TcTeO C MaJ IIN TeCTO 3a cIaIKN (Ha 6a3aTa H a MaKc. 250 rp. 6paUHo).
- Поставе Унструмени за месень Куната (11).
- HanbIhHeTe Kynata C mAcK. 250 rp. 6paHNo, cJeI TOBa Idoabete npynte CbCTaBKn, 6e3 TeuHOCTnte.
BkIIOUeTe ypeHa Na PbIHa cKOpocT.
-Добавete TeuHocHTe Ipe3 TpIb6aTa 3a nbIHe He JOKaTO dBiratelHaT a yact paBOTn.
- MakcimamHbBpeMe 3a MeceHe: 1 MInHyTa - CneI TOBa OCTabete DniratEnHaTuaCT da Ce Oxlaan 3a 10 MInHyTu.
Texholognia Smartspeed
Kak noIb3OBaTbcra np6opom
Ipeed n3MeJIbYeHHeM ...
- Ппебарптелнонарекьтмясо,сыр,лук,чеснok, MOPKOBb,чINI
- ydaJIte CTe6IIM 3eJIeHI, cKOpJyIpy opexOB
- ydaJIte KOCTN, JxJIbI xPraIu I3 MRA
- y6eHNTecb, B haJIHyn IpoTnBOCKOJb3aIeI NOCTabKn (12) Ha YaIe N3MeJIbHTeJI.
BHMMaHHe: OYeHb octpbl Hox! Bcerga depeXnTe erO 3a BePxHIOI pIaCTNkoByIO qAcTb N o6paauTeCb C Hm OCTOpOxHO.
OCTOPOXHO CHIMITE 3aunTHbI YexoJ C Hoxa.
- YctaHOBInTe HOX Ha CEHTpaJIbHbI CTepXeHb YAuN (11), NOBepHNte erO do QNKcaUIN.
- Помет范围内 поюксы в чашу. Рисецнистор кршки (10) К чаше рпн поочи Фнкатора кршки (10d), которь паслолжен ряdom с ручим.
- Дял зakрын Крblшни поberнite ee no yacobо стpenke, утоы Фнкатор зашиелкунся над руков.
- BCTaBbTe MOTOPHyIO uactb (4)В cUeJIeHne MOTOPHOJ uactn(10a)doФИКСАЦИ.
- BkIIOHTe npIbOp BCtB n y6eIITecb, YTO TOnKaTeJIb Ha MeCTe.
- BkIouHTe npi6opn npinepxuBaIte yau pyroynykoJ.
- После ИСПОЛБЗОВАнЯ OTKЛЮЧИТЕ рибор OТ сети И НжмITE KНОПКИ ФКСацIN (5), YTOБbl OTCOЕДИНТь MOTOPHYЮЧТь. Y6eрптЕ TOЛКATEЛь.
- HaxmTe 3aMOK KpbIshKn (10d) n DePxNte. NObepHnTe KpbIshKy (10) npOTnB YacOBo CtpeJKN dJa OTKpbITnJ.
- IoHIMMITE KpbIiKy.
- Octopoxho BbTaunTe HOX neped Tem, KaK BbHIMaTb N3MeIbYeHHbIe IPOyKtI. IJIa CHrTnH OHXa CJIerKa NOBepHInTe I npINoDHNMITE erO.
3aMeunBaHne JIERKORTeCTa
C NOMOUIHOXa(13) BbMOXeTe 3aMEcNTbJIeKoT eTcTo, IJIA6JIINOBIJIINPiPora,C INcNoJIb3OBAHHeM He 60Jee 250 r MyKn.
Ппмерpeцentа: tectо дяблнов
HaneTe 375 Mm MoIoka B yau,doabBe 250 r myknu
2яиц.Ha noJHNoI CKOpOCTn CMeaIe Do noJouyehn OndHopoNDHO HeXHO Tecta.
3aMeuBaHne Tecta
Ha pncyHke pa3dela D noka3aHo KaK noIb3oBaTbcra HacaIckoi Tecta. HacaIka IJr Tecta (14) nIealbHO NOxOuNT IJI 3ameWnBaHHaPa3hBix BnIOB Tecta, HApPIMep, IpOxxKeBOr OJIN bNcKBnTHOrO (MAKcIMyM 250 r MyKn).
- Onyctnte hacaiky dny Tecta B yauy (11).
- HacbNbTe B uAsy He 6oJe 250 r MykN, 3aTeM IO6aBbTe OCTaIbHbIe INHrpEInHeTbI, KpOme XnDKNX.
BkIIOHTe npi6op Ha noJIHyO CKOpocTb.
-ДобавытExидкиингpeиentblучep3HaNoJIHITeIbHe BbIKIQUOyApn6Op.
- MakcimmaJIbHoe BpeMЯ 3aMeIshuBaHnIy: 1 MInHyTa - 3aTeM daIte npIbOpY ocTbIb B TeueHne 10 MInHyT.
Пример peцentа: сесто за пиць.
250 r mykn, ½ yaiHoi JIOXKn coJi, ½ yaiHoi JIOXKn cyxnx dpoXkei, 5 yaHbIX JIOXeOINBKOBOrO MaCna, 150 mI BoDbl (KOMHaTHoN TeMnpeaTpybl).
PpMepeueTta:6nckBntHoe Tecto
250 r myk, 170 r macna (xolodnoro/TBepdo, MaIeHbKIMN kycoukam), 80 r caxapa Horo necka, 1 naKeTik BaHnlbHORO caxapa, 1 He6obIbwoe yio, 1 uenotka coII. Iy nOnyuHnX opoIwero pe3yIbTaTa He nCNoJIb3yIte TeIInoe, MryKOe MacIO. BlykIOuHTe np6op, KAK ToIbKO TcTO CΦOpMnpyeTcB aIap. Tecto CTAHOBITc CNIuKOM MfKIM OT qpe3MePHO 3aMeuBaHn.
Hape3ka /shnHKOBka (cm. ctp. 5 / pnc. E)
IcnoIb3yJe3BVeIaHape3Kn(15a)BblMoKeTepe3aTb orypzblnyk,prn6bl,ra6IOKm,MOPKOBBpeinc,cbipoi KapToΦeB,ka6auKn,KanycTy.IcnoIb3yJe3BVeIa IuHKOBKn(15b)BblMoKeTeuHHKOBaTBra6IOKn,MOPKOBB, cbipoi KapToΦeB,CBeKny,KanycTy,cbip(MrKmIIN cpeHeN TBepdoCTn).
- Помecтinte ЛзВи (15a,b) В држateь (15) И зафксupyгte в Нухном пложени.Установпе држateь на цHTpaJIbHyн CTepЖeHь чаши И зафксupyгte erо.
- Ппсоевине Кршky (10) Кашие ри помоши
фikkсатора Кршки (10d), раснохеногу рядом
с рунковши.
- Дяфкаси Кршки, NOBepHHTe ee no yacoboi CTpeIke, YTObbl ФнсCatop 3aueKnHycnSHaD pykoJ.
- BCTaBbTe MOTOpHyIO uactb BCuEpJIeHne MOTOpHOJ uactn(10a)doΦnKcaun.
- BkIIOUHTe npi6Op B cetb n do6aBbTe npOyKtbl B HApONHITelb.
- BkIIOUHTe npi6Op. HnKOrTa He cyuTe pyky B haNoJIHNTeJIb, noka npi6Op BkIIOUChen. BcERda nCpOJIb3yIte ToJkaTeJIb (10a)ДЯdoAbIeHnI npoDyKTOB.
- Послес И спользовая OTКИочITE пибор OT сети и НжмITE KHOПКИ ФИКСаци (5), чоьы OTсоедиНть MOTOPHYЮ.Yачь.
- Haxmnte ha φικcaTOp kpbiiuKn (10d) n ydepxuBaYte. ΠOBepHnTe KpbiiuKy (10) npOTnb Yacobov cTpeKn, qTo6bl OTkpbiTb ee.
- POnHnIMnTe KpbIuKy.
- BbTaUHTeJePkaTeJIbpePeI TeM, KaK BbIHMaTb N3MeJIbUeHHbIe IpoJyKTb.IIЯ ChrTnI JIe3BnI (15a,b) OCTopoXHO NOtOJIKNHITe erO CHN3Y BBepx.
yXoA (cm. ctp. 3 / pnc. C)
Ouichi MaToPHyU cactb (4) n peDyKTop BeHcNka (8a) BlaJxHO MraKoT TKAhBIO. KpbIuKy (10) MoXHo MblTb IOD IpTOUHO BDOi, HO He IOnpRyKaIte ee B BOdy I He MoiTBe B NOCyDOMoeHoi MaUnHe.
Bce npytne qactn MOxHO mbITb B nocydomoeyHm MaunHe.
CuaHIN3MeIbHTeJI MOXHO CHrTb IPOTNBOCKOJIb3aUIO NOCTABKJ DnJI 60JeE TtauTeJIbHOrO OHNuEHNIA.
Ppi pa6oTe c npOyKtAmn, IMeIOUmmn HacbIeHHbI CBeT (Haepmep, MOpKOb), IJIaCTMaCCOBbIe DeTaIIN MOrYT
OKpacntbca. Ipeepd OunchKoI npOTpTe TaKne DeTaJIpaCTHtIELbHbIM MaclOM.
Akceccyapbl
(MOxHNo pnpo6peCTn OTdJIbHo, IOCTUYHbI He BO BCex CTpaHax)
Texhonoria Smartspeed
K BnKOpncToBvBaTn npnla
Ipeepi nepwim BnKOpncTahHm:BuaJIb TpaHcnpOpTyBaJbHn 3amok 3 deTani npBoby (4), notarhyBwn 3a YepBOHy CTpiKy.
YbIMKHeHHa (nVB. cTOp. 3/Man. A)
Пилад Маконтpoьну Кногу.Дябeзneчно ВмkaHHслдуTe NaCtynHmKpOKam:
- CnoataKy haTnCKyIte KOHTPOJbHy KHOJKy (1) BeJIKNIM NaIbIeM i IyTPmUyTe. JAmNoHa 3aCBitITbcS rOCTiHIM 3eJIeHIM CBiTLOM.
2.ПOTIM HATNUCKyIte nepemikau Smartspeed (3) BiINOBiINO do 6axaHOI WBNIKOci.
Ksqo nepeMknay Smartspeed (3) He haTncHytn npotrrom 5 cekynd, npnilaHne moxHa 6yde ybIMKnHytn B ciJax 6e3neKn. CnHaJIbHa JAMnocka 6bImaec YepBOHm. DJIa yBIMKHeHHN npnilaNy, noCHt b 3 KpOky 1.
3.ПдчасpoobToBamHeNotpi6Ho yTpmyBaTu KOHTpoJIbHy KHOKNy HaTNCHYTOIO.
Puyn6JeHep (INB. cTOp. 3/MaJ. B)
PyHn6JIeHep npKeKpacHO IuHTb IJI npriToYBaHHcoyciB,piINIB,CyniB,MaIOHe3y i INTARoXapUyBaHHaTaOKJII3MiUyBaHHHaNOIB TaMOJOnHX KOKTeJIiB.ДЯЗOByTTHaNkPaunxpe3yIbTaTtB3MiUyBaHHBVKOpNCTOByte HaNBUny WBNdkicTb.
BCTABTe npuBID (4) BpyKy 6IeHepa (6).
- P03tauyyte puHnI 6JIeHep rIb6Oko B YAaI a6O MncuI. IOTIM yBIMKHiTb npUJa kO ONCaHO Bnue.
-Пись ВИКОPGИСТАНHA BIMKHIb 3 МЕрахи i HаTNCHiTb KHOПКу BiДКРПТЯ (5) ДЯ BiД'ЕДнAHнЯ пИВODY.
Pn3MiUyBaHHi 6e3nocepEnbO B KAcTpynI B XoJi rOtBuHn H CNoaTky 3HIMtB KaCTpyNIO 3 PInTN UO6 yHNKHTu PO36pNI3KyBaHH NINJIyOoi pIDHn (pN3NK o6wnapioBaHH!).
PnPKlaPeuenty:MaHOe3
250 r pooclinHHoI oJIi (HapnPKna,I, COHJshNkoBOi),
Poipi6HeHHa (INB.CTOp.4/MaJ.D)
BnKOpncTaHnJIe3a(13)DOnOMOKe Ioppi6HHTM'M'cO, Cnp, ZbYIO, 3eJIeHb, YacNHk, MOpKBy, ropIXN, Mmrdalb i TAK dani.
ДяdoягннHaikpauxpe3yIbTaTiB,6yIbIaCKaO3HaJOMTeC3MaKcImaIbHOIO KInbKiCTIO i WBnKicTIO,BkazAHmM B Ta6nzi p03diNy DiE.
He npdiHIOIte Dyke TBepi npodykTN, taki JK Ky6nKn IbOy, MyckaTHNI ropix, kabOBI 3epHa a6o 3naKn.
Ppeep noDpi6HeHHaM ...
3a3daneiBnapiaTe M'aco,Cnp,ci6yIIO,YacHnK,MopKBy, yJIi
Budalitc6bna33eJIenHi,kaJyny 3 ropiixiB
BnIitbKiCTKN,JINiXpUz3M'raC
3abxndnpekoHnyTecy,ooKjIbce npotn KOB3aHHa (12) Naite Ha MNCy POnDi6HOba.
Ybara: JIe3O duJyKe roCTpe! 3aBxJn TpIMaIte NOro 3a BepXHO pIJaCTIKOBy qACTInHy iPraIouTe 3 HmO6epeXHO.
Obepexho BuaIbIb IpaCTnKOBy KpnuKy 3Je3a.
- Помістіпь лezо в чінгі мінckи (11), обechіть яlorо до φікcaцii.
- HanobHITb MNCKy npOyKTAMN. PpueDnaHte KpuiKky (10) Do MnCKn i3 3aMKom (10d), po3TaUoBaHm nopRd 3 puKIO MnCKn.
3.ДяЗakpTTaKpiuSKnOBepHITb 3a RoDINHHKOBOCTpIKOIO,a6N3AMOK3aMKHyBC3KlaaHnHMHaDpyKOIO.
- BCTaBTe npuBID (4)В myfTy (10a)do φikcauii.
- YbIMKHiTb npnlaB Mpejxu i nepekoHaITeCya, 10 ToBxaJbHnK Ha Mic#.
- YBIMKHiTb npnla.i TpImaTe MNCy IHsOIO pyKOIO.
7.Пися ВИКОРИСТАнHA BIMKHIb 3 Мерекi i HATNCKUyTe KHOДКI BIDKPNITRA (5)ДЯ BIVaJIeHЯ npINBOy. BIVaJIITb ITOBxaJIbHnK.
- HatnckyTe 3amok KpnuKn (10d) i TpmaTte. O6epHITb KpnuKy (10) npotn rOdnHHNKoBOi cTpiJIK dIyBdkpTTT.
9.Пидимить кршку.
- 06epeXHO BnMIbJIe3O nepeI TUM, Jk BnHHTn noDi6HeHi pOdyKTN. IJRA BnJaIeHHa Je3a 3JeRka o6epHiTb NOrO i BNTraHITb.
3amic Jerkoro ticta
3 BnKOpNCTaHHM JIe3a (13) Bn MoXeTe 3amicHTI JIeKe TICTO, YK DnI MInHcIB A6o DnI PnPoRa, 3 BnKOpNCTaHHM He 6JIbSe 250 r 60poSha.
Pniklaedpeuenty:MLnHcEbeTicTo
Cnooyatky nomictiB 375 Ml moJoka B MnCKy,doaIte 250 r 6bopoSHA i notim 2 myu. Ha nobHni uWBnKoCTi 3miuaTe do 3do6yTTraODhopiDHorO HIXHORTo ticTa.
3amic Ticta
Kaptnnka 3po3iny D takox 3actocobna dIy BnKOpncTaHH npntpoI yIaMicy ticta.
ПпсстридлгТicta(14)idealbндлгЗamicypi3nHexBnDIBTicTa,HanpiklaД,dpiXdkoboroabo6ickBithoro(MaKcIMyM250rp6oosHa).
-ПомICTITппостридяпсь МИСКУ(11).
- HanobhItb Mncky He 6ijbwe Hix 250 rp 60puHa, notim doaTe octaHHi iHrpeJeHTN, OKpim piKnx.
- YbIMKHiTb npnlaHa nOBHy 1WBnKicTb.
-ДоаиTe piДинЧepe3 OТВiP ДЯнанOBння пипрацючОуmpИвDi.
- MakcimmaIbHn yac 3mIuBaHnHa:1xbuHa-nOTIM oxoJoiTb npBID npotraGM 10xbuHn.
OuHcENHHa (DnB. CTOp. 3/MaJI.C)
OuichiTe npBiD (4) i npIaId IaI BInHcKa (8a) BoIoroIO M'koIO TKaHnHOIO. KpUsky (10) MoXHa MmTnPiID npTOoHIO BOIOIO, aIe He 3aHypIOte II y BOy i He MnIte B NocydomnHi MaunHi.
Bci iHsi yactHH MoXHa MHTB NocydomnHi MaunHi.
BnMOKeTe 3HrTNIJIbIgI npOTN KOB3aHHra 3 MNCN noPi6HIOBaua IypeTeJIbHIooO OuHcEHn.
Pnpo60ti 3 npOyKTAMN 3 BELINKIM BMICTOM φap6HkIB (HaipNKlaI, MOPKa) pIaCTUKOBi DeTALI MOXYb BTPaTIu KOLip. PpOTPiB iX pOCLHHIO OJIeIO nepeD OUYIeHNrM.
Akkecsyapn
(OTPIMyIOTbcg OKpEmo,IOCTynHHe y BCiKpaIHax)
Country of origin: Poland
Year of manufacture
To determine the year of manufacture, refer to the 3-digit production code located near the type plate. The first digit of the production code refers to the last digit of the year of manufacture. The next two digits refer to the calendar week in the year of manufacture. Example:
"101" - The product was manufactured in week 01 of 2011.
山
y
.
Loi. ciuall ple laj j zai Juiy cuiy jor no Jy
:Jitio. gill pIe J 1000000000000000000000000000
.2011 pL 01 000001 111111111"101"
12j + 1,2 = 1
y
J 1
J 1 J 1 1 1 1 1 1 1 1 1 1 1 1 1 1 1
LgUe U
jL
()
yssgll 0sag E -oalg aess : gswell jessal o
10山
Ji:1ii1i
aai 250
Cjoo 5.
.(jll)111 100 150
:glll iaiell :iieagill 51 JIio
(,/)) 170.250
80.(s)
.20 3
aolull 1o
Iolai yolio Iolai yolio (9) aoull i bll 1sLo
:上
bollgol
(250 Jaa)
challgjull 1
(DJ1/4 1j)
L 11 (13)
.1|,jJl|,jJi|,jJi|,j
y
1
.E.D.
jg 111110
1 1
…
Jalllg jll, gill, Jll, lll, pll
1y
pall jno ydlalglg lbal
yddd aagdl aal all ggs sclg gss no laa
.(12)
JSLs!gale laIgai IaIgai
.
aaiia aiee iie 100
pJell 1eg jSro gds JLaal Jgds Jgld 1
Jlll jll ljj jll jll jll jll
( c + d) = 1
jai1:(L4aJ)
p(cilll alg gall buaio b)abuaio de
.(c)dcbj
(Smartspeed)
Sumspeed (Smartspeed)
Ji jie liai Lok.
blll lii i 100 (A Jkl)
aegagcysj
(Smartspeed) (3) c. d.
.1JLAAeAe Aa 5
JlJI JLaaiuia
(4)
J 1000000000000000000000000000000000000000000
.
(AK/3aJb)
E LJI 1JIO JIOI JIOI JIOI JIOI
1
1 1
a
= 2
L (Smartspeed) (3) 2.
aagg 1 aeg
5 Jy (Smartspeed) (3) c
gjgl jgl jgl jgl jgl jgl
J 1
- 1234567890123456789012345678901234567890123456789012345678901234567890123456789012345678901234567890123456789
JLaaaiu 1i jloj jbiu Jyauuuiu 3
lg =
(BK/3aJb)
aai 1 aai i 1 1 1 1 1 1 1 1 1 1 1 1
1algljabslplabg jzglulg Lwllg wlll g
eayll Jaaai Jia. aai yagg 1 g aeg
blill lii jiai gale juaaall