
MUM9YX5S12 - Food processor BOSCH - Free user manual and instructions
Find the device manual for free MUM9YX5S12 BOSCH in PDF.

| Product type | Food processor |
| Brand | Bosch |
| Model | MUM9YX5S12 |
| Power supply | 220-240 V ~ 50/60 Hz (standard) |
| Power | 800-1200 W (estimated) |
| Number of speeds | 7 speeds + on/off |
| Main functions | Mixing, kneading, whisking, beating egg whites, whipping cream |
| Automatic programs | Sensor Control Plus for cream (>300 ml and >700 ml), egg whites, yeast dough |
| Integrated scale | Yes, measuring range -990 g to 5000 g, precision 5 g (0.01 lb) |
| Timer function | Yes, adjustable up to 60 minutes, with acoustic signal |
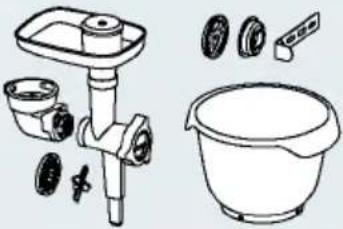
| Drive types | 3 drives: main (black), front (yellow), rear (red) |
| Mixing bowl | Stainless steel, with lid and addition opening |
| Included utensils | Mixing whisk « Profi Flexi », professional whisk, dough hook |
| Swivel arm | With assisted EasyArm function, unlocking button |
| Safety systems | Anti-start, anti-restart, swivel arm safety, drive protection |
| Cleaning | Wipe base with damp cloth; bowl and utensils dishwasher-safe |
| Cable winder | Yes, max. length 125 cm, adjustable |
| Display | Screen with scrolling text, language and brightness adjustment |
| Compatible accessories | Grater, multi-mixer, pasta machine, meat grinder, blender, etc. (see manual for list) |
| Weight | Approximately 6-8 kg (estimate) |
| Warranty | According to conditions of country of purchase |
Frequently Asked Questions - MUM9YX5S12 BOSCH
User questions about MUM9YX5S12 BOSCH
0 question about this device. Answer the ones you know or ask your own.
Ask a new question about this device
Download the instructions for your Food processor in PDF format for free! Find your manual MUM9YX5S12 - BOSCH and take your electronic device back in hand. On this page are published all the documents necessary for the use of your device. MUM9YX5S12 by BOSCH.
USER MANUAL MUM9YX5S12 BOSCH
natural_image
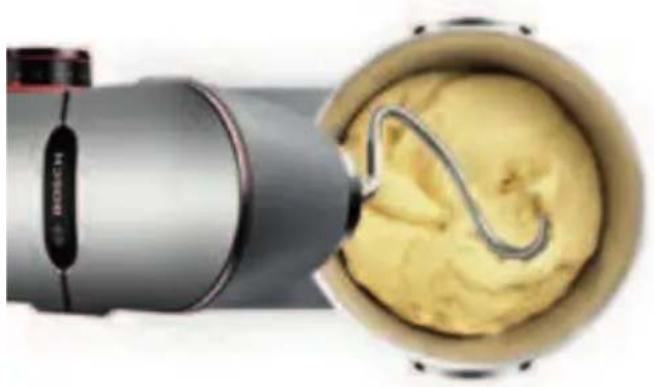
Close-up of a Bosch-branded blender with a dough ball inside, showing the interior and side view (no text or symbols on the main subject)
natural_image
Exterior view of a modern kitchen mixer with a stainless steel bowl and control panel (no text or symbols visible)Register your new Bosch now: www.bosch-home.com/welcome

natural_image
Breakfast display with rolled pastries, cream rolls, and a dark cake on a wooden table (no text or symbols visible)MUM9... OptiMUM

BOSCH
de Gebrauchsanleitung
en Instruction manual
fr Mode d'emploi
it Istruzioni per l'uso
nl Gebruiksaanwijzing
da Brugsanvisning
no Bruksanvisning
sv Bruksanvisning
fi Käyttöohje
| de | Deutsch | 3 | |
| en | English | 24 | |
| fr | Français | 44 | |
| it | Italiano | 65 | |
| nl | Nederlands | 86 | |
| da | Dansk | 107 | |
| no | Norsk | 126 | |
| sv | Svenska | 145 | |
| fi | Suomi | 164 |
- 1 Päckchen Backpul ver
- 150 ml Mil ch
This appliance is intended for domestic use only for processing normal amounts of food a of time for domestic use. Do not exceed pern quantities. → “Recipes” see page 36
The appliance is suitable for mixing, kneadi. The appliance must not be used for processing or objects. Additional applications are possible approved by the manufacturer are used. Only with approved genuine parts and accessories, accessory parts for other appliances.
Only use the appliance indoors at room temperature 2000 m above sea level.
Important safety information
Read and follow the instruction manual care reference! Enclose these instructions when y to someone else. If the instructions for cor are not observed, the manufacturer's liabili damage will be excluded.
This appliance can be used by persons with r sensory or mental capabilities or lack of ex knowledge if they have been given supervisic concerning use of the appliance in a safe wa understand the hazards involved. Keep child appliance and connecting cable and do not al appliance. Do not let children play with the user maintenance must not be performed by ch
⚠️ Risk of electric shock and fire!
■ The appliance may only be connected to a alternating current via a correctly installed. Ensure that the protective conductor system supply has been correctly installed.
■ Connect and operate the appliance only in specifications on the rating plate. Do not power cord and/or appliance are damaged. O service may repair the appliance, e.g. by power cord, in order to avoid hazards.
■ Never connect the appliance to timer swi controllable sockets. Never leave the appl it is switched on!
■ Do not place the appliance on or near ho. The power cord must not come into contact pulled across sharp edges.
■ Never immerse the base unit in water or dishwasher. Do not steam-clean the applian appliance with damp hands.
■ After each use, whenever the appliance is assembly, prior to disassembly, prior to c of an error, the appliance must always be mains.
⚠️ Risk of injury!
■ Before replacing accessories or addition, during operation, the appliance must be sw disconnected from the power supply.
■ Whenever the swivel arm is lowered, do no housing to avoid your fingers or hands get adjust the swivel arm while the appliance
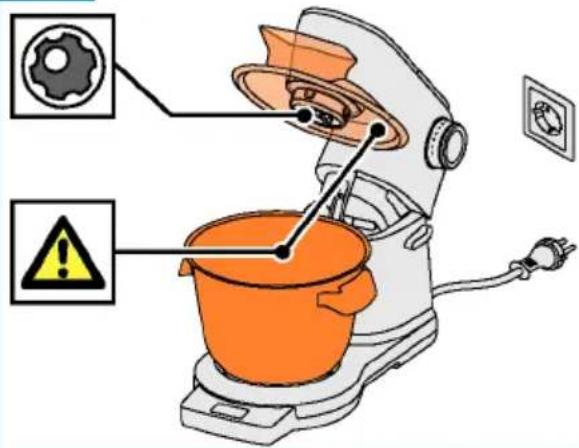
■ Only use tools when the bowl is inserted the protective drive covers are in place! fit the bowl, cover and drive covers accor
■ While operating the appliance, never reach shaft with your hands. Do not insert any o spoon) into the bowl or filling shaft. Kee and other utensils away from rotating part the drive continues for a short time. Wait to a standstill.
■ Never use tools and accessories or 2 acc time. When using the accessories, follow instructions enclosed.
■ When using accessories, observe the colo the drives and accessories.
⚠️ Risk of suffocation!
Do not allow children to play with packaging
⚠ Caution!
■ We recommend that the appliance is never than is necessary to process the ingredient at no-load.
■ Your work surface should be easily access: moisture, firm, flat, dry and large enough from splashing and to let you work unhinde
⚠️ Important!
It is essential to clean the appliance thorc after it has not been used for an extended p maintenance" see page 36
Congratulations on the purchase of contents
your new Bosch appliance. You can find
further information about our products
on our website.
www.bosch-home.com
Intended use
Ir _ product s Important safety information ..
Overview.
Before using the appliance
Our appliances continuously fuordetrigo first time .....
further development. For this Bartes and operating controls...
individual functions may differ primarily these.
instructions. In this case c\$etcki whet.her.
a newer version of these inslwiungi wintshoust additional functi
available on our website. Using the time and timer functi
When using this instruction manual. Using Sensor Control Plus
You can fold out the cover pages of these scales
instructions. There you will Using access for ten-
marked with letters and numbering and maintenance
Reference will be made to these illustrations.
throughout the manual (e.g. Re-adjustment of tools.
sequence B). Safety s
Di sposal
Guarantee
Please fold out the illustrat
→ Fig. A
Base unit
1 Rotary switch
a Illuminated ring (operation indicator)
b Setting dial
2 Release button
3 Swi vel arm
4 Main drive (black)
a Opening for inserting too
5 Front drive (yellow)
a Protective drive cover
6 Rear drive (red)
a Protective drive cover
7 Cable storage compartment
cable reel *
8 Recesses for bowl
Control panel
9 Function buttons
a Function selection but
b Setting buttons
10 Display
Bowl
11 Stainless steel mixing
12 Cover
a Filling shaft
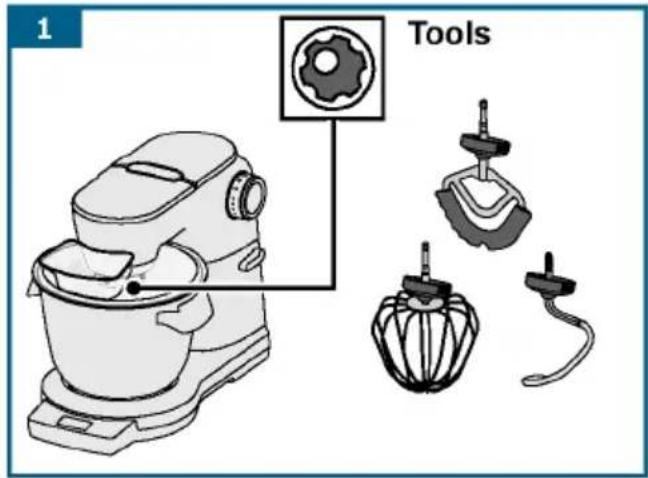
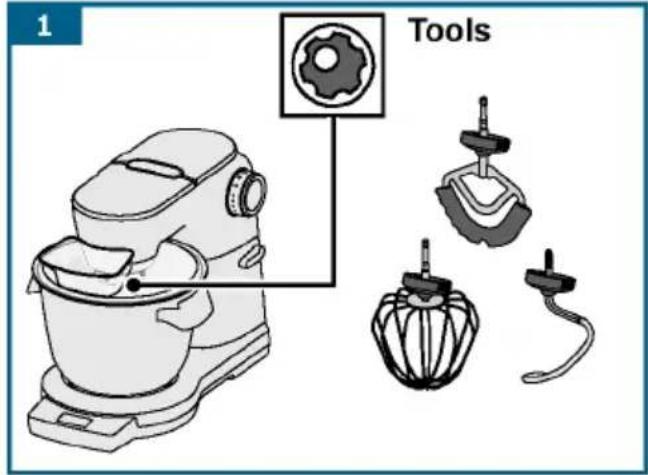
Tools
13 Professional flexible beating whisk
a Protective cap with eject buttons
14 Professional stirring which appliance has 3 different
a Protective cap with ej eMatinbudrtiones, black (4)
15 Kneading hook
a Protective cap with eje acctc ebsustordiness with a bevel gear.
* Depending on the model
Note: Your kitchen machine comes using accessories additional accessories depending on the
model.
Before using the appl for each page for the first time
Before the new appliance can be it must be fully unpacked, clear checked.
cation indicator)Caution!
Never operate a damaged appliar
■ Remove the base unit and all accessories from the packaging dispose of all packing materials
■ Check that all the parts are examine them for obvious dam
→ Fig. A
■ Thoroughly clean and dry al before using for the first ti
→ “Cleaning and maintenance” page 36
Parts and operating controls
Colour coding
The drives have different colour yellow and red). This colour co
can also be found on the access use accessories for the drive v colour.
Dr i ng e s whi sk
ect Buttons
The appliance has 3 different c
Matirbudrtiones, black (4)
For using tools or for using ecoctc ebsustordness with a bevel gear.
Front drive, yellow (5
Forresusing accessories and nge otnr he

Rear drive, red (6)
For using accessories connector.

Protective drive covers (5a and For covering unused drives.
Further information: → “Access page 41
Di s p l ay → Fig. A
Settings, information, error messages, and values are indicated on the display. Here, it is not possible long texts will run from right buttons with no bitlets (e.g. wood
t o display them fully
Example:


The language in which the te can be changed. → “Settings page 30
Function buttons → Fig. A
The appliance has 3 to 5 function (depending on the model), using special additional functions and programmes can be selected and a
Buttons
| Sensor Control Plus / Programme selection / Back | |
| Timer / Selection / Back | |
| Scales / Tare / Back | |
| — | Reduce selection/ values |
| + | Increase selection/ values |
* Depending on the model
Function selection buttons / Briefly pressing them will act v function selected. Press and hol the selected function. "Opti"WUN"will appear on the display again.
Note: The buttons are operated touching them with your finger.
- kinenesses always may impair the f the supply on herel, it is not possible gbuttonse with no bijredtrs (e.g. wood
Rotary switch with illuminated ring

→ Fig. B
The rotary switch is used to set required speed, start an automatic programme or to switch the appliance off. The integrated illuminated up during operation. The appliance no longer switch on if there is appliance operation, if the electric trip or the appliance has a deflection illuminated by going will light up.
Set t i n g s
M/A The setting M/A has two diff u nctions:
Standard (M):
Instantaneous switching
at maximum speed/fast. Hol automatic
down, rotary switch for the djusted. duration.
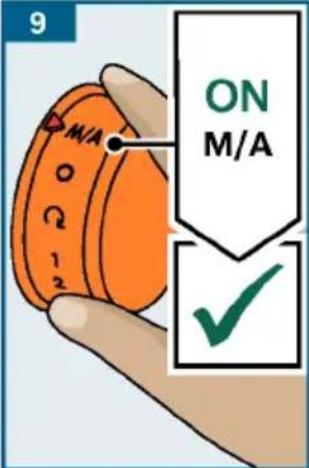
With Sensor Control Plus (A)
Automatic regulation of the After activating the automa set the rotary switch to M/ in this position for a few The rotary switch will rema to M/A and will revert back after the automatic program ended. The appliance is swi
→ "Using Sensor Control PI
page 33
Step the Switch off
Puhet | eave Folding in" at minimum speed / very slow
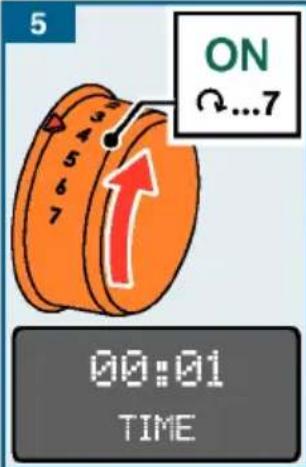
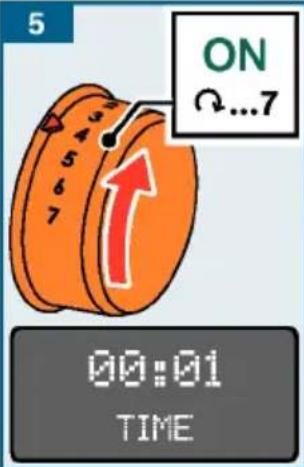
1...7 Speed settings
1: low speed / slow
7: maximum speed / fast
Tools
→ Fig. A
Professional flexible beating whisk
For stirring dough, e. or mousse. For folding beaten egg white.

Professional stirring
For beating egg white, cream and stirring lig e.g. sponge mixture.

Kneading hook
For kneading heavy dou (e.g. yeast dough) and ingredients which are be chopped (e.g. raisi

Recommended speeds
| Ω | For folding in and mix ingredients gently (e. beaten egg white) |
| 1-2 For stirring and mixing |
| 3 | For kneading heavy dough kneading hook |
| 5-7 For stirring and whippl (e.g. whipped cream) with professional flexible bed or the professional stir |
| M/A | For using the tools with Sensor Control Plus → “U Sensor Control Plus” see |
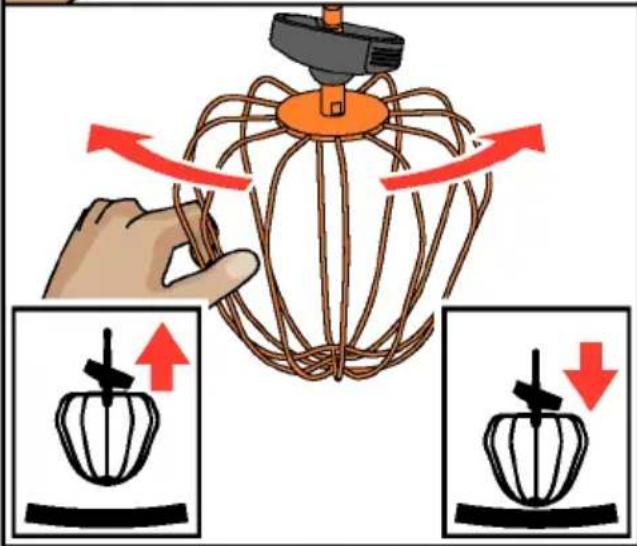
Re - adjustment of tools
The appliance is factory-set professional stirring whisk bottom of the bowl to ensure are mixed together perfectly
touch the bottom of the bowl from it, the gap can be easily → “Re-adjustment of tools”
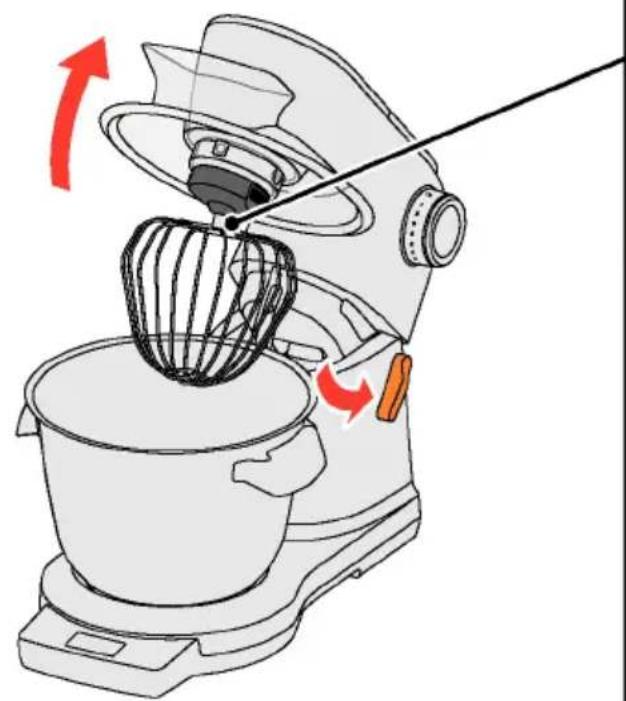
Swivel arm
→ Fig. ©
The swivel arm is moved up insert or to remove a tool The swivel arm features an
function, which supports the upward movement of the swivel arm.
Bowl and cover
→ Fig. D
The appliance comes with a spec which is securely attached to through insertion and rotation. Is secured to the swivel arm are automatically when the swivel arm is
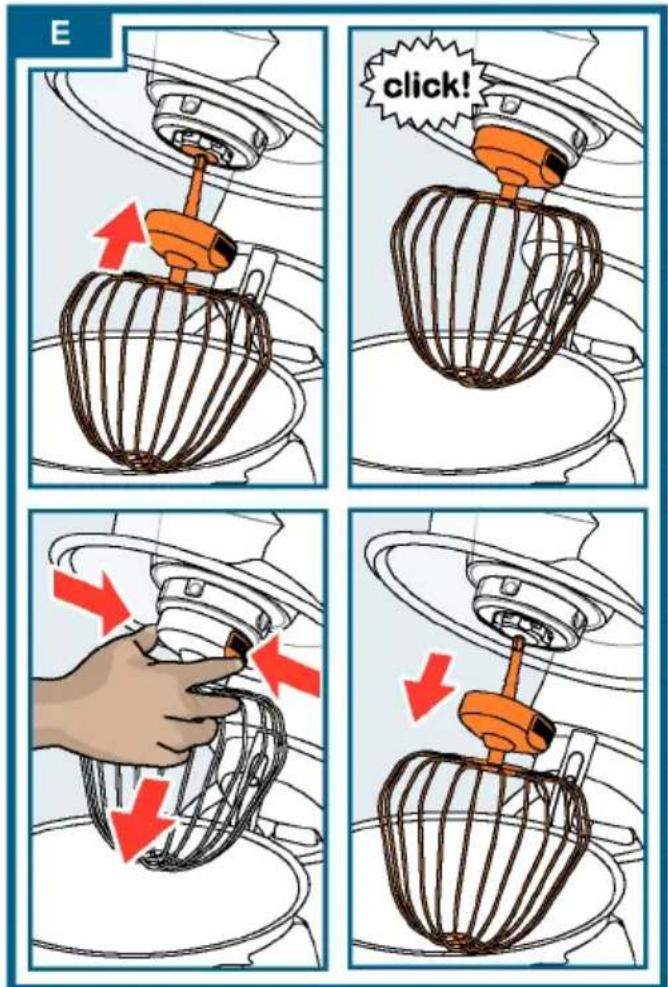
Inserting and removing to
p→nFig.
The tools are equipped with eje on the protective cap which are facilitate removal of the tools Insert tool: Insert the tool in drive until it locks into place then covered by the protective pposed Remove tool: Press both eject b (loculate chips). until the tool is released. Take of the drive.
ng d i f f e r e n t
C a b l e r e e l
. → F i g. A

Depending on the model The g ingredients is equipped with an a cable feel. Pull out the power go to the required length (max. signowing redients; the cord is loc th the Reduce cable length: Pull gentle eating and whisk how it to wind up to length. Then gently pull the co slowly release; the cord is loc using Important: Do not push the cord hand. If the cord jams, pull out the way and then allow it to wi
Cable st or age almost touches the compared ingredients → If gi gthetools

Depending on the model: The application is equipped with a cable storage compartment. The length of the can be adjusted as required by or pushing it back.
Safety systems
The appliance has various safet "Easy Safe L if systems" see page 38
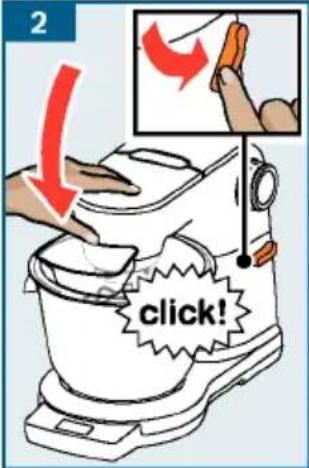
Preparation
■ Place the base unit on a smooth, clean or pounds (10). and stable surface.
■ Pull the power cord out to changing required saving setti length.
■ The current setting is chan
■ Press the release button and outputset+ or -.
the swivel arm to the stop ■ Press and hold buttons ⏻ and
■ Place the cover with the fisilmingt asheofutslay until "SETUP SAVED" the front on the main drive.briefly appears on the display
■ Insert the bowl. When doing Release buttons and + again recesses on the base unit. The changed settings are save
■ Turn the bowl anticlockwise until it locks
into place.
Example: Setting the lang
The base unit is prepared for further use. Press and hold buttons ① and Important: Do not slide the appliance until the configuration on the work surface as this may be opened.
the functioning of the scales. Remove buttons and + aga
appliance, lift it.
→ see also quick reference gui
■ Press and hold buttons ⑤ and application until the configuration may be opened.
es. Re e move buttons Ⓛ and + aga
- Keep pressing button Ⓤ until language selection appears.
Set t i n g s
- Press the release button and push the swivel arm down until it looks into place. - Plug the mains plug into the mains.
The appliance is switched on
■ "Optimum" appears on the display. until the desired language is Note: If the appliance is not used or press and hold buttons ⑤ and operated within a certain period, the display simultaneously until "SETUP SAVED" will slowly fade and switch to standby mode. "Optimum" will appear once again briefly appears on the display when any button is touched. SETUP
■ Press and hold buttons Ⓤ and + at the same time until the configuration SAVEDmenu is opened.
■ Release buttons Ⓤ and + againThe language selection is s
Selecting setting display.
Selecting setting
■ The following settings appear in sequence each time button Ⓤ The language selection is said: ■ Hold down one of the functions (e.g., (i, 2)) until "0.011" appears on
— LANGUAGE
Language in which the display texts are displayed. The appliance is used.
— SOUND
Volume of the acoustic signals - setting in 6 levels from off to loud.
— BRIGHTNESS
Brightness of the display - setting in 6 levels from dark to bright.
Using without addition operating the appliance
functions
⚠️ Risk of injury!
- Do not insert the mains pl set t m nigl (→ "Recommended spe all preparations for workings with page 29) appears on appliance are complete. the display and the elapsed
- While operating the appliance at times is displayed in min reach into the bowl or filling each of t.
- Do not operate the appli Note: with hbe duration is 60 mir the cover in place. hours are also dl101.38 played:
- Always wait for the drive. to comes the ingredients until standstill before moving the ashwieved taken required result.
or changing tools. 7. Turn the rotary switch to
- For safety reasons, always until the drive comes to a significant protective drive covers on this connection the mains plug.
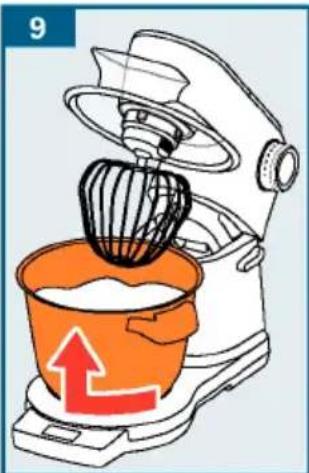
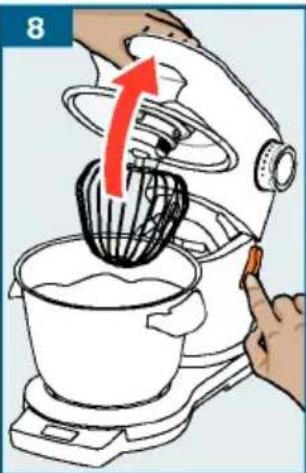
rear drive. 8. Press the release button ar important: the swivel arm to the stop.
- Prepare the base unit as 9 described the bowl clockwise until under "Preparation". raised. Remove the bowl.
- The appliance cannot be suit Pheedsohoth eject buttons ur unless the bowl has been insreelt ealsed. Take the tool out
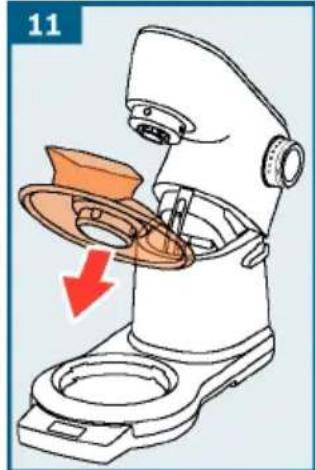
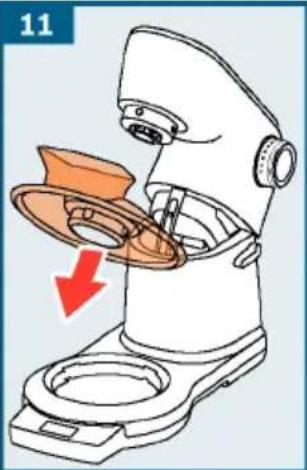
correctly. 11. Take the cover off the dri
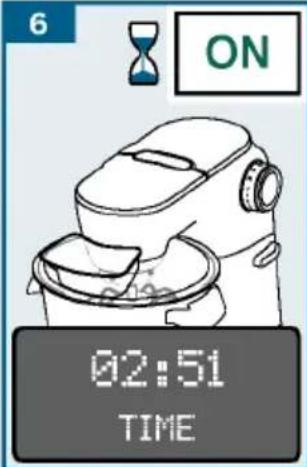
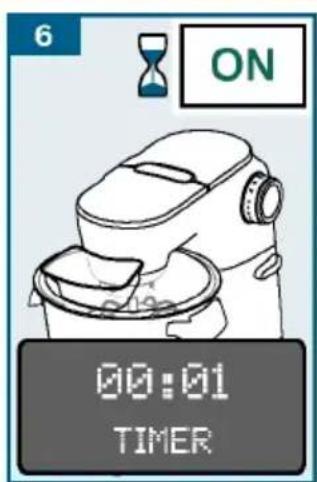
Note: The function "TIME" starts 12. Clean all parts immediately automatically with every use, counts the ongoing processing duration and indicates
this on the display.
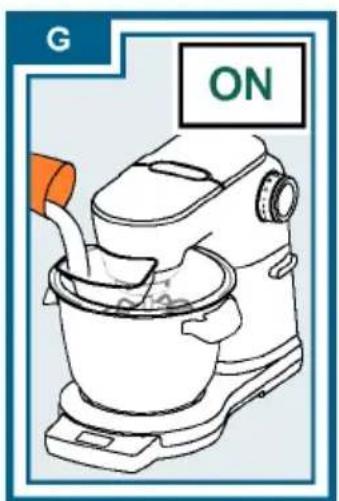
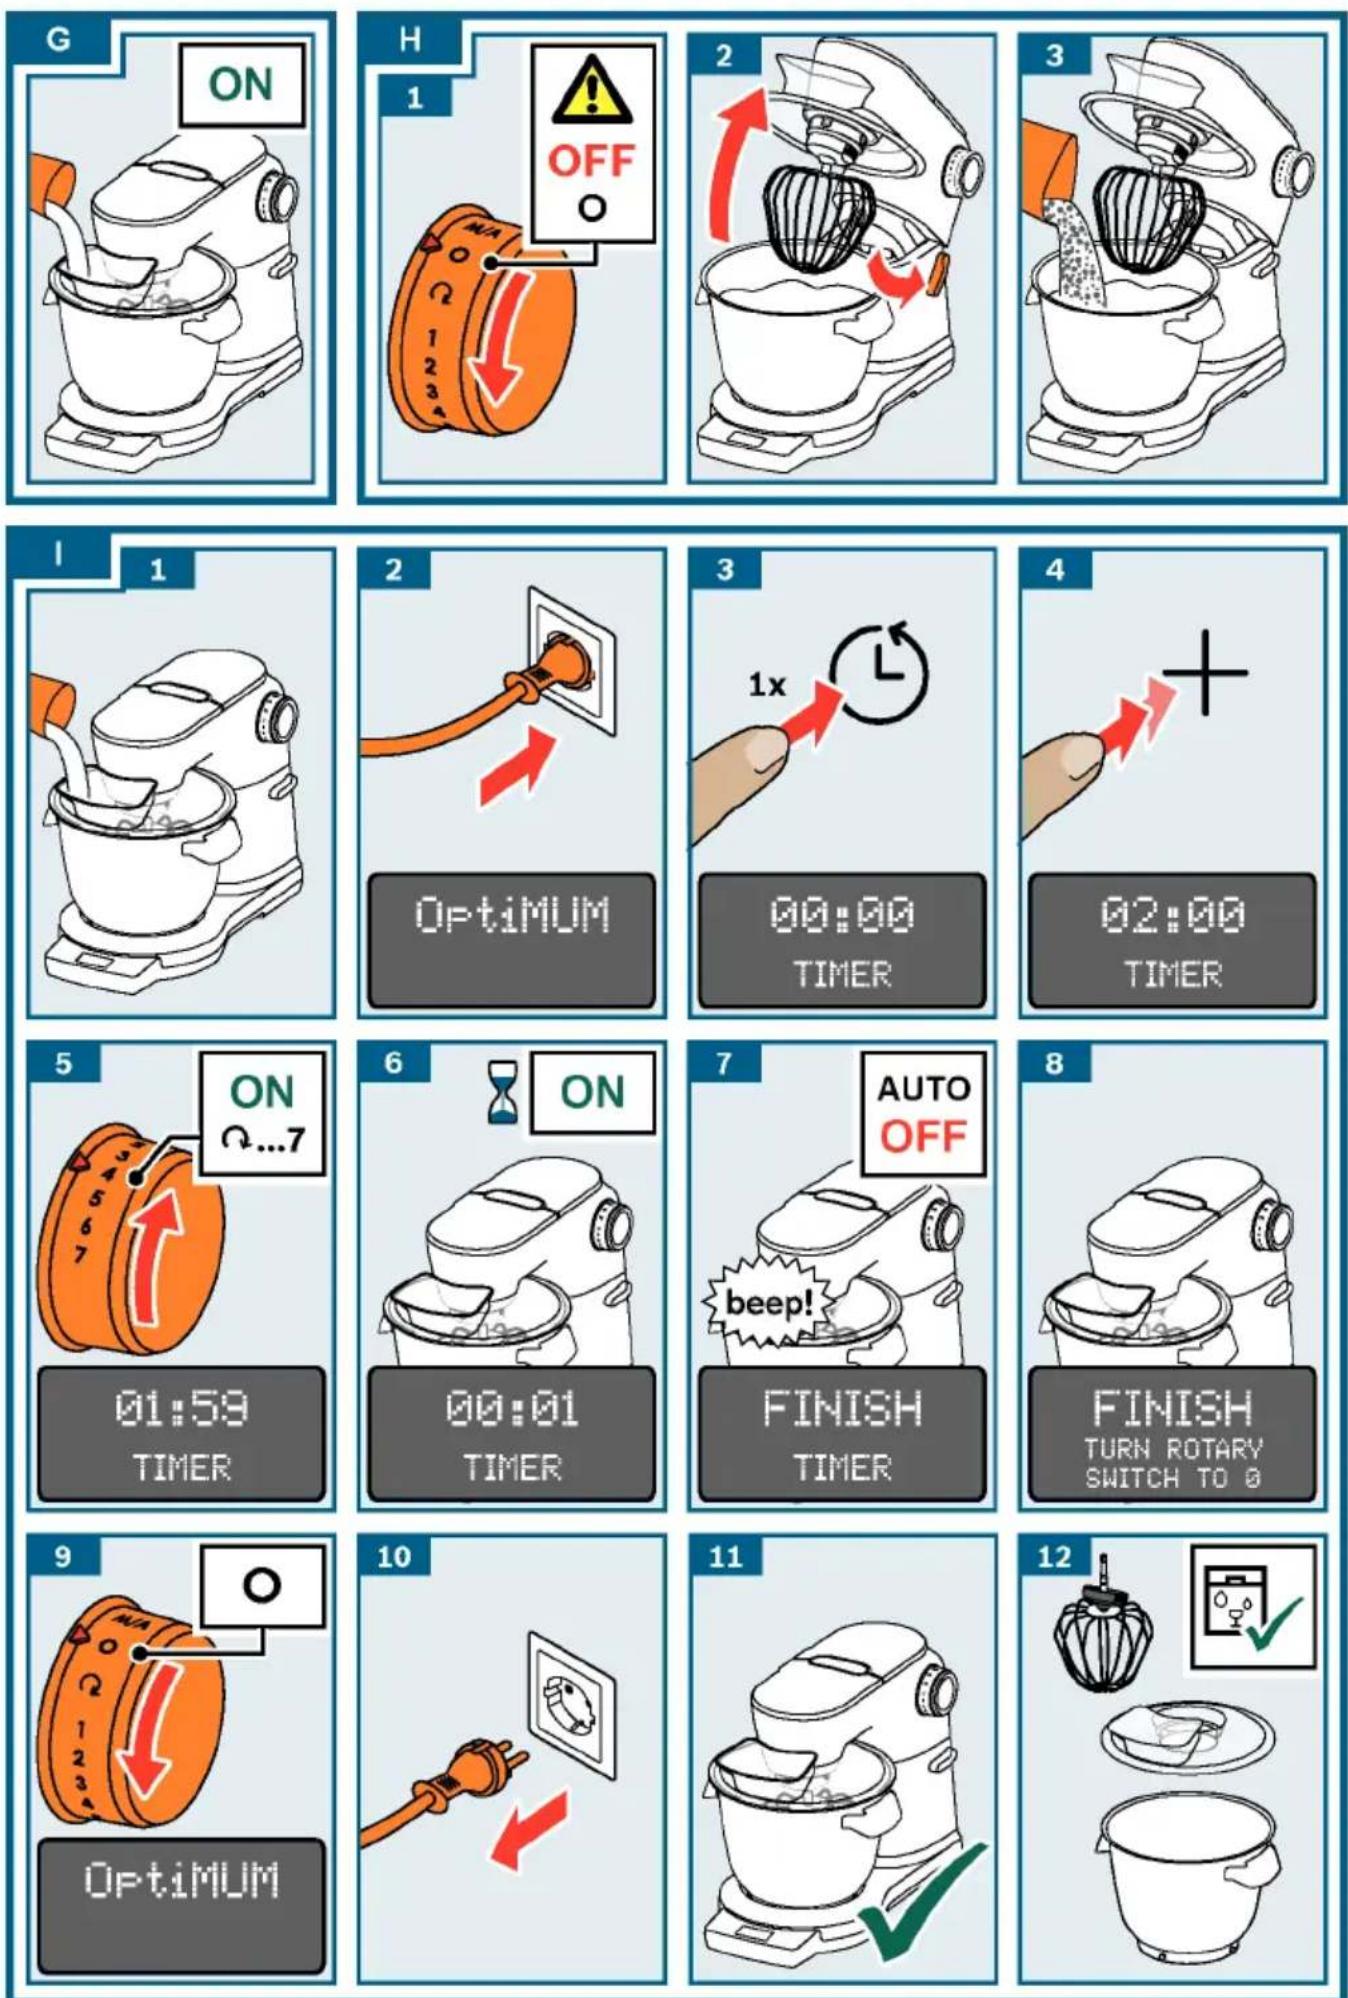
→ Image sequence F
- Depending on the processing task, select the professional flexible reading page 36
whisk, professional stirring Adding more ingredients or kneading hook → "Tools More ingredients can also be added page 29 insert the tool into top being.
drive until it locks into place. The drive is then covered by the protective cap.
-
Put the ingredients to be processed in the bowl. add more ingredients through shelf-in-the-cover.
-
Press the release button and push the swivel arm down until it locks into place.
⚠️ Risk of injury!
Carefully lower the swivel arm! Make Do not insert any objects (e.g. sure you do not get your hands or fingers) into the bowl or filling caught.
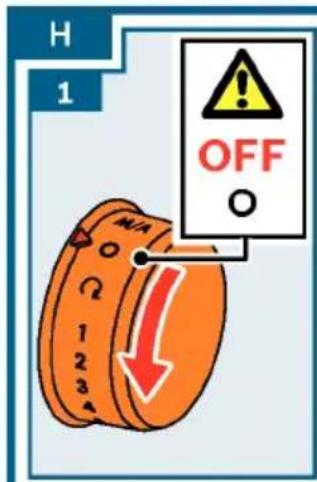
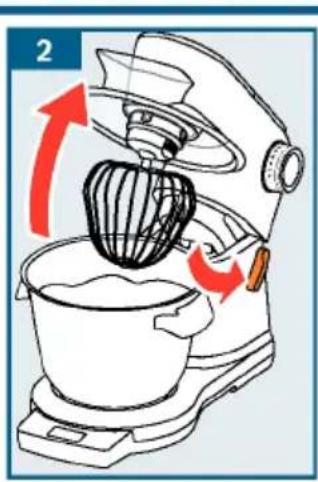
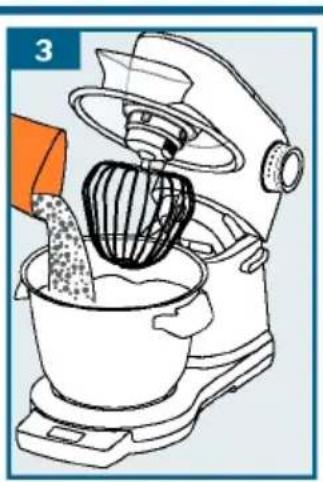
→ Image sequence H
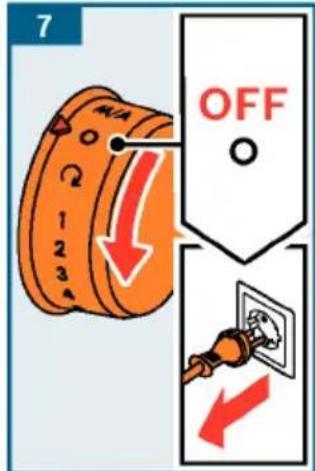
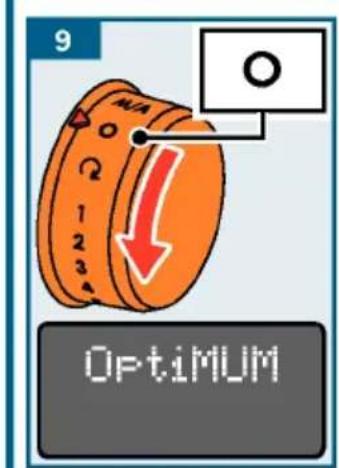
- To add larger quantities or turn the rotary switch to O. the drive comes to a standst
en Using the time and timer function
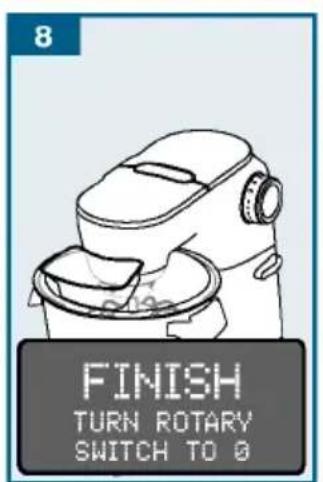
- Press the release button7.andOnce is the remaining duration the swivel arm to the stop. elapsed, an acoustic signal wi
- Add the ingredients directly to the appearance will stop press the release button and aptitudeally. "FINISH THEY" appears on swivel arm down until it lock the iditsqI palyace.
"Optimum" appears on the display. Note: Setting the acoustic sig Continue processing your ingredi sent sngs" see page 30
Using the time and timer function
- "TURN ROTARY SNITC-TO" appears on the display.
- Turn the rotary switch to "Optical" appears on the display.
ne0.and stdomerect the mains plug.
The appliance features a time and disconnect the mains plug. function. The following functions are processing with the "TIE" funct available: ended.
"TIME" function
- Clean all parts immediately
Display of the elapsed processing duration (standard setting). The "TIME" function page 36
starts automatically once then to process of
food has been started.
- The duration is indicated in minutes and seconds. Exam
Notes:
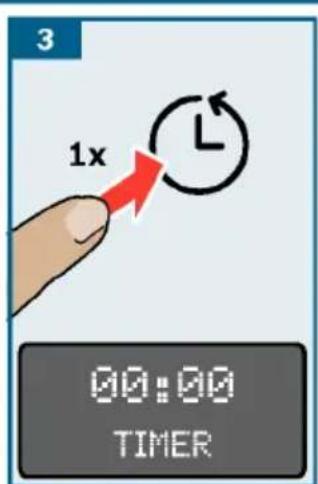
- Press button Ⓛ briefly during process 30 seconds: "01:30". to switch on the "TIVER" function. duration is 60 minutes or more - Hold button Ⓛ down during process displayed: "1:01:30".
to reset the display to "00:00".- Press button + or - at any t the displayed remaining duration
"TIMER" function
Setting of a required duration duration has elapsed, an acous will sound and processing will
The function may also be used processing food (e.g. for boil times of food).
- Press button Ⓛ briefly twice Once the timer (the appliance will cont stic signal to start it again.
Turn the rotary switch to O without processing. The remaining duration of resting remains saved and the countdown continue after the appliance is again.
→ Image sequence
- Prepare the appliance. Add ingredients down button Ⓛ to switch
- Plug the mains plug into the mains "OptiNAN" appears on the display. function has been activated as
- Press button Ⓤ. "oo" appears on the display. Using th
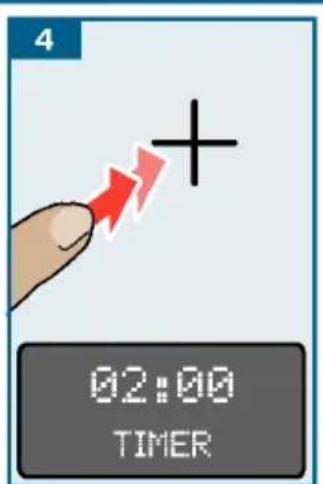
- Set the required processing duration using display button + or -. The values will change faster if the respective button is pressed and held down. The set processing duration will remain saved for approx. 5 minutes. Press button ⏻ briefly twice timer.
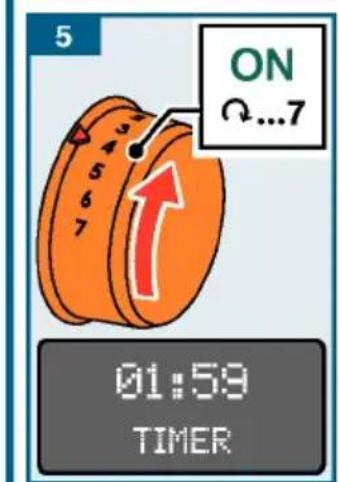
- Set the rotary switch to the required setting.
- The remaining duration will be shown on the display and the countdown will continue.
■ Once the duration has elapsed for applications with integrated signal sounds. "FINISHTIMER" applies options ">300 ml" and ">700 ml" are the display. not displayed for "CREAN". "Og" flashes
Notes:
- Press button Ⓛ briefly twice to stop the 300 ml and 1500 ml has been added to a timer or to start it again. The display shows the quantity - If food starts to be processed while using the timer, the appliance will set things. If less or more create continue to run until the remaining weight will flash.
duration has elapsed and tNostress:top
processing automatically.
Using Sensor Control
Depending on the model, the appliance may be equipped with Sensor Control Plus sensors function correctly. automatic programmes. Sensors monitor the processing of the ingredients and switch has been selected and the scale. Indicate 0g or "0.00 lb" (depend) the appliance off once the pre-programmed setting) or "ADD INGREDIENTS" appears consistency has been reached.
The following automatic programmes are displayed. available with Sensor Control Plus: If the appliance is switched by the rotary switch, the menu is CREAM.
Automatic preparation of whipped cream
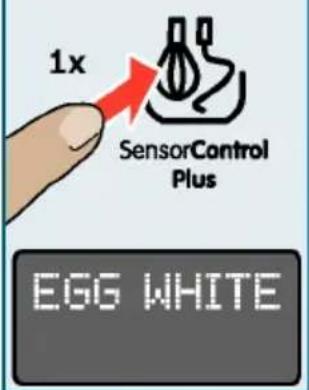
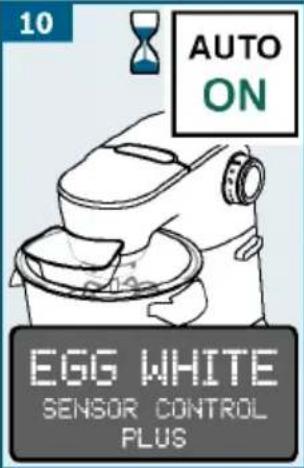
- EGG WHITE Automatic preparation of (beaten) Sensor Control Plus, do not and more ingredients.
- Sensor Control Plus is only - Automatic preparation of yeast dough. (in the specified quantities)
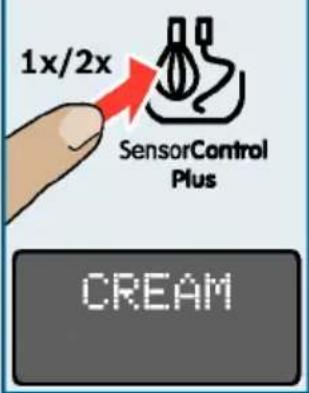
Selecting programme
■ Press button 📋. "CREAM" appears on The age, the temperature and the display. contents of the ingredients:
■ Press button 🎨 or buttons time required and the result
The following programmes appear Senior Control Plus cannot p
sequence: optimum results unless the e
Programme Tool / Ingredients
| CREAM>300 ml * | Professional stirring whisk300-700 ml cream | (approx. 6 °C).- Cream which was previously cannot be whipped. |
| CREAM>700 ml * | Professional stirring whisk700-1500 ml cream | - Cream which contains additional lactose-free cream can not play ideal results. |
| EGG WHITE | Professional stirring whiskWhite of 2-12 eggs | - Do not add sugar, flavours additives for cream or beaten |
| YEASTDOUGH | Kneading hookIngredients and quantities Sensor Control Plus is according to the recipeThe buttons are locked once → “Recipes” see page Sensor Control Plus has started | |
- Turn the rotary switch too. O "SENSOR CONTROL can appear Sensor Control Plus. A slight or she stands play. Sensor Control must be overcome for this. monitors the processing. - If the result is not how you wish the preprogrammed control turn the rotary switch to send ingeen (achieved, an acoustic cream and beaten egg white) will set down and processing with 3 (for yeast dough) and continue on the display. process the ingredients until that setting the acoustic consistency is achieved. → "Settings" see page 30 - Do not start Sensor Control2. PThe rotary switch automatic second time with ingredient st which "Optical" appears on the already been processed. display.
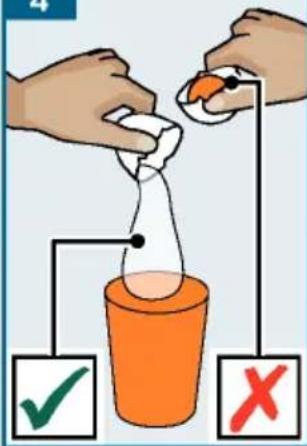
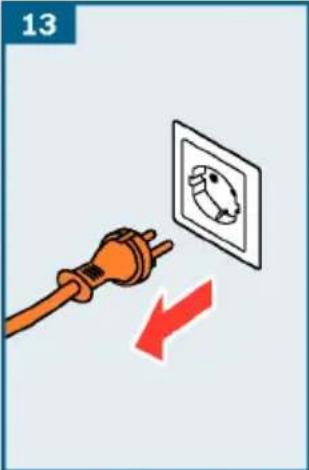
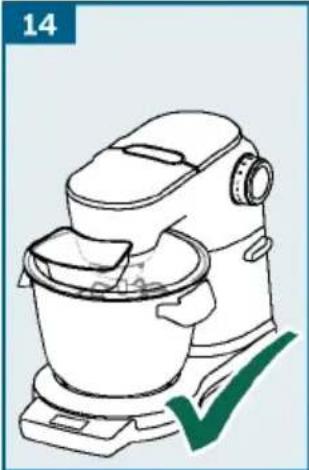
Example: Making beaten egg ^13 Disconnect the mains plug. white with Sensor Control ^14 Processing with the "EGG WHITE" function is ended.
→ Image sequence J 15. Clean all parts immediately
-
Prepare the base unit and in "eC/teaching and maintenance" professional stirring whisk.page 36
-
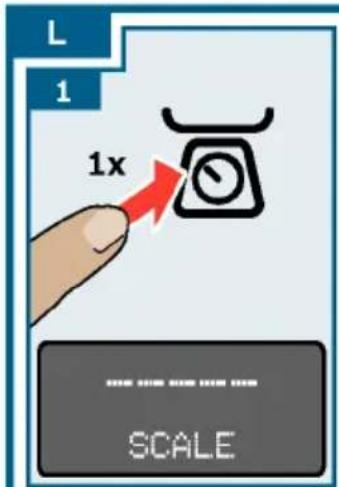
Press the release button and push the swivel arm down until it looks into place. Using the scales
-
Plug the mains plug into the mains. Depending on the model in quest "OptiWALM" appears on the display appliance may be equipped with
-
Separate the eggs (2-12 eggs) The following applications are
-
Press button 📋. "CREAM" appears on the display.
-
Weighing the added ingredient in the display. (either each ingredient indi ingredients together). "CREAM>300 ml". Press button 📋. Pre-setting a desired weigh again. "CREAM>700 ml" appears on the display. counting down until sufficient have been added (with audibly
-
Press button 📁. "EOG WHITE" appears have been added (with audiobin on the display. information signals). Important:
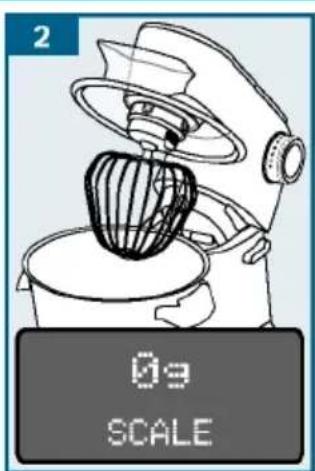
Note: If appliances feature integrated scales, these are now calibrated. Individual steps (0.01 lb). If less than dashes appear in succession on the display during calibration: “----” (tare). 0g or “0.00 lb” appears on the display (depending on the setting). The appliance has 4 weight in the feet. The scales only
-
Add the egg white to the bowl. The correct results if all or standing on a solid and level. Do not put any clothes or others.
-
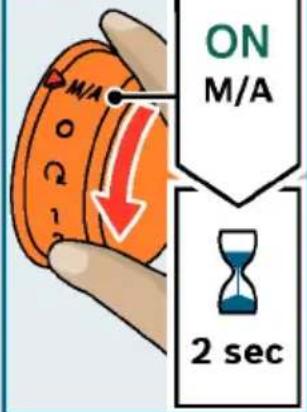
Turn the rotary switch to M/A and hold in this position for 2 seconds. The worktop must not be sub
-
After 2 seconds the rotary switch is vibrations while the scales are automatically fixed in this position and remains on M/A after being released. (e.g. by other activities important: If the rotary switch is connected,
Important: If the rotary switch does remain M/A, it was not held for long enough in this position.
- Do not slide the applian Pre-ab setting the weight
the work surface as this may impair the functioning of the objects. → Image sequence
functioning of the scales.1. lo move the Press bit
appliance, lift it. appliance again.
- After switching on or resetting the individual dashes appear one scales, they are calibrated for a brief other on the display during moment (tare). During this process, (tare).
not touch the appliance or 2. place "0g" and "0lb" appears on the d items on top of it (e.g. wooden spoon (depending on the setting). tea towel etc.). are ready.
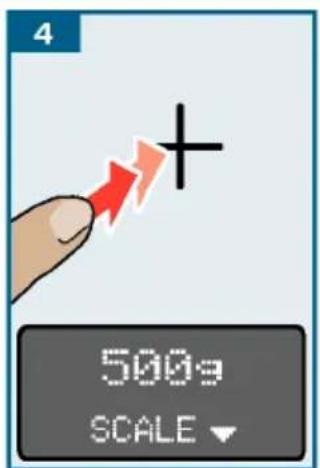
- Ensure that measuring jugs or 100g" or "0.20 lb" appears on the packaging are not lying on top of the display (depending on the set appliance (e.g. on the edge of the filling shaft). Set the required weight (500 g) using the + or
Weighing ingredients
→ Image sequence K
-
Prepare the base unit.
-
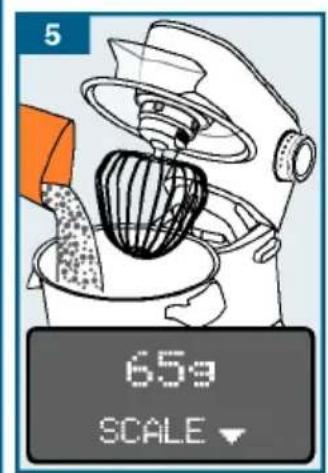
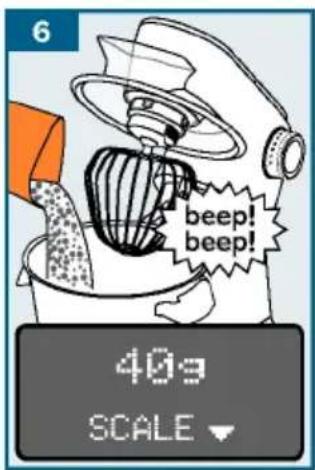
Plug the mains plug into the mains. From "40g", a recurring acou "Optimum" appears on the display. sounds. The lower the remain
-
Press button 🔒 and don't touch the sounds. appliance again. Individual dashes appear one after each other on the display during calibration: "Settings" see page 30 "----" (tare).
-
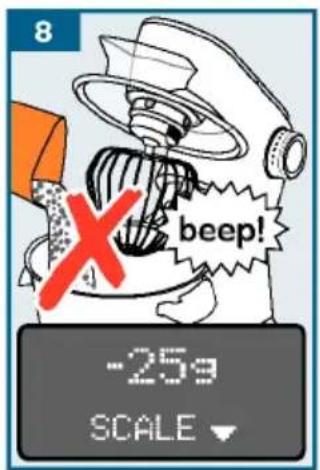
At "0g" (meaning that the pr
-
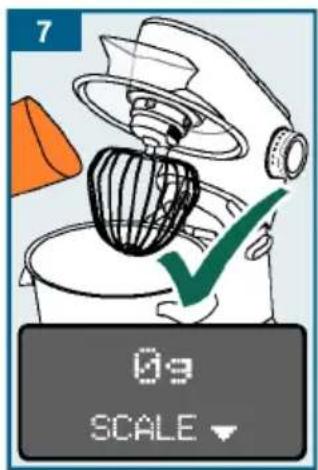
“0g” or “0.00lb” appears on the display (depending on the setting). Signal stops. are ready.
-
If the pre-set quantity has
-
Add ingredients. The scales exceed the acoustic signal weight. Continuously.
-
Start processing or put out other ingredients ready for use. Note Setting the acoustic si
-
Press button ☑ and do not touch the appliance again. "0g" or width a minus symbol. If the appearance on the display (depending on the setting). The scales are ready. Either remove the excess quantity.
-
Add all desired ingredients and weigh them in this manner. buttons ( 📄/ 📊/ 📅) until "Open"
Process the weighed ingredients. Using without additional functions" see page 31
Note: If button is pressed while processing food, "FOR SCALE
STOP MACHINE" appears on the display.
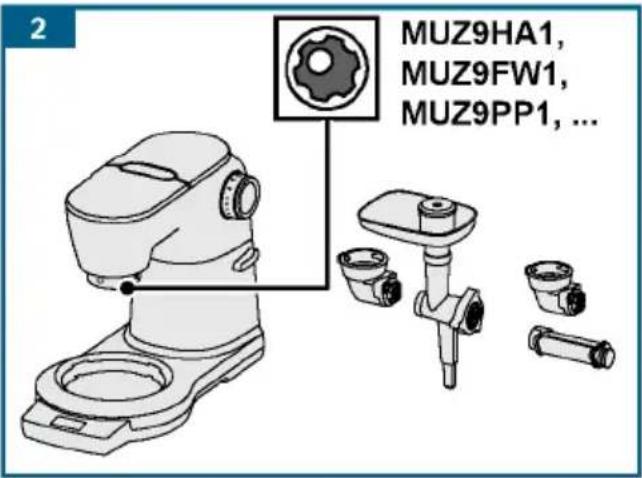
Using accessories
Cleaning and maintena
Your kitchen machine offers the unampeliance and the tools use of accessories that significantly remove healthy cleaned after each its functions. Depending on the Fingode,
certain accessories are already included in the scope of supply. If an accessory is not included, it can be purchased, never immerse the base unit via trade stockists or customer service and do not clean in the dish, "Accessories" see page 41 - Do not steam-clean the appl
Preparation for accessoriauieson!
The base unit requires different Do not tarate my cleaning age depending on the accessory. containing alcohol or spirits:
■ Place the base unit on a smoothno clear any sharp, point and stable surface. objects.
■ Pull the power cord out to-t De nequised abrasive cloths length.
agents.
■ Prepare the base unit as show no not wedge plastic parts depending on the accessory. dishwasher as they could become permanently deformed! Fig. M
→ Fig. M
- Preparation for tools. Cleaning the base unit
- Preparation for accessories ■ Remove the protective drive drive with bevel gear and accessory Wipe the base unit and driv used in place of the bowl. a soft, damp cloth and dry o
- Preparation for accessory on red drive, for example blender or multi-chopper. Cleaning the
- Preparation for accessory ■ You can clean the bowl, cover drive without outlet opening for food, with a detergent solution e.g. multi-blender or citrus soft cloth or sponge, or put to press.
- Preparation for accessory dishwasher. drive with outlet opening for Alfood, alel. gparts to dry. continuous-feed shredder.
Important:
■ Observe yellow, red or black marking on drive and accessory. → "Colour Coding" see page 27
■ Whin the crea
■ Always secure unused drives with the professional stirring which to 4 minutes at setting 7, do
protective drive covers.
■ See the separate instructions for the on the quantity and properties of individual accessory for all further steps.
Note: For models with Sensor Cor use the automatic programme. → Sensor Control Plus" see page 3:
Egg whites
- 2-12 egg whites

■ Beat the egg whites—with the professional stirring minutes at setting 7.
Note: For models with Sensor Control pinchus,alt
use the automatic programme. Sensor Control Plus" see page
Sponge mixture
Basic recipe

- 3 eggs
- 3-4 tbsp hot water
- 150 g sugar
- 1 sachet vanilla sugar
- 150 g flour
- 50 g cornflour
- Baking powder if required
■ Beat the ingredients (except for about 40 minutes at. setting and cornflour) with the prMax is minimum quantity: 4 x basic rec
stirring whisk for approx. 4-6 minutes at setting 7 until frothy. Yeast dougl
■ Turn the rotary switch to setting 1 and spoon in the sifted flour and corn flour within approx. 12 to 1 minute and mix.
Maximum quantity: 2 x basic recipe fat (room temperature)
Cake mixture
Basic recipe

- 3-4 eggs
- 200-250 g sugar
- 1 pinch salt
- 1 sachet vanilla sugar or 12 lemon
- 200-250 g butter or marg (room temperature)
- 500 g fl our
- 1 sachet baking powder
- 150 ml milk
■ Mix all ingredients with flexible beating whisk for
½ minute at 2, etaring then for - 500 g flour approx. 3 minutes at setting 7.250 g eggs
Maximum quantity: 2½ x basic
Short crust pastry
Basic recipe

- 125 g butter (room temperat whi sk0f q254 gt sugar
- 1 egg
Contr qdi nPchuss,alt
→ Ä Us i n g l e lemon peel or vani 3.3 250 g fl our
- Baking powder if required
■ Mix all ingredients with the flexible beating whisk for all 12 minute at setting 2, then 2-3 minutes at setting 6.
From 500 g flour:

■ Knead ingredients the kneading hook f
about 12 minute at setting 1,
cept for about 40 minutes at. setting Max is small quantity: 4 x basic rec
4-6 minutes Yeast dough
Basic recipe and 500 g flour and corn flour ute and mix.

- 80 g sugar
- 200-250 ml lukewarm milk
- 25 g fresh yeast or 1 sache
- Peel from 12 lemon
- 1 pinch salt
■ Mix all ingredients with the book from approx. 12 minute at then for approx. 3-6 minutes
Maximum quantity: 3 x basic rec
Note: For models with Sensor Cor use the automatic programme. →
Sensor Control Plus" see page 3:
Pasta dough the professional
basic recipe

- 500 g flour
7.250 g eggs (approx. 5)
^g recipe ^2-3 tbsp (20-30 g) cold wat as required
■ Mix all ingredients for abo 5 minutes at setting 3 until forms.
Maximum quantity: 1.5 x basic r
Bread dough
Basic recipe

- 1000 g flour
- 3 sachets dried yeast
- 2 tsp salt
- 660 ml warm water
■ Mix all ingredients with hook for approx. 12 minute then for approx. 4-5 min
Maximum quantity: 1,5 x basi
Safety systems
Start lock-out
The appliance can only be switched to the bowl has been inserted and it locked into place, or if an been secured to the main drive the kneading bevel gear and if the swivel at setting 1, into the lower position.
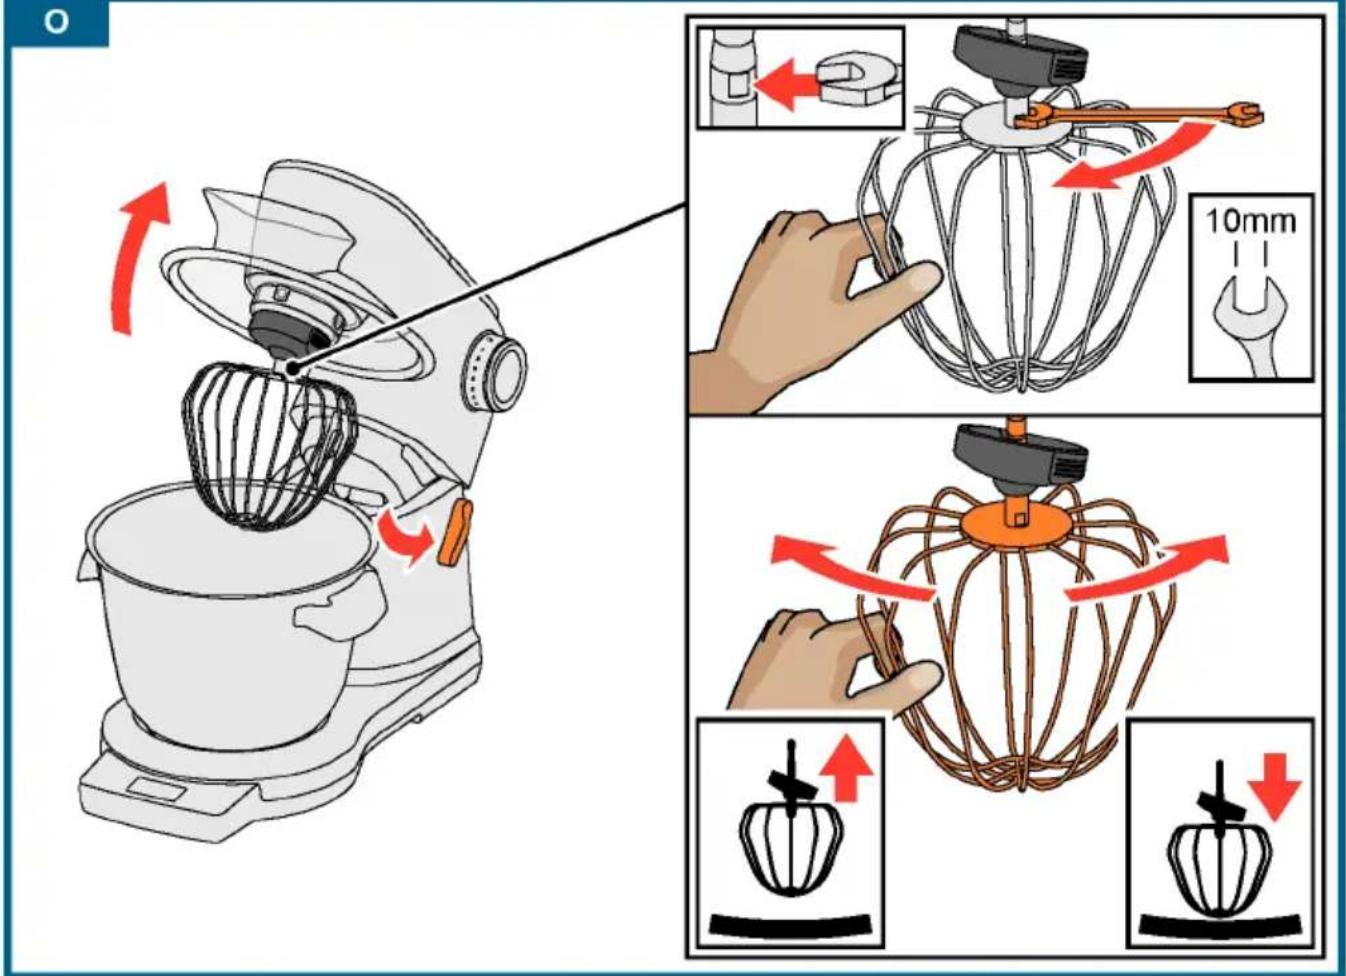
Re - adjustment of to
Automatic power-on safety If the power is interrupted, then consists switched on, but the most not start again when power is r. To switch back on, first turn to re-adjusting switch to O, and then switch o
⚠️ Risk of injury!
Pull out the mains plug before
Caution!
Only re-adjust tools in small be possible to completely lo arm, and when doing so, the not catch on the bottom or of the bowl. The optimum distant the tools and the bowl is 3
Overload protection I steps I must
The overload protection will slow the swim vehicle motor off automatically during tools should One possible cause may be processed on the edge of too much food at once.
→ Image sequence ☐
Swivel arm protection dev
The swivel arm will not unlock an accessory is fitted to the r stirring whisk and
■ Insert the professional check the current setting.
■ Press the release button and raise the swivel arm to the stop.
■ Hold the tool with one hand. Release the lock nut in a clockwise direction using a spanner wrench (10 mm).
■ Adjust the distance to the bowl by turning the tool (1 whole turn corresponds to a height adjustment of 1 mm).
Turn anticlockwise:
Distance to bowl is reduced.
Turn clockwise:
Distance to bowl is increased.
■ Press the release button and push the swivel arm down until it locks into place.
■ Check the tool distance. The optimum distance between the tools and the bowl is 3 mm. Adjust if necessary.
■ Once the distance is perfectly adjusted, press the release button and move the swivel arm back.
■ Hold the tool with one hand. Turn the lock nut in an anticlockwise direction using a spanner wrench (10 mm).
Disposal

Dispose of packaging in The guarantee conditions for mentally-friendly manner are defined by our representative in the appliance is labelled in accordance which it is solved with European Directive 2042e106 Editions can be obscoring used electric head dealer from whom the electronic appliances purchased. The bill of sales and electronic equipment was used when making an The guideline determine the framework of this guarantee work for the return and recycling of used appliances as applying reserved. throughout the EU. Please ask your specialist retailer about current disposal facilities.
Guarantee
Troubleshooting
In the following tables, you will find solutions for problem rectify yourself. If a fault cannot be eliminated, please
| Problem Possible cause Remedy | ||
| Nothing shown display. Illumination of supply. ring is off. Appliance cannot be switched on. | Ampliance has power reduced supply. | Check the power supply.Plug the mains plug into the |
| Appliance does start. The illuminated lights up. | Safety system activated. | "Safety systems" see page 38 |
| Appliance swit during use. | Smooth food been processed either at the time or for to period. | Turn the rotary switch to oReduce the processing quantityAdrigation the appliance to cool temperature. |
| Swivel arm was opened. | Turn the rotary switch to oPress the release button and swivel arm down until it lock | |
| Bowl or bevel (accessory) has become loose. | aTurn the rotary switch to oTighten the bowl by turning Tighten the bevel gear and locking lever completely. | |
| The swivel arm be opened. | A can necessary to the red rear | fRemove accessory.Priever the release button and the swivel arm. |
| The scales do show any change in weight even through ingredients are added. | The quantity added ingredient brightness than (0 bollngb). | Add at least 5 grams (0.01 lb), thesscales will not provide cor negramment results. |
| The appliance not start the Sensor Control program and switch off again. | The rotary switch was encoded down Pouslong enough in which position M/A. | |
| Sensor Control cannot be started "ADD INGREDIENTS" appears even that the ingredient already been added. | Models with ingredients were added before thogcales were achieved. | Empty the bowl. Select programme again. Do not add ingredients until has been selected and the scale indicate "0g" or "0.00lb" (dependi setting) or "ADD INGREDIENTS" appears on the display. |
| Display Possible Cause Remedy | |
| ERROR MOTOR OVERLOAD | Too much food has■bTurn the rotary switch to ○ processed either at the mains plug. same time or for ■Reduce the processing quanti long a period. ■Allow the appliance to cool room temperature. |
| The appliance or ■nTurn the rotary switch to ○ of the accessories$ hies mains plug. blocked. ■Check appliance/accessories the blockage. | |
| Motor defective. If the message appears contin motor may be defective. Please customer service. | |
| ERROR SCALE | The scales do not■Work reset the scales, hold do properly. the function buttons ( 📄/ 📋/ 📋 "OptiUN" appears on the display. |
| Scales defective If the message appears contin scales may be defective. Please customer service. | |
| The scale is ex Posedtuse the appliance on wor vibrations. e.g. a dishwasher is running ur | |
| The appliance has■Leert the appliance and set o slid on the work ■Refsede the scales and try ag before using the scales. | |
| Display | Possible cause | Remedy |
| ERRORARM OPEN | Swivel arm was opened. | ■ Turn the rotary switch to O.■ Press the release button and push the swivel arm down until it locks into place. |
| ERRORCHECK BOWL | Bowl or bevel gear (accessory) has become loose. | ■ Turn the rotary switch to O. Disconnect the mains plug.■ Tighten the bowl by turning until the stop.■ Tighten the bevel gear and close the locking lever completely. |
| FOR SCALESTOP MACHINE | Scale is switched on while the appliance is running. | ■ Switch the appliance off and wait until it stops before using the scale. |
| OVERLOADSCALEorUNDERLOADSCALE | The measurement result is outside the measurement and display range of the scales (-990 g to 5000 g) | ■ Do not add more than 5000 g of ingredients.■ Do not remove more than 990 g of ingredients. |
| OVERLOADorUNDERLOADwhen using SensorControl Plus | Too much or too little of the ingredients was added for the selected programme. | ■ Add ingredients according to the specified quantities.→ “Using SensorControl Plus” see page 33 |
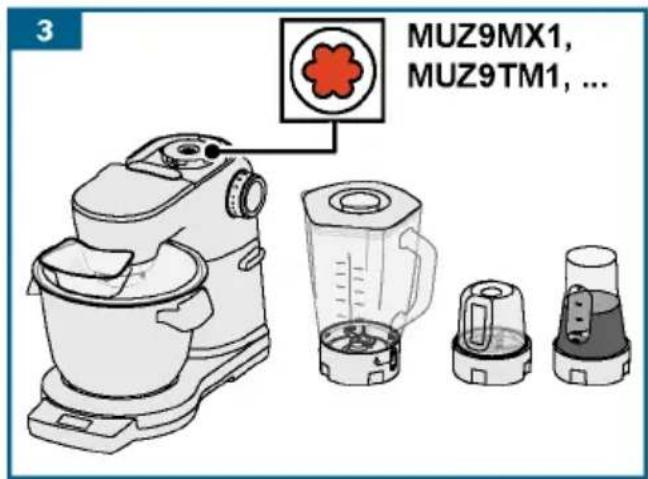
Accessories
Accessories and spare parts can be purchased via trade stockists or customer service. As the product range is being constantly extended, it is possible that there are additional accessories which are not listed here. In this case, go to www.bosch-home.com to see the latest accessories that are available.
| Accessories | Designation | Description |
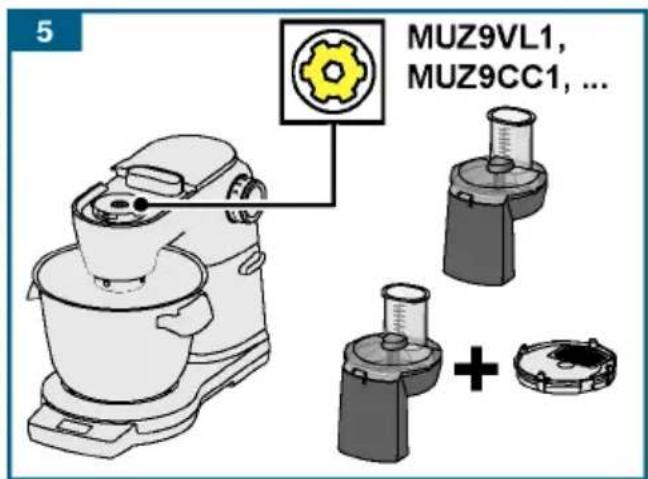
  | MUZ9VL1 | Continuous-feed shredderFor cutting, shredding and grating fruit, vegetables and other foods. |
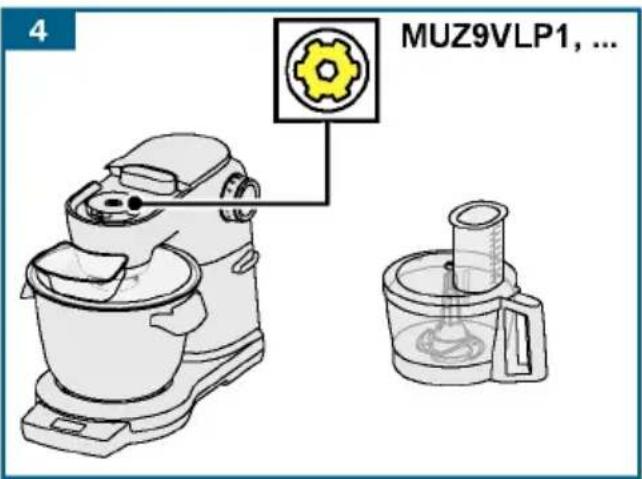
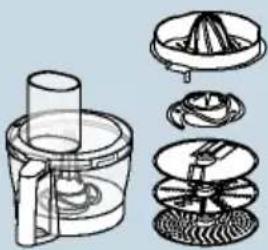 | MUZ9VLP1 | Multi-blender with citrus pressFor chopping herbs, vegetables, apples and meat, for grating carrots, radishes, cheese, nuts and chilled chocolate.For squeezing oranges, lemons and grapefruits. |
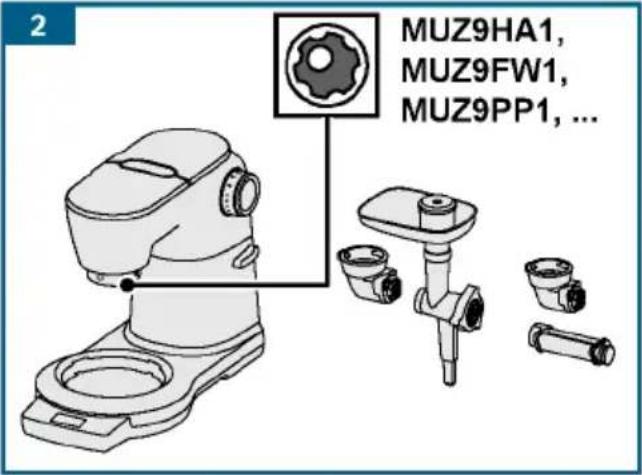
 | MUZ9PP1 | Pasta pressFor making sheets of dough and tagliatelle. |
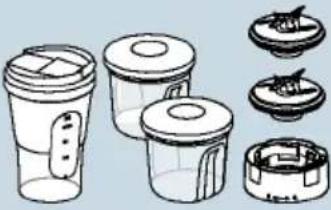 | MUZ9TM1 | Multi-chopper setFor grinding and chopping small quantities of spices, cereals, coffee or sugar.For cutting and chopping meat, fish, hard cheese, herbs, fruit, vegetables, nuts or chocolate.For mixing liquid or semi-solid food, for cutting/chopping raw fruit and vegetables, frozen fruit and puréeing food. |
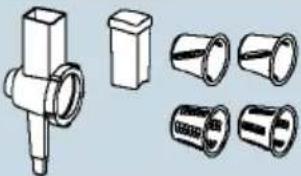
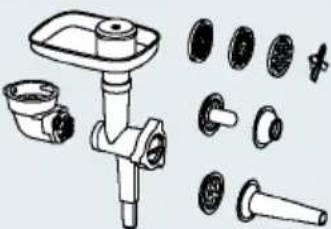 | MUZ9HA1 | Meat mincer with sausage stuffing and kebbe attachmentFor cutting fresh meat for steak tartare or meat loaf. For stuffing sausages. For making dough or minced meat pockets. |
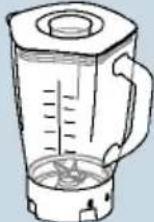 | MUZ9MX1 | BlenderFor mixing drinks, puréeing fruit and vegetables, preparing mayonnaise, chopping fruit/nuts and crushing ice cubes, for puréeing and mixing soups and sauces. |
 | MUZ9ER1 | Stainless steel mixing bowl with handlesThe bowl can be used to process up to 3500 g cake mixture. |
 | MUZ9KR1 | Plastic mixing bowl with handlesThe bowl can be used to process up to 3500 g cake mixture. |
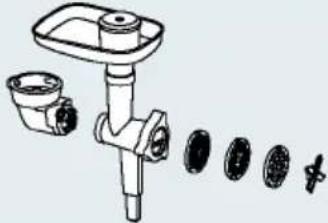 | MUZ9FW1 | Meat mincerFor cutting fresh meat for steak tartare or meat loaf. |
 | MUZ9PP2 | Pasta inserts for MUZ9HA1 and MUZ9FW1For making pasta. 5 different shapes available. |
 | MUZ9SV1 | Whirl insert for MUZ9HA1 and MUZ9FW1For making whirls. 4 different shapes available. |
 | MUZ9CC1 | Dicer for MUZ9VL1For cutting food into cube shapes. |
 | MUZ9PS1 | Chipper disc for MUZ9VL1For slicing raw potatoes for chips. |
 | MUZ9SC1 | Professional Supercut reversible disc for MUZ9VL1 and MUZ9VLP1For cutting fruit and vegetables into thick or thin slices. Particularly suitable for very soft or very fibrous food. |
 | MUZ9BS1 | “Baking Sensation” accessory setThe set contains the following parts:MUZ9FW1 meat mincer(with perforated disc medium, 5 mm),MUZ9SV1 whirl insert,MUZ9KR1 plastic mixing bowl. |
 | MUZ9RV1 | Shredding attachmentFor cutting up and shredding food. |
 | MUZ9AD1 | Bevel gear for MUZ9RV1Available separately if no bevel gear of another accessory is available. |
→ Suite de la figure J
PASTA i LIEVIP ATA were
t TENERE INTERRUT TORE SU
ntino danni
Frust a per mont are professional
Per mont are al bume d' uvo | panr
Svinge men svinges op for at
⚠️ Fare for kvelning!
and electronic equipment - WEEE).
To arrange an engineer visit, to order
spare parts and accessories or for
product advice please visit
www.bosch-home.co.uk
or call Tel.: 0344 892 8979*
*Calls are charged at the basic rate, please check with your telephone service provider for exact charges
GR Greece, Ελλάς
BSH I ki akes S is keves A. B.
Central Branch Service
17 km E. O. Athi non-Lami as
Potamou 20
14564 Kifisia
Unit 1 & 2, 3rd Floor,
North Block, Skyway House,
3 Sham Mong Road
Tai Kok Tsui, Kowloon
Hong Kong
Tel.: 2565 6151
Fax: 2565 6681
mailto:bosch.hk.service@bs
www.bosch-home.cn
HR Hrvatska, Croatia
BSH kućni uređaji d.o.o.
Kneza Branimira 22
10000 Zagreb
Tel.: 01 552 08 88
Fax: 01 640 36 03
www.bosch-home.com/hr
mail to: hi babej el ent es@bsh.
Alkatrészrendelés
Tel.: +361 489 5463
Fax: +361 201 8786
mailto:alkatreszrendeles@bsh.hu
www.bosch-home.com/hu
IE Republic of Irel
BSH Home Appliances Ltd.
Unit F4, Ballymount Drive
Ballymount Industrial Estate
Walkinstown
Dublin 12
Service Requests, Spares and Accessories
Tel.: 01450 2655*
Fax: 01450 2520
www.bosch-home.co.uk
* 0.03 € per minute at peak.
Off peak 0.0088 € per minute.
IL Israek,
C/S/B/ Home Appliance Ltd.
1, Hamasger St.
North Industrial Park
Lod, 7129801
Tel.: 08 9777 222
Fax: 08 9777 245
mailto:csb-serv@csb-ltd.co.il
www.bosch-home.co.il
IN India, Bhārat, भारत
BSH Household Appliances
Mfg. Pvt. Ltd. Arena House, Main Bldg,
2nd Floor,
Plot No. 103, Road No. 12,
MIDC, Andheri East
Mumbai 400 093
Toll Free 1800 266 1880*
www.bosch-home.com/in
* Mo-Sa: 8.00am to 8.00pm
(exclude public holidays)
I S Iceland
Smith & Norland hf.
Noatuni 4
105 Reykjavik
Tel.: 0520 3000
Fax: 0520 3011
www.smi nor.is
IT Italia, Italy
www.bosch-home.com/it
KZ Kazakhstan, Казақстан
IP Turebekov Yerzhan
Nur manovich
Jangeldina str. 15
Shimkent 160018
Tel.: 0252 31 00 06
ma@btsngeyc0mka_kz@mail.ru
LB Lebanon,
Teheni, Hana & Co.
Boulevard Dora 4043 Beyrouth
P. O. Box 90449
Jdeideh, 1202 2040
Tel.: 01 255 211
mailto:Info@Teheni-Hana.co
LT Li et uva, Lithuania
Senuku prekybos centras UAB
Jonavos g. 62
44192 Kaunas
Tel.: 0372 12146
Fax: 0372 12165
www.senukai.lt
UAB "AG Service"
R. Kalantos g. 32
52494 Kaunas
Tel.: 0700 556 55
Fax: 037 331 363
mailto:servisas@agservice
www.agservice.lt
Baltic Continent Ltd.
Lukšio g. 23
09132 Vilnius
Tel.: 05 274 1788
Fax: 05 274 1722
mailto:info@balticcontinent.lt
www.balticcontinent.It
LU Luxembourg
www.bosch-home.com/1u
LV Latvija, Latvia
SIA "General Serviss"
Bullu iela 70c
1067 Riga
Tel.: 06742 52 32
mail to: info@serviscentrs.lv
www.serviscentrs.lv
El kor Servi ss
Brivibas gatve 201
1039 Riga
Tel.: 067 070 520; -36
Fax: 067 070 524
mail to: info@el korserviss. lv
www.elkorserviss.lv
Sia Elektronika-Serviss
Tadaiku iela 4
1004 Ri ga
Tel.: 067 717 060
Fax: 067 601 235
mailto:serviss@elektronika.lv
www. elektronika.lv
MD Moldova
S.R.L. "Rialto-Studio"
ул.щусева 98
2012 Кишинев
F

1

2

natural_image
Line drawing of a kitchen mixer with a hand mixer inside, no text or symbols present
4


natural_image
Illustration of a kitchen mixer blending orange liquid with a brush, showing no text or symbols
natural_image
Illustration of a microscope with an orange funnel and red arrow indicating a process (no text or symbols)
natural_image
Line drawing of a kitchen mixer with mixing bowl and spatula (no text or symbols)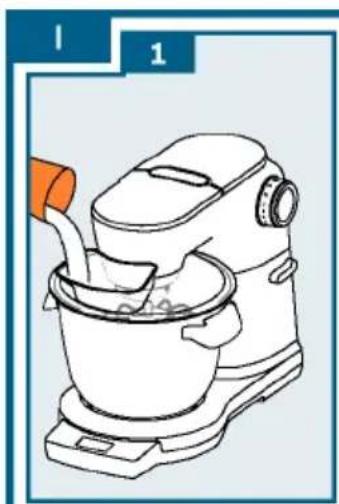
natural_image
Line drawing of a kitchen mixer with a hand pouring liquid from a bowl (no text or symbols)


natural_image
Illustration of an orange electrical plug with a circular socket inside a wall, connected to a red arrow indicating downward motion (no text or symbols)
natural_image
Line drawing of a kitchen mixer with a green checkmark indicating inspection (no text or symbols)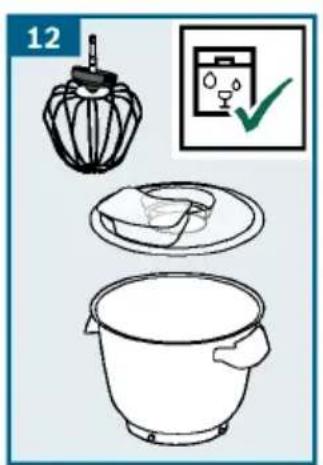
J


3

4

5

6
7

8


natural_image
Line drawing of a kitchen mixer with a green checkmark indicating inspection (no text or symbols)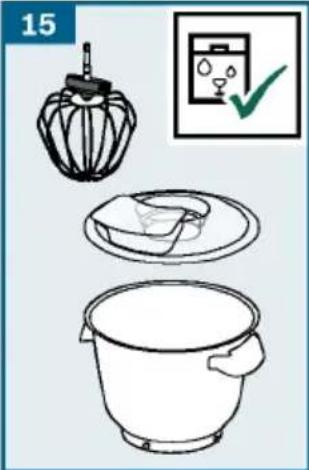
natural_image
Illustration of a kitchen appliance with a lid, plate, and bucket, accompanied by a checkmark icon (no text or symbols)
natural_image
Line drawing of a kitchen mixer with a bowl and lid, labeled 'SCALE' at bottom (no text on the diagram itself)


M
www.bosch-home.com


 |  |  |  | |
 | √ |  |  |  |
 |  |  |  |  |
 |  |  |  |  |
O

natural_image
Line drawing of a kitchen mixer with a hand tool, showing blade rotation and handle mechanism (no text or symbols)
natural_image
Close-up of a Bosch-branded blender with a dough ball inside, showing the interior and side view (no text or symbols visible)
natural_image
Exterior view of a modern kitchen mixer with a stainless steel bowl and control panel (no text or symbols visible)Register your new Bosch now: www.bosch-home.com/welcome

natural_image
Breakfast display with rolled pastries, cream slices, and a dark cake on a wooden table (no text or symbols visible)MUM9... OptiMUM

BOSCH
es Instrucciones de uso
pt Instruções de serviço
el Oδηγίες χρήσης
tr Kullanım kılavuzu
Montar e retirar as ferra
→ Fig. ☐
SensorControl Plus (A) ile:
www.bosch-home.com/tr
www.bosch-yetkiliservisi.com
Bandrol ve Seri No. :
To arrange an engineer visit, to order
spare parts and accessories or for
product advice please visit
www.bosch-home.co.uk
or call Tel.: 0344 892 8979*
*Calls are charged at the basic rate, please check with your telephone service provider for exact charges
GR Greece, Ελλάς
BSH I ki akes S is keves A. B.
Central Branch Service
17 km E. O. Athi non-Lami as
Potamou 20
14564 Kifisia
Unit 1 & 2, 3rd Floor,
North Block, Skyway House,
3 Sham Mong Road
Tai Kok Tsui, Kowloon
Hong Kong
Tel.: 2565 6151
Fax: 2565 6681
mailto:bosch.hk.service@bs
www.bosch-home.cn
HR Hrvatska, Croatia
BSH kućni uređaji d.o.o.
Kneza Branimira 22
10000 Zagreb
Tel.: 01 552 08 88
Fax: 01 640 36 03
www.bosch-home.com/hr
mail to: hi babej el ent es@bsh.
Alkatrészrendelés
Tel.: +361 489 5463
Fax: +361 201 8786
mailto:alkatreszrendeles@bsh.hu
www.bosch-home.com/hu
IE Republic of Irel
BSH Home Appliances Ltd.
Unit F4, Ballymount Drive
Ballymount Industrial Estate
Walkinstown
Dublin 12
Service Requests, Spares and Accessories
Tel.: 01450 2655*
Fax: 01450 2520
www.bosch-home.co.uk
* 0.03 € per minute at peak.
Off peak 0.0088 € per minute.
IL Israek,
C/S/B/ Home Appliance Ltd.
1, Hamasger St.
North Industrial Park
Lod, 7129801
Tel.: 08 9777 222
Fax: 08 9777 245
mailto:csb-serv@csb-ltd.co.il
www.bosch-home.co.il
IN India, Bhārat, भारत
BSH Household Appliances
Mfg. Pvt. Ltd. Arena House, Main Bldg,
2nd Floor,
Plot No. 103, Road No. 12,
MIDC, Andheri East
Mumbai 400 093
Toll Free 1800 266 1880*
www.bosch-home.com/in
* Mo-Sa: 8.00am to 8.00pm
(exclude public holidays)
I S Iceland
Smith & Norland hf.
Noatuni 4
105 Reykjavik
Tel.: 0520 3000
Fax: 0520 3011
www.smi nor.is
IT Italia, Italy
www.bosch-home.com/it
KZ Kazakhstan, Казақстан
IP Turebekov Yerzhan
Nur manovich
Jangeldina str. 15
Shimkent 160018
Tel.: 0252 31 00 06
ma@btsngeyc0mka_kz@mail.ru
LB Lebanon,
Teheni, Hana & Co.
Boulevard Dora 4043 Beyrouth
P. O. Box 90449
Jdeideh, 1202 2040
Tel.: 01 255 211
mail to: Info@Teheni - Hana. co
LT Li et uva, Lithuania
Senuku prekybos centras UAB
Jonavos g. 62
44192 Kaunas
Tel.: 0372 12146
Fax: 0372 12165
www.senukai.lt
UAB "AG Service"
R. Kalantos g. 32
52494 Kaunas
Tel.: 0700 556 55
Fax: 037 331 363
mailto:servisas@agservice
www.agservice.lt
Baltic Continent Ltd.
Lukšio g. 23
09132 Vilnius
Tel.: 05 274 1788
Fax: 05 274 1722
mailto:info@balticcontinent.lt
www.balticcontinent.It
LU Luxembourg
www.bosch-home.com/1u
LV Lat v i j a, Lat v i a
SIA "General Serviss"
Bullu iela 70c
1067 Riga
Tel.: 06742 52 32
mail to: info@serviscentrs.lv
www.serviscentrs.lv
El kor Servi ss
Brivibas gatve 201
1039 Riga
Tel.: 067 070 520; -36
Fax: 067 070 524
mail to: info@el korserviss. lv
www.elkorserviss.lv
Sia Elektronika-Serviss
Tadaiku iela 4
1004 Ri ga
Tel.: 067 717 060
Fax: 067 601 235
mailto:serviss@elektronika.lv
www. elektronika.lv
MD Moldova
S.R.L. "Rialto-Studio"
ул. Щусева 98
2012 Кишинев

F
1

2

natural_image
Line drawing of a kitchen mixer with a hand mixer inside, no text or symbols present


natural_image
Illustration of a microscope with an orange funnel and red arrow indicating a downward motion (no text or symbols)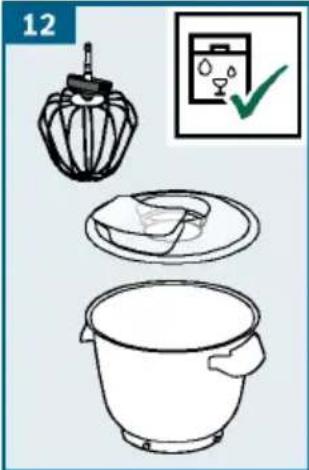
J

3

4
5
6

7

8


natural_image
Line drawing of a kitchen mixer with a green checkmark indicating inspection (no text or symbols)
natural_image
Illustration of kitchen utensils and a bowl with a checkmark icon (no text or symbols)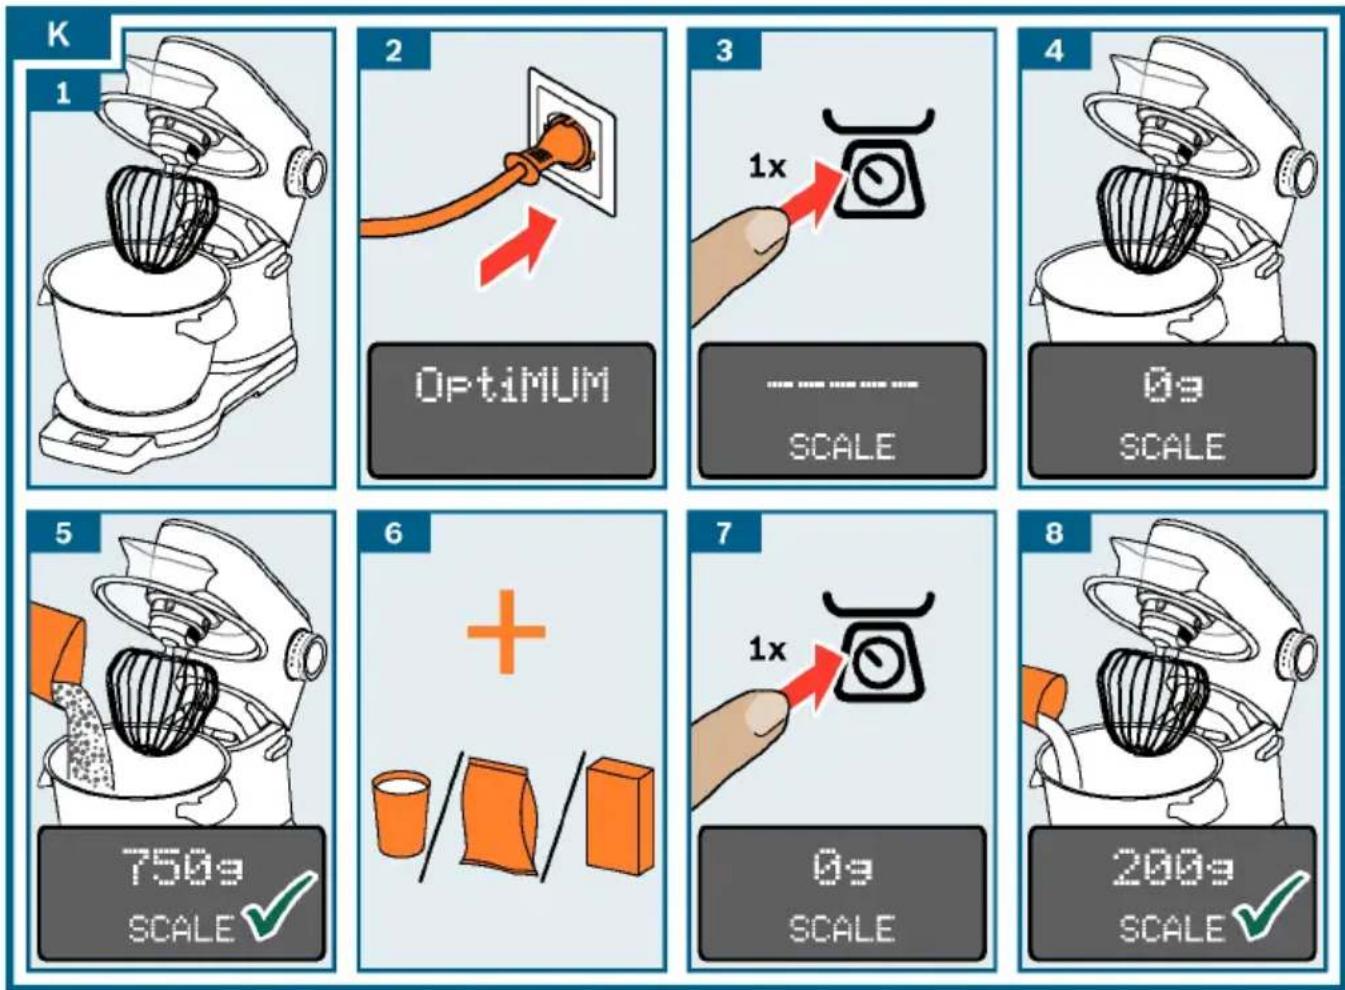


natural_image
Line drawing of a kitchen mixer with a bowl and lid, labeled 'SCALE' at bottom (no text on the diagram itself)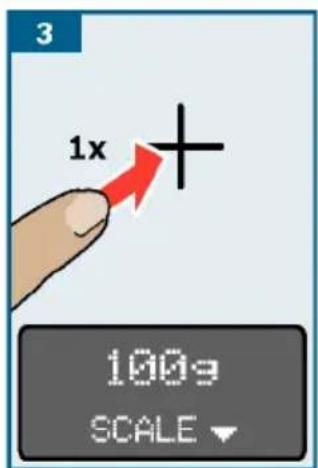


M
www.bosch-home.com

| | | | |
| √ | | | |
| | | | |
| | | | |
natural_image
Line drawing of a kitchen mixer with a hand tool, showing no text or symbols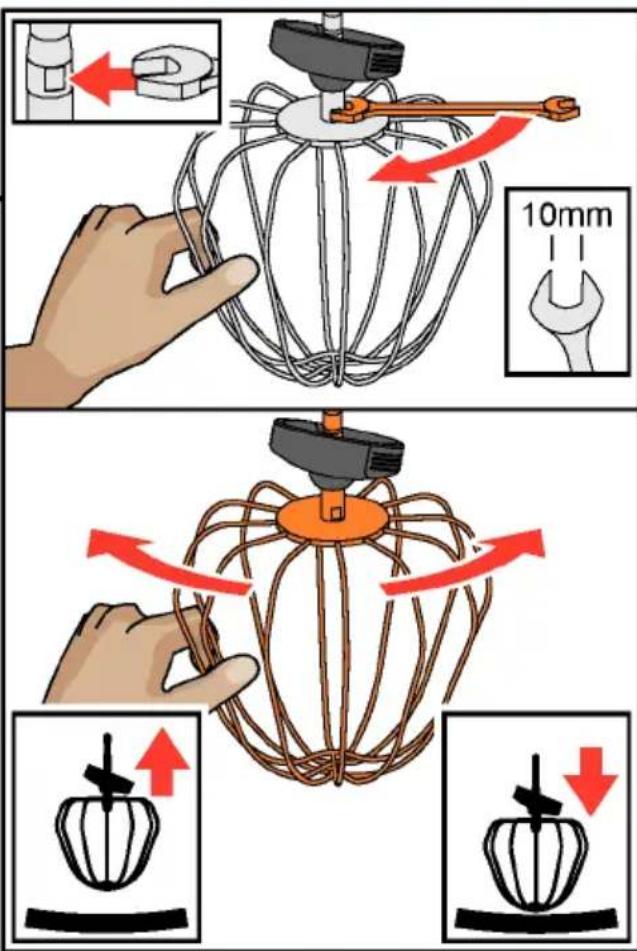
- Important safety information
- ⚠️ Risk of electric shock and fire!
- ⚠️ Risk of injury!
- ⚠️ Risk of suffocation!
- ⚠ Caution!
- ⚠️ Important!
- Congratulations on the purchase of contents
- Before using the appl for each page for the first time
- Parts and operating controls
- Colour coding
- Di s p l ay → Fig. A
- Function buttons → Fig. A
- Rotary switch with illuminated ring
- → Fig. B
- Set t i n g s
- Tools
- Professional flexible beating whisk
- Professional stirring
- Kneading hook
- Re - adjustment of tools
- Swivel arm
- Bowl and cover
- Inserting and removing to
- Safety systems
- Preparation
- Selecting setting
- Using without addition operating the appliance
- functions
- → Image sequence F
- → Image sequence H
- Using the time and timer function
- "TIME" function
- Notes:
- "TIMER" function
- → Image sequence
- Using Sensor Control
- Selecting programme
- Weighing ingredients
- → Image sequence K
- Using accessories
- Cleaning and maintena
- Preparation for accessoriauieson!
- → Fig. M
- Important:
- Egg whites
- Sponge mixture
- Basic recipe
- Cake mixture
- Short crust pastry
- From 500 g flour:
- Bread dough
- Start lock-out
- Re - adjustment of to
- Caution!
- Overload protection I steps I must
- → Image sequence ☐
- Swivel arm protection dev
- Turn anticlockwise:
- Turn clockwise:
- Disposal
- Guarantee
- Troubleshooting
- Accessories
- → Suite de la figure J
- ⚠️ Fare for kvelning!
- Montar e retirar as ferra
- SensorControl Plus (A) ile:
Brand : BOSCH
Model : MUM9YX5S12
Category : Food processor