
MCM5529 - Food processor BOSCH - Free user manual and instructions
Find the device manual for free MCM5529 BOSCH in PDF.


| Product Type | Food Processor |
| Model | MCM5529 |
| Brand | Bosch |
| Dimensions (H x W x D) | 25 x 20 x 35 cm |
| Weight | Approx. 4 kg |
| Power Consumption | 800 W |
| Bowl Capacity | 1.5 L |
| Main Functions | Chopping, Slicing, Shredding, Blending, Kneading |
| Number of Speed Settings | 2 + Pulse |
| Attachments Included | Stainless steel blade, slicing disc, shredding disc, dough hook |
| Safety Features | Safety lock, non-slip feet, overload protection |
| Cleaning | Removable parts dishwasher safe |
| Material | Plastic housing, stainless steel blades |
| Spare Parts Availability | Available from Bosch service centers |
| Warranty | 2 years |
| Certifications | CE, RoHS |
| Color | White/Black |
| Power Cord Length | 1.2 m |
| Storage | Integrated cord storage |
Frequently Asked Questions - MCM5529 BOSCH
User questions about MCM5529 BOSCH
0 question about this device. Answer the ones you know or ask your own.
Ask a new question about this device
Download the instructions for your Food processor in PDF format for free! Find your manual MCM5529 - BOSCH and take your electronic device back in hand. On this page are published all the documents necessary for the use of your device. MCM5529 by BOSCH.
USER MANUAL MCM5529 BOSCH
natural_image
Line drawing of a kitchen blender with handle and side panel (no text or symbols)MCM5529

BOSCH
1 Päckchen Backpulver
150 ml Milch
Congratulations on the purchase of your new BOSCH appliance. In doing so, you have opted for a modern, high-quality domestic appliance. You can find further information about our products on our web page.
This appliance is designed for processing normal household quantities in the home or similar quantities in non-industrial applications. Non-industrial applications include e.g. use in employee kitchens in shops, offices, agricultural and other commercial businesses, as well as use by guests in boarding houses, small hotels and similar dwellings.
Use the appliance for processing normal amounts of food for the household; see also "Recipes and Tips" booklet.
The appliance is maintenance-free.
The Instructions for Use refer to several models. Differences are identified.
Please keep the Instructions for Use in a safe place. If passing on the appliance to a third party, always include the operating instructions.
Use the appliance with original accessories only.
Overview
Please fold out the illustrated pages.
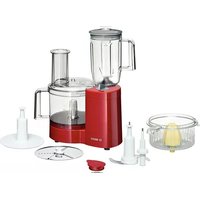
Base unit Fig. A
1 Rotary switch
0/off = Stop
M = Pulse switch
(for maximum speed hold down the rotary switch)
Settings 1-2= Operating speed
Setting 1 = Minimum speed - slow
Setting 2 = Fastest speed - fast
2 Blender drive cover
3 Cord store
Bowl with accessories Figure A
4 Bowl
5 Lid
5a Pusher
5b Pusher insert
Tools Figure B
6a Tool holder
6b Multi-function blade
6c Whipping (beating) disc
6d Disc holder
6e Reversible shredding disc – coarse/fine
6f Reversible slicing disc – thick/thin
6g Grating disc – medium-fine
6h Citrus press
6i Mashing attachment
6j Dicer
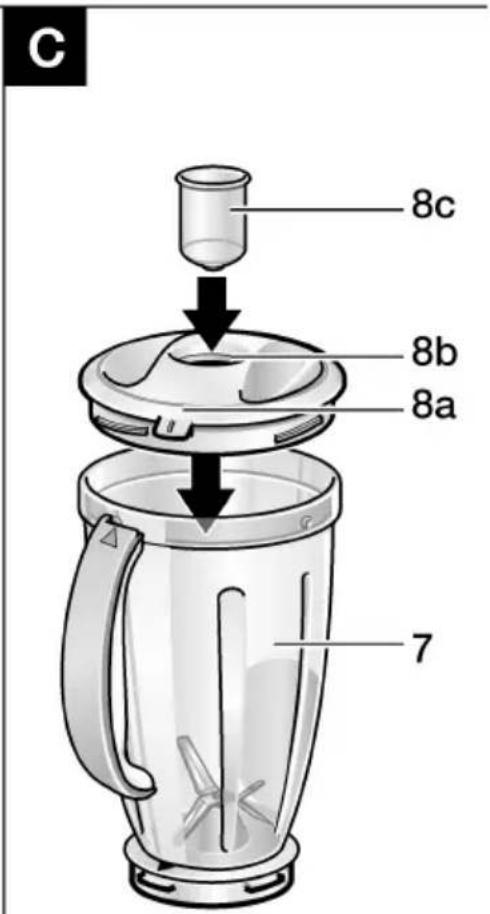
Blender
Figure C
7 Blender jug
8a Lid
8b Feed tube
8c Funnel
Safety Information

Risk of electric shock!
Connect and operate the appliance only in accordance with the specifications on the rating plate.
Do not use if the cord or appliance is damaged.
Keep children away from the appliance. Supervise children to prevent them from playing with the appliance.
Do not allow persons (also children) with restricted physical sensory perception or mental abilities or with lack of experience and knowledge to operate the appliance unless they are supervised or have been instructed in the use of the appliance by somebody who is responsible for their safety. After using the appliance, before cleaning the appliance, if leaving the appliance attended or if the appliance malfunctions, always pull out the plug. Do not pull the cord over sharp edges or hot surfaces.
To prevent injury, repairs such as replacing a damaged cord, should only be carried out by our customer service. If the power is interrupted, the appliance remains switched on and restarts when the power is restored. Change accessories and tools only when the appliance is at a standstill (rotary switch 0/off). Never immerse the base unit in water or place under running water.
Operating the appliance
Before operating the appliance and accessories for the first time, clean thoroughly; see "Cleaning and servicing".
Preparation
- Place the base unit on a smooth, clean surface.
- Pull the cord out of the cord store.
- Insert the mains plug.
en
Bowl with accessories/tools

Risk of injury from the rotating tools!
While the appliance is operating, keepfingers clear of the bowl. Always usethepusher (5a) for adding ingredients. Afterswitching off, the drive continues forashort time. Cage tools only when the appliance is at a standstill. Before using the bowl, always attach the blender drive cover (2) and never the blender jug.
Multi-function blade (6b) Figure D
for cutting, mincing, mixing.

Risk of injury from sharp blades!
Only grip the multi-function blade by the plastic handle.
Whipping disc (6c) Figure D
for cream, egg white, mayonnaise.
- Attach bowl and rotate as far as possible in a clockwise direction. Lug on the bowl must be located fully in the slot in the base unit.
- Inserting tools:
- Insert tool holder into the bowl.
- Place multi-function blade or whisking disc on the tool holder (note position - Fig. D5) and release.

Warning!
-Add ingredients to be processed always after the tool has been inserted.
-Remove blade guard from multi-function (6b) blade before inserting.
- Add ingredients.
- Attach lid with pusher (match arrow on lid to arrow on bowl) and rotate in a clockwise direction.
Lid lug must be located fully in the slot in the base unit.
- Set the rotary switch to the desired setting.
- To add more ingredients, set the rotary switch to 0/off.
- Remove the pusher and add ingredients through the feed tube.
- Add liquids through the pusher. Pusher insert can be used as a measuring jug.

Warning!
The appliance can only be switched on to process food in the bowl, with an attached bowl, a lid which is attached and screwed on tight as well as a blender drive cover which is closed.
Cutting discs Figure E
Shredding reversible disc (6e) – coarse/fine
for shredding fruit, vegetables and cheese, except for hard cheese (e. g. Parmesan).
Slicing reversible disc (6f) - thick/thin
for slicing fruit and vegetables.
Grating disc (6g) – medium-fine
for grating raw potatoes, hard cheese (e.g. Parmesan), cooled chocolate and nuts.
- Putting the discs on.
Turn required slicing/shredding side face up. Place disc onto the disc carrier such that the drive couplings on the disc carrier grip into the disc openings. Disc must rest on the lateral lug of the disc carrier.
● Lightly rotating, attach disc carrier to the drive axle.

Risk of injury from sharp blades!
Do not put fingers in the feed tube. Only use the pusher when adding more ingredients.
- Attach lid with pusher (match arrow on lid to arrow on bowl) and rotate in a clockwise direction. Lid lug must be located fully in the slot in the base unit.
- Fill with contents which are to be sliced or shredded.
Note:
Discs suitable for further purposes are available from dealers, see "Extra accessories".
- Set the rotary switch to the desired setting.
-
When adding contents which are to be sliced or shredded, apply only light pressure to the pusher.
-
To add more ingredients, set the rotary switch to 0/off.
- Remove the pusher and add ingredients through the feed tube.
- Add long and thin contents using the pusher.
Warning!
Empty the bowl before it becomes so full that the cutting or grating contents reach the disc carrier.
After using the appliance
- Set the rotary switch to 0/off.
- Pull out the mains plug.
- Rotate the lid in an anti-clockwise direction and remove.
- Remove tool:
- Take the tool holder together with multi-function blade or whisking disc out of the bowl. Remove multi-function blade or whisking disc from the tool holder.
Apply blade guard, after cleaning multi-function blade.
– Lift the tool holder on the recesses from the bowl. Take out discs.
- Rotate the bowl in an anti-clockwise direction and remove.
- Clean all parts, see "Cleaning and servicing".
Citrus press (6h) Figure F
for pressing the juice out of citrus fruits, e.g. oranges, grapefruits, lemons.
Warning!
Before operating the appliance, close theblender drive cover (2).
- Attach bowl and rotate as far as possible in a clockwise direction.
- Attach the citrus press (Arrow of citrus press must be on the arrow of bowl) and rotate in a clock-wise direction. The lug on the filter basket must be located fully in the slot in the base unit.
- Attach and press on pressing cone.
- To extract juice from the fruit, set the rotary switch to setting 1 and press the fruit onto the pressing cone.
Warning!
Check the level. Empty the bowl before the juice reaches the filter basket.
After using the appliance
- Set the rotary switch to 0/off.
- Pull out the mains plug.
● Unscrew the citrus press and remove the bowl. - Clean all parts, see "Cleaning and servicing".
Mashing attachment Figure G
Mashing attachment for mashing soft/cooked fruit or vegetables:
- Attach bowl and rotate as far as possible in a clockwise direction.
- Attach mashing sieve with mashing flanks.
- Attach the cover and as far as possible in a clockwise direction.
- Set rotary knob to setting 2.
- Remove the pusher and add ingredients through the feed tube.
Warning!
Check the level. Empty the bowl before the juice reaches the filter basket.
Max. quantity: 1000 g
After using the appliance
- Set the rotary switch to 0/off.
- Pull out the mains plug.
- Rotate the lid in an anti-clockwise direction and remove.
● Take mashing attachment out of the bowl. - Rotate the bowl in an anti-clockwise direction and remove.
Dicer Figure I/J
Dicer for cutting food into cube shapes.

Risk of injury from sharp blades/rotating drive!
Never reach into the attached dicer.
The dicer will not work until the lid has been screwed on.
Do not remove/attach the dicer until the drive has stopped.
When disassembling/assembling the dicer, take hold of the slicing disc by the plastic stud in the centre only.

Attention!
Application guidelines!
The dicer is suitable only for dicing potatoes (raw or boiled), carrots, cucumbers, tomatoes, peppers, onions, bananas, apples, pears, strawberries, melons, kiwis, eggs, soft cheese (e.g. Feta, Mozzarella), soft cheese slices (e.g. Emmentaler, Gouda), soft pork sausage (e.g. Mortadella), boiled or fried boneless poultry.
Food must not be frozen.
Before processing fruits which contain pips or stones (apples, peaches, etc.), always remove the pips or stones! Before processing boiled or fried meat, remove the bones.
If these guidelines are not observed, the dicer, including the cutting grid and the rotating blade, may be damaged.
If the dicer is not used as intended, is modified or is used improperly, Robert Bosch Hausgeräte GmbH cannot assume liability for any resulting injuries and/or damage.
Also excluded is the liability for injuries and/or damage (e.g. blunt or deformed blades) which result from the processing of unauthorised food.
Select operating speed according to the food to be diced.
Setting 1: boiled potatoes, potatoes and eggs; soft cheese (feta, mozzarella); cucumbers; bananas; strawberries; melons.
Setting 2: raw potatoes and carrots; soft pork sausage (e.g. Mortadella); soft sliced cheese (e.g. Emmental, Gouda); peppers; tomatoes; onions; apples; kiwi fruit.
Important information:
- Food must not contain any bones, pips or other solid constituents.
- Food must not be frozen.
- Fruit/vegetables should not be too ripe, as the juice may escape.
- Leave cooked food to cool down before dicing it, as it will then be firmer and the dicing result will be better.
- The length of the cubes can be influenced by increasing or reducing the pressure on the pusher.
Assembling the dicer Figure I
- Insert the blade insert into the base holder. Observe recesses!
- Insert the dicing disc into the base holder.
- Press up the 4 catches until they lock into position.
Working with the dicer Figure J
- Attach bowl and rotate as far as possible in a clockwise direction.
- Insert the dicer.
The arrow on the dicer and the arrow on the bowl handle must correspond!
- Attach lid and rotate in a clockwise direction. Lid lug must be located fully in the slot in the base unit.
- Insert the mains plug.
- Turn switch to required setting (1 or 2).
- Place the food to be diced in the filling shaft. If required, apply light pressure to the pusher. If required, chop up food beforehand.
Warning!
Empty the bowl without delay:
-after processing 500g,
—before the cubes have reached the lower edge of the dicer.
Note: While processing different foods according to a recipe, the dicer must be cleaned occasionally.
After using the appliance
- Set the rotary switch to 0/off.
- Pull out the mains plug.
- Rotate the lid in an anti-clockwise direction and remove.
● Take dicer out of the bowl. - Rotate the bowl in an anti-clockwise direction and remove.
- Remove food remnants from the cutting grid using the cutting grid cleaner.
Blender Figure L

Risk of injury from sharp blades/rotating drive!
Never place fingers in the attached blender! Blender will not operate until the lid has been screwed on tight. Do not remove/attach theblender until the drive is at a standstill.

Risk of scalding!
If processing hot liquids, steam escapes through the funnel in the lid. Add a max. 0.5 litres of hot or frothing liquid.
Warning!
Blender may be damaged. Do not process deep-frozen ingredients (except ice cubes). Donot operate when empty.
Blending
Warning!
To operate the blender, the blender lid and bowl must be attached and screwed on tight with the lid. Take the tools out of the bowl!
- Open blender drive cover. Additionally lift rear up and at the front fold up.
- Attach the blender jug (match arrow on the jug to the arrow on the appliance) and rotate as far as possible in a clockwise direction.
- Add ingredients.
Maximum capacity - liquid = 1.5 litres (frothing or hot liquids max. 0.5 litres).
Optial processing capacity - solids = 100 g.
- Attach lid and rotate in a clockwise direction. Lid lug must be located fully in the slot in the blender handle.
- Set the rotary switch to the desired setting.
- To add more ingredients, set the rotary switch to 0/off.
- Remove the lid and add ingredients
or
- remove the funnel and gradually add solid ingredients through the feed tube
or
• pour liquid through the funnel.
After blending
- Set the rotary switch to 0/off.
- Rotate the blender in an anti-clockwise direction and remove.
- Rotate the lid in an anti-clockwise direction and remove.
Tip: It is recommended to clean the blender after use see "Cleaning and servicing".
Cleaning and servicing

Risk of electric shock!
Never immerse the base unit in water orplace under running water.
Warning!
Surfaces may be damaged.
Do NOT use abrasive cleaning agents.
Note: If processing e.g. carrots and red cabbage, the plastic parts will become discoloured by a red film which can be removed with a few drops of cooking oil.
Cleaning the base unit
- Pull out the mains plug.
- Wipe the base unit with a damp cloth. If required, use a little detergent.
- Then dry the base unit.
Cleaning the bowl and accessories

Risk of injury from sharp blades!
Only grip the multi-function blade by the plastic handle.
All parts are dishwasher-safe. Do not wedge plastic parts in the dishwasher as they could warp.
Cleaning the citrus press
All parts are dishwasher-safe. It is recommended to rinse the pressing cone immediately after use on all sides under running water. Doing so prevents residue from drying on.
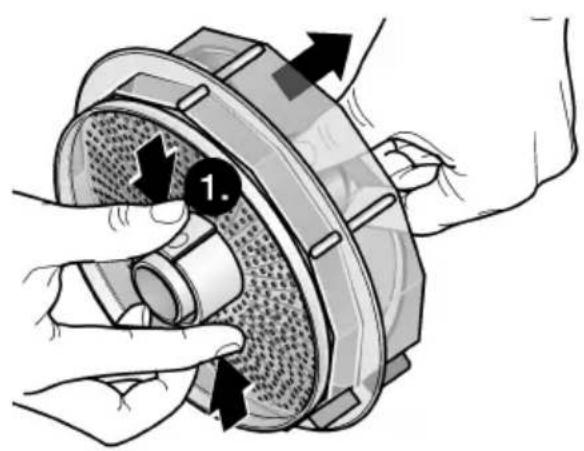
Cleaning the mashing attachment Figure H
Take mashing attachment apart for cleaning. For this, press underneath on the mashing flanks and remove from the mashing sieve.
Cleaning the dicer Figure K
Before cleaning the dicer, disassemble it:
- Press out the 4 catches and remove the dicing disc.
- Remove food remnants from the cutting grid using the cutting grid cleaner.
● Take blade insert out of the base holder. - Pre-rinse all parts under running water. Do not clean the parts in the dishwasher, otherwise the blades will be blunted. Clean parts with a brush.
Cleaning the blender

Risk of injury from sharp blades!
Do not touch blender blades with bare hands. Clean them with a brush.
It is recommended to clean the blender immediately after use. This will prevent residue from drying on and attacking the plastic (e.g. by essential oils in herbs). The blender jug, lid and funnel are dishwasher-safe.
Do not clean the blade insert in the dishwasher, but under running water (do not soak in water).
Tip: Pour a little water and washing-up liquid into the attached blender. Switch on at setting M for several seconds. Pour out the water and rinse the blender with clean water.
Taking the blender apart Figure M
- Upon the flanks, rotate the blade insert in an anti-clockwise direction. If required, make use of the blender lid. The blade insert is released.
● Take blade insert out and remove sealing ring.
Putting the blender together

Risk of injury!
Never assemble blender on the base unit.
- Apply sealing ring on blade insert
- Insert blade insert from below into blender jug
- Firmly screw on the blade insert by the wings in a clockwise direction. Rotate the blade insert at least until a wing covers the mark on the blender jug (position -> Figure M6).
Storing the appliance
- Pull out the mains plug.
- Attach the blender drive cover.
- Attach the bowl.
● Always store the multi-function blade with the blade guard attached. - Stow the cord in the cord store.
Note:
Possibilities for storing can be found in Figure N. Take all accessory parts out of the bowl and/or blender before use. Only insert the parts needed.
Extra accessories – Discs
(available from dealers)
MUZ45PS1 – for slicing French fries (chips) and fruit salad ingredients.
MUZ45AG1 – for slicing Asian style vegetables.
MUZ45RS1 – for shredding potatoes for potato dumplings and fritters.
MUZ45KP1 – for slicing and shredding fruit, vegetables and cheese.
Troubleshooting

Risk of injury!
Before rectifying a fault, pull out the mains plug.
Bowl with accessories
Fault:
Appliance does not start.
Remedial action:
- Attach the bowl (4) and screw on tight as far as possible.
- Attach lid (5) and screw on tight as far as possible.
- Close the blender drive cover (2).
Blender
Fault:
Appliance does not start.
Remedial action:
- Attach the bowl (4) and lid (5) and screw on tight as far as possible.
- Screw the blender (7) on tight as far as possible.
- Attach the blender lid (8a) and screw on tight as far as possible.

Important information
If the fault cannot be eliminated, please contact customer service.
Disposal
This appliance has been identified in accordance with the European directive 2002/96/EG on Waste Electrical and Electronic Equipment – WEEE. The Directive paves the way for effective EU-wide withdrawal and utilization of waste appliances.
Please ask your dealer or inquire at your local authority about current means of disposal.
Dispose of old batteries at public collection centres or return to your dealer.
Guarantee
The guarantee conditions for this appliance are as defined by our representative in the country in which it is sold. Details regarding these conditions can be obtained from the dealer from whom the appliance was purchased.
The bill of sale or receipt must be produced when making any claim under the terms of this guarantee.
Recipes and tips
Tips
Multi-function blade
Cutting

Herbs (except chives), 10–50 g
- Cut up in a dry bowl at setting 2.
Garlic, max. 500 g
- Cut up at setting M.
Onions, max. 500 g
• Quarter the onions.
• Cut up at setting M.
Vegetables or potatoes, raw, 100–500 g
- Cut the vegetables into pieces.
- Cut up several times for 2 seconds each at setting M.
Nuts or almonds 100–500 g
- Cut up at setting 2.
Hard cheese (e.g. Parmesan) 100–500 g
- Cut up at setting 2.
Bread rolls, hard 1–6
• Quarter the bread rolls.
- Cut up at setting 2.
Meat or liver 50–500 g
- Remove gristle, bone, skin and sinew from the meat.
- Cut the meat into pieces.
- Cut up at setting 2.
- Process the meat with herbs for sausage meat, stuffing and pâté.
Puréeing and blending

Fruit or vegetables, max. 500 g
● Purée fruit or vegetables with spices at setting 2.
- If required, add liquid and continue processing.
Whipping (beating) disc

Beating
Beaten egg white, 2–6 egg whites
- Beat at setting 2.
● Fold in beaten egg white at setting 1.
Whipped cream, 200–600 g
- Beat at setting 1.
- Fold in whipped cream at setting 1.
Slicing reversible disc

Slicing
Vegetables, max. 500 g
- First allow boiled vegetables to cool down.
- Slice at setting 1 or setting 2.
Shredding reversible disc

for shredding fruit, vegetables and cheese, except for hard cheese (e. g. Parmesan), max. 500 g
- Slice and shred at setting 1 or setting 2.
Citrus press

Extracting juice
Citrus fruit, max. 1000 g
- Squeeze juice out at setting 1 or 2.
Mashing attachment

Mashing
Fruit or vegetables (the stones have to be taken out of stoned fruit) raw, soft, ripe fruit (e.g. tomatoes, grapes, berries); max 1000 g
- Slice fruit/vegetables into pieces.
- If required cook fruit/vegetables until tender and strain at setting 2 preferably while still hot.
Note: Whilst stirring, bring fruit for making jams (berries without stems) to the boil without fluid, then mash.
Dicer

To dice food for use in salads, soups, sauces or as a side dish.
Recipes
Baking

Sponge mixture
Basic recipe (e.g. ∅ 26 cm sponge form tin)
3 eggs
3–4 tbs. hot water
150 g sugar
1 packet of vanilla sugar
150 g flour
50 g cornflour
1 tsp. baking powder
- Mix ingredients for 2 minutes at setting 1.
- Mix flour, cornflour and baking powder.
- Switch appliance to setting 1 and add the flour mixture through the feed tube.
- Do not mix for longer than 12 - 1 minute.
Base for fruit flan
Basic recipe
3 eggs
175 g sugar
175 g ground hazel nuts
75 g breadcrumbs
- Beat eggs and sugar for 2 minutes at setting 1 until a froth forms.
- Switch appliance to setting 1, add hazelnuts and breadcrumbs through the feed tube.
- Mix only briefly.
Plaited bun
Basic recipe
500 g flour
25 g yeast or 1 packet dried yeast
210–220 ml warm milk
1 egg
1 pinch of salt
80 g sugar
60 g melted, cooled fat
Graded rind of half a lemon
- Knead ingredients briefly at setting 1, and then for 1–2 minutes at setting 2.
Maximum quantity: 1 12 x basic recipe
Tips:
- Process ingredients such as candied lemon peel, candied orange peel etc., which are not able to be cut, by hand.
- Use up to 750 g flour for heavy and medium dough.
- Use up to 500 g flour for light dough.
Pizza dough
Basic recipe
250 g flour
10–15 yeast or 1/2 packet dried yeast
12 tsp. sugar
1 pinch of salt
2 tsb. oil
125–150 ml warm water
- Knead ingredients briefly at setting 1, and then for 1–2 minutes at setting 2.
Maximum quantity: 3 x basic recipe
Viennese strudel dough
Basic recipe
250 g flour
1 pinch of salt
3 tsb. oil
1 tsb. vinegar
125 g warm water




- Knead ingredients briefly at setting 1, then 2 minutes at setting 2.
- Brush dough balls with oil and leave to rest under a warm bowl for approx. 30 minutes. then, process further as usual
Maximum quantity: 2 x basic recipe
Cake mixture
Basic recipe
500 g flour
250 g butter or margarine (room temperature)
4 eggs
250 g sugar
1 packet of vanilla sugar
1 packet of baking powder
150 ml milk
- Process ingredients for approx. 1–3 minutes at setting 2.
Beverages
Orange mix cocktail
12 I. orange juice (6 oranges)
2–4 tsb. lemon juice (1 lemon)
300 g canned apricots
10 ice cubes
4 tsp. sugar or honey
- Cut the oranges and lemon into pieces and press out juice with the citrus press.
- Add juice, apricots and ice cubes to the blender and blend for 30 minutes at setting 2.
- Add sugar and honey to taste.
- Serve ice cold
Chocolate-milk
(Maximum quantity)
100 g chocolate
400 ml hot milk
- Cut up the chocolate at setting 2.
- Add hot milk and blend
Salads
"Olivie" salad
(for approx. 4 persons)
4 boiled, cooled potatoes
2 boiled carrots
4 hard-boiled eggs
200 g cooked chicken breast
1–2 pickled gherkins or marinaded cucumbers
1–2 cucumbers
300 g petits pois (1 small tin)
Salt and pepper
250 g Mayonnaise


- Dice the boiled, but already cooled potatoes, the carrots and the eggs on setting 1. Dice the cucumbers and the meat on setting 2.
- Mix all diced ingredients in a salad bowl with the peas.
- Season to taste with salt and pepper.
● Mix with mayonnaise and serve
"Vinaigrette" salad

(for approx. 4 persons)
4 boiled, cooled potatoes
500 g cooked beetroot
2 boiled carrots
2 pickled gherkins
100 g petits pois
12 leek (approx. 50 g)
Salt and pepper
100 ml cooking oil
● Dice the boiled, but already cooled potatoes, the carrots, the beetroot and the leek on setting 1. Dice pickled gherkins on setting 2.
- Mix all diced ingredients in a salad bowl with the peas.
- Season to taste with salt and pepper.
- Dress with edible oil.
"Stolichny" salad

(serves 2)
150 g ham
3 boiled, cooled potatoes
2 pickled gherkins or marinaded cucumbers
1 boiled carrot
Peas, half a can
Salt and pepper
Dressing:
14 carton of sour cream
14 glass mayonnaise
● Dice the boiled, but already cooled potatoes and the carrot on setting 1. Dice the ham and the cucumbers on setting 2.
- Mix all diced ingredients in a salad bowl with the peas.
- Season to taste with salt and pepper.
- Mix all ingredients. Dress with sour cream and mayonnaise.
Crab salad

(for approx. 4 persons)
300 g cooked meat
300 g boiled, cooled potatoes
200 g cucumbers
Green salad
50 g crab meat
3 hard-boiled eggs
150 g Mayonnaise
- Dice the boiled, but already cooled potatoes, the eggs, the cucumbers and the crab meat on setting 1. Dice the cooked meat on setting 2.
● Finely chop the green salad. - Season to taste with salt and pepper.
● Dress with mayonnaise.
Raw vegetable salad
(serves 2–4)
4 carrots
1 kohlrabi
1 apple
1 courgette
1 cucumber
14 cauliflower
100 g fresh cheese
Yoghurt dressing
100 g yoghurt
100 g sour cream
1 clove of garlic
1 tsb. ketchup
1 pinch of salt
1 pinch of sugar
3 tsb. vinegar
- Clean the carrots under running water with a coarse brush and shred with the shredding reversible disc.
- Peel the kohlrabi, cut into thick slices and shred with the shredding reversible disc.
- Wash and quarter the apple, shred with the shredding reversible disc.
- Wash the courgette and cucumber, cut lengthways and slice with the slicing reversible disc.
- Wash the cauliflower and divide into small florets.
● Process the ingredients for the dressing in the blender and dress the salad. - Arrange the salad on plates and sprinkle the fresh cheese over.
Soups and Sauces
Cream of cauliflower soup
(starter, serves 4)
1 large cauliflower (approx 1 kg)
2–3 tsb. butter
400 ml vegetable stock
400 ml water
200 ml cream
Salt, nutmeg
1egg yolk
Chervil
- Wash cauliflower and divide into florets just above the stems.

en
- Froth up butter on the cooker, brown cauliflower in it whilst stirring.
- Add the vegetable stock to it, add water and half of the cream.
- Bring soup to the boil and with the lid on, boil the cauliflower for 10 minutes until soft at a low setting.
- Mash the soup.
- Add salt and nutmeg to taste, simmer for another 10 minutes.
- Mix the egg yolk with the rest of the cream and fold into the soup. Do not allow to boil any longer.
● Garnish with chervil.
Tip: Following this receipe, broccoli can also be made into a soup.
"Okroshka" soup

(serves 4–6)
Kvass, 2 litres
300 g cooked sausage or chicken breast
3–4 boiled, cooled potatoes
3–4 hard-boiled eggs
1 bunch of radishes (8–10)
3 cucumbers
12 leek (approx. 50 g)
Parsley and dill
3 tbsp. sour cream
mustard, sugar
- Dice the boiled, but already cooled potatoes and the eggs on setting 1. Dice the cucumbers, the radishes, the sausage or the chicken breast on setting 2.
- Thoroughly mix sour cream, chopped leek and the eggs with mustard and sugar and dilute with a little kvass.
- Add the diced ingredients, chopped parsley and dill.
- Season to taste with salt and pepper.
Tomato sauce
(serves 2)
500 g soft tomatoes
1 onion
30 g fat
2 tbsp. tomato pulp
2 tsb. flour
salt
white pepper
1 tsb. sugar
1 tsb. vinegar
100–150 ml warm water

- Wash tomatoes, cut into quarters and mash.
- Peel onion and chop into small pieces.
- Brown chopped onion in fat, add mashed tomato and sear for a short period of time, dust with flour and mix.
- Add tomato pulp and water and bring to the boil whilst stirring.
- Season sauce and boil for 30 minutes at a low heat.
- Season to taste.
Mayonnaise

Basic recipe
1 egg
1 tsp. mustard
1 tsb. vinegar or lemon juice
1 pinch of salt
1 pinch of sugar
180 ml oil
Ingredients must be at the same temperature.
- Mix ingredients (except oil) for several seconds at setting 1.
- Switch appliance to setting 2, slowly pour the oil through the funnel and blend until the mayonnaise emulsifies.
Maximum quantity: 2 x basic recipe
Tip: Egg yolk mayonnaise can be prepared easily with the whipping (beating) disc.
Only the egg yolk is used instead of the whole egg.
Desserts
Strawberry sorbet

(serves 2–4)
250 g frozen strawberries
100 g icing sugar
150 ml cream
- Mix ingredients at setting 2 until a creamy ice forms.
Tip: This recipe can be used to make sorbet from other fruits, e.g. raspberries, bilberries and blackcurrants.
Honey bread spread

40 g butter (from refrigerator)
210 g honey (from refrigerator)
- Divide up butter into small pieces and with the honey add to the blender.
- Switch appliance to setting 2 for approx. 30 seconds.
Spuma de albuş, 2–6 albuşuri
Se bate la treapta 2.
- Amestecarea spumei de albuș se face la treapta 1.
Frişcă, 200-600 g
HEATHERTON, Victoria 3202
Tel.: 1300 368 339
Fax: 1300 306 818
valid only in AUS
mailto:bshau-as@bshg.com
www.bosch-home.com.au
BA Bosna i Hercegovina, Bosnia-Herzegovina
"HIGH" d.o.o.
Odobašina 57
71000 Sarajewo
Info-Line: 061 100 905
Fax: 033 213 513
mailto:delicnanda@hotmail.com
Bosch Hvidevareservice
Telegrafvej 4
2750 Ballerup
Tel.: 44 89 89 85
Fax: 44 89 89 86
mailto:BSH-Service.dk@
BSHG.com
www.bosch-home.dk
EE Eesti, Estonia
SIMSON OÜ
Raua 55
10152 Tallinn
Tel.: 0627 8730
Fax: 0627 8733
mailto:teenindus@simson.ee
ES España, Spain
BSH Electrodomésticos
España S.A.
To arrange an engineer visit, to order spare parts and accessories or for product advice please visit www.bosch-home.co.uk or call
*Calls from a BT landline will be charged at up to 3 pence per minute. A call set-up fee of up to 6 pence may apply.
GR Greece, Ελλάς
BSH Ikiakes Siskeves A.B.E.
Central Branch Services
17 km E.O. Athinon-Lamias &
Potamou 20
145 64 Kifisia
Greece – Athens
Tel.: 2104 277 701
Fax: 2104 277 669
North-Greece – Thessaloniki
Tel.: 2310 497 200
Fax: 2310 497 220
South-Greece – Heraklion/Kreta
Tel.: 2810 325 403
Fax: 2810 324 585
Central-Greece – Patras
Tel.: 2610 330 478
Fax: 2610 331 832
mailto:cs_gr_helpdesk@bshg.com
www.bosch-home.gr
HK Hong Kong, 香港
BSH Home Appliances Limited
Unit 1 & 2, 3rd Floor
North Block, Skyway House
3 Sham Mong Road
Tai Kok Tsui, Kowloon
Hong Kong
Tel.: 2565 6151
Fax: 2565 6252
mailto:bshhkg.service@bshg.com
HR Hrvatska, Croatia
Andabaka d.o.o.
Gunduliceva 10
21000 Split
Info-Line: 021 481 403
Info-Fax: 021 481 402
mailto:servis@andabaka.hr
IE Republic of Ireland
BSH Home Appliances Ltd.
Unit F4, Ballymount Drive
Ballymount Industrial Estate
Walkinstown
Dublin 12
Service Requests,
Spares and Accessories
Tel.: 01450 2655
Fax: 01450 2520
www.bosch-home.cu.uk
IL Israel,
C/S/B Home Appliance Ltd.
Uliel Building
2, Hamelacha St.
Industrial Park North
71293 Lod
Tel.: 08 9777 222
Fax: 08 9777 245
mailto:csb-serv@zahav.net.il
IS Iceland
Smith & Norland hf.
Noatuni 4
105 Reykjavik
Tel.: 0520 3000
Fax: 0520 3011
www.sminor.is
IT Italia, Italy
LT Lietuva, Lithuania
Senuku prekybos centras UAB
Jonavos g. 62
44192 Kaunas
Tel.: 0372 12146
Fax: 0372 12165
www.senukai.lt
LU Luxembourg
Unit F 2, 4 Orbit Drive
Mairangi BAY
Auckland 0632
Tel.: 09 477 0492
Fax: 09 477 2647
mailto:bshnz-cs@bshg.com
www.bosch-home.co.nz
PL Polska, Poland
Union Industrial Building
Block A, #01-03
577177 Singapore
Tel.: 6751 5000
Fax: 6751 5005
mailto:bshsgp.service@bshg.com
SI Slovenija, Slovenia
BSH Hišni aparati d.o.o.
Litostrojska 48
1000 Ljubljana
Tel.: 01 583 08 87
Fax: 01 583 08 89
Chung Hsiao E. Road, Sec. 1
Taipei ROC 100
Tel.: 02 5556 2556
Fax: 02 5556 1235
www.boschappliance.com.tw
UA Ukraine, Україна
15th Road Randjespark
Private Bag X36, Randjespark
1685 Midrand – Johannesburg
Tel.: 086 002 6724
Fax: 0866 171 780
mailto:applianceserviceza@
bshg.com
www.bosch-home.com
bosch-infoteam@bshg.com

flowchart
graph TD
    A["6a"] --> B["6b"]
    A --> C["6c"]
    A --> D["6d"]
    A --> E["6f"]
    A --> F["6g"]
    A --> G["6h"]
    A --> H["6i"]
    A --> I["6j"]

flowchart
graph TD
    A["Step 1: Cutting into kitchen bowl"] --> B["Step 2: Stopping with hand gesture"]
    B --> C["Step 3: Stopping with water dispenser"]
    C --> D["Step 4: Stopping with kitchen mixer"]
    D --> E["Step 5: Stopping with kitchen sink"]
    E --> F["Step 6: Stopping with bag and cup"]
    F --> G["Step 7: Stopping with container"]
    G --> H["Step 8: Stopping with hand press"]
    H --> I["Step 9: Stopping with bottle and cup"]
    I --> J["Step 10: Stopping with hand valve"]
    J --> K["Step 11: Stopping with electrical outlet"]
    K --> L["Step 12: Stopping with valve and cup"]
    L --> M["Step 13: Stopping with bag and cup"]

flowchart
graph TD
    A["1: Washing Machine"] --> B["2: Discharge"]
    B --> C["3: Covering Plate"]
    C --> D["4: Stopping Box"]
    D --> E["5: Finishing Bottle"]
    E --> F["6: Discharge & Seal"]
    F --> G["7: Washing Machine"]
    G --> H["8: Refrigerator & Washer"]
    H --> I["9: Discharge & Seal"]
    style A fill:#f9f,stroke:#333
    style B fill:#ccf,stroke:#333
    style C fill:#cfc,stroke:#333
    style D fill:#fcc,stroke:#333
    style E fill:#cff,stroke:#333
    style F fill:#ffc,stroke:#333
    style G fill:#cfc,stroke:#333
    style H fill:#fcc,stroke:#333
    style I fill:#ffc,stroke:#333

flowchart
graph TD
    A["1: Heating Pan"] --> B["2: Brushing"]
    B --> C["3: Hand Stipa"]
    C --> D["4: Power Switch"]
    D --> E["5: Control Valve"]

flowchart
graph TD
    A["1: Stacking a brush or cup"] --> B["2: Stopping a bowl or container"]
    B --> C["3: Stopping a spoon or plate with a handle"]
    C --> D["4: Stopping a cup or container"]
    D --> E["5: Stopping a cylindrical tube or stand"]
    E --> F["6: Stopping a plastic tube or bulb"]
    F --> G["7: Stopping a hand holding a cloth or paper"]
    G --> H["8: Stopping a hand holding a cloth or paper with a brush or knob"]
    H --> I["9: Stopping a hand holding a cloth or paper with a handle or knob"]
    I --> J["0: Off switch M/1/2/3/4/5/6/7/8/9/10/11/12/13/14/15/16/17/18/19/20/21/22/23/24/25/26/27/28/29/30/31/32/33/34/35/36/37/38/39/40/41/42/43/44/45/46/47/48/49/50/51/52/53/54/55/56/57/58/59/60/61/62/63/64/65/66/67/68/69/70/71/72/73/74/75/76/77/78/79/80/81/82/83/84/85/86/87/88/89/90/91/92/93/94/95/96/97/98/99/100"]
H
natural_image
Illustration of hands assembling a mechanical component with arrows indicating motion (no text or symbols)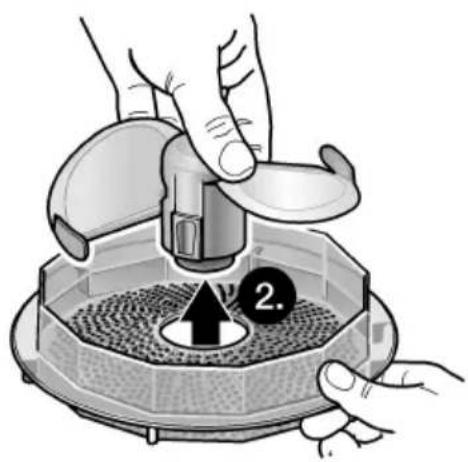
natural_image
Illustration of hands using a mechanical device to press or install a component, with no visible text or symbols.


flowchart
graph TD
    A["1. Hand holding cup"] --> B["2. Stopping cup"]
    B --> C["3. Hand holding cup with teapot"]
    C --> D["4. Stopping cup with food bag"]
    D --> E["5. Cover cup with meat and sauce"]
    E --> F["6. Stopping cup with hand tool and plate"]
    F --> G["7. Presser holding cup with cloth, 0/0 off press"]
    G --> H["8. Cover cup with hand tool, 1/2 press"]
    H --> I["9. Stopping cup with cloth, 2/3 press"]
    I --> J["10. Cover cup with hand tool, 3/4 press"]
    J --> K["11. Stopping cup with cloth, 4/5 press"]
    K --> L["12. Cover cup with hand tool, 5/6 press"]
    L --> M["13. Stopping cup with cloth, 6/7 press"]
    M --> N["14. Cover cup with hand tool, 7/8 press"]
    N --> O["15. Stopping cup with cloth, 8/9 press"]
    O --> P["16. Cover cup with hand tool, 9/10 press"]
    P --> Q["17. Stopping cup with cloth, 10/11 press"]
    Q --> R["18. Cover cup with hand tool, 11/12 press"]
    R --> S["19. Stopping cup with cloth, 12/13 press"]
    S --> T["20. Cover cup with hand tool, 13/14 press"]
    T --> U["21. Stopping cup with cloth, 14/15 press"]
    U --> V["22. Cover cup with hand tool, 16/16 press"]
    V --> W["23. Stopping cup with cloth, 17/17 press"]
    W --> X["24. Cover cup with hand tool, 18/18 press"]
    X --> Y["25. Stopping cup with cloth, 19/19 press"]
    Y --> Z["26. Cover cup with hand tool, 20/20 press"]

flowchart
graph TD
    A["Feeder with a plastic cup"] --> B["Add a lid"]
    B --> C["Cut into a bowl with lid"]
    C --> D["Divine into a tray with lid"]
    D --> E["Cleaning with a brush and spoon"]
    E --> F["Heating with a plate and spoon"]
    F --> G["Cleaning with a cloth and spoon"]
    G --> H["Cleaning with a baking pan and spoon"]
    H --> I["Cleaning with a baking pan and spoon"]
    I --> J["Cleaning with a baking pan and spoon"]
    J --> K["Cleaning with a baking pan and spoon"]
    K --> L["Cleaning with a baking pan and spoon"]
    L --> M["Cleaning with a baking pan and spoon"]
    M --> N["Cleaning with a baking pan and spoon"]
    N --> O["Cleaning with a baking pan and spoon"]
    O --> P["Cleaning with a baking pan and spoon"]
    P --> Q["Cleaning with a baking pan and spoon"]
    Q --> R["Cleaning with a baking pan and spoon"]
    R --> S["Cleaning with a baking pan and spoon"]



- Overview
- Please fold out the illustrated pages.
- Base unit Fig. A
- Rotary switch
- Bowl with accessories Figure A
- Tools Figure B
- Blender
- Figure C
- Safety Information
- Risk of electric shock!
- Operating the appliance
- Preparation
- Bowl with accessories/tools
- Risk of injury from the rotating tools!
- Multi-function blade (6b) Figure D
- Risk of injury from sharp blades!
- Whipping disc (6c) Figure D
- Warning!
- Cutting discs Figure E
- Shredding reversible disc (6e) – coarse/fine
- Slicing reversible disc (6f) - thick/thin
- Grating disc (6g) – medium-fine
- Note:
- After using the appliance
- Apply blade guard, after cleaning multi-function blade.
- Citrus press (6h) Figure F
- Mashing attachment Figure G
- Dicer Figure I/J
- Risk of injury from sharp blades/rotating drive!
- Attention!
- Application guidelines!
- Important information:
- Assembling the dicer Figure I
- Working with the dicer Figure J
- Blender Figure L
- Risk of scalding!
- Blending
- After blending
- Cleaning and servicing
- Cleaning the base unit
- Cleaning the bowl and accessories
- Cleaning the citrus press
- Cleaning the mashing attachment Figure H
- Cleaning the dicer Figure K
- Cleaning the blender
- Taking the blender apart Figure M
- Putting the blender together
- Risk of injury!
- Storing the appliance
- Extra accessories – Discs
- Troubleshooting
- Bowl with accessories
- Fault:
- Remedial action:
- Important information
- Disposal
- Guarantee
- Recipes and tips
- Tips
- Multi-function blade
- Cutting
- Puréeing and blending
- Whipping (beating) disc
- Beating
- Slicing reversible disc
- Slicing
- Shredding reversible disc
- Citrus press
- Extracting juice
- Mashing attachment
- Mashing
- Dicer
- Recipes
- Baking
- Sponge mixture
- Base for fruit flan
- Basic recipe
- Plaited bun
- Tips:
- Pizza dough
- Viennese strudel dough
- Cake mixture
- Beverages
- Orange mix cocktail
- Chocolate-milk
- Salads
- "Olivie" salad
- "Vinaigrette" salad
- "Stolichny" salad
- Crab salad
- Raw vegetable salad
- Yoghurt dressing
- Soups and Sauces
- Cream of cauliflower soup
- en
- "Okroshka" soup
- Tomato sauce
- Mayonnaise
- Desserts
- Strawberry sorbet
- Honey bread spread
- BA Bosna i Hercegovina, Bosnia-Herzegovina
- EE Eesti, Estonia
- ES España, Spain
- GR Greece, Ελλάς
- HK Hong Kong, 香港
- HR Hrvatska, Croatia
- IE Republic of Ireland
- IL Israel,
- IS Iceland
- IT Italia, Italy
- LT Lietuva, Lithuania
- LU Luxembourg
- PL Polska, Poland
- SI Slovenija, Slovenia
- UA Ukraine, Україна
Brand : BOSCH
Model : MCM5529
Category : Food processor