
VN-850PC - Dictaphone OLYMPUS - Free user manual and instructions
Find the device manual for free VN-850PC OLYMPUS in PDF.
User questions about VN-850PC OLYMPUS
0 question about this device. Answer the ones you know or ask your own.
Ask a new question about this device
Download the instructions for your Dictaphone in PDF format for free! Find your manual VN-850PC - OLYMPUS and take your electronic device back in hand. On this page are published all the documents necessary for the use of your device. VN-850PC by OLYMPUS.
USER MANUAL VN-850PC OLYMPUS
Thank you for purchasing an Olympus Digital Voice Recorder. Please read these instructions for information about using the product correctly and safely. Keep the instructions handy for future reference. To ensure successful recordings, we recommend that you test the record function and volume before use.
Dékujeme, ze ici zakoubi pétidini diktafon Olympus. Informe o spravémne a bezechépounvá töhoto produktu nalezte v têchto polyněk k pōtuit. Uschejote si je pro budociu pôtzii. Àby sho nahravú uspéchéne, doporućujeme před pôztumil diktafon otstevost knoefi harnávo u rovenh hlastosti.
refer to the complete advanced manual either from the stored data in the [OL_manual] folder of the recorder or download the data from the OLYMPUS website.
- The contents of this document may be changed in the future without advanced notice. Contact our Customer Support Center for the latest information relating to product names and model numbers.
- The screen and recorder illustrations shown in this manual were produced during the development stages and may differ from the actual product. The utmost care has been taken to ensure the integrity of the contents of this document. In the unlikely event that a questionable item, error, or omission is found, please contact our Customer Support Center.
- Any liability for passive damages or damage of any kind occurred due to data loss incurred by a defect of the product, repair performed by the third party other than Olympus or an Olympus authorized service station, or any other reason is excluded.
Trademarks and registered trademarks:
- IBM and PC/AT are the trademarks or registered trademarks of International Business Machines Corporation.
- Microsoft, Windows and Windows Media are registered trademarks of Microsoft Corporation.
- Macintosh is a trademark of Apple Inc.
Other product and brand names mentioned herein may be the trademarks or registered trademarks of their respective owner.
Safety precautions
Before using your new recorder, read this manual carefully to ensure that you know how to operate it safely and correctly. Keep this manual in an easily accessible location for future reference.
The warning symbols indicate important safety related information. To protect yourself and others from personal injury or damage to property, it is essential that you always read the warnings and information provided.
General precautions
- Do not leave the recorder in hot, humid locations such as inside a closed automobile under direct sunlight or on the beach in the summer.
- Do not store the recorder in places exposed to excessive moisture or dust.
- Do not use organic solvents such as alcohol and lacquer thinner to clean the unit.
- Do not place the recorder on top of or near electric appliances such as TVs or refrigerators.
- Avoid recording or playing back near cellular phones or other wireless equipment, as they may cause interference and noise. If you experience noise, move to another place, or move the recorder further away from such equipment.
- Avoid sand or dirt. These can cause irreparable damage.
- Avoid strong vibrations or shocks.
- Do not disassemble, repair or modify the unit yourself.
- Do not operate the unit while operating a vehicle (such as a bicycle, motorcycle, or go-cart).
- Keep the unit out of the reach of children.
Warning regarding data loss:
Recorded content in memory may be destroyed or erased by operating mistakes, unit malfunction, or during repair work.
It is recommended to back up and save important content to other media such as a computer hard disk.
Any liability for passive damages or damage of any kind occurred due to data loss incurred by a defect of the product, repair performed by the third party other than Olympus or an Olympus authorized service station, or any other reasons is excluded from the Olympus's liability.
Batteries
Danger:
- Batteries should never be exposed to flame, heated, short-circuited or disassembled.
- Never store batteries where they will be exposed to direct sunlight, or subjected to high temperatures in a hot vehicle, near a heat source, etc.
Warning:
- Do not solder lead wires or terminals directly onto a battery or modify it.
- Do not connect the and terminals together. This may cause fire, overheating or electric shock.
- When carrying or storing the batteries, be sure to put it in the provided case to protect its terminals. Do not carry or store the batteries with any metal objects (such as key rings).
If this warning is not followed, fire, overheating or electric shock may occur.
- Do not connect the batteries directly to a power outlet or a cigarette lighter of an automobile.
- Do not insert the batteries with their and terminals reversed.
- If any liquid from a battery gets into your eyes, promptly wash it off with clean water and consult your doctor at once.
- Do not attempt to recharge alkaline, lithium or any other non-rechargeable batteries.
- Never use any batteries with a torn or cracked outer cover.
- Keep batteries out of the reach of children.
- If you notice anything unusual when using this product such as abnormal noise, heat, smoke, or a burning odor:
1 remove the batteries immediately while being careful not to burn yourself, and;
2 call your dealer or local Olympus representative for service.
- Do not expose the batteries to water. Do not allow water to contact the terminals.
- Do not remove or damage the batteries insulating sheet.
- Do not use the batteries if you find something wrong with them such as leakage, color change or deformity.
- Unplug the charger if the charging is still incomplete after the specified time it should take.
- Should any batteries liquid get on skin or clothing, promptly wash it off with clean water.
- Keep batteries away from fire.
Caution:
- Do not subject batteries to strong shocks.
- When using rechargeable batteries that have not been used for a while, be sure to recharge them before use.
- Rechargeable batteries have limited lifetime. When the operating time becomes shorter even if the rechargeable battery is fully charged under the specified condition, replace it with a new one.
Getting started
Identification of parts
① EAR (Earphone) jack
② MIC (Microphone) jack
③ Built-in microphone
④ Recording indicator light
⑤ Built-in speaker
⑥ + button
⑦ REC(●)(Record) button
⑧ button
(9) FOLDER/INDEX/SCENE button
10 - button
ERASE button
12 OK/MENU button
13 1 button
14 STOP (■) button
15 Display (LCD panel)
16 POWER/HOLD switch
⑰ USB connector
18 Battery cover
⑲ Straphole
Display (LCD panel)
A: When the [Font Size] is set to [Large]
B): When the [Font Size] is set to [Small]
① Current file number/Total number of recorded files in the folder
② Folder indicator
③ Recorder status indicator
④ During recording mode: Elapsed recording time During playback mode: Elapsed playback time
5 [H] Microphone Sensitivity indicator [VCVF] VCVA indicator Low Cut Filter indicator
⑥ File lock indicator
⑦ Battery indicator
⑧ Recording mode indicator
During recording mode: Remaining recording time During playback or stop mode: File length
⑩ Playback mode indicator
11 File name*
12 During recording mode: Remaining memory bar indicator During playback or stop mode: Playback position bar indicator
13 Recording date and time*
- This item will be displayed when the [Font Size] is set to [Small] only.
Inserting batteries (Fig. 1)
1 Lightly press down on the arrow and slide the battery cover open.
2 Insert size-AAA alkaline battery, observing the correct and polarities.
3 Close the battery cover completely by pressing to the direction (A), then sliding to the direction (B).
Turning on/off the power (Fig. 2)
Turning on the power:
While the recorder is turned off, slide the POWER/HOLD switch in the direction indicated by the arrow.
Turning off the power:
Slide the POWER/HOLD switch in the direction indicated by the arrow for 1 second or longer.
Power save mode:
If the recorder is stopped/not used for over 5 minutes after it is turned on, it goes into standby (power-saving) mode, and the display shuts off. To exit standby mode and turn on the display, press any button.
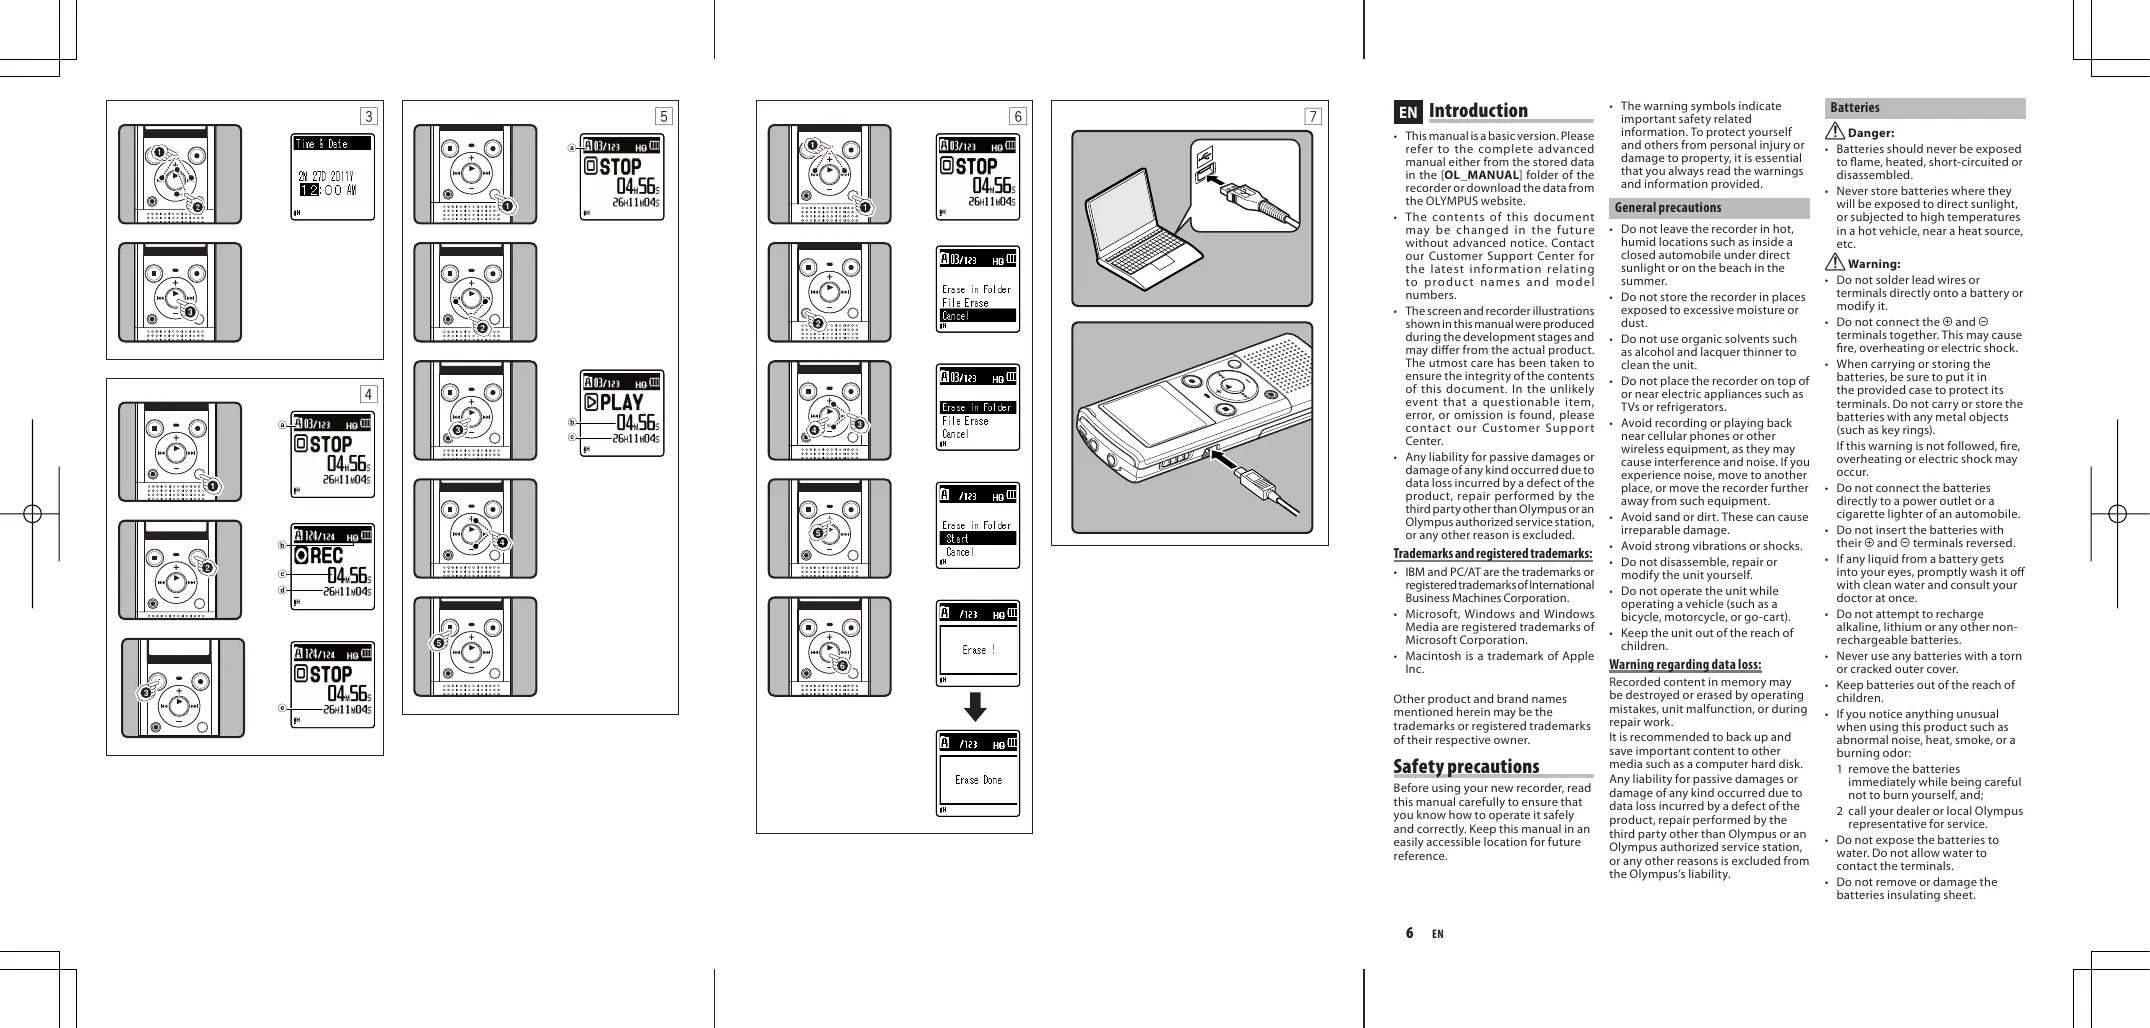
Setting time and date [Time & Date] (Fig. 3)
When you install batteries for the first time or each time you replace the batteries, the "Hour" indication will flash.
1 Press the or button to select the item to set.
2 Press the + or - button to set.
- Follow the same steps by pressing the or I button to select the next item, and press the + or - button to set.
- You can select between 12 and 24 hours display by pressing the FOLDER/INDEX/SCENE button while setting the hour and minute.
- You can select the order of the "month", "day" and "year" by pressing the FOLDER/INDEX/SCENE button while setting them.
3 Press the OK/MENU button to complete the setting.
The clock will start from the set date and time. Press the OK/MENU button according to the time signal.
Notes on the Folders
The recorder provides five folders, [u], [b], [c], [d] and [e]. To change the folder selection, press the FOLDER/INDEX/SCENE button while the recorder is stopped. Each folder can store up to 200 files.
Recording (Fig. 4)
1 Press the FOLDER/INDEX/SCENE button to select the desired folder.
2 Press the REC () button to start recording.
- Turn the microphone in the direction of the source to be recorded.
- Newly recorded audio will be saved as the last file in the selected folder.
Folder indicator
Recording mode
Elapsed recording time
Remaining recording time
3 Press the STOP (■) button to stop recording.
File length
Playback (Fig. 5)
1 Press the FOLDER/INDEX/SCENE button to select the desired folder.
2 Press the or 一 button to select the file to playback.
3 Press the OK/MENU button to start playback.
Folder indicator
b Elapsed playback time
File length
4 Press the + or - button to adjust to a comfortable listening volume.
- The volume can be adjusted within a range from [00] to [30].
5 Press the STOP (■) button at any point you want to stop the playback.
- This will stop the file being played back midway.
Erasing (Fig. 6)
1 Select the folder or file you want to erase.
2 While the recorder is during stop mode, press the ERASE button.
3 Press the + or - button to select [Erase in Folder] or [File Erase].
4 Press the OK/MENU button.
5 Press the + button to select [Start].
6 Press the OK/MENU button.
- The display changes to [Erase!] and erasing will start.
- [Erase Done] is displayed when the file is erased. File numbers will be reassigned automatically.
Notes:
- The locked files and files set as read-only cannot be erased.
- If an action is not selected within 8 seconds, the recorder will return to stop status.
- It may take over 10 seconds to complete processing. Never remove batteries during this time because data may be corrupted. In addition, replace the batteries with new ones in order to ensure that the batteries will not run out while processing.
- You cannot delete folders through the recorder.
Using the recorder on your PC
Operating environment
Windows:
Operating system:
Microsoft Windows XP/Vista/7 (Standard Installation)
Compatible PC's:
Windows PC's equipped with more than one free USB port
Macintosh:
Operating system:
Mac OS X 10.4.11-10.6 (Standard Installation)
Compatible PC's:
Apple Macintosh series equipped with more than one free USB port
Connecting to your PC (Fig. 7)
1 Turn the recorder's power ON.
2 Connect the USB connection cable to the USB port of the PC.
3 Make sure that the recorder is stopped, and then connect the USB cable to the connecting port on this recorder.
Windows:
When you open [My Computer], it will be recognized by the drive name of the product name.
Macintosh:
When connected, the recorder will be recognized by the drive name of the product name on the desktop.
- [Remote] is appeared on recorder if the USB cable is connected.
Disconnecting from your PC
Windows:
1 Click [ ] on the task bar located at the lower-right corner of the screen. Click [ Safely remove USB Mass Storage Device].
2 When the safe to remove hardware window appears, click [OK].
3 Disconnect the recorder from the PC.
Macintosh:
1 Move the drive icon for this recorder that is appear on the desktop to the garbage bin by Drag & Drop it.
2 Disconnect the recorder from the PC.
Notes:
Even if operational environment is satisfied, we do not support such as upgraded OS, the multi-boot environment and self-modified PC's.
- Do not use USB extension cables other than the supplied cable. Using cables from other manufacturers could result in damage to the recorder. Do not use the supplied USB extension cable with devices from other manufacturers.
- Be sure to push the cable connector all the way in. Otherwise, the recorder may not operate properly.
- NEVER disconnect the USB while the recording indicator light is flashing. If you do, the data will be destroyed.
Specifications
General points
Recording medium:
Built-in memory (1 GB)
Recording format:
WMA (Windows Media Audio)
Input level: -70 dBv
Maximum working output:
250 mW (8 Ω speaker)
Maximum headphone output:
≤ 150mV (according to EN 50332-2)
Wide band characteristic
headphone output:
75mV≤ (according to EN 50332-2)
Speaker:
Built-in 28 mm round dynamic speaker
MIC jack:
0 3.5 mm mini-jack, impedance 2k
EAR jack:
0.35 mm mini-jack, impedance 8Ω or more
Input power requirement:
AAA battery (LR03) or
Olympus Ni-MH rechargeable battery
External dimensions:
108mm× 39mm× 16.8mm
(without protrusions)
Weight: 66g (including battery)
Operating temperature: 0^ - 42^
Overall frequency response
During recording or playback mode:
HQ: 70 Hz to 13 kHz
SP: 70 Hz to 8 kHz
LP: 70 Hz to 3 kHz
Built-in microphone
(During recording mode):
40 Hz to 14 kHz
However, the upper limit value of the frequency response depends on each recording mode (see above diagram).
About music file
In cases where the recorder is unable to playback music files that have been transferred to it, check to make sure that the sampling rate and bit rate are in the range where playback is possible. Combinations of sampling rates and bit rates for music files which the recorder can playback are given below.
Sampling frequency:
8 kHz, 11 kHz, 16 kHz, 22 kHz, 32 kHz, 44.1 kHz, 48 kHz
Bit rate:
From 5 kbps up to 320 kbps.
Notes:
This recorder is compatible with Microsoft Corporation DRM9, but not with DRM10.
Even if the file is a compatible format to playback on the recorder, the recorder does not support every encoder.
Guide to recording times
HQ: approx. 67 h.
SP:approx.131 h.
LP: approx. 421 h.
[DNS] (Rec Scene): approx. 16 h. 30 min.
Notes:
- The above values are strictly rough guides.
- Caution is required, since the differences in the available recording time will increase when the bit rate is low.
Available recording time may be shorter if many short recordings are made (The displayed available recording time and recorded time are approximate indications).
Maximum recording time per file
HQ: approx. 26 h. 40 min.
SP: approx. 53 h. 40 min.
LP: approx. 148 h. 40 min.
[DNS] (Rec Scene): approx. 26 h. 40 min.
Note:
- Regardless of the memory remaining amount, the longest sound recording time per file is restricted to the above value.
Guide to battery life
Alkaline battery:
Built-in microphone
(During recording mode)
HQ: approx. 46 h.
LP:approx.51 h.
Built-in speakers
(During playback mode)
LP:approx.20 h.
Earphone Playback
HQ:approx.40 h.
LP:approx.44 h.
Ni-MH Rechargeable battery:
Built-in microphone
(During recording mode)
HQ:approx.33 h.
LP:approx.40 h.
Built-in speakers
(During playback mode)
HQ:approx.15 h.
Earphone Playback
HQ:approx.32 h.
LP:approx.34 h.
Notes:
- The above values are strictly rough
- guides.
- Battery life is measured by Olympus. It varies greatly according to the type of battery used and the conditions of use.
Specifications and design are subject to change without notice.
Accessories (Optional)
- Compact Zoom microphone (unidirectional): ME32
Highly sensitive noise-cancellation monaural microphone (unidirectional): ME52W - Tie clip microphone (omnidirectional): ME15
Telephone pickup: TP7 - Ni-MH rechargeable battery and charger set: BC400 (For Europe)
- Ni-MH rechargeable battery: BR401
- Connecting cord: KA333

"CE" mark indicates that this product complies with the European requirements for safety, health, environment and customer protection.

This symbol [crossed-out wheeled bin WEEE Annex IV] indicates separate collection of waste electrical and electronic equipment in the EU countries.
Please do not throw the equipment into the domestic refuse. Please use the return and collection systems available in your country for the disposal of this product. Applicable Product: VN-850PC

This symbol [crossed-out wheeled bin Directive 2006/66/EC Annex II] indicates separate collection of waste batteries in the
EU countries. Please do not throw the batteries into the domestic refuse. Please use the return and collection systems available in your country for the disposal of the waste batteries.
CS
Uvod
8 kHz, 11 kHz, 16 kHz, 22 kHz, 32 kHz, 44 kHz, 48 kHz
Bitová rychlost:
8 kHz, 11 kHz, 16 kHz, 22 kHz, 32 kHz, 44 kHz, 48 kHz
Bithastighed:
Fra 5 kbps til 320 Kbit/s
Bemark:
(Standardinstallation)
Ko mpatible PC's:
8 kHz, 11 kHz, 16 kHz, 22 kHz, 32 kHz, 44 kHz, 48 kHz
Bitrate:
Ni-MH Rechargeable battery :
8 kHz, 11 kHz, 16 kHz, 22 kHz, 32 kHz, 44,1 kHz, 48 kHz
Tasa de bits:
De 5 kbps a 320 kbps
Notas:
Poids: 66 g (Piles comprises)
8 kHz, 11 kHz, 16 kHz, 22 kHz, 32 kHz, 44 kHz, 48 kHz
Débit binaire:
Batteries rechargeable Ni-MH:
Microphone intégré
Elemek/akkumulatorok
Veszely:
8 kHz, 11 kHz, 16 kHz, 22 kHz, 32 kHz, 44.1 kHz, 48 kHz
Bitsurseq:
5 kbps - 320 kbps.
Megjegyzések:
Rispostain frequency
8 kHz, 11 kHz, 16 kHz, 22 kHz, 32 kHz, 44,1 kHz, 48 kHz
Bit rate:
Da 5 kbps a 320 kbps
Note:
8 kHz, 11 kHz, 16 kHz, 22 kHz, 32 kHz, 44,1 kHz, 48 kHz
Bitsnelheid:
Van 5 kbps tot 320 kbps.
Opmerkingen:
8 kHz, 11 kHz, 16 kHz, 22 kHz, 32 kHz, 44 kHz, 48 kHz
Bithastighet:
Fra 5 kbps til 320 kbps.
Notater:
Denne diktafonen er kompatibel med Microsoft Corporation DRM9, men/DDKDRM10.
- Selv om fil er kompatiblett format for espilling pa optakeren, supporter icke optaker alle enkodere.
8 kHz, 11 kHz, 16 kHz, 22 kHz, 32 kHz, 44 kHz, 48 kHz
Predkosc transmisji:
Od 5 kb/s do 320 kb/s
Uwagi:
Ha3BaHn8 coCTaBhblx qacteY
① THe3do EAR(hayuHnKn)
② THe3do MIC(BheHnMnKpOoh)
③ BCTpoehhblMukpfoH
④Инданкаторны сигналзапсн
⑤ BCTpoEHbI DnHaMnK
⑥ KhoNka+
⑦ Khonka REC (●) (3ainnb)
(8) Khonka ▷▶
⑨ KhoNka FOLDER/INDEX/SCENE
10 Khonka -
1 Khonka ERASE
12 Khonka OK/MENU
⑬ Khonkal
14 Khonka STOP (■)
15 Ducnnei (XK-ekpan)
16 Ipekeknouateb POWER/HOLD
⑰ Pa3bem USB
18 Kpbilka oTeJeHn6bTaapeek
19 Порозь дя ремшka
BbIKLIOUeHHe NITaHnI:
IpepeBnHtepeKlnuOatenb POWER/ HOLD B napanpBneHH, Ykaz3AHOM cTpeKoH, yUdpKeHMbaite er o T BoTH ONa3HmB T bueHe 1 CekynDb nnHOnDolbe.
Pexn m3neptoc6pexehen:
EcnIydktofoh octahOBneH/He nocb3yBtB Tc HneueM 5 MHTyH (HCXODHAR yCTAHOBKa), B TO BPemK kNITnAHRe BKNIOUeO, NITnAHRe 6bETBbIKUoHE. QTOb6b bIitNs cPekMA OxJDAHNu I KNOBtBu CINnJIeN, HAKMmTENoIbO hONKY.
Uctahobka Bpemehn u datbI Bpema n daata (Oth.3)
BCTpoehnbl, kpyrbln, dmametbp 08 mm
THe3do MIC:
03,5MM,conpoTnBneHne 2KOM
THe3doEAR:
03,5MM,conpotINBHeNMe 8OMnIb6BoJIbe
Tpe6obAHNA K nTaHnIO:
Batapekeni Tnna AAA nni Ni-MH Akkymyrtopby Olympus
Pa3mepbl:
108 MM×39 MM×16,8 MM (6be bTyCTNAOUXH XACTeJ)
Macca: 66 r (cuyetom 6aTaapeek)
Pa6oay Temnepa: 0^ - 42^
YacToTHbI dHaana3OH
Bpexnme Bocnpom3BedeHn nn 3a#nn:
HQ: 70 Γι Φ 13 κΓι
BctpoehnhmMkpooh (B pexmme zannci)
OT40Tdo14K
Teme He Mehee,BePxHMe npedelbHbe 3aHuEHHaCTOHYUByCTBNTeJIbHOCTn 3aBcIAT OT KOHKpETHORO pekmHa aHINCS (CM.CXEMy BIIue).
Omy3bikabHbHom aaiIe
B Cnuyae, korga dinktofoH He moKet Bocnpon3BnE npedeahhble Ha Hero My3bIkaNbHbe FauNbI, npoebpBe,cooTBECTbYETnHa cactota Dnckpert3aunu nB0tobar CkoPOTe nepeaun DaHHbx DONyctTmbm Dnana3oham,B KOTobpBu 03MOKHO BOCnpON3BeHeune. CoTuTaTHa YACTObl Dnckpert3aunu nB0tOBU CkoPOTe npedeau DaHHbx IMy3bIkaNbHbx FauNob,DOnyctTmbne IBAocPON3BdEHeHnHa HTOM dinkTOhoD, pNBDeHb NHXe.
YactotaDnckpeTn3aunn:
8 kFt, 11 kFt, 16 kFt, 22 kFt, 32 kFt, 44.1 kFt, 48 kFt
Ckopooctb nepepaun daHbIX:
OT5K6nT/cdo320K6nT/c
Ppimechan:
-ДанньддкгфОн COBМСТСM Microsoft Corporation DRM9, Ho He DRM10.
XOTARoPMAaXPINBA COBMECTIMMA CFOMOI 3BYKOpON3BeDHeN3 BYK03aINCbBaTeNA,HO 3BYK03aINCbBaTeNB He NOJIpeKINBAET BCE KOJINPOBUZNIK.
TamaTkaIOBpeMeHn3aHncn
HQ: npu6n.67 u.
SP: npn6n. 131 u.
[DNS] (Rec Scene):
npn6n.16u.30mn
Примechани:
Yka3aHbHeBbIe 3hAeHnE Hpi6m3ntteBhbI.
BHMAnHae,pa3HnUaBTOcYTNOM BVPemHb 3aIcNcYbENuNTcP rPi NIOHKeHNCHKOPoCTNIpeEaDHnBHx
NCTOe Bpme 3aHnC MoKet 6bTb MeHsue,ecnn 3aHnCaHO MHOro KOPOTKnx faHNoB (OCTabweecr BpMe3aHnCnnpOJNOJKTbnHoCTb 3aHnCaHnHO faHna, KOtOpBe bByoDnTCra HaNcPiIN, AByIIOCTc np6mNtBnBbIMn).
MaKcImaMbHoeBpemBa3anu KaKaDbqai
HQ: npu6π.26 q.40 MmH.
SP: npn6n.53 u.40 mH.
LP: npn6π.148 u. 40 mH.
[DNS] (Rec Scene):
6π.26u.40MnH.
Приимechани:
HeBaICuMoO TO CB6ODoHNaPAMrY uycTPOBA, MCAcIMbAbnHnaIINHa 3anicbBaEMofo HbAonpArHnueHa yka3AnHM BlBie 3haeHnEHm.
Pamrka no pecypcy 6atapeek
UeNohble6aTapeKn:
BCTpoeHHbMnKpOfoH
(Bpekmme3aannc)
HQ: npn6n.46 u.
LP: npn6n.51 u.
BCTPOeHHbI DNHaMnK
(BpekmE Bocpon3BedeHnA
HQ*: npn6n. 18 u.
LP: npn6n. 20 u.
Bocnpon3BeDHeNe Chepe3 HaywnKn
HQ: npu6n.40 u.
LP: npn6π.44 u.
Ni-MH akkymyjtopb:
BcTpoeHHbIMKpOoH
(Bpejxime 3anncn)
HQ: npn6n.33 u.
LP: npn6π.40 u.
BCTpoeHHbI DnHaMnK
(BpeKmE BocnpOn3BedeHnA)
HQ: npu6π.15 u.
LP: npn6n.16 u.
Bocnpon3BeDHeNe Chee3 HayshnKIn
HQ: npn6n.32 u.
LP: npn6n. 34 u.
Приимechanical:
Yka3aHbHeBbIe 3haeHennr PnbnmntneBbH.
Cspcn Cnyk6b4 batapeek onpejnelteca npmm Olympus.
OH B 6bIbIbIcTeneH3aBcNITOTmNa IcONbIbYeBmIXb6atapeekYcNobIyKcNpIyatauCn.
CzneuKnaKauN uN4nH MOryN mNeHartbZc 6e3 oB8aBnEny.
Akkeccyapbl (onuOnHbIe)
- Komkahn3b的3ym-MinKPOΦH (hampablenhnh) : ME32
BbKOcOyUBCTBtENbHbMoHOoMOHNeCKMnKPOoOHcNoBaJIeHNmWyoM(hanpaIeHNH):MES2w
Minkpofohon 2006 By Bnaulykabn Harnrctyck (BcehanpablenHHN): ME15
• UystcpnoBTO npnEMA BoXoJHxu TeteΦoHNbX 3BOhKOB:TP7
HnkeIb-MetanIgurdpnDhny akymyIaTOp n3apdHoe yctpoCTBO:BC400 (dA EBpOnb) - Hinkelb-metalanfogndnHbny akymyantopr:BR401
CoeHHTbHbI WHyp:KA333

3нak"YkazbIbAeT, YTO daHcNpDnyKT COOTBCTBYET EBPOneiCKM Tpe60baHnIMTO 6beonacOHTO, OXPAHe 3doPOBBy, OKyJxaoueCpeDJI 3aZuHt noTePBteHNe

3OT CMB01 [pepepeknytbmycOpbmy 6bkHa konecikax, 4mpeKtBBA EC 06 oTxOdaX WEEE, pnoJoxene IV) yka3baet ha 4pa3bnb 6cbp Mycopa 7nane kTnueckoro
3JNKTOPOHORO 06OUPDOBAHNA BCTPANAX EC. POKAYUNCTA, He Bb6pAcBbIaTE 3TO YCTPOBN TO BMECTC 6 CTBBOTBMN OTXDAMM
KonoNyama,ynIyIytnN3aAun DaHONHO npOkyTA KnoIb3yIteB CeIByTkoUmmu B WaeuI cTPAE CIcTEMAMM BO3BpTa I c6oPaI ytnN3aAun.
Приимен immoe n3delen: VN-850PC

OTOT CMBON
[nepeuepkhytb]
Mycopmbb6kHa
KoNEcIMKa, DInpeKtINBa EC
06 otXoxad 2006/EC,
pnpinoKHeI y kka3BaJb
Ha pa3dJIbIbHb cOOP mIOIbTOBaHbIX bIaEMENTOBITINAHB BCTPAHACEXC.
KoJyAnJIcTa, He BbIpaCbaJIbe
3eNEMtBI tNIbTHaMBEcTe C b6tOBaMbIMn
OTXoMDAM. KoJyAnJIcTa, dJIaYrTNl3AclUIM
NCTOJIb3OBAHbIXeNEMtOB TNIbTHaM
nONb3YITcE, DeIcNTBvOuIMnB in BaueJ
CTpAE cINCTeMAmIA Bo3BpArA n Cbopa
dJIyTNIb3AclUIM.
SV
Introduktion
8 kHz, 11 kHz, 16 kHz, 22 kHz, 32 kHz, 44.1 kHz, 48 kHz
Bithastighet:
8 kHz, 11 kHz, 16 kHz, 22 kHz, 32 kHz, 44 kHz, 48 kHz
Bit orani:
5 kbps ila 320 kbps
Notlar:
KeyMed House, Stock Road,
Southend-on-Sea, Essex, SS2 5QH, UK
Phone (switchboard): +49(0)800 111 4777
http://www.olympus.com
REP. OFFICE OLYMPUS C&S
blvd. Bulgaria 88, entr. 2, fl. 1, ap. 3, 1404 Sofia, Bulgaria
Tel./Fax: +359 2 854 84 14
http://www.olympus.bg
OLYMPUS C&S S.R.O.
OLYMPUS HUNGARY KFT.
1382 Budapest 62, Pf. 838, Tel.: +36 1 250 9377
POLYPHOTO S.P.A.
Via C. Pavese 11/13 20090 Opera/Milano,
Tel.: (02) - 530021
OLYMPUS LIETUVA UAB
Seskinés g. 55A, Vilnius, LT - 07159 Lietuva,
Tel.: +370 5 233 00 21
OLYMPUS LATVIA SIA
Vienibas gatte 87 b, LV-1004 Riga,
Tālr.: +371 67623334
OLYMPUS NEDERLAND B.V.
OLYMPUS POLSKA SP. Z O.O.
ul.Suwak 3,02-676Warszawa
Tel. 022 - 366 00 77, Faks: 022 - 831 04 53
OLYMPUS PORTUGAL, SA
Rua Antero de Quental, 221 - Loja 11
4455-586 Perafita, Tel.: +351 229 999 800
MGT EDUCATIONAL S.R.L
Bd Ficusului 40, sc B, et 2, Sector 1 Bucuresti, 013975
Tel.: 021-2328894, Fax: 021-2328899
http://www.mgt.ro
OLYMPUS D.O.O.
Dorda Stanojevica 12, 11070 Beograd
Tel.: 011 2222-914, Fax: 011 2222-910
http://www.olympus.co.yu
OJIMMNYC CEPBNC FACNJNTU PUC
r. MockBa, KoxeBnueckn np-3d 4, ctp.2
Tei.: +7 495 540 70 71
OLYMPUS SVERIGE AB
Pyramidvagen 5, 169 56 Solna, Sweden
Tel.: +46 8 7353400, Fax: +46 8 7353410
OLYMPUS SLOVENIJA D.O.O.
Baznikova 2, SI-1000 Ljubljana
TEL: +386 (1) 236 33 20
OLYMPUS SK SPOL. S R.O.
Slovnaftska 102,821 07 Bratislava
Tel.: +421 2 49209411
E-mail: info@olymbus.sk · servis@olymbus.sk
BEYAZ BILGISAYAR MALZ. DAG. SAN. TIC. LTD. STI.
Bostanci Yolu Cad. Keyap Yapi Kooperatifi No: 87 E-2,
Yukari Dudullu, Umraniye Istanbul 34760, Türkiye
Tel.: +90 (0)216 365 32 32, Faks: +90 (0)216 365 3867
E-mail: destek@beyazbilgisayar.com
ABTOPU3OBAHI CEPBICHI LECTPNI
YKPAiHA TOB «COHIKO YKPAiHA»,
M KIIB,Byn. UycBa 10
TeJ. (044) 251-29-68, 251-29-70
YKPAiHA TOB «KPOK-TTL»,
M KniB, np-T MaKOBcbKOro, 26
ten. (044) 459-42-55, 204-72-55
OLYMPUS
OLYMPUS IMAGING CORP.
Shinjuku Monolith, 3-1 Nishi-Shinjuku 2-chome, Shinjuku-ku, Tokyo 163-0914, Japan. Tel. +81 (0)3-3340-2111
http://www.olympus.com
OLYMPUS EUROPA HOLDING GMBH
(Premises/Goods delivery) Wendenstrasse 14-18, 20097 Hamburg, Germany. Tel. +49 (0)40-237730
(Letters) Postfach 10 49 08. 20034 Hamburg, Germany.
http://www.olympus-europa.com