
67904 - Mincer Lund - Free user manual and instructions
Find the device manual for free 67904 Lund in PDF.

| Product type | Electric meat grinder |
| Brand | Lund |
| Model | 67904 |
| Rated voltage | 220-240 V~ |
| Rated frequency | 50/60 Hz |
| Rated power | 550 W |
| Electrical protection class | II (double insulation) |
| Weight | 3.0 kg |
| Housing material | Plastic |
| Use | Household use only |
| Functions | Grinding, forward, reverse (REV), low speed (SLOW) |
| Control panel | Touch with ON, SLOW, REV buttons |
| Included accessories | Grinder body, screw, blade, 3 cutting plates (different diameters), mounting nut, feeding tray, pusher, sausage stuffing attachment, kebbe attachment |
| Additional accessories (optional) | Grater/grinder LUND 67907, citrus press LUND 67905 |
| Maximum continuous operation time | 2 minutes, then 20 minutes rest; or maximum 10 minutes, then 10 minutes rest |
| Maintenance | Clean immediately after use; do not immerse motor unit; wash accessories in warm water with dish soap; not dishwasher safe |
| Safety | Double insulation (class II), accessory locking, reverse for unblocking, overload protection |
| Warranty | Not specified |
Frequently Asked Questions - 67904 Lund
User questions about 67904 Lund
0 question about this device. Answer the ones you know or ask your own.
Ask a new question about this device
Download the instructions for your Mincer in PDF format for free! Find your manual 67904 - Lund and take your electronic device back in hand. On this page are published all the documents necessary for the use of your device. 67904 by Lund.
USER MANUAL 67904 Lund
natural_image
Exterior view of a stainless steel LUND electrician (no text or symbols visible on the device body)
natural_image
Exterior view of a modern LUND meat processing tool (no text or symbols visible)6790467903
CE

PL EN
Read the operating instruction
Safe contact with food
natural_image
Technical line drawing of a hand holding a cylindrical component next to an electric shaver (no text or symbols present)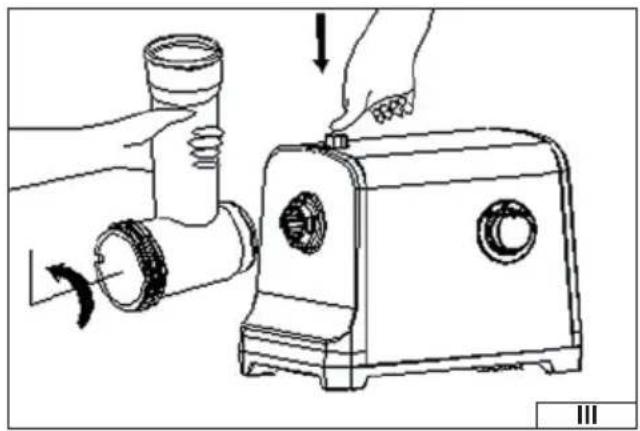
natural_image
Line drawing of a kitchen appliance being adjusted for a tool, showing hand positioning and rotation (no text or symbols)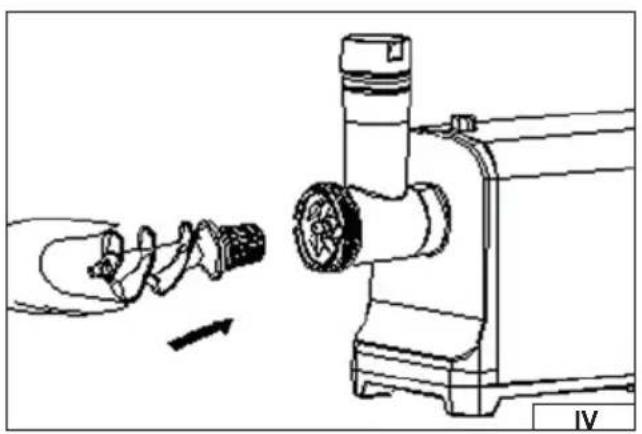
natural_image
Line drawing of a manual tool interacting with a motor, showing a hand holding a cable and a directional arrow (no text or symbols)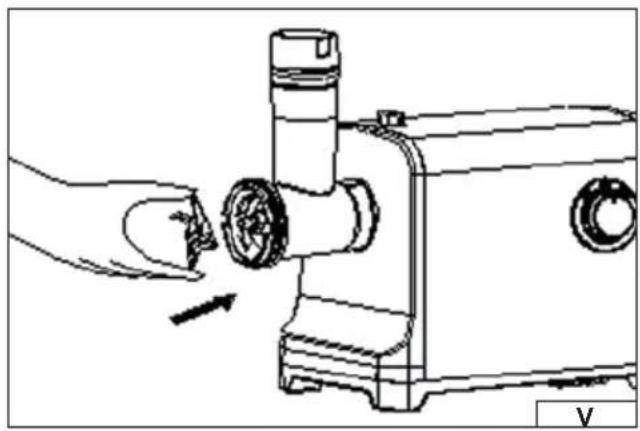
natural_image
Line drawing of a hand operating a sewing machine with a tool inserted (no text or symbols)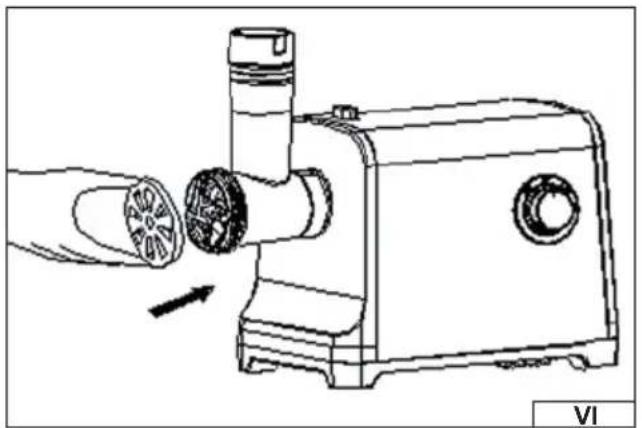
natural_image
Line drawing of a manual manual tool with a hand holding a circular component, showing mechanical components and an arrow indicating motion (no text or symbols)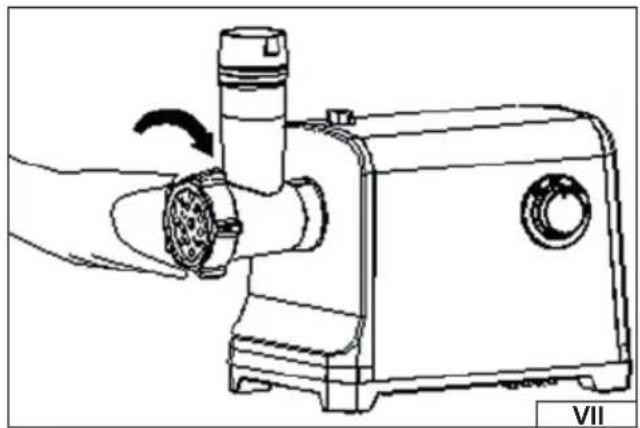
natural_image
Line drawing of a hand operating a manual kitchen tool with a rotating knob (no text or symbols)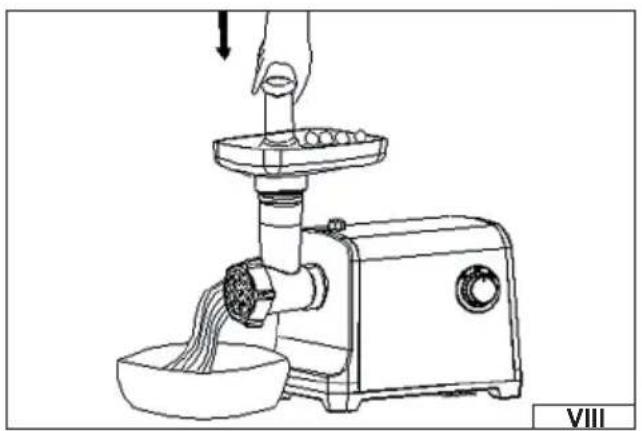
natural_image
Line drawing of a hand using a manual electrician to press noodles into a bowl (no text or symbols)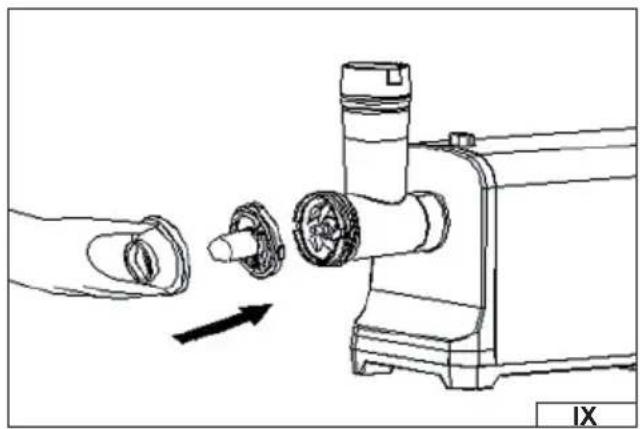
natural_image
Line drawing of a mechanical device with a hand holding a connector and a valve, showing a directional arrow (no text or symbols)PL EN DE RU UA LT LV CZ SK HU RO ES FR IT NL GR BG PT HR AR
natural_image
Line drawing of a mechanical device with a hand operating it, showing a curved arrow indicating rotation (no text or symbols)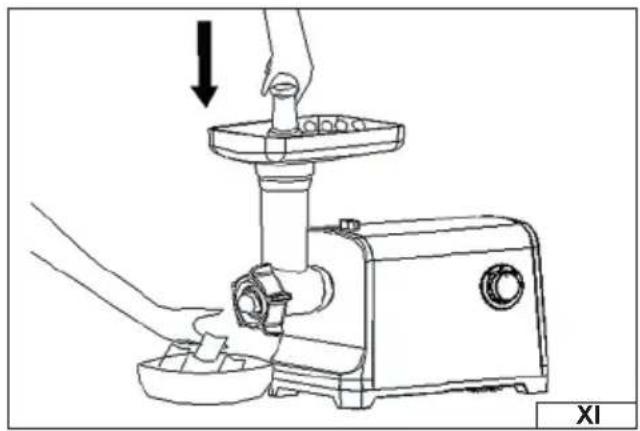
natural_image
Line drawing of a hand using a sewing machine to press or adjust food items, with no visible text or symbols.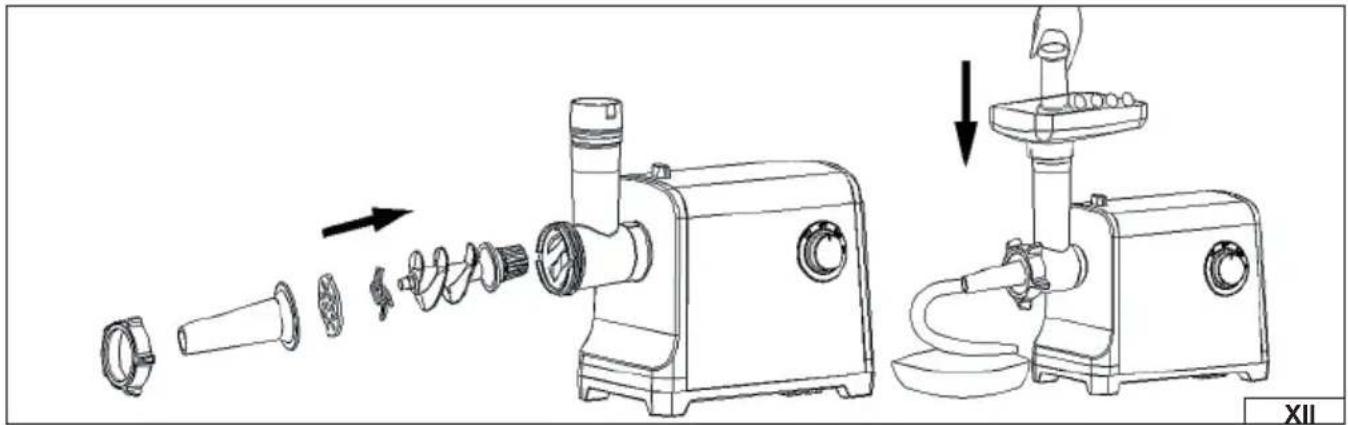
natural_image
Technical line drawing of a manual kitchen tool with exploded view and side view (no text or symbols)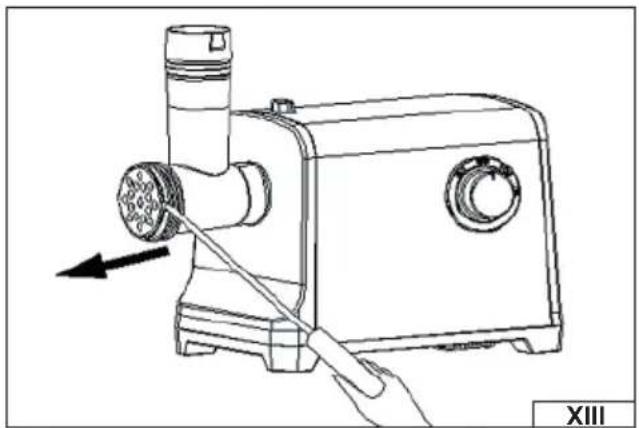
natural_image
Line drawing of a manual washing machine with a hand operating it, showing no text or symbols.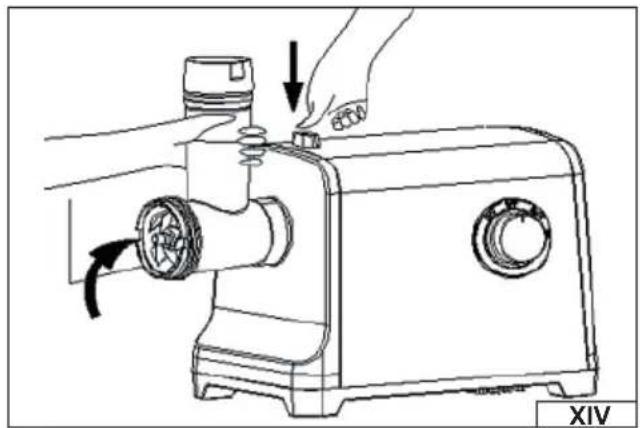
natural_image
Line drawing of a hand operating a sewing machine with a valve and handle, showing mechanical components and motion arrows (no text or symbols)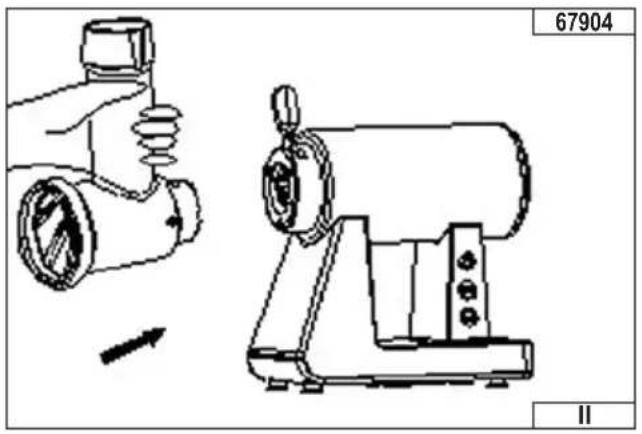
natural_image
Technical line drawing of a mechanical device with a hand holding a cylindrical component and a side view showing a cylindrical component mounted on a base (no text or symbols)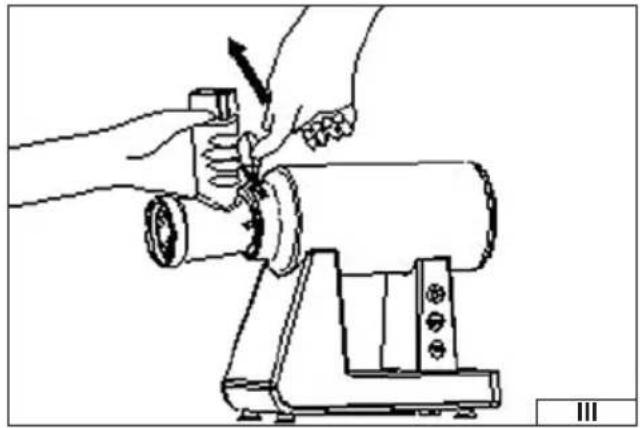
natural_image
Line drawing of hands operating a cylindrical mechanical device with a tool, no text or symbols present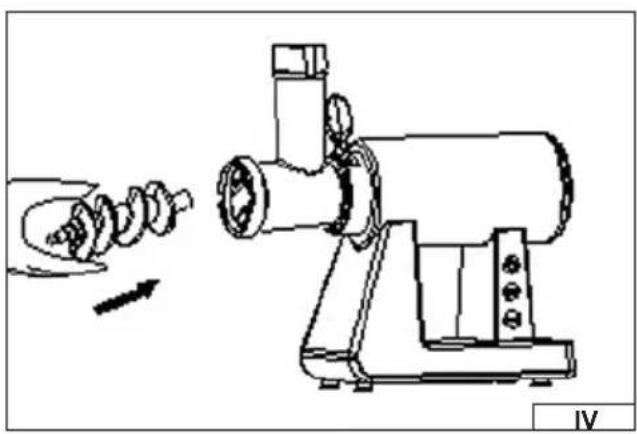
natural_image
Technical line drawing of a mechanical device with a spiral tool and base mount (no text or symbols)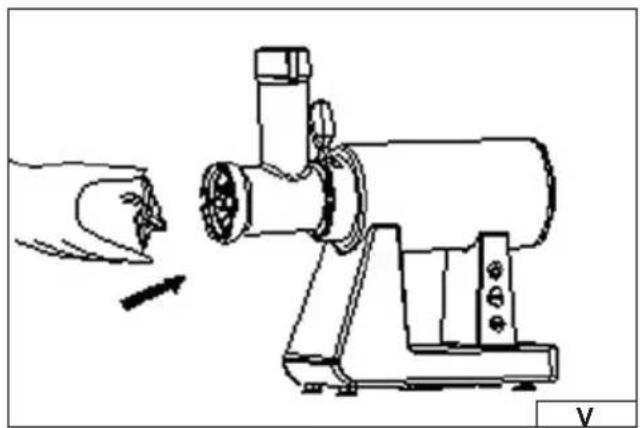
natural_image
Line drawing of a hand using a manual tool to cut a piece of material from a cylindrical device (no text or symbols)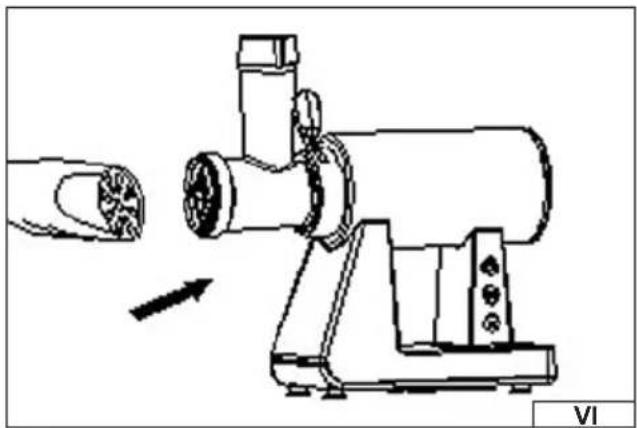
natural_image
Technical line drawing of a manual tool with a hand holding a screwdriver, showing a cutting process (no text or symbols)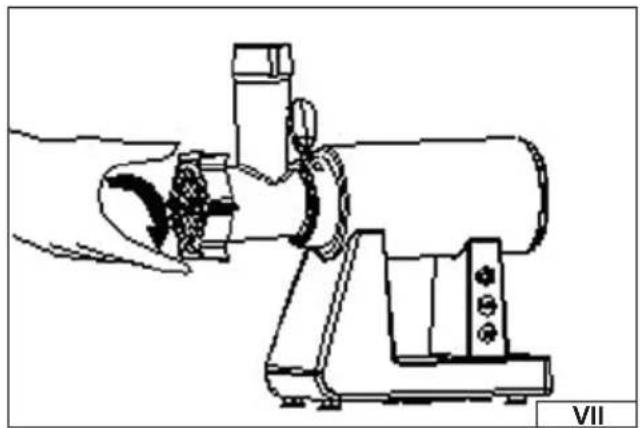
natural_image
Technical line drawing of a mechanical device with a hand operating it, no visible text or symbols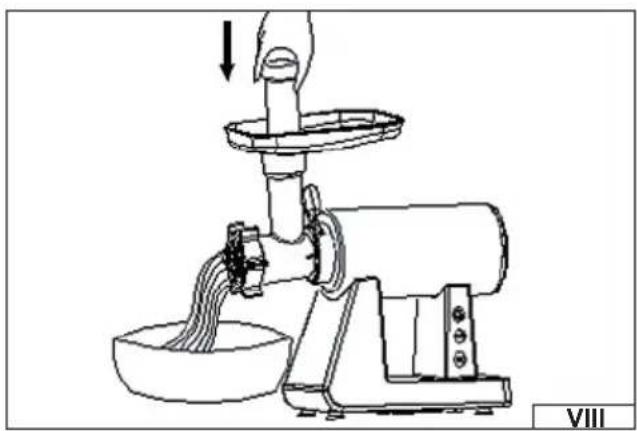
natural_image
Line drawing of a manual manual presser with a hand operating the lever and pouring liquid into a bowl (no text or symbols)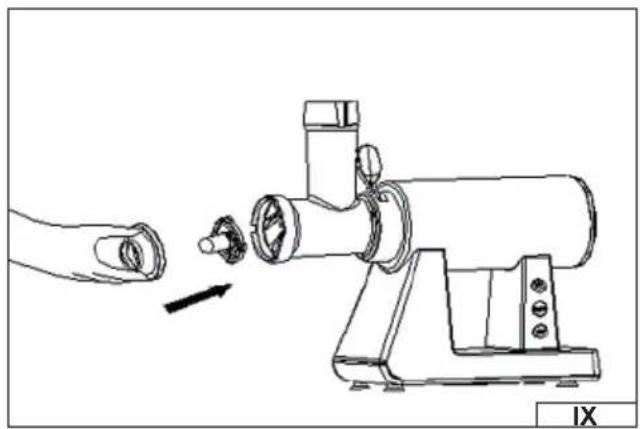
natural_image
Line drawing of a hand operating a cylindrical device with a knob inserted, showing a hand pointing to the knob (no text or symbols present)PL EN DE RU UA LT LV CZ SK HU RO ES FR IT NL GR BG PT HR AR
natural_image
Illustration of a hand interacting with a mechanical device, showing a hand gesture and a curved arrow indicating rotation (no text or symbols)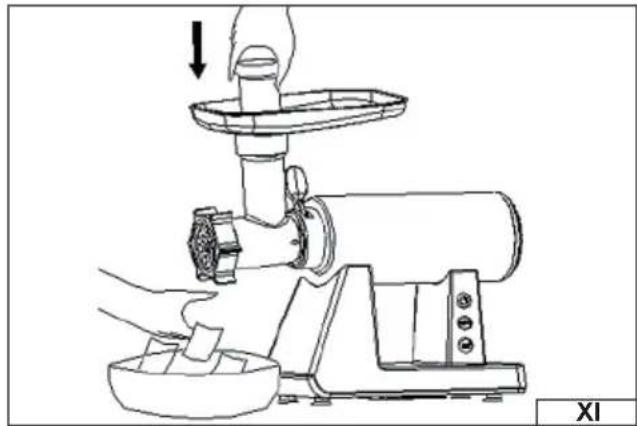
natural_image
Line drawing of a hand using a manual manual brush to press or install a cylindrical object, with no text or symbols present.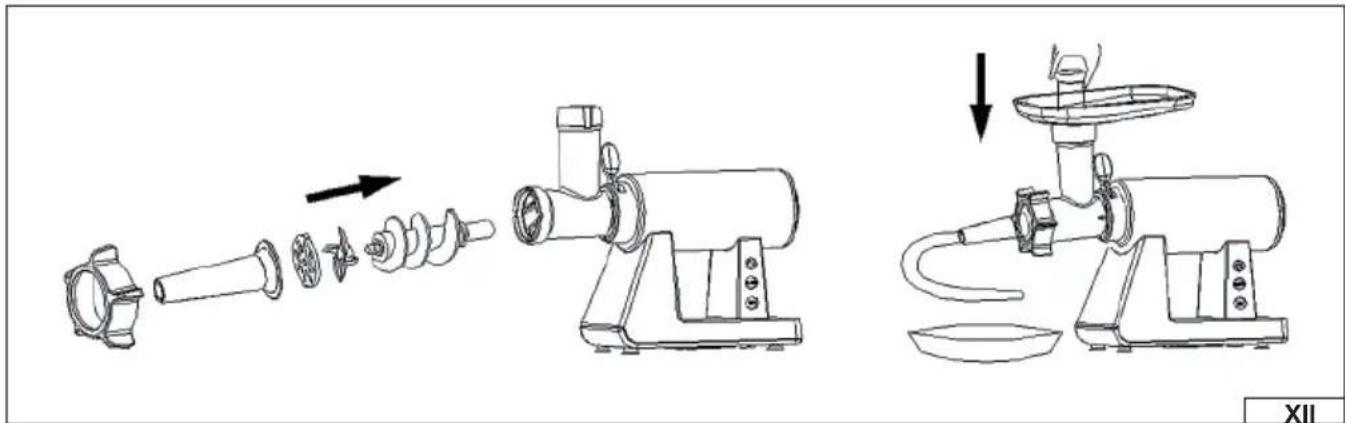
natural_image
Technical line drawing of a mechanical device with a cylindrical component and lever (no text or symbols)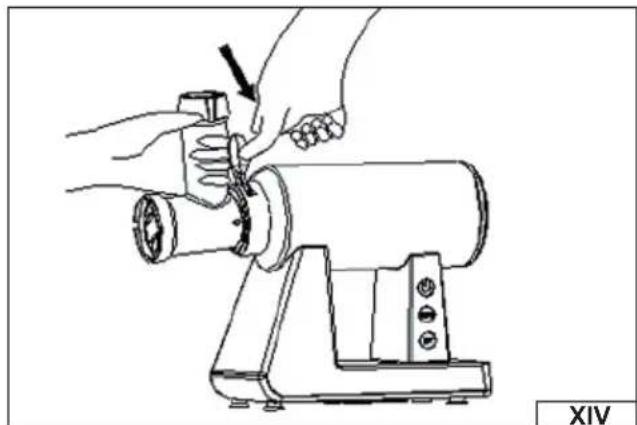
natural_image
Line drawing of hands using a tool to adjust or install a cylindrical component on a vise (no text or symbols)
This symbol indicates that waste electrical and electronic equipment (including batteries and storage cells) cannot be disposed of with other types of waste. Waste equipment should be collected and handed over separately to a collection point for recycling and recovery, in order to reduce the amount of waste and the use of natural resources. Uncontrolled release of hazardous components contained in electrical and electronic equipment may pose a risk to human health and have adverse effects for the environment. The household plays an important role in contributing to reuse and recovery, including recycling of waste equipment. For more information about the appropriate recycling methods, contact your local authority or retailer.
WYPOSAŻENIE PRODUKTU
Nasadka do kibbe (IX)
PRODUCT CHARACTERISTICS
The meat grinder is used for mechanical processing of meat and other food. Thanks to its rich equipment, the grinder significantly speeds up and facilitates many kitchen tasks. The product was designed for home use only and it is forbidden to use it in commercial applications. The correct, reliable and safe operation of the device depends on proper use, therefore:
Before using this product, please read the entire manual and keep it for future reference.
The manufacturer is not liable for any damage resulting from failure to comply with the safety regulations and recommendations of this manual.
PRODUCT EQUIPMENT
The product is delivered complete, but requires preparatory activities before starting work. The machine is equipped with a meat grinder, a sausage stuffing attachment and a kibbe (kebbe) attachment.
SAFETY INSTRUCTIONS
WARNING! Read all instructions below. Failure to follow them may result in electric shock, fire or injury.
FOLLOW THE INSTRUCTIONS BELOW
Do not use the device in an environment with an increased risk of explosion, containing flammable liquids, gases or vapors. The device must be placed on flat, even and hard surfaces. If the device is equipped with rubber feet or suction cups, choose a surface such that the feet or stands prevent the device from moving during use. Do not place the device near sources of heat or fire. The device must only be connected to a power supply with the voltage and frequency indicated on the device's rating plate. The device must be connected to a socket with a protective contact. The power cord plug must fit the socket. Do not modify the plug. Do not use any adapters to adapt the plug to the socket. An unmodified plug that fits the socket reduces the risk of electric shock. After each use, disconnect the power cord plug from the socket. Do not pull on the cable. Always remove the plug from the socket by grasping its housing. Avoid contact with grounded surfaces such as pipes, radiators and refrigerators. Grounding your body increases the risk of electric shock. The device is intended for indoor use only. Do not expose the device to precipitation or moisture. Water or moisture entering the device increases the risk of electric shock. Do not immerse the device in water or other liquids. Do not pour water into the product bowl while it is in use. Do not overload the power cord. Do not use the power cord to carry, connect or disconnect the plug from the power outlet. Avoid contact between the power cord and heat, oil, sharp edges and moving parts. Damage to the power cord increases the risk of electric shock. If the power cord is damaged (e.g. cut, melted insulation), immediately disconnect the plug from the socket and take the product to an authorized repair center. It is forbidden to use the device with a damaged power cord. The power cord must not be repaired, it must be replaced by a new one at an authorized service center. When using extension cords, use extension cords with the power supply parameters shown on the device's rating plate. The cross-section of the extension cord's cores should not be smaller than the cross-section of the cores of the device's power cable.
EN
This should be checked on the insulation of the power cable and extension cord or contact the manufacturer of the device and/or extension cord. Do not use the product with any damaged elements or with damaged equipment. If you notice damage to any part of the device, its further use is prohibited. In such a case, the device should be sent to an authorized service center or the part should be replaced by yourself, if the user manual allows such repair actions. Before starting any activities related to replacing, cleaning or adjusting moving parts, the device should be switched off and the power cord plug should be disconnected from the mains socket. The device may be used by children older than 8 years and by persons with reduced physical, mental capabilities and persons lacking experience and knowledge of the device, if supervision or instruction is provided regarding the use of the device in a safe manner so that the associated risks are understood. Children should not play with the device. Children should not clean or maintain the device without supervision. The appliance is intended for home use only. It is recommended not to exceed 2 minutes of continuous operation, after which the appliance should be left for approx. 20 minutes to cool down. During this time, the power cord plug should be disconnected from the mains socket. The maximum continuous operation time should not exceed 10 minutes, after which the product should be turned off and left to cool down by itself for another 10 minutes. Overloading the product leads to its faster wear and may also cause damage to the product. Do not use the grinder to grind hard parts of food. Meat should be prepared for grinding by removing skin, bones and cartilage. Other food products should be prepared for grinding by removing seeds, stalks, shells and all other hard parts. Do not grind frozen food products.
PRODUCT SERVICE
Preparing for work
Remove the product from the packaging, remove all packaging elements, and then wash all parts mounted to the drive unit according to the instructions in the section: „Product maintenance”.
Set up the product according to the instructions in the manual.
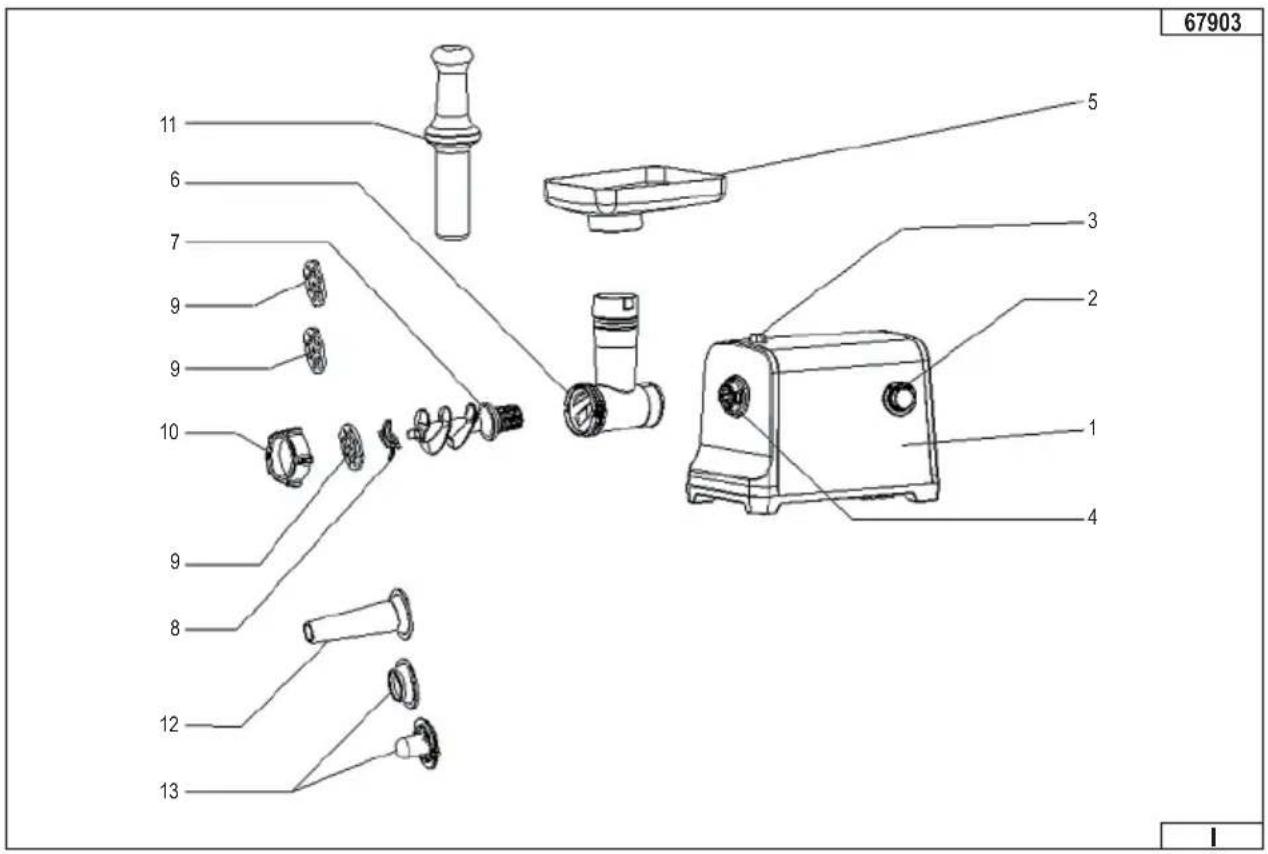
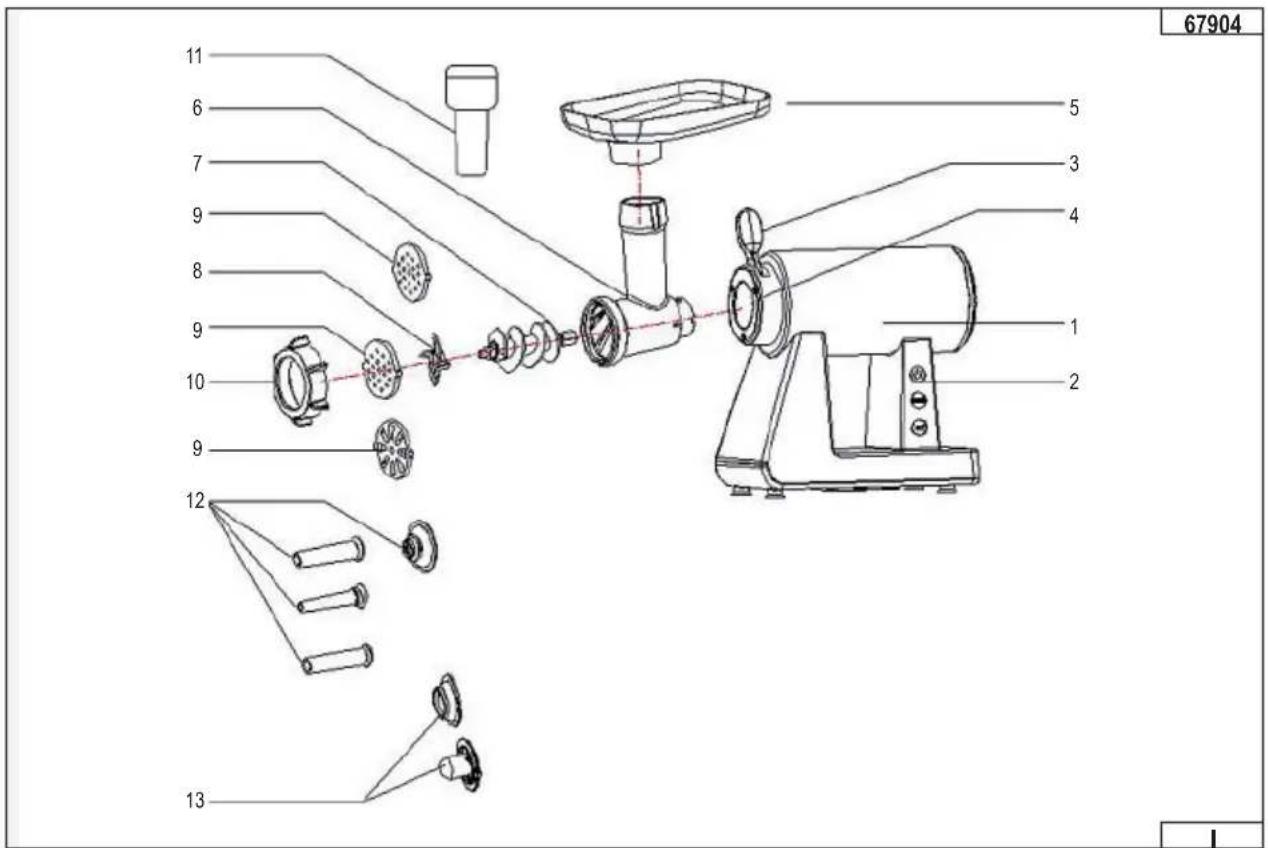
Install the meat grinder attachment body. The body should be installed by placing it on the mounting socket turned at an angle (II).
Press the attachment towards the socket and then turn it so that the inlet opening is facing upwards (III).
During assembly, you will hear the characteristic sound of the latch securing the attachment body in the socket.
If you experience problems with assembly, you can always press and hold the attachment lock button, attach the attachment and release the lock button.
Check correct assembly.
A correctly mounted attachment body cannot be dismantled except by pressing the lock button first. To dismantle, turn the attachment body a small angle and dismantle it from the mounting socket (XIV).
Meat grinder attachment
Connect the attachment body to the mounting socket. Insert the grinding auger into the body so that the drive axis fits into the auger hole (IV).
Place the blade on the square socket, with the cutting edges facing outwards from the attachment (V).
Put on the sieve. The sieve has positioning protrusions on the edge, which should fit into the cutouts on the front of the attachment (VI). The sieves included with the product have holes of different diameters. The smaller the holes, the more food products will be crushed during grinding.
Note: Only one strainer can be installed at a time.
Screw the mounting nut (VII) onto the outlet thread of the attachment.
Place the feed tray (VIII) on the inlet opening.
Check whether the push rod can be inserted and removed from the inlet hole (VIII) without any difficulties.
After installing the attachment, place a container under its outlet. The product is ready to use.
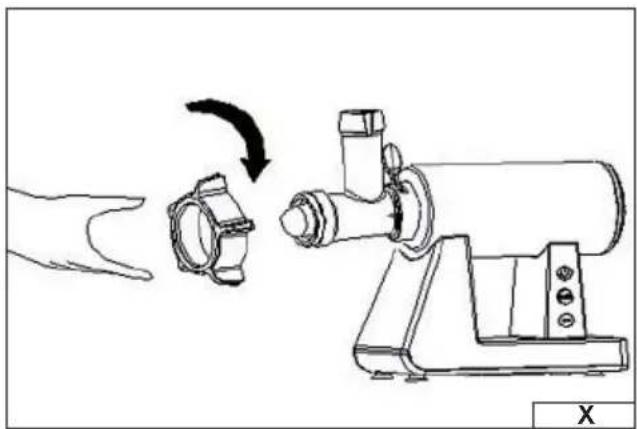
Kibbe attachment (IX)
Connect the attachment body to the mounting socket and insert the grinding auger inside the body.
EN
The rear of the kibbe attachment is equipped with positioning tabs that should fit into the cutouts at the front of the attachment.
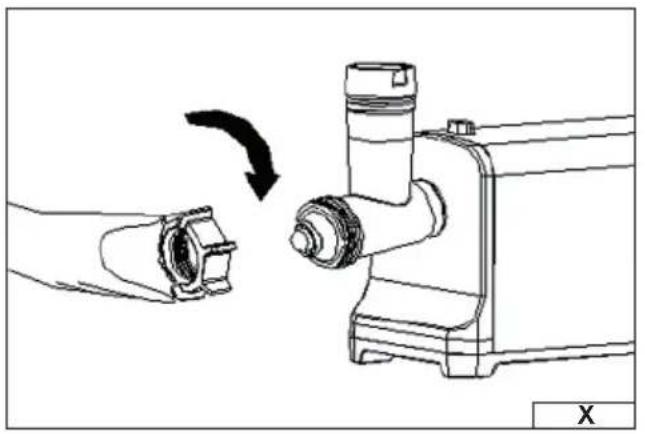
Place the front part of the kibbe attachment on and secure everything by tightening the mounting nut (X).
After installing the attachment, place a container under its outlet. The product is ready to use (XI).
Sausage stuffi ng attachment (XII)
Assemble the meat grinder attachment, but before screwing on the mounting nut, install the sausage stuffing attachment.
After installing the attachment, place a container under its outlet. The product is ready to use.
Additional accessories (available separately)
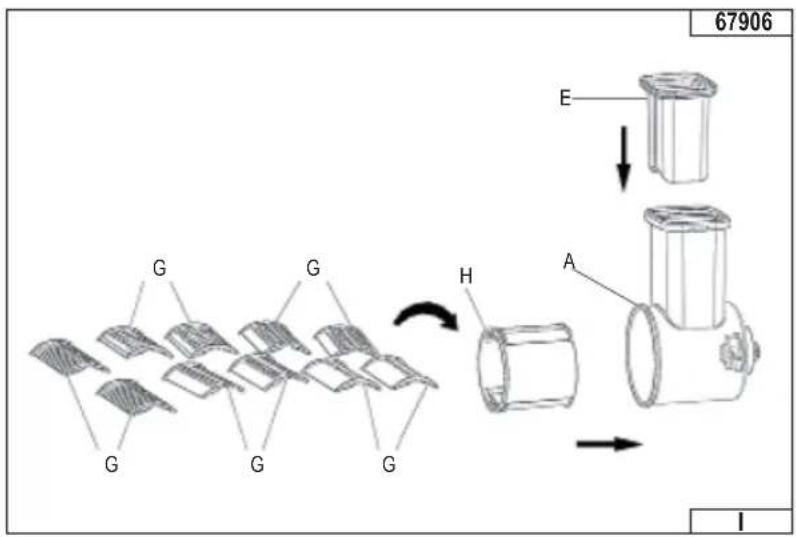
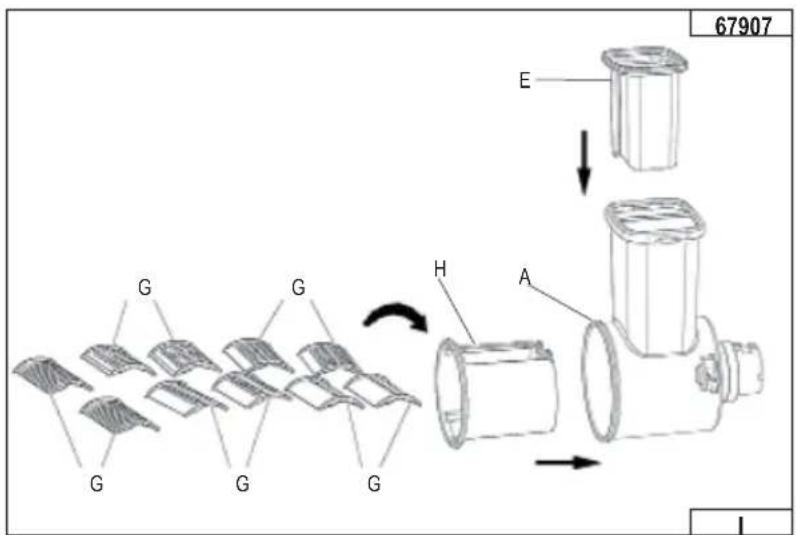
Grating and shredding attachment LUND 67906 (only for model 67903) and LUND 67907 (only for model 67904)
The attachment has a separate body and a separate pusher.
Install the attachment body (A) into the drive socket in the same way as for the meat grinder attachment.
Place the selected pair of blades (G) into the drum (H), then slide the drum into the body.
The drum holes have very sharp edges and care must be taken when handling them to avoid cuts.
The splines on the attachment axle should align with the notches in the hole in the rear wall of the drum.
Check that the push rod (E) can be inserted and removed from the inlet hole without any difficulties.
Note! Do not use the pusher from the mincer attachment in the grater and shredder attachment.
The product is equipped with a drum and five pairs of replaceable blades. Four pairs of blades with rectangular or round holes are used for grating. The larger the holes, the larger the shavings. One pair of blades with oblong holes is used for shredding.
After installing the attachment, place a container under its outlet. The product is ready to use.
LUND 67905 Juicer Attachment (only for model 67904)
Connect the attachment body to the mounting socket, similarly to the meat grinder attachment. Insert the grinding auger (B) into the body. Insert the filter (C) into the juicer, then attach the attachment (D) to the body of the attachment. The attachment prevents the juice from splashing during juicing. The juicer attachment has positioning protrusions that should fit into the cutouts at the front of the attachment. Turn the attachment to secure it in the appropriate place on the body. Place the feed tray (E) on the inlet of the attachment. Juice will flow out through the small holes in the filter and then through the cap, so you should place a container (F) underneath while working to prevent the juice from splashing out.
The front opening of the attachment will release the squeezed fruit pulp as a residue after juicing. Do not allow the juice and pulp to clog the inside of the attachment. Too much juice inside the attachment can flood the drive, which can damage the product and cause electric shock. After installing the attachment, place a container under its outlet, which is included in the set. The product is ready to use.
Product launch
Model 67903
Make sure the switch is in the OFF position, then plug the power cord into the socket. The product has a switch that can be set to positions:
OFF - product turned off ;
ON - product turned on;
SLOW - product turned on at low speed;
REV - reverse gear.
The device will start after setting the switch to the ON position. The switch does not need to be held in this position.
To turn off the device, turn the switch to the OFF position. Wait until the engine stops rotating.
To run the device at low speed, set the switch to the SLOW position.
The switch position marked REV is intended for short-term reverse operation. Set the switch to this position. The auger starts rotating in the opposite direction, which allows you to clean the inside of the attachment from food. To turn off the reverse operation, set the switch to the OFF position, the device will stop working.
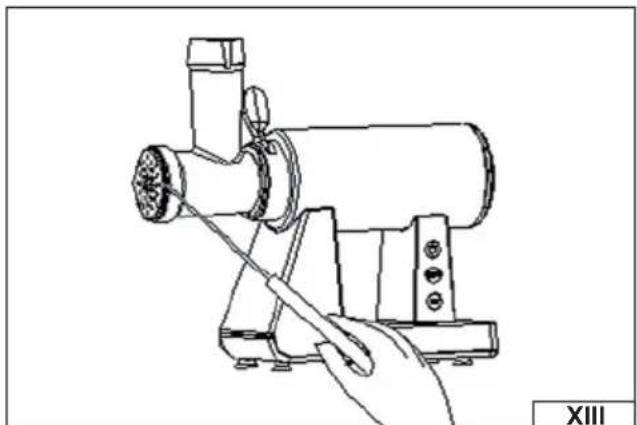
Reverse gear should be used when the grinder's efficiency drops. Rotating the auger in the opposite direction allows the food to be withdrawn from the attachment. Then restart the machine by turning the switch to the ON position and grind the food again. If the efficiency continues to drop, stop the machine, disconnect the attachment, disassemble it and clean it manually (XIII) and follow the instructions in the "Maintenance and storage" section.
After finishing work, turn off the device by moving the switch to the OFF position, then disconnect the product's power cable plug from the power outlet and proceed to maintain the product.
Model 67904
Connect the power cable plug to the mains socket. The product has a control panel with touch buttons. To start the selected function, touch the button:
switch symbol - product turned on;
SLOW - product turned on at low speed;
REV - reverse gear.
EN
The device will be started by touching the button marked with the power symbol on the control panel.
To turn off the device, touch the button marked with the switch symbol again. Wait until the engine stops rotating.
To run the device at low speed, touch the SLOW button after turning on the device.
The REV function is designed to briefly activate reverse gear. Touch the REV button on the control panel. The auger starts rotating in the opposite direction, which allows you to clean the inside of the attachment from food. Touching the button marked with the switch symbol will stop the device.
Reverse gear should be used when the grinder's performance decreases. Rotating the auger in the opposite direction allows the food to be withdrawn from the inside of the attachment. Then restart the device by touching the button marked with the power symbol and grind the food again. If the performance decreases further, stop the device, disconnect the attachment, disassemble it and clean it manually (XIII) and follow the instructions in the section „Maintenance and storage”.
After finishing work, turn off the device by touching the button marked with the switch symbol, then disconnect the product's power cable plug from the power outlet and proceed to maintain the product.
MAINTENANCE AND STORAGE
WARNING! Never immerse the drive housing in water or any other liquid. This may cause electric shock and damage to the product. All attachment and attachment elements can be immersed in water or washed under a stream of water after disconnecting them from the drive unit.
The parts of the appliance that have been in contact with food should be cleaned immediately after use. Dried food residues can stick to the product elements, which can lead to a decrease in the efficiency of the appliance or even its damage. However, if this happens, immerse the parts that are described as immersible in warm water with added dishwashing liquid and leave to soak, then clean with a soft sponge or brush and water with dishwashing liquid. None of the parts of the appliance are suitable for washing in mechanical dishwashers. This can lead to loss of shape, color, texture of the materials from which they were made.
Clean the holes in the grinder attachment sieves with a soft plastic brush. Do not use sharp objects (including scouring pads) to clean any part of the product.
Clean the drive housing with a soft cloth dampened with a solution of water and a mild detergent. Wipe dry. Do not use abrasive cleaners.
Before connecting the device to the power supply, make sure that all parts have been cleaned and dried. Store the product in dry and shaded places. Protect the storage area from access by unauthorized persons, especially children. Store the product in the individual packaging supplied with the product.
TECHNICAL PARAMETERS
| Parameter Unit of measurement Value | |||
| Catalogue number 67903 67904 | |||
| Nominal voltage [V~] 220 - 240 220 - 240 | |||
| Nominal frequency [Hz] 50 50 / 60 | |||
| Rated power | [W] | 350 | 550 |
| Electrical protection class | II | II | |
| Mass | [kg] | 1,7 | 3,0 |
PRODUKTMERKMALE
PRODUKTA RAKSTUROJUMS
CARACTÉRISTIQUES DU PRODUIT
Attachment de Kibbe (IX)


- PL EN
- WYPOSAŻENIE PRODUKTU
- Nasadka do kibbe (IX)
- PRODUCT CHARACTERISTICS
- PRODUCT EQUIPMENT
- SAFETY INSTRUCTIONS
- FOLLOW THE INSTRUCTIONS BELOW
- EN
- PRODUCT SERVICE
- Preparing for work
- Meat grinder attachment
- Kibbe attachment (IX)
- Product launch
- MAINTENANCE AND STORAGE
- PRODUKTMERKMALE
- PRODUKTA RAKSTUROJUMS
- CARACTÉRISTIQUES DU PRODUIT
- Attachment de Kibbe (IX)
Brand : Lund
Model : 67904
Category : Mincer