
67900 - Chopper Lund - Free user manual and instructions
Find the device manual for free 67900 Lund in PDF.
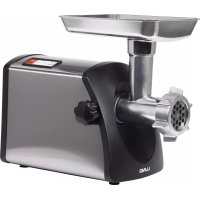
| Product Type | Multifunctional Electric Meat Grinder |
| Brand | Lund |
| Model | 67900 |
| Rated Voltage | 220-240 V~, 50 Hz |
| Rated Power | 550 W |
| Electrical Protection Class | II |
| Weight | 2.1 kg |
| Main Functions | Grinding, grating, mincing, juice extraction, kibbeh preparation, sausage stuffing |
| Housing Material | Plastic |
| Continuous Operation Capacity | 2 minutes maximum, then 20 minutes rest; up to 10 minutes with automatic cooling |
| Included Accessories | Blades, grinding plates of different diameters, grating/milling drums, sausage, juice, kibbeh nozzles, feeding tray, pusher |
| Maintenance and Cleaning | Removable parts washable with soapy water; motor housing wiped with a damp cloth; do not immerse motor; do not wash in dishwasher |
| Safety | 3-position switch (OFF/ON/reverse); accessory locking button; overload protection |
| Intended Use | Household use only |
| Certifications | CE marking |
| Spare parts and repairability | Repair by authorized service center; power cord replaceable only by a professional |
Frequently Asked Questions - 67900 Lund
User questions about 67900 Lund
0 question about this device. Answer the ones you know or ask your own.
Ask a new question about this device
Download the instructions for your Chopper in PDF format for free! Find your manual 67900 - Lund and take your electronic device back in hand. On this page are published all the documents necessary for the use of your device. 67900 by Lund.
USER MANUAL 67900 Lund
Read the operating instruction
Safe contact with food
This symbol indicates that waste electrical and electronic equipment (including batteries and storage cells) cannot be disposed of with other types of waste. Waste equipment should be collected and handed over separately to a collection point for recycling and recovery, in order to reduce the amount of waste and the use of natural resources. Uncontrolled release of hazardous components contained in electrical and electronic equipment may pose a risk to human health and have adverse effects for the environment. The household plays an important role in contributing to reuse and recovery, including recycling of waste equipment. For more information about the appropriate recycling methods, contact your local authority or retailer.
The meat grinder is used to mechanically process meat and other food. Thanks to its rich equipment, the device significantly speeds up and facilitates many cooking tasks. The product is designed for domestic use only and may not be used in commercial applications. The correct, reliable, and safe operation of the device depends on its proper use, which entails:
Reading and keeping the entire manual before the first use of the product is necessary.
The manufacturer shall not be held liable for any damage resulting from failure to observe the safety regulations and recommendations specified in this manual.
ACCESSORIES
The product is delivered complete, but requires carrying out a number of preliminary actions before starting operation. The machine is equipped with the following attachments: for grinding meat, for grating and shredding, for filling sausages, for kebbe, and for squeezing juice.
SAFETY INSTRUCTIONS
NOTE! Read all of the following instructions. Failure to do so may result in electric shock, fire, or injury.
FOLLOW THE INSTRUCTIONS BELOW
Do not use the product in an explosive environment containing flammable liquids, gases, or vapours. Set the device on flat, even, and hard surfaces. If the device is equipped with rubber feet or suction cups, select a surface type such that the feet or pads prevent the device from moving during use. Do not place the device near any heat or fire sources. Connect the device only to the power network with the voltage and frequency indicated on the nameplate of the device. The device must be plugged into an outlet with a protective contact. The plug of the power cord must match the power socket. Do not modify the plug. Do not use any power adapters to adapt the plug to the socket. An unmodified plug, which matches the socket, reduces the risk of an electric shock. After each application, unplug the power cord from the power socket. Do not disconnect the plug by pulling on the cable. Pull the plug out of the socket, always grasping it by its housing. Avoid direct contact with grounded surfaces such as piping, radiators and refrigerators. Grounding of the body increases the risk of an electric shock. The device is intended for indoor use only. Do not expose the device to any precipitation or moisture. If water and moisture enters the device, the risk of an electric shock is significantly increased. Do not immerse the product in water or any other liquid. Do not pour water into the product bowl during operation. Do not overload the power cord. Do not use the power cord to carry, connect, or disconnect the plug from the power socket. Avoid any contact between the power cord and heat sources, oil, sharp edges, and moving parts. Damage to the power cord increases the risk of an electric shock. If the power cord is damaged (e.g. it is cut, its insulation is melted), immediately unplug it from the wall socket, and return it to an authorised service facility. It is not allowed to use the product with a damaged power cord. It is not allowed to have the power cord repaired. It must be changed for a new one at an authorized service centre. When using extension cords, use extension cords with power parameters such as those shown on the device's nameplate. The cross-section of the extension wires shall not be less than the cross-section of the wires of the power cord of the device. This should be checked on the insulation of the power cord and the extension cord,
EN
or contact the manufacturer of the device and/or the extension cord. Do not use the product with damaged components or equipment. If you notice any damage to any part of the device, you must discontinue using it. In this case, the device must be taken to an authorised service centre or replaced by yourself, if this is permitted by the user's manual. Turn off the device and unplug the power cord from the wall socket before you start any work on replacing, cleaning, or adjusting moving parts. This device may be used by children of at least 8 years of age and by persons with reduced physical, mental abilities and persons with no experience or knowledge of the device, if supervised or instructed on its safe use so that the risks associated with it were understandable. Children should not play with the device. Children should not be allowed to clean or maintain the product without supervision. The device is intended for home use only. It is recommended not to exceed 2 minutes of continuous operation, after which the device should be left for about 20 minutes to cool down. During cool-down, unplug the power cord from the power socket. The maximum continuous operation period shall not exceed 10 minutes, after which the product must be switched off and left to cool down for a further 10 minutes. Overloading the product leads to faster wear and can also cause damage to the product. Do not use the device to grind hard food parts. The meat must be prepared for grinding by removing the skin, bones and cartilage. Other food products must be prepared for grinding by removing seeds, stalks, shells and any other hard parts. Do not grind frozen food products.
PRODUCT OPERATION
Preparing the product for operation
Remove the product from its packaging, remove all packaging components, and wash all drive unit components according to the instructions found in the "Product maintenance" section.
Set the product according to the instructions.
Install the meat grinder attachment body or the grating and shredding attachment body. The body should be mounted by pushing it at an angle to the mounting socket and then rotating it so that the inlet opening faces upwards (II).
During installation, you will hear the characteristic sound of the fixing ratchet which secures the attachment body in the socket.
In case of installation problems, you can always press and hold the lock button, fix the attachment and release the lock button. Ensure the assembly has been correct.
A correctly installed attachment body cannot be removed except by pressing the lock button (III) beforehand. Next, rotate the attachment body by a small angle and remove it from the mounting socket.
Meat grinder attachment
Connect the attachment body to the mounting socket. Insert the grinding auger into the body so that the axis of the drive fits into the opening of the auger (IV).
Place the blade on the square socket, the cutting edges should be directed to the outside of the attachment (V).
Apply the strainer. The strainer has positioning tabs on the edge, which should fit into the notches in the front of the attachment (VI).
The strainers supplied with the product have openings of different diameters. The smaller the openings, the more finely the food will be ground.
Caution! Only one strainer can be fitted at a time.
Screw the fi xing nut (VII) onto the outlet thread of the attachment.
Install the feed tray (VIII) on the inlet opening.
Check that the pusher can be easily inserted and removed from the inlet opening.
Sausage-fi lling attachment (IX)
Assemble like the meat grinding attachment, but before screwing on the fixing nut, install the sausage-filling attachment.
Juice-squeezing attachment (X)
Connect the attachment body to the mounting socket and insert the grinding auger into the body.
Insert the filter into the juice-squeezing cap and then the conical auger. Attach the cap to the attachment body and secure it with a nut. The tomato-squeezing attachment is equipped with positioning tabs, which should fit into the notches in the front of the
EN
attachment.
Tighten the adjusting screw at the front of the socket, but do not tighten it fully.
Place a cap on top of the attachment to prevent the juice from spilling out during squeezing.
There will be juice coming out through the small openings in the cap, so you should put a container of such a diameter as to prevent the juice from spilling over during operation.
The fruit pulp will be squeezed out of the front opening of the cap. The tightness of the screw must be adjusted by observing the results of the extrusion. Do not allow juice and pulp to clog the inside of the attachment. Excessive juice build-up inside the attachment can cause flooding of the drive, which can damage the product and cause electric shock.
If the pulp coming out of the opening is excessively dry, loosen the screw slightly. This will help avoid clogging of the attachment.
Fruits with a higher juice content should be squeezed with a more-tightened screw. Less juicy fruit should be squeezed with a less-tightened screw.
Kebbe attachment (XI)
Connect the attachment body to the mounting socket and insert the grinding auger into the body.
The rear part of the kebbe cap is equipped with positioning tabs, which should fit into the notches in the front of the attachment.
Insert the front part of the socket into the kebbe cap and secure by tightening the fixing nut.
Grating and shredding attachment (XII)
The attachment has a separate body and a separate pusher.
Install the attachment body into the drive socket.
Slide the drum into the body. The openings in the drum are very sharp and must be handled with care to avoid injury.
The attachment axis tabs should align with the notches in the opening in the rear wall of the drum (XIII).
Check that the pusher can be easily inserted and removed from the inlet opening.
Caution! Do not use the grinder attachment pusher in this attachment.
The product is equipped with three types of drums. Two drums with round openings are used for grating. The larger the openings, the larger the shavings. The drum with rectangular openings is used for shredding.
After mounting the selected attachment, place a container under its outlet. The product is ready for use.
Starting the device
Make sure that the switch is in the OFF position, then plug the power cord into the socket.
The product has a switch which can be set in three positions.
OFF - product switched off ,
ON - product switched on,
R - reverse mode.
The device will be started after flipping the switch to the ON position. The switch does not need to be held in this position.
The device is switched off when the switch is set to the OFF position. To do this, press the button in the spot marked with "R" lightly and release. Wait until the motor stops.
The switch position marked with "R" is intended for short engaging of the reverse gear. Press and hold the power switch in this position. The auger starts to rotate in the opposite direction, which allows you to clean the inside of the food attachment. Releasing the pressure on the switch will automatically return the switch to the OFF position, thus stopping the operation of the device.
Use reverse gear when the performance of the machine is reduced. Turning the auger in the opposite direction allows the food to be withdrawn from the inside of the attachment. Next, restart the device by flipping the switch to the ON position and then grind the food again. If you still notice a decrease in performance, stop the device operation, disconnect the attachment, disassemble and manually clean it according to the instructions in the "Product Maintenance" section.
When you have finished using the product, turn it off by flipping the switch to the OFF position, then unplug the product's power cord from the socket and begin maintenance activities on the product.
MAINTENANCE AND STORAGE
CAUTION! Never immerse the drive housing in water or other liquids. This may result in electrical shock and will damage the product. All components of the attachments can be immersed in water or washed under the jet of water.
Parts of the device which have been in contact with food should be cleaned immediately after use. Dried food residues can clog the components of the product, which can lead to a loss of performance or even damage the product. If this happens, immerse these parts which were described as immersible in warm water with dishwashing liquid and leave it to soak, then clean with a soft sponge or a brush and water with dishwashing liquid. None of the parts of the device is suitable for washing in mechanical dishwashers. This can lead to the loss of shape, colour and texture of the materials they are made of.
Clean the openings in the juice-squeezing attachment and the grinder attachment strainers with a soft plastic brush. Do not use sharp objects (including scouring sponges) to clean any part of the product.
EN
Clean the drive housing with a soft cloth dampened with a water and mild detergent solution. Wipe dry. Do not use abrasive cleaning agents.
Make sure all parts are cleaned and dried before connecting the device to the power supply. Store the product in dry, shaded conditions. Protect the storage place from unauthorized access, especially by children. Store the product in the unit packaging provided with the product.
TECHNICAL PARAMETERS
| Parameter Measure Unit Value | ||
| Catalogue No. 67900 | ||
| Rated voltage [V~] 220 - 240 | ||
| Rated frequency [Hz] 50 | ||
| Rated power [W] 550 | ||
| Electrical protection class II | ||
| Weight [kg] 2.1 |
PRODUKTINFORMATIONEN
N3 MaIeHbKnx OTBepCTn B HacaIke 6yIeT BblTeKaTb COK, N03ToMg BO BpeMraPabOTbI HyXHO IIOCTaBNTb Nocdy TaKOrO DnaMe-tpa, YTO6bI cok He pa36pbI3rNBaJIcR.
I3 nepedhero OTBepCTnHa cadaKb Byet BbIXOHTb MAKOTb BbIXaTbIX fpykTOB. CTeeneHb 3aTJXKN BnHTa HxKHO nOobpaTb, Ha6bnJa 3a pe3yNbTaTAMN OTKIMa. He donyckaiTe 3akynopnbAHnB HByTPn npNCtABKn, BblBaHHoro cokOM nnM kOtBu. CnUcKOM 60JIbwoe ckONJIeHne coka BHyTPn pncTabKn MOKeT npNBecrN K 3aJIbNAHIO dBIRaTeJIa, YTO B CBOIO OuepeDb MoKeT cTaTb npuHNO nobpeJdeHn npodykTA n nopaxHeHn 3JIeKTPnuYeCKm TOKOM.
Ecnn MxKoTb, BixOaJaa N3 OTBepctnA, CmIuKOM Cyxa, HxKHO HeMHORO OTKpyTntb BNHT. 3TO NO3BOINr N36eKaTb 3aKynOpNBAHn npnCTabKn. FpykTbC 60nbMm CoepjkaHne COKa, HxKHO BixKIMaTb Pnnp CnIbHee 3aTAYom BNHTe. Mehee coHhie FpykTb HyxHO BixKIMaTb Pn nMehee 3aTAYom BNHTe.
PpucmaeKa dnnKe6be (XI)
IopknHOnHeKoprnypncTAbKNMOHTaxHomy rhe3dy,BHyTpBkoprnyca BCTaBbTe uHEK dIpy6Kn MraCa.
3aHnay TaCTb HacaKn IyKe6eI Meet IONsiOnHpyUOuIe BbICTyn, KOTOpBle DOJINXHb BOITN B BBype3bl CnepeDn PnucTAbKN.
HaioKnTe nepeHIOU qactb HacaKn dIg Kebee n 3aKepeNte BCE, 3aTgNBa KpeEnKHyraKy.
IpucaMaeka dner pe3ku u wuHko8ku (XII)
Pnuctabka Imeet OTdeIbHbIK Kopnyc I OTdeIbHbIK TOIkaTeB.
YctaHOBtE Kopnyc npncTabKn B rHe3e DbIrataTeIa.
BBeIe 6apabah BHytpb Kopnyca. OTeBepTna 6apaabaHa NMeOT ouehb ocTpblc Kpa, co6JIouaIte npedocTopoxHocTb npn IX 06CnyxmbAHnn, yTO6bl n36ekatb nope3OB.
BbIcTynblOcnPnCTabKn DoJXHbI cOBnadaTb C HApTe3aMn B OTBepCTnB 3aHHe CTHe 6apabaHa (XIII).
y6eHNTecb, yTO TONkATEb MOXHO 6e3 IpePnTCTBn BINOKNtB N BBHyTb n3 BXOHDHO OTBepCTNA.
BnmaHne! He nCnoJIb3yIe T B npncTabe KToKaTeIg IpnctabKn dIpy6kn mca.
IpoNyKT OChaueH TpeM 6apabaham. Dba 6apab6aHa C KpyIbIMN OTBepCTnMa N ppeHa3HaeyHb I nra TepK. Yem 6oJIbWe OTBepCTn, TeM KpynHee CTpykKa. Bapa6aH C npmoyTohblIMN OTBepCTnMa N ppeHa3HaeyH dn HINKOBKn.
Iocne yCTaHOBKn Bb6paHHo npCTaBKn noe ee BbIXoN oOCTaBte nocydy. PpOdyKT rOToB K paOte.
3anyck npodykma
Y6eNTecb, yTO BbIKIOUaTeB haxoITcB nOIOXeHn «OFF», 3aTeM nOdkIOUHTe BnIKy Ka6eI nITaHn K po3ETke.
IpoNyKT IMeet BbIKIOuATEB, KOtOpB MoKHO YcTaHOBUTB Ttpex NIOXKeHnX:
ON> npOdyKT BkIIOueH;
《R》一3aDnHxOJ.
3anyck yctpoicTbHaCtynaet nocJe nepeKIOUeHnB bIKIOuAtenB nOIOXeHne «ON». He HxKHO ydePKNBaTb BbIKIOUaTeIb B daHHOM NOIOXeHn.
RU
OctaHOBka yCTPOIcTbHa HAcTyaet Nocne IpeKIOUeHnB BbIKNoUaTeJI B NoIOKeHne «OFF».ДЯ STOn UeN IerKo HaKMInTe KHOKNy B MecTe, O6O3NaueHHOM «R», n OTNyCTInTe ee. IdoXdnte, NOKA DBuRatJIb He octaHOBNTcra.
IIOJXeHHe BIKIOuateJI, Oo3NaueHHoe R), npEHa3NaueHO nIg KpaKOBpeMeHHoro 3aNcKa 3aHrOe XoJa. HaxMITE BblKIOUATEJIb I pNiDePKeHTe erO B 3tOM NIOJOxHn. UHEK NaHET BpaAaTbcra B o6paTHyIO CTOpOHy, YTO NO3BOIMTB OTHCTNTB BHyTppeHHIOU qACTb PnIcTaBKn OT NIIeBbIX IpOdyKTob. Iocne OTnyCKAHn BIKIOUaTeJIa OH aBTOMaTHueCKn BO3BpaAaETcR B IIOJoxHHe OFF pa60ta yctpoiCTBa ocTaHabINBaetcra.
3aHnXoH HyxHO nCOnb30BaTb B Cnyuae yMeHbSeHnna 3ΦΦeKTHBHOCTn pa6Otbl McOpbyk. BpaUHe NHeKa B o6paTHyIO CTOPHy IO3BOJAE TbbEcTN PNOyKTbI IN3HyTpN pNCTABKn. 3aTeM NOBTOpHO 3aNyCTNe YcTPOiCTBO, nepeKlouaB bIKNoYateJIb B NOLOKeHne «ON», n NobTOpHO n3MeJIbHTb PNOyKTbI. EcnN BCE eue Ha6NIOdaETc CHIXeHne 3ΦΦeKTHBHOCTN, OCTAHOBITE pa6OToY cTPOIcTBa, OTKIOHNTe pNCTABky, DeMOHTpyIte ee I OCHNTe BpyHyIO B COOTBeTCTBNI C yka3aHnAIMn n3 pa3dena «TexHnueckoe ObcNoyKBaHne npOdyKaT»
Iocne 3aBepHnna pa6oTb BblKnIOHTe ycTPOcTB, nepeKIOUaB bIKIOUaTeNB nOIOKeHne «OFF», 3aTeM OTKIOUHTe BUNIky Ka6eI NITAHN O T p03ETKN IN POBEdnte texHNueckoe obcnykBaHne npOdyKaTa.
TEXHNUCKOE OBCJLYKINBAHNE IN XPAHEHNE
BHIMAHIE! HnKorla He noprkaTe DBrataB B OBe IIN dpyroJ XnKocT.N 3TO MoKe TnpBecT N npaKeHIO 3JIeKtpueCKm TOKOM INOBpeXdeHIO pOdykTa. IoprkaTb B BObE IIN MbIb NOe cTpye MOxHO BCE 3JIeMeHTb I pNCTaBOK.
Yactn obopydOBaHn, KOtOpbIe NmEJI KONTAKT C NIIeBbIMN PpOyKTaMn, HxJHO OUnCTnB cpa3y Nocne yNoTpeBHeHn. 3aCOXUHe OCTATKIN NIIeEBbIX PpOyKTOB MOrY 3aJIeNTb 3NeMeHTb IpOyKTa, YTO MOxET PpNBecTI K CHNXeHIO 3ΦΦeKTHBHOCTn pa60tbl obopydOBaHn INI daxe ero NobpejdeHIO. EcII Bce-TAKN 3TO pON3OJET, NORpy3NTe TE 3JeMeHTbl, B Cnyae KOTopbIX 3TO BO3MOxHNO, B TEPNYBOy C DObABKOJ XIKKOCTN INI MaITbA NOCyDbl INaIte en PpONITaBCr, a 3aTEM OChNTe MMRKOn R6KO INI UTeKON IN BOOJ C XIKKOCTbO INI MaITbA NOCyDbl. Hn OJa n3 qacteY cTPOJCTBa He npEnHa3NaYeHa dInrMbTB B MEXAHuecknx NocyDOMoeuHbIX MaunHax. 3TO MOxET PpNBecTI K NOTEpe fOpMbI, Zbeta, fakTypbl MaTePnaIOB, n3 KOTopbIX OHN IN3ROTOBJeHbI.
OTBepCTN B npntabke DnO OTKIMa coka nIN B peWetkax Dnpy6kn MCA ONUCTNE C NOMOUI MOIKOJ UeTKn I3 PnactMaccbI. He nCnoJIb3yIte ocTpbie npedmetbl (B TOM uHcJIe MoaJIKN) DnO ONUCTKNIIOBOrN 3IeMeHTOB pOdykTA.
OuHCTnTe KOpNc DnIraTeJI MRAKo TKAHbIO, CMOeHHoPacTBopOM BObl N MRAKOrO YnCTaIeO cpeCTBa. BbITpNTe Docyxa. He nCNoJIb3yIte a6pa3INBIIe YnCTaIe OpeCTBa.
IpeKJde HEM NIOKNIOHTb YcTPOINCTBO K NCTOHNky NITAHN, y6eINTECB, YTO BCE DeTAJI N 6blNI ONUHEnBI N BbCyUHeB. XpaHInTe npOyKT B CUXNX MecTx, 3aUNIeHNbIX OT COHEnbIX NUYe. 3aUNITe MeCTo XpAHENHn OT DOCTYNa HE yNOHOMOeHHbIX JINU, OC06EHNO DTeE. XpaHInTe npOyKT B NOTpeINbCKnx YNAKOkBax, NOCTABJREMBIX BMeCTe C pOdyKTOM.
TEXHnueCKNE NAPAMETpbl
| ПараметрЕденизмерения 3начениe | ||
| Homер по Каталогу 67900 | ||
| Hominahльно наразоженце [В~] 220-240 | ||
| Hominahльна чASTOTA [Гц] | 5 | 0 |
| Hominahльна мошноctrь | [Вт] | 550 |
| Клasc онлайнпческий зашиты | II | |
| Bec | [Кг] | 2,1 |
XAPAKTEPNUCTIKA IPNIJAdy
Mrcopy6ka BnKOpncTOBc8d mexAHIO obpo6kn Mca Ta iHxN npOyKTIB xapUyBaHHa.3ab4Kn 6aratomy o6naHaHHO, MaunHa 3NaH0 npucKOpE i nonerWye 6araTo poBt B KuxHi. PpOdyKT pO3pOBeHm BnKIOuHO dI r DomauHbOro BnKOpnCTaHH, Noro 3abOpOHeo BnKOpncTOBvBaTH B KOMepuiHnx cIJax. IpaBnIbHa, HadiH a I 6e3neH a po6ota npictpo 3aJIeKHTb BiD npAwnbHoiPo60TN, TOMy:
Ipeed BnKOpncTahHm npOdykTy npOuHTaTe cio IHcTpkyciu i 36epexitb ii.
Bupo6nK He Hece BiIIOBiaJbHocTi 3a 36uTK, Aki BUNKIN B pe3yIbTaTI HeDOTpMaHHra IpaBn TexHikn 6e3neKn i peKOMHa- uicui ic IHcTpykuii.
OBIIADHAHHIPOOyKTY
IpoDyKT noCTabJIeCTbC B KOMnJIeKTHOMy CTaHI, aIe BIMarac npoBeHnI niIroTobKn nepeI noaTKom poBOTn. MaunHa ocha- 1eHa HAcTyINHMn IpnCTpOAMN: dIg OTpMaHHr M'ChORO fapSy, dIg TepT Ta nOpriBHeHnI, dIg HaunHKn KObAc, dIg KiB6i (Ke6be) Ta dIg BNTUckAHn COKy.
IHCTPYKl3 TEXHIKN E3NEKN
YBAG! IpoHTaIe Bci HabeJeHnxue iNCTpyKlJI. HeOpTpMaHnI cieI BmOrn MoKe np3BeCTn Do ypaXeHHeNEktpuHm CTpyMOM, NOxeki a6o TpaBMn. HEOBXdHO BVKOHYBATN HACTyHlIHCTpyKLII
He BnKOpNCTOBuYTe npNCTpiB yM0Bax NiIBNueHoi He6e3neKn BVbxy, B cepeoBnui, 1O MICNTb IeRKO3aIMnCTi PiDHN, Ra3n a60 nap. PnpCTpi NobuHEn 6yTN BCTaHOBNeHn Ha pIBHni, nlockii i Tbepi NobepxHi. JaIoo npNCTpi OChauHn rymOBmH hIXkamn a60 npncockamn, Bn6epitb TnP nobepxhi, 106 niDcTaba 60 HIXKN 3anobirn nepeMiueHHIO npNCTPOI niD qac BnKOpNCtAHn. He cTabe npNCTpi N6bn3y dJxepen TeNla a60 BorHIO. PnpCTpi NIDKluOaHTe TInbKn Do MepeXeBOi Hanpyr n i cactOTn, 3a3NaueHm Ha TabnUzI npNCTPOI. PnpCTpi NobuHEn 6yTN NIDKluOeuHn Do PO3ETkn i 3axNCm KOnTAkTom. StTeCebJIIO XINBLeHnRA NobuHEn NIDXODHTN Do PO3ETkn. He MoXHa 3MIHOBATN BnIKy. He MOXHa BnKOpNCTOBvBATn 6yd-b-aki nepexidHnKn DnAapTaQII BnIKN Do PO3ETkn. OpriHaNBa BnIKa, 10 NiDxOHTb DO PO3ETkn, 3HNKyE PN3NK UpaXeHHN ENEKTPNCHM CTPYMOM. PicraKoXHOro BnKOpNCtAHn CnD BnIHATN WTeNCelb 3 PO3ETkn. He Bntaryte wTeNCelb 3 PO3ETkn, NotarHyBss 3a Ka6eB. BnMaIoUH NtEncelb 3 PO3ETkn, 3ABXdTIpMaIte 3a II KOpync.Yhkaite KOHTAKTy 3 3aEMNeHmN NOBepxHMy, TaKMM YK Tpy6n, padiaTopn i Kynepn. 3aemHenr Tina NiDBuSyE PN3NK UpaXeHHN ENEKTPNCHM CTPYMOM. PnpCTpi NpN3NaueHm TInbKn DnApoBToB NpIMiSeHHI. ObepiraTe npNCTpi BId DoUy a60 BOIOnr. Boda i Bonora, 10 notpanlnoB BCEpEnHy npNCTPOI, NIIBNUOytb PN3NK UpaXeHHN eNEKTPNCHM CTPYMOM. He 3aHypioTe npNCTpiy y Body a60 iNDiPiH. He BnBaIte Body B YAry npNCTPOI niD qac PO6OTn. He nepBaHTaXyIte Ka6eB JINBLeHH. He BnKOpNCTOByTe Ka6eB JINBLeHH DnApeHceHH, PNecDAHNN I BiDEdHAn H BUNK 3 PO3ETKn. Yhkaite KOHTAKTy Ka6eHIO JINBLeHH 3 HarpITUM NOBepxHMy, MacLOM, ROCPMN KpaAMi i pyxNBIMN elementam. NsKOJHHe H Ka6eHIO JINBLeHH NIDBNUeE PN3NK UpaXeHH N ENEKTPNCHM CTPYMOM. Y pa3i NsKOJHHe H Ka6eHIO JINBLeHH (Hanp., nepepi3y, po3-llabenni 30Jou) cnD heraiHo BiD'EDHaTn BNkky Ka6eHIO 3 PO3ETKn, a notim nepedaTNI PPNAID B ABTOPIN3OBAHN cepBichN ueHTp. 3a6opOHCTBCB NIKOPNCTOBYATN npNCTPII 3 NOsKOJHm KabeJe M XINBLeHH. 3a6opOHEO NPOBOITN peMOHT Ka6eHIO JINBLeHH,
UA
Kabenb noBHeH 6yTn 3aMHeHn Ha HOBn B aBTOp3OBAHOMy cepBichOMy ceHTpi. JaKo BnKOpNCTOBYIOBcra NOOBKyBaHi, cIiD 3aCToCOBYBaTH NIOOBKyBaH 3 napMeTpAmn DxKepeJa XNBHeHHa, 3a3HaueHmHa TaBnUcI npNCrpoI. PepEn H xin NoobKyBaHa He NobInH e H MeHne IonepeuHoro nepeip3y npoBODIB KabeIO XNBHeHH npNCrpoI. PepeBipTe ue Ha iOJauCi CINOBoro KaBENIO I NOOBKyBaHa aBO 3BepHITbcg DO BnPOBnKa npNCrpoH / aBO NOOBKyBaHa.He BnKOpNCTOBYte Bnip6 i3 NOXODJeHNM KOMNoHEtAMn aBO NOKoJXeHNM ObladNaHHaM. RaKIO Bn NOMITIN N0XoKOJeHNH 6yDb-RAKOI qactHn N pNCTPOIO, Ioro NODJIbSe BnKOpNCTAHNRA 3aBOPoHNO. B UcbOMy BnPAnky npNCrpi CnID 3dATN B ABTOP3OBAHm CEPBICH N CEHTP aBO 3aMIHTN CIO uACTNH y CamOCTIHNO, RaKIO IHCTpyKci J KOpNCTyBaHa DOyCKAc TAKNI PemOH.TpeE IOaTKOM 6yDb-RAKNX DI, NOB'3aHnx 3aMiHO, YNuHem ABO peYlHOBAHNM pyxomnx qactTN, BIMKHITb npNCrpi I BiD EDHaNTe SHyp XNBLeHHA Bd PO3ETKn ENEKTpomepexki.LeIN pncrpi MoKe BnKOpNCTOBYBaTscn DITbMM CTAPWe 8 POKIB TA OC6AMN 3 OBMeJehmN F3NUHMN, NCIXHMM MOXINBOCTAMN, a TAKOX JIOBmN 3 BIDCYTHICTO DOCBIy I 3HaHNN pRnlaNy, RaKIO 6yDe 3a6e3NeueHn HAIIAD abo INCTpykTAX, knn CTOCYETBCBn BnKOpNCTAHNRA OblADHaHHa BnOHAHHa OBnDAHNN 6e3NeuHM CNOCOBom, TAKIM YINOM, 506 NOB'3aHI 3 ZIM Pn3IKN 6yIn 3pOzMINI. He Do3BOJMaTE DITram rpatncs 3 npnaDM. DITN 6e3 Harny He NobHHI uCTHTN pncrpi I BIKOHyBaTH texHniche OScnyROvBaHH naPnlaNy. LcE npcrpi npn3HaueHm TiIbKn DnA DomAunBo R BnkOpNCTAHN. PekomeNDyETBCa He nepBVnBuAtn 2 XBnIHNb 6e3nepePBHOI poBOTn, nicra QOR npNCrpi NobInEH OCTIRATN 6bn3bKO 20 XBnIH. IpOTAROM zboR Oacy BIDeHaite shHyp BID eLEKTPnuHO pO3ETKn.MakcImalhN b6e3nepeBHH pOboH uac He NobHHe NpeBVnBuAtn 10 XBnIH, nicra QOR npOdyKT NOBInEH 6yTN BIMKHeHni i camocTIHO OxONoDxyBaTncs 10 XBnIH. PpeBaHTaeHH NPOdyKTy npnsBODNTB do IORo SwBDIwOro 3HOCy Ta MOnke TAKOX CNPunHNrno N0XoKDJeHH npOdyKTy.He BnKOpNCTOBYIte M'acopy6ky dIpa NepemeJIIOBaHH TBePnX ShMaTOckIB iXi. Myco NobHHO 6yTN rOtOBm Do nepemeJIIOBaHH, cnID ycHyTu WkIPy, kictkn i xprui. lHiwi npOdyKTN xapVBAHH NOBHHI 6yTN NiDrTOBNeH i DnnpDioHH YSNXOM yCyHeHH HACINH, CTBe9, skapnytn Ta iHxN XTBepDlx qactHN. 3a-6bOpOHeHo MOJOTN 3amopoxeni npOdykTn.
PpabnIbHO BcTaHOBNeHH KOpNc HacaKn He MoXHa 3HrTn IHaKWe, HIX 3a DonomoroIO HaTnCKaHH KhONKn 6IokyBaHH (III).
Iotim noBepHItb Kopnyc HacaKn Ha HeBeNkyn KyT i BnMItb NOro 3 MoTHaKHO rOPO3>CMy.
Hacadka dny m'acchoo qapuy
PiEeHnTe KOpNc HacaKn Do MOHTaXHo rpo3>Emy. BCTABTe WHeK dIaFpsi B KopNc TaKIM YHOM, 0o6 npBIDHm BaI doCraRab WHeKa (IV).
Po3mictb Ie3o Ha KBaIpaTHn po3>EM , pixyHi KpOMKn NOBHHI 6yTN CKePOBaHI DO 3OBHIIHbOI CTOpOH NkPInneHHA (V).
BctaHobitb ciTactn fipbtp.CiTactn fipbtp Mae no3uiohyoichi Hkpaq,aki NobHHI nOtpanITn Ha na3n B nepehni
UA
actnhi kpinneHH (VI).
CnTa y Ucbomy npOdyKTi MaHOTb OTBOpn p3HOro diametpy. Ym MeHwe OTBOpn, Tm 6IbU DoKnaADHO npOdyKTn xapyBaHHa 6dYTB 3MeJIeHi.
Ybaro! OHOUacHO MoKHa BCTaHOBuTn NIIe OdHe CnTo.
PpInkpiitb KpinnBHyraKy (VII)do Bnynckhoip3b6n HacaKn.
TnKlaIb NotOK noaui (VIII) Ha BxidHn OTBip.
Ipebeipte, Mu MoxHa IerKo BCTaBHTn i BNTaRHyTn 1TOBxAu i 3 BxIDHO OTbOpy.
Hacadka dna HauuHKoebacu (IX)
36epitb, kHacay dny apeB BCTAHOBENHm KpInnIbHOI raKu BCTAHOBITb KpuKu dyHaunHKoB6acn.
3aKpytibpeyIIOUHnBnHTHa nepeDHIuCTNIH HacaDN,ane He 3aTayTe NOro nobHicTIO.
Toklaitb kpiuHa BepxHIO qactHy HacaK, 063anobirn CnNBAHHIO COKy iD cac BNKMamHra.
Cik 6ynde Bntnckatncb yepe3 MaIeHbKi OTBOpN B Hacaundi, Tomy niD yac po60Tu Heo6xIDHO niCTaBHTu TapiJky 3 TaKIM Jke diameTpOM TAKIM YINOM, 0o6 cik He 6pN3kAB.
3 NpeHbOTo OTBOPY HacaKn BnabNBOaTMtBcra MjKoTB pkyktI. CtyniHb 3aTaryBaHHr TBnHTa cnID Do6pTa, cnoctepiraUoy pe3yIbTaTN BxKIMMaHH. He cnID dOnyckatn, uO6 BCEpeHi HacaKn 6NoKyBaNCb ciK iM'koTb. 3aHaITo BeNIke HAKONiueHH COKY B cepeHi KpInHeHH MoKe np3BeCTn DO 3aTOnJIeHH PpINBOy, OIO MOKe NoIKoDnTn Bnpi6 Ta BnKNIkaTn ypaXeHH eJIeKTpNHm CTpyMOM.
KIO MOKOTb, IO BNXOHTb 3 OTBOPy, HAMIPHO cyxa, 3NfRka po3kpyTb TBHNT. LEO3BOJNTb yHNKHyTN 3a6NOKyBaHHHa cAaKn.
ΦpykTN 3 BnMm BmCTOM COKy cnid BnKmATn npn 6JIbI 3akpyeHOMy TBnHTi. ΦpykTN 3 MeHIMBmCTOM COky cnId BnKmATn npn MeHs 3akpyeHOMy TBnHTi.
Hacaadka do kebbe (XI)
Piknioitb Kopnyc HacaKn Do MOnTaXHoro po3Emy Ta BCTaBte IneK dIe npy BCEpeDInHy Kopnycy.
3aHaactnHa HacaKn DnA Ke6e Mae no3uHHi HakoHeuHKN, kki NobHHI nOtpanTu y BnCTyHn Ha nepeHni YacTnHi KpiJIleHH.
PoklaTb nepeDnH yacAnKn nIg Ke66 Ta 3akpinIt, 3aTgHyBwn raKy.
HacaKa dna mepmma nodpiBHeHHa (XII)
HacaIkaMaeOkpemnKopnycIOkpeMnUToBxau.
BctaHObItb Kopnyc Hacaikn B po3>Emi npnBOy.
BCTaBte 6apabah B cepenHy Kopnucy. Bapa6aHHi OTbOpn MaOtB dyke roctpi KpOMKn, TOMy cniD 6ytN dyke obepeKHMn, 106 yHKHTn npizib.
OTbOpn oci hacaKn noBHHi 36iraTncra 3 BmIMkAmn B OTbopi B 3aHni CTInu 6apa6ana (XIII).
Ipebeipte, Mu MoxHa IerKo BCTaBHTn IBTuRHyTn 1TOBxAu i3 BxIDHOrO OTbOpy.
Ybara! He BnKOpncToBnyTe wTobXaay BiHaacAnKn dIy aapuy.
Ppnaad ochaen Tpboma 6abaahamn. Dba 6abaahn 3 Kpynnm OTbopamn BknpncTObyOTcra nTepra. Ymm 6iNbwe OTbOp, Tm6JIbwe ctpyKn. Bapabah 3 npmykuyHMn OTbopamn BknpncTObyETcra nIOpi6HeHHr.
Iicn yctahOBKn Bn6paHOi hacAn Knn Nomicitb nocyd niD OTBip. Ipoayk rrotobn do po6oTn.
YeIMKHeHH npucmpo6io
IpekoHaTeBc, 0 npepemkauch 3haxoHtbc y noonxehHi OFF, a notim niknouitb shypr knbteHHdo po3eKn.
IpoNyKT Mae nepemMkaq, kmy MoKHa BCTaHOBUTN B TpbOx NonoXeHHx.
OFF- npOdyKT BmKHeHn,
ON - npoayKT BkIIOueHn,
R-3aDiHn xiD.
Pnncpi 6yde BBIMKHeHO nicJ npemHKaHH y no3uio ON. NpepMKaH He nOtpi6Ho yTpmyBaTn BcBOMy noJIOKeHHI.
Pncpi Bye BmKHeo nicn nepeMnKaHH y no3uio OFF. Iy zuoro Jerehko HATnCKaTe KhoNky Ha Miczi 3 no3HaQKO R icocna6te Tnck. NoukaTe, nOK dBnHyH He 3ynnHtbcra.
Ipo3nuipepemkaua 3 no3naKoR npn3NaeHa dny KOPOTKOaCHOrO yBIMKHeHH 3BOPTOHoi nepaui. HATNCiTb i ytpmuy Te nepemkay u ui no3nui. CbePINO nouHae o6epTaTncB npoTNexKHOMy HanpMky, 10do3BOJRE ONUCTNTu CEpeDHy hacaKn
UA
BID npOdykTIB. Ocna6nEHH TaCKy Ha BmMkaay npu3BeJe Do TORo, 10 cam nepeMknay nobepHeBcra B noNoXeHHA OFF i TMM CAMIM 3ynHHTb po6To npncTPOIO.
Pyx Ha3ad cIiD BnKOpNCToBvAtN, KOH npOyKTnBHCtB MaunHKn nadae. O6epTahra CbepDa y 3BopOTMy HAnpMky Do3BOJAE BVITRHT MeHenn npOyKT 3cepeHHn HacAdKn. Notim nepe3anyctIt npucpti, nepemictu npepmukay y noIOKeHHON, i 3anyctItb npouec nepemeliobAHnue pa3. KaTO Bu BCE ue cnoctepirae Te naIHn npOyKTHBHOCTI, 3ynHITb npncpti, BiDcHaHe HacAdKy, 3HIMtB II Ta OHCTITb II BpyHy, k ONcaHO B po3dini «ObcnyroByBaHH npOdykTy»
Iicra 3aBepseHH po60Tu BmKHiB npncpti, nobepHyBm npeMnKa y noNoKeHHA OFF, notim BiDcHaHte wTeNceJIb Ka6eJIO XINBHeHH BIDpo3ETKn Ta noOHtB texHlne o6CnyroByBaHH npOdykTy.
TEXHUYE OBCNYOBYBAHHI 3BEPITAHN
YBAI! Hikon He 3aHpyoTe KOpNc npBody y BODy u6 Byb-ky iHsy piDnHy. Lc MoKe CnpuHHTu ypaXeHHr eNeKTPuHm CTpyMOM Ta noKoHTu Bpi6. 3aHypTu y BODy a60 IpomTu nID NOTOKOM MOKHa Bci enemeHTu HacaDok.
YactHnN pncToIO, 6bU IN B KOHTaKti 3 iKeIIOBHHI 6bTn OunuHe Hi BIDpa3y nicra BIKOPnCTAHn. CyXi 3aJIuNk iXi MOxTyB 3aKynpoBAtn KOMnoHEnTI npcTPOIO, 10 MoKe npu3BeCTn Do 3HNKeHHn PpOdyKTNBHOCTI a6o HabITb NOnKOJKeHHn PpOdyK TY. RaIO BCE-TAKn Ue cTaHETbcra, 3aHpyTe Ue enemeHTn, 10 bUIn Bnue OnncaHI AK Taki KOTpi MOxHa 3aHypBoATn, B TeINy Body 3 DobabkoIO MmIoOI pIDHn I daNe IM pOcoOHNTscA, a Notim OChCTb M'koIO uTKOIO I BOHO 3 MIOUOIO pDINOHO. KoDHa qactNa npcTPOIO He NiIXoNDtB dner MMTT B NocydomnHnx Maunhax. Lc Me MoKe npu3BeCTn Do BTPaTH n fOpMN, KOlbOpy, TekCtyn MaTepiJIb, 3 JKNX BOH N 3pO6JIeHI.
OTbOpB H hacaKax dIy cOky Ta cIITax B hacaKax dIy fapSy OoHCTnTn 3 MkoIO pNactNKOBIO uTkoIO. He BIKOPNCBOyTe roctpi npedmetn (BKJIouaOHMy MoaAN) dIy NUIeHHy 6yD-koI qAcTHNI pNcTPOHO.
OuHCTITb KOpNc IpnBODy MRAKOHO TKAHNHO, 3MOeHOIO PO3HNOHOM BOIN I MRAKOHO MNHOORO 3aco6y. HAcxO BnTpIb. He BnKOpNCTOBYte a6pa3NBHI YCHTAYI 3ac06N.
IpeepiiknHHeHHm npicpOIO Do xkepeHa 3miHoro ctpMy BneBHITbC, 0o Bci Detani 6yIn Ounuenei i BucyuHeni. 36epiraTe npodyKT B cynx McIax, 3axuueHNx BiD COHryHIN xpomeHIB. C1id 3axncTnM micue 36epiraHHB iD DocTyN yHema e ynoBHOaKeHnx ocio, oocnBO dTe. 36epiraTe npodyKT B cNoXNBHX ynaKOBkax, 0o nocTabnIObTbC pa3om 3 npodykTOM.
TEXHIUHINAPAMETPN
| Параметр Одениya Вимірковань 3наченя | ||
| Каталожни Homep 67900 | ||
| HominHLha happyra [B~] 220 - 240 | ||
| HominHLha chactota (Гц) | 5 | 0 |
| HominHLha notykhnicb: | [Вт] | 550 |
| Клас[elektprinnoу зхисту ]II | ||
| Maca [кг] | 2,1 |
PRODUKTO CHARAKTERISTIKA
CHARACTERISTIQUES DU PRODUIT
EQUIPEMENT DU PRODUIT
ON - product ingeschakeld,


- ACCESSORIES
- SAFETY INSTRUCTIONS
- FOLLOW THE INSTRUCTIONS BELOW
- EN
- PRODUCT OPERATION
- Preparing the product for operation
- Meat grinder attachment
- Sausage-fi lling attachment (IX)
- Juice-squeezing attachment (X)
- MAINTENANCE AND STORAGE
- TECHNICAL PARAMETERS
- PRODUKTINFORMATIONEN
- RU
- TEXHNUCKOE OBCJLYKINBAHNE IN XPAHEHNE
- TEXHnueCKNE NAPAMETpbl
- XAPAKTEPNUCTIKA IPNIJAdy
- OBIIADHAHHIPOOyKTY
- IHCTPYKl3 TEXHIKN E3NEKN
- UA
- Hacadka dny m'acchoo qapuy
- TEXHUYE OBCNYOBYBAHHI 3BEPITAHN
- PRODUKTO CHARAKTERISTIKA
- CHARACTERISTIQUES DU PRODUIT
- EQUIPEMENT DU PRODUIT
Brand : Lund
Model : 67900
Category : Chopper