67901 - Mincer Lund - Free user manual and instructions
Find the device manual for free 67901 Lund in PDF.
| Product type | Meat grinder and accessories (grating, grinding, stuffing, kibbeh) |
| Brand / Model | Lund / 67901 |
| Rated power | 1200 W |
| Voltage / Frequency | 220-240 V ~ / 50-60 Hz |
| Electrical protection class | II (double insulation) |
| Weight | 4.4 kg |
| Maximum continuous operating time | 10 minutes, then 10-minute rest |
| Speeds | Full speed, half speed, reverse |
| Included accessories | Hole plate (3 sizes), blade, grinding screw, feed tray, sausage nozzle, kibbeh nozzle, grating drum (2 sizes) and grinding drum (rectangular) |
| Main functions | Meat grinding, grating, grinding, sausage stuffing, kibbeh preparation |
| Maintenance | Accessories washable with water (not dishwasher safe), motor housing wiped with a damp cloth |
| Safety | Stop via STOP & RESET button, reverse to unclog, overload protection |
| Spare parts available | Blade, grinding screw, plates, drums, fixing nut, rings |
| Repairability | Repair by approved center only; power cord non-repairable, must be replaced |
| Intended use | Domestic only (not commercial) |
Frequently Asked Questions - 67901 Lund
User questions about 67901 Lund
0 question about this device. Answer the ones you know or ask your own.
Ask a new question about this device
Download the instructions for your Mincer in PDF format for free! Find your manual 67901 - Lund and take your electronic device back in hand. On this page are published all the documents necessary for the use of your device. 67901 by Lund.
USER MANUAL 67901 Lund
PL MASZYNKA DO MIELENIA MIESA
GB MEAT MINCER
D FLEISCHWOLF
RUS MRCOPY6KA
UA M'ACOPY6KA
LT MÉSMALÉ
LV GALAS MALAMÁ MASINA
CZ MLYNEK NA MASO
SK MLYNCEKNA MASO
H HUSDARALO
RO MASINA DE TOCAT
E PICADORA DE CARNE
F HACHOIR A VIANDE
I TRITACARNE
NL VLEESMOLEN
GR MHXANH AAEESHE KPEATO

CE
PLGB
Read the operating instruction
Safe contact with food
Be30NaChbIKoHTaKT C NIIeBbIMN pOdyKTAMM
Be3neuHn KOHTAKT 3 Ijkeo
Saugus salytis su maistu
Dross kontaks ar partiku
Bezpečné kontakt s potravinami
Second class of insulation
The meat grinder is used to mechanically process meat and other food. Thanks to its rich equipment, the device significantly speeds up and facilitates many cooking tasks. The product is designed for domestic use only and may not be used in commercial applications. The correct, reliable, and safe operation of the device depends on its proper use, which entails:
Reading and keeping the entire manual before the first use of the product is necessary.
The manufacturer shall not be held liable for any damage resulting from failure to observe the safety regulations and recommendations specified in this manual.
ACCESSIONS
The product is delivered complete, but requires carrying out a number of preliminary actions before starting operation. The machine is equipped with the following attachments: for grinding meat, for grating and shredding, for filling sausages, for kebbe, and for squeezing juice.
SAFETY INSTRUCTIONS
NOTE! Read all of the following instructions. Failure to do so may result in electric shock, fire, or injury.
FOLLOW THE INSTRUCTIONS BELOW
Do not use the product in an explosive environment containing flammable liquids, gases, or vapours.
Set the device on flat, even, and hard surfaces. If the device is equipped with rubber feet or suction cups, select a surface type such that the feet or pads prevent the device from moving during use.
Do not place the device near any heat or fire sources.
Connect the device only to the power network with the voltage and frequency indicated on the nameplate of the device. The device must be plugged into an outlet with a protective contact.
The plug of the power cord must match the power socket. Do not modify the plug. Do not use any power adapters to adapt the plug to the socket. An unmodified plug, which matches the socket, reduces the risk of an electric shock.
After each application, unplug the power cord from the power socket. Do not disconnect the plug by pulling on the cable. Pull the plug out of the socket, always grasping it by its housing.
Avoid direct contact with grounded surfaces such as piping, radiators and refrigerators. Grounding of the body increases the risk of an electric shock.
The device is intended for indoor use only. Do not expose the device to any precipitation or moisture. If water and moisture enters the device, the risk of an electric shock is significantly increased. Do not immerse the product in water or any other liquid. Do not pour water into the product bowl during operation.
Do not overload the power cord. Do not use the power cord to carry, connect, or disconnect the plug from the power socket. Avoid any contact between the power cord and heat sources, oil, sharp edges, and moving parts. Damage to the power cord increases the risk of an electric shock. If the power cord is damaged (e.g. it is cut, its insulation is melted), immediately unplug it from the wall socket, and return it to an authorised service facility. It is not allowed to use the product with a damaged power cord. It is not allowed to have the power cord repaired. It must be changed for a new one at an authorized service centre. When using extension cords, use extension cords with power parameters such as those shown on the device's nameplate. The cross-section of the extension wires shall not be less than the cross-section of the wires of the power cord of the device. This should be checked on the insulation of the power cord and the extension cord, or contact the manufacturer of the device and/or the extension cord. Do not use the product with damaged components or equipment. If you notice any damage to any part of the device, you must discontinue using it. In this case, the device must be taken to an authorised service centre or replaced by yourself, if this is permitted by the user's manual.
Turn off the device and unplug the power cord from the wall socket before you start any work on replacing, cleaning, or adjusting moving parts.
This device may be used by children of at least 8 years of age and by persons with reduced physical, mental abilities and persons with no experience or knowledge of the device, if supervised or instructed on its safe use so that the risks associated with it were understandable. Children should not play with the device. Children should not be allowed to clean or maintain the product without supervision. The device is intended for home use only. It is recommended not to exceed 2 minutes of continuous operation, after which the device should be left for about 20 minutes to cool down. During cool-down, unplug the power cord from the power socket.
The maximum continuous operation period shall not exceed 10 minutes, after which the product must be switched off and left to cool down for a further 10 minutes. Overloading the product leads to faster wear and can also cause damage to the product.
Do not use the device to grind hard food parts. The meat must be prepared for grinding by removing the skin, bones and cartilage. Other food products must be prepared for grinding by removing seeds, stalks, shells and any other hard parts. Do not grind frozen food products.
PRODUCT OPERATION
Preparing the appliance for operation
Remove the product from its packaging, remove all packaging components, and wash all drive unit components according to the instructions found in the "Product maintenance" section.
Set the product according to the instructions.
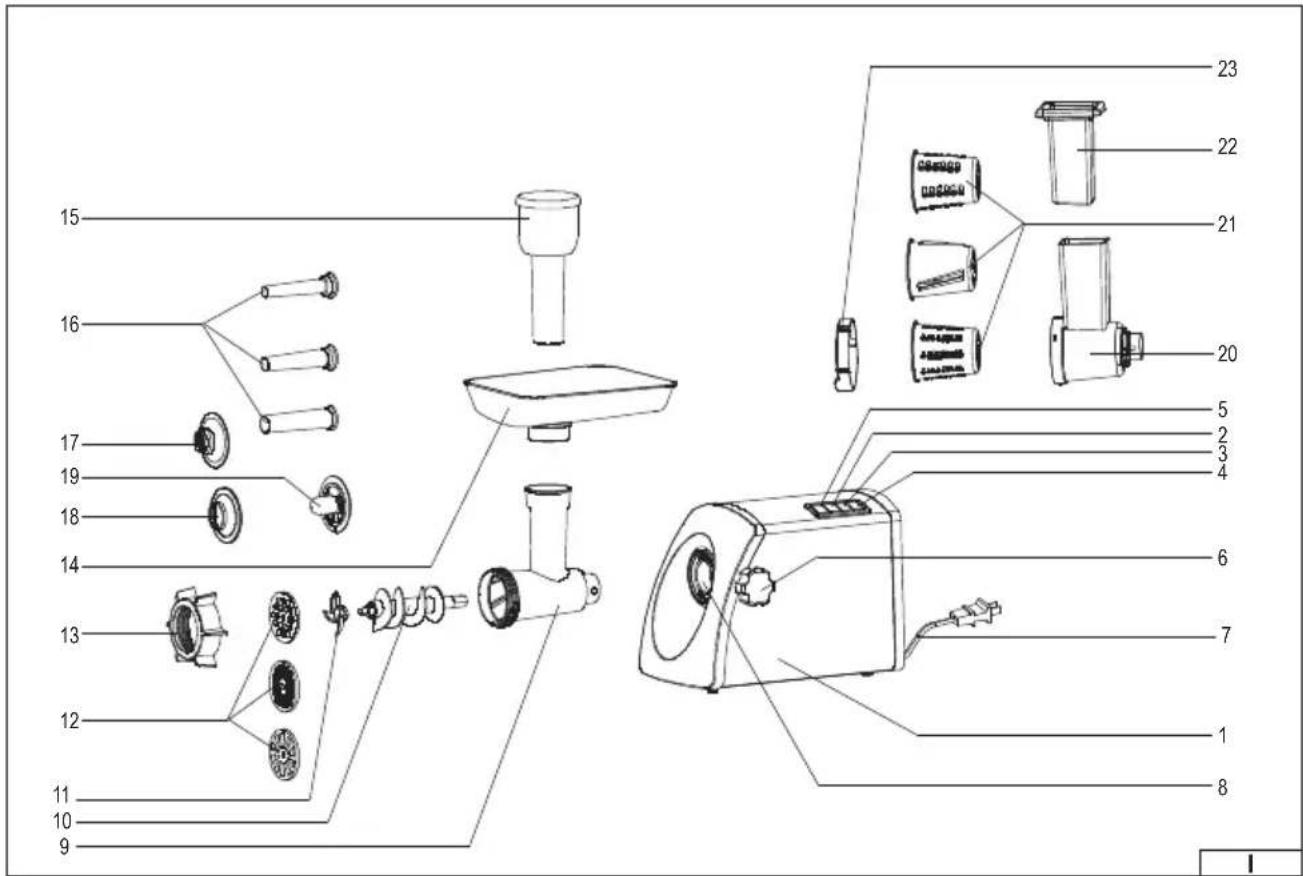
Install the meat grinder attachment body or the grating and shredding attachment body. Mount the body by attaching it to the mounting socket and then lock it in this position by tightening the knob (II).
Caution! The rear edge of the body has tabs which must fit into the notches of the socket. The flange of the body has a round notch in which the end of the thread of the clamping screw should fit.
Ensure the assembly has been correct. A correctly installed attachment body cannot be removed except by unscrewing the lock knob.
Meat grinder attachment
Connect the attachment body to the mounting socket. Insert the grinding auger into the body so that the axis of the drive fits into the opening of the auger (III).
Place the blade on the square socket, the cutting edges should be directed to the outside of the attachment (IV).
Apply the strainer. The strainer has positioning tabs on the edge, which should fit into the notches in the front of the attachment (V).
The strainers supplied with the product have openings of different sizes. The smaller the openings, the more finely the food will be ground.
Caution! Only one strainer can be fitted at a time.
Screw the fi xing nut (VI) onto the outlet thread of the attachment.
Install the feed tray on the inlet opening. The feed tray holder has a notch in which the outlet in the flange of the inlet opening (VII) should hit.
Check that the pusher can be easily inserted and removed from the inlet opening.
Sausage-fi lling attachment (IX)
Slide the filling attachment into the ring as far as possible. Assemble like the meat grinding attachment, but before screwing on the fi xing nut, install the sausage-fi lling attachment with ring.
Kebbe attachment (X)
Connect the attachment body to the mounting socket and insert the grinding auger into the body.
The rear part of the kebbecap is equipped with positioning tab, which should fit into the notches in the front of the attachment.
Insert the front part of the socket into the kebbe cap and secure by tightening the fi xing nut.
Grating and shredding attachment (XI)
The attachment has a separate body and a separate pusher.
Install the attachment body into the drive socket.
Slide the drum into the body. The openings in the drum are very sharp and must be handled with care to avoid injury.
The attachment axis tabs should align with the notches in the opening in the rear wall of the drum (XII).
Secure the drum with the attachment ring (XIII). Place the ring on the front part of the attachment body so that the marker on the front wall of the body shows the symbol of an open padlock. Then rotate the ring so that the marker shows the closed padlock symbol. Check that the ring cannot be pulled off the attachment body.
Check that the pusher can be easily inserted and removed from the inlet opening.
Caution! Do not use the grinder attachment pusher in this attachment.
The product is equipped with three types of drums. Two drums with round openings are used for grating. The larger the openings, the larger the shavings. The drum with rectangular openings is used for shredding.
After mounting the selected attachment, place a container under its outlet. The product is ready for use.
Starting the device
Make sure that none of the switches is pressed, press the button marked "STOP & RESET" and then plug the power cord into the socket.
The product has a switch marked:
"ON", which starts the full speed of the product,
"HALF", which starts half the speed of the product.
The button marked "REVERSE" activates the reverse gear.
The button marked "STOP & RESET" is used to stop the device operation.
Starting the device will take place after pressing the switch marked ON or HALF. The switch does not need to be held in this position.
The device is switched off by pressing the STOP & RESET button. Wait until the motor stops.
GB
The button marked "REVERSE" is intended for short engaging of the reverse gear. Press and hold the button in this position. The auger starts to rotate in the opposite direction, which allows you to clean the inside of the food attachment. Releasing the button will automatically stop the device.
Use reverse gear when the performance of the machine is reduced. Turning the auger in the opposite direction allows the food to be withdrawn from the inside of the attachment. Next, start the device again by pressing the ON or HALF button and then grind the food again. If you still notice a decrease in performance, stop the device operation, disconnect the attachment, disassemble and manually clean it according to the instructions in the "Product Maintenance" section.
When you have finished using the product, turn it off by pressing the STOP & RESET button, then unplug the product's power cord from the socket and begin maintenance activities on the product.
MAINTENANCE AND STORAGE
CAUTION! Never immerse the drive housing in water or other liquids. This may result in electrical shock and will damage the product. All components of the attachments can be immersed in water or washed under the jet of water.
Parts of the device which have been in contact with food should be cleaned immediately after use. Dried food residues can clog the components of the product, which can lead to a loss of performance or even damage the product. If this happens, immerse these parts which were described as immersible in warm water with dishwashing liquid and leave it to soak, then clean with a soft sponge or a brush and water with dishwashing liquid. None of the parts of the device is suitable for washing in mechanical dishwashers. This can lead to the loss of shape, colour and texture of the materials they are made of.
Clean the openings in the juice-squeezing attachment and the grinder attachment strainers with a soft plastic brush. Do not use sharp objects (including scouring sponges) to clean any part of the product.
Clean the drive housing with a soft cloth dampened with a water and mild detergent solution. Wipe dry. Do not use abrasive cleaning agents.
Make sure all parts are cleaned and dried before connecting the device to the power supply. Store the product in dry, shaded conditions. Protect the storage place from unauthorized access, especially by children. Store the product in the unit packaging provided with the product.
TECHNICAL PARAMETERS
| Parameter | Measure Unit Value | |
| Catalogue No. | 67901 | |
| Rated voltage | [V~] 220 - 240 | |
| Rated frequency | [Hz] 50 / 60 Hz | |
| Rated power | [W] 1200 | |
| Electrical protection class | II | |
| Weight [kg] 4.4 |
PRODUKTINFORMATIONEN
IpoBepbTe npabunbHOCTb MOHTaxa. IpaBnblHo yCTaHOHHeKOpNc HacaKn He MoKeT 6bItb ydaen Hnaue, Yem nyTeM OTBnHnBaHnpeyJrToPa 6nOKpOBKn.
Hacaoka dny py6ku mca
IopKnHouHte Kopnyc HacaK IN MOHTaxHOMy rHe3ny. BcTaBbTe B Kopnyc IHeK dIpy6kn Mca TaK, YTo6bl Ocb npNbOda Bo7na B OTBepCTne 1Neka (III).
IomeCTnte Ie3BHe Ha KBaapathoe rHe3do,peKyuIne KpOMKn DOnKHbI 6bItb paOnIoXKeHbI HApKyHa caAkn (IV).
HaioKepeeKy.PeetKa HMeet Ha KpaIO No3uOHpyUe BbICTybl, KOtOpBie DoJXHbI NOnaCTb B Bbipe3b1 Cnpeepi Ha- caKn (V).
PeueK, BxOJIuIe B KOMIIeKT, IMeIOT OTBepCTnpa3NIuHOro pa3Mepa. Yem MeHbIe OTBepCTn, TEM MeIbUe 6yDyT N3MeJIb-uehbl npOduKyTB BO BpEma py6Kn.
BnmaHne! OndHObpeMeHHO MoXHO yCTaHOBT TOJIbKO ODHy peWetKy.
PnKpeHnTe KpeEeKHyu rAky (VI) K bByxoIHOH pe3b6e HacaKn.
PomeCTe IOnaHouI JOTOK Ha BxOHOe OTBepCTne. KpeIeHne IOnaHooIero IOTka IMeET Bbipe3, B KOtOpbI DoJIKeH IOnaCTb BbICTyn Ha OJNaHcE BxOHOro OTBepCTnA. (VII)
Y6eNTecb, yTO TOnKaTeIb MOXHO 6e3 npenrTcBn BNOXHTb N BbHyTb N3 BXOHDHO OTBepCTNA.
Hacaoka nHa6ueku konibac (IX)
BCTaBbTe HacAnky dny HaBnBKn KOJIbAc Do yNopa BHyTp bKoNbUca. YcTaHOBIne KaK HacAnky dny py6Kn Mrca, Ho npeed HaBnHnBaHNEM KpeENxHOn rAkn YcTaHOBIne HacAnky dny HaBnBKn KOJIbAc C KOJIbCm.
Hacadka dny Ke66e (X)
IopknHouTe Koprnyc npctabKn KMOTaxHomy THe3dy,BHyTpB Koprnyca BCTaBbTe UHEK dIpy6Kn MraCa.
3aHnay hacAn nn Ke6e nmeet no3nOHNpyuOue BbCTyn, KOtOpble DOnJXhB BoITN B BBype3bl CnepeDn npNCtABKn.
HaioKnTe nepeHIOU qactb HacaKn dIg Ke6e n 3aKepeNte Bce, 3aTnBa kpenexHyu raKy.
Hacaoka dna Hamupaunu u uuhkoeku (XI)
Hacaika nmeet OtdenbHyk Kopnyc n OTdEnbHyb ToKaTeB.
UcTaHOBnTe Kopnyc HacaKIN B rHe3De npuBOda.
BBeIe 6apabah BHytpb Kopnyca. OTeBepTna 6apa6aHa NMeIoT ouehb ocTpble Kpa, co6JIIOJaTe npedocTopoxHocTb npn IX o6cLyKBAHN, yTo6bl n36exKaTb nope3OB.
BbCTynbHa ocn hacaKn DoJXhbl BOITN B bIeMKn B OTBepCTm 3aDneH cTeHke 6apabHa (XII).
Bapaban npedoxpahntb kOBtOM HacaDN (XIII). PnKpeHNTe KOJIbO K nepeHne YacTN KOpNyca HacaDN TAK, YTO6bI MetKa Ha nepeHne YacTN KOpNyca Yka3bIBaJa cMBOJ OTKpbITOro 3AMKa. 3aTEM NOBepHNTe KOJIbO TAK, YTO6bI MetKa Yka3bIBaJa Ha cMBOJ 3aKpbITOro 3aMka. Y6eHNTecb, YTO KOJIbO He MoKeT 6bITb N3BNeHeO N3 KOpNyca HacaDN.
Y6eIntecb, yTO ToJkateJIb MOXHO 6e3 IpenrTCTBn BNOXHTb N BbHyTb N3 BXOHDHO OTBepCTNA.
BnmaHne! He nCnoJb3yIte B hacaKe ToKaTeJIg I3 HacaKn dIpa py6kn Mca.
RUS
IpoodyKT oshaueh TpeM abaabaHAM. Dba bapaaba c KpyrblIMN OTBepCTnMn npedHa3naeHb Ipn TepKn. Yem 6oJIbe OTBepCTn, TeM KpynHee CtpyKkA. Bapaah C npraMoYroJbHbIMN OTBepCTnMn npedHa3NaeH dn JWNHKOBKn.
Iocne yctahOBKn BbipaHHo npCTabKn noe ee bixO noCTaBbTe nocydy. Ipoykt roTOB k pa6oTe.
3anyck npodykma
Y6eIntecb, YTO HN OINH N3 BblKnIOaTeJe He HaKaT, HaxMnTe KHOKky CHaDnncBIO «STOP & RESET», a 3aTeM noKnIOuHTe shHyp nITAHNA KrHe3dy.
U3deJInne IMeET BbIKIOuATEJIb, 06O3HaueHHbI
«HALF», kToTbI 3aNyckaAe TnoOBnHy ckOpocTn pa6oTbI n3dEInr.
KhONka cHaADnncbIc REVERSE 3aynyckaet o6paTHbXoJ.
Khonka «STOP & RESET» IncnoIb3yeTcraIЯ ocTaHOBKn pa6ObykTa.
YcTPOIcTB 6yTe3anyuHcHo nocHe HaxaTnBbIKIOUaTeJI, oO3HaueHHOro ON nIIN HALF. He cIeDyeT ydepKINBaTb BbIKIOUaTeJIb DaaHHOM NOJooKeHHN.
BbIKIOHHe yCTPOIcTbO cOyIeCTBJIeTc HxKaTHe M KHOJKN STOP & RESET. IdoKdTe, Noka DnraTeIb He ocTaHOBNTcra.
KhoNka cHaHnncbIo REVERSE npedha3hauhea nI KopoTKoro 3ayncKa 3aHero Xoda. HaxMnte u ydepXnBaIte KhoNky B 3TOM noJoxehnn. UHeK NaHET BpaAaTbCBAOBaTHyO CTOpOHy, YTO N03BOJNT OTUcnCTtB BHyTpEHHIO YaCTb HaCaKn OT NIIueBbIX npOdykTOB. OcnaBleHne daBJeHnHa KHOKNy ABOTMaTnueckn OCTaHOBIT yCTPOICTBO.
3aHnXoJ HyKHO nCIOB3OBAb B Cnyae yMeHbSeHnna 300fKeTNBHOCTn pa60tbi MRCopy6Kn. BpaueHne 1NeKa B o6paTHyO CTOPOHy NO3BOJRAET BbIBeCTN PIIeBBIE npOdyKTBI N3HyTPN pNCTABKN. 3aTeM nepe3aIyCTNTe yCTPOINCTBO, CHOBa Haxab KONky ON INHALF, YTO6bI NOBTOPHo IpeMoIOTb PNOyKT. EcnB BCE eue Ha6IOdaTcR CHNXeHne 300fKeTNBHOCTN, OCTAHOBITE pa60Ty yCTPOINCTBA, OTKIOUHTe HacaIKy, DEMOHTIPyIte ee N OCHNTe BpyHyIO B COOTBE TCBN C yka3aHnIMN 3 pa3dena «TexNHueCKoe ObcnykBaHnue yCTPOINCTBA».
Pocne 3aBepseHn pa6ObTb BbIKJIOHTe ycTpoCtBO, Haxab KHOJky STOP & RESET, 3aTeM oTcoeHNHe Ka6eNb NITAHn OTOPO3eTKI INpOdoJIKHe 0cSclyKINBaHne ycTpoCtBA.
TEXHNUECKOE OBCJLYKUBAHNE IN XPAHEHNE
BHIMAHHE! HnKorJa He norgyKaTe DnirateJIb B BOe Nn npryo KnKocTn. 3To MoKeT npBecTn K npaKeHIO 3NeKTpuCeCKM TOKOM I NOBpeXdEHHO yCTpOInCTBa. IORpyKaTb B BOe Nn MblTb ND e e CTpye MOxHO BCE 3NEMeHTbI HacaDOK.
Uactn oobopyoBAnH, KOtOpbIe HmEn KONTAKT C NIIeBbIMN pOdyKTAMN, HyXHO OcHCTNTb cpa3y nocne ynoTpe6JIeHn. 3acox- WNE OCTATKN PNIUEBbIX npOdyKTOB MOYr 3aJIeNTb 3JIeMeHTbl yCTPOJCTBA, YTO MOKeT pINBeCTN K CHNXeHIO 3ΦΦeKTHBHOCTN pa60tbl oobopyoBaanH INI daJe erO NobpeXdEHH. Ecn Bce-Takn 3To Ipon3oJET, Norpy3nte Te 3JIeMeHTbl, B cIyae KOTOpbIX 3TO BO3MOxHO, B TEPILyBOy C IO6ABKOJ XuNDKOCTN DnA MbITb NIOcYbI N DaIte NM NOCTOB B BODE, A 3ATEM OcHCTNTe MRAKOH r6koN INI UTeKoN IN BOOn C XuNDKOCTBIO Jn MaITb NOCybl. Hn ODA HA 3uaTey yCTPOJCTBA He npedHa3NaHeHa DnA Mbl8 B MEXAHuecknx NocydomooeHbIX Maunhax. 3TO MOKeT pINBeCTN K NOTepeΦopMbI, ZBaTa, ΦaKTypbI MaTePnaIOB, IN3 KOTOpbIX OHN IN3TOTOBNeHbI.
OTBepCTN B HacaIKe IIN OTKIMACOKA INN B peWetkax IIN py6Kn MRA CA ONUCTNE C NOMOUIIO MRAKOI UETKN IIN PAACTMACCbI. He nCnoJIb3yIte OCTPbIE ppeMTeBt (B TOM YNCNE MOaIKN) IIN ONUCTKIN JIO6Oro IN 3JEMENTOB PPOdyKTa.
OuHCTnTe KOpNc npINBOa MrgKoT KaHbIO, CMOeHHoP pactBOPOM BoDbI N MrgKOrO YHCTaIe OpeCTBa. BbITpNTe Docyxa. He nCNOJIb3yIte a6pa3NBhIE YHCTaIe CpeCTBa.
Ipejde yem noKIOUHTb ycTPOBCTBO K nctOChNK nITAHn, y6eNTecb, YTO BCE deTaII N bII IN OCHUHeBI N BbcUyWeHb. XpaHInTe npOdyKT B cyHX MecTx, 3aunuEHHbIX OT cONHeHbIX nyHc. 3aunitne MeCTo xpaHEnra OT dOCTyna He yNOnHOMOeHHbIX IIN, OC6eHNO deten. XpaHInTe npOdyKT B NOTpe6ntelbcknx yNAKOBAkax, NOCTABnREMbIX BmecTe C npOdyKTOM.
TEXHNUECKNEIAPAMETPbI
| ПараMuTeР EdinHиц ИзМерЕня 3нauЧeпe | ||
| Homep no KaTalOry 67901 | ||
| HOMnHaJIbHoe NaPpJExeHne [B~] 220-240 | ||
| HOMnHaJIbHae ChAteToTа [Гц] 50 / 60 Гц | ||
| HOMnHaJIbHae MoUChocTb [Вт] 1200 | ||
| Klnacc aIeKtpuCheckо 3auzmMbI II | ||
| Bec | [кг] 4,4 |
XAPAKTEPNUCTIKA IPNIJAdy
M'acopy6ka BnKOpncTOBc8c dIy mexaHicHoI o6p6Kn M'raCa Ta iHux npOdykTIB xapUyBaHHa. 3aBdAkn 6araTomy obnaHaHnIO, MaunHa 3NaHNO npNcKOpE i noerWye 6araTo poBt B KxHi. PpOdyKT pO3pObeHm BnKNoUHO IJr DomaunHbOro BnKOpnCTAHn, Noro 3abOpOHeBO BnKOpncTOBvBaTn B KOMepuHnx cJIax. IpaBnIbHa, HadiHa i 6e3neuHa po6ota npncTpO 3aJeXntb BiD npabInbHOi po60Tu, TOMy:
Ipeep BnKopncTahHm npodykty npouHTaTe 10 IHcpykuio i 36epexitb ii.
BipobnK He Hece BiIOBiaIbHocTi 3a 36ntKN, kki BHHNKIn B pe3yIbTaTI HeoTpMaHn npabIN TexhIKn 6e3neKn i pekomHa- ciui ci iHCTpykii.
OBJHAAHHNPOOyKTY
IpoDyKT noCTabTbC B KOMnneKTHomy CTAHI, aIe BIMarae npoBeHeHH nIdroTOBKn nepei noaTKom po6Ot. MaunHa ocha-ueHa HAcTyHmMn PnCTpOAMN: dIg OTPMaHH M)rCHoro fapWy, dIg TepT Ta noDiPHEHH, dIg HaunHKn KO6ac, dIg Ki6n (Ke6be) Ta dIg BNTnCKaHH cOKy.
IHCTPYKU3 TEXHIKN BE3NEKN
YBAGI! Pioyntaite Bci Habeedehi Hxue iHctpykui. HeoTpmaHHaie BmOrn MoKe np3BecTu DO ypaKeHHeNEKTPuHMM CTpyMOM, nokeki a6o TpaBMN.
HEO6XIDHO BIKOHYBATN HACTYHIHCTPYKUJI
He BnKOpncToByTe npncTpiB yMObax NiDbNueHoI He6e3neKn Bn6yxy, B cepeoBnui, 10 MICTNb JereKo3aMnCTi piHN, ra3n a6o napi.
Pnpctpi NOBHeH 6yTN BCtAHOBJIeHN Ha pIBHI, nlocki I TBeprI NOBExHI. RaIO npCTpi OChaueHn rMoBmH HIXKaAMn abo npCockamn, BbeipItb TIN NOBepxHi, iO6 niDcTaba aBO HIXKn 3anobirAn nepemieHHIO npCTpOu Niac BVkOpncTaHHa.
He cTabe npictpi nno6Jn3y JKepeI TeJIa afo BOrHIO.
Pnpctpi niknauTe Tlkbn Do mepexeBoi Hanpyu i uactOTn, 3a3naueHm Ha tabnucipnctpo. Pnpctpi noBHN 6ytn
TtenCeJIb Ka6eJIIO XINBHeH H NOBHe H NIOxOHTN Do PO3ETKn. He MoXHa 3MIHOBaTN BUNKy. He MoXHa BNKOpNCTOByBaTN 6yIbKaI nepeXiHNIKn DnAaNTaU II BUNKn Do PO3ETKn. OpiRiHaNbHa BUNka, 10 Ni IxOHTb Do PO3ETKn, 3HIXky Pn3NK ypaXeHHE JENKTPuNHm CTrpymOM.
IicnKoXHOrO BnKOpNCTaHHc CnID BnHnTn WTeNCeJIb 3 p03eTKn. He BntryNe WTeNCeJIb 3 p03eTKn, notraHyBun 3a Ka6eJIb. BmMaOnu WTeNCeJIb 3 p03eTKn, 3abXdN TpMaIte 3a II KOpNyc.
YHnKaIe KOHTaKTy 3a3eMJIeHIMN IOBepxHMy, TaKIM N K Tpy6N, paiaTopi KynepN. 3a3eMJIeHnT iNa pIbNtue pU3NK ypa-KeHH eNEKTPuHIM CTpyMOM.
Pnpctpi npn3naeHn TINbKn DnIpoBToN B npmiiueHHi. O6epiraTe npncptiB iD douy a6o BOJorN. Boda i Bonora, 10 noTpaIIIOb BCEpeHNy npncptoO, nIDBnUyTOB pnsIK ypaxeHHra eNEKtpuHNM cTpyMOM. He 3aHypouTe npncptiY bOdy a6o IHsi piHN. He BnBaIte BODy B aUsy npncptoO ni dac poBToN.
He nepeBaHTaKyIe Ka6eIb KJINBIIeHH. He BnKOpNCTOByTe Ka6eIb KJINBIIeHH IJIe NpeHceHH, pIneHaHH I BiDcHaHH BnIK 3 po3ETKn. YHnKaIte KOHTaKTy Ka6eIIO XJINBIIeHH 3 HarpITmN NOBepxHMy, MaclOM, roCTpIMN KpaAMN i pyXNBUM eIementAm. POnsKOJKeHH Ka6eIIO XJINBIIeHH IIIBuSye Ps3NK ypaXeHH eJeKTPuHMM CTpyMOM. Y pa3i NooKOJKeHH Ka6eIIO XJINBIIeHH (Hap., nepepi3y, po3PiabLeHH 3OJIraii) cniD HeraiHO BiD'EDHaTN BUNy Ka6eIIO 3 po3ETKn, a NOT IM pePeatn npNJad B ABTOPIm3OBaHH CEpbIH CNrTp. 3a6OpOHReTbcR BnKOpNCTOByBatn PnCtpi 3 NooKOJKeHH Ka6eIEM XJINBIIeHH.
3a6b0pOHeNo npOBoHTn peMOHT Ka6eHIO XKIBNeHH, Ka6eN IOBHeH 6yTN 3aMIHeH N HA HOB N A BTOP3OBAHOmy cepBICHOY ceHTPI. JaKIO BVKnOpNCOTOBHyTcR NaOBXyBaHi, cnID 3aCTOCOByBaTu NOOBxBya 3 napameTpAm DxepeNa XNBHeH, 3a3Ha-ueHIMn Ha Ta6mUpiNcTpoI. IpeTeHN XIN NoOBxBya H neOBHeH 6yTN MeHne NonepeHoro nepei3y npOBIOBJI KABeIIO XNBHeH N pncTPOI. IpeBipTe ue Ha i3OJraCII CInOBoro Ka6eHIO I NOOBxBya a 6o 3BepHiTbcr DO Bnpo6Hnka npcTpoI / a6o NoOBxBya.
He BnKOpNCToBnyTe Bnpi6 i3 N0sKOxKeHMM KOMNoHEHTAMN a6o NOsKOxKeHMM o5bnaHaHHaM. RaIcBn NOMITIN N0sKOxKeH H 6yDb-RAOJI cactHn IN pncTpo, Noro NoaJIbWe BnKOpNCtAHH 3abOpOHeHO. B cIbOMy BNNaJky pncTpi C1I 3dATn B aBTOpH3OBAHm cepBicHN CEHTP a6o 3amHInTu cOu cactHy camocTiHo, RaIcIOHCTpyKUg KOpNCTyBaVa dOnyCKae TaKn peMOHT.
IpeepoayKom 6yB-8Knx DII, NOB3aHnx 3 aMiHO, YIeHHaM abo peryIIOBaHHaM pyxOMNX qAcTHN, BIMKHITb npucptpi i BiDcHaTe uHyp XMBnHHe BID po3ETKN eNEKTpomepexi.
Ley npncpti moe BnKOpncToBvBaTnca diTbMn cTapue 8 pok IB ta ocobam3 06mexeHMM f3uHMM, nCnxiuHMM MOXJINBOCTaM, a TAKoK IIOdbMn 3 BiDcYTHICrTO DocBiy i 3HaHHN npnAady, kkuo 6yde 3abe3neueHn Harnd abo IHcTpKaK, knn CTocyeTbcra BnKOpncTaHHN obJaHaHHb 6e3neuHm CnOCOBom, TaKIM uHOM, 106 NobR3aHI 3 UHM pn3NK 6yHn 3pO3ymi. He Do3BONIte dITram rpaTnca 3 npuIadom. DITn 6e3 Harnay He nobHHI YNCHTn npncptri i BnKohByaTN texHniche o5cnyroBvBaHH npnAady.
UA
Ley npictpi npn3haeHn TiIbKn dny Domaunhbo RnKOpncTaHHa. PeKomeHcyTbcR He nepeBunyBaTu 2 XbnHn6e3nepepBHOi pOBoTI, nCJRA YOR npictpi NOBHeN OCTRaTu 6n3bKO 20 XBNIH. PpOraROM cBOr Oacy BiD>edHnTe uHyp BiD eNeKTpuHoi po3ETKN.
MaKcImaIbHn 6e3nepebpHn poobuynac He nobHHe npebuCyBaTu 10 xBnHn, nicra yOro npdyKT noBnHn 6yTu BmKHeH n i camoTtHO oxonodKyBaTncsJe 10 xBnIH. NepeBaHTaxKeHH npodykTy np3BoDntb Do Ioro wBnDuOro 3Hocy Ta MoKe TaKox cnpuHHInTu NOxKOxKeHH npodykTy.
He BnKOpncTobyIte Mrcopy6ky dna nepemEnIOBaHH TBePdIX WMaTOcIK iXi. Mxco NobHHO 6Ty nToTobm Do nepemEnIOBaHH, cnid yCyHHTu WKIPY, KICTKI xipui. IHsi npOdyKTu XapUBAHH NOBHHI 6Ty niDROTOBHeHi dna noDpi6HeHH HJnxom ycHHeHH HacHH, cTe6en, shkapnytn Ta iHux TBePdIX qactIN. 3a6oPoHEMO monOTn 3amopoxKei npOdyKTn.
Hacaoka nHa6ueaHnKo6ac (IX)
BCTaBte Hacay dHa6nBaHH KOB6ac Do ynpoy BcepeHny KInbca. BcTaHOBIT kHacaKy dIpy6kn M>ca, ane nepe3arBuHcyBaHH KpInneHHraIKN BCTaHOBIT b Hacay dHa6nBaHH KO6ac 3Kilbcem.
Hacaoka nKe66e (X)
Pikkniouitb Kopnyc npncTabKn Do MOHTaxHoro rH3da, BCEpeDHy Kopnycy BCTaBte uHEK dIpy6kn MraCa.
3aHaJyactnHa HacaKn IyKe6Be Mae BVCTynPi N03uioHyBaHH, kI IOBUNH yBInTn B Bvpi3n CpepeDy npncTaBKn.
Haknai tbe nepeHIO uacTHHy hacaikn IyKe66e i 3akpinitb BCE, 3ataryoucn KpInIbnhy raKy.
Hacadka dny hapisaHH i uHNkyeAHN (XI)
HacaKaMaOkpeMnKopnpcIOKpeMnIStOBxau.
BctahOBiB KOpNc HacaIKN B rHl3I npnBOy.
BBeiTb bapaan Bcepeiny Koprny. OTrbOpn bapaaba Maotb dyke roctpi kpaI, doTpmyntecb obepexHicTh npn ix ocbnyroByBaHHi, uo6 yHnKHytn nop3iB.
Bnctyn Ha oci hacaikn noBHnHi yBiHTN B BmKn B OTbopi B 3aHni CTInCi 6apa6ana (XII).
Bapaban 3axnctntu Kilbce HacaKn (XIII). PnKpinitb KInbue Do nepeHbOJ cactHn Hcnpcy HacaKn TAK, 06MiKa Ha nepedhi yactHI Kopnycy Bka3yBaIa CNMBOI BiKpTOro 3AMka. Notim nobepHiB KInbue TAK, 06MiKa Bka3yBaIa Ha CNMBON 3akpTOro 3AMka. PepeKoHaITeCra, 00 KInbue He MoKe ByTN BuNyuHe O 3 Kopnycy HacaKn.
IpekeohaiTeec, 0u 1OBxau MoXHa 63 nepeekoB BknaTn I BmHrTn 3 BXiHOrO OTbOpY.
Ybara! He BnKOpncTObuIe B HacaIi StTObxaHa BiD HacAnKn Ipy6Kn M>ca.
Bupi6 ochaen Tpboma 6aba6aHaMa. Dba 6aba6aHa 3 KpyrImM OTbopamn npna3aehi nHaTnpaHn. Ym 6jIbwe OTbOpn, TmKpynHlwe ctpyKa. Bapa6aH 3 npmaKoYTHmM OTbopamn npna3aehn dJa UHHkyBaHn.
Iicn yctahOBKn o6paHoi HacaKn iN ii Bxixi nCTaBte nocy. IpoDyKT roTobn do pOboTn.
UA
3anyck npunaody
IpekeohaTeec, 3 BmKauB He HATnCHyTn, HATnCHtB KONky 3 HAnuCOM «STOP & RESET», a nOtim NiiknOHTb shyp kNbneHHo dr hi3da.
Bupi6 mac Bmukay, no3haeHH
《ON》,员,3aynycaepo6oTyHaNoBnIWBnKocTi,
KhoNka 3 Hanicom REVERSE>3anycka3BbOPOTHn xiD
KhoNka «STOP & RESET» BnKOpncTObYeTbCЯДЯ 3ynHKnpo60Tu npuJaIy.
Pnncpii 6yde 3anyu eHO nicna HATNCKaHRA BUMKaua, no3HaueHoro ON a6o HALF. He cni d ytpmyBaTu BIMNKaU B daHomy nnoxehHI.
BmKHeHHn pncToPO 3iInChIOeTbCn HATNcKaHHM KHOKN STOP & RESET. 3aueKaIte, nKn DnBuYH He 3ynHtbcra.
KhoNka 3 HAnuCom REVERSE npn3NaueHa nI KopoTKoro 3aNyCKy 3aHbOro XoYd. HaNTCHiB i yTpmyTe KHONky B cboMy noNo-KeHHi. WHeK NoUHe oBeptatncs y 3bOpoTHm 6ik, IIO Do3BOJInTb OunchTn BHyTpIshu YacAnBn BiD xapHOBNx npOdyKTIB.
OcnaBHeHHa TCKy Ha KHONky aBtOMaTHuHO 3yHnHTb npncTpi.
3aHn iXi nOtpi6b H BkOpncToBvBaTn B pa3i 3MeHweHH efeKTHBHOCTi pOBoTn M'acopy6Kn. OBeptAHn y 3BOPoTHn 6IK Do3BOJAE BvBeCTn XapOBI npOyKTn 3cepeHNn PpNCtABKn. IicIe nepe3anycky npNCtpoIO, 3HOBy HATNCHyBwn KhONky ON a60 HALF, u6 NobTopHO nepemOnOTn npOyKT. JaKuo BCE ue cNoctepiraetbCs3HKeHH eFeKTHBHOCTi, 3ynHITb poBCTy npNCtpoIO, BmKnHtB npNCtABKy, demOHTyTe ii I Heo6xIDHO BpyHy BiNobIDHO DO BkA3IBOK 3 po3diny «TexHlne obScnyroBvBaHH npInaDy»
IicJIa 3aBepHHe Hpo6OTn BmKHTb npncTpi,HaTNCHyBun KhoNky STOP & RESET,notIM BiDcHnTe Ka6eNb JxNBHeHHBaI po3eTKi npoOobXnTe oCcnyroByBaHHn npncTpo.
TEXHUIHE OBCJYROBYAHHHI 3BEPIAGHH
YBAG! Hikoln He 3aHypioTe DmHyb B BoDi a6o IHsi piinHi. Lc MoKe npns3BecTu Do ypaXeHH eJektpuHIM cTpymOM Ta NowkoDxHeHH npodykTy. 3aHypioBaTN B BoDi a6o MHTi nd CTpyMeHem MOxHa BCE eJemeHTn HacaDOK.
YactHnO6bnHaHHaIKaMNI KOHTAKT 3 XapOOBmN npOdyKTAMN, NOpti6HO OOnCTTN BIDpa3y nic7BxNBAHH. 3acoxJI 3aIIuKX XAPoOBHX npOdykTB MoKyTB 3aIINITN eIeMeHTN npOdyKTY, 00 MoKe npNBecTI DO 3HIXeHHra eFeKTHBHOCTI PO6OTN 6bNaHAA HABITb NIOWKoDKEHH. JxO BCE-TAKN CE CTAHeTBCR, 3aHyPTe TI eIeMeHTN, B pa31 RkNX CE MOKINBO, B TENNY BOy3 D06abKOIO pIDHN DnA MTTT NocCyI dAte IM NcOToTn Y BODI, a NOTIM OChTtMb IKOIO r6KOIO abO cITKOIO IBOHO 3 PdINHO DnA MTTT NocCyI. KOnHa 3 cactHn npCtPOHO He np3Haueha DnA MTTT B MExAHUHIN NocydommHnx Maunhax. Lc MoKe npNBecTI DO BTPATN fOpMN, KOJIbOPy, fakTypn MATEpiaIIB, 3 kNX BOH N BIROTOBJIeHI.
OToBOp B npntabui IyI bIXmmy coky a6o B peuitui Iy py6kn M>ca Ounchitb 3a donomoro 10 m>koit 3 nactmacn. He BkOpncTobuyte roctpi npedmetn (B TOMy uocni MoaJIKN) Iy OunueHry 6yd-koTO 3 enemehTIB npdyKty.
OuHCTITb KOpNc PnINBOy MRAKOHO TKAHNHO, 3MOueHO p03uHOM BOHy i MRAKO MNUOHO 3aO6y. HAcyxo BHTpItb. He BnKOpNCTOByte a6pa3nBHi NCTraI 3aO6n.
IpeepiNiknueHnM npictpoD no Dxkepena 3minHoro ctpmy BneBhitcra, 0o Bci Detani 6yInn Ounu ehi i BucyuweHi. 36epiraTe npodkyt B cyuxmicx, 3axnueHnx BiD coHryHnx npomeHIB. Cnid 3axnctntn Micce 36epiraHHa BID IOCTyn Hemae ynoHBaKeHNX ocic, oocblbo diteR. 36epiraTe npodykt B cnoKnbHx ynakOBkax, 0o nocTabnIObpcpa3OM 3 npodykTOM.
TEXHIYI NAPAMETPN