POWAIR0105 - Paint spray PowerPlus - Free user manual and instructions
Find the device manual for free POWAIR0105 PowerPlus in PDF.

| Product type | High pressure spray gun |
| Brand | PowerPlus |
| Model | POWAIR0105 |
| Power source | Compressed air |
| Feed type | Gravity |
| Standard nozzle diameter | 1.5 mm |
| Recommended air pressure | 3.5 bar |
| Maximum air pressure | 4 bar |
| Cup capacity | 600 cc |
| Average air consumption | <226 l/min |
| Spray width | 160 - 240 mm |
| Air inlet connection | 1/4 in |
| Cup material | Aluminum |
| Spray pattern adjustment | Yes (round to elliptical) |
| Fluid flow adjustment | Yes |
| Recommended protective equipment | Goggles, gloves, respirator |
| Cleaning | With solvent, do not completely immerse |
| Included parts | Gun, 600 cc cup, instruction manual |
| Standards | EN1953:2013, Directive 2006/42/EC |
| Manufacturer | VARO – Vic. Van Rompuy N.V., Belgium |
Frequently Asked Questions - POWAIR0105 PowerPlus
User questions about POWAIR0105 PowerPlus
0 question about this device. Answer the ones you know or ask your own.
Ask a new question about this device
Download the instructions for your Paint spray in PDF format for free! Find your manual POWAIR0105 - PowerPlus and take your electronic device back in hand. On this page are published all the documents necessary for the use of your device. POWAIR0105 by PowerPlus.
USER MANUAL POWAIR0105 PowerPlus
natural_image
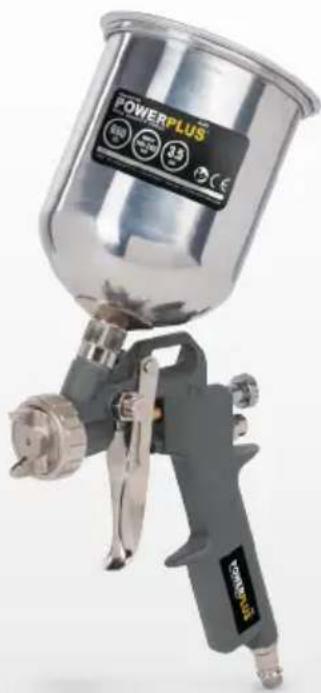
Exterior view of a PowerPlus spray gun with metal components and control buttons (no text-heavy labels or symbols)POWAIR0105
NL NEDERLANDS VERTAALDE VERSIE VAN DE ORIGINELE HANDLEIDING
FR FRANÇAIS TRADUCTION DU MODE D'EMPLOI D'ORIGINE
EN ENGLISH ORIGINAL INSTRUCTION MANUAL
POWAIR0105 NL
18/05/2020, Lier - Belgium
1 UTILISATION....2
2 DESCRIPTION (FIG. A)....2
3 LISTE DES PIECES CONTENUES DANS L'EMBALLAGE....2
4 RÈGLES DE SÉCURITÉ....3
5 INSTRUCTIONS POUR LE FONCTIONNEMENT....3
5.1 Préparation ....3
5.2 Réglage 4
5.2.1 Réglage de modèles:....4
5.2.2 Réglage de fluides (peinture):....4
5.2.3 Fonctionnement ....5
6 ENTRETIEN....6
7 ENTREPOSAGE....6
8 TECHNICAL DATA....6
9 DEPANNAGE 7
10 ENVIRONNEMENT....8
11 DÉCLARATION DE CONFORMITÉ ......9
PISTOLET PULVERISATEUR HAUTE PRESSION POWAIR0105
1 UTILISATION
18/05/2020, Lier - Belgium
1 APPLIANCE 2
2 DESCRIPTION....2
3 PACKAGE CONTENT LIST 2
4 SAFETY INSTRUCTIONS....2
5 INSTRUCTIONS FOR OPERATION ....3
5.1 Preparation....3
5.2 Adjustment ....4
5.2.1 Pattern adjustment: 4
5.2.2 Fluid (paint) adjustment: 4
5.2.3 Operation 4
6 MAINTENANCE....5
7 STORING....6
8 TECHNICAL DATA 6
9 TROUBLE SHOOTING....6
10 ENVIRONMENT....7
11 DECLARATION OF CONFORMITY 8
HIGH PRESSURE SPRAY GUN POWAIR0105
1 APPLIANCE
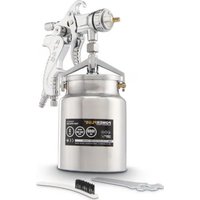
A High pressure spray gun is ideal for refinishing a wide variety of home improvement projects.
This high pressure paint sprayer features fluid and fan controls to offer a wide variety of patterns.

Warning Read this manual and general safety instructions carefully before using the appliance, for your own safety.
2 DESCRIPTION
- Nozzle, needle and air cap
- Fluid adjustment knob
- Pattern adjustment knob
- Air inlet plug
- Aluminium cup
- Trigger
3 PACKAGE CONTENT LIST
- Remove all packaging materials.
- Remove remaining packaging and packing inserts (if included).
- Check that the package contents are complete.
- Check the appliance, the power cord, the power plug and all accessories for transportation damage.
- Keep the packaging materials as far as possible until the end of the warranty period. Then take it to your local waste disposal system.
WARNING Packaging materials are not toys! Children must not play with plastic bags! There is a danger of suffocation!
POWAIR0105
1 x Spray gun
1 x Aluminium cup 600cc
1 x Manual

If any parts are missing or damaged, please contact your dealer.
4 SAFETY INSTRUCTIONS
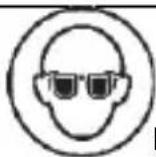
Fig 1
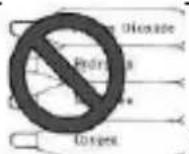
Fig 2
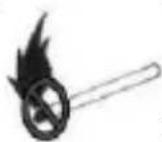
Fig 3
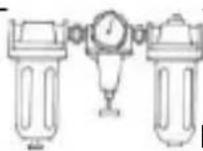
Fig 4
- For toxic vapors produced by spraying certain materials can create intoxication and serious damage to health. Always wear safety glasses, gloves and respirator to
POWAIR0105 EN
prevent the toxic vapor hazard, solvent and pointing paint coming into contact your eyes or skin. (see fig 1)
- Never use oxygen, combustible or any other bottle gas as a power source or would cause explosion and serious personal injury. (see fig 2)
- Fluid and solvent can be highly flammable or combustible. PIs Use the tool only in well-ventilated area, and avoid any ignition sources, such as smoking, open flames and decrial hazard. (see fig 3)
- Disconnect tool from air supply hose before doing tool maintenance and during non-operation, for emerge stop and prevention of unintended operation, a ball valve near the gun to air supply is recommend.
- Use clean, dry and regulate compressed air rated at 3.0-4.0bar, never exceed maximum permissive operating pressure 8.3bar (120psi) (see fig 4)
- Never use homogenate hydrocarbon solvent, which can chemically react with aluminum and zinc parts and chemically compatible with Alum, and zinc parts.
■ Never point gun at you and others at any time.
■ Before operating the tool, make sure all the screws & caps are securely tightened in case of leaking:
■ Before painting, make inspection for free movement of trigger and nozzle to insure tool can operate well. - Never modify this tool for any other applications. Only use parts, nozzles and accessories recommended and accessories recommended by manufactures.
5 INSTRUCTIONS FOR OPERATION
5.1 Preparation
- After unpacking the product, inspect carefully for any damage that may have occurred during transit. Make sure to tighten fittings, bolts, etc., before putting unit into service.
- Thoroughly mix and thin paint in accordance with the paint manufacturer's instructions. Most materials will spray readily if thinned properly.
- Strain material through filter, cheese cloth or a paint strainer.
- Fill the canister about 34 full and start the air compressor.
WARNING DO NOT EXCEED Maximum Pressure of Spray Gun or any other parts in the compressor system.
- After Connect the gun to air supply, please make sure that the fluid cap, container and air hose have been connected tightly with spray gun.
- Set up a piece of cardboard or other scrap material to use as a target and adjust for best spray pattern.
WARNING Never aim or spray at yourself or anybody else which would cause serious injury.
- Test the consistency of the material by making a few strokes on a cardboard target. If material still appears too thick, add a small amount of thinner. THIN WITH CARE! Do not exceed paint manufacturer's thinning recommendations.
5.2 Adjustment
The desired pattern, volume of fluid output and fine atomization can easily be obtained by regulating the Pattern Adjusting Knob, Fluid (PAINT) Adjusting Knob.

5.2.1 Pattern adjustment:
Turning pattern adjusting knob to the right till the end will make spray pattern round, or turning left will make spray pattern ellipse.
5.2.2 Fluid (paint) adjustment:
Turning the paint adjusting knob clockwise will decrease the volume of fluid output and counter-clockwise will increase fluid output.
5.2.3 Operation
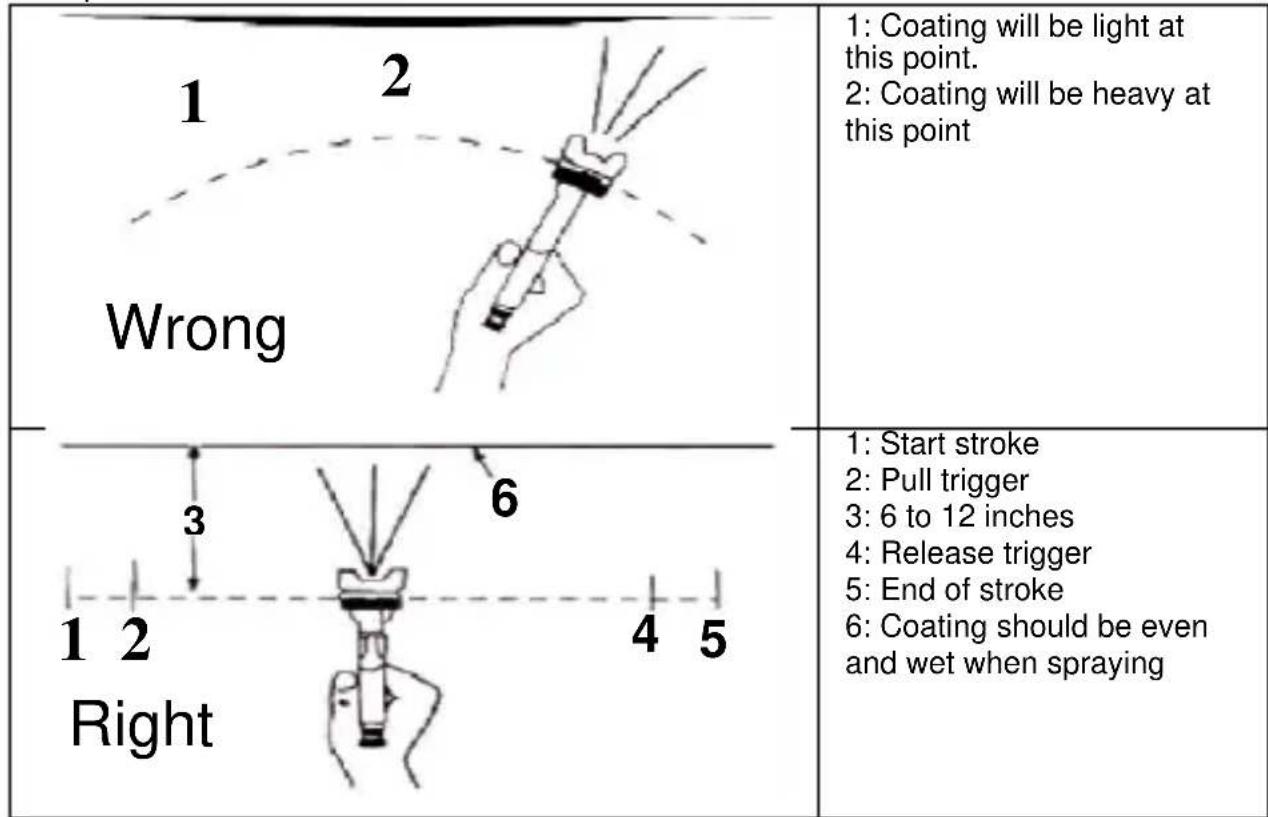
- Begin spraying. Always keep the gun at right angles to the work.
- Keep the nozzle about 6 to 12 inches from the work surface. Grip the gun keeping perpendicular with spraying area then move it parallel for several times, Stopping gun movement in mid-stroke will cause a build up of paint and result in runs. Do not fan the gun from side to side while painting. This will cause a build-up of paint in the center of the stroke and an insufficient coating at each end.
-
Trigger the gun properly. Start the gun moving at the beginning of the stroke BEFORE SQUEEZING THE TRIGGER and release the trigger BEFORE STOPPING GUN MOVEMENT at the end of the stroke. This procedure will blend each stroke with the next without showing overlap or unevenness.
-
The amount of paint being applied can be varied by the speed of the stroke, distance from the surface and adjustment of the fluid control knob.
-
Overlap strokes just enough to obtain an even coat.

NOTE: Two thin coats of paint will yield better results and have less chance of runs than one heavy layer.
- Use a piece of cardboard as a shield to catch overspray at the edges of the work to protect other surfaces.
6 MAINTENANCE

Incomplete cleaning could cause function failures and a degradation of the fan form.
- Remove any remaining paint by pouring it into another container.
- Disassemble the spray gun making sure to remove the needle before disassembling the nozzle to avoid damage to the housing of the nozzle closure.
- Clean all the paint passages and the nozzle. Clean the other components using a brush soaked in solvent.
- Reassemble the spray gun and spray a small quantity of solvent to eliminate all the residues in the paint passages.
7 STORING
- When not using spray gun, turn the fluid adjustment knob counter-clockwise to open which will reduce spring tension on needle fluid tip.
- Spray gun MUST BE well cleaned and lightly lubricated.
8 TECHNICAL DATA
| POWAIR0105 | |
| Air inlet | 14" |
| Type of feed | Gravity |
| Standard diameter of nozzle | 1.5mm |
| Recommended air pressure | 3.5bar |
| Max. pressure of air | 4bar |
| Paint capacity | 600cc |
| Avg. air consumption | <226l/min |
| Pattern width | 160-240mm |
9 TROUBLE SHOOTING
| Symptom | Problems | Solution |
Fluttering or spitting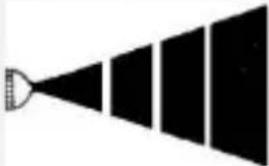 | Material level tool low. | Add material into container. |
| Container tipped too far. | Hold more upright. | |
| Loose fluid inlet connection. | Tighten. | |
| Loose or damaged fluid tip/seat. | Adjust or replace. | |
| Dry or loose fluid needle packing nut. | Lubricate and or tighten. | |
| Air vent clogged | Clear vent hole. | |
Pattern is arc. | Worn or loose Fluid nozzle. | Tighten or replace Fluid nozzle. |
| Material build up on Air cap. | Remove obstructions from holes, but don’t use metal objects to clean it. | |
Pattern is not Evenly spread. | Material build up on Air cap. | Clean or replace Air cap. |
| Fluid nozzle dirty or worn. | Clean or replace Fluid nozzle. | |
| The center of Pattern too narrow. | Material too thin or not enough. | Regulate material viscosity. |
 | Atomization air pressure too high. | Reduce air pressure. |
| Pattern width of fan-sharp is not enough. | Material too thick. | Regulate material viscosity. |
 | Atomization air pressure too low. | Increase air pressure. |
| Air leaking from air cap without pulling trigger | Sticking air valve stem | Lubricate |
| Contaminate on air valve or seat | Clean | |
| Worn or damaged air valve or seat | Replace | |
| Broken air valve spring | Replace | |
| Bent valve stem | Replace | |
| Fluid leaking from packing nut | Packing nut loose | Tighten, but do not restrict needle |
| Packing worn or dry | Replace or lubricate (non-silicone oil) | |
| Excessive overspray | Too high atomization pressure | Reduce pressure |
| Too far from work surface | Adjust to proper distance | |
| Improper stroking (arcing, gun motion too fast) | Move at moderate pace, parallel to surface. | |
| Will not spray | No pressure at gun | Check air lines |
| Fluid control not open enough | Open fluid control | |
| Fluid too heavy | Thin fluid or change to pressure feed system. |
10 ENVIRONMENT
Should your machine need replacement after extended use, do not put it in the domestic waste but dispose of it in an environmentally safe way.
VARO – Vic. Van Rompuy N.V. - Joseph Van Instraat 9 - BE2500 Lier - BELGIUM, declares that,
product: High pressure spray gun
trade mark: PowerPlus
model: POWAIR0105
is in conformity with the essential requirements and other relevant provisions of the applicable European Directives, based on the application of European harmonized standards. Any unauthorized modification of the apparatus voids this declaration.
European Directives (including, if applicable, their amendments up to the date of signature); 2006/42/EC
European harmonized standards (including, if applicable, their amendments up to the date of signature);
EN1953: 2013
Keeper of the Technical Documentation : Philippe Vankerkhove, VARO – Vic. Van Rompuy N.V.
The undersigned acts on behalf of the company CEO,
Mertens Ludo
Ludo Mertens
Certification Manager
18/05/2020, Lier - Belgium
HOCHDRUCK-SPRAYPISTOLE POWAIR0105
1 EINSATZBEREICH
Modell-No: POWAIR0105
18/05/2020, Lier - Belgium
POWAIR0105 ES
18/05/2020, Lier - Belgium
PISTOLA A SPRUZZO AD ALTA PRESSIONE POWAIR0105
1 APPLICAZIONE
natural_image
Abstract black-and-white geometric pattern with layered rectangular shapes (no text or symbols)natural_image
Simple line drawing of a curved, elongated object with speckled texture (no text or symbols)natural_image
Simple line drawing of two abstract shapes with internal dot patterns (no text or symbols)18/05/2020, Lier - Belgium
POWERPLUS® HIGH QUALITY TOOLS POWAIR0105 PT PULVERIZADOR DE ALTA PRESSÃO POWAIR0105
1 APLICAÇÃO
Decrease: Reduzir Pattern: Padrão Increase: Aumentar
Decrease: Reduzir Fluid: Fluido Increase: Aumentar
18/05/2020, Lier - Belgium
1 BRUKSOMRÅDE 2
2 BESKRIVELSE....2
3 PAKKENS INNHOLD 2
4 SIKKERHETSREGLER....2
5 BRUKSANVISNING 3
5.1 Klargjøring....3
5.2 Justering....4
5.2.1 Mønsterjustering: 4
5.2.2 Strømningsjustering (maling): 4
5.2.3 Bruk....4
6 VEDLIKEHOLD 5
7 OPPBEVARING....6
8 TEKNISKE DATA....6
9 FEILS∅KING....6
10 MILJ∅....7
11 SAMSVARSERKLÆRING....8
1 BRUKSOMRÅDE
POWAIR0105 NO
5.2.1 Mønsterjustering:
5.2.2 Strømningsjustering (maling):
18/05/2020, Lier - Belgium
1 ANVENDELSE....2
2 BESKRIVELSE (FIG. A)....2
3 MEDF∅LGENDE INDHOLD....2
4 SIKKERHEDSVEJLEDNING....2
5 BETJENINGSVEJLEDNING ....3
5.1 Klargøring....3
5.2 Justering....4
5.2.1 Justering af mønster: 4
5.2.2 Justering af væske (maling):....4
5.2.3 Betjening 4
6 VEDLIGEHOLDELSE....5
7 OPBEVARING....6
8 TEKNISKE DATA....6
9 FEJLFINDING....6
10 MILJ∅ 8
11 KONFORMITETSERKLÆRING....8
H∅JTRYKSSPR∅JTEPISTOL
POWAIR0105
1 ANVENDELSE
POWAIR0105 DA
18/05/2020, Lier - Belgium
1 ANVÄNDNINGSOMRÅDE....2
2 BESKRIVNING (FIG. A) 2
3 FÖRPACKNINGSINNEHÅLL 2
4 SÄKERHETSANVISNINGAR....3
5 ANVÄNDNINGSANVISNINGAR 3
5.1 Förberedelser 3
5.2 Inställning 4
5.2.1 Sprutmönsterinställning....4
5.2.2 Färgmatningsinställning 4
5.2.3 Sprutmålning....4
6 UNDERHÅLL....6
7 FÖRVARING....6
8 TECHNICAL DATA 6
9 FELSÖKNING....7
10 MILJÖ....8
11 KONFORMITETSDEKLARATION ....9
1 ANVÄNDNINGSOMRÅDE
3 FÖRPACKNINGSINNEHÅLL
18/05/2020, Lier - Belgium
18/05/2020, Lier - Belgium
 Eik 1 Eik 1 | 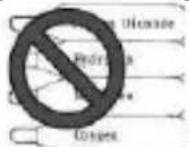 Eik2 Eik2 | 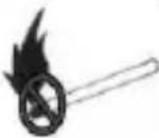 Eik3 Eik3 |  Eik4 Eik4 |
18/05/2020, Lier - Belgium
1 UREĐAJ 2
2 OPIS (FIG. A)....2
3 POPIS SADRŽAJA PAKIRANJA....2
4 SIGURNOSNA PRAVILA 3
5 UPUTE ZA RAD 3
5.1 Priprema....3
5.2 Podešavanje 4
5.2.1 Podešavanje oblika prskanja....4
5.2.2 Podešavanje tekućine (boje): 4
5.2.3 Upotreba 4
6 ODRŽAVANJE 5
7 ČUVANJE....6
8 TEHNIČKI PODACI 6
9 RJEŠAVANJE PROBLEMA....7
10 OKOLIŠ 8
11 IZJAVA O SUKLADNOSTI....9
VISOKOTLAČNI PIŠTOLJ ZA PRSKANJE POWAIR0105
1 UREĐAJ
Visokotlačni pištolj za prskanje je odličan za bojenje u razni kućnim radovima i popravcima. Ovaj visokotlačni rasprskivač karakterizira regulacija tekućine i ventilatora koja nudi široku lepezu oblika prskanja.

4 SIGURNOSNA PRAVILA
 SI 1 SI 1 |  SI 2 SI 2 | 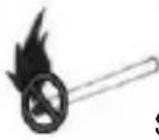 SI 3 SI 3 |  SI 4 SI 4 |
- Otrovne pare koje se oslobađaju prskanjem nekih materijala mogu dovesti do trovanja te ozbiljnih štetnih učinaka za zdravlje. Uvijek nosite sigurnosne naočale, rukavice i respirator kako biste izbjegli opasnost od otrovnih para, otapala i boje koja može doći u doticaj s vašom kožom ili očima. (pogledajte sl. 1)
- Nikad ne koristite kisik, zapaljivi ili bilo koji ukapljeni plin kao pogonsko sredstvo jer možete dovesti do eksplozije i ozbiljnih tjelesnih ozljeda. (pogledajte sl. 2)
Tekućina i otapalo mogu biti vrlo zapaljivi i gorivi. Molimo vas, alat koristite u dobro provjetravanim prostorijama i izbjegavajte izvore zapaljenja kako što su cigareta, otvoreni plamen, opasno prikriveno iskrenje, itd(pogledajte sl. 3). - Odvojite alat od crijeva za dovod zraka prije nego obavite održavanje i kad alat ne radi, preporučuje se da u blizini alata postavite kuglasti zaporni ventil za zaustavljanje rad u slučaju nužde.
- Koristite čist, suh i regulirani zrak pri tlaku od 3,0 – 4,0 bara i nikad ne prekoračujte maksimalni dozvoljeni tlak od 8,3 bara (120 psi) (pogledajte sl. 4)
- Nikad ne koristite homogenizirana ugljikohidratna otapala, koja mogu kemijski reagirati s aluminijskim i dijelovima od cinka i koji su kompatibilni s dijelovima od aluminija i cinka.
Nikad i ni u kojem trenutku ne okrećite pištolj prema sebi niti prema drugim osobama. - Prije pokretanja alata pobrinite se da svi vijci i kapice budu čvrsto stegnuti kako ne bi bilo propuštanja;
- Prije bojenja, izvršite pregled i uvjerite se da se okidač i mlaznice pokreću bez zapinjanja kako biste osigurali ispravan rad alata.
Nikad ne vršite nikakve preinake na ovom alatu ni za kakvu primjenu. Koristite samo one dijelove, mlaznice i pribor koje preporučuje proizvođač.
5 UPUTE ZA RAD
5.1 Priprema
18/05/2020, Lier - Belgium
1 UREĐAJ 2
2 OPIS (FIG. A)....2
3 LISTA SADRŽAJA PAKETA....2
4 BEZBEDNOSNA PRAVILA....3
5 UPUTSTVA ZA RAD ....3
5.1 Priprema....3
5.2 Podešavanje 4
5.2.1 Podešavanje oblika raspršene boje ....4
5.2.2 Podešavanje tečnosti (boje):....4
5.2.3 Rad 5
6 ODRŽAVANJE 6
7 ODLAGANJE....6
8 TEHNIČKI PODACI 6
9 DIJAGNOZA I OTKLANJANJE KVARA....7
10 ŽIVOTNA SREDINA 8
11 IZJAVA O USKLAĐENOSTI 9
PIŠTOLJ ZA RASPRŠIVANJE BOJE POD VISOKIM PRITISKOM POWAIR0105-POWAIR0106
1 UREĐAJ
Pištolj za raspršivanje boje pod visokim pritiskom je idealan za ponovno nanošenje završnog premaza bojom u širokom spektru projekata na osvežavanju doma.
18/05/2020, Lier - Belgium
POWAIR0105 CS
18/05/2020, Lier - Belgium
1 POUŽÍVANIE 2
2 POPIS (FIG. A) 2
3 OBSAH BALENIA 2
4 SAFETY INSTRUCTIONS....3
5 POKYNY NA PREVÁDZKU....3
5.1 Príprava....3
5.2 Nastavenia 4
5.2.1 Nastavenie vzoru: 4
5.2.2 Nastavenie kvapaliny (farby):....4
5.2.3 Prevádzka 4
6 ÚDRŽBA....5
7 USKLADNENIE 6
8 TECHNICKÉ ÚDAJE......6
9 ODSTRAŇOVANIE PROBLÉMOV......6
10 ŽIVOTNÉ PROSTREDIE 8
11 VYHLÁSENIE O ZHODE....9
VYSOKOTLAKOVÁ STRIEKACIA PIŠTOL' POWAIR0105
1 POUŽÍVANIE
Vysokotlaková striekacia pištol' je ideálna na prelakovanie širokej škály predmetov v domácnosti s ciel'om ich skrášlenia.
If any parts are missing or damaged, please contact your dealer.
4 SAFETY INSTRUCTIONS
 Obr 1 Obr 1 | 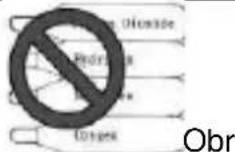 2 2 | 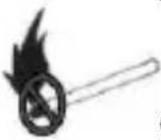 3 3 |  4 4 |
18/05/2020, Lier - Belgium
1 DOMENII DE UTILIZARE 2
2 DESCRIERE (FIG. A) 2
3 CONTINUTUL PACHETULUI....2
4 INSTRUCTIUNI DE SIGURANTĂ....2
5 INSTRUCTIUNI DE UTILIZARE ....3
5.1 Pregătirea....3
5.2 Reglarea....4
5.2.1 Ajustarea modelului:....4
5.2.2 Ajustarea fluidului (vopselei): 4
5.2.3 Mod de utilizare....4
6 ÎNTRETINEREA....5
7 DEPOZITAREA 6
8 DATE TEHNICE....6
9 DEPANAREA 6
10 MEDIU....8
11 DECLARATIA DE CONFORMITATE....9
PISTOL DE VOPSIT LA ÍNALTĂ PRESIUNE POWAIR0105
1 DOMENII DE UTILIZARE
WARNING Packaging materials are not toys! Children must not play with plastic bags! There is a danger of suffocation!
POWAIR0105
1 x pistol de vopsit
natural_image
Simple line drawing of two abstract shapes with internal dot patterns (no text or symbols)18/05/2020, Lier - Belgium
18/05/2020, Lier - Belgium
18/05/2020, Lier - Belgium
1 ПРЕДНАЗНАЧЕНИЕ НА ЕЛЕКТРИЧЕСКИЯ УРЕД....2
2 ОПИСАНИЕ (FIG. A)....2
3 СПИСЪК НА СЪДЪРЖАНИЕТО НА ПАКЕТА....2
4 ПРАВИЛА ЗА БЕЗОПАСНОСТ....3
5 ИНСТРУКЦИИ ЗА ЕКСПЛОАТАЦИЯ....3
5.1 Подготовка....3
5.2 Регулиране ....4
5.2.1 Регулиране формата на струята: 4
5.2.2 Регулиране на флуида (боята):......4
5.2.3 Работа....5
6 ТЕХНИЧЕСКО ОБСЛУЖВАНЕ....6
7 СЪХРАНЯВАНЕ....6
8 TECHNICAL DATA 6
9 НАМИРАНЕ И ОТСТРАНЯВАНЕ НА НЕИЗПРАВНОСТИ......6
10 ОКОЛНАТА СРЕДА ....8
11 ДЕКЛАРАЦИЯ ЗА СЪОТВЕТСТВИЕ....9
ПИСТОЛЕТ ЗА БОЯДИСВАНЕ С ВИСОКО НАЛЯГАНЕ POWAIR0105
1 ПРЕДНАЗНАЧЕНИЕ НА ЕЛЕКТРИЧЕСКИЯ УРЕД
18/05/2020, Lier - Belgium
natural_image
Exterior view of a PowerPlus spray gun (no text or symbols on the gun body)varo
WWW.VARO.COM
DESIGNED AND MARKETED BY VARO
©copyright by varo
VARO - VIC. VAN ROMPUY nv
JOSEPH VAN INSTRAAT 9 - 2500 LIER - BELGIUM
OFFICES: