POWX354 - Paint spray PowerPlus - Free user manual and instructions
Find the device manual for free POWX354 PowerPlus in PDF.

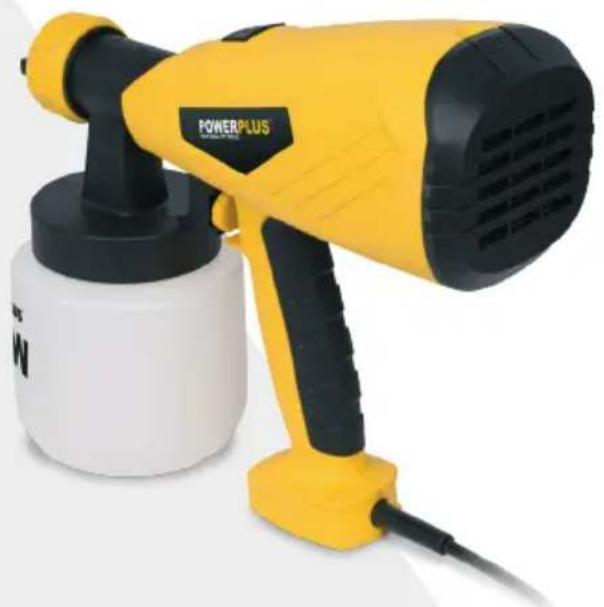
| Product Type | Paint Sprayer |
| Brand | PowerPlus |
| Model | POWX354 |
| Rated Power | 500 W |
| Rated Voltage | 220-240 V ~ 50 Hz |
| Nozzle Diameter | 2.6 mm (spare nozzle 1.8 mm included) |
| Flow Rate | 900 g/min |
| Maximum Viscosity | 100 din/s |
| Tank Capacity | 0.8 L |
| Cable Length | 2 m |
| Spray Patterns | 3 (circular, horizontal, vertical) |
| Product Volume Adjustment | Yes, via dial |
| Carbon Brush Motor | Yes |
| Soft Grip Handle | Yes |
| Quick Release Tank | Yes |
| Replaceable Air Filter | Yes |
| Sound Pressure Level | 82 dB(A) |
| Sound Power Level | 93 dB(A) |
| Vibrations | < 2.5 m/s² |
| Warranty | 36 months |
| Standards | CE, EN 60745-1, EN 50580 |
Frequently Asked Questions - POWX354 PowerPlus
User questions about POWX354 PowerPlus
0 question about this device. Answer the ones you know or ask your own.
Ask a new question about this device
Download the instructions for your Paint spray in PDF format for free! Find your manual POWX354 - PowerPlus and take your electronic device back in hand. On this page are published all the documents necessary for the use of your device. POWX354 by PowerPlus.
USER MANUAL POWX354 PowerPlus
natural_image
Yellow POWERPLUS spray gun with black handle and white base, no visible text or symbols on the device itself.
NL NEDERLANDS VERTAALDE VERSIE VAN DE ORIGINELE HANDLEIDING
FR FRANÇAIS TRADUCTION DU MODE D'EMPLOI D'ORIGINE
EN ENGLISH ORIGINAL INSTRUCTION MANUAL
natural_image
Line drawing of a spray gun with spray bottle and bucket (no text or symbols)Fig. 2B
natural_image
Line drawing of a spray gun with handle and base components (no text or symbols)Fig.3
Fig. 3A
natural_image
Technical line drawing of a circular mechanical component with internal concentric rings and mounting holes (no text or symbols)Fig. 3B
natural_image
Technical diagram of a circular mechanical component with internal components and mounting holes, plus a separate black circular shape below (no text or symbols)Fig. 3C

natural_image
Technical diagram of a circular mechanical component with internal components and a separate oval shape below (no text or symbols)Fig. 3D
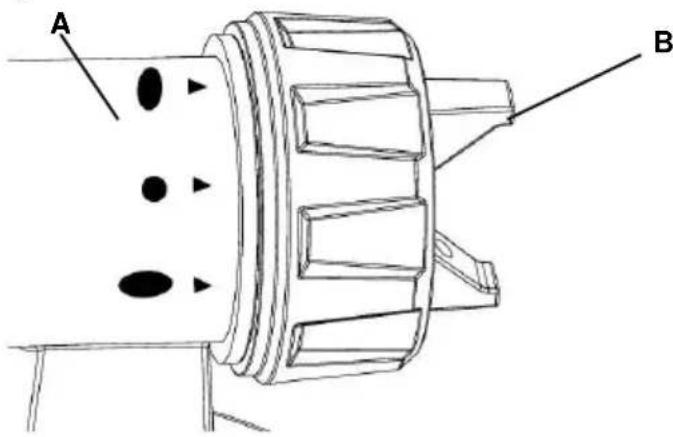
Fig. 4
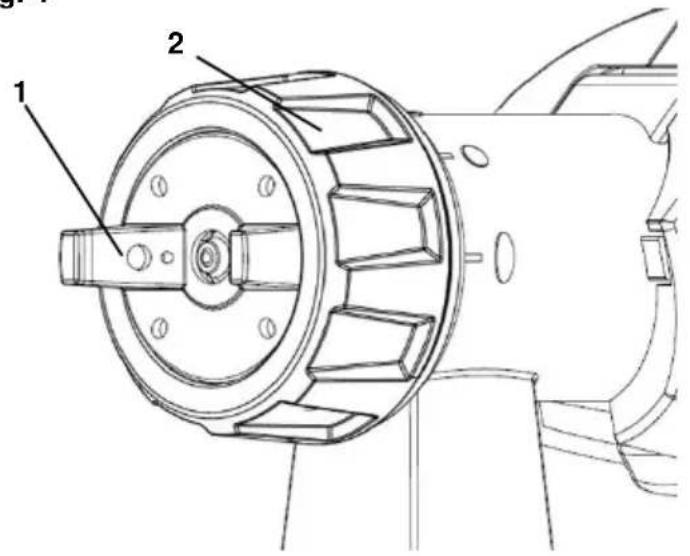
Fig. 5
natural_image
Line drawing of a mechanical component with no visible text or symbolsFig. 6
Fig. 6A
natural_image
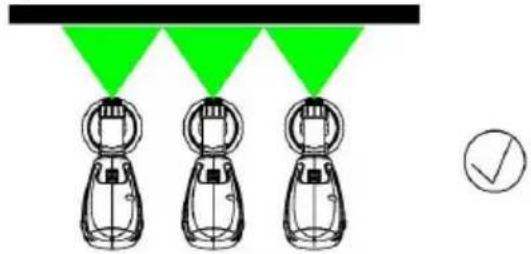
Three identical mechanical components with green triangular indicators above them, plus a checkmark icon below (no text or symbols on components)Fig. 6B
natural_image
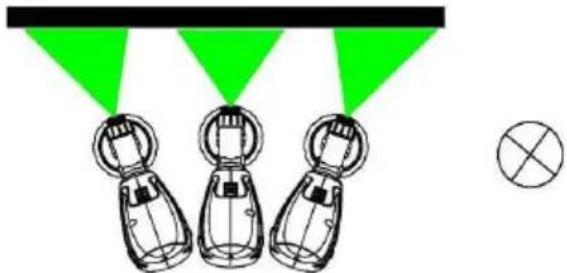
Diagram showing three identical mechanical components emitting green laser beams to a black beam, with a cross symbol nearby (no text or labels)Fig. 7

Fig. 8
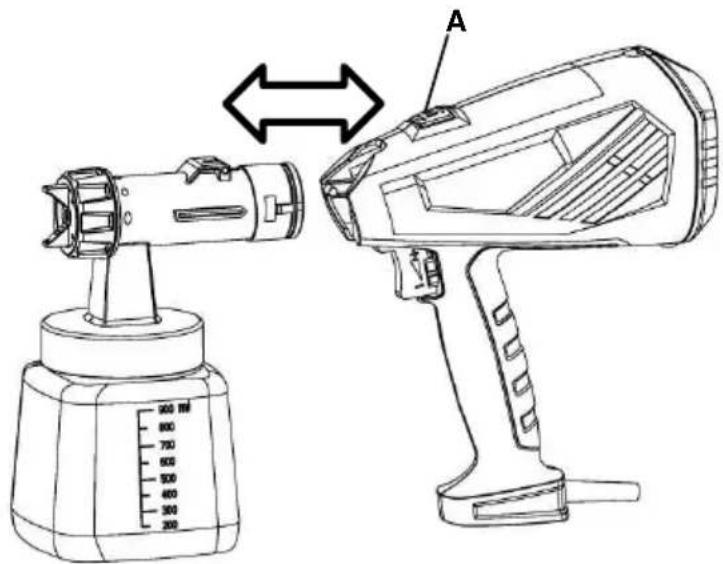
Fig. 9

natural_image
Technical line drawing of a mechanical device interior showing internal components and a labeled part (7), no text or symbols present.VERFSPUITPISTOOL 500 W POWX354

1 BESCHRIJVING (FIG. A)
Product: VERFSPUITPISTOOL 500 W
Handelsmerk: POWERplus
Model: POWX354
20/07/2022, Lier - Belgium
Fig. 3 A = jet large horizontal
Fig. 3 B = jet circulaire
Fig. 3 C = jet large vertical
1 DESCRIPTION (FIG. A) 2
2 PACKAGE CONTENT LIST....2
3 SYMBOLS 2
4 GENERAL POWER TOOL SAFETY WARNINGS .... 3
4.1 Working area....3
4.2 Electrical safety....3
4.3 Personal safety 3
4.4 Power tool use and care....4
4.5 Service....4
5 ADDITIONAL SAFETY INSTRUCTIONS ....4
5.1 Immediately switch off the spray gun when: 5
5.2 Coating materials suitable for use....5
5.3 Coating materials not suitable for use....5
5.4 Preparation of the coating material .... 5
6 START-UP 5
6.1 Thinning....5
6.2 Adjusting the desired Spray Setting (Fig. 4)....6
6.3 Adjusting the Material Volume (Fig. 5)....6
6.4 Spray Technique....7
6.5 Interruption of work up till 4 hours max. 7
7 TAKING OUT OF OPERATION AND CLEANING .... 7
8 MAINTENANCE 8
8.1 Correction of Malfunctions....8
9 TECHNICAL SPECIFICATIONS....9
10 NOISE....9
11 WARRANTY....10
12 ENVIRONMENT 10
13 DECLARATION OF CONFORMITY .... 11
PAINT SPRAY GUN 500W POWX354

WARNING! For your own safety, read this manual and the general safety instructions carefully before using the appliance. Your power tool should only be given to other users together with these instructions.
1 DESCRIPTION (FIG. A)
-
Air cap
-
Spray gun rear part
-
Nozzle
-
Air filter cover
-
Union nut
-
Material volume adjustment
-
Spray gun front part
-
Mains lead
-
Trigger guard
-
Container
-
Unlock button
■ Remove all packaging materials.
- Remove remaining packaging and packing inserts (if included).
- Check that the package contents are complete.
- Check the appliance, the power cord, the power plug and all accessories for transportation damage.
- Keep the packaging materials as far as possible until the end of the warranty period. Then take it to your local waste disposal system.

WARNING Packaging materials are not toys! Children must not play with plastic bags! There is a danger of suffocation!
1x manual
1x spare nozzle (1.8 mm)
1x viscosity cup
1x nozzle on pistol (2.6 mm)

If any parts are missing or damaged, please contact your dealer.
3 SYMBOLS
The following symbols are used in this manual and/or on the machine:
 | Denotes risk of personal injury or damage to the tool. |  | Read manual before use. |
 | In accordance with essential safety standards of applicable European directives. | 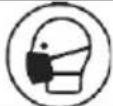 | Wear a mask In dusty conditions. |
 | Mandatory use of eye protection. |  | Wear noise protection. |
4 GENERAL POWER TOOL SAFETY WARNINGS
Read all safety warnings and instructions. Failure to heed warnings and follow instructions may result in electric shock, fire and/or serious injury. Keep safety warnings and instructions for future reference. The term "power tool" in the safety warnings refers to your mains-operated (corded) power tool or battery-operated (cordless) power tool.
4.1 Working area
- Keep working area clean and well lit. Untidy and dark areas can lead to accidents.
- Do not operate power tools in potentially explosive surroundings, for example, in the presence of inflammable liquids, gases or dust. Power tools create sparks which may ignite the dust or fumes.
- Keep children and bystanders at a distance when operating a power tool. Distractions can cause you to lose control of it.
4.2 Electrical safety

Always check that the power supply corresponds to the voltage on the rating plate.
- Power tool plugs must match the outlet. Never modify the plug in any way. Do not use adapter plugs with earthed power tools. Unmodified plugs and matching outlets will reduce the risk of a lethal electric shock.
- Avoid body contact with earthed surfaces such as pipes, radiators, kitchen ranges and refrigerators. There is an increased risk of a lethal electric shock if your body is earthed.
- Do not expose power tools to rain or wet conditions. If water gets inside a power tool, it will increase the risk of a lethal electric shock.
- Do not damage the cord. Never use the cord for carrying, pulling or unplugging the power tool. Keep the cord away from heat, oil, sharp edges or moving parts. Damaged or entangled cords increase the risk of a lethal electric shock.
- When operating a power tool outdoors, use an extension cable suitable for outdoor use. Using a cord suitable for outdoor use reduces the risk of a lethal electric shock.
- If operating a power tool in a damp location is unavoidable, use a power supply protected by a residual current device (RCD). Using an RCD reduces the risk of a lethal electric shock.
4.3 Personal safety
- Stay alert, watch what you are doing and use common sense when operating a power tool. Do not use a power tool when you are tired or under the influence of drugs, alcohol or medication. A moment of inattention when operating a power tool may result in serious personal injury.
- Use safety equipment. Always wear eye protection. Using safety equipment such as a dust mask, non-skid safety shoes, a hard hat, or hearing protection whenever it is needed will reduce the risk of personal injury.
- Avoid accidental starts. Ensure the switch is in the off position before inserting the plug. Carrying power tools with your finger on the switch or plugging in power tools when the switch is in the on position makes accidents more likely.
- Remove any adjusting keys or spanners before turning on the power tool. A spanner or key left attached to a rotating part of the power tool may result in personal injury.
- Do not reach out too far. Keep your feet firmly on the ground at all times. This will enable you retain control over the power tool in unexpected situations.
- Dress properly. Do not wear loose clothing or jewellery. Keep your hair, clothing and gloves away from the power tool. Loose clothes, jewellery or long hair can become entangled in the moving parts.
- If there are devices for connecting dust extraction and collection facilities, please ensure that they are attached and used correctly. Using such devices can reduce dust-related hazards.
4.4 Power tool use and care
- Do not expect the power tool to do more than it can. Use the correct power tool for what you want to do. A power tool will achieve better results and be safer if used in the context for which it was designed.
- Do not use the power tool if the switch cannot turn it on and off. A power tool with a broken switch is dangerous and must be repaired.
- Disconnect the plug from the power source before making adjustments, changing accessories, or storing power tools. Such preventive safety measures reduce the risk of starting the power tool accidentally.
- Store power tools, when not in use, out of the reach of children and do not allow people who are not familiar with the power tool or these instructions to operate it. Power tools are potentially dangerous in the hands of untrained users.
- Maintenance. Check for misalignment or jammed moving parts, breakages or any other feature that might affect the operation of the power tool. If it is damaged, the power tool must be repaired. Many accidents are caused by using poorly maintained power tools.
- Keep cutting tools sharp and clean. Properly maintained cutting tools with sharp cutting edges are less likely to jam and are easier to control.
- Use the power tool, accessories and cutting tools, etc., in accordance with these instructions and in the manner intended for the particular type of power tool, taking into account the working conditions and the work which needs to be done. Using a power tool in ways for which it was not intended can lead to potentially hazardous situations.
4.5 Service
- Your power tool should be serviced by a qualified specialist using only standard spare parts. This will ensure that it meets the required safety standards.
5 ADDITIONAL SAFETY INSTRUCTIONS
- NEVER SPRAY AT PERSONS - NEVER aim the nozzle at another person or animal. Never allow the spray to come into direct contact with the skin.
- FLASH POINT - This spray gun must not be used for spraying flammable paints and solvents with a flash point of less than 32 °C
- VENTILATION - Always make sure that there is adequate ventilation in the work area when spraying.
- BASKET NOZZLE - Always keep the spray basket nozzle in place during use.
- CONSIDER WORK AREA ENVIRONMENT – Do not use spray guns where there is a risk of fire or explosion.
- BEWARE OF ANY HAZARD - Beware of any Hazard by the material being sprayed and consult the markings on the container or the information supplied by the manufacturer.
- DO NOT SPRAY - Do not spray any material where the hazard is not known.
- USE EYE PROTECTION - Always use appropriate eye protection to keep hazardous vapours or fumes out of the eyes.
■ WEAR A MASK - Never operate a spray gun without wearing a face mask - PROTECT YOUR EARS - Wear ear protectors if the sound pressure exceeds 85 dB(A).
-
MAINTAIN YOUR TOOLS - Keep your spray gun, paint container and nozzles clean. Do not clean with flammable liquids with a flash point less than 32 °C. Inspect the mains lead periodically and if damaged have it replaced by a qualified person.
■ NAKED FLAMES - Never spray near a naked flame or appliance pilot flame.
■ SMOKING - Never smoke whilst spraying. -
THINNING - Always read the paint manufacturers thinning recommendations or instructions before using paint or other materials.
- DISCONNECT FROM THE MAINS SUPPLY - Always disconnect from the mains supply when filling the paint container or cleaning the spray gun.
- SWITCH OFF WHEN NOT SPRAYING – Avoid running the unit with the flow rate knob fully closed for any length of time.

We accept no responsibility for damage caused by the use of unsuitable substances, or paints that have not been thinned correctly, and any health hazards that arise from lack of adequate ventilation.
5.1 Immediately switch off the spray gun when:
- Interruption in the mains plug, mains lead or mains lead damage.
- Defect switch.
- Smoke or stench of scorched isolation.
5.2 Coating materials suitable for use
Water- and solvent-based paints, finishes, primers, 2-component paints, clear finishes, automotive finishes, staining sealers and wood sealer-preservatives.
5.3 Coating materials not suitable for use
Wall paints (emulsion paints) etc., alkali and acidic paints. Coating materials with a flash point below 21 °C.
5.4 Preparation of the coating material
The enclosed spray attachment can be used to spray paints, varnishes and glazes that are undiluted or slightly diluted.
- Stir the material up and put the required amount into the paint container.
| Thinning recommendation | |
| Sprayed material | |
| Glazes | undiluted |
| Wood preservatives, mordants, oils, disinfection agents, plant protective agents | undiluted |
| Paints containing solvents and water-soluble paints, primers, vehicle coating paints, hick-flm glazes | dilute by 5 - 10% |
- If the convey capacity is too low, add 5 - 10% dilution step-by-step until the convey capacity fulfils your requirements.
6 START-UP
6.1 Thinning

Always remember to disconnect from the mains supply before filling the paint container with sprayable material.
Most paints are supplied ready for brush application and will need to be thinned before they are suitable to be sprayed. Follow the manufacturer's advice on thinning. The paint when used with a spray gun. The viscosity cup will help you to determine the correct viscosity of paint to be used. To determine the correct viscosity, fill the cup to the brim with the paint. Measure the amount of time it takes for the cup to empty back into the can. The table below shows recommended times for different types of material.
Viscosity Table
| Spray material | Runout Time in Seconds |
| Oil enamel | 25-45 |
| Oil based primer | 30-50 |
| Varnish | 20-55 |
| Lacquer / lacquer sanding sealer | 25-40 |
| Oil stain | No thinning required |
| Clear sealer | No thinning required |
| Polyurethane | No thinning required |
If the paint takes longer than the recommended time to empty, then further thinning is required. Mix in a small quantity of the appropriate thinner and use the viscosity test until the correct thickness is achieved. Some sprayable materials contain particles and lumps. These materials should be strained before filling the paint container.
Before connecting to the mains supply, be sure that the supply voltage is identical with the value given on the rating plate.
- Unscrew the container from the spray gun.
- Aligning suction tube (Fig. 2).
If the suction tube is positioned correctly, the container contents can be sprayed without almost any residue.
When working on lying objects: Turn the suction tube forwards (Fig. 2 A).
Spraying work when working on overhead objects: Turn the suction tube rearwards (Fig. 2 B).
- Set the container on a sheet of paper, pour in the prepared coating material and screw the container tightly onto the spray gun.
- Put the machine down only on a level, clean surface. Otherwise the machine could tip over!
- Adjust the spray setting on the spray gun.
Three different spray jet settings can be chosen on the spray gun, depending on the application and target object.
Selecting the Spray Setting
Fig. 3 A = horizontal fat jet
Fig. 3 B = circular jet
Fig. 3 C = vertical fat jet
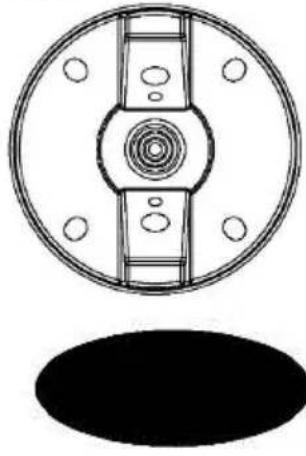
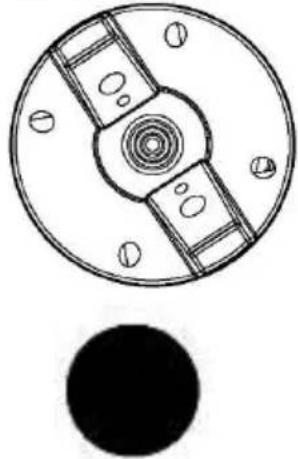
The spray pattern indication can be found on the front part of the sprayer (Fig.3D, A). With the arrowhead towards the boss on the tip (Fig.3D, B).
6.2 Adjusting the desired Spray Setting (Fig. 4)
With the union nut (2) slightly unscrewed, turn the air cap (1) to the desired spray setting position. Then tighten the union nut.

WARNING! Danger of injury! Never pull the trigger guard while adjusting the air cap.
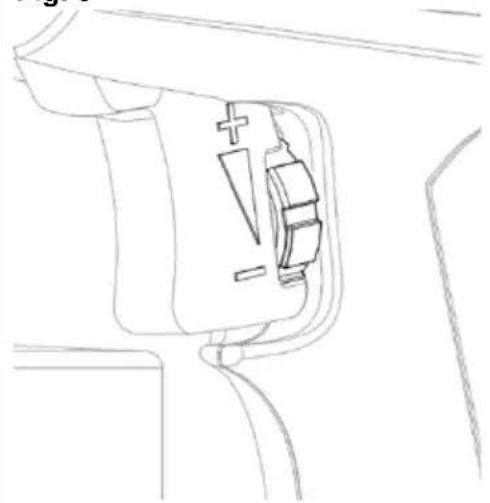
6.3 Adjusting the Material Volume (Fig. 5)
Set the material volume by turning the regulator on the trigger guard of the spray gun.
- turn to downside lower material volume.
+ turn to upside higher material volume.
6.4 Spray Technique
- The spray result depends heavily on the smoothness and cleanliness of the surface to be sprayed. Therefore the surface should be carefully prepared and kept free of dust.
- Cover all surfaces not to be sprayed.
- Cover screw threads or similar parts of the target object.
- It is advisable to test the spray gun on cardboard or a similar surface to find the correct setting.

Important: Begin spraying outside of the target area and avoid interruptions inside the target area.
- Correct (Fig. 6a): Be sure to hold the spray gun at an even distance of approx. 10 – 30 cm to the target object.
- Incorrect (Fig. 6b): Heavy spray fog build-up, uneven surface quality.
- Move the spray gun evenly cross-wise or up-and-down, depending on the spray pattern setting.
- An even movement of the spray gun results in an even surface quality.
- When coating material builds up on the nozzle (A) and air cap (B) (Fig. 7), clean both parts with a solvent or water.
6.5 Interruption of work up till 4 hours max.
■ Turn the machine off.
- When processing 2-component varnishes, clean the device immediately.
7 TAKING OUT OF OPERATION AND CLEANING
Proper cleaning is the prerequisite for problem-free operation of the paint application device. No warranty claims are accepted in case of improper or no cleaning.
- Unplug the power plug. Vent the container in case of longer breaks and after the work has been terminated. This can be done by briefly turning open and then closing the container or by pulling the trigger guard and letting the paint into the original paint container.
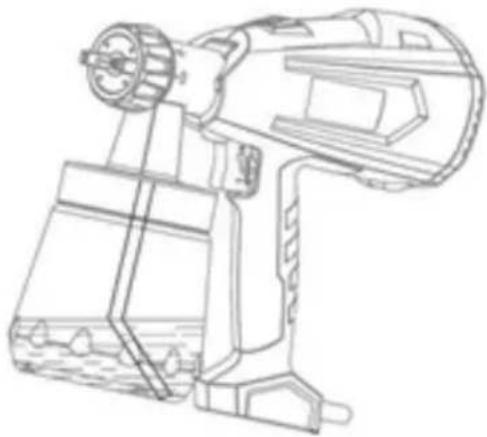
- Divide the spray gun. Press the unlock button (Fig. 8 A) downwards.
■ Unscrew the container. Empty any remaining coating material back into the material tin.
■ Preclean the container and suction tube with a brush. - Pour solvent or water into the container. Screw the container back on. Use only solvents with a flashpoint over 21 °C.
■ Assemble the gun again. - Insert the power plug, turn on the machine and spray the solvent or water into a container or a cloth.
- Repeat the above procedure until the solvent or water emerging from the nozzle is clear.
- Turn of the machine and remove the plug.

CAUTION! Never clean seals, diaphragm and nozzle or air holes of the spray gun with metal objects.

The ventilation hose and diaphragm are only solvent-resistant to a limited extent. Do not immerse in solvent, only wipe.

WARNING! Never hold the spray gun rear part under water or immerse it into liquids. Clean the housing only with a moistened cloth.
- Clean the outside of the spray gun and container with a cloth soaked in solvent or water.
- Unscrew the union nut and remove the air cap and nozzle. Clean the air cap and nozzle with a brush and solvent or water.
8 MAINTENANCE
Change the air filter if it is soiled (Fig. 9, item 7).

WARNING! Never operate the machine without the air filter; dirt could be sucked in and interfere with the function of the machine.
8.1 Correction of Malfunctions
| Problem | Cause | Remedy |
| No coating material emerges from the nozzle | Nozzle cloggedFeed tube cloggedMaterial volume setting turned too far to the left (-)Feed tube looseNo pressure build-up in container | CleanCleanTurn to the right (+)InsertTighten container |
| Coating material drips from the nozzle | Nozzle looseNozzle wornNozzle seal wornCoating material assembly at air cap, nozzle or needle | TightenChangeChangeClean |
| Atomization too coarse | Viscosity of coating material too highMaterial volume too largeMaterial volume adjusting screw turned too far to the right (+)Nozzle contaminatedAir filter heavily soiledToo little pressure build-up in container | ThinTurn material volume adjusting screw to the left (-)CleanChangeTighten container |
| Spray jet pulsates | Coating material in container running outAir filter heavily soiled | RefillChange |
| Coating material causes "paint tears" | Too much coating material applied. | Turn material volume adjusting screw to the left (-) |
| Too much fog of coating material (Overspray) | Distance to the object too largeToo much coating material applied | Reduce distance Turn material volume adjusting screw to the left (-) |
| Paint in the ventilating hose | Diaphragm soiledDiaphragm defective | Clean the diaphragmReplace the diaphragm |
9 TECHNICAL SPECIFICATIONS
| Rated Power | 500 W |
| Rated voltage | 220-240 V |
| Rated frequency | 50 Hz |
| Carbon brush motor | Yes |
| Diameter nozzle | 2.6 mm |
| Adjustable nozzle | Yes |
| Flow speed | 900g/min |
| Max viscosity | 100 din/sec |
| Cable length | 2 m |
| Tank capacity | 0.8 l |
| Adjustable paint flow control | Yes |
| Easy cleaning | Yes |
| Spray patterns | 3 |
| Round spray pattern | Yes |
| Horizontal spray pattern | yes |
| Vertical spray pattern | Yes |
| Quick change filter | Yes |
| Quick release | Yes |
| Soft grip | Yes |
10 NOISE
Noise emission values measured according to relevant standard. (K=3)
Acoustic pressure level LpA 82 dB(A)
Acoustic power level LwA 93 dB(A)

ATTENTION! Wear hearing protection when sound pressure is over 85 dB(A).
aw (Vibration)
<2.5 m/s²
K = 1.5 ~m / s^2
11 WARRANTY
- This product is warranted as provided by law for a 36-month period effective from the date of purchase by the first user.
- This warranty covers all material or production flaws excluding : batteries, chargers, defective parts subject to normal wear & tear such as bearings, brushes, cables, and plugs, or accessories such as drills, drill bits, saw blades, etc. ; damage or defects resulting from maltreatment, accidents or alterations; nor the cost of transportation.
- Damage and/or defects resulting from inappropriate use also do not fall under the warranty provisions.
■ We also disclaim all liability for any bodily injury resulting from inappropriate use of the tool.
- Repairs may only be carried out by an authorised customer service centre for Powerplus tools.
- You can always obtain more information at the number 00 32 3 292 92 90.
- Any transportation costs shall always be borne by the customer, unless agreed otherwise in writing.
- At the same time, no claim can be made on the warranty if the damage of the device is the result of negligent maintenance or overload.
- Definitely excluded from the warranty is damage resulting from fluid permeation, excessive dust penetration, intentional damage (on purpose or by gross carelessness), inappropriate usage (use for purposes for which the device is not suitable), incompetent usage (e.g. not following the instructions given in the manual), inexpert assembly, lightning strike, erroneous net voltage. This list is not exhaustive.
- Acceptance of claims under warranty can never lead to the prolongation of the warranty period nor commencement of a new warranty period in case of a device replacement.
■ Devices or parts which are replaced under the warranty therefore remain the property of Varo NV
- We reserve the right to reject a claim whenever the purchase cannot be verified or when it is clear that the product has not been properly maintained. (Clean ventilation slots, carbon brushes serviced regularly, etc.).
- Your purchase receipt must be kept as proof of date of purchase.
- Your appliance must be returned undismantled to your dealer in an acceptably clean state, (in its original blow-moulded case if applicable to the unit), accompanied by proof of purchase.
12 ENVIRONMENT

Should your appliance need replacement after extended use, do not discard it with the household rubbish but dispose of it in an environmentally safe way. Waste produced by electrical machine items should not be handled like normal household rubbish. Please recycle where recycle facilities exist. Check with your Local Authority or retailer for recycling advice.
VARO N.V. - Vic. Van Rompuy N.V. Joseph Van Instraat 9 - BE2500 Lier - BELGIUM, solely responsible declares that,
product: PAINT SPRAY GUN 500W
trade mark: POWERplus
model: POWX354
is in conformity with the essential requirements and other relevant provisions of the applicable European Directives, based on the application of European harmonized standards. Any unauthorized modification of the apparatus voids this declaration.
European Directives (including, if applicable, their amendments):
2006/42/EC
2014/30/EU
2011/65/EU
European harmonized standards (including, if applicable, their amendments):
EN60745-1:2009
EN50580:2012
EN IEC55014-1 : 2021
The undersigned acts on behalf of the company CEO,
Mertens Lido
Ludo Mertens
Certification Manager
20/07/2022, Lier - Belgium
20/07/2022, Lier - Belgium
20/07/2022, Lier - Belgium
20/07/2022, Lier - Belgium
20/07/2022, Lier - Belgium
20/07/2022, Lier - Belgium
FÄRGSPRUTA 500 W POWX354

2 FÖRPACKNINGSINNEHÅLL
20/07/2022, Lier - Belgium
17/08/2021, Lier - Belgium
20/07/2022, Lier - Belgium
1 OPIS (SL. A)....2
2 POPIS SADRŽAJA PAKETA 2
3 SIMBOLI 2
4 OPĆA UPOZORENJA O SIGURNOSTI RUKOVANJA
ELEKTRIČNIM ALATIMA....3
4.1 Radno mjesto....3
4.2 Električna sigurnost....3
4.3 Osobna sigurnost .... 3
4.4 Uporaba i održavanje električnog alata 4
4.5 Servis....4
5 DODATNE SIGURNOSNE UPUTE....4
5.1 Odmah isključite pištolj za prskanje u ovom slučaju: 5
5.2 Materijali za premaz prikladni za uporabu....5
5.3 Materijali za premaz koji nisu prikladni za uporabu....5
5.4 Priprema materijala za premazivanje....5
6 POKRETANJE 6
6.1 Razrjeđivanje....6
6.2 Podešavanje željenog uzorka prskanja (slika 4)....6
6.3 Podešavanje količine materijala (slika 5)....7
6.4 Tehnike prskanja....7
6.5 Prekid rada do 4 sata....7
7 PRESTANAK RADA I ČIŠĆENJE....7
8 ODRŽAVANJE 8
8.1 Rješavanje neispravnosti....8
9 TEHNIČKI PODACI 9
10 BUKA....9
11 JAMSTVO....10
12 OKOLIŠ 10
13 IZJAVA O SUKLADNOSTI 11
PIŠTOLJ ZA BOJU 500 W POWX354

UPOZORENJE! Prije uporabe alata, a radi vaše vlastite sigurnosti pažljivo pročitajte ovaj priručnik i opće upute o sigurnosti. Ove upute čine sastavni dio opreme električnog alata, pa i u slučaju prodaje drugom vlasniku.
1 OPIS (SL. A)
- Poklopac za zrak
- Mlaznica
- Spojna matica
- Prednji dio pištolja za boju
- Štitnik okidača
-
Gumb za deblokadu
-
Stražnji dio pištolja za boju
- Poklopac filtra za zrak
- Podešavanje količine materijala
- Kabel za napajanje
- Spremnik
2 POPIS SADRŽAJA PAKETA
5 DODATNE SIGURNOSNE UPUTE
NIKAD NE PRSKAJTE PO LJUDIMA – NIKAD ne okrećite mlaznicu prema drugoj osobi ili životinii. Nikad ne dopustite boji da dođe u kontakt s kožom.
- TEMPERATURA ISPARAVANJA – Ovaj pištolj za prskanje se ne smije koristiti za prskanje tekućina i otapala čija temperatura isparavanja je niža od 32 °C.
■ VENTILACIJA – Pobrinite se da uvijek ima dovolino ventilacije na miestu udje prskate.
- KOŠ MLAZNICA – Uvijek čuvajte koš mlaznicu za prskanje na svom mjestu tijekom korištenja.
- PAZITE NA RADNU OKOLINU – Ne koristite pištolje za prskanje tamo gdje postoji opasnost od požara ili eksplozije.
- ČUVAJTE SE SVAKE OPASNOSTI – Čuvajte se svake opasnosti koja može nastupiti od materijala koji se prskaju i pridržavajte se savjeta koji su navedeni na spremniku ili podataka koje ste dobili od proizvođača.
■ NE PRSKAJTE – Ne prskaite nikakvim tvarima kad nisu poznate sve opasnosti.
20/07/2022, Lier - Belgium
1 OPIS (SL. A)....2
2 SPISAK SADRŽAJA PAKOVANJA 2
3 SIMBOLI 2
4 OPŠTA BEZBEDNOSNA UPUTSTVA ZA ELEKTRIČNE ALATE .3
4.1 Radna oblast 3
4.2 Električna bezbednost....3
4.3 Bezbednost osoba....3
4.4 Korišćenje i održavanje električnog alata ....4
4.5 Servisiranje 4
5 DODATNA BEZBEDNOSNA UPUTSTVA....4
5.1 Odmah isključite pištolj za raspršivanja ukliko: 5
5.2 Materijali za premazivanje pogodni za upotrebu....5
5.3 Materijali za premazivanje koji nisu pogodni za upotrebu ....5
5.4 Priprema materijala za premazivanje....5
6 PRVO PUŠTANJE U RAD 6
6.1 Razređivanje....6
6.2 Podešavanje željene postavke raspršivanja (sl. 4)....7
6.3 Podešavanje količine materijala koji se raspršuje (sl. 5)....7
6.4 Postupak raspršivanja....7
6.5 Prekid rada kraći od 4 sata....7
7 STAVLJANJE VAN RADA I ČIŠĆENJE 7
8 ODRŽAVANJE 8
8.1 Ispravljanje nepravilnog funkcionisanja....8
9 TEHNIČKE SPECIFIKACIJE 9
10 BUKA....9
11 GARANCIJA....10
12 ŽIVOTNA SREDINA....10
13 IZJAVA O USKLAĐENOSTI....11
PIŠTOLJ ZA BOJENJE 500 W POWX354

5 DODATNA BEZBEDNOSNA UPUTSTVA
20/07/2022, Lier - Belgium
POWERPLUS® HIGH QUALITY TOOLS
POWX354 CS
20/07/2022, Lier - Belgium
POWERPLUS® HIGH QUALITY TOOLS
POWX354 SK
1 POPIS (OBR. A) 2
2 OBSAH BALENIA....2
3 VYSVETLENIE SYMBOLOV 2
4 VŠEOBECNÉ BEZPEČNOSTNÉ VAROVANIA PRE ELEKTRICKÉ NÁRADIE....3
4.1 Pracovná plocha ....3
4.2 Elektrická bezpečnost'....3
4.3 Osobná bezpečnost......3
4.4 Používanie elektrického náradia a starostlivost' oň....4
4.5 Servis....4
5 DOPLNKOVÉ BEZPEČNOSTNÉ POKYNY 4
5.1 V nasledujúcich prípadoch striekaciu pištol' okamžite vypnite: ....5
5.2 Nanášacie materiály vhodné na použitie....5
5.3 Nanášacie materiály nevhodné na použitie....5
5.4 Príprava nanášaného materiálu 5
6 SPUSTENIE....6
6.1 Riedenie....6
6.2 Úprava želaného nastavenia spreja (obr. 4)....7
6.3 Nastavenie objemu materiálu (obr. 5)....7
6.4 Sprejovacia technika ....7
6.5 Prerušenie práce do 4 hodín....7
7 VYRADENIE Z PREVÁDZKY A ČISTENIE....7
8 ÚDRŽBA....8
8.1 Oprava chybných funkcií....8
9 TECHNICKÉ ÚDAJE....9
10 HLUK....9
11 ZÁRUKA....10
12 ŽIVOTNÉ PROSTREDIE....10
13 VYHLÁSENIE O ZHODE 11
STRIEKACIA PIŠTOL' NA FARBU 500 W POWX354

20/07/2022, Lier - Belgium
POWERPLUS® HIGH QUALITY TOOLS
POWX354 SL
1 OPIS (SLIKA A)....2
2 VSEBINA ŠKATLE....2
3 SIMBOLI 2
4 SPLOŠNA VARNOSTNA OPOZORILA ZA ELEKTRIČNO
ORODJE....3
4.1 Delovno mesto....3
4.2 Električna varnost....3
4.3 Osebna varnost....3
4.4 Uporaba in nega električnega orodja....4
4.5 Servisiranje 4
5 DODATNA VARNOSTNA NAVODILA 4
5.1 Takoj izklopite pršilno pištolo v naslednjih primerih:....5
5.2 Primerni premazni materiali .... 5
5.3 Neprimerni premazni materiali....5
5.4 Priprava premaznega materiala ....5
6 VKLOP NAPRAVE....6
6.1 Redčenje....6
6.2 Prilagajanje nastavitve pršenja (slika 4)....7
6.3 Prilagajanje količine materiala (slika 5)....7
6.4 Tehnika pršenja....7
6.5 Prekinitev dela za največ 4 ure....7
7 SHRANJEVANJE IN ČIŠČENJE....7
8 VZDRŽEVANJE....8
8.1 Odpravljanje težav 8
9 TEHNIČNI PODATKI....9
10 HRUP....9
11 GARANCIJA....10
12 OKOLJE 10
13 IZJAVA O SKLADNOSTI....11
PRŠILNA PIŠTOLA ZA BARVE 500 W POWX354

20/07/2022, Lier - Belgium
Fig. 3 B = jet vertical consistent
Fig. 3 C = jet circular
20/07/2022, Lier - Belgium
POWERPLUS® HIGH QUALITY TOOLS
POWX354 PL
20/07/2022, Lier - Belgium
20/07/2022, Lier - Belgium
20/07/2022, Lier - Belgium
20/07/2022, Lier - Belgium
20/07/2022, Lier - Belgium
natural_image
Yellow POWERPLUS spray gun with black handle and white base, no visible text or symbols on the device itself.varo
WWW.VARO.CO M
DESIGNED AND MARKETED BY VARO
©copyright by varo