POWEBPSS3 - Paint spray PowerPlus - Free user manual and instructions
Find the device manual for free POWEBPSS3 PowerPlus in PDF.

User questions about POWEBPSS3 PowerPlus
0 question about this device. Answer the ones you know or ask your own.
Ask a new question about this device
Download the instructions for your Paint spray in PDF format for free! Find your manual POWEBPSS3 - PowerPlus and take your electronic device back in hand. On this page are published all the documents necessary for the use of your device. POWEBPSS3 by PowerPlus.
USER MANUAL POWEBPSS3 PowerPlus
natural_image
Exterior view of a power spray gun with black and red casing, no visible text or symbols on the main body.
natural_image
Black power plug device with visible 'POWERPLUS' label and three metallic pins (no readable text beyond branding)POWEB5510

natural_image
Exterior view of a power plant spray gun (POWERPLUS) with red and black casing, no visible text or symbols on the main body.
NL NEDERLANDS VERTAALDE VERSIE VAN DE ORIGINELE HANDLEIDING
FR FRANÇAIS TRADUCTION DU MODE D'EMPLOI D'ORIGINE
EN ENGLISH ORIGINAL INSTRUCTION MANUAL
natural_image
Black plastic electrical charger with a black cable and two terminal power plugs (no text or symbols visible)Fig. 2
natural_image
Line drawing of a mechanical device with no visible text or symbolsFig. 3
natural_image
Technical line drawing of a mechanical component with rotational arrow indicating motion (no text or symbols)Fig. 4

natural_image
Close-up of a mechanical component with red and black parts, no visible text or symbolsFig. 5
natural_image
Technical line drawing of a mechanical assembly with a pipette inserted into a circular component (no text or symbols)Fig. 6
natural_image
Technical line drawing of a mechanical assembly showing a shaft being inserted into a housing component (no text or symbols present)POWERPLUS POWEB5510 NL
1 TOEPASSING 3
2 BESCHRIJVING (FIG. A)......3
3 INHOUD VAN DE VERPAKKING....3
4 TOELICHTING VAN DE SYMBOLEN 4
5 ALGEMENE VEILIGHEIDSVOORSCHRIFTEN ....4
5.1 Werkplaats 4
5.2 Elektrische veiligheid....4
5.3 Veiligheid van personen....5
5.4 Zorgvuldige omgang met en gebruik van elektrisch gereedschap ....5
5.5 Service....6
6 VEILIGHEIDSINSTRUCTIES VOOR HET SNOERLOOS
SPUITPISTOOL ...... 6
7 BIJKOMENDE VEILIGHEIDSINSTRUCTIES VOOR BATTERIJEN EN LADERS....7
7.1 Batterijen....7
7.2 Laders....7
8 OPLADEN EN INBRENGEN OF UITNEMEN VAN DE BATTERIJ 8
8.1 Aanwijzingen op de lader (Fig. 1)....8
8.2 Uitnemen/inbrengen van de batterij (Fig. 2)....8
9 GEBRUIK 8
9.1 Viscositeitsmeting....8
9.2 Afregeling van het spuitdebiet (Fig. 3)....9
9.3 Inschakelen (Fig. 4) 9
9.4 Spuittechnieken....9
10 REINIGING EN ONDERHOUD 9
10.1 Reiniging....9
10.2 Reinig en smeer na elk gebruik (Fig. 5)....9
10.3 Werken aan het zuigersysteem (Fig. 6)....10
11 TECHNISCHE GEGEVENS....10
12 GELUID 10
13 PROBLEEMOPLOSSING....11
POWERPLUS POWEB5510 NL
14 GARANTIE 12
15 MILIEU....12
16 CONFORMITEITSVERKLARING....13
POWERPLUS
POWEB5510 NL
SPUITPISTOOL 18V (ZONDER BATTERIJPACK)
POWEB5510
1 TOEPASSING
2 BESCHRIJVING (FIG. A)
13 PROBLEEMOPLOSSING
Eric de Boer
Regelgevings- en compliancemanager
10/08/2017
POWERPLUS POWEB5510 FR
16 DÉCLARATION DE CONFORMITÉ
C ∈

VARO N.V. - Joseph Van Instraat 9 - BE2500 Lier - BELGIQUE, déclare que :
appareil : PISTOLET PULVÉRISATEUR 18 V (SANS ACCU)
marque : POWERplus
modèle : POWEB5510
Eric de Boer
1 APPLICATION ....3
2 DESCRIPTION (FIG. A) 3
3 PACKAGE CONTENT LIST....3
4 SYMBOLS....4
5 GENERAL POWER TOOL SAFETY WARNINGS....4
5.1 Working area....4
5.2 Electrical safety 4
5.3 Personal safety 5
5.4 Power tool use and care....5
5.5 Service....6
6 SAFETY INSTRUCTIONS FOR CORDLESS SPRAY GUN ...... 6
7 ADDITIONAL SAFETY INSTRUCTIONS FOR BATTERIES AND CHARGERS 6
7.1 Batteries....6
7.2 Chargers....7
8 CHARGING AND INSERTION OR REMOVAL OF BATTERY.....7
8.1 Charger indications (Fig. 1)....7
8.2 Removal / insertion of battery (Fig. 2)....8
9 OPERATION....8
9.1 Viscosity measurement....8
9.2 Adjusting the spraying (Fig. 3)....8
9.3 Switch on (Fig. 4)......8
9.4 Spraying Techniques....8
10 CLEANING AND MAINTENANCE 9
10.1 Clean and oil after each using (Fig. 5)....9
10.2 Changing the piston assembly (Fig. 6)....9
11 TECHNICAL DETAILS....9
12 NOISE....10
13 TROUBLE SHOOTING 10
14 WARRANTY....11
POWERPLUS
POWEB5510 EN
15 ENVIRONMENT 11
16 DECLARATION OF CONFORMITY 12
POWERPLUS POWEB5510 EN SPRAY GUN 18V (NO ACCU) POWEB5510
1 APPLICATION
This spray gun is intend for a variety of paints (oil-based and latex), primers, stains, preservatives and other nonabrasive materials. Do not use materials with flash points below 55°C. These spray guns are not intend for textured materials, block filler, lacquers, industrial enamels, or asphalt sealer or materials containing HHC. Not suitable for professional use.

WARNING! Read this manual and general safety instructions carefully before using the appliance, for your own safety. Your power tool should only be passed on together with these instructions.
2 DESCRIPTION (FIG. A)
- Release button for battery pack
- Battery pack (NOT included)
- Charger (NOT included)
- Motor housing
- Output control / Adjusting knob
- Trigger switch
- Handle
- Paint container
- Spray basket nozzle
- Viscosity cup
- Key for nozzle
- Safety lock
3 PACKAGE CONTENT LIST
- Remove all packaging materials.
- Remove remaining packing and package inserts (if included).
- Check that the package contents are complete.
- Check the appliance, the power cord, the power plug and all accessories for transportation damage.
- Keep the packing materials as far as possible till the end of the warranty period. Dispose it into your local waste disposal system afterwards.

WARNING: Packaging materials are not toys! Children must not play with plastic bags! Danger of suffocation!
1x manual
1x cleaning pin
1x viscosity cup
1x spare nozzle (0.8 mm)
2x valves
Key for nozzle

If any parts are missing or damaged, please contact your dealer.
4 SYMBOLS
In this manual and/or on the machine the following symbols are used:
 | Denotes risk of personal injury or damage to the tool. |  | In accordance with essential requirements of the European directive(s) |
 | Read manual before use |  | "Class II - The machine is double insulated; Earthing wire is therefore not necessary (only for charger) |
 | Ambient temperature 40°C max. (only for battery) |  | Do not expose charger and battery pack to water |
 | Use battery and charger only in closed rooms |  | Do not incinerate battery pack or charger |
 | Wear noise protection |  | Wear a mask In dusty conditions |
 | Mandatory use of eye protection. | ||
5 GENERAL POWER TOOL SAFETY WARNINGS
Read all safety warnings and instructions. Failure to heed warnings and follow instructions may result in electric shock, fire and/or serious injury. Keep safety warnings and instructions for future reference. The term "power tool" in the safety warnings refers to your mains-operated (corded) power tool or battery-operated (cordless) power tool.
5.1 Working area
- Keep working area clean and well lit. Untidy and dark areas can lead to accidents.
- Do not operate power tools in potentially explosive surroundings, for example, in the presence of inflammable liquids, gases or dust. Power tools create sparks which may ignite the dust or fumes.
- Keep children and bystanders at a distance when operating a power tool. Distractions can cause you to lose control of it.
5.2 Electrical safety
■ Always check that the power supply corresponds to the voltage on the rating plate.
- Power tool plugs must match the outlet. Never modify the plug in any way. Do not use adapter plugs with earthed power tools. Unmodified plugs and matching outlets will reduce the risk of an electric shock.
- Avoid body contact with earthed surfaces such as pipes, radiators, kitchen ranges and refrigerators. There is an increased risk of an electric shock if your body is earthed.
- Do not expose power tools to rain or wet conditions. If water gets inside a power tool, it will increase the risk of an electric shock.
POWERPLUS
POWEB5510 EN
- Do not damage the cord. Never use the cord for carrying, pulling or unplugging the power tool. Keep the cord away from heat, oil, sharp edges or moving parts. Damaged or entangled cords increase the risk of an electric shock.
- When operating a power tool outdoors, use an extension cable suitable for outdoor use. Using a cord suitable for outdoor use reduces the risk of an electric shock.
- If operating a power tool in a damp location is unavoidable, use a power supply protected by a residual current device (RCD). Using an RCD reduces the risk of an electric shock.
5.3 Personal safety
- Stay alert, watch what you are doing and use common sense when operating a power tool. Do not use a power tool when you are tired or under the influence of drugs, alcohol or medication. A moment of inattention when operating a power tool may result in serious personal injury.
- Use safety equipment. Always wear eye protection. Using safety equipment such as a dust mask, non-skid safety shoes, a hard hat, or hearing protection whenever it is needed will reduce the risk of personal injury.
- Avoid accidental starts. Ensure the switch is in the off position before inserting the plug. Carrying power tools with your finger on the switch or plugging in power tools when the switch is in the on position makes accidents more likely.
- Remove any adjusting keys or spanners before turning on the power tool. A spanner or key left attached to a rotating part of the power tool may result in personal injury.
- Do not reach out too far. Keep your feet firmly on the ground at all times. This will enable you retain control over the power tool in unexpected situations.
- Dress properly. Do not wear loose clothing or jewellery. Keep your hair, clothing and gloves away from the power tool. Loose clothes, jewellery or long hair can become entangled in the moving parts.
- If there are devices for connecting dust extraction and collection facilities, please ensure that they are attached and used correctly. Using such devices can reduce dust-related hazards.
5.4 Power tool use and care
- Do not expect the power tool to do more than it can. Use the correct power tool for what you want to do. A power tool will achieve better results and be safer if used in the context for which it was designed.
- Do not use the power tool if the switch cannot turn it on and off. A power tool with a broken switch is dangerous and must be repaired.
- Disconnect the plug from the power source before making adjustments, changing accessories, or storing power tools. Such preventive safety measures reduce the risk of starting the power tool accidentally.
- Store power tools, when not in use, out of the reach of children and do not allow people who are not familiar with the power tool or these instructions to operate it. Power tools are potentially dangerous in the hands of untrained users.
- Maintain power tools. Check for misalignment or jammed moving parts, breakages or any other feature that might affect the operation of the power tool. If it is damaged, the power tool must be repaired. Many accidents are caused by using poorly maintained power tools.
- Keep cutting tools sharp and clean. Properly maintained cutting tools with sharp cutting edges are less likely to jam and are easier to control.
- Use the power tool, accessories and cutting tools, etc., in accordance with these instructions and in the manner intended for the particular type of power tool, taking into account the working conditions and the work which needs to be done. Using a power tool in ways for which it was not intended can lead to potentially hazardous situations.
5.5 Service
- Your power tool should be serviced by a qualified specialist using only standard spare parts. This will ensure that it meets the required safety standards.
6 SAFETY INSTRUCTIONS FOR CORDLESS SPRAY GUN
- The spray gun must never be pointed towards people or animals.
- The spray gun must be used only for paints and solvents with 55°C minimum flashpoint.
- Warning! The high-pressure spray potentially causes severe skin damage. Never allow any part of the body to come in contact with the spray. In case of skin injection by the high-pressure, contact a physician immediately. The physician concerned should be informed of the type of sprayed material involved.
- The spray gun is not a toy, it must not be used by children or untrained persons.
- Always wear a suitable mask that provides the necessary protection against inhalation of harmful vapours.
- Provide for a sufficient ventilation to keep the air in the work area free from accumulation of flammable vapours.
- Do not spray any material of unknown composition.
- Do not operate the tool without the nozzle locknut in place.
- Never use the tool if the safety provisions or other important parts have been damaged.
- Never use gasoline or other flammable liquids to clean the tool. Vapours in the tool can be ignited by spark and cause the tool to explode.
- Always read the paint manufacturer's thinning recommendations or instructions before using paint or other materials.
- Only use spare parts from the manufacturer which have been approved by the manufacturer.
- Do not open the battery. Danger of short-circuiting.
- Protect the battery against heat, e. g., against continuous intense sunlight, fire, water, and moisture. Danger of explosion.
- In case of damage and improper use of the battery, vapours may be emitted. Ventilate the area and seek medical help in case of complaints. The vapours can irritate the respiratory system.
- Use the battery only in conjunction with your power tool. This measure alone protects the battery against dangerous overload.
- The battery can be damaged by pointed objects such as nails or screwdrivers or by force applied externally. An internal short circuit can occur and the battery can burn, smoke, explode or overheat.
7 ADDITIONAL SAFETY INSTRUCTIONS FOR BATTERIES AND CHARGERS
7.1 Batteries
■ Never attempt to open for any reason.
- Do not store in locations where the temperature may exceed 40 °C.
- Charge only at ambient temperatures between 4 °C and 40 °C.
- Store your batteries in a cool dry place (5 °C-20 °C). Never store batteries in discharged state.
It is better for Li-ion batteries to discharge and reload them regularly (at least 4 times a year). The ideal charge for long-term storage of your Li-ion battery is 40% of capacity.
- When disposing of batteries, follow the instructions given in the section "Protecting the environment".
- Do not cause short circuits. If connection is made between the positive (+) and negative (-) terminal directly or via accidental contact with metallic objects, the battery is short circuited and an intense current will flow causing heat generation which may lead to casing rupture or fire.
POWERPLUS
POWEB5510 EN
- Do not heat. If batteries are heated to above 100 °C, sealing and insulating separators and other polymer components may be damaged resulting in electrolyte leakage and/or internal short circuiting leading to heat generation causing rupture or file. Moreover do not dispose of the batteries in fire, explosion and/or intense burning may result.
■ Under extreme conditions, battery leakage may occur. When you notice liquid on the battery, proceed as follows:
- Carefully wipe the liquid off using a cloth. Avoid skin contact.
- In case of skin or eye contact, follow the instructions below:
- Immediately rinse with water. Neutralize with a mild acid such as lemon juice or vinegar.
In case of eye contact, rinse abundantly with clean water for at least 10 minutes. Consult a physician.

Fire hazard! Avoid short-circuiting the contacts of a detached battery. Do not incinerate the battery.
7.2 Chargers
- Never attempt to charge non-rechargeable batteries.
- Have defective cords replaced immediately.
- Do not expose to water.
- Do not open the charger.
- Do not probe the charger.
■ The charger is intended for indoor use only.
8 CHARGING AND INSERTION OR REMOVAL OF BATTERY
8.1 Charger indications (Fig. 1)
Connect the charger to the power outlet socket
- Solid green: ready to charge
■ Flickering red + solid green: charging
■ Solid green + solid red: charged

Note: if the battery does not fit properly, disconnect it and confirm that the battery pack is the correct model for this charger as shown on the specification chart. Do not charge any other battery pack or any battery pack that does not securely fit the charger.
- Frequently monitor the charger and battery pack while connected
- Unplug the charger and disconnect it from the battery pack when finished.
- Allow the battery pack to cool completely before using it.
- Store the charger and battery pack indoors, out of reach of children.

NOTE: If battery is hot after continuous use in the tool, allow it to cool down to room temperature before charging. This will extend the life of your batteries.
POWERPLUS POWEB5510 EN
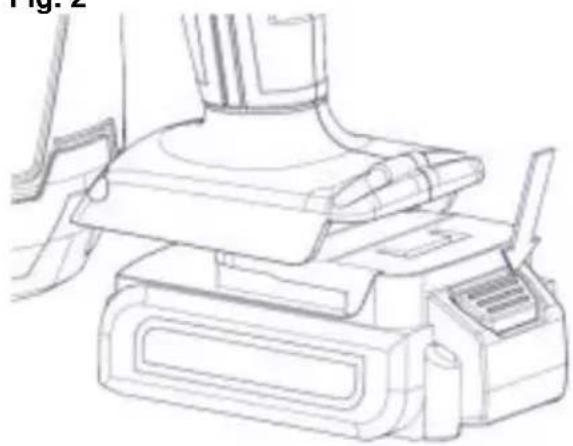
8.2 Removal / insertion of battery (Fig. 2)

WARNING: Before making any adjustments ensure the hedge trimmer is switched off or remove the battery pack.
- Hold the tool with one hand and the battery pack (2) with the other.
- To install: push and slide battery pack into battery port, make sure the release latch on the rear side of the battery snaps into place and battery is secure before beginning operation.
- To remove: Press the battery release latch and pull the battery pack out at the same time.
9 OPERATION
9.1 Viscosity measurement
■ Use the viscosity cup (10) to help measure the viscosity.
- Follow the manufacturer's advice on thinning the paint when used with a spray gun.
- The viscosity cup (10) will help you to determine the correct viscosity of paint that this spray gun can deal with.
- To determine the correct viscosity, fill the cup to the brim with the paint. Measure the amount of time it takes for the cup to empty back into the can. As a rule of thumb the viscosity should be between 15 and 100s (maximum).
The table below shows recommended times for different types of material.
| Paint type | Run out time |
| Primers | 24-28 seconds |
| varnishes | 20-25 seconds |
| Oil based paints | 18-22 seconds |
| Enamel paints | 18-22 seconds |
| Aluminium paints | 22-25 seconds |
| Wood sealers | 25-30 seconds |
| Wood preservatives | No thinning required |
| Wood stains | No thinning required |
- Some sprayable materials contain particles and lumps. These materials should be strained before filling the paint container.
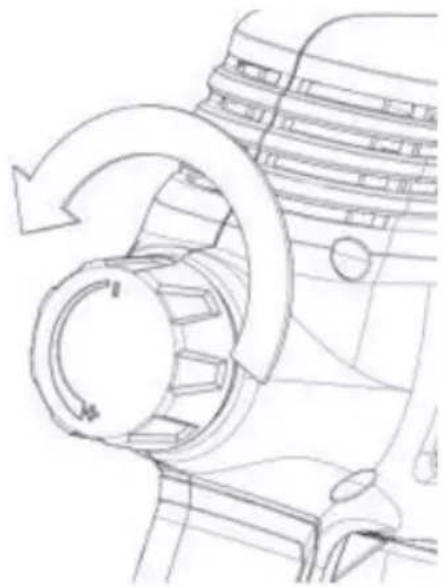
9.2 Adjusting the spraying (Fig. 3)
The sprayed capacity can be adjusted using the adjusting knob (5). Before starting the operation, Aim the spray gun at a piece of scrap material and operate the trigger switch (6) until paint is spraying. Adjust the adjusting knob (5) until the best spray pattern is reached. Rotating the adjusting knob (5) clockwise reduces the output and counter-clockwise increase the output. A poor spray pattern will concentrate the paint in the centre of the spray and give a blotchy finish. A good spray pattern will give even distribution of paint throughout the pattern.
9.3 Switch on (Fig. 4)
To switch on press down the safety lock (12) and actuate the trigger (6).
9.4 Spraying Techniques
- To obtain the best results, keep your spray gun level and parallel to the surface at all times.
- Keep the nozzle 20\~30cm from the surface and spray evenly from side to side or up and down, use smooth and even strokes.
- Do not spray at an angle as this will lead to paint runs on the surface.
- When spraying large areas, use a criss-cross pattern.
■ Move the spray gun evenly from the arm, not from the wrist.
POWERPLUS
POWEB5510 EN
- Never start or stop the spray gun while it is aimed at the surface to be sprayed.
- Evenly control the speed of movement of the spray gun. A fast speed of movement over the surface will give a thin coat and a slow speed will give a heavy coat.
- Apply one coat at a time. If a further coat is required, make sure you observe the manufacturers drying time recommendations before applying a second coat.
10 CLEANING AND MAINTENANCE

It is essential that the spray gun is cleaned and oiled after every use. Failure to clean and oil it will almost certainly result in blockages and it may not operate when you next come to use it! The guarantee does not cover cleaning a sprayer that has not been properly cleaned by the user.
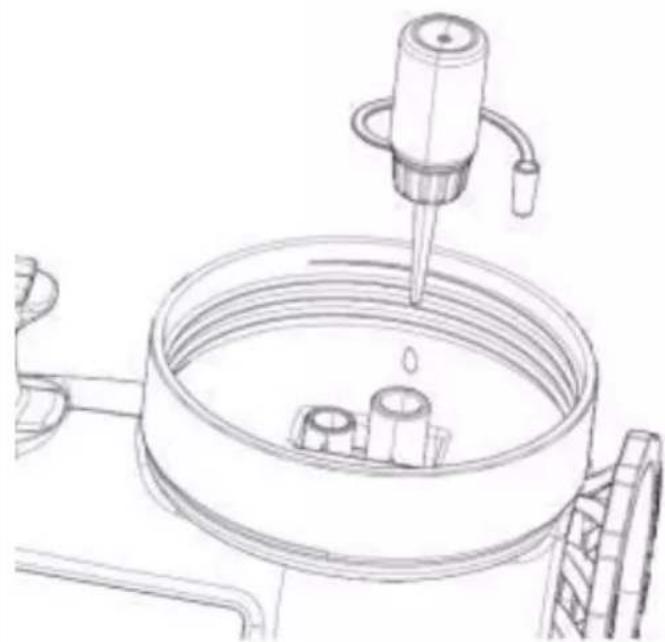
10.1 Clean and oil after each using (Fig. 5)
-
Pour back the remain paint in the container (8);
-
Clean the container (8) first.
-
A brief clean work can be done by spraying thinner (water or solvent) till cleaning.
-
A fully clean work should be done before the gun is stored. See "changing the piston assembly" to disassembly the pump assembly and clean thoroughly. Then assemble back.
-
Detach the suction hose and Oil the pump after each clean. Switch on the gun several times till oil spray out.
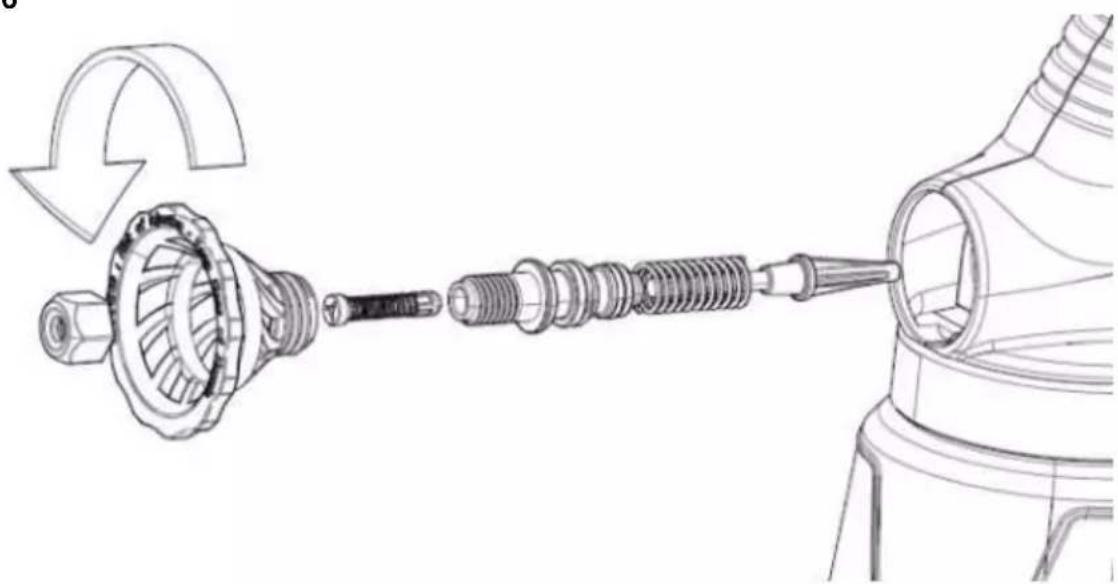
10.2 Changing the piston assembly (Fig. 6)
-
Loose the nozzle by using the wrench attached, but keep the nozzle on the pump.
-
Turn the guard counter clockwise fully and pull out the pump assembly.
-
Change the abrasive parts separately.
-
Following parts should be changed periodically: nozzle, atomizer, pump housing piston, o ring1# &2#.
11 TECHNICAL DETAILS
| Rated voltage | 18V |
| Tank capacity | 1L |
| Flow speed | 300g/min |
| Diameter nozzle | ∅ 0,8 mm |
| Battery connection | Slide-on |
| Adjustable paint flow control | Yes |
| Vertical spray pattern | Yes |
| Horizontal spray pattern | Yes |
| Round spray pattern | Yes |
| Max. viscosity | 60din/sec |
| Soft grip | Yes |
| Handle type | Fixed |
| Latex paint | yes |
12 NOISE
Noise emission values measured according to relevant standard. (K=3)
Acoustic pressure level LpA 88 dB(A)
Acoustic power level LwA 99 dB(A)

ATTENTION! Wear hearing protection when sound pressure is over 85 dB(A).
aw (Vibration)
11.3m/s²
K = 1,5 ~m / s^2
13 TROUBLE SHOOTING
| PROBLEM | CAUSE | SOLUTION |
| Motor hums but does not spray or irregular spraying | 1. Pump assembly damaged2.3.4. Suction tube is not in the correct position5. blocked suction tube6. blocked nozzle7. blocked filter8. loosened guard(3) or nozzle(2) | 1. Replace pump assembly according maintenance instruction.2.3. adjust the suction tube4.5. clean the suction tube using thinner6. clean the nozzle with thinner7. clean the filter with thinner8. tighten the guard or nozzle. |
| Atomization is not good | 1. nozzle or locknut is not tightened2. paint is too thick3. atomizer assembly abrased. | 1. tighten the nozzle and locknut2. check the viscosity of the paint3. replace the atomizer assembly. |
| Over painting | 1. spray gun is too close to the object being sprayed2. too much paint3.4. viscosity is too low | 1. keep the spray gun 20-30 cm from the surface2. adjust the output control to reduce spraying3. check the viscosity |
| No spray, no sound | 1. no electricity | 1. check power supply |
| Short time operation after charging. | 1. Battery not fully charged.2. Charger is defective.3. Battery is disabled. | 1. Fully charger the battery.2. Change a new charger of same specification.3. Change new battery of same specification. |
POWERPLUS
POWEB5510 EN
14 WARRANTY
- This product is warranted for a 24-month period effective from the date of purchase by the first user.
- This warranty covers all material or production flaws excluding : batteries, chargers, defective parts subject to normal wear & tear such as bearings, brushes, cables, and plugs, or accessories such as drills, drill bits, saw blades, etc. ; damage or defects resulting from maltreatment, accidents or alterations; nor the cost of transportation.
- Damage and/or defects resulting from inappropriate use also do not fall under the warranty provisions.
- We also disclaim all liability for any bodily injury resulting from inappropriate use of the tool.
- Repairs may only be carried out by an authorised customer service centre for Powerplus tools.
- You can always obtain more information at the number 00 32 3 292 92 90.
- Any transportation costs shall always be borne by the customer, unless agreed otherwise in writing.
- At the same time, no claim can be made on the warranty if the damage of the device is the result of negligent maintenance or overload.
- Definitely excluded from the warranty is damage resulting from fluid permeation, excessive dust penetration, intentional damage (on purpose or by gross carelessness), inappropriate usage (use for purposes for which the device is not suitable), incompetent usage (e.g. not following the instructions given in the manual), inexpert assembly, lightning strike, erroneous net voltage. This list is not exhaustive.
- Acceptance of claims under warranty can never lead to the prolongation of the warranty period nor commencement of a new warranty period in case of a device replacement.
- Devices or parts which are replaced under the warranty therefore remain the property of Varo NV.
- We reserve the right to reject a claim whenever the purchase cannot be verified or when it is clear that the product has not been properly maintained. (Clean ventilation slots, carbon brushes serviced regularly, etc.).
- Your purchase receipt must be kept as proof of date of purchase.
- Your appliance must be returned undismantled to your dealer in an acceptably clean state, (in its original blow-moulded case if applicable to the unit), accompanied by proof of purchase.
- Your tool must be charged at least 1x per month to ensure optimal operation of this tool.
15 ENVIRONMENT

Should your appliance need replacement after extended use, do not dispose of it with the household refuse, but in an environmentally safe way.
Waste produced by electrical machine items should not be handled like normal household rubbish. Please recycle where recycle facilities exist. Check with your Local Authority or retailer for recycling advice.
VARO N.V. - Joseph Van Instraat 9 - BE2500 Lier - BELGIUM, declares that,
Product: Spray gun 18V (NO ACCU)
Trade mark: POWERplus
Model: POWEB5510
is in conformity with the essential requirements and other relevant provisions of the applicable European Directives, based on the application of European harmonized standards. Any unauthorized modification of the apparatus voids this declaration.
European Directives (including, if applicable, their amendments up to the date of signature);
2006/42/EC
2014/30/EU
2011/65/EU
European harmonized standards (including, if applicable, their amendments up to the date of signature);
EN60745-1 : 2009
EN50580:2012
EN55014-1:2006
EN55014-2:2015
Keeper of the Technical Documentation : Philippe Vankerkhove, VARO – Vic. Van Rompuy N.V.
The undersigned acts on behalf of the company CEO,

Eric de Boer
Regulatory Affairs – Compliance Manager
10/08/2017
POWERPLUS POWEB5510 DE
Eric de Boer
Eric de Boer
Regulatoriske saker - Samsvarsleder
10/08/2017
POWERPLUS POWEB5510 DA
3 FÖRPACKNINGSINNEHÅLL
Eric de Boer
Eric de Boer
Eric de Boer
8.1 Indikatori punjača (Sl. 1)
POWERPLUS POWEB5510 SR
1 PRIMENA .... 3
2 OPIS (SL. A) 3
3 SPISAK SADRŽAJA PAKOVANJA....3
4 SIMBOLI....4
5 OPŠTA BEZBEDNOSNA UPUTSTVA ZA ELEKTRIČNE ALATE...4
5.1 Radna oblast 4
5.2 Električna bezbednost....5
5.3 Bezbednost osoba....5
5.4 Korišćenje i održavanje električnog alata....5
5.5 Servisiranje....6
6 BEZBEDNOSNA UPUTSTVA ZA BEŽIČNI PIŠTOLJ ZA RASPRŠIVANJE....6
7 DODATNA BEZBEDNOSNA UPUTSTVA ZA BATERIJE I PUNJAČE....7
7.1 Baterije....7
7.2 Punjači....7
8 PUNJENJE I UMETANJE ILI UKLANJANJE BATERIJE ....8
8.1 Indikatori punjača (Sl. 1)....8
8.2 Uklanjanje/umetanje baterija (Sl. 2) 8
9 RAD....8
9.1 Merenje viskoziteta 8
9.2 Podešavanje raspršivanja (Sl. 3)....9
9.3 Uključivanje (Sl. 4) 9
9.4 Metode raspršivanja 9
10 ČIŠĆENJE I ODRŽAVANJE....10
10.1 Očistite i podmažite nakon svake upotrebe (Sl. 5)....10
10.2 Zamena sklopa klipa (Sl. 6)....10
11 TEHNIČKI PODACI....10
12 BUKA 10
13 DIJAGNOZA I OTKLANJANJE KVAROVA....11
POWERPLUS POWEB5510 SR
14 GARANCIJA 12
15 ŽIVOTNA SREDINA....12
16 IZJAVA O USKLAĐENOSTI....13
POWERPLUS
POWEB5510 SR
PIŠTOLJ ZA RASPRŠIVANJE 18V (BEZ PUNJIVE
BATERIJE)
POWEB5510
1 PRIMENA
Ovaj pištolj za raspršivanje je namenjen za različite boje (na bazi ulja i lateks), osnovne premaze, bajceve za drvo, sredstva za zaštitu drveta i druge neabrazivne materijale. Ne koristite materijale čija je temperatura na kojoj daju sagorljive pare niža od 55 °C. Ovi pištolji za raspršivanje nisu namenjeni za materijale sa teksturom, sredstva za ispunjavanje neravnina, lakove, industrijske uljane boje ni asfaltne zaptivače kao ni za materijale koji sadrže visoko opasne hemikalije (HHC). Nije odgovarajuće za profesionalnu upotrebu.

8.1 Indikatori punjača (Sl. 1)
Priključite punjač na utičnicu električne mreže.
■ Zelena boja: spreman za punjenje.
- Trepćuće crveno + stalno zeleno: punjenje.
■ Puno zeleno + stalno crveno: napunjeno.

Eric de Boer
Eric de Boer
Eric de Boer
Regulačné záležitosti – Compliance Manager
10/08/2017
POWERPLUS POWEB5510 RO
Eric de Boer Divizia de reglementare – Director de conformitate 10/08/2017
POWERPLUS POWEB5510 PL
Eric de Boer
Eric de Boer
natural_image
Exterior view of a spray gun with black and red body (no text or symbols visible)varo
WWW.VARO.COM
DESIGNED AND MARKETED BY VARO
©copyright by varo
VARO - VIC. VAN ROMPUY nv
JOSEPH VAN INSTRAAT 9 - 2500 LIER - BELGIUM
OFFICES:
natural_image
Two black electrical connectors with a label showing 'NOI-17 VLS' and '18V 10N', one being replaced by an arrow (no additional text or symbols)Fig. 1
POWERPLUS POWEB9013 NL
1 TOEPASSINGSGEBIED 2
2 BESCHRIJVING (FIG. A) 2
3 INHOUD....2
4 TOELICHTING VAN DE SYMBOLEN 2
5 ALGEMENE VEILIGHEIDSVOORSCHRIFTEN .... 3
5.1 Werkplaats....3
5.2 Elektrische veiligheid ....3
5.3 Veiligheid van personen....3
5.4 Zorgvuldige omgang met en gebruik van elektrisch gereedschap....4
5.5 Service....4
6 BIJKOMENDE VEILIGHEIDSINSTRUCTIES VOOR BATTERIJEN EN LADERS 4
6.1 Batterijen....4
7 OPLADEN EN INBRENGEN OF VERWIJDEREN VAN DE BATTERIJ ....5
7.1 Aanwijzingen op de lader 5
7.2 Verwijderen/inbrengen van de batterij (Fig. 1)....6
8 TECHNISCHE GEGEVENS....6
9 MILIEU....6
POWERPLUS POWEB9013 NL
BATTERIJ 18V 3000MAH
POWEB9013
1 TOEPASSINGSGEBIED
2 BESCHRIJVING (FIG. A)
- Ontgrendelknop batterijpack
3 INHOUD
1 APPLICATION....2
2 DESCRIPTION (FIG. A) 2
3 PACKAGE CONTENT LIST....2
4 SYMBOLS 2
5 GENERAL POWER TOOL SAFETY WARNINGS ....3
5.1 Work area .... 3
5.2 Electrical safety....3
5.3 Personal safety 3
5.4 Power tool use and care....4
5.5 Service....4
6 ADDITIONAL SAFETY INSTRUCTIONS FOR BATTERIES AND CHARGERS ....4
6.1 Batteries 4
7 CHARGING AND INSERTION OR REMOVAL OF BATTERY .....5
7.1 Charger indications ....5
7.2 Removal / insertion of battery (Fig. 1)....5
8 TECHNICAL DATA 5
9 ENVIRONMENT 6
POWERPLUS POWEB9013 EN
BATTERY 18V 3000MAH
POWEB9013
1 APPLICATION
This battery is designed only to be used with our EB range tools and charger. You can use 18V battery only for 18V items in this range.
Not suitable for professional use.

WARNING! For your own safety, read this manual and general safety instructions carefully before using the appliance. Your power tool should only be passed on together with these instructions.
2 DESCRIPTION (FIG. A)
- Battery pack release button
3 PACKAGE CONTENT LIST
- Remove all packaging materials.
- Remove remaining packing and package inserts (if included).
- Check that the package contents are complete.
- Check the appliance, the power cord, the power plug and all accessories for transportation damage.
- Keep the packing materials as long as possible till the end of the warranty period. Dispose it into your local waste disposal system afterwards.

WARNING: Packaging materials are not toys! Children must not play with plastic bags! Danger of suffocation!
Battery Manual

If any parts are missing or damaged, please contact your dealer.
4 SYMBOLS
In this manual and/or on the machine the following symbols are used:
 | Denotes risk of personal injury or damage to the tool. |  | Read instructions carefully. |
 | Do not incinerate battery pack or charger |  | Do not expose charger and battery pack to water |
 | Use battery and charger only in closed rooms |  | Ambient temperature 40°C max. (only for battery) |
POWERPLUS POWEB9013 EN 5 GENERAL POWER TOOL SAFETY WARNINGS

Read all safety warnings and all instructions. Failure to follow all warnings and instructions may result in electric shock, fire and/or serious injury. Save all warnings and instructions for future reference. The term "power tool" in the warnings refers to your mains operated (corded) power tool or battery operated (cordless) power tool.
5.1 Work area
- Keep work area clean and well lit. Cluttered and dark areas invite accidents.
- Do not operate power tools in explosive atmospheres, such as in the presence of flammable liquids, gases or dust. Power tools create sparks which may ignite the dust or fumes.
- Keep children and bystanders away while operating a power tool. Distractions can cause you to lose control.
5.2 Electrical safety
- Always check that the power supply corresponds to the voltage on the rating plate.
- Power tool plugs must match the outlet. Never modify the plug in any way. Do not use any adapter plugs with earthed (grounded) power tools. Unmodified plugs and matching outlets will reduce risk of electric shock.
- Avoid body contact with earthed or grounded surfaces such as pipes, radiators, ranges and refrigerators. There is an increased risk of electric shock if your body is earthed or grounded.
- Do not expose power tools to rain or wet conditions. Water entering a power tool will increase the risk of electric shock.
- Do not abuse the cord. Never use the cord for carrying, pulling or unplugging the power tool. Keep cord away from heat, oil, sharp edges or moving parts. Damaged or entangled cords increase the risk of electric shock.
- When operating a power tool outdoors, use an extension cord suitable for outdoor use. Use of a cord suitable for outdoor use reduces the risk of electric shock.
- If operating a power tool in a damp location is unavoidable, use a residual current device (RCD) protected supply. Use of an RCD reduces the risk of electric shock.
5.3 Personal safety
- Stay alert, watch what you are doing and use common sense when operating a power tool. Do not use a power tool while you are tired or under the influence of drugs, alcohol or medication. A moment of inattention while operating power tools may result in serious personal injury.
- Use safety equipment. Always wear eye protection. Safety equipment such as dust mask, non-skid safety shoes, hard hat, or hearing protection used whenever conditions require will reduce personal injuries.
- Avoid accidental starting. Ensure the switch is in the off position before plugging in. Carrying power tools with your finger on the switch or plugging in power tools that have the switch on invites accidents.
- Remove any adjusting key or wrench before turning the power tool on. A wrench or a key left attached to a rotating part of the power tool may result in personal injury.
- Do not overreach. Keep proper footing and balance at all times. This enables better control of the power tool in unexpected situations.
- Dress properly. Do not wear loose clothing or jewellery. Keep your hair, clothing and gloves away from moving parts. Loose clothes, jewellery or long hair can be caught in moving parts.
POWERPLUS POWEB9013 EN
If devices are provided for the connection of dust extraction and collection facilities, ensure these are connected and properly used. Use of these devices can reduce dust related hazards.
5.4 Power tool use and care
- Do not force the power tool. Use the correct power tool for your application. The correct power tool will do the job better and safer at the rate for which it was designed.
- Do not use the power tool if the switch does not turn it on and off. Any power tool that cannot be controlled with the switch is dangerous and must be repaired.
- Disconnect the plug from the power source before making any adjustments, changing accessories, or storing power tools. Such preventive safety measures reduce the risk of starting the power tool accidentally.
- Store idle power tools out of the reach of children and do not allow persons unfamiliar with the power tool or these instructions to operate the power tool. Power tools are dangerous in the hands of untrained users.
- Maintain power tools. Check for misalignment or sticking of moving parts, breakage of parts and any other condition that may affect the power tool's operation. If damaged, have the power tool repaired before use. Many accidents are caused by poorly maintained power tools.
- Keep cutting tools sharp and clean. Properly maintained cutting tools with sharp cutting edges are less likely to stick and are easier to control.
- Use the power tool, accessories and tool bits etc., in accordance with these instructions and in the manner intended for the particular type of power tool, taking into account the working conditions and the work to be performed. Use of the power tool for operations different from intended could lead to a hazardous situation.
5.5 Service
- Have your power tool serviced by a qualified person using only identical replacement parts. This will ensure that the safety of the power tool is maintained.
6 ADDITIONAL SAFETY INSTRUCTIONS FOR BATTERIES AND CHARGERS
6.1 Batteries
■ Never attempt to open for any reason.
- Do not store in locations where the temperature may exceed 40 °C.
- Charge only at ambient temperatures between 4 °C and 40 °C.
- Store your batteries in a cool dry place (5 °C-20 °C). Never store batteries in discharged state.
It is better for Li-ion batteries to discharge and reload them regularly (at least 4 times a year). The ideal charge for long-term storage of your Li-ion battery is 40% of capacity.
- When disposing of batteries, follow the instructions given in the section "Protecting the environment".
- Do not cause short circuits. If connection is made between the positive (+) and negative (-) terminal directly or via accidental contact with metallic objects, the battery is short circuited and an intense current will flow causing heat generation which may lead to casing rupture or fire.
- Do not heat. If batteries are heated to above 100 °C, sealing and insulating separators and other polymer components may be damaged resulting in electrolyte leakage and/or internal short circuiting leading to heat generation causing rupture or file. Moreover do not dispose of the batteries in fire, explosion and/or intense burning may result.
■ Under extreme conditions, battery leakage may occur. When you notice liquid on the battery, proceed as follows:
- Carefully wipe the liquid off using a cloth. Avoid skin contact.
– In case of skin or eye contact, follow the instructions below:
POWERPLUS POWEB9013 EN
√ Immediately rinse with water. Neutralize with a mild acid such as lemon juice or vinegar.
√ In case of eye contact, rinse abundantly with clean water for at least 10 minutes. Consult a physician.

Fire hazard! Avoid short-circuiting the contacts of a detached battery. Do not incinerate the battery.
7 CHARGING AND INSERTION OR REMOVAL OF BATTERY
7.1 Charger indications
Connect the charger to the power outlet socket
■ Solid green: ready to charge
■ Flickering red + solid green: charging
■ Solid green + solid red: charged

Note: if the battery does not fit properly, disconnect it and confirm that the battery pack is the correct model for this charger as shown on the specification chart. Do not charge any other battery pack or any battery pack that does not securely fit the charger.
- Frequently monitor the charger and battery pack while connected
- Unplug the charger and disconnect it from the battery pack when finished.
- Allow the battery pack to cool completely before using it.
- Store the charger and battery pack indoors, out of reach of children.

NOTE: If battery is hot after continuous use in the tool, allow it to cool down to room temperature before charging. This will extend the life of your batteries.
7.2 Removal / insertion of battery (Fig. 1)

WARNING: Before making any adjustments ensure the tool is switched off or remove the battery pack.
- To install: push and slide battery pack into battery port, make sure the release latch on the rear side of the battery snaps into place and battery is secure before beginning operation.
- To remove: Press the battery release latch and pull the battery pack out at the same time.
8 TECHNICAL DATA
| Type | POWEB9013 |
| Voltage | 18V |
| Battery type | Li-ion |
| Battery capacity | 18V – 3000mAh |
| Charger rating input | 220-240V~50Hz |
| Charger rating output | 21V, 1.7A |
| Charging time | 18V = 2h |
POWERPLUS POWEB9013 EN
9 ENVIRONMENT

This product contains Li-ion. To preserve natural resources, please recycle or dispose of batteries properly. Local, state or federal laws may prohibit disposal of Li-ion batteries in ordinary trash. Consult you local waste authority for information regarding available recycling and/or disposal options.
POWERPLUS POWEB9013 DE
3 FÖRPACKNINGSINNEHÅLL
varo
WWW.VARO.COM
DESIGNED AND MARKETED BY VARO
©copyright by varo
VARO - VIC. VAN ROMPUY nv
JOSEPH VAN INSTRAAT 9 - 2500 LIER - BELGIUM
OFFICES:
natural_image
Black POWERPLUS power plug device with attached cable (no visible text or symbols on body)
NL NEDERLANDS VERTAALDE VERSIE VAN DE ORIGINELE HANDLEIDING
FR FRANÇAIS TRADUCTION DU MODE D'EMPLOI D'ORIGINE
EN ENGLISH ORIGINAL INSTRUCTION MANUAL
natural_image
Black plastic electrical plug with three labeled parts and a power outlet, shown against a plain background (no text or symbols on the device body)
POWERPLUS POWEB9050 NL
1 TOEPASSING 2
2 BESCHRIJVING (FIG. A)......2
3 INHOUD VAN DE VERPAKKING....2
4 TOELICHTING VAN DE SYMBOLEN 2
5 ALGEMENE VEILIGHEIDSVOORSCHRIFTEN .... 3
5.1 Werkplaats....3
5.2 Elektrische veiligheid....3
5.3 Veiligheid van personen....3
5.4 Zorgvuldige omgang met en gebruik van elektrisch gereedschap....4
5.5 Service....4
6 BIJKOMENDE VEILIGHEIDSINSTRUCTIES VOOR BATTERIJEN EN LADERS....4
6.1 Batterijen....4
6.2 Laders....5
7 OPLADEN EN INBRENGEN OF VERWIJDEREN VAN DE BATTERIJ 5
7.1 Aanwijzingen op de lader 5
8 TECHNISCHE GEGEVENS....6
9 MILIEU....6
POWERPLUS POWEB9050 NL
LADER 18V
POWEB9050
1 TOEPASSING
2 BESCHRIJVING (FIG. A)
This charger is designed for 18V battery pack. Not suitable for professional use.

WARNING! Read this manual and general safety instructions carefully before using the appliance, for your own safety. Your power tool should only be passed on together with these instructions.
2 DESCRIPTION (FIG A)
- Battery port
- Green light
- Red light
- Battery pack (NOT included)
- Battery pack release button
3 PACKAGE CONTENT LIST
■ Remove all packaging materials.
- Remove remaining packing and package inserts (if included).
- Check that the package contents are complete.
- Check the appliance, the power cord, the power plug and all accessories for transportation damage.
- Keep the packing materials as far as possible till the end of the warranty period. Dispose it into your local waste disposal system afterwards.

WARNING: Packaging materials are not toys! Children must not play with plastic bags! Danger of suffocation!
1 x charger
1 x Manual

If any parts are missing or damaged, please contact your dealer.
4 SYMBOLS
In this manual and/or on the machine the following symbols are used:
 | Denotes risk of personal injury or damage to the tool. | In accordance with essential requirements of the European directive(s) | |
 | Read manual before use | "Class II - The machine is double insulated; Earthing wire is therefore not necessary (only for charger) | |
 | Use battery and charger only in closed rooms | ||
POWERPLUS POWEB9050 EN
5 GENERAL POWER TOOL SAFETY WARNINGS
Read all safety warnings and instructions. Failure to heed warnings and follow instructions may result in electric shock, fire and/or serious injury. Keep safety warnings and instructions for future reference. The term "power tool" in the safety warnings refers to your mains-operated (corded) power tool or battery-operated (cordless) power tool.
5.1 Working area
- Keep working area clean and well lit. Untidy and dark areas can lead to accidents.
- Do not operate power tools in potentially explosive surroundings, for example, in the presence of inflammable liquids, gases or dust. Power tools create sparks which may ignite the dust or fumes.
- Keep children and bystanders at a distance when operating a power tool. Distractions can cause you to lose control of it.
5.2 Electrical safety
■ Always check that the power supply corresponds to the voltage on the rating plate.
■ Power tool plugs must match the outlet. Never modify the plug in any way. Do not use adapter plugs with earthed power tools. Unmodified plugs and matching outlets will reduce the risk of an electric shock.
- Avoid body contact with earthed surfaces such as pipes, radiators, kitchen ranges and refrigerators. There is an increased risk of an electric shock if your body is earthed.
- Do not expose power tools to rain or wet conditions. If water gets inside a power tool, it will increase the risk of an electric shock.
- Do not damage the cord. Never use the cord for carrying, pulling or unplugging the power tool. Keep the cord away from heat, oil, sharp edges or moving parts. Damaged or entangled cords increase the risk of an electric shock.
- When operating a power tool outdoors, use an extension cable suitable for outdoor use. Using a cord suitable for outdoor use reduces the risk of an electric shock.
- If operating a power tool in a damp location is unavoidable, use a power supply protected by a residual current device (RCD). Using an RCD reduces the risk of an electric shock.
5.3 Personal safety
- Stay alert, watch what you are doing and use common sense when operating a power tool. Do not use a power tool when you are tired or under the influence of drugs, alcohol or medication. A moment of inattention when operating a power tool may result in serious personal injury.
- Use safety equipment. Always wear eye protection. Using safety equipment such as a dust mask, non-skid safety shoes, a hard hat, or hearing protection whenever it is needed will reduce the risk of personal injury.
- Avoid accidental starts. Ensure the switch is in the off position before inserting the plug. Carrying power tools with your finger on the switch or plugging in power tools when the switch is in the on position makes accidents more likely.
- Remove any adjusting keys or spanners before turning on the power tool. A spanner or key left attached to a rotating part of the power tool may result in personal injury.
- Do not reach out too far. Keep your feet firmly on the ground at all times. This will enable you retain control over the power tool in unexpected situations.
- Dress properly. Do not wear loose clothing or jewellery. Keep your hair, clothing and gloves away from the power tool. Loose clothes, jewellery or long hair can become entangled in the moving parts.
- If there are devices for connecting dust extraction and collection facilities, please ensure that they are attached and used correctly. Using such devices can reduce dust-related hazards.
POWERPLUS POWEB9050 EN
5.4 Power tool use and care
- Do not expect the power tool to do more than it can. Use the correct power tool for what you want to do. A power tool will achieve better results and be safer if used in the context for which it was designed.
- Do not use the power tool if the switch cannot turn it on and off. A power tool with a broken switch is dangerous and must be repaired.
- Disconnect the plug from the power source before making adjustments, changing accessories, or storing power tools. Such preventive safety measures reduce the risk of starting the power tool accidentally.
- Store power tools, when not in use, out of the reach of children and do not allow people who are not familiar with the power tool or these instructions to operate it. Power tools are potentially dangerous in the hands of untrained users.
- Maintain power tools. Check for misalignment or jammed moving parts, breakages or any other feature that might affect the operation of the power tool. If it is damaged, the power tool must be repaired. Many accidents are caused by using poorly maintained power tools.
- Keep cutting tools sharp and clean. Properly maintained cutting tools with sharp cutting edges are less likely to jam and are easier to control.
- Use the power tool, accessories and cutting tools, etc., in accordance with these instructions and in the manner intended for the particular type of power tool, taking into account the working conditions and the work which needs to be done. Using a power tool in ways for which it was not intended can lead to potentially hazardous situations.
5.5 Service
- Your power tool should be serviced by a qualified specialist using only standard spare parts. This will ensure that it meets the required safety standards.
6 ADDITIONAL SAFETY INSTRUCTIONS FOR BATTERIES AND CHARGERS
6.1 Batteries
■ Never attempt to open for any reason.
- Do not store in locations where the temperature may exceed 40 °C.
- Charge only at ambient temperatures between 4 °C and 40 °C.
- Store your batteries in a cool dry place (5 °C-20 °C). Never store batteries in discharged state.
It is better for Li-ion batteries to discharge and reload them regularly (at least 4 times a year). The ideal charge for long-term storage of your Li-ion battery is 40% of capacity.
- When disposing of batteries, follow the instructions given in the section "Protecting the environment".
- Do not cause short circuits. If connection is made between the positive (+) and negative (-) terminal directly or via accidental contact with metallic objects, the battery is short circuited and an intense current will flow causing heat generation which may lead to casing rupture or fire.
- Do not heat. If batteries are heated to above 100 °C, sealing and insulating separators and other polymer components may be damaged resulting in electrolyte leakage and/or internal short circuiting leading to heat generation causing rupture or file. Moreover do not dispose of the batteries in fire, explosion and/or intense burning may result.
■ Under extreme conditions, battery leakage may occur. When you notice liquid on the battery, proceed as follows:
- Carefully wipe the liquid off using a cloth. Avoid skin contact.
– In case of skin or eye contact, follow the instructions below:
√ Immediately rinse with water. Neutralize with a mild acid such as lemon juice or vinegar.
POWERPLUS POWEB9050 EN
√ In case of eye contact, rinse abundantly with clean water for at least 10 minutes. Consult a physician.

Fire hazard! Avoid short-circuiting the contacts of a detached battery. Do not incinerate the battery.
6.2 Chargers
- Never attempt to charge non-rechargeable batteries.
- Have defective cords replaced immediately.
- Do not expose to water.
- Do not open the charger.
- Do not probe the charger.
■ The charger is intended for indoor use only.
7 CHARGING AND INSERTION OR REMOVAL OF BATTERY
7.1 Charger indications
Connect the charger to the power outlet socket
- Solid green: ready to charge
■ Flickering red + solid green: charging
■ Solid green and red: charged

Note: if the battery does not fit properly, disconnect it and confirm that the battery pack is the correct model for this charger as shown on the specification chart. Do not charge any other battery pack or any battery pack that does not securely fit the charger.
- Frequently monitor the charger and battery pack while connected
- Unplug the charger and disconnect it from the battery pack when finished.
- Allow the battery pack to cool completely before using it.
- Store the charger and battery pack indoors, out of reach of children.

NOTE: If battery is hot after continuous use in the tool, allow it to cool down to room temperature before charging. This will extend the life of your batteries.
8 TECHNICAL DETAILS
| Type | POWEB9050 |
| Charger rating input | 220-240V~50Hz |
| Charger rating output | 21V, 1.7A |
| Battery type | 18V li-ion battery pack 1.5Ah18V li-ion battery pack 3.0Ah |
9 ENVIRONMENT

Should your appliance need replacement after extended use, do not dispose of it with the household refuse, but in an environmentally safe way.
Waste produced by electrical machine items should not be handled like normal household rubbish. Please recycle where recycle facilities exist. Check with your Local Authority or retailer for recycling advice.
POWERPLUS POWEB9050 DE
3 FÖRPACKNINGSINNEHÅLL
In this manual and/or on the machine the following symbols are used:
natural_image
Black industrial electrical plug with attached power cord and two terminal pliers (no visible text or symbols)varo
WWW.VARO.COM
DESIGNED AND MARKETED BY VARO
©copyright by varo
VARO - VIC. VAN ROMPUY nv
JOSEPH VAN INSTRAAT 9 - 2500 LIER - BELGIUM
OFFICES: