Mondial - Car seat Chipolino - Free user manual and instructions
Find the device manual for free Mondial Chipolino in PDF.

User questions about Mondial Chipolino
0 question about this device. Answer the ones you know or ask your own.
Ask a new question about this device
Download the instructions for your Car seat in PDF format for free! Find your manual Mondial - Chipolino and take your electronic device back in hand. On this page are published all the documents necessary for the use of your device. Mondial by Chipolino.
USER MANUAL Mondial Chipolino
natural_image
Line drawing of a car seat assembly with no text or symbolsChipolino
продуктов номер/ item number/ cikkszám/ número de artículo/ codice articolo/artikelnummer/ numéro d'article/ broj proizvoda/ Број производа/Број на производ/ Numri i produktit/ αριθμός προϊόντος/ numărul produsului/número de produto/productnummer/ číslo produktu/ ʒιπτρεγρύξης δισθυξη:
STKMND02xxxxx
UN Regulation №129/04
ФИГУРИ/ FIGURES/ ÁBRÁK/ CIFRAS/ FIGURE/ FIGUREN/ LES FIGURES/ ОБЛИЦИ/ ОБЛИЦИ/ FORMA/ FIGURE/ ФІГОYPEΣ/ FIGURILE/ FIGURAS/ FIGUREN/ OBRÁZKY / ๑๒๓๔๗๘๐
ФИГУРИ/ FIGURES/ ÁBRÁK/ CIFRAS/ FIGURE/ FIGUREN/ LES FIGURES/ ОБЛИЦИ/ ОБЛИЦИ/ FORMA/ FIGURE/ ФІГОYPEΣ/ FIGURILE/ FIGURAS/ FIGUREN/ OBRÁZKY / ๑๒๓๔๗๘๐
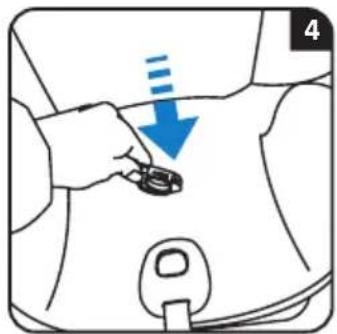
4

natural_image
Illustration of a child seated in a car seat with a magnified inset showing the cable being inserted (no text or symbols present)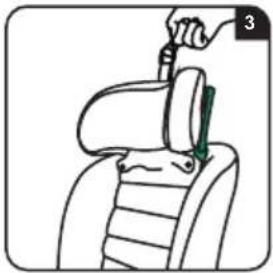
natural_image
Illustration of a hand holding a tool over a seatbelt, with a green clip and label '3' (no text or symbols on the diagram itself)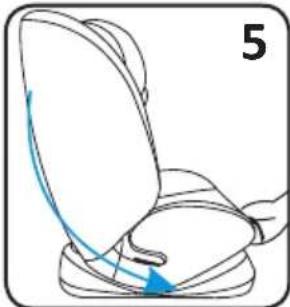
natural_image
Line drawing of a car seatbelt with blue motion arrows indicating movement (no text or symbols)6
natural_image
Line drawing of a medical procedure on pelvic anatomy, showing hands and anatomical alignment (no text or labels)
natural_image
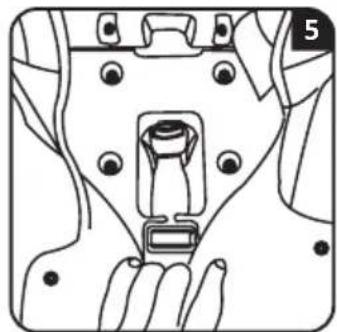
Line drawing of a mechanical component with a belt buckle and mounting holes (no text or symbols)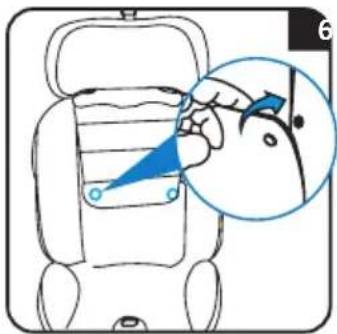
natural_image
Illustration of a folded or folded object with blue arrows indicating direction (no text or symbols)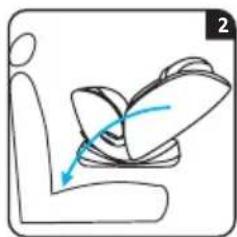
natural_image
Line drawing of a person sitting in a chair, showing seat and arm movement with a blue arrow indicating direction (no text or symbols)
natural_image
Diagram of a car seatbelt with a blue arrow indicating direction (no text or symbols)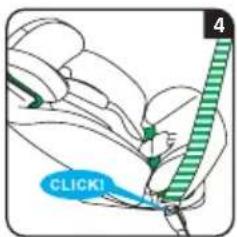
natural_image
Illustration of a belt buckle with green and red stripes (no text or symbols)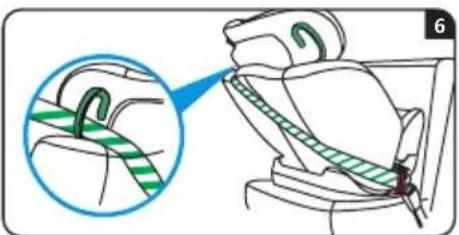

natural_image
Illustration of a person using a computer with a mouse, showing a cartoon character and a small figure (no text or symbols)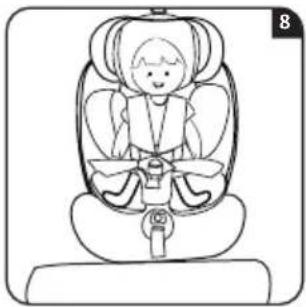
natural_image
Line drawing of a baby car seat with no text or symbols7
ФИГУРИ/ FIGURES/ ÁBRÁK/ CIFRAS/ FIGURE/ FIGUREN/ LES FIGURES/ ОБЛИЦИ/ ОБЛИЦИ/ FORMA/ FIGURE/ ФІГОYPEΣ/ FIGURILE/ FIGURAS/ FIGUREN/ OBRÁZKY / ๑๒๓๔๗๘๐
8
9
natural_image
Illustration of a child wearing a car seatbelt and using a green safety belt (no text or symbols)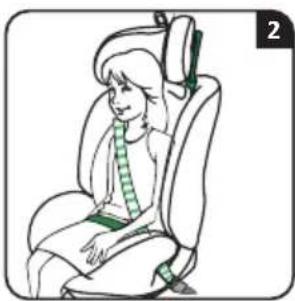
natural_image
Illustration of a person sitting in a car seat, wearing a green tie and seatbelt (no text or symbols)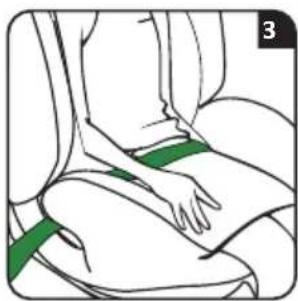
natural_image
Illustration of a person seated on a chair with hands placed on the back (no text or symbols visible)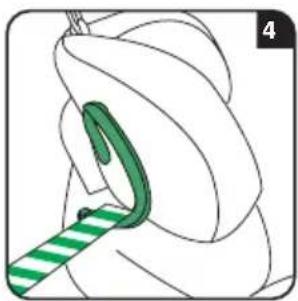
natural_image
Illustration of a green bandage being inserted into a curved object (no text or symbols)TO ASSURE SAFE USAGE OF THIS PRODUCT FOLLOW ALL WARNINGS, INSTRUCTIONS AND RECOMMENDATIONS GIVEN IN THIS USER MANUAL!
| NOTE for i-Size child restraint system, child height: 40–105 cmThis is an enhanced i-Size child restraint system. It is approved in accordance with Regulation No. 129 for use in “i-Size compatible” seating positions in the vehicle, as indicated by vehicle manufacturers in the vehicle user manual.In case of doubt, consult the manufacturer or retailer of the child restraint system.NOTE for i-Size enhanced child restraint system – booster seat category (100–150 cm)This is an enhanced i-Size child restraint system of the “booster seat” type. It is approved in accordance with Regulation No. 129 for use primarily in “i-Size” seating positions in the vehicle, as specified by vehicle manufacturers in the vehicle user manual.In case of doubt, consult the manufacturer or retailer of the child restraint system. | |||
 | NO SYSTEM CAN GUARANTEE ABSOLUTE PROTECTION AGAINST INJURY IN THE EVENT OF A COLLISION OR ACCIDENT! DRIVE WITH EXTRA CAUTION, ESPECIALLY WHEN A CHILD IS IN THE VEHICLE! | ||
| TO ENSURE THE SAFE USE OF THIS PRODUCT, FOLLOW THE WARNINGS, INSTRUCTIONS, AND RECOMMENDATIONS IN THIS MANUAL! | |||
| IMPROPER USE OF THE SEAT WILL REDUCE ITS PROTECTIVE AND SAFETY FUNCTIONS! FAILURE TO FOLLOW THE INSTRUCTIONS IN THIS MANUAL INCREASES THE RISK OF SERIOUS INJURY OR DEATH! | |||
| WARNING! | |||
  | |||
| DO NOT USE ANY SUPPORT CONTACT POINTS OTHER THAN THOSE DESCRIBED IN THE INSTRUCTION MANUAL AND MARKED ON THE CAR SEAT! | |||
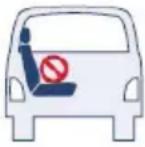
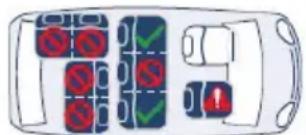
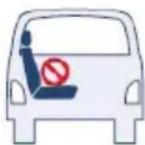
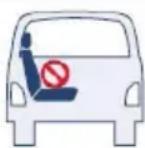
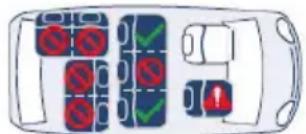
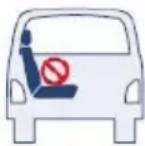
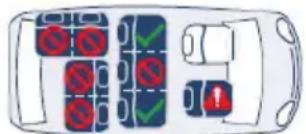
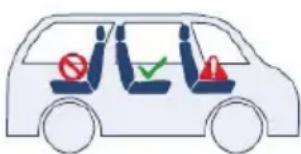
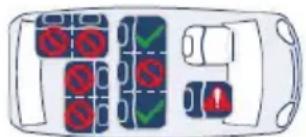
| SEATING POSITIONS IN THE VEHICLE | |||
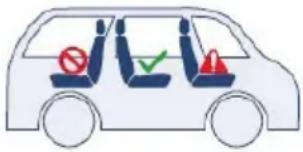  |  | Suitable location for installing the child seat. | |
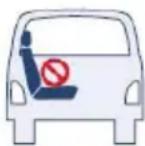
 | Not suitable location for installing the child seat. | ||
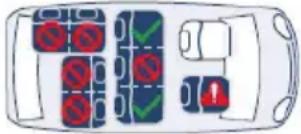 |  | Suitable only if the seat is equipped with ISOFIX connectors. | |
WARNING! SAFETY INSTRUCTIONS!
✿ WARNING! NEVER LEAVE THE CHILD UNATTENDED!
✿ WARNING! DO NOT USE ANY SUPPORT CONTACT POINTS OTHER THAN THOSE DESCRIBED IN THE MANUAL AND MARKED ON THE CAR SEAT!
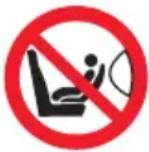
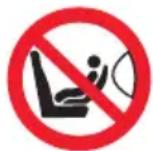
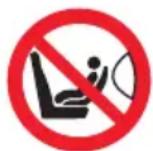
✿ WARNING! WHEN INSTALLING THE SEAT IN THE “REAR-FACING” POSITION, NEVER PLACE IT ON A PASSENGER SEAT EQUIPPED WITH AN ACTIVE AIRBAG! THIS MAY RESULT IN DEATH OR SERIOUS INJURY!
✿ WARNING! NEVER INSTALL THE SEAT IN A ΠΡΟΣ TA ΕΜΠΡΟΣ-FACING POSITION BEFORE THE CHILD IS OLDER THAN 15 MONTHS!
✿ WARNING! THE VEHICLE SEAT BELTS HOLDING THE CHILD SEAT TO THE CAR SEAT MUST BE TIGHTENED AND SECURED!
WARNING! THE HARNESS BELTS OF THE SEAT HOLDING THE CHILD MUST BE WELL TIGHTENED AND SECURED, ADJUSTED TO THE CHILD'S BODY AND SIZE SO THAT THEY FIT PROPERLY.
✿ WARNING! THE LAP BELT MUST BE POSITIONED LOW AND ANY PROTECTIVE BARRIER MUST BE INSTALLED CORRECTLY TO FIRMLY SECURE THE CHILD'S PELVIS WITHOUT APPLYING PRESSURE.
✿ WARNING! DO NOT MAKE ANY CHANGES, ADDITIONS, OR MODIFICATIONS TO THE CAR SEAT WITHOUT THE APPROVAL OF THE NOTIFIED BODY! FAILURE TO FOLLOW THE MANUFACTURER'S INSTRUCTIONS IS DANGEROUS!
✿ WARNING! KEEP AWAY FROM FIRE!
✿ Mounting the product onto the vehicle seat and securing the child must be performed only by an adult.
The rigid parts and the plastic components of the child restraint system must be placed and installed in such a way that, under normal operating conditions of the vehicle, they cannot become trapped by a moving seat or by a door of the vehicle.
Do not allow the belts of the child seat to become twisted, frayed, or torn; buckles and locks must always be intact and properly fastened.
If you detect any instability or malfunction in the structure, buckles, belts, locking mechanisms of the seat, stop using it until the defective parts are repaired or replaced.
❖ Replace the seat with a new one if it has been subjected to crash forces in an accident.
Do not use a second-hand seat, as you do not know what loads it may have been subjected to.
Do not use the seat without its cover and do not replace it with another one unless it is provided by the manufacturer, as it is an integral part of the child restraint system.
✿ Any luggage or other objects that may cause injury in the event of a crash must be properly secured. Remove or secure at a safe distance from the seat and the child any luggage that may cause injury in the event of sudden braking or an accident during travel.
Always check whether the seat is firmly attached to the vehicle seat, even when you are not placing a child in it. A loose seat, even without a child in it, can cause injury in a crash.
Do not place any additional padding in the seat except those provided by the manufacturer.
Do not use spare parts or other components not supplied by the manufacturer. The manufacturer does not take responsibility for safety if spare parts other than those original or recommended are used.
- Keep this manual in the designated storage compartment of the seat or in the vehicle in which the seat is used.
Do not expose the seat to direct sunlight to prevent potential burns to the child, deformation of the seat, and especially damage to plastic parts.
The seat does not replace a bassinet or bed. When the child needs to sleep, place them in a suitable stroller, bassinet, or bed.
Do not attach any additional cords or strings to the product to avoid the risk of strangulation.
✿ Never place the seat on beds, sofas, or similar soft surfaces.
Do not allow children to play with the product.
Do not remove the labels and warnings affixed to the seat. They are important for every user.
- Keep plastic packaging away from children to avoid the risk of suffocation!
INSTRUCTIONS FOR USE OF THE RESTRAINT SYSTEM
This is an enhanced i-Size child restraint system for children from 40 to 150 cm.
| Model Child height | Installation direction | Installation method Approved type | ||
| MONDIAL | 40 - 105 cm Rear-facing | 3-point vehicle seat belt + child seat harness | Universal belted Enhanced Child Restraint System | |
| 76 - 105 cm Forward-facing | 3-point vehicle seat belt + child seat harness | |||
| 100-150 cm Forward-facing 3-point | vehicle seat belt | I-Size booster seat | ||
IMPORTANT! Follow precisely the instructions and the installation sequence provided in the text and illustrations of this manual. Check the security of the fastening after completing each step! ALWAYS CHECK THE SECURITY OF THE BELT FASTENING! After each installation, make sure the vehicle seat belts are not twisted and are in the correct position.
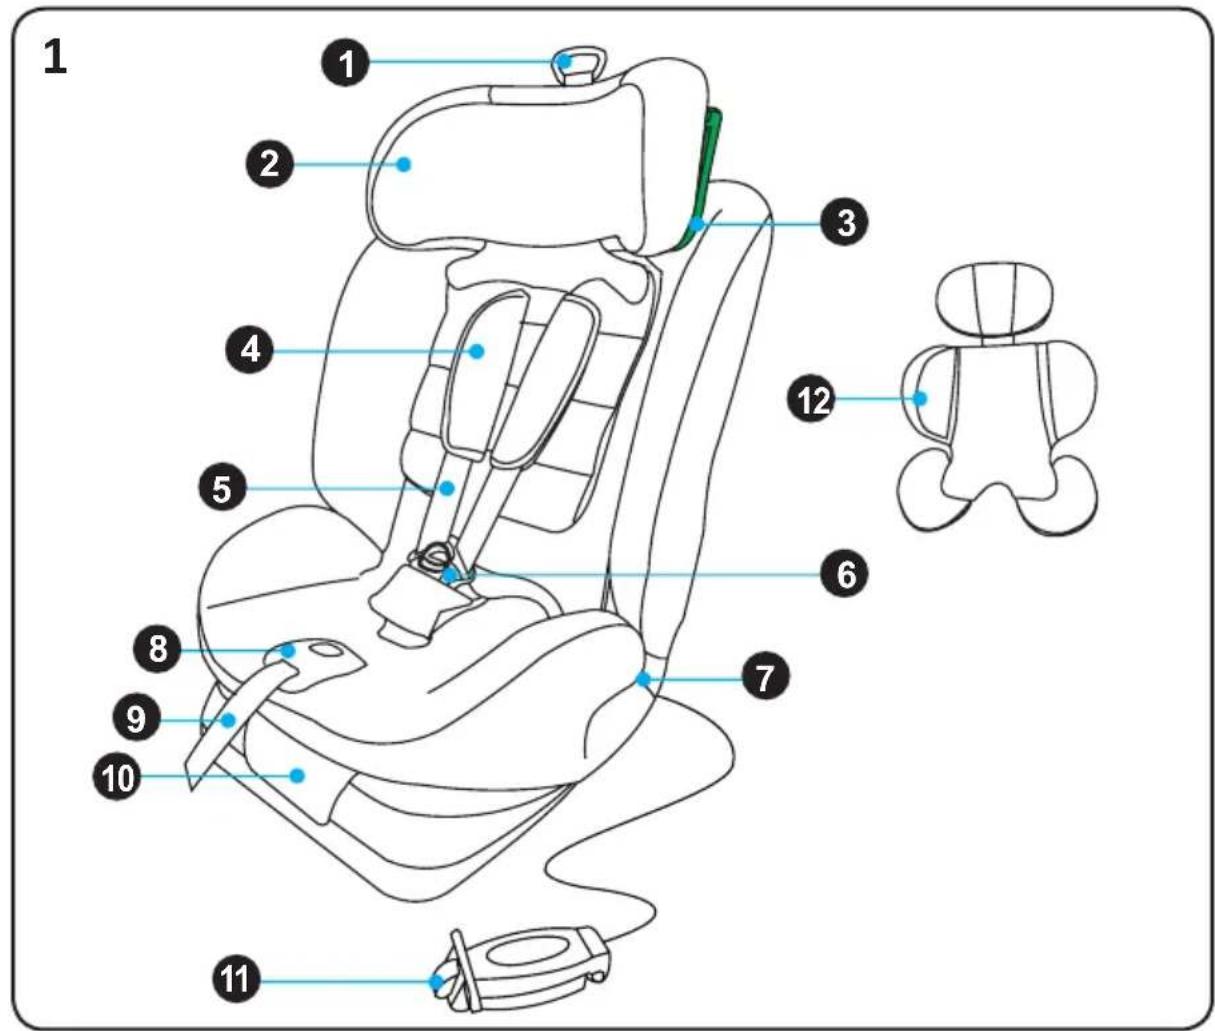
1. MAIN COMPONENTS
- Headrest height adjuster ring
- Headrest
- Vehicle belt guide
- Shoulder pad
- Shoulder straps
- Buckle
- Lower belt guide
- Shoulder strap adjuster button
- Harness adjustment strap
- Recline adjustment button
- Lock-off device for vehicle seat belt
- Infant cushion (up to 75 cm)
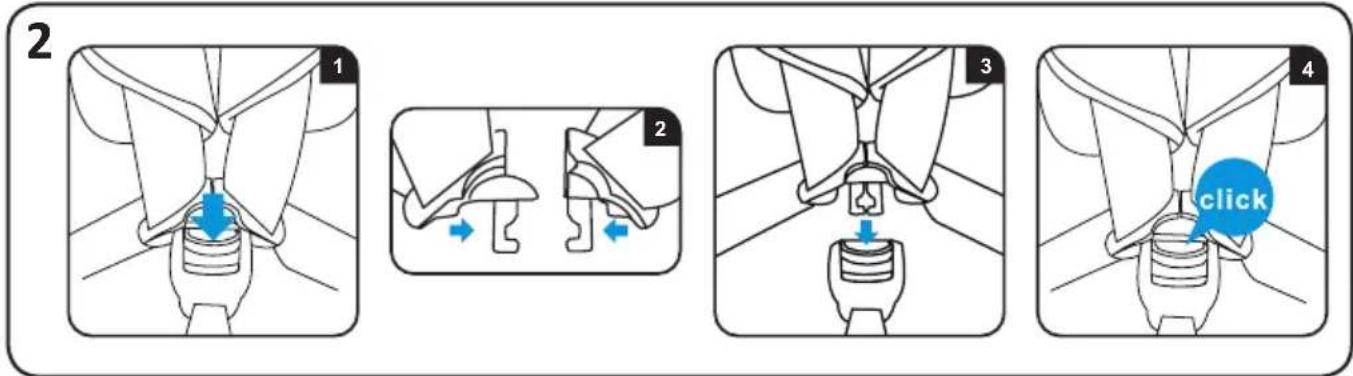
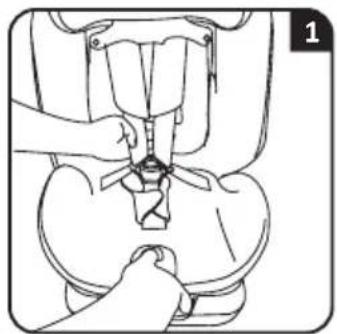
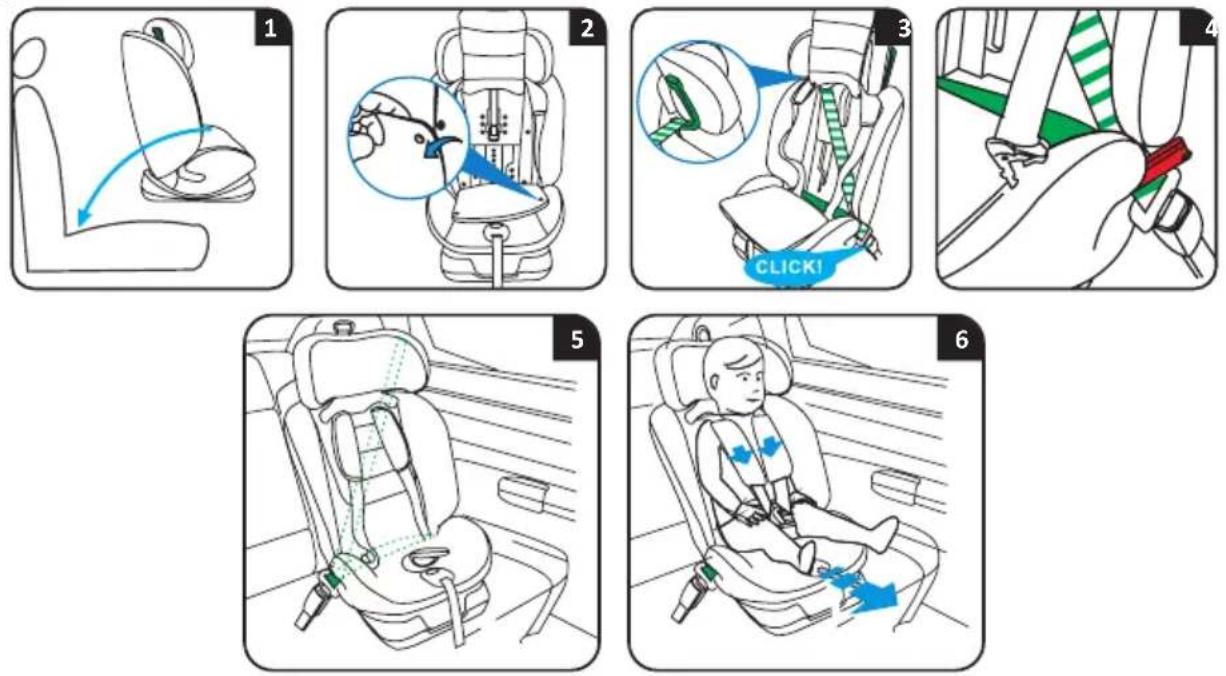
2. 5-POINT HARNESS SYSTEM
1) Press the red release button on the buckle (a) to unlock the metal tongues (b) of the shoulder straps.
2) Insert the two metal tongues (b) into the buckle (a) until you hear a "click" confirming they are securely latched.
IMPORTANT! Make sure the tongues are properly locked in place by pulling upward to check they are firmly secured.
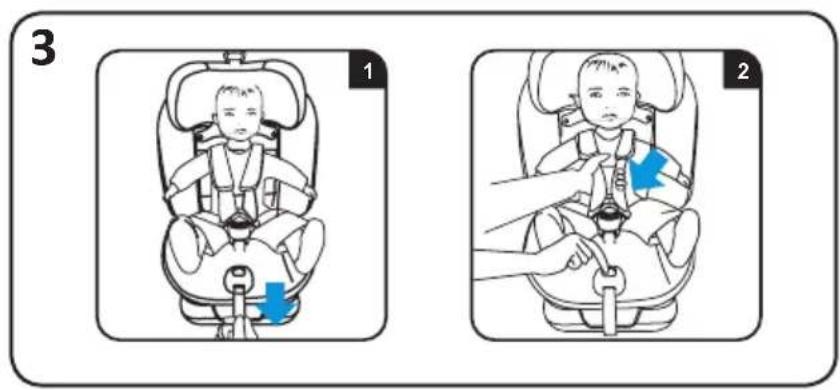
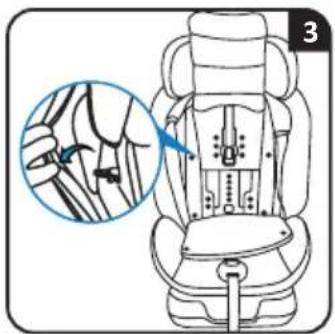
3. ADJUSTING THE SHOULDER HARNESS HEIGHT
1) Tighten the harness by pulling the adjustment strap until the belts fit snugly around the child's body—without causing discomfort or pressure. The recommended gap between the harness and the child's body is about two fingers' width (approximately 2–3 cm). The lap section of the harness should be positioned as low as possible, close to the child's crotch (not over the abdomen), to ensure the pelvis is securely restrained.
CAUTION! Make sure the straps are not twisted and fit around the child firmly but comfortably!
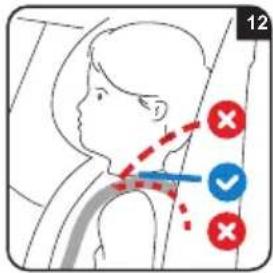
2) Select the height so that the headrest is as close as possible to the child's shoulders. If the child falls between two positions, use the higher one. Make sure the diagonal section of the seat belt runs over the child's shoulder, not the neck.
Note: Do not pull on the shoulder pads when adjusting the harness.
4. ADJUSTING THE HEADREST
IMPORTANT! A properly adjusted headres vides optimal protection for your child while seated.
When using the 5-point harness:
1) Adjust the headrest so that the shoulder straps are at the same level as the child's shoulders.
When using the vehicle's 3-point seat belt:
2) Adjust the headrest so that it is positioned as close as possible to the child's shoulders. If the child falls between two height positions, use the higher one. Make sure the diagonal part of the seat belt passes over the child's shoulder, not across the neck.
IMPORTANT! Ensure the headrest is securely locked in the selected height position by sliding it gently downward.
3) To adjust the headrest height, pull the adjustment ring (1) and move the headrest up or down to the appropriate height for your child.
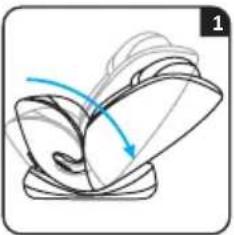
5. ADJUSTING THE SEAT RECLINE (4 POSITIONS)
To change the recline position, hold the lever at the front of the seat and push or pull the seat into the desired position until you hear a clear "click."
Recline Adjustment – Rearward-Facing Position:
- For children with a height of 40–105 cm, use recline position 5.
Recline Adjustment – FORWARD - Facing Position: - For children with height 76–105 cm, you may use positions 1, 2, 3, or 4.
- For children with height 100–150 cm, only position 1 is allowed.
6. REMOVING THE 5-POINT HARNESS SYSTEM
IMPORTANT! For children with a height of 100-150 cm, the integrated harness system must be removed.
1) Loosen the shoulder straps by pulling them fully forward and open the central buckle.
2) Unfasten the snap buttons on the backrest and lift the seat cover as shown in the illustration.
3) Insert the metal tongues of the harness into the designated storage slots on the inside of the backrest.
4) Lift the seat padding and remove the buckle from the harness system.
5) Place the buckle into the dedicated storage slot.
(6) Reposition the seat cover and close the snap buttons to secure it.
To reinstall the harness, follow the steps in reverse order. Make sure the straps are not twisted when reassembling.
7. INSTALLING THE SEAT REARWARD-FACING FOR CHILDREN 40–105 CM using the vehicle seat belt and the integrated 5-point harness
IMPORTANT! For children with a height of ≤ 75 cm, the infant cushion must be used. When the child is taller than 75 cm (up to 150 cm), the cushion must be removed.
IMPORTANT! For children under 15 months, the seat must be used in the rearward-facing position.
1) Set the seat recline to position "5" (fully reclined). You will hear a "click" when the position locks into place.
2) Place the child seat rearward-facing on the vehicle seat. Make sure the front edge of the child seat is firmly pressed against the vehicle seat.
3) Remove the infant cushion. Unfasten the snap buttons on the upholstery and fold the fabric downward toward the base of the seat.
4) Route the vehicle's lap belt through both lower belt guides (7). Buckle the belt into the vehicle's seat belt buckle until you hear a clear "click".
5) To ensure a more secure installation, tighten the diagonal section of the seat belt and fix it into the lock-off device, positioning it as near as possible to the vehicle buckle.
6) Guide the diagonal part of the vehicle belt be hind the seat back and through the designated belt guide on the child seat.
7) Shake the seat to check for stability and ensure it is securely installed. Refasten the upholstery buttons and reinsert the infant cushion if still needed.
IMPORTANT! Always make sure the seat is locked into the chosen position before each trip.
IMPORTANT! The headrest must be adjusted so the shoulder straps are level with or just above the child's shoulders.
EN
8) Place the child in the seat. Adjust the headrest to match the child's height. Tighten the shoulder straps, then secure them in the buckle.
8. INSTALLING THE SEAT ΠΡΟΣ TA EMΠΡΟΣ-FACING FOR CHILDREN 76–105 CM using the vehicle's seat belt and the integrated 5-point harness
1) Place the child seat on the vehicle seat in the "FORWARD-FACING" position. Make sure that the front part of the seat is firmly pressed against the vehicle seat.
2) Unfasten the snap buttons on the seat cover and fold the fabric down toward the bottom of the seat.
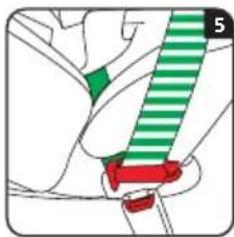
3) Pull out the vehicle's 3-point seat belt. Route the diagonal section through the belt guide (3) on the backrest, and the lap section through the appropriate lower belt guides at the base of the seat. Insert the belt tongue into the vehicle's seat belt buckle until you hear a "click."
4) To ensure a more secure installation, tighten the diagonal section of the seat belt and fix it into the lock-off device, positioning it as near as possible to the vehicle buckle.
IMPORTANT! Make sure the vehicle belt lies firmly across the child's pelvis, not slack or twisted. Ensure that the seat belt buckle does not interfere with the main load-bearing contact point of the seat. Also check that the seat cover does not obstruct the movement or routing of the seat belt in any way.
5) Shake the seat gently to ensure it is securely installed on the vehicle seat. Refasten the snap buttons on the seat cover.
6) Place the child in the seat. Adjust the headrest height according to the child's stature. Tighten the shoulder straps, then buckle them securely using the central harness buckle.
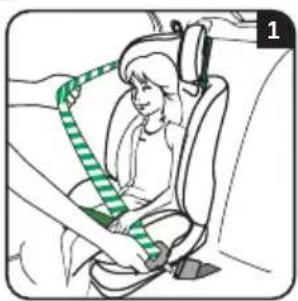
9. INSTALLING THE SEAT FORWARD-FACING FOR CHILDREN 100–150 CM Using the vehicle's 3-point seat belt
1) Seat the child in the child restraint and adjust the headrest height to fit the child. Pull out the vehicle's seat belt, route the diagonal part in front of the child, and fasten it into the vehicle's seat belt buckle.
2) Route both the lap and diagonal parts of the belt through the lap belt guide on the side of the seat closest to the vehicle buckle.
3) Then route the lap belt through the lap belt guide on the opposite side of the seat.
IMPORTANT! Ensure that the lap belt lies low across the child's thighs, securing the pelvis firmly in place. Pull the belt tight so that it fits snugly against the child's body. Make sure the belt is correctly routed and not twisted.
4) Guide the diagonal part of the belt through the shoulder belt guide on the backrest of the seat. Check again that the belt is not twisted.
CARE AND MAINTENANCE INSTRUCTIONS
- Clean dirty plastic or metal parts with a soft cotton cloth or sponge dampened with water or mild detergent.
- Hand-wash the upholstery and soft pads at 30°C using a mild detergent.
Do not bleach!
Do not spin dry!
Do not tumble dry!
Do not iron!
Do not use aggressive cleaning agents containing abrasives, ammonia, bleach, or alcohol.
✿ After cleaning, allow the seat to fully dry before use or storage. - Clean the belts externally only with mild soap and a damp cloth.
Do not soak or remove the labels! They contain important safety information. - Store the product in a clean and dry place. Avoid exposure to environmental elements such as sunlight, rain, humidity, or sudden temperature changes.
In case of issues with normal use, contact authorized service centers for consultation or repair.
A TERMÉK BIZTONSÁGOS HASZNÁLATÁNAK BIZTOSÍTÁSA ÉRDEKÉBEN KÖVESSE A FELHASZNÁLÓI KÉZIKÖNYVBEN TALÁLHATÓ ÖSSZES FIGYELMEZTETÉST, UTASÍTÁST ÉS AJÁNLÁST!


KEIN SYSTEM KANN ABSOLUTE SICHERHEIT GARANTIEREN VOR


НИЈЕДАН СИСТЕМ НЕ МОЖЕ ГАРАНТОВАТИ АПСОЛУТНУ ЗАШТИТУ ОД ПОВРЕДА У СЛУЧАЈУ СУДАРА ИЛИ НЕЗГОДЕ! ВОЗИТЕ СА ПОВЕЋАНОМ ОПРЕЗНОШЋУ, НАРОЧИТО КАДА ЈЕ ДЕТЕ У ВОЗИЛУ!


NICIUN SISTEM NU POATE GARANTA PROTECTIE ABSOLUTĂ ÎMPOTRIVA RĂNILOR ÎN CAZUL UNEI COLIZIUNI SAU AL UNUI ACCIDENT! CONDUCETI CU PRUDENTĂ SPORITĂ, ÎN SPECIAL ATUNCI CÂND ÎN VEHICUL SE AFLĂ UN COPIL!
PENTRU A ASIGURA UTILIZAREA ÎN SIGURANTĂ A ACESTUI PRODUS, RESPECTATI AVERTISMENTELE, INSTRUCTIUNILE ȘI RECOMAŃDĂRILE DIN ACEST MANUAL!
UTILIZAREA NECORESPUNZĂTOARE A SCAUNULUI VA REDUCE FUNCTIILE SALE DE PROTECTIE ȘI SIGURANTĂ! NERESPECTAREA INSTRUCTIUNILOR DIN ACEST MANUAL CREȘTE RISCUL DE RĂNIRE GRAVĂ SAU DE DECES!
AVERTISMENT!
NU INSTALATI NICIODATĂ SCAUNUL ÎN POZITIA CU FATA LA DIRECTIA
DE MERS CU COPILUL ÎN FATĂ ÎNAINTE CA ACESTA SĂ AIBĂ MAI MULT DE
15 LUNI! NU UTILIZATI NICIODATĂ SCAUNUL PE UN SCAUN DE PASAGER ECHIPAT CU UN AIRBAG FRONTAL ACTIV! ACEST LUCRU POATE DUCE LA DECES SAU VĂTĂMĂRI GRAVE!
NU UTILIZATI ALTE PUNCTE DE CONTACT ALE SUPORTULUI DECÂT CELE DESCRISE ÎN MANUALUL DE INSTRUCTIUNI ŞI MARCATE PE SCAUNUL AUTO!
POZITII DE ŞEDERE ÎN VEHICUL


NENHUM SISTEMA PODE GARANTIR UMA PROTECÇÃO ABSOLUTA


GEEN ENKEL SYSTEEM KAN ABSOLUTE BESCHERMING GARANDEREN TEGEN LETSEL BIJ EEN AANRIJDING OF ONGEVAL! RIJD EXTRA VOORZICHTIG, VOORAL ALS ER EEN KIND IN DE AUTO ZIT! VOOR EEN VEILIG GEBRUIK VAN DIT PRODUCT,
VOOR EEN VEILIG GEBRUIK VAN DIT PRODUCT, VOLG DE WAARSCHUWINGEN, INSTRUCTIES EN AANBEVELINGEN IN DEZE HANDLEIDING OP!
ONJUIST GEBRUIK VAN HET ZITJE VERMINDERT DE BESCHERMENDE EN VEILIGHEIDSFUNCTIES! HET NIET OPVOLGEN VAN DE INSTRUCTIES IN DEZE HANDLEIDING VERHOOGT HET RISICO OP ERNSTIG OF DODELIJK LETSEL!
WAARSCHUWING!
⚠ INSTALLEER HET ZITJE NOOIT VOORWAARTS GERICHT MET HET KIND NAAR VOREN VOORDAT HET KIND OUDER IS DAN 15 MAANDEN!
⚠ GEBRUIK HET ZITJE NOOIT OP EEN PASSAGIERSSTOEL MET EEN ACTIEVE FRONTAIRBAG! DIT KAN LEIDEN TOT ERNSTIG LETSEL OF DE DOOD!
GEBRUIK GEEN ANDERE STEUNPUNTEN DAN BESCHREVEN IN DE GEBRUIKSAANWIJZING EN AANGEGEVEN OP HET AUTOSTOELTJE!
ZITPLAATSEN IN DE AUTO

WAARSCHUWING! VEILIGHEIDSINSTRUCTIES!
modification of the following items: