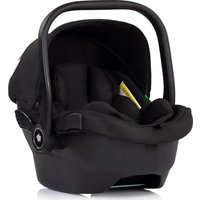
Clima Air - Car seat Chipolino - Free user manual and instructions
Find the device manual for free Clima Air Chipolino in PDF.

| Brand | Chipolino |
| Model | Clima Air |
| Product type | Car seat |
| Category | Enhanced i-Size child restraint system |
| Approval | Regulation No. 129 (i-Size universal) |
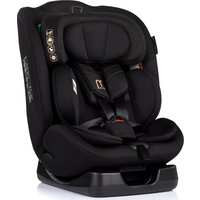
| Compatible child height | 40 – 150 cm |
| Installation direction | Rear-facing (40-105 cm) and forward-facing (76-150 cm) |
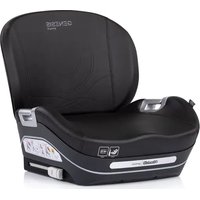
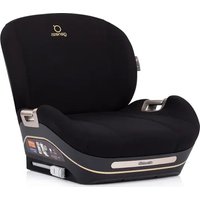
| Installation method | ISOFIX + support leg (up to 105 cm) or 3-point belt (100-150 cm) |
| Child restraint system | 5-point harness (up to 105 cm) or vehicle 3-point belt (100-150 cm) |
| Rotation | 360° with locking in rear or forward facing position |
| Recline | 5 positions (1 to 5 depending on use mode) |
| Adjustable headrest | 10 positions |
| Side protection | Integrated SPS (Side Protection System) |
| Heating / Cooling | Yes, via USB port (cable included, 5V/2A) |
| Power supply | USB 5V/2A (cable included) |
| Additional cushion | For child ≤ 75 cm (head cushion included) |
| Support leg | Yes, with green locking indicator |
| Safety indicators | Green/red for ISOFIX and support leg |
| Cover care | Hand wash at 30°C, do not bleach, do not tumble dry |
| Strap care | Surface cleaning with mild soap and damp cloth |
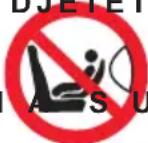
| Safety | Do not use on seat with active frontal airbag in rear-facing position; do not modify the product |
| After-sales service | Contact an authorized service center for repair or advice |
Frequently Asked Questions - Clima Air Chipolino
User questions about Clima Air Chipolino
0 question about this device. Answer the ones you know or ask your own.
Ask a new question about this device
Download the instructions for your Car seat in PDF format for free! Find your manual Clima Air - Chipolino and take your electronic device back in hand. On this page are published all the documents necessary for the use of your device. Clima Air by Chipolino.
USER MANUAL Clima Air Chipolino
natural_image
Line drawing of a car comfort seat assembly with no text or symbols on the diagram itselfпродуктов номер / item number / cikkszám/ número de artículo / codice articolo / artikelnummer / numéro d'article / broj proizvoda / αριθμός προϊόντος / numărul produsului / número de produto / productnummer / číslo produktu/ʒmɒŋəŋʒnɒ 6mɒŋɔn:
STKCLA250xxx
UN Regulation №129/03
UN Regulation No10/06
ФИГУРИ/ FIGURES/ ÁBRÁK/ CIFRAS/ FIGURE/ FIGUREN/ LES FIGURES/ ОБЛИЦИ/ ОБЛИЦИ/ FORMA/ FIGURE/ ФІГОΥΡΕΣ/ FIGURILE/ FIGURAS/ FIGUREN/ OBRÁZKY / ๑๒๓๔๗๘๐
ФИГУРИ/ FIGURES/ ÁBRÁK/ CIFRAS/ FIGURE/ FIGUREN/ LES FIGURES/ ОБЛИЦИ/ ОБЛИЦИ/ FORMA/ FIGURE/ ФІГОΥΡΕΣ/ FIGURILE/ FIGURAS/ FIGUREN/ OBRÁZKY / ๑๒๓๔๗๘๐
ФИГУРИ/ FIGURES/ ÁBRÁK/ CIFRAS/ FIGURE/ FIGUREN/ LES FIGURES/ ОБЛИЦИ/ ОБЛИЦИ/ FORMA/ FIGURE/ ФІГОΥΡΕΣ/ FIGURILE/ FIGURAS/ FIGUREN/ OBRÁZKY / ๑๒๓๔๗๘๐
7-5
natural_image
Illustration of hands adjusting a car seatbelt with red arrows indicating force or pressure points (no text or symbols present)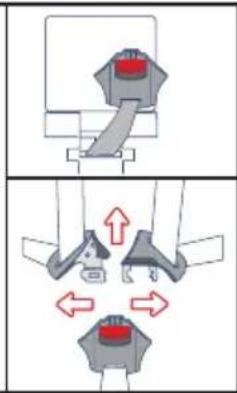
natural_image
Diagram showing two mechanical or electrical setups with red arrows indicating motion or force directions (no text or symbols present)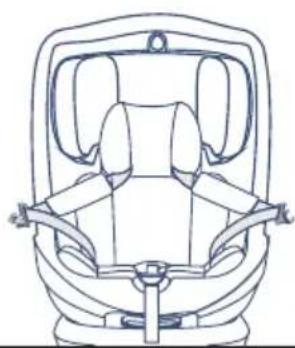
natural_image
Line drawing of a car seat assembly (no text or symbols)7-6
natural_image
Line drawing of a child seated in a car seat, no text or symbols present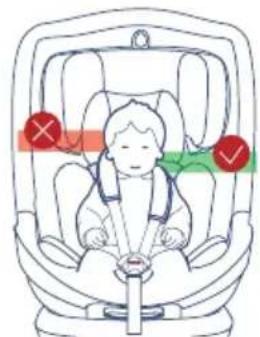
7-7
natural_image
Line drawing of a baby car seatbelt in a compact car seat (no text or symbols)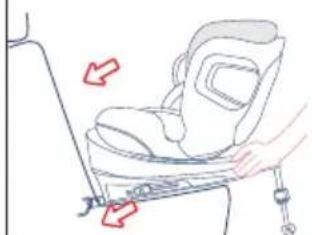
natural_image
Illustration of a hand adjusting a seatbelt with arrows indicating movement (no text or symbols)8-1
natural_image
Line drawing of a car seat assembly with a red arrow indicating left side (no text or symbols)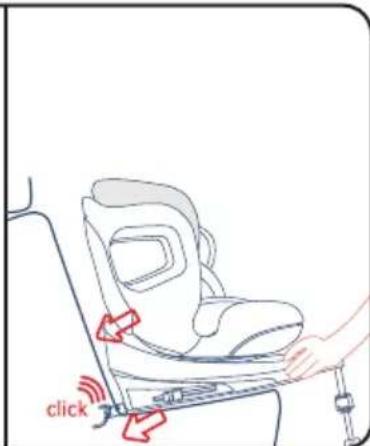
ФИГУРИ/ FIGURES/ ÁBRÁK/ CIFRAS/ FIGURE/ FIGUREN/ LES FIGURES/ ОБЛИЦИ/ ОБЛИЦИ/ FORMA/ FIGURE/ ФІГОYPEΣ/ FIGURILE/ FIGURAS/ FIGUREN/ OBRÁZKY / ۶۲۵۰۷۳۱۶۰

ФИГУРИ/ FIGURES/ ÁBRÁK/ CIFRAS/ FIGURE/ FIGUREN/ LES FIGURES/ ОБЛИЦИ/ ОБЛИЦИ/ FORMA/ FIGURE/ ФІГОYPEΣ/ FIGURILE/ FIGURAS/ FIGUREN/ OBRÁZKY / ۶۲۵۰۷۳۱۶۰

ФИГУРИ/ FIGURES/ ÁBRÁK/ CIFRAS/ FIGURE/ FIGUREN/ LES FIGURES/ ОБЛИЦИ/ ОБЛИЦИ/ FORMA/ FIGURE/ ФІГОYPEΣ/ FIGURILE/ FIGURAS/ FIGUREN/ OBRÁZKY / ๑๒๓๔๗๘๐
TO ASSURE SAFE USAGE OF THIS PRODUCT FOLLOW ALL WARNINGS, INSTRUCTIONS AND RECOMMENDATIONS GIVEN IN THIS USER MANUAL!
NOTE for i-Size child restraint system, child height: 40–105 cm
This is an enhanced i-Size child restraint system. It is approved in accordance with Regulation No. 129 for use in "i-Size compatible" seating positions in the vehicle, as indicated by vehicle manufacturers in the vehicle user manual.
In case of doubt, consult the manufacturer or retailer of the child restraint system.
NOTE for i-Size enhanced child restraint system – booster seat category (100–150 cm)
This is an enhanced i-Size child restraint system of the “booster seat” type. It is approved in accordance with Regulation No. 129 for use primarily in “i-Size” seating positions in the vehicle, as specified by vehicle manufacturers in the vehicle user manual.
In case of doubt, consult the manufacturer or retailer of the child restraint system.

NO SYSTEM CAN GUARANTEE ABSOLUTE PROTECTION AGAINST INJURY IN THE EVENT OF A COLLISION OR ACCIDENT! DRIVE WITH EXTRA CAUTION, ESPECIALLY WHEN A CHILD IS IN THE VEHICLE!
TO ENSURE THE SAFE USE OF THIS PRODUCT, FOLLOW THE WARNINGS, INSTRUCTIONS, AND RECOMMENDATIONS IN THIS MANUAL!
IMPROPER USE OF THE SEAT WILL REDUCE ITS PROTECTIVE AND SAFETY FUNCTIONS! FAILURE TO FOLLOW THE INSTRUCTIONS IN THIS MANUAL INCREASES THE RISK OF SERIOUS INJURY OR DEATH!
WARNING!
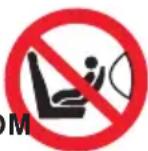
NEVER INSTALL THE SEAT IN THE FORWARD-FACING POSITION WITH THE CHILD FACING FORWARD BEFORE THE CHILD IS OLDER THAN 15 MONTHS!
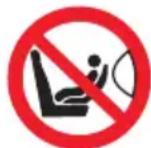
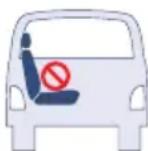
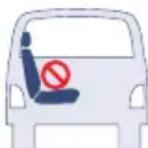
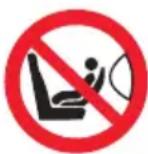
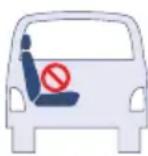
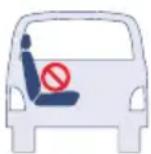
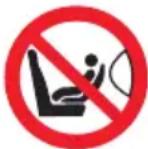
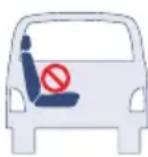
! NEVER USE THE SEAT ON A PASSENGER SEAT EQUIPPED WITH AN ACTIVE FRONT AIRBAG! THIS MAY RESULT IN DEATH OR SERIOUS INJURY!
DO NOT USE ANY SUPPORT CONTACT POINTS OTHER THAN THOSE DESCRIBED IN THE INSTRUCTION MANUAL AND MARKED ON THE CAR SEAT!
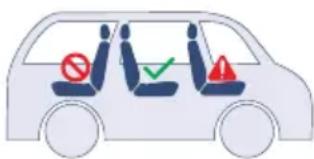
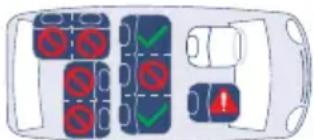
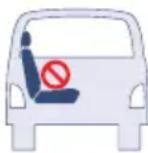
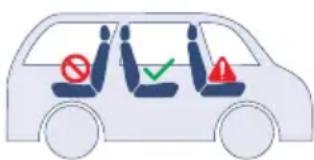
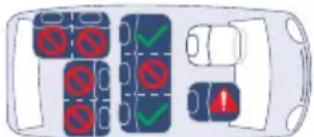
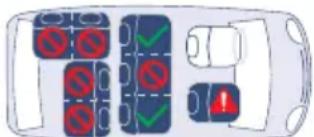
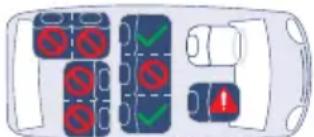
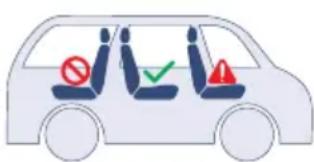
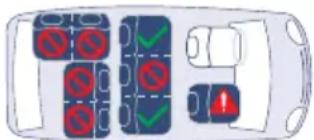
SEATING POSITIONS IN THE VEHICLE
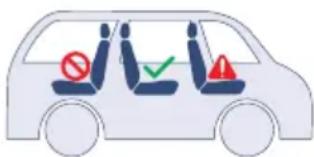

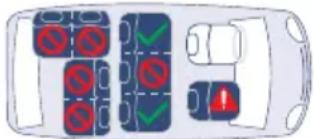

Suitable location for installing the child seat.

Not suitable location for installing the child seat.

Suitable only if the seat is equipped with ISOFIX connectors.
WARNING! SAFETY INSTRUCTIONS!
WARNING! NEVER LEAVE THE CHILD UNATTENDED!
WARNING! DO NOT USE ANY SUPPORT CONTACT POINTS OTHER THAN THOSE DESCRIBED IN THE MANUAL AND MARKED ON THE CAR SEAT!
WARNING! WHEN INSTALLING THE SEAT IN THE "REAR-FACING" POSITION, NEVER PLACE IT ON A PASSENGER SEAT EQUIPPED WITH AN ACTIVE AIRBAG! THIS MAY RESULT IN DEATH OR SERIOUS INJURY!
✿ WARNING! NEVER INSTALL THE SEAT IN A FORWARD-FACING POSITION BEFORE THE CHILD IS OLDER THAN 15 MONTHS!
✿ WARNING! THE VEHICLE SEAT BELTS HOLDING THE CHILD SEAT TO THE CAR SEAT MUST BE TIGHTENED AND SECURED!
WARNING! THE HARNESS BELTS OF THE SEAT HOLDING THE CHILD MUST BE WELL TIGHTENED AND SECURED, ADJUSTED TO THE CHILD'S BODY AND SIZE SO THAT THEY FIT PROPERLY.
✿ WARNING! THE LAP BELT MUST BE POSITIONED LOW AND ANY PROTECTIVE BARRIER MUST BE INSTALLED CORRECTLY TO FIRMLY SECURE THE CHILD'S PELVIS WITHOUT APPLYING PRESSURE.
✿ WARNING! DO NOT MAKE ANY CHANGES, ADDITIONS, OR MODIFICATIONS TO THE CAR SEAT WITHOUT THE APPROVAL OF THE NOTIFIED BODY! FAILURE TO FOLLOW THE MANUFACTURER'S INSTRUCTIONS IS DANGEROUS!
WARNING! KEEP AWAY FROM FIRE!
✿ Mounting the product onto the vehicle seat and securing the child must be performed only by an adult.
The rigid parts and the plastic components of the child restraint system must be placed and installed in such a way that, under normal operating conditions of the vehicle, they cannot become trapped by a moving seat or by a door of the vehicle.
Do not allow the belts of the child seat to become twisted, frayed, or torn; buckles and locks must always be intact and properly fastened.
If you find any insecurity or defect in the structure, buckles, belts, locking mechanisms of the seat, or the ISOFIX connectors, stop using it until the defective parts are repaired or replaced.
❖ Replace the seat with a new one if it has been subjected to crash forces in an accident.
Do not use a second-hand seat, as you do not know what loads it may have been subjected to.
Do not use the seat without its cover and do not replace it with another one unless it is provided by the manufacturer, as it is an integral part of the child restraint system.
✿ Any luggage or other objects that may cause injury in the event of a crash must be properly secured. Remove or secure at a safe distance from the seat and the child any luggage that may cause injury in the event of sudden braking or an accident during travel.
Always check whether the seat is firmly attached to the vehicle seat, even when you are not placing a child in it. A loose seat, even without a child in it, can cause injury in a crash.
Do not place any additional padding in the seat except those provided by the manufacturer.
Do not use spare parts or other components not supplied by the manufacturer. The manufacturer does not take responsibility for safety if spare parts other than those original or recommended are used.
- Keep this manual in the designated storage compartment of the seat or in the vehicle in which the seat is used.
Do not expose the seat to direct sunlight to prevent potential burns to the child, deformation of the seat, and especially damage to plastic parts.
The seat does not replace a bassinet or bed. When the child needs to sleep, place them in a suitable stroller, bassinet, or bed.
EN
Do not attach any additional cords or strings to the product to avoid the risk of strangulation.
✿ Never place the seat on beds, sofas, or similar soft surfaces.
Do not allow children to play with the product.
Do not remove the labels and warnings affixed to the seat. They are important for every user.
- Keep plastic packaging away from children to avoid the risk of suffocation.
Use only the USB cable provided by the manufacturer.
- Check the USB cable regularly. If damaged, discontinue use immediately.
INSTRUCTIONS FOR USE OF THE RESTRAINT SYSTEM
This is an enhanced i-Size child restraint system, universal ISOFIX type, for children from 40 to 150 cm.
| Model | Child height | Installation direction | Installation method Approved type | |
| CLIMA AIR | 40 - 105 cm | Rear-facing | ISOFIX + Support leg + Seat harness | I-Size universal ISOFIX |
| 76 - 105 cm | Forward-facing | ISOFIX + Support leg + Seat harness | ||
| 100-150 cm | Forward-facing | 3-point vehicle seat belt + ISOFIX attachment | I-Size booster seat | |
| 3-point vehicle seat belt | ||||
IMPORTANT! Follow precisely the instructions and the installation sequence provided in the text and illustrations of this manual. Check the security of the fastening after completing each step! ALWAYS CHECK THE SECURITY OF THE BELT FASTENING! After each installation, make sure the vehicle seat belts are not twisted and are in the correct position.
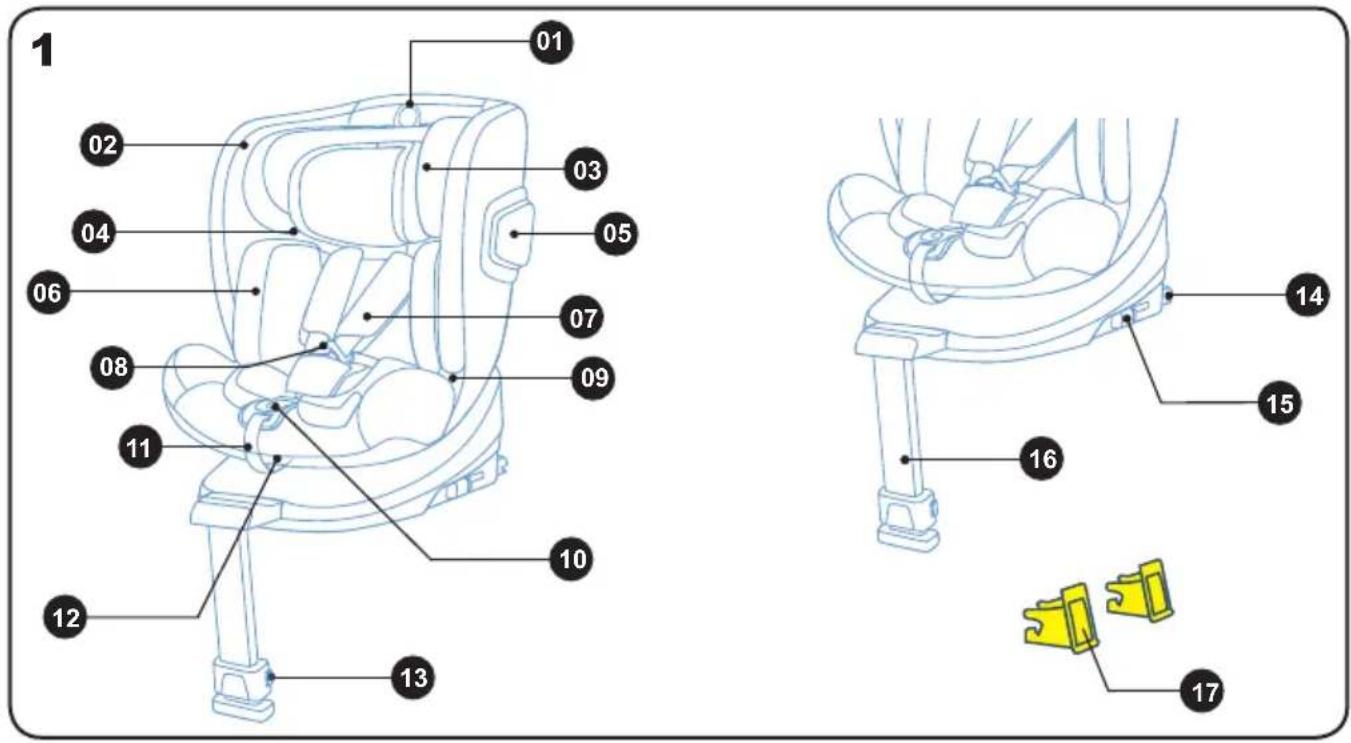
1. MAIN COMPONENTS
- Headrest adjustment loop
- Seat cover
- Headrest
- Vehicle seat belt guide
- Side impact protection
- Additional cushion
- Shoulder harness pad
- Harness system
- Lap belt guide
- Belt release button
- Harness adjustment strap
- Support leg adjustment button
- ISOFIX connector
- ISOFIX connector release button
-
Support leg
-
360° rotation system/recline adjustment handle
-
ISOFIX connector guide
- Fabric installation element
- USB cable (not shown in the illustration).
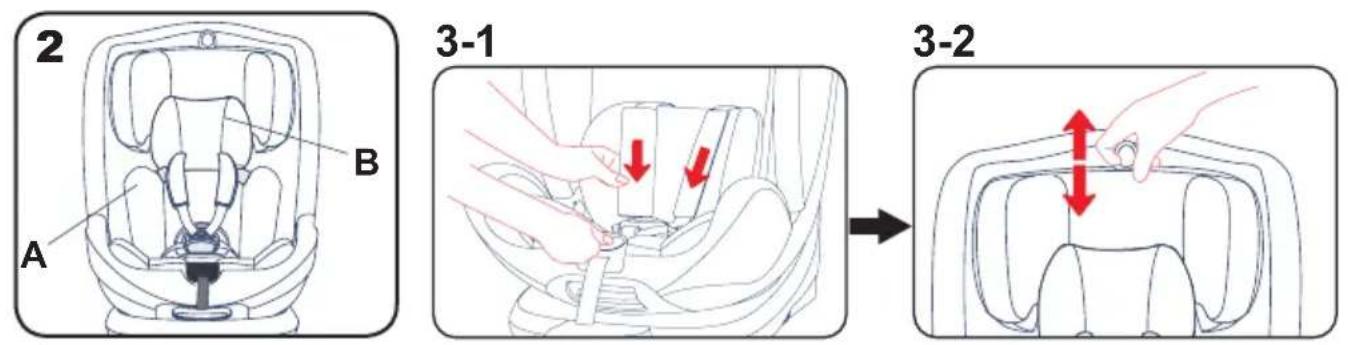
2. ADDITIONAL CUSHION AND HEAD CUSHION
For a child with a height of ≤ 75 cm, the additional cushion A and the head cushion B must be used in the seat.
When the child's height is above 75 cm and up to 150 cm, remove the additional cushion A and the head cushion B from the seat.
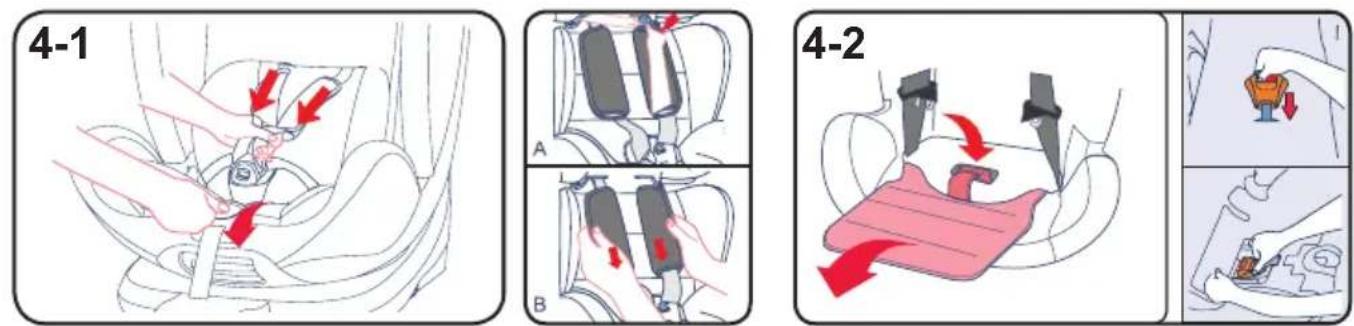
3. HEADREST ADJUSTMENT
3-1 – Loosen the shoulder harnesses by pressing the harness adjustment button and pulling the shoulder straps as far forward as possible.
3-2 – Pull the headrest adjustment loop to lift the headrest upward. Pull the loop and push the headrest back to slide it downward. A "click"
sound will be heard when the headrest locks into position.
IMPORTANT! Before installing the seat, adjust the headrest to fit your child's height.
The headrest can be adjusted to 10 positions.
Select the height so that the headrest is positioned as close as possible to the child's shoulders.
If the correct position falls between two levels, use the higher one.
IMPORTANT! Make sure the headrest is securely locked in the selected position by gently sliding it downward.
4. REMOVAL OF THE 5-POINT HARNESS SYSTEM
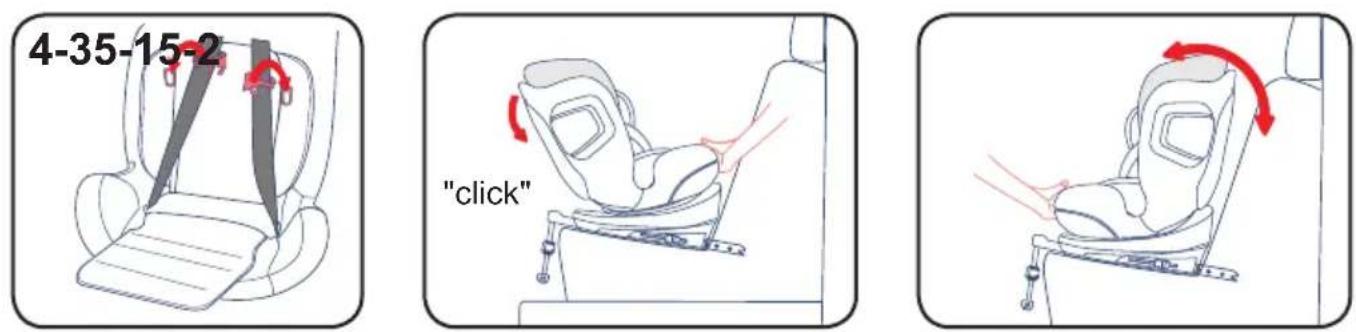
4-1 – Loosen the shoulder harness straps (see 3-1). Detach the shoulder straps (A) and pull them out (B).
4-2 – Place the buckle tongue into the compartment at the base of the seat.
4-3 - Store the harness system at the back of the seat cover.
5. SEAT RECLINE ADJUSTMENT (5 POSITIONS)
To change the position, grip the handle at the front of the seat and push or pull it into the desired position until you hear a distinct "click" sound.
5-1 – Reclining in rearward-facing position:
- For child height 40–105 cm, use recline positions: 1, 2, 3, 4, 5.
5-2 – Reclining in forward-facing position:
- For child height 76–105 cm, use positions: 1, 2, 3, 4, 5.
- For child height 100–150 cm, only position 1 may be used.
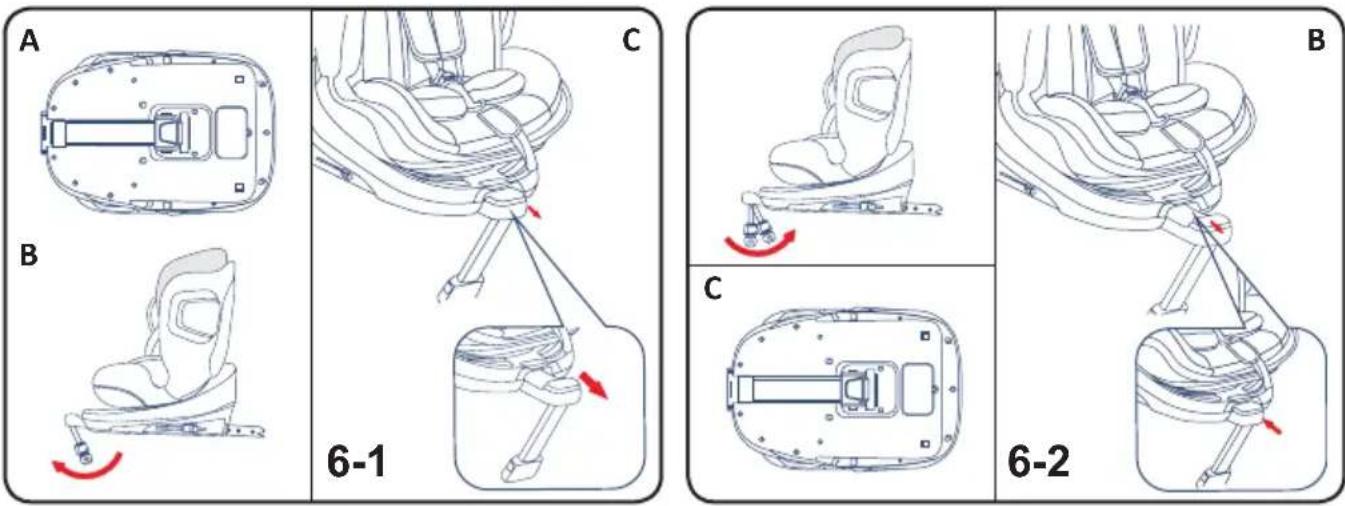
6. UNFOLDING AND STOWING THE SUPPORT LEG
The support leg is used for children with a height of 40–105 cm.
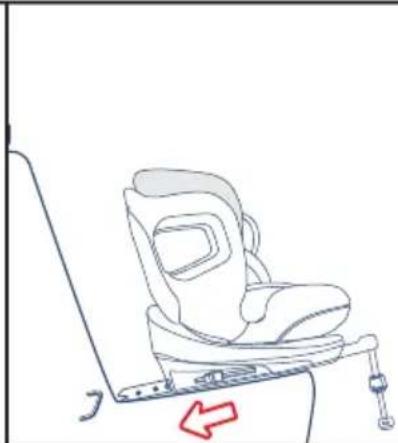
6-1 - Move the support leg outward from the bottom of the seat (A and B). When the support leg is rotated to a 45^ angle, pull out the entire panel (C).
WARNING! The seat can rotate only support leg is fully unfolded.
6-2 – Rotate the support leg inward toward the seat. When it reaches a 45^ angle, push the
entire panel inward until it locks completely. Finally, fold the support leg back into the slot at the bottom of the seat.
WARNING! The support leg is correctly lo when the indicator is fully green.
Note: If the indicator is red, repeat the installation by following the steps described above.
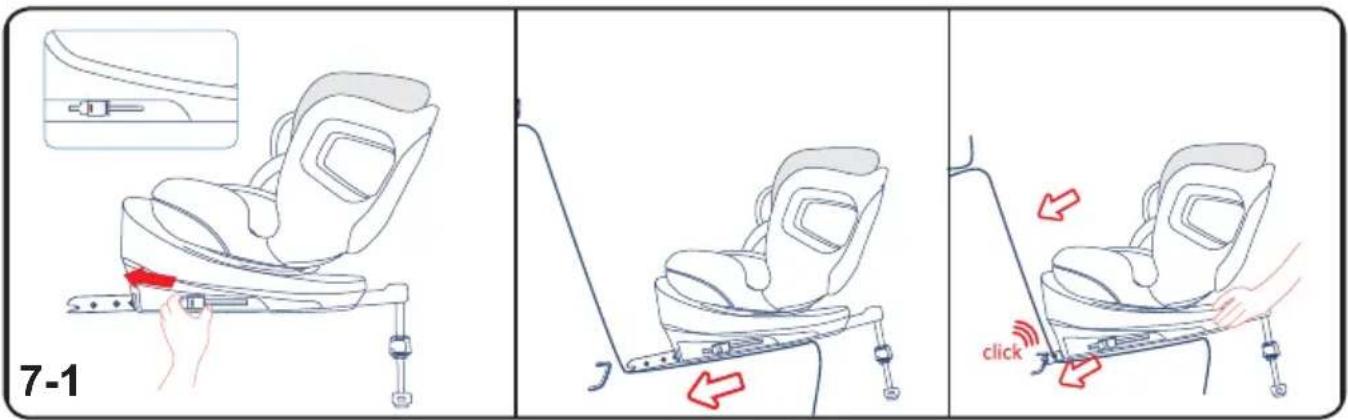
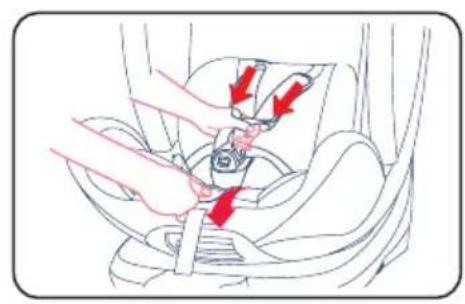
7. INSTALLING THE CHILD SEAT FOR A CHILD WITH A HEIGHT OF 40–105 CM, REAR-FACING, USING ISOFIX, SUPPORT LEG, AND THE 5-POINT HARNESS SYSTEM
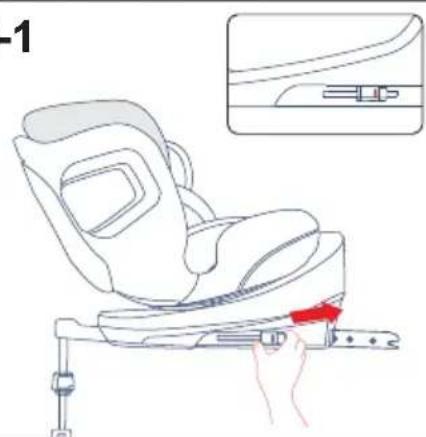
7-1 – Unfold the support leg until it locks into place. Press the ISOFIX release button and slide the ISOFIX connectors out as far as possible.
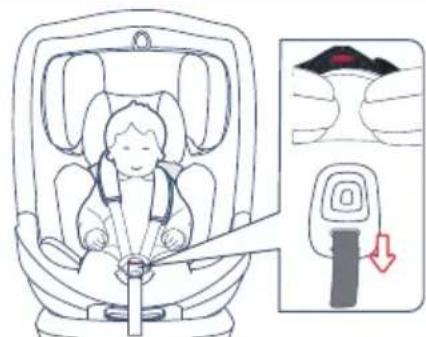
WARNING! The ISOFIX connectors are correctly locked when both indicators are fully green.
Note: If the indicators are red installation steps as described above.
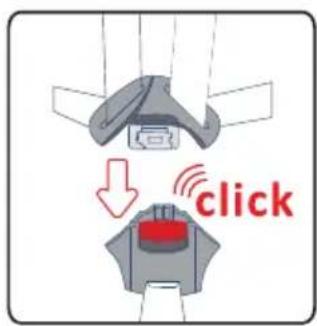
Attach the ISOFIX connectors to the vehicle's anchor points and press until you hear a "click" sound.
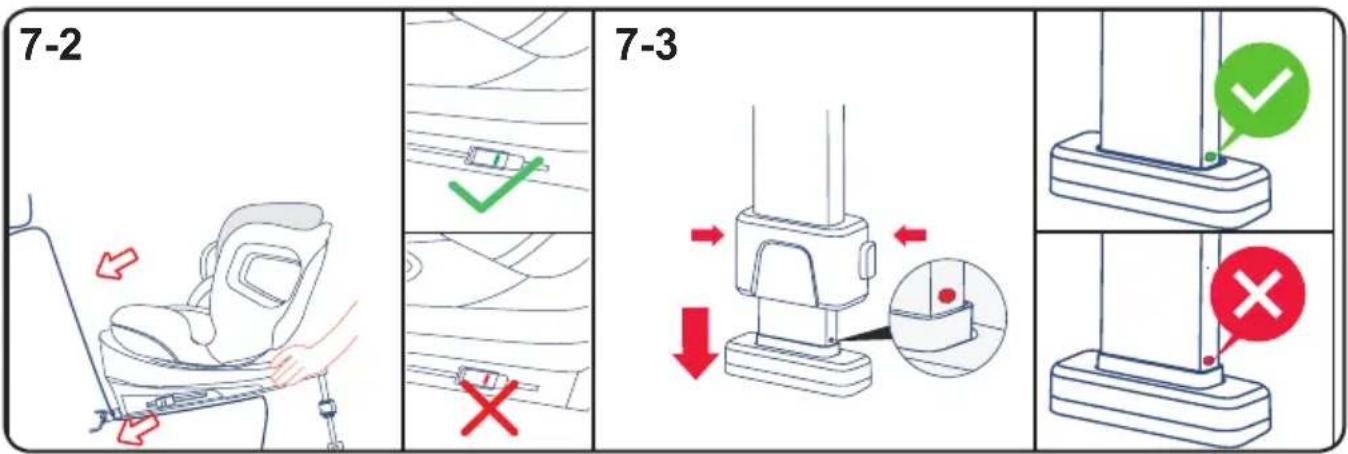
7-2 – Hold the seat base to check if it is firmly attached or if it wobbles. At the same time, observe the red/green ISOFIX indicator.
If the seat wobbles and the ISOFIX connectors are not locked, please repeat the steps above and reinstall.
7-3 – Press the support leg adjustment button and extend the support leg until it makes firm contact with the floor. Observe the ISOFIX red/green indicator to confirm that the installation is correct.
WARNING! The support leg is properly fixed when the indicator is fully green.
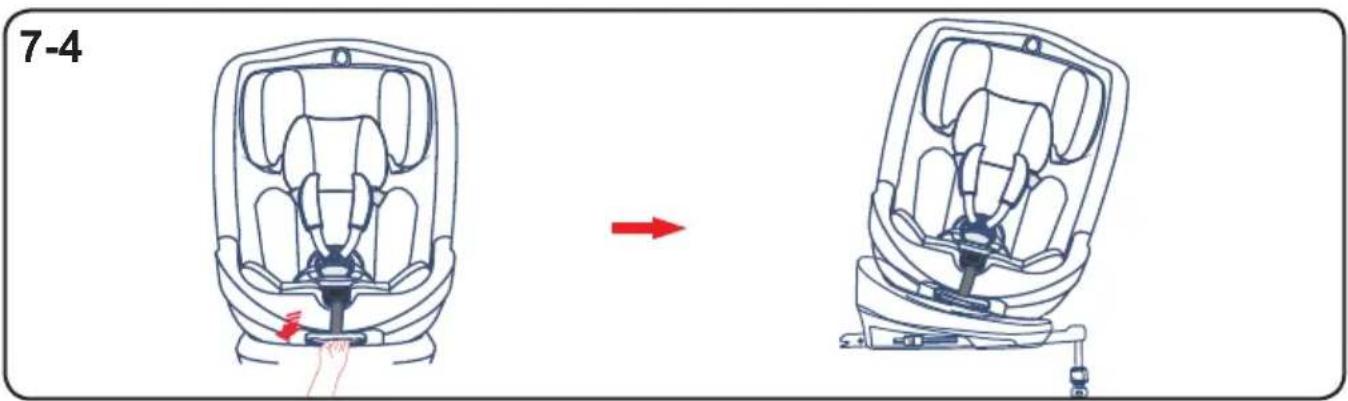
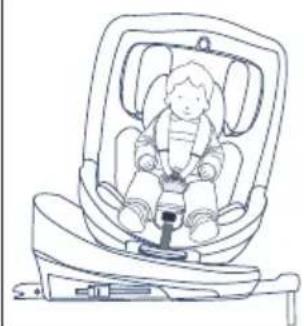
7-4 – Pull the rotation handle (1) and turn the seat to a side-facing position to make placing the child easier.
WARNING! Before every trip, ensure the seat is locked in the selected position.
WARNING! WHEN DRIVING, THE SEAT MUST BE LOCKED IN THE REAR-FACING POSITION ONLY!
Note: The seat can rotate 360^ freely (at any angle).
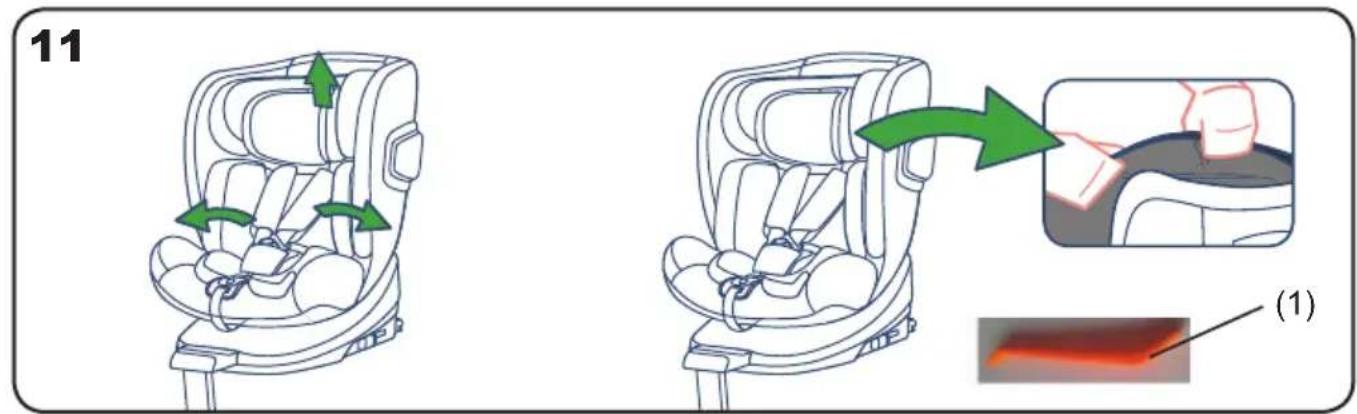
When the loosen the shoulder straps (see step 3-1) and pull them forward as much as possible. Unbuckle the harness by pressing the red button on the buckle and place the straps to the sides of the seat.
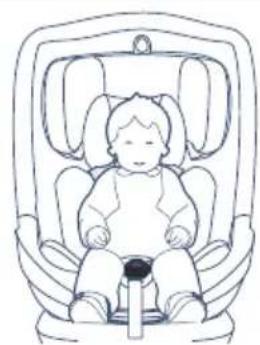
7-6 – Place the child into the car seat.
WARNING! The headrest must be adj that the shoulder straps are at shoulder level or slightly above.
Connect the two metal buckle tongues and insert them into the central buckle until you hear a "click" sound.
7-7 – Pull the adjustment strap to tighten the harness so that it snugly fits the child's body without pressing or causing discomfort.
The recommended distance between the child's body and the harness is two fingers (approximately
2–3 cm). The lap belts should be positioned as low as possible, close to the crotch, not across the stomach, to ensure the pelvis is securely held.
WARNING! Make sure the harness straps are not twisted and securely fit the child without pressing too tightly!
Pull the rotation handle (1) and turn the seat to the rear-facing position.
Pull the rotation button to adjust the seat direction.
Only the rear-facing position is allowed for children under 15 months.
WARNING! For children under 15 months, the seat must be in the REAR-FACING position!
8. INSTALLING THE CHILD SEAT FOR A CHILD WITH A HEIGHT OF 76–105 CM, FORWARD-FACING, USING ISOFIX, SUPPORT LEG, AND THE 5-POINT HARNESS
8-1 – Unfold the support leg until it locks. Press the ISOFIX release button and slide the ISOFIX connectors fully outward.
WARNING! The ISOFIX connectors are locked when both indicators are fully green.
Note: If the indicators are red, reinstall the seat by following the steps above.
Attach the ISOFIX connectors to the anchorage points of the car seat and press until you hear a "click" sound.
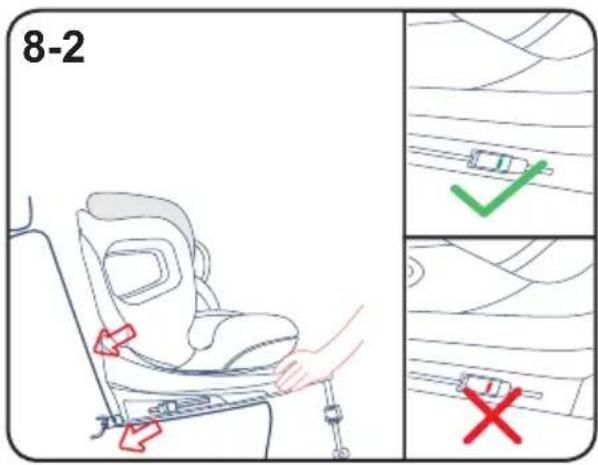
8-2 – Hold the base of the seat to check whether it is securely attached or wobbly. While doing so, observe the red/green ISOFIX indicator.
If the seat wobbles and the ISOFIX connectors are not secured, repeat the installation steps above.
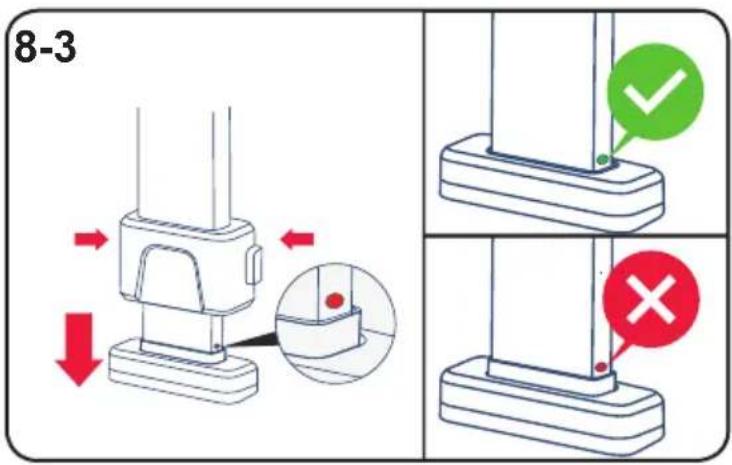
8-3 – Press the support leg adjustment button and extend the leg until it rests firmly on the vehicle floor. Observe the red/green ISOFIX indicator to confirm correct installation.
WARNING! The support leg is correctly secured when the indicator is fully green.
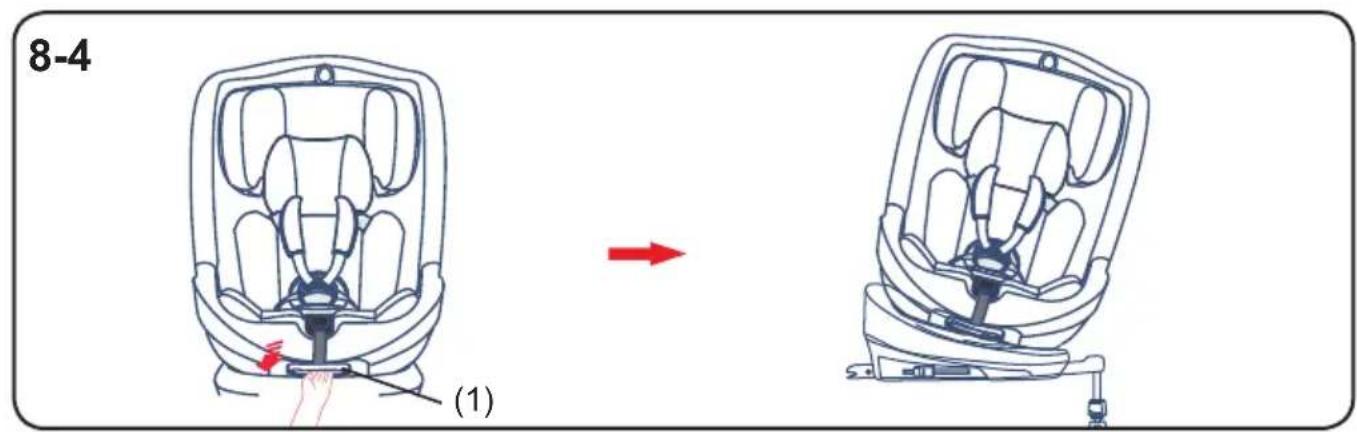
8-4 - Pull the rotation handle (1) and turn the seat is tested so to the side to make placing the child into the seat easier.
WARNING! Before every trip, ensure the seat is locked into the selected position.
WARNING! DURING DRIVING, THE SEAT MUST BE LOCKED IN THE FORWARD-FACING POSITION!
Note: The seat can rotate 360^ freely (at any angle).
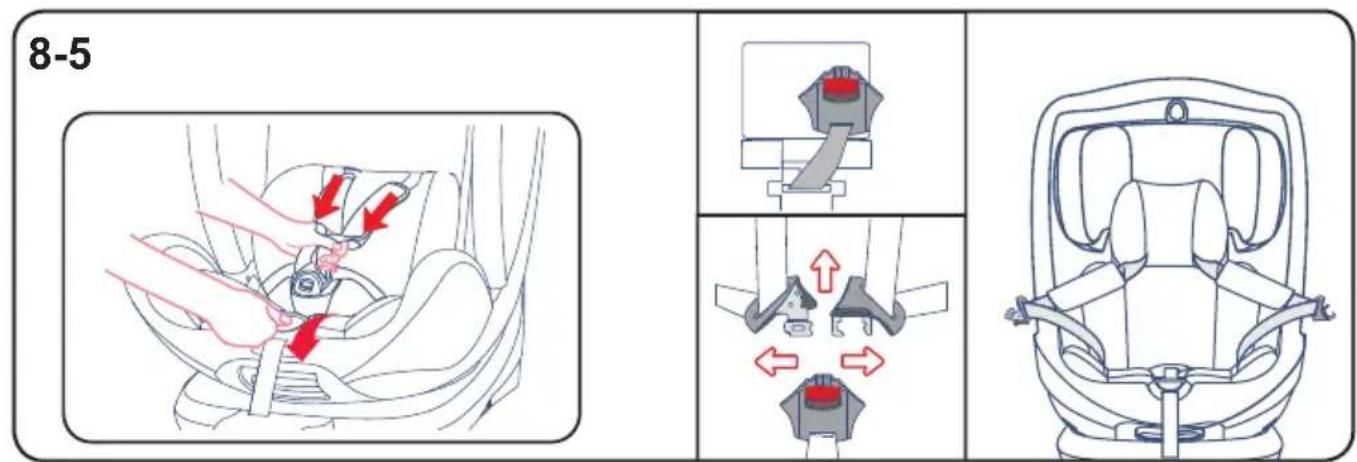
8-5 – Loosen the shoulder straps (see step 3-1) and pull them forward. Unbuckle the harness by pressing the red button on the buckle and place the straps to the side of the seat.
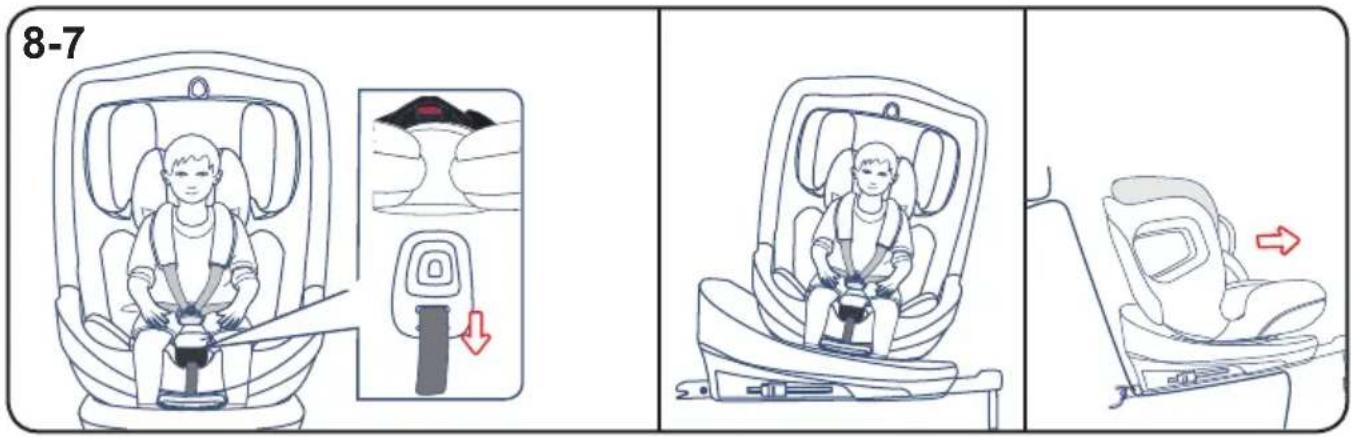
8-6 - Place the child into the car seat.
WARNING! The headrest must be adjuste the shoulder belts are at or just above the child's shoulder level.
Connect the two metal buckle tongues and insert them into the central buckle until you hear a "click" sound.
8-7 – Pull the adjustment strap so that the harness fits the child's body snugly, without pressure or discomfort. The recommended distance between the harness and the child's body is about two fingers (approx. 2–3 cm).
The waist belts should be positioned as low as possible, near the crotch, and not across the stomach, to keep the pelvis securely restrained.
WARNING! Make sure the harness straps are not twisted and fit the child securely without being too tight!
Pull the rotation handle and place the seat in the forward-facing position.
WARNING! Both rear-facing and forward-facing positions are allowed for children 76–105 cm tall, but the forward-facing position is permitted only for children over 15 months of age!
9. INSTALLING THE CHILD SEAT FOR A CHILD WITH A HEIGHT OF 100–150 CM, FORWARD-FACING, USING ISOFIX AND THE VEHICLE'S 3-POINT SEAT BELT
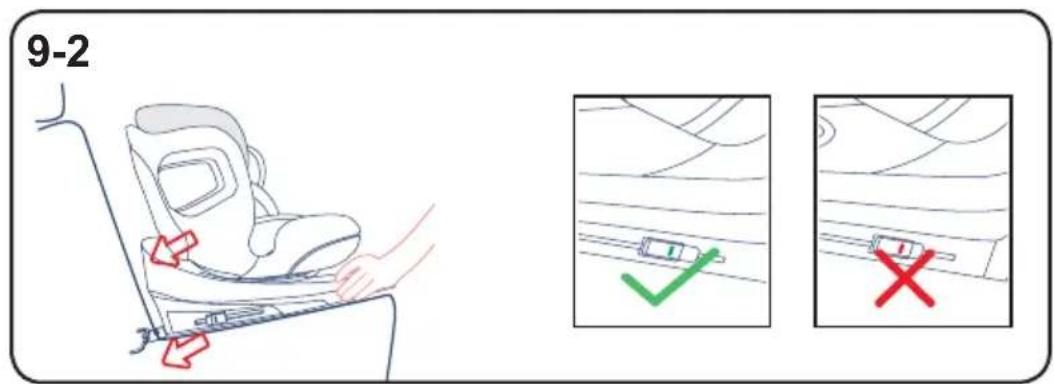
9-1 – Unfold the support leg until it locks. Press the ISOFIX release button and slide the ISOFIX connectors fully outward.
WARNING! The ISOFIX connectors are locked when both indicators are fully green.
Note: If the indicators are red, reinstall the seat by following the steps above.
Attach the ISOFIX connectors to the anchorage points of the car seat and press until you hear a "click" sound.
WARNING! For children with a height of 100–150 cm in the forward-facing position, the support leg must NOT be used!
9-2 – Hold the base of the seat to check whether it is securely fastened or wobbly. Watch the ISOFIX red/green indicator.
If the seat is loose and the ISOFIX connectors are not locked, repeat the steps above and reinstall it.
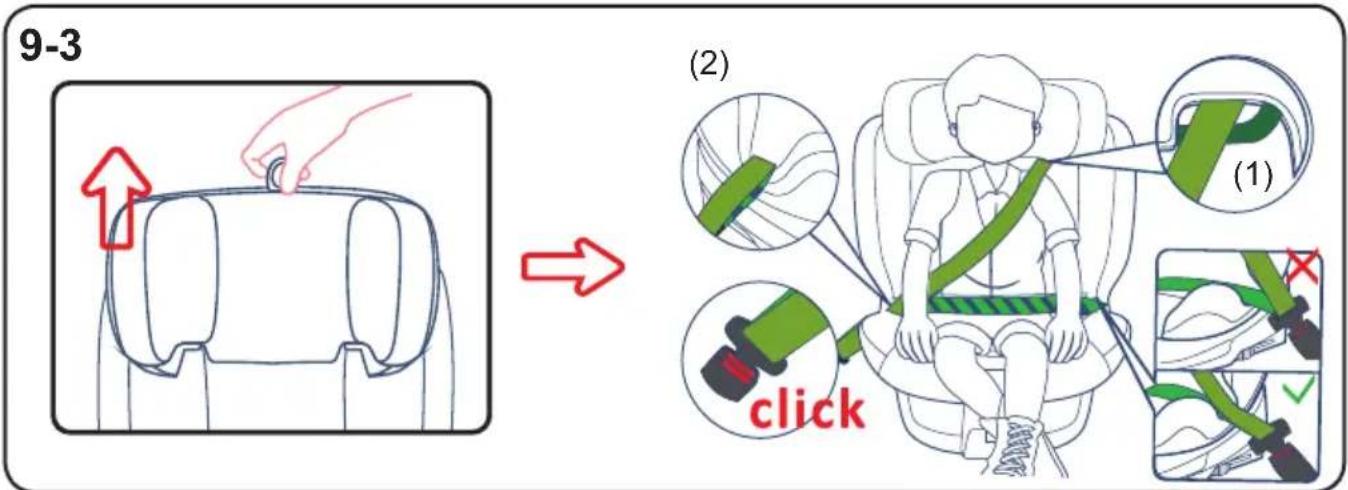
9-3 – Adjust the height of the headrest according to your child's height. Thread the vehicle seat belt through the shoulder belt guide. Place the child in the seat and route the vehicle lap belt through the lap belt guide (2). Buckle the belt into the vehicle's seat belt buckle until you hear a "click".
WARNING! Make sure the lap belt runs low over the child's thighs, ensuring the pelvis is firmly secured. Pull the belt tight so it fits snugly against the child's body. The belts must be properly adjusted and not twisted.
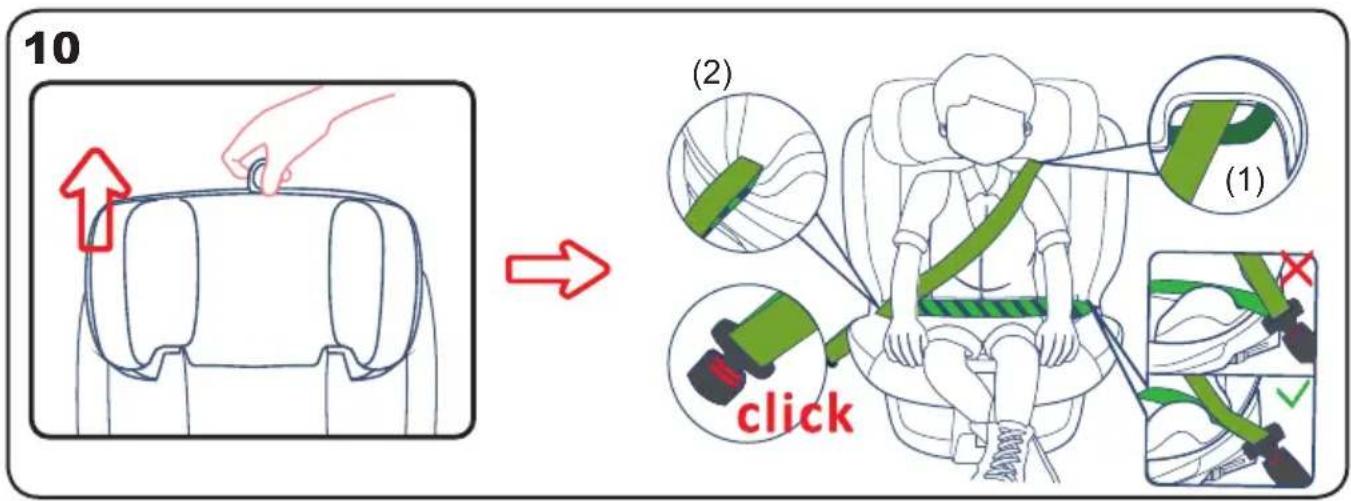
10. INSTALLING THE CHILD SEAT FOR A CHILD WITH A HEIGHT OF 100–150 CM, FORWARD-FACING, USING ONLY THE VEHICLE'S 3-POINT SEAT BELT
Adjust the headrest height according to your child's height. Thread the vehicle seat belt through the shoulder belt guide. Place the child in the seat and route the lap belt through the lap belt guide (2). Buckle the belt into the vehicle's seat belt buckle until you hear a "click".
WARNING! Make sure the lap belt runs low over the child's thighs, ensuring the pelvis is firmly secured. Pull the belt tight so it fits snugly against the child's body. The belts must be properly adjusted and not twisted.
11. REMOVING AND ATTACHING THE UPHOLSTERY
Adjust the headrest to the highest position and remove the additional padding.
Unbuckle the seat harness from the central buckle to remove the soft shoulder strap pads.
Carefully remove the upholstery of the headrest and seat.
To reattach the upholstery, follow the steps in reverse order. Use the plastic tool (1) to tuck the upholstery into the base of the seat.
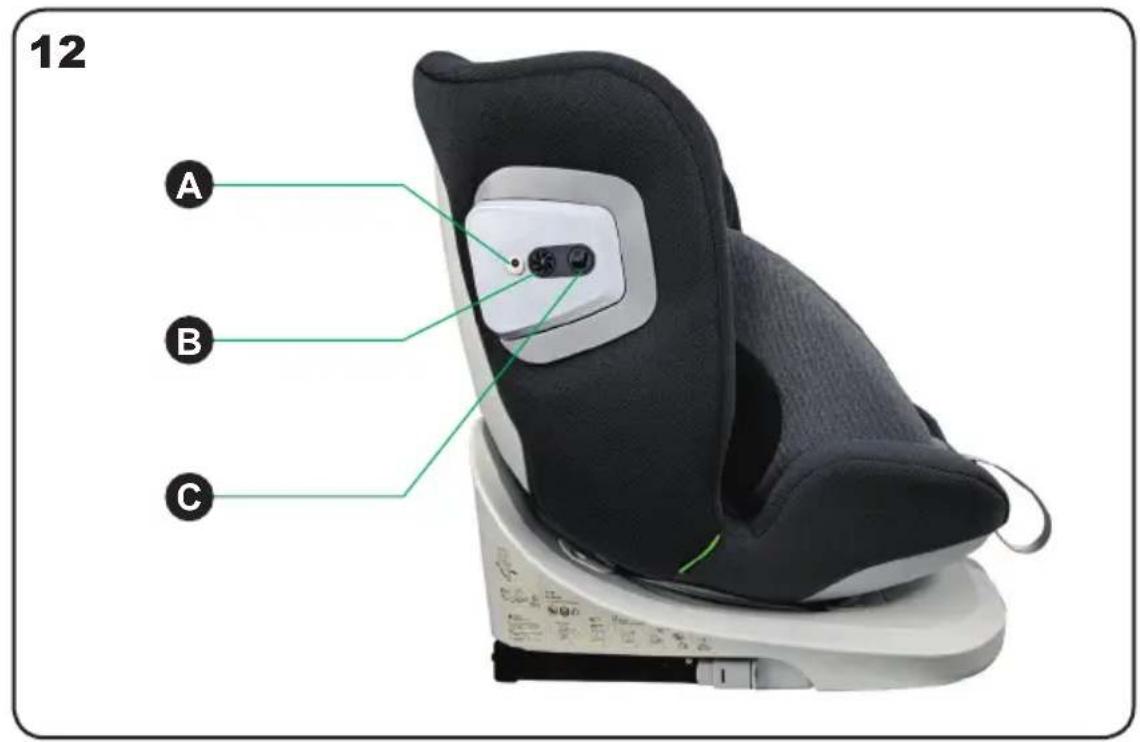
12. HEATING AND COOLING SYSTEM OF THE SEAT
This system requires the use of the supplied USB power cable (5V, 2A).
WARNING! Before connecting the power cable, make sure that the vehicle's USB port provides a voltage of 5V and a current of 2A. If necessary, use a suitable adapter!
Plug the USB cable into a 5V/2A car USB socket, then insert the charger into the seat's USB port (A).
To activate heating, press button C.
To activate cooling, press button B.
Note: Both buttons cannot be used simultaneously.
SIDE PROTECTION SYSTEM (SPS)
The additional SPS (Side Protection System) is designed to reduce the energy and impact force on the child's neck and head in the event of a side collision.
CARE AND MAINTENANCE INSTRUCTIONS
- Clean dirty plastic or metal parts with a soft cotton cloth or sponge dampened with water or mild detergent.
- Hand-wash the upholstery and soft pads at 30°C using a mild detergent.
Do not bleach!
Do not spin dry!
Do not tumble dry!
Do not iron!
Do not use aggressive cleaning agents containing abrasives, ammonia, bleach, or alcohol.
✿ After cleaning, allow the seat to fully dry before use or storage.
- Clean the belts externally only with mild soap and a damp cloth.
Do not soak or remove the labels! They contain important safety information.
- Store the product in a clean and dry place. Avoid exposure to environmental elements such as sunlight, rain, humidity, or sudden temperature changes.
In case of issues with normal use, contact authorized service centers for consultation or repair.
EN
ATTENTION! After the end of this product's service life, do not dispose of it with ordinary household waste. Instead, take it to an official collection point for proper recycling. Waste generated from damaged electrical and electronic equipment must be collected separately. Do not throw such waste into containers for mixed household waste.
Dispose of it only at designated collection sites. This will be your valuable contribution to environmental protection and to reducing the potential harmful effects of substances contained in batteries and adapters on the environment and human health.
A TERMÉK BIZTONSÁGOS HASZNÁLATÁNAK BIZTOSÍTÁSA ÉRDEKÉBEN KÖVESSE A FELHASZNÁLÓI KÉZIKÖNYVBEN TALÁLHATÓ ÖSSZES FIGYELMEZTETÉST, UTASÍTÁST ÉS AJÁNLÁST!
NIJEDAN SUSTAV NE MOŽE JAMČITI APSOLUTNU ZAŠTITU OD OZLJEDA U SLUČAJU SUDARA ILI NESREĆE! VOZITE S POSEBNIM OPREZOM, OSOBITO KADA SE U VOZILU NALAZI DIJETE!
ZA SIGURNO KORIŠTENJE OVOG PROIZVODA, PRIDRŽAVAJTE SE UPOZORENJA, UPUTA I PREPORUKA NAVEDENIH U OVOM PRIRUČNIKU!
NEPRAVILNA UPORABA SJEDALA SMANJUJE NJEGOVU ZAŠTITNU I SIGURNOSNU FUNKCIJU! NEPOŠTIVANJE UPUTA IZ OVOG PRIRUČNIKA POVEĆAVA RIZIK OD TEŠKIH OZLJEDA ILI SMRTI!
UPOZORENJE!
!NIKADA NE POSTAVLJAJTE SJEDALO U SMJERU VOŽNJE S DJETETOM OKRENUTIM PREMA NAPRIJED PRIJE NEGO ŠTO DIJETE NAVRŠI 15 MJESECI!
! NIKADA NE KORISTITE SJEDALO NA-SUVO; OPREMLJENOM AKTIVNIM PREDNJIM ZRAČNIM JASTUKOM! TO MOŽE REZULTIRATI SMRTJU ILI TEŠKIM OZLJEDAMA!
NEMOJTE KORISTITI NITI JEDNU DRUGU TOČKU OSLONCA OSIM ONIH OPISANIH U UPUTAMA I OZNAČENIH NA AUTOSJEDALICI!
POZICIJE SJEDENJA U VOZILU


UPOZORENJE! SIGURNOSNE UPUTE!
НИЈЕДАН СИСТЕМ НЕ МОЖЕ ГАРАНТОВАТИ АПСОЛУТНУ ЗАШТИТУ ОД ПОВРЕДА У СЛУЧАЈУ СУДАРА ИЛИ НЕЗГОДЕ! ВОЗИТЕ СА ПОВЕЋАНОМ ОПРЕЗНОШЋУ, НАРОЧИТО КАДА ЈЕ ДЕТЕ У ВОЗИЛУ!


ASNJË SISTEM NUK MUND TË GARANTOJË MBROJTJE ABSOLUTE KUNDËR LËNDIMEVE NË RAST PËRPLASJEJE APO AKSIDENTI! NGISNI ME KUJDES TË SHTUAR, VEÇANËRISHT KUR NË MAKINË KA NJË FËMIJË!
PËR TË SIGURUAR PËRDORIMIN E SIGURT TË KËTIJ PRODUKTI, NDIQNI PARALAJMËRIMET, UDHËZIMET DHE REKOMANDIMET NË KËTË UDHËZUES!
PËRDORIMI I PAPËRSHTATSHËM I ULËSES DO TË ULI FUNKSIONET E SAJ MBROJTËSE DHE TË SIGURISË! MOSNDAJEKJA E UDHËZIMEVE NË KËTË MANUAL RRIT RREZIKUN PËR LËNDIME TË RËNDA OSE VDEKJE!
PARALAJMËRIM!
KURRË MOS E INSTALONI ULËSEN NË POZICIONIN PËRPARA ME FËMIJËN TË KTHYER PËRPARA PA E KALUAR MOSHËN 15 MUAJSH!
KURRÈ MOS E PËRDORNI ULËSEN NË VENDIN E PASAGJERIT QË K A AIRBAG AKTIV PËRPARA! KJO MUND TË SJELLË VDEKJE OSE LËNDIME TË RËNDA!
MOS PËRDORNI ASNJË PIKË MBËSHTETËSE PËRVEÇ ATYRE TË PËRSHKRUARA NË UDHËZUESIN E PËRDORIMIT DHE TË SHËNUARA NË ULËSEN E MAKINËS!
POZICIONET E ULJEVE NË AUTOMJET


NICIUN SISTEM NU POATE GARANTA PROTECTIE ABSOLUTĂ ÎMPOTRIVA
ACCIDENTĂRILOR ÎN CAZUL UNEI COLIZIUNI SAU ACCIDENT!
CONDUCETI CU PRUDENTĂ SPORITĂ, MAI ALES
CÂND'UN COPIL SE AFLÃ ÎN VEHICUL!
PENTRU A ASIGURA UTILIZAREA ÎN SIGURANTĂ A ACESTUI
PRODUS, URMATI AVERTISMENTELE, INSTRUCTIUNILE
ŞI RECOMANDĂRILE DIN ACEST MANUAL!
UTILIZAREA NECORESPUNZĂTOARE A SCAUNULUI VA
REDUCE FUNCTIILE SALE DE PROTECTIE SI SIGURANTĂ!
NERESPECTAREA INSTRUCTIUNILOR DIN ACEST MANUAL
CRESTE RISCUL DE ACCIDENTARE GRAVÀ SAU DECES!
AVERTISMENT!
NU INSTALATI NICIODATĂ SCAUNUL ÎN POZITIA CU FATA SPRE ÎNAINTE, CU COPILUL ORIENTAT ÎNAINTE, ÎNAINTE CA ACESTA SĂ AIBĂ VĂRSTA DE 15 LUNI!
! NU UTILIZATI NICIODATĂ SCAUNUL PE UN SCAUN PASAGER ECHIPAT CU AIRBAG FRONTAL ACTIV! ACEST LUCRU POATE DUCE LA DECES SAU ACCIDENTARE GRAVĂ!
NU UTILIZATI NICIUN PUNCT DE SPRIJIN ÎN AFARA CELOR DESCRISE ÎN MANUALUL DE INSTRUCTIÚNI ŞI MARCATE PE SCAUNUL AUTO!
POZITII DE SEDERE ÎN VEHICUL


NENHUM SISTEMA PODE GARANTIR UMA PROTEÇÃO ABSOLUTA CONTRA LESÕES EM CASO DE COLISÃO OU ACIDENTE! CONDUZA COM EXTREMA CUIDADO, ESPECIALMENTE QUANDO HOUVER UMA CRIANÇA NO VEÍCULO!
PARA GARANTIR O USO SEGURO DESTE PRODUTO, SIGA OS AVISOS, INSTRUÇÕES E RECOMENDAÇÕES DESTE MANUAL!
O USO INCORRETO DO ASSENTO REDUZIRÁ SUAS FUNÇÕES DE PROTEÇÃO E SEGURANÇA! NÃO SEGUIR AS INSTRUÇÕES DESTE MANUAL AUMENTA O RISCO DE LESÕES GRAVES OU MORTE!
AVISO!
NUNCA INSTALE O ASSENTO NA POSIÇÃO VIRADA PARA A FRENTE COM A CRIANÇA VIRADA PARA A FRENTE ANTES DE ESTA TER MAIS DE 15 MESES!
! NUNCA UTILIZE O ASSENTO NUM BANCO DO PASSAGEIRO EQUIPADO COM AIRBAG FRONTAL ATIVO! ISSO PODE RESULTAR EM MORTE OU LESÕES GRAVES!
NÃO UTILIZE NENHUM PONTO DE APOIO DIFERENTE DOS DESCRITOS NO MANUAL DE INSTRUÇÕES E MARCADOS NO ASSENTO AUTO!

In case of doubt, consult the manufacturer or retailer of the child restraint system.
GEEN ENKEL SYSTEEM KAN ABSOLUTE BESCHERMING GARANDEREN TEGEN LETSEL BIJ EEN BOTSING OF ONGEVAL! RIJD MET EXTRA VOORZICHTIGHEID, VOORAL WANNEER ER EEN KIND IN HET VOERTUIG ZIT!
OM EEN VEILIG GEBRUIK VAN DIT PRODUCT TE GARANDEREN, VOLG DE WAARSCHUWINGEN, INSTRUCTIES EN AANBEVELINGEN IN DEZE HANDLEIDING!
ONGESCHIKT GEBRUIK VAN HET AUTOSTOELTJE VERMINDERT DE BESCHERMENDE EN VEILIGHEIDSFUNCTIES! HET NIET VOLGEN VAN DE INSTRUCTIES IN DEZE HANDLEIDING VERGROOT HET RISICO OP ERNSTIG LETSEL OF OVERLIJDEN!
WAARSCHUWING!
INSTALLLEER HET AUTOSTOELTJE NOOIT IN DE VOORWAARTSE POSITIE MET HET KIND VOORWAARTS GERICHT VOORDAT HET KIND OUDER IS DAN 15 MAANDEN!
GEBRUIK HET AUTOSTOELTJE NOOIT OP EEN PASSAGIERSSTOEL DIE IS UITGERUST MET EEN ACTIEVE FRONTAIRBAG! DIT KAN LEIDEN TOT DODELIJK OF ERNSTIG LETSEL!
GEBRUIK GEEN ENKELE ANDERE CONTACT- OF STEUNPUNTEN DAN DIEGENE DIE IN DE GEBRUIKSAANWIJZING WORDEN BESCHREVEN EN OP HET AUTOSTOELTJE ZIJN AANGEGEVEN!
ZITPOSITIES IN HET VOERTUIG
WAARSCHUWING! VEILIGHEIDSINSTRUCTIES!
ŽÁDNÝ SYSTÉM NEMŮŽE ZARUČIT ABSOLUTNÍ OCHRANU PŘED ZRANĚNÍM V PŘÍPADĚ NÁRAZU NEBO NEHODY! JEZDĚTE ZVÝŠENOU OPATRNOSTÍ, ZVLÁŠTĚ POKUD JE VE VOZIDLE DÍTĚ!
PRO ZAJIŠTĚNÍ BEZPEČNÉHO POUŽÍVÁNÍ TOHOTO VÝROBKU DODRŽUJTE VAROVÁNÍ, POKYNY A DOPORUČENÍ UVEDENÉ V TÉTO PŘÍRUČCE!
NESPRÁVNÉ POUŽÍVÁNÍ AUTOSEDAČKY SNÍŽÍ JEJÍ OCHRANNÉ A BEZPEČNOSTNÍ FUNKCE! NEDODRŽENÍ POKYNŮ V TÉTO PŘÍRUČCE ZVYŠUJE RIZIKO VÁŽNÉHO ZRANĚNÍ NEBO ÚMRTÍ!
VAROVÁNÍ!
NIKDY NEINSTALUJTE SEDAČKU V POLOZE PO SMĚRU JÍZDY S DÍTĚTEM ČELEM VPŘED, DOKUD NEMÁ VÍCE NEŽ 15 MĚSÍCŮ!
NIK DY NE POU ŽÍVEJ T E SE DAČKU NA SEDA DLE SPOLUJ E Z DCE V YBAV ENÉ M AKTIVNÍM ČELNÍ M AIRBAGEM! MUŽE DOJÍT K ÚMRTÍ NEBO VÁ ŽNÉMU ZR ANĚNÍ!
NEPOUŽÍVEJTE ŽÁDNÉ JINÉ OPĚRNÉ BODY, NEŽ KTERÉ JSOU POPSÁNY V NÁVODU K POUŽITÍ A OZNAČENY NA AUTOSEDAČCE!
UMÍSTĚNÍ AUTOSEDAČKY VE VOZIDLE


odds30n03n5, 6m0n5 n0s0n5 ≤ 75 1d, 80n000000000000000000000000000000000000000000000000 A 05 05n5n5 05n5n5n B.