ISOFIX Genesis - Car seat Chipolino - Free user manual and instructions
Find the device manual for free ISOFIX Genesis Chipolino in PDF.

User questions about ISOFIX Genesis Chipolino
0 question about this device. Answer the ones you know or ask your own.
Ask a new question about this device
Download the instructions for your Car seat in PDF format for free! Find your manual ISOFIX Genesis - Chipolino and take your electronic device back in hand. On this page are published all the documents necessary for the use of your device. ISOFIX Genesis by Chipolino.
USER MANUAL ISOFIX Genesis Chipolino
natural_image
Illustration of a white car seat with lid and seatbelt (no text or symbols)ChipoliNo
продуктов номер / item number / cikkszám/ número de artículo / codice articolo / artikelnummer / numéro d'article / broj proizvoda / αριθμός προϊόντος / numărul produsului / número de produto / productnummer / číslo produktu/Збмфрулбн бддгбн:
SDKGE02xxxxx
UN Regulation №129/04
ФИГУРИ/ FIGURES/ ÁBRÁK/ CIFRAS/ FIGURE/ FIGUREN/ LES FIGURES/ ОБЛИЦИ/ ОБЛИЦИ/ FORMA/ FIGURE/ ФІГОYPEΣ/ FIGURILE/ FIGURAS/ FIGUREN/ OBRÁZKY / ๑๒๓๔๗๘๐

3-1
2)
3)
ФИГУРИ/ FIGURES/ ÁBRÁK/ CIFRAS/ FIGURE/ FIGUREN/ LES FIGURES/ ОБЛИЦИ/ ОБЛИЦИ/ FORMA/ FIGURE/ ФІГОYPEΣ/ FIGURILE/ FIGURAS/ FIGUREN/ OBRÁZKY / ๑๗๑๖๖๖๖
ВНИМАНИЕ!

Правилно монтиране.

TO ASSURE SAFE USAGE OF THIS PRODUCT FOLLOW ALL WARNINGS, INSTRUCTIONS AND RECOMMENDATIONS GIVEN IN THIS USER MANUAL!
| NOTEfor an enhanced child restraint system, child height: 125–150 cmThis is an enhanced child restraint system of the category “Universal booster seat”. It is approved in accordance with Regulation No. 129 for use primarily in i-Size compatible and universal seating positions in vehicles, as indicated by the vehicle manufacturer in the vehicle owner’s manual.In case of doubt, consult the manufacturer or retailer of the child restraint system . | |||
 | NO SYSTEM CAN GUARANTEE ABSOLUTE PROTECTION AGAINSTINJURY IN THE EVENT OF A COLLISION OR ACCIDENT!DRIVE WITH EXTRA CAUTION, ESPECIALLY WHENA CHILD IS IN THE VEHICLE! | ||
| TO ENSURE THE SAFE USE OF THIS PRODUCT, FOLLOW THE WARNINGS,INSTRUCTIONS, AND RECOMMENDATIONS IN THIS MANUAL! | |||
| IMPROPER USE OF THE SEAT WILL REDUCE ITSPROTECTIVE AND SAFETY FUNCTIONS!FAILURE TO FOLLOW THE INSTRUCTIONS IN THIS MANUALINCREASES THE RISK OF SERIOUS INJURY OR DEATH! | |||
| WARNING! | |||
| ONLY IN THE FORWARD-FACING POSITION! | |||
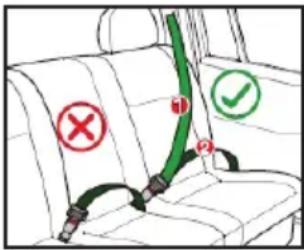 | WARNING!This child seat is suitable only for installation in vehicles equipped with APPROVED THREE-POINT RETRACTABLE SEAT BELTS, which comply with UN/ECE Regulation No. 16!1 Diagonal part of the vehicle seat belt2 Lap part of the vehicle seat belt | ||
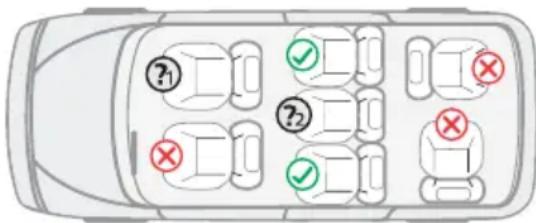
| SEATING POSITIONS IN THE VEHICLE | |||
 | √ | Correct installation. | |
| × | Incorrect installation. | ||
| ?1 | Do not install the seat on a front seat with an active airbag. | ||
| ?2 | Install on this seat only if it is equipped with a 3-point seat belt. | ||
WARNING! SAFETY INSTRUCTIONS!
✿ WARNING! NEVER LEAVE THE CHILD UNATTENDED.
✿ WARNING! DO NOT USE ANY SUPPORT CONTACT POINTS OTHER THAN THOSE DESCRIBED IN THE INSTRUCTIONS AND MARKED ON THE CAR SEAT.
✿ WARNING! THIS SEAT MUST BE INSTALLED ONLY IN THE FORWARD-FACING POSITION.
✿ WARNING! THE VEHICLE SEAT BELTS THAT HOLD THE CHILD AND THE CAR SEAT TO THE VEHICLE SEAT MUST BE TIGHTENED AND SECURED.
✿ WARNING! THE LAP BELT MUST BE POSITIONED LOW, AND ANY IMPACT SHIELD MUST BE INSTALLED PROPERLY TO HOLD THE CHILD'S PELVIS FIRMLY WITHOUT APPLYING EXCESSIVE PRESSURE.
✿ WARNING! DO NOT MAKE ANY CHANGES, ADDITIONS, OR MODIFICATIONS TO THE CAR SEAT WITHOUT THE APPROVAL OF THE NOTIFIED BODY. FAILURE TO FOLLOW THE MANUFACTURER'S INSTRUCTIONS MAY BE DANGEROUS.
✿ WARNING! DO NOT INSTALL THE CAR SEAT IN POSITIONS EQUIPPED WITH AN ACTIVE AIRBAG.
✿ WARNING! KEEP AWAY FROM FIRE.
The installation of the product on the car seat and the securing of the child must only be done by an adult.
- Hard parts and components made of plastic must be positioned and installed in a way that prevents them from being trapped by a sliding seat or a door of the vehicle during normal operation.
If you detect any looseness or malfunction in the structure, locking mechanisms, or ISOFIX devices, stop using the product until the defective parts are repaired or replaced.
❖ Replace the car seat with a new one if it has been subjected to crash forces in an accident.
Do not use a second-hand car seat, as you cannot know the extent of previous stress or damage.
Do not use the car seat without its original upholstery, and do not replace it with a non-original one. The cover is an integral part of the child restraint system.
✿ Any luggage or other objects that may cause injury in a crash must be securely fastened. Remove or fix them at a safe distance from the child and the car seat.
Always check that the car seat is securely fastened to the vehicle seat, even when no child is placed in it. An unsecured seat can cause injury in the event of a collision.
Do not place additional padding in the car seat unless provided or approved by the manufacturer.
Do not use spare parts or components that are not supplied by the manufacturer. The manufacturer is not responsible for safety if unauthorized parts are used.
- Keep the user manual in the compartment provided in the seat or in the vehicle where the seat is used.
Do not expose the car seat to direct sunlight to avoid the risk of burns, deformation of the seat, and damage to plastic parts.
Do not attach cords or strings to the product, to prevent the risk of strangulation.
✿ Never place the car seat on beds, sofas, or other soft surfaces.
Do not allow children to play with the product.
Do not remove the labels and warnings attached to the car seat. They are important for anyone using the seat.
- Keep the plastic packaging away from children to avoid the risk of suffocation!
INSTRUCTIONS FOR USING THE RESTRAINT SYSTEM
This child restraint seat, classified as a “Universal booster seat”, is approved according to Regulation R129/04. It is suitable for children with a height between 125–150 cm.
| Child's Height | Installation Direction | Installation Method Approved Type |
| 125-150 cm | FORWARD-FACING | 3-point vehicle seat belt + ISOFIX anchorage |
| 125-150 cm | FORWARD-FACING | 3-point vehicle seat belt |
IMPORTANT! Follow precisely the instructions and the installation sequence provided in the text and illustrations of this manual. Check the security of the fastening after completing each step! ALWAYS CHECK THE SECURITY OF THE BELT FASTENING! After each installation, make sure the vehicle seat belts are not twisted and are in the correct position.
1. MAIN COMPONENTS
- ISOFIX Insertion Guides
- ISOFIX Anchorage Points on the Vehicle Seat
- Armrests
- Seat Cover Fabric
- Base Unit
- Backrest
- Backrest Release Buttons
- ISOFIX Activation Buttons
- ISOFIX Connectors
- Vehicle Shoulder Belt Guide
2. TIPS FOR INSTALLING THE CAR SEAT
Always check whether the seat is installed correctly. Installation should follow the instructions provided on the stickers located on both sides of the seat or in the user manual.* Move the front passenger seat as far forward as possible to provide sufficient legroom for the child.
IMPORTANT! Before installing the car seat on the vehicle seat, read the vehicle's user manual and locate the ISOFIX anchorage points to ensure you install the seat in the correct position.
3. INSTALLING THE SEAT ON THE VEHICLE SEAT
3-1. ISOFIX Installation + Vehicle's 3-Point Safety Belt
IMPORTANT! Before installing the seat onto the vehicle seat, please refer to your vehicle's owner's manual and locate the ISOFIX anchorage points to ensure you are installing the seat in the correct position.
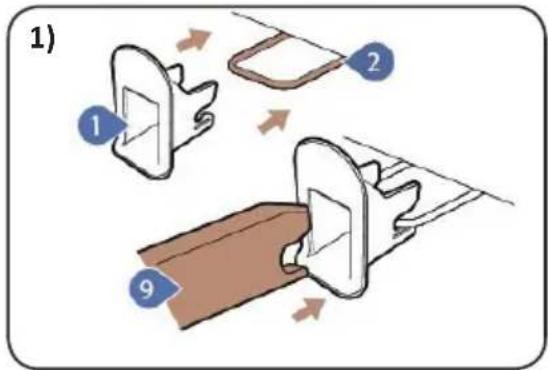
1) Insert the ISOFIX guides (1) into the ISOFIX anchorage points (2) on the vehicle seat.
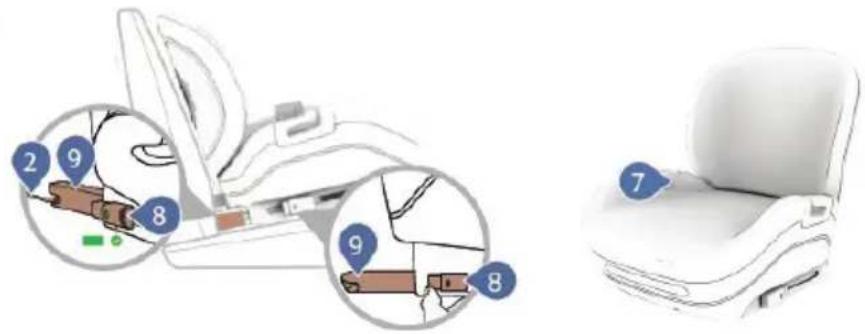
2) Press the ISOFIX buttons (8) and extend the ISOFIX connectors (9) fully outward. Align and insert the connectors into the ISOFIX anchorage points of the vehicle seat. Push the seat firmly backwards until a "click" sound is heard, indicating proper locking. The backrest (6) of the child seat should rest flush against the backrest of the vehicle seat.
WARNING! The ISOFIX connectors are correctly locked only when both indicators are fully green.
Note: If either indicator shows red, repeat the installation process as described above.
Gently shake the installed child seat. If it feels unstable or any of the ISOFIX connectors have come loose, reinstall the seat carefully.
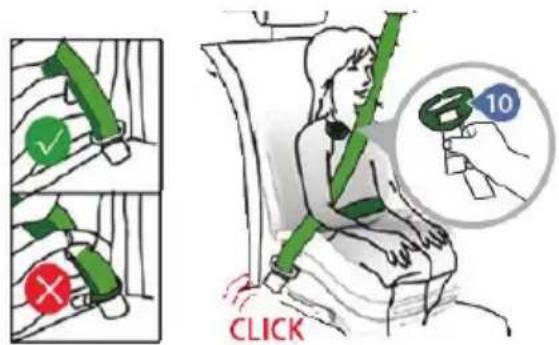
3) Place the child in the seat. Pull out the vehicle's 3-point safety belt. Route the shoulder (diagonal) belt over the child's shoulder and through the shoulder belt guide (10). Route the lap belt underneath both armrests (3), and
insert the belt tongue into the vehicle buckle until a "click" is heard.
Pull on the belt to ensure that it is securely latched.
WARNING! The diagonal belt must pass over the armrest.
Pull the diagonal belt upwards to remove slack and ensure the child is firmly secured in the seat.
WARNING! Ensure the belt fits snugly across the child's hips and stays clear of the neck area as it passes over the shoulders. The belt must not be twisted, and the seat cover must not interfere with the child's movement or the correct routing of the 3-point belt.
3-2. Installation Using Only the 3-Point Safety Belt
Ensure that the ISOFIX connectors are fully retracted. To retract them, press the ISOFIX release buttons (8) and slide the connectors inward.
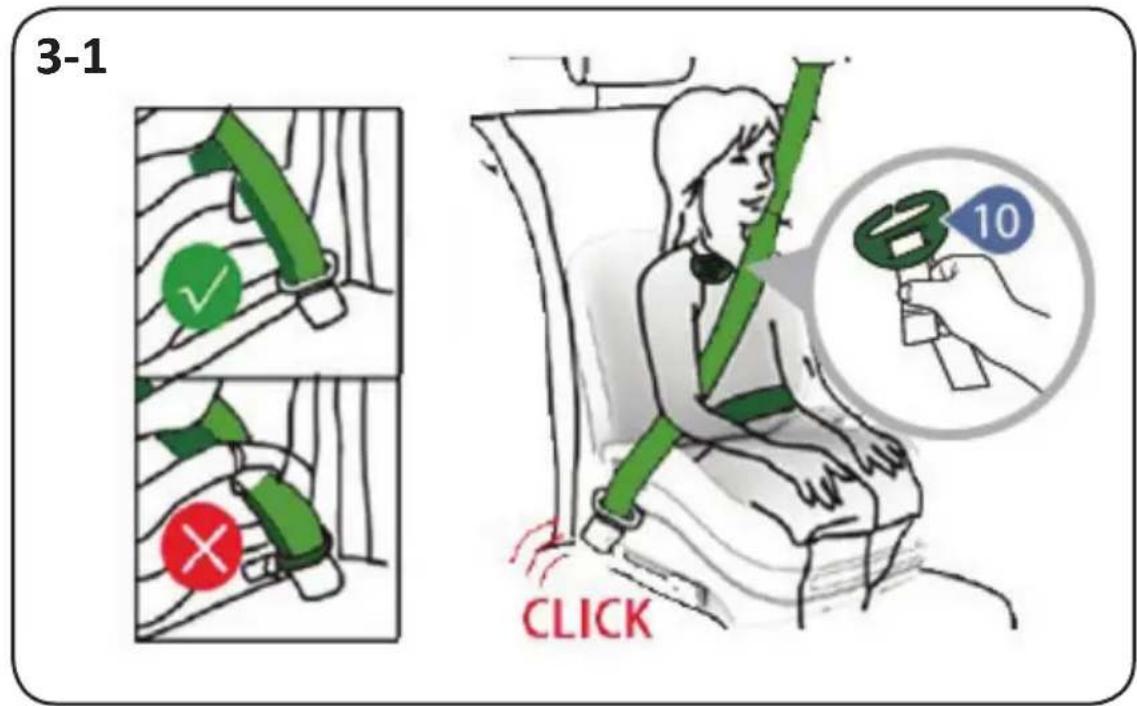
Place the child in the seat. Pull out the vehicle's 3-point safety belt. Route the diagonal belt over the child's shoulder and through the shoulder belt guide (10). Route the lap belt under both armrests and buckle it into the vehicle's seatbelt buckle until a "click" is heard.
Pull on the belt to ensure it is securely fastened.
Tighten the diagonal belt by pulling it upwards to eliminate slack and firmly secure the child in place.
WARNING! Make sure the lap belt sits low across the child's hips and the shoulder belt stays away from the neck area. The belt must not be twisted, and the seat cover must not interfere with the proper installation or function of the 3-point safety belt.
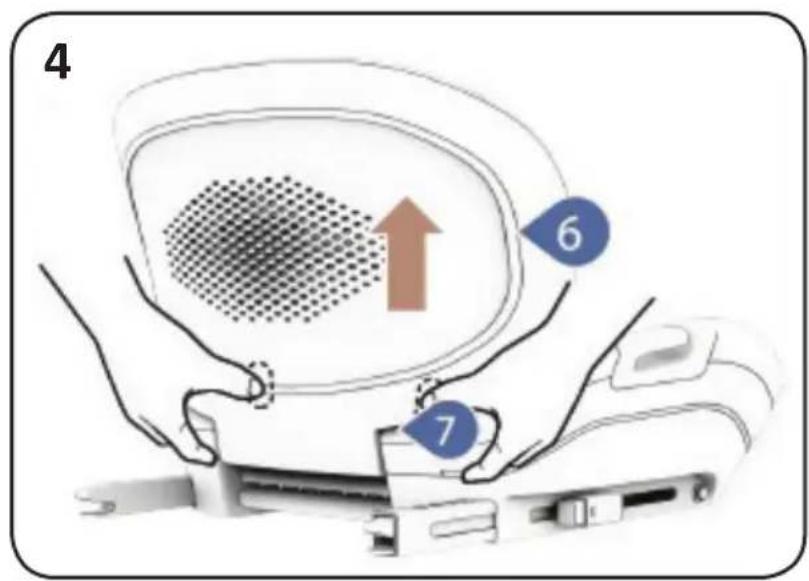
4. ATTACHING / DETACHING THE BACKREST FROM THE BASE UNIT
To detach the backrest, press the release buttons (7) and lift the backrest upward.
To attach the backrest, align it with the base and press down firmly until it locks into place with a "click" sound.
REMOVING THE SEAT FROM THE VEHICLE SEAT
Simultaneously press and hold the ISOFIX release buttons on both sides. At this moment, the ISOFIX locking indicators will turn red, indicating that the connectors have been released. Pull the seat outward to remove it from the vehicle seat.
MAINTENANCE AND CARE INSTRUCTIONS
- Clean dirty plastic or metal parts with a soft cotton cloth or sponge, moistened with water or mild detergent.
- Hand wash the fabric cover and soft padding at 30°C using a mild detergent.
Do not bleach! Do not spin-dry! Do not tumble dry! Do not iron!
Do not use aggressive cleaners containing abrasives, ammonia, bleach, or alcohol.
✿ After cleaning, allow the seat to dry completely before use or storage.
- Clean the harness straps only on the surface using mild soap and a damp cloth.
Do not wet or remove the labels! They contain important information.
- Store the product in a clean, dry place. Do not expose it to direct environmental conditions such as sunlight, rain, moisture, or sudden temperature changes.
In case of issues related to regular use, please contact authorized service centers for consultation or repair.
A TERMÉK BIZTONSÁGOS HASZNÁLATÁNAK BIZTOSÍTÁSA ÉRDEKÉBEN KÖVESSE A FELHASZNÁLÓI KÉZIKÖNYVBEN TALÁLHATÓ ÖSSZES FIGYELMEZTETÉST, UTASÍTÁST ÉS AJÁNLÁST!
НИЈЕДАН СИСТЕМ НЕ МОЖЕ ГАРАНТОВАТИ АПСОЛУТНУ ЗАШТИТУ ОД ПОВРЕДА У СЛУЧАЈУ СУДАРА ИЛИ НЕЗГОДЕ! ВОЗИТЕ СА ПОВЕЋАНОМ ОПРЕЗНОШЋУ, НАРОЧИТО КАДА ЈЕ ДЕТЕ У ВОЗИЛУ!
УПОЗОРЕЊЕ!

Правилна уградња.

Неправилна уградња.

ПРЕДУПРЕДУВАЊЕ!

NICIUN SISTEM NU POATE GARANTA PROTECTIE TOTALĂ
ÎMPOTRIVA ACCIDENTĂRILOR ÎN CAZ DE IMPACT SAU
ACCIDENT! CONDUCETI CU PRUDENTĂ SPORITĂ, ÎN SPECIAL
ATUNCI CÂND ÎN VEHICUL SE AFLÃ UN COPIL!
PENTRU A ASIGURA UTILIZAREA ÎN SIGURANTĂ A ACESTUI PRODUS,
RESPECTATI AVERTISMENTELE, INSTRUCTIUNILE
ŞI RECOMANDĂRILE DIN ACEST MANUAL!
UTILIZAREA NECORESPUNZĂTOARE A SCAUNULUI VA REDUCE FUNCTIILE SALE DE PROTECTIE ŞI SIGURANTĂ! NERESPECTAREA INSTRUCTIUNILOR DIN ACEST MANUAL CREŞTE RISCUL DE RĂNIRE GRAVĂ SAU DE DECES!
AVERTISMENT!
UTILIZARE DOAR ÎN POZITIA CU FATA SPRE ÎNAINTE!

AVERTISMENT!

Instalare corectă.