
ROXY 400L - Welding ROTHENBERGER - Free user manual and instructions
Find the device manual for free ROXY 400L ROTHENBERGER in PDF.

| Product Type | Gas and oxygen autogenous welder |
| Brand | Rothenberger |
| Model | ROXY 400L |
| Flame temperature | Up to 3,100 °C |
| Working temperature | 1,250 °C |
| Gas types | Propane, Butane, Maxigaz, Oxygen |
| Gas pressure | 2.5 to 4 bar (depending on regulator) |
| Oxygen pressure | 0.7 to 3 bar |
| Oxygen containers | 2 L (200 bar) or 1 L (110 bar) refillable cylinder |
| Operating time | Up to 19 h (2 L cylinder) or 14 h (1 L cylinder) |
| Working range | Material thickness: 0.1 to 5.0 mm |
| Power source | Maxigaz gas cartridge + oxygen cylinder |
| Main functions | Autogenous welding, brazing |
| Ignition | Manual with safety igniter |
| Equipment supplied | Burner, oxygen regulator, hoses, safety glasses, wrench, nozzles |
| Safety | Shut-off valves, gas handling instructions, PPE required |
| Maintenance and cleaning | Check tightness of connections, replace porous hoses, clean nozzles |
| Spare parts and repairability | Accessories and spare parts available via Rothenberger |
| Transport and storage | Close valves, store upright in a ventilated area |
| Disposal | Recycling of metals and gas cartridges through appropriate channels |
Frequently Asked Questions - ROXY 400L ROTHENBERGER
User questions about ROXY 400L ROTHENBERGER
0 question about this device. Answer the ones you know or ask your own.
Ask a new question about this device
Download the instructions for your Welding in PDF format for free! Find your manual ROXY 400L - ROTHENBERGER and take your electronic device back in hand. On this page are published all the documents necessary for the use of your device. ROXY 400L by ROTHENBERGER.
USER MANUAL ROXY 400L ROTHENBERGER
natural_image
Industrial gas cylinder and oxygen regulator device with attached tubing (no visible text or symbols)EN Instructions for use
rothenberger.com
A Overview

Intro
| DEUTSCH - Originalbetriebsanleitung!Bedienungsanleitung bitte lesen und aufbewahren! Nicht wegwerfen! Bei Schäden durch Bedienungsfehler erlischt die Garantie! Technische Änderungen vorbehalten! | Seite 2 |
| ENGLISHPlease read and retain these directions for use. Do not throw them away! The warranty does not cover damage caused by incorrect use of the equipment! Subject to technical modifications! | Page 9 |
| FRANÇAISLire attentivement le mode d'emploi et le ranger à un endroit sûr! Ne pas le jeter! La garantie est annulée lors de dommages dûs à une manipulation erronée! Sous réserve de modifications techniques! | Page 15 |
| ESPAÑOL¡Por favor, lea y conserve el manual de instrucciones! ¡No lo tire! ¡En caso de daños por errores de manejo, la garantía queda sin validez! Modificaciones técnicas reservadas! | Página 22 |
| ITALIANOPer favore leggere e conservare le istruzioni per l'uso! Non gettarle via! In caso di danni dovuti ad errori nell'uso, la garanzia si estingue! Ci si riservano modifiche tecniche! | Pagina 29 |
| NEDERLANDSLees de handleiding zorgvuldig door en bewaar haar goed! Niet weggooien! Bij schade door bedieningsfouten komt de garantieverlening te vervallen! Technische wijiziqingen voorbehouden! | Bladzijde 36 |
| PORTUGUESQueiram ler e guardar o manual de instruções! Não deitar fora! Em caso de avarias por utilização incorrecta, extingue-se a garantia! Reservado o direito de alterações técnicas! | Pagina 43 |
| DANSKLæs betjeningsvejledningen, og gem den til senere brug! Smid den ikke ud! Skader, som måtte opstå som følge af betjeningsfejl, medfører, at garantien mister sin gyldighed! Ret til tekniske ændringer forbeholdes! | Side 50 |
| SVENSKALås igenom bruksanvisningen och förvara den väl! Kasta inte bort den! Garantin upphör om apparaten har använts eller betjänats på ett felaktigt sätt! Med reservation för tekniska ändringar! | Sida 56 |
| NORSKLes bruksanvisningen og oppbevar den vel! Ikke kast den! Oppstår skader på grunn av betjeningsfeil opphører garantiens gyldighet! Tekniske forandringer forbeholdes! | Side 62 |
| SUOMILue ja säilytä tämä käyttöohje! Älä heitä pois! Takuu ei kata käyttövirheistä aiheutuvia vahinkoja! Oikeudet teknisiin muutoksiin pidätetään! | Sivulta 68 |
| POLSKIInstrukcję obsługi proszę przeczytać i zachować! Nie wyrzucać! Przy uszkodzeniach wynikajacych z błędów obsługi wygasa gwarancia! Zmiany techniczne zastrze zone! | Strony 74 |
| CESKYNavod k obsluze si prosim přečtěte a uschovejte jej! Nevyhazujte jej! V pripade poškozeni zpusobenem chybnou obsluhou zanika zaruka! Technicke změny jsou vyhrazeny! | Stránky 81 |
| TÜRKÇEKullanim açıklamalarini lütfen dikkatlice okuyunuz ve bir yerde muhafaza ediniz! Çöpe atmayiniz! Kullaniminda yapılan hatalar, garantinin silinmesine neden olur! Teknik deðipiklikler yapma hakkimiz saklidir! | Sayfa 87 |
| MAGYARKérjük, olvassa el és őrizze meg a kezelési utasítást! Ne dobja el! A helytelen kezelésből származó károsodások esetén megszůnik a jótállás! Můszaki változtatások fenntartva! | Oldaltól 93 |
| БЪЛГАРСКИПрочетете внимателно и запазете инструкцията за експлоатация! Не я захвърляйте или унищожавайте! При настъпили дефекти вследствие на неправилно обслужване гаранцията отпада! Техническиизменения по уреда са изключително в компетенцията на фирмата производител! | Страница 99 |
| ЕЛАННИКАОбдүгієс хөгіріσμού таракалеіσθε να τις διαβάσετε και να τις φιλάσσετε! Мнү тіς πετάξετε! Σε ʒημιες από σφάλματα хөгіріσμού παυει να ισχύει η εγγύηση! Με επιφύλαξη για техνικές αλλαγές! | Σελίδα 106 |
| РУССКИЙПрочтите инструкцию по эксплуатации и сохраняйте её для дальнейшего использования! В случае поломки инструмента из-за несоблюдения инструкции клиент теряет право на обслуживание по гарантии! Возможны технические изменения! | Страница 113 |
service@rothenberger.com - www.rothenberger.com
9 Entsorgung
1.1 Intended use 10
1.2 General safety instructions 10
1.3 Special Safety Instructions 11
2 Technical Data 11
3 Functions 11
3.1 Overview (A) 11
3.2 Operational description.... 11
4 Transport and storage 12
4.1 Set-up 12
5 Start-up.... 13
5.1 Lighting the burner.... 13
5.2 Setting the flame.... 13
5.3 Extinguishing the flame.... 13
5.4 Replacing the gas cartridge 13
5.5 Replacing the oxygen tank 13
6 Malfunctions and maintenance.... 14
7 Accessories 14
8 Customer service....14
9 Disposal 14
9.1 Metal parts and gas cartridges 14
Markings in this document:

Danger!
This sign warns against the danger of personal injuries.

Caution!
This sign warns against the danger of property damage and damage to the environment.

Call for action
1.1 Intended use
Thank you for purchasing a Rothenberger brand product. The gas welding device you have acquired is a high-quality product. Through the use of refillable 0.67L or 2L steel oxygen tanks, this universally applicable device allows a long welding time while being light and easy to handle.
An outstanding device for brazing.
1.2 General safety instructions

ATTENTION! All instructions must be read. Errors due to non-compliance with the instructions below can cause fire and/or severe injury. It is absolutely mandatory to comply with the legal safety regulations and technical guidelines. Damages due to operator error void the warranty.
KEEP THESE INSTRUCTIONS AVAILABLE
1) Work area
a) Keep your work area neat and clean. Messy or poorly lit work areas can lead to accidents.
b) Do not work with the device in explosive environments containing flammable liquids, gases or dusts. Tools create sparks that can ignite the dust, fumes or gases. Make sure ventilation is adequate. If possible, do not work in closed spaces.
c) Keep children and other people away from the tool during use. If you are distracted, you can lose control of the device.
d) Do not misuse the hoses for carrying or hanging the device. Keep the hoses away from heat, oil, sharp edges and moving parts of the device. Damaged or tangled hoses increase the risk of explosion.
e) Keep the device free of oil and grease. In pure oxygen, oils and greases of any kind can explode on their own. Do not place the device near heat sources (heaters, ovens, open flames, etc.).
2) Personal safety
a) Stay alert, pay attention to what you do, and work sensibly with any tool. Do not use the device if you are tired or under the influence of drugs, alcohol or medication. A single moment of distraction when using the machine can lead to serious injury.
b) Wear personal safety equipment and always wear safety glasses. Depending on the tool type and application, wearing personal safety equipment, such as slip-resistant safety shoes, flame-resistant clothing and safety glasses decreases the risk of injury.
c) Do not be overconfident. Make sure to stand securely and always keep your balance. This allows you to control the device better in unexpected situations.
d) Wear proper clothing. Do not wear loose clothing or jewellery. Keep hair, clothing and gloves away from moving parts. Loose clothing, jewellery or long hair can get caught in moving parts.
3) Careful handling and use of tools
a) Keep unused tools out of the reach of children. Do not allow anyone to use the device who is not familiar with it or who has not read its instructions. Tools are dangerous when used by inexperienced persons.
b) Maintain the device with care. Check to see whether the device's parts are operating properly and do not jam. See whether parts are broken or damaged enough to affect the device's operation. Have the damaged parts repaired before using the device. Many accidents are caused by poorly maintained tools.
c) Never leave the brazing tool unsupervised during use. There is an acute risk of fire.
d) Make sure that the manometers are seated securely on the oxygen pressure regulator. Replace damaged manometers only with original Rothenberger replacement parts.
4) Service
Have your device repaired only by qualified experts and only with original replacement parts. This ensures the continued safety of the device.
1.3 Special Safety Instructions
MAPP gas is highly flammable, colourless, heavier than air, and has a perceptible odour.
Cartridges and oxygen tanks must not be handled by children.
Store the cartridges and oxygen tanks in a well-ventilated area.
Do not smoke when working near the tanks.
Keep the cartridges and oxygen tanks away from ignition sources.
Check the screw joints' tightness using foaming substances (e.g., soapy water, leak detection spray).
Close the tank valves during malfunctions and after work.
Do not use the device in a horizontal position. When cartridges lie flat, liquid MAPP gas enters the gas cartridge valve and the burner nozzle, and that leads to malfunctions.
2 Technical Data
Flame temperature ....Up to 3100°C
Working temperature .....1250°C
The usable solder and flux depend on the working temperature.
Type of gas......Propane, propane/butane (Multigas 300), butane, MAPP gas
Gas pressure....2.5-4 bar (depending on the regulator or the content pressure in the cartridge).
Oxygen-returnable containers: 2L = 200 bar
Oxygen-returnable containers: 1L = 110 bar
Consumption ∅ ......Minimum consumption with middle-sized nozzle work duration of approx 1,0 - 2,5 hours
Operation time ....Oxygen tank depending on flame thickness:
2 L.max. 19 h. ca. 48 min
1 L.max. 14 h. ca. 18 min
work space ....0.1-5.0 mm material thickness
Oxygen working pressure .....Pre-setting 0,7 – 3 bar
3 Functions
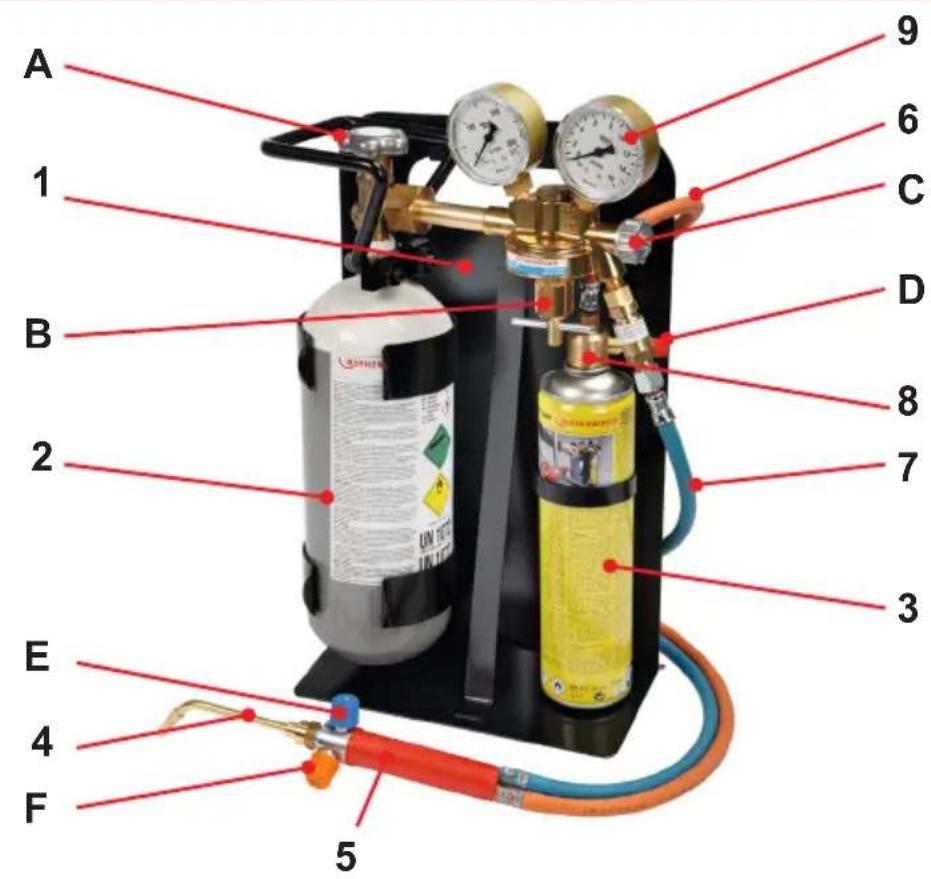
3.1 Overview (A)
1 Carrying frame 8 Fine regulator valve
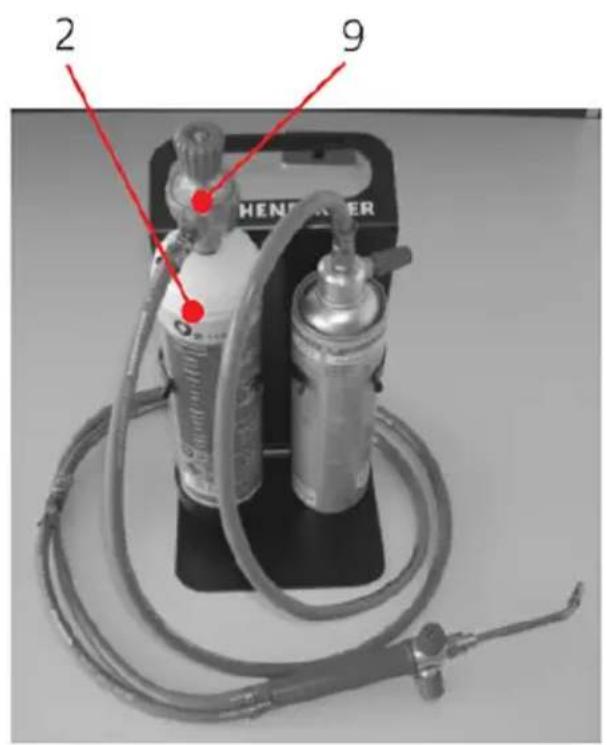
2 Oxygen tank 9 Oxygen pressure regulator
3 Maxi gas cartridge 10 Micro nozzle adaptor
4 Brazing burner 11 High-performance welding nozzles
5 Handle 12 Burner wrench
6 Gas hose, red 13 Welding goggles
7 Oxygen hose, blue 14 Safety lighter
3.2 Operational description
Welding with high-performance welding nozzles:
Basically, the welding flame should burn neutrally (the gas mixture is balanced), and its size should be adjusted to the material thickness, the weld shape, the welding position and the heat conductivity of the material.
When welding steel at greater thicknesses, open both valves wide, and when welding thinner welding steel plates close the valves somewhat.
Preheat the material and welding rod. As soon as the metal begins to melt on both sides of the seam, introduce the welding rod. Make sure that the welding area heats evenly. Run the burner in half circles around the welding rod.
Brazing:
Clean the connecting surfaces, polish them and round off the edges. Preheat the brazing area. Place the tip of the soldering rod onto the soldering area, melt a drop of solder, and spread it under constant flame movement.
4 Transport and storage
For transport, the oxygen tank valve and the Maxi gas cartridge must be closed. After finishing the soldering work: With the gas cartridge valve and oxygen tank valve closed, cut off the gas and oxygen valve at the handle, and allow the remaining gas to escape. This discharges the hoses and the oxygen pressure regulator. Remove the oxygen pressure regulator. Screw off the gas cartridge valve of the Maxi gas cartridge. The hoses can be connected to the oxygen pressure regulator and the gas cartridge valve. Secure the device against tilting and slipping on the loading surface. Store and transport only with the containers upright.
Reusable containers must be filled only by authorized facilities.
Refilling in an unintended manner can cause severe accidents.
4.1 Set-up

Change the gas cartridges in a well-ventilated area, preferably outdoors.
- Make sure that all valves are closed before work begins.
- During set-up, turn the oxygen pressure regulator tight with the wrench.
- Screw the MAXIGAS one-way container rightward into the gas fine regulator valve. Make sure that the tread begins and moves correctly. Screwing it in on a slant voids the warranty.
- Before igniting, make sure that the connections between the containers and the regulator. valves have no gas leaks. (Use leak detection spray or soapy water).
A Open the oxygen tank valve.
B Depending on the nozzle and the material thickness, adjust the working pressure to a setting of up to 0.7 - 3 bar.
C Opening the oxygen pressure regulator valve.
D Now opens the gas regulator valve about a half turn.
E Opening the oxygen valve hand dial and adding oxygen.
F Open the fuel gas valve dial and light the gas flame.
G Setting the gas flame. The flame must already be burning visibly from the nozzle tip.
H Adjust the heating flame by opening or choking the gas and oxygen feed.
- See 5.2
I Use only goggles that comply with DIN4646 and 58210/1.

All connections must be tightened or loosen using the wrench included. After the gas valve has been opened, ignition must occur immediately, because otherwise escaping gases can detonate.
Using the micro burner:
- Next unscrew the flame tube with the swivel nut.
- Then screw the micro nozzle adaptor directly to the torch handle using the swivel nut.
- Attach the desired micro burner, and screw the safety adaptor onto the micro nozzle adaptor to secure it from coming off.
- Set the flame as needed. Beware of an extremely short fuel gas flame that already burns visibly at the nozzle tip.
Shut-down:
Shut the device down in the opposite sequence, but first always turn off the gas. Always close the tank valve when work is interrupted.
5 Start-up
5.1 Lighting the burner
First open the gas regulator valve and light the gas; then open the oxygen valve and then adjust the flame. The flame must already be burning visibly from the nozzle tip.
Ignite the gas / oxygen mixture by using one of the appropriate gas lighters at the burner nozzle. (It can create black soot).
5.2 Setting the flame
With the hand dial marked orange on the handle, adjust the size and appearance of the flame. If the flame cannot be ignited or cuts off, the gas pressure is too high. In that case, choke off the gas at the torch handle (the dial marked orange) by turning it rightward.
The oxygen valve (the dial marked blue) must be completely open at the torch handle.
If the flame looks yellow, there is too much gas. Carefully choke the gas valve (the dial marked orange) at the torch handle by turning it farther leftward.
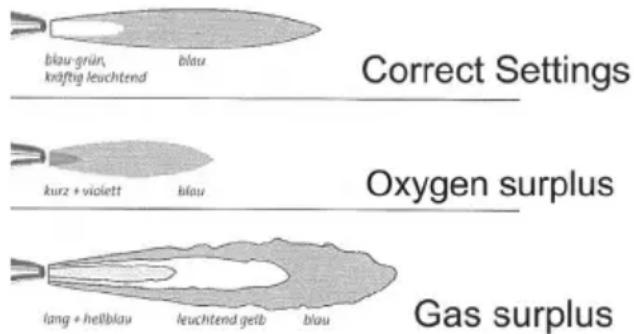
Then set to a neutral flame. This means that the strongly glowing blue-green core of the flame must be sharply delineated from the blue border of the flame (the secondary flame.
5.3 Extinguishing the flame
To extinguish the flame, first close the gas valve (the dial marked red) and then the oxygen valve (the dial marked blue) at the torch handle by turning rightward.
Close the gas cartridge valve and the oxygen tank valve by turning them rightward. Also close these valves during extended breaks.
5.4 Replacing the gas cartridge
→ Close the gas cartridge valve by turning it rightward.
→ Pull the Maxi gas cartridge tank with its gas cartridge valve and the hose line upward and out of the mounting.
→ Unscrew the Maxi gas cartridge leftward from the gas cartridge valve.
→ Make sure that the gasket in the gas cartridge valve is present and intact.
→ Only original Rothenberger Maxi gas cartridges may be used. Install a full Maxi gas cartridge into the gas cartridge valve by turning it rightward.
→ Insert the full Maxi gas cartridge, with the gas cartridge valve and hose line installed, into the mounting.
5.5 Replacing the oxygen tank
→ Close the oxygen tank valve by turning it rightward.
→ Screw off the oxygen pressure regulator by turning it counter-clockwise with the enclosed key.
→ Remove the oxygen tank from the mounting. Replace the empty oxygen tank with a full one.
→ Screw the oxygen pressure regulator clockwise onto the oxygen tank.
→ Make sure that the gasket in the oxygen pressure regulator is present and intact.
→ In so doing, make sure that the connections are free of oil and grease.
6 Malfunctions and maintenance
| Problem Cause Solution | ||
| The flame turns yellow. Either the oxygen tank valve is closed or the oxygen tank is empty. | Open the oxygen tank valve.Replace the empty oxygen tank with a full one. | |
| The flame gets smaller or lifts off the burner. | Either the gas cartridge valve is closed, or isn't open wide enough, or the gas cartridge is empty. | Open the gas cartridge valve by turning it (farther) left, or replace the gas cartridge. If you can still hear liquid noises when you shake the gas cartridge, the ambient temperature is too low for the gas to come out in gase-ous form (below -20°C). |
Regularly check the hoses for cuts and leaks (visual inspection).
Replace the hose package with its single-tank fuse if the single-tank fuse has triggered after a flashback.
Hoses become porous with time. Therefore, replace the hose package as soon as small cuts appear on the hoses.
7 Accessories
You can find suitable accessories in the main catalog or at www.rothenberger.com
8 Customer service
The ROTHENBERGER service locations are available to help you (see listing in catalog or online) and replacement parts and service are also available through these same service locations. Order your accessories and spare parts from your specialist retailer or using RO SERVICE+ online: 📞 + 49 (0) 61 95/ 800 8200 📄 + 49 (0) 61 95/ 800 7491 ✉ service@rothenberger.com - www.rothenberger.com
9 Disposal
Components of the unit are recyclable material and should be put to recycling. For this purpose registered and certified recycling companies are available. For an environmental friendly disposal of the non-recyclable parts (e.g. electronic waste) please contact your local waste disposal authority
9.1 Metal parts and gas cartridges
Metals must be sorted and delivered separately to a disposal facility.
Gas cartridges must be disposed of properly.
service@rothenberger.com - www.rothenberger.com
service@rothenberger.com - www.rothenberger.com
9 Eliminación
4 Hardsoldeerbrander
5.2 Stille inn flamme
service@rothenberger.com - www.rothenberger.com
9 Likvidace
service@rothenberger.com - www.rothenberger.com
9 Ártalmatlanítás
D-65779 Kelkheim / Germany
Telefon +49 6195 / 800 - 0
Telefax +49 6195 / 800 - 3500
info@rothenberger.com


- A Overview
- Entsorgung
- Technical Data 11
- Functions 11
- Transport and storage 12
- Start-up.... 13
- Malfunctions and maintenance.... 14
- Accessories 14
- Customer service....14
- Disposal 14
- Markings in this document:
- Intended use
- General safety instructions
- KEEP THESE INSTRUCTIONS AVAILABLE
- Special Safety Instructions
- Technical Data
- Functions
- Overview (A)
- Operational description
- Welding with high-performance welding nozzles:
- Brazing:
- Transport and storage
- Set-up
- Change the gas cartridges in a well-ventilated area, preferably outdoors.
- All connections must be tightened or loosen using the wrench included. After the gas valve has been opened, ignition must occur immediately, because otherwise escaping gases can detonate.
- Using the micro burner:
- Shut-down:
- Start-up
- Lighting the burner
- Setting the flame
- Extinguishing the flame
- Replacing the gas cartridge
- Replacing the oxygen tank
- Accessories
- Customer service
- Disposal
- Metal parts and gas cartridges
- Eliminación
- Stille inn flamme
- Likvidace
- Ártalmatlanítás
Brand : ROTHENBERGER
Model : ROXY 400L
Category : Welding