
GKE 18V-15 Professional - Electric chainsaw BOSCH - Free user manual and instructions
Find the device manual for free GKE 18V-15 Professional BOSCH in PDF.

 FR
FR
 BG
BG
 CS
CS
 DA
DA
 DE
DE
 EL
EL
 EN
EN
 ES
ES
 ET
ET
 FI
FI
 HU
HU
 IT
IT
 KK
KK
 KO
KO
 LT
LT
 LV
LV
 MK
MK
 NL
NL
 NO
NO
 PL
PL
 PT
PT
 RO
RO
 RU
RU
 SK
SK
 SL
SL
 SV
SV
 TR
TR
 UK
UK
| Product type | Cordless electric pruning saw |
| Brand | Bosch |
| Model | GKE 18V-15 Professional |
| Article number | 3 601 HD7 0.. |
| Rated voltage | 18 V |
| No-load cutting speed | 7.2 m/s |
| Guide bar length | 15 cm |
| Chain pitch | 3/8\" low profile |
| Drive link thickness | 1.1 mm |
| Number of drive links | 28 |
| Max. cutting diameter | 13 cm |
| Tool-less chain tensioning | Yes (SDS) |
| Automatic chain lubrication | Yes |
| Oil reservoir capacity | 50 ml |
| Weight (without battery) | 1.75 kg |
| Weight (with 4.0 Ah battery) | 2.40 kg |
| Compatible batteries | GBA 18V..., ProCORE18V... |
| Recommended batteries | GBA 18V... ≥ 4.0 Ah |
| Recommended chargers | GAL 18..., GAX 18... |
| Sound pressure level | 84 dB(A) |
| Sound power level | 90 dB(A) |
| Vibration (average) | 3.8 m/s² (uncertainty 1.5 m/s²) |
| Operating and storage temperature | -20 to +50 °C |
| Chain type | 3/8\" - 90PX Low Kickback |
Frequently Asked Questions - GKE 18V-15 Professional BOSCH
User questions about GKE 18V-15 Professional BOSCH
0 question about this device. Answer the ones you know or ask your own.
Ask a new question about this device
Download the instructions for your Electric chainsaw in PDF format for free! Find your manual GKE 18V-15 Professional - BOSCH and take your electronic device back in hand. On this page are published all the documents necessary for the use of your device. GKE 18V-15 Professional by BOSCH.
USER MANUAL GKE 18V-15 Professional BOSCH
natural_image
Exterior view of a Bosch chain-linking tool (no text or symbols visible on the device itself)
text_image
Warning symbols and illustrations for workplace safety, including warning, hazard, no-dress, hand gesture, manual writing, and reading.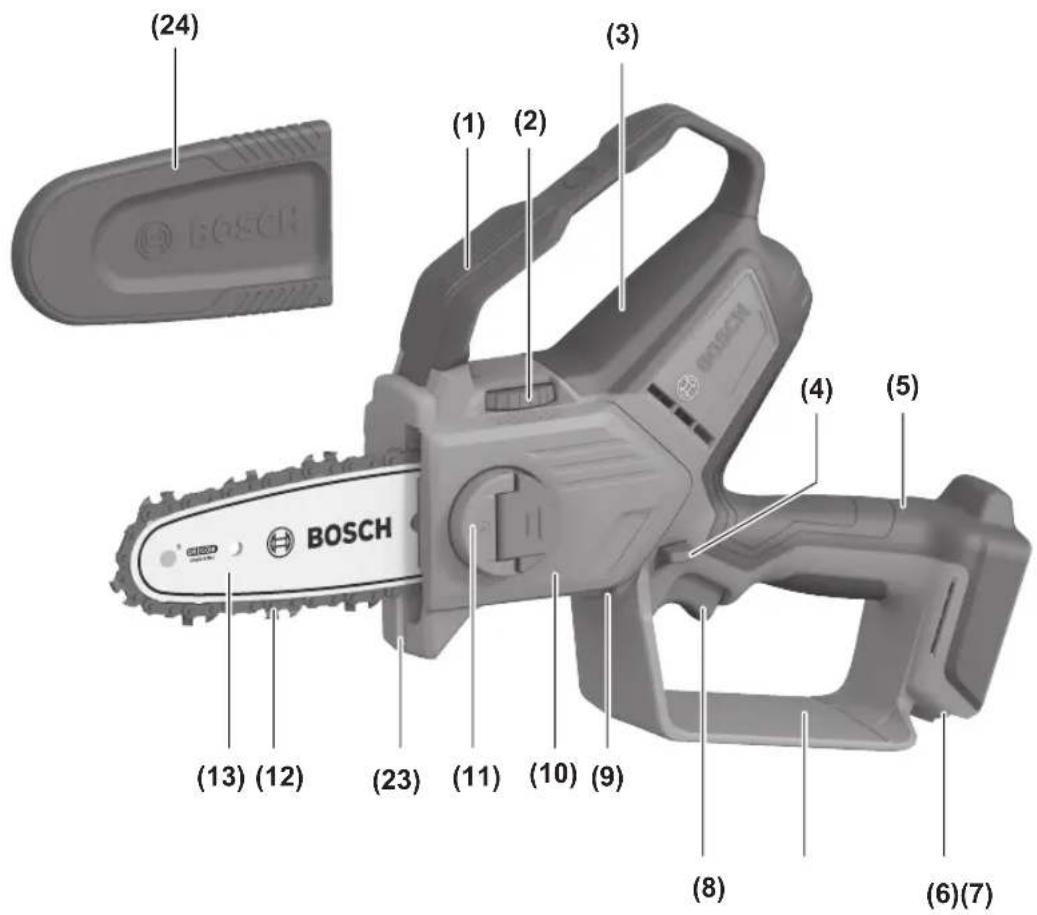
text_image
(24) (1) (2) (3) (4) (5) (6)(7) (8) (9) (10) (11) (12) (13) BOSCH BOSCH4
B1

text_image
BOSCH (16)B2
text_image
BOSCH (20) (17) (25) (18) (19)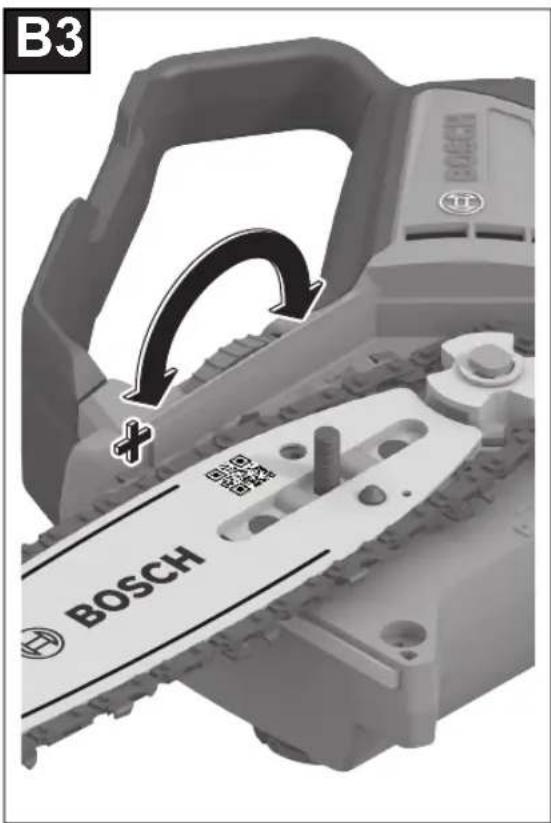
text_image
B3 BOSCH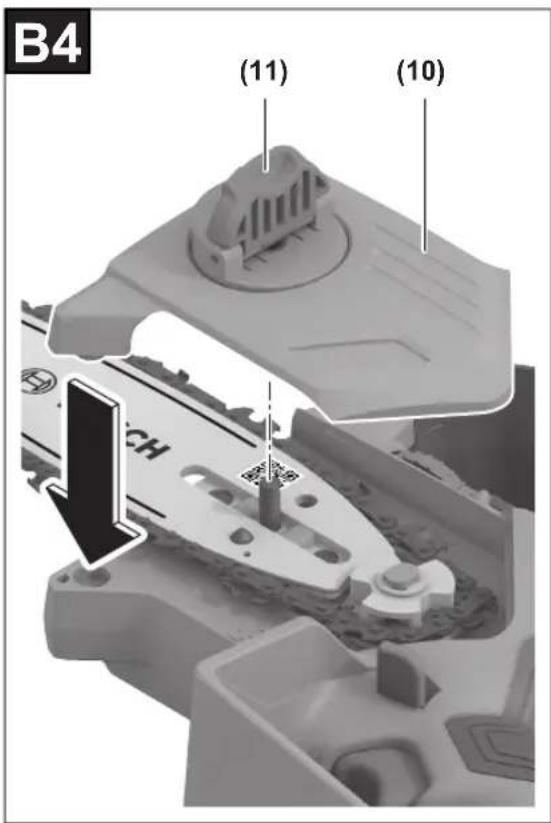
text_image
B4 (11) (10)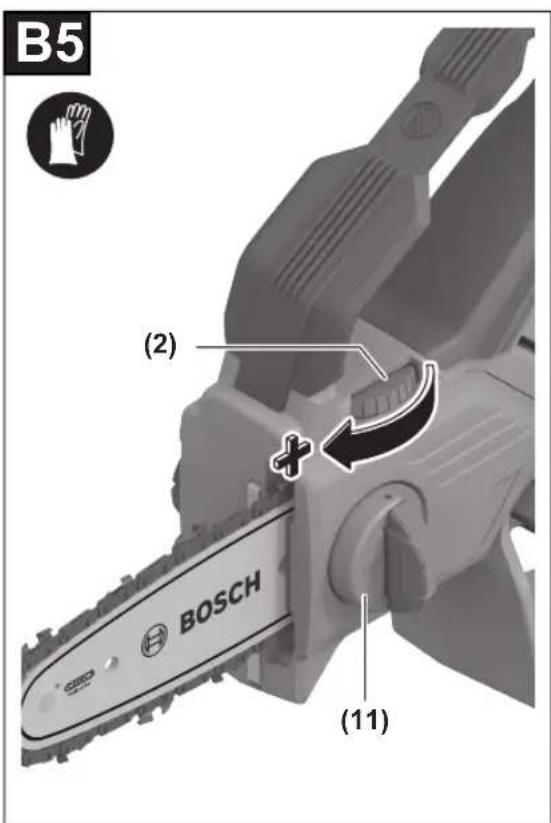
text_image
B5 (2) + BOSCH (11)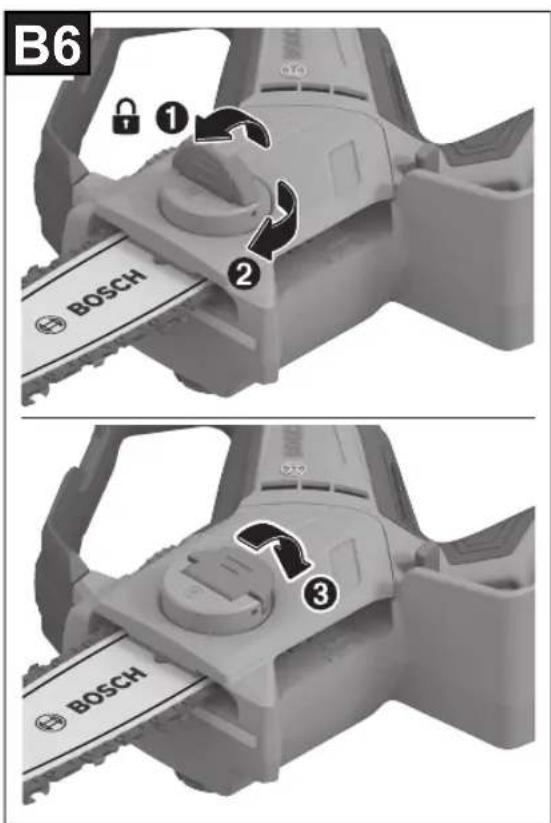
text_image
B6 ① ② BOSCH ③ BOSCH6
text_image
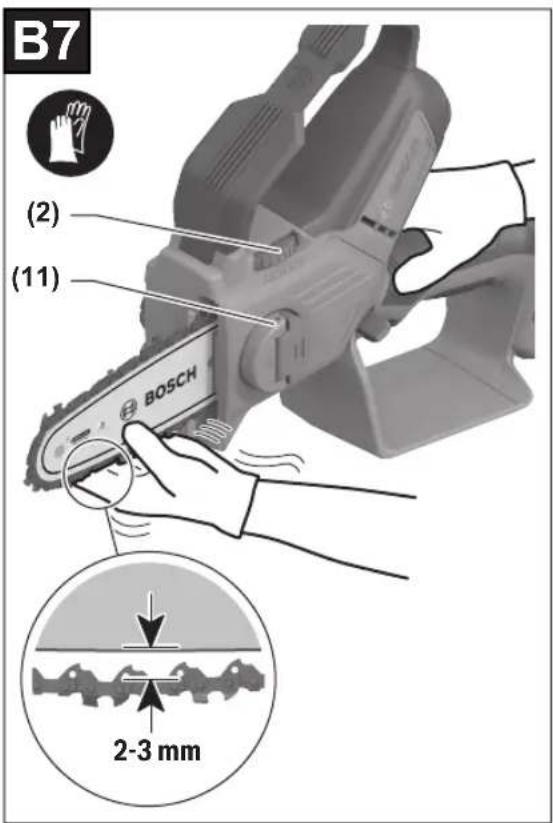
B7 (2) (11) BOSCH 2-3 mm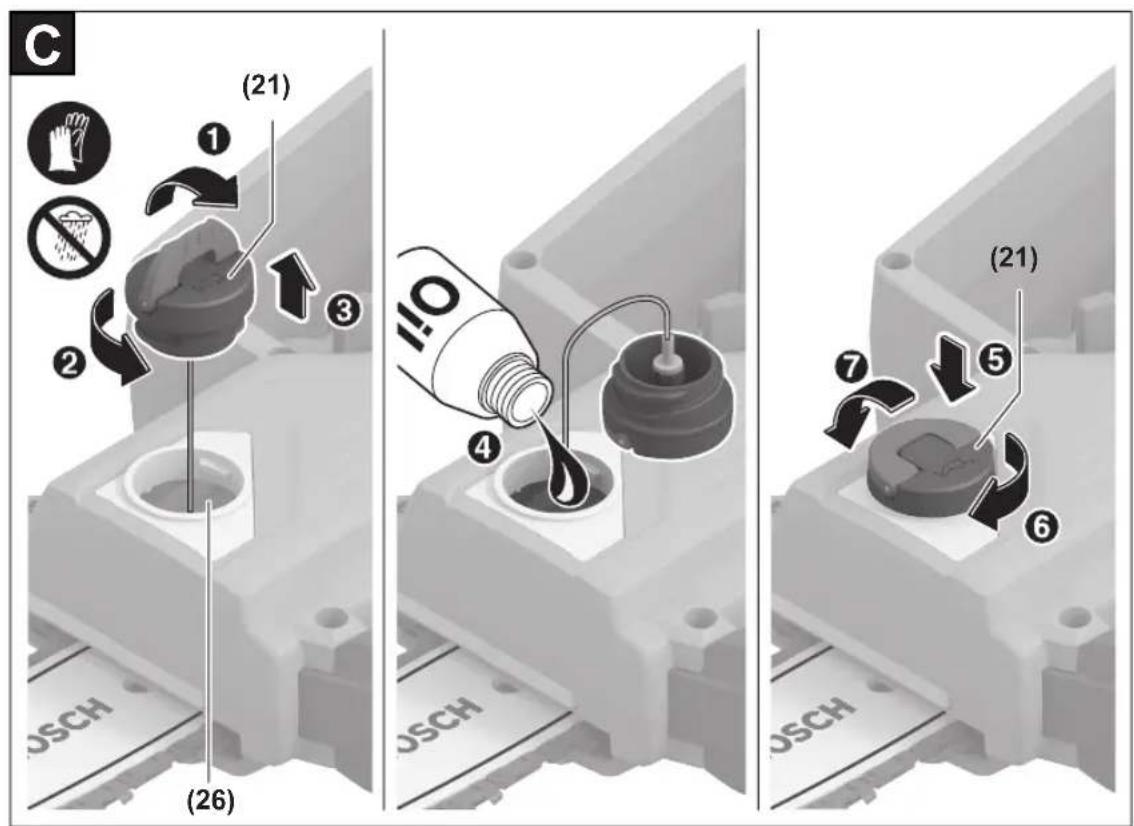
text_image
C (21) ① ② ③ (26) (21) ④ ⑤ ⑥ OSCH OSCH OSCH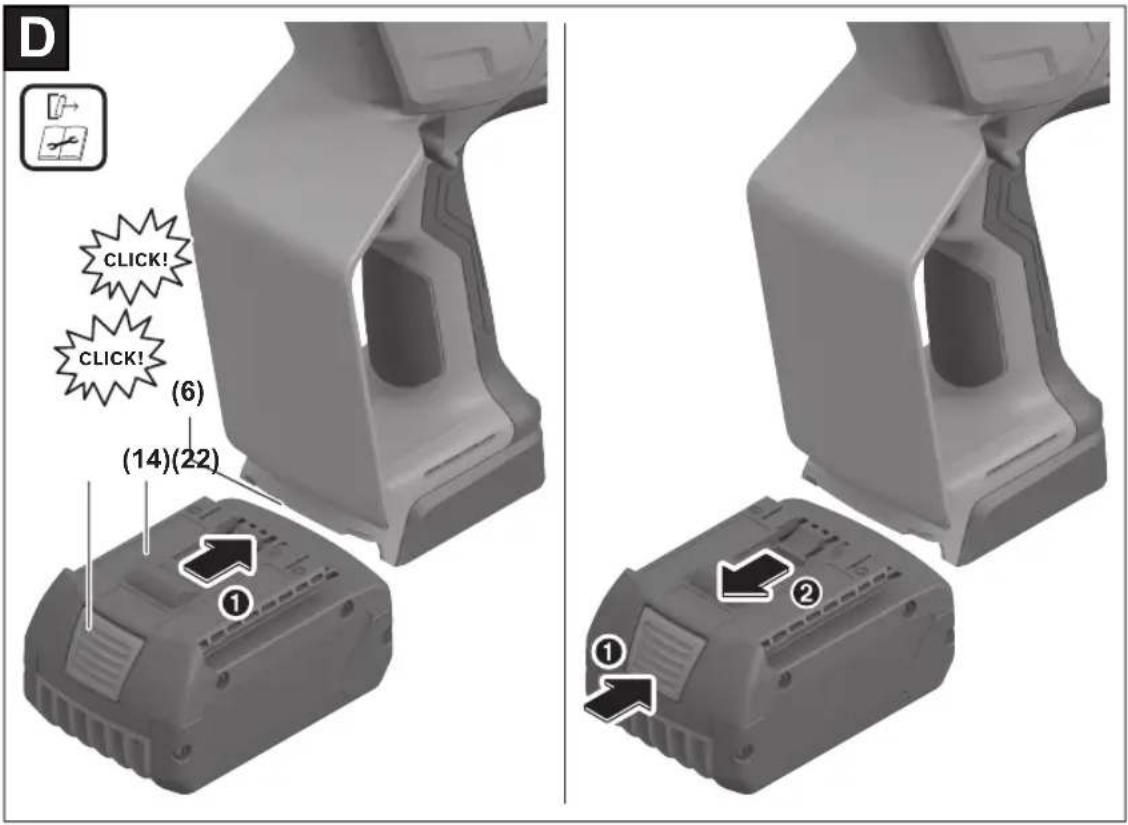
text_image
D CLICK! CLICK! (6) (14)(22) ① ② ①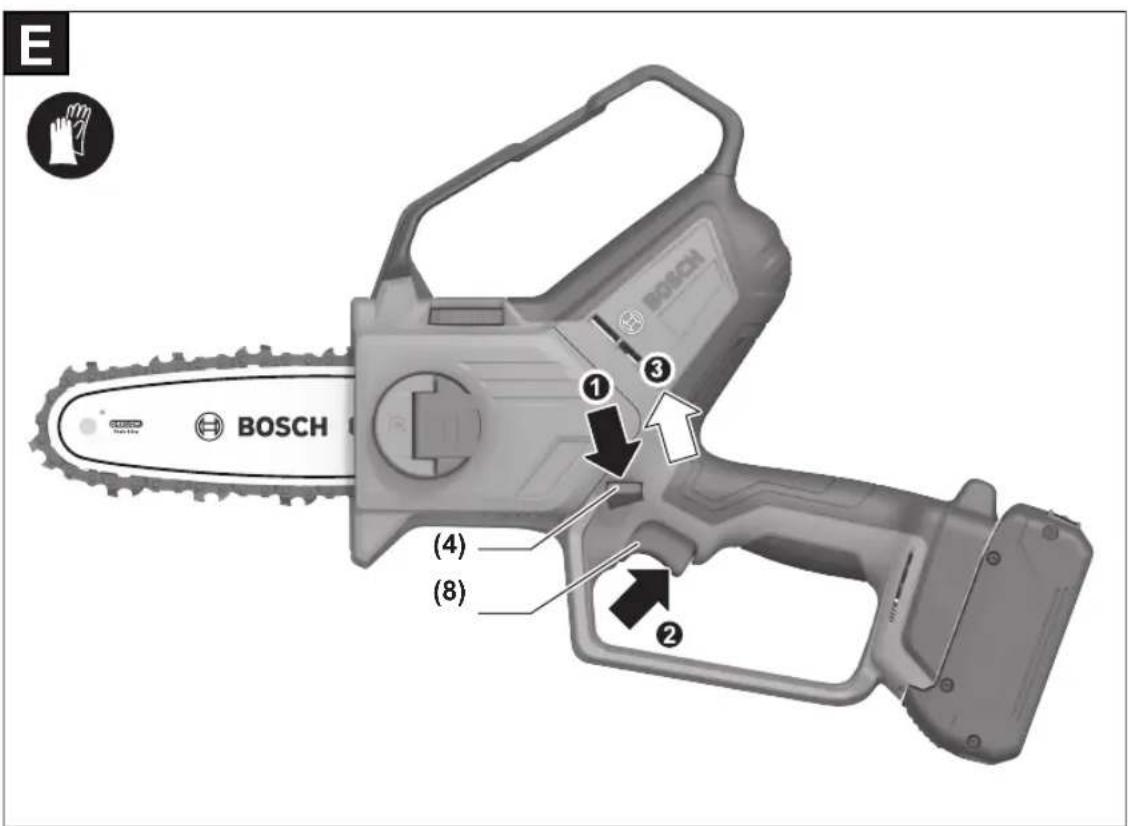
text_image
BOSCH ① ③ ② (4) (8)8

text_image
F (3) (5) BOSCH X BOSCH X BOSCH X BOSCH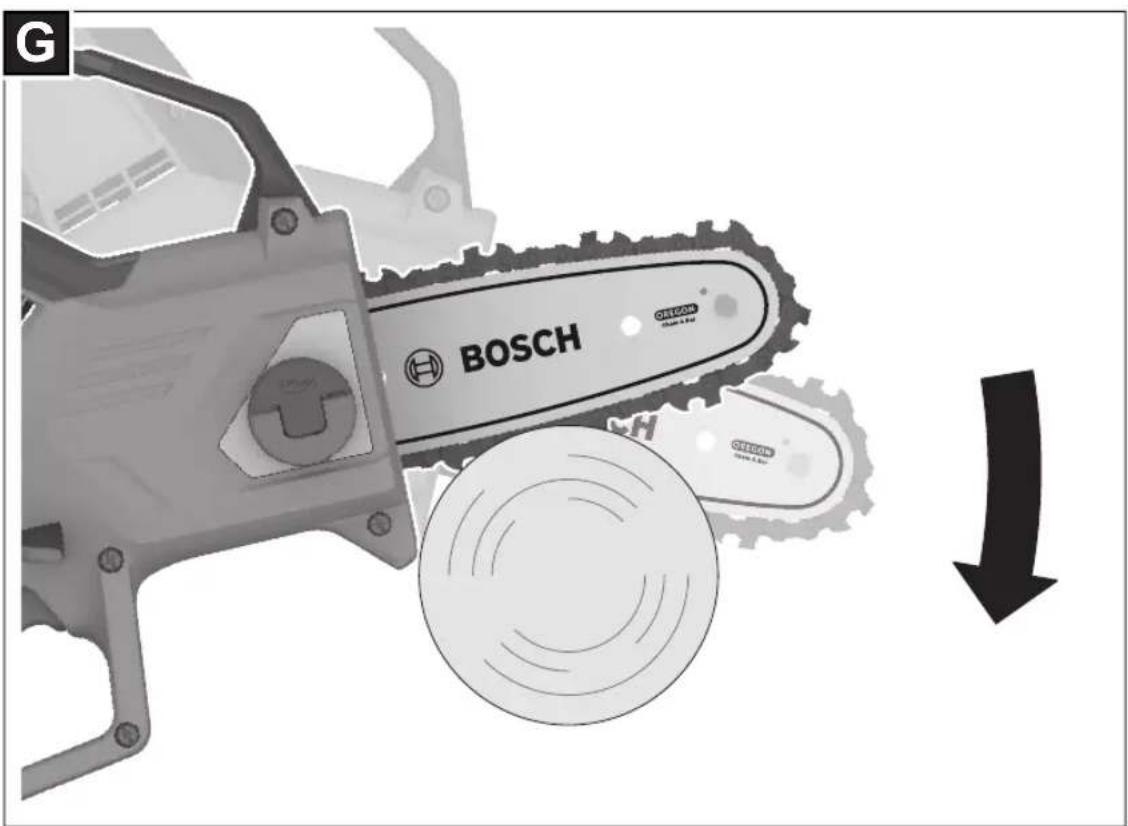
text_image
G BOSCH ORIOM ORIOM ORIOM ORIOM ORIOM ORIOM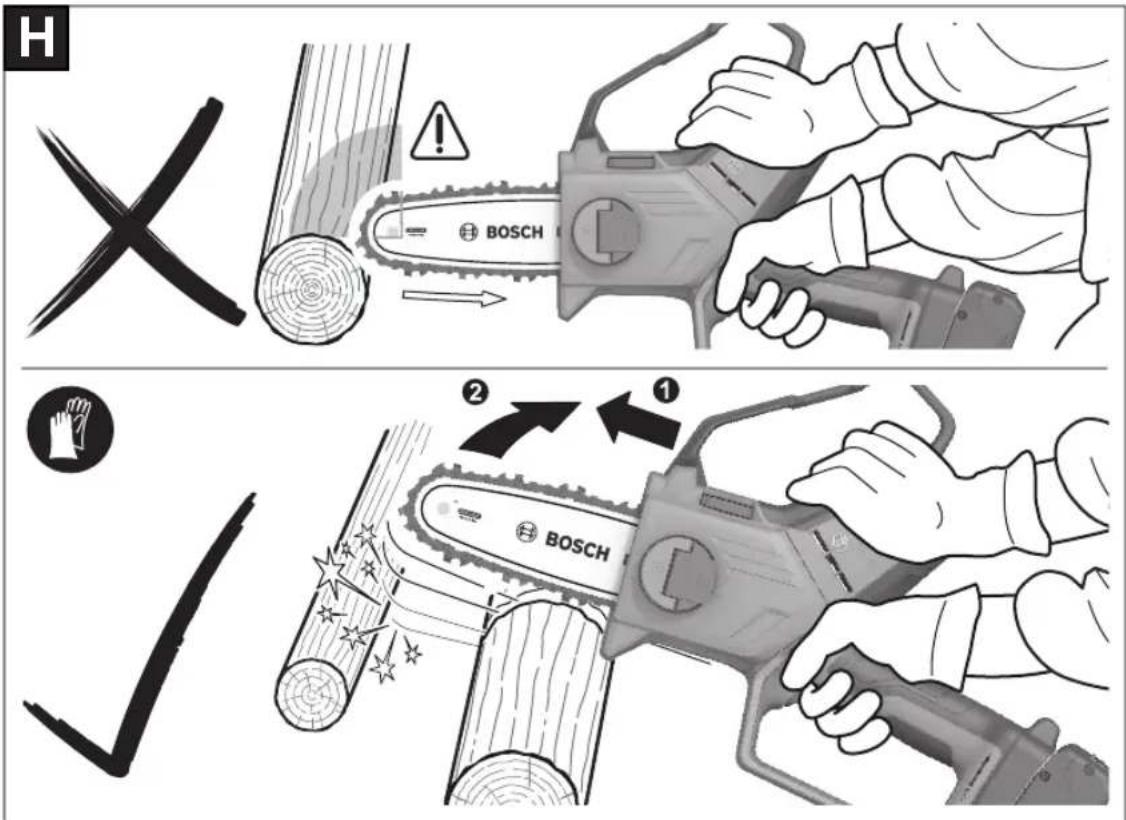
text_image
H BOSCH ② ① ✓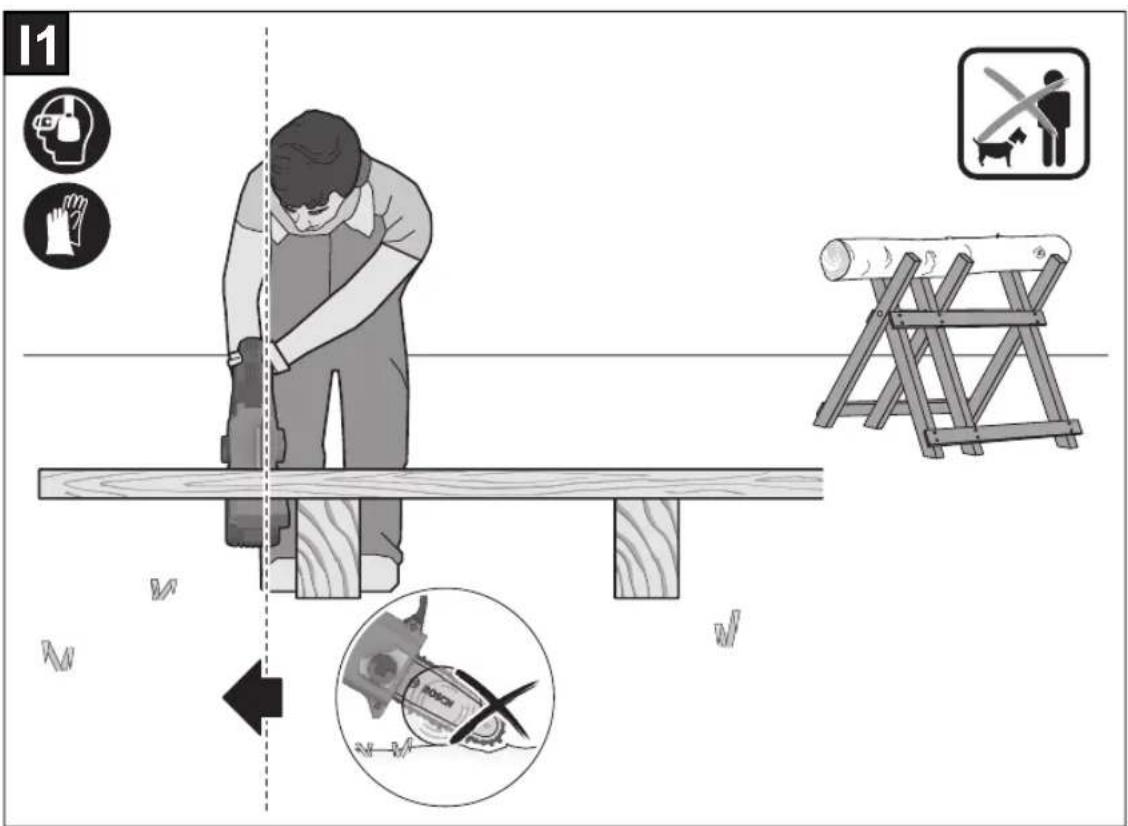
text_image
11 W W W W W W W W W W W W W W W W W W W W W W W W W W W W W W W W W W W W W W W W W W W W W W W W W W MOSA10
text_image
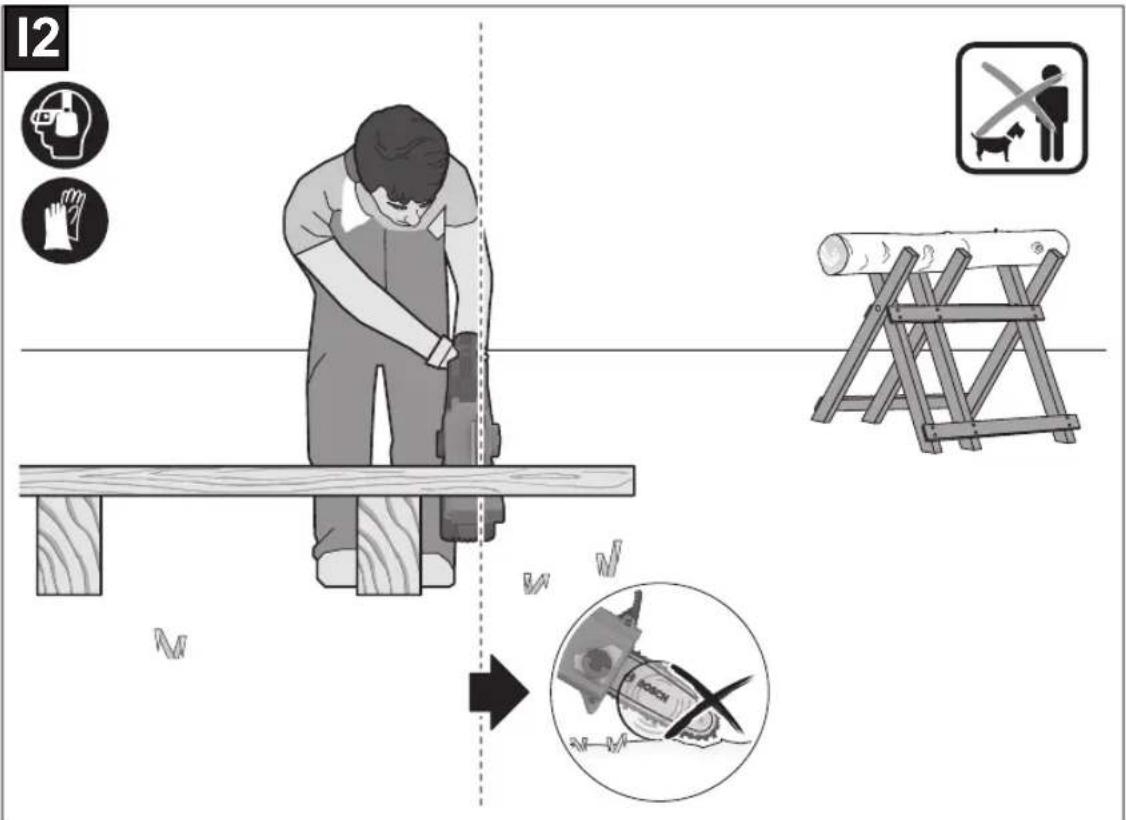
12 12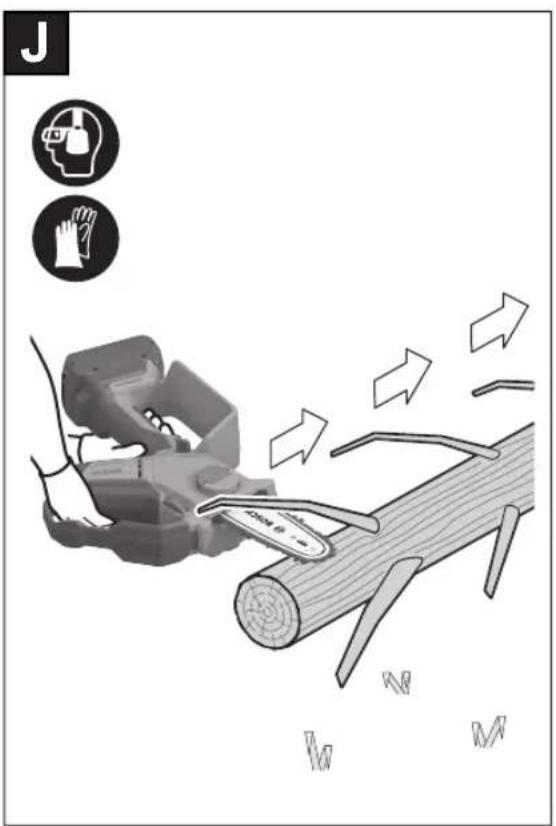
text_image
J H H W W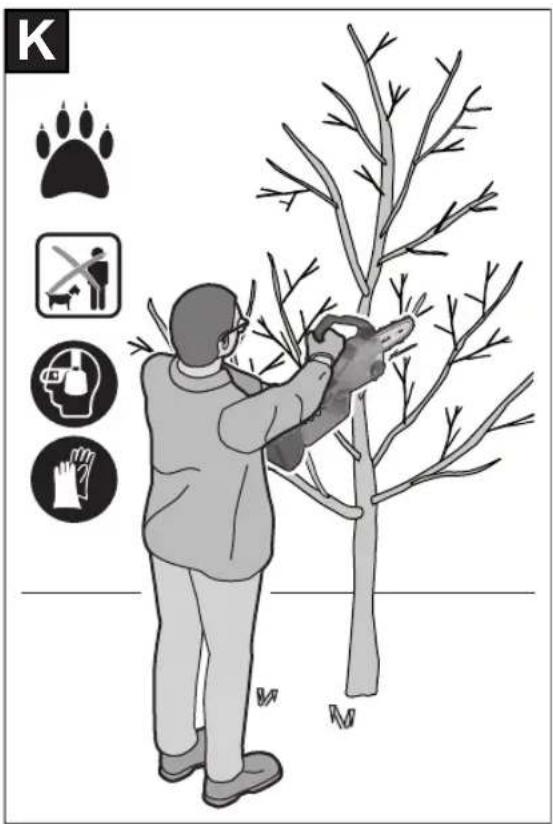
natural_image
Illustration of a person pruning a tree with a long-handled tool, accompanied by four hand icons (no text or symbols on the diagram itself)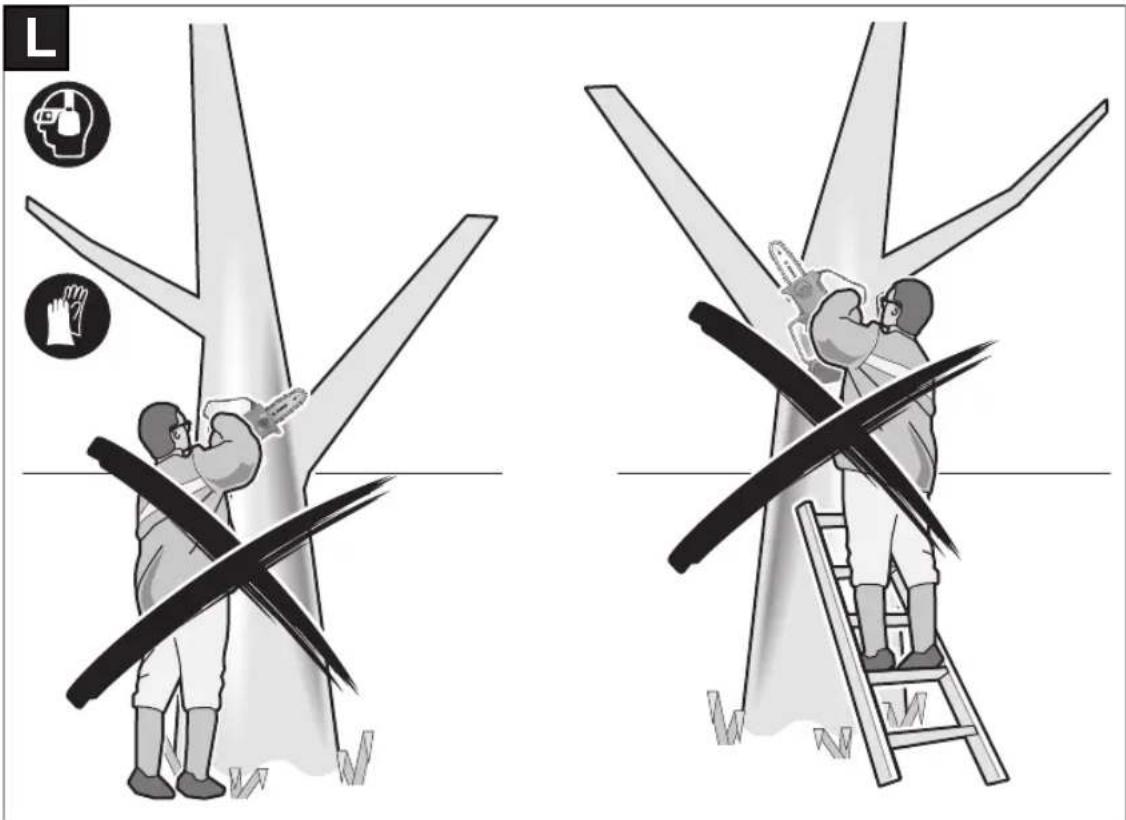
text_image
Illustration showing two scenarios of a person using a tool to clean or repair a tree, with icons indicating safety and hand protection.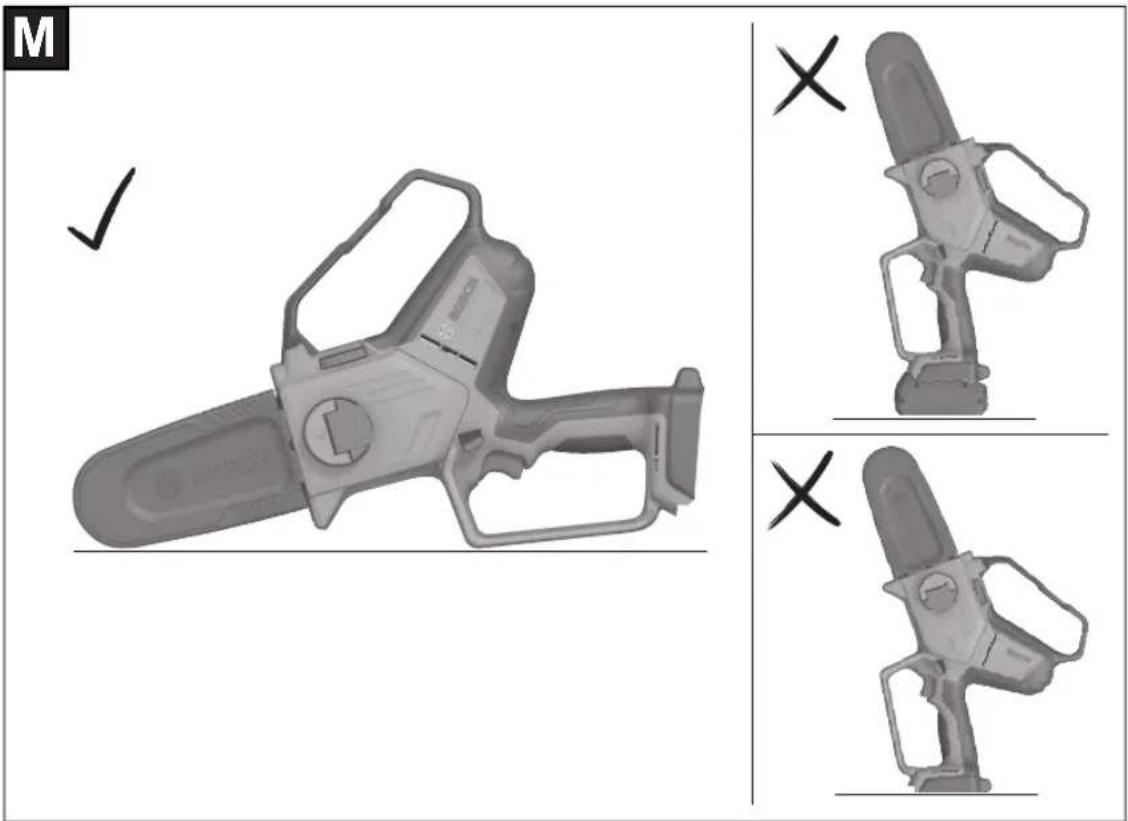
text_image
M ✓ × × ×12
N

F 016 800 642
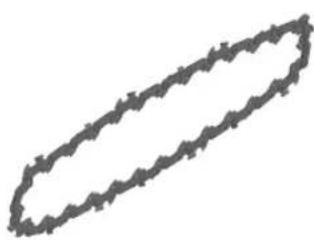
natural_image
Simple black oval shape with jagged edges on white background (no text or symbols)15 cm
F 016 800 662
20 cm
F 016 800 672
Deutsch
Sicherheitshinweise
Explanation of Symbols

Read instruction manual.

General hazard safety alert.

Do not expose to rain.

Always hold the pruner saw with both hands.

Pay attention to the kickback of the pruner saw and avoid sawing with the tip of the chain bar.

Keep hands away from moving chain.

Wear eye and ear protection.

Danger area! Keep hands, fingers or arms away from this area.

Wear hand protection.

WARNING: Disconnect the battery before carrying out maintenance work.
General Power Tool Safety Warnings
WARNING
Read all safety warnings, instructions, illustrations and specifica-
tions provided with this power tool. Failure to follow all instructions listed below may result in electric shock, fire and/or serious injury.
Save all warnings and instructions for future reference.
The term "power tool" in the warnings refers to your mains-operated (corded) power tool or battery-operated (cordless) power tool.
Work area safety
▶ Keep work area clean and well lit. Cluttered or dark areas invite accidents.
▶ Do not operate power tools in explosive atmospheres, such as in the presence of flammable liquids, gases or dust. Power tools create sparks which may ignite the dust or fumes.
▶ Keep children and bystanders away while operating a power tool. Distractions can cause you to lose control.
Electrical safety
▶ Power tool plugs must match the outlet. Never modify the plug in any way. Do not use any adapter plugs with earthed (grounded) power tools. Unmodified plugs and matching outlets will reduce risk of electric shock.
- Avoid body contact with earthed or grounded surfaces, such as pipes, radiators, ranges and refrigerat-
26 | English
ors. There is an increased risk of electric shock if your body is earthed or grounded.
▶ Do not expose power tools to rain or wet conditions. Water entering a power tool will increase the risk of electric shock.
▶ Do not abuse the cord. Never use the cord for carrying, pulling or unplugging the power tool. Keep cord away from heat, oil, sharp edges or moving parts. Damaged or entangled cords increase the risk of electric shock.
▶ When operating a power tool outdoors, use an extension cord suitable for outdoor use. Use of a cord suitable for outdoor use reduces the risk of electric shock.
▶ If operating a power tool in a damp location is unavoidable, use a residual current device (RCD) protected supply. Use of an RCD reduces the risk of electric shock.
Personal safety
▶ Stay alert, watch what you are doing and use common sense when operating a power tool. Do not use a power tool while you are tired or under the influence of drugs, alcohol or medication. A moment of inattention while operating power tools may result in serious personal injury.
▶ Use personal protective equipment. Always wear eye protection. Protective equipment such as a dust mask, non-skid safety shoes, hard hat or hearing protection used for appropriate conditions will reduce personal injuries.
▶ Prevent unintentional starting. Ensure the switch is in the off-position before connecting to power source and/or battery pack, picking up or carrying the tool. Carrying power tools with your finger on the switch or energising power tools that have the switch on invites accidents.
Remove any adjusting key or wrench before turning the power tool on. A wrench or a key left attached to a rotating part of the power tool may result in personal injury.
▶ Do not overreach. Keep proper footing and balance at all times. This enables better control of the power tool in unexpected situations.
▶ Dress properly. Do not wear loose clothing or jewellery. Keep your hair and clothing away from moving parts. Loose clothes, jewellery or long hair can be caught in moving parts.
▶ If devices are provided for the connection of dust extraction and collection facilities, ensure these are connected and properly used. Use of dust collection can reduce dust-related hazards.
▶ Do not let familiarity gained from frequent use of tools allow you to become complacent and ignore tool safety principles. A careless action can cause severe injury within a fraction of a second.
Power tool use and care
▶ Do not force the power tool. Use the correct power tool for your application. The correct power tool will do the job better and safer at the rate for which it was designed.
▶ Do not use the power tool if the switch does not turn it on and off. Any power tool that cannot be controlled with the switch is dangerous and must be repaired.
▶ Disconnect the plug from the power source and/or remove the battery pack, if detachable, from the power tool before making any adjustments, changing accessories, or storing power tools. Such preventive safety measures reduce the risk of starting the power tool accidentally.
▶ Store idle power tools out of the reach of children and do not allow persons unfamiliar with the power tool or these instructions to operate the power tool. Power tools are dangerous in the hands of untrained users.
- Maintain power tools and accessories. Check for misalignment or binding of moving parts, breakage of parts and any other condition that may affect the power tool's operation. If damaged, have the power tool repaired before use. Many accidents are caused by poorly maintained power tools.
▶ Keep cutting tools sharp and clean. Properly maintained cutting tools with sharp cutting edges are less likely to bind and are easier to control.
▶ Use the power tool, accessories and tool bits etc. in accordance with these instructions, taking into account the working conditions and the work to be performed. Use of the power tool for operations different from those intended could result in a hazardous situation.
▶ Keep handles and grasping surfaces dry, clean and free from oil and grease. Slippery handles and grasping surfaces do not allow for safe handling and control of the tool in unexpected situations.
Battery tool use and care
▶ Recharge only with the charger specified by the manufacturer. A charger that is suitable for one type of battery pack may create a risk of fire when used with another battery pack.
▶ Use power tools only with specifically designated battery packs. Use of any other battery packs may create a risk of injury and fire.
When battery pack is not in use, keep it away from other metal objects, like paper clips, coins, keys, nails, screws or other small metal objects, that can make a connection from one terminal to another. Shorting the battery terminals together may cause burns or a fire.
▶ Under abusive conditions, liquid may be ejected from the battery; avoid contact. If contact accidentally occurs, flush with water. If liquid contacts eyes, additionally seek medical help. Liquid ejected from the battery may cause irritation or burns.
▶ Do not use a battery pack or tool that is damaged or modified. Damaged or modified batteries may exhibit unpredictable behaviour resulting in fire, explosion or risk of injury.
▶ Do not expose a battery pack or tool to fire or excessive temperature. Exposure to fire or temperature above 130°C may cause explosion.
▶ Follow all charging instructions and do not charge the battery pack or tool outside the temperature range specified in the instructions. Charging improperly or at temperatures outside the specified range may damage the battery and increase the risk of fire.
Service
▶ Have your power tool serviced by a qualified repair person using only identical replacement parts. This will ensure that the safety of the power tool is maintained.
▶ Never service damaged battery packs. Service of battery packs should only be performed by the manufacturer or authorized service providers.
Pruner Saw Safety Warnings
▶ Keep all parts of the body away from the saw chain when the pruner saw is operating. Before you start the pruner saw, make sure the saw chain is not contacting anything. A moment of inattention while operating pruner saws may cause entanglement of your clothing or body with the saw chain.
The tool is designed for use with both hands. Always hold the pruner saw with one hand on the rear handle and the other hand on the auxiliary handle (see figure F).
Hold the pruner saw by insulated gripping surfaces only, because the saw chain may contact hidden wiring. Saw chains contacting a "live" wire may make exposed metal parts of the power tool "live" and could give the operator an electric shock.
▶ Wear eye protection. Further protective equipment for hearing, head, hands, legs and feet is recommended. Adequate protective equipment will reduce personal injury from flying debris or accidental contact with the saw chain.
▶ Do not operate a pruner saw in a tree, on a ladder, from a rooftop, or any unstable support. Operation of a pruner saw in this manner could result in serious personal injury.
▶ Always keep proper footing and operate the pruner saw only when standing on fixed, secure and level surface. Slippery or unstable surfaces may cause a loss of balance or control of the pruner saw.
▶ When cutting a limb that is under tension be alert for spring back. When the tension in the wood fibres is released the spring loaded limb may strike the operator and/or throw the pruner saw out of control.
▶ Use extreme caution when cutting brush and saplings. The slender material may catch the saw chain and be whipped toward you or pull you off balance.
Carry the pruner saw by the rear handle with the pruner saw switched off and away from your body. When transporting or storing the pruner saw, always fit the chain cover. Proper handling of the pruner saw will reduce the likelihood of accidental contact with the moving saw chain.
▶ Follow instructions for lubricating, chain tensioning and changing the bar and chain. Improperly tensioned or lubricated chain may either break or increase the chance for kickback.
▶ Cut wood only. Do not use pruner saw for purposes not intended. For example: do not use pruner saw for cutting metal, plastic, masonry or non-wood building materials. Use of the pruner saw for operations different than intended could result in a hazardous situation.
This pruner saw is not intended for felling trees. Use of the pruner saw for operations different than intended could result in serious injury to the operator or bystanders.
▶ Follow all instructions when clearing jammed material, storing or servicing the pruner saw. Make sure the switch is off and the battery pack is removed.
▶ Causes and operator prevention of kickback:
- Kickback may occur when the nose or tip of the guide bar touches an object, or when the wood closes in and pinches the saw chain in the cut.
- Tip contact in some cases may cause a sudden reverse reaction, kicking the guide bar up and back towards the operator.
- Pinching the saw chain along the top of the guide bar may push the guide bar rapidly back towards the operator.
- Either of these reactions may cause you to lose control of the saw which could result in serious personal injury. Do not rely exclusively upon the safety devices built into your pruner saw. As a pruner saw user, you should take several steps to keep your cutting jobs free from accident or injury.
Kickback is the result of tool misuse and/or incorrect operating procedures or conditions and can be avoided by taking proper precautions as given below:
Maintain a firm grip, with thumbs and fingers encircling the pruner saw handles, with both hands on the saw and position your body and arms to allow you to resist kickback forces. Kickback forces can be controlled by the operator, if proper precautions are taken. Do not let go of the pruner saw.
▶ Do not overreach and do not cut above shoulder height. This helps prevent unintended tip contact and enables better control of the pruner saw in unexpected situations.
▶ Only use replacement guide bars and saw chains specified by the manufacturer. Incorrect replacement guide bars and saw chains may cause chain breakage and/or kickback.
28 | English
▶ Follow the manufacturer's sharpening and maintenance instructions for the saw chain. Decreasing the depth gauge height can lead to increased kickback.
▶ Do not use the pruner saw to cut stumps and tree roots.
Additional Safety Warnings
This tool contains magnets – keep away from implants and other medical devices, e.g. pacemaker or insulin pumps, magnetic storage media and magnetically sensitive devices. The magnet generates a field that can impair the function of the devices or lead to irreversible data loss.
This appliance is not intended for use by persons (including children) with reduced physical, sensory or mental capabilities, or lack of experience and knowledge, unless they have been given supervision or instruction concerning use of the appliance by a person responsible for their safety. Children should be supervised to ensure that they do not play with the appliance.
▶ Always ensure all handles and guards are fitted when using the machine. Never attempt to use an incomplete machine or one fitted with an unauthorized modification.
▶ Always make sure that the chain is in the correct position. An incorrectly positioned chain can result in chain breakage, kickback and/or injury.
▶ Always wear robust full length trousers when working with the pruner saw.
Safety Instructions and Recommendations for Optimal Handling of the Battery
▶ Ensure the product is switched off before inserting the battery. Inserting the battery into a product that has the switch on can cause accidents.
▶ Use only Bosch batteries intended specifically for this product. Use of any other batteries may create a risk of injury and fire.
▶ Do not modify or open the battery. There is a risk of short-circuiting.


Protect the battery against heat (e.g., against continuous intense sunlight), fire, water, and moisture. There is a risk of explosion.
▶ When not using the machine detach the battery away from paper clips, coins, keys, nails, screws, or other small metal objects that could cause bridging of the terminals. Shorting the battery terminals together may cause burns or a fire.
In case of damage and improper use of the battery pack, vapours may be emitted. Ventilate the area and seek medical help in case of complaints. The vapours can irritate the respiratory system.
▶ Only use the battery with products from the manufacturer. This is the only way in which you can protect the battery against dangerous overload.
The battery can be damaged by pointed objects such as nails or screwdrivers or by force applied externally. An internal short circuit may occur, causing the battery to burn, smoke, explode or overheat.
▶ Do not short-circuit the battery. There is a risk of explosion.
▶ Protect the battery against moisture and water.
▶ Store the product and battery only within a temperature range between -20^ and 50^ . As an example, do not leave the battery in the car in summer.
▶ Occasionally clean the air inlet vents of the battery using a soft, clean and dry brush.
Symbols
The following symbols are important for reading and understanding the original instructions. Please take note of the symbols and their meaning. The correct interpretation of the symbols will help you to use the product in a better and safer manner.
Symbol Meaning
| Carefully check the area where the tool is to be used for wildlife and pets. Wild animals and pets can be injured by the machine during operation. Thoroughly check the working area and remove any stones, sticks, wires, bones and foreign objects. | |
| Wear head protection if there is a risk that falling branches could cause injuries. | |
| Keep children and bystanders away while operating the machine. Distractions can cause you to lose control over the machine. | |
| Movement direction | |
| Reaction direction | |
| Weight | |
| Switching On | |
| Switching Off | |
| Permitted action | |
| Prohibited action | |
| CLICK | Audible noise |
| Accessories/Spare parts |
Product Description and Specifications

Read all safety warnings and all instructions. Failure to follow the safety warnings and instructions may result in electric shock, fire and/or serious injury.
Please observe the illustrations at the beginning of this operating manual.
Intended Use
The product is intended for sawing wood such as branches, planks, wooden beams etc., at ground level.
Cuts can be sawed with or across the grain.
This power tool is not suitable for sawing mineral materials and plasterboard.
This power tool is not intended for felling trees.
This power tool must be operated with two hands whilst in use.
Delivery Scope
Carefully remove the machine from its packaging and check if the following parts are complete:
- Pruner saw
- Cover
- Saw chain
- Chain bar
- Chain cover
- Operating instructions
Battery and charger are included in certain versions.
When parts are missing or damaged, please contact your dealer.
Product Features
The numbering of the product features refers to the diagram of the power tool on the graphics page.
(1) Auxiliary hand guard
(2) Affixed tensioning wheel
(3) Auxiliary handle/insulated gripping surface
(4) Lock-off button for On/Off switch
(5) Rear handle / insulated gripping surface
(6) Battery receptacle
(7) Rear hand guard
(8) On/Off switch
(9) Chip ejector
(10) Cover
(11) Clamping knob
(12) Saw chain
(13) Chain bar
(14) Battery ^a)
(15) Charger ^a)
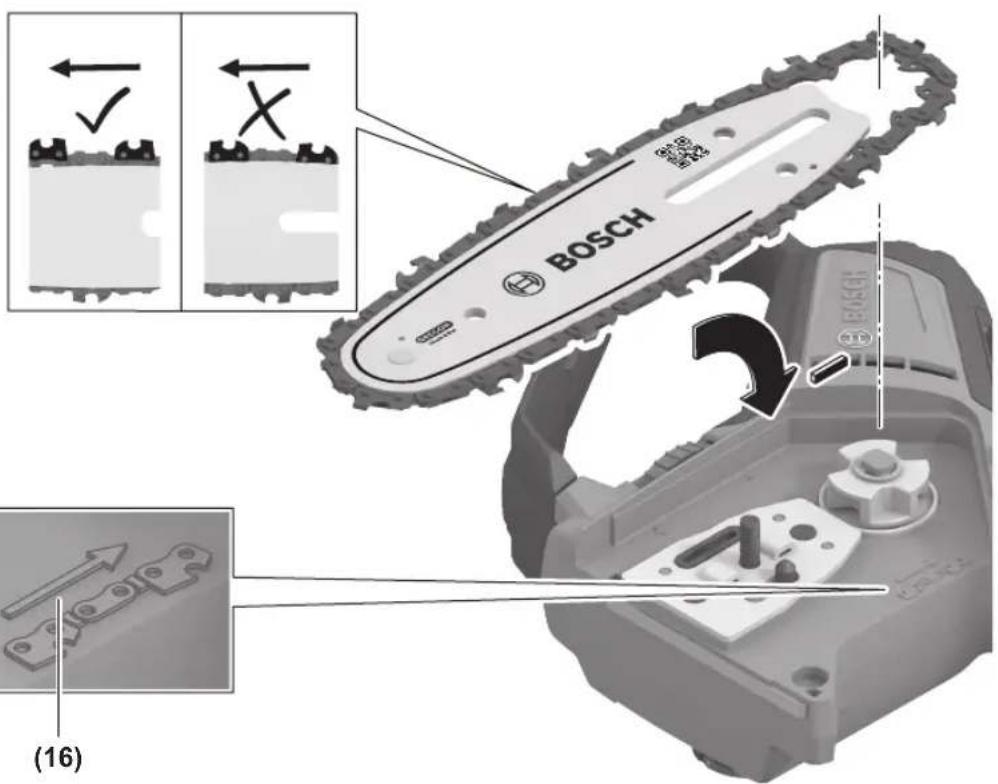
(16) Symbol for rotation and cutting direction
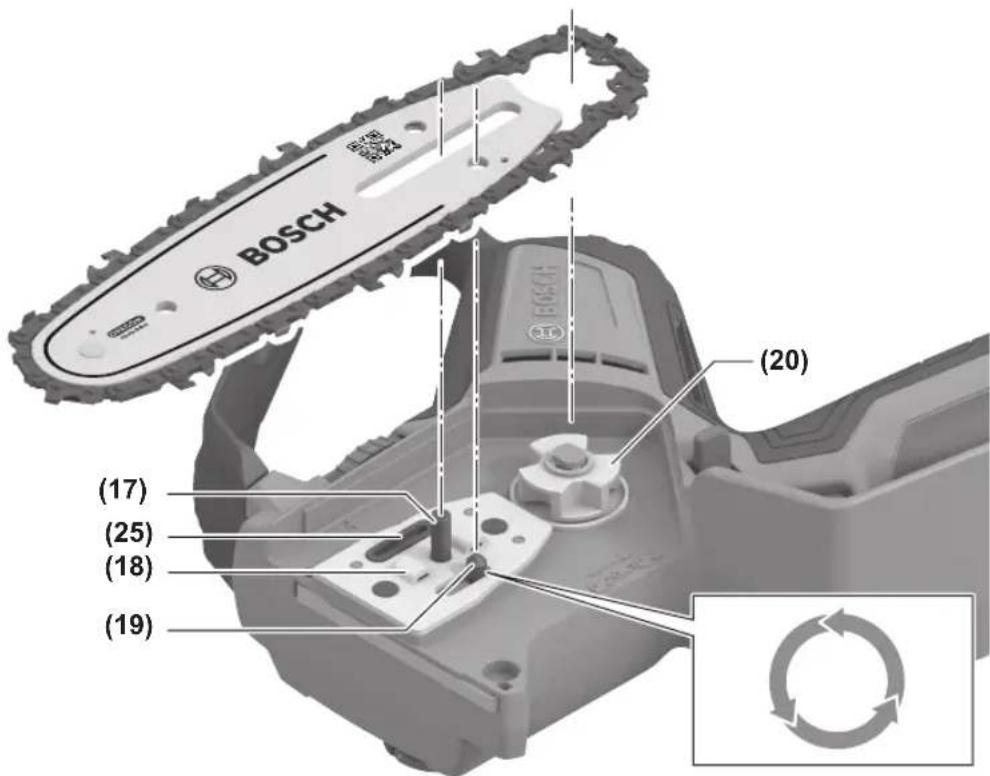
(17) Fastening bolt
(18) Guide fin for chain bar
(19) Bolt for chain tension
(20) Drive sprocket
(21) Oil filler cap
(22) Battery release button
(23) Base plate
(24) Chain cover
(25) Oil seal
(26) Oil reservoir
a) The accessories illustrated or described are not included as standard delivery.
Technical Data
| Pruner saw GKE 18V-15 GKE 18V-20 | ||
| Article number | 3 601 HD7 0.. 3 601 HD7 1.. | |
| Rated voltage V 18 18 | ||
| Chain speed (no-load) m/s 7.2 7.2 | ||
| Chain bar length cm 15 20 | ||
| Compatible chain bar Oregon - 1 619 P18 111 | Bosch - 1 619 PS3 141 | Oregon - 1 619 P19 527Bosch - 1 619 PS3 142 |
| Saw chain pitch 3/8" low profile 3/8" low profile | ||
| Drive link thickness 1.1 (0.043") 1.1 (0.043") | ||
| Amount of drive links 28 33 | ||
| Max. cutting diameter cm 13 18 | ||
| Toolless chain tensioning (SDS) | ● | ● |
| Automatic chain oiler | ● | ● |
| Nose sprocket | ● | ● |
30 | English
Pruner saw GKE 18V-15 GKE 18V-20
| Saw chain type 3/8'–90PX – low kickback 3/8'–90PX – low kickback | ||
| Oil reservoir capacity ml 50 50 | ||
| WeightA) | ||
| – without battery kg 1.75 1.80 | ||
| – with battery kg 2.40 (4.0Ah) – 3.15 (12.0Ah) 2.45 (4.0Ah) – 3.20 (12.0Ah) | ||
| Serial number See serial number (type plate) | on the machine | See serial number (type plate) on the machine |
| Recommended ambient temperature during charging | °C 0 ... +35 0 ... +35 | |
| Permitted ambient temperature during operationB) and storage | °C -20 ... +50 -20 ... +50 | |
| Compatible batteries GBA 18V... | ProCORE18V... | GBA 18V... ProCORE18V... |
| Recommended batteries GBA 18V... ≥ 4.0Ah | GBA 18V... ≥ 4.0Ah | |
| Recommended chargers | GAL 18... GAX 18... | GAL 18... GAX 18... |
A) Depending on battery in use
B) Limited performance at temperatures < 0 °C
Noise/Vibration Information
| GKE 18V-15 GKE 18V-20 | |||
| Noise emission values determined according to EN 62841-4-1 | |||
| Typically the A-weighted noise levels of the product are: | |||
| – Sound pressure level | dB(A) | 84 84 | |
| – Sound power level | dB(A) | 90 90 | |
| – Uncertainty K | dB | 3.0 | 3.0 |
| Wear hearing protection! | |||
| Vibration total values ah (triax vector sum) and uncertainty K determined according to EN 62841-4-1 | |||
| – Vibration emission value a_h | m/s^2 | 3.8 | 3.8 |
| – Uncertainty K | m/s^2 | 1.5 | 1.5 |
The declared vibration total value(s) and the declared noise emission value(s) have been measured in accordance with a standard test method and may be used for comparing one machine with another.
The declared vibration total value(s) and the declared noise emission value(s) may also be used in a preliminary assessment of exposure.
The vibration and noise emissions during actual use of the machine can differ from the declared total value depending on the ways in which the machine is used; and of the need to identify safety measures to protect the operator that are based on an estimation of exposure in the actual conditions of use (taking account of all parts of the operating cycle such as the times when the machine is switched off and when it is running idle in addition to the trigger time).
Rechargeable battery
Bosch sells some cordless power tools without a rechargeable battery. You can tell whether a rechargeable battery is included with the power tool by looking at the packaging.
Charging the battery
▶ Use only the chargers listed in the technical data. Only these chargers are matched to the lithium-ion battery of your power tool.
Note: Lithium-ion rechargeable batteries are supplied partially charged according to international transport regulations. To ensure full rechargeable battery capacity, fully charge the rechargeable battery before using your tool for the first time.
Inserting the Battery
Push the charged battery into the battery holder until it clicks into place.
Removing the Battery
To remove the rechargeable battery, press the battery release button and pull the battery out. Do not use force to do this.
The rechargeable battery has two locking levels to prevent the battery from falling out if the battery release button is pressed unintentionally. The rechargeable battery is held in place by a spring when fitted in the power tool.
Battery charge indicator
The green LEDs on the battery charge indicator indicate the state of charge of the battery. For safety reasons, it is only possible to check the state of charge when the power tool is not in operation.
Press the button for the battery charge indicator or to show the state of charge. This is also possible when the battery is removed.
If no LED lights up after pressing the button for the battery charge indicator, then the battery is defective and must be replaced.
Battery model GBA 18V...

LED Capacity
| 3× continuous green light 60–100 % |
| 2× continuous green light 30–60 % |
| 1× continuous green light 5–30 % |
| 1× flashing green light 0–5 % |
Battery model ProCORE18V...

LED Capacity
| 5 × continuous green light 80–100 % |
| 4 × continuous green light 60–80 % |
| 3 × continuous green light 40–60 % |
| 2 × continuous green light 20–40 % |
| 1 × continuous green light 5–20 % |
| 1 × flashing green light 0–5 % |
Recommendations for Optimal Handling of the Battery
Protect the battery against moisture and water.
Only store the battery within a temperature range of -20 to 50 °C. Do not leave the battery in your car in the summer, for example.
Occasionally clean the ventilation slots on the battery using a soft brush that is clean and dry.
A significantly reduced operating time after charging indicates that the battery has deteriorated and must be replaced.
Follow the instructions on correct disposal.
Battery Maintenance
Use the following procedures to enable optimum usage of the battery:
- Protect the battery against moisture and water.
- Store the machine and battery only within a temperature range between -20^ and 50^ . As an example, do not leave the battery in the car in summer.
- The battery must not be stored within the product but stored separately.
- Do not leave the battery in the product in direct sunlight.
- The ideal storage condition for the battery is 5^ .
- Occasionally clean the venting slots of the battery using a soft, clean and dry brush.
A significantly reduced working period after charging indicates that the battery is used and must be replaced.
Assembly
Mounting and Tensioning the Saw Chain (see figures B1 - B7)
▶ Wear PPE before maintaining or changing the saw chain.
▶ Do not use any tools for assembly.
▶ Using the pruner saw with a misaligned or improperly tensioned chain may result in chain breakage, kick-back, and/or injury. A correctly aligned and tensioned chain optimises product performance and extends its service life.
Upon initial operation, new chains can lengthen considerably.
- Avoid tensioning the chain if it is hot, as this will cause the chain to become overtensioned and fit too tightly against the chain bar when it cools down.
▶ Use only chains with a drive link thickness of 1.1 mm.
- Place the pruner saw on any suitable flat surface.
- Make sure that the tensioning wheel (2) has been turned fully in anticlockwise direction.
- Slot in the saw chain (12) in the gap of the chain bar (13). Ensure the saw chain is in the correct running direction by comparing the saw chain with the symbol for rotation and cutting direction (16).
- Place the chain bar (13) on the fastening bolt (17) and place the chain links around the drive sprocket (20).
- Check if all parts are positioned properly and hold the chain bar and the chain in this position.
- Rotate the tensioning wheel (2) clockwise until the chain is partially tensioned.
32 | English
- Attach the SDS cover (10) and rotate the clamping knob (11) clockwise until the cover is partially secured.
- Turn the tensioning wheel (2) clockwise (+) until the correct chain tension is reached. The saw chain (12) is correctly tensioned when it can be raised approx. 2–3 mm.
- Once the correct tension is reached, rotate the clamping knob (11) clockwise until it is firmly secured and fold down the bracket on the clamping knob (11). The chain bar is fixed in the set position. Do not continue to turn the tensioning wheel (2).
- If the chain is tensioned too tightly, fold up the bracket on the clamping knob (11) and turn partly anti-clockwise. Turn the tensioning wheel (-) and repeat the tensioning steps.
Saw Chain Lubrication
The pruner saw is not supplied filled with oil. Be sure to fill the oil reservoir of the pruner saw with chain oil before using it.
Check regularly whether the saw chain is properly lubricated:
- When the oil reservoir is full, hold the pruner saw with the tip of the chain bar pointed at a light-coloured surface.
- Let the power tool run for approx. 1 minute or until oil is visible on the light-coloured surface.
- If no oil is visible, see troubleshooting "Saw chain dry".
- If the lubrication system is still not working properly, contact a Bosch Customer Service centre.
Note: Use Bosch chain saw oil or equivalent chain oil approved for pruner saws. Use of non-approved oil may impair the performance of the oiling system.
Saw chain life and cutting capacity depend on optimum lubrication. Therefore, the saw chain is automatically lubricated with chain oil during operation via the oil outlet.
Filling the oil reservoir (see figure C)
To fill the oil reservoir, please proceed as follows:
- Set the pruner saw on any suitable surface with the oil filler cap (21) facing upward.
- Clean the area around the oil filler cap (21). Use a clean cloth to remove any dirt.
- Unscrew the cap.
- Carefully fill the oil reservoir with chain saw oil. Use of non-approved oil may impair the performance of the oil-ing system.
- Avoid dirt or debris from entering the oil reservoir.
- Screw oil filler cap on again. Clean any spilled oil remaining on the tool with a cloth.
- Make sure that the oil cap is not overtightened.
- Run the pruner saw for 30 seconds to pump oil into the system.
Note: The oil filter is integrated in the oil reservoir. Contact Bosch Customer Service for cleaning or troubleshooting. Note: Oil becomes denser at lower temperatures, which decreases the flow rate of oil. Do not use the pruner saw without oil.
Note: To check the oil level, switch off the machine and remove the battery.
Operation
Switching On and Off (see figure E)
Switching On
Remove the chain cover and insert the charged battery. Hold the pruner saw with both hands, one hand on the rear handle (5) and one hand on the auxiliary handle (3) between the handle and auxiliary hand guard ((1)).
Press the power lock-off button (4) and afterwards the On/Off switch (8).
As soon as the saw chain (12) moves, release the lock-off button for the On/Off switch (4) again.
Switching Off
Release the On/Off switch (8), the saw chain (12) comes to a standstill.
If the saw chain (12) does not stop after you release the On/Off switch (8), contact your Bosch Service Centre.
Remove the battery and mount the chain cover.
Working with the Pruner Saw
▶ Always read the operating and safety information before use.
▶ Never operate the machine with defective guards or shields, or without safety devices, for example protection from the running saw chain in place.
▶ Always check the condition of the pruner saw and the chain. Is the saw chain lubricated with oil? See Section "Saw chain lubrication". Only use the pruner saw if it is in perfect condition. Do not make any modifications to the pruner saw.
▶ Always check that the pruner saw is correctly assembled, see section "Mounting and Tensioning the Saw Chain".
▶ Always wear suitable clothing and personal protective equipment.
▶ Wear safety glasses, hearing protection and protective gloves. Suitable clothing reduces the risk of injury from thrown about cuttings and accidental contact with the saw chain.
▶ Always make sure that the environment is free from obstacles and persons not involved.
▶ Always use the pruner saw on a stable, level surface. Always use the pruner saw in good light conditions.
▶ Never use the pruner saw on a ladder or above shoulder height.
Note: The pruner saw is not supplied filled with oil (F 016 800 642). Do not use the pruner saw until you have
filled the oil reservoir with the recommended chain saw oil (see figure C).
▶ Never over-reach or work with arms fully extended.
▶ Always hold the pruner saw with both hands.
▶ Be careful with oil on the grip surfaces and use the gloves.
▶ Use a protective mask when cutting treated wood.
▶ Ensure that there is no power cable in the cutting area.
Do not use the pruner saw in bad weather conditions, especially when there is a risk of lightning. This decreases the risk of being struck by lightning.
Do not touch the chain bar. It may become hot after use.
Always ensure all handles and guards are fitted/undamaged when using the machine.
General Behaviour (see figure G)
- First-time users should practice cutting logs on a saw horse.
- Hold the pruner saw at the side of your body, with your preferred hand.
- The chain must be running at full speed before it makes contact with the wood.
- Do not force the saw chain while cutting, let the chain do the work.
- Remove the pruner saw with the saw chain running from an unfinished cut.
- Beware when reaching the end of the cut. The weight of the pruner saw changes unexpectedly as it cuts free from the wood. Danger of injury to the legs and feet.
Kickback (see figure H)
Kickback is the sudden backward/upward motion of the pruner saw, occurring when the chain (at the tip of the chain bar) comes in contact with a log or wood, or when the chain becomes jammed.
When kickback occurs, the pruner saw reacts unpredictable and can cause heavy injuries to the operator or bystanders. Particular attention must be given when sawing sidewards, slanted or during length cuts; release the On/Off switch (8) in dangerous situations to prevent injuries.
To avoid kickback:
– Saw with the chain bar at a flat angle.
- Never work with a widely stretched or heavily worn out saw chain.
- Remove a blunt saw chain.
- Never saw above shoulder height.
- Never work with the tip of the chain.
- Always hold the pruner saw firmly with both hands.
- Always use a Bosch approved low-kickback saw chain.
- Ensure correct chain tension.
Cutting logs/firewood (see figures I1 and I2)
- To cut logs, use a saw horse standing on a level and firm surface.
- Saw only wood or wooden objects. When sawing, always take care to avoid hitting stones, nails, etc., as these could be thrown up, could cause damage to the chain, or could result in serious injury to the operator or bystanders.
- Always secure the logs before cutting.
- Always cut the logs beyond the support points to prevent the log from snapping and the chain from jamming.
- Never allow the saw chain to make contact with the ground or items of workplace equipment.
- Be careful not to trip over tree stumps, branches, roots, etc.
- It is not recommended to cut wood larger than the cutting capacity specified in the technical data.
Limbing a Branch or Tree (see figure J)
- Limbing is removing the small branches from a fallen tree or large branch.
- Leave larger lower limbs to support the log off the ground.
- Remove the smaller limbs in one cut.
- Be careful when cutting branches/twigs, as these can spring or bounce back.
- Never use the pruner saw on a ladder or above shoulder height.
- Sawing is optimized when the chain speed remains steady during cutting.
Troubleshooting
The following chart lists problem symptoms, possible causes and corrective action, if your power tool does not operate properly. If these do not identify and correct the problem, contact your service agent.
Warning: Switch off and remove the battery prior to any troubleshooting.
Problem Possible Cause Corrective Measure
| Pruner saw fails to operate | Battery discharged Recharge battery; see also "Battery Charging" |
| Battery not fully connected Ensure both locking levels are engaged | |
| Motor protector has activated Allow motor to cool | |
| Battery too hot/cold Allow to cool/warm |
34 | English
Problem Possible Cause Corrective Measure
| Chain tension too high Release saw chain; see also (see "Mounting and Tensioning the Saw Chain (see figures B1 - B7)", page 31). | ||
| Saw chain will not move | Battery discharged Recharge battery; see also "Battery Charging" | |
| Power tool defective Contact your Bosch Service Centre | ||
| Area under SDS cover clogged See "Maintenance and Cleaning" | ||
| No oil on saw chain Retension saw chain; see also (see "Mounting and Tensioning the Saw Chain (see figures B1 - B7)", page 31) and oil saw chain (see also "Saw chain lubrication") | ||
| Pruner saw operates intermittently | Internal loose contact Contact your Bosch Service Centre | |
| On/Off switch (8) defective | Contact your Bosch Service Centre | |
| Saw chain dry No oil on saw chain Oil saw chain; see also "Saw chain lubrication" | ||
| Oil seal or oil passage clogged Clean oil seal and oil passage | ||
| Oil reservoir empty Refill oil reservoir; see also (see "Filling the oil reservoir (see figure C)", page 32) | ||
| Saw chain/guide bar hot | No oil on saw chain Oil saw chain; see also "Saw chain lubrication" | |
| Chain tension too high Release saw chain; see also (see "Mounting and Tensioning the Saw Chain (see figures B1 - B7)", page 31) | ||
| Dull saw chain Replace saw chain | ||
| Pruner saw rips, vibrates or does not saw properly | Saw chain tension too loose Release saw chain; see also (see "Mounting and Tensioning the Saw Chain (see figures B1 - B7)", page 31) | |
| Dull saw chain Replace saw chain | ||
| Saw chain worn out Replace saw chain | ||
| Saw chain teeth are facing in the wrong direction Reassemble with saw chain in correct direction | ||
| Excessive vibrations/noise | Power tool defective Contact your Bosch Service Centre | |
| Sawing time per battery charge too low | Too much friction, due to lack of lubricant Oil saw chain; see also "Saw chain lubrication" | |
| Saw chain dirty Clean saw chain | ||
| Poor sawing technique see Working with the pruner saw | ||
| Battery not fully charged | Recharge battery; see also (see "Charging the battery", page 30) | |
| Battery out of the allowable temperature range | Allow battery to warm naturally to room temperature (within battery operating temperature 0-45°C) | |
| The saw chain is running slow | Battery discharged Recharge battery; see also "Battery Charging" | |
| Battery out of the allowable temperature range | Allow battery to warm naturally to room temperature (within battery operating temperature 0-45°C) | |
| Excess oil | Residual oil from chain and sprocket area | See "storage" figure M and (see "Maintenance and Service", page 34) |
Maintenance and Service
Maintenance and Cleaning
▶ Before any work on the garden product itself (e.g. maintenance, tool change, etc.) as well as during
transport and storage, remove the battery from the garden product. There is danger of injury when unintentionally actuating the On/Off switch.
▶ Always wear suitable clothing and personal protective equipment.
▶ Regularly check the chain saw for obvious defects such as loose, dislodged or damaged saw chain and chain bar, loose fixings and worn or damaged components.
▶ Do not modify this product. Unauthorized modifications may impair the safety of your product and may result in increased noise and vibration and invalidates warranty.
Note: To ensure long and reliable service, carry out the following maintenance regularly.
For safe and proper working, always keep the power tool and its ventilation slots clean. Regularly check the pruner saw for obvious defects such as loose or damaged saw chain and chain bar and worn or damaged components.
Do not use water, solvents or polishes to clean the power tool.
Use a clean cloth or stiff brush to carefully remove any debris from the power tool.
Use a clean cloth to carefully remove debris from the oil outlet. Make sure that no debris enters the oil outlet, as this can cause blockages and lubrication problems.
Check that covers and guards are undamaged and correctly fitted. Carry out necessary maintenance or repairs before using.
Maintaining the saw chain
- Clean the chain bar and saw chain before storing the product for an extended period of time to prevent the parts from seizing.
How to clean the saw chain:
- Remove the cover (10), the chain bar (13) and the saw chain (12) from the chain saw and clean with a stiff brush. Dismantling the saw chain and chain bar.
- Inspect the saw chain for damage and replace or sharpen the saw chain.
Replacing and Sharpening the Saw Chain
▶ A sharp saw chain is required for optimum performance and safety.
▶ Never sharpen the saw chain yourself unless you have experience with it.
The saw chain can become blunt through prolonged use or when coming into contact with objects other than wood.
- Replace the saw chain with the Bosch saw chain accessory or have the saw chain professionally resharpened, see accessories.
- To assemble the saw chain to the tool Mounting and tensioning the saw chain and chain bar.
Replacing the Chain Bar
▶ Only replace the chain bar if you fully understand the product and the instructions, otherwise please contact the Bosch Service Centre.
- If the chain bar is worn, you can mount it upside down to extend its life, or you can replace it.
Note: Overtightening can cause the chain bar to pinch and restrict the path of the rotating saw chain (see "Mounting and Tensioning the Saw Chain (see figures B1 - B7)", page 31).
Chain bar
GKE 18V-15 1 619 PS3 141
GKE 18V-20 1 619 PS3 142
Checking the Automatic Oiler
Proper functioning of the automatic saw chain oiler can be checked by running the chain saw and pointing the tip of the chain bar towards a piece of cardboard or paper on the ground. Do not touch the ground with the chain and ensure a safety clearance of 20 cm. If an increasing oil pattern develops, the automatic oiler is operating correctly. If there is no oil pattern despite a full oil reservoir, see section "Troubleshooting" or contact your authorized Bosch after-sales service.
Transport and storage of the pruner saw
Before transporting the pruner saw:
- Always remove the battery.
- Always fit the chain guard on the chain bar (13) when the pruner saw is not being used to prevent injury.
- It is recommended to carry the pruner saw with the chain bar behind you.
In addition to all the steps for transporting the pruner saw, carry out the following before putting the chain saw into storage:
- Before putting the pruner saw into storage, always empty the oil reservoir, and refill it before use.
- Always store the pruner saw in a safe, dry place, out of the reach of children.
- Never place objects on the pruner saw.
After-Sales Service and Application Service
Great Britain
Tel. Service: (0344) 7360109

You can find our service addresses and links to the repair service and spare parts ordering at www.bosch-pt.com/serviceaddresses
In all correspondence and spare parts orders, please always include the 10-digit article number given on the nameplate of the product.
Disposal

Products, rechargeable batteries, accessories and packaging are to be recycled in an environmentally friendly manner.

Do not dispose of rechargeable batteries/batteries into household waste!
Only for EU countries:
According to European Directive 2012/19/EU on Waste Electrical and Electronic Equipment and its implementation into national law, power tools that are no longer usable must
36 | Français
be collected separately and disposed must be collected separately and be disposed of in an environmentally friendly manner. According to European Directive 2006/66/EG rechargeable batteries that are defect or no longer usable must be collected separately and disposed of in an environmentally friendly manner.
If disposed incorrectly, waste electrical and electronic equipment may have harmful effects on the environment and human health, due to the potential presence of hazardous substances.
Only for United Kingdom:
According to The Waste Electrical and Electronic Equipment Regulations 2013 (SI 2013/3113) (as amended) and the Waste Batteries and Accumulators Regulations 2009 (SI 2009/890) (as amended), products that are no longer usable must be collected separately and disposed of in an environmentally friendly manner.
Français
Calle Robert Bosch No. 405
www.bosch-pt.com/serviceaddresses
Tlf. Service Center: 44898855

Du kan finde vores serviceadresser og links til reparationsservice og bestilling af reservedele på: www.bosch-pt.com/serviceaddresses
www.bosch-pt.com/serviceaddresses
(22) Buton deblocare accumulator
www.bosch-pt.com/serviceaddresses
www.bosch-pt.com/serviceaddresses
Molimo da kod svih pitanja i naručivanja rezervnih delova neizostavno navedete broj artikla sa 10 brojčanih mesta prema tipskoj pločici proizvoda.
Zbrinjavanje
Proizvode, akumulatore, pribor i pakovanja treba odvesti na ekološki savesno recikliranje.
Proizvode i akumulatore/baterije ne bacajte u kućni otpad!
Samo za zemlje EU:
Prema Evropskoj direktivi 2012/19/EU proizvodi koji nisu više upotrebljivi, a prema Evropskoj direktivi 2006/66/EZ akumulatori/baterije koje su neispravne ili istrošene moraju se odvojeno sakupiti i reciklirati na ekološki prihvatljiv način.
www.bosch-pt.com/serviceaddresses
www.bosch-pt.com/serviceaddresses
Legal Information and Licenses
1. Open Source Components
1.1 Infineon TLE Library · BSD 3-Clause
Copyright © 2015, Infineon Technologies AG All rights reserved.
Redistribution and use in source and binary forms, with or without modification, are permitted provided that the following conditions are met:
- Redistributions of source code must retain the above copyright notice, this list of conditions and the following disclaimer.
- Redistributions in binary form must reproduce the above copyright notice, this list of conditions and the following disclaimer in the documentation and/or other materials provided with the distribution.
- Neither the name of the copyright holders nor the names of its contributors may be used to endorse or promote products derived from this software without specific prior written permission.
THIS SOFTWARE IS PROVIDED BY THE COPYRIGHT HOLDERS AND CONTRIBUTORS "AS IS" AND ANY EXPRESS OR IMPLIED WARRANTIES, INCLUDING, BUT NOT LIMITED TO, THE IMPLIED WARRANTIES OF MERCHANTABILITY AND FITNESS FOR A PARTICULAR PURPOSE ARE DISCLAIMED. IN NO EVENT SHALL THE COPYRIGHT OWNER OR CONTRIBUTORS BE LIABLE FOR ANY DIRECT, INDIRECT, INCIDENTAL, SPECIAL, EXEMPLARY, OR CONSEQUENTIAL DAMAGES (INCLUDING, BUT NOT LIMITED TO, PROCUREMENT OF SUBSTITUTE GOODS OR SERVICES; LOSS OF USE, DATA, OR PROFITS; OR BUSINESS INTERRUPTION) HOWEVER CAUSED AND ON ANY THEORY OF LIABILITY, WHETHER IN CONTRACT, STRICT LIABILITY, OR TORT (INCLUDING NEGLIGENCE OR OTHERWISE) ARISING IN ANY WAY OUT OF THE USE OF THIS SOFTWARE, EVEN IF ADVISED OF THE POSSIBILITY OF SUCH DAMAGE.
2. Warranty Disclaimer
This product contains Open Source Software components which underly Open Source Software Licenses. Please note that Open Source Licenses contain disclaimer clauses. The text of the Open Source Licenses that apply are included in this manual under "Legal Information and Licenses".