
DOH4541H - Oven DE DIETRICH - Free user manual and instructions
Find the device manual for free DOH4541H DE DIETRICH in PDF.

| Product type | Built-in oven |
| Brand | De Dietrich |
| Model | DOH4541H |
| Height (mm) | 596 |
| Width (mm) | 592 |
| Depth (mm) | 544 |
| Weight (kg) | 34.5 |
| Power supply | 220-240 V, 50/60 Hz, 16 A |
| Maximum power (kW) | 2.8 (estimated) |
| Useful volume (L) | 73 |
| Cooking modes | Fan-assisted, Conventional, Grill, Fan-assisted grill, Fan-assisted bottom heat, Eco, Keep warm, Defrost, Dough rising, Dehydrate, Shabbat, Combination heat |
| Automatic functions | AI (intelligent), Low temperature, automatic cooking by categories (meats, fish, dishes, bread, desserts) |
| Cleaning | Steam cleaning (35 min), Pyrolysis |
| Door type | Removable door, removable inner glass panels |
| Interior lighting | Halogen lamp 25 W, 220-240 V, G9, replaceable |
| Supplied accessories | Anti-tilt grid, drip tray 45 mm, 2 half-grids "flavor", telescopic sliding rails, plastic wedge |
| Number of levels | 6 heights |
| Safety | Button lock, child safety (< 8 years), automatic shut-off (AS), reinforced insulation |
| Energy efficiency index | 81.4 (fan-assisted mode) |
| Energy consumption (conventional mode) | 0.82 kWh/cycle |
| Energy consumption (fan-assisted mode) | 1.10 kWh/cycle |
| Country of manufacture | France (Origine France Garantie label) |
| After-sales service | Contact: 0 892 02 88 04 (€0.50/min) or 09 69 39 34 34 (toll-free) |
Frequently Asked Questions - DOH4541H DE DIETRICH
User questions about DOH4541H DE DIETRICH
0 question about this device. Answer the ones you know or ask your own.
Ask a new question about this device
Download the instructions for your Oven in PDF format for free! Find your manual DOH4541H - DE DIETRICH and take your electronic device back in hand. On this page are published all the documents necessary for the use of your device. DOH4541H by DE DIETRICH.
USER MANUAL DOH4541H DE DIETRICH
1 INSTALLATION ....6

Afficheur

natural_image
Diagram of a kitchen appliance with a grater and a black arrow pointing to the interior (no text or symbols)
natural_image
3D CAD model of a rectangular tray with internal channels and a black arrow indicating direction (no text or symbols)
natural_image
3D diagram of a kitchen appliance with a mesh grille and an arrow indicating direction (no text or symbols)• 3 PRESENTATION DU FOUR
SYSTÈME DE RAILS COULISSANTS
natural_image
Diagram of a microwave oven with airflow arrows indicating internal flow (no text or symbols)
natural_image
Mechanical assembly diagram showing a lever mechanism with arrows indicating motion direction (no text or symbols)
natural_image
Diagram of a rectangular tray with arrows indicating direction or movement, no text or symbols present
natural_image
Mechanical assembly diagram showing a lever mechanism with directional arrows and a magnified inset view (no text or symbols)natural_image
Two-panel illustration showing a person using a rack-mounted device to lift or rotate a wall panel (no text or symbols present)NETTOYAGE DES VITRES DE LA PORTE

Attention
natural_image
Illustration of a hand using a tool to adjust or install a component, with no visible text or symbols.
natural_image
Illustration of a hand inserting a component into a device with arrows indicating direction (no text or symbols)natural_image
Diagram of a printer or printer with a magnified inset showing the printer's internal structure (no text or symbols present)
natural_image
Diagram showing a printer's internal structure with an open base and a magnified view of the printer's tip (no text or symbols present)REEMPLACEMENT DE LA LAMPE

natural_image
Mechanical component diagram showing a pin-like assembly with a rotating knob (no text or symbols)RELATIONS CONSOMMATEURS FRANCE
| A | B | G | |
| SERVICE: | C | TYPE: D | I CE |
| E | F | ||
| Nr | H | Made in France |
You have just purchased a De Dietrich product. This choice reflects your high standards and taste for the French way of life.
Resulting from over 300 years' know-how, the De Dietrich creations embody the fusion between design, authenticity and technology at the service of culinary arts. Our appliances are manufactured using noble materials and offer an irreproachable quality of finish.
We are certain this high-quality product will enable cooking enthusiasts to express all their talents.
The De Dietrich Customer Service Department is at your disposal for all your questions and suggestions to always better meet your expectations.
We are honoured to be your new partner in the kitchen and thank you for your trust.

BVCert.6011825
With its factories based in France, in Orléans and Vendôme, De Dietrich cultivates a constant search for excellence, perpetuating exceptional know-how in the design of perfectly finished products.
Many of our electrical appliances are certified by the “Origine France Garantie” label, an acknowledgement which certifies they are manufactured in France.
This label both ensures the quality and durability of our appliances, as well as their traceability, thus offering a clear and objective indication of their provenance.
www.de-dietrich.com
De Dietrich
CRÉATEUR D'ÉMOTIONS DEPUIS 1684
IMPORTANT SAFETY ADVICE AND PRECAUTIONS......4
1 INSTALLATION ....6
Choice of location and fitting....6
Electrical connection 7
2 ENVIRONMENT 7
Caring for the environment....7
3 DESCRIPTION OF THE OVEN....8
The controls and display....9
Locking the controls....9
Accessories (depending on model)....10
Sliding rail system....11
Installing and removing the sliding rails 11
4 FIRST USE AND SETTINGS....12
Using the oven for the first time ....12
Settings menu (depending on model)....12
5 MANUAL COOKING MODE....13
Start a cooking programme ....15
6 COOKING TIPS....16
Drying function 16
7 AUTOMATIC COOKING MODE....17
Presentation of the automatic mode ....17
Presentation of dish categories....18
Starting an automatic cooking programme 21
Immediate cooking....21
8 OTHER FUNCTIONS....22
Cooking end options (according to the type of cooking)....22
Timer function 22
9 CARE....23
Cleaning and maintenance: 23
Replacing the light bulb....25
10 TROUBLESHOOTING AND SOLUTIONS....26
11 FUNCTIONAL SUITABILITY TESTS......28
IMPORTANT SAFETY ADVICE AND PRECAUTIONS
IMPORTANT SAFETY INSTRUCTIONS - READ CAREFULLY AND KEEP FOR FUTURE USE.
This user guide is available for download on the brand's website.
Once you receive the appliance, unpack it or have it unpacked immediately. Give it an overall inspection. Make a note of any reservations on the delivery slip and keep a copy.

Important:
This appliance may be used by children aged 8 years and older, and by persons with impaired physical, sensory or mental capacities, or without experience or knowledge, if they are supervised or have received prior instructions on how to use the appliance safely and have understood the risks involved.
— Children must not play with the appliance. The appliance should not be cleaned or maintained by unsupervised children.
— Children should be supervised to prevent them from playing with the appliance.

WARNING:
— The appliance and its accessible parts become hot during use. Be careful not to touch the heating elements inside
the oven. Children under 8 should not be allowed near the appliance unless they are constantly supervised
— This appliance is designed to cook with the door closed.
— Before pyrolytic cleaning of your oven, remove all accessories and any thick deposits.
— During cleaning, the surfaces may become warmer than under normal conditions of use.
It is advisable to keep children away from the appliance.
— Do not use a steam cleaner.
— Do not use abrasive cleaners or hard metal scrapers to clean the oven's glass door; they could scratch the surface and cause the glass to.

WARNING:
Make sure the appliance is disconnected from the power before replacing the lamp in order to avoid the risk of electric shock. Change the lamp only when the appliance has cooled down. To unscrew the view port and the light, use a rubber glove, which will make disassembly easier.

It must be possible to disconnect the appliance from the power supply by fitting a switch on the fixed wiring system in accordance with installation rules.
— If the power cable is damaged, it should be replaced by the manufacturer, its after-sales service or by a similarly qualified person in order to avoid danger.
— This appliance may be installed either under a worktop or in a column as shown in the installation diagram.
— Centre the oven in the cabinet so as to ensure a minimum gap of 10mm between the appliance and the surrounding unit. The material of the unit supporting the appliance must be heat-resistant (or covered with a heat-resistant material). For greater stability,
attach the oven to the unit with 2 screws through the holes provided on the side panels.
— The appliance must not be installed behind a decorative door to prevent overheating.
— This appliance is designed to be used for domestic and similar applications such as kitchen areas for the staff of shops, offices and other professional premises; farms; use by clients of hotels, motels and other residential type establishments; guest house type environments.
— The oven must be turned off when cleaning inside the oven.
Do not modify the characteristics of this appliance; doing so could be dangerous.
Do not use your oven as a larder or to store any items after use.
• 1 INSTALLATION
CHOICE OF LOCATION AND FITTING
The diagrams show the dimensions of a cabinet that will be able to hold your oven. This appliance may be installed either in a column (A) or under a worktop (B). If the cabinet is open, its opening at the back must be 70 mm maximum (C and D). Install the oven in the cabinet. To do this, remove the rubber stops and pre-drill a 2-mm diameter hole in the wall of the cabinet to avoid splitting the wood. Attach the oven with the two screws.
Re-position the rubber stops.
If the furniture is closed at the back, make a 50 x 50 mm opening through which to route the electrical cable.

• 1 INSTALLATION
ELECTRIC CONNECTION
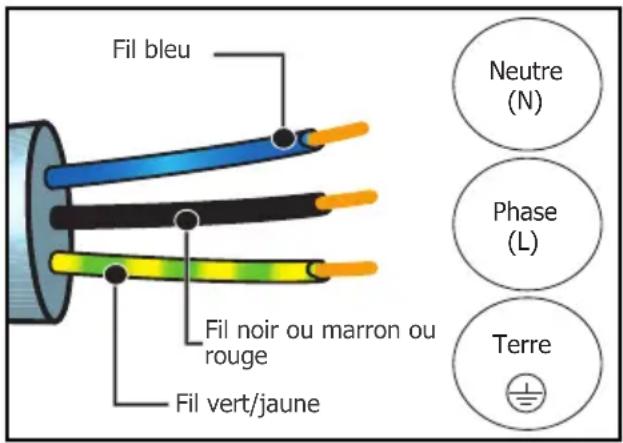
The oven is supplied with a standardised power cable with 3 conductors of 1.5mm^2 (1 live + 1 neutral + earth) which must be connected to the 220-240 Volt grid by means of an all-pole cut-off device in compliance with the installation rules.
The safety wire (green-yellow) is connected to the appliance's terminal and must be connected to the installation's earth. The circuit should be protected with a 16Amp fuse.
We cannot be held responsible for any accident or incident resulting from non-existent, defective or incorrect earthing or non-compliant connection.
Your appliance is designed to work as is, at a frequency of 50Hz or 60Hz, without you having to do anything.
Important: If the electrical installation of your home requires a modification to connect the appliance, call a qualified electrician. If the oven malfunctions in any way, unplug the appliance or remove the fuse for the oven's connection line.
• 2 ENVIRONMENT
CARING FOR THE ENVIRONMENT
The packaging material of this appliance is recyclable. Please recycle it and help protect the environment by depositing it in municipal containers provided for this purpose.
Your appliance also contains many recyclable materials. It is therefore marked with this logo to indicate that used appliances should not be mixed with other waste.
Recycling of appliances organised by your manufacturer is carried out under the best conditions, in accordance with the European regulation on waste disposal of
electronic and electrical equipment.
Contact your local authority or retailer for information on used appliance collection points close to your home. We thank you for your help in protecting the environment.
• 3 DESCRIPTION OF THE OVEN
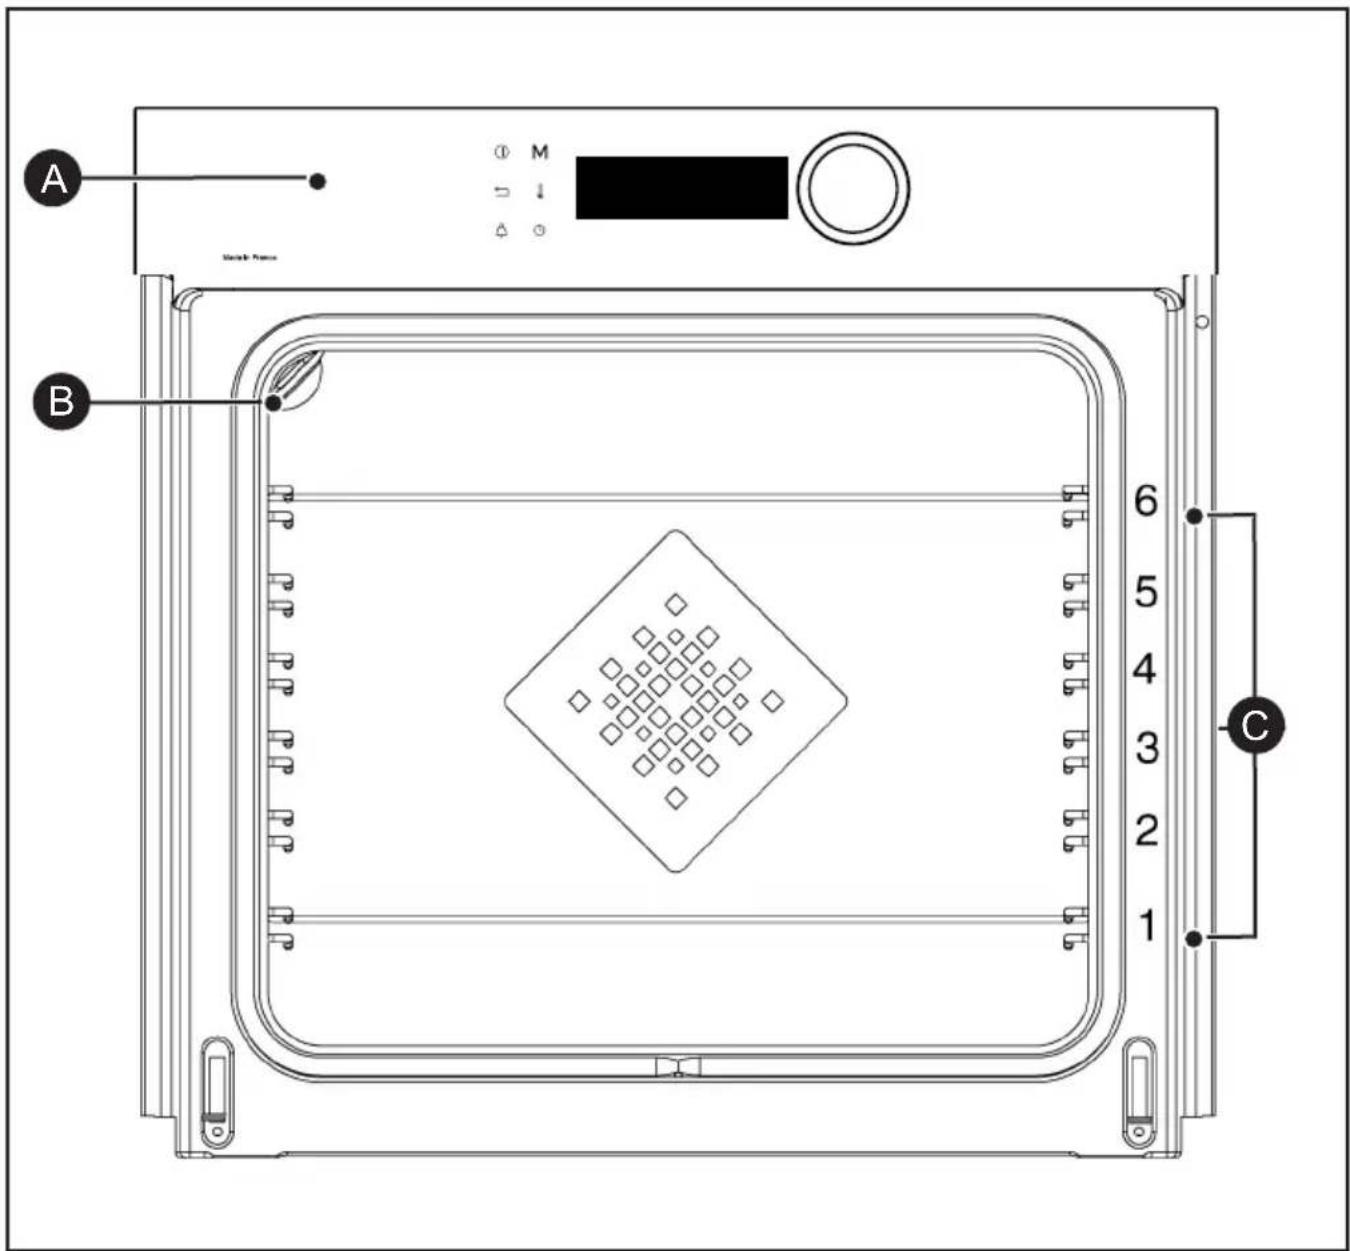
A Control panel
B Light
C Shelf runners (6 heights available)
• 3 DESCRIPTION OF THE OVEN
THE CONTROLS AND DISPLAY
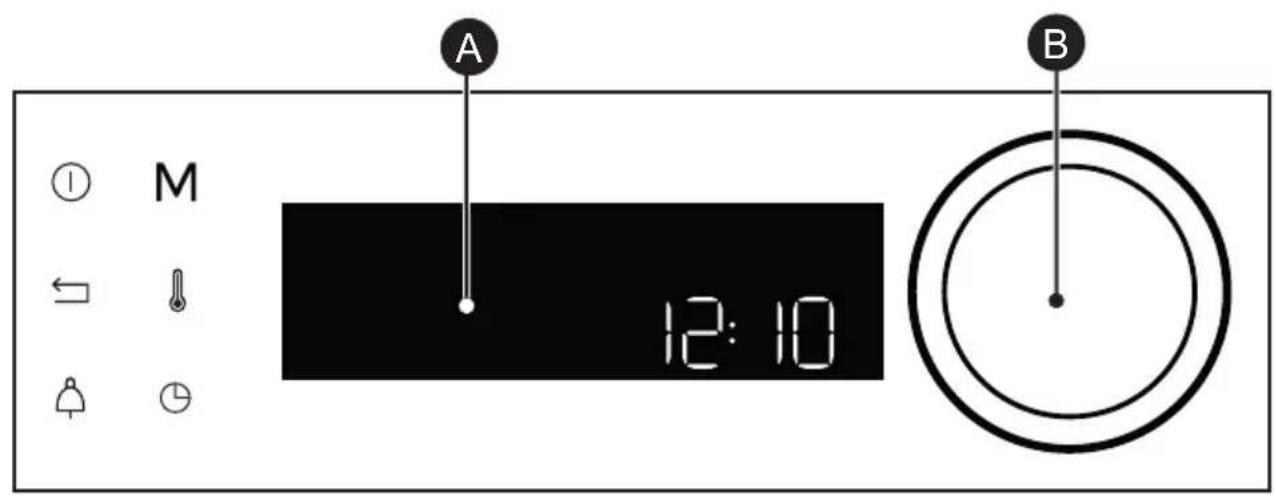

Display

Rotating knob with central button (cannot be removed):
- programme selection, increase or reduce values by turning it.
- Validate each action by pressing the centre.
LOCKING THE CONTROLS
Press and at the same time until the symbol appears on the screen.
Control locking is accessible during cooking or when the oven has stopped.
NOTE: only the stop key Ⓛ remains active.
To unlock the keypad, press the back and stop keys at the same time until the padlock symbol disappears from the screen.
• 3 DESCRIPTION OF THE OVEN
ACCESSORIES (DEPENDING ON MODEL)
- Anti-tip safety rack. When inserted into the supports, the rack can be used to support dishes and moulds containing the food to be cooked or browned, or for grilling (place food directly onto the rack). Position the anti-tip stop towards the back of the oven.
- 45 mm multi-purpose drip tray. To be inserted into the supports or placed on the sliding rails, with the handle towards the oven door. When placed under the rack, it collects juices and fat from grilling, and can also be used half-filled with water as a double-boiler.
- "Flavour" racks. These 2 half-racks are used separately, but only when placed on a sheet or drip tray with the anti-tip handle towards the back of the oven. By using just one grill, it is easy to moisten your food with the cooking juices collected in the dish.
natural_image
Diagram of a kitchen appliance with a grater and a black arrow indicating direction (no text or symbols)
natural_image
3D CAD model of a rectangular tray or container with internal channels and a black arrow pointing to the bottom-right corner (no text or symbols)
natural_image
3D diagram of a kitchen appliance with a mesh tray and ventilation duct (no text or symbols)• 3 DESCRIPTION OF THE OVEN
SLIDING RAIL SYSTEM
The new sliding rail system makes food more practical and easier to handle as the trays can be effortlessly pulled for simpler handling. The trays can be completely removed, providing full access. Their stability ensures that food can be handled safely, reducing the risk of burns. This means that you can take food out of the oven far more easily.
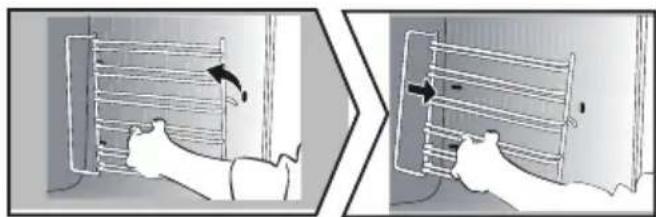
INSTALLING AND REMOVING THE SLIDING RAILS
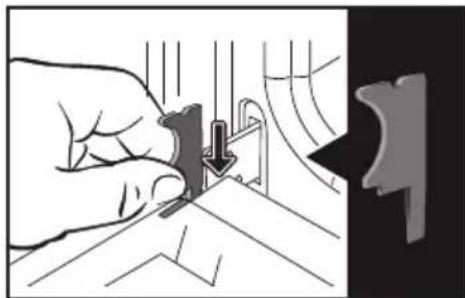
After removing the 2 shelf runners, choose the height (2 to 5) at which you want to fit your rails. Snap the left rail against the left shelf runner by applying enough pressure to the front and back of the rail so that the 2 tabs on the side of the rail slot into the shelf runner. Do the same for the right-hand rail.
NOTE: the telescopic sliding part of the rail must unfold towards the front of the oven, with the buffer Ⓐ opposite you. Insert your 2 shelf runners and then put your tray on the 2 rails. The system is now ready to use.
To remove the rails, remove the shelf runners again.
Slightly prise apart the bottom of the tabs fixed on each rail to release the shelf runner. Pull the rail towards you.
natural_image
Diagram of a microwave oven with airflow arrows indicating internal flow (no text or symbols)
natural_image
Mechanical assembly diagram showing a lever mechanism with arrows indicating motion direction (no text or symbols present)
natural_image
Diagram of a rectangular tray with arrows indicating direction or movement, no text or symbols present
natural_image
Mechanical assembly diagram showing a lever mechanism with directional arrows and a magnified inset view (no text or symbols)The accessories may warp with the effect of heat, but this will not alter their function. They will return to their original shape once cooled.
• 4 FIRST USE AND SETTINGS
USING THE OVEN FOR THE FIRST TIME
- Select the language
The first time you use your oven or after a power cut, turn the knob to select your language and press to confirm your choice.

Before using your oven for the first time, heat it at maximum temperature while empty for approximately 30 minutes. Make sure that the room is sufficiently ventilated.
- Set the time
Adjust the hours and minutes by turning the knob, then press to confirm.
Your oven displays the time.
SETTINGS MENU (DEPENDING ON MODEL)
In the general menu, select the
"SETTINGS" function by turning the control knob and confirm. Different settings are proposed.
Select the setting you want by turning the control knob then confirm.
Then set your parameters and confirm them.
- Time
Modify the hour, validate, then modify the minutes and validate again. If you oven is connected the time updates automatically.
- Sound
Your oven emits sounds when you use the keys. To keep these sounds, select ON, otherwise select OFF to deactivate them and confirm.
- Brightness
Select the desired brightness level.
- Sleep mode
You can also put your display on standby: ON position: the display switches off after certain amount of time.
OFF position: the brightness diminishes after a certain amount of time.
- Lamp management
Two setting options are proposed: ON position: the lamp remains on during all cooking programmes (except in ECO function). AUTO position: the oven lamp goes off after a certain period of time during the cooking programmes. Select your position and confirm.
- Language
Choose your language and confirm.
- DEMO mode
By default, the oven is configured in normal heating mode.
If it is activated in DEMO mode (ON position), the mode for presenting products in stores, your oven will not warm up.
- Diagnostic
Access the Diagnostic menu if a problem occurs.
If you contact the After-Sales Service, you will be asked to provide the codes displayed in the diagnostic.
• 5 MANUAL COOKING MODE
This mode lets you set the cooking parameters yourself: temperature, cooking type, cooking time. During your navigation, you can directly access this menu by pressing the "M" key.

Pre-heat your oven empty before cooking.
| Position | T°C recommended mini - maxi | Use | |
 | Combined heat | 205°C35°C - 230°C | Recommended for meat, fish, vegetables, preferably in an earthenware dish. |
 | Fan oven* | 180°C35°C - 250°C | Recommended for keeping white meat, fish and vegetables moist. For cooking multiple items on up to three levels. |
 | Traditional | 200°C35°C - 275°C | Recommended for meat, fish, vegetables, preferably in an earthenware dish. |
 | ECO* | 200°C35°C - 275°C | This setting saves energy while maintaining the quality of the cooking. In this setting, pre-heating is not required. |
 | Ventilated grill | 200°C100°C - 250°C | Roasts and poultry are juicy and crisp all over. Slide the drip tray on to the bottom shelf support. Recommended for all spit-roasted poultry or meat, for sealing and thoroughly cooking a leg or a rib of beef. To retain the moist texture of fish steaks. |
 | Bottom heat ventilated | 180°C75°C - 250°C | Recommended for meat, fish, vegetables, preferably in an earthenware dish. |
 | Variable grill | 41 - 4 | Recommended for grilling cutlets, sausages, toasting bread and prawns placed on the grill. Cooking controlled by the upper element. The grill covers the entire shelf surface. |
*Cooking mode as per standard EN 60350-1: 2016 to demonstrate compliance with requirements of the energy label of European regulation UE/65/2014.
• 5 MANUAL COOKING MODE
| Position | Recommended T°C mini - maxi | Use | |
 | Keep warm function | 60°C35°C - 100°C | Recommended for letting dough rise for bread, brioche, kügelhopf.Put the mould on the bottom, not exceeding 40°C (plate-warming, defrosting). |
 | Defrost | 35°C30°C - 50°C | Ideal for delicate dishes (fruit tarts, custard pies, etc.). Defrost meat, bread rolls, etc. at 50°C (meat should be placed on the rack with a dish underneath to catch the drips). |
 | Dough rising | 40°C | Programme recommended for all types of dough to rise, such as bread, brioche, pizza, kouglof, etc. Place your dish directly onto the bottom of the oven. |
 | Drying | 80°C35°C - 80°C | Sequence to dehydrate certain food items such as fruits, vegetables, roots, seasoning plants and herbs. Refer to the specific table on P.16. |
 | Shabbat | 90°C | Special sequence: the oven operates uninterrupted for 25 to 75 hours at 90°C only. |

Never place tin foil directly in contact with the oven floor as the build up of heat may damage the enamel.

Advice on how to save energy Avoid opening the door during cooking to avoid heat escaping from the oven.
• 5 MANUAL COOKING MODE
STARTING A COOKING PROGRAMME
IMMEDIATE COOKING
When you have selected and validated your cooking function, example: Ventilated floor, press the knob to confirm, preheating starts; a beep informs you the oven has reached the set temperature. You can now place your dish in the oven at the recommended shelf heights.
NB: Certain parameters may be modified before cooking starts (temperature, cooking time and delayed start); see the following chapters.
CHANGING THE TEMPERATURE
Based on the type of cooking you already selected, the oven will recommend the ideal cooking temperature.
This can be adjusted as follows:
- Press the key.
- Turn the control knob to change the temperature then confirm your choice.
COOKING TIME
You can enter the cooking time for your dish by pressing the Ⓤkey, enter the cooking time by turning the control knob then confirm.
SETTING THE COOKING END TIME (delayed start)
You can change the cooking end time if you want to delay it by pressing twice on the ⏻ key, then enter your cooking end time by turning the knob and confirm.
Once you have set the cooking end time, confirm. The cooking end time remains displayed.
NB: You may start cooking without selecting a duration or end time.
In this case, when you feel that you have cooked your dish for long enough, stop cooking (see the "Stopping cooking in progress" chapter).
STOPPING COOKING IN PROGRESS
To stop a cooking programme in progress, press the control knob.
"STOP" displays on the screen
Confirm by pressing the knob or by pressing and holding the oven stop key.
DRYING FUNCTION
Drying is one of the oldest methods of preserving food. The aim is to remove all or some of the water in the food to preserve foodstuffs and prevent the development of microbes. Drying preserves the nutritional qualities of food (minerals, proteins and other vitamins). It allows food to be stored in optimal conditions thanks to their reduced size and makes food easy to use once rehydrated.

Only use fresh food. Wash the food carefully, drain and wipe.
Cover the grill in parchment paper and distribute the cut food evenly on top. Use shelf level 1 (if you have several grill pans, put them on levels 1 and 3). Turn the food over several times during drying. The values provided in the table may vary depending on the type of food to dehydrate, its maturity, its thickness and its humidity rate.
GUIDE TABLE TO DEHYDRATE YOUR FOOD
| Fruits, vegetables and herbs | Temperature | Time in hours | Accessories |
| Fruits with seeds (in 3 mm slices, 200 g per grill pan) | 80°C | 5-9 | 1 or 2 grill pans |
| Fruits with stones (plums) | 80°C | 8-10 | 1 or 2 grill pans |
| Edible roots (carrots, parsnips), grated and blanched | 80°C | 5-8 | 1 or 2 grill pans |
| Sliced mushrooms | 60°C | 8 | 1 or 2 grill pans |
| Tomato, mango, orange, banana | 60°C | 8 | 1 or 2 grill pans |
| Sliced red beetroot | 60°C | 6 | 1 or 2 grill pans |
| Herbs | 60°C | 6 | 1 or 2 grill pans |
• 7 AUTOMATIC COOKING MODE
PRESENTATION OF THE AUTOMATIC MODE
In the AUTO mode, you will find many varied recipes sorted into categories, which you can cook in different ways. The oven AI will offer you automatically a preselected automatic cooking mode or alternatives to be selected from the navigation interface.
AI
This mode selects for you the suitable cooking parameters based on the food to be prepared. For some types of food, some additional parameters must be entered (weight, size, etc.)
LOW TEMPERATURE
For a recipe managed completely by the oven using a specific electronic programme.
This cooking mode makes meat fibres tender thanks to slow cooking at low temperature. Cooking quality is optimal.

Cooking ABSOLUTELY must begin in a cool oven.

Cooking at low temperature wires food to be extremely fresh. For try, it is important to rinse the side and inside with cold water and ray with absorbent paper before king.
• 7 AUTOMATIC COOKING MODE
PRESENTATION OF DISH CATEGORIES
In the general menu, select the "AUTO" function by turning the control knob and confirm.
Different dish categories are available to you:
- Meat, Fish, Dishes, Bread & Doughs, Desserts.
Select the setting you want by turning the control knob then confirm.

Tip
Before inserting your dish, for all cooking programmes, the oven indicates which shelf level to place your dish on
| MEAT AI | LOW TEMPERATURE | |
| MEAT TERRINE O | ||
| SHOULDER OF LAMB O | ||
| DE-BONED LEG OF LAMB O | ||
| LEG OF LAMB ON THE BONE O | ||
| VEAL RIBS O | ||
| VEAL ROAST O O | ||
| PORK SHANK O | ||
| PORK LOIN O | ||
| FILET MIGNON O O | ||
| PORK ROAST O O | ||
| BEEF ROAST O O | ||
| Poultry O O | ||
| DUCK O | ||
| DUCK BREAST | O | |
| TURKEY LEG O | ||
| TURKEY | O | |
| GOOSE | O |
• 7 AUTOMATIC COOKING MODE
PRESENTATION OF DISH CATEGORIES
| FISH AI | LOW TEMPERATURE | |
| TROUT O O | ||
| SALMON O O | ||
| LARGE FISH O O | ||
| SMALL FISH O O | ||
| SEA BASS O O | ||
| LOBSTER O | ||
| FISH TERRINE O |
| TYPE OF FOOD AI | LOW TEMPERATURE | |
| STUFFED VEGETABLES O | ||
| VEGETABLE GRATIN O | ||
| STUFFED TOMATOES O | ||
| LASAGNE O | ||
| MEAT PIE O | ||
| SAVOURY TART | O | |
| CHEESE TART | O | |
| QUICHE | O | |
| PIZZA | O | |
| POTATO GRATIN | O O | |
| MOUSSAKA | O | |
| SOUFFLÉ | O |
• 7 AUTOMATIC COOKING MODE
PRESENTATION OF DISH CATEGORIES
| BREAD AND DOUGHS AI | LOW TEMPERATURE | |
| BRIOCHE O | ||
| BAGUETTES O | ||
| BREAD O | ||
| SHORTCRUST PASTRY O | ||
| PUFF PASTRY O |
| DESSERTS AI | LOW TEMPERATURE | |
| YOGHURT O | ||
| KOUGLOF O | ||
| SPONGE CAKE O | ||
| APPLE CAKE O | ||
| POUND CAKE O | ||
| LOAF CAKE O | ||
| CHOCOLATE CAKE | O | |
| YOGHURT CAKE | O | |
| FRUIT CRUMBLE | O | |
| FRUIT PIE | O | |
| BISCUITS/COOKIES | O | |
| CUPCAKES | O | |
| CHOUX PASTRY | O | |
| CRÈME CARAMEL | O |
• 7 AUTOMATIC COOKING MODE
STARTING AN AUTOMATIC COOKING PROGRAMME
The “AUTO” function selects for you the suitable cooking parameters based on the food to be prepared.
IMMEDIATE COOKING
- Select the "AUTO" mode when you are in the general menu then confirm.
The oven suggests several categories of dishes (Meat, Fish, Dishes, Bread & Doughs, Desserts):
Depending on the selected dish, the AI mode suggests a default weight which you will need to adjust if needed before confirming. The oven automatically calculates the cooking time and temperature parameters. The shelf height displays, insert your dish and confirm.
- The oven beeps and turns off when the cooking time is finished; your screen then indicates that the dish is ready.

For certain AI recipes the oven must be preheated before you e your dish in it.
You may open your oven to baste your dish at any time during cooking.
COOKING END OPTIONS (ACCORDING TO THE TYPE OF COOKING)
Once cooked in both the manual and Auto mode, the oven offers three options to adjust to the expected result: CRISP, KEEP WARM and ADD 5 MIN.
CRISP
You can brown a dish once cooked with the "Crisp" function.
Select a cooking function, add the temperature and set a cooking time. Once cooked, select the “Crisp” function and confirm by pressing the control knob.
Cooking starts. The grill will automatically switch on during the 5 last minutes of your cooking time.
ADD 5 MIN (only in manual mode)
You can select the “ADD 5 MIN” option at the end of your cooking with a set time. By activating “ADD 5 MIN”, the oven will use the same cooking mode and temperature settings for 5 more minutes. You may press this again if necessary.
BON APPETIT: once cooked, your oven displays "Bon Appétit" and you can remove your dish from it. To switch off your oven, press the control knob or the stop oven key.
KEEP WARM
Once cooked, you can select the “KEEP WARM” option, which enables you to leave your dish in the oven without overcooking it. The oven temperature will adjust to an eating temperature until you are ready.
TIMER FUNCTION
This function can only be used either when the oven is off or during cooking.
- Press the key.
Set the minute minder by turning the knob and then press to confirm. The timer starts.
Once the time has lapsed, there is a sound signal. To stop it, press any key.
Note: You can modify or cancel the timer at any time.
Press the key again and set your time or set it to 0m00s to cancel. Pressing the control knob during the countdown will also stop the timer.
. 9 CARE
CLEANING AND MAINTENANCE:
With this function you will spend less time cleaning your oven, and be eco-responsible. To do so, spray the oven cavity with 300 ml water and launch the steam cleaning function by positioning the knob on 35 min.
CLEANING THE OUTER SURFACES
Use a window washing product applied to a soft cloth. Do not use abrasive creams or scouring sponges.
CLEANING THE SHELF RUNNERS
Remove the shelf runners to clean them. Lift the front part of the shelf runner upwards, push the shelf runner assembly and release the front hook from its housing. Then gently pull the whole shelf runner towards you to release the rear hooks from their housing. Pull out the two shelf supports.
natural_image
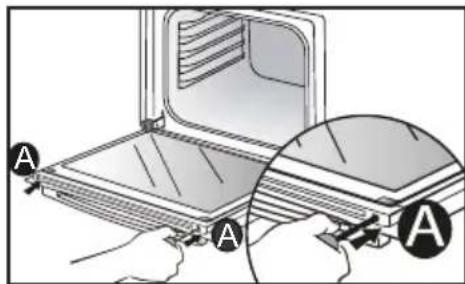
Diagram showing two views of a person using a rack-mounted device, with no visible text or symbols.REMOVING THE OVEN DOOR GLASS PANELS

Warning
Do not use scouring products, abrasive sponges or metal scrapers to clean the glass oven door as this could scratch the surface and cause the glass to shatter.
Before doing this, remove any excess grease on the inside panel with a soft cloth and washing up liquid.
To clean the different inside glass panels, disassemble them as follows:
REMOVING THE DOOR
Open the door fully and block it with the plastic wedge provided in your appliance's plastic pouch.
natural_image
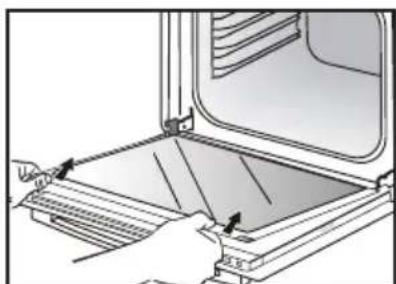
Illustration of a hand operating a sewing machine tool with a downward arrow indicating compression (no text or symbols present)Remove the clipped glass panel: use a tool (screwdriver) to press into the slots (A) in order to unclip the first glass panel and remove it.
natural_image
Illustration of a hand pressing down on a door panel with arrows indicating movement (no text or symbols)Do not soak the glass panels in water. Rinse with clean water and dry off with a lint-free cloth.
. 9 CARE
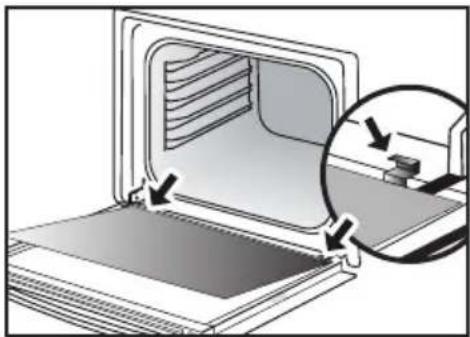
RE-ASSEMBLING THE DOOR
After cleaning, reposition the glass panel and engage it into the metal stops, then clip it in with the shiny side facing outwards. Remove the plastic wedge.
Your appliance is now ready to use again.
natural_image
Diagram of a printer or printer with a magnified inset showing the printer's internal structure (no text or symbols present)
natural_image
Diagram showing a printer's internal structure with an open lid and a magnified view of the printer's tip (no text or symbols present)REPLACING THE LIGHT BULB
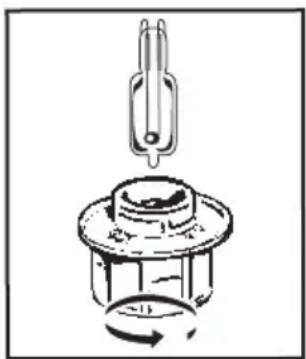
Warning: Make sure the appliance is disconnected from the power supply before replacing the bulb in order to avoid the risk of electric shock. Change the lamp only when the appliance has cooled down.
Bulb details:
25 W, 220-240 V\~, 300°C, G9.
natural_image
Mechanical component diagram showing a pin-like assembly with a rotating knob (no text or symbols)You can replace the bulb yourself. Unscrew the view port and remove the bulb (use a rubber glove, which will make it easier to remove). Insert the new bulb and replace the view port.
This product contains a light source with energy rating G.
• 10 TROUBLESHOOTING AND SOLUTIONS
| Questions | Troubleshooting and Solutions |
| - "AS" is displayed (Auto Stop system). | This function stops heating the oven if you forget to switch it off. Turn your oven to STOP. |
| - Fault code starting with "F". | Your oven has detected a problem. Stop the oven for 30 minutes. If the fault is still there, cut off the power supply for at least one minute. If the fault persists, contact the Customer Service Department. |
| - The oven is not heating. | Check that the oven is correctly connected and that your installation's fuse is not out of service. Check that the oven is not set to "DEMO" mode (see settings menu). |
| - The oven light is not working. | Replace the bulb or the fuse. Check that the oven is correctly connected. See chapter on replacing the light bulb. |
| - The cooling fan continues to operate after the oven has stopped. | This is normal. It can work for up to one hour after cooking to cool down the oven. If it continues beyond this, contact the After Sales Service. |
COOKING TIME FOR THE MANUAL MODE
| TYPE OF FOOD |  | * |  | * |  | * |  | * |  | * |  | * | Cooking time in minutes | |
| [T440] | LEVEL | [ST42] | LEVEL | [DB46] | LEVEL | [XY7X] | LEVEL | [SDY1] | LEVEL | [SW46] | LEVEL | |||
| MEAT | Roast pork (1 kg) 200 2 190 2 60 | |||||||||||||
| Roast veal (1 kg) 200 2 190 2 60-70 | ||||||||||||||
| Roast beef 240 2 200 2 30-40 | ||||||||||||||
| Lamb (leg, shoulder 2.5 kg) 220 2 220 2 | 200 | 2 210 2 | 60 | |||||||||||
| Poultry (1kg) 200 3 220 3 210 3 | 185 3 60 | |||||||||||||
| Chicken thighs 220 3 210 3 20-80 | ||||||||||||||
| Pork/veal chops | 210 | 3 | 20-30 | |||||||||||
| Beef ribs (1 kg) | 210 3 | 210 | 3 20-30 | |||||||||||
| Mutton ribs | 210 | 3 | 20-30 | |||||||||||
| FISH | Grilled fish | 275 | 4 | 15-20 | ||||||||||
| Cooked fish (bream) | 200 3 | 190 3 | 30-35 | |||||||||||
| Fish papillotte | 220 3 | 200 3 | 15-20 | |||||||||||
| VEGETABLES | Gratins (precooked ingredients) | 275 2 | 30 | |||||||||||
| Potato gratins | 200 3 | 180 3 | 45 | |||||||||||
| Lasagne | 200 3 | 180 3 | 45 | |||||||||||
| Stuffed tomatoes 170 3 170 3 30 | ||||||||||||||
| PASTRIES AND CAKES | Sponge cake - Génoise | 180 3 | 180 | 4 35 | ||||||||||
| Swiss roll | 220 | 3 | 180 | 2 | 190 | 3 | 5-10 | |||||||
| Brioche | 180 | 3 | 200 | 3 | 180 | 3 | 180 | 3 | 35-45 | |||||
| Brownies | 180 2 | 180 2 | 20-25 | |||||||||||
| Cake - Pound cake | 180 | 3 | 180 | 3 | 180 | 3 | 45-50 | |||||||
| Clafoutis | 200 3 | 190 3 | 30-35 | |||||||||||
| Cookies - Shortbread | 175 3 | 170 3 | 15-20 | |||||||||||
| Kugelhopf | 180 | 2 | 40-45 | |||||||||||
| Meringues | 100 | 4 | 100 | 4 | 100 | 4 | 60-70 | |||||||
| Madeleines | 220 | 3 | 210 | 3 | 5-10 | |||||||||
| Choux pastry | 200 | 3 | 180 | 3 | 200 | 3 | 30-40 | |||||||
| Individual puff pastry | 220 | 3 | 200 | 3 | 5-10 | |||||||||
| Savarin cake 180 3 | 175 3 | 180 3 | 30-35 | |||||||||||
| Shortcrust pastry tart | 200 1 | 200 1 | 30-40 | |||||||||||
| Thin puff pastry tart | 215 1 | 200 1 | 20-25 | |||||||||||
| VARIOUS | Terrine pâté | 200 | 2 | 190 | 2 | 80-100 | ||||||||
| Pizza | 240 | 1 | 15-18 | |||||||||||
| Quiche | 190 | 1 | 180 | 1 | 190 | 1 | 35-40 | |||||||
| Soufflé | 180 2 | 50 | ||||||||||||
| Pie | 200 2 | 190 2 | 40-45 | |||||||||||
| Bread | 220 2 | 220 2 | 30-40 | |||||||||||
| Toasted bread | 275 | 4-5 | 2-3 | |||||||||||
Note: Before putting them in the oven, all meats must be kept at room temperature for at least one hour.
* Depending on model
FUNCTIONAL SUITABILITY TESTS IN ACCORDANCE WITH IEC/ EN 60350 STANDARD
| FOOD | * COOKING MODE | LEVEL ACCESSORIES °C Min. TIME PREHEATING | |||||
| Short-bread (8.4.1) |  | 5 45-mm pan 150 30-40 yes | |||||
| Short-bread (8.4.1) |  | 5 45-mm pan 150 25-35 yes | |||||
| Short-bread (8.4.1) |  | 2+ 5 | 45 mm pan + wire rack | 150 25-45 yes | |||
| Short-bread (8.4.1) |  | 3 45-mm pan 175 25-35 yes | |||||
| Short-bread (8.4.1) |  | 2+ 5 | 45 mm pan + wire rack | 160 30-40 yes | |||
| Small cakes |  | 5 45-mm pan 170 25-35 yes | |||||
| Small cakes |  | 5 45-mm pan 170 25-35 yes | |||||
| Small cakes |  | 2+ 5 | 45 mm pan + wire rack | 170 20-40 yes | |||
| Small cakes |  | 3 45-mm pan 170 25-35 yes | |||||
| Small cakes |  | 2+ 5 | 45 mm pan + wire rack | 170 25-35 yes | |||
| Fat-free sponge cakes (8.5.1) |  | 4 wire | rack 150 30-40 yes | ||||
| Fat-free sponge cakes (8.5.1) |  | 4 wire | rack 150 30-40 yes | ||||
| Fat-free sponge cakes (8.5.1) |  | 2+ 5 | 45 mm pan + wire rack | 150 30-40 yes | |||
 | |||||||
| Fat-free sponge cakes (8.5.1) |  | 3 wire | rack 150 30-40 yes | ||||
| Fat-free sponge cakes (8.5.1) |  | 2+ 5 | 45 mm pan + wire rack | 150 30-40 yes | |||
| Apple pie (8.5.2) |  | 1 wire | rack 170 90-120 yes | ||||
| Apple pie (8.5.2) |  | 1 wire | rack 170 90-120 yes | ||||
| Apple pie (8.5.2) |  | 3 wire | rack 180 90-120 yes | ||||
| Browned surface (9,2.2)* Depending on model |  | 5 wire | rack 275 3-6 yes | ||||
NOTE: When cooking on 2 levels, dishes can be removed at different times.
Recipe with yeast (depending on model)
Ingredients:
- Flour 2 kg • Water 1240 ml • Salt 40 g • 4 packets of dehydrated baker's yeast
Mix the dough in a mixer and allow it to rise in the oven.
Method: For yeast-based pastry recipes. Pour the dough into a heat-resistant dish.
Remove the wire shelf supports and put the dish on the bottom.
Pre-heat the oven to 40--50°C with the circulating heat function for five minutes. Stop the oven and allow the dough to rise for 25-30
minutes thanks to the residual heat.

Information for domestic ovens (UE n° 66/2014)
informacie dotyczące domowych piekamików (UE n° 66/2014)
Información sobre los homos domésticos (UE n° 66/2014)
informácie v prícade nů na pečenie pre domácnost (UE n° 56/2014)
Information om hushallsugnar (UE n° 66/2014)
Informationen zu Haushaltsbacköfen (UE n° 66/2014)
FR E Informations concernant les fours domestiques (UE n° 66/2014)
informazioni relative ai formi per uso domestico (UE n° 55/2014)
DAN. Onlysginner for own till tusholdnings brug (UE n° 66/2014)
EL: Πληροφορίες για οκιακούς φούρνους (UE n° 66/2014) Kotitalouksien uunien tiedot (UE n° 66/2014)
| Symbol | Unit | Value | EN: Symbol-FR: Symbol-CS: Značka-DA/Symbol-DE: Symbol-ES: Simboi-IT: Simboi-NL: Symboi-PL: Oznarcenia-PT: Simboi-SK: Symboi-EL: Žučko-Fl: Symboi-SV: Symbol. EN: Value-FR: Value-R: Value-R: Value-R: Value-R: Value-R: Value-R: Value-R: Value-R: Value-R: Value-R: Value-R: Value-R: Value-R: Value-R: Value-R: Value-R: Value-R: Value-R: Value-R: Value-R: Value-R: Value-R: Value-R: Value-R: Value-R: Value-R: Value-R: Value-R: Value-R: Value-R: Value-R: Value-R: Value-R: Value-R | ||||||||||||||||
| XCD25P | XCD25T | XCT25P | XHT25S | XHT25T | XHT25P | XHT15P | XHT25U | XHT25V | XHT25W | XHT15W | XHT45W | XHT35W | XHT71W | ||||||
| Type norme | EN: Type norme-FR: Type norme-CS Model-DA: Nomtype-DE: Typ-ES Modelo-IT: Tipo di norma-NL: Type standaard-PL: Typ wedlug normy-PT: Tipo de norma-SK: Standardny typ EL: Turoç trponúrou-FI: Standardtyppi-SV: Typ av norm. | ||||||||||||||||||
| Model identification | EN: Model identification-FR: Identification du modèle-CS: Identifikace modelu-DA: Modelidentifikation-DE: Modelkennung-ES: Identificatio on del modelo-IT: Identifistivo del modelo-NL: Identificatie van het model-PL: Identifikator modelu-PT: Identificação do modelo-SK: Identifikacija modelu-EL: Tourortoljon movtou-FI: Mallitunniste-SV: Modelbeskrivning. | ||||||||||||||||||
| Type of oven | Simple = FR:simple-CS: Jednoducha-DA: Enkel-DE: Einfach-ES: Simple-IT: Simplice-NL: Simplice-PL: Pojedynczy-PT: Simples-SK: Jednopostefovd-EL: Améç-F: Yksinkerbänen-SV: Enkel. | EN: Type of oven-FR: Type de four-CS: Typ trouzy-DA: Ovtype-DE: At des Backofens-EL: Turoç quipyou-ES: Tipo de homo-IT: Tipologia di fomo-NL: Type oven-PL: Typ pleikamika-PT: Tipo de forno-SK: Typ rügy na pečenie-EL: Turoç quipyou-FI: Umin lyyppi-SV: Typ av ugn. | |||||||||||||||||
| Mass of the appliance | M | 34,5 | 30,7 | 35,7 | 33,5 | 36,2 | 35,6 | 38,0 | 33,5 | 36,6 | 38,0 | 38,0 | 38,0 | 38,0 | 43,1 | kg | EN: Mass of the appliance-FR: Masse de l'apparali-CS: Hmotnost spotfebrica-DA: Apparalats masse-DE: Masses des Gerätes-ES: Massa del aparato-IT: Massa dell'apparacchio-NL: Massa van het boeslei-PL: Masa uzradzonia-PT: Massa do aparelho SK: Hmotnost spotfebrica-EL: Maça re ouxuriong-FI: Lalleen massa-SV: Apoparens massa. | ||
| Number of cavities | 1 | 1 | 1 | 1 | 1 | 1 | 1 | 1 | 1 | 1 | 1 | 1 | 1 | 1 | EN: Number of cavities-FR: Nombre de cavities-CS: Počet pedicih prostorn-DA: Antal hulrum-DE: Anzahl der Garraume-ES: Número de cavidades-IT:Número di cavità-NL:Aantal ovenruimen-PL: Liczba komör-PT: Número de cavidades-SK: Počet vykurovarich časti. | ||||
| Heat source per cavity (electricity or gas) | Electricity = FR: Electricité-CS: Elektifina-DA: DE: Strom-ES: Electricidad-IT: Energia elettrica-NL: Elektricitat-Electricité. | EN: Heat source per cavity (electricity or gas):FR: Source de chaleur par cavite (electrédite ou gaz)-CS:Zdroj tepla jednotlivých pečilch prostori (elektifina nebo plyn)-DA: Varmeikde pr. ovrum (el eller gas):DE: Wärmequelle je Garuma (Strom oder Gas):ES: Fuente de calor por cavidad (electrichidad o gas):HT Fonte di calore di clascuna cavita (energia elettrica o gas):NL: Warmebron per ovenruimte (elektricitat of gas):PL: Zódio energii dila každej komory (energia elektryczna lub gaz)-PT: Fonte de calor por cavidade (elektricitadou gas):SK:Zdroj tepla na vykurovacu časti (elektricka energy alebo plyn):EL:Πηγί θερμάτος ονό θέλαρού ηξικτρεί ενφρεση η φυκού οφροί-FI: Kunkin pesän liimmölnähde (sähkö tai kassu):SV: Värmekalilla per kavitet (elektricitat eller gas). | |||||||||||||||||
| Volume per cavity | V | 73,0 | 73,0 | 73,0 | 73,0 | 73,0 | 73,0 | 73,0 | 73,0 | 73,0 | 73,0 | 73,0 | 73,0 | 73,0 | 73,0 | l | EN: Volume per cavity-FR: Volume par cavite-CS: Objem jednotlivých pečilch prostorn-DA: Volumen pr. ovrum-DE: Volumen je Garuma-ES: Volumen por cavidad-IT: Volume di clascuna cavita- NL: Volume per ovenruimte-PL: Obystać da každej komory-PT: Volume por cavidade-SK: Objem na vykurovacu časti-EL: Dykoç ová θέλαρού-FI: Kunkin pesän liimmölnähde (sähkö tai kassu):SV: Värmekalilla per kavitet (elektricitat eller gas). | ||
| Energy consumption (electricity) required to heat a standardised load in a cavity of an electric heated oven during a cycle in conventional mode per cavity (electric final energy) | EC electric cavity | 0,82 | 0,82 | 0,69 | 0,70 | 0,70 | 0,70 | 0,70 | 0,70 | 0,70 | 0,70 | 0,70 | 0,70 | 0,70 | 0,70 | kWh/cycle | EN: Energy consumption (electricity) required to heat a standardised load in a cavity of an electric heated oven during a cycle in conventional mode per cavity (electric final energy)-FR: Consommation d'énergie (electrictie) requise pour chauffer une charge normalisée dans une cavité d'un four électrique su cours d'un cycle en mode conventionnel par cavite (energie électrique finale):CS: Spotbea energie (elektrifine) potébné k omñáí normalizované nápne j e jednotlivých pečilch prostorch elektricky ohfvano trouzy behem jednotho cyku v vežimu s přízenou kavokor (konečn elektricka energie):DA: Kravot energiortrag (el) ili opvarming af en standardiszenet last i let ovrum i let ovturni un opstom ovun i on cyklus i traditionell bidand por ovrum (bendlig elonorgi):DE: Energieverbrauch (Strom) bel der Erhizing einer Standardbelastung im Garraum eines Elektrobackofera während eines Zyklus im konventionalsen Modus je Garuma (elektrische Endenergie):ES: Consumo de energia (electricidad) necessario para calendar una carga normalizada en una cavidade de un horno eléctrico durante un ciclo en modo convencional, por cavidad (energia eléctrica final):IT: Consumo energético (energia eléctrica) necessario por riscaldare un carico normalizzato in una cavidade un formo eléctrico durante un ciclo in modo convencional per ciascuna cavita (energia eléctrica final):IT: Consumo energético (energia eléctrica) necessario por riscaldare un carico normalizzato in una cavidade un formo eléctrico durante un ciclo in modo convencional per ciascuna cavita (energia eléctrica final):IT: Consumo energético (energia eléctrica) necessario por riscaldare un carico normalizzato in una cavidade un formo eléactrico durante un ciclo in modo convencional per ciascuna cavita (energia eléctrica final):IT: Consumo energético (energia eléctrica) necessario por riscaldare un carico normalizzato in una cavidade un formo eléctrico durante un ciclo in modo convencional per ciascuna cavita (energia eléctrica final):IT: Consumo energético (energia eléctrica) necessario por riscozne u výkurovacu časti rügy na pečenie u shrevom na elektrickú energiu počas cyku v bežnom režime na vykurovacu časti (konečn elektricka energie):EL: Koravukum (ηξικτρεί) ενφρεση ανό θέλαρού η πποί στατήση γιπο περωνη τυμοτονευο φρησου ος θέλαρού ηξικτρεί εξιρονευο φρησου ος θέλαρού ηξικτρεί εξιρονευο φρησου ος θέλαρού ηξικτρεί εξιρονευο φρησου ος θέλαρού ηξικτρεί εεξιρονευο φρησου ος θέλαρού ηξικτρεί εεξιρονευο φρησου ος θέλαρού ηξικτρεί εεξιρονευο φρησου ος θέλαρού ηξικ τυκήση κατα νατισαιν νανλούκούναν αναν αναν αναν αναν αναν αναν αναν αναν αναν αναν αναν αναν αναν αναν αναν αναν αναν αναν αναν αναν αναν αναν αναν αναν αναναν αναν αναν αναν αναν αναν αναν αναν αναν αναν αναν αναν αναν αναν αναν αναν αναν αναν αναν αναν αναν αναν αναν αναν αναν | ||
| Energy consumption required to heat a standardised load in a cavity of an electric heated oven during a cycle in fan-forced mode per cavity (electric final energy) | EC electric cavity | 1,23 | 1,34 | 1,23 | - | 1,10 | 1,10 | 1,10 | - | 1,10 | 1,10 | 1,10 | 1,10 | 1,10 | 1,10 | kWh/cycle | EN: Energy consumption required to heat a standardised load in a cavity of an electric heated oven during a cycle in fan-forced mode per cavity (electric final energy)-FR: Consommation d'énergie requise pour chauffer une charge normalisée dans une cavité d'un four électrique au cours d'un cycle en chaleur tournante par cavite (energie électrique finale):CS: Spotbea energie potébné k omñáí normalizované nápne j e jednotlivých pečilch prostorch elektricky ohfvano trouzy behem jednotho cyku v vežimu s přízenou kavokor (konečn elektricka energie):DA: Kravot energiortrag (el) olvarming af en standardiszenet last i let ovrum i let ovturni un ovturni un modo conveniaticen bei der Eletthabektorch bei der Eletthabektorch bei der Eletthabektorch bei der Eletthabektorch bei der Eletthabektorch bei der Eletthabektorch bei der Eletthabektorch bei der Eletthabektorch bei der Eletthabektorch bei der Eletthabektorch bei der Eletthabektorch bei der Eletthabektorch bywahrt eines Zyklus im Umluffmodus je Garuma (elektrische Endenergie):ES: Consumo de energia necessario para calendar una carga normalizada en una cavidade de un horno eléctrico durante un ciclo en modo de circulación forzada, por cavidad (energia eléctrica final):IT: Consumo energético necessario per riscaldare un carico normalizzato in una cavidade un formo eléctrico durante un ciclo en modo de circulación forzada (energia eléctrica final):SK: Spotbea energie (elektriny) potébné na ohvre standardizovaného obsahu vo vykurovasc), časti rügy na pečenie u shrevom na elektrickú energiu počas cyku v vežmu ve v angestandere in de ovenruimte van een elektrisch verwarmede oven gedeundere een cyclos in heluchlu-chmodus, per ovenruimte (elektrische eindenergie):DL: Zuzycecie energie koniecznej do podgrazania znormalizovaného wsadu w komorze piekamika elektrycznego w trakcie tvänia cyklu wt trybe z vlączonyman wentylatorem da kaladej komory (korocowa energy elektryczna):PT: Consumo de energia necessario, por cavidade, para aquecer uma carga normalizada numa cavidade de um forno eléctrico durante un ciclo em modo de ventrālpo forzada (energia eléctrica final):SK: Spotbea energie (elektriny) potébné na ohvre standardizovaného obsahu vo vykurovasc), časti rügy na pečenie u shrevom na elektrickú energiu počas cyku v vežmu ve v angestandere in de ovenruimte van een elektrisch verwarmede oven gedeundere en cyclos in heluchlu-chmodus, per ovenruimte (elektrische eindenergie):DL: Zuzycecie energie koniecznej do podgrazania znormalizovaného wsadu w komorze piekamika elektrycznego w trakcie tvänia cyklu wt trybe z vlączonyman wentylatorem da kaladej komory (korocowa energy elektryzna):PT: Consumo de energia necessario, por cavidade, para aquecer uma carga normalizada numa cavidade de um forno eléctrico durante un ciclo em modo de ventrālpo forzada (energia eléctrica final):SK: Spotbea energie (elektriny) potébné na ohvre standardizovaného obsahu vo vykurovasc), časti rügy na pečenie u sh revem na elektrickú energiu počas cyku v vežmu ve v angestandere in de ovenruimte van een elektrisch verwarmede oven gedeundere en cyclos in heluchlu-chmodus, per ovenruimte (elektrische eindenergie):DL: Zuzycecie energie koniecznej do podgrazania znormalizovaného wsadu w komorze piekamerika elektrycznego w trakcie tvänia cyklu wt trybe z vlączonyman wentylatorem da kaladej komory (korocowa energy elektryzna):PT: Consumo de energia necessario, por cavidade, para aquecer uma carga normalizada numa cavidade de um forno eléctrico durante un ciclo em modo de ventrālpo forzada (energia eléctrica final):SK: Spotbera energie (elektriny) potébné na ohvre standardizovaného obsahu vo vykurovasc), časti rügy na pečenie u shrevom na elektrickú energiu počas cyku v vežmu ve v angestandere in de ovenruimte van een elektrisch verwarmede oven gedeundere en cyclos in heluchlu-chmodus, per ovenruimteme (elektrische eindenergie):DL: Zuzycecie energie koniecznej do podgrazania znormalizovaného wsadu w komorze piekamika elektrycznego w trakcie tvänia cyklu wt trybe z vlączonyman wentylatorem da kaladej komory (korocowa energy elektryzna):PT: Consumo de energia necessario, por cavidade; para aquecer uma carga normalizada numa cavidade de um forno eléctrico durante un ciclo em modo de ventrālpo forzada (energia eléctrica final):SK: Spotbera energie (elektriny) potébné na ohvre standardizovaného obsahu vo vykurovasc), časti rügy na pečenie u sh revem na elektrickú energiu počas cyku v vežmu ve v angestandere in de ovenruimteme van een elektrisch verwarmede oven gedeundere en cyclos in heluchlu-chmodus, per ovenruimteme (elektrische eindenergie):DL: Zuzycecie energie koniecznej do podgrazania znormalizovaného wsadu w komorze piekamerika elektrycznego w trakcie tvänia cyklu wt trybe z vlączonyman wentylatorem da kaladej komory (korocowa energy elektryzna):PT: Consumo de energia necessario, por cavidade; para aquecer uma carga normalizada numa cavidade de um forno eléctrico durante un ciclo em modo de ventrālpo forzada (energia eléctrica final):SK: Spotbea energie (elektriny) potébné na ohvre standardizovaného obsahu vo vykurovasc), časti rügy na pečenie u sh revem na elektrickú energiu počas cyku v v vežmu ve v angestandere in de ovenruimteme van een elektrisch verwarmede oven gedeundere en cyclos in heluchlu-chmodus, per ovenruimteme (elektrische eindenergie):DL: Zuzycecie energie koniecznej do podgrazania znormalizovaného wsadu w komorze piekamerika elektrycznego w trakcie svänia cyklu wt trybe z vlączonyman wentylatorem da kaladej komory (korocowa energy elektryzna):PT: Consumo de energia necessario, por cavidade; para aquecer uma carga normalizada numa cavidade de um forno eléctrico durante un ciclo em modo de ventrālpo forzada (energia eléctrica final):SK: Spotbera energie (elektriny)Potébné na ohvre standardizovaného obsahu vo vykurovasc), časti rügy na pečenie u sh revem na elektrickú energiu počas cyku v vežmu ve v angestandere in de ovenruimteme van een elektrisch verwarmede oven gedeundere en cyclos in heluchlu-chmodus, per ovenruimteme (elektrische eindentergie):DL: Zuzycecie energie koniecznej do podgrazania znormalizovaného wsadu w komorze piekamerika elektrycznego w trakcie tvänia cyklu wt trybe z vlączonyman wentylatorem da kaladej komory (korocowa energy elektryzna):PT: Consumo de energia necessario, por cavidade; para aquecer uma carga normalizada uma cavidade de um forno eléctrico durante un ciclo em modo de ventrālpo forzada (energia eléctrica final):SK: Spotbera energie (elektriny) potébné na ohvre standardizovaného obsahu vo vykurovasc), časti rügy na pečenie u sh revem na elektrickú energiu počas cyku v vežmu ve v angestanderes in de ovenruimteme van een elektrisch verwarmede oven gedeundere en cyclos in heluchlu-chmodus, per ovenruimteme (elektrische eindenergie):DL: Zuzycecie energie koniecznej do podgrazania znormalizovaného wsadu w komorze piekamerika elektrycznego w trakcie tvänia cyklu wt trybe z dlæzonyman wentylatorem da kaladej komory (korocowa energy elektryzna):PT: Consumo de energia necessario, por cavidade; para aquecer uma carga normalizada numa cavidade de um forno eléctrico durante un ciclo em modo de ventrālpo forzada (energia eléctrica final):SK: Spotbera energie (elektriny) potébné na ohvre standardizovaného obasu vo vykurovasc), časti rügy na pečenie u sh revem na elektrickú energiu počas cyku v vežmu ve v angestandere in de ovenruimteme van een elektrisch verwarmede oven gedeundere en cyclos in heluchlu-chmodus, per ovenruimteme (elektrische eindentergie):DL: Zuzycecie energie konieznej do podgrazania znormalizovaného wsadu w komorze piekamerika elektrycznego w trakcie tvänia cyklu wt trybe z dlæzonyman wentylatorem da kaladej komory (korocowa energy elektryzna):PT: Consumo de energia necessario, por cavidade; para aquecer uma carga normalizada numa cavidade de um forno eléctrico durante un ciclo en modo de ventrālpo forzada (energia eléctrica final):SK: Spotbera energie (elektriny) potébné na ohvre standardizovaného obsahu vo vykurovasc), časti rügy na pečenie u sh revem na elektrickú energiu počas cyku v vežmu ve v angestandere in de ovenruimteme van een elektrisch erwarmede oven gedeundere en cyclos in heluchlu-chmodus, per ovenruimteme (elektrische eindentergie):DL: Zuzycecie energie konieznej do podgrazania znormalizovaného wsadu w komorze piekamerika elektrycznego w trakcie tvänia cyklu wt trybe z dlæzonyman wentylatorem da kaladej konary komory (korocowa energy elektryza):PT: Consumo de energia necessario, por cavidade; para aquecer uma carga normalizada uma cavidade de um forno eléctrico durante un ciclo em modo de ventrālpo forzada (energia eléctrica final):SK: Spotbera energie (elektriny) potébné na ohvre standardizovaného obasu vo vykurovasc), časti rügy na pečenie u sh revem na elektrische eindentergie):DL: Zuzycecie energie konieznej do podgrazania znormalizovaného wsadu w komorze piekamerika elektrycznego w trakcie tvänia cyklu wt trybe z dlæzonyman wentylatorem da kaladej komory (korocowa energy elektryza):PT: Consumo de energia necessario, por cavidade; para aquecer uma carga normalizada numa cavidade de um forno eléctrico durante un ciclo em modo de | ||
| Domestic Electric Oven - Product FicheAs per the Commission Delegated Regulation (EU) N° 65/204 | |
| Trade Mark | DE DIETRICH |
| Commercial code | DOH4541* |
| Energy Efficiency Index (EEI cavity) | 80,2 |
| Energy Efficiency Class | A+ |
| Energy consumption per cycle in conventional mode | 0,69kWh |
| Energy consumption per cycle in fan-forced convection mode | 1,23kWh |
| Number of cavities | 1 |
| Heat source(s) per cavity | Electric |
| Volume of the cavity | 73l |
| European Union eco-label | |

VÁŽENÁ ZÁKAZNICE, VÁŽENÝ ZÁKAZNÍKU

Displej

natural_image
Diagram of a kitchen appliance with a grater and a black arrow indicating direction (no text or symbols)
natural_image
3D CAD model of a rectangular tray or container with internal channels and a black arrow indicating direction (no text or symbols)
natural_image
3D diagram of a kitchen appliance with a mesh tray and ventilation duct (no text or symbols). 3 POPIS TROUBY
SYSTÉM POSUVNÝCH LIŠT
natural_image
Diagram of a microwave oven with airflow arrows indicating internal flow (no text or symbols)
natural_image
Mechanical assembly diagram showing a lever mechanism with arrows indicating motion direction (no text or symbols present)
natural_image
Diagram of a rectangular tray with arrows indicating direction or movement, no text or symbols present
natural_image
Mechanical assembly diagram showing a lever mechanism with directional arrows and a magnified inset view (no text or symbols)natural_image
Diagram showing a person using a rack-mounted device to lift a wall, with no visible text or symbolsČIŠTĚNÍ SKEL DVEŘÍ

Pozor
natural_image
Illustration of a hand using a tool to adjust or install a mechanical component, with no visible text or symbols.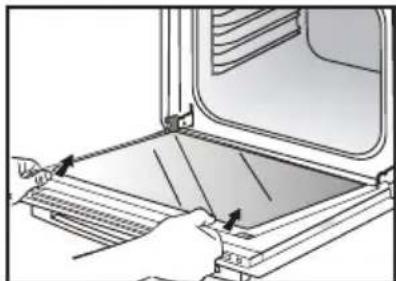
natural_image
Illustration of a hand using a tool to adjust or install a tray inside an oven (no text or symbols visible)natural_image
Diagram of a printer or printer with a magnified inset showing the printer's internal structure (no text or symbols present)
natural_image
Diagram showing a printer's internal structure with an open base and a magnified view of the printer's tip (no text or symbols present)VÝMĚNA ŽÁROVKY
natural_image
Mechanical component diagram showing a pin inserted into a housing with a rotating arrow indicating rotation (no text or symbols)1 INSTALLATION ....6

Display

natural_image
Simple line drawing of a vertical panel with three symbols: circle, left-pointing arrow, and bell (no text or labels)
TILBEH∅R (IF∅LGE MODELLEN)
natural_image
Diagram of a kitchen appliance with a grater and a black arrow indicating direction (no text or symbols)
natural_image
3D CAD model of a rectangular tray or container with internal channels and a black arrow indicating direction (no text or symbols)
natural_image
3D diagram of a kitchen appliance with a mesh tray and ventilation duct (no text or symbols)• 3 PRÆSENTATION AF OVNEN
SYSTEM MED GLIDESKINNER
natural_image
Diagram of a microwave oven with airflow arrows indicating internal flow (no text or symbols)
natural_image
Mechanical assembly diagram showing a lever mechanism with arrows indicating motion direction (no text or symbols)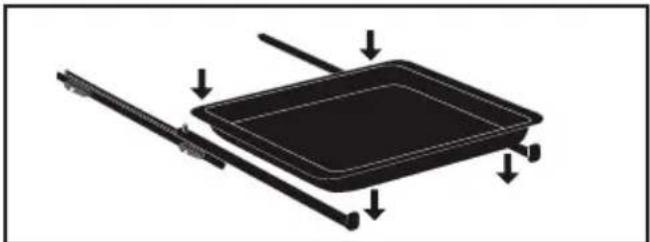
natural_image
Diagram of a rectangular tray with arrows indicating direction or movement, no text or symbols present
natural_image
Mechanical assembly diagram showing a lever mechanism with directional arrows and a magnified inset view (no text or symbols)natural_image
Diagram showing a person using a rack-mounted device to lift a wall, with no visible text or symbolsRENG∅RING AF LÅGENS RUDER

Vigtigt
natural_image
Illustration of a hand using a tool to adjust or install a mechanical component, with no visible text or symbols.
natural_image
Illustration of a hand pressing down on a mechanical component with arrows indicating motion (no text or symbols)natural_image
Diagram of a laptop with an open screen and a magnified inset showing the screen area (no text or symbols)
natural_image
Diagram showing a printer's internal structure with an open base and a magnified view of the printer's tip (no text or symbols present). 9 VEDLIGEHOLDELSE
UDSKIFTNING AF PÆREN
natural_image
Mechanical component diagram showing a pin-like assembly with a rotating base and housing (no text or symbols)GODE RÅD FOR TILBEREDNING I MANUEL FUNKTION
| RETTER |  |  |  |  |  |  | Tid for tilbe-redning i minutter | |||||||
| [S40D] | NIVEAU | [S40H] | NIVEAU | [24WV2] | NIVEAU |  | NIVEAU | [X06H] | NIVEAU | [0CEW] | NIVEAU | |||
| K∅D | Svinesteg (1 kg) 200 2 190 2 60 | |||||||||||||
| Kalvesteg (1 kg) 200 2 190 2 60-70 | ||||||||||||||
| Oksesteg 240 2 200 2 30-40 | ||||||||||||||
| Lam (kølle, bov 2,5 kg) 220 2 220 2 200 2 210 2 60 | ||||||||||||||
| Fjerkræ (1 kg) 200 3 220 3 210 3 185 3 60 | ||||||||||||||
| Kyllingelår 220 3 210 3 20-30 | ||||||||||||||
| Svine/kalvekoteletter 210 3 20-80 | ||||||||||||||
| Oksekoteletter (1 kg) | 210 3 | 210 3 | 20-30 | |||||||||||
| Fårekoteletter | 210 3 | 20-30 | ||||||||||||
| FISK | Grillet fisk | 275 4 | 15-20 | |||||||||||
| Kogt fisk (havrude/brasen) | 200 3 | 190 3 | 30-35 | |||||||||||
| Indpakket fisk | 220 3 | 200 3 | 15-20 | |||||||||||
| GR∅NSAGER | Gratiner (tilberedte madvarer) | 275 2 | 30 | |||||||||||
| Kartoffelgratin | 200 3 | 180 3 | 45 | |||||||||||
| Lasagner | 200 3 | 180 3 | 45 | |||||||||||
| Farserede tomater | 170 3 | 170 3 | 30 | |||||||||||
| KAGER | Sukkerbrødskage - Sandkage | 180 3 | 180 | 4 35 | ||||||||||
| Rullede småkager | 220 | 3 | 180 | 2 | 190 | 3 | 5-10 | |||||||
| Brioche | 180 | 3 | 200 | 3 | 180 | 3 | 180 | 3 | 35-45 | |||||
| Brownies 180 2 180 2 20-25 | ||||||||||||||
| Cake - Pund-til-pund | 180 | 3 | 180 | 3 | 180 | 3 | 45-50 | |||||||
| Clafoutis | 200 3 | 190 3 | 30-35 | |||||||||||
| Cookies - tørkager | 175 3 | 170 3 | 15-20 | |||||||||||
| Kugelhopf | 180 2 | 40-45 | ||||||||||||
| Marengs | 100 4 | 100 4 100 4 60-70 | ||||||||||||
| Madeleinekager | 220 3 | 210 3 | 5-10 | |||||||||||
| Vandbakkelser | 200 | 3 | 180 | 3 | 200 | 3 | 30-40 | |||||||
| Petit fours af butterdej | 220 3 | 200 3 | 5-10 | |||||||||||
| Savarinkage | 180 3 | 175 3 180 3 30-35 | ||||||||||||
| Mørdej | 200 1 | 200 1 | 30-40 | |||||||||||
| Butterdej til tærte | 215 1 | 200 1 | 20-25 | |||||||||||
| DIVERSE | Postej 200 2 190 2 80-100 | |||||||||||||
| Pizza | 240 | 1 | 15-18 | |||||||||||
| Quiche | 190 | 1 | 180 | 1 | 190 | 1 | 35-40 | |||||||
| Soufflé | 180 2 | 50 | ||||||||||||
| Pie | 200 2 | 190 2 | 40-45 | |||||||||||
| Brød | 220 2 | 220 2 | 30-40 | |||||||||||
| Ristet brød | 275 | 4-5 | 2-3 | |||||||||||
1 INSTALLATION ....6

Anzeige

ZUBEHÖR (JE NACH MODELL)
natural_image
Diagram of a kitchen appliance with a grater and a black arrow indicating direction (no text or symbols)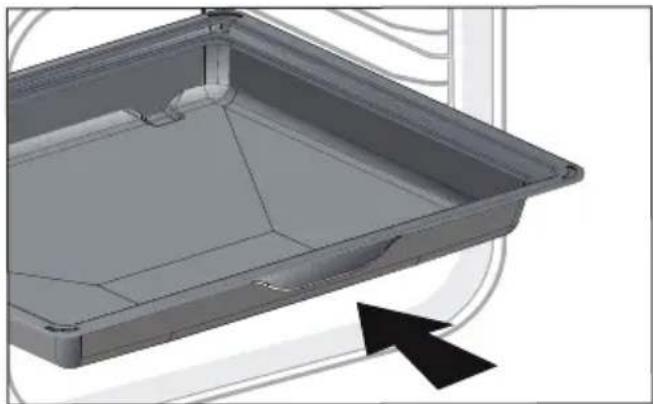
natural_image
3D CAD model of a rectangular tray or container with internal channels and a black arrow indicating direction (no text or symbols)
natural_image
3D diagram of a kitchen appliance with a mesh tray and ventilation duct (no text or symbols)natural_image
Diagram of a microwave oven with airflow arrows indicating internal flow (no text or symbols)
natural_image
Mechanical assembly diagram showing a lever mechanism with labeled component A (no text or symbols beyond label)
natural_image
Diagram of a rectangular tray with arrows indicating direction or force, no text or symbols present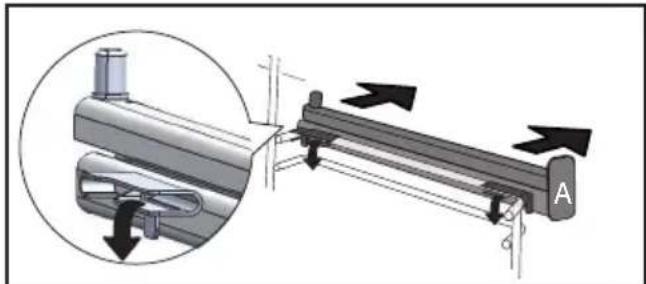
natural_image
Mechanical assembly diagram showing a lever mechanism with directional arrows indicating motion (no text or symbols present)natural_image
Two-panel illustration showing a person using a rack-mounted device to lift or rotate a panel (no text or symbols present)natural_image
Illustration of a hand using a tool to adjust or install a mechanical component, with no visible text or symbols.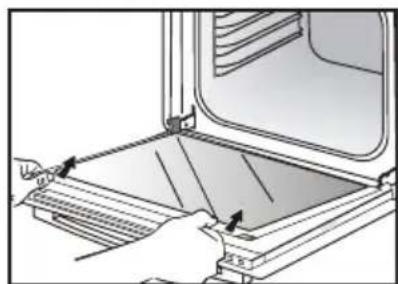
natural_image
Illustration of hands operating a door with a slide inside, showing mechanical components (no text or symbols)natural_image
Diagram of a computer with an open screen and a magnified inset showing a close-up of the screen (no text or symbols present)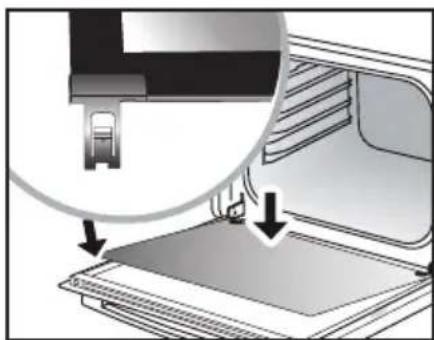
natural_image
Diagram showing a printer's internal structure with an open lid and a magnified view of the printer's internal components (no text or symbols present)AUSWECHSELN DER LAMPE
natural_image
Mechanical component diagram showing a pin-like assembly with a rotating knob (no text or symbols)
Visualizador

natural_image
Diagram of a kitchen appliance with a grater and a black arrow indicating direction (no text or symbols)
natural_image
3D CAD model of a rectangular tray or container with internal channels and a black arrow indicating direction (no text or symbols)
natural_image
3D diagram of a kitchen appliance with a mesh tray and ventilation duct (no text or symbols)natural_image
Diagram of a microwave oven with airflow arrows indicating internal flow (no text or symbols)
natural_image
Mechanical assembly diagram showing a lever mechanism with arrows indicating motion direction (no text or symbols present)
natural_image
Diagram of a rectangular tray with arrows indicating direction or movement, no text or symbols present
natural_image
Mechanical assembly diagram showing a lever mechanism with directional arrows and a magnified inset view (no text or symbols)natural_image
Diagram showing a person using a ladder to lift a wall-mounted device, with no visible text or symbolsnatural_image
Illustration of a hand using a tool to adjust or install a mechanical component, with no visible text or symbols.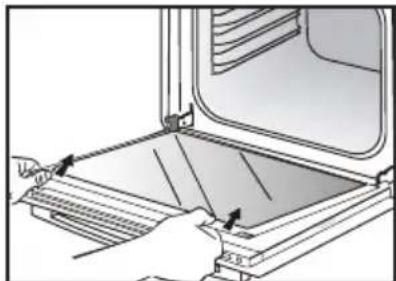
natural_image
Illustration of hands operating a refrigerator with a handle, showing internal components and airflow direction (no text or symbols)natural_image
Diagram of a printer or printer with a magnified inset showing the printer's internal structure (no text or symbols present)
natural_image
Diagram showing a printer's internal structure with an open base and a magnified view of the printer's tip (no text or symbols present)AJUSTES LUZ
natural_image
Mechanical component diagram showing a pin-like assembly with a rotating knob (no text or symbols)
Οθόνη

flowchart
graph TD
    A["Start Circle"] --> B["Directional Arrow"]
    B --> C["Bell Icon"]

natural_image
Diagram of a kitchen appliance with a grater and a black arrow indicating direction (no text or symbols)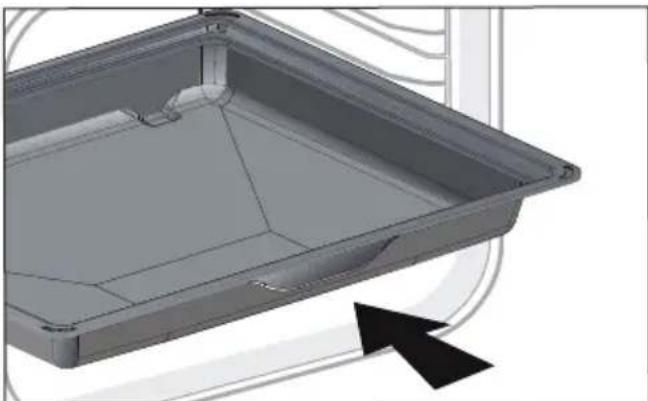
natural_image
3D CAD model of a rectangular tray with internal pipes and a black arrow indicating direction (no text or symbols)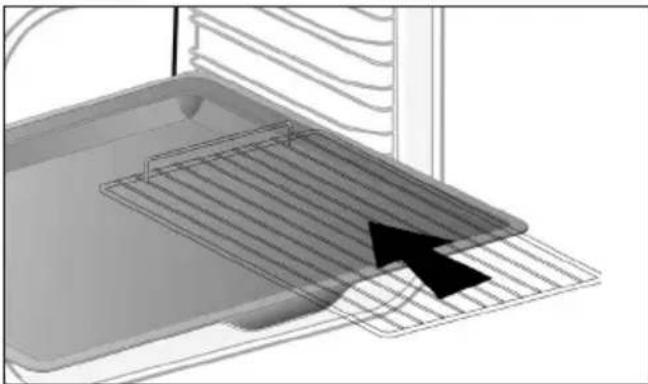
natural_image
3D diagram of a kitchen appliance with a grater and ventilation duct, showing no text or symbolsnatural_image
Diagram of a microwave oven with airflow arrows indicating internal flow (no text or symbols)
natural_image
Mechanical assembly diagram showing a lever mechanism with arrows indicating motion direction (no text or symbols present)
natural_image
Diagram of a rectangular tray with arrows indicating direction or force, no text or symbols present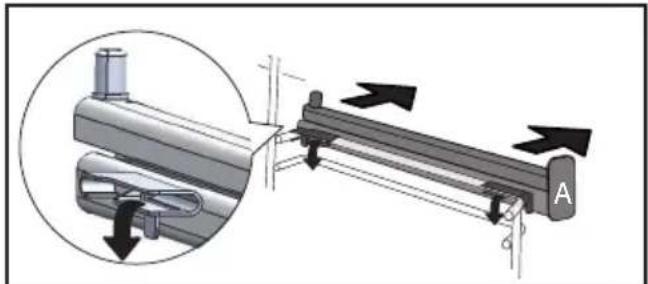
natural_image
Mechanical assembly diagram showing a lever mechanism with directional arrows and a magnified inset view (no text or symbols)natural_image
Two-panel illustration showing a person using a rack-mounted device to lift or rotate a wall panel (no text or symbols present)natural_image
Illustration of a hand using a tool to adjust or install a mechanical component, with no visible text or symbols.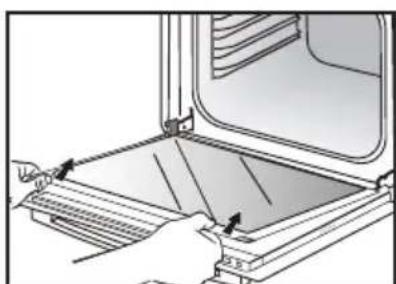
natural_image
Illustration of hands installing or adjusting a door panel inside an oven (no text or symbols visible)natural_image
Diagram of a computer monitor with an open screen and a magnified inset showing the screen area (no text or symbols present)
natural_image
Diagram showing a printer's internal structure with an open lid and a magnified view of the component (no text or symbols).9 ΣΥΝΤΗΡΗΣΗ
natural_image
Mechanical component diagram showing a pin and rotating arrow (no text or symbols)natural_image
Illustration of a bowl with a lid, inside a rectangular frame, with a clock icon and number 25 mm (no text or symbols on the main subject)Information for domestic ovens (UE n° 66/2014)
informacie dotyczące domowych piekamików (UE n° 66/2014)
Información sobre los homos domésticos (UE n° 66/2014)
informácie v prícade nů na pečenie pre domácnost (UE n° 56/2014)
Information om hushallsugnar (UE n° 66/2014)
Information for domestic ovens (UE n° 66/2014)
Informations concernant les fours domestiques (UE n° 66/2014)
informace týkajici se trub pro domácnost (UE n° 66/2014)
Informatie met betrekking tot buishoudelijke ovens (UE n° 86/2014)
EL F Πληροφορίες για ακιακούς φούρνους (UE n° 66/2014) Kotitalouksien uunien tiedot (UE n° 66/2014)
| Symbol Unit Value | EN: Symbol-FR. Symbol-CS: Značka-DA/Symbol-DE: Symbol-ES: Simboi-IT: Simboi-NL: Symboi-PL: Oznarcenia-PT: Simboi-SK: Symboi-EL: Žučko-Fl: Symboi-SV: Symbol. EN: Value-FR. Valuer-CS: Hodnola-DA: Vandi-DE: Warl-ES: Valor-IT: Valore-NL: Waarde-PL: Warloš-PT: Valor-SK: Hodnola-EL: Apunuká ruž-Fl: Arvo-SV: Várde EN: Unit-FR: Unit-ES: Jednotka-DA: Enhed-DE: Einheit-ES: Unid-IT: Unitá di mura-NL: Einheid-PL: Jednostva-PT: Unidade-SK: Jednotka-EL: Movidoa-Fl: Yksikko-SV: Enhet. | |||||||||||||||||
| Type norme | XCD25P | XCD25T | XCT25P | XHT25S | XHT25T | XHT25P | XHT15P | XHT25U | XHT25V | XHT25W | XHT15W | XHT45W | XHT35W | XHT71W | EN: Type norme-FR. Type norme-CS Model-DA: Nomtype-DE: Typ-ES Modelo-IT: Tipo di norma-NL: Type standaard-PL: Typ według normy-PT: Tipo de norma-SK: Standardny typ EL: Turoç trponúmou-FI: Standardtyppi-SV: Typ av norm. | |||
| Model identification | EN: Model identification-FR: Identification du modèle-CS: Identifikace modelu-DA: Modelidentifikation-DE: Modelkennung-ES: Identificación del modelo-IT: Identificativo del modelo-NL: Identificatie van het model-PL: Identifikator modelu-PT: Identificação do modelo-SK: Identifikacija modelu-EL: Tourortoljón jevrtázou-FI: Mallitunniste-SV: Modelbeskrivning. | |||||||||||||||||
| Type of oven | Simple = FR:simple-CS:Jednoducha-DA:Enkel-DE:Einfach-ES:Simple-IT: Simplice-NL:Simplee-PL:Pojedynczy-PT:Simples-SK:Jedinopostefové-EL:Améç-FYksinkerbänen-SV:Enkel. | EN: Type of oven-FR: Type de four-CS:Typ trouzy-DA:Ovtype-DE:At des Backofens-EL:Turoç quipyou-ES:Tipo de homo-IT: Tipologia di fomo-NL: Type oven-PL:Typ plekomika-PT:Tipo de forno-SK:Typ rüty na pečenie-EL:Turoç quipyou-FI:Uninil tyyppi-SV:Typ av ugn. | ||||||||||||||||
| Mass of the appliance | M | 34,5 | 30,7 | 35,7 | 33,5 | 36,2 | 35,6 | 38,0 | 33,5 | 36,6 | 38,0 | 38,0 | 38,0 | 38,0 | 43,1 | kg | EN: Mass of the appliance-FR: Masse de l'apparali-CS:Hmotnost spotfebčia-DA:Apparalats masse-DE: Masses des Gerätes-ES: Massa del aparato-IT: Massa dell'apparacchio-NL: Massa van het boeslei-PL:Masa urządzenia-PT:Massa do aparelhoSK:Hmotnost spotrebrica-EL:Måça re:ruokuruş-FI:Lalleen massa-SV:Apoparalats massa. | |
| Number of cavities | 1 | 1 | 1 | 1 | 1 | 1 | 1 | 1 | 1 | 1 | 1 | 1 | 1 | 1 | EN: Number of cavities-FR:Nombre de cavités-CS:Počet pedčitich prostorn-DA:Antal hulrum-DE:Anzahl der Garraume-ES:Numero de cavidades-IT:Numero di cavità-NL:Aantal ovenruimlen-PL:Liczba komör-PT:Numero de cavidades-SK:Počet vykurovarich častí. | |||
| Heat source per cavity (electricity or gas) | FR:Electricité-CS:Elektifina-DA:DE:Strom-ES:Electricidad-IT:Energia elettrica-NL:Elektricitat-Electricity = FL:Energia elektryczna-PT:Eletricidade-SK:Elektrickä-EL:Haarkrský svípyno-FI:Sähkö-SV:Elektricitet. | EN: Heat source per cavity (electricity or gas):FS:Source de chaleur par cavite (electriette ou gaz)-CS:Zdroj tepla jednotlivých pečitich prostori (elektifna nebo plyn)-DA:Varmeikde pr. ovrunr (el eller gas):DE:Wärmequelle je Garraum (Strom oder Gas):ES:Fuente de calor por cavidad (electrichidad o gas):HT:Fonte di calore di clascuna cavita (energia elektrica o gas):NL:Warmebron per ovenruimte (elektricitat of gas):PL:Zódio energii dila každej komory (energia elektryczna lub gaz)-PT:Fonte de calor por cavidade (elektricitadou gas):SK:Zdroj tepla na vykurovacu čast (elektricka energy alebo plyn)-EL:LTnyí 8tpórnroć ovó 8tókuo (NLxkrptki svípyno é quonč od/pro)-FI:Kunkin pesän liimmönlahde (sähkö tai kassu)-SV:Värmekkalla per kavitet (elektricitet eller gas). | ||||||||||||||||
| Volume per cavity | V | 73,0 | 73,0 | 73,0 | 73,0 | 73,0 | 73,0 | 73,0 | 73,0 | 73,0 | 73,0 | 73,0 | 73,0 | 73,0 | 73,0 | I | EN: Volume per cavity-FR:Volume per cavity-CS:Objem jednotlivých pečitich prostori-DA:Volumen per ovrunm-DE:Volumen je Garraum-ES:Volumen per H-Volumen di clascuna cavita-NL: Volume per ovenruimte-PL:Ovjotado da klasda; komory-PT:Volume per corteide-SC:Objem na vykurovacu čast-EI:Clykog ovó 8tókuo-FI:Kunkin pesän liimmönlahde (sähkö tai kassu)-SV:Värmekkalla per kavitet (elektricitet eller gas). | |
| Energy consumption (electricity) required to heat a standardised load in a cavity of an electric heated oven during a cycle in conventional mode per cavity (electrical final energy) | EC electric cavity | 0,82 | 0,82 | 0,69 | 0,70 | 0,70 | 0,70 | 0,70 | 0,70 | 0,70 | 0,70 | 0,70 | 0,70 | 0,70 | 0,70 | kWh/cycle | EN: Energy consumption (electricity) required to heat a standardised load in a cavity of an electric heated oven during a cycle in conventional mode per cavity (electrical final energy)-FR:Consommation d'énergie (electrictie) requise pour chauffer une charge normalisée dans une cavite d'un four électrique su cours d'un cycle en mode conventionnel par cavite (energie électrique finale)-CS:Spotbeja energie (elektifni) pathebné co ohñati normalizvané nápne v jednotlivých pečitich prostorch elektricky olfvano trouzy bühem jednotho cyklu v vežimu s přihzenou kawalor (konečna elektricka energie):DA:Kratvet energifortrag (el) ti opvarming af en standardiszenet last i et ovváciu un lotupdov celvum i on cyklus i fristloné tlildand por ovrunmi (randalaj elerorgi):DE:Energieverbrauch (strom) bel der Erhizing einer Standardbelatung im Garraum eines Elektrobackofera während eines Zyklus im conventionals Modus je Garraum (elsichtene Endenergia):ES:Consumo de energia (electricidad) necessario para calendar una carga normalizada en una cavidade de un horno eléctrico durante un ciclo em modo convencialmente, por cavidad (energia eléctrica final):IT:Consumo energético (energia eléctrica) necessario por riscaldare un carico normalizzato un la cavita i un formo eléctrico durante un ciclo in modo convencialmente por ciascuna cavita (energia eléctrica final):NE:Consumo energético (energia eléctrica) necessario por riscaldare un carico normalizzato un la cavita i un formo eléctrico durante un ciclo em modo convencialmente por ciascuna cavita (energia eléctrica final):NL:Energieverbruik (elektricitat) bi vervarming van een standardislanding in de overnuimte van een elektrisch verwamde oven gedurende en cycius in conventionale modus, per ovenruimte (elektrische eindenergia):PL:Zyutice energii (elektrikznej) koniecznej do podgranzia znormalizanwago wsadu v komorze plekamika elektrycznego w trakie pracy wy Cyprus w trybie tradycynym dla každej komory (korocova energia elektryczna):PT:Consumo de energia (electricidad) necessario, por cavidade, para aquecer uma carga normalizada numa cavidade de um formo eléctrico durante um ciclo em modo convencialmente (energia eléctrica final):SK:Spotbeja energie (elektrikny) potrebnej na ohrev standardizovaného obsahu vo vykurovacj časti rüty na pečenie s ohrevom na elektrickú energiu počas cyklu v bežnom režime na vykurovacuča čast (konečna elektricka energia):EL:Toravdukurn (NLxkrptki) svýpynos avo 8tókuo ó omolo omantnoh za ytn Btpuyan v tomortomutov joeprou oz 8tókuo jnaktrpk and upuvov v odpruv v kordi tv májrkou npovpou mojuu muzndla na cavidade de un horno eléctrico durante un ciclo em modo de circulación forzada, por cavidad (energia eléctrica final):IT:Consumo energético necessario per riscaldare un carico normalizzato in una cavita i un formo eléctrico durante un ciclo em modo de circulación forzada (energia eléctrica final):SK:Spotbeja energie (elektriny) potrebnej na ohrev standardizovaného obsahu vo vykurovacj časti rüty na pečenie s ohrevom na elektricu energiu počas cyklu v režime ventiladora na vykurovacu čast (konečna elektricka energia):EL:Toravdukurn svýpynos avo 8tókuo ó omolo omantnoh za ytn Btpuyan v tomortomutov joeprou oz 8tókuo jnaktrpk and upuvov v odpruv v kordi tv májrkou muzndla na cavidade de un horno eléctrico durante un ciclo em modo de circulación forzada, por cavidade, para aquecer uma carga normalizada numa cavidade de um formo eléctrico durante un ciclo em modo de circulación forzada (energia eléctrica final):SK:Spotbeja energie (elektriny) potrebnej na ohrev standardizovaného obsahu vo vykurovacj časti rüty na pečenie s ohrevom na elektricu energiu počas cyklu v režime ventiladora na vykurovacu čast (kONEČNA elektricka energia):EL:Toravdukurn svýpynos avo 8tókuo ó omolo omantnoh za ytn Btpuyan v tomortomutov joeprou oz 8tókuo jnaktrpk and upuvov v odpruv v kordi tv májrkou muzndla na cavidade de un horno eléctrico durante un ciclo em modo de circuó forzada (energia eléctrica final):SK:Spotbeja energie (elektriny) potrebnej na ohrev standardizovaného obsahu vo vykurovacj časti rüty na pečenie s ohrevom na elektricu energiu počas cyklu v režime ventiladora na vykurovacu čast (kONEČNA elektricka energia):EL:Toravdsukurn svýpynos avo 8tókuo ó omolo omantnoh za ytn Btpuyan v tomortomutov joeprou oz 8tókuo jnaktrpk and upuvov v odpruv v kordi tv májrkou muzndla na cavidade de un horno eléctrico durante un ciclo em modo de circuó forzada (energia eléctrica final):Sk:Spotbeja energie (elektriny) potrebnej na ohrev standardizovaného obsahu vo vykurovacj časti rüty na pečenie s ohrevom na elektricu energiu počas cyklu v režime ventiladora na vykurovacu čast (kONEČNA elektricka energia):EL:Toravdsukurn svýpynos avo 8tÓkuo ó omolo omantnoh za ytn Btpuyan v tomortomutov joeprou oz 8tókuo jnaktrpk and upuvov v odpruv v kordi tv májrkou muzndla na cavidade de un horno eléctrico durante un ciclo em modo de circuó forzada (energia eléctrica final):SK:Spotbeja energie (elektrINY) potrebnej na ohrev standardizovaného obsahu vo vykurovacj časti rüty na pečenie s ohrevom na elektricu energiu počas cyklu v režime ventiladora na vykurovacu čast (kONEČNA elektricka energia):EL:Toravdsukurn svýpynos avo 8tÓkuo ó omolo omantnoh za 8tÓkuo jnaktrpk and upuvov v odpruv v kordi tv májrkou muzndla na cavidade de un horno eléctrico durante un ciclo em modo de circuó forzada (energia eléctrica final):Sk:Spotbeja energie (elektriny) potrebnej na ohrev standardizovaného obsahu vo vykurovacj časti rüty na pečenie S ohrevom na elektricu energiu počas cyklu v režime ventiladora na vykurovacu čast (kONEČNA elektricka energia):EL:Toravdsukurn svýpynos avo 8tÓkuo ó omolo omantnoh za ytn Btpuyan v tomortomutov joeprou oz 8tÓkuo jnaktrpk and upuvov v odpruv v kordi tv májrkou muzndla na cavidade de un horno eléctrico durante un ciclo em modo de circuó forzada (energia eléctrica final):SK:Spotbeja energie (elektriny) potrebnej na ohrev standardizovaného obsahu vo vykurovacj časti rüty na pečenie S ohrevom na elektricu energiu počas cyklu v režime ventiladora na vykurovacu čast (kONEČNA elektricka energia):EL:Toravdsukurn svýpynos avo 8tókuo ó omolo omantnoh za ytn Btpuyan v tomortomutov joeprou oz 8tÓkuo jnaktrpk and upuvov v odpruv v kordi tv májrkou muzndla na cavidade de un horno eléctrico durante un ciclo em modo de circuó forzada (energia eléctrica final):SK:Spotbeja energie (elektrINY) potrebnej na ohrev standardizovaného obsahu vo vykurovacj časti rüty na pečenie S ohrevom na elektricu energiu počas cyklu v režime ventiladora na vykurovacu čast (kONEČNA elektricka energia):EL:Toravdsukurn svýpynos avo 8tÓkuo ó omolo omantnoh za 8tÓkuo jnaktrpk and upuvov v odpruv v kordi tv májrkou muz ndla na cavidade de un horno eléctrico durante un ciclo em modo de circuó forzada (energia eléctrica final):SK:Spotbeja energie (elektriny) potrebnej na ohrev standardizovaného obsahu vo vykurovacj časti rüty na pečenie S ohrevom na elektricu energiu počas cyklu v režime ventiladora na vykuroVacu čast (kONEČNA elektricka energia):EL:Toravdsukurn svýpynos avo 8tÓkuo ó omolo omantnoh za ytn Btpuyan v tomortomutov joeprou oz 8tÓkuo jnaktrpk and upuvov v odpruv v kordi tv májrkou muzndla na cavidade de un horno eléctrim durante un ciclo em modo de circuó forzada (energia eléctrica final):SK:Consumo energético necessario per riscaldare un carico normalizzato un una cavidade de un horno eléctrico durante un una cavidade de un horno eléctrico durante un una cavidade de un horno eléctrico durante un una cavidade de un horno eléctrico durante un una cavidade de un horno eléctrico durante un una cavidade de un horno eléctrico durante un una cavidade de un horno eléctrico durante un una cavidade de un horno eléctrico durante un una cavidade de un horno eléctrico durante un una cavitude de un horno eléctrico durante un una cavidade de un horno eléctrico durante un una cavidade de un horno eléctrico durante un una cavidade de un horno eléctrico durante un una cavidade de un horno eléctrico durante un una cavidade de un horno eléctrico durante un una cavidade de un horno eléctrico durante un una cavidade de un horno eléctrico durante un una cavidade de un hprime de un hprime de un hprime de un hprime de un hprime de un hprime de un hprime de un hprime de un hprime de un hprime de un hprime de un hprime de un hprime de un hprime de un hprime de un hprime de un hprime de un hprime de un hprime de un hprime de un hprime de un hprime de un hprime de un hprime de un hprime de un hfirste de un hprime de un hprime de un hprime de un hprime de un hprime de un hprime de un hprime de un hprime de un hprime de un hprime de un hprime de un hprime de un hprime de un hprime de un hprime de un hprime de un hprime de un hprime de un hprime de un hprime de un hprime de un hprime de un hprime de un hprime de un h'engence de un hprime de un hprime de un hprime de un hprime de un hprime de un hprime de un hprime de un hprime de un hprime de un hprime de un hprime de un hprime de un hprime de un hprime de un hprime de un hprime de un hprime de un hprime de un hprime de un hprime de un hprime de un hprime de un hprime de un hprime de un h'n't't't't't't't't't't't't't't't't't't't't't't't't't't't't't't't't't't't't't't't't't't't't't't't't't't't't't't't't't't't't't't't't't't't't't't't't't't't't't't't't't't't't't't't't't't't't't't't't't't't't'lt'lt'lt'lt'lt'lt'lt'lt'lt'lt'lt'lt'lt'lt'lt'lt'lt'lt'lt'lt'lt'lt'lt'lt'lt'lt'lt'lt'lt'lt'lt'lt'lt'lt'lt'lt'lt'lt'lt'lt'lt'lt'lt'lt'lt'lt'lt'lt'lt'lt'll'lt'lt'lt'lt'lt'lt'lt'lt'lt'lt'lt'lt'lt'lt'lt'lt'lt'lt'lt'lt'lt'lt'lt'lt'lt'lt'lt'lt'lt'lt'lt'lt'lt'lt'lt'lt'lt'lt'lt'lt'lt'lt'lt'lt'lt'lt'lt'lt'lt'ilt'lt'lt'lt'lt'lt'lt'lt'lt'lt'lt'lt'lt'lt'lt'lt'lt'lt'lt'lt'lt'lt'lt'lt'lt'lt'lt'lt'lt'lt'lt'lt'lt'lt'lt'lt'lt'lt'lt'lt'lt'lt'lt'lt'lt'lt'lt'lt'lt'lt'Alt'lt'lt'lt'lt'lt'lt'lt'lt'lt'lt'lt'lt'lt'lt'lt'lt'lt'lt'lt'lt'lt'lt'lt'lt'lt'lt'lt'lt'lt'lt'lt'lt'lt'lt'lt'lt'lt'lt'lt'lt'lt'lt'lt'lt'lt'lt'lt'lt'lt'alt'lt'lt'lt'lt'lt'lt'lt'lt'lt'lt'lt'lt'lt'lt'lt'lt'lt'lt'lt'lt'lt'lt'lt'lt'lt'lt'lt'lt'lt'lt'lt'lt'lt'lt'lt'lt'lt'lt'lt'lt'lt'lt'lt'lt'lt'lt'lt'lt'lt'It'l'lt'lt'lt'lt'lt'lt'lt'lt'lt'lt'lt'lt'lt'lt'lt'lt'lt'lt'lt'lt'lt'lt'lt'lt'lt'lt'lt'lt'lt'lt'lt'lt'lt'lt'lt'lt'lt'lt'lt'lt'lt'lt'lt'lt'lt'lt'lt'lt'lt'Lt'lt'lt'lt'lt'lt'lt'lt'lt'lt'lt'lt'lt'lt'lt'lt'lt'lt'lt'lt'lt'lt'lt'lt'lt'lt'lt'lt'lt'lt'lt'lt'lt'lt'lt'lt'lt'lt'lt'lt'lt'lt'lt'lt'lt'lt'lt'lt'lt'lt'tt'lt'lt'lt'lt'lt'lt'lt'lt'lt'lt'lt'lt'lt'lt'lt'lt'lt'lt'lt'lt'lt'lt'lt'lt'lt'lt'lt'lt'lt'lt'lt'lt'lt'lt'lt'lt'lt'lt'lt'lt'lt'lt'lt'lt'lt'lt'lt'lt'lt'tl'lt'lt'lt'lt'lt'lt'lt'lt'lt'lt'lt'lt'lt'lt'lt'lt'lt'lt'lt'lt'lt'lt'lt'lt'lt'lt'lt'lt'lt'lt'lt'lt'lt'lt'lt'lt'lt'lt'lt'lt'lt'lt'lt'lt'lt'lt'lt'lt'lt'nt'lt'lt'lt'lt'lt'lt'lt'lt'lt'lt'lt'lt'lt'lt'lt'lt'lt'lt'lt'lt'lt'lt'lt'lt'lt'lt'lt'lt'lt'lt'lt'lt'lt'lt'lt'lt'lt'lt'lt'lt'lt'lt'lt'lt'lt'lt'lt'lt'lt'mt'lt'lt'lt'lt'lt'lt'lt'lt'lt'lt'lt'lt'lt'lt'lt'lt'lt'lt'lt'lt'lt' | |
HYVÄ ASIAKAS
5 MANUAALINEN KYPSENNYSTILA....13
6 KYPSENNYSVINKIT....16

Näyttö

natural_image
Diagram of a kitchen appliance with a grater and a black arrow pointing to the interior (no text or symbols)
natural_image
3D CAD model of a rectangular tray or container with internal channels and a black arrow indicating direction (no text or symbols)
natural_image
3D diagram of a kitchen appliance with a mesh grille and an arrow indicating direction (no text or symbols). 3 UUNIN YLEISKUVAUS
LIUKUKISKOJÄRJESTELMÄ
natural_image
Diagram of a microwave oven with airflow arrows indicating internal flow (no text or symbols)
natural_image
Mechanical assembly diagram showing a lever mechanism with arrows indicating motion direction (no text or symbols present)
natural_image
Diagram of a rectangular tray with arrows indicating direction or movement, no text or symbols present
natural_image
Mechanical assembly diagram showing a lever mechanism with directional arrows and a magnified inset view (no text or symbols)• 5 MANUAALINEN KYPSENNYSTILA
• 5 MANUAALINEN KYPSENNYSTILA
KYPSENNYKSEN KESTOAIKA
natural_image
Diagram showing a person using a rack-mounted device to lift a wall, with no visible text or symbolsLUUKUN LASIEN PUHDISTAMINEN

Varoitus
natural_image
Illustration of a hand fastening a mechanical component with a downward arrow, next to a close-up of a metallic bracket (no text or symbols)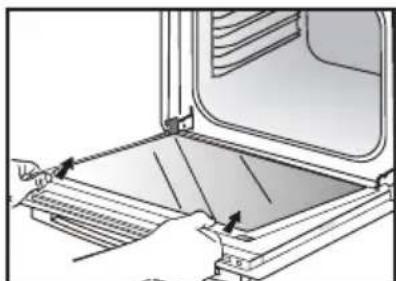
natural_image
Illustration of a hand pressing down on a mechanical component with arrows indicating motion (no text or symbols)natural_image
Diagram of a printer or printer with a magnified inset showing the printer's internal structure (no text or symbols present)
natural_image
Diagram showing a printer's internal structure being inserted into a paper sheet, with magnified detail highlighting the component (no text or symbols present). 9 _HUOLTOTOIMET
LAMPUN VAIHTAMINEN
natural_image
Mechanical component diagram showing a fork inserted into a housing with a rotating arrow indicating rotation (no text or symbols)MANUAALISEN TILAN KYPSENNYSVINKKI
| RUOKALAJIT | | | | | |  | Kypsen-nyksen kestoaika laskettuna minuu-teissa | |||||||
 | TASO |  | TASO |  | TASO |  | TASO |  | TASO | [2HYS] | TASO | |||
| LIHARUAT | Porsaanpaisti (1 kg) 200 2 190 | 2 60 | ||||||||||||
| Vasikanpaisti (1 kg) 200 2 190 | 2 60-70 | |||||||||||||
| Naudanpaisti 240 2 200 2 30-40 | ||||||||||||||
| Lammas (reisi, lapa 2,5 kg) 220 | 2 220 2 | 200 2 | 210 2 | 60 | ||||||||||
| Linnunliha (1 kg) 200 3 220 3 2 | 10 3 185 | 3 60 | ||||||||||||
| Kanankoivet 220 3 210 3 20-30 | ||||||||||||||
| Porsaan- tai vasikankyljykset | 210 3 | 20-30 | ||||||||||||
| Naudankyljykset (1 kg) | 210 3 | 210 | 3 20-30 | |||||||||||
| Lampaankyljykset | 210 3 | 20-30 | ||||||||||||
| KALA | Grillattu kala | 275 4 | 15-20 | |||||||||||
| Keitetty kala (hammasahven) | 200 3 | 190 3 | 30-35 | |||||||||||
| Kala en papillote | 220 3 | 200 3 | 15-20 | |||||||||||
| VIHANNEKSET | Gratiinit | 275 2 | 30 | |||||||||||
| Perunagratiini | 200 3 | 180 3 | 45 | |||||||||||
| Lasagne | 200 3 | 180 3 | 45 | |||||||||||
| Täytetyt tomaatit 170 3 170 3 30 | ||||||||||||||
| LEIVONNAISET | Savoiardi- ja Génoisekeksit | 180 3 | 180 | 4 35 | ||||||||||
| Kääretorttu | 220 | 3 | 180 | 2 | 190 | 3 | 5-10 | |||||||
| Briossi | 180 | 3 | 200 | 3 | 180 | 3 | 180 | 3 | 35-45 | |||||
| Pikkuleivät | 180 2 | 180 2 | 20-25 | |||||||||||
| Kakut - kuivakakut | 180 | 3 | 180 | 3 | 180 | 3 | 45-50 | |||||||
| Hedelmäpiiras | 200 3 | 190 3 | 30-35 | |||||||||||
| Keksit - Pikkuleivät | 175 3 | 170 3 | 15-20 | |||||||||||
| Kugelhopf | 180 2 | 40-45 | ||||||||||||
| Marengit | 100 4 | 100 4 100 | 4 60-70 | |||||||||||
| Madeleine-leivokset | 220 3 | 210 3 | 5-10 | |||||||||||
| Tuulihatut | 200 3 | 180 3 200 | 3 30-40 | |||||||||||
| Petit fours -leivokset | 220 3 | 200 3 | 5-10 | |||||||||||
| Savariini | 180 3 | 175 3 180 | 3 30-35 | |||||||||||
| Murotaikinaleivät | 200 1 | 200 1 | 30-40 | |||||||||||
| Hedelmäpiirakat | 215 1 | 200 1 | 20-25 | |||||||||||
| SEKALASET | Lihamureke | 200 2 | 190 2 | 80-100 | ||||||||||
| Pitsa | 240 | 1 | 15-18 | |||||||||||
| Piiraat | 190 | 1 | 180 | 1 | 190 | 1 | 35-40 | |||||||
| Kohokkaat | 180 2 | 50 | ||||||||||||
| Piirakat | 200 2 | 190 2 | 40-45 | |||||||||||
| Leipä | 220 2 | 220 2 | 30-40 | |||||||||||
| Paahdettu leipä | 275 | 4-5 | 2-3 | |||||||||||

Kijelző

flowchart
graph TD
    A["○"] --> B["←"]
    B --> C[" Bell"]
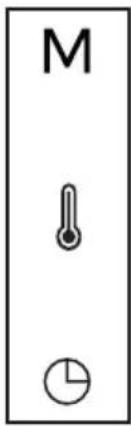
natural_image
Diagram of a kitchen appliance with a grater and a black arrow indicating direction (no text or symbols)
natural_image
3D CAD model of a rectangular tray or container with internal channels and a black arrow pointing to the bottom-right corner (no text or symbols)
natural_image
3D diagram of a kitchen appliance with a mesh tray and ventilation duct, showing no text or symbols• 3 A SÜTÖ BEMUTATÁSA
CSÚSZÓSÍN-RENDSZER
natural_image
Diagram of a microwave oven with airflow arrows indicating internal flow (no text or symbols)
natural_image
Mechanical assembly diagram showing a lever mechanism with labeled component A (no text or symbols beyond label)
natural_image
Diagram of a rectangular tray with arrows indicating direction or movement, no text or symbols present
natural_image
Mechanical assembly diagram showing a lever mechanism with directional arrows indicating motion (no text or symbols present)natural_image
Two-panel illustration showing a person using a rack-mounted device to lift or rotate a wall panel (no text or symbols present)natural_image
Illustration of a hand holding a small object with a downward arrow, next to a close-up of a mechanical component (no text or symbols)
natural_image
Illustration of a hand pressing down on a mechanical component with arrows indicating motion (no text or symbols)natural_image
Diagram of a computer monitor with an open screen and a magnified inset showing the screen area (no text or symbols)
natural_image
Illustration of a printer's internal structure with magnified view showing internal components (no text or symbols)A LÁMPA CSERÉJE
natural_image
Mechanical component diagram showing a pin-like assembly with a rotating arrow (no text or symbols)
Display

natural_image
Simple diagram with three symbols: a circle, an arrow, and a bell (no text or labels)
natural_image
Diagram of a kitchen appliance with a grater and a black arrow indicating direction (no text or symbols)
natural_image
3D CAD model of a rectangular tray or container with internal channels and a black arrow pointing to the bottom-right corner (no text or symbols)
natural_image
3D diagram of a kitchen appliance with a mesh tray and ventilation duct (no text or symbols)natural_image
Diagram of a microwave oven with airflow arrows indicating internal flow (no text or symbols)
natural_image
Mechanical assembly diagram showing a lever mechanism with arrows indicating motion direction (no text or symbols present)
natural_image
Diagram of a rectangular tray with arrows indicating direction or movement, no text or symbols present
natural_image
Mechanical assembly diagram showing a lever mechanism with directional arrows and a magnified inset view (no text or symbols)natural_image
Diagram showing two steps of a hand holding a grid-like object, with arrows indicating direction (no text or symbols present)PULIZIA DEI VETRI DELLA PORTA

Attenzione
natural_image
Illustration of a hand using a tool to adjust or install a mechanical component, with no visible text or symbols.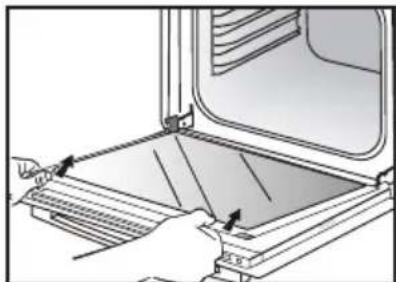
natural_image
Illustration of a hand using a tool to adjust or install a tray inside an oven (no text or symbols visible)natural_image
Diagram of a printer or printer with a magnified inset showing the printer's internal structure (no text or symbols present)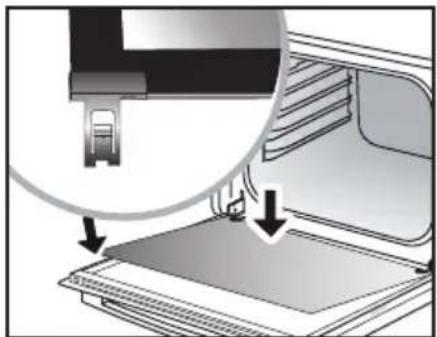
natural_image
Diagram showing a printer's internal structure with an open base and a magnified view of the printer's internal components (no text or symbols present)natural_image
Mechanical component diagram showing a pin-like assembly with a rotating knob (no text or symbols)8 ANDERE FUNCTIONS....22

Display

natural_image
Diagram of a kitchen appliance with a grater and a black arrow indicating direction (no text or symbols)
natural_image
3D CAD model of a rectangular tray or container with internal channels and a black arrow pointing to the bottom-right corner (no text or symbols)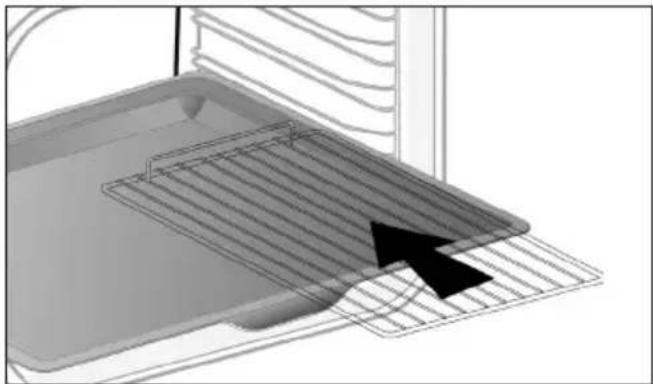
natural_image
3D diagram of a kitchen appliance with a mesh tray and ventilation duct (no text or symbols)• 3 VOORSTELLING VAN DE OVEN
SYSTEEM VAN SCHUIFRAILS
natural_image
Diagram of a microwave oven with airflow arrows indicating internal flow (no text or symbols)
natural_image
Mechanical assembly diagram showing a lever mechanism with arrows indicating motion direction (no text or symbols)
natural_image
Diagram of a rectangular tray with arrows indicating direction or movement, no text or symbols present
natural_image
Mechanical assembly diagram showing a lever mechanism with directional arrows and a magnified inset view (no text or symbols)natural_image
Two-panel illustration showing a person using a rack-mounted device to lift or rotate a wall, with no visible text or symbols.REINIGING VAN DE RUITEN VAN DE DEUR

Opgelet
natural_image
Illustration of a hand using a tool to adjust or install a mechanical component, with no visible text or symbols.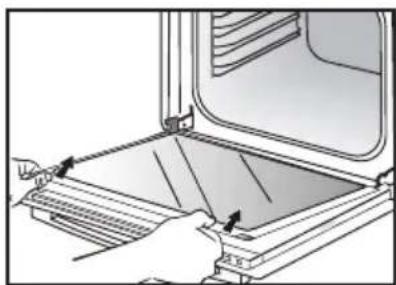
natural_image
Illustration of a hand using a tool to adjust or install a slide inside an oven (no text or symbols visible)natural_image
Diagram of a computer monitor with an open screen and a magnified inset showing the screen area (no text or symbols present)
natural_image
Diagram showing a printer's internal structure being inserted into a paper airplane (no text or symbols visible)VERVANGING VAN DE LAMP
natural_image
Mechanical component diagram showing a lever and rotating knob (no text or symbols)
Display

natural_image
Diagram of a kitchen appliance with a grater and a black arrow indicating direction (no text or symbols)
natural_image
3D CAD model of a rectangular tray or container with internal channels and a black arrow pointing to the bottom-right corner (no text or symbols)
natural_image
3D diagram of a kitchen appliance with a mesh tray and ventilation duct, showing no text or symbols• 3 PRESENTASJON AV OVNEN
GLIDESKINNER
natural_image
Diagram of a microwave oven with airflow arrows indicating internal flow (no text or symbols)
natural_image
Mechanical assembly diagram showing a lever mechanism with arrows indicating motion direction (no text or symbols)
natural_image
Diagram of a rectangular tray with arrows indicating direction or movement, no text or symbols present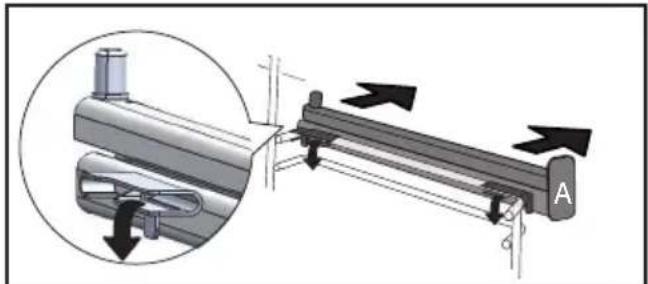
natural_image
Mechanical assembly diagram showing a lever mechanism with directional arrows and a magnified inset view (no text or symbols)INNSTILLE STEKESLUTT (utsatt start)
natural_image
Diagram showing a person using a rack-mounted device to lift a wall, with no visible text or symbolsRENGJ∅RING AV GLASSRUTENE PÅ D∅REN

Viktig
natural_image
Illustration of a hand using a tool to adjust or install a component, with no visible text or symbols.natural_image
Illustration of a hand pressing down on a mechanical component with arrows indicating motion (no text or symbols)Ikke dypp rutene ned i vann. Skyll med rent vann og tørk med en lofri klut.
. 9 VEDLIKEHOLD
SETTE TILBAKE DØREN
natural_image
Diagram of a computer monitor with an open screen and a magnified inset showing the screen area (no text or symbols present)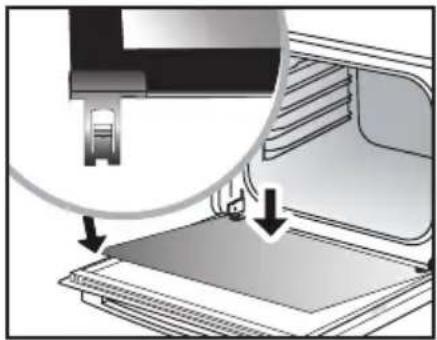
natural_image
Diagram showing a printer's internal structure being inserted into a paper airplane (no text or symbols visible)BYTTE LYSPÆRE
natural_image
Mechanical component diagram showing a pin-like assembly with a rotating base and housing (no text or symbols)STEKERÅD I MANUELL MODUS
| RETTER |  |  |  |  |  |  | Steke-tid i minutter | |||||||
| [227H] | RILLE |  | RILLE | [4743] | RILLE |  | RILLE |  | RILLE | [2444] | RILLE | |||
| KJ∅TT | Svinestek (1 kg) 200 2 190 2 60 | |||||||||||||
| Kalvestek (1 kg) 200 2 190 2 60 | -70 | |||||||||||||
| Oksestek 240 2 200 2 30-40 | ||||||||||||||
| Lam (lår, skulder 2,5 kg) 220 2 | 220 2 200 2 21 | 0 2 60 | ||||||||||||
| Fjærkre (1 kg) 200 3 220 3 210 3 | 185 3 60 | |||||||||||||
| Kyllinglår 220 3 210 3 20-30 | ||||||||||||||
| Svine-/kalvekoteletter 210 3 | 20-30 | |||||||||||||
| Oksekoteletter (1 kg) | 210 3 | 210 3 | 20-30 | |||||||||||
| Fårekoteletter | 210 3 | 20-30 | ||||||||||||
| FISK | Grillet fisk | 275 4 | 15-20 | |||||||||||
| Fiskerett | 200 3 | 190 3 | 30-35 | |||||||||||
| Foliedampet fisk | 220 3 | 200 3 | 15-20 | |||||||||||
| GR∅NNSA-KER | Grateng (kokte grønnsaker) | 275 2 | 30 | |||||||||||
| Fløtegratinerte poteter | 200 3 | 180 3 | 45 | |||||||||||
| Lasagne | 200 3 | 180 3 | 45 | |||||||||||
| Fylte tomater | 170 3 | 170 3 | 30 | |||||||||||
| BAKVERK | Bløtkakebunn | 180 3 | 180 4 | 35 | ||||||||||
| Rullekake | 220 | 3 | 180 | 2 | 190 | 3 | 5-10 | |||||||
| Boller | 180 | 3 | 200 | 3 | 180 | 3 | 180 | 3 | 35-45 | |||||
| Brownies | 180 2 | 180 2 | 20-25 | |||||||||||
| Formkake | 180 | 3 | 180 | 3 | 180 | 3 | 45 - 50 | |||||||
| Bærpai | 200 3 | 190 3 | 30-35 | |||||||||||
| Småkaker | 175 3 | 170 3 | 15-20 | |||||||||||
| Marmorkake | 180 2 | 40-45 | ||||||||||||
| Marengs | 100 4 | 100 4 | 100 4 | 60-70 | ||||||||||
| Muffins | 220 3 | 210 3 | 5-10 | |||||||||||
| Vannbakkelis | 200 3 | 180 3 | 200 3 | 30-40 | ||||||||||
| Små former med butterdeig | 220 | 3 | 200 | 3 | 5-10 | |||||||||
| Formkake med gjærdeig | 180 | 3 | 175 | 3 | 180 | 3 | 30-35 | |||||||
| Terte med mørdeig | 200 1 | 200 1 | 30-40 | |||||||||||
| Terte med butterdeig | 215 1 | 200 1 | 20-25 | |||||||||||
| DIVERSE | Terrin | 200 2 | 190 2 | 80-100 | ||||||||||
| Pizza | 240 | 1 | 15-18 | |||||||||||
| Quiche | 190 | 1 | 180 | 1 | 190 | 1 | 35-40 | |||||||
| Sufflé | 180 2 | 50 | ||||||||||||
| Pai | 200 2 | 190 2 | 40-45 | |||||||||||
| Brød | 220 2 | 220 2 | 30-40 | |||||||||||
| Ristet brød | 275 | 4-5 | 2-3 | |||||||||||
System szyn uchylnych....11
8 INNE FUNKCJE....22
WYBÓR MIEJSCA INSTALACJI I WBUDOWANIA

Wyświetlacz

natural_image
Diagram of a kitchen appliance with a grater and a black arrow pointing to the interior (no text or symbols)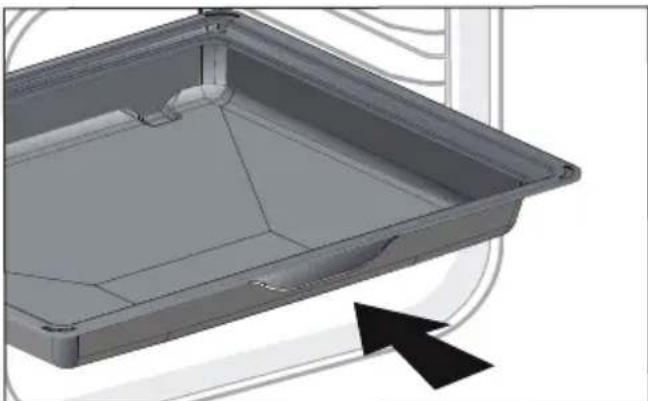
natural_image
3D CAD model of a rectangular tray with internal channels and a black arrow indicating direction (no text or symbols)
natural_image
3D diagram of a kitchen appliance with a mesh grille and an arrow indicating direction (no text or symbols)• 3 PREZENTACJA PIEKARNIKA
natural_image
Diagram of a microwave oven with airflow arrows indicating internal flow (no text or symbols)
natural_image
Mechanical assembly diagram showing a lever mechanism with arrows indicating motion direction (no text or symbols)
natural_image
Diagram of a rectangular tray with arrows indicating direction or movement, no text or symbols present
natural_image
Mechanical assembly diagram showing a lever mechanism with directional arrows and a magnified inset view (no text or symbols)natural_image
Two-panel illustration showing a person using a ladder to lift a wall, with arrows indicating motion direction (no text or symbols)CZYSZCZENIE SZYBY DRZWICZEK

Uwaga
natural_image
Illustration of a hand using a tool to adjust or install a component, with no visible text or symbols.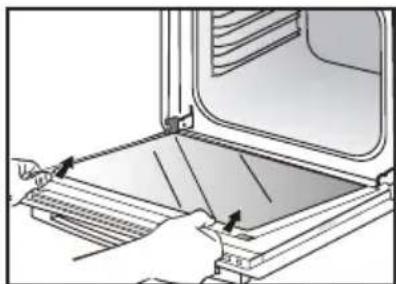
natural_image
Illustration of a kitchen appliance with a hand operating a tray (no text or symbols visible)natural_image
Diagram of a computer monitor with an open screen and a magnified inset showing the exterior portion (no text or symbols)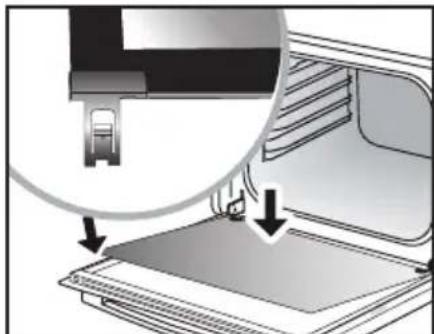
natural_image
Diagram showing a printer's internal structure with an open base and a magnified view of the printer's tip (no text or symbols present)WYMIANA LAMPKI
natural_image
Mechanical component diagram showing a pin-like assembly with a rotating knob (no text or symbols)
Visualizador

natural_image
Simple line drawing of a vertical rectangle with three symbols: circle, left-pointing arrow, and bell (no text or labels)
natural_image
Diagram of a kitchen appliance with a grater and a black arrow indicating direction (no text or symbols)
natural_image
3D CAD model of a rectangular tray or container with internal channels and a black arrow indicating direction (no text or symbols)
natural_image
3D diagram of a kitchen appliance with a mesh tray and ventilation duct (no text or symbols)natural_image
Diagram of a microwave oven with airflow arrows indicating internal flow (no text or symbols)
natural_image
Mechanical assembly diagram showing a lever mechanism with arrows indicating motion direction (no text or symbols present)
natural_image
Diagram of a rectangular tray with arrows indicating direction or movement, no text or symbols present
natural_image
Mechanical assembly diagram showing a lever mechanism with directional arrows and a magnified inset view (no text or symbols)natural_image
Two-panel illustration showing a person using a wall-mounted device to lift a panel, with no visible text or symbols.LIMPEZA DOS VIDROS DA PORTA

Atenção
natural_image
Illustration of a hand using a tool to adjust or install a mechanical component, with no visible text or symbols.
natural_image
Illustration of a hand using a tool to adjust or install a tray inside an oven (no text or symbols visible)natural_image
Diagram of a computer monitor with an open screen and a magnified inset showing the screen area (no text or symbols present)
natural_image
Diagram showing a printer's internal structure being inserted into a paper airplane (no text or symbols visible)natural_image
Mechanical component diagram showing a pin-like assembly with a rotating knob (no text or symbols)
Дисплей

natural_image
Pure electrical circuit lines without any symbols
natural_image
Diagram of a kitchen appliance with a grater and a black arrow indicating direction (no text or symbols)
natural_image
3D CAD model of a rectangular tray or container with internal channels and a black arrow pointing to the bottom-right corner (no text or symbols)
natural_image
3D diagram of a kitchen appliance with a mesh tray and ventilation duct (no text or symbols)natural_image
Diagram of a microwave oven with airflow arrows indicating internal flow (no text or symbols)
natural_image
Mechanical assembly diagram showing a lever mechanism with arrows indicating motion direction (no text or symbols present)
natural_image
Diagram of a rectangular tray with arrows indicating direction or movement, no text or symbols present
natural_image
Mechanical assembly diagram showing a lever mechanism with directional arrows and a magnified inset view (no text or symbols)natural_image
Diagram showing a person using a ladder to lift a wall, with arrows indicating motion (no text or symbols present)natural_image
Illustration of a hand using a tool to adjust or install a mechanical component, with no visible text or symbols.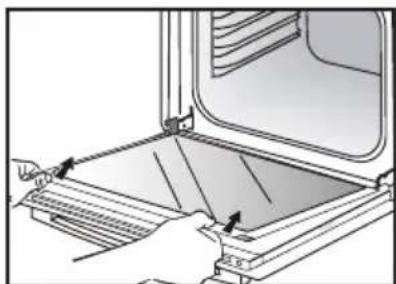
natural_image
Illustration of a hand inserting a tray into an oven with arrows indicating the process (no text or symbols present)natural_image
Diagram of a computer monitor with an open screen and a magnified inset showing the screen area (no text or symbols present)
natural_image
Diagram showing a printer's internal structure being inserted into a paper airplane (no text or symbols visible). 9 уход
ЗАМЕНА ЛАМПОЧКИ

natural_image
Mechanical component diagram showing a pulley and rotating knob (no text or symbols)
Displej

natural_image
Diagram of a kitchen appliance with a grater and a black arrow indicating direction (no text or symbols)
natural_image
3D CAD model of a rectangular tray or container with internal channels and a black arrow indicating direction (no text or symbols)
natural_image
3D diagram of a kitchen appliance with a mesh tray and ventilation duct (no text or symbols)• 3 POPIS RÚRY
SYSTÉM POSUVNÝCH KOL'AJNIČIEK
natural_image
Diagram of a microwave oven with airflow arrows indicating internal flow (no text or symbols)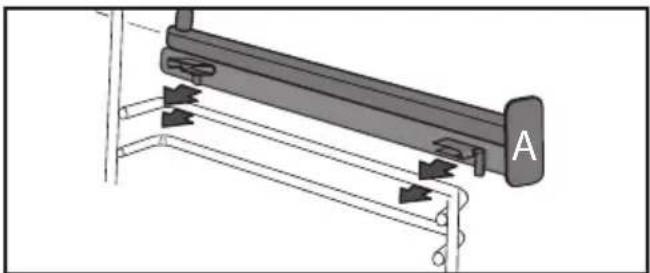
natural_image
Mechanical assembly diagram showing a lever mechanism with arrows indicating motion direction (no text or symbols present)
natural_image
Diagram of a rectangular tray with arrows indicating direction or movement, no text or symbols present
natural_image
Mechanical assembly diagram showing a lever mechanism with directional arrows and a magnified inset view (no text or symbols)natural_image
Two-panel illustration showing a person using a rack-mounted device to lift or lift the other (no text or symbols present)ČISTENIE SKLA DVIEROK

Pozor
natural_image
Illustration of a hand using a tool to adjust or install a mechanical component, with no visible text or symbols.Odstráňte prichytené sklo: pomocou nástroja (skrutkovača) zatlačte do otvorov (A) tak, aby sa sklo odklopilo a následne ho vyberte.
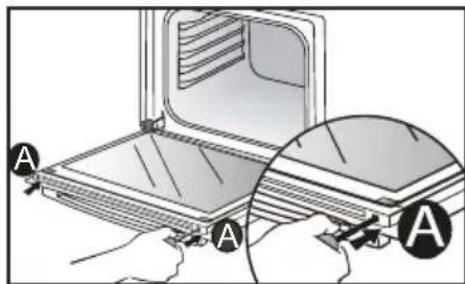

natural_image
Illustration of hands installing or adjusting a door panel inside an oven (no text or symbols visible)Sklá neponárajte do vody. Opláchnite čistou vodou a osušte handričkou, z ktorej sa neuvolňujú vlákna.
. 9 ÚDRŽBA
SPÄTNÁ MONTÁŽ DVIEROK
natural_image
Diagram of a computer monitor with an open screen and a magnified inset showing the screen area (no text or symbols present)
natural_image
Diagram showing a printer's internal structure being inserted into a paper airplane (no text or symbols visible)VÝMENA ŽIAROVKY
natural_image
Mechanical component diagram showing a pin-like assembly with a rotating knob (no text or symbols)1 INSTALLATION ....6

Display

natural_image
Diagram of a kitchen appliance with a grater and a black arrow indicating direction (no text or symbols)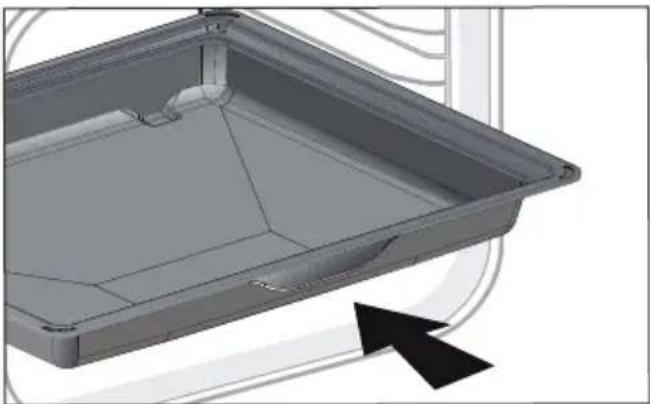
natural_image
3D CAD model of a rectangular tray with internal pipes and a black arrow indicating direction (no text or symbols)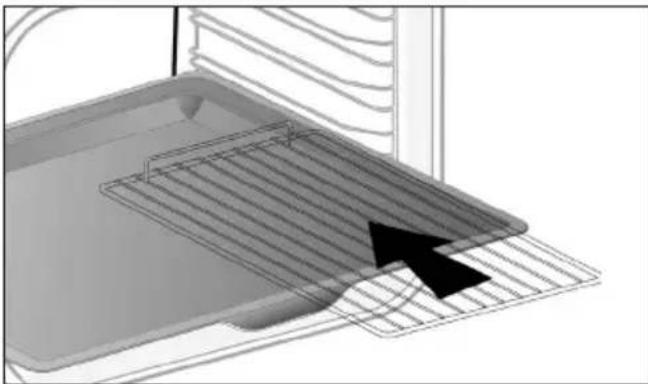
natural_image
3D diagram of a kitchen appliance with a mesh tray and ventilation duct, showing no text or symbols• 3 PRESENTATION AV UGNEN
SYSTEM MED GLIDSKENOR
natural_image
Diagram of a microwave oven with airflow arrows indicating internal flow (no text or symbols)
natural_image
Mechanical assembly diagram showing a lever mechanism with arrows indicating motion direction (no text or symbols present)
natural_image
Diagram of a rectangular tray with arrows indicating direction or force, no text or symbols present
natural_image
Mechanical assembly diagram showing a lever mechanism with directional arrows and a magnified inset view (no text or symbols)natural_image
Two-panel illustration showing a hand holding a grid device, with arrows indicating movement or change (no text or symbols)RENGÖRA GLASEN I LUCKAN

Observera
natural_image
Illustration of a hand using a tool to adjust or install a mechanical component, with no visible text or symbols.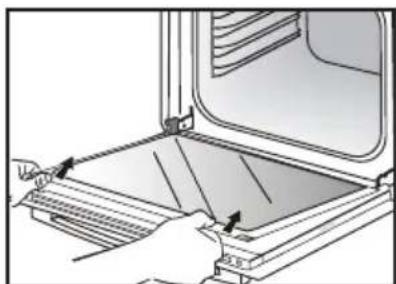
natural_image
Illustration of a hand using a tool to adjust or install a tray inside an oven (no text or symbols visible)natural_image
Diagram of a printer or printer with a magnified inset showing the printer's internal structure (no text or symbols present)
natural_image
Diagram showing a printer's internal structure with an open base and a magnified view of the printer's tip (no text or symbols present)BYTA UGNSLAMPA
natural_image
Mechanical component diagram showing a pin inserted into a housing with a rotating arrow indicating rotation (no text or symbols)
Дисплей

natural_image
Pure electrical circuit lines without any symbols
natural_image
Diagram of a kitchen appliance with a grater and a black arrow indicating direction (no text or symbols)
natural_image
3D CAD model of a rectangular tray or container with internal channels and a black arrow pointing to the bottom-right corner (no text or symbols)
natural_image
3D diagram of a kitchen appliance with a mesh tray and ventilation duct, showing no text or symbolsnatural_image
Diagram of a microwave oven with airflow arrows indicating internal flow (no text or symbols)
natural_image
Mechanical assembly diagram showing a lever mechanism with arrows indicating motion direction (no text or symbols)
natural_image
Diagram of a rectangular tray with arrows indicating direction or force, no text or symbols present
natural_image
Mechanical assembly diagram showing a lever mechanism with directional arrows and a magnified inset view (no text or symbols)natural_image
Two-panel illustration showing a person using a wall-mounted device to lift a panel, with arrows indicating motion (no text or symbols)natural_image
Illustration of a hand using a tool to adjust or install a mechanical component, with no visible text or symbols.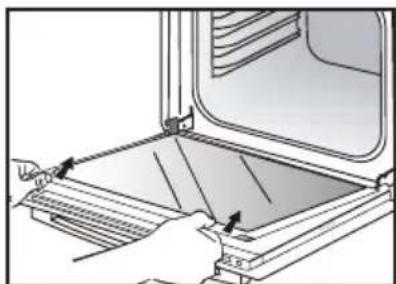
natural_image
Illustration of a hand using a tool to adjust or install a tray inside a refrigerator (no text or symbols visible)natural_image
Diagram of a printer or printer with a magnified inset showing the printer's internal structure (no text or symbols present)
natural_image
Diagram showing a printer's internal structure with an open lid and a magnified view of the printer's tip (no text or symbols present)ЗАМІНА ЛАМПОЧКИ
natural_image
Mechanical component diagram showing a pin-like assembly with a rotating shaft and base (no text or symbols)8 乾地の乾地の乾地の乾地の乾地の乾地の乾地の乾地の乾地の乾地の乾地の乾地の乾地の乾地の乾地の乾地の乾地の乾地の乾地の乾地の乾地の乾地の乾地の乾地の乾地の乾地の乾地の乾地の乾地の乾地の乾地の乾地の乾地の乾地の
הכלה 3הוֹרָהוֹרָהוֹרָהוֹרָהוֹרָהוֹרָהוֹרָהוֹרָהוֹרָהוֹרָהוֹרָהוֹרָהוֹרָהוֹרָהוֹרָה: (הכלה + ph+1N 1) ^2 n" n 1.5 n" n" n" n" n" n" n" n" n" n" n" n" n" n" n" n" n" n" n" n" n" n" n" n" n" n" n" n" n" n" n" n" n" n" n" n" n" n" n" n" n" n" n" n" n" n" n" n" n" n" n
natural_image
Diagram of a kitchen appliance with a grater and a black arrow indicating direction (no text or symbols)natural_image
3D CAD model of a rectangular tray or container with internal channels and a black arrow indicating direction (no text or symbols)natural_image
3D diagram of a kitchen appliance with a grater and ventilation duct, showing no text or symbolsהכלה,הכלההוּרָהוּרָהוּרָהוּרָהוּרָהוּרָהוּרָהוּרָהוּרָהוּרָהוּרָהוּרָהוּרָהוּרָהוּרָה
.שְׁרָה אַרִיָה
(DEMO) כרְבָר -
.הכלההוּרָהוּרָהוּרָהוּרָהוּרָהוּרָהוּרָהוּרָהוּרָהוּרָהוּרָהוּרָהוּרָהוּרָהוּרָה
(Sleep) אַרְשָׁת -
natural_image
Illustration of a hand using a tool to adjust or install a mechanical component, with no visible text or symbols.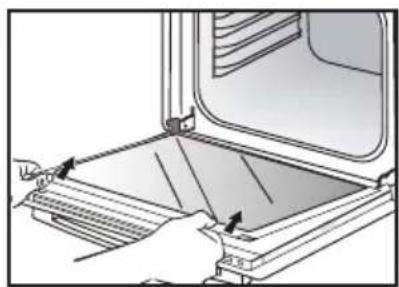
natural_image
Illustration of a hand using a tool to adjust or install a tray inside an oven (no text or symbols visible)natural_image
Two-panel illustration showing a hand holding a rack with arrows indicating motion or movement, no text or symbols present.תַעְרָה בְּרָה
תָרִי

natural_image
Diagram of a laptop with a magnified inset showing the screen area and control panel (no text or symbols)
natural_image
Diagram showing a 3D printer with a close-up view of its internal structure (no text or symbols present)תָאַעְה בִרְשׁ