
Sensor P20514 - Saucepan TEFAL - Free user manual and instructions
Find the device manual for free Sensor P20514 TEFAL in PDF.

User questions about Sensor P20514 TEFAL
0 question about this device. Answer the ones you know or ask your own.
Ask a new question about this device
Download the instructions for your Saucepan in PDF format for free! Find your manual Sensor P20514 - TEFAL and take your electronic device back in hand. On this page are published all the documents necessary for the use of your device. Sensor P20514 by TEFAL.
USER MANUAL Sensor P20514 TEFAL
Tefal ^® SENSOR ^®
natural_image
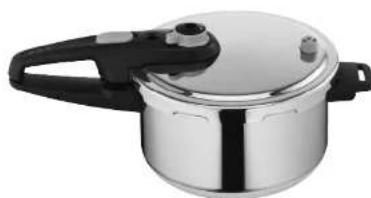
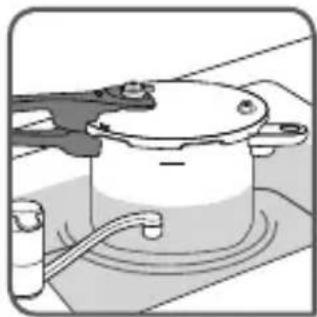
Close-up of a stainless steel cooking pot with black handle and lid (no text or symbols visible)Guide de l'utilisateur - User manual - Bedienungsanleitung - Gebruiksaanwijzing - Manuale d'uso - Guía del usuario - Manual do utilizador - Brugervejledning - Käyttöopas - Bruksanvisning - Bruksanvisning - Rъъководство на потребителя - Vodič za korisnike - Üživatelská příručka - Upute za korisnika - Használati ütmutató - Instrukcja obsługi - Ghidul utilizatorului - Руководство пользователя - Použivateľská příručka - Navodila za uporabnika - Uputstvo za upotrebu - Інструкція з експлуатації - ОБ NHLÉС хріоңд - Kullanım kıləvuzu - 用户指南 دُنْتَرِ رَهْنَّا دَلَى الْتَعَمَال
www.tefal.com
"Is preceding on model - "Inon model - "Inon Model - "It's an end of model - "Inon model - "It's an end of model - "It's an end of model - "It's an end of model - "It's an end of model - "It's an end of model - "It's an end of model - "It's an end of model - "It's an end of model - "It's an end of model - "It's an end of model - "It's an end of model - "It's an end of model - "It's an end of model - "I'm not a model - "I'm not a model - "I'm not a model - "I'm not a model - "I'm not a model - "I'm not a model - "I'm not a model - "I'm not a model - "I'm not a model - "I'm not a model - "I'm not a model - "I'm not a model - "I'm not a model - "I'm not a model - "I'm not a model
natural_image
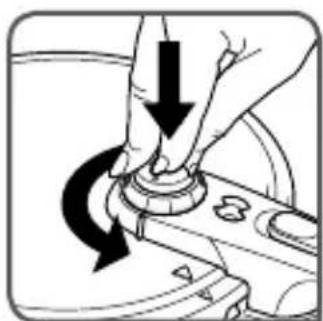
Close-up of hands using a tool to adjust or install a mechanical component (no visible text or symbols)fig 1
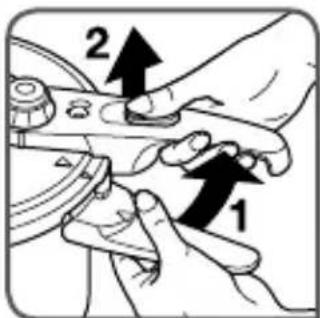
fig 2
natural_image
Illustration of hands using a tool to adjust or install a mechanical part (no text or symbols visible)fig 3

fig 4
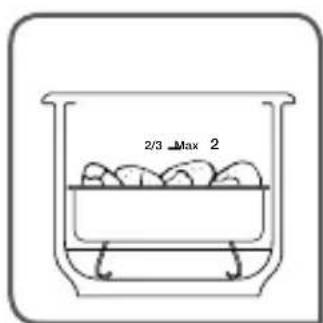
fig 5*
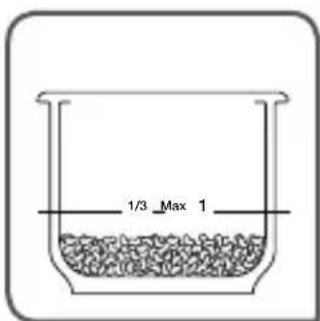
fig 6
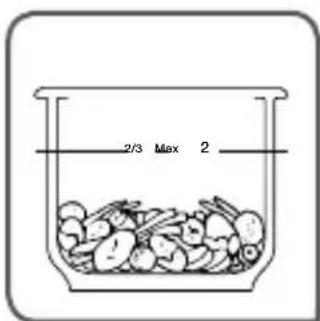
fig 7
natural_image
Illustration of hands using a mechanical switch to adjust a circular component (no text or symbols visible)fig 8

natural_image
Close-up of a hand using a screwdriver to adjust a component (no text or symbols visible)fig 9
natural_image
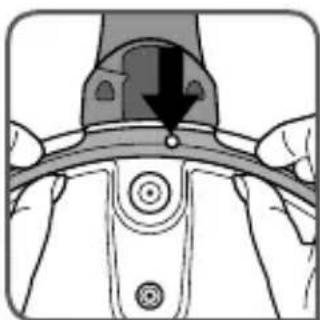
Mechanical component diagram showing a lever mechanism with a black arrow indicating force or direction (no text or symbols present)fig 10
natural_image
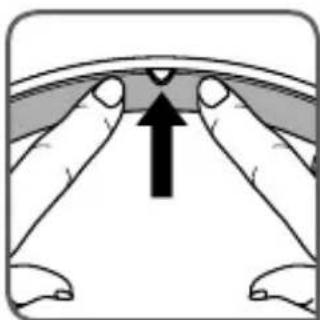
Diagram showing two hands holding a curved object with an upward arrow, no text or symbols presentfig 11

natural_image
Illustration of hands using a faucet to adjust or install a mechanical component (no text or symbols visible)fig 12
natural_image
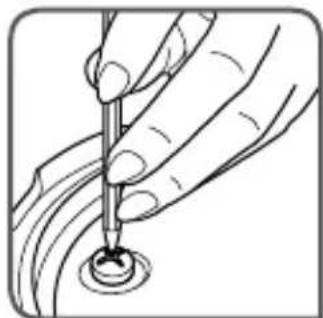
Illustration of a hand holding a screwdriver inserted into a circular component (no text or symbols)fig 13

natural_image
Simple line drawing of a pot with a lid and a handle, no text or symbols presentfig 14
natural_image
Line drawing of a mechanical device emitting smoke or vapor (no text or symbols)fig 15
natural_image
Diagram of a human face focusing on a circular mechanical component with alignment lines (no text or symbols)fig 16
*depending on model - *selon modèle - *Je nach Modell - *afhankelijk van model - *a seconda del modelo - *según el modelo - *consoante o modelo - *afhængig af modellen - *mallikohtainen - *avhengig av modell - *beroende på modell - *В зависимости от модела - *ovisno o modelu - *v závislosti na modelu - *ovisno o modelu - *modelltöl függöen - *w zależności od modelu - *în funcție de model - *в зависимости от модели - *v závislosti od modelu - *odvisno od modela - *u zavisnosti od modela - *залежно від моделі - *avòloya με το μοντέλο - *modele göre - *視機型而定 - بسته به مدل * - صب الموديل
PRÉCAUTIONS IMPORTANTES
natural_image
Illustration of hands holding a lid with a downward arrow indicating a drop or direction (no text or symbols)
natural_image
Simple line drawing of a circular object with a perforated lid and internal structure (no text or symbols)
natural_image
Diagram showing a hand operating a mechanical component with directional arrows indicating rotation (no text or symbols present)Avant la cuisson
natural_image
Illustration of a cooking pot with a handle and water level indicator (no text or symbols)natural_image
Illustration of a hand holding a screwdriver above a circular base (no text or symbols)Before using your pressure cooker, please take the time to read all the instructions and always refer to the «User guide». Improper use may result in damage.
For your safety, this appliance complies with the applicable standards and regulations:
- Pressure Equipment Directive (PED)
- Materials in contact with foodstuffs
- Environment
| COMPULSORY CHECKS BEFORE EACH USE | CHECK■ that the steam release outlet is unblocked - Fig. 16.■ that the safety valve ball is mobile - Fig 13.■ that the lid gasket is properly positioned beneath each of the grooves on the lid - Fig. 11.■ that the pan handles are properly closed. |
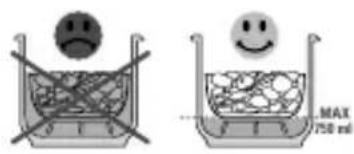
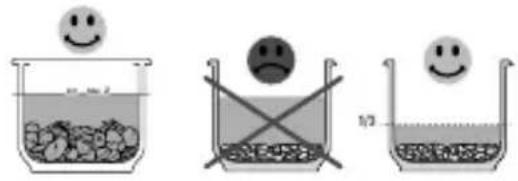
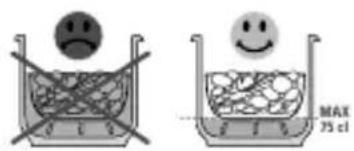
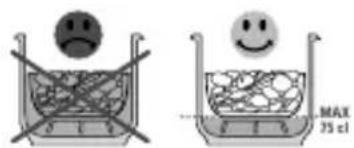
| ALWAYS COMPLY WITH THE FOLLOWING QUANTITIES | ■ Never use your pressure cooker without liquid – this will seriously damage it. Make sure that there is always enough liquid in the device when cooking.■ Minimum 250ml.■ Maximum 2/3 of the height of the pan, MAX 2 marker - Fig 7.■ When pressure cooking, the food in the steam basket should not be in contact with the water.■ Maximum 1/3 (MAX 1) - Fig. 6. for foodstuffs that expand and/or foam during cooking, such as rice, pulses, dried vegetables, stewed fruit, pumpkin, courgettes, carrots, potatoes, fish fillets etc. do not fill your pressure cooker more than 1/3 full (MAX 1 marker - Fig 6.).■ Foodstuffs put in the steam basket must not exceed the MAX 2 level of the pan - Fig. 5*. |
| COMPULSORY CHECKS BEFORE EACH USE | While the pressure cooker is in use, it must be kept out of the reach of children.This device cooks using pressure. Improper use may result in scalding injuries. Make sure that the pressure cooker is properly closed before use. (See section «Closing»).During cooking, check that the valve is still murmuring. If there is not enough steam being released, release the pressure in the cooker and check that there is enough liquid and that the steam release outlet is not blocked. After these checks, if there is still not enough steam, slightly increase the heat.Do not cook foodstuffs that might block the safety components:- cranberries- pearl barley- rolled oats- split peas- noodles, macaroni, spaghetti- rhubarb- blackcurrants, redcurrants or whitecurrantsNever use your pressure cooker to cook milk-based pudding recipes (such as rice pudding, semolina pudding...).Never use coarse salt in your pressure cooker. Only use fine salt at the end of cooking. This will prevent «pitting», which may degrade the bottom of your pressure cooker.Never use your pressure cooker to fry under pressure using oil. Do not leave your pressure cooker unattended while heating oil or fats. Continuing to heat oil which has started to smoke degrades it and could raise its temperature enough for flames to appear. Do not use your pressure cooker for any other purpose than the one it is meant for.Do not put your pressure cooker in a hot oven.Never use a piece of aluminium foil unsecured on a container placed in your pressure cooker. Always secure the foil with string onto the container.Never put plastic film into your pressure cookerAlcohol vapour is flammable. Bring to a boil for 2 minutes before putting the lid on. Check your appliance on a regular basis if you are making alcohol-based recipes.Only use the pressure cooker with the compatible heat source(s) listed in the user guide. |
| AFTER COOKING... | ■ Gradually turn the operating valve (A) align with the symbol ⚙ - Fig. 10. If, when releasing steam, you notice an abnormal release of pressure, return the operating valve (A) to the cooking position 📋 or 🌐 then carry out fast pressure release in a sink filled with cold water.■ If the pressure indicator (E) does not descend, place your pressure cooker in cold water.■ Never interfere with the pressure indicator.■ After cooking meats with a skin surface (e.g. ox tongue etc.), where there’s a risk of swelling under pressure, don’t pierce the meat when swollen to avoid being scalded. Pierce the meat before cooking.■ For foodstuffs that expand and/or foam during cooking, such as rice, pulses, dried vegetables, stewed fruit, pumpkin, courgette, carrots, potatoes, fish fillets etc. Let your pressure cooker cool down for a few minutes, then cool in a sink filled with cold water. Methodically and lightly shake the pressure cooker each time before opening, after verifying that the pressure indicator has fully dropped down, to prevent bubbles of steam overflowing and burning you. This operation is particularly important when steam is released quickly or after cooling down in cold water.■ Always be very careful when moving your pressure cooker under pressure. Do not touch hot surfaces. Use the handles and knobs. Use oven mitts if necessary.■ For soups, we recommend fast pressure release in cold water (see section «End of cooking»).■ Make sure that the vent is in the pressure release position before opening the pressure cooker. The pressure indicator (E) must be down before opening.■ Never use force to open your pressure cooker. Make sure that: the internal pressure has been released. The pressure indicator (E) must have dropped down. (See «Safety» section). |
| MAINTENANCE | ■ If you notice that a part of your pressure cooker is broken or cracked, do not attempt to open it under any circumstances if it is closed; wait for it to cool down completely before moving it. Do not use it again and take it to a TEFAL Approved Service Centre for repair.■ Do not tamper with the safety systems other than when following the cleaning and maintenance instructions.■ Only use the correct TEFAL original parts for your model. In particular, use a TEFAL pan and lid.■ Do not use your pressure cooker for storing acidic or salty foods before or after cooking as it may damage your pan.■ Clean and rinse your pressure cooker immediately after each use.■ Never put the operating valve (A), the gasket (H)* or the lid in the dishwasher.■ Never use bleach or products containing chlorine, as these will impair the quality of the stainless steel.■ Do not leave the lid soaking in water.■ Change the gasket every year or immediately if a split appears.■ Make sure that you get your pressure cooker checked in a TEFAL Approved Service Centre after 10 years of use. To store your pressure cooker: Place the lid upside down on the pan in order to prevent the premature wear of the lid gasket. |
KEEP THESE INSTRUCTIONS
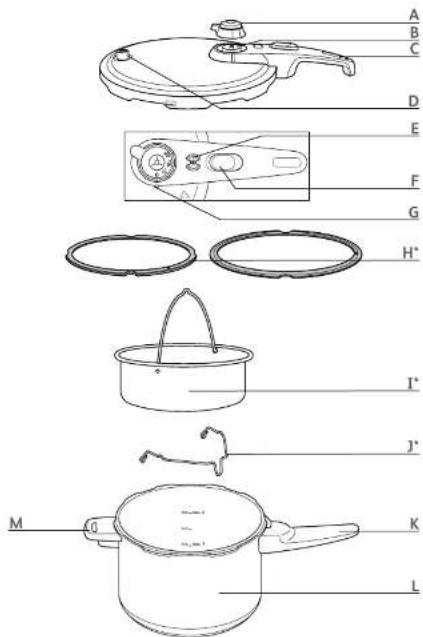
Descriptive diagram
A. Operatingvalve
B. Operating valve pipe
C. Long lid handle
D. Safety valve
E. Pressure indicator
F. Opening button
G. Operating valve position marker
H. Lid gasket (depending on model)
I. Steam basket (depending on model)
J. Trivet (depending on model)
K. Long pan handle
L. Pan
M. Short pan handle
Compulsory checks before each use
Checking the operating valve
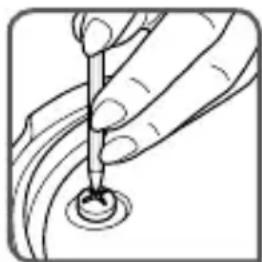
- Check that the operating valve pipe (B) of the operating valve (A) is not obstructed. Clean if necessary using a toothpick (see section «Using the operating valve»).
Checking the safety valve
- Check that the bearing of the safety valve can move (use a small toothpick) (see section ‘To clean the safety valve’).
USE
Opening
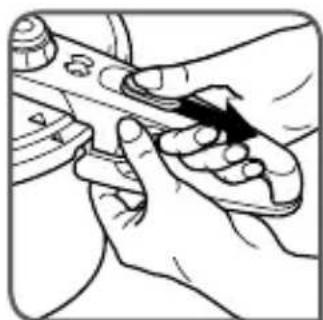
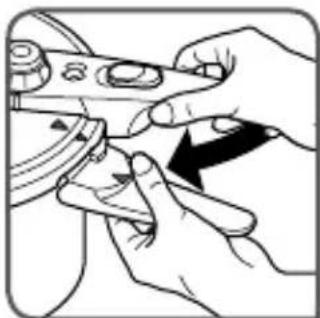
■ Hold the long pan handle (K) in one hand, take the lid handle (C) with the other hand and pull back the opening button with your thumb (F) - Fig 1
■ Then, without releasing the button, turn the lid to the right until it opens, then lift the lid - Fig 2
Closing
- Place the lid level on the pan by aligning the triangles on the lid and the pan handle (K) - Fig. 3
■ Turn the lid to the left until you hear it click shut - Fig. 4
If you can't close it, check that the opening button (F) is all the way back, if not, use your thumb to pull it all the way back.
When the pressure cooker is closed and not in operation, it is normal for the lid to move slightly relative to the pan. This effect disappears when the product is pressurised.
Before first use
- Fill the pan 2/3 with water (Maximum fill mark 2).
- Close your pressure cooker.
- Move the operating valve (A) to Position the symbol @opposite the positioning marker (G).
- Place your pressure cooker on a heat source, then set to maximum power.
- When steam begins to exit the valve, turn down the heat source and set a timer for 15 min.
■ After 15 min., turn off your heat source. Place your pressure cooker in a sink filled with cold water. - When the pressure indicator (E) descends, your pressure cooker is no longer under pressure. Gradually turn the operating valve (A), adjusting the speed that the pressure is released by how far you open the valve, until in the position. When the pressure indicator (E) drops down open your pressure cooker.
■ Rinse your pressure cooker with water and dry it.
Note: the appearance of stains on the bottom of the inside of the pan does nothing to impair the quality of the metal. They are simply limescale deposits. To remove them, use a sponge pad with a little diluted white vinegar.
Minimum fill level
■ Always use a minimum quantity of liquid equal to 250ml.
For steam cooking
■ The fill level must be at least equal to 750 ml.
- Clip the trivet (J)* onto the basket (I)*.
Maximum fill level
■ Never fill your pressure cooker past 2/3 full - Fig. 7
For certain foodstuffs
- For foodstuffs that expand and/or foam during cooking, such as rice, pulses, dried vegetables, stewed fruit, pumpkin, courgette, carrots, potatoes, fish fillets etc, do not fill your pressure cooker more than 1/3 full (maximum fill mark 1) - Fig. 6. Let your pressure cooker cool down for a few minutes, then cool in a sink filled with cold water. Methodically and lightly shake the pressure cooker each time before opening, after checking that the pressure indicator is fully descended, to prevent bubbles of steam overflowing and burning you. This operation is particularly important when steam is released quickly or after cooling down in cold water.
Using the steam basket\*
■ Pour 750 ml of water into the bottom of the pan (L).
- Clip the trivet (J)* onto the basket (I)*, then place in the bottom of the pan.
natural_image
Illustration of hands using a tool to press or inspect a circular object with a downward arrow (no text or symbols)
natural_image
Simple line drawing of a circular container with a lid and internal structure (no text or symbols)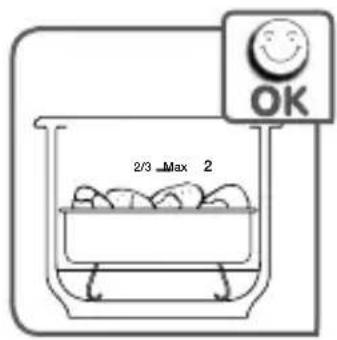
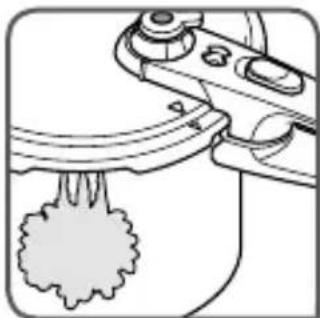
■ While steam cooking, the food in the steam basket* should not be in contact with the water - Fig. 5*.
The food in the steam basket* must not exceed the MAX 2 level.
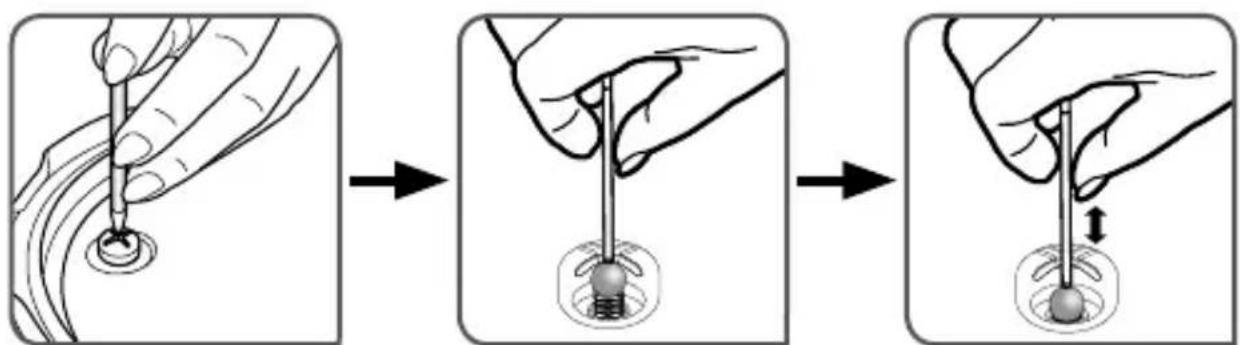
Using the operating valve (A)
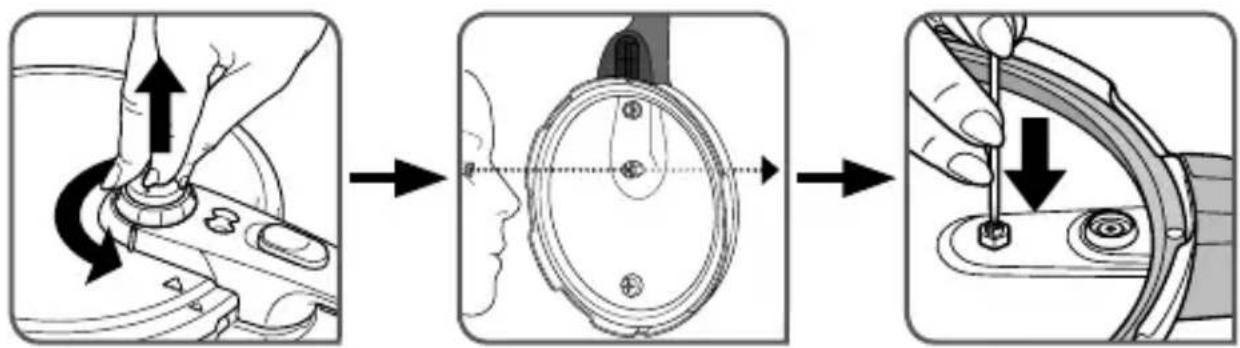
To fit the operating valve (A):
Caution: This must only be carried out when the pressure cooker is cold and not in use.
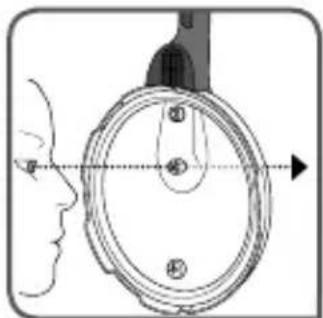
- Place the operating valve (A) in position, aligning the symbol 0 on the valve with the positioning marker (G).
- Press down on the valve then turn it to the symbol or .
To cook vegetables, delicate foodstuffs and preserve vitamins
■ Position the valve symbol (A) align with positioning marker (G). Pressure operates at 50kPa (7 psi/7 lbs pressure)
For cooking meat and frozen foods
■ Position the valve symbol (A) align with positioning marker (G). Pressure operates at 80kPa (12 psi/12 lbs pressure)
To release the steam
■ Position the valve symbol (A) align with positioning marker (G).
To remove the operating valve
Caution: Leave the appliance to cool completely before removing the valve (A).
- Press down on the valve and turn the valve to align position 0 with the positioning marker (G) - Fig 8
■ Remove the valve.
To fit the operating valve
■ Position the operating valve by aligning the 0 with the positioning marker (G).
■ Press down on the valve and turn to the desired position.

Before cooking
■ Before each use, remove valve (A) (see section «Using the operating valve (A)») and visually check that the operating valve pipe (B) is not obstructed. If needed, clean it with a toothpick - Fig. 9
- Check that the safety ball valve is mobile (see section ‘To clean the safety valve) - Fig. 13.
- Add the ingredients and liquid. Close the lid and check that it is properly closed.
- Put the operating valve on (A) and select position for .
■ Place your pressure cooker on a heat source, then set to full power.
During cooking
- When the operating valve (A) is continuously emitting steam and making a steady sound (PSCHHHT), cooking has started, so lower the heat source so it continues to whisper steadily.
■ Count the cooking time indicated in your recipe.
■ As soon as the cooking time is finished, switch off the heat source.
The pressure indicator (E) prevents pressure from rising in the pressure cooker if the lid is not properly closed.
It is normal for steam to escape around the pressure indicator (E) when pressure begins operating.
End of cooking
To release the steam
■ When the heat source has been turned off, you have two options:
Slow pressure release:
■ This is used for stews, vegetables, meat joints, and fish dishes.
■ Gradually turn the operating valve (A), adjusting the speed that the pressure is released by how far you open the valve, until it aligns opposite the marker with the symbol ⚙. When the pressure indicator (E) drops down, your pressure cooker is no longer under pressure.
If, while releasing steam, you notice an abnormal release of pressure, return the operating valve (A) to the cooking position or, then carry out fast decompression in a sink filled with cold water.
If the pressure indicator (E) does not descend, run cold water into your sink and submerge the bottom of your pressure cooker until the pressure indicator descends.
Never interfere with the pressure indicator.
Fast pressure release: -
■ This is used for soups, rice, pasta, egg custards, cake and pudding mixes, recipes contain rice or pasta and recipes with a high liquid content.
■ Run cold water into your sink and submerge the bottom of your pressure cooker until the pressure indicator descends. When the pressure indicator (E) drops down, your pressure cooker is no longer under pressure. Turn the operating valve (A) to position 🎨.
■ You can now open it.
■ For foodstuffs that expand during cooking, such as rice, pulses, dried vegetables, stewed fruit, pumpkin, courgettes, potatoes, fish fillets etc., do not fill your pressure cooker past 1/3 (MAX 1) mark. Let your pressure cooker cool down for a few minutes, then cool in a sink filled with cold water. Methodically and lightly shake the pressure cooker each time before opening, after checking that the pressure indicator has fully descended, to prevent bubbles of steam overflowing and burning you. This operation is particularly important when steam is released quickly or after cooling down in cold water. For soups, we recommend fast pressure release in cold water.
natural_image
Illustration of a cooking pot with a tool and tubing (no text or symbols)The pressure indicator (E) prevents the pressure cooker from being opened if it is still under pressure.
SAFETY
EN
Your pressure cooker is fitted with several safety devices:
■ Closing safety:
- If the lid is positioned incorrectly, or not completely shut, steam will leak around the pressure indicator (E) and it will not be able to increase pressure.
The pressure indicator (E) prevents pressure from rising in the pressure cooker if it is not properly closed.
■ Opening safety:
- If your pressure cooker is under pressure, the pressure indicator (E) is in the high position and the handles of the lid can't be opened.
- Never try to open the pressure cooker by force.
- Above all, do not interfere with the pressure indicator (E).
- Make sure that the interior pressure has fallen by checking that the pressure indicator (E) is in the low position.
- Never use any other models of lid handles.
The pressure indicator (E) prevents the pressure cooker from being opened if it is still under pressure.
■ Two safety devices against overpressure:
- First device: the safety valve (D) releases the pressure and the steam escapes vertically from the top of the lid - Fig. 14
- Second device: the gasket (H) ^* allows steam to escape from between the lid and the pan - Fig. 15
Caution: this may extinguish the flame on a gas hob.
If one of the overpressure safety systems is triggered:
■ Turn off the heat source.
■ Allow the pressure cooker to cool completely.
■ Open the pressure cooker..
- Check and clean the operating valve (A), the operating valve pipe (B), the safety valve (D) and the gasket (H)*.
Recommendations for use
1 - Steam is very hot when it leaves the pressure cooker. Make sure that you do not burn yourself.
2 - While the pressure indicator is high, you cannot open the pressure cooker. Never interfere with the pressure indicator.
3 - To move your pressure cooker, use the two pan handles. Use oven mitts if necessary.
4 - Never leave food in your pressure cooker.
5 - Never use bleach or products containing chlorine.
6 - Do not put in the dishwasher or leave soaking in water: the gasket, the lid and the operating valve.
7 - Change the gasket every year or if a split appears.
8 - You should only clean your pressure cooker when it is cold and empty.
9 - As with any cooking utensil, ensure close supervision if you are using the pressure cooker near children.
10 - In the event of dropping the pan or the lid, it is imperative that you get your pressure cooker checked in a TEFAL Approved Service Centre.
11 - Make sure that you get your pressure cooker checked in a TEFAL Approved Service Centre after 10 years of use.
CLEANING
To ensure the correct operation of your pressure cooker, follow these cleaning and maintenance recommendations after each use.
Wash your pressure cooker, pan and lid after each use.
The browning and marks which may appear following long use do not affect the operation of the pressure cooker.
To extend the lifespan of your pressure cooker, don't overheat the pan when empty.
- Wash your pressure cooker (pan and lid) after each use using warm water with a little washing-up liquid added. Follow the same procedure for the basket*.
- Don’t use bleach or chlorine-containing chemicals.
■ Do not overheat your pan when empty.
To clean the pan
- For the inside of the pan, wash with a sponge pad and washing-up liquid. For the outside of the pan, wash with a natural sponge and washing-up liquid. If the inside of the pressure cooker has blackened, if it has iridescent reflections or if food has burnt onto it, clean it with white vinegar or with a special stainless steel cleaning product intended for this use.
To clean the lid
- Wash the lid under running warm water with a sponge and washing-up liquid. Rinse well.
- Do not put the lid in the dishwasher.
Only the pan and basket* are dishwasher-safe.
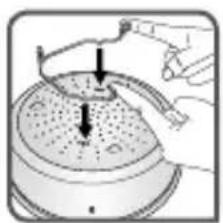
Cleaning the lid gasket (H) ^*
■ After each use, clean the gasket (H) ^* and its housing.
- Put it back into its housing by lining up the hole in the gasket with the pressure indicator rod on the lid - Fig. 10
■ Remove it. See section «Using the operating valve»
■ Clean the operating valve (A) under running tap water - Fig. 12.
To clean the operating valve (A):
To clean the operating valve pipe (B) located on the underside of the lid:
■ Remove the operating valve (A) (see section «Using the operating valve»).
■ Visually check that the operating valve pipe (B) is not blocked - Fig. 16 If needed, clean it with a toothpick - Fig. 9
To clean the safety valve (D)
- Clean the bottom of the safety valve (D) located on the underside of the lid by running under water.
■ Make sure that it works properly by lightly pushing on the ball which you should be able to push down without any difficulty.
■ See drawing opposite.
Never remove the safety valve cover (D), located on the top of the lid.
natural_image
Illustration of a hand holding a screwdriver above a circular base (no text or symbols)To extend the lifespan of your pressure cooker, don't overheat the pan when empty.
MAINTENANCE
To change your pressure cooker's gasket:
- Change your pressure cooker's gasket every year or if a cut appears.
■ Always use an original TEFAL gasket corresponding to your model.
To store your pressure cooker:
■ Turn the lid over on the pan.
Make sure that you get your pressure cooker checked in a TEFAL Approved Service Centre after 10 years of use.
TEFAL accessories
■ Commercially available accessories for your Sensor pressure cooker are:
| 4.5 L / 6 L 8 L / 10 L | ||
| Steam basket 792185 - | ||
| Trivet 792691 or X1030007 | ||
| Gasket 792189 980549 | ||
■ To replace other parts or for repairs, contact a TEFAL Approved Service Centre.
■ Only use the correct TEFAL original parts for your model.
FEATURES
| Total capacity* | Pan capacity | ∅ Int. pan ∅ | Pan base references | |
| 5 L 4.5 L | 22 cm 15.5 cm P | 20506 | ||
| 6.5 L 6 L | 22 cm | 15.5 cm P20507 | ||
| 8.8 L 8 L | 25 cm | 18 cm | P20514 | |
| 10.8 L | 10 L | 25 cm | 18 cm | P20515 |
* total capacity: total capacity including the volume of the lid.
Technical information: Operating pressure: 80 kPa/12 psi.
Maximum safety pressure: 140 kPa/20 psi.
The pan, the steaming basket*, the trivet* and lid are made from stainless steel.
Compatible heat sources
GAS
ELECTRIC
(Solid plate)

ELECTRIC
(Radiant or halogen ceramic hobs)

ELECTRIC
(Ceramic induction hob)
ELECTRIC
(Spiral resistor)

- Your Sensor pressure cooker can be used on all heat sources, except Aga hobs, but including induction.
- On electric and induction hobs, use a ring with a diameter equal to or less than that of your pressure cooker base.
■ On ceramic hobs, make sure that the base of the pan is clean and dry. - On gas, the flame should not extend beyond the diameter of the pan.
- For all heat sources, make sure that your pressure cooker is well centred.
GUARANTEE
EN
- When used as recommended in the instructions, the pan of your new TEFAL pressure cooker is guaranteed for 10 years against:
- any defect linked to the metallic structure of your pan, - any premature deterioration of the base metal.
- All other parts of your pressure cooker are guaranteed against defects in workmanship or materials, for the period of warranty defined by the law in force in the country of purchase and from the date of purchase.
- This contractual guarantee is established upon presentation of the receipt or invoice showing the date of purchase.
This Guarantee excludes:
■ Damage resulting from failure to comply with important precautions, or negligent use, particularly:
- knocks, dropping, use in the oven, etc - putting the lid and the operating valve in the dishwasher.
■ Only TEFAL Approved Service Centres are authorised to give you this guarantee.
- Please call the TEFAL Advice number to find out the address of your nearest TEFAL Approved Service Centre.
Australian – NZ warranty
COOKWARE, BAKEWARE AND PRESSURE COOKERS Limited Replacement Guarantee
Our goods come with guarantees that cannot be excluded under the Australian Consumer Law. You are entitled to a replacement or refund for a major failure and compensation for any other reasonably foreseeable loss or damage. You are also entitled to have the goods repaired or replaced if the goods fail to be of acceptable quality and the failure does not amount to a major failure. In addition to these statutory rights and any other rights and remedies you may have under the law, Groupe SEB Australia Pty Ltd (we or us) guarantees this Jamie Oliver by Tefal/Tefal/All-Clad/Moulinex product will be free of defects in material and craftsmanship including handles, body, knobs, lids and fixings for 12 months from the date of purchase. We also guarantee the non-stick coating of this Jamie Oliver by Tefal/Tefal/All-Clad/Moulinex product will be free of blistering or peeling for the life of the Jamie Oliver by Tefal/Tefal/All-Clad/Moulinex product. Should your Jamie Oliver by Tefal/Tefal/All-Clad/Moulinex product develop a defect during the guarantee period or the non-stick coating peel during the life of your Jamie Oliver by Tefal/Tefal/All-Clad/Moulinex product, you should return it, at your cost, to the retailer from which you purchased it from, together with your receipt as proof of purchase.
The retailer will then forward your claim directly to us for processing. Alternatively, if the retailer is unable to help you, you may contact us directly at:
Groupe SEB Australia Pty Ltd, Customer Service Department, Unit 1, No 10 Hill Rd, Homebush NSW 2127 T: +61 2 9748 7944
If on receipt your Jamie Oliver by Tefal/Tefal/All-Clad/Moulinex product is found to be defective or the non-stick coating has peeled, we will, at our cost, replace or repair the product in our discretion. Only the defective part or accessory will be repaired or replaced. Packaging, instructions etc. will not be replaced unless faulty. This guarantee excludes defects caused by the Jamie Oliver by Tefal/Tefal/All-Clad/Moulinex product not being used in accordance with instructions, accidental damage (including overheating), misuse or being tampered with by unauthorised persons. It also does not apply if the Jamie Oliver by Tefal/Tefal/All-Clad/Moulinex product is used commercially and excludes consumable items (including accessories such as pressure regulators and safety devices), dishwasher effects and damages, stains, dents, discolouration, scratches or scuffs due to normal wear and tear, and your costs of claiming under the warranty.
REGULATORY MARKINGS
| Markings Location | |
| Identification of manufacturer or commercial brand | On the short lid handle |
| Year of manufacture On the top of the lid | |
| Equipment identification/model reference | On the top of the lid |
| Operating pressure (OP) On the top of the lid | |
| Safety pressure (SP) On the top of the lid | |
| Capacity On the outside of the pan. |
TEFAL ANSWERS YOUR QUESTIONS
EN
| Problems Recommendations | |
| If you are unable to close the lid: | Check that the opening button (F) is all the way back. If needed, pull on the button to move it back. |
| If your pressure cooker has heated under pressure without liquid inside | Have your pressure cooker checked by an approved TEFAL Service Centre. |
| Steam escapes through the operating valve with a high-pitched whistling | Turn off the heat source. Let the appliance cool down. After opening the appliance, check that the operating valve pipe is not blocked by food. |
| If the pressure indicator has not risen and nothing is escaping through the operating valve during cooking | This is normal during the first few minutes. If the phenomenon persists, check that:- The heat source is sufficiently strong; if not, increase it.- The quantity of liquid in the pan is sufficient.- The operating valve is in a cooking position.- Your pressure cooker is properly closed.- There is no deterioration of the gasket or edge of the pan.- The gasket is correctly positioned in the lid - Fig, 10-11 |
| If the pressure indicator has risen and nothing is escaping through the operating valve during cooking | This is normal during the first few minutes. If the problem persists, put your pressure cooker in cold water, see section «End of cooking», then open it. Clean the operating valve outlet and check that the safety valve ball can be pressed without any difficulty, clean if necessary. Never interfere with the pressure indicator. |
| If steam leaks from around the lid, | Check:The correct closure of the lid.The position of the lid gasket. The condition of the gasket; replace if necessary.The cleanliness of the lid, the gasket, the safety valve and the operating valve.The condition of the edge of the pan. |
| If you are unable to open the lid | Check that the pressure indicator is in the lowered position. If not, release the pressure, if necessary, by cooling your pressure cooker in a sink filled with cold water. See section «End of cooking». Never interfere with the pressure indicator. |
| If the food is not cooked or is burnt, | Check:The cooking time.The power of the heat source.The correct position of the operating valve.The quantity of liquid. |
| If one of the safety systems is triggered | Turn off the heat source.Let your pressure cooker cool by leaving to stand on the hob until the pressure indicator drops down. This make take several hours. Open the pressure cooker. Check and clean the operating valve, the operating valve pipe, the safety valve and the gasket. If the problem persists, have your appliance checked by a TEFAL Approved Service Centre. |
TABLE OF COOKING TIMES
Meats and fish
FRESHValve position | FROZENvalve position | |
| Beef (Topside 1 kg) 32 min | (medium)** 1 hr (medium)** | ** |
| Chicken (Whole, 1.2 kg) 20 mins | Do not cook from frozen. | |
| Lamb (Leg 1.3 kg) 40 min | (medium)** 1hr 15 mins (medium)** | |
| Salmon (4 steaks 0.6 kg) | 6 mins 8 mins | |
| Tuna (4 steaks 0.6 kg) 7 mins | 9 mins | |
** Cook for an additional 5 minutes for well-done meat.
If your model is equipped with a steam basket, we recommend steaming vegetables (see section «Using the steam basket»).
If your model doesn't have a steam basket: cook directly in the water.
Note: The cooking times for vegetables are the same whether steamed in the basket or cooked directly in water.
| FRESHValve position | FROZENValve position | |
| Artichokes, whole | 20 mins | - |
| Asparagus, whole | 5 mins | 3 mins |
| Broccoli, florets | 4 mins | 5 mins |
| Brussel sprouts | 8 to 11 mins | 6 to 8 mins |
| Carrots, cut into round slices | 7 mins | 9 mins |
| Cauliflower florets | 5 to 7 mins | 5 mins |
| Celery, thinly sliced | 7 to 9 mins | - |
| Chicory, cut in half | 13 to 16 mins | - |
| Chopped leeks | 8 mins | 10 mins |
| Fine green beans (whole) | 6 to 8 mins | 4 to 6 mins |
| Green cabbage, thinly sliced | 5 to 7 mins | 3 mins |
| Green lentils (dried pulses) | 16 mins | - |
| Mushrooms, thinly sliced | 3 mins | - |
| Peas | 3 to 6 mins | 5 mins |
| Peppers cut into quarters | 6 to 8 mins | 3 mins |
| Potato (e.g. King Edwards) cut into quarters (depending on size) | 10 to 15 mins | - |
| Red beetroot cut into 4 (depending on size) | 20 to 30 mins | - |
| Rice (long grain white), see note below | 8 mins | - |
| Semi-dried beans *** | 18 to 22 mins | - |
| Sliced courgettes | 3 to 6 mins | 4 to 7 mins |
| Spinach | 3 to 4 mins | 4 to 5 mins |
| Turnips, cut into cubes | 4 to 6 mins | 7 mins |
*** Not available in all countries RICE: never fill the pan more than one-third full including liquid as rice froths and boils up during cooking.
GOLDEN RULES WHEN PRESSURE COOKING
(for UK consumers) For models 6 litres or more in capacity.
The minimum quantity of liquid required for normal cooking is 250 ml ( 12 pint) for the first 14 hour cooking. For each additional 14 hour, or part of 14 hour, add a further 150 ml ( 14 pint) of liquid. For example, 45 minutes cooking requires 600 ml (1 pint) of liquid. Note: This is only a general guide. Certain foods, such as rice, pulses, steamed puddings and Christmas puddings may require extra water (see text below).
- When steaming foods in the basket use a minimum of 750 ml (1¼ pint) water in the cooker.
■ Always use a liquid that gives off steam when boiled e.g. water stock, wine, beer, cider. Never use oil or fat. All pressure cooking requires some liquid.
- Whatever the size of pressure cooker, the maximum filling level when all the ingredients and liquid have been added are:
Solid foods e.g. vegetables, meat joints: no more than two-thirds full
Liquids and cereals e.g. soups, stews, cereal and pasta: no more than half full
Foods that swell during cooking e.g. rice, dried beans, dried peas, dried vegetables, stewed fruit, pumpkin, courgettes, carrots, potatoes, fish fillets, etc: no more than one-third full
- When cooking pulses they swell up and tend to froth up. Use 1.2 litres (2 pints) water for every 450 g (1 lb) pre-soaked weight of pulses. Remember all dried peas and dried beans, must be soaked in boiling water for 1 hour before cooking. Drain, rinse thoroughly and cook in fresh water. Never eat uncooked beans or peas. Soaking is not necessary for red lentils. The high temperatures achieved in the pressure cooker ensure that any natural toxins in the pulses are destroyed. Canned beans and pulses can simply be drained and rinsed before adding to the pressure cooker.
For steamed suet puddings, sponge puddings or Christmas puddings, a short pre-steaming time is best to enable the raising agent to activate and prevent a heavy, close texture. Extra liquid is required so use a minimum of 1½ pint/900 ml of boiling water for a combined steaming and cooking time of up to 1 hour. For each additional ¼ hour of cooking, or part of ¼ hour, add a further ¼ pint/150 ml of boiling water. Pre-steaming is done with the operating valve in the steam release position on a low heat for the required time. Then turn the operating valve to either 📋 or ⚙ and increase the heat to bring to full pressure. Lower the heat and pressure cook for the required time.
■ Pressure operates at 50kPa (7 psi / 7lbs pressure) and pressure at 80kPa (12 psi / 12lbs pressure).
■ Never cook dumplings with the lid tightly closed, as they could rise up and block the safety devices. Cook the stew and at the end of cooking, release the steam and cook gently for about 10 - 15 minutes without the lid on.
■ Pressure cooking times vary according to the size of individual pieces or thickness of the food, not the weight.
■ To prevent discolouration of the interior, caused by mineral deposits in hard water areas, add a tablespoon of lemon juice or vinegar.
■ Cooking containers must withstand temperatures of 130°C (250°F). Any covering on containers, e.g. foil, greaseproof paper or cling film, must be securely tied otherwise they could block the safety devices. Do not use plastic lids as they prevent steam from being in contact with the food. Also, they could distort and come off during cooking which could block the safety outlets.
■ Accurate timing is essential when pressure cooking to prevent overcooking, especially with vegetables, fruit and fish.

natural_image
Illustration of hands holding a lid with a downward arrow indicating a drop or direction (no text or symbols)
natural_image
Illustration of a circular container with a perforated lid and internal structure (no text or symbols)
natural_image
Mechanical component diagram showing a hand pressing down on a circular knob with directional arrows indicating motion (no text or symbols)DE
Vor dem Garen
natural_image
Illustration of a cooking pot with a lid and tubing (no text or symbols)natural_image
Illustration of a hand holding a screwdriver above a circular base (no text or symbols)
natural_image
Illustration of hands holding a container with a lid and arrows indicating process (no text or symbols)
natural_image
Illustration of a circular container with internal structure and two small protrusions (no text or symbols)
natural_image
Diagram showing a hand operating a mechanical component with directional arrows indicating rotation (no text or symbols present)NL
Vóór het koken
natural_image
Illustration of a cooking pot with a handle and water level indicator (no text or symbols)■ Daarna kunt u de snelkookpan openen.
natural_image
Illustration of a hand holding a tool with a circular base, no text or symbols presentnatural_image
Illustration of hands holding a lid with a lid removed, showing internal granular texture (no text or symbols)
natural_image
Simple line drawing of a circular object with a perforated lid and internal structure (no text or symbols)
natural_image
Diagram showing a hand pressing down on a mechanical component with an inset view of a control dial (no text or symbols)IT
Prima della cottura
natural_image
Illustration of a cooking pot with a pliers and tubing (no text or symbols)natural_image
Illustration of a hand holding a screwdriver with a circular base (no text or symbols)
natural_image
Illustration of a hand holding a lid with a downward arrow indicating a drop or direction (no text or symbols present)
natural_image
Simple line drawing of a circular object with a perforated top and side dot (no text or symbols)
natural_image
Diagram showing a hand operating a mechanical component with directional arrows indicating rotation (no text or symbols present)ES
Antes de la cocción
natural_image
Illustration of a cooking pot with a lid and tubing (no text or symbols)natural_image
Illustration of a hand holding a screwdriver with a circular base, no text or symbols present

natural_image
Illustration of hands holding a lid with a downward arrow indicating a process or movement (no text or symbols present)
natural_image
Illustration of a circular steamer with a lid and internal structure (no text or symbols)
natural_image
Diagram showing a hand operating a rotary knob with directional arrows indicating rotation (no text or symbols present)Antes da cozedura
natural_image
Illustration of a cooking pot with a lid and tubing (no text or symbols)natural_image
Illustration of a hand holding a screwdriver with a circular base (no text or symbols)

natural_image
Illustration of a hand holding a container with arrows indicating process (no text or symbols)
natural_image
Simple line drawing of a circular container with a lid and internal structure (no text or symbols)
natural_image
Diagram showing a hand turning a button on a machine, with no visible text or symbolsInden tilberedning
natural_image
Illustration of a cooking pot with a lid and tubing (no text or symbols)■ Nu kan du åbne.
natural_image
Illustration of a hand holding a screwdriver above a circular base (no text or symbols)
| FRISK Ventilens position | DYBFROST Ventilens position | |
| Asparges | 5 min. | 3 min. |
| Blomkål i buketter | 5-7 min. | 5 min. |
| Broccoli | 4 min. | 5 min. |
| Bønner, halvtørrede | 18-22 min. | - |
| Græskar skåret i kvarte | 6-8 min. | 3 min. |
| Grønne bønner (haricots verts) | 6-8 min. | 4-6 min. |
| Grønærter | 3-6 min. | 5 min. |
| Gulerødder i skiver | 7 min. | 9 min. |
| Hele artiskokker | 20 min. | - |
| Julesalat skåret i halve | 13-16 min. | - |
| Kartofler i kvarte (ifølge størrelse) | 10-15 min. | - |
| Linser, grønne (tørrede grøntsager) | 16 min. | - |
| Majroer i tern | 4-6 min. | 7 min. |
| Porrer i små stykker | 8 min. | 10 min. |
| Ris (tørrede grøntsager) | 8 min. | - |
natural_image
Illustration of hands holding a container with a lid and a pointed lid, no text or symbols present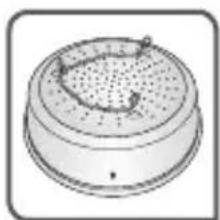
natural_image
Simple line drawing of a circular container with a lid and side port (no text or symbols)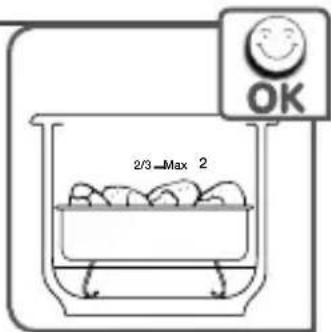
natural_image
Illustration of a cooking pot with a lid and tubing (no text or symbols)natural_image
Illustration of a hand holding a screwdriver above a circular component (no text or symbols)LAKISÄÄTEISET MERKINNÄT
NO
■ Kontroller at kulen i sikkerhetsventilen er bevegelig (bruk en liten pinne).
BRUK
Åpning
natural_image
Illustration of hands holding a lid with a pointed lid and a downward arrow indicating a process (no text or symbols)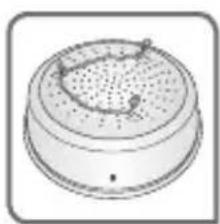
natural_image
Simple line drawing of a circular object with a textured top and small protrusions, resembling a lid or cover (no text or symbols)
natural_image
Diagram showing a hand operating a rotary knob with a control dial (no text or symbols)Før kokingen
natural_image
Illustration of a cooking pot with a lid and tubing (no text or symbols)■ Nå kan du âpne den.
natural_image
Illustration of a hand holding a screwdriver inserted into a circular component (no text or symbols)

natural_image
Illustration of hands cleaning a perforated metal steamer (no text or symbols)
natural_image
Simple line drawing of a circular container with a lid and internal structure (no text or symbols)
natural_image
Diagram showing a hand operating a rotary knob with directional arrows indicating rotation (no text or symbols present)Före tillagningen
natural_image
Illustration of a cooking pot with a lid and tubing (no text or symbols)natural_image
Illustration of a hand holding a screwdriver with a circular base (no text or symbols)
natural_image
Illustration of a hand holding a lid with a pointed lid and a downward arrow indicating motion (no text or symbols)
natural_image
Simple line drawing of a circular object with a perforated top and internal structure (no text or symbols)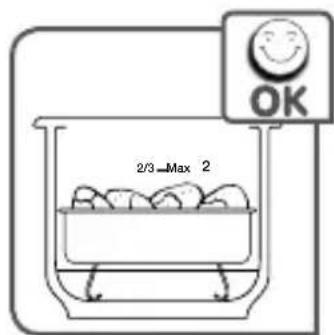
natural_image
Diagram showing a hand operating a rotary knob with directional arrows indicating rotation (no text or symbols present)Преди готвенето
natural_image
Illustration of a cooking pot with a side arm and water level indicator (no text or symbols)■Можете да отворите тенджерата.
natural_image
Illustration of a hand holding a screwdriver with a circular base (no text or symbols)
BS
■ Provjerite da nije začepljen ispusni otvor radnog ventila (pogledajte poglavlje «upotreba radnog ventila»).
■ Provjerite da li je kuglica sigurnosnog ventila pokretna (koristite štapić).
UPOTREBA
Otvaranje
- Držite dugačku dršku posude (K) jednom rukom, drugom rukom podignite dršku poklopca (C) i palcem povucite tipku za otvaranje (F) - Slika 1
- Zatim, bez otpuštanja tipke, okrenite poklopac udesno dok se ne otvori, a zatim podignite poklopac - Slika 2
Zatvaranje
■ Stavite poklopac na lonac, poravnavajući trokute na poklopcu i dršci lonca (K) - Slika 3
■ Okrenite poklopac ulijevo dok ne čujete klik zatvaranja - Slika 4
Ako ne možete zatvoriti, provjerite da li je tipka za otvaranje (F) u povučenom položaju, i ako nije, uz pomoć palca je vratite nazad.
Prva upotreba
■ Napunite vodom do 2/3 lonca.
■ Zatvorite ekspres lonac.
■ Postavite radni ventil (A)©
■ Stavite ekspres lonac na izvor toplote i regulišite ga na maksimalnu snagu.
- Kad para počne izlaziti kroz ventil, smanjite jačinu izvora toplote i podesite na 15 min.
- Kada protekne 15 min, ugasite izvor toplote. Stavite ekspres lonac u hladnu vodu.
- Kada se sigurnosna šipka (E) ponovo spusti, ekspres lonac više nije pod pritiskom. Okrenite radni ventil (A) u potrebni položaj 🌿otvorite ekspres lonac.
- Isperite vaš ekspres lonac vodom i osušite ga.
Napomena: pojava mrlja na unutrašnjem dnu lonca ne mijenja kvalitet metala. To su ostaci kamenca. Da biste ih uklonili, možete koristiti spužvu za ribanje s malo razrijeđenog bijelog sirćeta.
Minimalno punjenje
■ Uvijek dodajte minimalnu količinu tečnosti od najmanje 25 cl.
Za kuhanje na pari
■ Punjenje mora biti najmanje 75 cl.
- Pričvrstite potporu (J)* na košaru (I)*.
Maksimalno punjenje
- Nikada nemojte puniti svoj ekspres lonac iznad 2/3 visine spremnika - Slika 7
Za neke namirnice
■ Maksimalno 1/3 (MAX 1) - slika 6 Za kašastu hranu koja se širi ili pjeni tokom kuhanja, kao što su riža, mahunarke, dehidrirano povrće, kompoti, tikva, tikvice, mrkva, krompir, riblji fileti, ostavite vaš ekspres lonac da se ohladi nekoliko minuta, a zatim ga ohladite u hladnoj vodi. Lagano i sistematicično protresite ekspres lonac prije svakog otvaranja, nakon što ste provjerili da je sigurnosna šipka dobro spuštena, kako biste spriječili bilo kakav prodor mjehurića pare koji bi vas mogli opeći. Ova operacija je posebno važna tokom brzog pražnjenja pare ili nakon hlađenja u hladnoj vodi.
natural_image
Illustration of hands using a tool to press or adjust a steamer (no text or symbols visible)
natural_image
Simple line drawing of a circular container with a lid and internal structure (no text or symbols)
- Prilikom kuhanja pod parom, hrana u košari za paru* ne smije biti u kontaktu s vodom - Slika 5*.
Namirnice stavljene u parnu košaru* ne smiju prelaziti nivo MAX 2 posude.
Korištenje radnog
ventila (A)
Kuhati delikatnu hranu i čuvati vitamine
■ Postavite grafički simbol ≈ ventila (A) prema oznaci (G).
Za kuhanje mesa i odmrzavanje
■ Postavite grafički simbol 📋 ventila (A) prema oznaci (G).
Za oslobađanje pare
■ Postavite grafički simbol 🌐 ventila (A) prema oznaci (G).
Za uklanjanje radnog ventila
■ Ostavite lonac da se ohladi prije uklanjanja ventila (A).
- Pritisnite centralni dio i okrenite ventil kako biste poravnali položaj 0 sa oznakom (G) - Slika 8
■ Skinite ventil.
Kad ponovo postavljate radni ventil,
■ postavite ga tako da poravnate 0 sa oznakom (G).
■ Pritisnite središnji dio i okrenite ga u željeni položaj.

natural_image
Diagram showing a hand operating a rotary knob with directional arrows indicating rotation (no text or symbols present)Prije kuhanja
- Prije svake upotrebe skinite ventil (A) (pogledajte poglavlje «upotreba radnog ventila (A)») i svakodnevno provjerite da linija radnog ventila (B) nije blokirana. Po potrebi ga očistite čačkalicom - Slika 9
■ Postavite radni ventil (A) i odaberite položaj
■ Stavite ekspres lonac na izvor toplote i regulišite ga na maksimalnu snagu.
Tokom kuhanja
■ Kada radni ventil (A) neprestano ispušta paru, emitirajući stabilan zvuk (PSCHHHT), počinje kuhanje, smanjite izvor toplote.
■ Odbrojavanje vremena kuhanja naznačenog u vašem receptu.
■ Kada vrijeme kuhanja istekne, isključite izvor toplote.
Sigurnosna šipka (E) sprječava da se poklopac ekspres lonca podigne pod pritiskom ako nije pravilno zatvoren.
Kraj kuhanja
Za oslobađanje pare
natural_image
Illustration of a cooking pot with a lid and tubing (no text or symbols)natural_image
Illustration of a hand holding a screwdriver inserted into a circular component (no text or symbols)Da biste duže očuvali karakteristike ekspres lonca, nemojte pregrijavati lonac dok je prazan.
ODRŽAVANJE
Za zamjenu gumice vašeg ekspres lonca:
■ Gumicu vašeg ekspres lonca mijenjajte jednom godišnje ili ako ima pukotinu.
■ Uvijek kupujte gumicu kompanije TEFAL, onu koja odgovara vašem modelu.
Za odlaganje vašeg ekspres lonca:
- Okrenite poklopac na posudi.

| SVJEŽEPoložaj ventila | SMRZNUTOPoložaj ventila | |
| Artičoke cijele | 20 min | - |
| Asparagus | 5 min | 3 min |
| Brokoli | 4 min | 5 min |
| Buketići karfiola | 5 do 7 min | 5 min |
| Cvekla presječena na 4 (ovisno o veličini) | 20 do 30 min | - |
| Endivija izrezana na pola | 13 do 16 min | - |
| Fini zeleni grah | 6 do 8 min | 4 do 6 min |
| Grah srednje suh | 18 do 22 min | - |
| Krompir na četvrtine (ovisno od veličine) | 10 do 15 min | - |
| Mali grah | 3 do 6 min | 5 min |
| Mrkva na kriške | 7 min | 9 min |
| Prasa u komadima | 8 min | 10 min |
| Prokulice | 8 do 11 min | 6 do 8 min |
| Repa na kocke | 4 do 6 min | 7 min |
| Rezani celer | 7 do 9 min | - |
| Rezani šampinjoni 3 min - | ||
| Rezani zeleni kupus 5 do 7 min 3 min | ||
| Riža (suho povrće) 8 min - | ||
| Špinat 3 do 4 min 4 do 5 min | ||
| Tikva izrezana na četvrtine 6 do 8 min 3 min | ||
| Tikvice na kriške 3 do 6 min 4 do 7min | ||
| Zelena leća (suho povrće) 16 min - |
DŮLEŽITÁ UPOZORNĚNÍ
CS
natural_image
Illustration of hands placing a small object into a container with a downward arrow (no text or symbols)
natural_image
Simple line drawing of a circular object with a perforated top and side holes (no text or symbols)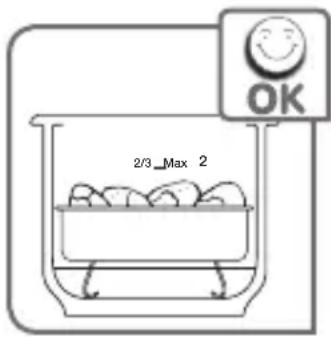
natural_image
Diagram showing a hand operating a rotary knob with directional arrows indicating rotation (no text or symbols present)Před vařením
natural_image
Illustration of a cooking pot with a handle and water level indicator (no text or symbols)natural_image
Illustration of a hand holding a screwdriver above a circular base (no text or symbols)HR
■ Provjerite da nije začepljen ispusni otvor radnog ventila (pogledajte poglavlje «Uporaba radnog ventila»).
■ Uvjerite se da se kuglica sigurnosnog ventila slobodno kreće (koristite štapić).
UPORABA
Otvaranje
- Držite dugu ručku posude (K) jednom rukom, drugom rukom podignite ručku poklopca (C) i palcem povucite gumb za otvaranje (F) - slika 1
- Zatim, ne puštajući gumb, okrenite poklopac udesno dok se ne otvori, a zatim ga podignite - slika 2
Zatvaranje
■ Stavite poklopac na lonac poravnavanjem trokuta na poklopcu i ručke posude (K) - slika 3
- Okrenite poklopac ulijevo dok ne čujete da je zatvoren - slika 4
Ako ga ne možete zatvoriti, provjerite je li gumb za otvaranje (F) u položaju za izvlačenje, a ako nije, onda ga gurnite natrag palcem.
Prva uporaba
■ Ulijte vodu do 2/3 posude.
■ Zatvorite ekspres lonac.
■ Namjestite radni ventil (A)©
- Stavite ekspres lonac na izvor topline i prilagodite izvor na maksimalnu jačinu.
- Kada para počne izlaziti iz ventila smanjite jačinu izvora topline i podesite na 15 min.
- Kada protekne 15 min, ugasite izvor topline. Stavite ekspres lonac u hladnu vodu.
- Kada sigurnosna šipka (E) ponovno padne, posuda više nije pod tlakom. Okrenite radni ventil (A) u ispravan položaj 🚙otvorite ekspres lonac.
Operite posudu s vodom i obrišite je.
Napomena: mrlje na unutarnjem dnu posude ne mijenja kvalitetu metala. To su ostaci kamenca. Da biste ih uklonili, možete upotrijebiti spužvu za ribanje s malo razrijeđenog bijelog octa.
Minimalno punjenje
natural_image
Illustration of hands holding a container with a lid and a downward arrow indicating a process (no text or symbols)
natural_image
Illustration of a circular container with a lid and internal structure (no text or symbols)

- Kada kuhate na pari, hrana u košarici za kuhanje na pari* ne smije biti u doticaju s vodom - slika 5*.
Namirnice koje se nalaze u košarici za kuhanje na pari* ne smiju premašivati razinu MAX 2.
Uporaba radnog ventila (A)
Prije kuhanja
- Prije svake uporabe skinite ventil (A) (pogledajte poglavlje «Korištenje radnog ventila (A)») i svakodnevno provjerite radni ventil (B). Po potrebi ga očistite čačkalicom - slika 9
- Namjestite radni ventil (A) i odaberite položaj ili .
- Stavite ekspres lonac na izvor topline i prilagodite izvor na maksimalnu jačinu.
Nakon kuhanja
natural_image
Illustration of a cooking pot with a lid and piping (no text or symbols)natural_image
Illustration of a hand holding a screwdriver with a circular base (no text or symbols)Kako biste duže zadržali svojstva ekspres lonca, nemojte ga pregrijavati dok je prazan.
ODRŽAVANJE
Za zamjenu brtve ekspres lonca:
■ Brtvu ekspres lonca mijenjajte svake godine ili ako se na njoj pojave pukotine.
■ Uvijek kupite brtvu marke TEFAL, onu koja odgovara vašem modelu.
Za spremanje ekspres lonca:
■ Vratite poklopac na posudu lonca.
| SVJEŽEPoložaj ventila | SMRZNUTOPoložaj ventila | |
| Artičoke, cijele | 20 min | - |
| Brokula | 4 min | 5 min |
| Bundeva izrezana na četvrtine | 6 do 8 min | 3 min |
| Crvena repa, izrezana na 4 dijela (ovisno o veličini) | 20 do 30 min | - |
| Cvjetovi karfiola | 5 do 7 min | 5 min |
| Endivia izrezana na polovice | 13 do 16 min | - |
| Fini zeleni grah | 6 do 8 min | 4 do 6 min |
| Grašak | 3 do 6 min | 5 min |
| Izrezane gljive | 3 min | - |
| Izrezani zeleni kupus | 5 do 7 min | 3 min |
| Krumpir izrezan na četvrtine (ovisno o veličini) | 10 do 15 min | - |
| Mrkva izrezana na kriške | 7 min | 9 min |
| Poriluk u komadima | 8 min | 10 min |
| Prokulice | 8 do 11 min | 6 do 8 min |
| Repa izrezana na kocke | 4 do 6 min | 7 min |
| Rezani celer 7 do 9 min - | ||
| Riža (sušeno povrće) 8 min - | ||
| Srednje suhi grah 18 do 22 min - | ||
| Šparoga 5 min 3 min | ||
| Špinat 3 do 4 min 4 do 5 min | ||
| Tikvice izrezane na kriške 3 do 6 min 4 do 7min | ||
| Zelena leća (sušeno povrće) 16 min - |
FONTOS ÓVINTÉZKEDÉSEK
HU
natural_image
Illustration of hands cleaning a perforated metal steamer (no text or symbols)
natural_image
Simple line drawing of a circular object with a perforated top and side holes (no text or symbols)

natural_image
Diagram showing a hand operating a rotary knob with directional arrows indicating rotation (no text or symbols present)Főzés előtt
natural_image
Illustration of a cooking pot with a lid and tubing (no text or symbols)■ Kinyithatja.
natural_image
Illustration of a hand holding a screwdriver above a circular base (no text or symbols)
natural_image
Illustration of hands holding a steamer with a downward arrow indicating cooling or drying process (no text or symbols)
natural_image
Simple line drawing of a circular container with a lid and internal structure (no text or symbols)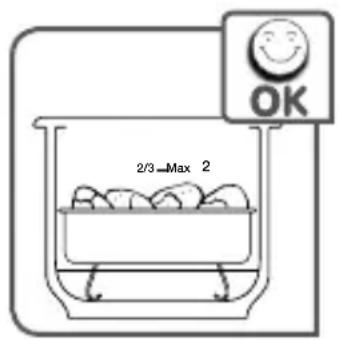
natural_image
Diagram showing a hand pressing down on a mechanical component with directional arrows indicating rotation (no text or symbols present)Przed gotowaniem
natural_image
Illustration of a cooking pot with a tool and tubing (no text or symbols)natural_image
Illustration of a hand holding a screwdriver above a circular base (no text or symbols)
natural_image
Illustration of a hand holding a lid with a downward arrow indicating a drop or direction (no text or symbols present)
natural_image
Illustration of a circular container with a lid and internal structure (no text or symbols)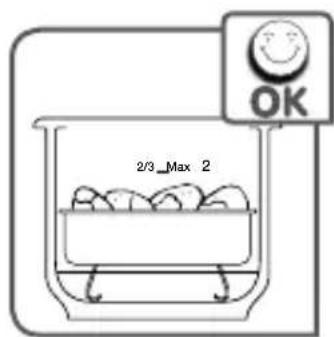
natural_image
Diagram showing a hand operating a rotary knob with a control dial, no text or symbols presentÎnainte de gătire
natural_image
Illustration of a cooking pot with a tool and tubing (no text or symbols)natural_image
Illustration of a hand holding a screwdriver above a circular base (no text or symbols)
natural_image
Illustration of hands holding a lid with a downward arrow indicating a process or movement (no text or symbols present)
natural_image
Simple line drawing of a circular container with a lid and side port (no text or symbols)
natural_image
Diagram showing a hand operating a rotary knob with directional arrows indicating rotation (no text or symbols present)natural_image
Illustration of a cooking pot with a tool and tubing (no text or symbols)natural_image
Illustration of a hand holding a screwdriver above a circular base (no text or symbols)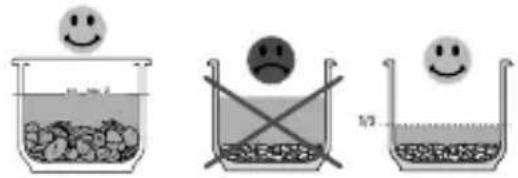
TENTO NÁVOD SI USCHOVAJTE.
Popisná schéma
natural_image
Illustration of hands holding a lid with a pointed lid and a downward arrow indicating motion (no text or symbols)
natural_image
Simple line drawing of a circular container with a lid and internal structure (no text or symbols)
natural_image
Diagram showing a hand pressing down on a mechanical component with directional arrows indicating rotation (no text or symbols present)Pred varením
natural_image
Illustration of a cooking pot with a lid and piping (no text or symbols)natural_image
Illustration of a hand holding a screwdriver with a circular base (no text or symbols)natural_image
Illustration of a hand holding a lid with arrows indicating a process or operation (no text or symbols present)
natural_image
Simple line drawing of a circular container with lid and side ports (no text or symbols)
- Ob kuhanju na paro živila, ki so v košu za paro*, ne smejo biti v stiku z vodo - slika 5*.
natural_image
Diagram showing a hand turning a button on a machine, with no visible text or symbolsPred kuhanjem
natural_image
Illustration of a cooking pot with a tool and tubing (no text or symbols)natural_image
Illustration of a hand holding a pen inserted into a circular component, with no visible text or symbols.Da bi lonec na zvišan tlak čim dlje ohranil svoje lastnosti, ga ne segrevajte, ko je prazen.
VZDRŽEVANJE
Menjava tesnila pri loncu na zvišan tlak:
- Tesnilo na loncu na zvišan tlak zamenjajte vsako leto ali će se na njem pojavi zareza.
■ Uporabljajte samo originalne dele TEFAL, ki ustrezajo vašemu modelu.
Hramba vašega lonca na zvišan tlak:
■ Obrnite pokrov na posodi.
Nujno je, da preverite vaš ekonom lonec v odobrenem servisnem centru TEFAL po 10 letih uporabe.
Dodatki TEFAL

| SVEŽEPoložaj ventila | ZMRZNJENOPoložaj ventila | |
| Brokoli | 4 min | 5 min |
| Brstični ohrovt | 8 do 11 min | 6 do 8 min |
| Buča, narezana na četrtine | 6 do 8 min | 3 min |
| Bučke | 3 do 6 min | 4 do 7min |
| Cele artičoke | 20 min | - |
| Cvetača | 5 do 7 min | 5 min |
| Endivja v 2 rezinah | 13 do 16 min | - |
| Korenje | 7 min | 9 min |
| Koščki pora | 8 min | 10 min |
| Krompir, narezan na četrtine(ustrezna velikost) | 10 do 15 min | - |
| Mlad grah | 3 do 6 min | 5 min |
| Rdeča pesa, prerezana na 4 kose (ustrezna velikost) | 20 do 30 min | - |
| Repa v kockah | 4 do 6 min | 7 min |
| Riž (suha zelenjava) | 8 min | - |
| Stročji fižol | 6 do 8 min | 4 do 6 min |
| Suh fižol 18 do 22 min - | ||
| Sveže zelje 5 do 7 min 3 min | ||
| Šampinjoni v rezinah 3 min - | ||
| Šparglji 5 min 3 min | ||
| Špinača 3 do 4 min 4 do 5 min | ||
| Zelena leča (suha zelenjava) | 16 min - |
VAŽNE MERE PREDOSTROŽNOSTI
- Proverite da li je zapušen ispusni otvor radnog ventila (videti poglavlje „Upotreba radnog ventila“).
Provera sigurnosnog ventila
■ Proverite da li se kuglica sigurnosnog ventila slobodno kreće (koristite štapić).
UPOTREBA
Otvaranje
- Jednom rukom držite dugačku ručku posude (K), drugom rukom podignite ručku poklopca (C) i palcem povucite dugme za otvaranje (F) - Slika 1
■ Zatim, ne puštajući dugme, okrećite poklopac udesno sve dok se ne otvori i zatim ga podignite - Slika 2
Zatvaranje
■ Stavite poklopac na lonac, tako da poravnate trouglove na poklopcu i ručki lonca (K) - Slika 3
- Okrećite poklopac ulevo sve dok ne čujete da se zatvorio - Slika 4
Ako ne možete da zatvorite, proverite da li je dugme za otvaranje (F) u povučenom položaju, i ako nije, palcem ga vratite nazad.
Prva upotreba
■ Sipajte vodu do 2/3 lonca.
■ Zatvorite ekspres lonac.
■ Postavite radni ventil (A)©
- Stavite ekspres lonac na izvor toplote koji ćete podesiti na maksimalnu jačinu.
- Kad para počne da izlazi kroz ventil, smanjite jačinu izvora toplote i podesite na 15 min.
- Kada istekne 15 min, isključite izvor toplote. Stavite ekspres lonac u hladnu vodu.
- Kada se sigurnosna poluga (E) ponovo spusti, ekspres lonac više nije pod pritiskom. Okrenite radni ventil (A) u odgovarajući položaj 🚙i otvorite ekspres lonac.
■ Operite vodom ekspres lonac i obrišite ga.
natural_image
Illustration of hands holding a steamer with a downward arrow indicating cooling or heating process (no text or symbols)
natural_image
Simple line drawing of a circular object with a perforated top and side dot (no text or symbols)
- Prilikom kuvanja na pari, namirnice u korpi za paru* ne smeju da budu u doticaju s vodom - Slika 5*.
Namirnice koje se nalaze u korpi za kuvanje na pari* ne smeju da prelaze oznaku MAX 2 na posudi.
Korišćenje radnog ventila (A)
Za pripremu osetljivih namirnica i čuvanje vitamina
■ Postavite simbol ventila (A) prema oznaci (G).
Za pripremu mesa i odmrzavanje
■ Postavite simbol ventila (A) prema oznaci (G).
Za ispuštanje pare
■ Postavite simbol ventila (A) prema oznaci (G).
Za uklanjanje radnog ventila
- Ostavite uređaj da se ohladi pre nego što uklonite ventil (A).
■ Pritisnite centralni deo i okrenite ventil da biste poravnali položaj 0 sa oznakom (G) - Slika 8
■ Skinite ventil.
Kad ponovo postavljate radni ventil,
■ postavite ga tako da 0 bude poravnata sa oznakom (G).
■ Pritisnite centralni deo i okrenite ga u željeni položaj.
natural_image
Diagram showing a hand turning a button on a machine, with no visible text or symbolsPre kuvanja
- Pre svake upotrebe skinite ventil (A) (pogledajte poglavlje „Upotreba radnog ventila (A)“) i svakodnevno proverite da linija radnog ventila (B) nije blokirana. Po potrebi ga očistite čačkalicom - Slika 9
■ Postavite radni ventil (A) i izaberite položajati . - Stavite ekspres lonac na izvor toplote koji ćete podesiti na maksimalnu jačinu.
Tokom kuvanja
natural_image
Illustration of a cooking pot with a lid and tubing (no text or symbols)natural_image
Illustration of a hand holding a screwdriver with a circular base, no text or symbols presentDa biste duže očuvali karakteristike ekspres lonca, nemojte da ga pregrejavate dok je prazan.
ODRŽAVANJE
Zamena dihtunga na ekspres loncu:

| SVEŽEPoložaj ventila | SMRZNUTOPoložaj ventila | |
| Artičoke, cele | 20 min | - |
| Brokoli | 4 min | 5 min |
| Bundeva isečena na četvrtine | 6 do 8 min | 3 min |
| Cvekla presečena na 4 dela (zavisno od veličine) | 20 do 30 min | - |
| Endivija presečena napola | 13 do 16 min | - |
| Fini zeleni pasulj | 6 do 8 min | 4 do 6 min |
| Karfiol | 5 do 7 min | 5 min |
| Krompir isečen na četvrtine (zavisno od veličine) | 10 do 15 min | - |
| Mali grašak | 3 do 6 min | 5 min |
| Pirinač (sušeno povrće) | 8 min | - |
| Praziluk u komadima | 8 min | 10 min |
| Prokelj | 8 do 11 min | 6 do 8 min |
| Repa isečena na kocke | 4 do 6 min | 7 min |
| Sečeni celer | 7 do 9 min | - |
| Sečeni šampinjoni | 3 min | - |
| Sečeni zeleni kupus 5 do 7 min | 3 min | |
| Spanać 3 do 4 min 4 do 5 min | ||
| Srednje suvi pasulj 18 do 22 min - | ||
| Šargarepa na kriške 7 min 9 min | ||
| Špargla 5 min 3 min | ||
| Tikvice na kriške 3 do 6 min 4 | do 7 min | |
| Zeleno sočivo (sušeno povrće) | 16 min - |
natural_image
Illustration of a hand holding a steamer with arrows indicating process (no text or symbols)
natural_image
Simple line drawing of a circular container with a lid and internal structure (no text or symbols)
natural_image
Diagram showing a hand operating a rotary knob with directional arrows indicating rotation (no text or symbols present)natural_image
Illustration of a cooking pot with a lid and tubing (no text or symbols)natural_image
Illustration of a hand holding a screwdriver with a circular base (no text or symbols)natural_image
Illustration of hands holding a steamer with liquid and a downward arrow indicating flow (no text or symbols)
natural_image
Simple line drawing of a lid with a perforated top and a small protrusion on the lid (no text or symbols)
natural_image
Diagram showing a hand pressing down on a mechanical component with directional arrows indicating rotation (no text or symbols present)natural_image
Illustration of a cooking pot with a lid and tubing (no text or symbols)natural_image
Illustration of a hand holding a screwdriver with a circular base (no text or symbols)
natural_image
Illustration of a hand holding a container with a lid and a downward arrow indicating a process (no text or symbols)
natural_image
Simple line drawing of a circular container with a perforated lid and side holes (no text or symbols)
natural_image
Illustration of a cooking pot with a lid and tubing (no text or symbols)natural_image
Illustration of a hand holding a screwdriver with a circular base (no text or symbols)
natural_image
Illustration of hands using a tool to press or inspect a steamer (no text or symbols visible)
natural_image
Simple line drawing of a circular container with internal structure (no text or symbols)
natural_image
Diagram showing a hand operating a rotary knob with directional arrows indicating rotation (no text or symbols present)烹煮前
natural_image
Illustration of a cooking pot with a lid and tubing (no text or symbols)■您現在可以打開。
natural_image
Illustration of a hand holding a pen inserted into a circular component, with no visible text or symbols.
| التوصيات المُشكلت | |
| تأكد بأن قضيب%Dمان في الوضع المنخفض. فإذا لم يكونالأمر كذلك، يجب تغريق الضغط . وإذا لم的大مر، تبرد طنجرةال substances بالமاء البارد. انظر فقرة «عند انتهاه الطهي».لّ تتدخل ب (((شؤون قضيب%Dمان أبداً). | إن ként غير قادر علىفتح الغطاء |
| يرجى التأكد مما يلي:وقت الطهي.قوة المصدر ال SAPARI.الموقع الصين لصام الت “[ “[ “[ “[ “[ “[ “[ “[ “[ “[ “[ “[ “[ “[ “[ “[ “[ “[ “[ “[ “[ “[ “[ “[ “[ “[ “[ “[ “[ “[ “[ “[ “[ “[ “[ “[ “[ “[ “[ “[ “[ “[ “[ “[ “[ “[ “[ “[ “[ “[ “[ “[ “[ “[ “[ “[ “[ “[ “[ “[ “[ “[ “[ “[ “[ “[ “[ “[ “[ “[ “[ “[ “[ “[ “[ “[ “[ “[ “[ “[ “[ “[ “[ “[ “[ “[ “[ “[ “[ “[ “[ “[ “[ “[ “[ “[ “[ “[ “[ “[ [( “[ “[ “[ “[ “[ “[ “[ “[ “[ “[ “[ “[ “[ “[ “[ “[ “[ “[ “[ “[ “[ “[ “[ “[ “[ “[ “[ “[ “[ “[ “[ “[ “[ “[ “[ “[ “[ “[ “[ “[ “[ “[ “[ “[ “[ “[ “[ “[ “[ “[ “[ “[ “[ “[ “[ “[ “[ “[ “[ “[ “[ “[ “[ “[ “[ “[ “[ “[ “[ “[ “[ “[ “[ “[ “[ “[ “[ “[ “[ “[ “[ “[ “[ “[ “[ “[ “[ “[ “[ “[ “[ “[ “[ “[ “[ “[ “[ “[ “[],[ “[ “[ “[ “[ “[ “[ “[ “[ “[ “[ “[ “[ “[ “[ “[ “[ “[ “[ “[ “[ “[ “[ “[ “[ “[ “[ “[ “[ “[ “[ “[ “[ “[ “[ “[ “[ “[ “[ “[ “[ “[ “[ “[ “[ “[ “[ “[ “[ “[ “[ “[ “[ “[ “[ “[ “[ “[ “[ “[ “[ “[ “[ “[ “[ “[ “[ “[ “[ “[ “[ “[ “[ “[ “[ “[ “[ “[ “[ “[ “[ “[ “[ “[ “[ “[ “[ “[ “[ “[ “[ “[ “[ “[ “[ “[ “[ “[ “[ “[ [, “[ “[ “[ “[ “[ “[ “[ “[ “[ “[ “[ “[ “[ “[ “[ “[ “[ “[ “[ “[ “[ “[ “[ “[ “[ “[ “[ “[ “[ “[ “[ “[ “[ “[ “[ “[ “[ “[ “[ “[ “[ “[ “[ “[ “[ “[ “[ “[ “[ “[ “[ “[ “[ “[ “[ “[ “[ “[ “[ “[ “[ “[ “[ “[ “[ “[ “[ “[ “[ “[ “[ “[ “[ “[ “[ “[ “[ “[ “[ “[ “[ “[ “[ “[ “[ “[ “[ “[ “[ “[ “[ “[ “[ “[ “[ “[ “[ “[ “[ [ “,” [ “,” [ “,” [ “,” [ “,” [ “,” [ “,” [ “,” [ “,” [ “,” [ “,” [ “,” [ “,” [ “,” [ “,” [ “,” [ “,” [ “,” [ “,” [ “,” [ “,” [ “,” [ “,” [ “,” [ “,” [ “,” [ “,” [ “,” [ “,” [ “,” [ “,” [ “,” [ “,” [ “,”[ “,” [ “,” [ “,” [ “,” [ “,” [ “,” [ “,” [ “,” [ “,” [ “,” [ “,” [ “,” [ “,” [ “,” [ “,” [ “,” [ “,” [ “,” [ “,” [ “,” [ “,” [ “,” [ “,” [ “,” [ “,” [ “,” [ “,” [ “,” [ “,” [ “,” [ “,” [ “,” [ “,” [“,” [ “,” [ “,” [ “,” [ “,” [ “,” [ “,” [ “,” [ “,” [ “,” [ “,” [ “,” [ “,” [ “,” [ “,” [ “,” [ “,” [ “,” [ “,” [ “,” [ “,” [ “,” [ “,” [ “,” [ “,” [ “,” [ “,” [ “,” [ “,” [ “,” [ “,” [ “,” [ “,” [ “], [ “,” [ “,” [ “,” [ “,” [ “,” [ “,” [ “,” [ “,” [ “,” [ “,” [ “,” [ “,” [ “,” [ “,” [ “,” [ “,” [ “,” [ “,” [ “,” [ “,” [ “,” [ “,” [ “,” [ “,” [ “,” [ “,” [ “,” [ “,” [ “,” [ “,” [ “,” [ “,” [ “,”] | إن لم يتم طهيالطعام، أو أن الطعامقد احترق |
| أوقف تشغيل المصدر ال SAPARI.اترك طنجرة الضغيل لكي تبرد تماماً. وين-era ض قضيبال fmان.افتم طنجرة الضغيل.تأكد من حالة صمّام الت “[ “[ “[ “[ “[ “[ “[ “[ “[ “[ “[ “[ “[ “[ “[ “[ “[ “[ “[ “[ “[ “[ “[ “[ “[ “[ “[ “[ “[ “[ “[ “[ “[ “[ “[ “[ “[ “[ “[ “[ “[ “[ “[ “[ “[ “[ “[ “[ “[ “[ “[ “[ “[ “[ “[ “[ “[ “[ “[ “[ “[ “[ “[ “[ “[ “[ “[ “[ “[ “[ “[ “[ “[ “[ “[ “[ “[ “[ “[ “[ “[ “[ “[ “[ “[ “[ “[ “[ “[ “[ “[ “[ “[ “[ “[ “[ “[],[ “,” [ “,” [ “,” [ “,” [ “,” [ “,” [ “,” [ “,” [ “,” [ “,” [ “,” [ “,” [ “,” [ “,” [ “,” [ “,” [ “,” [ “,” [ “,” [ “,” [ “,” [ “,” [ “,” [ “,” [ “,” [ “,” [ “,” [ “,” [ “,” [ “,” [ “,” [ “,” [ “,” [ ",” [ “,” [ “,” [ “,” [ “,” [ “,” [ “,” [ “,” [ “,” [ “,” [ “,” [ “,” [ “,” [ “,” [ “,” [ “,” [ “,” [ “,” [ “,” [ “,” [ “,” [ “,” [ “,” [ “,” [ “,” [ “,” [ “,” [ “,” [ “,” [ “,” [ “,” [ “,” [ “,” [ “}, [ “,” [ “,” [ “,” [ “,” [ “,” [ “,” [ “,” [ “,” [ “,” [ “,” [ “,” [ “,” [ “,” [ “,” [ “,” [ “,” [ “,” [ “,” [ “,” [ “,” [ “,” [ “,” [ “,” [ “,” [ “,” [ “,” [ “,” [ “,” [ “,” [ “,” [ “,” [ “,” [ “,” | “,” [ “,” [ “,” [ “,” [ “,” [ “,” [ “,” [ “,” [ “,” [ “,” [ “,” [ “,” [ “,” [ “,” [ “,” [ “,” [ “,” [ “,” [ “,” [ “,” [ “,” [ “,” [ “,” [ “,” [ “,” [ “,” [ “,” [ “,” [ “,” [ “,” [ “,” [ “,” [ “,” [ (“,” [ “,” [ “,” [ “,” [ “,” [ “,” [ “,” [ “,” [ “,” [ “,” [ “,” [ “,” [ “,” [ “,” [ “,” [ “,” [ “,” [ “,” [ “,” [ “,” [ “,” [ “,” [ “,” [ “,” [ “,” [ “,” [ “,” [ “,” [ “,” [ “,” [ “,” [ “,” [ “,” [ “?”] | إذا تم تفعتيل أحدانظمةHNSLDADE |
جدول أوقات الطهي
اللحوم والأسماك
natural_image
Illustration of a hand holding a pen inserted into a circular component, with no visible text or symbols.natural_image
Illustration of a cooking pot with a lid and side arm, no text or symbols present■ إِنزع الصّمام.
natural_image
Simple line drawing of a circular object with a perforated top surface and internal structure (no text or symbols)
natural_image
Illustration of hands holding a steamer with a downward arrow indicating cooling or drying process (no text or symbols)داخل القدر.
natural_image
Illustration of a hand holding a screwdriver above a circular base (no text or symbols)natural_image
Illustration of a cooking pot with a lid and side arm, no text or symbols present■ سوباب را بردارید.
natural_image
Simple line drawing of a circular object with a perforated top and base, resembling a lid or cover (no text or symbols)
natural_image
Illustration of hands using a tool to press or adjust a steamer (no text or symbols visible)تابه قرار دهید.