
58G067 - Saw Graphite - Free user manual and instructions
Find the device manual for free 58G067 Graphite in PDF.

| Product type | Jigsaw |
| Brand | Graphite |
| Model | 58G067 |
| Category | Saw |
| Supply voltage | 230 V AC |
| Supply frequency | 50 Hz |
| Rated power | 650 W |
| No-load stroke rate | 0 – 3100 min⁻¹ |
| Stroke length | 18 mm |
| Max cutting thickness (wood) | 65 mm |
| Max cutting thickness (metal) | 8 mm |
| Weight | 2.1 kg |
| Protection class | II |
| Sound pressure level Lp_A | 84.6 dB(A) (K=3 dB(A)) |
| Sound power level Lw_A | 95.6 dB(A) (K=3 dB(A)) |
| Vibration (wood cutting) a_h | 4.535 m/s² (K=1.5 m/s²) |
| Vibration (sheet metal cutting) a_h | 4.008 m/s² (K=1.5 m/s²) |
| Manufacturing year | 2019 |
| Speed setting | Rotary dial (0 to 5) |
| Pendulum action | 4 positions (0 to III) |
| Angle cut | 0° to 45° (left/right) |
| Lighting | Integrated LED |
| Dust blower | Yes, with control lever |
| Parallel guide | Included |
| Blade clamping system | T-shank (tool-free) |
| Included accessories | Hex key, 2 blades, parallel guide, carry case |
| Maintenance | Clean with dry cloth, periodic lubrication of guide roller, replace carbon brushes if <5 mm |
Frequently Asked Questions - 58G067 Graphite
User questions about 58G067 Graphite
0 question about this device. Answer the ones you know or ask your own.
Ask a new question about this device
Download the instructions for your Saw in PDF format for free! Find your manual 58G067 - Graphite and take your electronic device back in hand. On this page are published all the documents necessary for the use of your device. 58G067 by Graphite.
USER MANUAL 58G067 Graphite
natural_image
Five different types of saw cutting tools shown in line drawings, no text or symbols present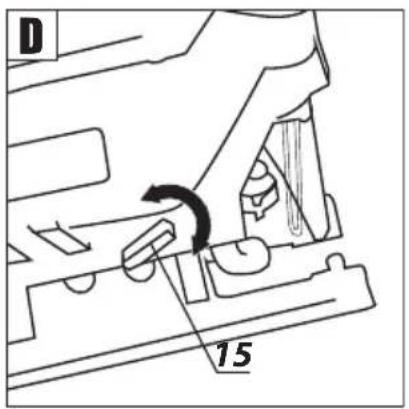

natural_image
Simple line drawing of a mechanical component with no text or symbols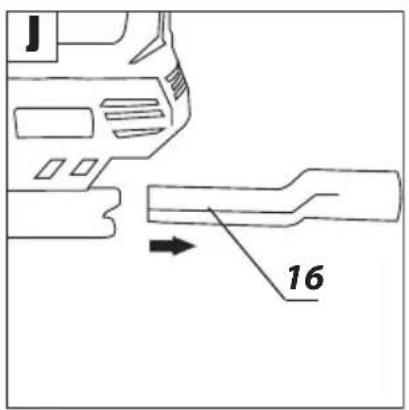

INSTRUKCJA ORYGINALNA (OBSŁUGI)
PILARKA BRZESZCZOTOWA
(WYRZYNARKA)
58G067
UWAGA: PRZED PRZYSTĄPIENIEM DO UŻYTKOWANIA ELEKTRONARZĘDZIA NALEŻY UWAŻNIE PRZECZYTAĆ NINIEJSZĄ INSTRUKCJĘ I ZACHOWAĆ JĄ DO DALSZEGO WYKORZYSTANIA.
SZCZEGÓŁOWE PRZEPISY BEZPIECZEŃSTWA
GTX SERVICE
C ∈
/EC Declaration of Conformity/
/The above listed product is in conformity with the following UE Directives:/
/and fulfils requirements of the following Standards:/
/Name and address of the person who established in the Community and authorized to compile the technical file:/
/GRUPA TOPEX Quality Agent/
BLADE SAWING MACHINE (JIGSAW) 58G067
CAUTION: BEFORE USING THE POWER TOOL READ THIS MANUAL CAREFULLY AND KEEP IT FOR FUTURE REFERENCE.
DETAILED SAFETY REGULATIONS
- Whenever working tool can hit hidden electric wires or its own power cord during operation, hold the power tool only by insulated surfaces of the handle. Contact with power supply line may transfer its voltage to metal parts of the power tool and cause electric shock.
- Keep hands at safe distance from the cutting area. Do not put them under processed piece. Contact with blade may cause injury.
- Switch off the jigsaw after work. Remove blade from processed piece only when it is at standstill. This way you can avoid recoil and it is possible to safely put the power tool away.
- Use only undamaged blades in good technical condition. Bent, blunt blades may break, additionally may affect cutting line and cause recoil.
-
Certain wood and metal types may be dangerous to health and cause allergic reactions, respiratory tract illness or be carcinogenic.
-
Use dust masks when cutting to protect your respiratory system against produced dust.
- Use dust extraction system when cutting wood.
- always provide good ventilation of your workplace.
- Do not cut water system pipes with the jigsaw. Cutting a pipe may cause material damages or electric shock.
- Carefully check the processed material before cutting to eliminate possibility of cutting nails, bolts, or other hard objects.
- Do not cut objects thicker than allowed in technical specification for a given material.
- Hold the jigsaw in a closed hand.
- Ensure the jigsaw does not have contact with the material before pressing the switch.
- Do not touch moving parts with your hand.
- Do not put away the jigsaw until it stops moving. Do not switch the jigsaw on when not holding it.
- Do not touch the blade or processed material immediately after the work has been finished. Those elements may be hot and may cause burns.
- When you see unusual behaviour of the tool or hear strange noises, immediately switch off the tool and remove the plug from mains socket.
• To ensure proper cooling keep ventilation holes in the jigsaw body uncovered.
- Before connecting the jigsaw to mains socket make sure the supply voltage matches the voltage on the rating plate of the tool.
• Each time before connecting the jigsaw check the power cord, in case of damage hand over to authorized workshop for repair.
- Power cord of the jigsaw always must be on the safe side, where there is no danger of accidental damage by operating power tool.
CAUTION! This device is designed to operate indoors.
The design is assumed to be safe, protection measures and additional safety systems are used, nevertheless there is always a small risk of injuries at work.
Explanation of used symbols

1

2

3
4 5

6

- Read instruction manual, observe warnings and safety conditions therein.
- Device with class II insulation.
- Use personal protection measures (protective goggles, earmuff protectors, anti-dust mask)
- Disconnect the power cord before starting maintenance or operation.
- Protect against rain.
- Keep the tool away from children.
CONSTRUCTION AND USE
Jigsaw is a hand-operated power tool with insulation class II. It is driven by a single-phase commutator motor. The tool is designed for making straight, dividing cuts, curved cuts and holes in wood, wood-based materials, plastics and metals (provided that appropriate blade is used).
Range of use covers repair and building works, and any work from the range of individual, amateur activities (tinkering).
Use the power tool in accordance with the manufacturer's instructions only.
DESCRIPTION OF DRAWING PAGES
Below enumeration refers to the device elements depicted on the drawing pages of this manual.
-
Work speed control wheel
-
Switch
-
Switch lock button
-
Footplate
-
Wheel for pendulum action setting
-
Blade holder
-
Guard
-
Edge guide locking screws
-
Blade protection
-
Illumination (LED)
-
Light switch
-
Clip for tools
-
Voltage indicator
-
Guiding roller
-
Airflow control lever
-
Dust extraction outlet
^3 Differences may appear between the product and drawing.
MEANING OF SYMBOLS

CAUTION

WARNING

ASSEMBLY / SETTINGS

INFORMATION
EQUIPMENT AND ACCESSORIES
-
Hexagonal key - 1 pce
-
Blade - 2 pcs
- Edge guide - 1 pce
- Carrying case - 1 pce
Disconnect the power tool from power supply.
Installation and removal of the blade is tool free.
- Set the wheel for pendulum action setting (5) to position "III" and lift the guard (7) (fig. A).
- Pull the lever of the blade holder (6) and slide blade into the blade holder (6) to mechanical stop (blade teeth should be facing forward) (fig. B).
- Important! Make sure the blade is properly positioned in the guiding roller (14).
- Release the lever of the blade holder (6) and ensure the blade is properly seated.
- Blade removal is similar to installation, only the sequence of actions is reversed.

Use blades suitable for T-shank holder mechanism, as shown on fig. C.
DUST EXTRACTION

The jigsaw features a system for blowing sawdust off the cutting line. It is controlled with the airflow control lever (15) (fig. D). Additionally, it is possible to attach external dust extraction system to the outlet (16).
When using an external dust extraction system, set the airflow control lever (15) to the off position "O". Switch off the dust blow off system to improve efficiency of the external dust extraction.
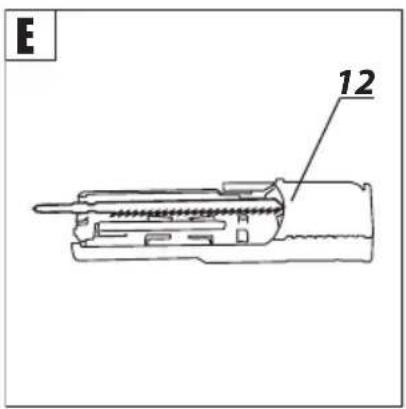
BLADE STORAGE

In the rear section the jigsaw has convenient retractable clip (12) for storage of blades and hex key (fig. E).
Before connecting the jigsaw to a power supply always check that the power supply voltage matches the voltage specified on the rating plate fixed on the power tool.
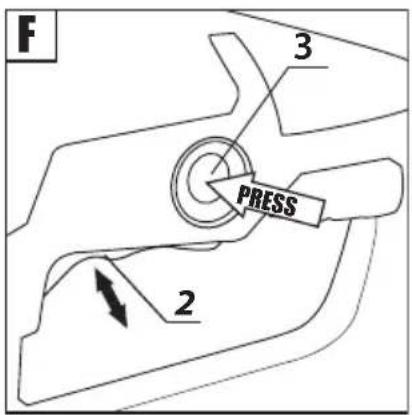
Switching on – press the switch button (2) and hold in this position.
Switching off – release pressure on the switch (2).
Locking the switch (continuous operation)
Switching on:
- Press the switch button (2) and hold in this position.
- Press the switch lock button (3) (fig. F).
- Release pressure on the switch button (2).
Switching off:
- Press and release the switch button (2).

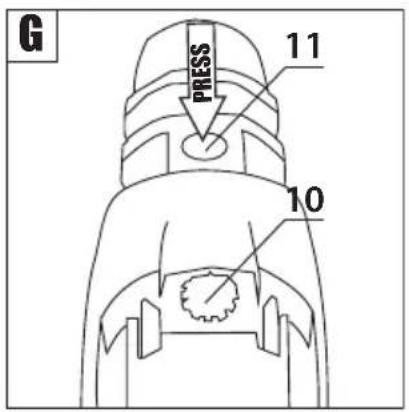
Each time the workplace requires illumination, press the light switch (11) to turn on the LED (10) that illuminates the workplace (fig. G).
VOLTAGE INDICATOR
When the device is connected to a power supply socket, the voltage indicator lamp (13) turns on.
You can control rotational speed of the jigsaw motor by turning and setting the work speed control wheel (1) in desired position. It allows to adjust the power tool working speed to match characteristics of processed material. Speed control range is 0 to 5.
The bigger the number on the wheel rim (1) (fig. H), the greater the jigsaw operation speed.
BLADE PENDULUM ACTION CONTROL Available pendulum action control allow
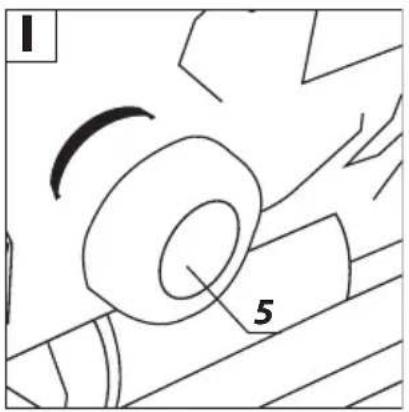
Available pendulum action control allows for better adjustment of the jigsaw operation parameters to requirements of the processed material. Pendulum action is controlled in steps with the wheel for pendulum action setting (5) and its range is 0 to III (fig. I). The table below presents the best choices of pendulum action setting for various materials:
| Metal sheet, in general: 0 Steel sheet: 0 - I | |
| Aluminium sheet: Plastic: I - II | |
| Plywood: Wood: I - III |
Set the switch for pendulum action to 0 when using knife blade. Lubrication is recommended for metal cutting.

FOOTPLATE ADJUSTMENT FOR BEVEL CUTTING
Disconnect the power tool from power supply.

Adjustable jigsaw footplate allows to make a bevel cut in the range from 0° to 45° (to either side). Slide out and remove the dust extraction outlet (16) before making the adjustment (fig. J).

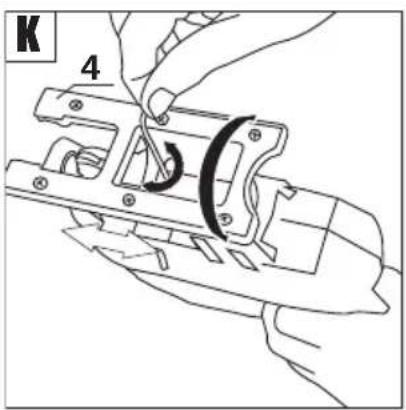
- Use the hexagonal key and loosen the footplate (4) fixing screws.
- Move the footplate (4) backwards and tilt right or left (up to 45^ ).
- Set the footplate (4) at desired angle, move forward and tighten fixing screws to secure it (fig. K).

Scale allows for setting the footplate to angles: 0^ , 15^ , 30^ or 45^ (right or left). always put the hexagonal key in its storage place after adjustment has been made.

INSTALLATION OF THE EDGE GUIDE
Disconnect the power tool from power supply.

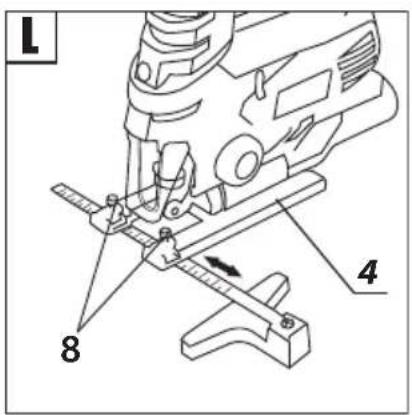
You can install the edge guide on the left or the right side of the jigsaw footplate.

- Loosen the edge guide locking screws (8).
- Slide the edge guide bar into holes in the footplate (4), use the scale to set required distance and fix by tightening the edge guide locking screws (8) (fig. L).

Edge guide bar should be pointed downwards.

CUTTING

- Put front part of the footplate (4) flat on the material that you plan to cut.
- Switch on the jigsaw and wait until it reaches its full set rotational speed.
- Move the jigsaw slowly and guide the blade along previously set cutting line.
- When cutting curved lines move the jigsaw very carefully.
Make a cut at a uniform rate, be careful not to overload the jigsaw. Excessive pressure applied on the blade will suppress pendulum action and will affect cutting efficiency unfavourably. Decrease or switch off the pendulum action completely when necessary in cutting along gently curved line.

When the jigsaw footplate does not rest on the processed material with its whole surface, but is lifted above instead, there is danger of breaking the blade.
CUTTING A HOLE IN MATERIAL

- Make a hole in processed material with 10 mm diameter.
- Put blade into the hole and start cutting from that spot.
METAL CUTTING / TYPES OF BLADES

Use appropriate blades with more teeth for cutting of metal.
For metal cutting use appropriate lubricant (e.g. cutting oil). Metal cutting without lubrication leads to rapid wear of blade. The below table gives the best choices for blade type:
| Teeth per inch | Blade length | Application range |
| 24 | Soft steel, non-ferrous metals | |
| 14 Non-ferrous metals, plastics | ||
| 9 Wood, plywood | ||
- Use only appropriate and sharp blades.
- Do not use blades with damaged shank.
- Use appropriate blade types.
Unplug the power cord from mains socket before commencing any activities related to installation, adjustment, repair or maintenance.

- Cleaning the device after each use is recommended.
- Do not use water or any other liquid for cleaning.
- Clean the device with a dry cloth or blow through with compressed air at low pressure.
- Do not use any cleaning agents or solvents, since they may damage plastic parts.
- Clean ventilation holes in the motor casing regularly to prevent device overheating.
- Regular lubrication of guiding roller is recommended. A drop of oil applied in this spot will prolong lifetime of the roller.
- In case of power cord damage replace it with a cord with the same specification. Entrust the repair to a qualified specialist or return the tool to a service point.
- In case of excessive commutator sparking, have the technical condition of carbon brushes of the motor checked by a qualified person.
• always store the tool in a dry place, beyond reach of children.
REPLACEMENT OF CARBON BRUSHES

Immediately replace worn out (shorter than 5 mm), burnt or cracked motor carbon brushes. always replace both carbon brushes at a time.

Entrust replacement of carbon brushes only to a qualified person. Use only original parts.
All defects should be repaired by service workshop authorized by the manufacturer.
TECHNICAL PARAMETERS
RATED PARAMETERS
| Jigsaw 58G067 | ||
| Parameter Value | ||
| Supply voltage 230 V AC | ||
| Power supply frequency 50 Hz | ||
| Rated power 650 W | ||
| Blade stroke cycles (without load) 0-3100 min | -1 | |
| Max i m um thickness of cut material | Wood 65 mm | |
| Metal 8 mm | ||
| Blade stroke length 18 mm | |
| Protection class II | |
| Weight | 2,1 kg |
| Year of production | 2019 |
| 58G067 defines type and indication of the device | |
NOISE LEVEL AND VIBRATION PARAMETERS
| Sound pressure | Lp_A = 84,6 dB(A) K=3 dB(A) |
| Sound power | Lw_A = 95,6 dB(A) K=3 dB(A) |
| Vibration acceleration (cutting a plate) | a_h = 4,535 m/s^2 K=1,5 m/s^2 |
| Vibration acceleration (cutting a metal sheet) | a_h = 4,008 m/s^2 K=1,5 m/s^2 |
Noise and vibration information
Noise produced by the device is defined with: level of produced sound pressure Lp_A and level of sound power Lw_A (where K is measurement uncertainty). Vibrations produced by the device are defined with vibration acceleration value a_h (where K is measurement uncertainty).
Sound pressure Lp_A , sound power Lw_A and vibration acceleration a_h specified in this manual have been measured in accordance with EN 62841-1:2015. Specified vibration level a_h can be used to compare tools and for initial evaluation of exposition to vibrations.
Specified vibration level is representative only for main applications of the device. When the device is used for other purposes or with different working tools, the vibration level may change. Insufficient or too rare maintenance may increase vibration level. The abovementioned factors may lead to higher exposure to vibrations during whole working time.
In order to precisely define exposure to vibrations, include periods when the device is switched off and when it is switched on but not used for working. Once all factors have been carefully considered, total exposition to vibrations may be significantly lower.
To protect the user from results of exposure to vibrations, use additional safety measures such as: device and working tool periodic maintenance, proper hand temperature conditions, good work organisation.
ENVIRONMENTAL PROTECTION
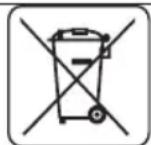
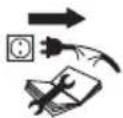
Electrical equipment must not be disposed off with household waste and, instead, should be utilized at appropriate facilities. Information on utilization can be provided by the product vendor or the local authorities. Waste electrical and electronic equipment contains substances that are not neutral to the natural environment. Equipment that is not recycled constitutes a potential hazard to the environment and to human health.
* Right to introduce changes is reserved.
"Grupa Topex Spółka z ograniczoną odpowiedzialnością" Spółka komandytowa with seat in Warsaw at ul. Pograniczna 2/4 (hereinafter Grupa Topex) informs, that all copyrights to this instruction (hereinafter Instruction), including, but not limited to, text, photographies, schemes, drawings and layout of the instruction, belong to Grupa Topex exclusively and are protected by laws accordingly to Copyright and Related Rights Act of 4 February 2004 (ustawa o prawie autorskim i prawach pokrewnych, Dz. U. 2006 No 90 item 631 with later amendments). Copying, processing, publishing, modifications for commercial purposes of the entire Instruction or its parts without written permission of Grupa Topex are strictly forbidden and may cause civil and legal liability.

FERĂSTRĂU CU PÂNZĂ (DE
TRAFORAJ)
58G067
ATENȚIE: ÎNAINTE DE UTILIZAREA SCULEI ELECTRICE, CITIȚI CU ATENȚIE ACESTE INSTRUCTIUNI ȘI PĂSTRAȚI-LE PENTRU UTILIZARE LOR ULTERIOARĂ.
REGULI DETALIATE DE SECURITATE
GRAFISKÄS DALAS APRAKSTS
PRIBOR I DODATNA OPREMA
-
Šesterokutni ključ - 1 kom.
-
List pile - 2 kom.
-
Paralelna vodilica - 1 kom.
-
Transportni kofer - 1 kom.
PRIPREMA ZA RAD
POSTAVLJANJE LISTA PILE

Električni alat isključite iz napajanja.
List pile montirajte ili mijenjajte bez pomoći alata.
- Preklopnik za regulaciju njihanja (5) postavite u položaj „III“ i podignite štitnik (7) (crtež A).
AFVOEREN VAN HET STOF

REMPLACEMENT DES BROSSES CARBONIQUES
DONNÉES RELATIVES AU BRUIT ET AUX VIBRATIONS
- INSTRUKCJA ORYGINALNA (OBSŁUGI)
- PILARKA BRZESZCZOTOWA
- (WYRZYNARKA)
- 58G067
- SZCZEGÓŁOWE PRZEPISY BEZPIECZEŃSTWA
- C ∈
- BLADE SAWING MACHINE (JIGSAW) 58G067
- DETAILED SAFETY REGULATIONS
- CONSTRUCTION AND USE
- DESCRIPTION OF DRAWING PAGES
- MEANING OF SYMBOLS
- EQUIPMENT AND ACCESSORIES
- DUST EXTRACTION
- BLADE STORAGE
- Switching on:
- Switching off:
- VOLTAGE INDICATOR
- BLADE PENDULUM ACTION CONTROL Available pendulum action control allow
- FOOTPLATE ADJUSTMENT FOR BEVEL CUTTING
- INSTALLATION OF THE EDGE GUIDE
- CUTTING
- CUTTING A HOLE IN MATERIAL
- METAL CUTTING / TYPES OF BLADES
- REPLACEMENT OF CARBON BRUSHES
- TECHNICAL PARAMETERS
- Noise and vibration information
- ENVIRONMENTAL PROTECTION
- FERĂSTRĂU CU PÂNZĂ (DE
- TRAFORAJ)
- REGULI DETALIATE DE SECURITATE
- GRAFISKÄS DALAS APRAKSTS
- PRIBOR I DODATNA OPREMA
- PRIPREMA ZA RAD
- POSTAVLJANJE LISTA PILE
- AFVOEREN VAN HET STOF
- REMPLACEMENT DES BROSSES CARBONIQUES
Brand : Graphite
Model : 58G067
Category : Saw