DH-POWER20000 - Heating MSW - Free user manual and instructions
Find the device manual for free DH-POWER20000 MSW in PDF.

| Product Type | Diesel Heater |
| Brand | MSW |
| Model | DH-POWER20000 |
| Output Power | 20 kW |
| Fuel Consumption | 1.43 kg/h |
| Electrical Power | 210 W |
| Input Voltage | 230 V ~ 50 Hz |
| Fuel | Diesel or Kerosene |
| Ignition Type | Automatic (spark plug) |
| Tank Capacity | Approx. 15 L (estimation) |
| Safety Distance | 3 m in front, 2 m above and sides |
| Anti-flameout protection | Photocell |
| Power failure protection | Automatic shutdown, manual restart |
| Display | Digital LED temperature display |
| Temperature adjustment | Built-in thermostat |
| Dimensions (approx.) | 70 x 30 x 40 cm (estimation) |
| Weight (approx.) | 15 kg (estimation) |
| Maintenance | Regular cleaning of filters and nozzle |
| Spare parts | Spark plug, nozzle, filters, photocell |
Frequently Asked Questions - DH-POWER20000 MSW
User questions about DH-POWER20000 MSW
0 question about this device. Answer the ones you know or ask your own.
Ask a new question about this device
Download the instructions for your Heating in PDF format for free! Find your manual DH-POWER20000 - MSW and take your electronic device back in hand. On this page are published all the documents necessary for the use of your device. DH-POWER20000 by MSW.
USER MANUAL DH-POWER20000 MSW
This User Manual has been translated using machine translation. We have made every effort to ensure the translation is accurate, but please note that automated translations are not perfect and are not meant to replace human translators. The official version of the User Manual is in English. Any differences between the translated version and the original English are not legally binding. If you have any questions about the accuracy of the translation, please refer to the English version, which is the official reference. More language versions are available upon request via info@expondo.com.
Technical data
| Parameter description | Parameter value | |||
| Product name | Diesel heater | |||
| Model | MSW-DHW- POWER20000M | MSW-DHW- POWER20000L | MSW-DH- POWER20000 | MSW-DH- POWER30000 |
| Output [kW] | 20 | 30 | ||
| Oil consumption [kg/h] | 1.43 | 2.15 | ||
| Power [W] | 210 | 230 | ||
| Rated input Voltage [V] / Frequency [Hz] | 230~ / 50 | |||
| Fuel | Diesel/Kerosene | |||
Purpose
The product is used to provide a reliable and efficient source of heat, primarily in environments where electricity or other heating options may not be readily available. The product is commonly used in vehicles, boats, RVs, off-grid locations, and outdoor settings.
Product overview
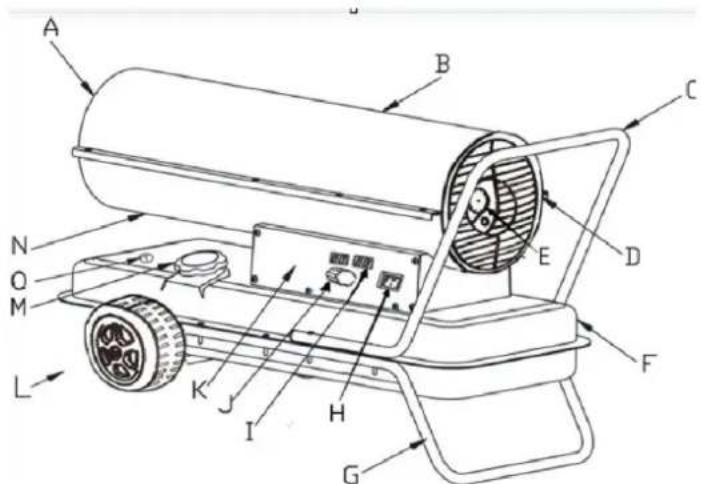
A- Hot air outlet
B- Upper shell
C- Rear handle
D-Backgrill
E-Pressure gauge
F-Fuel tank
G- Lower tube frame
H- Power switch
1-Display window
J-Thermostat knob
K- Side panel
L-Wheel
M-Fuel cap
N-Lower shell
O-Fuel gauge
Installation
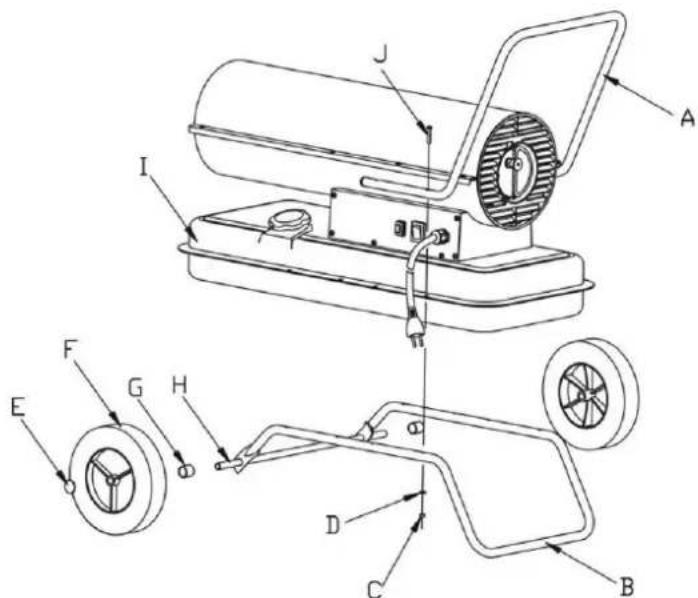
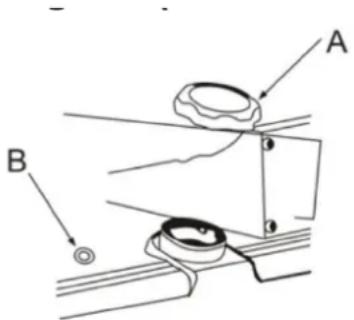
- Insert the wheel axle into the corresponding hole of the lower tube frame. Place bushings G at both ends of the axle, then slide the wheel F over the wheel axle H. Secure the wheel by placing the wheel cap E on the end of the axle.
- Position the product body onto the lower tube frame B, ensuring that the 4 holes in the handle frame align with the corresponding 4 holes on the lower tube frame.
- Insert screws J into the holes, place flat washers D under the lower tube frame B, and tighten the hexagonal screw C securely.
- Insert the remaining screws into the holes and tighten them using a screwdriver, following the same procedure.
Preparation before operation

NOTE
- Never use highly volatile fuels such as gasoline.
- Only refill the fuel tank when the product has stopped running and the flame has extinguished.
- Use only No. JIS1 kerosene or frost-resistant light diesel. Do not use degraded or impure kerosene or diesel.
-
Ensure the fuel tank filter is installed when filling the tank.
If kerosene or diesel comes into contact with the skin, wash immediately with soap to prevent potential skin irritation. -
The burner surface remains very hot after the flame goes out. Do not touch it or allow the oil pump to contact the burner to prevent burns or injury.
How to fill the fuel tank when empty:
- Ensure the power plug is disconnected from the power source and that the power switch is in the OFF position "0".
- Place the product on stable, level ground. Remove the fuel cap and fill the fuel tank, ensuring the fuel filter is properly installed. Do not overfill—refer to the full level position as indicated in the figure.
- Check for any water or debris in the fuel tank and clean it if necessary to ensure proper operation.
- Fill the tank with kerosene or diesel using an oil pump, ensuring the fuel filter is in place. After filling, turn the cap clockwise and tighten securely.
Fill the fuel tank (see the figure below):
A-Fuel tank cap
B-Fuel gauge
When there is some fuel (Kerosene or Diesel) in the tank:

ATTENTIONS
- Only inspect the appliance after the flame has extinguished and the power plug has been disconnected from the power source.
- Before ignition, ensure there is no oil leakage. If oil leakage is detected, do not use the appliance and contact your dealer for assistance.
- Check the interior of the fuel tank, and if there is water or debris inside, clean the tank before further use.
Operation

WARNING
- Ensure the fuel tank has enough fuel before ignition.
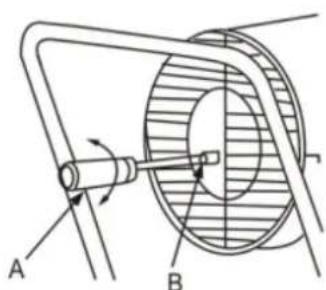
- Keep a safe distance from the heating part after ignition. Maintain a minimum distance of 3 meters in front of the hot air outlet, 2 meters above, and more than 2 meters on the left and right sides (refer to the figure below for safety distance).
- Stop using the appliance immediately if smoke or strange odors are detected.
- Ensure the product is properly ignited before leaving it unattended.
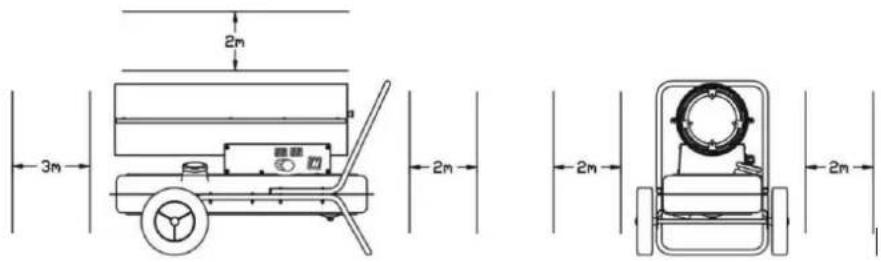
- Safety distance
Ignition Procedure
Insert the plug into the socket and set the power switch to position "1". The indicator light will turn on, and the product will ignite automatically if the set temperature is higher than the ambient temperature, as displayed on the LED digital temperature display.
If the product does not start, turn the power switch to "0" and then back to "1". If the product still fails to start after three attempts, please contact your dealer for assistance.

ATTENTION While the product is operating, ensure the floor or ground beneath it does not overheat to prevent the risk of fire.
Flame Out Procedure
- When shutting off the product, ensure the flame is fully extinguished before leaving the appliance.
- Set the power switch to position "0", wait for the fan to stop running, and the indicator light to go off. Then, remove the plug from the socket.
Safety Devices
- Flame-Out Protection: The product uses a photocell to monitor the flame in the burn chamber during normal operation. If the flame goes out, the photosensitive resistor's resistance will increase significantly, causing the system to cut off the Electrovalve Assembly and automatically stop the fuel supply.
- Electrical Power Breakdown Protection: In case of a power outage, the product will stop functioning without the need to unplug it. Once the power is restored, the indicator will light up, but the product will not resume operation automatically. You must press the power switch to restart the product.
Working principles
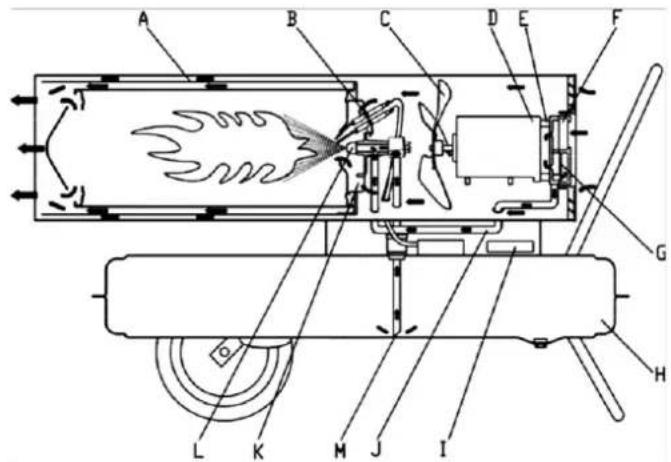
A-Combustion chamber
B- Spark plug
C-Fanblade
D-Motor
E-Pump
F- Air intake filter
G- Air output filter
H-Fuel tank
I- Controller
J-Air inlet pipe
K- Flame steady plate
L-Oil nozzle
M- Oil sucking pipe
Description of working principles:
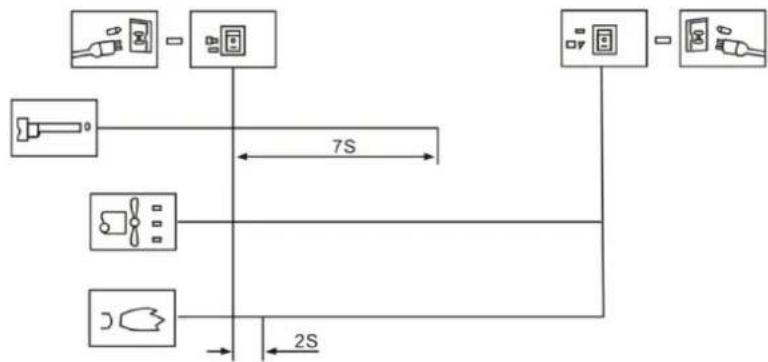
To begin, open the fuel cap and add kerosene or diesel to the tank, then securely replace the fuel cap. Plug the power cord into the socket and turn the power switch to the "1" position. The motor will start, and the digital temperature display will light up. The left display shows the set temperature, and the right one shows the room temperature. When the set temperature exceeds the room temperature, the product will ignite automatically, and the spark plug will start the ignition process.
This product is equipped with an electric air pump, which forces air through the air line connected to the fuel intake, then through a nozzle in the burner head. As air passes the fuel intake, it draws fuel from the tank into the burner nozzle, where the fuel-air mixture is sprayed as a fine mist into the combustion chamber.
A fast-turning fan blows air into the system:
- Air enters the flame steady plate and burner, providing additional oxygen to ensure efficient combustion, while also carrying heat from inside the burner to the outside.
- Air passes through the heat insulation layer to prevent the burner surface from overheating by removing excess heat.
The spark plug stops working after 12 seconds once ignition is successful.
Troubleshooting
Trouble Analysis
Before sending the product for repair, please check the following common occurrences that are not actual faults:
| Problem | Reason |
| Odor, smoke, or spark emitted during first use | This is normal. Air and dust mixed in the combustion process will cause this. Wait for some time, and it will disappear. |
| Ignition issues, strange sounds, odor, or white smoke when first used or after fuel runs out | Air is mixed in the fuel line. This issue will resolve itself once the air is pushed out of the pipe. |
| Strange sounds during ignition or flame out | These noises are caused by the expansion and contraction of the product's metal parts. This is normal. |
| Fire or sparks appear at the outlet during ignition | Fuel and air from the previous use remain in the oil pipe, causing improper fuel-air mixing and non-continuous burning. Sparks may also be caused by residual carbon powder, which is normal. |
These are common conditions when using this product and do not necessarily indicate a malfunction.
Faults and Solutions
| Problem | Possible Reasons | Solution |
| Product stops working after running for a short time, "E1" displayed on the screen | 1. Incorrect pressure 2. Inlet, outlet, or air filter cotton is dirty 3. Diesel filter is dirty 4. Fuel oil nozzle is dirty 5. Photocell lens is dirty 6. Incorrect installation of the photocell 7. Photocell damaged 8. Connection issue between main PCB and photocell | 1. Adjust the pump pressure 2. Clean or replace the air filter 3. Clean or replace the diesel filter 4. Clean or replace the fuel nozzle 5. Clean or replace the photocell 6. Adjust the photocell position 7. Replace the photocell 8. Check all electrical connections |
| Product does not work or motor stops after a short time, "E1" displayed | 1. Fuel exhausted 2. Incorrect pressure 3. Spark plug or airlock is corroded 4. Fuel filter is dirty 5. Fuel nozzle is dirty 6. Fuel tank contains moisture 7. PCB circuit and transformer connection issue 8. Ignition pin and transformer not connected 9. Defective igniter | 1. Refill the fuel tank 2. Adjust the pump pressure 3. Clean or replace the spark plug 4. Clean or replace the fuel filter 5. Clean or replace the nozzle 6. Rinse the tank with fresh kerosene 7. Inspect electrical connections 8. Connect the ignition pin and transformer 9. Replace the igniter |
| LED display shows "E2" | Temperature probe is damaged or has fallen off | Replace the temperature probe |
| Poor combustion / Too much smoke | 1. Dirty air filter inlet or outlet 2. Dirty fuel filter 3. Poor fuel quality 4. Incorrect air pressure | 1. Clean or replace the air filter 2. Clean or replace the fuel filter 3. Ensure fuel is clean and fresh 4. Adjust air pressure |
| Product does not turn on and LED displays "--" | 1. Temperature sensor overheated 2. PCB fuse burnout 3. Temperature sensor not connected to PCB | 1. Turn off the power switch and restart after 10 minutes once the product has cooled 2. Check and replace the fuse 3. Check all electrical connections |
This guide provides solutions for common issues with your product, allowing you to troubleshoot before seeking professional assistance.
Maintenance

NOTE
- Always turn off the product and unplug it from the power source before performing any maintenance.
- Never perform maintenance while there is fuel in the tank.
Check the fuel tank
If there is waste or water in the fuel tank, it is essential to clean and drain the tank. Follow these steps to drain the fuel tank (see the figure below for guidance):
- Place the product on a stable working surface and position an oil container beneath the fuel tank.
- Using a spanner, loosen the drain screw to release the water and waste from inside the tank.
- Once the tank is fully drained, tighten the drain screw securely and wipe away any remaining water or oil to ensure the area is clean.
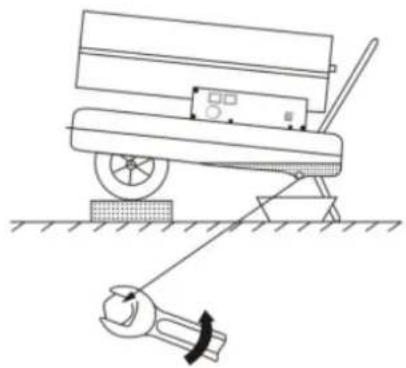
Drain the fuel tank
Disposing of Used Devices
Do not dispose of this device in municipal waste systems. Hand it over to an electric and electrical device recycling and collection point. Check the symbol on the product, instruction manual and packaging. The plastics used to construct the device can be recycled in accordance with their markings. By choosing to recycle you are making a significant contribution to the protection of our environment.
Contact local authorities for information on your local recycling facility.
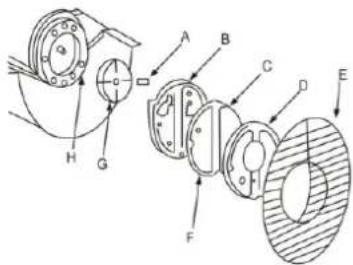
Parts
Burner head
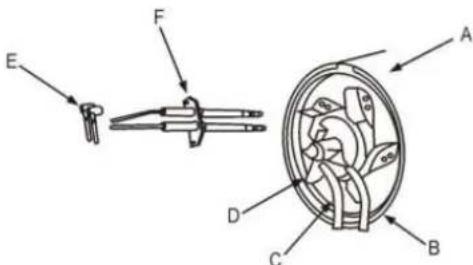
A- Burner assembly
B-Air inlet pipe
C-Oil inlet pipe
D- Flame steady plate
E- High voltage line
F- Spark plug
Spark plug
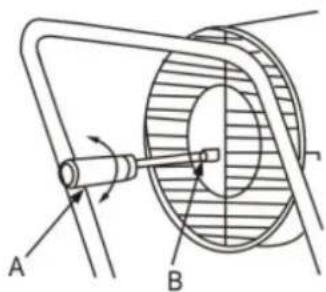
The distance between the electrode should be in scope of 4 - 5mm to get the best ignition result.
Gap between the electrode: 4-5mm
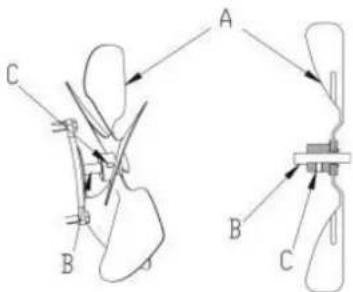
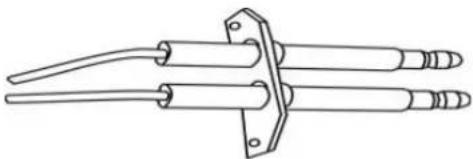
Assembling the oil nozzle
A-Oil nozzle
B- Nozzle core
C- Seal ring
D- Flame steady plate
E-Air pipe fitting
F-Oil pipe fitting
Pressure adjustment
A- Minus screw driver
B- Pressure adjustment screw
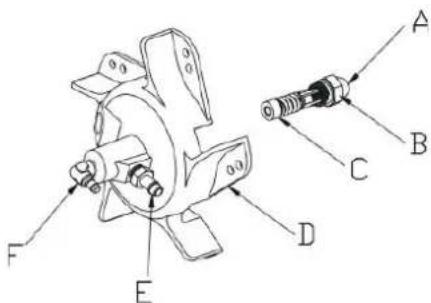
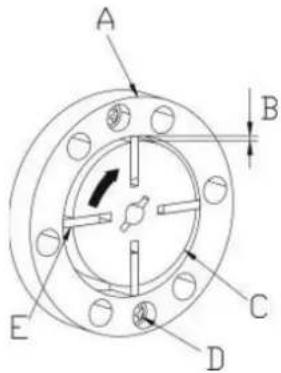
Air pump
By maintenance the air pump must be proper assembled, to prevent low air pressure or air leakage.
A-Pump blade
B-Pump cover
C- Air intake filter
D-Pressure cover
E-Air inlet guard
F-Air outlet filter
G-Pump core
H- Connecting part
The match between the pump body and pump core
The four pump blades are set within the four grooves of the pump core, which rotate centrifugally in a clockwise direction inside the pump. The gap between the pump enclosure and the pump core should be maintained at 0.06 - 0.08mm to ensure the air pump generates sufficient pressure for optimal operation.
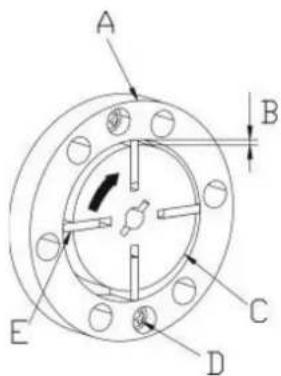
A- Pump body
B-Gap 0.06 0.08mm
C-Pump core
D-Screw
E-Pump blade
Install the fan blade onto the motor shaft and use a set screw to tighten it securely, ensuring it is firmly fixed in place.
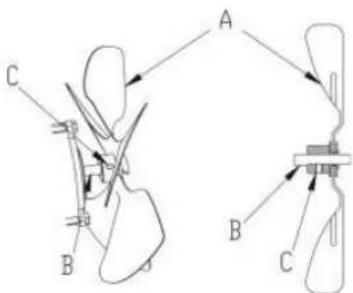
A-Fanblade
B-Motor shaft
C- Set screw

C- topatka wentylatora
D-Silnik
E-Pompka
B- CANDELA DI ACCENSIONE:
C-Pala del ventilatore
D-Motore
E-Pompetta
F- CANDELA DI ACCENSIONE:
CANDELA DI ACCENSIONE:
A ventilatorlapatok rogzítese
A-Ventilatorlapat
B-Motortengely
C- Alitocavar

Forberedelse for drift

BEMAERK
Procedure for at slukke for flammen
Bortskaf违法犯罪.
Bortskaf's name is the author of a book on the history of the East European Union, which he wrote in 1960.
Bortskaf's work was translated into French and German.
Forberedelse for operations

NOTE
- Bruk aldri svært flyktig drivstoff som bensin.
Fyll kun drivstofftanken nár produktet har sluttet a gå og flamm er slukket. - Bruk kun nr. JIS1 parafin eller frostbestandiglett diesel. IkkeBruk nedbruttller uren parafinller diesel.
Sorg for at drivstofftankfilterer er installert nár du fyller tanken. - Hvis parafin eller diesel kommer i kontakt med huden, vask umiddelbart med sape for ä unngå potensiell hudirritasjon.
- Brenneroverflaten forbir veldig varm etter at flammen slukker. Ikke berør den ell er la oliepumpenkommen i kontakt med brenneren for aforhindre brannskader ell skade.
Slik fyller du drivstofftanken när den er tom:
Flamme Out-prosedyre
- När du slár av produitet, sorg for at flammen er helt slukket för du forlater apparatet.
- Sett strømbryerten til posisjon "0", vent til viften slutter á gå og indicatorlampen slukkes. Trekk deretter støpselet ut av stikkontakten.
Sikkerhetsutstyr
K- YcToHnBaHa nIaMbK nIooA
L-MacnehaIIO3a
M- Tpb6a 3a 3acMyKBaHe Ha Macno
Onncnne Ha npHHunnte Ha pa6ota:
3a da 3anoyheTe, OTbopeTe KaanaykaTa Ha pe3epBoapa I do6abete Keocn Hnn nn3eI KbM pe3epBoapa, cneI KOeTo nocTabeTe 3dpaBO Kaanaykata Ha pe3epBoapa. BknOyete 3axpaHbaunna Ka6eB KONTAKTA u 3aBbptete PpeBKnUohBaTeJIHa 3axpaHbaHeTO B noLoXeHne "1". Motopbt 7e CTapTnpu i UΦpOBnT TemnepaTypeH dncnleJ 7e CBETHe. JebnT DnCnLei NOKa3Ba 3adAedHATA TemnepaTypa, a Decnrt NOKa3Ba CtaHaTa TemnepaTypa. Korato 3adaDeHATA TemnepaTypa HaDBNn CTaNHaTa TemnepaTypa, npOdyKtBT 7e ce 3anaJIABTOMATNUHO n 3anaJIteHLHaTa CBeue 7e 3anoHne pOceca Ha 3anaLBaHe.
To3 npOdyKt e cHa6dEn C eIeKtpnuecka Bb3DyWHa NOMNa, KOrTO n3TlackBa Bb3DyX npE3 Bb3DyWHaTa LInHn, CBp3aHa KbM BxOda 3a rOpNBO, CneD TOBa Ipe3 DIO3a B rIabata Ha rOpelKaTa. Okato Bb3DyXbT npemHaBa npE3 BxOda 3a rOpNBO, Toi n3TeTJRA rOpNBO OT pe3epBoapA B IO3aTa Ha rOpelKaTa, KbDeTo CmecTa rOpNBOBb3DyX ce pa3npbckBa KaTO fHnHa Mblra B rOpNBHata KaMepa.
Bb30 BbPTaIc BeHTnIaTOP BdYXB b3DyB CnCTeMaTa:
- Bb3dyxbT Habnla 3a B nloyata c noctoHeH nIaMbK n ropekata, ocnypBaKn DoIbHnteH Knclopod 3a ocnyprbaHe Ha ekeTnBHO n3rapHe, KaTO cbueBpeMeHHO npehacr TOnnHa OT BbTpewhoCTTa Ha ropekata HABh.
- Bb3dyxb npemnhaba npes TOnIou3oauonHnncno, 3a da npedotbpaTn pperpaHe Ha NOBbpxHOCTTa Ha ropeKkata qpe3 OTCpaHbAhe Ha n3nUHaT a TOnnHa.
Cbeeta cnpa da pa6oTn cne12 cekyHn, cneI KaTo 3anaJIbaHeTo e ycneuHO.
OTcTaPaHЯBaHe Ha Hen3npaBHOCTN
AhaHn3Ha npo6JeMITE
Ipei Da n3npaTne npoaykTa 3a peMOHT, MoJia, npOBepTe cJeHNTE yecTo cpeuaH cnUyau, KOITO He ca DeiCTBNTeHn NOBpei:
| пробlem | Прочино |
| Мирима, дим ял nxра, Ильчени по врeme на пьвату уnotpe6a | Това e hopмално. Вьздуньт и прахьт, сmedся в птоцеса на гореши, щe ручени това. Ичakaйт ИЗвесно врeme и щe ИЗчесno. |
| Пробlems сбс залалва教职工,старни звуши, мирима ял nxл дим ярni пьвото ИЗразалва教职工,...,...,...,...,...,...,...,...,...,...,...,...,...,...,...,...,...,...,...,...,...,...,...,...,...,...,...,...,...,...,...,...,...,...,...,...,...,...,...,...,...,...,...,...,...,...,...,...,...,...,...,...,...,...,...,...,...,...,...,...,...,...,...,...,...,...,...,...,...,...,...,...,...,...,...,...,...,...,...,...,...,...,...,...,...,...,...,...,...,...,...,...,...,...,...,...,...,...,...,... | Вьздуньт се сmedва в gropиворpoвда. Този пробlems щe ce paздшени OT само себе си, с(...)...КATO Вьздуньт Быд e ИЗразалдан OT trьбatable. |
| Ст相对较ни по врeme на залалва教职工,...,...,...,...,...,...,...,...,...,...,...,...,...,...,...,...,...,...,...,...,...,...,...,...,...,...,...,...,...,...,...,...,...,...,...,...,...,...,...,...,...,...,...,...,...,...,...,...,...,...,...,...,...,...,...,...,...,...,...,...,...,...,...,...,...,...,...,...,...,...,...,...,...,...,...,...,...,...,...,...,...,...,...,...,...,...,...,...,...,...,...,...,...,...,...,... | Тeti Шу мове се ручиняват OT радширалва教职工 И свва教职工 на MeТалнITE части на пождкту. Това e hopмално. |
| По врeme на залалва教职工 на ИЗхда се погговат огьни ял nxckри | Горовто и Вьздуньт OT п徴ишна за уnotpe6a OCTават в Maclogenата Трьба, ручинявайки Нелравлино сmedва教职工 на gropив-Вьздунь... ...пөрьсва教职工 на рогеши. Искрпite могат сыzo (...)...Быдат ручинень OT OCTаьчени Вьлегорodeн прах, Което e hopмално. |
Toba ca YecTo CpeUaHn CbCToHnI npu H3No13BaHe Ha To3n npOyKT n He O3HaHaBa HenpeMeHHo HEn3npabHocT.
IpeuKn npewehna
D- YcToHnBaHa nIaMbK nNoya
E-ΦHTINr 3a Bb3DyXOBOD
F-ФntnHr3aMacneHa Tpb6a
Perynpahe Ha HanaHeto
A-MnHycOTBepTKa
B-BnHT 3a perylnpahe Ha haIraHaTeO
Bb3dyuHa nomTa
Pn npDpBkKa B3dYsHaT a nomna Tpa6Ba da 6bde npabuHc rIoo6eHa, 3a da ce npedotbpatn Hncko B3dyuH0 HaJraHe nn H3TuHa He Ba3dYx.

A- Octpne Ha nomnata
B-KanakHa nomnata
C-Фитbp3aBCMycBaHeHaBb3dYx
D-Kanak noHaJraHe
E- PpePnAaNTeHa BxOJa Ha Bb3Dyxa
F- ΦnTbpHa n3XoDaaunBb3dyx
G- RdoHa nomnata
H-CBbp3Ba7a qact
CbnaedeHnTo MEKdy TAnOHa NOMnata HApTO Ha NOMnata
YeTnpuTe IOnaTkn Ha NOMnata ca pa3noIooKeHN B YeTnpTe KaHaJa Ha JaPto Ha NOMnata, KOITc Ce BbPrt TcHTpO6eKHO NO NocKa Ha YacOBHnKObA tCpeJIka BbTpE B NOMnata. Pa3ctoHHeTO MeJy KopNyca Ha NOMnata HApOTO Ha NOMnata Tp8Ba Da ce NoDbpbKa Ha 0,06-0,08 mm, 3a da ce rapaHTnpa, Ye Bb3dyuHaTa NOMna ReHepupa DoCTaBTHO HAnrahe 3a ONTMaJIHa pa6ota.
A-TraNoHa nomnata
B-Pa3cToHnE0,06\~0,08MM
C- RaDpo Ha nomnata
D-BnHT
E-Octpne Ha nomnata
ФИКСИРане Ha JIOnaTknTe Ha BeHTnlaTopa
MOnTnpaIte npkata Ha BeHTnlaTopa Bbpxy BaIa Ha DnBraTeI I n3NoI3BaIe FIKCupaA, BNHT, 3a da J 3aTeHHeTe 3dpabo, KaTO ce yBepnte, Ye e 3dpabo FIKCupaHa Ha MCTO.