HQAIR25S - Heating MSW - Free user manual and instructions
Find the device manual for free HQAIR25S MSW in PDF.

| Product type | Ultra-slim energy recovery ventilator (ERV) |
| Model | MSW-HQAIR25S |
| Supply voltage | 230 V~ / 50 Hz |
| Rated power | 350 W |
| Protection rating | IPX2 |
| Protection class | I |
| Noise level | 63 dB |
| Airflow (3 speeds) | 320 / 380 / 450 m³/h |
| Maximum static pressure | 380 Pa |
| Connection diameter | ∅ 146 mm |
| Dimensions (L x W x H) | 620 x 850 x 270 mm |
| Weight | 24.4 kg |
| Coverage area | 148 m² |
| Thermal protection | Yes |
| Core type | Energy recovery (ERV/HRV) |
| Filter maintenance | Periodic vacuum cleaning, replace if necessary |
| Motor maintenance | Annual inspection and cleaning by a professional |
| Installation | By a professional, circuit breaker mandatory |
| Safety | Do not use with combustion appliances, avoid humid or corrosive environments |
| Repairability | Spare parts available through after-sales service |
Frequently Asked Questions - HQAIR25S MSW
User questions about HQAIR25S MSW
0 question about this device. Answer the ones you know or ask your own.
Ask a new question about this device
Download the instructions for your Heating in PDF format for free! Find your manual HQAIR25S - MSW and take your electronic device back in hand. On this page are published all the documents necessary for the use of your device. HQAIR25S by MSW.
USER MANUAL HQAIR25S MSW
natural_image
Diamond-shaped metallic panel with a central black rectangular cutout and mounting holes, mounted on a black frame (no text or symbols visible)This User Manual has been translated for your convenience using machine translation. Reasonable efforts have been made to provide an accurate translation; however, no automated translation is perfect nor is it intended to replace human translators. The official User Manual is the English version. Any discrepancies or differences created in the translation are not binding and have no legal effect for compliance or enforcement purposes. If any questions arise related to the accuracy of the information contained in the User Manual, please refer to the English version of those contents which is the official version.
Technical data
| Parameter description Parameter value | ||||
| Product name | Ultra slim ERV | |||
| Model | MSW-HQAIR15S | MSW-HQAIR25S | MSW-HQAIR10S | |
| Rated voltage [V~] / frequency [Hz] | 230 / 50 | |||
| Rated power [W] | 250 | 350 | 150 | |
| Protection class | I | |||
| IP protection rating | IPX2 | |||
| Emitted noise [dB] | 65 | 63 | 60 | |
| Air flow [m3/h] | 210 / 300 / 350 | 320 / 380 / 450 | 160 / 175 / 210 | |
| Max pressure [Pa] | 353 | 380 | 348 | |
| Inlet/outlet size [mm] | ∅ 146 | ∅ 146 | ∅ 96 | |
| Dimensions [width x depth x height; mm] | 600 x 860 x 235 | 620 x 850 x 270 | 500 x 860 x 200 | |
| Weight [kg] | 23.6 | 24.4 | 18.7 | |
| Coverage area [m2] | 120 | 148 | 70 | |
| Thermal protection | √ | |||
| Heat efficiency [%] | Cooling load | 52 | 57.5 | 61 |
| Heating load | 78 | 68 | 65 | |
| Enthalpy efficiency [%] | Cooling load | 60 | 58 | 60 |
| Heating load | 69.5 | 68 | 68 | |
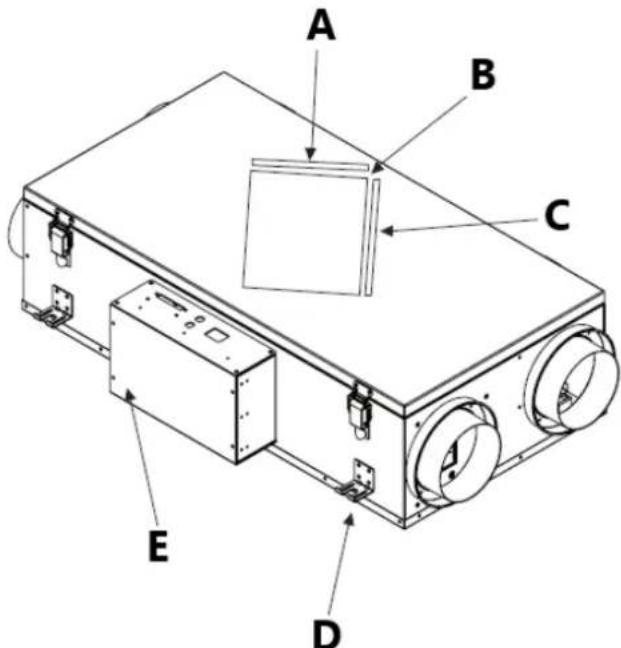
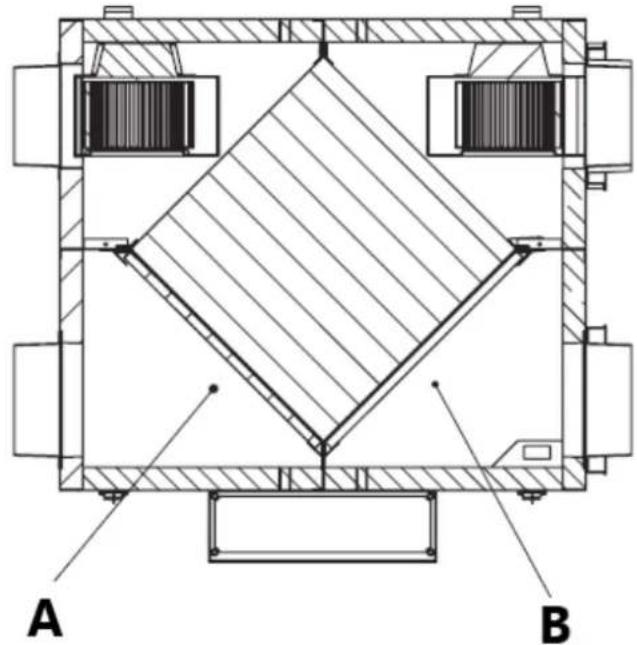
A. Air filter
B. Energy recovery ventilation (ERV) core
C. Air filter
D. Power box
E. Installation bracket
Install and usage
• The installation should be completed by a professional service staff.
- Do not install the unit in the place with high temperature or fire., as it may cause the filter distortion and burn out the motor.
- Do not install the unit in the kitchen which has a lot of smoke. Filter and ERV/HRV core is useless as long as oil fumes attach to it and can easily cause fire.
- Do not install in the place with high humidity such as bathroom etc. The appliance in contact with steam may cause fire and/or electric shock.
- Do not install the appliance in the ceiling with insufficient strength or alternatively straighten the fixing surface before installation.
- Do not install in places which have combustible gas. It may cause fire.
- Caution! This product cannot be used for ventilation with open-type burning appliances (heaters)!
- Do not install the unit and outdoors or with air inlet near the machinery factory or research facilities. Avoid the environment which has acids, alkalis, organic solvents, paints, harmful gases or corrosive composition of gases. It may damage the appliances or cause fire.
• Do not install the air inlet in the kitchen.
• If the air duct is installed tilted outside it may cause water seepage.
• In order to prevent condensation an extension should be installed from outdoor to indoor.
• Install protection of the air ducts, inlets and outlets to prevents small animals getting in.
• During installation following piping should be avoided:

a) Bend
b) Bend many times
c) Reduced diameter
• A circuit breaker should be installed to prevent electric shock or any short circuits.
- Do not reverse the appliance, it may fall down and cause injury.
- After completing installation do a test run and check if any problem occurs (blockage, restrictions, abnormal noise during work).
• The appliance is controlled by the included controller with a knob.
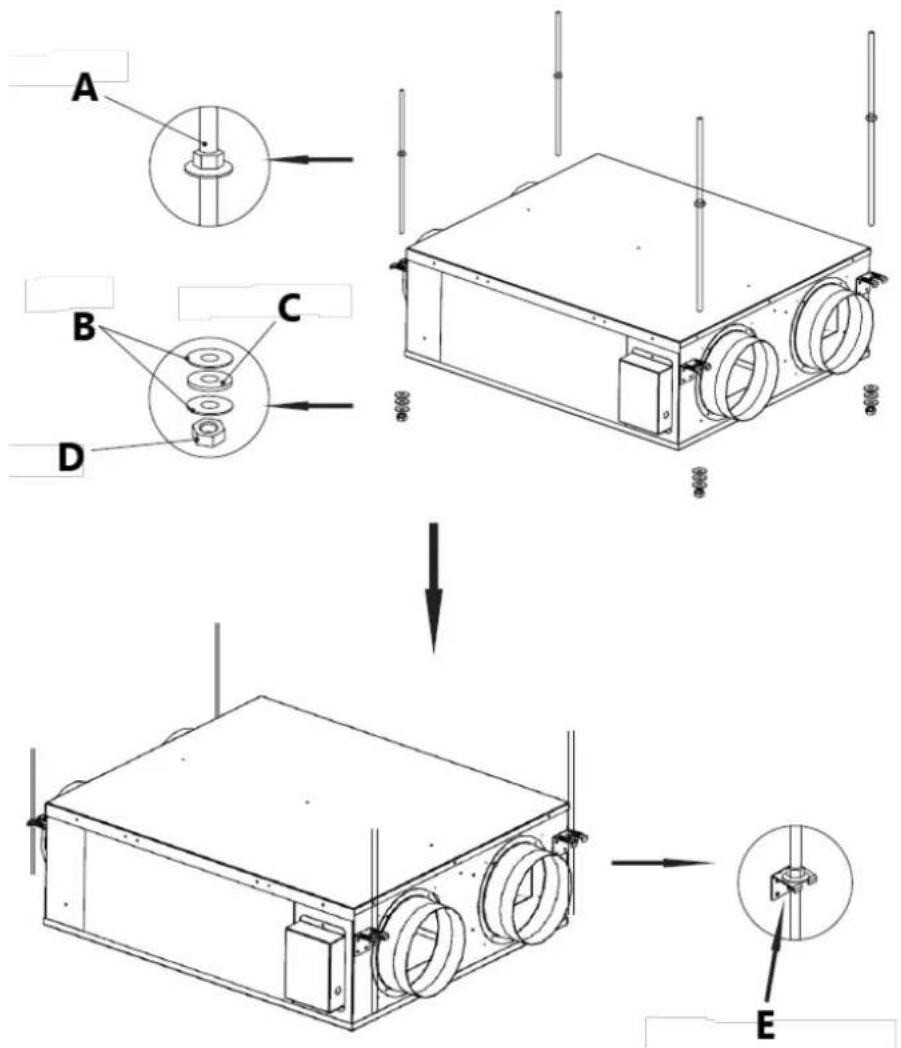
A. Screw rods
B. Washers
C. Rubber washer
D. Screw nut
E. Tighten everything securely
Connection diagram
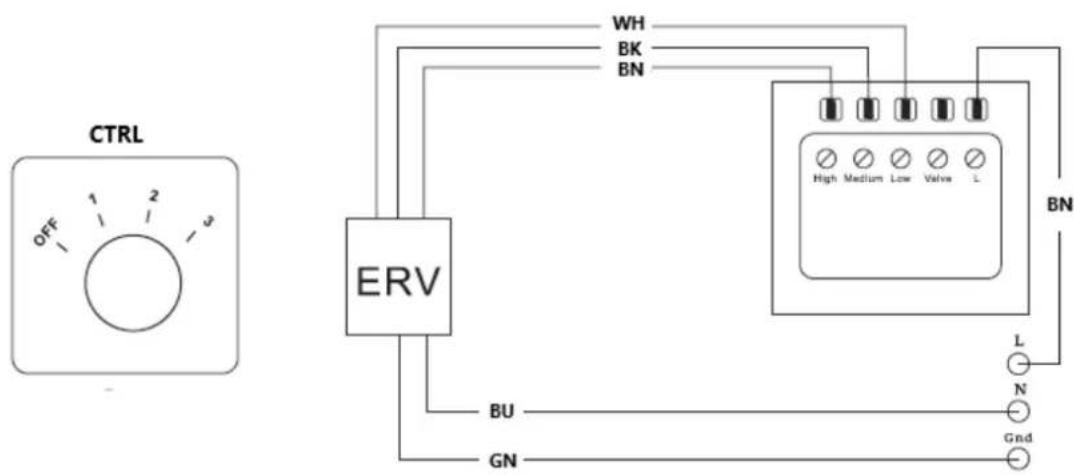
CTRL - controller
WH - white wire
BK - black wire
BN - brown wire
BU - blue wire
GN - green wire
Maintenance
a) When the ERV/HRV is used for a long time, the filter will be dirty and clogged by dust, it may decreasing the air volume, impact the ventilation, increase the noise. Please clean the filter periodical, especially in a hostile environment (a higher number of dust).
Filter maintenance:
- Unlock the hanging chain under the make the access panel upward
- Please hold the indoor side filter and abstract it horizontally (A on the picture below).
• Use a vacuum cleaner to suck the attached dirt and dust away.
• The installation of indoor side filter is following the reversed steps. - Please hold the outdoor side filter and abstract it horizontally (B on the picture below)
- Please use a vacuum to suck the attached dirt and dust away.
• The installation is in the reversed steps, please noticed the marked direction.

natural_image
Diamond-shaped metallic panel with a central black rectangular cutout and mounting holes, mounted on a black frame (no text or symbols visible)a) The duct fan should be cleaned and check annually (clean motor; parts cannot be exposed to moisture) to make it operate safe and prolong its life.
b) Cut the power supply before any maintenance and wait for the rotating elements to stop.
c) When there is an abnormal noise or significantly efficiency reduction, please check the bearing and replace it if necessary (done only by a qualified service technician).
d) Do not spray the device with a water jet or submerge it in water.
e) Do not allow water to get inside the device through vents in the housing of the device.
f) Do not use sharp and/or metal objects for cleaning (e.g. a wire brush or a metal spatula) because they may damage the surface material of the appliance.
Disposing of used devices
Do not dispose of this device in municipal waste systems. Hand it over to an electric and electrical device recycling and collection point. Check the symbol on the product, instruction manual and packaging. The plastics used to construct the device can be recycled in accordance with their markings. By choosing to recycle you are making a significant contribution to the protection of our environment.
Contact local authorities for information on your local recycling facility.

natural_image
Diamond-shaped metallic panel with a central black rectangular cutout and mounting holes, mounted on a black frame (no text or symbols visible)natural_image
Diamond-shaped metallic panel with a central black rectangular cutout and mounting holes, mounted on a black frame (no text or symbols visible)natural_image
Diamond-shaped metallic panel with a central black rectangular cutout and mounting holes, mounted on a black frame (no text or symbols visible)A. barre a vite
B. Rondelle
C. Rondella in gomma
D. Dado a vite
E. Stringere tutto saldamente
natural_image
Diamond-shaped metallic panel with a central black rectangular cutout, mounted on a black frame (no text or symbols visible)natural_image
Technical cross-sectional diagram of a mechanical assembly (no text or labels)A
B

natural_image
Diamond-shaped metallic panel with a central black rectangular cutout and mounting holes, mounted on a black frame (no text or symbols visible)natural_image
Diamond-shaped metallic panel with a central black rectangular cutout and mounting holes, mounted on a black frame (no text or symbols visible)natural_image
Diamond-shaped metallic panel with a central black rectangular cutout and mounting holes, mounted on a black frame (no text or symbols visible)natural_image
Diamond-shaped metallic panel with a central black rectangular cutout and mounting holes, mounted on a black frame (no text or symbols visible)natural_image
Diamond-shaped metallic panel with a central black rectangular cutout and mounting holes, mounted on a black frame (no text or symbols visible)natural_image
Diamond-shaped metallic panel with a central black rectangular cutout and mounting holes, mounted on a black frame (no text or symbols visible)natural_image
Diamond-shaped metallic panel with a central black rectangular cutout and mounting holes, mounted on a black frame (no text or symbols visible)natural_image
Diamond-shaped metallic panel with a central black rectangular cutout and mounting holes, mounted on a black frame (no text or symbols visible)natural_image
Diamond-shaped metallic panel with a central black rectangular cutout and mounting holes, mounted on a black frame (no text or symbols visible)natural_image
Diamond-shaped metallic panel with a central black rectangular cutout, mounted on a black frame (no text or symbols visible)natural_image
Diamond-shaped metallic panel with a central black rectangular cutout and mounting holes, mounted on a black frame (no text or symbols visible)natural_image
Diamond-shaped metallic panel with a central black rectangular cutout and mounting holes, mounted on a black frame (no text or symbols visible)natural_image
Diamond-shaped metallic panel with a central black rectangular cutout and mounting holes, mounted on a black frame (no text or symbols visible)natural_image
Architectural cross-section diagram of a room with diagonal hatching and internal structural elements (no text or labels)A
B
natural_image
Diamond-shaped metallic panel with a central black rectangular cutout and mounting holes, mounted on a black frame (no text or symbols visible)natural_image
Diamond-shaped metallic panel with a central black rectangular cutout and mounting holes, mounted on a black frame (no text or symbols visible)For the disposal of the device please consider and act according to the national and local rules and regulations.
CONTACT
expondo Polska sp. z o.o. sp. k.