
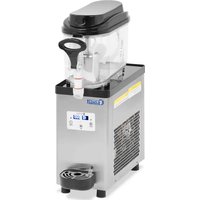
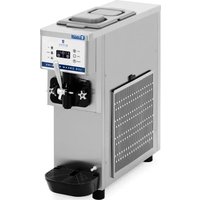
RCSI-24 - Ice machine Royal Catering - Free user manual and instructions
Find the device manual for free RCSI-24 Royal Catering in PDF.

| Product type | Professional soft ice cream machine |
| Model | RCSI-24 |
| Brand | Royal Catering |
| Power supply | 230 V ~ / 50 Hz |
| Nominal power | 2.14 kW |
| Production capacity | 33 L/h |
| Cooling tank capacity | 2 x 6 L + 2 x 2 L (total 16 L) |
| Refrigerant | R290 (145 g) and R600 (55 g) |
| Dimensions (W x D x H) | 750 x 550 x 1360 mm |
| Net weight | 134 kg |
| Protection class | I |
| Ambient temperature range | 10 to 43 °C |
| Pre-cooling temperature range | 0 to 25 °C |
| Display | LCD screen with icons and portion counter |
| Main functions | Automatic churning, washing, hardness adjustment, pre-cooling, portion counter, standby |
| Dispensing device | Double lever dispenser |
| Food contact materials | Removable parts in stainless steel and food-grade plastic |
| Care and cleaning | Integrated wash cycle; manual cleaning of parts with food detergent; seal lubrication |
| Safety | Overvoltage protection, automatic lock, emergency stop, flammable refrigerant R290 (precautions) |
| Spare parts and repairability | Seals, rings, motor, PC board, belt, dispenser; repair by qualified professional |
Frequently Asked Questions - RCSI-24 Royal Catering
User questions about RCSI-24 Royal Catering
0 question about this device. Answer the ones you know or ask your own.
Ask a new question about this device
Download the instructions for your Ice machine in PDF format for free! Find your manual RCSI-24 - Royal Catering and take your electronic device back in hand. On this page are published all the documents necessary for the use of your device. RCSI-24 by Royal Catering.
USER MANUAL RCSI-24 Royal Catering
SOFT ICE CREAM MACHINE

| DE | Produktname | Softeismaschine |
| EN | Product name | Soft ice cream machine |
| PL | Nazwa produktu | Maszyna do lodów włoskich |
| CZ | Název výrobku | Stroj na toćenou zmržlinu |
| FR | Nom du produit | Machine à glace italienne |
| IT | Nome del prodotto | Macchina per gelato soft |
| ES | Nombre del producto | Máquina de helado suave |
| HU | Termék neve | Lágyfagylaltgép |
| DA | Produktnavn | Softice-maskine |
| FI | Tuotteen nimi | Pehmytjätelökone |
| NL | Productnaam | Softijs machine |
| NO | Produktnavn | Softis maskin |
| SE | Produktnamn | Mjukglassmaskin |
| PT | Nome do produits | Máquina de sorvete suave |
| SK | Názov produktu | Stroj na mäkkú zmržlinu |
| BG | Иme на п的对象ы | Машни за мек сладолец |
| EL | Övoça пioóvτος | Мнхауń пал�тоύsoft |
| HR | Naziv proizvoda | Stroj za sladoled na toćenje |
| LT | Produktov pavadinimas | Minkštuju leduje aparatas |
| RO | Numele produsului | Maşinia de ingheţată moale |
| SL | Ime izdelka | Stroj za mehki sladoled |
| DE Modell | EN Product model | PL Model Produktu | CZ Model vyrobku | FR Modèle | IT Modello | ES Modelo | HU Modell | DA Model | FI Tuotteen malli | NL Productmodel | NO Produktmodell | SE Produktmodell | PT Modelo do produits | SK Model | BG(Model na п的对象к | EL Movétélo пioíóvτος | HR Model proizvoda | LT: Gaminio modelis | RO: Model de produs | SL: Model izdelka | RCSI-16 RCSI-17 RCSI-18 RCSI-24 | |
| DE Hersteller | EN Manufacturer | PL Producent | CZ Výrobce | FR Fabricant | IT Produttore | ES Fabricante | HU Termeló | DA Producent | FI Valmistaja | NL Producent | NO Producent | SE Tillverkare | PT Fabricante | SK Výrobca | BG пioиьовител | EL Kατακειαστής | HR Proizvodac | LT Gamintojas | RO Produçător | SL Proizvajalec | expendo Polska sp. z o.o. sp. k. | |
| DE Anschrift des Herstellers | EN Manufacturer Address | PL Adres producenta | CZ Adresa výrobce | FR Adresse du fabricant | IT Indirizzo del produttore | ES Dirección del fabricante | HU A gyartó cime | DA Producentens adresse | FI Valmistajan osoite | NL Adres producent | NO Produentens adresse | SE Tillverkarends adress | PT Endereço do fabricante | SK Adresa výrobcu | BG Адес на пioиьовитela | EL: Διεύθυνηκατακειαστή | HR Adresa proizvodac | LT Gamintojo adresas | RO Adresa producătorului | SL Naslov proizvajalca | ul. Nowy Kisielin – Innowacyjna 7, 66-002 Zielona Góra | Poland, EU |

This User Manual has been translated for your convenience using machine translation. Reasonable efforts have been made to provide an accurate translation; however, no automated translation is perfect nor is it intended to replace human translators. The official User Manual is the English version. Any discrepancies or differences created in the translation are not binding and have no legal effect for compliance or enforcement purposes. If any questions arise related to the accuracy of the information contained in the User Manual, please refer to the English version of those contents which is the official version.
Technical data
| Parameter specification | Parameter value | |
| Product name | SOFT ICE CREAM MACHINE | |
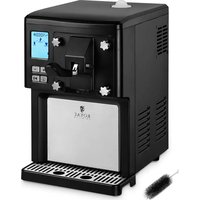
| Model | RCSI-16 | RCSI-17 |
| Supply voltage [VAC] / Frequency [Hz] | 230~/50 | |
| Rated power [kW] | 1.15 | 1.29 |
| Protection class | I | |
| Capacity (throughput) [L/h] | 15 | |
| Refrigerant type / charge [g] | R290/145 | R290/145 R600/55 |
| Refrigerating bin dimensions [mm] | 300x240x150 | |
| Refrigerating bin volume [L] | 10 + 1.8 | |
| Pre-cooling temperature range [°C] | none | 0-25 |
| Ambient temperature range [°C] | 10-43 | |
| Dimensions (Width x Depth x Height) [mm] | 495 x 700 x 685 54 | 5 x 705 x 875 |
| Weight [kg] | 72 | 86 |
| Model | RCSI-18 | RCSI-24 |
| Supply voltage [VAC] / Frequency [Hz] | 230~/50 | |
| Rated power [kW] | 1.64 | 2,14 |
| Protection class | I | |
| Capacity (throughput) [L/h] | 23 | 33 |
| Refrigerant type / charge [g] | R290/145 R600/55 | |
| Refrigerating bin dimensions [mm] | 300x150x150 | |
| Refrigerating bin volume [L] | (6)x2 + (1.8)x2 | (6)x2 + (2)x2 |
| Pre-cooling temperature range [°C] | 0-25 | |
| Ambient temperature range [°C] | 10-43 | |
| Dimensions (Width x Depth x Height) [mm] | 545 x 680 x 975 | 750 x 550 x 1360 |
| Weight [kg] | 112 | 134 |
1. General overview
This manual is intended to assist you in safe and reliable use. The product is designed and manufactured strictly according to technical specifications using the latest technology and components, and maintaining the highest quality standards.
READ THE MANUAL CAREFULLY AND UNDERSTAND IT BEFORE USE.
To ensure long and reliable operation of the product, operate and maintain it correctly and strictly in compliance with this manual. The technical data and specifications in this manual are up-to-date. The manufacturer reserves the right to modifications for the purpose of quality improvement. Considering the technological progress and the feasibility of noise reduction, the product is designed and built so that risks resulting from noise emissions are minimised as far as possible.
EN
Explanation of symbols
The product meets the requirements of relevant safety standards.
Read the manual before use.
Recyclable product.
CAUTION! or WARNING! or REMEMBER! indicates a specific instruction. General warning sign.
CAUTION! Risk of electric shock!
For indoor use only.
NOTE! The figures in this manual are illustrative only and may vary in some details from the actual appearance of the product.
The original version of the manual is in German language. Other language versions are translations from German.
2. Operating safety
CAUTION! Read all safety warnings and all instructions. Failure to follow the warnings and instructions may result in electric shock, fire and/or serious injury or death.
The term "appliance" or "product" in the warnings and instructions refers to the SOFT ICE CREAM MACHINE.
2.1. Electrical safety
a) The appliance power cord plug must fit into the mains outlet. Do not modify the plug in any way. Original power cord plugs and matching mains outlets reduce the risk of electric shock.
b) Avoid touching earthed objects, like piping, radiators, heaters, and refrigerators. There is an increased risk of electric shock if your body is earthed and touching the appliance exposed to direct rain, a wet floor or while operating in a humid environment. If water penetrates into the appliance, there is an increased risk of damage to the appliance and electric shock.
c) Do not use the power cord in any unintended way. Never use it to carry the appliance or to unplug it from the mains outlet. Keep the power cord away from sources of heat, oil, sharp edges or moving parts. Damaged or tangled cords increase the risk of electric shock.
d) If you cannot avoid using the appliance in a wet environment, use a residual current device (RCD) to connect the appliance to electrical mains. Using an RCD reduces the risk of electric shock.
e) Do not use the appliance if the power cord is damaged or shows evidence of wear. Have a damaged power cord replaced by a qualified electrician or the manufacturer's technical service.
f) To avoid electric shock, do not immerse the power cable, its plug or the appliance itself in water or other liquid. Do not use the appliance on wet surfaces.
2.2. Workplace safety
a) Keep the workplace tidy and well lit. Disorder or poor lighting can lead to accidents. Be careful, watch what you are doing and use common sense when working with the appliance.
b) In the event of damage or malfunction of the appliance, turn it off immediately and report the incident to authorised personnel.
c) If in doubt as to whether the appliance is working, contact the manufacturer's technical service.
d) Repairs to the appliance may only be carried out by the manufacturer's service. Do not attempt to repair the product on your own!
e) In the event of ignition or a fire, use dry powder or CO2 extinguishers only to suppress the fire of the appliance if live with electrical voltage.
f) No children or unauthorised individuals shall be allowed at the workplace.
g) Check the condition of the safety warning stickers regularly. Replace them if they are illegible.
h) Keep this manual for future reference. If the product is to be handed over to a third party, hand it over with this user manual.
i) Keep packaging components and small installation parts out of the reach of children.

Remember! Keep children and other bystanders safe while operating this product.
2.3. Personal safety
a) Do not operate the appliance if you are tired, ill or under the influence of alcohol, drugs or medication which might significantly impair your ability to operate the appliance.
b) The product is not intended to be used by individuals (including children) with reduced mental, sensory or intellectual capacity or lack of experience and/or knowledge, unless they are supervised by an individual responsible for their safety or have been given instructions by the responsible individual on how to operate the product.
c) The appliance may only be operated by individuals who are physically fit, capable of handling the appliance and who have been adequately trained, have read this manual and have received training in health and safety.
d) To prevent accidental operation, make sure the power switch is OFF before connecting the appliance to mains power.
e) The appliance is not a toy. Children must be supervised to ensure that they do not play with it.
2.4. Safe use of the product
a) Do not use the appliance if the power switch does not function properly (does not switch on or off). Appliances which cannot be controlled with their power switches are dangerous, shall not be operated and must be repaired.
b) Before adjustment, replacement of any accessories or storing the appliance, unplug it from the mains. This safety precaution reduces the risk of accidental operation.
c) Keep unused appliances out of the reach of children and anyone unfamiliar with the appliance or this manual. Appliances are dangerous in the hands of inexperienced users.
d) Keep the product in good working order. Before each use, check for generally evident damage and damage to any of the moving parts (inspect for cracks in parts and components or any other condition that may affect the safe operation of the product). If damaged, have the product repaired before use.
e) Keep the product out of the reach of children.
f) The product shall be repaired and maintained by qualified personnel using original spare parts only. This will ensure safe operation of the product.
g) To ensure the designed operational integrity of the product, do not remove the factory-installed covers or loosen any bolts.
EN
h) When transporting and handling the appliance from storage to the place of use, follow the health and safety regulations for manual handling that apply in the country of operation of the appliance.
i) Avoid stopping the appliance with heavy loads. This can cause overheating of the drive elements and result in damage to the appliance.
j) Clean the appliance regularly to prevent permanent deposits of dirt.
k) The appliance is not a toy. Cleaning and maintenance shall not be performed by children without adult supervision.
I) Never attempt to tamper with the appliance to change its parameters or structure.
m) Keep the appliance away from sources of fire and heat.
n) Do not cover the vents of the appliance!
o) Caution! Do not leave any water in the bin after cleaning. Otherwise, ice may form and cause the motor to stall and fail.
p) Operate, handle, and transport this appliance in upright orientation only. Do not tilt the appliance sideways by more than 45^ .
q) Do not operate any electric appliances not provided for by the manufacturer in any of the compartments of this appliance.
r) Do not operate any mechanical tools to remove ice from the the refrigerating compartment interior or other implements, appliances or chemicals to accelerate the defrosting.
s) Once the appliance has been delivered to its destination and before plugging it into the mains, leave it upright for 24h , until the refrigerant inside becomes stable.
t) Connect the power cord plug directly to an mains outlet. Do not connect to mains power via any extension cords.
u) CAUTION! The R290 refrigerant is a flammable and explosive gas. Maintenance of this appliance shall only be done by qualified professionals!

CAUTION! Although the appliance has been designed to be safe and has been provided with adequate safeguards, and despite the use of additional safety measures, there is still a low, residual risk of accident or injury during its operation. Caution and common sense are advised when using the product.
3. Rules of use
This appliance is intended to make ice cream from a suitably prepared input batch of products.
The user is responsible for any damage caused by non-intended use.
3.1. Appliance overview


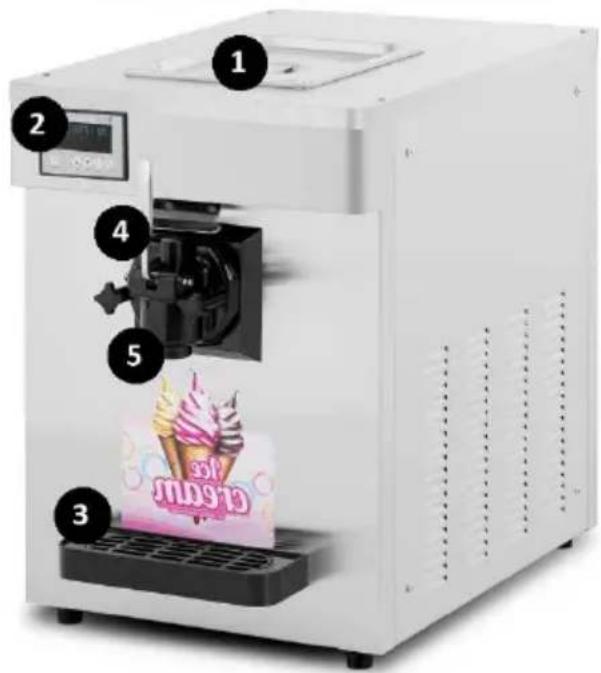
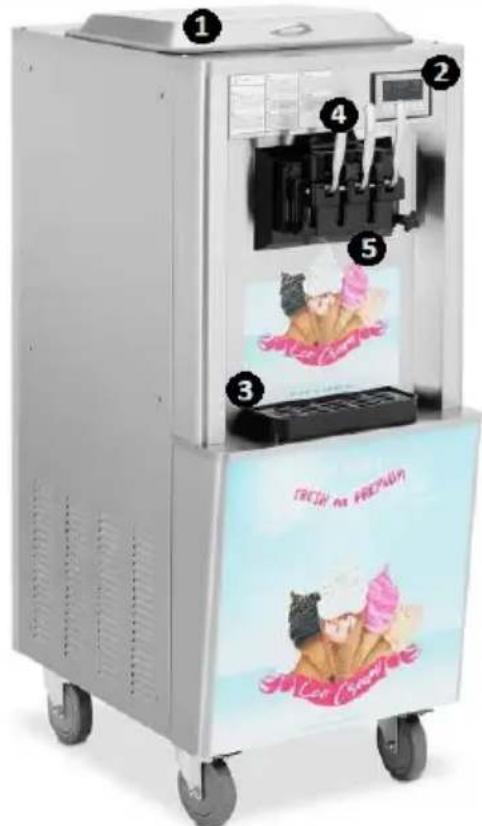
1 - Refrigerating bin lid
2 - Control panel:
a) LCD display
b) Input batch processing on/off key ("AUTO")
c) Refrigerating compartment wash on/off key ("WASH")
d) Batch thickness reduction key ("SUB")
e) Batch thickness increase key ("ADD")
f) Power switch ("ON/OFF")
g) Batch pre-cooling / cooling level setting key ("SET/PRECOOLING") (on model RCSI-17 / RCSI-18)
3-Drip tray
4 - Dispenser handle
5-Dispenser unit
3.2. Preparations for operation
POSITIONING THE APPLIANCE
The ambient temperature shall be within +10 - +43^ at the place of operation. Position the appliance where good air circulation is ensured. Maintain a minimum clearance of 50~cm from all sides of the appliance. Keep the appliance away from any hot surfaces. Always operate the appliance on a level, firm, clean, fireproof, and dry surface and out of the reach of children and individuals with reduced mental, sensory and intellectual capacities. Position the appliance where the mains plug can be reached at any time. Make sure that the mains power ratings match the data on the rating plate!
Prior to first use disassemble all elements and wash them.
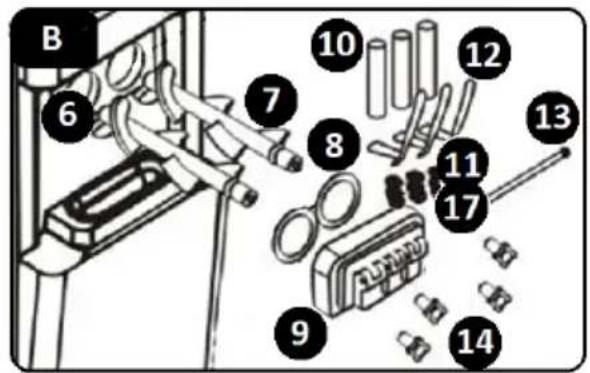
INSTALLING THE APPLIANCE
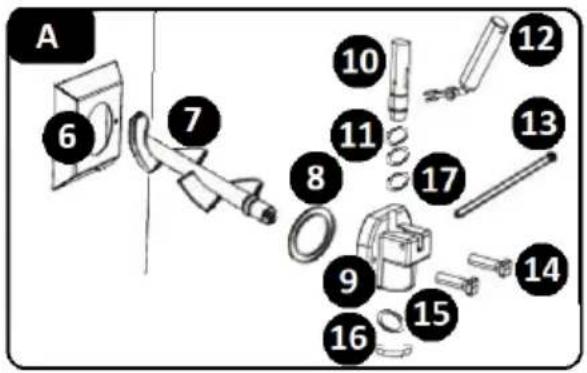
A - Model RCSI-16/ RCSI-17
B - Model RCSI-18
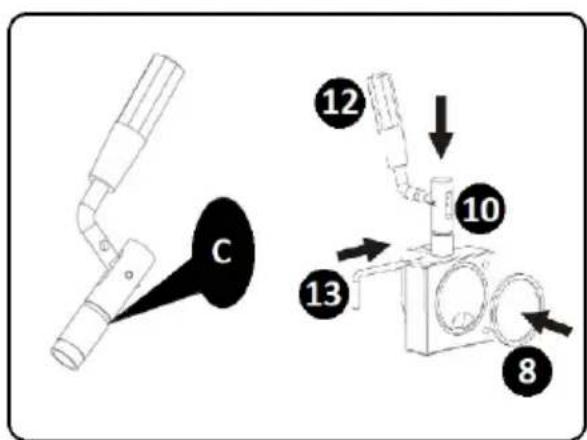
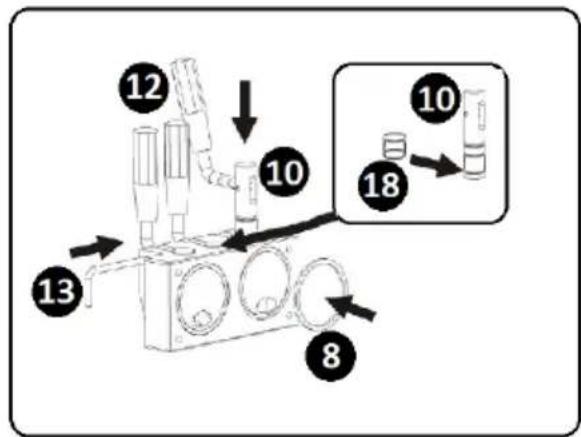
C - Apply the lubricant here
6 - Refrigerating compartment
7-Stirrer
8 - Refrigerating compartment guard gasket
9 - Refrigerating compartment guard
10 - Valve stem
11 - Valve stem o-rings
12-Lever
13 - Cotter pin
14 - Fasteners
15 - Dispenser gasket
16 - Dispenser lid
17 - Stem o-ring, mid size
18 - Mid stem gasket (model RCSI-
18)
a) Install the stirrer (7) inside the refrigerating compartment (6).
b) Seat the refrigerating compartment guard gasket (8) inside the compartment guard (9).
c) Slide the dedicated o-rings (17 - size 11x2) onto the valve stem (10).
d) CAUTION! For model RCSI-18: Slide the dedicated gasket (18) onto the mid stem of the valve.
e) Align the resulting assembly with the opening in the opening of the refrigerating compartment guard (9) and install the assembly in the opening.
f) Install the dispenser levers (12) by inserting them into the holes in the valve stems (10). Secure the assembly using the cotter pin (13).
g) CAUTION! For model RCSI-16/ RCSI-17: Install the dispenser gasket (15). Do this by removing the dispenser lid (16) turning it clockwise to detach. Install the gasket (15) inside of the detached part. Reinstall the detached parts.
h) Attach the resulting assembly to the front panel of the appliance. Do this by passing the integrated locating pins through the holes in the refrigerating compartment guard (9). Secure the with the fasteners (14) included.
i) Install the drip tray by sliding it into its receptacle under the dispenser cluster.
j) Disassembly is done in reverse order of assembly.
3.3. Operating the appliance
Before operating this appliance, verify the installation process has been correctly done and connect the power cord plug to a mains outlet. Refer to the appliance parameters and functions. Turn on the appliance and set the desired parameters as described below. Start the appliance by turning the power switch (f) ON. When done, turn the power switch (f) OFF and unplug the appliance from the mains.
3.3.1. CLEANING THE APPLIANCE COMPONENTS
Before operating the appliance and finishing the operation, always run the cleaning of the refrigerating bin, the refrigerating compartment and its parts. The procedure:
a) Fill the refrigerating bin (1) with water.
b) On the control panel, press the refrigerating compartment wash on/off key ("WASH"). The LCD shows the stirrer run icon (I). The appliance beeps shortly.
c) A correct cleaning cycle needs at least 3 minutes to run.
d) When done cleaning, stop the cleaning mode by switching the refrigerating compartment wash on/off key ("WASH").
e) Empty the appliance by operating the dispenser lever(s) (12).
f) Repeat the cleaning steps above 2-3 times.
g) Clean piston

EN
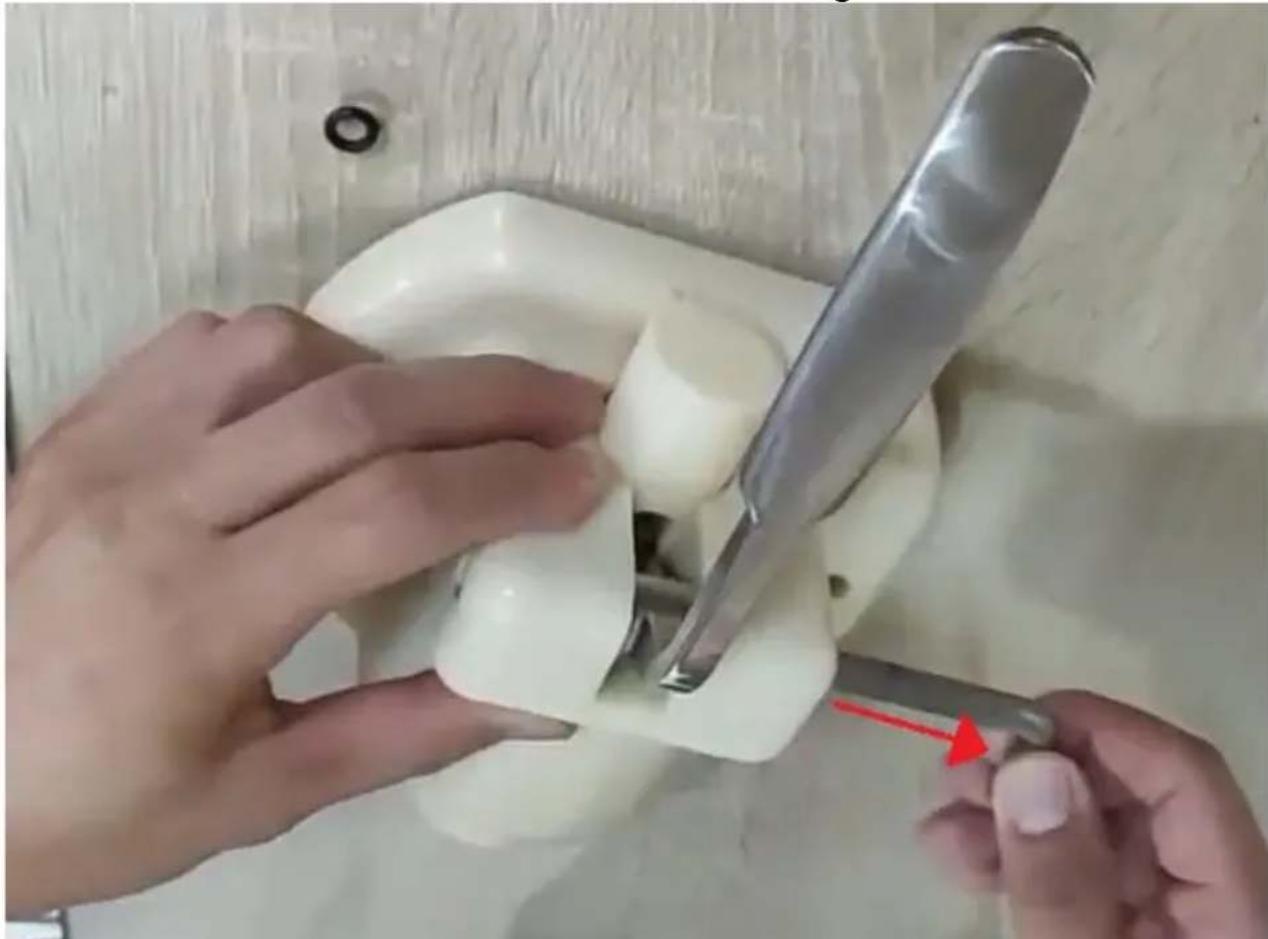
1. Remove Stem O-ring
2. Pull the Cotter pin
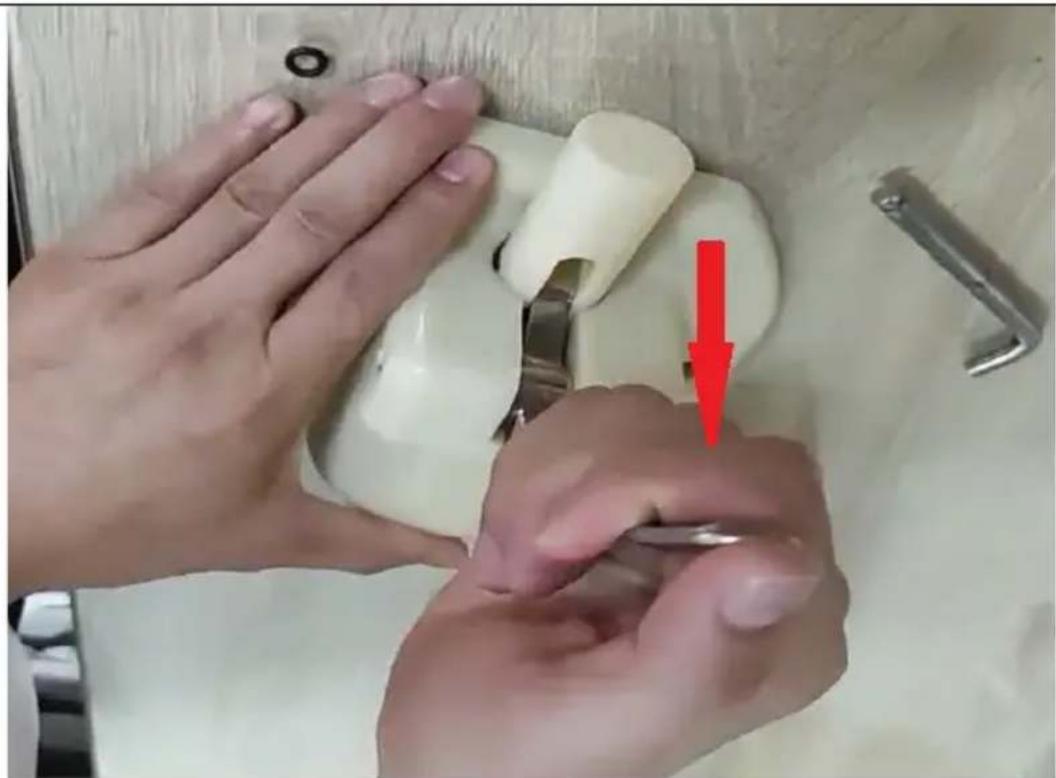
EN
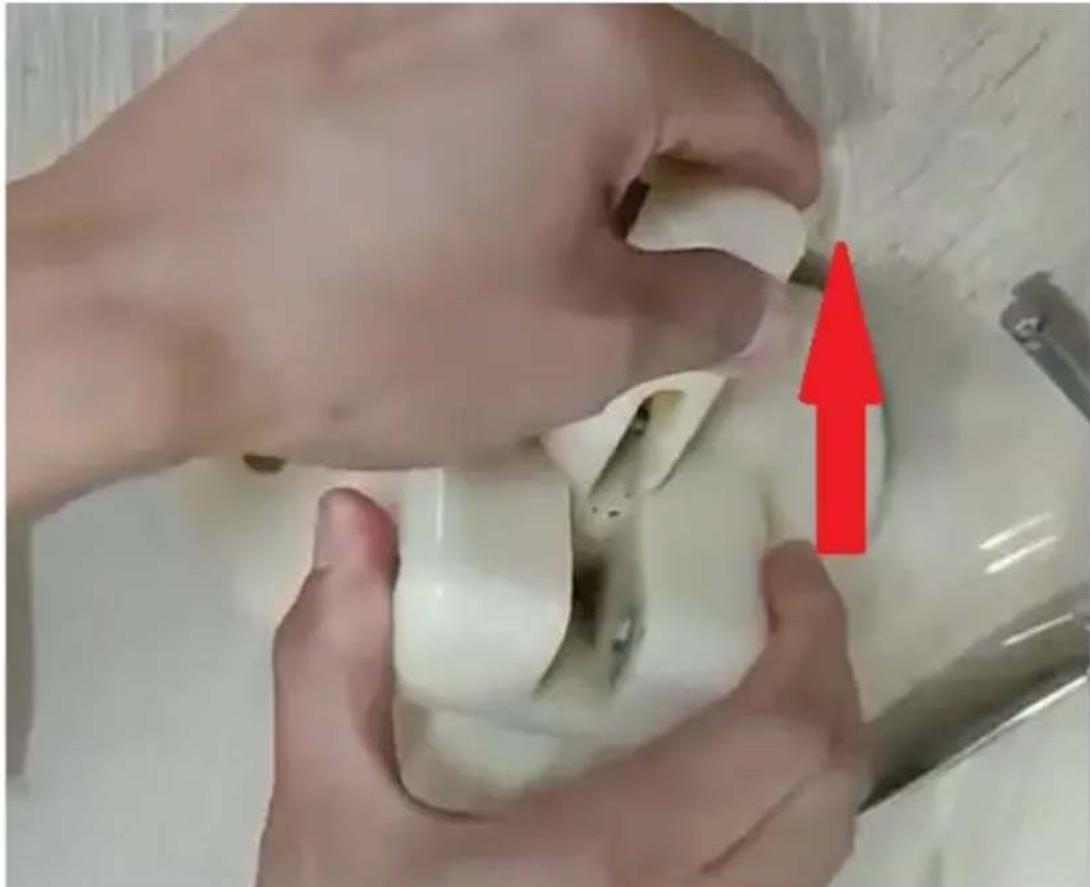
3. Pull the Lever down and remove it
4. Pull the Piston upwards for cleaning
-
Clean the Piston with dedicated food-approved detergent 6. Add food grade lubricants before assembly
-
Assembly in reverse order
h) Remove the refrigerating compartment guard (9) and the stirrer (7).
i) Clean the refrigerating compartment guard parts with a dedicated food-approved detergent.
j) CAUTION! The temperature of water or the dedicated food-approved detergent shall not be more than 40^ . Otherwise there will be a risk of appliance failure.
k) With the parts dry, coat the sliding surfaces of the stems using a dedicated food-approved lubricant (see INSTALLING THE APPLIANCE, item C).
I) Reassemble the appliance. When done, the appliance can be operated again.
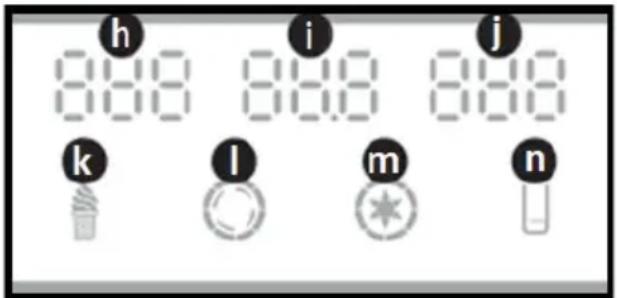
3.3.2. LCD ICONS
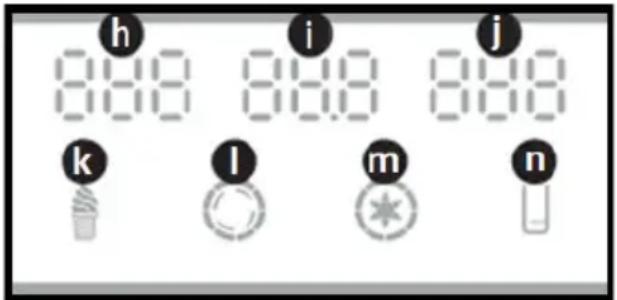
h - "NO." - dispensed ice cream cone counter
i - "HARD" - ice cream cone thickness level / "AC.V" - supply voltage
j - "TEMPERTURE" - ice cream bulk temperature (model RCSI-17/ RCSI-18)
k - "ICE CREAM" - the icon shows that the ice cream batch is being churned or ready for dispensing: flashing - the ice cream batch is being churned; steadily on - the ice cream batch has been churned and is ready for dispensing
I - "CHURN" - the icon comes on when the stirrer (drive unit) is running m - "PRECOOL" - the icon comes on when pre-cooling is running / the appliance keeps the batch cold (model RCSI-17/ RCSI-18)
n - "LEVEL" - the icon comes on when the batch in the refrigerating bin is low
3.3.3. STANDBY MODE
When the appliance is plugged into mains and turned on with the power switch (f), it is in standby mode. The appliance beeps shortly. The LCD shows these indications:
a) "NO." - the digits show the number of dispensed ice cream cones
b) "AC.V" - the current supply voltage
c) "TEMPERTURE" - the ice cream bulk temperature (model RCSI-17/ RCSI-18)
d) "LEVEL" - the icon comes on when the batch in the refrigerating bin is low
3.3.4. ICE CREAM THICKNESS (HARDNESS) SETTINGS
The final ice cream bulk thickness setting has been factory defined. You can change the setting to suit your ice cream recipe if needed. The procedure:
a) Press and hold the required key for 5 seconds: the "SUB" key to reduce the ice cream batch thickness or the "ADD" key to increase the thickness. The appliance control system enters the setting mode.
b) The LCD display will cycle through the parameters.
c) Operate either of the both keys to reduce/increase the ice cream bulk thickness (d / e)
d) The setting is changed in 0.1 increments. The thickness can be adjusted to anywhere within 2.0 and 6.0.
e) Having input the thickness setting, wait for the appliance to store it in memory and show the main readings on the LCD.
3.3.5. PRE-COOLING TEMPERATURE SETTINGS
a) CAUTION! The pre-cooling mode is supported in model RCSI-17/ RCSI-18. There are two temperature thresholds selectable for the refrigerating system. First, the low temperature threshold is configured, followed by the high temperature threshold.
b) CAUTION! When the appliance reaches the low temperature threshold while running, the refrigerating system will stop.
c) CAUTION! When the appliance reaches the high temperature threshold, the refrigerating system will restart.
d) Start the pre-cooling. Do this by pressing and holding the batch pre-cooling / cooling level selector key (g) for approx. 5 seconds.
e) The control system enters the low temperature threshold setting mode. The setting can be adjusted to anywhere within 0 - 10^ .
f) The LCD reads the current setting of the pre-cooling low temperature threshold.
g) Change the temperature setting by operating the "SUB" or "ADD" keys (d / e).
h) CAUTION! The user can enter the setting in 1^ increments.
i) Having input the setting, wait for the appliance to store it in memory and show the main readings on the LCD.
j) Do this by pressing and holding the batch pre-cooling / cooling level selector key (g) for approx. 5 seconds.
k) The control system enters the high temperature threshold setting mode. The setting can be adjusted to anywhere within 12 - 25^ .
I) Enter the setting by repeating step (e) in this section.
3.3.6. RESETTING THE DISPENSED ICE CREAM CONE COUNTER
a) CAUTION! Resetting the counter too often may cause the electrical circuitry of the appliance to fail.
b) To display the dispensed ice cream counter reading, press and hold the "SUB" and "ADD" buttons (d / e) simultaneously for approx. 5 seconds.
c) Now, press and hold the "SUB" (d) or "ADD" (e) key for 5 seconds. The counter is reset to zero.
a) Fill the refrigerating bin with the ready batch of the product.
b) Keep the batch level between the MIN and MAX marks. Never attempt to operate the appliance if the batch level is below the MIN mark (the drain port) or the MAX mark shown inside of the refrigerating bin.
c) CAUTION! Model RCSI-18 features two refrigerating bins. Load the batch to both bins to operate this appliance.
d) CAUTION! Do not operate the refrigerating system of this appliance with a refrigerating bin empty. Risk of failure!
e) Having filled the refrigerating bin with enough of the batch, close the bin with the lid.
f) Start the stirrer drive unit to mix the batch. Press the "WASH" key (c) on the control panel. The LCD shows the stirrer run icon (I). The appliance beeps shortly.
g) The batch should be mixed for approx. 1 minute.
h) Run the refrigerating system. Press the "AUTO" key (b) on the control panel.
i) CAUTION! The "AUTO" key (b) first starts the stirrer drive unit; after 30 seconds, the refrigerating system comes on.
j) The LCD shows the "ICE CREAM" icon while the batch is processed. The appliance beeps shortly.
k) When the appliance is running, the stirrer stops automatically once the batch reaches the density setting.
I) The appliance restarts processing the batch if two ice cream servings are dispensed from the refrigerating chamber or 5 minutes of inactivity pass.
m) Ice cream servings are dispensed by pulling the dispenser lever(s) towards you. The batch stirrer will stop and the dispenser nozzle will release the ice cream dose.
n) CAUTION! Always have a serving dish or an ice cream waffle ready to dispense the ice cream cone to.
o) CAUTION! You can dispense more servings of the ice cream while the appliance is processing the batch. The appliance will switch on the batch processing again as required.
p) CAUTION! If you need to leave the appliance for several hours without dispensing any ice cream and with the ice cream batch in the bin(s), start the pre-cooling before leaving (Model RCSI-17/ RCSI-18). The ice cream batch will be chilled until you turn off the pre-cooling. Start the PRE-COOLING mode by pressing the "SET/PRECOOL" key (g).
3.4. Cleaning and maintenance
a) Before cleaning and when the appliance is not in use, unplug it from the mains.
b) Only mild cleaning agents intended for surfaces in contact with food shall be used to clean the appliance.
EN
c) After each cleaning, dry all components well before the appliance is used again.
d) Store the appliance in a dry and cool place, protected from moisture and direct sunlight.
e) Do not spray the appliance with a stream of water and do not immerse it in water.
f) Ensure that water will not enter through the ventilation ports in the housing.
g) Clean the ventilation ports with a brush and compressed air.
h) Regularly inspect the appliance for technical defects and damage.
i) Use a soft cloth for cleaning.
j) Do not clean with any sharp and/or metal implements (e.g. a wire brush or a metal scraper) as these may damage the surface of the appliance.
k) Do not clean the appliance with acidic substances, medical products, thinners, fuel, oil or other chemicals as they may damage it.
DISPOSAL OF WASTE APPLIANCES
At the end of its service life, this product must not be disposed of with mixed household waste; return it to a collector/recycler of waste electrical and electronic equipment. This is shown by the symbol placed on the product, the user manual or the packaging. The materials used in the appliance can be reused according to their classification identifications. By reuse, recycling or applying other forms of use of waste appliances, you make a significant contribution to the protection of our environment.
Local administration will provide you with the information about the nearest disposal locations for the appliance.
TROUBLESHOOTING
| Problem | Possible cause | Correction action |
| The cream is not puffed well | Ice cream is too hard 1.sugar is too less The hardness adjustment is not correct | 1.add more sugar (>13%) in the mixture 2adjust the "soft" button |
| Beater doesn't work 1.motor or control panel broken 2.Belt is loosen Gear box broken | 1 REPLACE the damage part 2 Adjust belt Repair gearbox | |
| The discharge hole is stuffed with ice due to the water don't remove out when cleaning | Stop the machine and take out the ice when melted | |
| Ice cream is too soft | The mixture is not correctly formulated, The hardness is low Extremely large current of motor, Suspected of short circuit Ice cream inside | Prepare qualified serous fluid, Readjust the hardness up Repair or replace motor After several pcs ice cream, need wait for 4 mins production time |
| Ice cream is too hard | Too much moisture in the ingredients, The hardness is high | Prepare qualified serous fluid again, Readjust the hardness down |
| Leakage of materials | The screw is loose Seal ring broken | Tighten the screw tighten Replace seal ring |
| Leakage of gearbox | The fair of H or O seal ring | Replace the seal ring |
| The display has no signal | The problem of PC board, The plug is loose | Replace PC board Check connecting plug |
| The display lacks digits | The display apparatus is damaged (the display apparatus takes in water or materials) | Replace display apparatus. |
EN
| UL error | The voltage is too low The power line is too long Power line is too thin | Solve the problem of voltage Shorten power line Enlarge power line |
| Problem | Possible cause | Correction action |
| The cream is not puffed well | Ice cream is too hard 1 sugar is too less 2 The hardness adjustment is not correct | 1.add more sugar (>13%) in the mixture 2adjust the "soft" button |
| Beater doesn't work 1 motor or control panel broken 2 Belt is loosen Gear box broken | 1 Replace the damage part 2 Adjust belt Repair gearbox | |
| The discharge hole is stuffed with ice due to the water don't remove out when cleaning | Stop the machine and take out the ice when melted | |
| Ice cream is too soft | The mixture is not correctly formulated, The hardness is low Extremely large current of motor, Suspected of short circuit Ice cream inside | Prepare qualified serous fluid, Readjust the hardness up Repair or replace motor After several pcs ice cream, need wait for 4 mins production time |
| Ice cream is too hard | Too much moisture in the ingredients, The hardness is high | Prepare qualified serous fluid again, Readjust the hardness down |
EN
| Leakage of materials | The screw is loose Seal ring broken | Tighten the screw tighten Replace seal ring |
| Leakage of gearbox | The fair of H or O seal ring | Replace the seal ring |
| The display has no signal | The problem of PC board, The plug is loose | Replace PC board Check connecting plug |
| The display lacks digits | The display apparatus is damaged (the display apparatus takes in water or materials) | Replace display apparatus. |
| UL error | The voltage is too low The power line is too long Power line is too thin | Solve the problem of voltage Shorten power line Enlarge power line |
| The motor doesn’t stop, and the compressor stop when the ice cream is reday | PC board have problem | Repair or replace it |
| The motor doesn’t run when ice cream is serving | Stroke switch have problem, Swing board for distributor don’t make stroke switch on when handle is pushed down | Repair or replace stroke switches Reset swing board to make stroke switch on |
EN
The stirring beater is broken
This problem doesn't occur in normal conditions, the problems for using in abnormal conditions are as follows:
Too much moisture in the serous fluid, the cylinder freezes.
When cleaning, turn on refrigerating function by mistake, resulting in the materials in one cylinder, but no in the other.
Refrigerate when the cylinder is empty.
When produce ice creams, one cylinder is used too much.
Hot serous fluid is quickly
refrigerated after being poured into the hopper.
The power cable of motor is inversely connected, resulting in refrigeration with materials in it.
Error code
CCC
If the handle is pushed down for
more than 1 minute
Replace beater.
Error code
UH
power supply higher than 254
voltages at beginning
restore to normal voltage.
Error code
UL
power supply less than 187voltage at
beginning
restore to normal voltage.
EN
| JJJ | the measured current is 2A bigger than the hardness you set for 5 seconds, the alarm(buzz) will be heard and machine will be stop and held for 5 minutes. Ice cream is too hard that machine self-protection | Wait for 5 min |
| Screen is blank and machine could not work after “JJJ” show and restart machine | Old version machine self-protection program is blank screen and lock all function of machine | Plug in and wait for 5 min |
Notes:
- Allowable fluctuation of supply voltage: Standard 230V (187V-254V)
- It is prohibited to press AUTO button with water in the cylinder or hopper.
- Lower the hardness and keep the precool and auto function are on if you want to keep ice cream inside machine for whole night
- There is not precool function for RCSI-16, temperature of precool tank will not be show.
- We provide one more set of sealing for machine, please replace them if there is any leakage found.
- On any side of the machine, a space of over 30cm shall be kept for heat dissipation

NOTE! The figures in this manual are illustrative only and may vary in details from the actual appearance of the product.
3.3.2. IKONY LCD DISPLEJE
PLACERING AF APPARATET
INSTALLATION AF APPARATET
A- Model RCSI-16/ RCSI-17
B- Model RCSI-18
C-Pafor smoremiddelet her
14 - Festemidler
6-Kjoledel
15 - Dispenserpakning
7-Rrereverk
16 - Dispenserlokk
PLACERING AV APPARATEN
17 - O-ring, medelstor
18 - Mellanskaftspackning (modell
RCSI-18)
a) Installera omröraren (7) inuti kyldelen (6).
b) Satt tillbaka packningen for kylutrymmesskyddet (8) inuti fackskyddet (9).
6-Chladiaci priestor
7-Miesadlo
8 - Ochranné tesnenie chladiaceho priestoru
9 - Ochranny kryt chladiaceho priestoru
10 - Driek ventilu
11 - O-kruzky drieku ventilu
12 - Páka
13-Zavlačka
14 - Spojovacie privky
15 - Tesnenie dávkovača
16 - Veko dávkovača
17 - O-krúžok predstavca, stredná velkost'
18 - Stredové tesnenie drieku (model RCSI-18)
a) Nainstalujte miešadlo (7) do chladiaceho priestoru (6).
d) Ako He MojkeTe Da n36erHeTe N3NoJ3BaHeTo Ha ypeJa BbB BlaJHa CpeJa, N3NoJ3BaIte YcTpoiCTBO 3a ocTaTbUeH TOK (RCD), 3a Da cBbPKeTe ypeJa KbM eJeKtpnueckaTa MpeJa. N3NoJ3BaHeTo Ha RCD HamaJIba PnCKa OT TOKOB yIap.
e) He n3noJ3BaIte ypeDa, aKo 3axpaHbAunr Ka6e I nobpeDen nn mMa cJeOn ot n3HocBaHe. CmeHeTe NobpeDEnn 3axpaHbAun, Ka6e I OT KBaJIuΦnUparH eJekTpoTexHnK nn OT texHnueckaTa cnJ6bHa npOn3BODnteJra.
f) 3a Да ИЗБERHETe TOKOB yДap, He NOTANIte 3axpaHbAunia Ka6el, IeENCeLa IIN camnYpeD BvB BODa INI INI dpyra TeuHocT. He n3noJ3BaIte ypeDa Bbpxy MOKpn IOBbpxHOCTN.
2.2. Bezonaichoct Ha pa60THOTO MRCTO
a) ПдьржайтpepaOTHOTo MЯСTO NOpeDeHOn Ido6peOCBeTeHo. Pa3cTpoIcTBOTO nIINoILOwOTo OCBeTneHne MoRa Tda IOBeDaT Do NHnIeHTN. BbIeTe BnIMaTeJIHn, BnIMaBaIte KaKBO npaBIne N DeiCtBaIte pa3ymHo, KOrato pa6OTnte cypeJa.
b) B cnyuahn ha noBpeHa nHn Henn3npaBHOCT Ha ypeHa, He3a6abHo ro n3KIOUeTe N DOknaDbaIte 3a INuIDeHTa Ha OTOpN3npaH nepcoHaJ.
c) Ako ce cBmHbATE daH ypeDbT pa60TN, CbByKeTe ce cTexHnueckaTa cnJx6a Ha npOn3BOdnteJI.
d) PemOHrHa ypeJa MoKe Da ce n3BbPwBa cAmO OT cepBn3 Ha npOn3BOuNTeJr. He ce onntBaIte da peMOHTnpaTe npOdykTa cam!
e) B cnyaH na Bb3nIaMeHraBe nIi noJap n3noI3BaIte noJaporacnteIc bC cyx npax nIi CO2 camo 3a notyuaBaHe Ha orbHn Ha ypeDa, aKo e eoI HnnpexKeHne.
f) Ha pa6oTHOTOMrCTOHe ce donyckat Deca nHn HeynblHomOseHn Iina.
g) IpoBepaIte peoBHO cbCTOHNTo Ha npEynpeHnHTe cTnKepn 3a 6e3oNaChoc. CmHeTe n, aKo ca HeuETnBn.
h) 3ana3eTe TOBa pBkoBOcTBo 3a 6bdeu cnpaBKn. Ako npOdyKtB Tpr6Ba da 6bnde npedaen Ha TpeTa cTpaHa, npdaIte ro c TOBa pBkoBOcTBo 3a notpe6ntela.
i) CbxpahraBaTe KOMnoHENTe Ha onaKOBkata N MaIKTe MOHTaXHH Yactn daJeY OT deca.

3anomhete! Na3eTe deuata n dpyrnte Mmhybaun B 6e3oNaCHOCT, DOkato pa6OTaT C To3n npOdyKT.
2.3. Лучна 6e3oNaCHOCT
a) He pa6oTeTe c ypeDa, aKO cTe yMopeHn, 6OJIHn nIIN NOd Bb3JeICTBHeTo Ha aIKOXOI, HApKOTnIe IeKapCTBa, KOINTO MORaT 3HaunTeJHo Da HApUwAT cnOCo6HOCTTa BN da pa6oTne C ypeDa.
b) IpoDyKTbT He e npedHa3HaueH 3a n3noJ3BaHe ot Lnca (BkIouHTeJHo deca) C HamaJIeH yMCTBeH, CeTINBEN Nn INHTeJIeKTuJAEH KanaUTeT Nn JInca Ha ONNT N/INn PO3HaHnA, OCBEN aKO He ca Na6JIoDaBAHN OT LnCe, OTROBOPHO 3a TExHaTa 6e3OJaCHocT, INn Ca NOlyuNn INHcTpPyKcNn OT OTROBOPHn INDNBvauJHo KaK Da pa6OTn c npOdyKtA.
c) YpeIbT MoKe Da ce N3NoI3Ba cAmO ot Iuca, KOnto ca fN3nueckn rOdHn, cnocobHa 6opabT C ypea N KOnto ca 6nIn nOxOJaIO oByeHN, npOyeN ca TOBa pBkoBOCTBO n Ca npemHaII n ObyeHne 3a 3dpabe n 6e3OnacHOCT.
d) 3a da npedotbpaTne cnuyaHa pa6ota, ybepeTe ce, ye npebKIOUbaTeJrT Ha 3axpaHbAHeto e n3KIOueH, npdi Da cBbPKeTe ypeDa KbM eJeKTpUeCKaTa MpeKa.
e) YpeIbT He e irpaUka. DeaTa Tp6Ba Da 6bDaT Ha6IoDaBAHn, 3a Da ce rapaHTnpa, Ye He cn IrpaT C Hero.
2.4. Bezonaacha ynoTpe6a Ha npOdyKta
a) He u3noI3BaIte ypeDa, aKO npBkIIOUbATEJrT Ha 3axpaHbHeTo He yHKcIOHnpaPABINHO (He ce BkIOUbVA INn IN3KIOUb). YpeInte, KOITo He MOrat Da ce ynpabIbAT C TexHIne npBkIOUbATEJIr 3a 3axpaHbAHe, ca OpanCHN, He Tp6Ba Da ce u3noI3BaT n Tp6Ba Da 6bDaT peMOHTnpaHn.
b) Преши Настоюка, смяна Ha akcecoapи плсьхранявае Ha урета, ИЗКЛЮчete ro ot eilektpruecka tа мржа. Тази Марka 3a 6e3oNAcHOCТНамаляв рпсka OT сLYЧАйно 3адeйСТВаHe.
c) CbxpaaHbAaTe Heu3noJ3BaHnTe ypei DaJeU OT Deua I Nua, KOHTo He ca 3aNo3HaTn C ypeJa HIn TOBa pBkoBOdCTBO. YpeIte ca OnaChn B pBcTe Ha Heonntn Notpe6nteJI.
d) IopIbpxaTe npOyKtBdo6po pa6oTHo cbCToHne. IpeN BcKa ynoTpe6a npOBepTe 3a OueBnHN IOBpeiN UeTI Ha HKarO OT DnXeUITE ce YactN (npOBepTe 3a NyKHaTnH N CACTN KOMNoHEn Tn INBcKO dpYrO cbCToHne, KoTo MoKe Da NoBInre Ha 6e3oNaChata pa6oTa Ha npOdyKtA). Ako e npOBpeDeH, nonpaBeTe npOyKtA npEiN ynoTpe6a.
e) CbxpahraBai Te npOdykTa Ha HeIOCTbHNO 3a Deca Macto.
f) Пюдуктг Трябва Да ce peмонтура И подьржа OT KBалифицранперсонал само с оригинални рзэрьни час. Тoba ще rapaHTnpa6ezonacha pa6ota на пюдуктаг.
g) 3a da ocHypTe npoeKTHpaHaTa onepaTHBHa cJIoCT Ha npOdyKTa, He OTcTpaHbAitTe fapuHo MOHTpAHnTe KaauN He pa3Xla6BaIte HnKaKBn 6oJTOBe.
h) Korato TpaHcnpTnpe n 6opabnte c ypeDa OT cKlaIdo MAcTOTO Ha ynoTpe6a, cna3BaIte npabInlata 3a 3dpabe n 6e3OpacHocT 3a pbuHO 6opabHe, KOTo ce npilaarB CtpaHaTa, B KOTo pa60Tu ypeDbT.
i) I36yBaIe cnpaHTo Ha ypeDa C roJMyo HATOBapBaHe. TOba MoKe da npuHH nperpBaHe Ha 3aBnKBaunTe eJeMeHTn i Da DOBeDe Do nobpeDa Ha ypeDa.
j) Почистваite урета рedingно,зд ппсOTВразпг Трайно HaTpynBaHe Ha МьсOTЯ.
k) YpeIbT He e nIrpauKa. NOpNCtBaHeto I NODpBxKKaTa He Tpr6Ba Da ce H3BbPWBaT OT Deca 6e3 HaD3Op Ha Bb3paCTeH.
I) Hnkora He ce onntbaite Da 6bpkate B ypeDa, 3a Da npomeHnte HerOBHTe napametpn nn CtpyKtypa.
m) DpbjXTe ypeDa daJeu OT n3TOUHNuHa OrbH N TOIINHa.
n) He nokpmbaTe BeHTnlaUOHHTe OTbOpn Ha ypeda!
o) BHHMaHHe! He ocTabraIte BoDa B KOHTeHepa CneI nouNCTBaHe. B npotNBcIyauM MoKe Da ce o6pa3yBa IeI N da DoBede Do cnpaHe n NobpeHa Ha DnurTaTeJI.
p) Pa6oTeTe, 6opabete n TpaHcnpTnpaIte To3n ypei camo B n3npaBeHo noJoxeHne. He haklaHnTe ypeia HactpaHn c nobuee ot 45^
q) He pa6oTeTe c eIekTpueckn ypei, KOHTO He ca npedBnDeHn OT npOn3BOIDTeJI, B HHTO eJHO OT OTdJeHnTa Ha To3N ypeI.
r) He n3noJ3BaIte HnKaBm MexaHnUHn HnCTpyMeHTn 3a OTcTpaHraBaHe Ha Jed,OT BbTpewHocTTa Ha XlaAnlHTo OTdeJeHne NIn dpYn HnCTpyMeHTn, ypeNnXHMkaJIu 3a YCKOpRABaHe Ha pa3Mpa3RaBaHeTO.
s) Cnei KaTo ypeBbT 6bDe DoctaBeH Do MecToHa3HaueHHeTo My I npEi Da ro BkIouHTe BeleKtpnueckata MpeKa, octaBeTe ro n3npaBeH 3a 24 Yaca, Dokato XnaIINHnT aReHT BbTpce Ce cTa6nInn3npa.
t) CbpxeTe 7enCeHa Ha 3axpaHbauaun Ka6eI dIpeKTHO KbM eIekTpueckn KaHTaKT. He cBp3BaIte KbM eIekTpueckata Mpeka Upe3 ydblknteHN Ka6eIi.
u) BHIMAHHE! XnaHnHnT areHT R290 e 3aapanm n ekcnlo3nBeH ra3. PndpbkKaTa Ha To3n ypeI Tp6Ba Da ce N3BbPwBa cMo OT KbaInΦnUpaHn CneuaJIncTu!

BHNMAHNE! BbnpkNe yyepeDbTe npoeKtnpaH da 6bde 6e30naceH e cna6dien c aedeKBaTHN ppeDna3Hm MepKn N BbnpkN n3noJ3BaHeTo Ha donbIhnteJIHH MepKn 3a 6e3oNaChocT, BCE OSe IMa HncbK, ocTaTbueH pNcK OT 3IonoLyka IIn HapaHЯBaHe NO Bpeme Ha Herobata pa6ota. PpenopbUba ce nobuheo BHImaHne n 3dpab pa3ym npn n3noJ3BaHe Ha npodykta.
OTCTPAHRABE HA HEN3IPABHOCTN
Ta otoxia oe auto to eyyepidio eva mov evdcktka
Kai evdexetai va diapepouv oe opioevc aeitoupeiec aoTnv npaymuikn Eauion tou npoiovtoc.
H apxikn ekdoon tou exyepidou ivaI OTN yepaukyn yawoo. OI aAee yawoskec ekdoeic ivai mEtaopaoei c ano ta yepauviKa .
1 - Capac recipient frigorific
2 - Panou de control:
a) Afişaj LCD
b) Tasta de activare/dezactivare a procesarii loturilor (,A U T O^ )
c) Tasta dePornire/oprire spalare compartment frigorific (,SPALARE^ )
d) Tasta de reducere a grosimii lotului (,SUB^ )
e) Tasta de creştere a grosimil lotului (,ADD^ )
f) Comutator de alimentare (,ON/OFF^)
g) Tasta de setare a nivelului de preracire/racire in lot (,SET/PRECOOLING^ ) (pe modelul RCSI
17 / RCSI-18)
3 - Tava de scurgere
4 - Maner dozator
5 - Unitate de dozens
6-Compartment frigorific
7-Agitator
9 - Aparatoare compartment frigorific
10 - Tija supapei
11 - Inele O ale tijei supapei
12-Parghie
13 - $ift
14 - Elemente de fixare
15-Garnituradozator
16 - Capac dozator
For the disposal of the device please consider and act according to the national and local rules and regulations.
CONTACT
expondo Polska sp. z o.o. sp. k.

- General overview
- READ THE MANUAL CAREFULLY AND UNDERSTAND IT BEFORE USE.
- EN
- Explanation of symbols
- Operating safety
- Electrical safety
- Workplace safety
- Personal safety
- Safe use of the product
- Rules of use
- Appliance overview
- Preparations for operation
- POSITIONING THE APPLIANCE
- INSTALLING THE APPLIANCE
- Operating the appliance
- CLEANING THE APPLIANCE COMPONENTS
- LCD ICONS
- STANDBY MODE
- ICE CREAM THICKNESS (HARDNESS) SETTINGS
- PRE-COOLING TEMPERATURE SETTINGS
- RESETTING THE DISPENSED ICE CREAM CONE COUNTER
- Cleaning and maintenance
- DISPOSAL OF WASTE APPLIANCES
- Notes:
- IKONY LCD DISPLEJE
- PLACERING AF APPARATET
- INSTALLATION AF APPARATET
- PLACERING AV APPARATEN
- Bezonaichoct Ha pa60THOTO MRCTO
- Лучна 6e3oNaCHOCT
- Bezonaacha ynoTpe6a Ha npOdyKta
- CONTACT
Brand : Royal Catering
Model : RCSI-24
Category : Ice machine