
38.4 E Combi Care - Scarifier AL-KO - Free user manual and instructions
Find the device manual for free 38.4 E Combi Care AL-KO in PDF.



| Product type | Electric handlebar scarifier |
| Brand and model | AL-KO 38.4 E Combi Care |
| Working width | 38 cm |
| Power supply | 230 V ~ 50 Hz, fuse 10 A min, residual current device 30 mA |
| Motor power | 1500 W (estimated) |
| Adjustable working depth | Yes, by knob (shallow to deep) |
| Cutting system | Scarifier roller (12 blades) + aerator roller optional |
| Collection bag | Yes, included (capacity not specified, approx. 40 L) |
| Weight | Approximately 18 kg |
| Dimensions (L×W×H) | 120 × 50 × 80 cm (estimated) |
| Handlebar type | Foldable, height adjustable |
| Safety | Safety button + safety lever/loop, deflector flap |
| Usage | Dry and closely mown lawn, domestic use |
| Maintenance and cleaning | Clean cutting system with brush, no water |
| Spare parts and repairability | Scarifier roller, aerator roller, collection bag, screws, power cable |
| Warranty | Legal warranty against manufacturing defects, wear parts excluded |
Frequently Asked Questions - 38.4 E Combi Care AL-KO
User questions about 38.4 E Combi Care AL-KO
0 question about this device. Answer the ones you know or ask your own.
Ask a new question about this device
Download the instructions for your Scarifier in PDF format for free! Find your manual 38.4 E Combi Care - AL-KO and take your electronic device back in hand. On this page are published all the documents necessary for the use of your device. 38.4 E Combi Care by AL-KO.
USER MANUAL 38.4 E Combi Care AL-KO
AL-KO KOBER GROUP Kottz, Germany
This documentation or excerpts therefrom may not be reproduced or disclosed to third parties without the express permission of the AL-KO KOBER GROUP.


| 32.4 E Basic Care 38.4 E Combi Care | |
| 114039 114040 | |
| 1060 x 1000 x 540 mm 1080 x 1000 x 590 mm | |
| 10 kg ca. 12 kg | |
| 32 cm 38 cm | |
| 230 V AC / 50 Hz | |
| min. 10 A | |
| II / IPX4 | |
| 1200 W 1400 W | |
| 3800 (+/-100) min-1 | 4000 (+/-100) min-1 |
| LpA = 83,6 dB(A), K = 3 dB(A) L | pA = 85,2 dB(A), K = 3 dB(A) |
| LwA = 94,5 dB(A), K= 3 dB(A) L | wA = 96,0 dB(A), K = 3 dB(A) |
| 7,672 m/s2(left) / 6,386 m/s2(right), K = 1,5 m/s2 | 7,195 m/s2(left) / 7,523 m/s2(right), K = 1,5 m/s2 |
1 About these operating instructions. 20
1.1 Symbols on the title page 20 1.2 Legends and signal words 21
2 Product description 21
2.1 Designated use 21 2.2 Possible foreseeable misuse 21 2.3 Safety and protective devices.. 21 2.4 Symbols on the appliance 21 2.5 Product overview (01) 22 2.6 Scope of supply (02, 03) 22
3 Safety instructions 22
3.1 General electrical machine safety warnings 22
3.1.1 Work area safety 22 3.1.2 Electrical safety 22 3.1.3 Personal safety 23 3.1.4 Electrical machine use and care . 23 3.1.5 Service 24
3.2 Lawn scarifier and lawn aerator safety warnings 24 3.3 Vibration load 24 3.4 Noise pollution 25
4Assembly. 25
4.1 Fitting the scarifier (04 - 06) 26 4.2 Installing the grass collector (07, 08). 26
5 Start-up 26
5.1 Carrying out visual inspection 26 5.2 Providing the mains cable and checking the mains connection 26 5.3 Adjusting the handlebar (06) 26
6 Operation 27
6.1 Folding the handlebar in and out (09) 27 6.2 Opening the baffle (10) 27 6.3 Attaching and removing the grass collector [optional] (11) 27 6.4 Setting the working depth (12) 27 6.5 Making the mains connection (13, 14, 15) 28
6.6 Starting and stopping the motor (16, 17) 28
7 Maintenance and care 28
7.1 Cleaning the blade system 28 7.2 Replacing the scarifier roller and aeration roller (optional) (18) 29
8 Help in case of malfunction 29 9 Transport 29 10 Storage 30 11 Disposal 30 12 After-Sales/Service 30 13 Information on the Declaration of Conformity 30 14 Warranty 30
1 ABOUT THESE OPERATING INSTRUCTIONS
The German version is the original operating instructions. All additional language versions are translations of the original operating instructions. - Keep these operating instructions in a safe place at all times so that they can be consulted if you need any information about the appliance. Only pass on the appliance to other persons together with these operating instructions. Comply with the safety and warning information in these operating instructions.
1.1 Symbols on the title page
Symbol Meaning

It is essential to read through these operating instructions carefully before start-up. This is essential for safe working and trouble-free handling.

Operating instructions

To avoid electric shock, do not damage or cut the power cable!
1.2 Legends and signal words
DANGER! Denotes an imminently dangerous situation which will result in fatal or serious injury if not avoided. WARNING! Denotes a potentially dangerous situation which can result in fatal or serious injury if not avoided. CAUTION! Denotes a potentially dangerous situation which can result in minor or moderate injury if not avoided.
IMPORTANT! Denotes a situation which can result in material damage if not avoided.
NOTE: Special instructions for ease of understanding and handling.
2 PRODUCT DESCRIPTION
This documentation describes several device models. Identify your model based on the product images and the description of the different options.
2.1 Designated use
This scarifier is intended for loosening and aerating a lawn (scarifying) in private applications, and is only allowed to be used on dried lawns which have been mown short.
Any other use, as well as unauthorised conversions or add-ons, are regarded as contrary to the intended use and will result in invalidation of the warranty as well as loss of conformity (CE mark); the manufacturer will thus decline any responsibility for damage and/or injury suffered by the user or third parties.
2.2 Possible foreseeable misuse
The appliance is not designed for commercial use in public parks and sports facilities or for use in farming and forestry. It must not be used for trimming bushes and hedges or for levelling the ground.
2.3 Safety and protective devices
WARNING! Risk of injury. Defective and disabled safety and protective devices can result in serious injury.
Have any defective safety and protective devices repaired. Never disable safety and protective devices.
Motor switch lever/operator presence control
The appliance is equipped with a motor switch lever/operator presence control which stops the appliance when it is released.
Baffle
The appliance is equipped with a baffle that prevents grass and objects being thrown out during scarifying without grass collector.
2.4 Symbols on the appliance
| Symbol | Meaning |
| Risk of objects being thrown out! Keep bystanders away! Maintain a safety distance! | |
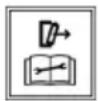
| Read the operating instructions before starting maintenance, care and cleaning work! | |
| Do not run over the mains cable! Danger of electric shock if the mains cable is damaged. | |
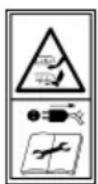
| Keep your hands and feet away from the blade system! Disconnect the appliance from the mains supply before starting maintenance, care and cleaning work! | |
| Not relevant. | |
| Procedure for starting the motor see chapter 6.6 "Starting and stopping the motor (16, 17)", page 28 | |
| Shallow scarifying | |
| Deep scarifying |
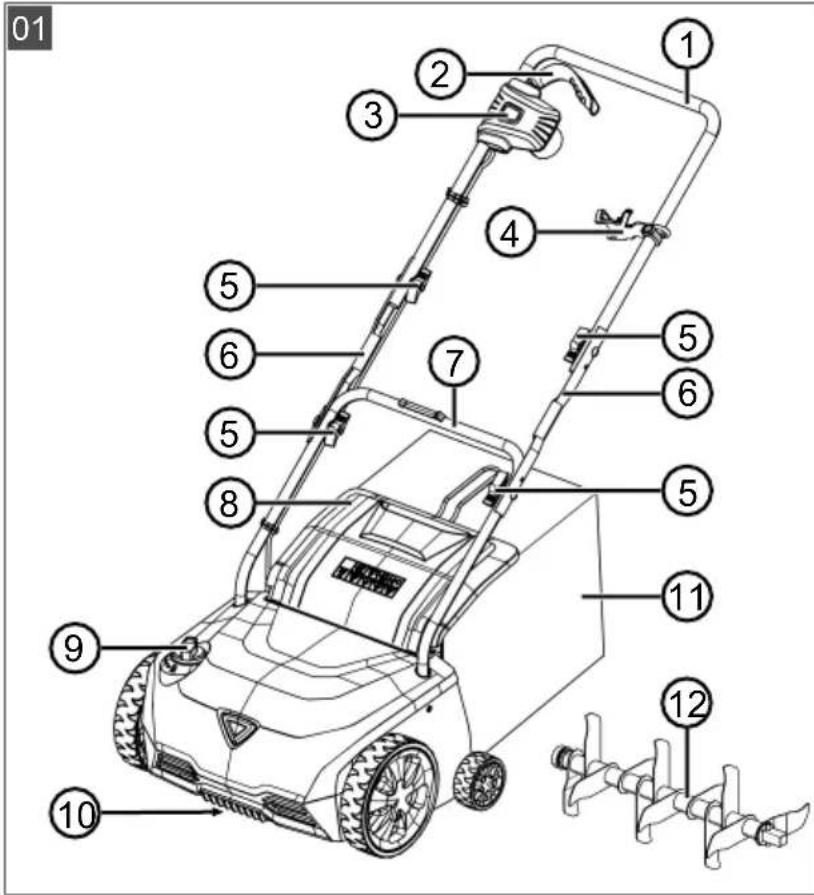
2.5 Product overview (01)
| No. Component | |
| 1 Upper handlebar, folding | |
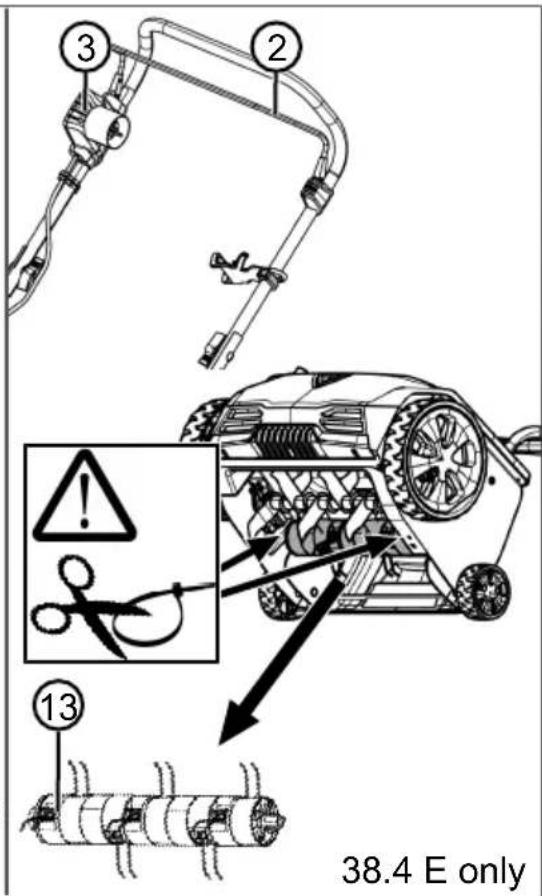
| 2 32.4 E: Motor switch lever38.4 E: Operator presence control | |
| 3 Motor switch with safety button and inte-grated mains plug | |
| 4 Cable strain relief hook | |
| 5 Wing bolts | |
| 6 Intermediate brace | |
| 7 Lower handlebar, height-adjustable | |
| 8 Baffle | |
| 9 Adjuster wheel for working depth | |
| 10 Blade system with scarifier roller or aer-ator roller | |
| 11 Grass collector | |
| 12 Scarifier roller | |
| 13 Aerator roller* |
- for 38.4 E only
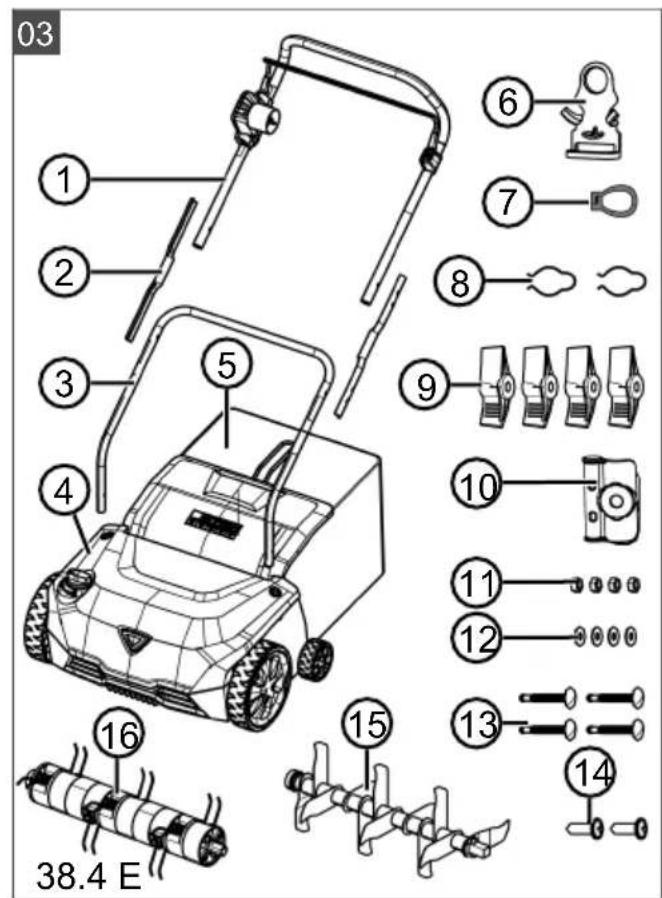
2.6 Scope of supply (02, 03)
The items listed here are included in the standard scope of supply. Check that all items are present:
| No. Component |
| 1 Upper handlebar |
| 2 Intermediate brace (x2) |
| 3 Lower handlebar |
| 4 Scarifier |
| 5 Grass collector |
| 6 Cable strain relief hook |
| 7 Cable strain relief clip |
| 8 Cable clips (x2) |
| 9 Wing nuts (x4) |
| 10 Cable clip on the cable |
| 11 Nuts (x4) |
| 12 Washers (x4) |
| 13 Screws for handlebar (x4) |
No. Component
14 Screws for lower handlebar (x2) 15 Scarifier roller 16 Aerator roller* | **
- for 38.4 E only
** Risk of damage to the appliance. Remove the aerator roller before switching on the appliance.
Available as optional accessories:
32 cm aerator roller, Art. No.: 114049 (for 32.4 E Basic Care only)
3 SAFETY INSTRUCTIONS
3.1 General electrical machine safety warnings

WARNING! Read all safety warnings, illustrations, and specifications provided with this machine. Failure to follow all instructions listed below may result in electric shock, fire, and/or serious injury.
Save all warnings and instructions for future reference.
The term "machine" in the warnings refers to your mains-operated (corded) machine or battery-operated (cordless) machine.
3.1.1 Work area safety
- Keep work area clean and well lit. Cluttered or dark areas invite accidents.
- Do not operate machines in explosive atmospheres, such as in the presence of flammable liquids, gases or dust. Machines create sparks which may ignite the dust or fumes.
- Keep children and bystanders away while operating a machine. Distractions can cause you to lose control.
3.1.2 Electrical safety
The machine plug must fit into the plug socket. Never modify the plug in any way. Do not use adapter plugs with earthed (grounded) machines. Unmodified plugs and matching outlets will reduce risk of electric shock. - Avoid body contact with earthed or grounded surfaces, such as pipes, radiators, ranges and refrigerators. There is an increased risk of electric shock if your body is earthed or grounded.
- Do not operate the machine in rain or wet conditions. This may increase the risk of electric shock.
- Do not abuse the mains cable. Never use the mains cable for carrying, pulling or unplugging the machine. Keep mains cable away from heat, oil, sharp edges or moving parts. Damaged or entangled mains cables increase the risk of electric shock.
- When operating a machine outdoors, use an extension lead suitable for outdoor use. Use of an extension lead suitable for outdoor use reduces the risk of electric shock. If operating a machine in a damp location is unavoidable, use a residual current device (RCD) protected supply. Use of an RCD reduces the risk of electric shock.
3.1.3 Personal safety
- Stay alert, watch what you are doing and use common sense when operating a machine. Do not use a machine while you are tired or under the influence of drugs, alcohol or medication. A moment of inattention while operating machines may result in serious personal injury. Use personal protective equipment. Always wear eye protection. Protective equipment such as dust mask, non-skid safety shoes, hard hat or hearing protection used for appropriate conditions will reduce personal injuries. Prevent unintentional starting. Ensure the switch is in the off-position before connecting to power source and/or battery pack, picking up or carrying the machine. Carrying machines with your finger on the switch or energising machines that have the switch on invites accidents.
- Remove any adjusting key or wrench before turning the machine on. A wrench or a key left attached to a rotating part of the machine may result in personal injury.
- Do not overreach. Keep proper footing and balance at all times. This enables better control of the machine in unexpected situations.
- Dress properly. Do not wear loose clothing or jewellery. Keep your hair and clothing away from moving parts. Loose clothes, jewellery or long hair can be caught in moving parts.
If devices are provided for the connection of dust extraction and collection facilities, ensure these are connected and properly used. Use of dust collection can reduce dust-related hazards. Do not let familiarity gained from frequent use of machines allow you to become complacent and ignore machine safety principles. A careless action can cause severe injury within a fraction of a second.
3.1.4 Electrical machine use and care
- Do not force the machine. Use the correct machine for your application. The correct machine will do the job better and safer at the rate for which it was designed.
- Do not use the machine if the switch does not turn it on and off. Any machine that cannot be controlled with the switch is dangerous and must be repaired.
- Disconnect the plug from the power source and/or remove the battery pack, if detachable, from the machine before making any adjustments, changing accessories, or storing machines. Such preventive safety measures reduce the risk of starting the machine accidentally. Store idle machines out of the reach of children and do not allow persons unfamiliar with the machine or these instructions to operate the machine. Machines are dangerous in the hands of untrained users.
- Maintain machines and accessories. Check for misalignment or binding of moving parts, breakage of parts and any other condition that may affect the machine's operation. If damaged, have the machine repaired before use. Many accidents are caused by poorly maintained machines.
- Keep cutting tools sharp and clean. Properly maintained cutting tools with sharp cutting edges are less likely to bind and are easier to control. Use the machine, accessories and tool bits etc. in accordance with these instructions, taking into account the working conditions and the work to be performed. Use of the machine for operations different from those intended could result in a hazardous situation.
- Keep handles and grasping surfaces dry, clean and free from oil and grease. Slip
pery handles and grasping surfaces do not allow for safe handling and control of the machine in unexpected situations.
3.1.5 Service
Have your machine serviced by a qualified repair person using only identical replacement parts. This will ensure that the safety of the machine is maintained.
3.2 Lawn scarifier and lawn aerator safety warnings
- Do not use the machine in bad weather conditions, especially when there is a risk of lightning. This decreases the risk of being struck by lightning. Thoroughly inspect the area for wildlife where the machine is to be used. Wildlife may be injured by the machine during operation. Thoroughly inspect the area where the machine is to be used and remove all stones, sticks, wires, bones, and other foreign objects. Thrown objects can cause personal injury. Before using the machine, always visually inspect to see that the tines and the tines assembly are not worn or damaged. Worn or damaged parts increase the risk of injury. Before use, check the supply cord and any extension cord for signs of damage or aging. Do not use the machine if the cord is damaged or worn. If the cord is damaged or worn during use, switch off the machine and do not touch the cord before disconnecting it from the supply. A damaged supply cord or extension cord may result in electric shock, fire and/or serious injury. Check the catcher frequently for wear or deterioration. A worn or damaged catcher may increase the risk of personal injury.
- Keep guards in place. Guards must be in working order and be properly mounted. A guard that is loose, damaged, or is not functioning correctly may result in personal injury.
- Keep all cooling air inlets clear of debris. Blocked air inlets and debris may result in overheating or risk of fire. While operating the machine, always wear non-slip and protective footwear. Do not operate the machine when barefoot or wearing open sandals. This reduces the
chance of injury to the feet from contact with the moving tines.
While operating the machine, always wear long trousers. Exposed skin increases the likelihood of injury from thrown objects. Do not operate the machine in wet grass. Walk, never run. This reduces the risk of slipping and falling which may result in personal injury. Do not operate the machine on excessively steep slopes. This reduces the risk of loss of control, slipping and falling which may result in personal injury. When working on slopes, always be sure of your footing, always work across the face of slopes, never up or down and exercise extreme caution when changing direction. This reduces the risk of loss of control, slipping and falling which may result in personal injury. Use extreme caution when reversing or pulling the machine towards you. Always be aware of your surroundings. This reduces the risk of tripping during operation. Keep the supply cord away from the tines. A damaged supply cord may result in electric shock, fire and/or serious injury. Switch off and remove plug from mains if the cord is entangled or damaged. Entangled or damaged cords can increase the risk of electric shock. Hold the machine by insulated gripping surfaces only, because the tines may contact hidden wiring or its own cord. Tines contacting a "live" wire may make exposed metal parts of the machine "live" and could give the operator an electric shock. Do not touch tines and other hazardous moving parts while they are still in motion. This reduces the risk of injury from moving parts. When clearing jammed material or cleaning the machine, make sure all power switches are off and the power cord is disconnected. Unexpected operation of the machine may result in serious personal injury.
3.3 Vibration load
Vibration total values and noise emission values
The declared vibration total values and noise emission values have been measured according to a standardised test method and can be used to compare one power tool with another.
cording to a standardised test method and can be used to compare one power tool with another.
The declared vibration total values and noise emission values can also be used for an initial assessment of the exposure. The vibration total values and noise emission values may differ from the given value during actual use of the power tool, depending on how the power tool is used. Adhere to the safety measures according to the safety chapter. Try to keep the vibration load as low as possible. Exemplary measures to reduce vibration are the wearing of gloves when using the tool and the limitation of working time. All parts of the operating cycle must be taken into account (e.g. times when the power tool is switched off and those in which it is switched on but runs without load).
The actual magnitude of the vibration emissions during the use of the appliance may deviate from that stated by the manufacturer. Observe the following influencing factors before or during use:
The actual magnitude of the vibration emissions during the use of the appliance may deviate from that stated by the manufacturer. Observe the following influencing factors before or during use:
Is the appliance being used as intended? Is the material being cut or processed in the proper manner? Is the appliance in a proper condition of use? Is the cutting tool properly sharpened or is the correct cutting tool installed? Are the handle grips and any optional vibration grips mounted, and are they firmly attached to the appliance?
Only operate the tool at the motor speed required for the respective work. Avoid using the maximum speed in order to reduce noise and vibrations. The noise and vibrations of the tool may increase due to improper use and maintenance. This leads to health damage. In this case, immediately switch off the tool and have it repaired by an authorised service workshop. The degree of stress due to vibration depends on the work to be performed or on the use of the tool. Estimate the stress and plan appropriate work breaks. This considerably reduces stress due to vibration over the entire working time.
- Extensive use of the tool exposes the operator to vibrations, which can lead to circulatory issues ("white fingers"). To avoid this risk, wear gloves and keep your hands warm. If any symptoms of "white fingers" occur, immediately consult a physician. These symptoms include: Numbness, loss of feeling, tingling, itching, pain, reduced muscular strength, changes in the colour or condition of the skin. Normally these conditions affect the fingers, hands or pulse. The risk increases at low temperatures. Take long breaks during your working day so you can recover from the noise and the vibrations. Plan your work in such a way that the use of appliances that generate strong vibrations is spread over several days. If you notice an unpleasant sensation or discoloration of the skin on your hands when using the tool, stop work immediately. Take sufficient work breaks. Without sufficient breaks, a hand/arm vibration syndrome can occur.
- Minimise your risk of being exposed to vibrations. Maintain the tool according to the instructions in the operating instructions. If the tool is used frequently, contact your dealer to purchase anti-vibration accessories (e.g. handles).
- Avoid working with the tool at temperatures below 10°C. Define how the vibration load can be limited in a work plan.
3.4 Noise pollution
A certain level of noise exposure from this appliance is inevitable. Carry out noisy work at approved and specified time periods. Observe rest periods as necessary and restrict the duration of the work to a minimum. For your personal protection and protection of persons in the vicinity, appropriate hearing protection must be worn.
4 ASSEMBLY
WARNING! Danger if assembly is not carried out completely! Use of an incompletely assembled device can result in serious injury.
Only use the device when it is fully assembled! Before switching on, check that all safety and protective devices are in place and functioning correctly!
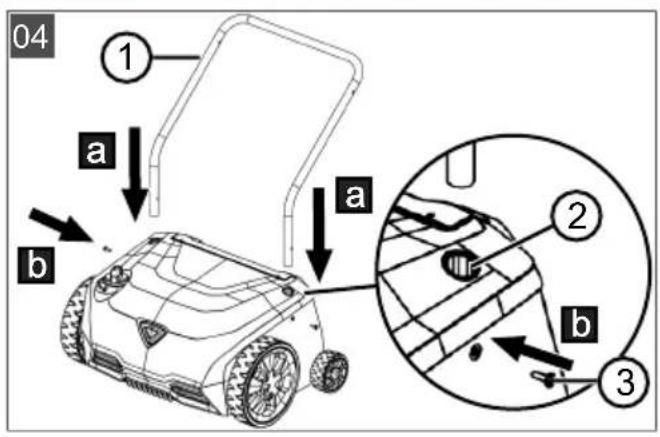
4.1 Fitting the scarifier (04 - 06)
Installing the lower handlebar (04)
- Insert the lower handlebar (04/1) into the openings (04/2) in the scarifier (04/a).
- Secure the lower handlebar by tightening the screws (02/14, 03/13, 04/3) for the lower handlebar finger-tight (04/b).
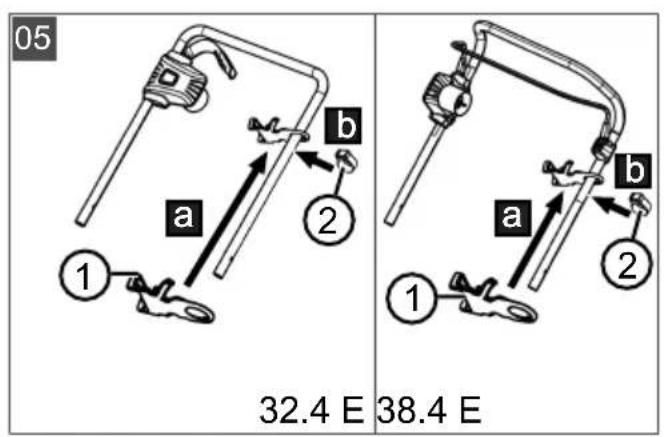
Fitting the cable strain relief hook (05)
- Thread the cable strain relief hook (05/1) onto the upper handlebar from below (05/a).
- Attach the cable strain relief clip (05/2) below the cable strain relief hook on the upper handlebar (05/b).
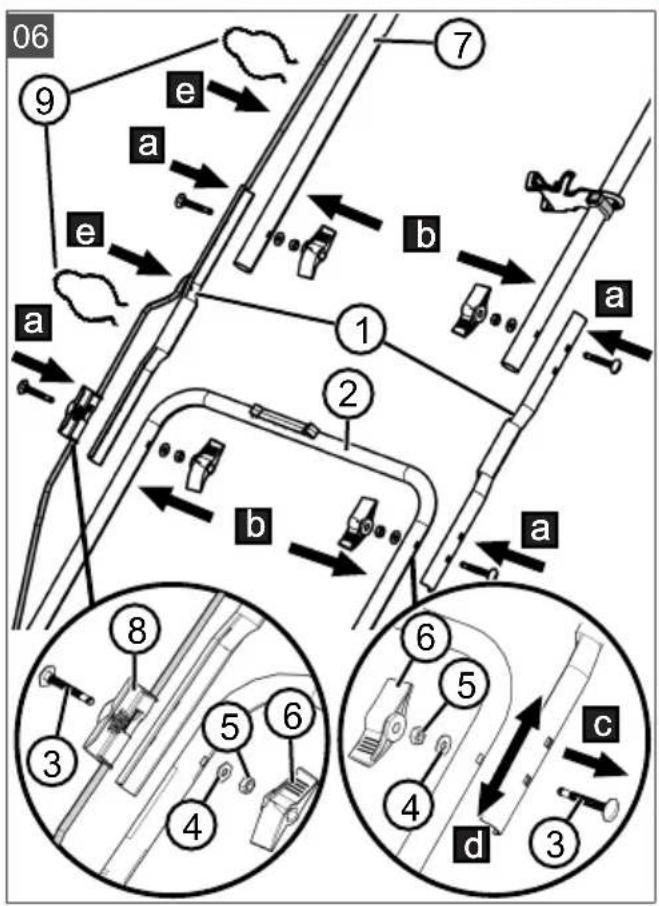
Installing the intermediate brace on the lower handlebar (06)
- Position the two intermediate braces (06/1) on the lower handlebar (06/2).
- Push the screws (06/3) through.
- On the left-hand side: Push screw (06/3) through cable clip (06/8) on the cable.
- Fit the washers (06/4), nuts (06/5) and wing nuts (06/6) and tighten.
Installing the upper handlebar on the intermediate brace (06)
NOTE Fit the cable strain relief hook before installing the upper handlebar.
- Position the upper handlebar (06/7) on the intermediate brace (06/1).
- Push the screws (06/3) through.
- Fit the washers (06/4), nuts (06/5) and wing nuts (06/6) and tighten.
Fitting the cable clips (06)
- Fix the cable to the handlebar (06/e) with cable clips (06/9).
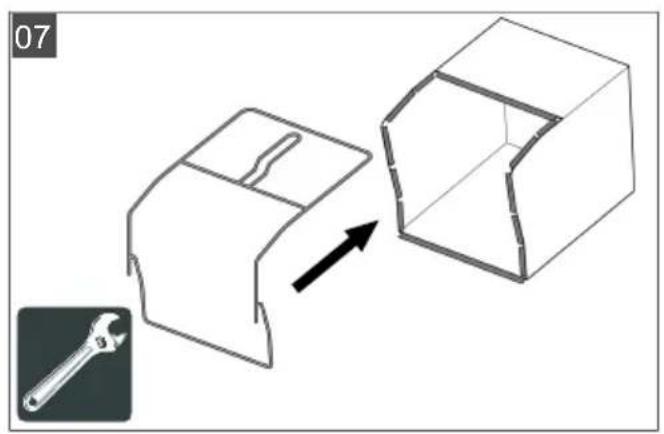
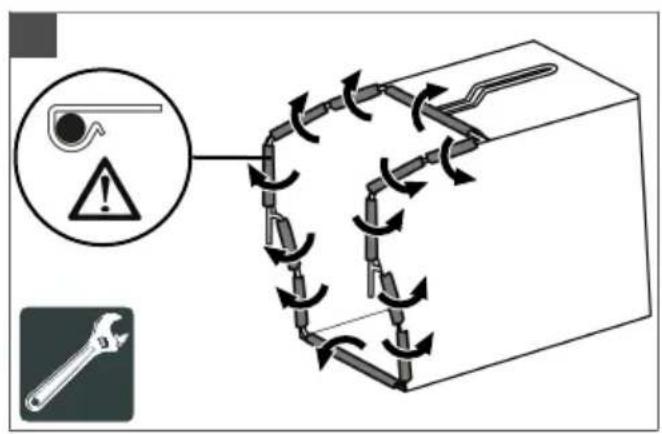
4.2 Installing the grass collector (07, 08)
See figures (07) to (08).
5 START-UP
IMPORTANT! Risk of damage to the appliance. The aerator roller screw is fastened to the underside of the scarifier.
- Remove the aerator roller before switching on the appliance.
5.1 Carrying out visual inspection
- Check the appliance for damage and loose screws. Replace the defective appliance parts and tighten the screws.
- Check the mains cable for damage. Replace the defective mains cable.
- Check the appliance for coarse soiling. Remove soiling.
5.2 Providing the mains cable and checking the mains connection
Observe the safety instructions for the mains cable.
Demands on the mains cable
Obtain a mains cable that satisfies the following requirements:
3 conductors with a minimum cross-section of 2.5 mm² (i.e. with protective conductor). Maximum length 40 m. Spray water protected (protection category IP44). Suitable for outdoor use (H05RN-F quality, i.e. rubber sheathed cable).
Demands on the mains connection
Check that the mains connection satisfies the following requirements:
Min. 10 A fuse. Fault current circuit breaker with max. 30 mA trigger current.
5.3 Adjusting the handlebar (06)
- On both sides of the upper and lower handlebar at the intermediate brace:
Loosen the wing nut (06/6) at the intermediate brace (06/1). Remove nut (06/5) and washer (06/4) from the screw. Pull out (06/c) the screw (06/3).
- On the left-hand side: Pull out screw (06/3) with cable clip (06/8) on the cable.
- Move the handlebar (06/2, 06/7) to the next hole in the intermediate brace (06/d).
- Tighten the handlebar again in the reverse order.
6 OPERATION
NOTE: Always mow the lawn before scarifying (max. grass height: 4 cm). Remove any foreign objects from the lawn surface. Stay in the operating position and grasp the handle to maintain stability during operation.
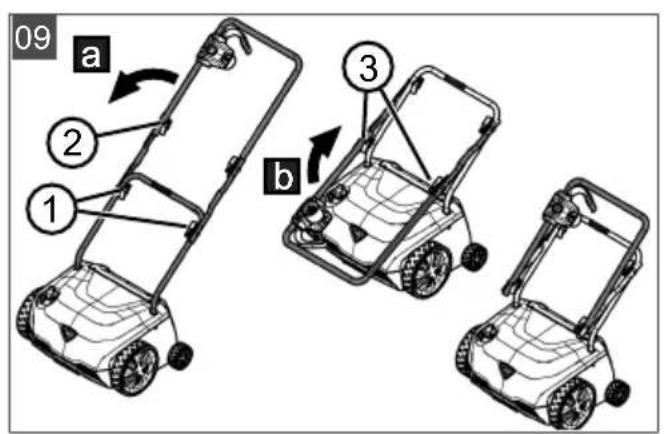
6.1 Folding the handlebar in and out (09)
CAUTION! Danger of crushing. Fingers or other parts of the body can be crushed between the loose parts of the handlebar.
Hold the loose parts of the handlebar tightly. - Do not hold any fingers or other parts of the body between the loose parts.
IMPORTANT! Danger of damaging the mains cable. The motor and mains cables can be crushed and damaged between the loose parts of the handlebar.
- Do not trap the cables when folding the handlebar in and out.
Folding in the handlebar
- Loosen the wing nuts (09/1) at the lower handlebar and fold the top handlebar (09/2) downwards (09/a).
- Loosen the wing nuts (09/3) at the upper handlebar until the whole folded upper handlebar can be folded upwards (09/b).
- Tighten all wing nuts slightly.
Folding out the handlebar
Proceed in the reverse order.
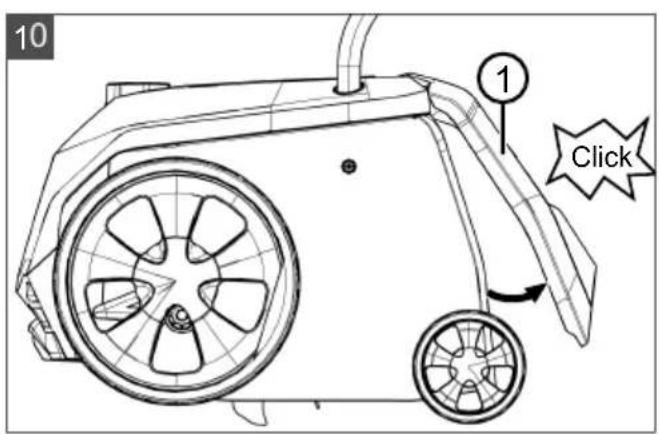
6.2 Opening the baffle (10)
The appliance can be operated with or without grass collector.
For scarifying without grass collector
NOTE: The impact flap is closed on delivery. Always open the impact flap before scarifying so that the scarified material can be discharged at the impact flap.
- Fold the baffle (10/1) back until it audibly engages at an angle of approx. 30°.
For scarifying with grass collector
Fold the baffle completely up. Using the grass collector: see chapter 6.3 "Attaching and removing the grass collector [optional] (11)", page 27.
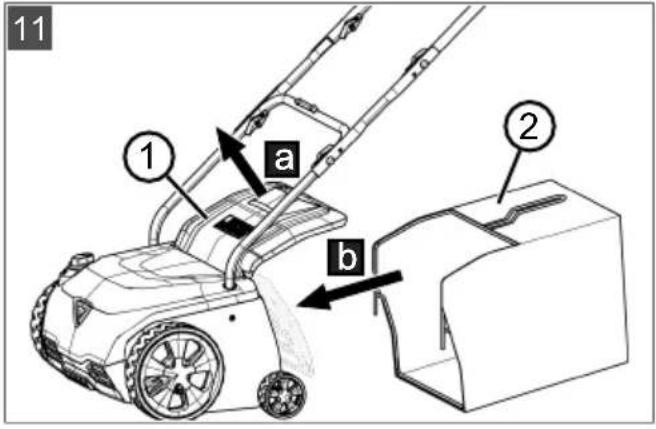
6.3 Attaching and removing the grass collector [optional] (11)
Attaching the grass collector
- Raise baffle (11/1) (11/a).
- Attach the grass collector (11/2) in the holders (11/b) from behind.
- Release the baffle.
Removing and emptying the grass collector
- Stop the appliance and wait until the blade system has come to a standstill.
- Raise the baffle (11/1).
- Lift the grass collector (11/2) out of the holders and take off to the rear.
- Empty the grass collector.
- Attach the grass collector (see above).
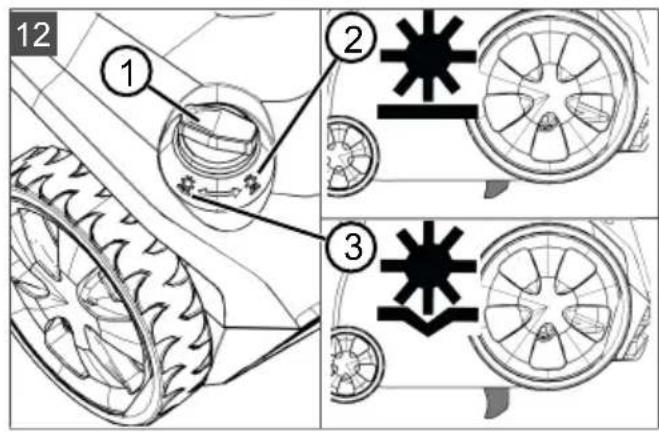
6.4 Setting the working depth (12)
CAUTION! Danger of cutting injuries.
There is danger of lacerations when reaching into the blade system while it is running on or the stopped blade system.
- Stop the appliance and wait until the blade system has stopped.
- Disconnect the mains plug to power down the appliance. Wear protective gloves.
The setting of the working depth depends on:
Lawn condition:
Well-kept: low working depth. Overgrown: high working depth.
Ground to be scarified:
Initially 2 - 3 mm penetration depth into the lawn. Gradually increase the working depth until sufficient material is scarified from the ground.
Blade wear:
New blades: low working depth. Worn blades: high working depth.
If the working depth is too large: The appliance stops and the motor does not run.
IMPORTANT! Danger of damage to the appliance. Only set the working depth if the engine is switched off and the blade shaft is stopped.
- Turn the setting wheel (12/1) to the right to scarify less deeply (12/2). The blade system is raised.
- Checking the working depth:
Start the appliance (see chapter 6.6 "Starting and stopping the motor (16, 17)", page 28). Drive a short distance on the lawn and check the result. If the lawn is insufficiently or irregularly scarified, the blade system must be lowered.
- Stop the appliance and wait until the blade system has come to a standstill.
- Turn the setting wheel (12/1) slightly to the left to scarify more deeply (12/3). The blade system is lowered.
- Repeat the previous steps until the lawn is scarified uniformly.
6.5 Making the mains connection (13, 14, 15)
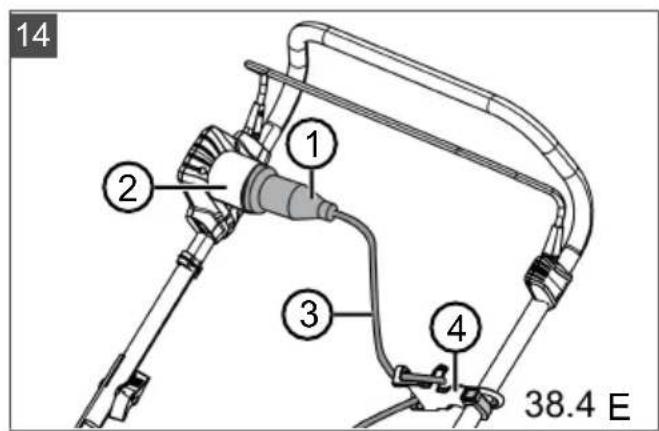
- Firmly plug the socket (13/1, 14/1) of the mains cable into the plug (13/2, 14/2) on the motor switch.
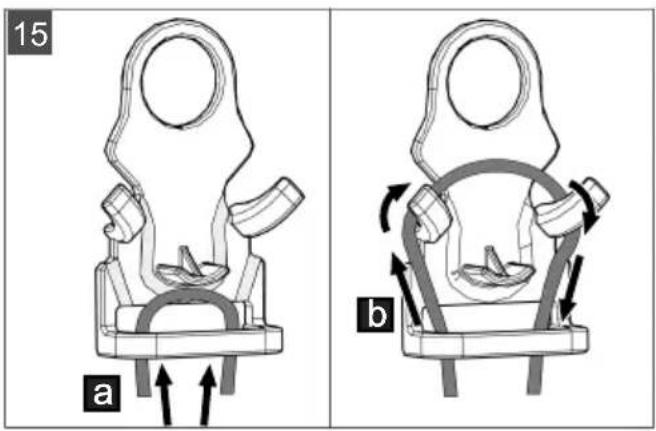
- Clamp the mains cable (13/3, 14/3) into the cable strain relief hook (13/4, 14/4) (15/a) and (15/b) in such a way that it cannot be pulled off the motor switch.
6.6 Starting and stopping the motor (16, 17)
IMPORTANT! Risk of damage to the appliance. The motor and blade system can be damaged by repeatedly switching on and off.
- Switch the motor on only when the blade system is at a standstill.
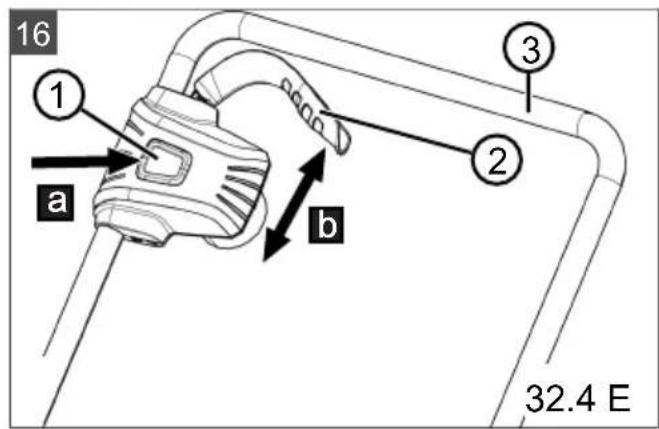
Starting the motor 32.4 E
- Press the safety button (16/1) and hold (16/a).
- Pull motor switch lever (16/2) towards the handlebar (16/3) (16/b). Start the motor and blade system.
- Release the safety button (16/1) and hold the motor switch lever (16/2).
NOTE The motor switch lever does not latch. Hold it tight against the handlebar during the entire working period.
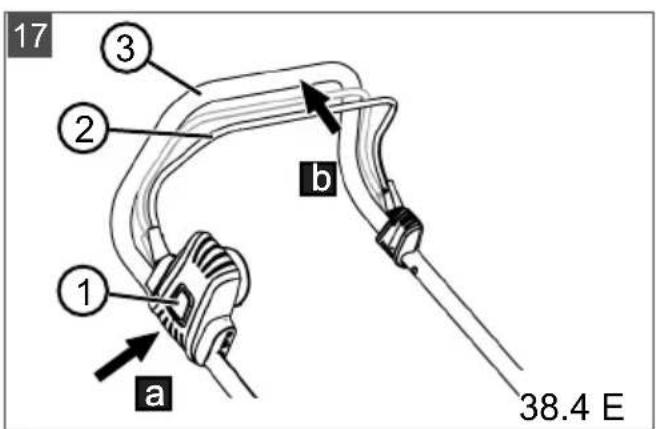
Starting the motor 38.4 E
- Press the safety button (17/1) and hold it (17/a).
- Pull the operator presence control (17/2) towards the handlebar (17/3) (17/b). Start the motor and blade system.
- Release the safety button (17/1) and hold the motor switch lever (17/2).
NOTE: The operator presence control does not latch. Hold it tight against the handlebar during the entire working period.
Stopping the motor 32.4 E
- Release the motor switch lever (16/2). It automatically returns to its initial position.
The motor stops immediately. The blade system runs down to a standstill.
Stopping the motor 38.4 E
- Release the operator presence control (17/2). It automatically returns to its initial position. The motor stops immediately. The blade system runs down to a standstill.

CAUTION! Danger of cutting injuries.
There is danger of lacerations when reaching into the blade system while it is running or when it has stopped.
- Stop the appliance and wait until the blade system has stopped.
- Disconnect the mains plug to power down the appliance. Wear protective gloves.
7 MAINTENANCE AND CARE

CAUTION! Danger of cutting injuries.
There is danger of lacerations when reaching into the blade system while it is running or when the blade system is stopped.
- Stop the appliance and wait until the blade system has stopped.
- Disconnect the mains plug to power down the appliance. Wear protective gloves.
NOTE: Replace the defective mains cable only with an original mains cable (with plug and socket) from the manufacturer!
7.1 Cleaning the blade system
IMPORTANT! Danger from water. Water in the appliance causes short-circuits and destroys electrical components.
Do not spray the appliance with water. Only use a broom or a brush for cleaning.
- Stop the appliance and wait until the blade system has come to a standstill.
- Disconnect the mains plug.
- Remove the grass collector (see chapter 6.3 "Attaching and removing the grass collector [optional] (11)", page 27).
- Tilt the appliance onto its side and clean the blade system with a broom or hand brush.
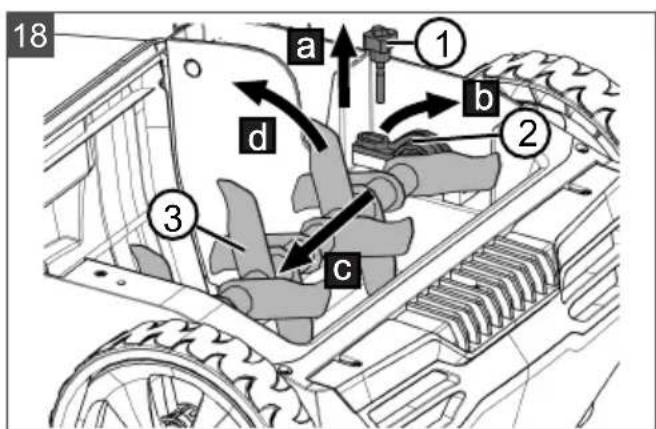
7.2 Replacing the scarifier roller and aeration roller (optional) (18)
The scarifier roller is intended for coarse scarifying work and the aeration roller (optional) for fine scarifying work (see chapter 2.6 "Scope of supply (02, 03)", page 22).
Removing the roller
- Stop the appliance and wait until the blade system has come to a standstill.
- Disconnect the mains plug.
- Turn the appliance over.
- Loosen and remove the screw (18/1) (18/a).
- Fold the locking bar (18/2) upwards (18/b).
- Gently push the roller (18/3) towards the housing (18/c).
- Remove the roller (18/d).
Installing the roller
Proceed in the reverse order.
8 HELP IN CASE OF MALFUNCTION
CAUTION! Risk of injury. Sharp-edged and moving appliance parts can lead to injury. Always wear protective gloves during maintenance, care and cleaning work! NOTE For malfunctions that are not listed in this table or that you cannot resolve yourself, please contact our customer service.
| Malfunction Cause Remedy | ||
| Motor does not start. No electric power | Check the mains cable and circuit breaker. Pull the motor switch lever/operator presence control completely up against the handlebar. | |
| The blade system is blocked by lawn thatch and moss. | Set a lower working depth. Clean the blade system. | |
| Immediate short-circuit on inserting the mains plug | Defective electrical components in the appliance. | Contact a customer service workshop. |
| The blade system does not rotate. | The blade system is blocked by lawn thatch and moss. | Set a lower working depth. Clean the blade system. |
| Motor and scarifier performance decreases. | The blade system is braked. | Set a lower working depth. Mow the lawn. |
| Scarifier blades are worn. | Replace scarifier roller. | |
| Appliance vibrates and does not run smoothly. | Scarifier blades are damaged. | Replace scarifier roller. Contact a customer service workshop. |
9 TRANSPORT
IMPORTANT! Risk of damage to the appliance. The blade system will be damaged if the appliance is moved over a solid surface with the blade system lowered.
To raise the blade system, turn the adjuster wheel for the working depth to Shallow scarifying. 1. Stop the motor and wait until the blade system has come to a standstill. 2. Turn the setting wheel for the working depth to the right to Shallow scarifying (12/2).
- Remove the mains plug from the power socket, fold up the mains cable.
Transporting the appliance between two working areas
Move the appliance to the working area with the blade system raised. To carry the appliance: Lift the appliance by the carrying handle.
Transporting the appliance in a vehicle
- Fold in the handlebar (see chapter 6.1 "Folding the handlebar in and out (09)", page 27).
- Secure the appliance in the vehicle against falling over and slipping.
- Protect the appliance against collisions with loose objects. Do not place objects on the appliance.
10 STORAGE
- Disconnect the mains plug.
- Turn the setting wheel for the working depth to the right to Shallow scarifying (12/2).
- Fold in the handlebar (see chapter 6.1 "Folding the handlebar in and out (09)", page 27).
- Thoroughly clean the spreader (see chapter 7.1 "Cleaning the blade system", page 28).
- Apply a thin coat of oil or silicon to all metal parts for corrosion protection.
- Store the appliance in a dry, clean location protected from frost. Cover with a breathable tarpaulin to protect against dust. Do not use plastic film in order to avoid the accumulation of moisture.
11 DISPOSAL
Information on the German Electrical and Electronic Equipment Act

Electrical and electronic appliances do not belong in household waste, but should be collected and disposed of separately!
- Owners or users of electrical and electronic appliances are obliged by law to return them after use.
14 WARRANTY
The symbol of the crossed-through rubbish bin means that electrical and electronic appliances may not be disposed of in the household rubbish.
Electrical and electronic appliances can be handed in at the following places at no charge:
Public service disposal or collection points (e.g. municipal building yards) Points of sale of electrical appliances (stationary and online) if dealers are obliged to take them back or offer this voluntarily.
These statements only apply to appliances that are installed and sold in the countries of the European Union and are subject to European Directive 2012/19/EU. Different provisions may apply to the disposal of electrical and electronic appliances in countries outside the European Union.
12 AFTER-SALES/SERVICE
In the event of questions of warranty, repair or spare parts, please contact your nearest AL-KO Service Centre. These can be found on the Internet at: www.alko-garden.com/service-contacts
Further information on spare parts can be found at: www.alko-garden.com/spareparts
13 INFORMATION ON THE DECLARATION OF CONFORMITY
We hereby declare, as the exclusively responsible party, that this product in its marketed form meets the requirements of the harmonised EU Directives, EU safety standards and the product-specific standards. The Declaration of Conformity forms part of the operating instructions and is included with the machine.
We will remedy any material or manufacturing defects discovered in the device during the statutory period of limitation for claims for defects by repair or replacement at our discretion. The period of limitation is determined in each case by the law of the country in which the device was purchased.
Our warranty promise applies only if:
These operating instructions are observed. The device is handled correctly. Original spare parts have been used.
The warranty becomes void in the case of:
Unauthorised repair attempts. Unauthorised technical modifications. Use for other than the intended purpose.
The warranty does not include:
Paint damage attributable to normal wear. Wear parts that are marked with a box xxxxxx (x) on the spare parts card.
The warranty period commences with the purchase by the first end user. The date on the proof of purchase is decisive. In the event of a warranty claim, please contact your dealer or the nearest authorised customer service centre with this declaration and the original proof of purchase. This declaration does not affect the purchaser's statutory claims for defects against the vendor.
TRANSLATION OF THE ORIGINAL USER MANUAL Table of contents
2 PRODUCT DESCRIPTION
6.5 Power connection (13, 14, 15)
1.1 Table of contents
Table of contents Meaning

Before first use, please read these operating instructions carefully. This is a condition for safe work and proper handling.

2.5 Parts List (01)
Item No. Description
1 Upper housing, inclined 232.4E: Engine pulley 38.4E: Belt guard 3 Belt tensioner with idler pulley 4 Blade holder 5 Belt guide 6 Middle pulley 7 Upper housing, lower part 8 Housing cover 9 Grease nipples 10 Cutting mechanism with roller for vertical adjustment and roller for ventilation 11 Grass collection bag 12 Roller for vertical adjustment 13 Roller for ventilation*
- only for 38.4 E
2.6 Overall view (02, 03)
The overall view shows all the parts listed. Check that all parts are included:
Item No. Component
1 Upper housing 2 Middle pulley (x2) 3 Lower housing 4 Vertical adjuster 5 Grass collection bag 6 Blade holder 7 Cable guide clip 8 Cable clips (x2) 9 Belt guides (x4) 10 Cable clip on cable 11 Screws (x4) 12 Washers (x4) 13 Screws for upper housing (x4) 14 Screws for lower housing (x2) 15 Roller for vertical adjustment 16 Roller for ventilation* |
- only for 38.4 E
**Danger of injury. Before adjusting, remove the ventilation roller.
Proceed as follows:
Ventilation roller 32 mm, part no. 114049 (only for 32.4 E Basic Care)
SAFETY INSTRUCTIONS
3.1 General safety instructions for electric machines
WARNING! Read all safety instructions, instructions, illustrations and technical data provided with this electric tool. Failure to follow the instructions below may result in electric shock, fire and/or serious injury. Keep all safety instructions and instructions for future use.
Nojam "MaWuHa"kopuwehuy6e36edHocHM HaHOMeHaMa,odHocu ce Ha MaUHe no2oHe hynemMpexe (ca MPexHum KaBnom) unu Ha akymyamopcku no2oBeHe MaUHe (6e3 MpexHo2 Ka6na).
3.1.1 Be36eHocT Ha paHOM MecTy
OdpkaBajTe cBoje paHNo noDpyje YnCTm n do6po ocBeTbeHm. Hpei nn Iowe ocBeTbeHa paHa noDpyja Mory DOBeCTn Do He3roDa. Hemojte paINTn ca MaunHom y Nopdpyjma y Kojima noctojn onachoct od ekcnlo3nje, y Kojima ce HaJana3e 3apanbne TeuhoCTn, racobn nnn npaunHe. MaunHe npou3BOpe bapnue koje Mory da 3anaje npaunHy nnn nape. Tokom Kopniheba MaunHe dpxnTe Ha pactojaBy deuy n Dpyre ocobe. Y cnuyajy OMeTaBa naXbE MOKeTe Da n3ry6nTe KOHTpOny HaMaunHOM.
3.1.2 EJektpnHa 6e36eHnoCT
IpnKbUyHn yTuKaU Mopa Da odroBapa yTuHnU. YTuKaU Hn Ha KoJn Haun He CMe Da ce npomEn. Hemojte da KopncTnte aanTepcKe yTuKaue 3ajeHoc ca MaunHaMa KoJe mAjy 3aWTNTO y3emBeHe. HenpomebeHn yTuKau N oDroBapajyhe yTuHnUe cMaBbyjOnacHOCT Od eNeKtpuHOr yDapa. CnpeHTe fH3nKdOOp ca y3embeHm NOBpunHaMa Kao Ha npMep KoI ceBN, rpejau, Wnpetau n cPnxNepa. KaJa je BaWe TeNo y3emJbEHO, NocToJn nobehana onachOCT OJ eJIeKTpuHOr yDapa. Hemojte da KOpncHTe MaunHy npi KnHn nn Bna3n. To moKe da noBeha onaChocT od eNeKtpnHOr ydapa. HemojTe HeHameHcKn KOpNCTNTn npNKbUyHn Ka6I Da Hocnte MaunHe, obecnte je nn Da n3ByuTe yTuKau n3 yTuHnue. YbajTe npNKbUyHn Ka6I od TOnlNote, yBa, ouTpNx NBua nn potnpajyHnx DeNoBa. OoTeHen nn 3aneTbAHn npNKbUyHn Ka6NoBn nobehabajy onaChOc T od eJeKTPnuHor ydapa. Ako ca mawHOM paNTe Ha OTBOpeHOM, KOpNCHTte cAmO npOdyXHe Ka6NoBe KoJn cy nOroHN 3a paD ha OTBOpeHOM. PpImeHa npOdyxHor ka6Ja noroHOr 3a paD Ha OTBOpeHOM cMaHyje onaCHOCT Od eJIekTpUHOr ydapa.
Ako ce paad MaunHe y BnaXHOM OkpyxeHy He MoKe n36eHn, KopncTnte 3aHTnTHn PpeKnDaY 3a Ctpyj KBapa. Ynotpe6a 3aHTnTHor PpeKnDaY a 3a Ctpyj KBapa cMaByje onachOCT oJ eJeKtpnHOr ydapa.
3.1.3 Be36eHocT lydu
Be careful, pay attention to what you are doing and use common sense when working with the machine. Do not use the tool if you are tired or under the influence of drugs, alcohol, or medication. A moment of inattention while using the tool may lead to serious personal injury. Use personal protective equipment. Always wear eye protection. Protective equipment such as dust mask, non-skid safety shoes, hard hat, or hearing protection used for appropriate conditions will reduce personal injuries. Prevent unintentional starting. Ensure the switch is in the off-position before connecting to power source and/or battery pack, picking up or carrying the tool. Carrying power tools with your finger on the switch or energising power tools that have the switch on invites accidents. Remove any adjusting key or wrench before turning the power tool on. A wrench or a key left attached to a rotating part of the power tool may result in personal injury. Do not overreach. Keep proper footing and balance at all times. This enables better control of the power tool in unexpected situations. Dress properly. Do not wear loose clothing or jewellery. Keep your hair, clothing and gloves away from moving parts. Loose clothes, jewellery or long hair can be caught in moving parts. If devices are provided for the connection of dust extraction and collection facilities, ensure these are connected and properly used. Use of dust collection can reduce dust-related hazards. Do not let familiarity gained from frequent use of the tool allow you to become complacent and ignore tool safety principles.
Safety rules for machines. Improper handling for even a second can lead to serious injury.
3.1.4 Use and maintenance of electric machines
Do not operate the machine. Use the machine only for its intended purpose. With the appropriate machine, follow these instructions and safety precautions within the specified power range. Do not use the machine if it is not in proper working order. A machine that can no longer be switched on or off is dangerous and must be repaired. Unplug the plug from the socket and/or disconnect the battery if it can be removed, before performing any maintenance, replacing parts of the accessory, or putting the machine away. This measure prevents accidental starting of the machine. Do not use the machine in damp conditions. Do not allow persons who are not familiar with these instructions to use the machine. Machines are dangerous if used by inexperienced persons. Keep the machine and accessories out of reach of children. Check that moving parts function properly and do not jam, and that parts are not broken or damaged to the extent that the machine's function is impaired. Have damaged parts repaired before using the machine. Many accidents are caused by poorly maintained machines. Keep cutting tools sharp and clean. Properly maintained cutting tools with sharp blades are less likely to jam and are easier to control. Use the machine, accessories, and tools, etc., in accordance with these instructions. In doing so, take into account the working conditions and the activity to be performed. Using the machine for purposes other than those intended can lead to dangerous situations. Keep your hands dry, clean, and free of oil and grease. Slippery hands and gripping surfaces do not allow safe handling and control of the machine in unexpected situations.
3.1.5 Service
Have the machine repaired only by qualified specialists who use only original spare parts. This ensures that the safety of the machine is maintained.
3.2 Safety instructions for the vertical shaft for lawn trimming
Do not use the machine at low speeds, especially not at idle. This reduces the risk of injury. Thoroughly inspect the machine's equipment for visible damage. A machine that is running can cause injury to people or animals. Thoroughly inspect the cutting tools for any stones, debris, wood, bones, or other foreign objects. Damaged parts can cause injury. Before using the machine, always check that the blades or cutting unit are not damaged or worn. Damaged or worn parts increase the risk of injury. Before use, check the power cord and any extension cords for signs of damage or wear. Do not use the machine if the cord is damaged or worn. If the power cord is damaged or worn during operation, unplug the machine and do not touch the cord before removing the plug from the outlet. A damaged cord or extension cable can lead to electric shock, fire, and/or serious injury. Regularly check the fuel tank for damage or leaks. A damaged or leaking fuel tank can increase the risk of injury. Keep protective guards in their place. Protective guards must be suitable for use and properly attached. A protective guard that is loose, damaged, or not functioning correctly can lead to injury.
Keep air intake openings free of debris. Blocked air intakes and debris can lead to overheating or fire risk. Always wear safety goggles and protective footwear when operating the machine. Do not use the machine barefoot or with open sandals. This creates a risk of injury to the feet from contact with rotating blades. Always wear long trousers and closed-toe shoes when operating the machine. Loose clothing can be caught by moving parts and cause injury. Do not operate the machine on wet grass. Walk, do not run. This reduces the risk of slipping or falling, which could lead to injury. Do not use the machine on excessively steep slopes. To reduce the risk of losing control, slipping, and falling, which could lead to injury, always work at a safe distance from the cutting edge, never on unstable or slippery surfaces, and be especially careful when reversing or pulling the machine towards you. Always be aware of your surroundings. This reduces the risk of injury during operation. Keep the power cord away from the blade. A damaged power cord can lead to electric shock, fire, and/or serious injury. Unplug the machine and call a qualified technician if the power cord is damaged or worn. Damaged or worn cords can increase the risk of electric shock. Hold the machine only by the insulated gripping surfaces, as the blade may contact hidden wiring or its own power cord. Contact of the blade with a live wire can cause metal parts of the equipment to become live and result in electric shock.
Before operating the machine, read the instructions carefully to reduce the risk of injury from moving parts. Ensure that all guards are in place and that the machine is properly grounded before inserting material or starting the machine. Unexpected machine operation can lead to serious injuries.
3.3 Vibration emission value
Total vibration emission values and uncertainty
The stated vibration emission values were measured according to a standardized test procedure and can be used to compare one electric tool with another. The stated vibration emission values can also be used for a preliminary assessment of exposure. The vibration emission values during actual use of the electric tool may differ from the stated values, depending on the way the electric tool is used. Follow the safety measures in accordance with the safety section. Try to keep the exposure to vibrations as low as possible. Examples of measures to reduce vibration exposure are wearing gloves when using the tool and organizing working hours. All parts of the work cycle must be taken into account (for example, times when the electric tool is switched off and times when the tool is switched on but running without load).
Danger due to vibration
The vibration emission value during actual use of the tool may differ from the stated value of the manufacturer. Before use, pay attention to the following influencing factors:
Is the tool being used as intended? Is the material being cut in the correct manner? Is the tool in proper working condition? Is the tool sharpened as specified? Is the correct tool installed?
Are the handles and, if necessary, the anti-vibration handles mounted and are they firmly connected to the tool?
Important: adjust the speed to the required number of engine revolutions. Avoid maximum number of revolutions to reduce noise and vibration. Improper use and maintenance can increase noise and vibration. This can be harmful to health. In that case, immediately switch off the device and have it repaired by an authorized service workshop. The degree of vibration load depends on the work to be performed. Read the instructions for use and maintenance. In this way, the vibration load during the entire working time is significantly reduced. Frequent use of the device can cause vibration-related problems with the blood vessels ("white finger"). To reduce this risk, wear gloves and keep your hands warm. If symptoms of "white finger" are detected, consult a doctor immediately. These symptoms include: numbness, loss of sensitivity, tingling, itching, pain, weakening of muscles, discoloration or changes in the skin. These symptoms relate to fingers, hands, or wrists. The danger increases at low temperatures. During your working day, take sufficient breaks to recover from noise and vibration. Plan your work so that the use of the device with strong vibration is spread over several days. If you notice a tingling sensation or a change in skin color during use of the device on your hands, stop work immediately. Take sufficiently long work breaks. Without sufficiently long work breaks, hand-arm vibration syndrome can occur. Minimize your risk of exposure to vibrations. Maintain the device properly according to the instructions in the operating manual. If the device is used frequently, contact your distributor to obtain anti-vibration equipment (e.g., gloves).
Avoid working with the device at temperatures below 10°C. During work, determine how the vibration load can be limited.
3.4 Noise load
Certain noise exposure due to this device cannot be avoided. Schedule work with intensive noise for permitted times and for the required duration. Take breaks as needed and limit the duration of work to the necessary minimum. For your health and the health of people nearby, appropriate noise protection must be worn.
4 ASSEMBLY
WARNING! Danger due to incomplete assembly! Use of an incompletely assembled device can lead to serious injuries.
The device may only be operated if it is completely assembled! Before switching on, check all safety and protective devices to see if they are present and functional!
4.1 Assembly of the vertical shaft (04-06)
Assembly of the lower guide tube (04)
- 1. Insert the guide tube (04/1) into the opening (04/2) in the vertical shaft (04/a). 2. Tighten the guide tube with the locking screw (02/14, 03/13, 04/3) so that it cannot be turned by hand.
Assembly of the cable holder (05)
1. Insert the holder (05/1) into the guide tube (05/a). 2. Attach the safety screw for the cable holder (05/2) (05/b) below the cable guide on the upper guide tube.
Assembly of the middle tube onto the lower guide tube (06)
1. Position the upper water hose (06/1) on the lower water hose (06/2). 2. Tighten the fitting (06/3) to the end. 3. On the left side: route the fitting (06/3) through the cable gland (06/8) to the cable. 4. Install the support (06/4), the washer (06/5), and the lock washer (06/6), and tighten.
Installation of the upper water hose on the lower water hose (06)
NOTE: Before installing the upper water hose, install the cable gland.
1. Position the upper water hose (06/7) on the lower water hose (06/1). 2. Tighten the fitting (06/3) to the end. 3. Install the support (06/4), the washer (06/5), and the lock washer (06/6), and tighten.
Installation of the cable gland (06)
- Secure the cable to the hose (06/e) with the cable glands (06/9).
4.2 Installation of the grass catcher frame (07, 08)
Insert the frame (07) into (08).
5 OPERATION
DANGER! Risk of injury from rotating parts. The ventilation plug is attached to the bottom of the cylinder.
Before starting the device, remove the ventilation plug.
5.1 Visual inspection
- Check the device for visible damage. Replace damaged parts and tighten.
- Check the power cord for damage. Replace a damaged power cord.
- Check the device for a clean surface. Clean the surface.
5.2 Laying the supply cable and checking the supply connection
Pay attention to the safe laying of the cable for starting.
Requirements for the supply cable
Lay the supply cable according to the following requirements:
Conductor with a minimum cross-section of 2.5 mm² (i.e., with a protective conductor) up to 40 m, with protection against mechanical damage (protection class IV44) for outdoor use (quality H05RN-F, i.e., rubber cable)
Requirements for the supply connection
Check that the supply connection meets the following requirements:
Rated current 10 A, protective device with a maximum tripping current of 30 mA
6.5 Connecting the supply cable (13, 14, 15)
1.1 Symbols on the title page
Symbol Meaning

Be sure to read these operating instructions carefully before commissioning. This is a prerequisite for safe work and trouble-free operation of the device.

Operating instructions
DANGER! Do not touch or disassemble, to avoid electric shock!
1.2 Explanation of symbols and signs
DANGER! Indicates an imminently hazardous situation which, if not avoided, will result in death or serious injury. WARNING! Indicates a potentially hazardous situation which, if not avoided, could result in death or serious injury. CAUTION! Indicates a potentially hazardous situation which, if not avoided, may result in minor or moderate injury.
CAUTION! Indicates a situation which, if not avoided, may cause material damage.
NOTE Notes for better understanding and handling.
2 DESCRIPTION OF THE PRODUCT
This documentation describes several models of the device. Identify your model with the help of the product images and the descriptions of the different versions.
2.1 Intended use
This shredder is intended for shredding and cutting of garden waste (shredding) for private use and may only be used when the material to be shredded is dry.
Any other use, as well as unauthorized reconstruction or modification of the machine components, is considered use not in accordance with the intended purpose and will result in the loss of the warranty, as well as the declaration of conformity (CE marking) and the manufacturer's liability for damages caused to the user or third parties.
2.2 Possible foreseeable misuse
The device is not designed for professional use in public parks and sports facilities, nor for use in agriculture and forestry. It must not be used for shredding food or for leveling terrain.
2.3 Safety and protective devices
WARNING! Risk of injury. Defective and disabled safety and protective devices can lead to serious injuries.
Repair defective protective devices. Never bypass or disable safety and protective devices.
Device for reversing the engine / feed mechanism
Set the device for reversing the engine / feed mechanism, which is set when released.
Feed stop
Set the feed stop, which prevents the ejection of grass and objects during vertical operation without a grass collection bag.
2.4 Symbols on the device
Symbol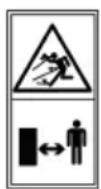
Meaning
Danger of ejected objects! Keep people away from the danger zone! Maintain a safe distance!
Symbol
Meaning

Read the operating instructions before starting any work, maintenance, or cleaning!
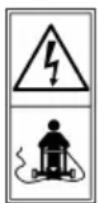
Do not step on the mower or cable! Risk of electric shock if the mower or cable is damaged.
Keep hands and feet away from the cutting blade! Switch off the device before maintenance or cleaning work!
Not applicable.

Procedure for starting the engine - see chapter 6.6 Starting and stopping the engine (16, 17), page 273

Bearing with small depth

Bearing with large depth
2.5 Product presentation (01)
| № Kompoнent |
| 1 Горна ос hobна дрьжka, сгьваема |
| 2 32.4 E: Лост за преевлочвае на дви- ratеля 38.4 E: Предаизна рениca |
| 3 Преевлочваел на дви ratеля с-byтон 3a бezонасост и вграданцения |
| 4 Скоба за облесчавае на опьна на ka- бefa |
| 5 Крилчати вnettове |
| 6 Среда орьжka |
By component
1 Main frame, height-adjustable 2 Front guard 3 Handle for adjusting the working depth 4 Depth adjustment mechanism with roller 5 Guide 6 Collector for collecting grass 7 Depth adjustment roller 8 Guide*
- only for 38.4 E
2.6 Scope of delivery (02, 03)
The following items are included in the scope of delivery. Check that all items are included:
By component
1 Main frame 2 Side guard (x2) 3 Lower main frame 4 Verticutter 5 Collector for collecting grass 6 Bracket for cable guide 7 Safety clamp for cable guide bracket 8 Cable brackets (x2) 9 Clamping straps (x4) 10 Cable bracket for cable 11 Nuts (x4) 12 Bolts (x4) 13 Screws for main frame (x4) 14 Screws for lower frame (x2) 15 Depth adjustment roller 16 Guide* | **
- only for 38.4 E
** danger of injury from the device. Remove the guide roller before you switch on the device.
The guide is available as an accessory:
Guide 32cm, art. no: 114049 (only for 32.4 E Basic Care)
3 SAFETY INSTRUCTIONS
3.1 Safety instructions for electrical machines
WARNING! Read all safety instructions, instructions, illustrations and technical data provided with this electrical machine. Failure to follow the instructions below may result in electric shock, fire and/or serious injury. Keep all safety instructions and instructions for future use.
The term "machine" used in the safety instructions refers to machines powered by the mains (with mains cable) or machines powered by battery packs (without mains cable).
3.1.1 Work area safety
Keep the work area clean and well lit. Cluttered or dark work areas can lead to accidents. Do not operate the machine in explosive atmospheres, such as in the presence of flammable liquids, gases or dust. Machines create sparks, which may ignite dust or fumes. Keep children and other people away while operating the machine. If you are distracted, you may lose control of the machine.
3.1.2 Electrical safety
The machine plug must fit the outlet. Never modify the plug in any way. Do not use adapter plugs with earthed (grounded) machines. Unmodified plugs and matching outlets will reduce risk of electric shock. Avoid body contact with earthed surfaces, such as pipes, radiators, ranges and refrigerators. There is an increased risk of electric shock if your body is earthed.
Do not expose the machine to rain or wet conditions. Water entering the machine will increase the risk of electric shock. Do not abuse the cord. Never use the cord for carrying, pulling or unplugging the machine. Keep cord away from heat, oil, sharp edges or moving parts. Damaged or entangled cords increase the risk of electric shock. When operating the machine outdoors, use an extension cord suitable for outdoor use. Use of a cord suitable for outdoor use reduces the risk of electric shock. If operating the machine in a damp location is unavoidable, use a residual current device (RCD) protected supply. Use of an RCD reduces the risk of electric shock.
3.1.3 Personal safety
Be attentive, watch what you are doing and use common sense when operating the machine. Do not use the machine when you are tired or under the influence of drugs, alcohol, or medications. A moment of inattention while using the machine can lead to serious injury. Wear personal protective equipment and safety glasses. Wearing personal protective equipment, such as a dust mask, non-slip safety shoes, a safety helmet, or hearing protection, depending on the type and manner of use of the machine, reduces the risk of injury. Avoid accidental starting. Make sure the machine is switched off before connecting it to the power supply and/or battery pack, picking it up, or carrying it. If you carry the machine with your finger on the switch or connect it to the power supply while it is switched on, this can lead to accidents. Before switching on the machine, remove adjusting tools or wrenches. A tool or wrench that is left attached to a rotating part of the machine can cause injury.
Avoid abnormal body posture. Ensure a secure stance and maintain balance at all times. This will help you control the machine in unexpected situations. Wear suitable clothing. Do not wear loose clothing or jewelry. Keep your hair and clothing away from moving parts. Loose clothing, jewelry, or long hair can be caught by moving parts. If dust extraction and collection equipment can be mounted, connect it and use it properly. Using a dust extraction system can reduce dust-related hazards. Do not create a false sense of security and do not disregard the safety rules for machines, even if you are familiar with them after repeated use. Careless actions can lead to serious injury within a fraction of a second.
3.1.4 Use and operation of the electric machine
Do not overload the machine. Use the correct machine for your work. The correct machine will do the job better and safer at the rate for which it was designed. Do not use the machine with a damaged switch. A machine that cannot be switched on or off is dangerous and must be repaired. Disconnect the machine from the power supply and/or remove the battery pack before making any adjustments, changing accessories, or storing the machine. Such preventive safety measures reduce the risk of accidental starting. Store idle machines out of the reach of children. Do not allow people who are not familiar with the machine or who have not read these instructions to operate it. Machines are dangerous when used by untrained people. Maintain the machines and accessories with care. Check for misalignment or binding of moving parts
The machine must not be used if it is damaged or if parts are missing. Before using the machine, repair the damaged parts. Many accidents are caused by poorly maintained machines.
Keep cutting tools sharp and clean. Properly maintained cutting tools with sharp blades are less likely to bind and are easier to control. Use the machine, accessories, and blades, etc., in accordance with these instructions, taking into account the working conditions and the work to be performed. Use of the machine for operations different from those intended could result in a hazardous situation. Keep handles and gripping surfaces dry, clean, and free from oil and grease. Slippery handles and gripping surfaces do not allow for safe handling and control of the machine in unexpected situations.
3.1.5 Service
Have your machine serviced by a qualified repair person using only identical replacement parts. This will ensure that the safety of the machine is maintained.
3.2 Safety instructions for hedge trimmers and grass trimmers
Do not use the machine in bad weather, especially when there is a risk of lightning. This increases the risk of being struck by lightning. Carefully inspect the working area of the machine for animals. Animals may be injured by the running machine. Carefully inspect the working area of the machine and remove all stones, sticks, wires, bones, and other foreign objects. Projected objects can cause injury. Before using the machine, always check that the teeth or blades are not worn or damaged. Worn or damaged parts increase the risk of injury.
Check the power cord and extension cord regularly for damage or wear. Do not use the machine if the cords are damaged or worn. If the power cord is damaged or worn during operation, unplug the machine and do not touch the cord; first remove the plug from the socket. A damaged power cord or extension cord can cause electric shock, fire, and/or serious injury. Check the dust collection hose regularly for wear or damage. A worn or damaged dust collection hose can increase the risk of injury. Keep the protective caps clean. The protective caps must be straight and properly secured. A loose, damaged, or improperly secured cap can lead to injury. ■ Keep the ventilation openings and air intakes clear. Blocked ventilation openings and air intakes can cause overheating or fire hazard. When working with the machine, always wear non-slip safety footwear. Do not work with the machine barefoot or with open sandals. This reduces the risk of injury to the feet from contact with the rotating blades. When working with the machine, always wear long trousers. The fabric reduces the likelihood of injury from thrown objects. Do not work with the machine on wet ground. Walk, never run. This reduces the risk of slipping and falling, which can lead to injury. Do not work with the machine on excessively steep slopes. This reduces the risk of loss of control, slipping, and falling, which can lead to injury. Make sure you have a stable position when working on slopes; always work across the slope, never up or down, and be extremely careful when changing direction. This reduces the risk of loss of
control, slipping, and falling, which can lead to injury.
Be especially careful when working in reverse or when pulling the machine towards you. Always pay attention to the surroundings. This reduces the risk of tripping during operation. Keep the power cord away from the blades. A damaged power cord can cause electric shock, fire, and/or serious injury. Unplug the machine and remove the plug from the socket if the power cord is caught or damaged. A caught or damaged cord can increase the risk of electric shock. Hold the machine only by the insulated gripping surfaces, as the blades may come into contact with hidden wiring or the machine's own power cord. Contact with a live wire can energize the metal parts of the equipment and cause electric shock. Do not touch the blades or other dangerous parts that may be rotating. This reduces the risk of injury from rotating parts. Make sure all switches are off and the plug is removed before clearing jammed material or servicing the machine. Unexpected operation of the machine can lead to serious injury.
3.3 Vibration damping
General information on vibration emission
The declared total vibration and noise emission values are measured according to the standard test method and may be used for comparing one electric power tool with another. The declared total vibration and noise emission values may also be used for a preliminary assessment of exposure. The total vibration and noise emission values may differ from the actual values during actual use of the electric power tool, depending on the way the electric power tool is used.
depending on the way the electric power tool is used.
Keep the safety instructions according to the safety chapter. Try to minimize the maximum exposure to vibration. Typical measures for reducing vibration exposure include wearing gloves when using the tool and limiting the duration of work time. Take into account all parts of the work cycle (for example, the time when the electric power tool is switched off, or the time when it is switched on but working without load).
Vibration hazard
The actual vibration emission during use of the device may differ from the value stated by the manufacturer. Consider the following factors of influence before or during use:
Is the tool used as intended? Is the material being cut according to the regulations? Is the tool in proper working condition for use? Is the tool correctly sharpened and adjusted? Is the correct tool accessory installed? Are the accessories mounted and are they securely attached? Are the optional vibration dampers and their connections stable on the tool?
Operate the tool only with the necessary accessories for the corresponding work. Avoid maximum speed to reduce noise and vibrations. Improper use and poor maintenance can increase noise and vibrations of the tool. This leads to health risks. In this case, switch off the tool immediately and send it for repair to an authorized service. The level of vibration exposure depends on the work that needs to be performed or on the use of the tool. Assess the appropriate pauses during work. This way, the vibration exposure can be significantly reduced during the total work time.
Improper use of the tool may cause vibration-induced injuries (white finger). To reduce this risk, wear gloves and keep your hands warm. If you recognize symptoms of "white fingers", seek medical help without delay. These symptoms include: numbness, tingling, itching, pain, loss of strength, changes in skin color. Usually these symptoms affect the fingers, hands, or wrists. At low temperatures, the risk increases. Take longer breaks during the workday to recover from noise and vibration. Plan your work so that the use of equipment that generates strong vibrations is distributed over a longer period. If you feel discomfort or notice changes in the color of your hands while using the tool, stop work immediately. Take sufficient breaks during work. Without sufficient breaks during work, vibration-induced hand-arm syndrome may occur. You have risks from noise and vibration. Maintain the tool in accordance with the instructions in the operating manual. If the tool is used frequently, contact your dealer to purchase anti-vibration accessories (e.g., handles). Operate the tool at temperatures above 10°C. In the work plan, determine how vibration exposure can be limited.
3.4 Noise and vibration
Some noise from this tool cannot be avoided. Perform noisy work during permitted and designated hours of the day. If necessary, observe rest periods and limit the duration of work to the minimum necessary. For your personal protection and for the protection of people nearby, you must wear hearing protection.
4 Assembly
WARNING! Danger of incorrect assembly! Working with an improperly assembled tool can lead to serious injury.
Work with the machine only when it is fully assembled! Before switching on, check all safety devices to ensure they are present and functional!
4.1 Assembling the vertical shaft (04 - 06)
Assemble the full base frame (04)
1. Insert the full base frame (04/a) into the openings (04/2) of the vertical shaft. 2. Securely tighten the full base frame with the screws (02/14, 03/13, 04/3) to the full frame (04/b).
Attaching the cable guide bracket (05)
- 1. Slide the cable guide bracket (05/1) from above onto the upper base frame (05/a). 2. Secure the safety clamp for the cable guide bracket (05/2) to the cable guide bracket on the upper base frame (05/b).
Assembling the middle frame to the full base frame (06)
1. Place the two middle frames (06/1) onto the full base frame (06/2). 2. Insert the screws (06/3). 3. On the left side: insert the screw (06/3) through the cable guide (06/8) of the cable. 4. Secure the washers (06/4), nuts (06/5), and cap nuts (06/6) and tighten.
Assembling the upper base frame to the middle frame (06)
Place the upper main spring, attach the bracket for cable routing.
- Place the upper main spring (06/7) to the middle spring (06/1).
- Insert the screws (06/3).
- Attach the washers (06/4), nuts (06/5), and tighten the nuts (06/6) and secure them.
Attachment of cable brackets (06)
4.2 Mounting the debris collection collector (07, 08)
1. Secure the cables with the cable brackets (06/9) to the holder (06/e).
Insert (07) to (08).
5 START-UP AND OPERATION
WARNING! Risk of damage to the device. The adjusting lever is attached to the side of the chipper.
Remove the adjusting lever before switching on the device.
5.1 Perform a visual inspection
- Check the device for damaged or loose screws. Replace defective parts of the device and tighten the screws. 2. Check the safety devices. Replace defective safety devices.
- Check the device for heavy contamination. Remove the contamination.
5.2 Adding the safety cable - check the connection with the safety mechanism
Safety instructions for cable protection.
Selecting the cable protection
Select the cable protection that meets the following requirements:
3-core cable with a minimum cross-section of 2.5 mm² (i.e., with protective conductor) Maximum 40 m length Protection against water jets (protection class IP44) Outdoor use (cable type H05RN-F, i.e., rubber cable)
Selecting the connection with the protection
Check that the connection with the protection meets the following requirements:
At least 10 A rated current Overcurrent protection with max. residual current 30 mA
5.3 Adjusting the main handle (06)
- On both sides of the main handle under the middle handle:
Remove the cap nuts (06/6) from the middle handle (06/1). Remove the nut (06/5) and washer (06/4) from the bolt. Remove (06/c) the bolt (06/3).
- On the left side: Remove the bolt (06/3) through the cable bracket (06/8) of the cable. 3. Move the main handle (06/2, 06/7) to the middle hole of the middle handle (06/d).
- Reassemble the main handle in reverse order.
6 CONTROL
INSTRUCTIONS: The saw blade must be vertical (max. blade height: 4 cm). Remove the saw blade from the surface for the blade. Stay in working position and hold the handle firmly to ensure stability during work.
6.1 Raising and lowering the main handle (09)
WARNING! Risk of injury.
Fingers or other parts of the body can get caught between the swivel parts of the main frame.
Keep the swivel parts of the main frame firmly. Do not place fingers or other parts of the body between the swivel parts.
WARNING! Risk of damage to the locking cable. The locking cable can be pinched between the swivel parts of the main frame and be damaged.
Do not pull the cables when folding/unfolding the main frame.
Folding the main frame
- Loosen the locking knobs (09/1) on the lower main frame and fold the upper main frame (09/2) downward (09/a).
- Loosen the locking knobs (09/3) on the upper main frame until the upper main frame can be folded upward (09/b).
- Then tighten all locking knobs.
Unfolding the main frame
Proceed in reverse order.
6.2 Attaching the optional cutting unit (10)
The unit can be used with or without the grass collection bag.
For vertical cutting without a collection tray for grass
WARNING: The cutting attachment is closed at delivery. Before vertical cutting, remove the cutting attachment so that the material from vertical cutting can be discharged through the cutting attachment.
- Remove the cutting attachment (10/1) backwards until it releases, tilting it approximately 30°.
For vertical cutting with a collection tray for grass
The cutting attachment is fully raised. Using the collection tray for grass: see section 6.3 "Attaching and removing the collection tray for grass [optional] (11)," page 272.
6.3 Attaching and removing the collection tray for grass [optional] (11)
Attaching the collection tray for grass
- 1. Raise the cutting attachment (11/1). 2. Attach the collection tray for grass (11/2) by guiding it from the rear over the support bracket (11/b). 3. Lower the cutting attachment.
Removing and emptying the collection tray for grass
- 1. Stop the engine and pull the spark plug connector to prevent the engine from starting. 2. Raise the cutting attachment (11/1).
- 3. Remove the collection tray for grass (11/2) from the mounting points and pull it backwards. 4. Empty the collection tray for grass.
- Remove the collection tray for grass (see above).
6.4 Adjusting the working depth (12)
WARNING! Danger of injury.
When the blade comes into contact with the engine module, which is not stopped or is not at rest, there is a danger of injury.
Stop the machine and remove the plug from the socket. Then, to avoid injury, wear protective gloves. Follow the instructions.
The adjustment of the working depth is determined by:
Condition of the soil:
Well-maintained: shallow working depth. Poorly maintained: deep working depth.
Material from vertical tillage:
First, set a penetration depth of 2-3 mm. Gradually adjust the working depth deeper until the material from vertical tillage is removed from the soil.
Adjusting the blades:
New blades: shallow working depth. Worn blades: deep working depth.
If the working depth is too deep, the machine stops and the engine does not start.
WARNING! Risk of damage to the machine. Adjust the working depth only when the engine and blades are stopped.
- Turn the handle for adjusting the working depth (12/1) clockwise for shallow working depth (12/2). The machine moves up.
2. Checking the working depth:
Start the machine (see Chapter 6.6 "Starting and stopping the engine" (16, 17), page 273). Drive a short distance on the field and check the results. If the field is tilled too shallowly or unevenly, the machine must be lowered.
- Stop the machine and remove the plug from the socket.
- Turn the handle for adjusting the working depth (12/1) counterclockwise for deep working depth (12/3). The machine moves down.
- NOBTOpeI npedHnTe cTbNkN,doKaTo MopaBaTa He cTaHe paBHomepHo BepTKyTnpaHa.
6.5 Connecting to the mains (13, 14, 15)
- Connect the mains cable (13/1, 14/1) to the mains switch (13/2, 14/2) of the motor protection switch.
- Insert the (15/a) and (15/b) mains cable (13/3, 14/3) into the cable clamp (13/4, 14/4), so that it cannot be pulled out of the motor protection switch.
6.6 Starting and stopping the motor (16, 17)
WARNING! Risk of damage to the device. If the motor is switched on and off repeatedly in quick succession, the motor and the relay may be damaged. Switch on the motor only when the relay is ready.
Starting the motor 32.4 E
- Press the safety button (16/1) and hold it pressed (16/a). 2. Pull the motor switch lever (16/2) towards the main handle (16/3) (16/b). The motor starts and the relay engages.
- Release the safety button (16/1) and hold the lever for switching on the motor (16/2).
NOTE The lever for switching on the motor cannot be locked. Hold it only for as long as you work with the main handle.
Starting the motor 38.4 E
- Press the safety button (17/1) and hold it pressed (17/a). 2. Pull the pre-selector switch (17/2) towards the main handle (17/3) (17/b). The motor starts and the relay engages.
- Release the safety button (17/1) and hold the pre-selector switch (17/2).
NOTE The pre-selector switch cannot be locked. Hold it only for as long as you work with the main handle.
Stopping the motor 32.4 E
- The throttle position sensor (16/2) automatically returns to the zero position.
The engine stops. The repair module continues to rotate until it stops.
Engine stop 38.4 E
- The preset rail (17/2) is pushed. It automatically returns to the left position.
The engine stops. The repair module continues to rotate until it stops.
WARNING! Risk of injury.
When installing the lever to the repair module, if it is not secured, there is a risk of injury.
Turn the lever and the sound until the repair module stops. Remove the cover to disconnect the lever. Wear protective gloves.
7 MAINTENANCE AND CARE
WARNING! Risk of injury.
When installing the lever to the repair module, if it is not secured, there is a risk of injury.
Turn the lever and the sound until the repair module stops. Remove the cover to disconnect the lever. Wear protective gloves.
INSTRUCTION: Replace the defective protective cover, cable only with original protective cover, cable (with marked contact) from the manufacturer!
7.1 Maintenance of the repair module
WARNING! Risk of water. Water entering the device can cause short circuits and damage to electrical parts.
Turn off the device with water. For cleaning, use only a brush for collecting debris or a cleaning brush.
- Turn off the device and remove the power module to turn it off. 2. Remove the cover.
- Detach the debris collection container (see Chapter 6.3 "Attaching and Detaching the Debris Collection Container [optional] (11)", page 272).
- Then turn the device on and attach the power module with the brush for debris or for cleaning.
7.2 Removing the Vertical Adjustment Roller and the Leveling Roller (optional) (18)
The vertical adjustment roller is intended for coarse vertical adjustment, and the leveling roller (optional) is intended for fine vertical adjustment (see Chapter 2.6 "Scope of Delivery (02, 03), page 266).
Removing the rollers
- Turn off the device and remove the power module to turn it off. 2. Remove the cover. 3. Turn over.
- Unscrew the screws (18/1) (18/a).
- Remove the locking bracket (18/2) upward (18/b).
- Press the lever (18/3) toward the housing (18/c).
- Remove the roller (18/d).
Installing the rollers
Proceed in the reverse order.
8 Troubleshooting
WARNING! Danger of injury.
Moving parts and their area may cause injury.
Follow the rules for maintenance, service, and cleaning after the protective cover!
INSTRUCTIONS FOR REPAIRS that are not listed in this table or that you cannot perform yourself, please contact your nearest competent customer service.
Be careful not to damage or break the network cable to avoid electric shock!
1.2 Symbols and signal words
DANGER! Indicates a hazardous situation which, if not avoided, will result in death or serious injury. WARNING! Indicates a potentially hazardous situation which, if not avoided, could result in death or serious injury. CAUTION! Indicates a potentially hazardous situation which, if not avoided, may result in minor or moderate injury.
ATTENTION! Indicates a situation which, if not avoided, may result in property damage.
NOTE Special instructions for better understanding and operation.
2 PRODUCT DESCRIPTION
This document describes several models of devices. Determine the model by the images and descriptions of the different functions.
2.1 Intended use
The aerator is intended for loosening and aerating the lawn (aeration) on private plots, and it can be used only on dry, short-cut lawns. Any other use or unauthorized modifications and additions are considered misuse and
lead to the voiding of the warranty, as well as the loss of conformity (CE mark) and the rejection of any liability for damage caused to the user or third parties by the manufacturer.
2.2 Cases of intended use
The device is not intended for commercial use in public parks, sports grounds, agricultural and forestry operations. It should not be used for trimming hedges and garden fences, nor for leveling surfaces.
2.3 Protective and safety devices
DANGER! Risk of injury.
Malfunction or failure of protective and safety devices can cause injury.
Faulty protective and safety devices must be repaired. Never disable protective and safety devices.
Switch lever for motor / protective arc
The device is equipped with a motor switch lever / protective arc that stops the device when released.
Deflector flap
The device is equipped with a deflector flap that prevents the ejection of grass and objects when the grass catcher is vertical.
2.4 Symbols on the device
Symbol
Meaning
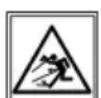

Danger from ejected objects! Keep bystanders out of the danger zone! Maintain a safe distance!

Before performing maintenance, care, and cleaning work, read the operating instructions!
Symbol
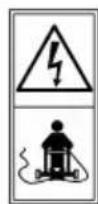
Connect to the mains cable! Danger of electric shock if the mains cable is damaged.
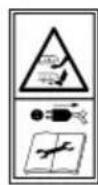
Before servicing, maintenance, and cleaning, disconnect the device from the mains power supply!
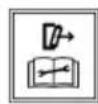
Not applicable.

Required actions for starting the engine
See section 6.6 "Starting and stopping the engine (16, 17), page 286"

Vertical at shallow depth

Vertical at great depth
2.5 Product overview (01)
No.
Component
1 Upper guide bar, foldable 232.4E: Release lever for engine 38.4E: Overload protection arc 3 Engine switch with key interlock and built-in mains plug 4 Cable coupling plate 5 Screws with hex head 6 Spray guard 7 Lower guide bar, height-adjustable 8 Deflector flap 9 Disc for setting working depth
No. Component
10 Adjustment mechanism for the drive lever for the spray cylinder 11 Grass catcher 12 Drive shaft bearing 13 Spray cylinder*
- Only for 38.4E
The production date is indicated on the factory plate. The production date corresponds to the first four digits of the serial number KYZ-AAAA.
X: year of production Y: month of production (A = January) ZZ: day of production
2.6 Delivery set (02, 03)
The delivery set includes the listed items. Check that all items are included:
No. Component Measure
1 Upper guide beam 2 Middle handle element (2 pcs.) 3 Lower guide beam 4 Spindle 5 Chip collector 6 Coupling plate for cable 7 Terminal for protective grounding of plastic coupling for cable 8 Cable clamps (2 pcs.) 9 Nuts (4 pcs.) 10 Clamps for cable 11 Nuts (4 pcs.) 12 Sealing rings (4 pcs.) 13 Bolts for guide beam (4 pcs.) 14 Bolts for lower handle element (2 pcs.) 15 Ventilator shaft
No. Component Measure
16 Aerating cylinder* | **
- *only for 38.4 E
**Danger of damage to the device. Before using the device, remove the aerating cylinder.
Accessories available:
3 SAFETY INSTRUCTIONS
3.1 General safety instructions for electrical machines
WARNING! Read all safety instructions, instructions, illustrations and technical specifications included with this machine. Failure to follow the safety instructions and instructions may result in electric shock, fire and/or serious injury.
Keep all safety instructions for future use.
The term "machine" used in the safety instructions refers to a machine powered by mains electricity (with a mains cable) or a machine powered by a battery (without a mains cable).
3.1.1 Safety at the workplace
The workplace must be clean and well lit. Clutter or unlit areas at the workplace can lead to accidents. Do not work with the machine in an explosive atmosphere, where flammable liquids, gases, or dust are present. Machines produce sparks that can ignite dust or vapors. While using the machine, keep children and other people away. If you are distracted, you may lose control of the machine.
3.1.2 Electrical safety
The machine's plug must fit the outlet. The plug must not be modified. For machines with protective grounding, do not use adapter plugs or ungrounded plugs and matching outlets; this reduces the risk of electric shock. Avoid body contact with grounded surfaces such as pipes, radiators, stoves, or refrigerators. If your body is grounded, there is an increased risk of electric shock. Do not use the machine in rain or wet conditions. This may increase the risk of electric shock. Do not use the connecting cable for purposes other than intended, such as carrying or pulling the machine or pulling the plug out of the outlet. Keep the connecting cable away from sources of heat, oil, sharp edges, or moving parts. Damaged or tangled connecting cables increase the risk of electric shock. If you work with the machine outdoors, use only extension cables that are also suitable for outdoor use. Using an extension cable intended for outdoor use reduces the risk of electric shock. If the machine must be used in a damp environment, use a residual current device (RCD). Using an RCD reduces the risk of electric shock.
3.1.3 Personal safety
When working with the machine, you must be attentive and approach the work with a clear understanding of the appropriateness of your actions. Do not use the machine when tired or under the influence of alcohol, narcotics, or medications. A brief lapse of attention while using the
machine can lead to serious injuries.
Personal protective equipment must be worn, and protective goggles are mandatory. Depending on the type and conditions of use of the machine, the use of personal protective equipment such as a respirator, non-slip safety footwear, a safety helmet, or hearing protection significantly reduces the risk of injury. Avoid accidental starting. It is necessary to make sure that the machine is switched off before connecting it to the power source and/or battery pack, picking it up, or carrying it. Do not carry the machine with your finger on the switch or connect it to the mains while it is switched on. This could cause an accident. Before switching on the machine, remove adjustment tools or wrenches. A tool or wrench left in a rotating part of the machine can cause damage. Avoid an awkward body position. It is necessary to choose a stable position that allows you to maintain balance at all times. This will help you better control the machine in unexpected situations. Wear suitable clothing. Do not wear loose clothing or jewelry. Keep your hair and clothing away from moving parts. Loose clothing, jewelry, or long hair can get caught in moving parts. If dust extraction and collection equipment is provided, make sure it is properly connected and used. Dust extraction can reduce dust-related hazards. Do not consider yourself immune to danger and do not ignore the safety rules for machines, even if you are familiar with the machine after repeated use. Careless handling can lead to serious injury within a few seconds.
Do not overreach. Use the appropriate machine for the job. Using the correct machine will allow you to work better and more confidently within the specified power range. Do not use a machine with a damaged switch. A machine that cannot be turned on or off is dangerous and requires repair. Before adjusting the device, changing parts, or storing the machine, unplug the power cord (or) remove the battery. This precautionary measure will prevent accidental starting of the machine. Store unused machines in a place inaccessible to children. Do not allow people who are unfamiliar with the machine or who have not read these instructions to use it. Machines are dangerous if used by inexperienced people. Take good care of your machines. Check that moving parts are in perfect working order, not pinched, broken, or damaged to the extent that the machine functions worse. Before using the machine, damaged parts must be repaired. Many accidents occur due to poorly maintained machines. Keep cutting tools sharp and clean. Properly maintained cutting tools with sharp edges are less likely to jam and are easier to control. Use the machine, accessories, etc., in accordance with these instructions. Take into account working conditions and the specific task. Using the machine for purposes for which it is not intended may lead to dangerous situations. Make sure that handles and gripping surfaces are dry and clean, free of oil or grease. Slippery handles and gripping surfaces do not allow for safe operation and control of the machine in unexpected situations.
3.1.5 Service
3.2 Safety instructions for vertical trimmers and hedge trimmers for gas
The machine must only be operated by qualified personnel using original spare parts. This ensures the machine's reliability. Do not use the machine in bad weather, especially during thunderstorms. This reduces the risk of lightning strikes. Carefully check the machine's work area for the absence of wild animals. The working machine can injure wild animals. Carefully check the machine's work area and remove all stones, sticks, wire, bones, and other foreign objects. Their pieces, which fly out during mowing, can cause injury. Before using the machine, always check the blade and blade assembly for wear and damage. Worn or damaged parts increase the risk of injury. Before use, check the power cord and extension cables for signs of damage or aging. Do not use the machine if it is damaged or worn. In case of damage or wear of the power cord during operation, turn off the machine and do not touch the cord until you have unplugged the power plug from the outlet. Damaged power cords or extension cables can lead to electric shock, fire, and/or serious injury. Regularly inspect the oil tank for wear. A worn or damaged oil tank can increase the risk of injury. Keep the protective covers in place. The protective covers must be in good condition and securely fastened. Loose, damaged, or faulty protective covers can lead to injury. Clean the air intake openings of debris. Clogged openings
for air intake and debris can lead to overheating or fire.
Do not use the machine barefoot or in open sandals. This reduces the risk of injury from contact with the rotating blade. Always wear long trousers when operating the machine. Loose clothing increases the risk of injury from thrown parts. Do not use the machine on wet grass. Do not run. This reduces the risk of slipping and falling, which could lead to injury. Do not operate the machine on steep slopes. This reduces the risk of losing control, slipping, and falling, which could lead to injury. When working on slopes, watch your footing; always work perpendicular to the slope; working uphill or downhill is strictly prohibited; when changing direction of work, extra caution is required. This reduces the risk of losing control, slipping, and falling, which could lead to injury. Be especially careful when working in reverse or pulling the machine towards you. Pay attention to the surroundings. This reduces the risk of tripping during work. Keep the power cord away from the blades. A damaged power cord can lead to electric shock, fire, and/or serious injury. Turn off the machine and disconnect it from the mains if the cord is tangled or damaged. Damaged cords can increase the risk of electric shock. Hold the machine only by the insulated handles, as the blade may contact hidden wiring or its own cord. Contact of the blade with a live wire can cause the metal parts of the device to become live, which can lead to electric shock.
Metal parts of the device will also be live, which can cause electric shock.
Do not touch the blade or other dangerous moving parts. This reduces the risk of injury from moving parts. Before removing jammed material or cleaning the machine, make sure all switches are off and the cord is disconnected. Unexpected use of the machine can lead to serious injury.
3.3 Vibration load
Declared vibration and noise values
The declared total vibration and noise values are measured in accordance with a standardized test method and can be used to compare one power tool with another. The declared total vibration and noise values can also be used for a preliminary assessment of exposure. The total vibration and noise values may differ from the declared values during actual use, depending on the way the power tool is used. Observe safety measures in accordance with the safety chapter. Try to keep the vibration load to a minimum. Example measures to reduce vibration load include wearing gloves when using the tool and limiting working time. In this case, all parts of the working cycle must be considered (for example, times when the power tool is switched off and times when it is switched on without load).
Vibration hazard
The actual vibration emission value during use of the device may differ from the declared value. Observe the following factors affecting exposure during use:
Is the device being used for its intended purpose? Is the material being cut or processed correctly?
Is the device in good working condition? Is the cutting tool correctly sharpened or installed? Are auxiliary handles installed, if required, and are they securely attached to the device?
Operate the device only at the speed required for the job. Avoid maximum speed to reduce noise and vibration. Improper use and maintenance may increase vibration levels. This is harmful to human health. In such cases, immediately turn off the device and contact an authorized service center for repair. The level of vibration stress depends on the work being performed or the use of the device. Assess and set appropriate breaks in work. As a result, vibration load over the entire working time will be significantly reduced. Prolonged use of the device may cause vibration-related issues with blood circulation (the "white finger" symptom). To reduce this risk, wear gloves and keep hands warm. If symptoms of "white finger" are detected, immediately consult a doctor. These symptoms include: numbness, loss of sensation, tingling, itching, pain, weakness, changes in color or condition of the skin. Usually these symptoms appear on the fingers, hands, or wrists. At low temperatures, the risk increases. During the working day, take regular breaks to rest from noise and vibration. Plan your work so as to divide the operation of the device, which creates strong vibrations, over several days. If you feel discomfort or tingling in the hands when using the device, immediately stop working. Set sufficient breaks in work. Working without sufficient breaks
may lead to local vibration disease.
Minimize the risk of vibration exposure. Perform maintenance of the device in accordance with the instructions in the operating manual. If the equipment is used frequently, contact a specialist to purchase anti-vibration accessories (e.g., gloves). Avoid working with the device at temperatures below 10°C. In the work plan, determine how to limit vibration load.
3.4 Acoustic Load
Some acoustic load caused by this device is unavoidable. Perform noisy work at the established and specified times. If necessary, consider instructions regarding "quiet hours" and limit the duration of work to the most necessary. To ensure protection of yourself and those nearby, it is necessary to wear ear protection.
4 INSTALLATION
Danger of injury due to improper mounting! Operating an improperly mounted device can lead to serious injuries.
The device may only be operated when fully installed! Before switching on, check for the presence and serviceability of all protective and safety devices!
4.1 Installation of the vertical turret (04-06)
Install the lower guide beam (04)
- Insert (04/a) the lower guide beam (04/1) into the openings (04/2) of the vertical turret.
- Tighten by hand (04/b) the lower guide beam with bolts (02/14, 03/13, 04/3) for the handle element.
Attaching the elastic coupling for the cable (05)
- Slide (05/a) the elastic coupling for the cable (05/1) from below onto the upper guide beam.
2. Secure (05/b) the cable guard for the elastic coupling for the cable (05/2) at the bottom to the upper guide beam.
Installation of the middle handle elements on the lower guide beam (06)
- Place both middle handle elements (06/1) on the lower guide beam (06/2).
- Insert the bolts (06/3).
- Left: Insert the bolt (06/3) through the cable clamp (06/8) on the cable.
- Install and tighten the sealing plugs (06/4), nuts (06/5), and wing nuts (06/6).
Installation of the upper guide beam on the middle handle elements (06)
Before installing the upper guide beam, install the elastic coupling for the cable.
- Install the upper right handle (06/7) on the middle element of the handle (06/1).
- Insert the bolts (06/3).
- Install and tighten the sealing washers (06/4), nuts (06/5), and wing nuts (06/6).
Attaching the cable clamps (06)
- Secure (06/e) the cable with the cable clamps (06/9) on the handle.
4.2 Mounting the grass catcher (07, 08)
See fig. (07)-(08).
5 COMMISSIONING
CAUTION! Risk of damage to the device. The air filter is secured in the lower part of the cylinder.
Before switching on the device, remove the air filter.
5.1 Visual inspection
1. Check the device for damage or loose screws. Replace damaged parts and tighten screws. 2. Check the power cord for damage. Replace the damaged power cord. 3. Remove any dirt or blockages. Clean the device.
5.2 Checking the condition of the power cord and the power connection
Follow the safety instructions for the power cord.
Power cord requirement
Check the connection corresponds to the following requirements:
3 wires with a minimum cross-section of 2.5 mm (i.e., with a protective wire) maximum length: 40 m. Protection against water splashes (protection class: IP44) and suitable for outdoor use (quality H05RN-F, i.e., rubber hose).
Requirement for wall mounting.
Check the connection to the mains corresponds to the following requirements:
Fuse with a minimum current of 10 A. Residual current device with a rated current of max. 30 mA.
5.3 Adjusting the guide bar (06)
- On both sides of the guide bar, at the lower and upper part of the middle element of the handle:
Turn the wing nut (06/6) on the middle element of the handle (06/1). Remove the nut (06/5) and the sealing washer (06/4) from the bolt. Pull out (06/c) the bolt (06/3).
2. On the left: Pull out the bolt (06/3) through the cable clamp (06/8) on the cable. 3. Move (06/d) the guide bar (06/2, 06/7) to the next hole on the middle element of the handle. 4. Reassemble the guide bar in reverse order.
6 ASSEMBLY SEQUENCE
1. WARNING: Always keep a distance from the gas before mowing (maximum height of the gas: 4 cm). Remove foreign objects from the gas. Stay in a normal working position and firmly hold the handle to ensure stability during work.
6.1 Folding and unfolding the guide bar (09)
CAUTION! Danger of pinching.
Loose parts of the body can be caught between the free parts of the guide bar.
Hold the free parts of the guide bar well. Keep fingers and other body parts away from the free parts.
WARNING! Risk of damage-free operation. The engine cable and the guide rail cable must be routed between the free parts of the guide rail, which will lead to their damage.
Make sure that the cable is not pinched when folding/unfolding the guide rail.
Folding the guide rail
- Loosen the tensioning screws (09/1) and fold the upper guide rail (09/2) back.
- Loosen the tensioning screws (09/3) on the upper guide rail so that the entire folded upper guide rail can be folded upwards (09/b).
- Slightly tighten all tensioning screws.
Unfolding the guide rail
Perform all steps in reverse order.
6.2 Opening the protective flap (10)
The device can work with or without a grass catcher.
Too high working depth: the device stops, the engine does not start.
WARNING! Risk of damage to the device. Adjust the working depth only when the engine is stopped and the blade shaft is switched off.
6.5 Connecting the mains cable (13, 14, 15)
- Insert the socket (13/1, 14/1) of the mains cable into the plug (13/2, 14/2) of the engine switch. 2. Connect (15/a) and (15/b) the mains cable (13/3, 14/3) to the cable coupling (13/4, 14/4) so that it cannot be pulled off the engine switch.
6.6 Starting and stopping the engine (16, 17)
ATTENTION! Risk of damage to the device. Repeated short-term switching on/off leads to damage to the engine and the cutting mechanism. Switch on the engine only when the cutting mechanism is in the fully lowered position.
Starting the engine 32.4 E
- Press the unlocking button (16/1) and hold it in the pressed position (16/a). 2. Press (16/b) the gear lever (16/2) towards the guide beam
(16/3). Start the engine and the cutting mechanism. 3. Release the unlocking button (16/1) and hold the gear lever (16/2).
NOTE: The gear lever is not locked. Hold it on the guide beam for the entire duration of the work.
Starting the engine 38.4 E
- Press the unlocking button (17/1) and hold it in the pressed position (17/a). 2. Press (17/b) the protective guard (17/2) towards the guide beam (17/3). Start the engine and the cutting mechanism.
- Release the unlocking button (17/1) and hold the protective guard (17/2).
NOTE: The protective guard is not locked. Hold it on the guide beam for the entire duration of the work.
Stopping the engine 32.4 E
- Release the gear lever (16/2). It automatically returns to the neutral position.
The engine will stop immediately. The cutting mechanism will continue to operate until it stops.
Stopping the engine 38.4 E
- Release the protective guard (17/2). It automatically returns to the neutral position.
The engine will stop immediately. The cutting mechanism will continue to operate until it stops.
CAUTION! Risk of cuts. Contact with the moving or coasting cutting tool presents a risk of cuts.
Stop the device and wait until the cutting tool has come to a standstill. Pull the mains plug to disconnect the device. Wear protective gloves.
7 MAINTENANCE AND CARE
CAUTION! Risk of cuts. Contact with the moving or coasting cutting tool presents a risk of cuts.
Stop the device and wait until the cutting tool has come to a standstill. Pull the mains plug to disconnect the device. Wear protective gloves.
I NOTE: Replace a defective mains cable only with an original mains cable (with plug) from the manufacturer.
7.1 Cleaning the device
WARNING! Danger due to water ingress. Water entering the device can cause a short circuit and damage to electrical components.
Do not spray water on the device; use a slightly damp cloth for cleaning.
- Stop the device and wait until the cutting mechanism has come to a standstill.
- Pull the mains plug.
- Remove the grass catcher (see Chapter 6.3 "Installing and removing the grass catcher [optional] (11)," page 286).
- Tilt the device to the side and clean the cutting mechanism with a brush or cloth.
7.2 Replacing the aerator shaft or aerator spiral (optional) (18)
The aerator shaft is intended for initial, coarse cleaning and processing of the lawn; the aerator spiral (optional) is for more thorough cleaning (see Chapter 2.6 "Scope of delivery (02, 03), page 279).
- Stop the device and wait for the mechanism to stop.
- Pull out the mains plug.
- Turn the device over.
- Unscrew the bolts (18/1). 5. FIXING BRACKET (18/2) FOLD UP (18/b).
- Push the shaft (18/3) slightly in the direction of the housing (18/c).
- Remove the shaft (18/d).
Mounting the shaft
Perform all steps in reverse order.
8 TROUBLESHOOTING
CAUTION! Risk of injury. Moving parts and sharp edges can cause injury.
Always wear protective gloves during technical maintenance and care.
NOTE: In case of malfunctions not listed in this table or that you cannot fix yourself, contact our service department.
12 CUSTOMER SERVICE
If you have any questions regarding warranty, repair, and spare parts, please contact the nearest AL-KO service center. The address can be found on the Internet at the following address:
www.alko-garden.com/service-contacts
More detailed information about spare parts is available at the link:
www.alko-garden.com/spareparts
13 DECLARATION OF CONFORMITY
We hereby declare, under our sole responsibility, that this product, in the form in which it is placed on the market, complies with the requirements of the harmonized EC directives, EC safety standards, and the specific standards applicable to this product. The declaration of conformity is part of the operating instructions and is attached to the ma-
14 WARRANTY
We will remedy any possible material or manufacturing defects within the statutory limitation period, as established by law with regard to claims for quality, by repairing or replacing the product. The limitation period is determined by the legislation of the country in which the device was purchased.
Our warranty obligation is void - the warranty is annulled in the event of:
Only in the event of: attempts at self-repair; failure to follow this operating manual; self-made technical modifications; use not in accordance with the intended purpose; improper handling; use of non-original spare parts.
The warranty does not cover:
Damage to the paint coating caused by normal wear; wearing parts, as marked in the spare parts list (XXXXXX).
The warranty period begins after the purchase by the first end user. The decisive factor is the date on the purchase document. Please contact your dealer or the nearest authorized service center with this certificate and the purchase document. This certificate does not affect the statutory rights of the buyer to make claims against the seller.
INSTRUCTIONS FOR USE AND OPERATION
1 Information about the manual 291
1.1 Symbols on the title page.. 291 1.2 Symbols and abbreviations 292
2 Description of the device 292
2.1 Intended use..... 292 2.2 Possible misuse..... 292 2.3 Prohibited and protective elements..... 292 2.4 Symbols on the device.. 292 2.5 Product overview (01) 293 2.6 Scope of delivery (02, 03) 293
3 Safety instructions 294
3.1 General safety instructions for electrical machines 294
3.1.1 Safety at the workplace..... 294 3.1.2 Electrical safety 294 3.1.3 Safety of persons 294 3.1.4 Use and handling of the electrical machine 295 3.1.5 Service 295
3.2 Safety instructions for vertical cutters and operators of mowers 295 3.3 Vibration load 296 3.4 Acoustic load 297
4 Assembly 297
4.1 Mounting the vertical cutter (04-06). 4.2 Mounting the grass catcher (07, 08) 298
5 Commissioning 298
5.1 Visual inspection.. 298 5.2 Check the cable and plug before connecting to the mains 298 5.3 Adjusting the cutting height (06) .... 298
6 Operation 298
6.1 Folding and unfolding the frame parts (09). 299 6.2 Using the transport lock (10) 299
6.3 Installation and removal of the pressure switch [optional] (11) 299 6.4 Setting up the hydraulic system (12). 299 6.5 Installation/disconnection of the switch (13, 14, 15). 300 6.6 Starting and stopping the engine (16, 17).. 300
7 Technical maintenance and care ...300
7.1 Cleaning the moving block.. 301 7.2 Filling for vertical or horizontal (optional) (18) 301
8 Troubleshooting 301 9 Transportation 302 10 Storage 302 11 Disposal 302 12 Service maintenance. 303 13 Information about the declaration of conformity. 303 14 Warranty 303
1 INFORMATION ON THE OPERATING MANUAL
The German version of this operating manual is the original. All other language versions are translations of the original manual. Always keep this manual with the device so that you have the information about the device at hand. Pass the device on to other persons only together with this manual. Read and follow the safety instructions and warnings before using this manual.
1.1 Symbols on the title page
Symbol

Meaning
Mandatory: Read this manual before commissioning. This is a necessary condition for safe and trouble-free operation.
Symbol
Meaning

Vertical on small hydraulic

Vertical on large hydraulic
2.5 Overview of the device (01)
Item
Component
1 Upper frame part, adjustable 232.4E: Belt for lifting mechanism 38.4E: Rear bracket with switch for lifting mechanism with built-in limit switch 4 Coupling for cable 5 Mounting bolts 6 Middle crossbar 7 Lower frame part, adjustable in height 8 Fuse 9 Disconnecting device for lifting mechanism 10 Lifting mechanism with vertical shaft or shaft for drive 11 Cable guide 12 Vertical shaft 13 Shaft for drive
*Only 38.4E
Date of manufacture
The date of manufacture is indicated on the product nameplate. The date of manufacture is indicated by the first two digits of the serial number XYZ - AAAAAAAAA.
X: Year of manufacture Y: Place of manufacture (A = January) ZZ: Day of manufacture
2.6 Delivery set (02, 03)
The delivery set includes the items listed below. Check the availability of all items:
Item Component
1 Upper frame part 2 Middle crossbar (2 pcs.) 3 Lower frame part 4 Vertical lift 5 Cable guide 6 Coupling for cable 7 Clamp for coupling for cable 8 Cable clamp (2 pcs.) 9 Bracket-bushings (4 pcs.) 10 Cable clamp for cable 11 Bolts (4 pcs.) 12 Washers (4 pcs.) 13 Bolts for upper frame part (4 pcs.) 14 Bolts for lower frame part (2 pcs.) 15 Vertical shaft 16 Shaft for drive* | **
*Only 38.4E
** Risk of damage to the device. Remove the drive shaft before moving the device.
Available accessories:
Drive shaft 32 cm, art. No: 114049 (only for 32.4E Basic Care)
3 SAFETY RULES
3.1 General safety instructions for electric machines
WARNING! Read all safety rules, instructions, specifications, and diagrams included with the machine. Failure to follow safety rules and instructions may result in electric shock, fire, and/or serious injury.
Keep safety rules and instructions for future use.
The term "machine" used in safety instructions refers to machines operating from the mains (with a mains cable) or machines operating from a battery (without a mains cable).
3.1.1 Workplace safety
The work area must be clean and well lit. Clutter and poor lighting are contributing factors to accidents. It is forbidden to use the machine in explosive atmospheres where there are flammable liquids, gases, or dust. Machines create sparks that can ignite dust or fumes. When using the machine, keep children and other people at a safe distance. If you are distracted, you may lose control of the machine.
3.1.2 Electrical safety
The machine plug must match the socket outlet. Never modify the plug in any way. Do not use any adapter plugs with earthed (grounded) machines. Unmodified plugs and matching outlets will reduce risk of electric shock. Avoid body contact with earthed surfaces such as pipes, radiators, stoves, and refrigerators. If your body is earthed, the risk of electric shock increases. It is forbidden to use the machine in rain or damp conditions. This may increase the risk of electric shock.
Do not abuse the cord, never carry the machine by the cord, or pull the cord to disconnect from the mains. Keep the cord away from heat, oil, sharp edges, and moving parts. Damaged or entangled cords increase the risk of electric shock. When operating the machine outdoors, use an extension cord suitable for outdoor use. Use of a cord suitable for outdoor use reduces the risk of electric shock. If operating the machine in a damp location is unavoidable, use a residual current device (RCD) protected supply. Use of an RCD reduces the risk of electric shock.
3.1.3 Personal safety
Be careful, watch your hands and keep your body at a safe distance while working with the machine. Do not use the machine if you are tired or under the influence of drugs, alcohol, or medications. A moment of inattention while working with the machine can cause serious injury. Use personal protective equipment and always wear protective goggles. Depending on the type of machine use, personal protective equipment such as a respirator, non-slip safety shoes, helmet, and gloves significantly reduce the risk of injury. Avoid accidental starting. It is recommended that the machine be switched off before connecting it to the power source and/or battery, picking it up, or carrying it. Do not carry the machine with your finger on the switch and do not connect it to the power supply while it is switched on. This can lead to an accident. Before switching on the machine, remove any adjusting tools or wrenches. A tool or wrench left on a rotating part of the machine can cause injury.
Avoid awkward body positions. Choose a stable stance and maintain balance. This allows better control of the machine in unexpected situations. Wear appropriate clothing. Do not wear loose clothing or jewelry. Keep your hair and clothing away from moving parts. Loose clothing, jewelry, or long hair can get caught in such parts. If dust extraction and collection equipment is provided, it should be properly connected and used. The use of such equipment reduces risks caused by dust. Do not consider yourself safe and do not ignore safety rules for the machine, even if you are familiar with the machine after repeated use. Careless handling can lead to serious injury within seconds.
3.1.4 Use and handling of the electric machine
Do not overload the machine. Use the appropriate machine for the work to be done. With the correct machine you will work better and safer in the specified power range. Do not use the machine with a defective switch. A machine that cannot be switched on or off is dangerous and needs repair. Before adjusting the machine, changing accessories, or storing it, unplug the plug from the socket and/or remove the battery. This prevents accidental starting. Store machines that are not in use in a dry place out of the reach of children. Do not allow persons who are not familiar with the machine or have not read these instructions to use it. Machines used by untrained persons are dangerous. Carefully maintain the machine and accessories. Check that moving parts work properly and do not jam, and that there are no broken or damaged parts that could affect the operation of the machine. Before use,
have damaged parts repaired. Many accidents are caused by poorly maintained machines.
The instrument must be kept clean and sharp. Carefully bend the instrument with sharp edges to reduce the risk of injury and make it easier to control. Use the machine and accessories according to their instructions. Consider the operating conditions and characteristics. Using the machine not for its intended purpose may lead to dangerous situations. Ensure that the handles and the handle parts are dry and clean, free of oil or grease. Slippery handles and handle parts do not allow safe operation and control of the machine in unforeseen situations.
3.1.5 Service
Have the machine repaired only by qualified specialists who use original spare parts. This guarantees that the machine will remain safe to use.
3.2 Safety instructions for hedge trimmers and lawn mower operators
Do not use the machine in bad weather, especially during a thunderstorm. This reduces the risk of being struck by lightning. Carefully inspect the work area for the presence of animals. The machine may injure animals. Carefully inspect the work area and remove all stones, sticks, wires, brushes, and other foreign objects. Objects that are thrown can cause injury. Before using the machine, always check that the teeth or the tooth assembly are not worn or damaged. Worn or damaged parts increase the risk of injury. Before operation, check the power cord for any damage. If the cord is damaged, replace it. Do not use the machine if the cord is damaged or worn. If the cord is damaged during operation, disconnect it immediately.
If the machine is damaged or malfunctioning, turn it off and do not touch it until you have unplugged the power cord. A damaged or worn power cord can lead to electric shock, injury, and/or serious injury. Regularly check the oil level gauge for leaks or damage. A damaged or worn oil level gauge can pose a safety hazard. Keep the protective covers in place. The protective covers must be properly and securely fastened. Loose, damaged, or faulty protective covers can cause injury. Clean the air vents of dust. Clogged air vents can cause overheating or fire. During machine operation, wear appropriate protective clothing. Do not use the machine barefoot or in open sandals. This reduces the risk of injury from contact with the teeth or blades. During machine operation, wear long pants. The possibility of injury from flying debris is reduced. Do not use the machine on wet grass. Do not walk backwards. This reduces the risk of slipping and falling, which can lead to injury. Do not operate the machine on steep slopes. This increases the risk of loss of control, slipping, and falling, which can lead to injury. When operating on slopes, make sure you have a stable footing. Work across the slope, not up or down, and be especially careful when changing direction. This increases the risk of loss of control, slipping, and falling, which can lead to injury. Be especially careful when working in reverse or pulling the machine towards you. Always pay attention to the surrounding environment. This reduces the risk of tripping during work. Keep the power cord away from the teeth. A damaged power cord
4.2 Mounting the grass trimmer (07, 08)
See fig. (07) - (08).
5 STARTING OPERATION
WARNING! Danger of injury from the attachment. For protection, keep it attached to the lower part of the vertical shaft.
Remove the attachment before switching on the device.
5.1 Visual inspection
1. Check the device for damage and the tightness of all screw connections. If necessary, replace all damaged parts and tighten the screw connections.
8 TROUBLESHOOTING
WARNING! Danger of injury.
Moving parts and parts with sharp edges can cause injury.
Wear protective gloves during technical and service maintenance and cleaning! NOTE: If damage occurs that is not listed in the table, or damage that you cannot fix yourself, contact our service department.
| HecnpabHicb TpinyHа YcunHeHn |
| Дыгун He npaцю. Hemae StpymU |
| PizalbHni MexaHizM 3a6HTo DePnom Ta MOXOM. |
| MittteBe KoprOte 3amKanHЯ пд чс BCTaBKn Mepe-JzeBOrO ShTekepa |
| PizalbHni MexaHizM 3a6HTo DePnom Ta MOXOM. |
| ЗнжуOTьС оБерТи ДВИ-уНа ТАяКICь ВERTNkUciI. |
| Hoxi BaIa DnA BERTNkUciI 3NoIeHl. |
Fault Cause Remedy
The device vibrates and runs unevenly.
The shaft for the vertical trimmer is damaged.
3amHItb BaJ dJaBepTKyucii. Cπiδ 3BερHyTnCS yO cepBicHoI MaNCTepHi.
9 TPAHCIOPTYBAHH
YBAG! He6e3neka nooKoJKeHH npncTpoI. PiaJIbHm MexaHI3M 6yJe nooKoJKeHO, JaK- Ioo BepTKyTeP 6yJe pyxaTnca Ha TBepdiN NOBepXHi 3 OnuSeHm PiaJIbHm MexaHI3MOM.
I 106 n iDnAtn p3aIbHm MexaHIm, dNCK pe- rYIIOBaHHra po6Ooi IIN6Hn CJId BCTaHOBnTn Ha BepTKuCiHo Ha HeBeJNKi IIN6Hni. 1. BumkhnytДBnHyTаdoyekatncя nobhoi 3y- nHKn pi3aJIbHoro MexaHi3My. 2.Повернітб дис ретулованг робочи ГИБИНи на Вертукуцio 3 MaIIO ГИБИНо (12/2) npabopyu. 3. BntaHyTmpeXeBn uTekep i3 po3eTKn, CKpyTuTmpeXeBn Ka6enb.
TpaHcnpTyBaHHn npncIpoM MIX DbOMa po6oHmN 3OHAMN
Ipebe3tn npicpti3 nHnTm pi3aHnM mexaHi3MOM do po6o0i 30Hn. Y pa3i nepenecenHn npncTpo: npncptpi cnid Tpimatn 3a pyky dny TpaHCnpTyBaHn.
TpaHcnpTyBaHHЯ npncIpoU B TpaHCnOpTHomy 3ac06i
CknadaaHna yactnHpaMn (nVB. po3di n 6.1 "CknadaaHa ma po3knaadaaHna yacmuHa paMu (09),cmopiHa 299). Uo6 yHnKHyTn nepeKnDaHHa 60 3MiueHH npncTpii cnid 3aΦikcyBaTu. 3a6e3neuHTn 3axnCT npncTPOU BiD yapib iHux npedmetiB. He cTaBиHa npucpii iHsi npedMeTu.
10 3BEPIgAHH
- Bnimitb MepexeBn uTekep. 2.Повернь диck peуловаHHя робочоi ГIN-6ин Ha BepTKyciIO 3 MaIIO rN6HIO (12/2) npabopyu.
- CknaaHnHaactnHn pAMn (nB. po3di 6.1 "CknaaHn ma po3KnadaHn yacmu Hp amu (09)cmopiHa 299).
- PeTeHbHo ouNCTHTn npNcTpii (DVB. po3di 7.1 "OuUeHnH pIXyOzo 6nOKy", cmopinKa 301).
5.ДЯЗхИСТУВIDКОПОЗИHA BCIMETANeBIDETAJIHaHecITbTOHKnIshapMacnaaboCnI-KOHy. 6. 36epiraTe npucptpiB cyxomy, uCTOMy Ta 3axuueHOMy BiD BnINBy Hn3bKnx TeMnepaTyp Micci.ДЯ 3axncty BiD nIpy HaKpnTe NOBITponpOHNKHM TeHTOM.3 MeTOIO 3ano6i- raHHaKONUeHHIO BOIOrn He CJId BnKOpncTOBYBaTI NOnIETNHeHOBY PIIIBky.
11 YTNJI3ALI
Bka3iBkn ⅢoDo eNeKtpnHoro n eNeKtpoHHoro 6bnaHaHHa

Electrical and electronic devices must not be disposed of with household waste. They must be collected and disposed of separately.
Owners or users of electrical and electronic equipment are obliged to return it in accordance with the legislation after use.
The symbol of the crossed-out waste bin indicates that electrical and electronic devices are prohibited from being disposed of together with other household waste.
Electrical and electronic devices can be disposed of free of charge at the following locations:
State service for removal or collection (municipal waste collection points), electrical equipment stores (stationary and online stores) provided that the sellers are obliged to accept them or offer them on a voluntary basis.
These regulations apply only to devices installed and sold in the countries of the European Union, in accordance with EU Directive 2012/19/EC. In countries outside the European Union, different rules for the disposal of electrical and electronic devices may apply.
12 SERVICE AND MAINTENANCE
If you have any questions regarding warranty, repair, or spare parts, please contact the nearest AL-KO service center. The address can be found on the internet at: www.alko-garden.com/service-contacts
Further detailed information about spare parts is available at: www.alko-garden.com/spareparts
13 DECLARATION OF CONFORMITY
We declare under our sole responsibility that this product, in the form in which it is placed on the market, complies with the requirements of the harmonized EU directives, EU safety standards, and the standards applicable to it. The Declaration of Conformity is an integral part of the operating instructions and is attached to the machine.
14 WARRANTY
Until the end of the warranty period established by law, the manufacturer eliminates possible material defects, manufacturing defects, or replaces them (at its discretion). The warranty period is determined by the legislation of the country in which the device was purchased.
The warranty is maintained only under the following conditions:
The warranty is void under the following conditions:
Instructions for use of the manual
Self-repair
Use of the device for its intended purpose
Self-modification of technical characteristics
Use of original spare parts
Use not for its intended purpose
The warranty does not fully cover:
Corrosion of the paint coating, natural wear and tear of parts, wear, damage indicated in the list of spare parts frame; XXXXX (X)
The warranty period begins from the date of purchase of the product by the first end user. The purchase date is indicated in the receipt. In case of a warranty claim, contact the authorized dealer or the original receipt, which confirms the purchase, to your dealer or to the nearest authorized service center. This warranty obligation does not change the rights of the buyer established by law.
Ukraine
LLC AL-KO KOSER
Str. Brovarskaya 156, 07442
v. Velikaya Dymerka, Brovary district,
Kyiv region, Ukraine
Tel/Fax: +38 044 392-07-08 / 09
UK
Imported by: AL-KO Gardentech UK Ltd, Murray way, Wincanton, Somerset, BA9 9RS / UK | +44 (0) 1963 828055
shop.uk@al-ko.com | www.alko-garden.uk
- ABOUT THESE OPERATING INSTRUCTIONS
- SYMBOLS ON THE TITLE PAGE
- SYMBOL MEANING
- LEGENDS AND SIGNAL WORDS
- PRODUCT DESCRIPTION
- DESIGNATED USE
- POSSIBLE FORESEEABLE MISUSE
- SAFETY AND PROTECTIVE DEVICES
- MOTOR SWITCH LEVER/OPERATOR PRESENCE CONTROL
- BAFFLE
- SYMBOLS ON THE APPLIANCE
- PRODUCT OVERVIEW (01)
- SCOPE OF SUPPLY (02, 03)
- NO. COMPONENT
- AVAILABLE AS OPTIONAL ACCESSORIES
- SAFETY INSTRUCTIONS
- GENERAL ELECTRICAL MACHINE SAFETY WARNINGS
- WORK AREA SAFETY
- ELECTRICAL SAFETY
- PERSONAL SAFETY
- ELECTRICAL MACHINE USE AND CARE
- SERVICE
- LAWN SCARIFIER AND LAWN AERATOR SAFETY WARNINGS
- VIBRATION LOAD
- VIBRATION TOTAL VALUES AND NOISE EMISSION VALUES
- THE ACTUAL MAGNITUDE OF THE VIBRATION EMISSIONS DURING THE USE OF THE APPLIANCE MAY DEVIATE FROM THAT STATED BY THE MANUFACTURER. OBSERVE THE FOLLOWING INFLUENCING FACTORS BEFORE OR DURING USE
- NOISE POLLUTION
- ASSEMBLY
- FITTING THE SCARIFIER (04 - 06)
- INSTALLING THE LOWER HANDLEBAR (04)
- FITTING THE CABLE STRAIN RELIEF HOOK (05)
- INSTALLING THE INTERMEDIATE BRACE ON THE LOWER HANDLEBAR (06)
- INSTALLING THE UPPER HANDLEBAR ON THE INTERMEDIATE BRACE (06)
- FITTING THE CABLE CLIPS (06)
- INSTALLING THE GRASS COLLECTOR (07, 08)
- START-UP
- IMPORTANT! RISK OF DAMAGE TO THE APPLIANCE. THE AERATOR ROLLER SCREW IS FASTENED TO THE UNDERSIDE OF THE SCARIFIER
- CARRYING OUT VISUAL INSPECTION
- PROVIDING THE MAINS CABLE AND CHECKING THE MAINS CONNECTION
- DEMANDS ON THE MAINS CABLE
- DEMANDS ON THE MAINS CONNECTION
- ADJUSTING THE HANDLEBAR (06)
- OPERATION
- FOLDING THE HANDLEBAR IN AND OUT (09)
- FOLDING IN THE HANDLEBAR
- FOLDING OUT THE HANDLEBAR
- OPENING THE BAFFLE (10)
- FOR SCARIFYING WITHOUT GRASS COLLECTOR
- FOR SCARIFYING WITH GRASS COLLECTOR
- ATTACHING AND REMOVING THE GRASS COLLECTOR [OPTIONAL] (11)
- ATTACHING THE GRASS COLLECTOR
- REMOVING AND EMPTYING THE GRASS COLLECTOR
- SETTING THE WORKING DEPTH (12)
- MAKING THE MAINS CONNECTION (13, 14, 15)
- STARTING AND STOPPING THE MOTOR (16, 17)
- STARTING THE MOTOR 32.4 E
- STARTING THE MOTOR 38.4 E
- STOPPING THE MOTOR 32.4 E
- STOPPING THE MOTOR 38.4 E
- CAUTION! DANGER OF CUTTING INJURIES
- MAINTENANCE AND CARE
- CLEANING THE BLADE SYSTEM
- REPLACING THE SCARIFIER ROLLER AND AERATION ROLLER (OPTIONAL) (18)
- REMOVING THE ROLLER
- INSTALLING THE ROLLER
- HELP IN CASE OF MALFUNCTION
- TRANSPORT
- TRANSPORTING THE APPLIANCE BETWEEN TWO WORKING AREAS
- TRANSPORTING THE APPLIANCE IN A VEHICLE
- STORAGE
- DISPOSAL
- INFORMATION ON THE GERMAN ELECTRICAL AND ELECTRONIC EQUIPMENT ACT
- WARRANTY
- AFTER-SALES/SERVICE
- INFORMATION ON THE DECLARATION OF CONFORMITY
- TRANSLATION OF THE ORIGINAL USER MANUAL TABLE OF CONTENTS
- POWER CONNECTION (13, 14, 15)
- TABLE OF CONTENTS
- TABLE OF CONTENTS MEANING
- PARTS LIST (01)
- ITEM NO. DESCRIPTION
- OVERALL VIEW (02, 03)
- ITEM NO. COMPONENT
- PROCEED AS FOLLOWS
- GENERAL SAFETY INSTRUCTIONS FOR ELECTRIC MACHINES
- BE36EHOCT HA PAHOM MECTY
- EJEKTPNHA 6E36EHNOCT
- BE36EHOCT LYDU
- USE AND MAINTENANCE OF ELECTRIC MACHINES
- SAFETY INSTRUCTIONS FOR THE VERTICAL SHAFT FOR LAWN TRIMMING
- VIBRATION EMISSION VALUE
- TOTAL VIBRATION EMISSION VALUES AND UNCERTAINTY
- DANGER DUE TO VIBRATION
- NOISE LOAD
- ASSEMBLY OF THE VERTICAL SHAFT (04-06)
- ASSEMBLY OF THE LOWER GUIDE TUBE (04)
- ASSEMBLY OF THE CABLE HOLDER (05)
- ASSEMBLY OF THE MIDDLE TUBE ONTO THE LOWER GUIDE TUBE (06)
- INSTALLATION OF THE UPPER WATER HOSE ON THE LOWER WATER HOSE (06)
- INSTALLATION OF THE CABLE GLAND (06)
- INSTALLATION OF THE GRASS CATCHER FRAME (07, 08)
- VISUAL INSPECTION
- LAYING THE SUPPLY CABLE AND CHECKING THE SUPPLY CONNECTION
- REQUIREMENTS FOR THE SUPPLY CABLE
- REQUIREMENTS FOR THE SUPPLY CONNECTION
- CONNECTING THE SUPPLY CABLE (13, 14, 15)
- EXPLANATION OF SYMBOLS AND SIGNS
- DESCRIPTION OF THE PRODUCT
- INTENDED USE
- DEVICE FOR REVERSING THE ENGINE / FEED MECHANISM
- FEED STOP
- SYMBOLS ON THE DEVICE
- MEANING
- SYMBOL
- BY COMPONENT
- SCOPE OF DELIVERY (02, 03)
- SAFETY INSTRUCTIONS FOR ELECTRICAL MACHINES
- USE AND OPERATION OF THE ELECTRIC MACHINE
- SAFETY INSTRUCTIONS FOR HEDGE TRIMMERS AND GRASS TRIMMERS
- VIBRATION DAMPING
- GENERAL INFORMATION ON VIBRATION EMISSION
- VIBRATION HAZARD
- NOISE AND VIBRATION
- ASSEMBLING THE VERTICAL SHAFT (04 - 06)
- ASSEMBLE THE FULL BASE FRAME (04)
- ATTACHING THE CABLE GUIDE BRACKET (05)
- ASSEMBLING THE MIDDLE FRAME TO THE FULL BASE FRAME (06)
- ASSEMBLING THE UPPER BASE FRAME TO THE MIDDLE FRAME (06)
- ATTACHMENT OF CABLE BRACKETS (06)
- MOUNTING THE DEBRIS COLLECTION COLLECTOR (07, 08)
- START-UP AND OPERATION
- PERFORM A VISUAL INSPECTION
- ADDING THE SAFETY CABLE - CHECK THE CONNECTION WITH THE SAFETY MECHANISM
- SELECTING THE CABLE PROTECTION
- SELECTING THE CONNECTION WITH THE PROTECTION
- ADJUSTING THE MAIN HANDLE (06)
- CONTROL
- RAISING AND LOWERING THE MAIN HANDLE (09)
- WARNING! RISK OF INJURY
- FOLDING THE MAIN FRAME
- UNFOLDING THE MAIN FRAME
- ATTACHING THE OPTIONAL CUTTING UNIT (10)
- FOR VERTICAL CUTTING WITHOUT A COLLECTION TRAY FOR GRASS
- FOR VERTICAL CUTTING WITH A COLLECTION TRAY FOR GRASS
- ATTACHING AND REMOVING THE COLLECTION TRAY FOR GRASS [OPTIONAL] (11)
- ATTACHING THE COLLECTION TRAY FOR GRASS
- REMOVING AND EMPTYING THE COLLECTION TRAY FOR GRASS
- ADJUSTING THE WORKING DEPTH (12)
- WARNING! DANGER OF INJURY
- CONNECTING TO THE MAINS (13, 14, 15)
- ENGINE STOP 38.4 E
- MAINTENANCE OF THE REPAIR MODULE
- REMOVING THE VERTICAL ADJUSTMENT ROLLER AND THE LEVELING ROLLER (OPTIONAL) (18)
- REMOVING THE ROLLERS
- INSTALLING THE ROLLERS
- TROUBLESHOOTING
- SYMBOLS AND SIGNAL WORDS
- CASES OF INTENDED USE
- PROTECTIVE AND SAFETY DEVICES
- DANGER! RISK OF INJURY
- SWITCH LEVER FOR MOTOR / PROTECTIVE ARC
- DEFLECTOR FLAP
- NO
- COMPONENT
- DELIVERY SET (02, 03)
- NO. COMPONENT MEASURE
- ACCESSORIES AVAILABLE
- GENERAL SAFETY INSTRUCTIONS FOR ELECTRICAL MACHINES
- SAFETY AT THE WORKPLACE
- SAFETY INSTRUCTIONS FOR VERTICAL TRIMMERS AND HEDGE TRIMMERS FOR GAS
- DECLARED VIBRATION AND NOISE VALUES
- ACOUSTIC LOAD
- INSTALLATION
- INSTALLATION OF THE VERTICAL TURRET (04-06)
- ATTACHING THE ELASTIC COUPLING FOR THE CABLE (05)
- INSTALLATION OF THE MIDDLE HANDLE ELEMENTS ON THE LOWER GUIDE BEAM (06)
- INSTALLATION OF THE UPPER GUIDE BEAM ON THE MIDDLE HANDLE ELEMENTS (06)
- ATTACHING THE CABLE CLAMPS (06)
- MOUNTING THE GRASS CATCHER (07, 08)
- COMMISSIONING
- CHECKING THE CONDITION OF THE POWER CORD AND THE POWER CONNECTION
- POWER CORD REQUIREMENT
- REQUIREMENT FOR WALL MOUNTING
- ADJUSTING THE GUIDE BAR (06)
- ASSEMBLY SEQUENCE
- FOLDING AND UNFOLDING THE GUIDE BAR (09)
- CAUTION! DANGER OF PINCHING
- FOLDING THE GUIDE RAIL
- UNFOLDING THE GUIDE RAIL
- OPENING THE PROTECTIVE FLAP (10)
- CONNECTING THE MAINS CABLE (13, 14, 15)
- STARTING AND STOPPING THE ENGINE (16, 17)
- STARTING THE ENGINE 32.4 E
- STARTING THE ENGINE 38.4 E
- STOPPING THE ENGINE 32.4 E
- STOPPING THE ENGINE 38.4 E
- CLEANING THE DEVICE
- REPLACING THE AERATOR SHAFT OR AERATOR SPIRAL (OPTIONAL) (18)
- MOUNTING THE SHAFT
- CUSTOMER SERVICE
- DECLARATION OF CONFORMITY
- INSTRUCTIONS FOR USE AND OPERATION
- INFORMATION ON THE OPERATING MANUAL
- OVERVIEW OF THE DEVICE (01)
- ITEM
- DATE OF MANUFACTURE
- ITEM COMPONENT
- AVAILABLE ACCESSORIES
- SAFETY RULES
- WORKPLACE SAFETY
- USE AND HANDLING OF THE ELECTRIC MACHINE
- SAFETY INSTRUCTIONS FOR HEDGE TRIMMERS AND LAWN MOWER OPERATORS
- MOUNTING THE GRASS TRIMMER (07, 08)
- STARTING OPERATION
- FAULT CAUSE REMEDY
- TPAHCIOPTYBAHH
- TPAHCNPTYBAHHN NPNCIPOM MIX DBOMA PO6OHMN 3OHAMN
- TPAHCNPTYBAHHЯ NPNCIPOU B TPAHCNOPTHOMY 3AC06I
- BEPIGAHH
- YTNJI3ALI
- BKA3IBKN ⅢODO ENEKTPNHORO N ENEKTPOHHORO 6BNAHAHHA
- SERVICE AND MAINTENANCE
- UKRAINE
- UK
Brand : AL-KO
Model : 38.4 E Combi Care
Category : Scarifier