CE-BC 5 M LiFePO4 - Battery charger EINHELL - Free user manual and instructions
Find the device manual for free CE-BC 5 M LiFePO4 EINHELL in PDF.

| Product Type | 12 V Battery Charger |
| Brand | Einhell |
| Model | CE-BC 5 M LiFePO4 |
| Supply Voltage | 220-240 V ~ 50 Hz |
| Power Consumption | 85 W |
| Rated Output Voltage | 12 V d.c. |
| Rated Output Current | 5 A |
| Lead-Acid/GEL Battery Capacity | 10-120 Ah |
| LiFePO4 (LFP) Battery Capacity | 5-120 Ah |
| Small Battery Capacity (12V M) | 2-32 Ah |
| Power Supply Function (SUPPLY) | 12 V d.c., max 5 A |
| RECOND Program | 15.5 V / 1.5 A |
| FORCE Program | 16 V / 5 A |
| Protection Category | II |
| Protection Rating | IP65 |
| Operating Temperature | -20°C to 40°C |
| Charge Programs | STD, AGM, Winter, 12V M, RECOND, 12V LFP, FORCE |
| SUPPLY Function | Yes (buffer supply) |
| Compatible Battery Types | Lead-acid, GEL, AGM, LiFePO4 (with BMS) |
| Integrated Protection | Reverse polarity (except FORCE/SUPPLY), short-circuit, overload |
| Maintenance | Clean with damp cloth, store in dry place |
| Spare Parts | Available through after-sales service |
Frequently Asked Questions - CE-BC 5 M LiFePO4 EINHELL
User questions about CE-BC 5 M LiFePO4 EINHELL
0 question about this device. Answer the ones you know or ask your own.
Ask a new question about this device
Download the instructions for your Battery charger in PDF format for free! Find your manual CE-BC 5 M LiFePO4 - EINHELL and take your electronic device back in hand. On this page are published all the documents necessary for the use of your device. CE-BC 5 M LiFePO4 by EINHELL.
USER MANUAL CE-BC 5 M LiFePO4 EINHELL

flowchart
graph LR
    A["Power Supply"] --> B["Switch"]
    B --> C["Motor"]
    C --> D["Terminal"]
    D --> E["DC Control"]
    F["Battery"] --> G["Switch"]
    G --> H["Motor"]
    H --> I["Terminal"]
    I --> J["DC Control"]
flowchart
graph TD
    A["Motor 1: Battery"] --> B["Switch"]
    B --> C["Motor 2: Plug-in Socket"]
    C --> D["Load 1: Power Supply"]
    D --> E["Load 2: Power Supply"]
    E --> F["Load 3: Power Supply"]
    F --> G["Load 4: Power Supply"]
    G --> H["Load 5: Power Supply"]
    H --> I["Load 6: Power Supply"]
    I --> J["Load 7: Power Supply"]
    J --> K["Load 8: Power Supply"]
    K --> L["Load 9: Power Supply"]
    L --> M["Load 10: Power Supply"]
    M --> N["Load 11: Power Supply"]
    N --> O["Load 12: Power Supply"]
    O --> P["Load 13: Power Supply"]
    P --> Q["Load 14: Power Supply"]
    Q --> R["Load 15: Power Supply"]
    R --> S["Load 16: Power Supply"]
    S --> T["Load 17: Power Supply"]
    T --> U["Load 18: Power Supply"]
    U --> V["Load 19: Power Supply"]
    V --> W["Load 20: Power Supply"]
    W --> X["Load 21: Power Supply"]
    X --> Y["Load 22: Power Supply"]
    Y --> Z["Load 23: Power Supply"]
    Z --> AA["Load 24: Power Supply"]
    AA --> AB["Load 25: Power Supply"]
    AB --> AC["Load 26: Power Supply"]
    AC --> AD["Load 27: Power Supply"]
    AD --> AE["Load 28: Power Supply"]
    AE --> AF["Load 29: Power Supply"]
    AF --> AG["Load 30: Power Supply"]
    AG --> AH["Load 31: Power Supply"]
    AH --> AI["Load 32: Power Supply"]
    AI --> AJ["Load 33: Power Supply"]
    AJ --> AK["Load 34: Power Supply"]
    AK --> AL["Load 35: Power Supply"]
    AL --> AM["Load 36: Power Supply"]
    AM --> AN["Load 37: Power Supply"]
    AN --> AO["Load 38: Power Supply"]
    AO --> AP["Load 39: Power Supply"]
    AP --> AQ["Load 40: Power Supply"]
    AQ --> AR["Load 41: Power Supply"]
    AR --> AS["Load 42: Power Supply"]
    AS --> AT["Load 43: Power Supply"]
    AT --> AU["Load 44: Power Supply"]
    AU --> AV["Load 45: Power Supply"]
    AV --> AW["Load 46: Power Supply"]
    AW --> AX["Load 47: Power Supply"]
    AX --> AY["Load 48: Power Supply"]
    AY --> AZ["Load 49: Power Supply"]
    AZ --> BA["Load 50: Power Supply"]
    BA --> BB["Load 51: Power Supply"]
    BB --> BC["Load 52: Power Supply"]
    BC --> BD["Load 53: Power Supply"]
    BD --> BE["Load 54: Power Supply"]
    BE --> BF["Load 55: Power Supply"]
    BF --> BG["Load 56: Power Supply"]
    BG --> BH["Load 57: Power Supply"]
    BH --> BI["Load 58: Power Supply"]
    BI --> BJ["Load 59: Power Supply"]
    BJ --> BK["Load 60: Power Supply"]
    BK --> BL["Load 61: Power Supply"]
    BL --> BM["Load 62: Power Supply"]
    BM --> BN["Load 63: Power Supply"]
    BN --> BO["Load 64: Power Supply"]
    BO --> BP["Load 65: Power Supply"]
    BP --> BQ["Load 66: Power Supply"]
    BQ --> BR["Load 67: Power Supply"]
    BR --> BS["Load 68: Power Supply"]
    BS --> BT["Load 69: Power Supply"]
    BT --> BU["Load 70: Power Supply"]
    BU --> BV["Load 71: Power Supply"]
    BV --> BW["Load 72: Power Supply"]
    BW --> BX["Load 73: Power Supply"]
    BX --> BY["Load 74: Power Supply"]
    BY --> BZ["Load 75: Power Supply"]
    BZ --> CA["Load 76: Power Supply"]
    CA --> CB["Load 77: Power Supply"]
    CB --> CC["Load 78: Power Supply"]
    CC --> CD["Load 79: Power Supply"]
    CD --> CE["Load 80: Power Supply"]
-3-
D
Gefahr!
When using the equipment, a few safety precautions must be observed to avoid injuries and damage. Please read the complete operating instructions and safety regulations with due care. Keep this manual in a safe place, so that the information is available at all times. If you give the equipment to any other person, hand over these operating instructions and safety regulations as well. We cannot accept any liability for damage or accidents which arise due to a failure to follow these instructions and the safety instructions.
Explanation of the warning signs on the equipment (see Fig. 4)
1 = The equipment is totally insulated
2 = CAUTION - Read the operating instructions to reduce the risk of injury
3 = Fuse value on pcb
4 = Disconnect from the mains supply before connecting or disconnecting the battery to or from the charger.
IMPORTANT: Explosive gases. Avoid flames and sparks. Provide good ventilation during the charging process.
1. Safety regulations
The corresponding safety information can be found in the enclosed booklet.
Danger!
Read all safety regulations and instructions. Any errors made in following the safety regulations and instructions may result in an electric shock, fi re and/or serious injury.
Keep all safety regulations and instructions in a safe place for future use.
This equipment can be used by children of 8 years and older and by people with limited physical, sensory or mental capacities or those with no experience and knowledge if they are supervised or have received instruction in how to use the equipment safely and understand the dangers which result from such use. Children are not allowed to play with the equipment. Unless supervised, children are not allowed to clean the equipment and carry out user-level maintenance work.
Waste disposal
Batteries: Only dispose of these items through motor vehicle workshops, special collection points or special waste collection points. Ask your
local council.
2. Layout and items supplied
2.1 Layout (Fig. 1)
1 Function key
2 LCD display
3 Charging cable, black (-)
4 Charging cable, red (+)
5 Suspension eye
6 Mains power cable
2.2 Items supplied
- Open the packaging and take out the equipment with care.
- Remove the packaging material and any packaging and/or transportation braces (if available).
• Check to see if all items are supplied.
• Inspect the equipment and accessories for
transport damage - If possible, please keep the packaging until the end of the guarantee period.
Danger!
The equipment and packaging material are not toys. Do not let children play with plastic bags, foils or small parts. There is a danger of swallowing or suffocating!
- Battery charger
• Original operating instructions
• Safetyinstructions
3. Proper use
The charger is designed for charging non-maintenance-free or maintenance-free12 V lead acid batteries (wet / Ca/Ca / EFB batteries), 12 V gel and AGM batteries, and 12 V lithium iron phosphate (LiFePO4 / LFP) batteries of the type used in motor vehicles.
The charging programs RECOND and FORCE (For) are designed solely for reviving lead acid batteries (not AGM, GEL, LiFePO4 / LFP batteries) which have undergone exhaustive discharge. These charging programs require a higher level of attention. Use these programs only under continuous supervision.
The SUPPLY function enables the device to be
GB
used as a buffer power supply, e.g. while changing a battery or for operating mobile 12 V DC consumers (note the maximum power consumption) which are also intended for a motor vehicle's 12 V connection. It is not suitable for use as a permanent 12 V power supply (e.g. on gale and barrier systems etc.) or as a replacement for tool batteries (e.g. cordless screwdrivers etc.).
The battery charger is designed only for mobile use and not for installation in vehicles or for stationary use.
The equipment is to be used only for its prescribed purpose. Any other use is deemed to be a case of misuse. The user / operator and not the manufacturer will be liable for any damage or injuries of any kind caused as a result of this.
Please note that our equipment has not been designed for use in commercial, trade or industrial applications. Our warranty will be voided if the machine is used in commercial, trade or industrial businesses or for equivalent purposes.
4. Technical data
Mains voltage: 220-240 V \~ 50Hz
Max. power rating: 85 W
Rated output voltage: 12 V DC
Rated output current: 5 A
Battery capacity "STD/AGM/Winter": ...10-120 Ah
Battery capacity "12V M" (max. 1A): .....2-32 Ah
Battery capacity "12 V LFP" 5-120 Ah
"SUPPLY" function output max.: 5 A
"RECOND" charging program: .15.5 V DC/1.5 A "FORCE" charging program: 16 V DC/5 A
FORCE charging program: ..... 10 V DC / 3A Protection class:
Protection class.
Protection type: IP65
Ambient temperature: -20^-40^
5. Operation
Before you connect the equipment to the power
supply make sure that the data on the speci ca- tions label are identical to the supply voltage.
tions label are identical to the supply voltage. Danger! Do not charge any frozen batteries.
Please also refer to the instructions in the
owner's manuals for the car, radio, navigation
system, etc.
Notes on automatic charging
(charging programs 12V STD, 12V AGM, 12V Winter, 12 V M, 12V LFP)
The charger is a microprocessor controlled automatic charger, i.e. it is suitable in particular for charging maintenance-free batteries and for the long-term charging and maintenance-charging of batteries which are not in constant use, e.g. for classic cars, recreational vehicles, lawn tractors and the like. The integrated microprocessor enables charging in several steps. The fi nal charging step, maintenance charging, maintains the battery capacity at 95–100% and therefore keeps the battery fully charged at all times. The charging operation does not need to be monitored. However, do not leave the battery unattended if you charge it over an extended period of time, so that you can disconnect it from the mains power supply in the event of a fault in the charger.
5.1 Program symbols in the display (Fig. 2)
A "12 V STD" normal charging program for 12 V lead-acid or GEL batteries
B "12 V AGM" normal charging program for 12 V AGM batteries
C "Winter" charging program for 12 V lead-acid, AGM or GEL batteries
D "12 V M" charging program for maintenance charging of 12 V lead-acid, AGM and GEL batteries.
E "RECOND" charging program for restoring the charging capability of lead-acid batteries that have undergone exhaustive discharge (residual voltage min. 3 V)
F "12V LFP" charging program for 12 V LiFePO4 (LFP) batteries equipped with BMS (Battery Management System).
G "SUPPLY" 12 V power supply, e.g. while changing a battery
H Charge status of the battery in percent (1 increment = 20%) and charging process (increment is lit = the battery has reached the charge level shown; increment in the battery symbol fl ashes = the battery is being charged to the next charge level; all increments are lit = the battery is fully charged).
K "LCD" with the following displays:
• Charge voltage in V
- Battery is defective (BAI)
• Battery is fully charged (FUL)
• Battery is connected with reverse polarity or there is a short-circuit at the terminals (Err).
• FORCE (For) charging program for reviving
5.2
No!
●
•
5.2
On
SOC
ligr
If n
to it
The
If y
will
sev
ché
SU
V F
LH
HEX
syn
To i
mu
sec
the
5.2
If tr
LCl
che
wr
sev
the
ve :
To:
pro
pre
wh
the
sev
GB
lead acid batteries which have undergone exhaustive discharge.
5.2 Settings
Note:
- Settings can be made only when the LCD is lit.
- When either of the two following variants 5.3.1 and 5.3.2 is connected to a battery, the battery will be charged with the indicated charging program (see section 5.1).
- When a 12 V DC / max. 5A consumer is connected, it will be supplied with DC voltage when the SUPPLY function is active.
5.2.1 Charger without a battery (Fig. 5)
Once the charger is connected to a shock-proof socket-outlet (see "Technical data"), the LCD will light up briefly. All the symbols will appear. If no battery is connected, the charger will switch to idle mode after a few seconds.
The LCD will go out after a short time.
If you press the "Mode" button once, the LCD will light up. If you press the "Mode" button briefly several times, you will be able to activate the charging programs and the additional function SUPPLY in the following order: 12 V STD -> 12 V AGM -> Winter -> 12 V M -> RECOND -> 12 V LFP -> SUPPLY -> 12 V STD.... Switching to the next option is possible only after the respective symbol lights up.
To activate the FORCE charging program you must press the "MODE" button for approx. 3-5 seconds when the LCD is lit. "For" will appear in the display.
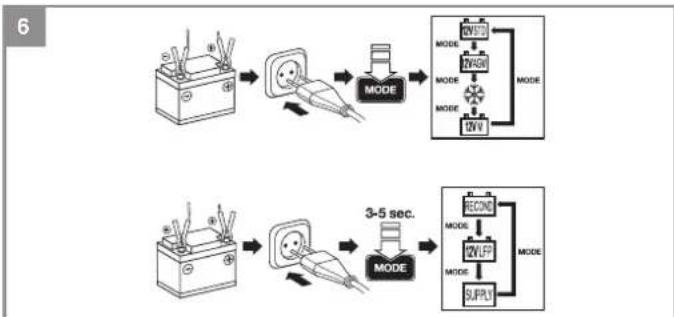
5.2.2 Charger with a battery (Fig. 6)
If the device is connected to a battery and the LCD is lit, you will be able to activate only the charging programs 12 V STD -> 12 V AGM -> Winter -> 12 V M -> 12 V STD by pressing briefly several times on the "Mode" button. Switching to the next option is possible only after the respective symbol lights up.
To switch to the RECOND and 12 V LFP charging programs and the function SUPPLY you must press the "MODE" button for approx. 3-5 seconds when the LCD is lit. "RECOND" will appear in the display. If you press the "Mode" button briefly several times, you will be able to activate the charging programs and the additional function
SUPPLY in the following order: RECOND -> 12 V LFP -> SUPPLY -> RECOND.... Switching to the next option is possible only after the respective symbol lights up.
There are three ways to return to the charging programs 12 V STD, 12 V AGM, Winter, 12 V M: a) Press the "MODE" button for approx. 3-5 seconds when the LCD is lit
b) Remove the connected battery or the consumer
c) Pull out the power plug
5.3 Charging programs and additional function
Note: Read section 5.1 as well. Charging the battery is described in section 5.4. Always refer to the operating manuals supplied for your vehicle and by the battery manufacturer.
5.3.1 12 V STD
Max. 5 A charging current, microprocessor-controlled and dependent on the charge status of the battery. Normal charging program for lead acid batteries (wet, Ca/Ca, EFB batteries) and gel batteries
5.3.2 12 V AGM
Max. 5 A charging current, microprocessor-controlled and dependent on the charge status of the battery. Normal charging program for AGM batteries
5.3.3 "Winter" charging program
Max. 5 A charging current, microprocessor-controlled and dependent on the charge status of the battery. Charging program with higher end-of-charge voltage at -20^ - +5^ ambient temperature, can be used for normal lead acid batteries (wet / Ca/Ca batteries). The information issued by the battery manufacturer regarding the charging temperature must be observed. Batteries below 0^ are poor at storing the charge. They must be warmed up fi rst. Danger! Do not charge frozen batteries.
5.3.4 12 V M
Max. 1 A charging current, microprocessor-controlled and dependent on the charge status of the battery. Charging program for 12 V lead acid, AGM and GEL batteries with low capacity and for maintenance charging of 12 V lead acid, AGM and GEL batteries.
Caution! Not suitable for LiFePO4 / LFP.
-15-
GB
5.3.5 RECOND
Charging program with 1.5 A constant current charging, used only for restoring the charging capability of lead acid batteries which have undergone exhaustive discharge and have a minimum residual voltage of 3 V. This charging program is not suitable for VRLA batteries (e.g. AGM or GEL) and LiFePO4 batteries. Caution! Use only for batteries which are free-standing and have been taken out of the car; do not use for batteries while they are installed in the car with a connection to the car's electrical system. The higher charging voltage could damage the electrical system. The RECOND process must be checked every half an hour and must never exceed a time of 4 hours.
Using the RECOND charging program
- Connect the charger to a lead acid battery as described in section 5.4 and check the charging process every half hour.
• After 4 hours at the latest, or as soon as you hear the battery start to gas (bubble), remove the charger as described in section 5.4.
5.3.6 12 V LFP
Max. 5 A charging current, microprocessor-controlled and dependent on the charge status of the battery. Charging program specially for lithium iron phosphate (LiFePO4 / LFP) batteries which are themselves equipped with a BMS (Battery Management System). It is prohibited to charge LiFePO4 / LFP batteries which have no BMS.
5.3.7 For (FORCE)
This charging program has a higher end-of-charge voltage and a temporary charging current of 5 A. It is used only for restoring the charging capability of lead acid batteries which have undergone exhaustive discharge and have a minimum residual voltage of least 1V . This charging program can be activated only without a connected battery (see section 5.2.1).
The battery will be charged with 5 A for approx. 5 minutes. Then the battery should have a residual voltage of more than 3 V. If this is the case, the device will continue to charge the battery using the "12 V STD" charging program. If this is not the case, the LED will indicate "BAI". The battery is defective.
Warning!
- Follow the instructions supplied by the battery manufacturer.
• Only use for batteries which are free-standing and have been taken out of the car, not while they are installed in the car with a connection
to the car's electrical system. The higher charging voltage could damage the electrical system.
• Use the FORCE program only together with a normal lead acid battery (wet / Ca/Ca batteries).
- Never use it for a battery of sealed design (a VRLA battery such as an AGM or GEL battery) or for a lithium iron phosphate battery (LiFePO4 / LFP).
- Protection against swapped poles is not provided. If the poles are swapped there is a risk of damaging the charger and the battery. It is imperative to make sure that the polarity is correct when you connect up.
5.3.8 Additional function SUPPLY
For supplying 12 V DC voltage, e.g. when changing a battery or for operating 12 V DC / max. 5 A consumers that are also intended for a motor vehicle's 12 V connection.
Warning! Protection against swapped poles will not be available. If the poles are swapped there is a risk of damaging the charger and the battery/on-board vehicle power supply or a connected consumer. It is imperative that you make sure the polarity is correct when you connect up. Observe the maximum power consumption (see "Technical data") of the consumer.
Note:
- The direct voltage which is provided (shown in the display) is load-dependent and without load it is approx. 13.7 V.
- This function can be used for consumers which are operated from a vehicle's cigarette lighter.
• Refer to and observe the operating manual for your 12 V consumer.
5.4 Charging the battery:
- First connect the red charging cable to the positive pole of the battery.
- Then connect the black charging cable to the bodywork of the vehicle away from the battery and the petrol pipe.
- Warning! Under normal circumstances the negative battery pole is connected to the bodywork and you proceed as described above. In exceptional cases it is possible that the positive battery pole is connected to the bodywork (positive earthing). In this case, connect the black charger cable to the negative pole on the battery. Then connect the red charger
-
•
-
Cal
The
of t
the
che
farr
Chi
●
。
5.5
In it
enc
。
| GB | ||
| cal | cable to the bodywork at a point away from the battery and the petrol pipe.After the battery has been connected to the charger, you can connect the charger to a socket (see Technical Data). You can now change the charging settings (see section 5.2.2).Important! Charging may create dangerous explosive gas and therefore you should avoid spark formation and naked flames whilst the battery is charging.There is a risk of explosion! It is essential that you ventilate the rooms well.When "FUL" appears in the LCD display (and all increments Fig. 2/Item H), charging has been completed. The charger holds the battery at 95% - 100% available battery capacity using pulsed charging. If the charger shows this after just a few minutes, this indicates that the battery capacity is low. The battery needs replacing. | come into contact with each other). The protection against short-circuits ensures that the battery and charger do not get damaged. |
| - | 5.6 Finishing charging the batteryPull the plug out of the socket.First disconnect the black charging cable from the bodywork.Then release the red charging cable from the positive pole on the battery.Important! In case of positive earthing, first disconnect the red charging cable from the bodywork and then the black charging cable from the battery. | |
| 5 | ||
| - | Important! If the mains plug is pulled out but the charger cables are still connected to the battery, the charger will draw off a small amount of electricity from the battery. We therefore recommend that you always completely remove the charger from the battery when not in use. | |
| - | ||
| ill | Calculating the charging time (Fig. 3)The charging time depends on the charge status of the battery. If the battery is fully discharged, the approximate charging time up to approx. 80% charged can be calculated using the following formula:Battery capacity in AhCharging time/h = Amp.(charging current) | |
| er | ||
| ry/ | ||
| he | ||
| ve | ||
| cal | ||
| n | ||
| out | The charging current should amount to at least 1/10th of the rated capacity in amps and should not exceed half of the rated capacity in amps.The charging times will be longer at low ambient temperatures. | 6. Overload cut-outThe charger has electronic protection against overloading, short-circuits and swapped poles when the 12 V STD, 12 V AGM, 12 V Winter, 12 and 12 V LFP charging programs are used. One or more fine fuses are also fitted. If the fuse suffers a defect it must be replaced by a new fuse with the same amp value. If necessary, please contact our customer service center. |
| te | ||
| 5.5 Fault indicator in the display (Fig. 2/Item K)In the following cases the display will indicate an error "Err":If the terminal clamps are connected to the battery terminals with the wrong polarity. The protection against swapped poles ensures that the battery and charger do not get damaged. Remove the charger from the battery and start the charging process from the beginning again.Caution! Protection against swapped poles is not provided in the FORCE and SUPPLY program.If there is a short-circuit between the two terminal clamps (the metal parts of the clamps | ||
| heory | ||
| e | ||
| o- | ||
| ve. | ||
| co- | ||
| f | ||
| act | ||
| e | ||
| er | ||
-17-
GB
7. Maintenance and care of the battery
- Ensure that your battery is always fitted securely.
- A perfect connection to the cable network of the electrical system must be ensured at all times.
- Keep the battery clean and dry. Apply a thin coating of grease to the connection terminals using an acid-free, acid-resistant grease (Vaseline).
- Check the level of the acid in batteries that are not maintenance-free versions approximately every 4 weeks and top up with distilled water if necessary.
8. Replacing the power cable
Danger!
If the power cable for this equipment is damaged, it must be replaced by the manufacturer or its after-sales service or similarly trained personnel to avoid danger.
9. Cleaning, maintenance and ordering of spare parts
Danger!
Always pull out the mains power plug before starting any cleaning work.
9.1 Cleaning
Keep all safety devices, air vents and the motor housing free of dirt and dust as far as possible. Wipe the equipment with a clean cloth or blow it with compressed air at low pressure.
• We recommend that you clean the device immediately each time you have finished using it.
- Clean the equipment regularly with a moist cloth and some soft soap. Do not use cleaning agents or solvents; these could attack the plastic parts of the equipment. Ensure that no water can seep into the device. The ingress of water into an electric tool increases the risk of an electric shock.
- The charger should be placed in a dry room for storage. Any corrosion must be cleaned off the charging terminals.
9.2 Maintenance
There are no parts inside the equipment which require additional maintenance.
9.3 Ordering replacement parts:
Please quote the following data when ordering replacement parts:
• Type of machine
• Article number of the machine
• Identification number of the machine
- Replacement part number of the part required For our latest prices and information please go to www.Einhell-Service.com
10. Disposal and recycling
The equipment is supplied in packaging to prevent it from being damaged in transit. The raw materials in this packaging can be reused or recycled. The equipment and its accessories are made of various types of material, such as metal and plastic. Never place defective equipment in your household refuse. The equipment should be taken to a suitable collection center for proper disposal. If you do not know the whereabouts of such a collection point, you should ask in your local council offices.

For
Na
Toc
disp
Rec
As
The
acc
COS
Ple
sec
The
cor
Suk
GB

For EU countries only
Never place any electric power tools in your household refuse.
To comply with European Directive 2012/19/EC concerning old electric and electronic equipment and its implementation in national laws, old electric power tools have to be separated from other waste and disposed of in an environment-friendly fashion, e.g. by taking to a recycling depot.
Recycling alternative to the return request:
As an alternative to returning the equipment to the manufacturer, the owner of the electrical equipment must make sure that the equipment is properly disposed of if he no longer wants to keep the equipment. The old equipment can be returned to a suitable collection point that will dispose of the equipment in accordance with the national recycling and waste disposal regulations. This does not apply to any accessories or aids without electrical components supplied with the old equipment.
Please note that batteries and lamps (e.g. light bulbs) must be removed from the tool before it is disposed of.
The reprinting or reproduction by any other means, in whole or in part, of documentation and papers accompanying products is permitted only with the express consent of the Einhell Germany AG.
Subject to technical changes
-19-
GB
Warranty certifi cate
Dear Customer,
All of our products undergo strict quality checks to ensure that they reach you in perfect condition. In the unlikely event that your device develops a fault, please contact our service department at the address shown on this guarantee card. You can also contact us by telephone using the service number shown. Please note the following terms under which guarantee claims can be made:
-
These guarantee terms apply to consumers only, i.e. natural persons intending to use this product neither for their commercial activities nor for any other self-employed activities. These warranty terms regulate additional warranty services, which the manufacturer mentioned below promises to buyers of its new products in addition to their statutory rights of guarantee. Your statutory guarantee claims are not affected by this guarantee. Our guarantee is free of charge to you.
-
The warranty services cover only defects due to material or manufacturing faults on a product which you have bought from the manufacturer mentioned below and are limited to either the rectification of said defects on the product or the replacement of the product, whichever we prefer. Please note that our devices are not designed for use in commercial, trade or professional applications. A guarantee contract will not be created if the device has been used by commercial, trade or industrial business or has been exposed to similar stresses during the guarantee period.
-
The following are not covered by our guarantee:
- Damage to the device caused by a failure to follow the assembly instructions or due to incorrect installation, a failure to follow the operating instructions (for example connecting it to an incorrect mains voltage or current type) or a failure to follow the maintenance and safety instructions or by exposing the device to abnormal environmental conditions or by lack of care and maintenance.
- Damage to the device caused by abuse or incorrect use (for example overloading the device or the use or unapproved tools or accessories), ingress of foreign bodies into the device (such as sand, stones or dust, transport damage), the use of force or damage caused by external forces (for example by dropping it).
-
Damage to the device or parts of the device caused by normal or natural wear or tear or by normal use of the device.
-
The guarantee is valid for a period of 24 months starting from the purchase date of the device. Guarantee claims should be submitted before the end of the guarantee period within two weeks of the defect being noticed. No guarantee claims will be accepted after the end of the guarantee period. The original guarantee period remains applicable to the device even if repairs are carried out or parts are replaced. In such cases, the work performed or parts filled will not result in an extension of the guarantee period, and no new guarantee will become active for the work performed or parts fitted. This also applies if an on-site service is used.
-
To make a claim under the guarantee, please register the defective device at: www.Einhell-Service.com. Please keep your bill of purchase or other proof of purchase for the new device. Devices that are returned without proof of purchase or without a rating plate shall not be covered by the guarantee, because appropriate identification will not be possible. If the defect is covered by our guarantee, then the item in question will either be repaired immediately and returned to you or we will send you a new replacement.
Of course, we are also happy offer a chargeable repair service for any defects which are not covered by the scope of this guarantee or for units which are no longer covered. To take advantage of this service, please send the device to our service address.
Also refer to the restrictions of this warranty concerning wear parts, consumables and missing parts as set out in the service information in these operating instructions.
-20
Danger!
The Ground Truth image displays a single, solid horizontal line. According to Rule 2 (UNDERSCORE & LINE RULES), this is a stylistic or background line, not a placeholder underscore. Therefore, the OCR result must ignore it and output nothing or only meaningful text.
(no text)
Drc
Prc
Gre
np
Ter
The image is too blurry to recognize any text content.
Lad
odi
bru
Pro
me
anv
a/b
ma
tet
bri
Be
erh
trie
pro
V
4.
Na
No
No
No
Dot
Da
Dut
Da
For
Lad
Lad
Bos
Be
Om
5.
Ind
ska
den
DK/N
mer under konstant opsyn.
mom Management System (BMS)
-> Zimski -> 12V M -> RECOND -> 12V LFP ->
SUPPLY -> 12V STD.... Dalje prebačivanje je moguće tek nakon što odgovarajući simbol zasvetli.
Za aktiviranje programa punjenja FORCE pri osvetljenom LCD displeju se taster „MODE“ mora držati pritlsnutim oko 3-5 sekundl. Displej prika-
zuje „For“.
GB Declaration of conformity: We declare conformity in accordance
with the EU directive and standards for article
The following table is provided in the image.
SherryWangProckler ManagementAndreas Wechselpartner/General Manager
First CE: 22
Art-No.:10.022.51 I-No.:21012
Subject to change without notice
Archive-File/Record: NAPR024990
Documents registrar: Josef Landauer
Wiesenve, 22, D-9405 LandatNear
- CIC Befen charger - C Parqueur de bahelir - Carlos bahelir - DAVI Bahedelir - S Daher lindole - CIC Nidke belter - SiV Dalé/tek rabeles - Ni Daherlöseer - E Carqueur de bahelir - IVV Akni seht - SiV Dalé/tek rabeles - AMAAaunlal - DAVI Akni seht - NIV Akni seht de industrial bahelir - SiT Pergenerp uistare - F Cargagor de bahelir - 1978 ITF e Pergenerp uistare - IVV Uchai da partenje belter - VCI Pergenerp - IVA3 gel. ciblud - NIV Sopogera sypotrostrico evegrometro - SiC Austratior - LV Austratior - Lästiljärte - Si Austratiorloster omlafide - NII Sopogera vypotrostrico ovelamer - IVVI Sahedler - SiC Austratior omlafide - NIV Uchai seht

Declaration of conformity
We, Einhell UK Ltd
Champions Business Park, First Floor Unit 10, Arrowe Brook Rd, Upton, Wiral CH49 0AB, United Kingdom
declare the conformity to UK standards and legislation was assessed for:
Battery Charger CE-BC 5 M LiFePO4 (Einhell)
UK legislation
□Simple Pressure Vessels (Safety) Regulation
Electrical Equipment (Safety) Regulation
□Radio Equipment Regulation
□Personal Protective Equipment Regulation
☐ The Ecodesign for Energy-Related Products and Energy Information Regulation
The Restriction of the Use of Certain Hazardous Substances in Electrical and Electronic Equipment Regulation
□Noise Emission in the Environment by Equipment for use Outdoors Regulation
Electromagnetic Compatibility Regulation
□ Measuring Instruments Regulation
□ Pressure Equipment (Safety) Regulation
Annex V
□Annex VI
Noise:measuredL max = dB (A); guaranteed L max = dB (A)
P = kW; L/C = cm
UK Approved Body:
□Supply of Machinery (Safety) Regulation
□Annex IV
UK Approved Body:
UKTE Certifi cate No.:
Standards: BS EN 60335-1; BS EN IEC 60335-2-29; BS EN 62233; BS EN IEC 55014-1;
BS EN IEC 55014-2; BS EN IEC 61000-3-2; BS EN 61000-3-3
Wirral, 2023.04.18

Tom Chambers, Managing Director Einhall UK Ltd.
Archive-File/Record: NAPR024960
Article Number: 10.022.51 I.-No.:21012
Subject to change without notice Wiesenweg 22, 84405 Landauisar, Germany
Documents registrar: Josef Landsauer


-170-