LTR 3-18 Dual - Lawn mower Kärcher - Free user manual and instructions
Find the device manual for free LTR 3-18 Dual Kärcher in PDF.

| Product Type | String Trimmer (LTR) |
| Brand | Kärcher |
| Model | LTR 3-18 Dual |
| Service Voltage | 36 V (2 × 18 V) |
| Working Width | 300 mm |
| Cutting Line Diameter | 2.00 mm |
| No-load Speed | Up to 8000 min⁻¹ |
| Sound Pressure Level LpA | 82.2 dB(A) (uncertainty 3 dB(A)) |
| Sound Power Level LwA | 94.6 dB(A) (uncertainty 3 dB(A)) |
| Vibration Value (front handle, line) | 3.93 m/s² |
| Vibration Value (rear handle, line) | 1.56 m/s² |
| Dimensions (L × W × H) | 1020 × 310 × 920 mm |
| Weight (without battery) | 2.42 kg |
| Power Supply | 2 Kärcher Battery Power 18 V (+) battery packs |
| Compatible Charger | BC 18 V ... (Battery Power 18 V (+) series) |
| Main Functions | Grass cutting, edge trimming, pivoting head, telescopic shaft, use with two batteries |
| Maintenance and Cleaning | Clean after each use with a soft, dry cloth; remove cutting residues; clean battery compartments |
| Safety | Line guard, release button, line cutter for line length, protection against debris |
| Spare Parts and Repairability | Line spool, grass cutting blade, spool cover; repair by qualified personnel |
| Warranty | According to the conditions of the Kärcher subsidiary in the country |
| General Information | Outdoor use for soft grass; do not use in the rain; maintain a distance of 15 m from people |
Frequently Asked Questions - LTR 3-18 Dual Kärcher
User questions about LTR 3-18 Dual Kärcher
0 question about this device. Answer the ones you know or ask your own.
Ask a new question about this device
Download the instructions for your Lawn mower in PDF format for free! Find your manual LTR 3-18 Dual - Kärcher and take your electronic device back in hand. On this page are published all the documents necessary for the use of your device. LTR 3-18 Dual by Kärcher.
USER MANUAL LTR 3-18 Dual Kärcher
natural_image
Yellow and black metal detector with a long wire, isolated on white background (no text or symbols)Deutsch 5
English 12
Français 19
Italiano 27
Español 34
Português 42
Nederlands 49
Türkçe 57
Svenska 64
Suomi 70
Norsk 77
Dansk 84
Eesti 91
Latviešu 98
Lietuviškai 105
Polski 112
Magyar 120
Čeština 127
Slovenčina 134
Slovenščina 142
Românește 149
Hrvatski 156
Srpski 163
Ελληνικά 170
Русский 178
Українська 187
Български 195
Қазақша 203
日本語 211
العربيya 218
A
natural_image
3D rendered mechanical component with yellow and black parts, showing a tool interacting with a surface (no text or symbols visible)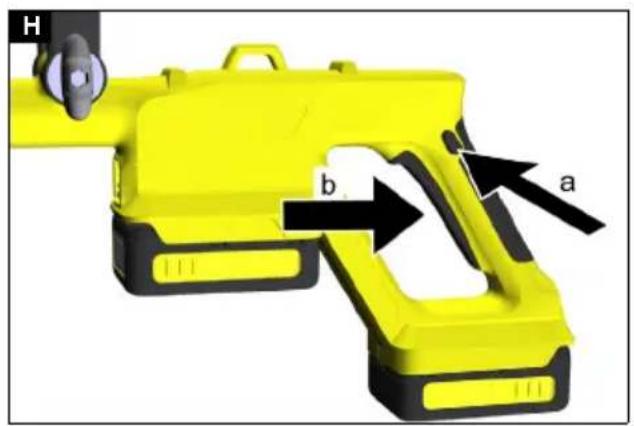

natural_image
Diagram showing two yellow mechanical components labeled 'a' and 'b', with arrows indicating movement or force direction (no text or symbols beyond labels)
natural_image
3D rendering of a mechanical tool interacting with grass, showing no text or symbols
natural_image
Yellow electric shock gun with mechanical components and directional arrows indicating motion (no text or symbols)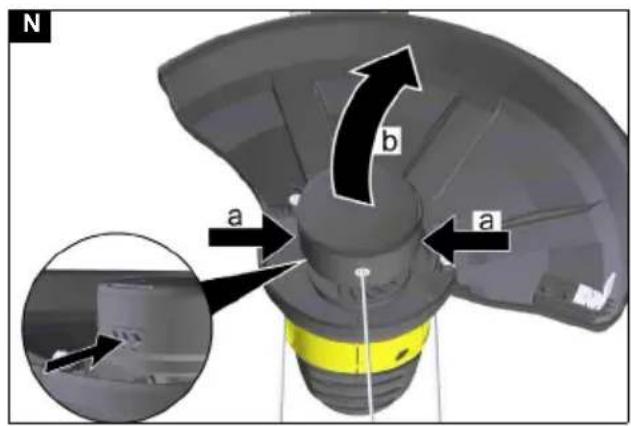
natural_image
3D mechanical component diagram showing a yellow and black assembly with a black arrow indicating direction (no text or symbols)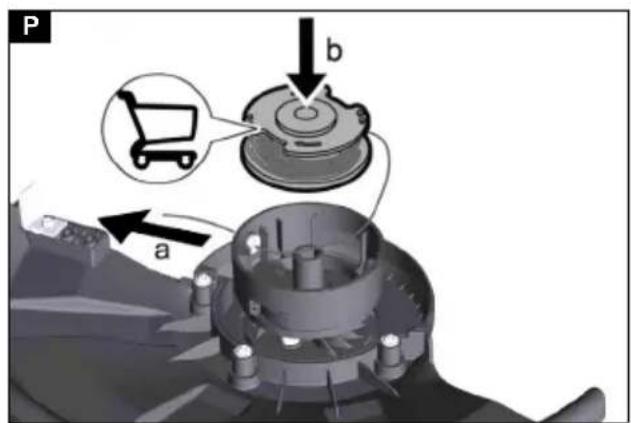
natural_image
Mechanical assembly diagram showing a rotating component with arrows indicating motion (no text or symbols)Inhalt

H. Jenner
Chairman of the Board of Management

S. Reiser
Manager Regulatory Affairs & Certification
71364 Winnenden (Germany)
Tel.: +49 7195 14-0
Fax: +49 7195 14-2212
Winnenden, 2023/08/01
Contents
Safety instructions.... 12
Intended use 15
Environmental protection 15
Accessories and spare parts.... 15
Scope of delivery.... 15
Symbols on the device 15
Description of the device.... 16
Installation 16
Initial startup.... 16
Operation 16
Transport.... 17
Storage.... 17
Care and maintenance.... 17
Troubleshooting guide.... 18
Warranty.... 18
Technical data 18
Vibration value 18
Declaration of Conformity.... 18
Safety instructions

Read these safety instructions, these original instructions, the safety instructions provided with the battery pack and the original instructions supplied with battery pack/standard charg-
er before using the device for the first time. Act in accordance with them. Keep the booklets for future reference or for future owners.
In addition to the notes in the operating instructions, you also need to take into consideration the general safety regulations and accident prevention guidelines applicable by law.
Hazard levels
⚠️DANGER
- Indication of an imminent threat of danger that will lead to severe injuries or even death.
⚠ WARNING
- Indication of a potentially dangerous situation that may lead to severe injuries or even death.
△CAUTION
- Indication of a potentially dangerous situation that may lead to minor injuries.
ATTENTION
- Indication of a potentially dangerous situation that may lead to damage to property.
General Power Tool Safety Instructions
⚠ WARNING
- Read all safety warnings, instructions, illustrations and specifications provided with this power tool.
Failure to follow all instructions listed below may result in electric shock, fire and/or serious injury. Save all warnings and instructions for future reference.
The term "power tool" in the warnings refers to your mains-operated (corded) power tool or battery-operated (cordless) power tool.
1 Work area safety
a Keep work area clean and well lit. Cluttered or dark areas invite accidents.
b Do not operate power tools in explosive atmospheres, such as in the presence of flam-
mable liquids, gases or dust. Power tools create sparks which may ignite the dust or fumes.
c Keep children and bystanders away while operating a power tool. Distractions can cause you to lose control.
2 Electrical safety
a Power tool plugs must match the outlet. Never modify the plug in any way. Do not use any adapter plugs with earthed (grounded) power tools. Unmodified plugs and matching outlets will reduce the risk of electric shock.
b Avoid body contact with earthed or grounded surfaces such as pipes, radiators, ranges and refrigerators. There is an increased risk of electric shock if your body is earthed or grounded.
c Do not expose power tools to rain or wet conditions. Water entering a power tool will increase the risk of electric shock.
d Do not abuse the cord. Never use the cord for carrying, pulling or unplugging the power tool. Keep cord away from heat, oil, sharp edges or moving parts. Damaged or entangled cords increase the risk of electric shock.
e When operating a power tool outdoors, use an extension cord suitable for outdoor use. Use of a cord suitable for outdoor use reduces the risk of electric shock.
f If operating a power tool in a damp location is unavoidable, use a residual current device (RCD) protected supply. Use of an RCD reduces the risk of electric shock.
3 Personal safety
a Stay alert, watch what you are doing and use common sense when operating a power tool. Do not use a power tool while you are tired or under the influence of drugs, alcohol or medication. A moment of inattention while operating power tools may result in serious personal injury.
b Use personal protective equipment. Always wear eye protection. Protective equipment such as a dust mask, non-skid safety shoes, hard hat or hearing protection used for appropriate conditions will reduce personal injuries.
c Prevent unintentional starting. Ensure the switch is in the off-position before connecting to power source and/or battery pack, picking up or carrying the tool. Carrying power tools with your finger on the switch or energising power tools that have the switch on invites accidents.
d Remove any adjusting key or wrench before turning the power tool on. A wrench or a key left attached to a rotating part of the power tool may result in personal injury.
e Do not overreach. Keep proper footing and balance at all times. This enables better control of the power tool in unexpected situations.
f Dress properly. Do not wear loose clothing or jewellery. Keep your hair, clothing and gloves away from moving parts. Loose clothes, jewellery or long hair can be caught in moving parts.
g If devices are provided for the connection of dust extraction and collection facilities, ensure these are connected and properly used. Use of dust collection can reduce dust-related hazards.
h Do not let familiarity gained from frequent use of tools allow you to become complacent and ignore tool safety principles. A careless action
can cause severe injury within a fraction of a second.
4 Power tool use and care
a Do not force the power tool. Use the correct power tool for your application. The correct power tool will do the job better and safer at the rate for which it was designed.
b Do not use the power tool if the switch does not turn it on and off. Any power tool that cannot be controlled with the switch is dangerous and must be repaired.
c Disconnect the plug from the power source and/or the battery pack from the power tool before making any adjustments, changing accessories, or storing power tools. Such preventive safety measures reduce the risk of starting the power tool accidentally.
d Store idle power tools out of the reach of children and do not allow persons unfamiliar with the power tool or these instructions to operate the power tool. Power tools are dangerous in the hands of untrained users.
e Maintain power tools. Check for misalignment or binding of moving parts, breakage of parts and any other condition that may affect the power tool's operation. If damaged, have the power tool repaired before use. Many accidents are caused by poorly maintained power tools.
f Keep cutting tools sharp and clean. Properly maintained cutting tools with sharp cutting edges are less likely to bind and are easier to control.
g Use the power tool, accessories and tool bits etc. in accordance with these instructions, taking into account the working conditions and the work to be performed. Use of the power tool for operations different from those intended could result in a hazardous situation.
h Keep handles and grasping surfaces dry, clean and free from oil and grease. Slippery handles an grasping surfaces do not allow for safe handling and control of the tool in unexpected situations.
5 Battery tool use and care
a Recharge only with the charger specified by the manufacturer. A charger that is suitable for one type of battery pack may create a risk of fire when used with another battery pack.
b Use power tools only with specifically designated battery packs. Use of any other battery packs may create a risk of injury and fire.
c When battery pack is not in use, keep it away from other metal objects, like paper clips, coins, keys, nails, screws or other small metal objects, that can make a connection from one terminal to another. Shorting the battery terminals together may cause burns or a fire.
d Under abusive conditions, liquid may be ejected from the battery; avoid contact. If contact accidentally occurs, flush with water. If liquid contacts eyes, additionally seek medical help. Liquid ejected from the battery may cause irritation or burns.
e Do not use a battery pack or tool that is damaged or modified. Damaged or modified batteries may exhibit unpredictable behaviour resulting in fire, explosion or risk of injury.
f Do not expose a battery pack or tool to fire or excessive temperature. Exposure to fire or temperature above 130 °C may cause explosion.
g Follow all charging instructions and do not charge the battery pack or tool outside the temperature range specified in the instructions. Charging improperly or at temperatures outside the specified range may damage the battery and increase the risk of fire.
6 Service
a Have your power tool serviced by a qualified repair person using only identical replacement parts. This will ensure that the safety of the power tool is maintained.
b Never service damaged battery packs. Service of battery packs should only be performed by the manufacturer or authorized service providers.
Lawn trimmer and lawn edge trimmer safety warnings
1 Do not use the machine in bad weather conditions, especially when there is a risk of lightning. This decreases the risk of being struck by lightning.
2 Thoroughly inspect the area for wildlife where the machine is to be used. Wildlife may be injured by the machine during operation.
3 Thoroughly inspect the area where the machine is to be used and remove all stones, sticks, wires, bones, and other foreign objects. Thrown objects can cause personal injury.
4 Before using the machine, always visually inspect to see that the cutter and the cutter assembly are not damaged. Damaged parts increase the risk of injury.
5 Check the grass collector frequently for wear or deterioration. A worn or damaged grass collector may increase the risk of personal injury.
6 Keep guards in place. Guards must be in working order and be properly mounted. A guard that is loose, damaged, or is not functioning correctly may result in personal injury.
7 Keep all cooling air inlets clear of debris. Blocked air inlets and debris may result in overheating or risk of fire.
8 Wear eye protection and ear protection. Adequate protective equipment will reduce personal injury.
9 While operating the machine, always wear non-slip and protective footwear. Do not operate the machine when barefoot or wearing open sandals. This reduces the chance of injury to the feet from contact with the moving cutter.
10 Always wear clothing such as trousers that covers the operator's legs while operating the machine. Contact with the moving cutter or line may cause injury.
11 Keep bystanders away while operating the machine. Thrown debris can result in serious personal injury.
12 Do not operate the machine above waist height. This helps prevent unintended cutter contact and enables better control of the machine in unexpected situations.
13 Do not operate the machine in wet grass. Walk, never run. This reduces the risk of slipping and falling which may result in personal injury.
14 Do not operate the machine on excessively steep slopes. This reduces the risk of loss of control, slipping and falling which may result in personal injury.
15 When working on slopes, always be sure of your footing, always work across the face of slopes, never up or down and exercise extreme caution when changing direction. This reduces the risk of loss of control, slipping and falling which may result in personal injury.
16 Keep all power cords and cables away from cutting area. Power cords or cables may be hidden in hedges or bushes and can be accidentally cut or damaged by the line or cutter.
17 Keep all parts of the body away from the moving trimmer cutter or line. Do not clear material from the machine until it has been disconnected from the power source. The moving trimmer cutter or line may result in serious personal injury.
18 Carry the machine with the machine switched off and away from your body. Proper handling of the machine will reduce the likelihood of accidental contact with the moving line or cutter.
19 Only use replacement cutting heads and plastic cutting lines and cutters specified by the manufacturer. Incorrect replacement parts may cause loss of control, breakage and injury.
20 Do not replace the plastic lines or cutters with metal wires or blades. Use of non-recommended cutting devices may cause injury.
Safe servicing and care
⚠ WARNING • After pushing out a new string, bring the device into the normal operating position before switching it on. • Ensure that the device is in a safe condition by regularly checking that all bolts, nuts and screws are screwed tight. • Check that the moving parts function correctly and are not blocked, and that no parts are broken or damaged. Have a damaged device repaired before using it. • Switch the motor off, remove the battery pack and make sure that all moving parts have stopped moving:
• Before cleaning or servicing the device.
• Before changing accessories.
⚠️ CAUTION • Only use accessories and spare parts which are approved by the manufacturer. Only original accessories and original spare parts ensure that the appliance will run fault-free and safely.
ATTENTION • Clean the product with a soft, dry cloth each time after use.
Note • Service and maintenance work may only be performed by suitably qualified and specially trained personnel. We recommend sending the product to an authorised service centre for repair. • You may only perform the adjustments and repairs described in these operating instructions. Contact your authorised Customer Service department for other repairs. • Have damaged or illegible warning signs on the device replaced by the authorised Customer Service department.
Safe transport and storage
⚠ WARNING • Switch the device off, allow it to cool down and remove the battery pack before storage or transportation.
⚠ CAUTION • Risk of injury and damage to the device. Secure the device against movement or falling down during transport.
ATTENTION • Remove all foreign bodies from the device before storage or transportation. • Store the device in a dry, well ventilated location out of the reach of children. Keep the device away from corrosive substances such as garden chemicals. • Do not store the device outdoors.
Residual risks
⚠ WARNING
- Certain residual risks remain present, even when the device is operated in the prescribed manner. The following dangers can be present when using the device:
- Vibration can cause injuries. Use the correct tools for the job, use the handles provided and restrict the working time and hazard exposure time.
- Noise can cause hearing injuries. Wear hearing protection and limit the duration of exposure.
• Injuries due to flung objects.
Risk reduction
△CAUTION
- Using the device for longer periods can cause poor circulation in the hands due to vibrations. A general period of use cannot be set, because this depends on several influencing factors:
- Personal tendency to suffer from poor circulation (frequently cold fingers, tingling sensation in the fingers)
- Low ambient temperature. Wear warm gloves to protect your hands.
- Holding the device too tightly hindering blood circulation.
- Continuous operation is more harmful than operation interrupted by work breaks.
You should see a doctor if using the device regularly and for lengthy periods of time, and in the event of repeated occurrences of symptoms such as tingling in the fingers or cold fingers.
Intended use
This device is suitable for cutting grass or similar soft vegetation.
⚠️DANGER
Improper use
Risk of fatal injury from incision injuries
Only use the device for its proper use.
Never use metal blades such as saw blades or brush blades.
⚠ WARNING
Flying objects
Risk of injury and damage
Maintain a minimum distance of 15 m from persons, animals and other objects.
• The device is intended for outdoor use.
- The device can be used for trimming grass along walls, fences, trees and on edgings.
- The device can also be used for mowing in places that are difficult to access with lawnmowers, e.g.ditches, slopes and clearings.
- Modifications and changes not authorised by the manufacturer are prohibited.
- Never use the device in a wet environment or in the rain.
- Never mow wet grass or other growth.
Rechargeable battery packs and chargers
Only use the device with battery packs and chargers from the KÄRCHER 18 V Battery Power (+) system.


Suitable battery packs and chargers are marked with the KÄRCHER 18 V Battery Power (+) System symbol.
Suitable battery packs bear the designation "Battery Power 18/... and Battery Power+ 18/...".
Suitable chargers bear the designation "BC 18 V ...".
Environmental protection

The packing materials can be recycled. Please dispose of packaging in accordance with the environmental regulations.

Electrical and electronic devices contain valuable, recyclable materials and often components such as batteries, rechargeable batteries or oil, which - if handled or disposed of incorrectly - can
pose a potential danger to human health and the environment. However, these components are required for the correct operation of the device. Devices marked by this symbol are not allowed to be disposed of together with the household rubbish.
Notes on the content materials (REACH)
Current information on content materials can be found at: www.kaercher.de/REACH
Accessories and spare parts
Only use original accessories and original spare parts. They ensure that the appliance will run fault-free and safely.
Information on accessories and spare parts can be found at www.kaercher.com.
Scope of delivery
The scope of delivery for the appliance is shown on the packaging. Check the contents for completeness when unpacking. If any accessories are missing or in the event of any shipping damage, please notify your dealer.
Symbols on the device

Follow all warning notices and safety instructions. Read and comprehend all instructions before using the product.

Wear suitable eye protection when working with the device.

Do not subject the device to rain or moist conditions.
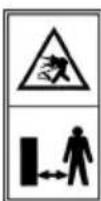
Danger due to flung objects. Keep a safe distance away.

Wear suitable hearing protection when working with the device.
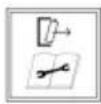
Remove the rechargeable battery pack prior to any maintenance work.
Set the rotary range.

Lock/unlock telescoping.

The guaranteed sound level specified on the label is 96 dB(A).
Description of the device
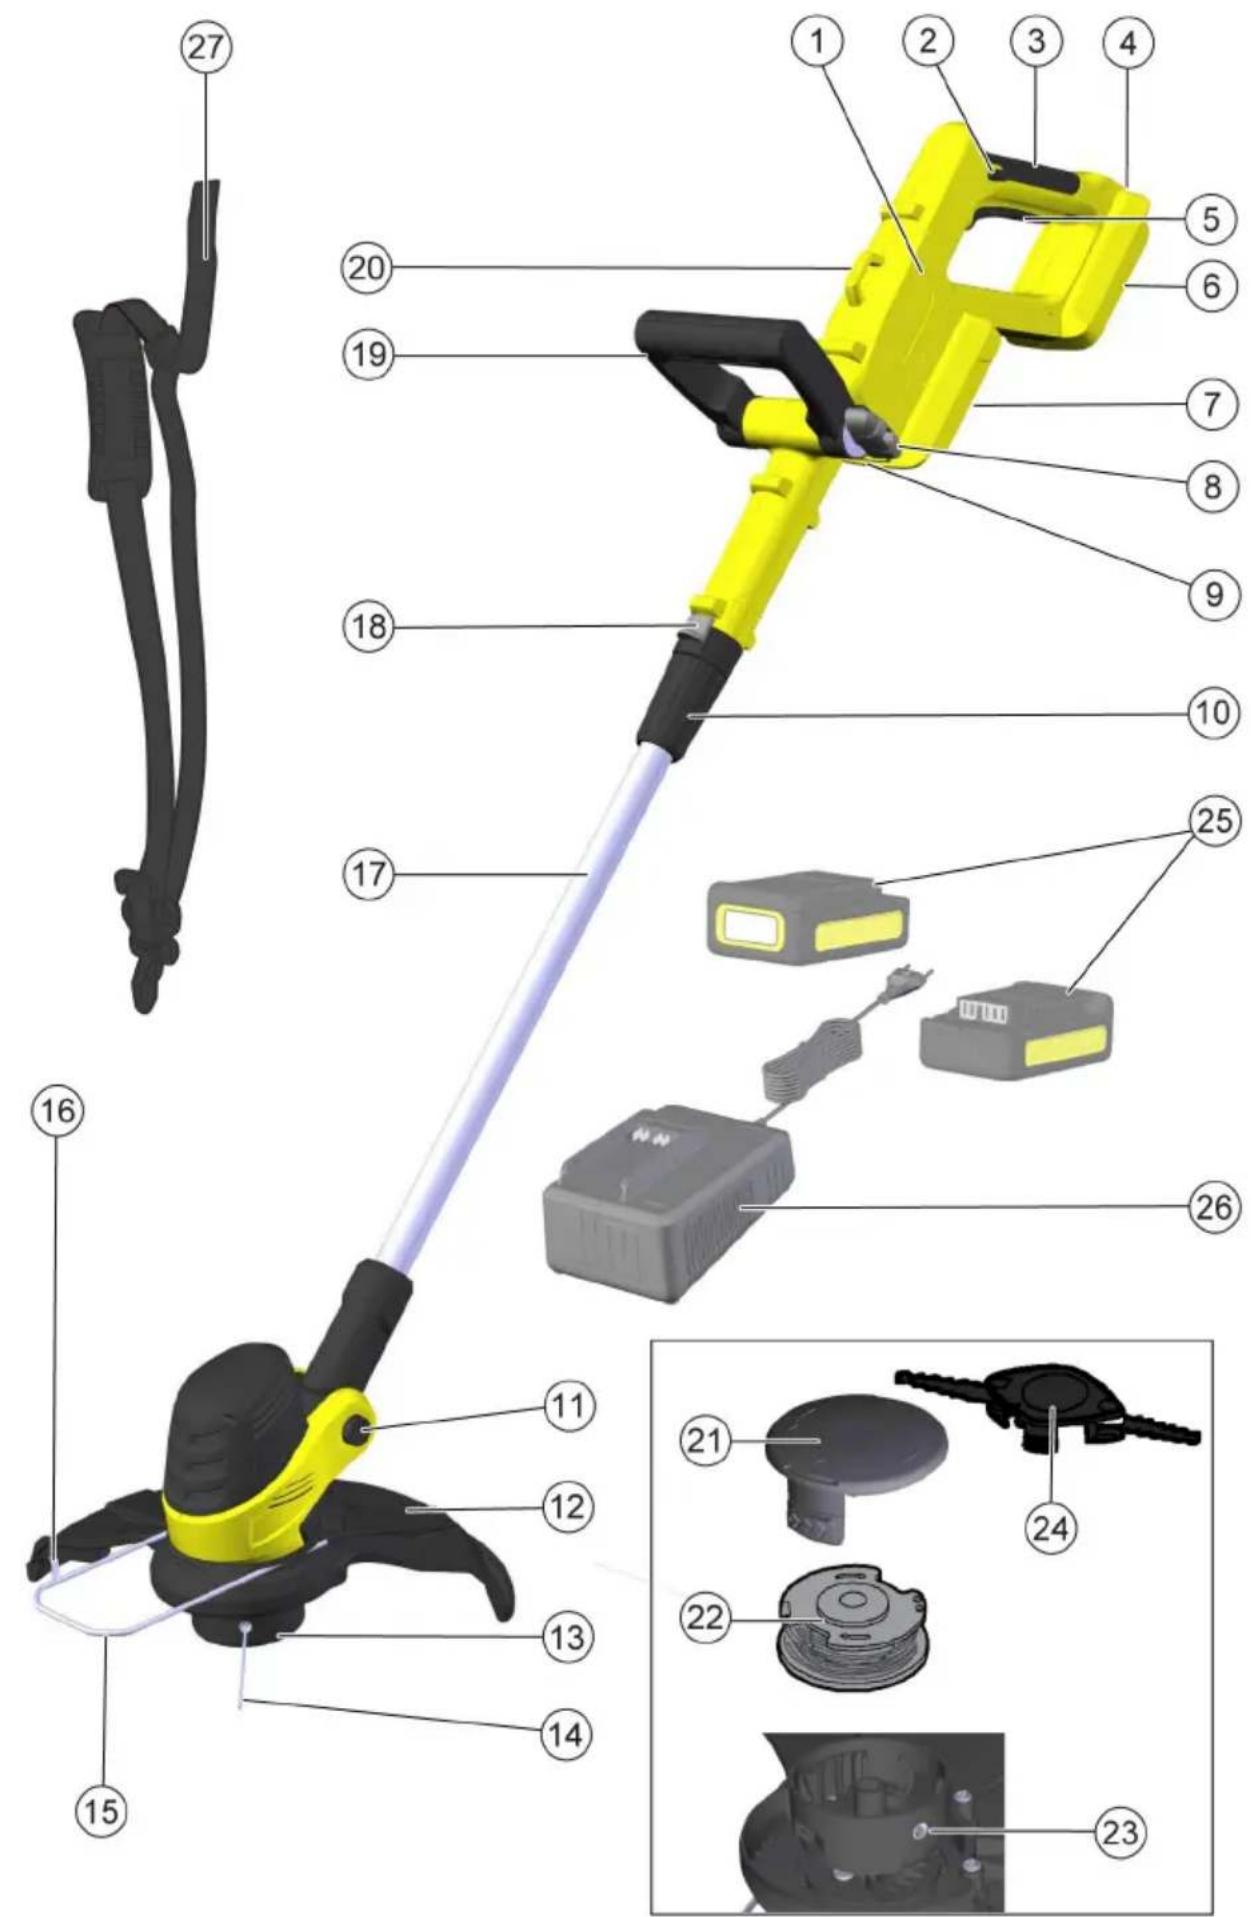
For the illustrations, refer to the graphics page Illustration A
①Device (LTR means lawn trimmer)
② Trigger lockout button
③ Handle
④ Unlocking button 1. Rechargeable battery pack
⑤ Power switch
⑥ Intake 1. Rechargeable battery pack
⑦ Intake 2. Rechargeable battery pack
⑧ Locking screw of handle and guide
⑨ Unlocking button 2. Rechargeable battery pack
⑩Telescoping collar
⑪Swivel head unlocking button
⑫ String guard
⑬ String reel
⑭ Trimmer string
⑮ Plant guard bracket
⑯Cutting blade for string length
⑰ Lower shaft
⑱ Shaft unlocking button
19 Handle and guide
⑳ Attachment eyelet for shoulder strap
②1 Reel cover
⑳String reel
②3 Feed-through hole for string
24 Trimmer knife
25*Rechargeable battery pack
26*Charger
27*Carrying belt
* optional
Installation
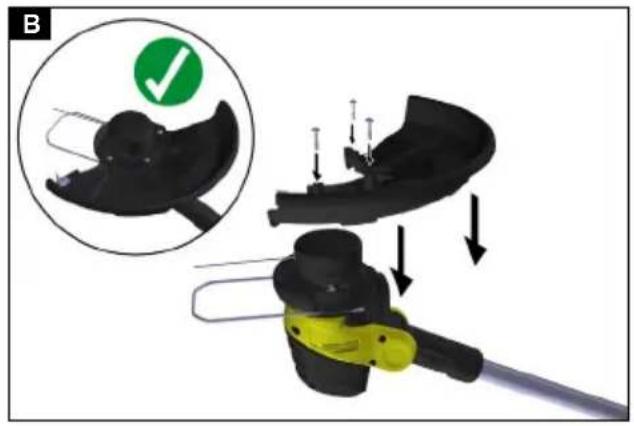
Installing the string guard
⚠ WARNING
Blade on the string guard
Incision injuries
Install the string guard before using the device for the first time.
⚠ WARNING
Exposed string
Incision injuries
Never use the device without the string guard.
Illustration B
The string guard must face the operator.
-
Insert the string guard into the bracket.
-
Screw the string guard to the bracket.
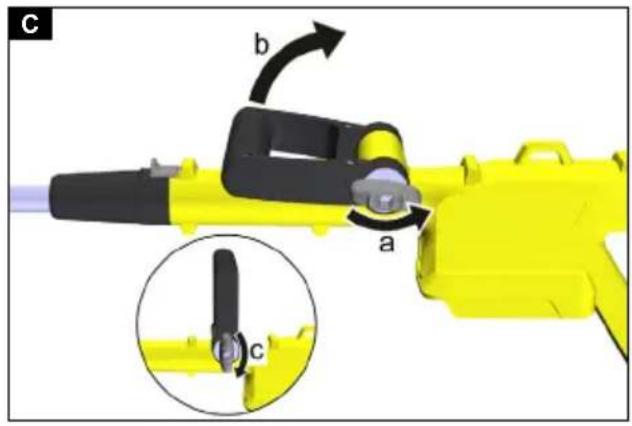
Mounting the handle and guide
-
Release the locking screw of the handle and guide.
-
Move the handle and guide to the desired position.
-
Tighten the locking screw of the handle and guide.
Illustration C
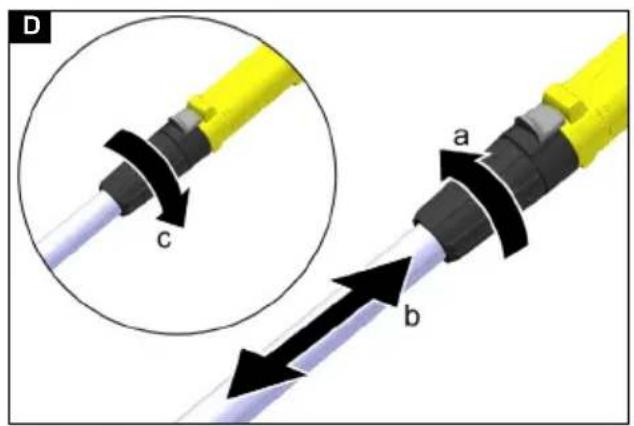
Initial startup
Adjusting shaft length
-
Release the telescoping collar counterclockwise. Illustration D
-
Pull out the upper shaft until the desired length is reached.
-
Tighten the telescoping collar clockwise.
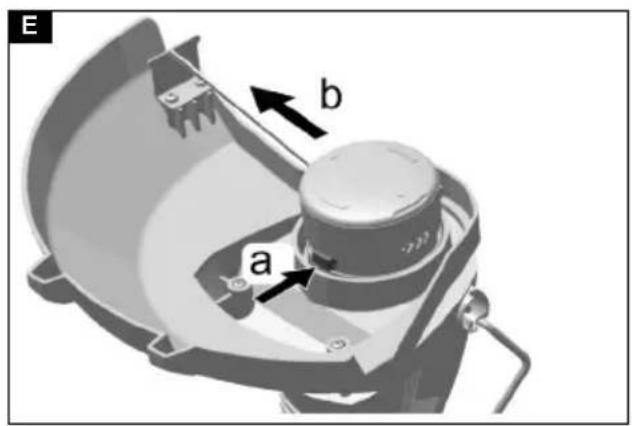
Adjusting the string length
- Press the button for releasing the string and pull the string out of the string reel and up to the cutting edge. If necessary, press the button several times. Illustration E
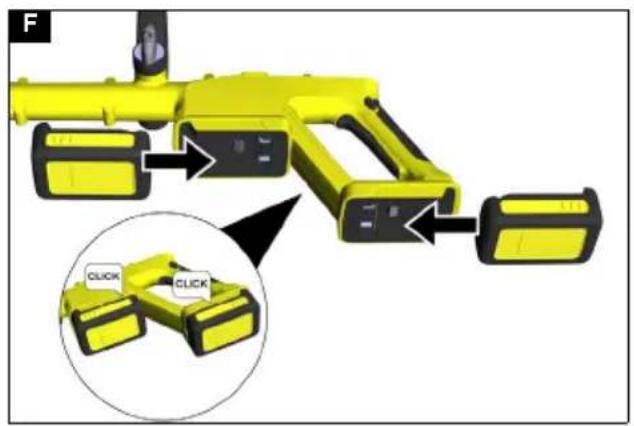
Fitting battery packs
- Push the battery packs into the 1st and 2nd mount until they audibly latch into place.
Illustration F
Operation
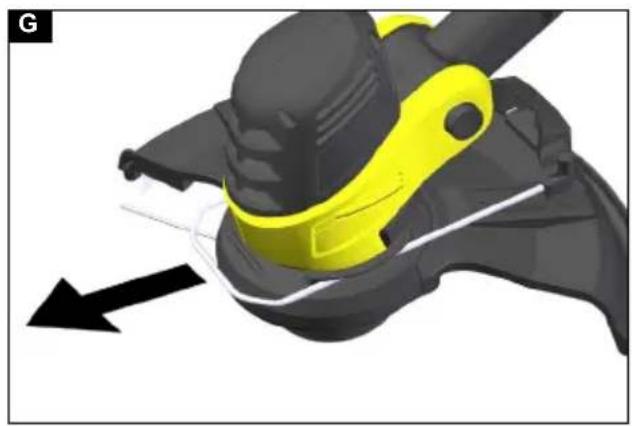
Positioning the plant guard bracket
- Pull out the plant guard bracket to the foremost position.
Illustration G
Working techniques
△CAUTION
Obstacles in the mowing area
Risk of injury and damage
Before starting mowing, check the work area for objects that may be flung away, e.g. wires, stones, cords or glass.
- Hold down the unlocking button and press the trigger at the same time.
Illustration H
The device starts up and the string rotates.
Note
The unlocking button does not need to be held during operation.
2. Guide the cutting head parallel to the ground.
3. Guide the device in a semi-circular movement from left to right over the cutting area.
4. Cut tall grass in several passes, from top to bottom.
Extending the string length during operation
The string on the device wears during mowing and becomes shorter due to fraying and being torn off. A string that is too short will result in unsatisfactory mowing results.
Note
The string length can be extended during operation.
- Release the trigger.
- Press the unlocking button and trigger.
The string extends automatically and is automatically trimmed to the correct length by the cutting blade. Illustration I
Note
You must replace the string reel if the string no longer extends automatically.
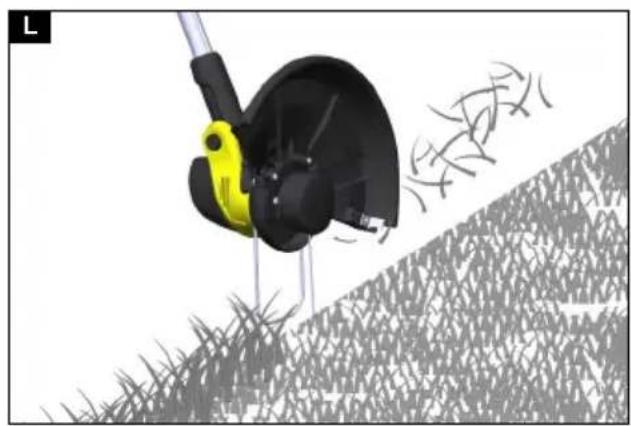
Mowing edges
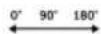
- Press the swivel head unlocking button and move the cutting head to the middle position. Illustration J
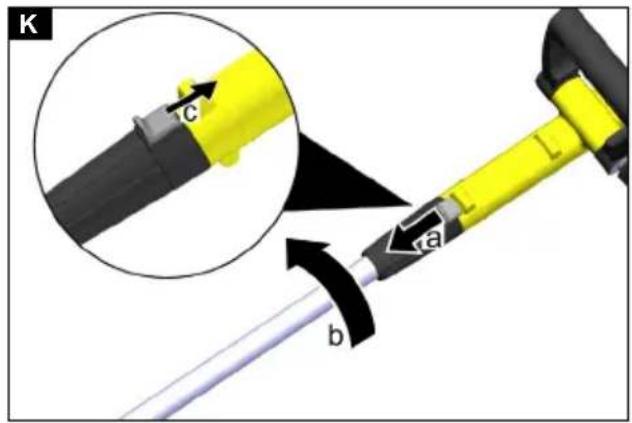
- Pull the shaft unlocking button towards the swivel head and hold it. Turn the shaft through 180°. Illustration K
- Release the shaft unlocking button.
- Press the trigger unlocking button and the trigger.
- Mow the edge regions. Illustration L
Removing the battery packs
Note
During longer work breaks, remove the battery packs from the device and secure them against unauthorised use.
- Release both battery packs by pressing the unlocking button and remove them from the device. Illustration M
Ending operation
- Remove the battery pack from the device (see Chapter Removing the battery packs).
- Clean the device (see Chapter Cleaning the device).
Transport
△CAUTION
Failure to observe the weight
Risk of injury and damage
Be aware of the weight of the device during transportation.
- Remove the battery packs (see Chapter Removing the battery packs).
- Secure the device against slipping and tipping over when transporting in vehicles.
Storage
⚠ WARNING
Switch the device off, allow it to cool down and remove the battery pack before storage or transportation.
Always clean the device before putting it into storage (see Chapter Cleaning the device).
- Release the telescoping collar and press the shaft sections together. Illustration D
- Tighten the telescoping collar.
- Press the swivel head unlocking button and fold the swivel head in as far as possible.
- Store the device in a dry, well ventilated location. Keep away from corrosive substances such as garden chemicals and defrosting salt. Do not store the device outdoors.
Care and maintenance
△CAUTION
Uncontrolled startup
Cutting injuries
Remove the battery packs from the device before all work on the device.
△CAUTION
Risk of injury from sharp blades
Wear safety goggles and protective gloves when working on the device.
Cleaning the device
- Remove any remaining cutting residue from the string guard and the cutting head.
- Clean the device components with a damp cloth if required.
- Clean the front and rear battery pack mount and electric contacts of dirt and foreign bodies regularly.
Replacing the cutting tool
Replacing the string reel
- Press the unlocking buttons on both sides and remove the cover. Illustration N
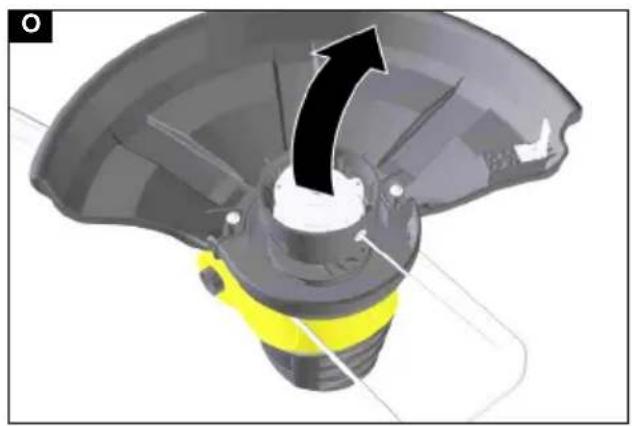
- Remove the old string reel. Illustration O
- Fit the new string reel.
- Guide the new trimmer string through the opening in the housing. Illustration P
- Fit the cover until it latches into place on both sides.
- Adjust the string length (see Chapter Adjusting the string length).
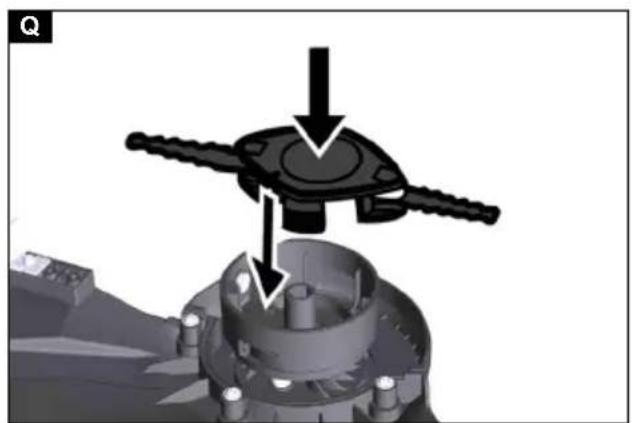
Replacing the trimmer knife
- Press the unlocking buttons on both sides and remove the cover. Illustration N
- Remove the string reel. Illustration O
- Fit the new trimmer knife into the support. Note the correct position via the marking. Illustration Q
Troubleshooting guide
Malfunctions often have simple causes that you can remedy yourself using the following overview. When in doubt, or in the case of malfunctions not mentioned here, please contact your authorised Customer Service.
As the battery pack ages, even if it is looked after, its capacity reduces such that the full run time will no longer be reached when fully charged. This does not indicate a defect.
| Fault Cause Rectification | ||
| The device does not start up | One or both battery packs is not fitted correctly. | ● Push the battery packs into the mounting until they latch into place. |
| One or both battery packs is empty. | ● Check which battery pack is empty and charge it. | |
| One or both battery packs is defective. | ● Replace the defective battery pack. | |
| The device stops during operation | String is too long and is causing the motor to overload | ● Install the string guard.The string will automatically be shortened. |
| Cutting head blocked by cutting residue | ● Remove the cutting residue. | |
| Motor is overloaded | ● Mow only suitable cutting material, see Chapter Intended use. | |
| Motor has overheated | ● Stop working and allow the motor to cool down. | |
| The battery has overheated | ● Stop working and allow the battery to cool down to normal battery temperature. | |
| One or both battery packs is empty. | ● Check which battery pack is empty and charge it. |
Warranty
The warranty conditions issued by our sales company responsible apply in all countries. We shall remedy possible malfunctions on your device within the warranty period free of cost, provided that a material or manufacturing defect is the cause. In a warranty case, please contact your dealer (with the purchase receipt) or the next authorised customer service site. (See overleaf for the address)
Technical data
| LTR 3-18 Dual | ||
| Device performance data | ||
| Working voltage of the battery V 36 | ||
| Working width | mm | 300 |
| Cutting string, diameter | mm | 2,00 |
| no-load-speed | min^-1 | max. 8000 |
| Determined values in acc. with EN 50636-2-91 | ||
| Sound pressure level L_pA | dB(A) | 82,2 |
| Uncertainty K_pA | dB(A) | 3 |
| Sound power level L_wA | dB(A) | 94,6 |
| Uncertainty K_WA | dB(A) | 3 |
| Front handle with string reel hand-arm vibration value | m/s^2 | 3,93 |
| Rear handle with string reel hand-arm vibration value | m/s^2 | 1,56 |
| Front handle with blade hand-arm vibration value | m/s^2 | 5,89 |
| Rear handle with blade hand-arm vibration value | m/s^2 | 3,48 |
| Uncertainty K | m/s^2 | 1,5 |
LTR 3-18 Dual
| Dimensions and weights | ||
| Length x width x height | mm | 1020 x 310 x 920 |
| Weight (without battery pack) | kg | 2,42 |
Subject to technical modifications.
Vibration value
⚠ WARNING
The specified vibration value was measured using a standard test procedure and may be used to compare devices.
The specified vibration value may be used in a provisional assessment of the load.
Depending on the way the device is used, the vibration emission can deviate from the specified overall value during the current use of the device.
Device with a hand-arm vibration value > 2.5 m/s ^4 (see chapter Technical Data in the operating instructions)
⚠️ CAUTION • Uninterrupted use of the device for several hours can lead to numbness. • Wear warm gloves to protect your hands. • Take regular breaks from work.
Declaration of Conformity
EU Declaration of Conformity
We hereby declare that the machine described below complies with the relevant basic safety and health requirements in the EU Directives, both in its basic design and construction as well as in the version placed in circulation by us. This declaration is invalidated by any changes made to the machine that are not approved by us.
Product: Battery-powered lawn trimmer
Type: LTR 3-18 Dual
Currently applicable EU Directives
2000/14/EC (+2005/88/EC)
2006/42/EC (+2009/127/EC)
2011/65/EU
2014/30/EU
Harmonised standards used
EN 60335-1: 2012 + A11: 2014 + A13: 2017 + A15:
2021
EN 50636-2-91:2014
EN IEC 63000: 2018
EN 55014-1: 2017 + A11: 2020
EN 55014-2: 1997 + A1: 2001 + A2: 2008
EN 62233: 2008
Conformity evaluation procedure used
2000/14/EC and amended by 2005/88/EC: Annex VI
Name and address of the notified body involved
TÜV Rheinland LGA Products GmbH (NB 0197)
Tillystraße 2
D-90431 Nuremberg
Sound power level dB(A)
LTR 3-18 Dual
Measured: 93,0
Guaranteed: 96
The signatories act on behalf of and with the authority of the company management.

H. Jenner
Chairman of the Board of Management

S. Reiser
Manager Regulatory Affairs & Certification
Documentation supervisor:
S. Reiser
Alfred Kärcher SE & Co. KG
Alfred-Kärcher-Str. 28 - 40
71364 Winnenden (Germany)
Ph.: +49 7195 14-0
Fax: +49 7195 14-2212
Winnenden, 2023/08/01
Declaration of Conformity (UK)
We hereby declare that the product described below complies with the relevant provisions of the following
UK Regulations, both in its basic design and construction as well as in the version put into circulation by us.
This declaration shall cease to be valid if the product is modified without our prior approval.
Product: Battery-powered lawn trimmer
Type: LTR 3-18 Dual
Currently applicable UK Regulations
S.I. 2001/1701 (as amended)
S.I. 2008/1597 (as amended)
S.I. 2012/3032 (as amended)
S.I. 2016/1091 (as amended)
Designated standards used
EN 60335-1: 2012 + A11: 2014 + A13: 2017 + A15:
2021
EN 50636-2-91:2014
EN IEC 63000: 2018
EN 55014-1: 2017 + A11: 2020
EN 55014-2: 1997 + A1: 2001 + A2: 2008
EN 62233: 2008
Applied conformity assessment procedure
S.I. 2001/1701 (as amended): Schedule 9
Name and address of the notified body involved
AnP Certification Limited (NB 8500)
2 Parkfield Street
Rusholme
Manchester
M14 4PN
United Kingdom
Sound power level dB(A)
LTR 3-18 Dual
Measured: 93,0
Guaranteed: 96
The signatories act on behalf of and with the authority of the company management.

H. Jenner
Chairman of the Board of Management

S. Reiser
Manager Regulatory Affairs & Certification
Documentation supervisor:
S. Reiser
Alfred Kärcher SE & Co. KG
Alfred-Kärcher-Str. 28 - 40
71364 Winnenden (Germany)
Ph.: +49 7195 14-0
Fax: +49 7195 14-2212
Winnenden, 2023/08/01
Contenu
2006/42/CE (+2009/127/CE)
2011/65/UE
2014/30/UE
Chairman of the Board of Management

S. Reiser
Manager Regulatory Affairs & Certification
71364 Winnenden (Germany)

H. Jenner
Chairman of the Board of Management

S. Reiser
Manager Regulatory Affairs & Certification
71364 Winnenden (Germany)
Tel.: +49 7195 14-0
Fax: +49 7195 14-2212
Winnenden, 01/08/2023
2006/42/CE (+2009/127/CE)
2011/65/UE
2014/30/UE
Chairman of the Board of Management

S. Reiser
Manager Regulatory Affairs & Certification
71364 Winnenden (Germany)
Tel.: +49 7195 14-0
Fax: +49 7195 14-2212
Winnenden, 01/08/2023
Índice
2006/42/CE (+2009/127/CE)
2011/65/UE
2014/30/UE

H. Jenner
Chairman of the Board of Management

S. Reiser
Manager Regulatory Affairs & Certification
Winnenden, 01/08/2023
Inhoud
Reduceren van risico's
⚠ VOORZICHTIG
Chairman of the Board of Management

S. Reiser
Manager Regulatory Affairs & Certification
71364 Winnenden (Germany)
Tel.: +49 7195 14-0
Fax: +49 7195 14-2212
Winnenden, 2023/08/01
İçindekiler
2006/42/AT (+2009/127/AT)
2011/65/AB
2014/30/AB

H. Jenner
Chairman of the Board of Management

S. Reiser
Manager Regulatory Affairs & Certification

H. Jenner
Chairman of the Board of Management

S. Reiser
Manager Regulatory Affairs & Certification
D-71364 Winnenden (Germany)
Tfn: +49 7195 14-0
Fax: +49 7195 14-2212
Winnenden, 01.08.2023
Sisältö
Chairman of the Board of Management

S. Reiser
Manager Regulatory Affairs & Certification
71364 Winnenden (Germany)
Puh.: +49 7195 14-0
2006/42/EF (+2009/127/EF)
2011/65/EU
2014/30/EU
Anvendte harmoniserte standarder
EN 60335-1: 2012 + A11: 2014 + A13: 2017 + A15: 2021
EN 50636-2-91:2014
EN IEC 63000: 2018
EN 55014-1: 2017 + A11: 2020
EN 55014-2: 1997 + A1: 2001 + A2: 2008
EN 62233: 2008
Chairman of the Board of Management

S. Reiser
Manager Regulatory Affairs & Certification
71364 Winnenden (Germany)
Tlf.: +49 7195 14-0
2006/42/EF (+2009/127/EF)
2011/65/EU
2014/30/EU

H. Jenner
Chairman of the Board of Management

S. Reiser
Manager Regulatory Affairs & Certification
71364 Winnenden (Germany)
Tlf.: +49 7195 14-0
Fax: +49 7195 14-2212
Winnenden, 2023/08/01
Sisukord
Ohutusjuhised 91
2006/42/EÜ (+2009/127/EÜ)
2011/65/EL
2014/30/EL

H. Jenner
Chairman of the Board of Management

S. Reiser
Manager Regulatory Affairs & Certification
71364 Winnenden (Germany)
Tel: +49 7195 14-0

H. Jenner
Chairman of the Board of Management

S. Reiser
Manager Regulatory Affairs & Certification

H. Jenner
Chairman of the Board of Management

S. Reiser
Manager Regulatory Affairs & Certification
2006/42/WE (+2009/127/WE)
2011/65/UE
2014/30/UE

H. Jenner
Chairman of the Board of Management

S. Reiser
Manager Regulatory Affairs & Certification
71364 Winnenden (Germany)
Tel.: +49 7195 14-0

H. Jenner
Chairman of the Board of Management

S. Reiser
Manager Regulatory Affairs & Certification
2006/42/ES (+2009/127/ES)
2011/65/EU
2014/30/EU

H. Jenner
Chairman of the Board of Management

S. Reiser
Manager Regulatory Affairs & Certification
2006/42/ES (+2009/127/ES)
2011/65/EÚ
2014/30/EÚ
Chairman of the Board of Management

S. Reiser
Manager Regulatory Affairs & Certification
71364 Winnenden (Germany)
Tel.: +49 7195 14-0
Fax: +49 7195 14-2212
Winnenden, 01.08.2023
Kazalo
Varnostna navodila 142
Namenska uporaba 145
Zaščita okolja 145
Pribor in nadomestni deli.... 145
Obseg dobave.... 145
Simboli na napravi.... 145
Opis naprave 145
Montaža.... 146
Zagon 146
Upravljanje 146
Transport 147
Skladiščenje 147
Varen transport in shranjevanje
2006/42/ES (+2009/127/ES)
2011/65/EU
2014/30/EU
Chairman of the Board of Management

S. Reiser
Manager Regulatory Affairs & Certification
Winnenden, 1. 8. 2023
Cuprins
Directive UE relevante
2000/14/CE (+2005/88/CE)
2006/42/UE (+2009/127/UE)
2011/65/UE
2014/30/UE
Norme armonizate aplicate
EN 60335-1: 2012 + A11: 2014 + A13: 2017 + A15: 2021
EN 50636-2-91:2014
EN IEC 63000: 2018
EN 55014-1: 2017 + A11: 2020
EN 55014-2: 1997 + A1: 2001 + A2: 2008
EN 62233: 2008
Chairman of the Board of Management

S. Reiser
Manager Regulatory Affairs & Certification
71364 Winnenden (Germania)
Tel.: +49 7195 14-0
Fax: +49 7195 14-2212
Winnenden, 2023/08/01
Sadržaj
Sigurnosni napuci.... 156
2006/42/EZ (+2009/127/EZ)
2011/65/EU
2014/30/EU
Chairman of the Board of Management

S. Reiser
Manager Regulatory Affairs & Certification
Opunomoćenik za dokumentaciju:
S. Reiser
Alfred Kärcher SE & Co. KG
Alfred-Kärcher-Str. 28 - 40
71364 Winnenden (Njemačka)
Tel.: +49 7195 14-0
Telefaks: +49 7195 14-2212
Winnenden, 01.08.2023.
Sadržaj
| Sigurnosne napomene | 163 |
| Namenska upotreba | 166 |
| Zaštita životne sredine | 166 |
| Pribor i rezervni delovi | 166 |
| Obim isporuke | 166 |
| Simboli na uređaju | 166 |
| Opis uređaja | 167 |
| Montaža | 167 |
| Puštanje u pogon | 167 |
| Rukovanje | 167 |
| Transport | 168 |
| Skladištenje | 168 |
| Nega i održavanje | 168 |
| Pomoć u slučaju smetnji | 169 |
| Garancija | 169 |
| Tehnički podaci | 169 |
| Vrednost vibracija | 169 |
| EU izjava o usklađenosti | 169 |
Sigurnosne napomene

Pre prve upotrebe uređaja, pročitajte ove sigurnosne napomene, ovo originalno uputstvo za rad, sigurnosne napomene koje su priložene uz akumulatorsko pakovanje i priloženo
2006/42/EZ (+2009/127/EZ)
2011/65/EU
2014/30/EU
Primenjene harmonizovane norme
EN 60335-1: 2012 + A11: 2014 + A13: 2017 + A15: 2021
EN 50636-2-91:2014
EN IEC 63000: 2018
EN 55014-1: 2017 + A11: 2020
EN 55014-2: 1997 + A1: 2001 + A2: 2008
EN 62233: 2008

H. Jenner
Chairman of the Board of Management

S. Reiser
Manager Regulatory Affairs & Certification
Lice ovlašćeno za dokumentaciju:
S. Reiser
Alfred Kärcher SE & Co. KG
Alfred-Kärcher-Str. 28 - 40
71364 Winnenden (Germany)
Tel.: +49 7195 14-0
Chairman of the Board of Management

S. Reiser
Manager Regulatory Affairs & Certification
71364 Winnenden (Germany)
Tηλ.: +49 7195 14-0
Φαξ: +49 7195 14-2212
Winnenden, 2023/08/01
Содержание

H. Jenner
Chairman of the Board of Management

S. Reiser
Manager Regulatory Affairs & Certification
71364 Winnenden (Germany)
Тел.: +49 7195 14-0
Факс: +49 7195 14-2212

H. Jenner
Chairman of the Board of Management

S. Reiser
Manager Regulatory Affairs & Certification
71364 Winnenden (Germany)
Тел.: +49 7195 14-0
Факс: +49 7195 14-2212

H. Jenner
Chairman of the Board of Management

S. Reiser
Manager Regulatory Affairs & Certification
71364 Winnenden (Germany)
Тел.: +49 7195 14-0
Факс: +49 7195 14-2212
Виненден, 2023/08/01
Мазмуны
• Increasediation of the most-used economy in Germany, where you have just been interested in the country.
natural_image
Black and white line drawing of a hand giving a thumbs-up gesture (no text or symbols)THANK YOU!
MERCI! DANKE! iGRACIAS!

Register your product and benefit from many advantages.
www.kaercher.com/welcome


Rate your product and tell us your opinion.
natural_image
Icon showing a gear and wrench inside a square frame (no text or symbols)www.kaercher.com/dealersearch
Alfred Kärcher SE & Co. KG
Alfred-Kärcher-Str. 28-40
71364 Winnenden (Germany)