KI2321SE0 - Fridge NEFF - Free user manual and instructions
Find the device manual for free KI2321SE0 NEFF in PDF.

| Product type | Built-in fridge-freezer |
| Brand | Neff |
| Model | KI2321SE0 |
| Height (cm) | 177.2 (estimated) |
| Width (cm) | 54.1 (estimated) |
| Depth (cm) | 54.8 (estimated) |
| Net weight (kg) | Up to 45 |
| Power supply | 220-240 V, 50/60 Hz, alternating current |
| Climate class | SN, N, ST, T (10 °C to 43 °C) |
| Refrigerant | Shown on rating plate (flammable) |
| Refrigerator volume (L) | Not specified (estimated 200-250 L) |
| Freezer volume (L) | Not specified (estimated 50-80 L) |
| Freezing capacity (kg/24h) | Shown on rating plate |
| Storage time in case of failure (h) | Shown on website (storage time) |
| Main functions | Refrigeration, freezing, super function, ice cube preparation |
| Temperature setting | Electronic, refrigerator compartment 2 °C to 8 °C |
| Interior lighting | LED, energy efficiency class E |
| Defrosting | Automatic for the refrigerator, manual for the freezer |
| Cleaning and care | Clean with warm water and mild detergent, do not use steam cleaner |
| Safety | Child lock not mentioned, but instructions to avoid risks of explosion, electrocution, cold burns |
| Spare parts and repairability | Spare parts available for 10 years, repairs by qualified personnel only |
Frequently Asked Questions - KI2321SE0 NEFF
User questions about KI2321SE0 NEFF
0 question about this device. Answer the ones you know or ask your own.
Ask a new question about this device
Download the instructions for your Fridge in PDF format for free! Find your manual KI2321SE0 - NEFF and take your electronic device back in hand. On this page are published all the documents necessary for the use of your device. KI2321SE0 by NEFF.
USER MANUAL KI2321SE0 NEFF
10 Compartment congestion.... 41
1.6 Installation sure
6.2 Trappe du compartment congestion
10 Compartment condélation
usages (waste electrical and electronic equipment - WEEE).
(waste electrical and electronic equipment - WEEE).
WAARSCHUWING - Kans op verstikking!
WAARSCHUWING Kans op explosie!
4.7 CMHa Ha ctpaHnHaTa LED cbettnHa 16
4.7.1 CbAJIHe Ha cTpaHnUHaTa LED nAmna 16
4.7.2 MoHTnpaHe Ha cTpaHmHaTa LED nAMna 17
OTHOCHO To3n DokyMeHT
1.1 Baxha nHΦopMaζη
1.1.1 Uen
TeHc cBbETn 3a pEmOH T NOMarat Ha Ntpe6nTEnla DpemOHtnpa Cam ypeiB C bOeTBeTbVE C pernameHTa 3a ekONOrOcb6paHO npoeKtnpaHe Ha ypeiNe (OT 03.2021 r.).
Te cbIbpxk HnHOpMaunKa Ka Da CMeHrTe ONpeDeneHn pe3epBn YactN, BKIOHTENHO npdynpckdHn n PNCKOB.
Ako IMATE HRAKAKBb BNPOCN,MOJcCBpXeTe Ce c HAUNO tONe 3a o6CnykBahe Ha KInENTn.Hocm OTROBOPHOCT 3a UETn, cmo AKO cbBeNTe 3a peMOHT ca cna3EH npabnHNO.
1.2 06aCHeHne Ha cHMBOJInTe
1.2.1 HbHa onaCHOCT
IpeynpeintenHnBaCe cBcTOrT OT CmBOJ nCnHaHa Dyma.CnrHaHaTa yMa noka3Ba cepno3HOCTTA Ha onaCHOCTTA.
| Ниво на п dedурждени 3начени | |
| ОПАСHОCT | Еспаразы新股у на п dedурждени.TО сбоб Shedени по Смьт ини сернони наразяваим. |
| ПРEDУПЕЖДЕНЕ | Еспаразы新股у на п dedурждени.TOT сбob Shedени по Смьт ини сернони наразяваим. |
| ВИМATEЛНО | Еспаразы新股у на п dedурждени.TOT сбob Shedени по Смьт ини наразяваим. |
| ВИМАМЕЛ | Еспаразы新股у на п dedурждени.TOT сбob Shedени по Смьт ини onMy-шостевни.$etп. |
Tabuua 1: Hua Ha onachocm
1.2.2 Cnmbon3a onachoct
CIMBOHTE3aONACHOCTCa CIMBOHNUH N3o6paXeHNA, KOHTO DaBaT INDINKAUHA 3a BnDa ONACHOCT.
BTo3n DOKyMeHCTe H3N013BaT CNEdHInTe CMBOIN 3a OnaCHOCT:
MoHTnpaIteB06paTeHpeI.

PemOH
4.3CMHaHa nIb3raaata ce naHTa
Cneunannn HNCTpyMeHTN:
HakpaHHK Torx TX20 6,3 MM (1/4") [00340865]
PDEUYPEXHEHNE
Texk, o6emnctuypei!
Pnck OT nadaun yactn nopadpa3Xna6eHN BnHToBe!
NoBpeHa DpyrN yactn Ha ypea nn B DoMa Ha KneHTa, Hanp. dbHo
TO.
3akpenete KOMnoHEHTa, Taka Ye da He naHe.
N3nCKBaHe:
YpeDbTe N3KJIIOUeHOT 3aXpaHbHaHeTO.
Me6eHnata Bpata n Bpata tHa ypea ca pa3deneHN. BnKTe "NcHctpyKun 3a MOHTaX".
4.3.1 Cbajhe Ha nbbraata ce nahta
1.Pa3BnTeDbataBnHTa(1)
2.CBane rophata naHTa (2).
3.ИЗваде БраТа(T)
4.Pa3BnTe DBaTa BnHTa(4).
5. CbaneTe donHaTa nHaTa (5).
TnHTnte ca cBaaneH.
4.3.2 MoTHnpaHEna nnb3raaata ce naHTa
MoHTnpaIteB06paTeHpeI.

PemOH
4.4 CMHa Ha paΦTa
N3nCKBaHe:
BpaTaTa e oTbopeHa.
4.4.1 N3BaXdaHe Ha paΦTa
H3dpnaiTepaTa.

PaftbtecbaneH.
4.4.2 MoThnpaHe Ha paPta
MOHTnpaTeB06paTeHpeI.

PemOH
4.5 CmHa Ha cTeJaXa Ha BpaTaTa
M3nCKBaHe:
Bpatae oTbopeha.
4.5.1 N3Baxdahe Ha CTenaxa Ha BpaTata
NobHHeTcTeJaxHaBaPaTaHarope.
CTenakbT Ha BpaTaTa e CbaNeH.
4.5.2 MoNTupaHc HcTeNaKa Ha BpaTaTa
MOHTnpaTBeBobpaTepeI.

PemOH
4.6CMHa Ha KOHTeHepa 3a NIOOBe n 3eJeHuyu
N3nCKBaHe:
Bpatae oTbopeha.
4.6.1 N3BaXdane Ha KOHTeHepa 3a nIOdoBe n3eJeHcyu
- N3dbpnaTe KOHTeHepa 3a nnOdoBe n 3eNeHyuN DoKbTeo MoKe Da CTnHe.
2.1. NOBUNHETe KOHTEHEPA 3a NNODOBE H 3eENHUYU B NpeHATA YACT (1). 2. IV3BaIeTe KOHTEHEPA (2).
KoHTeHepbT 3a nnOBoE n3eneHuyu e oTcPaHeH.
4.6.2 MoHTnpaHe Ha KOHTeHepa 3a nIODoBe H 3eJeHcyu
MoHTpaTBe Bo6paTeH peI.

PemOH
4.7CMHaHa cTpaHnHaTa LED cbETnHa
CneuaJIHHnHCTpymeHTn:
CmykateHnHaaHa 05 MM [00342224]

Baunr type e chabden c LED ocBertneHne, KoTo He n3nckba noDpBxka.
Toba oCebETnEHMe MOXe Da 6bJe peMOHTnAPHO cAmO DT CNEUHINCTNOT CNYKbata 3a 0cBnykBaHe Ha KInnENT HnNt O KbanuHnPauHn TexHHn!

ONACHOCT

PCKOTOKOByapnapaHnactnnoHanpeXeHne!
OnachOCT 3A XIBOTA OT TOKOB Ydap B CNYa HnepaBnHcpeMOHT ENEKTPNueKte NaTbTpBA Da ce pMOHTnpAT OT KBaMnPHaPAN ENEKTPOTEXHHU.
CJepoMOHTA TpRABa Da ce IaBbPun npOeRpa 3a 6EoNaCHOCT CbIaNcHO VDE 0701 nn B cBoTBeTCTBne Cc CneuHmHnTe 3a CTpaHaTa pAnope6M.

ONACHOCT
Pnck ot TokOB yap nopadu qactn noHanpeXeHne!
CmbpT OT TKOB yap
3NkIOeTe ypeDte O t eNkTPrHeKcTo 0 3axpaBaHe NOE 60 ceKyHnI pIeINI 3aONuBaHa Hp EMOHTA.


BHIMATEJIHO
Octpn pb6oBe!
HapaHbAHnO TnpaBaHe
Hocete npedna3n pkbauu.
N3nCKBaHe:
YpeBTe H3KnIOueH OTOxpaHbAHeTo.
BpataTa e OTBOpeHa.
PaTOBeTa n3BaDeHn.
4.7.1 CbJIaHHe Ha cTpahHara LED JAMnA
- NocTabete DBe CmYkATEHnHaAsnBbpxy Kanaka Ha cTpaHnHaTaLED CbETnHa.
2.И3dbpnaIte cmykaTeJIHITe YauIN HANpeI c eIDHO BbPTENBO DnKHeHc.
KanaKaT ha LED nAmnata e cBaneH.

PemOH
3.CBaIeLEDmoyna.


CtpaHnHata LED lamnae cBaJeHa.
4.7.2 MoTHnPaHHe Ha CTpaHnHaTa LED JAMna

Poppadi B3M0KHOCTTa KYKATE Ha KAAKA HA JAMnATA da ce ChyIaT NO BpeMe Ha CBaJIHETO, peSEbPAHTc PAnHnEDA LAmna e KOMnIeKT, KOITB KINHBA LED MOdyn n Kanak.
MoHTnpaTBeBopatEnpeJ.
raneni padajicimi dly.
Zajistete Jednotlivo soucasti pred pamem.
POZOR!
Nebezpeci padajicich dilu kvuli uvolenym srobum!
Poskozeni jin'ych casti spotfebié nebo prvku domacnosti zakaznika,
pr. podlathy.
Zajistete jednotlive soucasti prcd padem.
Požadavek:
Sorg for at sikre componenten mod at falde ned.
BEMAERK!
Fare for nedfaldende dele pga. 1osnede skruer!
Sorg for at sikre componenten mod at falde ned.
Preindstilling:
Beknelling/afklemming yan yingers
Self-repair hints - Refrigerator
1 Concerning this document. 83
1.1 Important information 83
1.1.1 Purpose 83
1.2 Explanation of symbols 83
1.2.1 Danger levels.. 83
1.2.2 Hazard symbols 83
1.2.3 Structure of the warnings 84
1.2.4 General symbols 84
Safety. 85
2.1 General Safety instructions 85
2.1.1 All domestic appliances 85
Tools and aids. 86
Repair 87
4.6 Replacing fruit and vegetable container 95
4.6.1 Removing fruit and vegetable container 95
4.6.2 Installing fruit and vegetable container 95
4.7 Replacing LED side light 96
4.7.1 Removing LED side light 96
4.7.2 Installing LED side light 97
Concerning this document
1.1 Important information
1.1.1 Purpose
These repair hints support consumer to repair appliances by himself according to the applicable eco-design regulation (as of 03/2021).
They contain information how to exchange defined spare parts including warnings and risks.
In case of questions, please contact our customer service. We will only be liable for damages if the repair hints have been followed properly.
1.2 Explanation of symbols
1.2.1 Danger levels
The warning levels consist of a symbol and a signal word. The signal word indicates the severity of the danger.
Table 1: Danger levels
| Warning level Meaning | |
| Danger | Non-observation of the warning message will result in death or serious injuries. |
| Warning | Non-observation of the warning message could result in death or serious injuries. |
| Caution | Non-observation of the warning message could result in minor injuries. |
| Notice | Non-observation of the warning message could result in damage to property. |
1.2.2 Hazard symbols
Hazard symbols are symbolic representations which give an indication of the kind of danger.
The following hazard symbols are used in this document:
| Hazard symbol Meaning | |
| ! | General warning message |
| Danger from electrical voltage | |
| Risk of explosion | |
| Danger of cuts | |
| Danger of crushing |
Concerning this document
| Hazard symbol Meaning | |
| Danger from hot surfaces | |
| Danger from strong magnetic field | |
| Danger from non-ionizing radiation |
Table 2: Hazard symbols
1.2.3 Structure of the warnings
Warnings in this document have a standardised appearance and a standardised structure.
Danger
Type and source of danger!
Possible consequences of ignoring the danger / warning.
Measures and prohibitions for preventing the danger.
The following example shows a warning that warns against electric shock due to live parts. The measure for avoiding the danger is mentioned.
Danger
Risk of electric shock due to live parts!
Death by electrocution
- Disconnect appliances from electrical supply at least 60 seconds
before starting repairs.
1.2.4 General symbols
The following general symbols are used in this document:
| Gen. symbol Meaning | |
| 1 | Identification of a special tip (text and/or graphic) |
| i | Identification of a simple tip (only text) |
| Identification of a link to a video tutorial |
Table 3: General symbols
| Gen. symbol Meaning | |
| Identification of required tools | |
| Identification of required preconditions | |
| Identification of a condition (if ..., then ...) | |
| Identification of a result | |
| [Start]Identification of a key or button | |
| [00123456] Identification of a material number | |
| Status Identification of displayed text / window(in the appliance's display) | |
Safety
2.1 General Safety instructions
2.1.1 All domestic appliances
Risk of electric shock due to live parts!
Errors by repairs involving electrical components can lead to electrical shock!
- Disconnect the appliance from the mains for at least 60 seconds before starting work.
After the repair have a safety test according VDE 0701 or country-specific regulations performed.
Risk of injury from sharp edges!
Wear protective gloves.
Risk of crushing during repair, maintenance, troubleshooting and service due to heavy and moving components
Wear protective shoes.
- Secure heavy components from falling down.
- Do not stick body parts into moving components.
Risk to the appliance's safety / function!
Only use original spare parts.
Risk of damage to electrostatically sensitive components (ESDs)!
- Do not touch the modules, including connections and conductor paths.

Tools and aids
| Designation Details Images | ||
| Protection cloth [00342013] | 60 cm x 50 cm | ### |
| Suction cup [00342224] | ∅50 mm | |
| Torx Bit TX20 [00340865] | 6.3 mm (1/4") | |
Prerequisite:
Door is open.
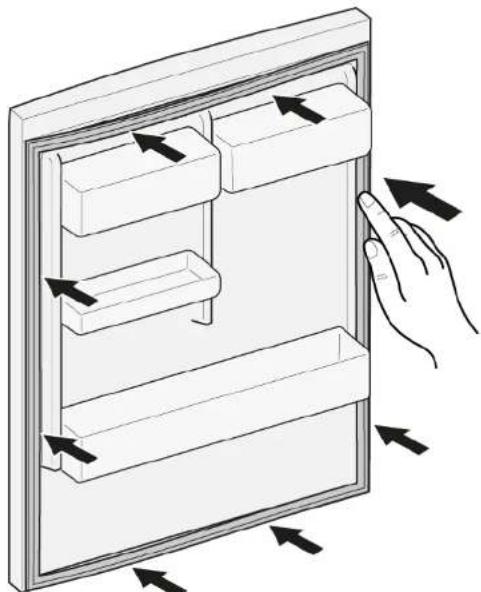
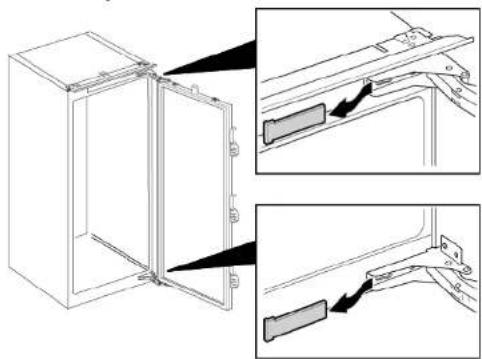
- Release door gasket from the groove on right and left corner.
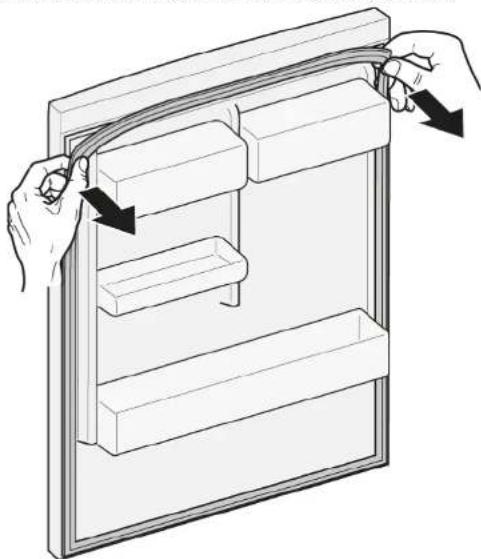
- Pull out door gasket from groove.
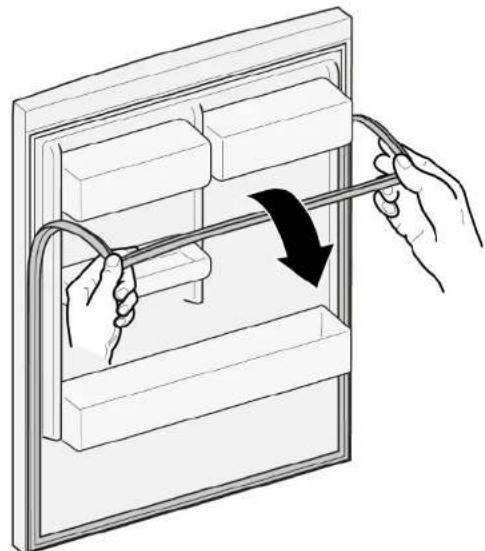

Door gasket is removed.
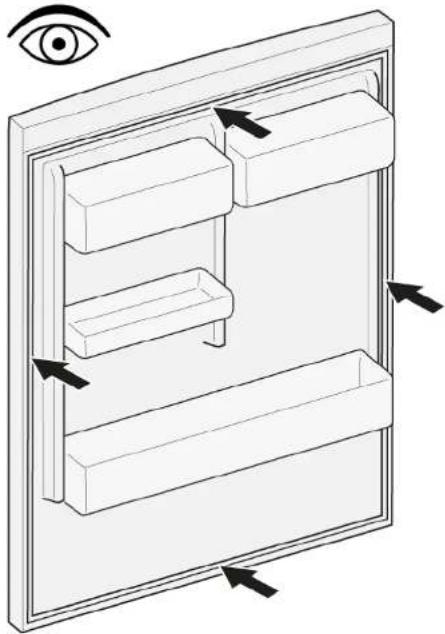
Thickness of new door gasket may deviate slightly from thickness of old door gasket. This will not affect closing behavior and long-term function. If your appliance has adjustable hinges or hinge attachments, you can optimize the closing behavior subsequently. Small side holes in door gasket are functional (required for ventilation). These are not production faults.

Repair
- Check groove for gasket for damage.
- If groove for gasket is it is damaged.
- Contact customer service.
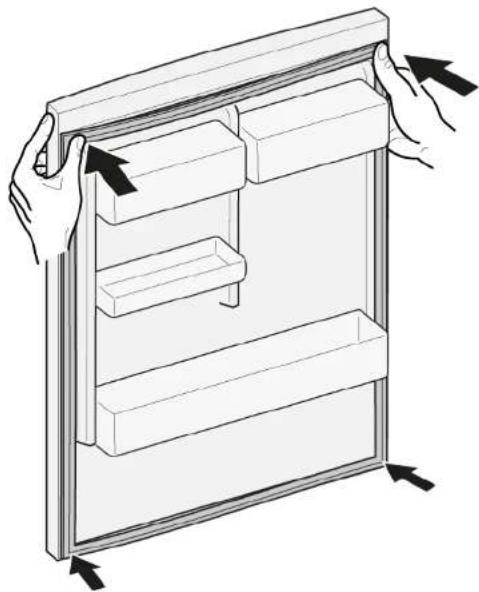
- Slight deformation of door gasket is normal and does not affect its function. It is recommended to straighten door gasket before inserting it into appliance.
Heat door gasket with a hair dryer or hot water and manually reshape it.
- Push corners of gasket at the top and bottom to the groove.

Repair
- Press whole gasket step by step into the groove.
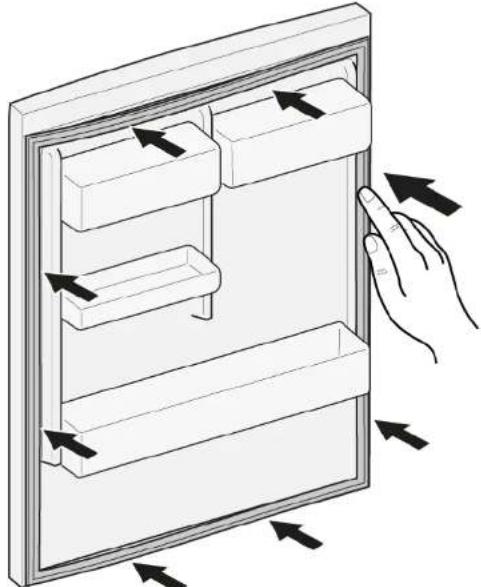

Door gasket is installed.
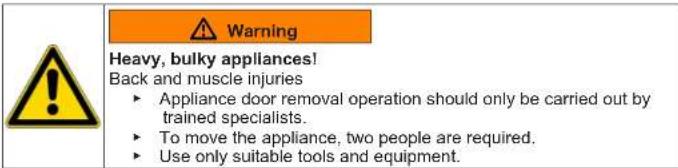
Heavy, bulky appliances!
Back and muscle injuries
- Appliance door removal operation should only be carried out by
trained specialists.
To move the appliance, two people are required.
Use only suitable tools and equipment.

Sharp edges!
Cut injuries
Wear protective gloves.

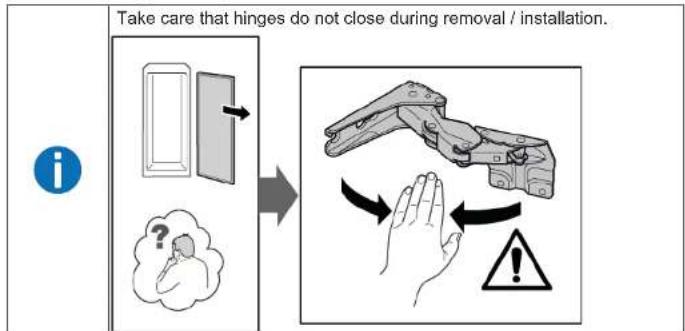
Open hinge area!
Finger crushing / entrapment
Do not reach into the hinge area.
Wear protective gloves.


Risk of falling parts due to released screws!
Injury because of falling parts.
- Secure component from falling down.

Risk of falling parts due to released screws!
Damage to other parts of the appliance or at customers home e.g. bot
tom.
- Secure component from falling down
Prerequisite:
Appliance is disconnected from power supply.
Furniture door is removed. See Installation Instruction.
Door is open.
4.2.1 Removing flat hinge
- Remove two hinge covers.

Repair
2.1. Loosen four screws (1).
- Slide out and remove door (2).

3.1. Remove four screws (1).
- Remove hinges (2).
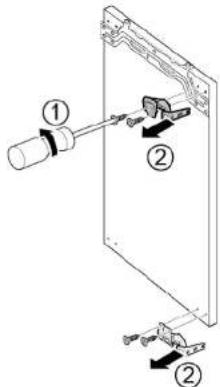

Hinges are removed.
4.2.2 Installing flat hinge
Install in reverse order.

Repair
4.3 Replacing sliding hinge
Required tools:
Torx Bit TX20 6,3 mm (1/4") [00340865]


Prerequisite:
Appliance is disconnected from power supply.
Furniture door and appliance door are separated. See Installation Instruction.
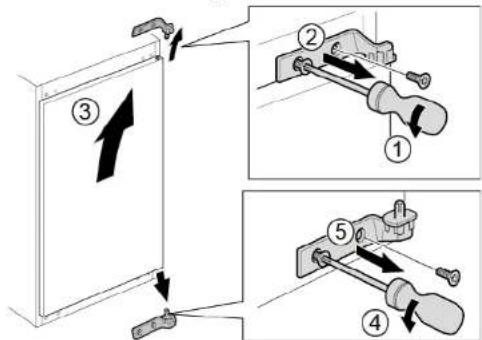
4.3.1 Removing sliding hinge
- Unscrew two screws (1).
- Remove upper hinge (2).
- Remove door (3).
- Unscrew two screws (4).
- Remove lower hinge (5).

Hinges are removed.
4.3.2 Installing sliding hinge
Install in reverse order.

Repair
4.4 Replacing shelf
Prerequisite:
Door is open.
4.4.1 Removing shelf
Pull out shelf.
Shelf is removed.
4.4.2 Installing shelf
Install in reverse order.

Repair
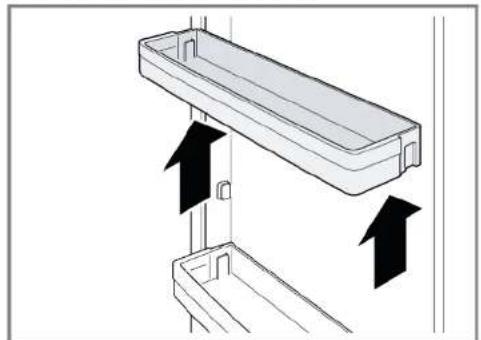
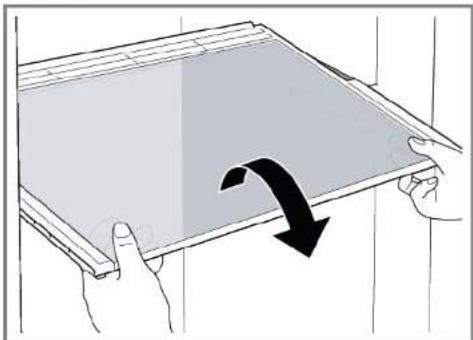
4.5 Replacing door rack
Prerequisite:
Door is open.
- Lift door rack upwards.

Door rack is removed.
Install in reverse order.

Repair
4.6 Replacing fruit and vegetable container
Prerequisite:
Door is open.
4.6.1 Removing fruit and vegetable container
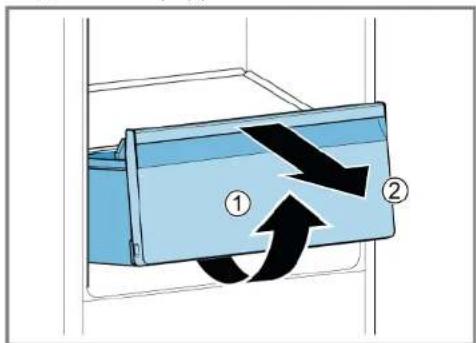
- Pull out the fruit and vegetable container as far as it will go.
-
- Lift the fruit and vegetable container at the front (1).
-
Remove container (2).


Fruit and vegetable container is removed.
4.6.2 Installing fruit and vegetable container
Install in reverse order.

Repair
4.7 Replacing LED side light
Required tools:
Suction cup 50mm [00342224]

Your appliance features a maintenance-free LED light.
These lights may be repaired by customer service or authorised technicians only!
Danger
Risk of electric shock due to live parts!
Danger to life through electric shock in case of improper repair
Electric parts should be repaired by a qualified electricians.
After the repair have a safety test according VDE 0701 or country-specific regulations performed.

Danger
Risk of electric shock due to live parts!
ath by electrocution
- Disconnect appliances from electrical supply at least 60 seconds
before starting repairs.
Caution
Sharp edges!
Cut injuries
Wear protective gloves.
Prerequisite:
Appliance is disconnected from power supply.
Door is open.
Shelves are removed.
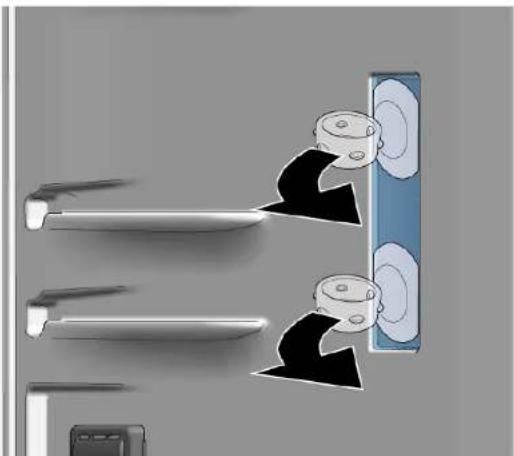
4.7.1 Removing LED side light
-
Stick two suction cup on LED side light cover.
-
Pull suction cups forward in one rotary movement.
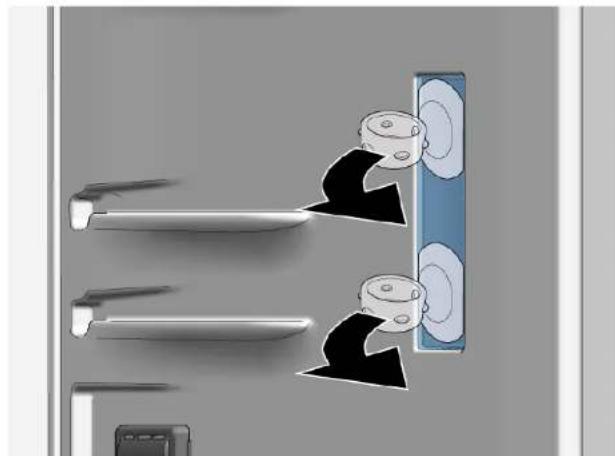
LED light cover is removed.

Repair
- Remove LED module.
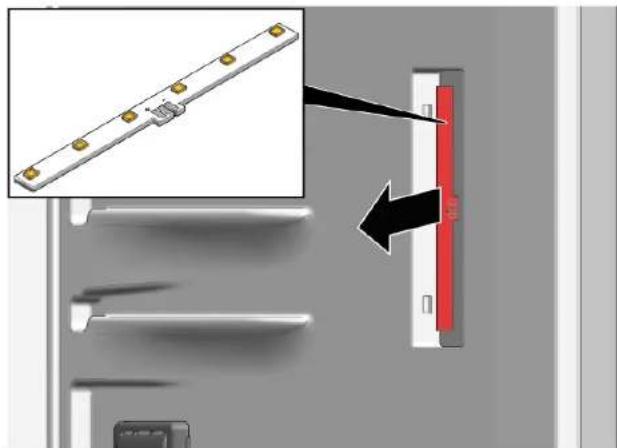

LED side light is removed.
4.7.2 Installing LED side light

Due to lamp cover hooks are easy to break during removal process spare part LED side light is the set that includes LED module and light cover.
Install in reverse order.
Remonditeave - Külmik
1 Selle dokumendiga seoses 99
1.1 Tahtis teave 99
1.1.1 Eesmark 99
1.2 Sumbolite selgitus 99
1.2.1 Ohutasemed.. 99
1.2.2 Ohusumbolid 99
1.2.3 Hoiatuste struktuur 100
1.2.4 Üldised sumbolid 100
Ohutus 101
2.1 Uldised ohutusjuhised 101
2.1.1 Koki kodumasinad 101
Tabel 1: Ohutasedmed
1.2.2 Ohusumbolid
Fare for a knuse/sette fast fingre
m = 311 ;
PERIGO
m = 311
Risco deCHOque eltrico devidao a partes sob tensao!
- Remova as dobradiças (2).


Cap torx TX20 6.3 mm (1/4") [00340865]


AVERTISMENT
Aparate grele, masive!
Accidentarea spatelui si leziuni musculare
- Tryck in hela packningen i sparet bit for bit.