AirSense 10 AutoSet - Power bank ResMed - Free user manual and instructions
Find the device manual for free AirSense 10 AutoSet ResMed in PDF.

| Product Type | Lithium-ion external battery for ResMed devices |
| Brand | ResMed |
| Model | ResMed Power Station II-V2 (RPSII-V2) |
| Dimensions (L x W x H) | 230 mm x 126 mm x 26 mm |
| Weight | 0.9 kg (battery only) / 2.3 kg (complete system) |
| Battery Technology | Lithium-ion |
| Battery Capacity | < 100 Wh (97 Wh) |
| Output Voltage | Selectable: 12 V or 24 V |
| Rated Output Current | 3.75 A (12 V) / 3.46 A (24 V) |
| Full Charge Time | < 4 hours |
| Typical Usage Time | > 8 hours with average settings |
| Input Power | 100-240 V AC, 50-60 Hz; or 12 V/24 V DC |
| Built-in Protections | Overcharge, over-discharge, overcurrent, short circuit, high temperature |
| Minimum Life Cycles | 500 cycles (80% remaining capacity) |
| Compatible Devices | AirSense 10 series, AirCurve 10 series, Lumis 100/150, Stellar 100/130/150 |
| Connection Options | Dual battery coupling kit (optional) |
| Indicators | LEDs: charge level, charging, DC discharge, silence mode |
| Audible Alarms | When charge is < 10% (10 seconds) and < 5% (continuous) |
| Operating Temperature | Charging: 5°C to 40°C; Discharging: -5°C to 40°C |
| Operating Humidity | 5% to 85% RH (non-condensing) |
| Storage Temperature | -20°C to +45°C (battery); -20°C to +60°C (adapter/cables) |
| IP Rating | IP21 (discharge); IP20 (charging, power adapter) |
| Airplane Use | RTCA/DO-160 compliant, category M (FAA) |
| Maintenance | No maintenance required; exterior cleaning with a damp cloth |
| Warranty | Battery: 6 months; accessories: 90 days to 2 years depending on component |
Frequently Asked Questions - AirSense 10 AutoSet ResMed
User questions about AirSense 10 AutoSet ResMed
0 question about this device. Answer the ones you know or ask your own.
Ask a new question about this device
Download the instructions for your Power bank in PDF format for free! Find your manual AirSense 10 AutoSet - ResMed and take your electronic device back in hand. On this page are published all the documents necessary for the use of your device. AirSense 10 AutoSet by ResMed.
USER MANUAL AirSense 10 AutoSet ResMed
natural_image
Exterior view of a ResMed power station II-V2 device (no text or symbols on body)ResMed Power Station II-V2
Battery pack / Baterie / Batteripakke / Accu / Akupatarei / Akku / Bloc-batterie / Akkupack / Συστοιχία μπαταριών / Alimentatore a batteria / Akumulators / Batteripakke / Battery pack / Bateria / Paquete de batería / Batteripack / Batarya paketi / 電池組 / Unit baterai / Pek bateri / Uzbekabaddeอร์ / حزمة البطارية عزمة العلترية
Illustrations only, parts may differ / Pouze ilustrace, části se mohou lišit / Kun til illustrationsformål, de faktiske dele kan variere herfra / Alleen ter illustratie, onderdelen kunnen afwijken / Ainult illustratsioonid, osad võivad erineda / Vain kuvitukset, osat voivat erota kuvasta / Illustrations uniquement, les pièces peuvent varier / Dient nur der Darstellung; Teile können abweichen / Móvo ενδεικτικά, τα μέρη μπορεί να διαφέρουν / Immagini a solo scopo illustrativo, i componenti potrebbero differire / Tikai ilustratīvam nolūkam, sastāvdalas var atšķirties / Kun til illustrasjon, deler kan avvike / Przedstawione części mają tylko charakter poglądowy i mogą różnić / Ilustrações apenas, as peças podem variar / Solo para fines ilustrativos. Las piezas pueden ser diferentes. / Endast i illustrationssyfte; innehållet kan variera / Sadece görsel amaçlıdır, parçalar farklılık gösterebilir / 僅提供圖例 ,零件可能有所不同 / Hanya sebagai ilustrasi, komponen aslinya bisa berbeda / Ilustrasi sahaja, bahagian-bahagian mungkin berbeza / ภาพประกอบเท่านั้น ชั้นส่วนจริงอาจมีความแตกต่างจากภาพ / الصور للトップيغ ققط، وقد تختلاف القطع لديك /
^a DC plug / ^a DC zástrčka / ^a DC-stik / ^a DC-stekker / ^a Alalisvoolupistik / ^a Tasavirtapistoke / ^a Prise secteur /
^a Gleichstromstecker / ^a Búóμα DC / ^a Spinotto CC / ^a Līdzstrāvas spraudnis / ^a DC-plugg / ^a Wtyczka prądu stałego /
^a Ficha de CC/ ^a Enchufe de CC/ ^a DC-kontakt/ ^a DC fisi/ ^a 直流電電源插頭/ ^a Colokan DC/ ^a Palam DC/
English
Intended use
The ResMed Power Station II-V2 (RPSII-V2) is an external lithium-ion battery pack that provides power when mains power is unavailable.
The RPSII battery coupler kit allows the simultaneous connection of two RPSII-V2 battery packs to power a ResMed therapy device. It may also be used to simultaneously charge two battery packs simultaneously.
The Air10 power supply unit (PSU) adaptor is intended to connect the Air10 PSU to the battery pack for charging. The DC cable is intended to connect the battery pack to a therapy device for discharging.
Read the entire guide before using the battery pack. Refer to the device user guides for intended patients/medical conditions, uses, the environment where used, and contraindications associated with CPAP, bilevel, and ventilation therapy.
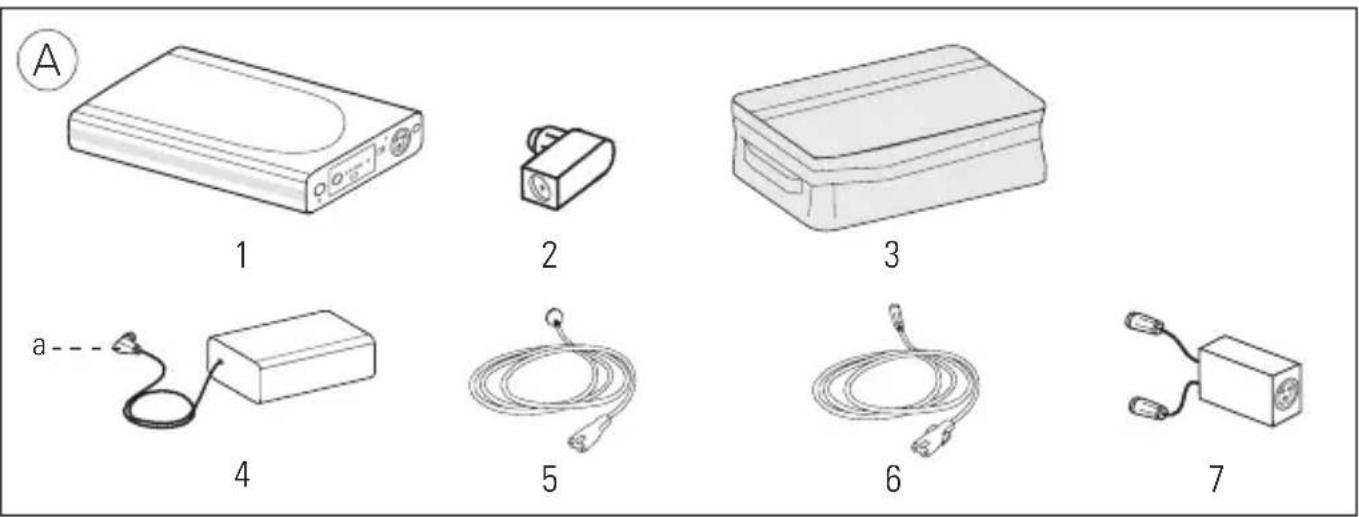
At a glance
Refer to illustration A.
The RPSII-V2 system comprises the following components: Available separately:
- Battery pack
- 90W AC power supply unit
- Air10 power supply unit adaptor 5. AC or DC power cord
- Carry bag 6. DC cable
Optional accessory:
- RPSII Battery coupler kit (packed with Velcro ^TM strap)
Compatible devices and accessories
A range of devices, power supply units, and DC cables are available for use with the RPSII-V2.
Refer to the following lists on www.resmed.com/downloads/devices:
- Battery / Device Compatibility List for compatible devices
- Power Supply Unit / Device Compatibility List for compatible power supply units
If you do not have internet access, contact your ResMed representative.
For more information on setting up your devices, see your device user guide.
DC output voltage and DC cables
| DC cable part number 24V For use with | ||
| 37343 (Air10 DC cable) | √ | AirSenseTM 10 Series |
| 37343 (Air10 DC cable) | √ | AirCurveTM 10 Series |
| 37343 (Air10 DC cable) | √ | LumisTM 100/150/HFT Series |
| 24959 (Stellar DC cable) | √ | StellarTM 100/130/150 Series |
| 24981 (Stellar 0.5m DC cable) | ||
Notes:
- Not all devices are available in all regions.
- Air10 DC cables are used only with AirSense 10 / AirCurve 10 / Lumis series and power supply units.
- To recharge the RPSII-V2 using power supply units supplied with the AirSense 10 / AirCurve 10 / Lumis series, an RPSII-V2 Air10 PSU adaptor (part no. 24706) is required.
• For information on battery run times, refer to the Battery / Compatibility List on www.resmed.com/downloads/devices.
Control panel
Refer to illustration B.
The control panel of your battery pack includes the following:
- Audible alert mute button
- Battery charge level indicators
- Charge level check button
- Charging indicator
- DC on / off switch
- DC switch / discharging indicator
- DC input / output port
- Voltage output selector switch (rear panel)
- Audible alert mute indicator
Setting up

CAUTION
- Ensure the battery pack and the device are turned off before setting up.
- When the battery pack is plugged into the mains power supply, ensure all cables are properly connected.
Charging the battery pack
Refer to illustration C.
- Attach the power supply unit adaptor to the DC plug and connect it into the battery pack DC input / output port.
- Connect the AC or DC power cord to the power supply unit.
- Plug the other end of the AC or DC power cord into the mains power outlet.
Notes:
- Charging takes less than 4 hours from 0% battery pack charge level to greater than 95% .
- To discontinue charging, unplug the power cord from the mains power outlet.
Providing power to the device
Refer to illustration D.
- Select the correct output voltage for your device using the voltage output selector from the battery pack rear panel.
- Connect the appropriate DC cable to the battery pack.
- Connect the other end of the DC cable to the device.
- Set the DC on / off switch to on.
Providing backup power to the device (for systems with both AC and DC inputs)

WARNING
In this configuration, the Stellar draws power from the battery pack first until it is fully discharged and will not recharge. As a result, once all power has been discharged from the battery pack, it will not act as an AC backup.
Refer to illustration E.
- Select the correct output voltage for your device using the voltage output selector from the battery pack rear panel.
- Connect the appropriate DC cable to the battery pack.
- Connect the other end of the DC cable to the device.
- Connect the AC power cord to the rear of the device.
- Plug the other end of the AC power cord into the mains power outlet.
- Set the DC on / off switch to on.
Notes:
- When powering the device regularly check the battery pack charge level.
- In the event you notice any unexplained changes in the device (battery pack / coupler kit / PSU adaptors / DC cables), signs of degradation that affect performance, or if the enclosure is broken, discontinue use and contact your healthcare provider.
Using two batteries
Refer to illustration F.
- Place one battery pack on top of another.
If required, use the Velcro strap to hold the battery packs securely. - Plug the battery pack coupler cables into each of the DC input / output ports. The battery pack coupler cables are marked with '1' (primary) and '2' (reserve) labels.
- When charging two battery packs, attach the power supply unit adaptor to the DC plug and connect the adaptor to the battery pack coupler.
When powering a device, connect the DC cable of the device to the end of the battery pack coupler. The primary battery pack supplies power to the device and the reserve battery pack takes over when the primary battery pack is disconnected or discharged.
Indicators
Refer to illustration B.
The battery pack provides LEDs to indicate its current operating state.
| LED indicator Status | ||
| Battery pack charge level1 (B-6) | ||
| One amber flashing (audible alert beeps continuously) | Less than 5% | |
| One green flashing (audible alert beeps for 10 sec) | Less than 10% | |
| One green continuous 10% to 40% (approximate) | ||
| Two green continuous 40% to 65% (approximate) | ||
| Three green continuous 65% to 90% (approximate) | ||
| Four green continuous | Greater than 90% (approximate) | |
| Charging (B-7) | ||
LED indicator Status

Flashing green Charging

Constant green Fully charged
DC on / off (B-8)

Flashing blue Battery pack turned on but not discharging

Constant blue Battery pack turned on and discharging
Audible alert mute (B-5)

Flashing blue Not discharging and mute is active

Constant blue Discharging and mute is active
When setting the DC on / off switch, the charge level indicator may fluctuate between different levels. To check the battery pack charge level, press the charge level check button (B-2) on the control panel. The number of green LEDs indicates the approximate charge level.
To mute the alert, press the audible alert mute button (B-1). To permanently mute, press and hold the audible alert mute button (B-1) for 5 seconds. To deactivate, press the audible alert mute button (B-1) when the mute is still active.
Using humidifiers
When the Stellar device is integrated with the H4i humidifier and is not connected to the mains power supply, the humidifier will only operate in passive unheated mode despite the warm-up message appearing on the device. When the device is connected to the mains power supply, it will return to active heated mode.
AirSense 10, AirCurve 10, and Lumis series operate normally in active heated mode when connected to the battery pack or to the mains power supply.
Cleaning and maintenance

WARNING
Do not immerse the battery pack in water, and do not use liquids to clean any part of the product.
- Disconnect the battery pack from the power supply unit and the device. Remove all cables.
- Wipe the exterior of the battery pack, battery coupler kit, DC cables, and adaptors with a clean cloth.
Storing

CAUTION
The battery pack must be charged to 100%, indicated by four green LEDs and switched off before storing. You must recharge the battery pack to 100% again after six months of storage. When not in use, all lithium-ion batteries self-discharge over time. If not periodically recharged (ie, every six months), the battery pack will eventually self-discharge to the point that it can no longer be recharged. If this occurs, the battery pack is no longer usable and is unrecoverable.
Store the battery pack in a cool, dry place.
Note: When left switched on, a fully charged battery pack self-discharges to 0% of full capacity within four weeks of storage. When switched off, the battery pack self-discharges to 0% of full capacity within six months of storage.
Servicing
The battery pack is intended to provide safe and reliable operation when used and maintained in accordance with the instructions provided by ResMed. There is no servicing necessary during the lifetime of the battery pack.
The intended design life of the system excluding the battery pack is 2 years. The intended design life of the battery pack is 500 recharge cycles. After 500 recharge cycles, the battery pack will last about 60% of the time from its original condition. A full charge in an older battery pack will not last as long as in a new battery pack. As with all electrical equipment, if any irregularity becomes apparent, you should exercise caution and contact an authorized ResMed service representative.
Traveling
Consult with your carrier if you intend to take the battery pack on board with your device.
Troubleshooting
If there is a problem, try the following suggestions. If the problem cannot be solved, contact your equipment supplier or ResMed. Do not attempt to open the battery pack.
Problem / Possible cause Solution
Device is not running
Power connections are disrupted. Check all cables and connect them as described in Setting up.
The battery pack is discharged. Connect the device to the mains power supply and recharge the battery pack.
The battery pack is off. Set the DC on / off switch to on.
| Problem / Possible cause Solution | |
| Incorrect output voltage selected. Select the correct output voltage for your device using the output voltage selector switch from the battery pack rear panel.Note: For a list of output voltages and DC cables for your device, see the Compatible devices and accessories section, your device user guide, or the Battery / Device Compatibility List on www.resmed.com/downloads/devices | |
| The battery pack sounds an audible alert continuously and an amber LED is flashing | |
| The battery pack charge level is less than 5%. | Press the audible alert mute button to mute the alert. Recharge the battery pack as soon as possible. |
| The battery pack sounds an audible alert for 10 seconds and a green LED is flashing | |
| The battery pack charge level is below 10%. | Recharge the battery pack as soon as possible. |
| Charging stops before completion | |
| When charging the battery pack inside the carry bag, the ambient temperature is warmer than 95°F (35°C). | Remove the battery pack from the carry bag or charge the battery pack where the ambient temperature is cooler than 95°F (35°C). |
| The battery pack turns off and stops powering the device | |
| When the battery pack is in the carry bag, the ambient temperature is warmer than 95°F (35°C). | Remove the battery pack from the carry bag or power the device where the ambient temperature is cooler than 95°F (35°C). |
| The battery pack charge level indicator is inaccurate | |
| Ambient temperature is at extreme condition [eg, 23°F (-5°C), +104°F (+40°C)]. | Recharge the battery pack as soon as possible to ensure adequate capacity. |
Technical specifications
Battery pack
Technology Lithium-ion
Capacity < 100 Wh (97 Wh)
UN classification UN3480 (lithium-ion batteries)
Output voltage (24V / 26V) ± 0.5V, 90W continuous
Output current (rated) 3.75 A / 3.46 A
Standby current < 100 μA
Protection Overcharge, over-discharge, excess current, short circuit, high temperature
Minimum life cycle ≥ 500 cycles at 23°C to 60% capacity
Dimensions (L x W x H) 9.1" x 5.0" x 1.0" (230 mm x 126 mm x 26 mm)
Weight 2.0 lb (0.9 kg)
System: 5.1 lb (2.3 kg)
Recharge time < 4 hrs at full level
Run time > 8 hrs at average device settings
For more information, see the Battery / Device Compatibility List on www.resmed.com/downloads/devices
AC power supply
Input range 100–240V, 50–60Hz, 1.0-1.5A
110V, 400Hz (nominal for aircraft use)
Output current (rated) 3.75 A
DC converter
Input range 12V / 24V, 13A / 6.5A
Environmental conditions
Operating temperature:
Charging 41°F to +104°F (5°C to 40°C)
Discharging 23°F to +104°F (-5°C to 40°C)
Operating humidity 5–85% relative humidity, non-condensing
Transport / storage temperature:
Battery pack / coupler kit -4°F to +113°F (-20°C to +45°C)
PSU adaptor / DC cables -4°F to +140°F (-20°C to +60°C)
Transport / storage humidity 5–85% relative humidity, non-condensing
Operating / storage air pressure 680 hPa to 1060 hPa
Aircraft use
Product meets the Federal Aviation Administration (FAA) requirements (RTCA/D0-160, section 21, category M) for all phases of air travel.
Electromagnetic compatibility
Product complies with all applicable electromagnetic compatibility requirements (EMC) according to IEC 60601-1-2, for residential, commercial, and light industry environments. Information regarding the electromagnetic emissions and immunity of these ResMed devices can be found on www.resmed.com/downloads/devices
IEC 60601-1 classification
Class II (double insulation) and / or Internally Powered Equipment, IP21 (IP20 while charging), Continuous Operation (from mains), Limited Operation (from battery), Equipment not suitable for use in the presence of a flammable anaesthetic mixture with air or with oxygen or nitrous oxide.
^1 Using 15 cm H_2O (IPAP), 5 cm H_2O (EPAP), and 15 BPM (Respiratory Rate). Not applicable to devices when using heated humidification and heated tubing.
Note: The manufacturer reserves the right to change these specifications without notice.
Symbols
The following symbols may appear on the device:
Charging; Battery pack charge level; Audible alert mute; DC input / output; O I DC on / off;
See symbols glossary at www.resmed.com/symbols.

Environmental Information
Disposal of the battery pack, power supply unit, power supply unit adaptors, and DC cables should be carried out in accordance with applicable national laws and regulations. WEEE 2012/19/EU is a European Directive that requires the proper disposal of electrical and electronic equipment. The battery pack, power supply unit, power supply unit adaptors, and DC cables should be disposed of separately, not as unsorted municipal waste. To dispose of your battery pack, power supply unit, power supply unit adaptors, and DC cables, you should use appropriate collection, reuse and recycling systems available in your region. The use of these collection, reuse and recycling systems is designed to reduce pressure on natural resources and prevent hazardous substances from damaging the environment. European Directive 2006/66/EC requires the proper disposal of spent batteries and accumulators. The battery pack may only be returned to collection points fully discharged. If charged or partially discharged, care should be taken to prevent short circuiting. Batteries containing more than 0.0005% of mercury by mass, more than 0.002% of cadmium by mass or more than 0.004% of lead by mass are marked below the crossed-bin symbol with the chemical symbols (Hg, Cd, Pb) of the metals for which the limit is exceeded.
If you need information on these disposal systems, please contact your local waste administration. The crossed-bin symbol invites you to use these disposal systems. If you require information on collection and disposal of your ResMed device please contact your ResMed office, local distributor or go to www.resmed.com/environment.
Disposal
Disposal of the battery pack, power supply unit, power supply unit adaptors, and DC cables should be carried out in accordance with applicable national laws and regulations. If you need information on these disposal systems, please contact your local waste administration. If you require information on collection and disposal of your ResMed device please contact your ResMed office, local distributor or go to www.resmed.com/environment.
General warnings and cautions

WARNINGS
- Lithium-ion batteries have built-in safety protection circuits, but can still be dangerous if they are not used correctly. Damaged batteries can become inoperative or catch fire.
- Due to the risk of fire or electric shock:
- do not place the battery pack near open fire or heaters.
- do not expose the battery pack to direct sunlight or heat (eg, behind a car window).
- do not expose the battery pack to water, rain, or high moisture levels.
- do not short-circuit the battery pack.
- do not use a damaged battery pack.
- do not open the battery pack, AC charger or DC converter.
- Make sure to revert to AC power when the battery pack and / or device internal battery capacity is low.
- Make sure to periodically recharge the battery pack due to effects of self-discharging.
- As the battery pack ages, the available capacity decreases. When the remaining battery pack capacity is low, do not rely on the battery pack as the primary supply.
- Ensure the internal battery of any connected device is kept charged up to provide backup power in the event of loss of power from the battery pack.
- Explosion hazard—do not use in the vicinity of flammable anaesthetics.
- The battery system is not intended for use by persons (including children) with reduced physical, sensory or mental capabilities, or lack of experience and knowledge, unless they have been given supervision or instruction concerning use of the battery system by a person responsible for their safety.
- Children should be supervised to ensure they do not play with the battery system.
- Care should be taken to keep the power supply unit adaptor dry. While connected to a device and discharging, the battery system is rated to IP21 (Drip proof) according to IEC-60529. When charging, the battery system is rated to IP20 (No protection) due to the power supply unit adaptor which is rated to IP20. The AC power supply, battery pack, and DC converter are rated to IP21.
- Only use ResMed power supplies compatible with the RPSII-V2 battery pack for charging. For a list of compatible power supplies for RPSII-V2 battery pack, see the Power Supply Unit / Device Compatibility List on www.resmed.com/downloads/devices.

CAUTIONS
- Avoid hard, physical impact on the battery pack.
- Before using it for the first time, ensure that the battery pack and its components are in good condition and operational. If there are any defects, the system should not be used.
- The battery pack is to be used only in accordance with the intended use stated in this guide. Damage to equipment or injury can result from modifications to the equipment or operation.
- Always fully charge the battery pack before use, or before relying on as a backup power.
- Monitor the charge level of the battery pack. When the charge level is low, ensure that continuity of power can be maintained.
- When in use, always plug the cable from the battery pack into the device. Keep the battery pack power switch turned on to ensure it can provide backup power.
- When transporting, turn off the battery pack, unplug all cables, and pack in the carry bag.
- Medical electrical equipment requires special precautions regarding EMC and needs to be installed and operated according to the information provided in this user guide. Portable and mobile communications equipment can affect medical electrical equipment. If EMC interference is observed, for example, static on radios, move the battery pack away from other equipment.
Notes:
- The above are general warnings and cautions. Specific warnings, cautions, and notes appear with the relevant instructions in the guide.
- For any serious incidents that occur in relation to this product, these should be reported to ResMed and the competent authority in your country.
Limited warranty
ResMed Pty Ltd (hereafter 'ResMed') warrants that your ResMed product shall be free from defects in material and workmanship from the date of purchase for the period specified below.
Product Warranty period
- Mask systems (including mask frame, cushion, headgear and tubing)—excluding single-use devices
- Accessories—excluding single-use devices
• Flex-type finger pulse sensors
• Humidifier water tubs - Batteries for use in ResMed internal and external battery systems 6 months
Product Warranty period
| Clip-type finger pulse sensors | 1 year |
| CPAP and bilevel device data modules | |
| Oximeters and CPAP and bilevel device oximeter adaptors | |
| Humidifiers and humidifier cleanable water tubs | |
| Titration control devices | |
| CPAP, bilevel and ventilation devices (including external power supply units) | 2 years |
| Battery accessories | |
| Portable diagnostic / screening devices |
This warranty is only available to the initial consumer. It is not transferable.
If the product fails under conditions of normal use, ResMed will repair or replace, at its option, the defective product or any of its components.
This limited warranty does not cover: a) any damage caused as a result of improper use, abuse, modification or alteration of the product; b) repairs carried out by any service organisation that has not been expressly authorised by ResMed to perform such repairs; c) any damage or contamination due to cigarette, pipe, cigar or other smoke; and d) any damage caused by water being spilled on or into an electronic device.
Warranty is void on product sold, or resold, outside the region of original purchase.
Warranty claims on defective product must be made by the initial consumer at the point of purchase.
This warranty replaces all other expressed or implied warranties, including any implied warranty of merchantability or fitness for a particular purpose. Some regions or states do not allow limitations on how long an implied warranty lasts, so the above limitation may not apply to you.
ResMed shall not be responsible for any incidental or consequential damages claimed to have resulted from the sale, installation or use of any ResMed product. Some regions or states do not allow the exclusion or limitation of incidental or consequential damages, so the above limitation may not apply to you.
This warranty gives you specific legal rights, and you may also have other rights which vary from region to region. For further information on your warranty rights, contact your local ResMed dealer or ResMed office.
Čeština
Určené použití
www.resmed.com/downloads/devices
AC napájení
www.resmed.com/downloads/devices
Vaihtovirta
Syöttövirta 100–240 V, 50–60 Hz, 1,0–1,5 A
Classification UN UN3480 (batteries lithium-ion)
Tension de sortie (24 V / 26 V) ± 0,5 V, 90 W continu
24959 (Stellar likestrømkabel)

Stellar™ 100/130/150-serien
24981 (Stellar 0,5 m likestrømkabel)
Merknader:
www.resmed.com/downloads/devices,查看電池/
裝置相容清單
交流電源
輸入範圍
100–240 V, 50–60 Hz, 1.0–1.5 A
Berat 2.0 lb (0.9 kg)
Sistem: 5.1 lb (2.3 kg)
www.resmed.com/downloads/devices
natural_image
Simple curved dotted line with blue, purple, and red dots (no text or symbols)ResMed

ResMed Pty Ltd
1 Elizabeth Macarthur Drive
Bella Vista NSW 2153 Australia
See ResMed.com for other ResMed locations worldwide. For patent and other intellectual property information, see ResMed.com/ip. AirSense, AirCurve, Lumis, and Stellar are trademarks and/or registered trademarks of the ResMed family of companies. Velcro is a registered trademark of Velcro Industries B.V.
© 2024 ResMed. 2481044/2 2024-01