
FT-MF - Washing machine SAMSUNG - Free user manual and instructions
Find the device manual for free FT-MF SAMSUNG in PDF.

| Brand | Samsung |
| Model | FT-MF |
| Product type | Microfiber filter for washing machine |
| Dimensions (W × H × D) | 100 × 215 × 281 mm (with filter handle and rear cover); 265 mm (with rear cover) |
| Net weight | 2.0 kg |
| Power supply | 220-240 V AC, 50-60 Hz |
| Power consumption | 7 W (max) |
| Water pressure | 0.5 to 2.0 kgf/cm² |
| Main function | Traps plastic microfibers released from clothing during washing |
| Connectivity | Wi-Fi 2.4 GHz, compatible with SmartThings app |
| Status indicator | Filter status light (flashes to indicate cleaning), Wi-Fi light |
| Installation | On wall (mounting hardware included) or on top of washing machine (non-slip pad included) |
| Connection | Washing machine drain hose to inlet (IN), outlet hose (OUT) to drain; adapters included |
| Maintenance | Clean mesh filter every 30 cycles or every month; reset by button (3 seconds) |
| Defrosting | If temperature < 0 °C, disassemble and defrost in a warm place |
| Safety | Unplug before cleaning; do not use extension cord; do not immerse in water |
| Spare parts | Mesh filter, handle, drain hose, bracket, non-slip pad, screws, hose clamps, hose connector, adapter |
| Repairability | Do not disassemble yourself; contact an authorized Samsung service center |
| Warranty and compliance | Compliant with Directive 2014/53/EU; declaration of conformity available at www.samsung.com |
| Environmental information | Do not dispose of with household waste; collection points at www.quefairedemesdechets.fr |
Frequently Asked Questions - FT-MF SAMSUNG
User questions about FT-MF SAMSUNG
0 question about this device. Answer the ones you know or ask your own.
Ask a new question about this device
Download the instructions for your Washing machine in PDF format for free! Find your manual FT-MF - SAMSUNG and take your electronic device back in hand. On this page are published all the documents necessary for the use of your device. FT-MF by SAMSUNG.
USER MANUAL FT-MF SAMSUNG
Safety information contains important information to keep the user safe and prevent property damage that may occur due to improper installation or misuse of the product. Read the safety information thoroughly before use.

text_image
SAMSUNGSafety information
Congratulations on your new Samsung Microfiber filter. This manual contains important information on the installation, use and care of your Microfiber filter. Please take some time to read this manual to take full advantage of your Microfiber filter's many benefits and features.
What you need to know about the safety instructions
Please read this manual thoroughly to ensure that you know how to safely and efficiently operate the extensive features and functions of your new Microfiber filter. Please store the manual in a safe location close to the Microfiber filter for future reference. Use the Microfiber filter only for its intended purpose as described in this instruction manual.
Warnings and Important Safety Instructions in this manual do not cover all possible conditions and situations that may occur. It is your responsibility to use common sense, caution and care when installing, maintaining and operating your Microfiber filter.
Because the following operating instructions cover various models, the characteristics of your Microfiber filter may differ slightly from those described in this manual and not all warning signs may be applicable. If you have any questions or concerns, contact your nearest service center or find help and information online at www.samsung.com.
Important safety symbols
What the icons and signs in this user manual mean:

WARNING
Hazards or unsafe practices that may result in severe personal injury, death and/or property damage.

CAUTION
Hazards or unsafe practices that may result in personal injury and/or property damage.

NOTE
Indicates that a risk of personal injury or material damage exists.

Read the instructions
These warning signs are here to prevent injury to yourself and others. Please follow them explicitly.
After reading this manual, store it in a safe place for future reference. Read all instructions before using the Microfiber filter.
As with any equipment that uses electricity and moving parts, potential hazards exist. To safely operate the Microfiber filter, familiarize yourself with its operation and exercise care when using it.
Important safety precautions

WARNING
To reduce the risk of fire, electric shock, or injury to persons when using your Microfiber filter, follow basic precautions, including the following:
-
The Microfiber filter is not to be used by persons (including children) with reduced physical, sensory or mental capabilities, or lack of experience and knowledge, unless they have been given supervision or instruction concerning use of the Microfiber filter by a person responsible for their safety.
-
For use in Europe: The Microfiber filter can be used by children aged from 8 years and above and persons with reduced physical, sensory or mental capabilities or lack of experience and knowledge if they have been given supervision or instruction concerning use of the Microfiber filter in a safe way and understand the hazards involved. Children shall not play with the Microfiber filter. Cleaning and user maintenance shall not be made by children without supervision.
-
Children should be supervised to ensure that they do not play with the Microfiber filter.
- If the supply cord is damaged, it must be replaced by the manufacturer, its service agent or similarly qualified persons in order to avoid a hazard.
- The new hose supplied with the Microfiber filter is to be used and the old hose should not be reused.
Critical electrical warnings

WARNING
Plug the power cord into a wall socket that meets local electrical specifications. Use the socket for this appliance only, and do not use an extension cord. If you plug the power cord into a power strip, make sure the power strip specification is 220 V / 16 A / 3600 W or higher.
- Ensure that the power voltage, frequency, and current are the same as those of the product specifications. Failure to do so may result in electric shock or fire.
Do not pull the power cord when unplugging the power plug. Unplug the power plug by holding the plug.
Remove all foreign substances such as dust or water from the power plug terminals and contact points using a dry cloth on a regular basis.
Plug the power plug into the wall socket so that the cord is running towards the floor. If you plug the power plug into the socket in the opposite direction, the electric wires within the cable may be damaged and this may result in electric shock or fire.
Do not pull or excessively bend the power cord. Do not twist or tie the power cord. Do not hook the power cord over a metal object, place a heavy object on the power cord, insert the power cord between objects, or push the power cord into the space behind the Microfiber filter.
Plug the power plug into the wall socket firmly. Do not use a damaged power plug, damaged power cord, or loose wall socket.
Unplug the power cord when the Microfiber filter is not being used for long periods of time or during a thunder or lightning storm.
Do not touch the power plug with wet hands.
Before cleaning or performing maintenance, unplug the Microfiber filter from the wall socket.
Unplug the power plug before disassembling or repairing the product.
Critical installation warnings

WARNING
Install the Microfiber filter on a solid and flat wall.
Do not install the Microfiber filter in a bathroom, in a location exposed to the elements, or splashing water.
Do not install the Microfiber filter near a heater or an flammable material, in a humid, oily, or dusty place, in a place exposed to direct sunlight and water, in a place where you might put a candle or mosquito repellent incense on the Microfiber filter, in a place where there is a risk or gas leak.
Safety information
Critical usage warnings

WARNING
The Microfiber filter is designed to capture micro plastic fibers released from clothes during washing and must not be used for other purposes.
Do not attempt to repair, disassemble, or modify the Microfiber filter yourself. Do not use a fuse (such as copper, steel wire, etc.) other than a standard fuse.
- When the Microfiber filter needs to be repaired or reinstalled, contact your nearest service center.
- This may result in electric shock, fire, problems with the Microfiber filter, or injury.
To avoid the risk of electric shock and fire, plug the power plug into the wall socket firmly. Do not use a damaged power plug, damaged power cord, or loose wall socket. Unplug the power plug when the Microfiber filter is not being used for long periods of time or during a thunder or lighting storm.
- Do not install the Microfiber filter in a RVs (recreational vehicles), ships, airplanes.
Keep the Microfiber filter away from children or pets.
Unplug the power plug when the Microfiber filter is not operating.
Do not press the buttons using sharp objects such as pins, knives, fingernails, etc.
• This may result in electric shock or injury.
If the Microfiber filter generates a strange noise, a burning smell, or smoke, unplug the power cord immediately and contact your nearest service center.
Do not remove the mesh filter while the Microfiber filter is operating. Water may overflow.
Critical cleaning warnings

WARNING
When the Microfiber filter is contaminated by a foreign substance such as detergent, dirt, food waste, etc., unplug the power plug and clean the Microfiber filter using a damp, soft cloth.
- Do not clean the Microfiber filter by spraying water directly onto it. Do not use benzene, thinner, or alcohol, to clean the Microfiber filter. Do not use a strong acidic cleaning agent.
- It may cause discoloration, deformation, product damage, rusting, electric shock, or fire.
Before cleaning or performing maintenance, unplug the Microfiber filter from the wall socket.
- This may result in electric shock or fire.
Instructions about the WEEE
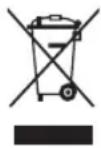
Correct Disposal of This Product (Waste Electrical & Electronic Equipment)
(Applicable in countries with separate collection systems)
This marking on the product, accessories or literature indicates that the product and its electronic accessories (e.g. charger, headset, USB cable) should not be disposed of with other household waste at the end of their working life. To prevent possible harm to the environment or human health from uncontrolled waste disposal, please separate these items from other types of waste and recycle them responsibly to promote the sustainable reuse of material resources.
Household users should contact either the retailer where they purchased this product, or their local government office, for details of where and how they can take these items for environmentally safe recycling. Business users should contact their supplier and check the terms and conditions of the purchase contract. This product and its electronic accessories should not be mixed with other commercial wastes for disposal.
For information on Samsung's environmental commitments and product regulatory obligations, e.g. REACH, WEEE or Batteries, visit our sustainability page available via www.samsung.com
Product disposal in France

Declaration of conformity
Hereby, Samsung declares that this radio equipment is in compliance with Directive 2014/53/EU and with the relevant statutory requirements in the UK. The full text of the EU declaration of conformity and the UK declaration of conformity is available at the following internet address: The official Declaration of conformity may be found at http://www.samsung.com, go to Support > Support home and enter the model name.
- Wi-Fi max transmitter power: 20 dBm at 2.412 GHz – 2.472 GHz
Turning on Wi-Fi (for network models only)
Turning on Wi-Fi consumes more energy. Under an environment where Wi-Fi is frequently turned on, actual energy consumption can be greater than the values in the specification sheet section.
- Tap and hold to Filter Reset button for 7 seconds to turn on Wi-Fi.
- The Microfiber filter enters AP mode and connects to your smartphone.
- On your smartphone, tap Select to connect the Microfiber filter to your smartphone.
- Once the connection process is complete, the Microfiber is successfully connected to your smartphone.
Installation

NOTE
- Remove the product packaging and check if there is any missing accessory.
- Packaging materials can be dangerous to children. Dispose all packaging material (plastic bags, polystyrene, etc.) out of children's reach.
What's included
Make sure all the parts are included in the product package. If you have a problem with the Microfiber filter or the parts, contact a local Samsung customer center or the retailer.
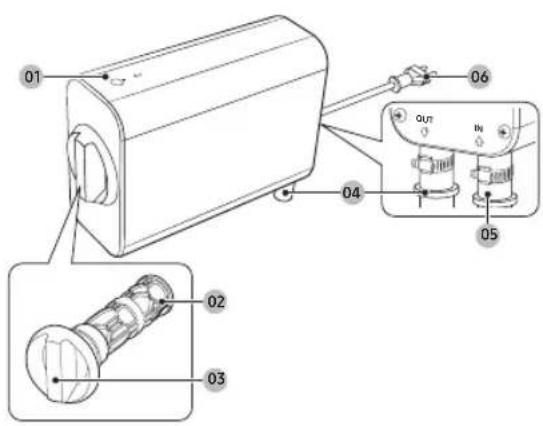
text_image
Technical diagram of a mechanical device with labeled parts and internal components01 Buttons and indicators
02 Mesh filter
03 Mesh filter handle
04 Water outlet port (OUT)
05 Water inlet port (IN)
06 Power plug
* The design of the filter and/or hose differs with the model.
Accessories

natural_image
Five line drawings of electronic components or devices, including a cylindrical device and a rectangular ruler (no text or symbols)Drain hose Cradle Bracket Hose clamp Anti-slip pad

natural_image
Five different types of screw and nut components shown in line drawings (no text or labels)Long screw Anchor bolt Short screw Hose connector Adaptor
Installation requirements
The Microfiber filter is optimized for Samsung household washing machines. If you are using a third-party washing machine, check the filter's specification and the washing machine's hose specification.
Location
- Away from direct sunlight
- Adequate room for ventilation
- The ambient temperature is always higher than the freezing point (0 °C)
- Away from a heat source

CAUTION
Do not install the Microfiber filter in areas where water may freeze. If the water remaining in the Microfiber filter freezes, it may cause damage to the Microfiber filter.
Electrical connection
• Install the Microfiber filter in a location near a wall socket to plug the power cord.
- Do not use an extension cord.

WARNING
- Use only the power cord that comes with the Microfiber filter.
- Do not modify the provided plug. If it does not fit the outlet, call a qualified electrician to install a suitable outlet.
Installation
Hose connection
Install the product in a location where you can connect your Samsung washing machine's drain hose to the Microfiber filter, and the drain hose to the drain system at the same time.
To reduce the risk of leaks:
- Use the provided hose clamps to firmly fix the hoses connected to the water inlet (IN) and outlet (OUT) ports.
• Regularly check the hose connections for leaks.

CAUTION
Before using the Microfiber filter for the first time, check all hose connections for leaks.
Wall (when mounted on a wall)
Install the Microfiber filter on a solid and flat wall.
When installing the Microfiber filter on a wall, use a level and make sure it is level.

CAUTION
- Choose a wall where you can use the provided anchor bolt to fasten the bracket (such as a concrete or cement walls).
- If you install your Microfiber filter on a wall made of other kinds of material, use a proper anchor bolts and screws designed for that material.
Installing the Microfiber filter
You must install the Microfiber filter in the upright position.
Installing on a wall

NOTE
To install the Microfiber filter on a wall, you need a drill and a cross-head screwdriver. (Not provided)
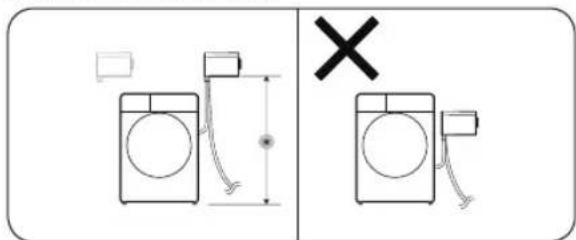
text_image
Diagram showing washing machine and a washing machine with a cross symbol indicating cancellation or failure.- Decide where on the wall you want to install the Microfiber filter.
- The minimum distance (*) from the floor to the bottom of the Microfiber filter must be 100 ± 5 cm.

CAUTION
You must install the product higher than the washing machine, and the product's water outlet port (OUT) must point down.

natural_image
Technical line drawing of a mechanical component with two screws and a housing (no text or symbols)- Hold the cradle against the installation location and mark the spots where the screws will be fastened.
- Drill holes in the spots you have marked in the previous step, and then insert the anchor bolts.
- Attach the cradle to the wall with long screws.
natural_image
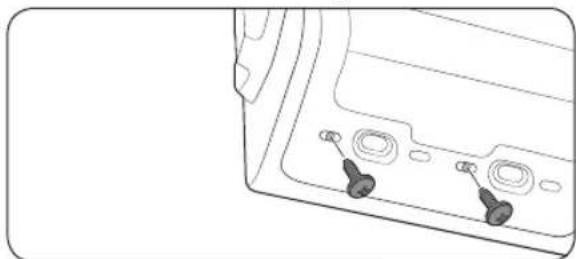
Line drawing of a device's front panel with two buttons and three circular ports (no text or symbols)- Attach the bracket to the Microfiber filter. Use the short screws and fasten them at the bottom of the Microfiber filter.
natural_image
Diagram of a device with a magnified inset showing internal components (no text or symbols)- Align the holes on the bracket with the grooves on the cradle, and then mount the bracket.

CAUTION
- Be careful not to damage the Microfiber filter while attaching the bracket or mounting to the cradle.
-
Make sure to check the Microfiber filter is securely fastened to the cradle
-
Connect the hoses to the Microfiber filter according to the instructions in the "Connecting the hoses" section.
-
Plug the power cord into a wall socket.

NOTE
The power turns on and the Filter status indicator lights up when you plug the power cord into a wall socket.
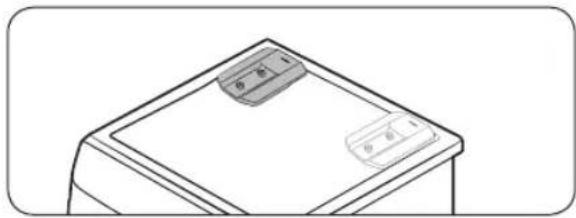
Installing on a washing machine

NOTE
Before the installation, keep the top, sides, and rear of the washing machine clear of interfering objects.

natural_image
Diagram showing a mechanical component with an inset view of a rectangular component being inserted, no text or symbols present.- Remove the films on both sides of the anti-slip pad, and then attach the anti-slip pad to the bottom of the cradle.

NOTE
You must attach the smooth side of the anti-slip pad to the cradle.
natural_image
Simple line drawing of a desk with two rectangular objects on top (no text or symbols)-
Attach the cradle on the rear-left or rear-right side of the washing machine's top surface.
-
Connect the hoses to the Microfiber filter according to the instructions in the "Connecting the hoses" section.
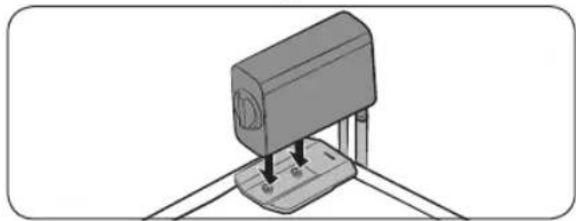
natural_image
3D diagram of a mechanical device with a base and mounting base, no visible text or symbols-
Align the holes on the bottom of the Microfiber filter with the grooves on the cradle, and then mount the Microfiber filter.
-
Plug the power cord into a wall socket.

NOTE
The power turns on and the Filter status indicator lights up when you plug the power cord into a wall socket.
Connecting the hoses
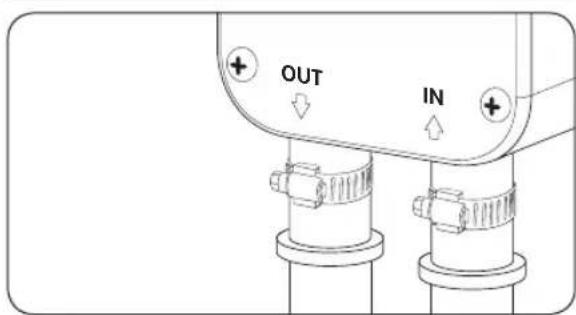
text_image
OUT IN- Connect the washing machine's drain hose to the water inlet port (IN) of the Microfiber filter.

CAUTION
- Make sure the washing machine is off before connecting the washing machine's drain hose to the water inlet port (IN). - Some water may remain in the washing machine's drain hose. Be careful when you connect it to the Microfiber filter.
-
Connect the provided drain hose to the water outlet port (OUT).
-
Firmly fix the hoses with the provided hose clamps.

CAUTION
Do not stretch the drain hose by force. If the hose is too short, replace the hose with a longer, high-pressure hose.
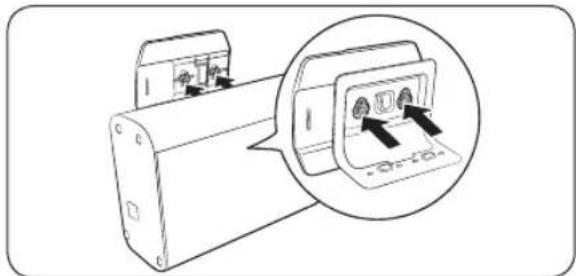
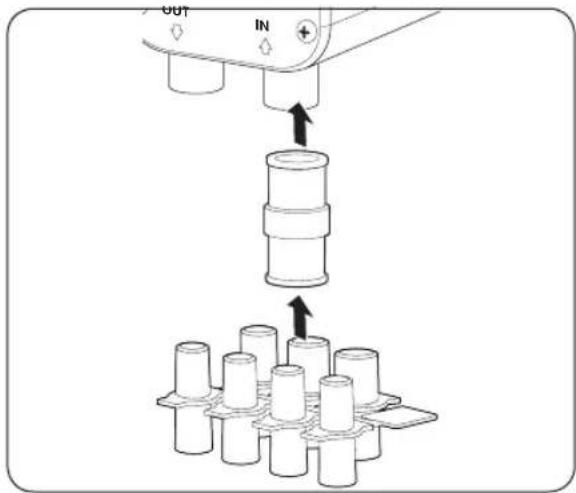
Using the hose connector and adapter
If you cannot connect your washing machine's drain hose to the water inlet port (IN) because of the unmatching size, use the hose connector and adapter according to the following instruction.
text_image
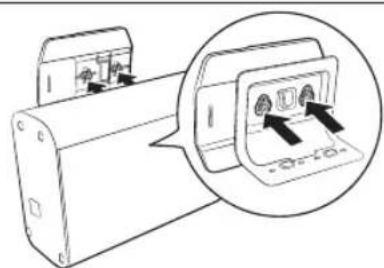
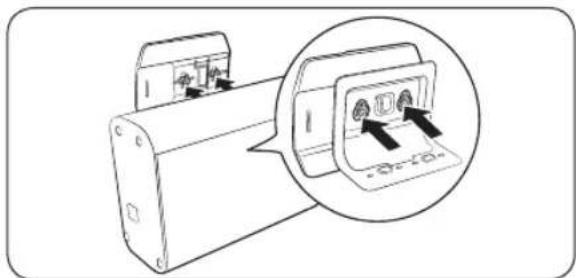
Diagram illustrating a mechanical assembly process with labeled components and directional arrows indicating movement or force.- Connect the hose connector to the water inlet port (IN).
- Find the right-sized adapter for your washing machine's drain hose, and then connect it to the hose connector.
- Firmly fix both ends of the hose connector with the provided hose clamps.
- Connect your washing machine's drain hose to the adapter.
- Operate the washing machine for one full cycle to check for water leaks.
Operations

CAUTION
Do not remove the mesh filter while the Microfiber filter is operating.
Buttons and indicators
FT-MF
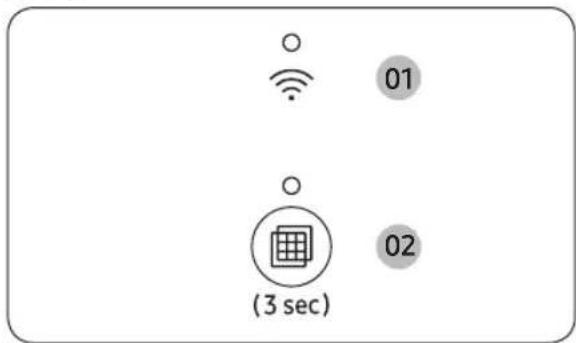
text_image
01 (3 sec) 0201 Wi-Fi

The WI-FI indicator lights up when the Microfiber filter is connected to Wi-Fi.
- Press and hold the Filter Reset button for 7 seconds to turn on or off the Wi-Fi.
02 Filter status indicator / Filter Reset button

The Filter status indicator lights up when the Microfiber filter is on.
- The power turns on when you plug the power cord into a wall socket.

CAUTION
Make sure to turn on the Microfiber filter before you operate your washing machine. If you operate the washing machine while the Microfiber filter is off, a drain error message may appear on your washing machine because the water cannot be drained properly through the Microfiber filter.
Press this button for 3 seconds to reset the status of the mesh filter after cleaning the mesh filter.
- Clean the mesh filter when the Filter status indicator icon blinks. (Refer to the "Cleaning the mesh filter" section on page 9.)

CAUTION
- Be careful when removing the mesh filter because there may be undrained water inside.
- If the Filter status indicator keeps blinking after resetting the filter, check if you have properly inserted the mesh filter.
- If your washing machine is experiencing a draining problem, turn it off and remove the filter.
SmartThings
Wi-Fi connection
On your smartphone or tablet, go to Settings and turn on the wireless connection and select an AP (Access Point).
• The Microfiber filter supports the Wi-Fi 2.4 GHz protocols.
Download
On an app market (Google Play Store, Apple App Store, Samsung Galaxy Apps), find the SmartThings app with a search term of "SmartThings". Download and install the app on your device.

NOTE
The app is subject to change without notice for improved performance.
Log in
You must first log into SmartThings with your Samsung account. To create a new Samsung account, follow the instructions on the app. You don't need a separate app to create your account.

NOTE
If you have a Samsung account, use the account to log in. A registered Samsung smartphone or tablet user automatically logs in.
To register your Microfiber filter to SmartThings
- Make sure your smartphone or tablet is connected to a wireless network. If not, go to Settings and turn on the wireless connection and select an AP (Access Point).
- Open SmartThings on your smartphone or tablet.
- If a message of "A new device is found.", select Add.
- If no message appears, select + and select your Microfiber filter in a list of devices available. If your Microfiber filter is not listed, select Device Type > Specific Device Model, and then add your Microfiber filter manually.
- Register your Microfiber filter to the SmartThings app as follows.
a. Add your Microfiber filter to SmartThings. Make sure your Microfiber filter is connected to SmartThings.
b. When registration is complete, your Microfiber filter appears on your smartphone or tablet.
Maintenance
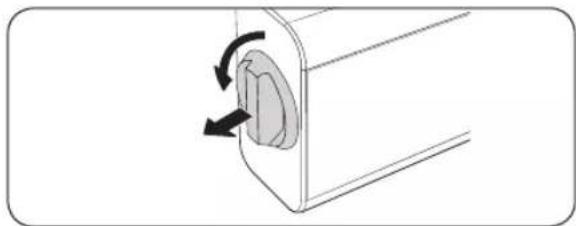
Cleaning the mesh filter
Clean the mesh filter when the Filter status indicator blinks.

CAUTION
For the safety, turn off the Microfiber filter and the washing machine connected to it before removing the mesh filter.
natural_image
Diagram of a mechanical component with a circular opening and directional arrows indicating rotation (no text or symbols)- Turn off the Microfiber filter and the washing machine connected to it.
- Hold the mesh filter handle and turn it counterclockwise. Then, pull out to remove the mesh filter from the main unit.

CAUTION
Be careful when removing the mesh filter because there may be undrained water inside.
natural_image
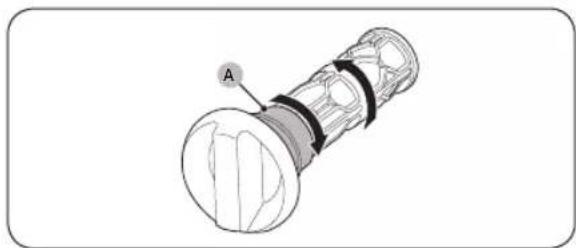
Technical illustration of a mechanical component with labeled section A (no text or symbols beyond label)- Separate the mesh filter and the handle.
- Hold the part (A) of the handle. Then turn the mesh filter in the direction of the arrow (as shown in the figure).
natural_image
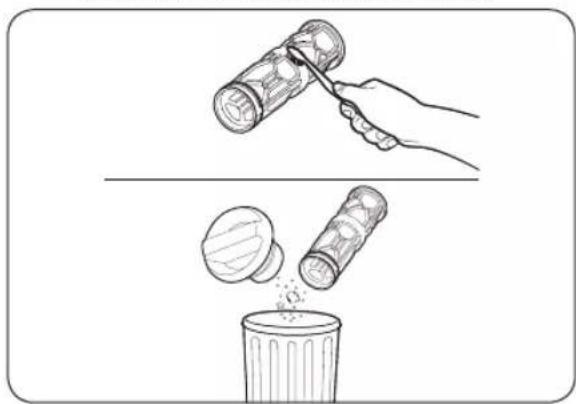
Illustration showing a hand using a tool to remove plastic bottles into a trash bin (no text or symbols present)- Clean the waste collected in the mesh filter using a soft brush.
- Make sure to discard the collected waste into the waste bin.
- Assemble the mesh filter and the handle.
- Insert the cleaned mesh filter back into the main unit, and then turn it clockwise until the mark on the handle is pointing up.
- Press and hold the Filter Reset button for 3 seconds to reset the status of the mesh filter.

CAUTION
- If the mesh filter is damaged, performance may degrade, or a drain error message may appear on your washing machine.
- If the Filter status indicator keeps blinking after resetting the filter, check if you have properly inserted the mesh filter.
- If the mesh filter is not inserted in the correct position, water may leak or performance may degrade. Furthermore, a drain error message may appear on your washing machine.
natural_image
Illustration of a hand using a tool to clean or wash a toilet inside a sink (no text or symbols)
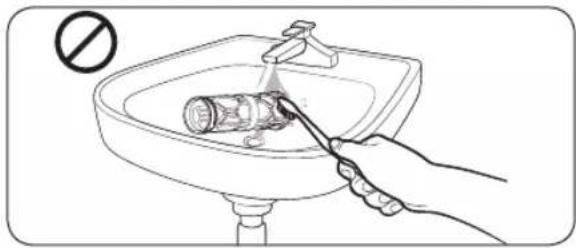
CAUTION
To continue using the Microfiber filter in an environmentally friendly way, avoid using water to clean the mesh filter. Instead, discard the collected waste in a waste bin.
Defrosting the Microfiber filter
Any water remaining inside the Microfiber filter may freeze when the temperature drops below 0 °C.
- Turn off the Microfiber filter, and unplug the power cord.
- Disconnect the two hoses connected to the Microfiber filter and soak them in warm water.
- Detach the Microfiber filter from the cradle, and put it on a tray or a container. Then, move it to a warm place to defrost frozen water.
- Mount the Microfiber filter onto the cradle, and connect the hoses back to it.

NOTE
If the Microfiber filter still doesn't operate normally, repeat the above steps until it operates normally.
Troubleshooting
Checkpoints

CAUTION
Contact the service center if a problem persists, or if you encounter a problem that is not in this section.
Does not operate.
- Check if power is supplied properly.
- Check and reset the circuit breaker.
Excessive vibration or makes noise.
- Make sure the Microfiber filter is securely mounted on a solid wall.
- Use the provided accessories to securely fasten the cradle to the wall. Then, fasten the bracket to the Microfiber filter to mount the Microfiber filter to the cradle.
- Make sure the Microfiber filter is not in contact with any other object.
- The motor can cause noise during normal operation.
Does not drain.
- Make sure the drain hose is straightened all the way to the drain system. If you encounter a drain problem, call for service.
- Make sure the drain hose is not frozen or clogged.
- Make sure the drain hose is connected to a drain system that is not clogged.
- Make sure the hoses are properly connected to the water inlet (IN) and outlet (OUT) ports.
- Make sure the drain hose is not kinked.
- Clean the mesh filter.
- You must not remove the mesh filter while either the Microfiber filter or the washing machine connected to the Microfiber filter is operating. Before removing the mesh filter, turn off the Microfiber filter and the washing machine connected to it.
- Check if there is a drain error on the washing machine connected to the Microfiber filter. Refer to the washing machine's user manual to resolve the drain error.
Leaks water.
- Check if the mesh filter is inserted in the correct position.
- Turn off the Microfiber filter and the washing machine connected to it, and then remove the mesh filter. Insert the mesh filter back into the main unit, and then turn it clockwise until the mark on the handle is pointing up.
- Make sure all hose connections are tight.
- Make sure the end of the drain hose is correctly inserted and secured to the drain system.
- Check the drain hose.
- Make sure the end of the drain hose is not placed on the floor.
- Make sure the drain hose is not frozen or clogged.
Make sure the drain nose is not frozen or clogged.
The Filter status indicator is not turning off.
- Press and hold the Filter Reset button for 3 seconds to reset the status of the mesh filter.
- Clean the mesh filter.
- The Filter status indicator lights up after every 30 cycles (of washing machine) or every month, whichever comes first. Clean the mesh filter regularly for the best performance.
- Check if the mesh filter is inserted in the correct position.
- Turn off the Microfiber filter and the washing machine connected to it, and then remove the mesh filter. Insert the mesh filter back into the main unit, and then turn it clockwise until the mark on the handle is pointing up. Then, press the Filter Reset button to reset the status of the mesh filter.
The Filter status and the Wi-Fi indicators are blinking simultaneously.
- Check if the product is installed according to the installation guide.
- Unmount the product from the wall or the washing machine, and then discard the remaining water inside the hose and the product. Then, re-install the product according to the installation instructions.
- Press and hold the Filter Reset button for 3 seconds.
Appendixes
Standby power consumption
| Power consumption | Standby mode 0.50 W | |
| Network standby mode 2.00 W | ||
| Time in networked standby mode (Wi-Fi) 10 min |
Specification sheet
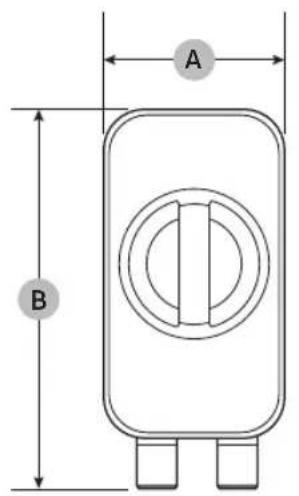
text_image
A B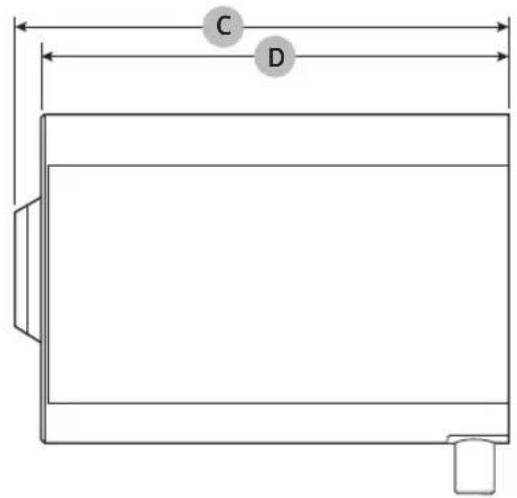
text_image
C D| Type Microfiber filter | |||
| Model name FT-MF | |||
| Dimensions | A (Width) 100 mm | ||
| B (Height) 215 mm | |||
| C (Depth with filter handle and rear cover) 281 mm | |||
| D (Depth with rear cover) 265 mm | |||
| Water pressure 0.5~2.0 Kgf/cm | 2 | ||
| Net weight 2.0 kg | |||
| Power consumption | AC 220-240 V / 50~60 Hz | 7 W | |

NOTE
• The design and specifications are subject to change without notice for quality improvement purposes.
- The dimensions stated here may differ slightly from the actual measurements depending on the measuring method.
text_image
Technical diagram of a mechanical device with labeled components and internal parts, including zoomed-in views and control buttons.natural_image
Five line drawings of electronic components or devices, including a cylindrical device and a rectangular device (no text or symbols)natural_image
Five different types of screw and nut components shown in line drawings (no text or labels)text_image
Diagram showing two washing machines with different sizes and a cross symbol indicating cancellation or disconnection.natural_image
Technical line drawing of a mechanical component with screws and a housing (no text or symbols)natural_image
Line drawing of a device front panel with two buttons and three circular ports (no text or symbols)natural_image
Technical line drawing of a mechanical device with an inset close-up showing internal components (no text or symbols)natural_image
Diagram showing a mechanical component with an inset view of a rectangular component being inserted, no text or symbols present.Deutsch16
natural_image
Simple line drawing of a device with two rectangular components on top (no text or symbols)natural_image
3D diagram of a mechanical device with pins inserted, no text or symbols presentnatural_image
Diagram of a mechanical component with a circular feature and directional arrows indicating rotation (no text or symbols)natural_image
Technical illustration of a mechanical component with labeled section A (no text or symbols beyond label)natural_image
Illustration showing a hand using a hammer to clean a trash bin with a bag, and another hand pouring liquid into a bin (no text or symbols)natural_image
Illustration of a hand using a tool to clean or store water near a sink with a no-smoking symbol (no text or labels)
VORSICHT
Fig. 22: No table of contents or results.
text_image
Technical diagram of a mechanical device with labeled components and internal partstext_image
Diagram showing washing machine placement and replacement, with a cross symbol indicating replacement or cancellation.natural_image
Technical line drawing of a mechanical component with two screws and a housing (no text or symbols)natural_image
Line drawing of a device rear panel with two buttons and three circular ports (no text or symbols)natural_image
Diagram of a device with an inset showing internal components (no text or symbols)natural_image
Diagram showing a mechanical component with an arrow indicating direction, no text or symbols presentNederlands26
natural_image
Simple line drawing of a desk with two rectangular objects on top (no text or symbols)natural_image
3D diagram of a mechanical device with a base and mounting base, no visible text or symbolsnatural_image
Diagram of a mechanical component with a circular feature and bidirectional arrows indicating rotation (no text or symbols)natural_image
Technical illustration of a mechanical component with labeled section A (no text or symbols beyond label)natural_image
Illustration showing a hand using a tool to remove plastic bottles into a trash bin (no text or symbols present)natural_image
Illustration of a hand using a tool to clean a toilet in a sink (no text or symbols)
LET OP
text_image
Diagram showing washing machine operation with a cross symbol indicating cancellation or failurenatural_image
Technical line drawing of a mechanical component with screws and fasteners (no text or symbols)natural_image
Line drawing of a device's front panel with two buttons and three circular ports (no text or symbols)natural_image
Diagram of a device with an inset showing two buttons and a close-up view of the button (no text or symbols present)natural_image
Diagram showing a mechanical component with an inset magnified view of a rectangular component (no text or symbols)natural_image
Simple line drawing of a desk with two rectangular objects on top (no text or symbols)natural_image
3D diagram of a mechanical device with a base and mounting base, no visible text or symbolstext_image
Diagram illustrating a mechanical assembly process with labeled components and directional arrows indicating movement or force.natural_image
Diagram of a mechanical component with a circular feature and directional arrows indicating rotation (no text or symbols)natural_image
Technical illustration of a mechanical component with labeled section A (no text or symbols beyond label)natural_image
Illustration showing a hand using a tool to remove plastic bottles into a trash bin (no text or symbols)natural_image
Illustration of a hand using a tool to clean or store water near a sink with a 'no' symbol (no text or labels)
ATTENTION
natural_image
Five line drawings of electronic components or devices, including a cylindrical device and a rectangular device (no text or symbols)natural_image
Five different types of screw and nut components shown in line drawings (no text or labels)text_image
Diagram showing washing machine and a washing machine with a cross symbol indicating cancellation or failure.natural_image
Technical line drawing of a mechanical component with two screws and a housing (no text or symbols)natural_image
Line drawing of a device's front panel with two buttons and three circular ports (no text or symbols)- Fissare la staffa al Microfiber filter. Fissare le viti corte al fondo del Microfiber filter.
natural_image
Diagram of a device with a magnified inset showing internal components (no text or symbols)natural_image
Diagram showing a mechanical component with an inset view of a rectangular component being inserted, no text or symbols present.Italiano46
natural_image
Simple line drawing of a desk with two mobile phones on top (no text or symbols)natural_image
3D diagram of a mechanical device with a base and mounting base, no text or symbols presenttext_image
Diagram illustrating a mechanical assembly process with labeled components and directional arrows indicating movement or force.natural_image
Diagram of a mechanical component with a circular feature and directional arrows indicating rotation (no text or symbols)natural_image
Technical illustration of a mechanical component with labeled section A (no text or symbols beyond label)natural_image
Illustration showing a hand using a tool to remove plastic bottles into a trash bin (no text or symbols present)natural_image
Illustration of a hand using a tool to clean or wash a bottle in a sink (no text or symbols)
ATTENZIONE
Consumo energetico in standby
text_image
Technical diagram of a mechanical device with labeled components and internal partsnatural_image
Five line drawings of electronic components or devices, including a cylindrical device and a rectangular device (no text or symbols)natural_image
Illustration of five different types of screw and nut components (no text or labels)text_image
Diagram showing washing machine operation with a 'X' symbol indicating cancellation or failurenatural_image
Technical line drawing of a mechanical component with two screws and a central hub (no text or symbols)natural_image
Line drawing of a device's front panel with two buttons and three circular ports (no text or symbols)natural_image
Diagram of a device with an inset showing internal components (no text or symbols)natural_image
Diagram showing a mechanical component with an inset view of a rectangular component being inserted, no text or symbols present.natural_image
Simple line drawing of a desk with two mobile phones on top (no text or symbols)natural_image
3D diagram of a mechanical device with a base and mounting base, no text or symbols presenttext_image
Diagram illustrating a mechanical assembly process with labeled components and directional arrows indicating movement or force.natural_image
Diagram of a mechanical component with a circular feature and directional arrows indicating rotation (no text or symbols)natural_image
Technical illustration of a mechanical component with labeled section A (no text or symbols beyond label)natural_image
Illustration showing a hand using a hammer to clean a trash bin with a bag, and another hand pouring liquid into a container (no text or symbols)natural_image
Illustration of a hand using a tool to clean a toilet in a sink (no text or symbols)
PRECAUCIÓN
text_image
Technical diagram of a mechanical device with labeled components and internal parts, including zoomed-in views and control buttons.natural_image
Five line drawings of electronic components or devices, including a cylindrical device and a rectangular device (no text or symbols)natural_image
Five different types of screw and nut components shown in line drawings (no text or labels)text_image
Diagram showing washing machine operation with a 'X' symbol indicating cancellation or failure- Decida o local na parede onde pretende instalar o Microfiber filter.
natural_image
Technical line drawing of a mechanical component with screws and fasteners (no text or symbols)natural_image
Line drawing of a device rear panel with two buttons and three circular ports (no text or symbols)- Instale o suporte ao Microfiber filter. Utilize os parafusos curtos e aperteos à parte inferior do Microfiber filter.
natural_image
Diagram of a device with an inset showing internal components (no text or symbols)natural_image
Diagram showing a mechanical component with an arrow indicating direction, no text or symbols presentPortuguês66
natural_image
Simple line drawing of a desk with two rectangular objects on top (no text or symbols)natural_image
3D diagram of a mechanical device with a base and mounting base, no visible text or symbolstext_image
Diagram illustrating a mechanical assembly process with labeled components and directional arrows indicating movement or force.natural_image
Diagram of a mechanical component with a circular feature and bidirectional arrows indicating rotation (no text or symbols)natural_image
Technical illustration of a mechanical component with labeled section A (no text or symbols beyond label)natural_image
Illustration showing a hand using a hammer to clean a trash bin with a bag, and another hand pouring liquid into a container (no text or symbols)natural_image
Illustration of a hand using a tool to clean or store water near a sink with a no-smoking symbol (no text or labels)
ATENÇÃO
text_image
Technical diagram of a mechanical device with labeled parts and internal componentsInstallation of Microfiber filter
Du skal installere dit Microfiber filter i oprejst position.
text_image
Diagram showing two washing machines with different sizes and a cross symbol indicating cancellation or disconnection.natural_image
Technical line drawing of a mechanical component with two screws and a housing (no text or symbols)natural_image
Line drawing of a device's front panel with two buttons and three circular ports (no text or symbols)natural_image
Diagram of a device with an inset showing internal components (no text or symbols)natural_image
Diagram showing a mechanical component with an inset view of a rectangular component being inserted, no text or symbols present.Dansk76
natural_image
Simple line drawing of a cabinet with two boxes on top (no text or symbols)natural_image
3D diagram of a mechanical component with a base and mounting base, no visible text or symbolsnatural_image
Diagram of a mechanical component with a circular feature and directional arrows indicating rotation (no text or symbols)natural_image
Technical line drawing of a mechanical component with labeled section A (no text or symbols beyond label)natural_image
Illustration showing a hand using a tool to remove plastic bottles into a trash bin (no text or symbols present)natural_image
Illustration of a hand using a tool to clean a toilet in a sink (no text or symbols)
FORSIGTIG
text_image
Technical diagram of a mechanical device with labeled parts and internal componentsnatural_image
Five line drawings of electronic components or devices, including a cylindrical device and a rectangular ruler, arranged horizontally (no text or symbols)natural_image
Illustration of five different types of screw and nut components (no text or labels)text_image
Diagram showing washing machine operation with a 'X' symbol indicating cancellation or failurenatural_image
Technical line drawing of a mechanical component with screws and fasteners (no text or symbols)natural_image
Line drawing of a device rear panel with two buttons and three circular ports (no text or symbols)natural_image
Diagram of a device with a close-up view showing internal components (no text or symbols)natural_image
Diagram showing a mechanical component with an inset view of a rectangular component being inserted, no text or symbols present.Suomi86
natural_image
Simple line drawing of a cabinet with two boxes on top (no text or symbols)natural_image
3D diagram of a mechanical device with a base and mounting bracket (no text or symbols)natural_image
Diagram of a mechanical component with a circular feature and bidirectional arrows indicating rotation (no text or symbols)natural_image
Technical illustration of a mechanical component with labeled section A (no text or symbols beyond label)natural_image
Illustration showing a hand using a tool to remove plastic bottles into a trash bin (no text or symbols)natural_image
Illustration of a hand using a tool to clean a toilet in a sink (no text or symbols)
HUOMIO
text_image
Technical diagram of a mechanical device with labeled parts and internal componentsnatural_image
Five line drawings of electronic components or devices, including a cylindrical device and a rectangular ruler, arranged horizontally (no text or symbols)Avløpsslange Holder Brakett Slangeklemme Sklisikker pute

natural_image
Illustration of five different types of screw and nut components (no text or labels)Lang skrue Ankerbolt Kort skrue Slangekobling Adapter
Monteringskrav
Montere Microfiber filter
Du må montere Microfiber filter i stående stilling.
Montere på en vegg

MERK
text_image
Diagram showing washing machine operation with a 'X' symbol indicating cancellation or failurenatural_image
Technical line drawing of a mechanical component with two screws and a central hub (no text or symbols)natural_image
Line drawing of a device front panel with two buttons and three circular ports (no text or symbols)- Fest braketten til Microfiber filter. Bruk de korte skruene og fest dem på bunnen av Microfiber filter.

natural_image
Diagram of a device with an inset showing internal components (no text or symbols)natural_image
Diagram of a mechanical component with an arrow indicating direction, no text or symbols presentnatural_image
Simple line drawing of a desk with two mobile phones on top (no text or symbols)natural_image
3D diagram of a mechanical device with a base and mounting base, no text or symbols presenttext_image
Diagram illustrating a mechanical assembly process with labeled components and directional arrows indicating movement or force.natural_image
Diagram of a mechanical component with a circular feature and bidirectional arrows indicating rotation (no text or symbols)natural_image
Technical illustration of a mechanical component with labeled section A (no text or symbols beyond label)natural_image
Illustration showing a hand using a tool to remove plastic bottles into a trash bin (no text or symbols present)natural_image
Illustration of a hand using a tool to clean a toilet in a sink (no text or symbols)
FORSIKTIG
text_image
Technical diagram of a mechanical device with labeled parts and internal componentsnatural_image
Five line drawings of electronic components or devices, including a cylindrical device and a rectangular ruler, arranged horizontally (no text or symbols)natural_image
Illustration of five different types of screw and nut components (no text or labels)Montera Microfiber filter
text_image
Diagram showing washing machine and water pump with a cross symbol indicating cancellation or failurenatural_image
Technical line drawing of a mechanical component with two screws and a central hub (no text or symbols)natural_image
Line drawing of a device rear panel with two buttons and three circular ports (no text or symbols)natural_image
Diagram of a device with an inset showing internal components (no text or symbols)natural_image
Diagram showing a mechanical component with an arrow indicating direction, no text or symbols presentSvenska106
natural_image
Simple line drawing of a desk with two rectangular objects on top (no text or symbols)natural_image
3D diagram of a mechanical device with a base and mounting base, no visible text or symbolstext_image
Diagram illustrating a mechanical assembly process with labeled components and directional arrows indicating movement or force.natural_image
Diagram of a mechanical component with a circular feature and bidirectional arrows indicating rotation (no text or symbols)natural_image
Technical illustration of a mechanical component with labeled section A (no text or symbols beyond label)natural_image
Illustration showing a hand using a tool to remove plastic bottles into a trash bin (no text or symbols present)natural_image
Illustration of a hand using a tool to clean a toilet in a sink (no text or symbols)
VAR FÖRSIKTIG!
Tina Microfiber filter
natural_image
Five line drawings of electronic components or devices, including a cylindrical device and a rectangular device (no text or symbols)natural_image
Five different types of screw and nut components shown in line drawings (no text or labels)text_image
Diagram showing two washing machines with a distance measurement and a cross symbol indicating cancellation or failure.natural_image
Technical line drawing of a mechanical component with screws and a housing (no text or symbols)natural_image
Line drawing of a device's front panel with two buttons and a handle (no text or symbols)natural_image
Technical line drawing of a mechanical device with an inset close-up showing internal components (no text or symbols)natural_image
Diagram showing a mechanical component with an inset view of a rectangular component being inserted, no text or symbols present.Polski116
natural_image
Simple line drawing of a desk with two mobile phones placed on top (no text or symbols)natural_image
3D diagram of a mechanical device with a base and mounting bracket (no text or symbols)text_image
Diagram illustrating a mechanical assembly process with labeled components and directional arrows indicating movement or force.natural_image
Diagram of a mechanical component with a circular feature and directional arrows indicating rotation (no text or symbols)natural_image
Technical illustration of a mechanical component with labeled section A (no text or symbols beyond label)natural_image
Illustration showing a hand using a tool to remove plastic bottles into a trash bin (no text or symbols present)natural_image
Illustration of a hand using a tool to clean or wash a toilet in a sink (no text or symbols)
PRZESTROGA
natural_image
Five line drawings of electronic components or devices, including a cylindrical device and a rectangular device (no text or symbols)natural_image
Five different types of screw and nut components shown in line drawings (no text or labels)text_image
Diagram showing washing machine operation with a 'X' symbol indicating cancellation or failurenatural_image
Technical line drawing of a mechanical component with screws and a housing (no text or symbols)natural_image
Line drawing of a device's front panel with two buttons and three circular ports (no text or symbols)natural_image
Diagram of a device with an inset showing internal components (no text or symbols)natural_image
Diagram showing a mechanical component with an arrow indicating direction, no text or symbols presentnatural_image
Simple line drawing of a desk with two rectangular objects on top (no text or symbols)natural_image
3D diagram of a mechanical device with a base and mounting base, no visible text or symbolsnatural_image
Diagram of a mechanical component with a circular feature and bidirectional arrows indicating rotation (no text or symbols)natural_image
Technical illustration of a mechanical component with labeled section A (no text or symbols beyond label)natural_image
Illustration showing a hand using a tool to remove plastic bottles into a trash bin (no text or symbols)natural_image
Illustration of a hand using a tool to clean a toilet in a sink (no text or symbols)
VIGYÁZAT!
natural_image
Five line drawings of electronic components or devices, including a cylindrical device and a rectangular device (no text or symbols)natural_image
Five different types of screw and nut components shown in line drawings (no text or labels)text_image
Diagram showing washing machine operation with a switch symbol and labeled dimensionsnatural_image
Technical line drawing of a mechanical component with screws and fasteners (no text or symbols)natural_image
Line drawing of a device's front panel with two buttons and a handle (no text or symbols)natural_image
Technical line drawing of a mechanical device with an inset close-up showing internal components (no text or symbols)natural_image
Diagram showing a mechanical component with an inset view of a folded sheet metal (no text or symbols)Ελληνικά136-
natural_image
Simple line drawing of a desk with two devices, one above and one below (no text or symbols)natural_image
3D illustration of a mechanical device with a base and three pins inserted, no text or symbols presenttext_image
Diagram illustrating a mechanical assembly process with labeled components and directional arrows indicating movement or force.natural_image
Diagram of a mechanical component with a circular feature and directional arrows indicating rotation (no text or symbols)natural_image
Technical illustration of a mechanical component with labeled section A (no text or symbols beyond label)natural_image
Illustration showing a hand using a tool to remove a cylindrical object into a trash bin (no text or symbols present)natural_image
Illustration of a hand using a tool to clean or store floor fixtures in a sink (no text or symbols)
ΠΡΟΣΟΧΗ
text_image
Technical diagram of a mechanical device with labeled parts and internal componentsnatural_image
Five line drawings of electronic components or devices, including a cylindrical device and a rectangular ruler, arranged horizontally (no text or symbols)natural_image
Illustration of five different types of screw and nut components (no text or labels)Şurub lung Bolt de ancorare Şurub scurt Conector furtun Adaptor
Instalarea Microfiber filter
text_image
Diagram showing washing machine operation with a mark and incorrect symbol indicating failure or rejectionnatural_image
Technical line drawing of a mechanical component with screws and fasteners (no text or symbols)natural_image
Line drawing of a device's front panel with two buttons and three circular ports (no text or symbols)natural_image
Diagram of a device with an inset showing internal components (no text or symbols)natural_image
Diagram showing a mechanical component with an arrow indicating direction, no text or symbols presentRomână146
natural_image
Simple line drawing of a desk with two rectangular objects on top (no text or symbols)natural_image
3D diagram of a mechanical device with a base and mounting base, no visible text or symbolstext_image
Diagram illustrating a mechanical assembly process with labeled components and directional arrows indicating movement or force.natural_image
Diagram of a mechanical component with a circular feature and bidirectional arrows indicating rotation (no text or symbols)natural_image
Technical illustration of a mechanical component with labeled section A (no text or symbols beyond label)natural_image
Illustration showing a hand using a tool to clean a trash bin with a bag, and another falling into the bin (no text or symbols present)natural_image
Illustration of a hand using a tool to clean a toilet in a sink (no text or symbols)
ATENTIE
natural_image
Five line drawings of electronic components or devices, including a cylindrical device and a rectangular device (no text or symbols)natural_image
Illustration of five different types of screw and nut components (no text or labels)text_image
Diagram showing washing machine operation with a 'X' symbol indicating cancellation or failurenatural_image
Technical line drawing of a mechanical component with two screws and a central hub (no text or symbols)natural_image
Line drawing of a device rear panel with two buttons and three circular ports (no text or symbols)natural_image
Diagram of a device with an inset showing internal components (no text or symbols)natural_image
Diagram showing a mechanical component with an arrow indicating direction, no text or symbols presentБългарски156-
natural_image
Simple line drawing of a box with two devices on top (no text or symbols)natural_image
3D diagram of a device with a base and two pins inserted, no text or symbols presenttext_image
Diagram showing a mechanical device with labeled components and directional arrows indicating assembly or process flow.natural_image
Diagram of a mechanical component with directional arrows indicating rotation or movement (no text or symbols)natural_image
Technical illustration of a mechanical component with labeled section A (no text or symbols beyond label)natural_image
Illustration showing a hand using a tool to remove a bottle from a cup into a trash bin (no text or symbols present)natural_image
Illustration of a hand using a tool to clean or store water from a sink (no text or symbols)
ВНИМАНИЕ
natural_image
Five line drawings of electronic components or devices, including a cylindrical device and a rectangular device (no text or symbols)natural_image
Illustration of five different types of screw and nut components (no text or labels)text_image
Diagram showing washing machine operation with a mark and incorrect symbol indicating failure or invalidnatural_image
Technical line drawing of a mechanical component with two screws and a central hub (no text or symbols)natural_image
Line drawing of a device's front panel with two buttons and three circular ports (no text or symbols)natural_image
Technical line drawing of a mechanical device with an inset close-up showing internal components (no text or symbols)natural_image
Diagram showing a mechanical component with an inset magnified view of a rectangular component (no text or symbols)Lietuvių k.166
natural_image
Simple line drawing of a device with two labeled buttons on top (no text or symbols)natural_image
3D diagram of a mechanical device with a base and mounting base, no text or symbols presentnatural_image
Diagram of a mechanical component with a circular feature and directional arrows indicating rotation (no text or symbols)natural_image
Technical illustration of a mechanical component with labeled section A (no text or symbols beyond label)natural_image
Illustration showing a hand using a tool to remove plastic bottles into a trash bin (no text or symbols present)natural_image
Illustration of a hand using a tool to clean or wash a toilet in a sink (no text or symbols)
PERSPÉJIMAS
text_image
Technical diagram of a mechanical device with labeled parts and internal components01 Pogas un indikatori
02 Sieta filtrs
03 Sieta filtra rokturis
04 Üdens novades pieslēgvieta (ĀRĀ)
05 Üdens ieplüdes pieslégvieta (IEKŠÄ)
06 Strāvas kontaktdakša
* Filtra un/vai caurules izskats var but atškirīgs atkarībā no modela.
Piederumi

natural_image
Five line drawings of electronic components or devices, including a cylindrical device and a rectangular ruler, arranged horizontally (no text or symbols)Novadcaurule Ligzda Kronšteins Šlūtenes skava Pretslides spilventiņš

natural_image
Illustration of five different types of screw and nut components (no text or labels)text_image
Diagram showing two washing machines with different sizes and a cross symbol indicating cancellation or replacement.natural_image
Technical line drawing of a mechanical component with screws and fasteners (no text or symbols)natural_image
Line drawing of a device rear panel with two buttons and three circular ports (no text or symbols)natural_image
Technical line drawing of a mechanical device with an inset close-up showing internal components (no text or symbols)natural_image
Diagram showing a mechanical component with an arrow indicating direction, no text or symbols presentLatviski176
natural_image
Simple line drawing of a desk with two rectangular objects on top (no text or symbols)natural_image
3D diagram of a mechanical device with a base and mounting base, no visible text or symbolstext_image
Diagram illustrating a mechanical assembly process with labeled components and directional arrows indicating movement or force.natural_image
Diagram of a mechanical component with a circular feature and bidirectional arrows indicating rotation (no text or symbols)natural_image
Technical line drawing of a mechanical component with labeled section A (no text or symbols beyond label)- Atdaliet sieta filtru un rokturi.
natural_image
Illustration showing a hand using a tool to remove plastic bottles into a trash bin (no text or symbols)natural_image
Illustration of a hand using a tool to clean a toilet in a sink (no text or symbols)
UZMANĪBU!
text_image
Technical diagram of a mechanical device with labeled parts and internal componentsnatural_image
Five line drawings of electronic components or devices, including a cylindrical device and a rectangular ruler, arranged horizontally (no text or symbols)natural_image
Illustration of five different types of screw and nut components (no text or labels)Pikk kruvi Ankrupolt Lühike kruvi Voolikuliitmik Adapter
Paigaldusnõuded
text_image
Diagram showing a washing machine with a door and a cross symbol indicating cancellation or failure.natural_image
Technical line drawing of a mechanical component with two screws and a central hub (no text or symbols)natural_image
Line drawing of a device's front panel with two buttons and three circular ports (no text or symbols)- Kinnitage kronstein filtri Microfiber filter külge. Keerake lühikesed kruvid filtri Microfiber filter pöhja külge.

natural_image
Diagram of a device with an inset showing internal components (no text or symbols)natural_image
Diagram showing a mechanical component with an inset magnified view of a rectangular component (no text or symbols)Eesti186
natural_image
Simple line drawing of a desk with two rectangular objects on top (no text or symbols)natural_image
3D diagram of a mechanical device with a base and mounting base, no visible text or symbolstext_image
Diagram illustrating a mechanical assembly process with labeled components and directional arrows indicating movement or force.natural_image
Diagram of a mechanical component with a circular feature and directional arrows indicating rotation (no text or symbols)natural_image
Technical illustration of a mechanical component with labeled section A (no text or symbols beyond label)natural_image
Illustration showing a hand using a tool to remove plastic bottles into a trash bin (no text or symbols present)natural_image
Illustration of a hand using a tool to clean a toilet in a sink (no text or symbols)
ETTEVAATUST!
Supervised few elements are not
Prohlášení o shodě
text_image
Technical diagram of a mechanical device with labeled parts and internal componentsnatural_image
Five line drawings of electronic components or devices, including a cylindrical device and a rectangular ruler, arranged horizontally (no text or symbols)natural_image
Illustration of five different types of screw and nut components (no text or labels)Dlouhý vrut Hmoždinka Krátký vrut Spojka hadice Adapter
text_image
Diagram showing two washing machines with a distance measurement and a cross symbol indicating cancellation or failure.natural_image
Technical line drawing of a mechanical component with two screws and a central hub (no text or symbols)natural_image
Line drawing of a device rear panel with two buttons and three circular ports (no text or symbols)natural_image
Diagram of a device with an inset showing internal components (no text or symbols)natural_image
Diagram showing a mechanical component with an inset view of a rectangular component being inserted, no text or symbols present.Čeština196
natural_image
Simple line drawing of a cabinet with two boxes on top (no text or symbols)natural_image
3D diagram of a mechanical device with a base and mounting bracket (no text or symbols)natural_image
Diagram of a mechanical component with a circular feature and bidirectional arrows indicating rotation (no text or symbols)natural_image
Technical illustration of a mechanical component with labeled section A (no text or symbols beyond label)natural_image
Illustration showing a hand using a tool to remove plastic bottles into a trash bin (no text or symbols present)natural_image
Illustration of a hand using a tool to clean a toilet in a sink (no text or symbols)
UPOZORNĚNÍ
text_image
Technical diagram of a mechanical device with labeled parts and internal componentstext_image
Diagram showing two washing machines with a distance measurement and a cross symbol indicating cancellation or failure.- Určte miesto, kam si želáte Microfiber filter nainštalovat.
- Minimálna vzdialenost (*) od podlahy k spodku Microfiber filtra musí byt 100 ± 5 cm.

UPOZORNENIE
natural_image
Technical line drawing of a mechanical component with two screws inserted (no text or symbols)natural_image
Line drawing of a device's front panel with two buttons and three circular ports (no text or symbols)- K Microfiber filtru pripojte držiak. Krátke skrutky utiahnite v spodnej časti Microfiber filtra.

natural_image
Technical line drawing of a mechanical device with an inset close-up showing internal components (no text or symbols)natural_image
Diagram of a mechanical component with an inset showing a magnified view of a rectangular component (no text or symbols)natural_image
Simple line drawing of a desk with two rectangular objects on top (no text or symbols)natural_image
3D diagram of a mechanical device with a base and mounting base, no text or symbols presentnatural_image
Diagram of a mechanical component with directional arrows indicating rotation or movement (no text or symbols)natural_image
Technical illustration of a mechanical component with labeled section A (no text or symbols beyond label)natural_image
Illustration showing a hand using a tool to remove plastic bottles into a trash bin (no text or symbols present)natural_image
Illustration of a hand using a tool to clean or wash a toilet in a sink (no text or symbols)
UPOZORNENIE
text_image
Technical diagram of a mechanical device with labeled parts and internal components01 Gumbi i pokazatelji
02 Filtar s mrežicom
03 Ručica filtra s mrežicom
04 Izlazni otvor za vodu (OUT)
05 Ulazni otvor za vodu (IN)
06 Priključak za napajanje
* Dizajn filtra i/ili crijeva razlikuje se na različitim modelima.
Dodatna oprema

natural_image
Five line drawings of electronic components or devices, including a cylindrical device and a rectangular ruler, arranged horizontally (no text or symbols)Crijevo za odvod Posuda Podupirač Stezaljka za crijevo Podloga protiv klizanja

natural_image
Illustration of five different types of screw and nut components (no text or labels)text_image
Diagram showing washing machine and a washing machine with a cross symbol indicating cancellation or failure.- Odlučite gdje na zidu želite montirati filtar Microfiber filter.
- Minimalna udaljenost (*) od poda do dna filtra Microfiber filter mora biti 100 ± 5 cm.

OPREZ
Potrebno je montirati uređaj tako da bude iznad perilice za rublje, a izlazni otvor za vodu (OUT) bude usmjeren prema dolje.

natural_image
Technical line drawing of a mechanical component with two screws and a housing (no text or symbols)- Držite posudu na mjestu za montažu i označite mjesta gdje ćete pričvrstiti vijke.
- Izbušite rupe na mjestima koja ste označili u prethodnom koraku, a zatim umetnite sidrene vijke.
- Pričvrstite posudu na zid dugačkim vijcima.

natural_image
Line drawing of a device's front panel with two buttons and three circular ports (no text or symbols)- Pričvrstite podupirač na filtar Microfiber filter. Pričvrstite kratke vijke na dno filtra Microfiber filter.

natural_image
Diagram of a device with an inset showing internal components (no text or symbols)- Poravnajte rupe na podupiraču s utorima na posudi, a zatim montirajte podupirač.

OPREZ
- Pazite da ne oštetite filtar Microfiber filter dok pričvršćujete podupirač ili dok ga montirate na posudu.
-
Pobrinite se da provjerite je li filtar Microfiber filter sigurno pričvršćen na posudu
-
Povežite cijevi na filtar Microfiber filter prema uputama u odjeljku „Povezivanje crijeva“.
-
Uključite kabel za napajanje u zidnu utičnicu.

NAPOMENA
Napajanje se uključuje i pokazatelj statusa filtra zasvijetli kada ukopčate kabel za napajanje u zidnu utičnicu.
Montiranje na perilicu za rublje

NAPOMENA
Prije montiranja uklonite predmete na perilici, s bočnih strana ili na stražnjoj strani perilice koji bi mogli smetati.
natural_image
Diagram showing a mechanical component with an inset view of a rectangular component being inserted, no text or symbols present.Hrvatski216
- Uklonite foliju sa svake strane podloge protiv klizanja, a zatim pričvrstite podlogu protiv klizanja na dno posude.

NAPOMENA
Morate pričvrstiti glatku stranu podloge protiv klizanja na posudu.
natural_image
Simple line drawing of a desk with two rectangular objects on top (no text or symbols)natural_image
3D diagram of a mechanical device with a base and mounting base, no text or symbols present-
Poravnajte rupe na dnu filtra Microfiber filter s utorima na posudi, a zatim montirajte filtar Microfiber filter.
-
Uključite kabel za napajanje u zidnu utičnicu.

NAPOMENA
Napajanje se uključuje i pokazatelj statusa filtra zasvijetli kada ukopčate kabel za napajanje u zidnu utičnicu.
Povezivanje crijeva
text_image
OUT IN- Povežite crijevo za odvod perilice za rublje na ulazni otvor za vodu (IN) na filtru Microfiber filter.

OPREZ
- Pobrinite se da je perilica za rublje isključena prije nego što povežete crijevo za odvod perilice za rublje na ulazni otvor za vodu (IN). - U crijevu za odvod perilice za rublje možda će ostati malo vode. Budite oprezni kada ga povezujete na filtar Microfiber filter.
-
Povežite isporučeno crijevo za odvod na izlazni otvor za vodu (OUT).
-
Čvrsto pričvrstite crijeva isporučenim stezaljkama za crijevo.

OPREZ
text_image
Diagram illustrating a mechanical assembly process with labeled components and directional arrows indicating movement or force.- Povežite priključak za crijevo na ulazni otvor za vodu (IN).
- Pronađite adapter ispravne veličine za crijevo za odvod perilice za rublje, a zatim ga povežite na priključak za crijevo.
- Čvrsto pričvrstite oba kraja priključka za crijevo isporučenim stezaljkama za crijevo.
- Povežite crijevo za odvod perilice za rublje na adapter.
- Pustite perilicu za rublje da radi jedan puni ciklus da biste provjerili dolazi li do curenja.
Rad

OPREZ
Nemojte uklanjati filtar s mrežicom dok se filtar Microfiber filter upotrebljava.
Gumbi i pokazatelji
FT-MF

text_image
01 (3 sec) 0201 Wi-Fi

Pokazatelj za Wi-Fi zasvijetli kada se filtar Microfiber filter poveže na Wi-Fi.
- Pritisnite i držite gumb Ponovno postavljanje filtra 7 sekundi da biste uključili ili isključili Wi-Fi.
02 Gumb pokazatelja statusa filtra / Ponovno postavljanje filtra

natural_image
Diagram of a mechanical component with a circular feature and bidirectional arrows indicating rotation (no text or symbols)- Isključite filtar Microfiber filter i perilicu za rublje povezanu na njega.
- Primate ručicu filtra s mrežicom i okrenite je u smjeru suprotnom od kazaljke na satu. Zatim je izvucite da biste uklonili filtar s mrežicom s glavne jedinice.

OPREZ
natural_image
Technical illustration of a mechanical component with labeled section A (no text or symbols beyond label)- Odvojite filtar s mrežicom i ručicu.
natural_image
Illustration showing a hand using a tool to remove plastic bottles into a trash bin (no text or symbols present)- Mekom četkom očistite otpad prikupljen u filtru s mrežicom.
- Pobrinite se da prikupljeni otpad odložite u kantu za smeće.
- Sastavite filtar s mrežicom i ručicu.
- Umetnite očišćeni filtar s mrežicom natrag u glavnu jedinicu, a zatim ga okrećite u smjeru kazaljke na satu sve dok oznaka na ručici ne pokazuje prema gore.
- Pritisnite i držite gumb Ponovno postavljanje filtra 3 sekunde da biste ponovno postavili status filtra s mrežicom.

OPREZ
natural_image
Illustration of a hand using a tool to clean or wash a toilet in a sink (no text or symbols)
OPREZ
Da biste nastavili upotrebljavati filtar Microfiber filter na ekološki prihvatljiv način, filtar s mrežicom nemojte čistiti vodom. Umjesto toga, bacite prikupljeni otpad u koš za smeće.
Odmrzavanje filtra Microfiber filter
Voda koja ostane u filtru Microfiber filter može se zamrznuti kada temperatura padne ispod 0 °C.
- Isključite filtar Microfiber filter i iskopčajte kabel za napajanje.
- Odspojite dva crijeva priključena na filtar Microfiber filter i namočite ih u toploj vodi.
- Odvojite filtar Microfiber filter od posude i stavite ga na pliticu ili spremnik. Zatim ga stavite na toplo mjesto da biste odledili zamrznutu vodu.
- Montirajte filtar Microfiber filter na posudu i ponovno povežite crijeva na njega.

NAPOMENA
Ako filtar Microfiber filter i dalje ne radi normalno, ponovite prethodno navedene korake dok ne počne raditi normalno.
Rješavanje problema
Kontrolne točke

OPREZ
Obratite se servisnom centru ako se problem nastavi ili ako naidete na problem koji nije u ovom odjeljku.
Ne radi.
natural_image
Five line drawings of electronic components or devices, including a cylindrical device and a rectangular device (no text or symbols)natural_image
Illustration of five different types of screw and nut components (no text or labels)text_image
Diagram showing washing machine and a washing machine with a cross symbol indicating cancellation or failure.natural_image
Technical line drawing of a mechanical component with two screws and a central hub (no text or symbols)natural_image
Line drawing of a device's front panel with two buttons and three circular ports (no text or symbols)natural_image
Diagram of a device with a magnified inset showing internal components (no text or symbols)natural_image
Diagram showing a mechanical component with an inset view of a rectangular component being inserted, no text or symbols present.Türkçe226
natural_image
Simple line drawing of a desk with two mobile phones on top (no text or symbols)natural_image
3D diagram of a mechanical device with a base and mounting base, no text or symbols presenttext_image
Diagram illustrating a mechanical assembly with labeled components and directional arrows indicating movement or force.natural_image
Diagram of a cylindrical device with a circular component and directional arrows indicating rotation (no text or symbols)natural_image
Technical line drawing of a mechanical component with labeled section A (no text or symbols beyond label)natural_image
Illustration showing a hand using a tool to remove a bottle from a cup into a trash bin (no text or symbols present)natural_image
Illustration of a hand using a tool to clean a toilet in a sink (no text or symbols)
DIKKAT
SAMSUNG ELECTRONICS CO.,LTD (Maetan-
dong) 129, Samsung-ro, Yeongtong-gu, Suwon-si
Gyeonggi-do, Korea, 443-742
TEL: +82 2 2255 0114
FAKS: +82 2 2255 0117
LVD (Nemko AS):
Gaustadalléen 30, P.O. Box 73 Blindern, N-0314
Oslo, Norway
TEL: +47 22 96 03 30
FAKS: +47 22 96 05 50
EMC (Nemko AS):
Gaustadalléen 30, P.O. Box 73 Blindern, N-0314
Oslo, Norway
TEL: +47 22 96 03 30
FAKS: +47 22 96 05 50