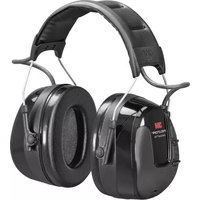
USER MANUAL WorkTunes Pro 3M
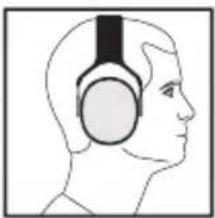
F:7 F:8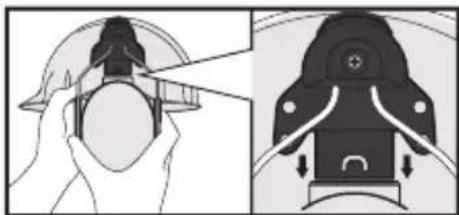
F:9 F:10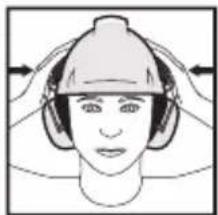
F:11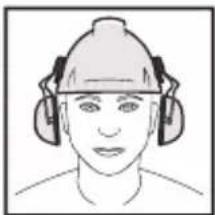
G:1 G:3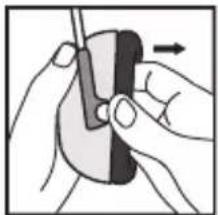
G:2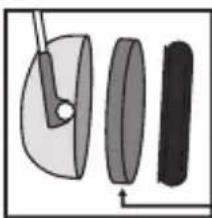
H:2 H:3 H:4
H:1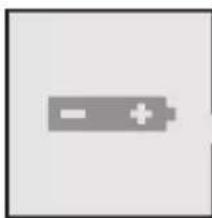
EN 352-1:2002 / EN 352-3:2003 / EN 352-8:2008
3M™ PELTOR™ WorkTunes™ Pro FM Radio Headset, Headband HRXS220A, HRXS221A
| A:1 Frequency (Hz) | 125 | 250 | 500 | 1000 | 2000 | 4000 | 8000 | SNR |
| A:2 Mean attenuation (dB) | 17.0 | 24.0 | 29.5 | 36.9 | 37.3 | 39.3 | 35.4 | 32 |
| A:3 Standard deviation (dB) | 3.2 | 2.0 | 2.6 | 3.3 | 4.9 | 3.2 | 3.9 |
| A:4 APV (dB) | 13.8 | 22.0 | 26.9 | 33.6 | 32.4 | 36.1 | 31.5 |
A:5 H=34dB M=29dB L=22dB
3M™ PELTOR™ WorkTunes™ Pro FM Radio Headset, Helmet attachment HRX220P3E, HRXS221P3E
| A:1 Frequency (Hz) | 125 | 250 | 500 | 1000 | 2000 | 4000 | 8000 | SNR |
| A:2 Mean attenuation (dB) | 16.6 | 22.0 | 29.1 | 36.3 | 36.4 | 38.7 | 34.2 | 31 |
| A:3 Standard deviation (dB) | 2.7 | 2.2 | 2.9 | 3.4 | 3.9 | 4.2 | 4.0 |
| A:4 APV (dB) | 13.9 | 19.8 | 26.2 | 32.9 | 32.5 | 34.5 | 30.2 |
A:5 H = 33dB M=28dB L=21dB
ANSI S3.19-1974
3M™ PELTOR™ WorkTunes™ Pro AM/FM Radio Headset, Headband HRXS221A-NA
| B:1 Test Frequency (Hz) | 125 | 250 | 500 | 1000 | 2000 | 3150 | 4000 | 6300 | 8000 | NRR | CSA Class |
| B:2 Mean attenuation (dB) | 17.2 | 21.8 | 30.3 | 36.5 | 38.4 | 40.5 | 40.4 | 36.2 | 34.7 | 26 |
| B:3 Standard deviation (dB) | 2.4 | 1.8 | 2.6 | 2.9 | 3.0 | 2.4 | 3.4 | 2.4 | 2.9 | A |
3M™ PELTOR™ WorkTunes™ Pro AM/FM Radio Headset, Hard hat HRXS221P3E-NA
| B:1 Test Frequency (Hz) | 125 | 250 | 500 | 1000 | 2000 | 3150 | 4000 | 6300 | 8000 | NRR | CSA Class |
| B:2 Mean attenuation (dB) | 15.7 | 19.5 | 28.7 | 34.9 | 34.7 | 37.1 | 35.9 | 32.4 | 32.2 | 23 |
| B:3 Standard deviation (dB) | 3.1 | 2.1 | 2.8 | 2.9 | 3.0 | 2.4 | 3.3 | 2.9 | 3.0 | B |
AS/NZS 1270:2002
3M™ PELTOR™ WorkTunes™ Pro AM/FM Radio Headset, Headband HRXS221A
| C:1 Test Frequency (Hz) | 125 | 250 | 500 | 1000 | 2000 | 4000 | 8000 | SLC80 | Class | Clamping Force 11,3N |
| C:2 Mean attenuation (dB) | 17.6 | 22.1 | 29.9 | 36.4 | 37.6 | 38.4 | 34.9 | 32 | 5 |
| C:3 Standard deviation (dB) | 3.7 | 3.7 | 3.3 | 2.8 | 2.2 | 2.4 | 2.6 |
| C:4 Mean minus SD | 13.9 | 18.4 | 33.6 | 33.6 | 35.4 | 36.0 | 32.3 | Mass 355g |
3M™ PELTOR™ WorkTunes™ Pro AM/FM Radio Headset, Helmet attachment HRXS221P3E
| C:1 Test Frequency (Hz) | 125 | 250 | 500 | 1000 | 2000 | 4000 | 8000 | SLC80 | Class | Clamping Force 11,9N |
| C:2 Mean attenuation (dB) | 18.1 | 21.1 | 29.4 | 33.9 | 35.2 | 36.2 | 34.2 | 30 | 5 |
| C:3 Standard deviation (dB) | 2.5 | 1.9 | 3.9 | 2.8 | 2.9 | 4.2 | 3.4 |
| C:4 Mean minus SD | 15.6 | 19.2 | 25.5 | 31.1 | 32.3 | 32.0 | 30.8 | Mass 374g |
This earmuff was tested with Protector HC600 industrial safety helmet (P3E adapter).
TABLE D (EN352-3:2003)
| D:1 Helmet manufacturer | D:2 Helmet model | D:3 Attachment | D:4 Head Size |
| 3M | G3000 Basic set | E | L |
| 3M | H-700 | E | L |
| 3M | G500 Headgear | E | SML |
| 3M | G3501 | E | L |
| Centurion | Centurion Spectrum | E | L |
| Auboueix | Auboueix IRIS 2 | E | L |
| Scott | Scott Safety style 600 | E | L |
| MSA | MAS V-Gard | E | L |
www.3M.com.
GB IE ZA US AU NZ
3M™ PELTOR™ WorkTunes™ Pro FM Radio Headset HRXS220A, HRX220P3E
3M™ PELTOR™ WorkTunes™ Pro AM/FM Radio Headset HRXS221A-NA, HRXS221P3E-NA, HRXS221A, HRXS221P3E
Introduction
Congratulations and thank you for choosing 3M™ PELTOR™ Communication Solutions! Welcome to the next generation of protective communication.
Please read, understand, and follow all safety information contained in these instructions prior to the use of this device. Retain these instructions for future reference.
Intended use
These 3M™ PELTOR™ WorkTunes™ Pro headsets are intended to provide protection against hazardous noise levels and loud sounds while allowing the user to listen to the radio or other audio devices. It is expected that all users read and understand the provided user instructions as well as be familiar with the use of this device.
Explanation of Signal Word Consequences

WARNING: Indicates a hazardous situation which, if not avoided, could result in serious injury or death.

CAUTION: Indicates a hazardous situation which, if not avoided, could result in minor or moderate injury and/or property damage.
NOTICE: Indicates a situation which, if not avoided, could result in property damage.
WARNING
- If the information and recommendations contained herein are not adhered to, the protection afforded by the earmuffs will be severely impaired. This hearing protector helps reduce exposure to hazardous noise and other loud sounds. Misuse or failure to wear hearing protection at all times when exposed to hazardous noise may result in hearing loss or injury. For proper use, see supervisor, user instructions, or contact 3M Technical Support.
- Earmuffs, and in particular cushions, may deteriorate with use and should be examined at frequent intervals for cracking and leakage, for example.
When used regularly, 3M recommends replacing the foam liners and cushions at least twice a year to maintain consistent attenuation, hygiene, and comfort. If a cushion is damaged, it should be replaced. The cushions and foam liners may deteriorate with use and should be examined at regular intervals for cracking or other damage.
- Ensure the hearing protector is fitted, adjusted, regularly checked for serviceability, and maintained in accordance with these user instructions. Improper fit of this device will reduce its effectiveness in attenuating noise. Consult the enclosed instructions for proper fit. Hearing protectors must be worn at all times in noisy surroundings for proper protection.
- The audibility of warning signals at a specific workplace may be impaired while using the entertainment facility.
- The fitting of hygiene covers to the cushions may affect the acoustic performance of the earmuffs.
- The noise reduction may be lower when eyeglasses, goggles or respirator straps are worn between the sealing surface of the earmuff cushions and the sides of the wearer's head. For best noise reduction, select eyeglasses or goggles that have thin, flat temples or straps which will minimize interference with the seal of the earmuff cushions. Pull long hair back to the extent possible and remove other items that may degrade the earmuff seal such as pencils, hats, jewelry or earbuds. Do not bend and reshape the headband as this will cause a loose fit and allow sound leakage.
- The helmet mounted earmuffs are of large size range. Earmuffs complying with EN 352-3 are of medium size range or small size range or large size range. Medium size range earmuffs will fit the majority of wearers. Small size range or large size range earmuffs are designed to fit wearers for whom medium size range earmuffs are not suitable.
- When worn according to the User Instructions, this hearing protector helps reduce exposure to both continuous noises, such as industrial noises and noises from vehicles and aircraft, as well as very loud impulse noises, such as gunfire. It is difficult to predict the required and/or actual hearing protection obtained during exposure to impulse noises. For gunfire, the weapon type, number of rounds fired, proper selection, fit and use of hearing protection, proper care of hearing protection, and other variables will impact performance. If your hearing seems dulled or you hear a ringing or buzzing during or after any noise exposure (including gunfire), or for any other reason you suspect a hearing problem, your hearing may be at risk. To learn more about hearing protection for impulse noise, visit www.3M.com/hearing.
- The limitation of the input signal is only effective for levels not exceeding 250mV RMS.
• The size of the headband and headgear are S, M, L and for the helmet attached is L.
CAUTION
RISK OF EXPLOSION IF BATTERY IS REPLACED BY AN INCORRECT TYPE. DISPOSE OF USED BATTERIES ACCORDING TO THE INSTRUCTIONS
NOTICE
- Although hearing protectors can be recommended for protection against the harmful effects of impulsive noise, the Noise Reduction Rating (NRR) is based on the attenuation of continuous noise and may not be an accurate indicator of the protection attainable against impulsive noise such as gunfire.
- If NRR is used to estimate typical workplace protection, 3M recommends that NRR be reduced by 50% or in accordance with applicable regulations.
- This hearing protector limits the entertainment audio signal to 82 dB(A) effective to the ear.
- This product may be adversely affected by certain chemical substances. Further information should be obtained from the manufacturer.
- In Canada, users of hard hats combined with earmuffs must refer to CSA Standard Z94.1 on industrial protective headwear.
- Operating temperature range: -4°F (-20°C) to 131°F (55°C)
• Storage temperature range: -4°F (-20°C) to 131°F (55°C)
- Weight of Hearing Protector: HRXS220A = 351g, HRXS220P3E = 369g, HRXS221A = 353g, HRXS221P3E = 371g
3M Svenska AB hereby declares that this 3M™ PELTOR™ Headset is in compliance with the essential requirements and other provisions set out in the appropriate directives. Thereby they fulfil the requirements for CE marking.
Hereby, 3M Svenska AB declares that the radio equipment type [broadcast radio receiver] is in compliance with Directive 2014/53/EU. The full text of the EU declaration of conformity is available at the following internet address: http://www.3M.com/peltor/doc
The product has been tested and approved in accordance with [EN 352-1:2002 / EN 352-3:2002, EN352-8:2008].

Additional information can be obtained by contacting 3M in the country of purchase or 3M Svenska AB Värmamo. For contact information, see last pages of this user instruction. This product contains electrical and electronic components and must not be disposed of using standard refuse collection. Please consult local directives for disposal of electrical and electronic equipment.
Notified Body Type Examination Certificate acc. directive 89/686/EEC:
PZT GmbH, An der Junkerei 48 F, D-26389 Wilhelmshaven, Germany. Notify body #1974

Do not mix old and new batteries. Do not mix alkaline, standard, or rechargeable batteries.
To properly dispose of the battery, follow local solid waste disposal regulations
EMC COMPLIANCE
This device complies with Part 15 of the FCC rules and Industry Canada's license-exempt RSSs. Operation is subject to the following two conditions: (1) This device may not cause harmful interference, and (2) this device must accept any interference received, including interference that may cause undesirable operation.
Note: This device has been tested and found to comply with the limits for a Class B digital device, pursuant to part 15 of the FCC Rules. These limits are designed to provide reasonable protection against harmful interference in a residential installation. This device generates, uses and can radiate radio frequency energy and, if not installed and used in accordance with the instructions, may cause harmful interference to radio communications. However, there is no guarantee that interference will not occur in a particular installation. If this device does cause harmful
interference, which can be determined by turning the device off and on, the user is encouraged to try to correct the interference by one or more of the following measures:
Reorient or relocate the receiving antenna.
Increase the separation distance between the two interfering devices.
Consult 3M Technical Support.
NO MODIFICATION: Modifications to this device shall not be made without the written consent of 3M Company. Unauthorized modifications may void the warranty and the user's authority to operate the device.
WARRANTY AND LIMITATION OF LIABILITY
Note: The following statements do not apply in Australia and New Zealand. Consumers should rely on their statutory rights.
WARRANTY: In the event any 3M Personal Safety Division product is found to be defective in material, workmanship, or not in conformity with any express warranty for a specific purpose, 3M's only obligation and your exclusive remedy shall be at 3M's option, to repair, replace or refund the purchase price of such parts or products upon timely notification of the issue by you and substantiation that the product has been stored, maintained and used in accordance with 3M's written instructions. EXCEPT WHERE PROHIBITED BY LAW, THIS WARRANTY IS EXCLUSIVE AND IS IN LIEU OF ANY EXPRESS OR IMPLIED WARRANTY OF MERCHANTABILITY, FITNESS FOR A PARTICULAR PURPOSE OR OTHER WARRANTY OF QUALITY, OR THOSE ARISING FROM A COURSE OF DEALING, CUSTOM OR USAGE OF TRADE, EXCEPT OF TITLE AND AGAINST PATENT INFRINGEMENT. 3M has no obligation under this warranty with respect to any product that has failed due to inadequate or improper storage, handling, or maintenance; failure to follow product instructions; or alteration or damage to the product caused by accident, neglect, or misuse.
LIMITATION OF LIABILITY: EXCEPT WHERE PROHIBITED BY LAW, IN NO EVENT SHALL 3M BE LIABLE FOR ANY DIRECT, INDIRECT, SPECIAL, INCIDENTAL OR CONSEQUENTIAL LOSS OR DAMAGES (INCLUDING LOST PROFITS) ARISING FROM THIS PRODUCT, REGARDLESS OF THE LEGAL THEORY ASSERTED. THE REMEDIES SET FORTH HEREIN ARE EXCLUSIVE.
NO MODIFICATION: Modifications to this device shall not be made without the written consent of the 3M Company. Unauthorized modifications may void the warranty and the authority granted under Federal Communications Commission rules permitting the operation of this device.
LABORATORY ATTENUATION
Explanation of attenuation tables: European Standard EN 352
A:1 Frequency (Hz)
A:2 Mean attenuation, Mean att (dB)
A:3 Standard deviation, St dev (dB)
A:4 Assumed protection value, APV (dB)
A:5 H = Hearing protection estimation for high frequency sounds (f ≥ 2000 Hz).
M = Hearing protection estimation for medium frequency sounds (500 Hz < f < 2000 Hz).
L = Hearing protection estimation for low frequency sounds (f ≤ 500 Hz).
USA Standard ANSI S3.19-1974
B:1 Frequency (Hz)
B:2 Mean Attenuation, Mean Att (dB)
B:3 Standard Deviation, St Dev (dB)
The level of noise entering a person's ear, when hearing protector is worn as directed, is closely approximated by the difference between the A-weighted environmental noise level and the NRR.
Example
- The environmental noise level as measured at the ear is 92 dBA.
- The NRR is 23 decibels (dB).
- The level of noise entering the ear is approximately equal to 69 dB(A).
CAUTION: For noise environments dominated by frequencies below 500 Hz the C-weighted environmental noise level should be used.
Australia/New Zealand Standard AS/NZS 1270:2002
C:1 Test Frequencies
C:2 Mean Attenuation. Mean Att
C:3 Standard Deviation, St Dev
C:4 Mean minus SD
Compatible Industrial Safety Helmets
EN352-3:2003: These ear-muffs should be fitted to, and used only with, the industrial safety helmets listed in Table D. AS/NZS 1270:2002: This earmuff was tested in combination with the following industrial safety helmet, and may give different levels of protection if fitted to different helmets: Protector HC600.
Explanation of the industrial safety helmet attachment table:
D:1 Helmet manufacturer
D:2 Helmet model
D:3 Helmet attachment
D:4 Head size: S = small, M = medium, L = large
COMPONENTS
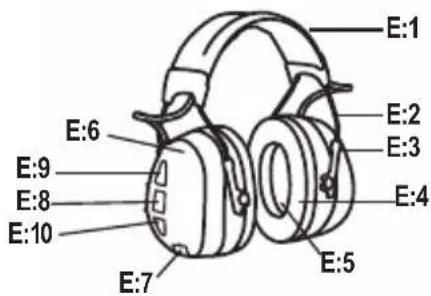
HRXS220A, HRXS221A, HRXS221A-NA
E:1 Headband (Stainless steel, PVC, PA)
E:2 Headband wire (stainless steel)
E:3 Two-point fastener (POM)
E:4 Cushion (PVC foil and PUR foam)
E: 5 Foam liner (PUR foam)
E: 6 Cup (ABS)
E: 7 Latch (PA)
E: 8 On/Off/Mode button (TPE)
E: 9 [+] button (TPE)
E: 10 [-] button (TPE)
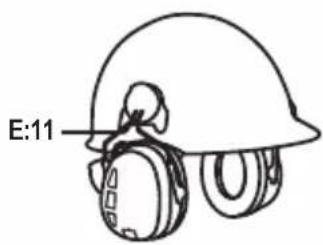
HRXS220P3E, HRXS221P3E, HRXS221P3E-NA,
E: 11 Cup supporting arm (stainless steel)
FITTING INSTRUCTIONS
Headband
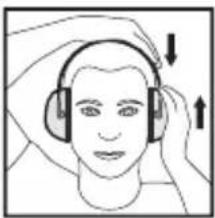
F:1 Slide out the cups and tilt the top out, as the cable must be on the outside of the headband. F:2 Adjust the height of the cups by sliding them up or down while holding the headband in place. F:3 The headband should be positioned across the top of your head.
Helmet Attachment
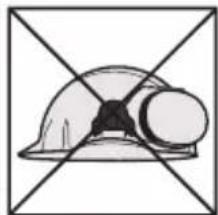
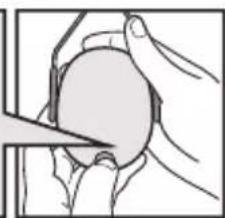
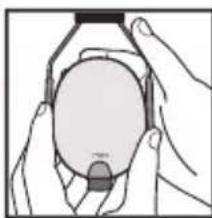
F:7 Insert the helmet attachment in the slot on the helmet and snap it into place (F:8). F:9 Work mode. To switch the unit from ventilation mode to work mode, press the headband wires inwards until you hear a click on both sides. Make sure that the cups and the headband wires do not press on the edge of the helmet when in work mode as this can cause noise leakage. F:10 Ventilation mode. Avoid placing the cups against the helmet (F:11) as this prevents ventilation.
OPERATING INSTRUCTIONS
Switching the headset on and off
Press and hold the On/Off/Mode button (E:8). A voice message will confirm.
Adjust radio volume
Press the + or the – button to adjust the radio volume. There are eight volume levels, where the lowest level is on mute to enable listening to the external input.
Search station
Press the On/Off/Mode button to search a station. A voice message will confirm, "Search station". Press the + or the – button to change station. A voice message will tell you which frequency you are at, followed by a short tone when you exit the search station mode.
Store station
Press and hold the On/Off/Mode button to store station while you are in search station mode. To access your preset stations push the On/Off/Mode button till you hear the voice message, "Stored station". Press + or – to browse preset stations.
Changing radio AM/FM band (only specific models)
Press the On/Off/Mode button to change radio band. A voice message will confirm, "Radio band". Press the + or the - button to change radio band.
Listening via the 3.5 mm external input jack Connect an external device via the 3.5 mm input jack using a 3.5 mm cable (purchase separately). Press the – button to set the radio volume on the lowest level and mute to enable listening to the external device. Adjust the sound level on the external device.
Automatic power off
The unit will automatic power off after four hours of inactivity. This is indicated by a voice message, "Automatic power off" followed by a series of short tones, then the unit will power off. Press any button to avoid automatic power off.
CLEANING AND MAINTENANCE
Use a cloth wetted with soap and warm water to clean the outside of the cups, headband and cushions.
NOTE: Do NOT immerse the hearing protector in water.
If the hearing protector gets wet from rain or sweat, turn the earmuffs outwards, remove the cushions and foam liners, and allow to dry before reassembly. The cushions and foam liners may deteriorate with use and should be examined at regular intervals for cracking and leakage. When used regularly, 3M recommends replacing the foam liners and cushions at least twice a year to maintain consistent attenuation, hygiene, and comfort. If a cushion is damaged, it should be replaced. See Spare Parts Section below. Keep the earmuffs clean and dry and store at normal room temperature in a clean uncontaminated area before and after use.
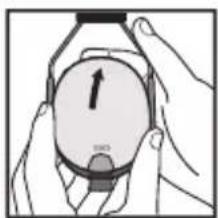
REMOVING AND REPLACING THE CUSHIONS
G:1 To remove the cushion, slide your fingers under the edge of the cushion and firmly pull straight out.
G:2 To replace, insert the foam liner. Make sure that you choose the correct thickness of the foam liner. The thickness of the new foam liner should correspond to the one you are replacing.
G:3 Then, fit one side of the cushion into the groove of the cup and then press on the opposite side until cushion snaps in place.
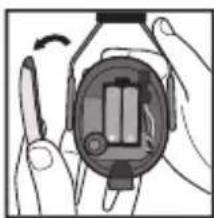
REPLACING THE BATTERIES
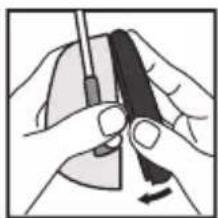
Detach the latch H:1 with your fingers.
H:2 Open the cup.
H:3 Insert or replace the batteries. Make sure the polarity corresponds to the markings.
H:4 Close the cup and lock the latch.
SPARE PARTS AND ACCESSORIES
3M™ PELTOR™ HY220 Hygiene Kit
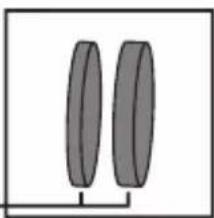
Hygiene kit consisting of two (DK034) thin foam liners, two (DK042) thick foam liners and two snap-in cushions.
3M™ PELTOR™ HY100A Clean – Single-Use Protectors
Single-use protector for the cushions. Package of 100 pairs.
3M™ PELTOR™ FL6CE 3.5 mm cable
3.5 mm cable to connect an external device
3M™ PELTOR™ WorkTunes™ Pro HRXS220A, HRX220P3E FM radio headset
3M™ PELTOR™ WorkTunes™ Pro HRXS221A-NA, HRXS221P3E-NA, HRXS221A, HRXS221P3E AM/FM radio headset
Introduction
- Weight of hearing protection: HRXS220A = 351g, HRXS220P3E = 369g, HRXS221A = 353g, HRXS221P3E = 371g
HRXS220A, HRXS221A, HRXS221A-NA
HRXS20A, HRXS221A. HRXS221A-NA
D:4 Head dimensions: S = small, M = medium, L = large
COMPONENTS
HRXS220A, HRXS221A, HRXS221A-NA
E:1 Headband (stainless steel, PVC, PA)
HRXS220P3E, HRXS221P3E, HRXS2213E-NA,
HRXS220A, HRXS221A. HRXS221A-NA
E:1 Headband (stainless steel, PVC, PA)
E:2 Headband cable (stainless steel)
E:8 On/Off/Mode button (TPE)
E:9 [+] button (TPE)
E:10 [-] button (TPE)
HRXS22OP3E, HRXS221P3E, HRXSS1P3E-NA,
HRXS220A, HRXS221A, HRXS221A-NA
HRXS220A, HRXS221A, HRXSS21A-NA
E:1 Headband (stainless steel, PVC, PA)
E:2 Headband cable (stainless steel)
E:3 Three-point attachment (POM)
E:4 Cushion (PVC foil and PUR foam)
E:5 Foam lining (PUR foam)
E:6 Cup (ABS)
E:7 Lock (PA)
E:8 On/Off/Mode button (TPE)
E:9 [+] button (TPE)
E:10 [-] button (TPE)
HRXS220P3E, HRXS221P3E, HRXS221P3E-NA,
HRXS220A, HRXS221A, HRXS221A-NA
- This hearing protector limits the entertainment audio signal to 82 dB(A) effective to the ear.
HRXS220A, HRXS221A, HRXS221A-NA
E:1 Headband (stainless steel, PVC, PA) E:2 Yoke (stainless steel) E:3 Two-point attachment (POM) E:4 Cushion (PVC film and PUR foam) E:5 Foam lining (PUR foam) E:6 Cup (ABS) E:7 Volume-controlled ambient sound microphone (PUR foam) E:8 Hook (PA) E:9 On/Off button (TPE) E:10 [+] button (TPE) HRXS220P3E, HRXS221P3E, HRXS221P3E-NA, E:11 [-] button (TPE)
ADJUSTMENT INSTRUCTIONS
Headband
HRXS220A, HRXS221A, HRXS221A-NA
HRXS220A, HRXS221A, HRXS221A-NA
HRXS220A, HRXS221A, HRXS221A-NA
HRXS220A, HRXS221A, HRXSS21A-NA
HRXS220A, HRXS221A, HRXS221A-NA
HRXS220A, HRXS221A, HRXS221A-NA
E: 1 Headband (stainless steel, PVC, PA) E: 2 Headband wire (stainless steel) E: 3 Two-point clip (POM) E: 4 Cushion (PVC film and PUR foam) E: 5 Foam insert (PUR foam) E: 6 Cup (ABS) E: 7 Latch (PA) E: 8 On/Off/Mode button (TPE) E: 9 [+] button (TPE) E: 10 [-] button (TPE)
HRXS220P3E, HRXS221P3E, HRXS221P3E-NA
HRXS220A, HRXS221A, HRXS221A-NA
E:1 Headband (stainless steel, PVC, PA)
E:2 Headband wire (stainless steel)
E:3 Two-point clip (POM)
E: 4 Cushion (PVC film and PUR foam)
- The limitation of the input signal is only remained for levels not exceeding 250mV RMS.
HRXS220A, HRXS221A, HRXS221A-NA
HRXS220A, HRXS221A, HRXS221A-NA
Press and hold the On/Off/Mode button (E:8). A voice message will confirm.
Notified body that certified the examination according to directive 89/686/CEE:
PZT GmbH, An der Junkerei 48 F, D-26389 Wilhelmshaven, Germany, Notify body #1974

HRXS220A, HRXS221A, HRXS221A-NA
E:1 Fixing strap (stainless steel, PVC, PA)
E:2 Fixing strap cable (stainless steel)
FIXING INSTRUCTIONS
HRXS2201, HRXS221A, HRXS221A-NA
HRXS220A, HRXS221A, HRXS221A-NA
HRXS220A, HRXS221A, HRXS221-NA
3.5 mm cable to connect an external device
BG
3M™ PELTOR™ WorkTunes™ Pro FM radio earmuffs HRXS220A, HRX220P3E
3M™ PELTOR™ WorkTunes™ Pro AM/FM radio earmuffs HRXS221A-NA, HRXS221P3E-NA, HRXS221A, HRXS221P3E
Introduction
3M™ PELTOR™ WorkTunes™ Pro FM radio earmuffs HRXS220A, HRX220P3E
3M™ PELTOR™ WorkTunes™ Pro AM/FM radio earmuffs HRXS221A-NA, HRXS221P3E-NA, HRXS221A, HRXS221P3E
Introduction
HRXS220A, HRXS221A, HRXS221A-NA
HRXS220A, HRXS221A, HRXS221A-NA
E: 6 Kalpaksha (ABS)
E: 7 Ысырма (РА)
3M United Kingdom PLC
3M Centre, Cain Road
Bracknell, RG12 8HT
0870 60 800 60
3M Ireland
The Iveagh Building, The Park
Carrickmines, Dublin 18
1 800 320 500
3M South Africa
146a Kelvin Drive, Woodmead
Sandton 2128, Johannesburg
+27 11 806 2230
3M Personal Safety Division
3M Center, Building 0235-02-W-70
St. Paul, MN 55144-1000
Technical Assistance: 1-800-243-4630
3M Australia Pty Limited
1 Rivett Road, North Ryde
N.S.W. 2113
+61 (1)800 024 464
3M New Zealand Limited
94 Apollo Drive, Rosedale
AUCKLAND 0632, New Zealand
+64 (0)800 364 357
3M France
Bd de l'Oise
95006 Cergy Pontoise Cedex
+33 1 30 31 61 61
3M (Schweiz) AG
3M Belgium bvba/sprl
Hermeslaan 7
1831 Diegem
+32 2 722 51 11
Compagnie 3M Canada, C.P. 5757
London, Ontario, N6A 4T1
Service technique :
1 - 800 - 267 - 4414
3M Deutschland GmbH
Carl-Schurz-Str. 1
41453 Neuss
+49 2131 14 26 04
3M Österreich GmbH
Kranichberggasse 4
1120 Wien
+43 1 86686 0
3M Italia srl
Via Norberto Bobbio 21
20096 Pioltello (MI)
+39 02 70351
3M España.S.L.
3M Personal Safety Division, 3M
Mexico S.A. de C.V.
Av. Santa Fe No. 190
Col. Santa Fe, Del. Alvaro Obregon
Mexico D.F. 01210
3M Nederland B.V.
Molengraaffsingel 29
2629 JD Delft
+31 (0)15 7822406
3M Svenska AB
Bollstanäsvägen 3
191 89 Sollentuna
+46 8 92 21 00
3M (Denmark) a/s
Hannemanns Allé 53
DK 2300 København S
+45 43480100
3M Norge AS
Avd. Verneprodukter
Postboks 100, 2026 Skjetten
Tlf: 06384
Suomen 3M Oy
PL 600 (Keilaranta 6)
02151 Espoo
p. +358 9 525 21
3M Poland Sp. z o.o.
Aleja Katowicka 117, Kajetany K /
Warszawy
05-830 Nadarzyn
+48 22 739 60 00
3M Hungária Kft.
"BRIDGE' Plaza" 4th floor, 12 Bakikhanov street
Baku AZ 1065
+994 12 404 5050
3M (EAST) AG PODRUŽNICA RH
Avenija Većeslava Holjevca 40
10010 Zagreb
+385 1 2499 750
3M Bulgaria
3M