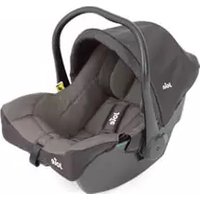
i-Trillo FX - Car seat Joie - Free user manual and instructions
Find the device manual for free i-Trillo FX Joie in PDF.
User questions about i-Trillo FX Joie
0 question about this device. Answer the ones you know or ask your own.
Ask a new question about this device
Download the instructions for your Car seat in PDF format for free! Find your manual i-Trillo FX - Joie and take your electronic device back in hand. On this page are published all the documents necessary for the use of your device. i-Trillo FX by Joie.
USER MANUAL i-Trillo FX Joie
natural_image
Simple icon depicting a person relaxing and sitting next to a child (no text or symbols)ECE R129/03: i-Size
natural_image
Line drawing of a car comfort seat with seat, neck, and seat (no text or symbols)GB
Welcome to Joie™
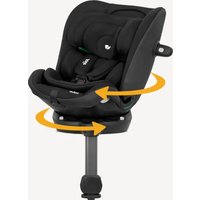
Congratulations on becoming part of the Joie family! We are so excited to be part of your journey with your little one. While traveling with the i-Trillo™ FX series high back booster you are using a high quality, fully certified safety enhanced child restraint. Please carefully read this manual and follow each step to ensure a comfortable ride and best protection for your child.
To use this Joie booster according to ECE R129/03, your child must meet the following requirements.
Child height 100cm-150cm (Reference age 3.5-12 years).
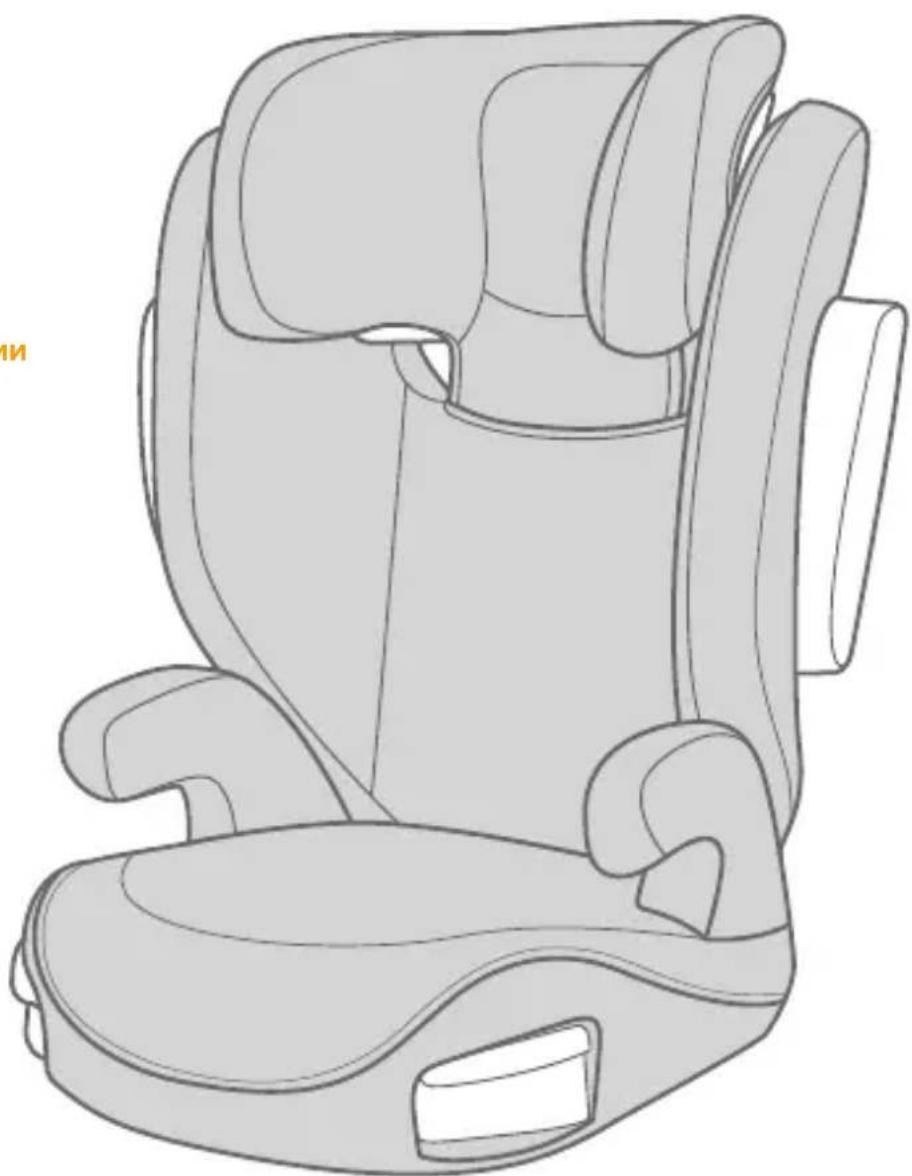
Booster
Please read all the instructions in this manual before installing and using the product.
I IMPORTANT: KEEP FOR FUTURE REFERENCE. PLEASE READ CAREFULLY.
Please keep the instruction manual in the storage compartment at the bottom of the booster as right figure.
For warranty information, please visit our website at joiebaby.com
natural_image
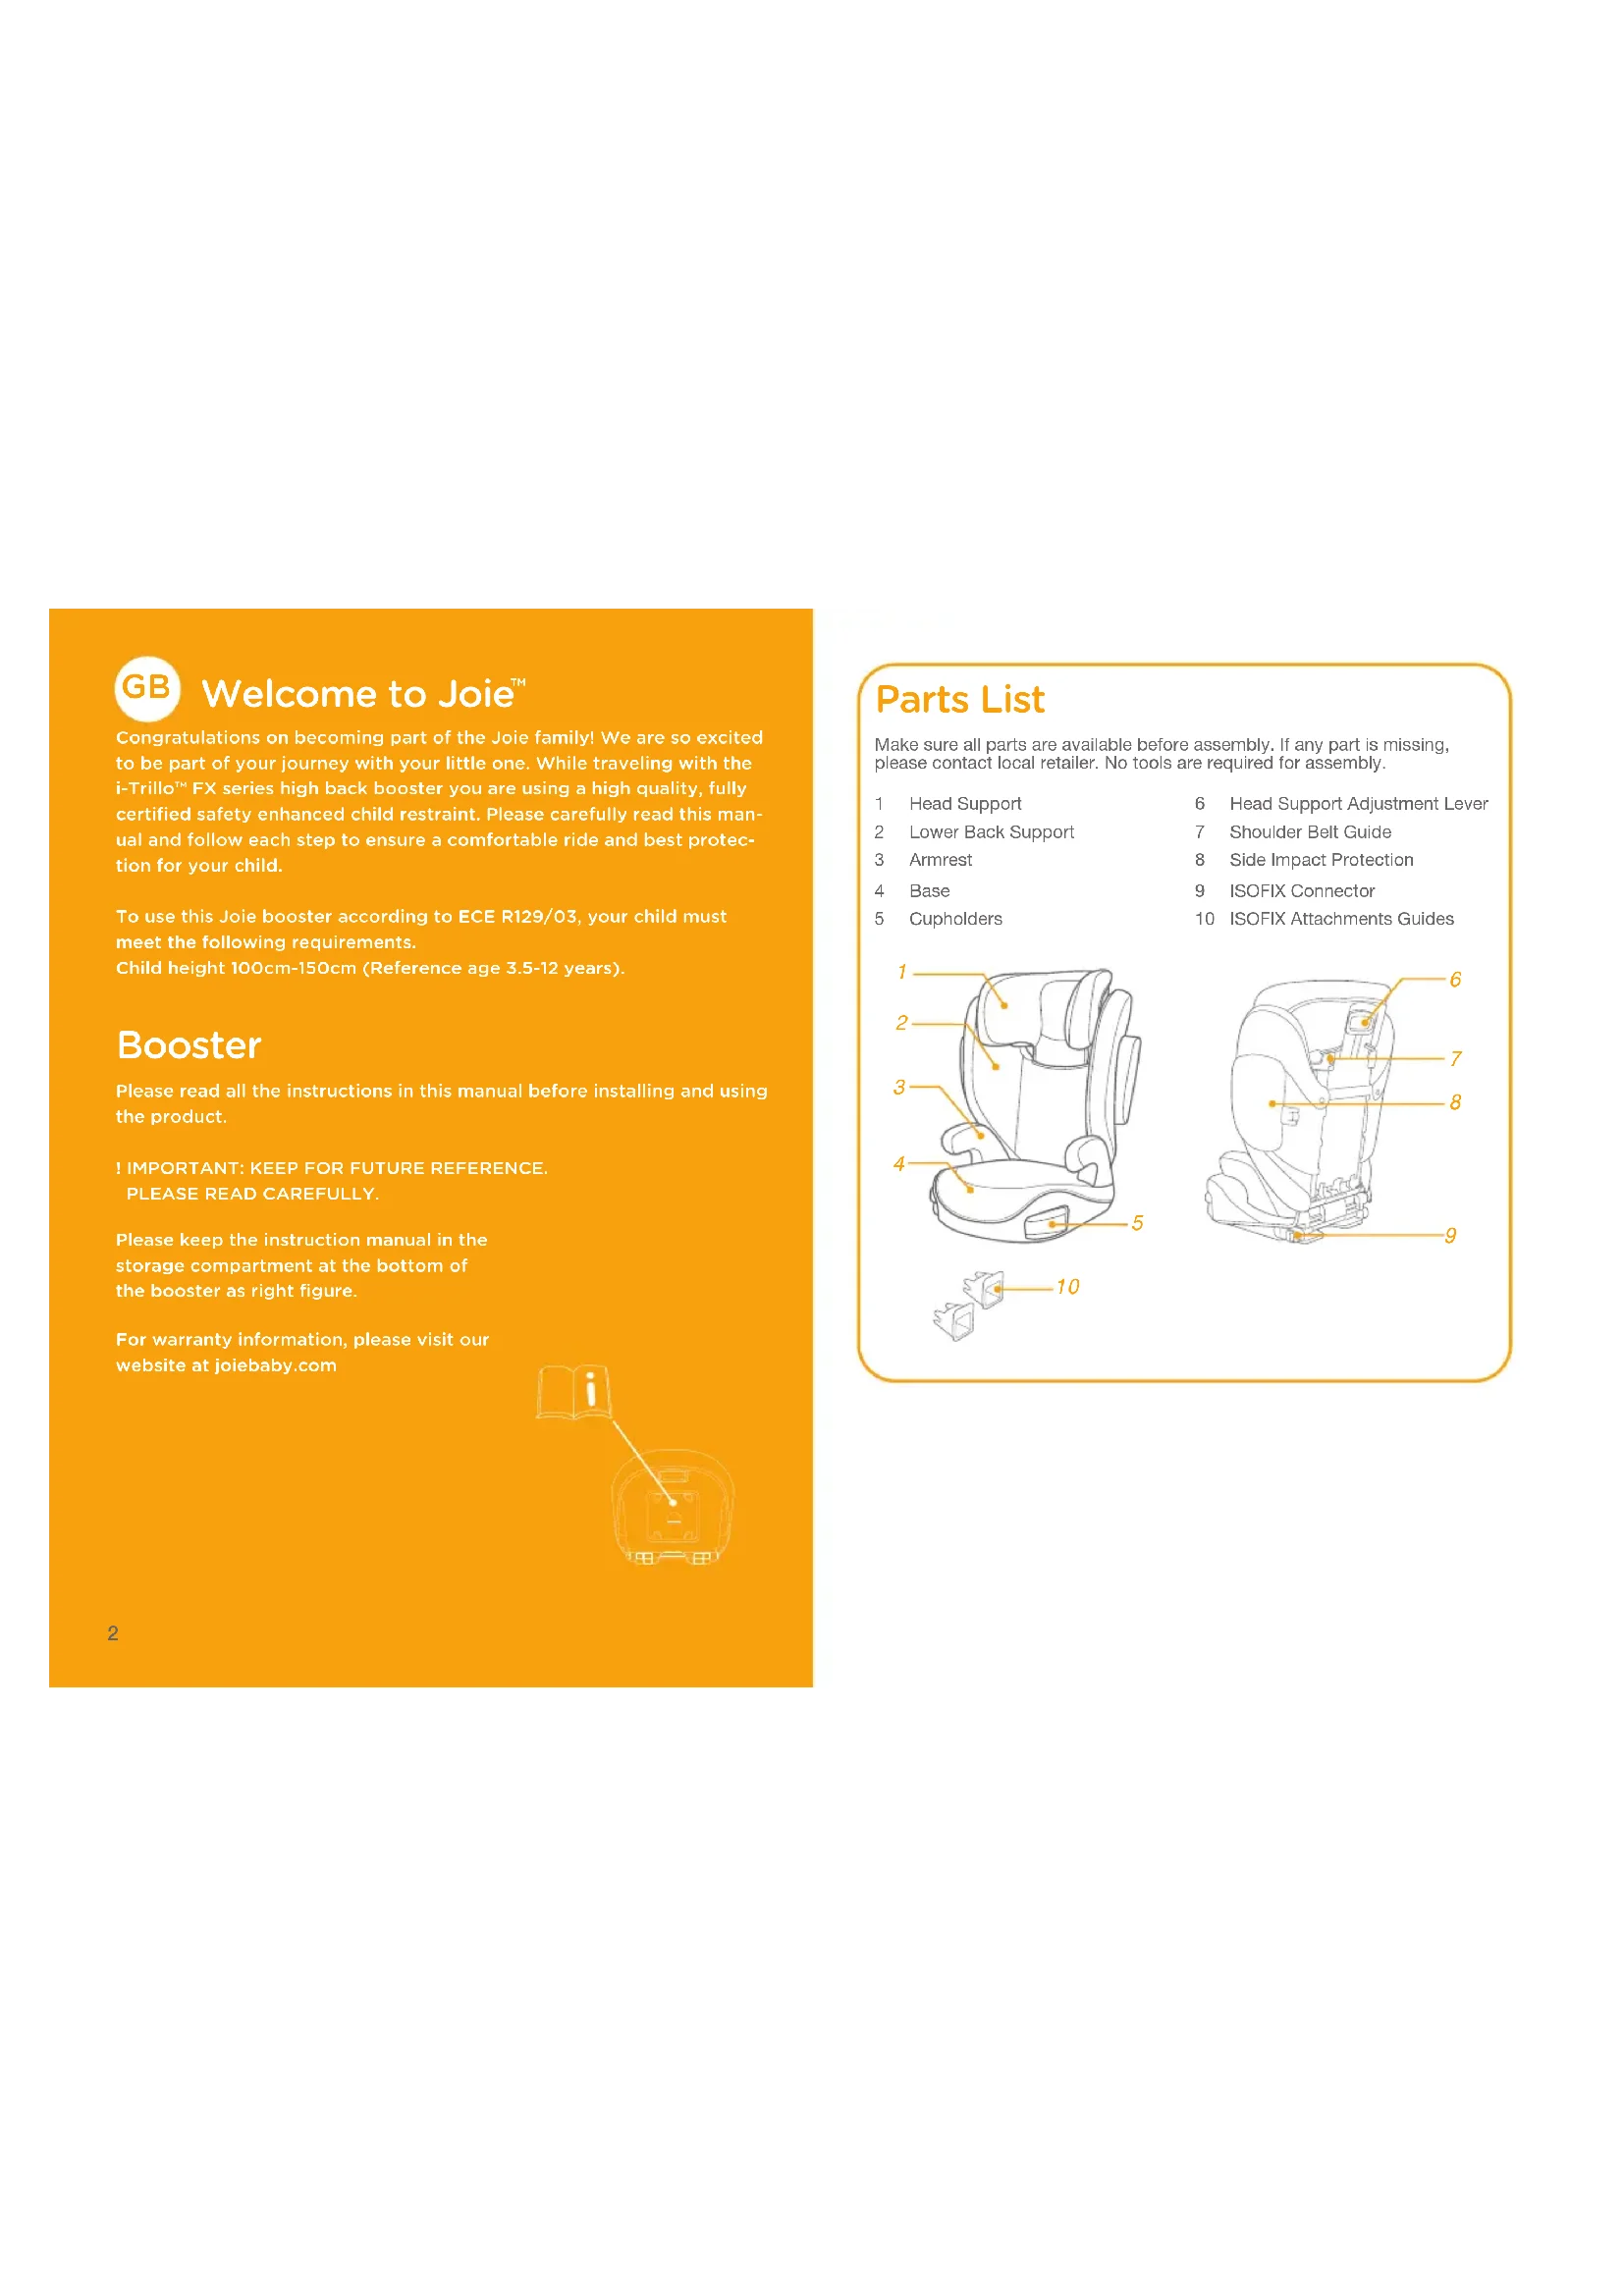
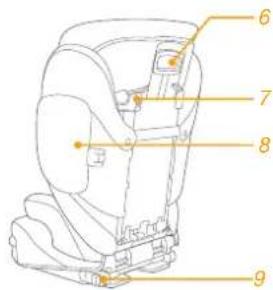
Simple line drawing of an open book with a pointer and a vehicle icon, no text or symbols present.Parts List
Make sure all parts are available before assembly. If any part is missing, please contact local retailer. No tools are required for assembly.
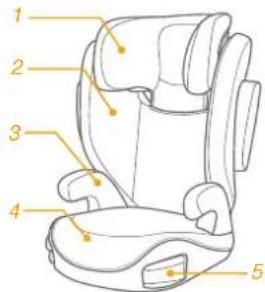
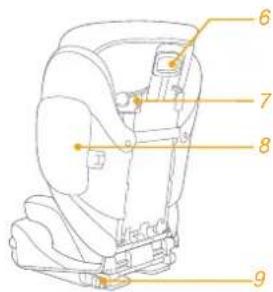
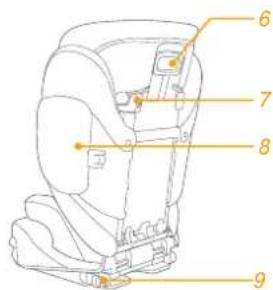
1 Head Support
2 Lower Back Support
3 Armrest
4 Base
5 Cupholders
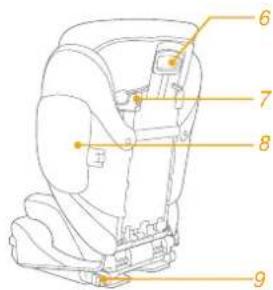
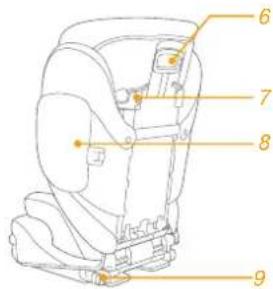
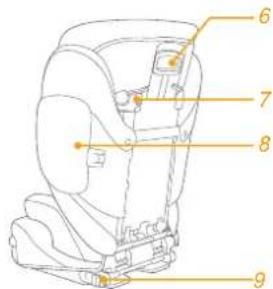
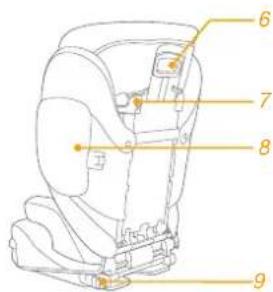
6 Head Support Adjustment Lever
7 Shoulder Belt Guide
8 Side Impact Protection
9 ISOFIX Connector
10 ISOFIX Attachments Guides
text_image
Diagram of a car seat with numbered labels pointing to different seat positions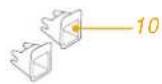
text_image
Technical diagram of a car seat assembly with numbered parts labeled 6, 7, 8, and 9WARNING
! NO booster can guarantee full protection from injury in an accident. However proper use of this booster will reduce the risk of serious injury or death to your child.
! Always take care to follow the installation instructions correctly, this will ensure the booster performs at an optimum safety level.
! Do take care so that the rigid items and plastic parts of an booster shall be so located and installed that they are not liable to become trapped by a move-able seat or in a door of the vehicle.
! To use this booster seat according to the ECE R129/03, your child must meet the following requirements.
Child height 100cm-150cm (reference age: 3.5-12 years). Forward facing only (in vehicle travel direction)
! The enhanced child restraint may not fit in all approved vehicles.
! Any straps holding the booster to the vehicle should be tight, that any straps restraining the child should be adjusted to the child's body, and the straps should not be twisted.
! The booster seat should be replaced if it has been subjected to heavy loads in the event of an accident or if it has been dropped.
WARNING
! This booster seat is only intended to be used in the car.
! Do not make any alterations or additions to the booster seat without approval from the type approval authority. DO NOT remove any of the white EPP/EPS foams. Failure to do so may result in serious safety issues.
! DO NOT use the seat if the surfaces are too hot from sunlight.
! Never leave the child unattended in the booster seat or vehicle, not even for a few minutes.
! Any luggage or other objects liable to cause injuries in the event of a collision shall be properly secured.
! The booster shall not be used without the soft goods.
! The booster soft goods should not be replaced with any other than the one recommended by the manufacturer, because the soft goods constitutes an integral part of the restraint performance.
! Always secure child in booster, even on short trips, as this is when most accidents occur.
! DO NOT leave this booster, or other items unbelted or unsecured in your vehicle. Remove the booster seat from the car if not regular used and store in a dry, sun-protected surrounding.
WARNING
! It's recommended not to use a second-hand booster seat whose history is not known. It may have invisible structural damages or defects due to incorrect usage/storage.
! DO NOT use any load bearing contact points other than those described in the instructions and marked on the booster.
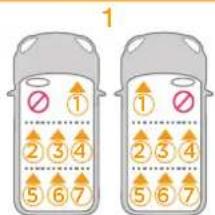
! DO NOT install this booster under the following conditions:
1. Vehicle seats facing sideways or rearward with respect to the vehicle's direction of travel.
2. Vehicle seats movable during installation.
! Consult the retailer for issues concerning maintenance repair and part replacement.
! To avoid burns, never put hot liquids in your booster's cupholders.
Emergency
In case of emergency or accidents, it is most important to have your child taken care of with first aid and medical treatment immediately.
Product Information
- This is an i-Size booster seat Enhanced Child Restraint System. It is approved according to UN Regulation No.129, for use primarily in "i-Size seating positions" as indicated by vehicle manufacturers in the vehicle user's manual.
- If in doubt, consult either the Enhanced Child Restraint System manufacturer or the retailer.
Product Booster seat
Materials Plastics, Metal, Fabrics
Patent No. Patents pending
Suitable for Child height 100cm-150cm (Reference age 3.5-12 years).
Installation Forward facing (in vehicle travel direction)
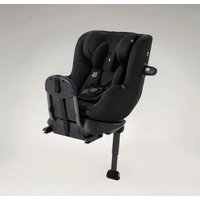
Booster Assembly
see images 1 - 7
- Squeeze the head support adjustment lever first and then slide in lower back support under the fabric cover to connect them together.
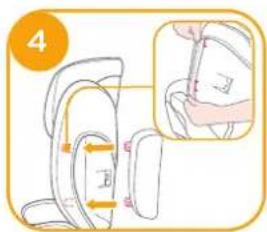
! CHECK to make sure two pieces are securely snapped together by pulling on them. - To attach the lower back support to the base, hook the lower back support over the seat bar hinge on the base.
- Rotate the lower back support up while holding the booster seat until it clicks into an upright position.
natural_image
Illustration of a person wearing a head covering and holding a device, with no visible text or symbols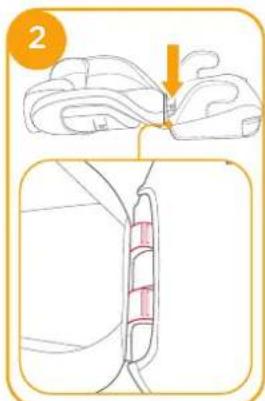
text_image
2
natural_image
Line drawing of a seat with an arrow indicating motion (no text or symbols)- Align the side impact protection with the slot of lower back support plastics mounts, and then insert to lock. ④ ⑤
! Please choose whether to install the side impact protection according to the size of the car. - Remove side impact protection. Please refer to 67

text_image
4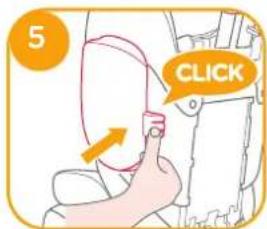
text_image
5 CLICK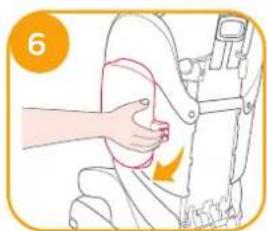
natural_image
Illustration of a hand pressing down on a mechanical component (no text or symbols)
text_image
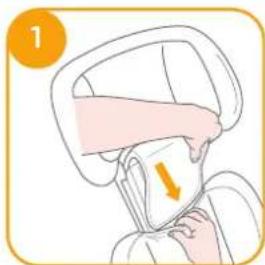
7Height Adjustment - for Head Support
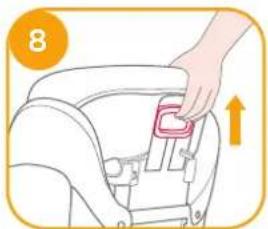
see image 8
Squeeze the head support adjustment lever while pulling up or down on the head support until it snaps into one of the 10 positions.

natural_image
Illustration of a hand placing a pink plastic clip into a seat (no text or symbols)Concerns on Installation
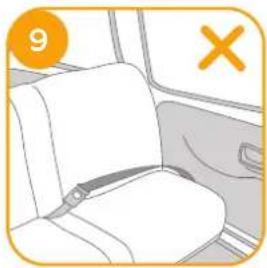
see images 9 - 11

natural_image
Interior view of a vehicle seat with a yellow X symbol (no text or symbols on the seat itself)
natural_image
Interior view of a car seatbelt with a numbered badge (10) and checkmark indicator (no text or symbols on the belt)11

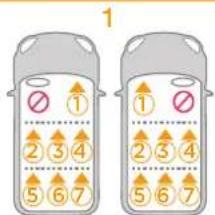
text_image
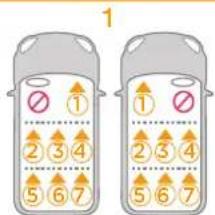
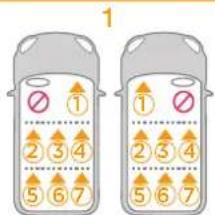
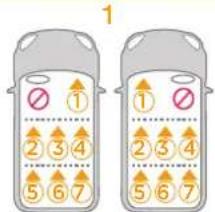
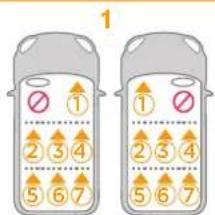
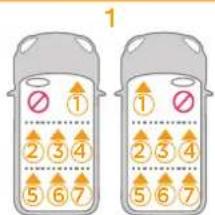
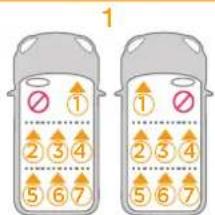
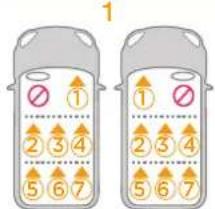
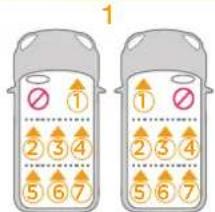
1 2 3 4 5 6 7 1 2 3 4 5 6 7
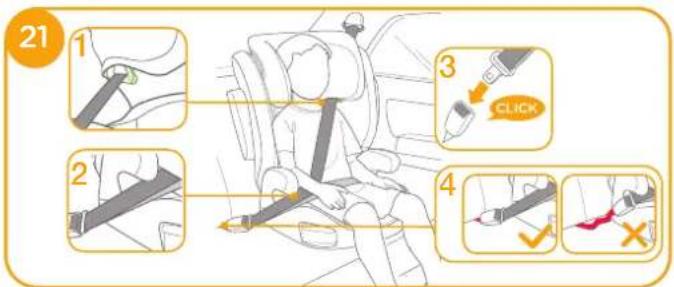
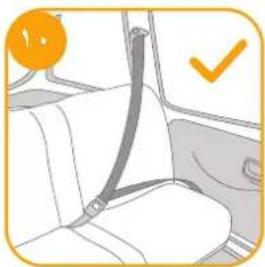
Installation using ISOFIX System and 3-point belt or using 3-point belt only
see images 12 - 25
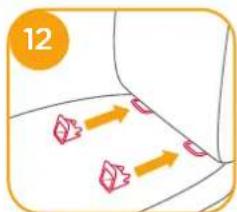
If vehicle is equipped with ISOFIX, the vehicle lower anchor points may be visible at the vehicle seat crease. See your vehicle owner's manual for exact locations, anchor identification, and requirements for use.
- Fit the ISOFIX guides with the ISOFIX anchor points. 12 The ISOFIX guides can protect the surface of the vehicle seat from being torn. They can also guide the ISOFIX connectors.
- Press the ISOFIX adjusting button to pull out the ISOFIX connectors.
Rotate the ISOFIX connectors 180 degrees until they are pointing in the direction of the ISOFIX guides.

text_image
12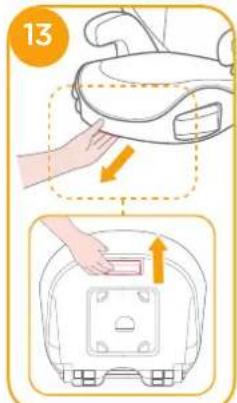
text_image
13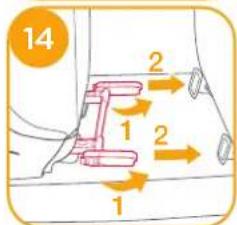
text_image
14 2 1 2 1- Line up the ISOFIX connectors with the ISOFIX anchor points, and then click both ISOFIX connectors into the ISOFIX anchor points.
! Make sure that both ISOFIX connectors are securely attached to their ISOFIX anchor points. The colors of the indicators on the both ISOFIX connectors should be completely green. -1
! Check to make sure the booster is securely installed by pulling on the both ISOFIX connectors.
- Press the ISOFIX adjustment button to retract the seat back to desired position.
1
2
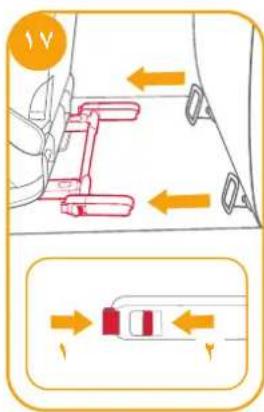
- To remove the booster:
a. Press the secondary lock button -1 first and then the button -2 on the ISOFIX connectors before removing the booster from the vehicle seat.
b. Rotate the ISOFIX connectors by 180 degrees, then press the ISOFIX adjusting button to fold the ISOFIX connectors.
1 2
1 3
3
2
1
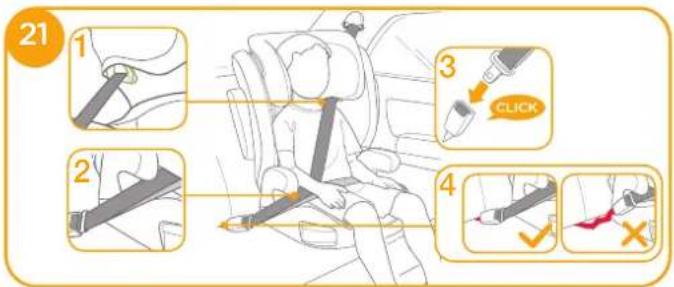
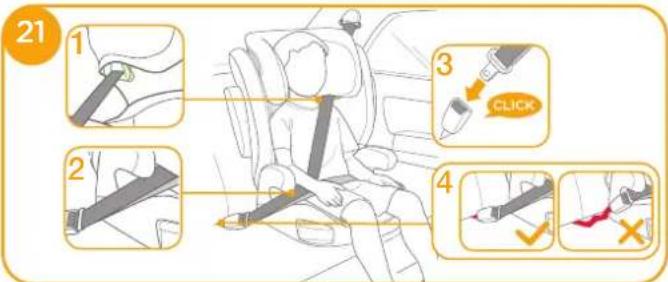
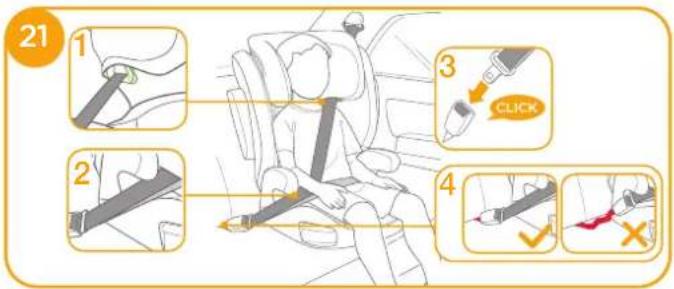
! Pull the vehicle safety belt and pass through the belt path 21, and then buckle it up. 21-3
text_image
21 1 2 3 CLICK 4! Could also be installed by using 3-point belt only. 21 - 25
! Position shoulder belt through the shoulder belt guide shown in 21-1
! DO NOT position vehicle belt over top of the armrests. It must pass underneath the armrests. 21 -2
! The booster can not be used if the vehicle safety belt buckle (female buckle end) is too long to anchor the booster securely.
21 -4
! After your child is placed in this booster, the safety belt must be used correctly, and ensure that any lap strap is worn low down, so that the pelvis is firmly engaged. ^21
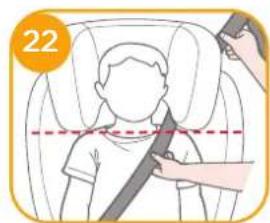
! To ensure the correct head support height is obtained, the bottom of the headrest MUST be even with the top of child's shoulders as shown in ② and the shoulder belt must be positioned in the green zone as shown in ③
! Place a booster firmly against the back of a forward-facing vehicle seat equipped with a lap/shoulder belt.
! Make sure, that the shoulder belt portion of the vehicle belt goes straight through the shoulder belt guide as shown in 24
! Tighten the vehicle belt by pulling the shoulder strap until all belt slack is removed.
! I f the belt lays across child neck, head or face, readjust head support height.
! Any straps holding the booster to the vehicle should be tight and the straps should not be twisted.
text_image
22
natural_image
Illustration of a child wearing a seatbelt being lifted by a hand, with no text or symbols present.
text_image
24
text_image
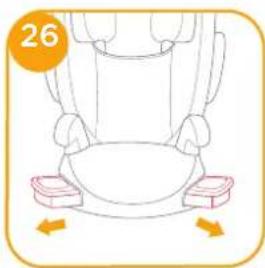
25 ×Use Cupholders
see image 26
natural_image
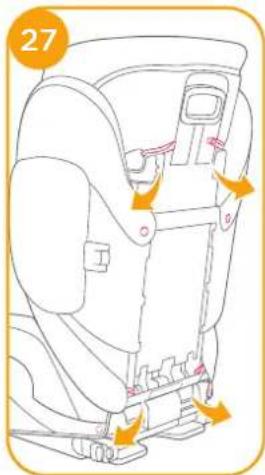
Line drawing of a car seat with arrows indicating movement or rotation (no text or symbols)Detach Soft Goods
see image 27
Open 4 pairs of buttons and 4 pairs of elastics on the back of soft goods to remove it. 27 To refit the seat pad simply reverse the steps above.

text_image
27Care and Maintenance
! Please wash the soft goods and inner padding with cold water under 30°C.
! Do not iron the soft goods.
Do not bleach or dry clean the soft goods.
! Do not use undiluted neutral detergent gasoline or other organic solvent to wash the booster. It may cause damage to the booster.
! Do not twist the soft goods and inner padding to dry with great force. It may leave the soft goods and inner padding with wrinkles.
! Please hang dry the soft goods and inner padding in the shade.
! Please remove the booster from the vehicle seat if not in use for a long period of time. Put the booster in a cool, dry place and somewhere your child cannot access it.

FR
natural_image
Simple line drawing of an open book and a vehicle with a pointer, no text or symbols presentListe des pièces
text_image
Diagram of a car seat with numbered labels pointing to different seat positions
text_image
Technical diagram of a car seat with numbered labels pointing to different seat positionsAVERTISSEMENT
natural_image
Illustration of a person's head and neck with a yellow arrow indicating a specific point (no text or symbols present)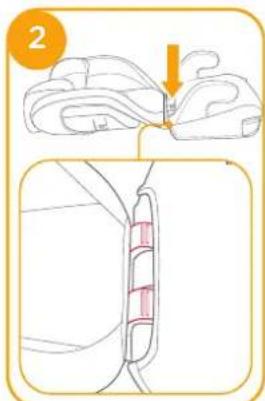
text_image
2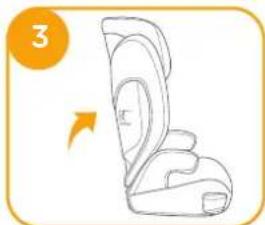
natural_image
Line drawing of a seat with an arrow indicating motion (no text or symbols)natural_image
Illustration of a hand adjusting a seatbelt with a magnified view (no text or symbols)
text_image
7natural_image
Illustration of a hand placing a red rectangular object into a car seat frame (no text or symbols)natural_image
Interior view of a vehicle seat with a yellow X mark and number 9 in the corner (no text or symbols on the seat itself)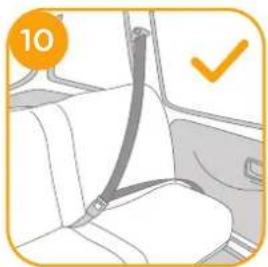
natural_image
Interior view of a car seatbelt with a numbered badge (10) and checkmark indicator (no text or symbols on the suit)11

text_image
1 2 3 4 5 6 7
text_image
15 CLICK 1 ✓ ×natural_image
Line drawing of a car seat with a circular badge showing number 19 and a checkmark (no text or symbols on the diagram itself)
natural_image
Illustration of a car recycling tray with a 'X' symbol and number 20 (no text or symbols on the tray itself)natural_image
Line drawing of a car seat with arrows indicating direction (no text or symbols)natural_image
Simple line drawing of a vehicle with an open book and a pointer, no text or symbols presentTeileliste
text_image
Technical diagram of a car seat with numbered labels pointing to different compartmentsWARNUNG
natural_image
Illustration of a person's head and neck with a yellow arrow indicating a specific point (no text or symbols present)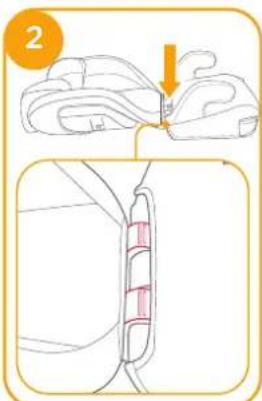
text_image
2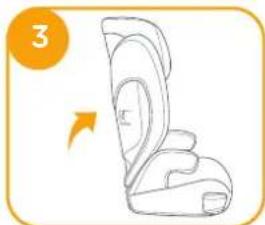
natural_image
Line drawing of a seat with an arrow indicating direction (no text or symbols)natural_image
Illustration of a hand pressing down on a mechanical component (no text or symbols)
text_image
7natural_image
Illustration of a hand placing a pink plastic clip into a car seat (no text or symbols)natural_image
Interior view of a vehicle seat with a close button and 'X' symbol (no text or labels)
natural_image
Interior view of a car seatbelt with a numbered badge (10) and checkmark indicator (no text or symbols on the suit)11

text_image
1 2 3 4 5 6 7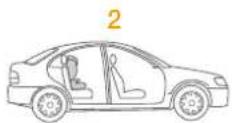
text_image
15 CLICK 1 ✓ ×natural_image
Line drawing of a car seat with a circular badge showing number 19 and a checkmark (no text or symbols on the diagram itself)
natural_image
Simple line drawing of a tray with food items and a 'X' symbol, no text or labels presentnatural_image
Illustration of a child wearing a seatbelt being lifted by a hand, with no text or symbols present.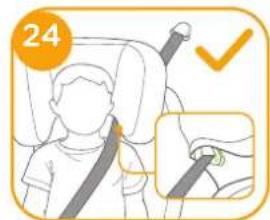
text_image
24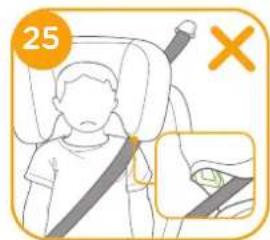
text_image
25 ×natural_image
Line drawing of a car seat with arrows indicating direction (no text or symbols)natural_image
Simple line drawing of an open book with a pointer and a battery icon, no text or symbols present.Onderdelenlijst
text_image
Technical diagram of a car seat with numbered labels pointing to different compartmentsWAARSCHUWING
natural_image
Illustration of a person's head and neck with a yellow arrow indicating a specific point (no text or symbols present)
text_image
2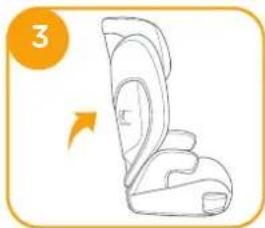
natural_image
Line drawing of a car seat with an arrow indicating direction (no text or symbols)natural_image
Illustration of a hand pressing down on a mechanical component with an arrow indicating motion (no text or symbols)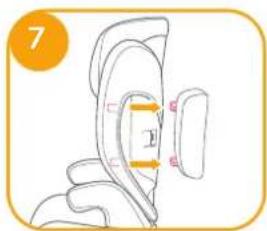
text_image
7 2natural_image
Illustration of a hand placing a red button into a seatbelt, with an orange arrow indicating direction (no text or symbols)Installatiekwesties
natural_image
Interior view of a vehicle seat with a visible seatbelt and window (no text or symbols)
natural_image
Car seatbelt buckle diagram showing seat, seat, and door (no text or symbols)11
text_image
1 2 3 4 5 6 7 1 2 3 4 5 6 7
text_image
15 CLICK 1 ✓ ×natural_image
Line drawing of a car seat with a circular badge showing number 19 and a checkmark (no text or symbols on the diagram itself)
natural_image
Illustration of a car backseat with a cross symbol (no text or labels)natural_image
Illustration of a child wearing a seatbelt being lifted by a hand, with no text or symbols present.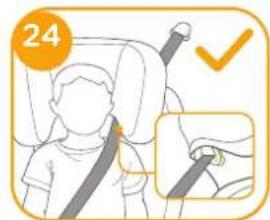
text_image
24
text_image
25 ×natural_image
Line drawing of a car seat with arrows indicating movement or force (no text or symbols)natural_image
Simple line drawing of an open book with a pointer and a small icon below (no text or symbols)Elenco parti
text_image
Technical diagram of a car seat assembly with numbered parts labeled 6, 7, 8, and 9.AVVERTENZA
natural_image
Illustration of a person's head and neck with a yellow arrow indicating a specific point (no text or symbols present)
text_image
2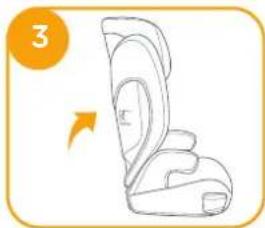
natural_image
Line drawing of a car seat with an arrow indicating motion (no text or symbols)natural_image
Illustration of a hand adjusting a seatbelt with a magnified view (no text or symbols)
text_image
7natural_image
Illustration of a hand placing a red button into a vehicle seat (no text or symbols)natural_image
Interior view of a vehicle seat with a yellow X symbol (no text or symbols on the seat itself)
natural_image
Interior view of a car seatbelt with a belt buckle, no text or symbols visible11

text_image
1 2 3 4 5 6 7 1 2 3 4 5 6 7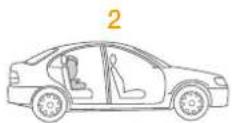
text_image
15 CLICK 1 ✓ ×natural_image
Line drawing of a car seat with a circular badge showing number 19 and a checkmark (no text or symbols on the diagram itself)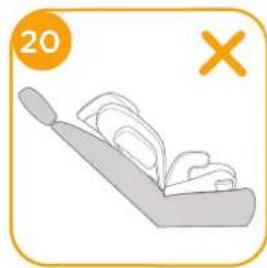
natural_image
Illustration of a chair with open legs and a tray, marked with an orange circle containing the number 20 and a yellow X (no text or symbols on the diagram itself)natural_image
Illustration of a child wearing a seatbelt being lifted by a hand, with no text or symbols present.
text_image
24
text_image
25 ×natural_image
Line drawing of a car seat with arrows indicating direction (no text or symbols)natural_image
Simple line drawing of a vehicle with an open book and a pointer, no text or symbols presentLista de piezas
text_image
Diagram of a car seat with numbered labels pointing to different seat positions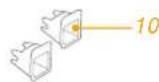
text_image
Technical diagram of a car seat with numbered labels pointing to different compartmentsADVERTENCIA
natural_image
Illustration of a person's head and neck with a yellow arrow indicating a specific point (no text or symbols present)
text_image
2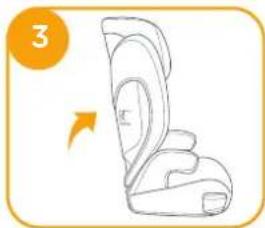
natural_image
Line drawing of a car seat with an arrow indicating motion (no text or symbols)natural_image
Illustration of a hand pressing down on a person's head with a magnified inset showing the motion (no text or symbols)
text_image
7 2natural_image
Illustration of a hand adjusting a seatbelt mechanism (no text or symbols)natural_image
Interior view of a vehicle seat with a yellow X mark and number 9 in the corner (no text or symbols on the seat itself)
natural_image
Interior view of a car seatbelt with a black buckle, no text or symbols visible11

text_image
1 2 3 4 5 6 7 1 2 3 4 5 6 7
text_image
15 CLICK 1 ✓ ×natural_image
Line drawing of a car seat with a circular badge showing number 19 and a checkmark (no text or symbols on the diagram itself)
natural_image
Illustration of a car seatbelt with a cross mark and number 20 (no text or symbols on the diagram itself)natural_image
Illustration of a child wearing a seatbelt being lifted by a hand, with no text or symbols present.
text_image
24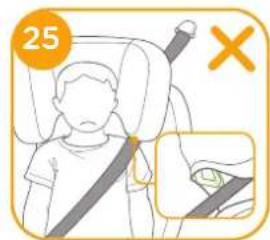
text_image
25 ×Uso del sujetavasos
natural_image
Line drawing of a car seat with arrows indicating movement or force (no text or symbols)natural_image
Simple line drawing of an open book with a pointer and a battery icon, no text or symbols present.Lista de componentes
text_image
Diagram of a car seat with numbered labels pointing to different seat positions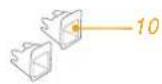
text_image
Technical diagram of a car seat with numbered labels pointing to different seat positionsAVISO
natural_image
Illustration of a person's head and neck with a highlighted orange arrow indicating a specific point (no text or symbols present)
text_image
2
natural_image
Line drawing of a car seat with an arrow indicating direction (no text or symbols)natural_image
Illustration of a hand adjusting a seatbelt with an arrow indicating rotation (no text or symbols)
text_image
7natural_image
Illustration of a hand placing a red button on a car seat frame (no text or symbols)natural_image
Interior view of a vehicle seat with a yellow X symbol (no text or symbols on the seat itself)
natural_image
Interior view of a car seatbelt with a black strap and checkmark indicator (no text or symbols on the belt)11

text_image
1 2 3 4 5 6 7 1 2 3 4 5 6 7
text_image
15 CLICK 1 ✓ ×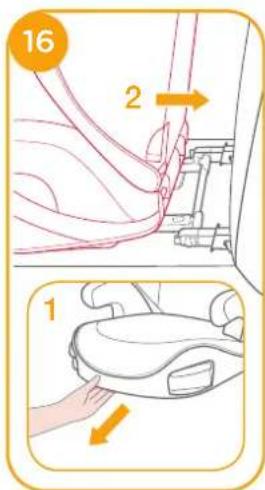
text_image
16 2 1- Para remover a cadeira auto:
natural_image
Line drawing of a car seat with a circular badge showing the number 19 and a checkmark (no text or symbols on the diagram itself)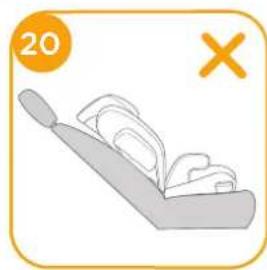
natural_image
Simple line drawing of a chair with plates and a handle, no text or symbols presentnatural_image
Illustration of a child wearing a seatbelt being lifted by a hand, with a numbered label '23' in the top-left corner (no text or symbols on the diagram itself)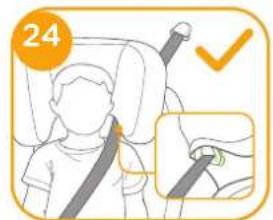
text_image
24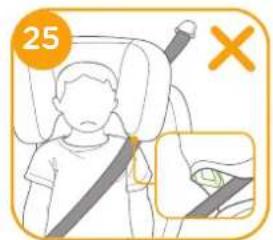
text_image
25 Xnatural_image
Line drawing of a car seat with arrows indicating movement or force (no text or symbols)natural_image
Simple line drawing of an open book and a train car with a pointer, no text or symbols present.Wykaz części
text_image
Diagram of a car seat with numbered labels pointing to different seat positionsOSTRZEŻENIE
natural_image
Illustration of a person's head and neck with a yellow arrow indicating a specific point (no text or symbols present)
text_image
2
natural_image
Line drawing of a car seat with an arrow indicating motion (no text or symbols)natural_image
Illustration of a hand pressing down on a mechanical device with an arrow indicating motion (no text or symbols)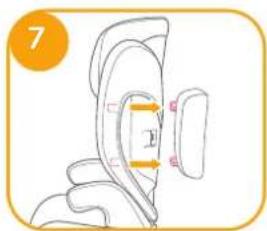
text_image
7natural_image
Illustration of a hand placing a red button into a seatbelt device (no text or symbols)natural_image
Interior view of a vehicle seat with a door and orange X symbol (no text or symbols on the seat itself)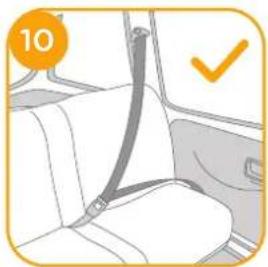
natural_image
Interior view of a car seatbelt with a numbered badge (10) and checkmark indicator (no text or symbols on the suit)11

text_image
1 2 3 4 5 6 7 1 2 3 4 5 6 7
text_image
15 CLICK 1 ✓ ×natural_image
Line drawing of a car seat with a circular badge showing number 19 and a checkmark (no text or symbols on the diagram itself)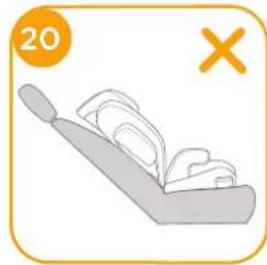
natural_image
Illustration of a tray with food items and a 'X' symbol, no text or labels presentnatural_image
Illustration of a child wearing a seatbelt inside a car seat, with a hand adjusting the seatbelt (no text or symbols present)
text_image
24
text_image
25 ×natural_image
Line drawing of a car seat with arrows indicating direction (no text or symbols)natural_image
Simple line drawing of an open book with a pointer and a battery icon, no text or symbols present.Seznam dílů
text_image
Technical diagram of a car seat with numbered labels pointing to different compartmentsVAROVÁNÍ
natural_image
Illustration of a person's head and neck with a yellow arrow indicating pressure or movement (no text or symbols)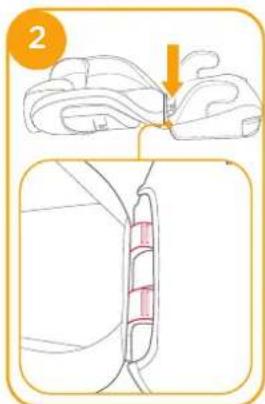
text_image
2
natural_image
Line drawing of a car seat with an arrow indicating motion (no text or symbols)natural_image
Illustration of a hand adjusting a baby's seatbelt, showing the number 6 (no text or symbols on the diagram itself)
text_image
7natural_image
Illustration of a hand adjusting a car seatbelt with an orange arrow indicating upward motion (no text or symbols)natural_image
Interior view of a vehicle seat with a door and window, no visible text or symbols
natural_image
Interior view of a car seatbelt with a black strap and checkmark indicator (no text or symbols on the belt)11
text_image
1 2 3 4 5 6 7 1 2 3 4 5 6 7
text_image
15 CLICK 1 ✓ ×natural_image
Line drawing of a car seat with a circular badge showing number 19 and a checkmark (no text or symbols on the diagram itself)
natural_image
Illustration of a car with open rear seats and a 'X' symbol (no text or labels)natural_image
Illustration of a child wearing a seatbelt being lifted by a hand, with no text or symbols present.
text_image
24
text_image
25 ×natural_image
Line drawing of a car seat with arrows indicating movement or force (no text or symbols)natural_image
Simple line drawing of an open book with a pointer and a vehicle icon, no text or symbols present.text_image
Technical diagram of a car seat with numbered labels pointing to different seat positionsVÝSTRAHA
natural_image
Illustration of a person's head and neck with a yellow arrow indicating a specific point (no text or symbols present)
text_image
2
natural_image
Line drawing of a car seat with an arrow indicating direction (no text or symbols)natural_image
Illustration of a hand adjusting a seatbelt with a highlighted orange arrow (no text or symbols)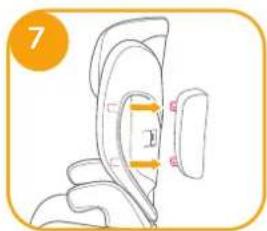
text_image
7natural_image
Illustration of a hand adjusting a seatbelt device (no text or symbols visible)natural_image
Interior view of a vehicle seat with a door and window, no visible text or symbols
natural_image
Interior view of a car seatbelt with a black buckle, no text or symbols visible11
text_image
1 2 3 4 5 6 7 1 2 3 4 5 6 7
text_image
15 CLICK 1 ✓ ×- Vybratie autosedačky:
natural_image
Line drawing of a car seat with a circular badge showing number 19 and a checkmark (no text or symbols on the diagram itself)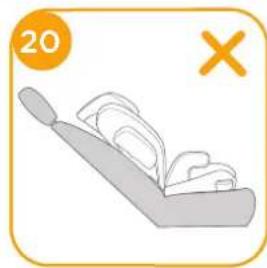
natural_image
Illustration of a chair with open booklets and a 'X' symbol (no text or labels)! Vytiahnite bezpečnostný pás vozidla a prevedte ho cez dráhu pásu 21, potom ho zapnite. 21 -3
text_image
21 1 2 3 CLICK 4natural_image
Illustration of a child wearing a car seatbelt being lifted by a hand (no text or symbols)
text_image
24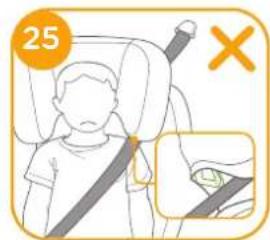
text_image
25 ×natural_image
Line drawing of a car seat with arrows indicating movement or force (no text or symbols)natural_image
Simple line drawing of an open book with a pointer and a battery icon, no text or symbols present.Seznam delov
text_image
Diagram of a car seat with numbered labels pointing to different compartments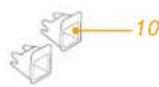

text_image
Technical diagram of a car seat with numbered labels pointing to different compartmentsOPOZORILO
natural_image
Illustration of a person's head and neck with a yellow arrow indicating a specific point (no text or symbols present)
text_image
2
natural_image
Line drawing of a car seat with an arrow indicating motion (no text or symbols)natural_image
Illustration of a hand pressing down on a mechanical component (no text or symbols)
text_image
7Nastavitev višine - za oporo za glavo
Glejte sliko 8
Stisnite ročico za nastavitev opore za glavo, obenem pa dvignite oporo za glavo ali jo potisnite navzdol, dokler se ne zaskoči v enem izmed 10 položajev. ^8
natural_image
Illustration of a hand placing a red button into a car seat frame (no text or symbols)natural_image
Interior view of a vehicle seat with a visible seatbelt and window (no text or symbols)
natural_image
Interior view of a car seatbelt with a numbered badge (10) and checkmark indicator (no text or symbols on the suit)11

text_image
1 2 3 4 5 6 7
text_image
15 CLICK 1 ✓ ×natural_image
Line drawing of a car seat with a circular badge showing number 19 and a checkmark (no text or symbols on the car itself)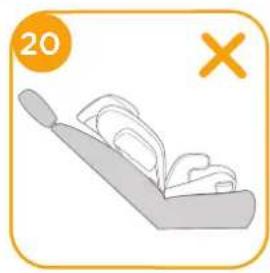
natural_image
Simple line drawing of a chair with a tray and handle, no text or symbols present! Varnostni pas vozila povlecite in ga speljite skozi vodilo za pas 21, nato ga zapnite. 21-3
text_image
21 1 2 3 CLICK 4natural_image
Illustration of a child wearing a car seatbelt, with a hand adjusting the seatbelt (no text or symbols present)
text_image
24
text_image
25 ×natural_image
Line drawing of a car seat with arrows indicating left and right sides (no text or symbols)natural_image
Simple line drawing of a train with an open book and a pointer, no text or symbols presenttext_image
Diagram of a car seat with numbered labels pointing to different seat compartments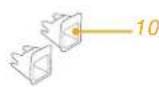
text_image
Technical diagram of a car seat with numbered labels pointing to different seat positionsПРЕДУПРЕЖДЕНИЯ
natural_image
Illustration of a person's head and neck with a yellow arrow indicating a specific point (no text or symbols present)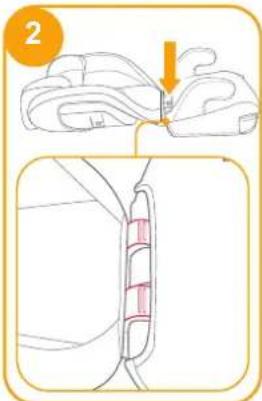
text_image
2
natural_image
Line drawing of a seat with an arrow indicating rotation (no text or symbols)natural_image
Illustration of a hand pressing down on a person's head and shoulders, with an arrow indicating pressure or motion (no text or symbols present)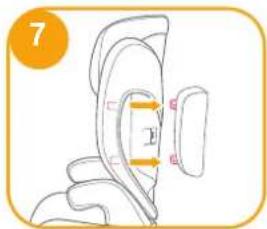
text_image
7 2natural_image
Illustration of a hand adjusting a seatbelt device (no text or symbols visible)natural_image
Interior view of a vehicle seat with a yellow X mark and number 9 in the corner (no text or symbols on the seat itself)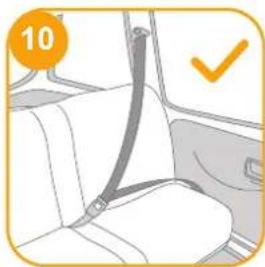
natural_image
Interior view of a car seatbelt with a checkmark indicating selection (no text or symbols on the belt)11
text_image
1 2 3 4 5 6 7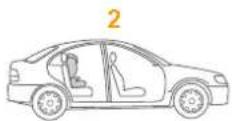
text_image
15 CLICK 1 ✓ ×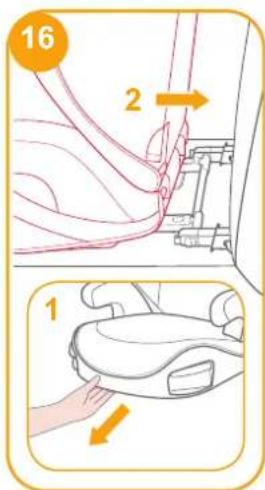
text_image
16 2 1natural_image
Line drawing of a car seat with a circular badge showing number 19 and a checkmark (no text or symbols on the diagram itself)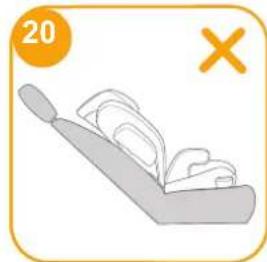
natural_image
Simple line drawing of a tray with food items and a 'X' symbol (no text or labels)natural_image
Line drawing of a car seat with arrows indicating movement or force (no text or symbols)natural_image
Line drawing of a car seat assembly with arrows indicating movement or adjustment (no text or symbols)Уход за изделием
natural_image
Simple line drawing of an open book with a pointer and a small icon below, on an orange background (no text or symbols)Liste over dele
text_image
Diagram of a car seat with numbered labels pointing to different seat positions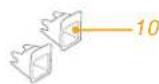
text_image
Technical diagram of a car seat with numbered labels pointing to different compartmentsADVARSEL
natural_image
Illustration of a person's head and neck with a highlighted finger pointing to the shoulder area (no text or symbols)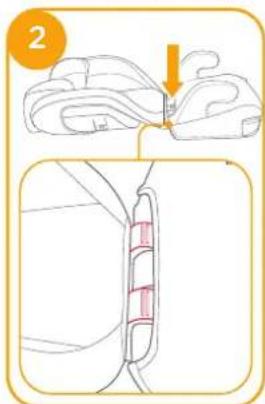
text_image
2
natural_image
Line drawing of a car seat with an arrow indicating motion (no text or symbols)natural_image
Illustration of a hand adjusting a baby's seatbelt, showing the seatbelt being held (no text or symbols present)
text_image
7natural_image
Illustration of a hand adjusting a seatbelt device (no text or symbols visible)Forholdsregler under opstilling
natural_image
Interior view of a vehicle seat with a door and window, no visible text or symbols
natural_image
Interior view of a car seatbelt with a checkmark indicating selection (no text or symbols on the belt)11
text_image
1 2 3 4 5 6 7
text_image
15 CLICK 1 ✓ ×natural_image
Line drawing of a car seat with a circular badge showing number 19 and a checkmark (no text or symbols on the diagram itself)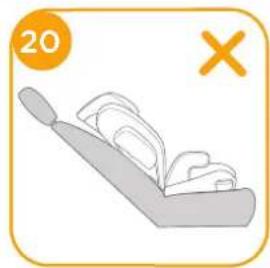
natural_image
Illustration of a car seatbelt with a 'X' symbol and number 20 in the corner (no text or symbols on the diagram itself)natural_image
Line drawing of a car seat with arrows indicating direction (no text or symbols)natural_image
Simple line drawing of an open book and a train car on orange background (no text or symbols)Alkatrészek listája
text_image
Diagram of a car seat with numbered labels pointing to different seat positionsFIGYELEM
natural_image
Illustration of a person's head and neck with a yellow arrow indicating pressure or movement (no text or symbols)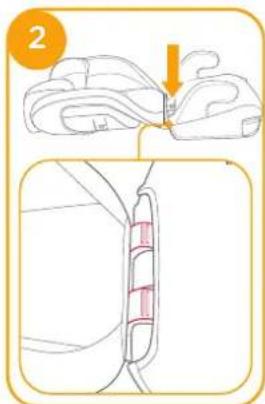
text_image
2
natural_image
Line drawing of a car seat with an arrow indicating direction (no text or symbols)natural_image
Illustration of a hand adjusting a hair accessory with an arrow indicating motion (no text or symbols)
text_image
7natural_image
Illustration of a hand adjusting a car seatbelt with an orange arrow indicating upward motion (no text or symbols)Szerelési útmutatók
natural_image
Interior view of a vehicle seat with a yellow X mark and number 9 in the corner (no text or symbols on the seat itself)
natural_image
Interior view of a car seatbelt with a checkmark indicating selection (no text or symbols on the belt)11
text_image
1 2 3 4 5 6 7
text_image
15 CLICK 1 ✓ ×natural_image
Line drawing of a car seat with a circular badge showing number 19 and a checkmark (no text or symbols on the diagram itself)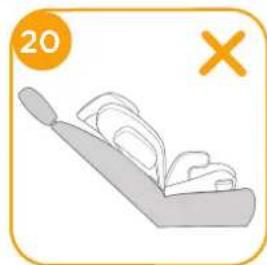
natural_image
Illustration of a hand holding a tray with food items, marked with an orange circle containing the number 20 and a yellow X (no text or symbols on the tray itself)natural_image
Illustration of a child wearing a seatbelt inside a car seat, with a hand adjusting the seatbelt (no text or symbols present)
text_image
24
text_image
25 ×natural_image
Line drawing of a car seat with arrows indicating clockwise motion (no text or symbols)natural_image
Simple line drawing of an open book with a pointer and a vehicle icon, no text or symbols present.Lista componentelor
text_image
Diagram of a car seat with numbered labels pointing to different seat positions
text_image
Technical diagram of a car seat with numbered labels pointing to different seat positionsAVERTISMENT
Materiale Plastic, metal, textile
natural_image
Illustration of a person's head and neck with a yellow arrow indicating pressure or movement (no text or symbols)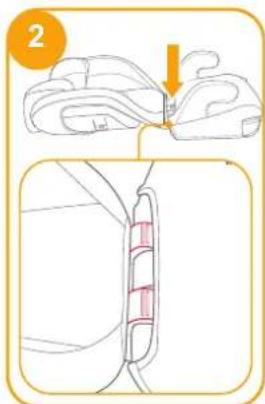
text_image
2
natural_image
Line drawing of a car seat with an arrow indicating motion (no text or symbols)natural_image
Illustration of a hand pressing down on a mechanical component (no text or symbols)
text_image
7natural_image
Illustration of a hand placing a red button into a car seat frame (no text or symbols)natural_image
Interior view of a vehicle seat with a visible seatbelt and window, marked with an orange 'X' symbol (no text or symbols on the seat or background)
natural_image
Interior view of a car seatbelt with a numbered badge (10) and checkmark (✓), no text or symbols on the belt itself.11
text_image
1 2 3 4 5 6 7
text_image
15 CLICK 1 ✓ ×natural_image
Line drawing of a car seat with a circular badge showing the number 19 and a checkmark (no text or symbols on the diagram itself)
natural_image
Illustration of a tray with food items and a 'X' symbol (no text or labels)natural_image
Illustration of a child wearing a seatbelt being lifted by a hand, with no text or symbols present.
text_image
24
text_image
25 ×natural_image
Line drawing of a car seat with arrows indicating direction (no text or symbols)natural_image
Simple line drawing of an open book with a pointer and a small figure, on an orange background (no text or symbols)text_image
Diagram of a car seat with numbered labels pointing to different seat positions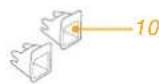
text_image
Technical diagram of a car seat with numbered labels pointing to different seat positionsΠΡΟΕΙΔΟΠΟΙΗΣΗ
natural_image
Illustration of a person's head and neck with a yellow arrow indicating pressure or movement (no text or symbols)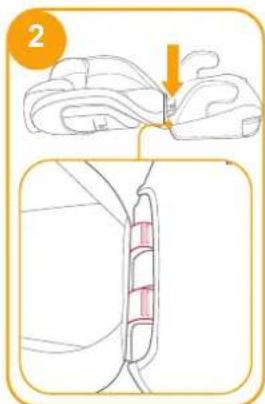
text_image
2
natural_image
Line drawing of a car seat with an arrow indicating motion (no text or symbols)natural_image
Illustration of a hand adjusting a baby's seatbelt, showing the number 6 (no text or symbols on the diagram itself)
text_image
7natural_image
Illustration of a hand adjusting a seatbelt with an arrow indicating upward motion (no text or symbols)natural_image
Interior view of a vehicle seat with a door and window, no visible text or symbols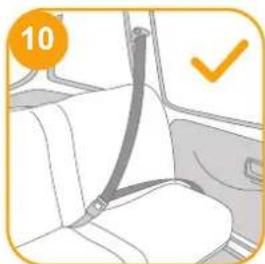
natural_image
Interior view of a car seatbelt with a belt buckle, no text or symbols visible11
text_image
1 2 3 4 5 6 7 ① ① ② 3 4 5 6 7
text_image
15 CLICK 1 ✓ ×
text_image
16 2 1natural_image
Line drawing of a car seat with a circular badge showing the number 19 and a checkmark (no text or symbols on the diagram itself)
natural_image
Illustration of a hand holding a tray with food items, marked with an orange circle and an 'X' symbol (no text or labels)natural_image
Illustration of a child wearing a seatbelt being lifted by a hand, with no text or symbols present.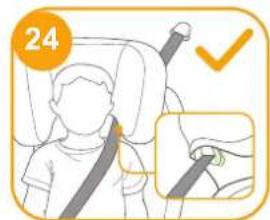
text_image
24
text_image
25 ×natural_image
Line drawing of a car seat with arrows indicating direction (no text or symbols)natural_image
Simple line drawing of an open book with a pointer and a vehicle icon, no text or symbols present.Parça Listesi
text_image
Technical diagram of a car seat with numbered labels pointing to different compartmentsUYARI
natural_image
Illustration of a person's head and neck with a yellow arrow indicating a specific point (no text or symbols present)
text_image
2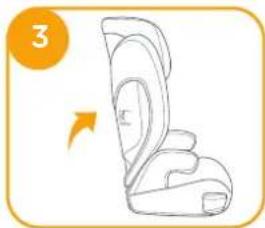
natural_image
Line drawing of a car seat with an arrow indicating motion (no text or symbols)natural_image
Illustration of a hand pressing down on a baby's seat (no text or symbols)
text_image
7natural_image
Illustration of a hand placing a pink plastic clip into a car seat (no text or symbols)natural_image
Interior view of a vehicle seat with a door and seatbelt, no visible text or symbols
natural_image
Interior view of a car seatbelt with a belt buckle, showing no text or symbols11
text_image
1 2 3 4 5 6 7
text_image
15 CLICK 1 ✓ ×natural_image
Line drawing of a car seat with a circular badge showing number 19 and a checkmark (no text or symbols on the diagram itself)
natural_image
Illustration of a car backseat with a 'X' symbol and number 20 (no text or labels)natural_image
Illustration of a child wearing a seatbelt inside a car seat, with a hand adjusting the seatbelt (no text or symbols present)
text_image
24
text_image
25 ×Bardaklık Kullanımı
bkz. şekil 26

natural_image
Line drawing of a car seat with arrows indicating movement or positioning (no text or symbols)text_image
Diagram of a car seat with labeled parts in Chinese, showing front and rear views with numbered annotations.
Joié™ مرحابك في علم
AR
natural_image
Simple line drawing of an open book with a pointer and a small icon, no text or symbols present.تحذير
text_image
Diagram illustrating a hand holding a small object with labeled dimensions, showing a mechanical or anatomical setup.natural_image
Illustration of a hand pressing down on a mechanical component with an orange circular icon (no text or symbols)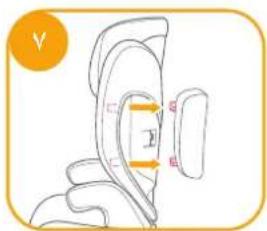
text_image
Diagram showing anatomical or mechanical alignment with labeled measurements and a checkmark in the top-left corner.natural_image
Illustration of a person wearing a head covering and holding a medical device, with a yellow arrow indicating pressure or force (no text or symbols)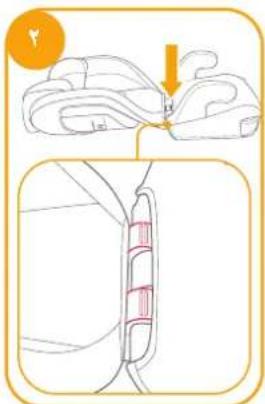
text_image
Medical illustration showing a surgical procedure on a limb with an arrow indicating direction of movement or insertion.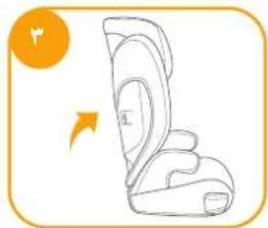
natural_image
Line drawing of a car seat with an arrow indicating direction (no text or symbols)natural_image
Diagram showing two pink flame-like shapes moving in a curved path with an orange circular icon above (no text or symbols)۲۰ - ۳ راجع الصور
text_image
Diagram illustrating a robotic vacuum cleaner's step: adding pressure to a seatbelt, then adjusting the air gap.text_image
Diagram illustrating fabric movement with arrows and labels, showing fabric changes and movement directionnatural_image
Illustration of a hand adjusting a car seatbelt with an orange arrow indicating upward motion (no text or symbols)نبيهات بشأن التركيب
١١ - ٢ راجع الصور
natural_image
Illustration of a car seatbelt with a yellow checkmark indicating selection (no text or symbols)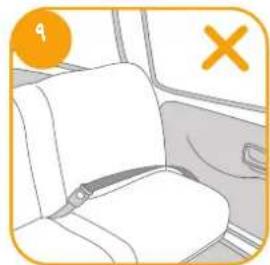
natural_image
Interior view of a vehicle seat with seatbelt and door, no visible text or symbols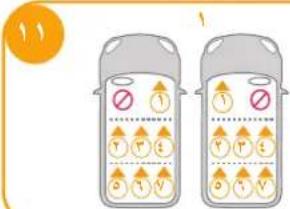
text_image
Illustration showing two car windows with warning symbols and icons, one with a crossed-out 'No' symbol and the other with an open circle.
text_image
Diagram showing vehicle door and rear view with directional arrows and a magnified view of the rear wall.text_image
10 CLICK ✓ ×text_image
Diagram illustrating car seatbelting technique with directional arrows and motion indicators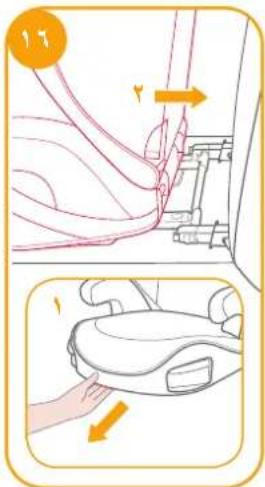
text_image
Diagram illustrating a car seat assembly process with directional arrows indicating movement or force, accompanied by a close-up of the seat.
natural_image
Simple line drawing of a tray with food items and an orange circle containing a cross symbol (no text or labels)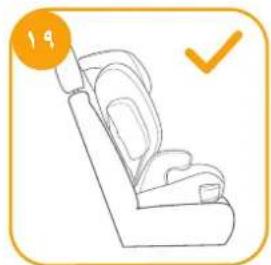
natural_image
Line drawing of a car seat with a circular badge showing number 19 and a checkmark (no text or symbols on the diagram itself)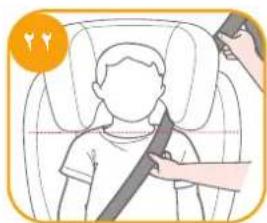
natural_image
Illustration of a child wearing a seatbelt being lifted by a hand (no text or symbols)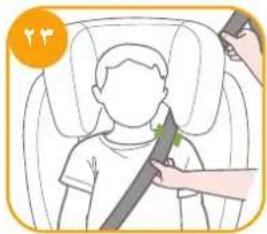
natural_image
Illustration of a child wearing a car seat with a hand adjusting the seatbelt (no text or symbols present)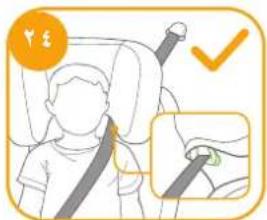
text_image
Illustration showing a child's seatbelt with a checkmark indicating correct and incorrect conditions.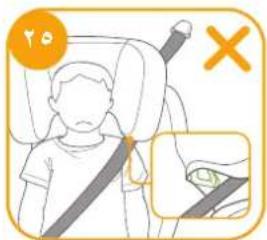
text_image
Diagram showing a person wearing a seatbelt with a close-up of the seatbelt and a 'X' symbol indicating no change.natural_image
Line drawing of a car seat with arrows indicating movement or positioning (no text or symbols)natural_image
Line drawing of a car seat assembly with arrows indicating movement or adjustment (no text or symbols)natural_image
Simple line drawing of an open book with a pointer and a small icon below (no text or symbols)Popis dijelova
text_image
Diagram of a car seat with numbered labels pointing to different seat positions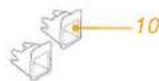

text_image
Technical diagram of a car seat with numbered labels pointing to different compartmentsUPOZORENJE
natural_image
Illustration of a person wearing a headband and holding a device, with an orange arrow indicating motion (no text or symbols)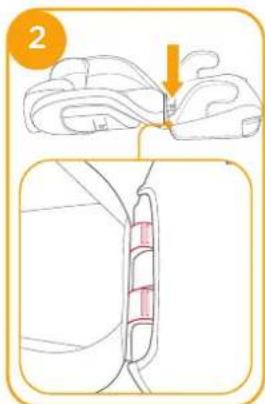
text_image
2
natural_image
Line drawing of a car seat with an arrow indicating direction (no text or symbols)- Poravnajte zaštitu od bočnog udarca utorom plastičnih nosača oslonca za donji dio leđa, a zatim ga umetnite kako bi ga učvrstili. ④ ⑤
! Prema veličini automobila odaberite treba li ugraditi zaštitu od bočnog udarca. - Uklonite zaštitu od bočnog udarca. Pogledajte slike ⑥ i ⑦
text_image
4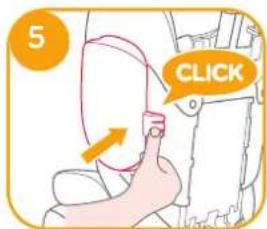
text_image
5 CLICK
natural_image
Illustration of a hand pressing down on a mechanical component with an arrow indicating motion (no text or symbols)
text_image
7Podešavanje visine - za oslonac za glavu
pogledajte sliku 8
natural_image
Illustration of a hand placing a red button into a car seat frame (no text or symbols)Pripazite prilikom postavljanja
natural_image
Interior view of a vehicle seat with a door and window, no visible text or symbols
natural_image
Interior view of a car seatbelt with a numbered badge (10) and checkmark indicator (no text or symbols on the suit)11
text_image
1 2 3 4 5 6 7
text_image
15 CLICK 1 ✓ ×natural_image
Line drawing of a car seat with a circular badge showing number 19 and a checkmark (no text or symbols on the diagram itself)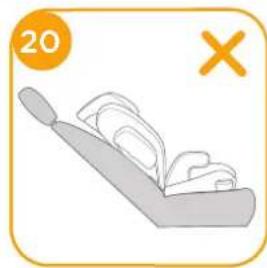
natural_image
Simple line drawing of a tray with food items and a 'X' symbol (no text or labels)! Povucite sigurnosni pojas vozila i provucite ga po predviđenoj putanji prolaska ^21 , a zatim ga zakopčajte. ^21 -3
text_image
21 1 2 3 CLICK 4natural_image
Illustration of a child wearing a seatbelt inside a car seat, with a hand adjusting the seatbelt (no text or symbols present)
text_image
24
text_image
25 ×natural_image
Line drawing of a car seat with arrows indicating movement or force (no text or symbols)Skidanje obloga
pogledajte sliku 27
Otvorite 4 para gumbi i 4 para elastičnih kukica na stražnjoj strani obloge kako biste je skinuli.

Za ponovno stavljanje jastuka sjedalice gore navedene korake izvršite suprotnim redoslijedom.
text_image
27Briga i održavanje
natural_image
Simple line drawing of an open book with a pointer and a small icon below, set against an orange background (no text or symbols)Lista över delar
text_image
Technical diagram of a car seat with numbered labels pointing to different seat positionsWARNING
natural_image
Illustration of a person's head and neck with a yellow arrow indicating pressure or movement (no text or symbols)
text_image
2
natural_image
Line drawing of a car seat with an arrow indicating direction (no text or symbols)natural_image
Illustration of a hand adjusting a seatbelt on a device (no text or symbols)
text_image
7natural_image
Illustration of a hand placing a red rectangular object into a car seat frame (no text or symbols)Angående installation
se bilder 9 - 11
natural_image
Interior view of a vehicle seat with a yellow X mark and number 9 in the corner (no text or symbols on the seat itself)
natural_image
Interior view of a car seatbelt with a numbered badge (10) and checkmark indicator (no text or symbols on the suit)11

text_image
1 2 3 4 5 6 7 1 2 3 4 5 6 7
text_image
15 CLICK 1 ✓ ×- Ta bort bilbarnstolen:
natural_image
Line drawing of a car seat with a circular badge showing number 19 and a checkmark (no text or symbols on the diagram itself)
natural_image
Illustration of a hand holding a tray with a tray, marked with an orange circle containing the number 20 and a yellow X symbol (no text or symbols on the tray itself)natural_image
Illustration of a child wearing a seatbelt being lifted by a hand, with no text or symbols present.
text_image
24
text_image
25 ×Använda kopphållare
se bilden 26

natural_image
Line drawing of a car seat with arrows indicating movement or force (no text or symbols)natural_image
Simple line drawing of an open book with a pointer and a battery icon, no text or symbols present.Deleliste
text_image
Technical diagram of a car seat assembly with numbered parts labeled 6, 7, 8, and 9.ADVARSEL
natural_image
Illustration of a person's head and neck with a highlighted orange arrow indicating a specific point (no text or symbols present)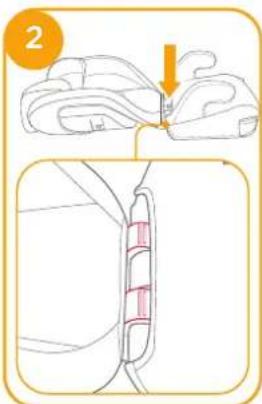
text_image
2
natural_image
Line drawing of a car seat with an arrow indicating motion (no text or symbols)natural_image
Illustration of a hand adjusting a garment with a curved line indicating motion (no text or symbols)
text_image
7 2natural_image
Illustration of a hand adjusting a seatbelt device (no text or symbols visible)natural_image
Interior view of a vehicle seatbelt with no visible text or symbols
natural_image
Interior view of a car seatbelt with a checkmark indicating selection (no text or symbols on the belt)11
text_image
1 2 3 4 5 6 7 ① ① ② 3 4 ⑤ 6 7
text_image
15 CLICK 1 ✓ ×- Ta av beltestolen:
natural_image
Line drawing of a car seat with a circular badge showing number 19 and a checkmark (no text or symbols on the diagram itself)
natural_image
Simple line drawing of a chair with folded papers and a 'X' symbol, no text or labels presentnatural_image
Illustration of a child wearing a seatbelt being lifted by a hand, with number 23 in the corner (no text or symbols on the diagram itself)
text_image
24
text_image
25 ×Bruke koppholdere
se bilde 26
natural_image
Line drawing of a car seat with arrows indicating movement or positioning (no text or symbols)text_image
Icon showing an open book with a question mark and a car, likely representing information or system status.Osaluettelo
text_image
Diagram of a car seat with numbered labels pointing to different seat positions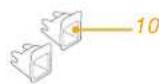

text_image
Technical diagram of a car seat with numbered labels pointing to different seat positionsVAROITUS
natural_image
Illustration of a person wearing a head covering and holding a medical device, with a downward arrow indicating pressure or pressure (no text or symbols present)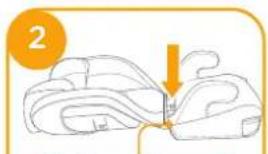
natural_image
Diagram of a car seat with a highlighted section and arrow indicating direction (no text or symbols)
natural_image
Pure diagram of a mechanical or electrical component with no text, numbers, or symbols
natural_image
Line drawing of a car seat with an arrow indicating direction (no text or symbols)natural_image
Illustration of a hand adjusting a seatbelt with a magnified view (no text or symbols)
text_image
7natural_image
Illustration of a hand placing a red button into a seatbelt, with an orange arrow indicating direction (no text or symbols)natural_image
Interior view of a vehicle seat with a visible door and window, marked with an orange X (no text or symbols)
natural_image
Interior view of a car seatbelt with a belt buckle, no text or symbols visible11
text_image
1 2 3 4 5 6 7 1 2 3 4 5 6 7
text_image
15 CLICK 1 ✓ ×natural_image
Line drawing of a car seat with a circular badge showing number 19 and a checkmark (no text or symbols on the diagram itself)
natural_image
Simple line drawing of a tray with food items and a 'X' symbol, no text or labels presentnatural_image
Illustration of a child wearing a seatbelt being lifted by a hand, with number 23 in the corner (no text or symbols on the diagram itself)
text_image
24
text_image
25 ×natural_image
Line drawing of a car seat with arrows indicating movement or force (no text or symbols)Irrota pehmyttarvikkeet
katso kuva
Allison Baby UK Ltd, Venture Point, Towers Business Park Rugeley, Staffordshire, WS15 1UZ
NUNA International B.V. Van der Valk Bourmanweg 178 C, 2352 JD Leiderdorp, The Netherlands