EVERYDAY - Stroller Kindercraft - Free user manual and instructions
Find the device manual for free EVERYDAY Kindercraft in PDF.
| Product type | Multi-position stroller with bassinet and seat |
| Recommended age | From birth to 4 years (up to 22 kg for seat) |
| Maximum child weight (seat) | 22 kg |
| Maximum child weight (bassinet) | 9 kg |
| Stroller weight (approx.) | Approx. 10 kg |
| Dimensions unfolded (approx.) | Approx. 100 x 60 x 100 cm |
| Dimensions folded (approx.) | Approx. 70 x 30 x 50 cm |
| Wheels | 2 swivel front wheels with lock, 2 rear wheels |
| Brake | Central foot brake |
| Safety harness | 5-point |
| Backrest positions | 3 (sitting, semi-reclined, lying) |
| Footrest adjustment | 4 positions |
| Parent handle adjustment | 2 height levels |
| Canopy | Adjustable with ventilation panel |
| Included accessories | Bassinet, mattress, footmuff, mosquito net, rain cover, sunshade, cup holder, car seat adapters |
| Cover care | Machine washable at 30°C, gentle cycle |
| Frame care | Clean with damp cloth and mild detergent |
| Warranty | 24 months, extendable up to 120 months* |
| Brand | Kinderkraft |
| Model | EVERYDAY |
Frequently Asked Questions - EVERYDAY Kindercraft
User questions about EVERYDAY Kindercraft
0 question about this device. Answer the ones you know or ask your own.
Ask a new question about this device
Download the instructions for your Stroller in PDF format for free! Find your manual EVERYDAY - Kindercraft and take your electronic device back in hand. On this page are published all the documents necessary for the use of your device. EVERYDAY by Kindercraft.
USER MANUAL EVERYDAY Kindercraft
Available only in selected countries Details on kinderkraft.com

text_image
WATCH MANUAL VIDEO
reddot winner
natural_image
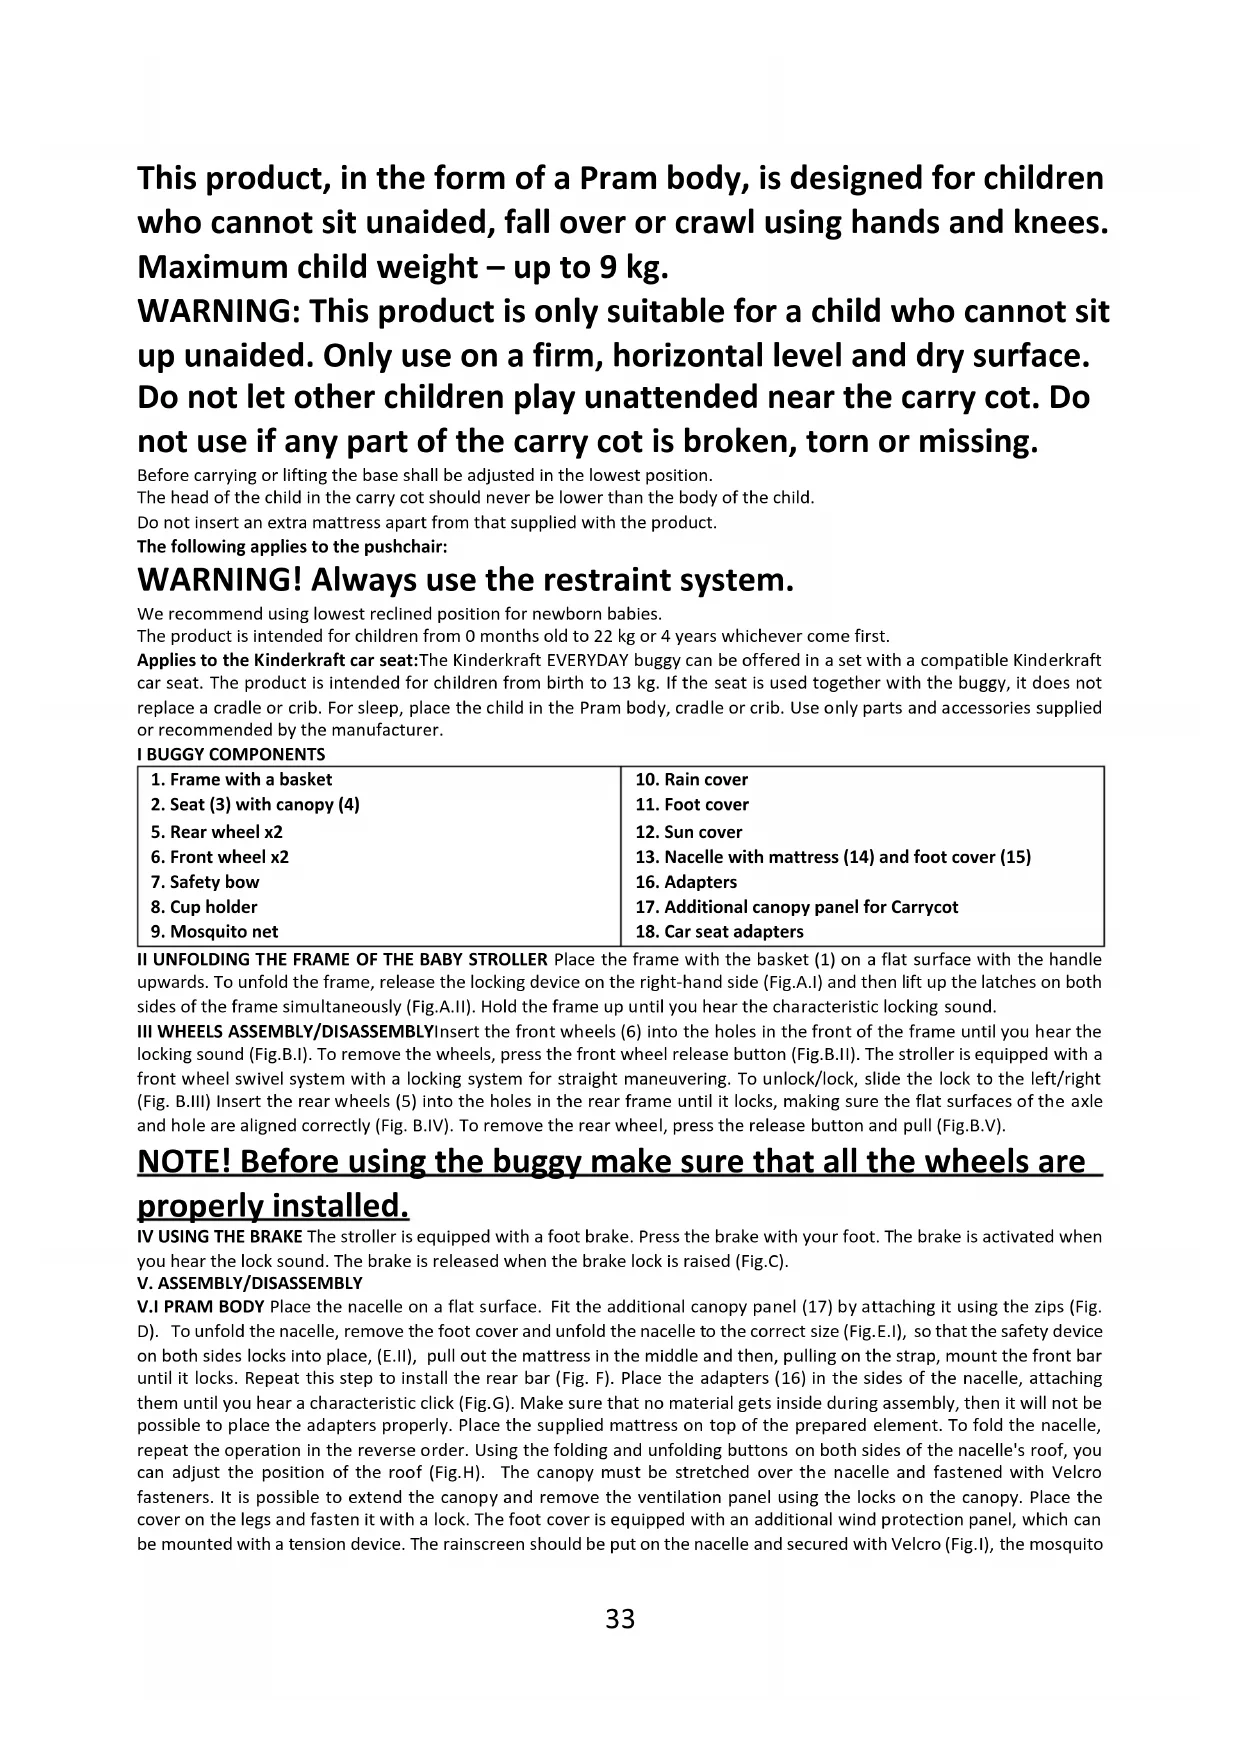
Illustration of a two-wheeled baby stroller with a matching backrest and front-mounted arms (no text or symbols)
kinderkraft.com

/kinderkraftofficial

kinderkraft

@kinderkraftofficial
(AR) عربة أطفال
(CS) Kočárek
(DE) Buggy
(EN) Stroller
(ES) Silla de paseo
(FR) Pousette
(HU) Babakocsi
(IT) Passeggino
MODEL: EVERYDAY
دليل الاستخدام
NÁVÓD K OBSLUZE
BEDIENUNGSANLEITUNG
USER MANUAL
MANUAL DE USARIO
GUIDE D'UTILISATION
HASZNÁLATI UTASÍTÁS
ISTRUZIONI PER UTENTE
(NL) Kinderwagen
(PL) Wózek
(PT) Carrinho de bebé
(RO) Cărucior
MANUAL DE INSTRUÇÕES
MANUAL DE UTILIZARE
natural_image
Technical line drawing of a mechanical device with no visible text or symbols1.
text_image
4. 3.2.

natural_image
Two identical circular diagrams showing a wheel with four spokes, no text or symbols present.5.
natural_image
Two identical mechanical levers with three blades and a central hub, shown side by side (no text or symbols)6.
natural_image
Simple line drawing of a curved mechanical or electrical component with two connectors at both ends (no text or symbols)7.
8.

natural_image
Simple line drawing of a folded paper or scroll with a handle (no text or symbols)9.
natural_image
Simple line drawing of a rolled-up document or scroll (no text or symbols)10.
natural_image
Technical line drawing of a mechanical device with an inset showing a hand operating a tool (no text or symbols present)A
natural_image
Technical line drawing of a mechanical linkage or bracket assembly (no text or symbols)I
natural_image
Diagram of a bicycle steering wheel with an upward arrow indicating motion (no text or symbols)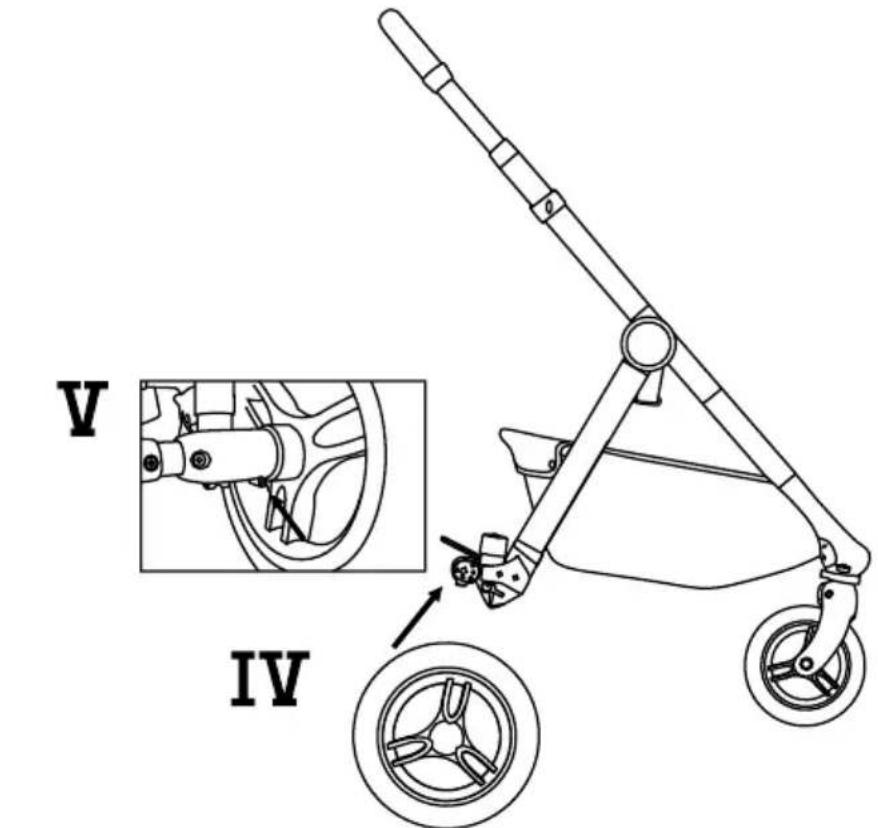
text_image
V IVB
natural_image
Diagram of a vehicle chassis with wheels and lock mechanism, no text or symbols presentC
natural_image
Line drawing of a refrigerator with a close-up inset showing internal components (no text or symbols)
text_image
GH
natural_image
Line drawing of a stroller with two wheels and a canopy cover, no text or symbols present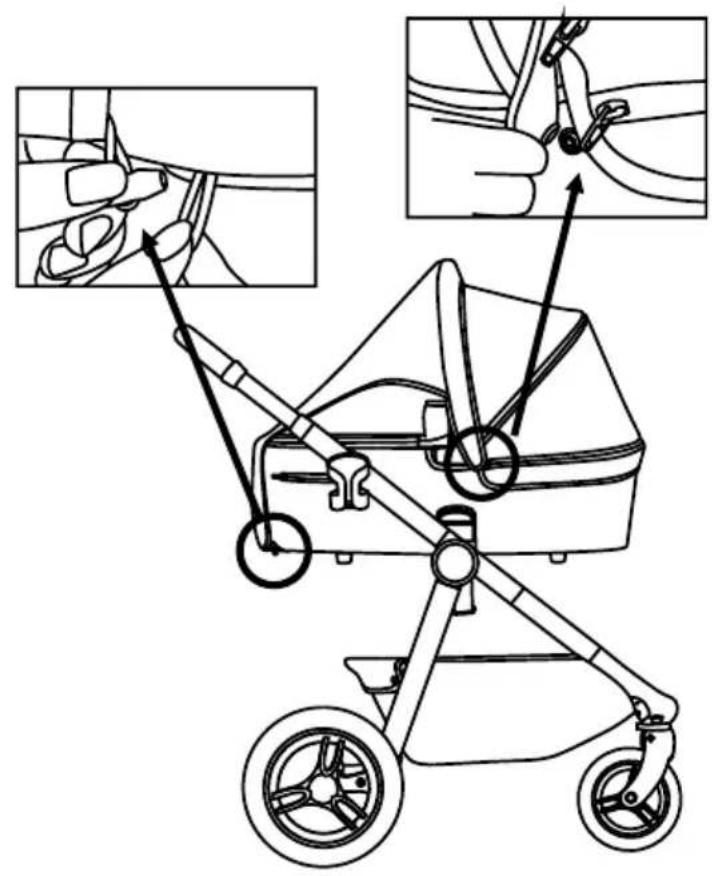
text_image
Diagram of a stroller with hand fastening technique, showing close-up and detail views of the device's handle and grip.|
J
natural_image
Line drawing of a stroller with fan blades and wheels (no text or symbols)0

natural_image
Line drawing of a hand adjusting a mechanical component with an arrow indicating motion (no text or symbols)P
text_image
TU
natural_image
Illustration of a baby stroller with a canopy cover, showing body positioning and seat arrangement (no text or symbols)V
natural_image
Line drawing of a stroller with hand positioning guide (no text or symbols)W
natural_image
Line drawing of a two-wheeled stroller with a close-up inset showing the handle and wheel (no text or symbols)Y.11
natural_image
Line drawing of a hand holding a tool with an arrow indicating direction (no text or symbols)Z

text_image
Diagram of a baby stroller with labeled parts and directional arrows indicating assembly or movement.E'
AR
عند تركيب و Falk المظلة ، تذكر أن Tequeم بربط وفک أحزمة الفيلكرو Municipal Municipal Municipal Municipal Municipal Municipal Municipal Municipal Municipal Municipal Municipal Municipal Municipal Municipal Municipal Municipal Municipal Municipal Municipal Municipal Municipal Municipal Municipal Municipal Municipal Municipal Municipal Municipal Municipal Municipal Municipal Municipal Municipal Municipal Municipal Municipal Municipal Municipal Municipal Municipal Municipal Municipal Municipal Municipal Municipal Municipal Municipal Municipal Municipal Municipal Municipal Municipal Municipal Municipal Municipal Municipal Municipal Municipal Municipal Municipal Municipal Municipal Municipal Municipal Municipal Municipal Municipal Municipal Municipal Municipal Municipal Municipal Municipal Municipal Municipal Municipal Municipal Municipal Municipal Municipal Municipal Municipal Municipal Municipal Municipal Municipal Municipal Municipal Municipal Municipal Municipal Municipal Municipal Municipal Municipal Municipal Municipal Municipal Municipal Municipal Council
Kiddy®, Kinderkraft®, Maxi Cosi®, Cybex®, BeSafe®, Nuna®; Kinderkraft MINK, Kiddy Evoluna I-Size 2, Evolution Pro 2,
Cybex Aton, Aton 2, Aton Q, Maxi Cosi Mico, Mico AP, Mico NXT, Mico Max 30, Citi, Cabrio, CabrioFix, BeSafe iZi Go, iZi Go
.Modular, Nuna Pipa
Thank you for purchasing a Kinderkraft product. Our products have been designed for your child's safety and comfort. The buggy is an ideal solution for those who value quality, modernity and functionality. Please read the manual carefully and follow its recommendations.
IMPORTANT - READ CAREFULLY AND KEEP FOR FUTURE REFERENCE.
Safety and care notes
WARNING!
- Never leave the child unattended.
- Ensure that all the locking devices are engaged before use.
- To avoid injury ensure that the child is kept away when unfolding and folding this product.
- Do not let the child play with this product.
- Check that the pram body or seat unit or car seat attachment devices are correctly engaged before use.
- This product is not suitable for running or skating.
- The product is designed to transport one child at a time.
• Maximum basket load 5 kg. - Any load attached to the handle and/or on the back of the backrest and/or on the sides of the vehicle will affect the stability of the vehicle.
- The maximum permissible weight of a parent's bag suspended on the buggy's handles is 3 kg.
- The maximum load carried in the cup holder must never exceed 0,5 kg.
• Maximum load in the trinket pocket 0.25 kg. - Lift the front suspension when going up a curb or step.
- The brakes should be locked when the child is placed in or taken out of the buggy.
- Use only parts and accessories supplied or recommended by the manufacturer. Do not use other parts or accessories.
- Do not place the product near open flame or other heat sources.
- Do not use with an additional platform.
- The handles and the bottom of the carrycot should be checked regularly for signs of damage and wear.
- Make sure the handle is in the correct position of use before carrying or lifting.
The following applies to the Pram body:
This product, in the form of a Pram body, is designed for children who cannot sit unaided, fall over or crawl using hands and knees. Maximum child weight – up to 9 kg.
WARNING: This product is only suitable for a child who cannot sit up unaided. Only use on a firm, horizontal level and dry surface. Do not let other children play unattended near the carry cot. Do not use if any part of the carry cot is broken, torn or missing.
Before carrying or lifting the base shall be adjusted in the lowest position.
The head of the child in the carry cot should never be lower than the body of the child.
Do not insert an extra mattress apart from that supplied with the product.
The following applies to the pushchair:
WARNING! Always use the restraint system.
We recommend using lowest reclined position for newborn babies.
The product is intended for children from 0 months old to 22 kg or 4 years whichever come first.
Applies to the Kinderkraft car seat: The Kinderkraft EVERYDAY buggy can be offered in a set with a compatible Kinderkraft car seat. The product is intended for children from birth to 13 kg. If the seat is used together with the buggy, it does not replace a cradle or crib. For sleep, place the child in the Pram body, cradle or crib. Use only parts and accessories supplied or recommended by the manufacturer.
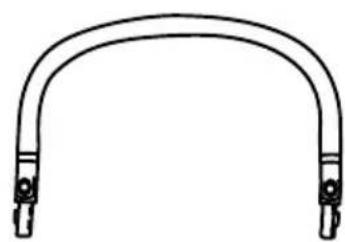
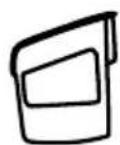
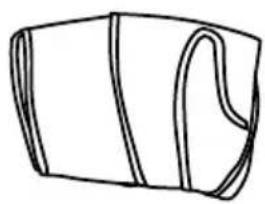
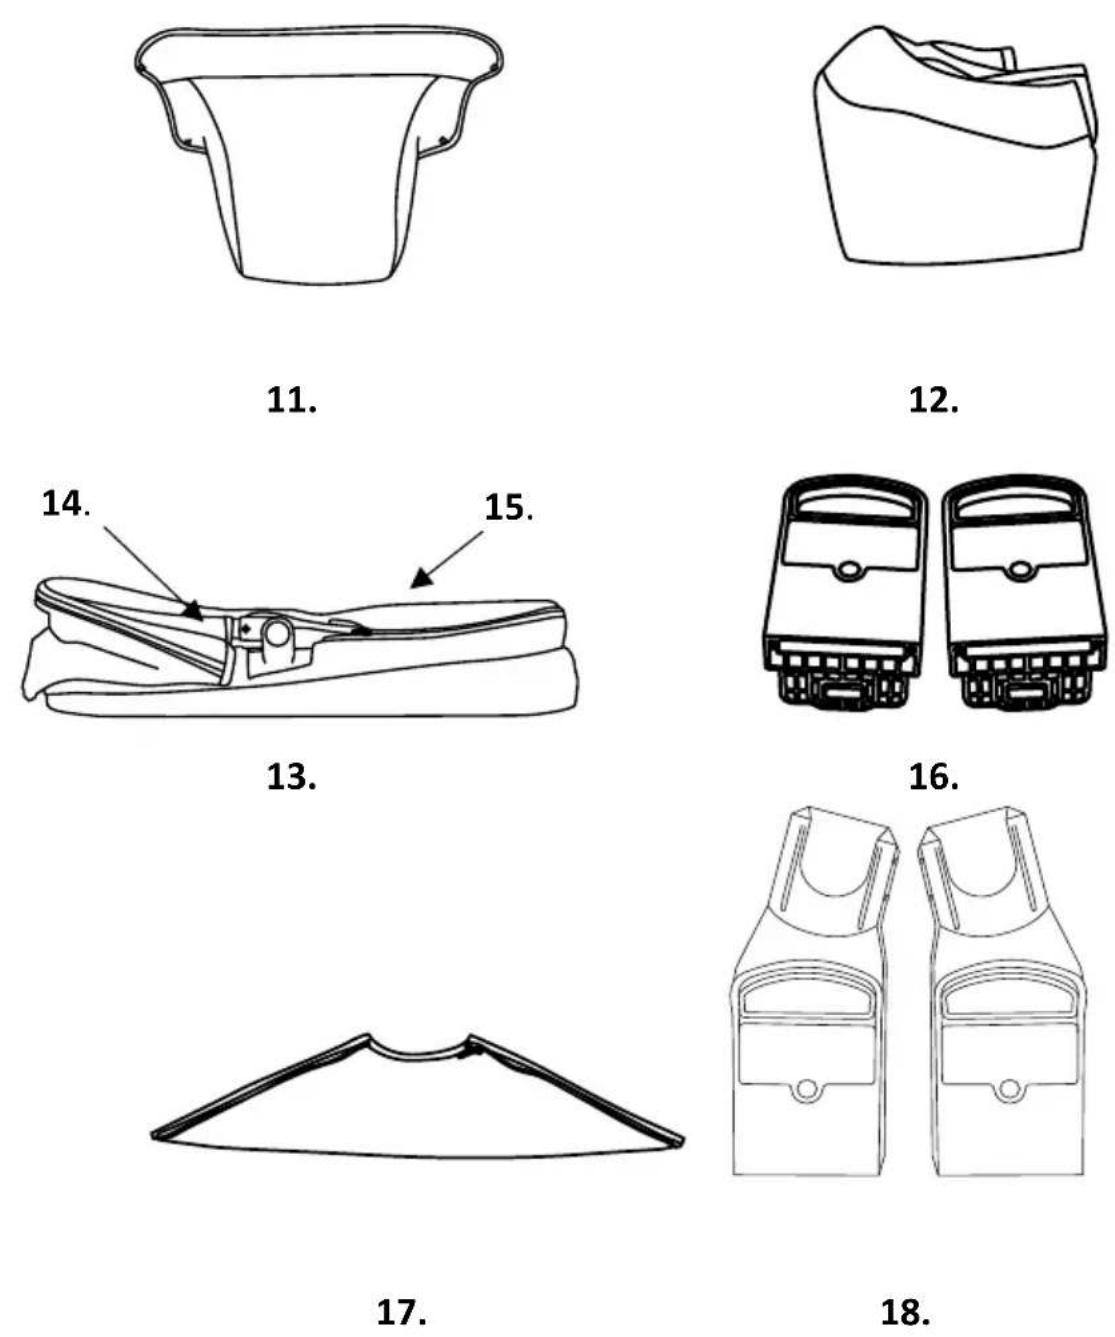
I BUGGY COMPONENTS
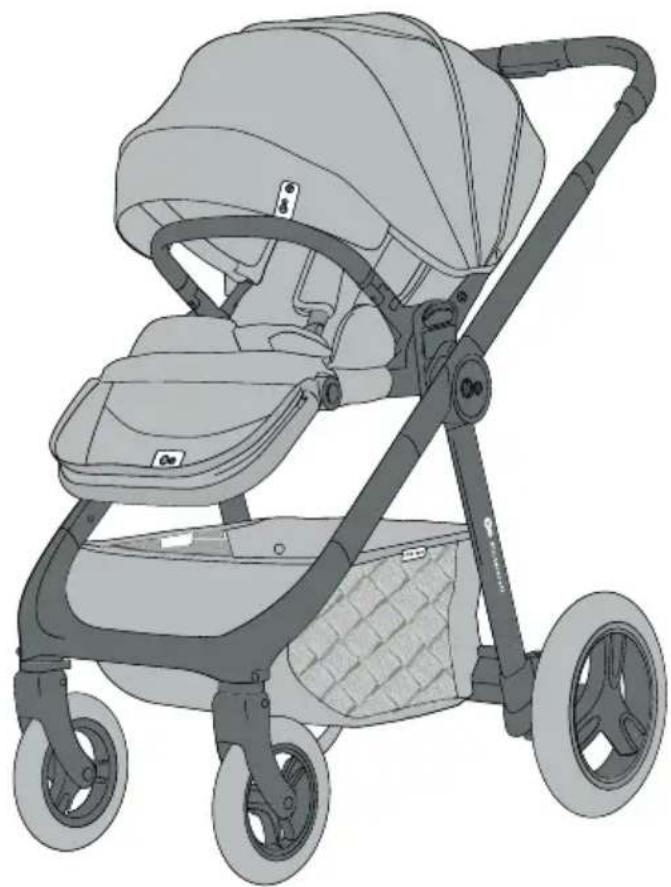
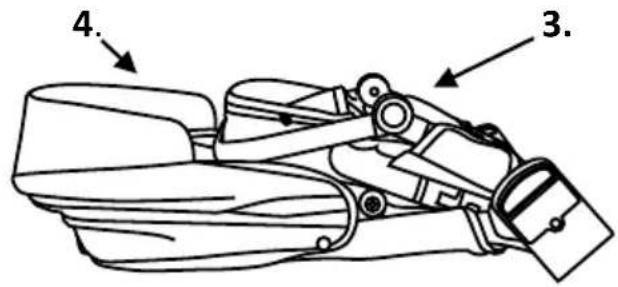
| 1. Frame with a basket2. Seat (3) with canopy (4)5. Rear wheel x26. Front wheel x27. Safety bow8. Cup holder9. Mosquito net | 10. Rain cover11. Foot cover12. Sun cover13. Nacelle with mattress (14) and foot cover (15)16. Adapters17. Additional canopy panel for Carrycot18. Car seat adapters |
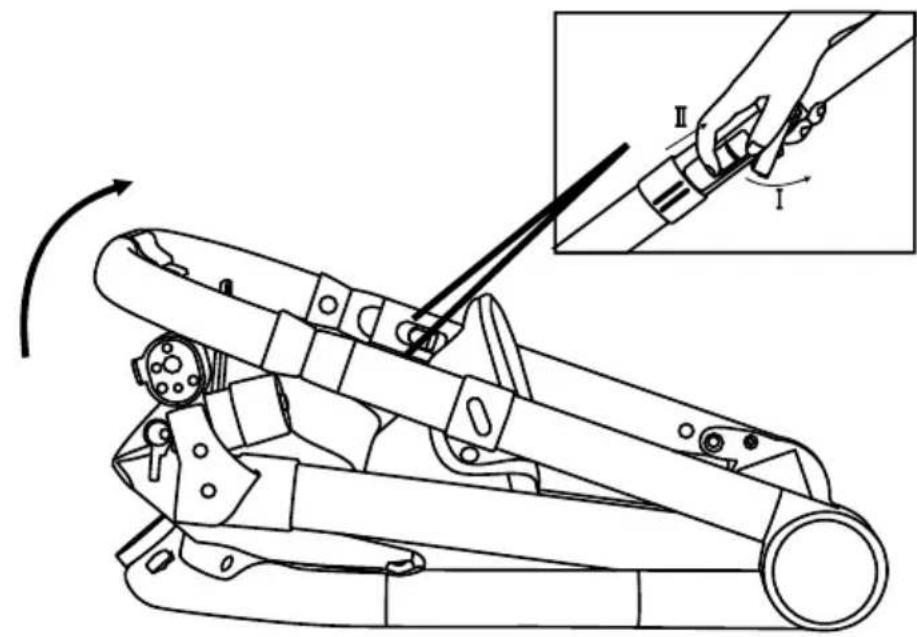
II UNFOLDING THE FRAME OF THE BABY STROLLER Place the frame with the basket (1) on a flat surface with the handle upwards. To unfold the frame, release the locking device on the right-hand side (Fig.A.I) and then lift up the latches on both sides of the frame simultaneously (Fig.A.II). Hold the frame up until you hear the characteristic locking sound.
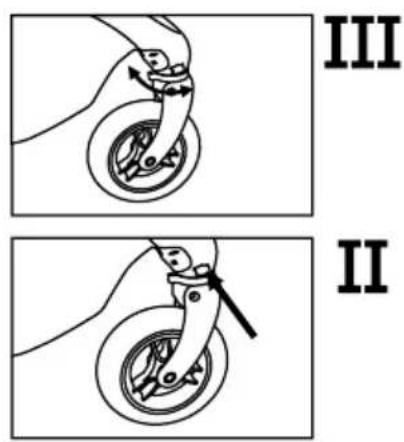
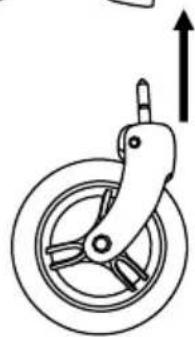
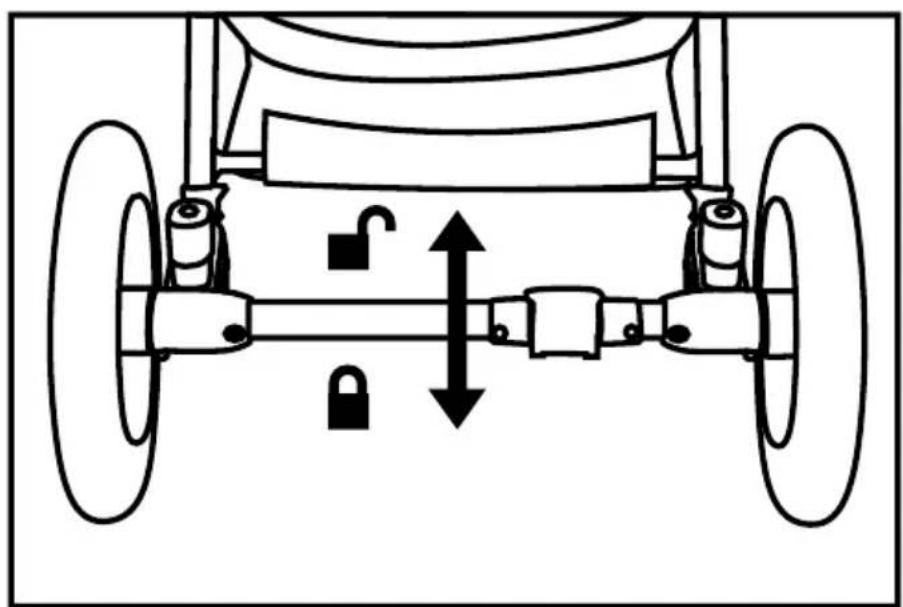
III WHEELS ASSEMBLY/DISASSEMBLYInsert the front wheels (6) into the holes in the front of the frame until you hear the locking sound (Fig.B.I). To remove the wheels, press the front wheel release button (Fig.B.II). The stroller is equipped with a front wheel swivel system with a locking system for straight maneuvering. To unlock/lock, slide the lock to the left/right (Fig. B.III) Insert the rear wheels (5) into the holes in the rear frame until it locks, making sure the flat surfaces of the axle and hole are aligned correctly (Fig. B.IV). To remove the rear wheel, press the release button and pull (Fig.B.V).
NOTE! Before using the buggy make sure that all the wheels are properly installed.
IV USING THE BRAKE The stroller is equipped with a foot brake. Press the brake with your foot. The brake is activated when you hear the lock sound. The brake is released when the brake lock is raised (Fig.C).
V. ASSEMBLY/DISASSEMBLY
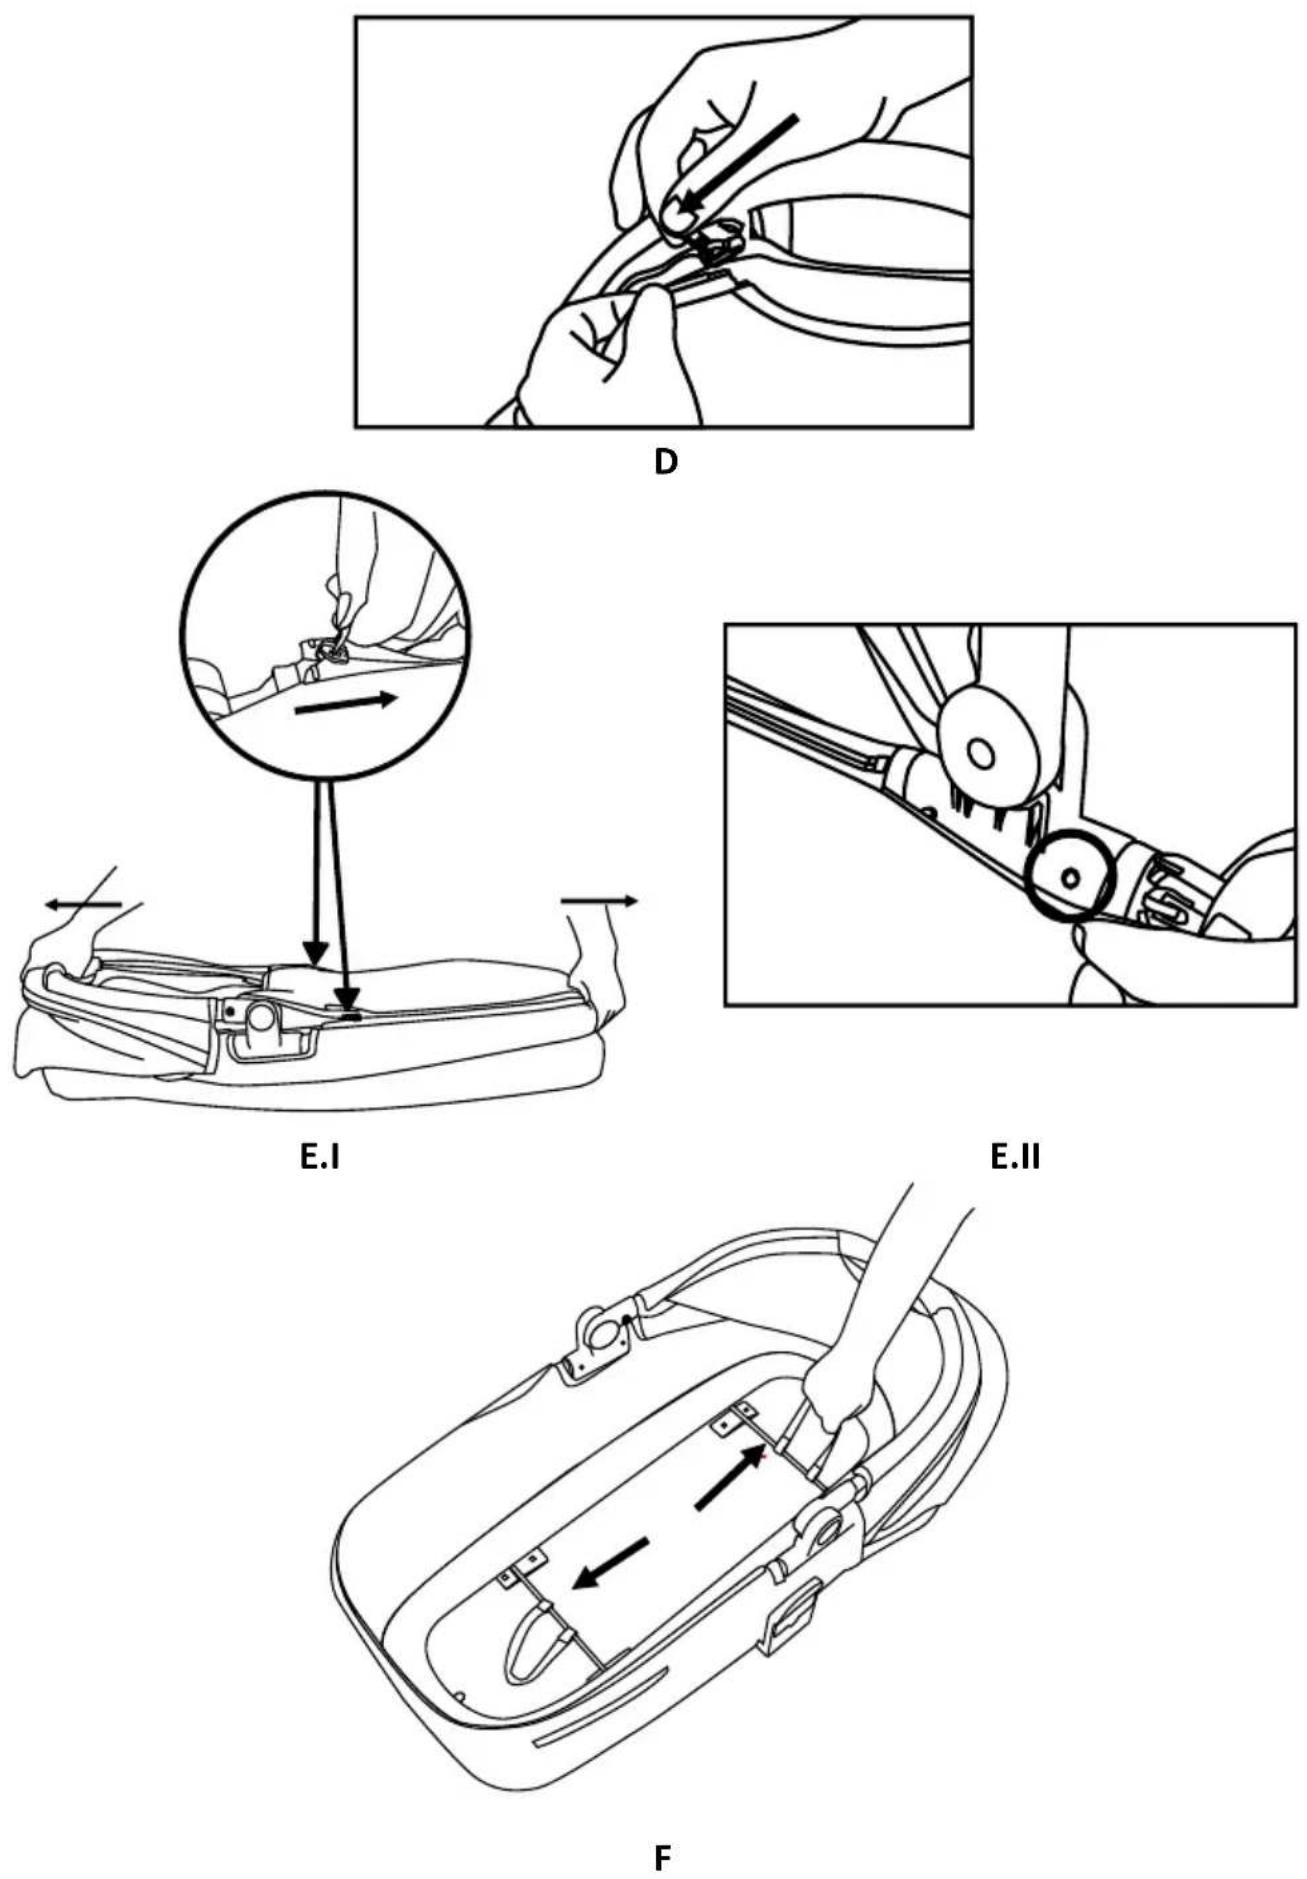
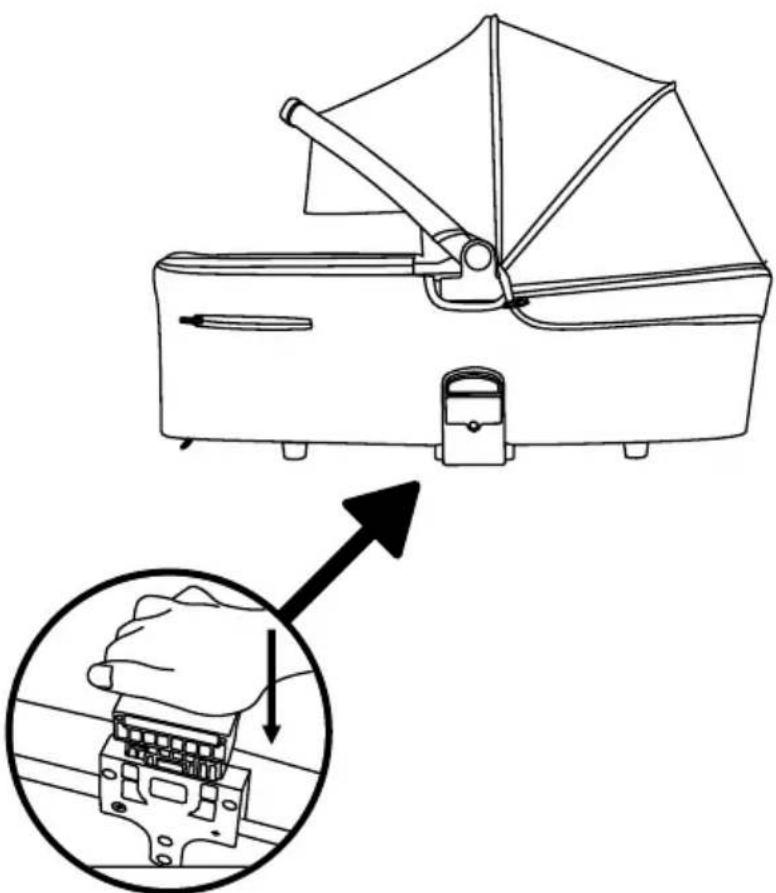
V.I PRAM BODY Place the nacelle on a flat surface. Fit the additional canopy panel (17) by attaching it using the zips (Fig. D). To unfold the nacelle, remove the foot cover and unfold the nacelle to the correct size (Fig.E.I), so that the safety device on both sides locks into place, (E.II), pull out the mattress in the middle and then, pulling on the strap, mount the front bar until it locks. Repeat this step to install the rear bar (Fig. F). Place the adapters (16) in the sides of the nacelle, attaching them until you hear a characteristic click (Fig.G). Make sure that no material gets inside during assembly, then it will not be possible to place the adapters properly. Place the supplied mattress on top of the prepared element. To fold the nacelle, repeat the operation in the reverse order. Using the folding and unfolding buttons on both sides of the nacelle's roof, you can adjust the position of the roof (Fig.H). The canopy must be stretched over the nacelle and fastened with Velcro fasteners. It is possible to extend the canopy and remove the ventilation panel using the locks on the canopy. Place the cover on the legs and fasten it with a lock. The foot cover is equipped with an additional wind protection panel, which can be mounted with a tension device. The rainscreen should be put on the nacelle and secured with Velcro (Fig.I), the mosquito
net should be stretched on the nacelle and secured with straps, the sunscreen should be put on the nacelle and secured with tension on both sides of the stroller and with straps on the bottom of the nacelle (Fig.J).
V.II ATTACHING THE PRAM BODY TO THE BUGGY FRAME
NOTE! THE PRAM BODY CAN ONLY BE MOUNTED FACING
BACKWARDS (the child faces the person pushing the buggy).
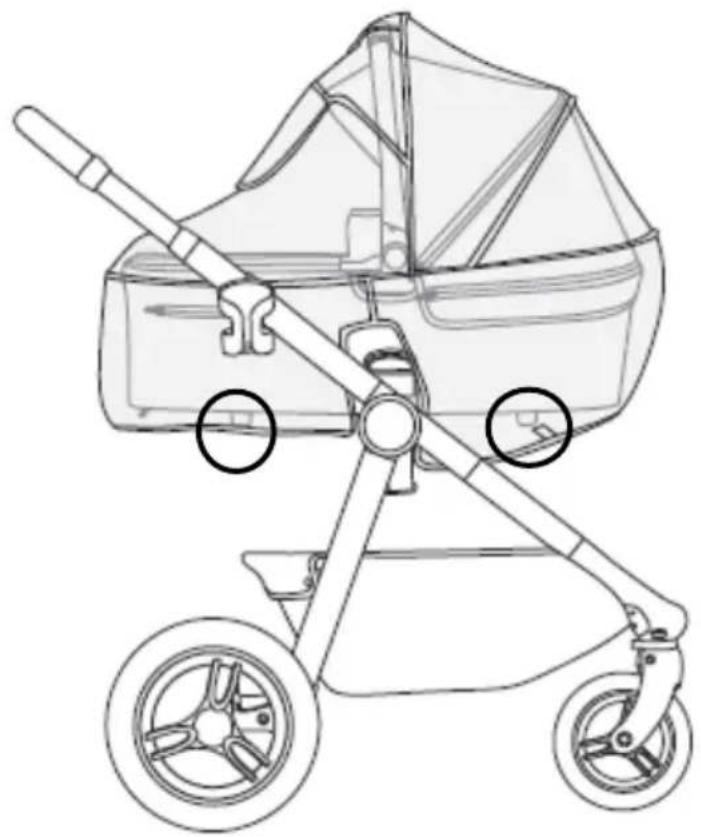
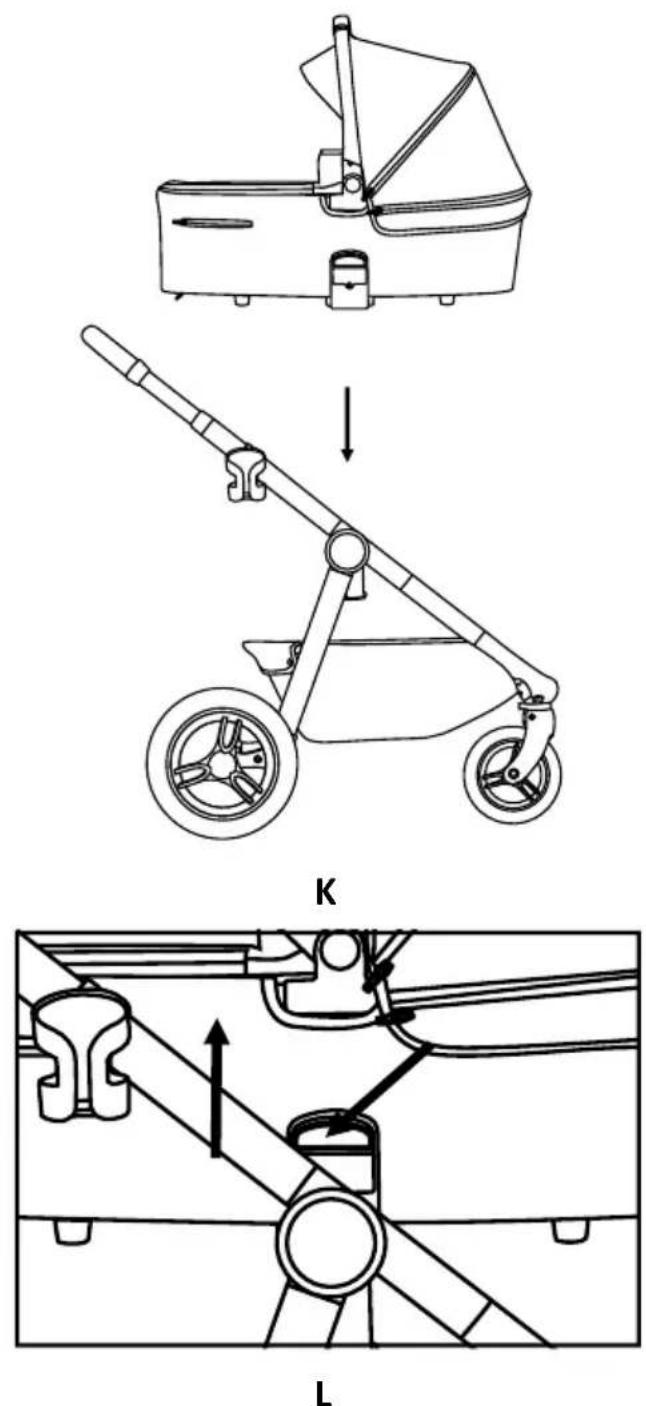
To mount the nacelle, slide it onto the frame of the stroller until the characteristic click (Fig.K). While removing the nacelle, lift the nacelle release lever from the frame on both sides and pull it up (Fig.L).
NOTE! Do not fold the buggy frame when the Pram body is installed on it.
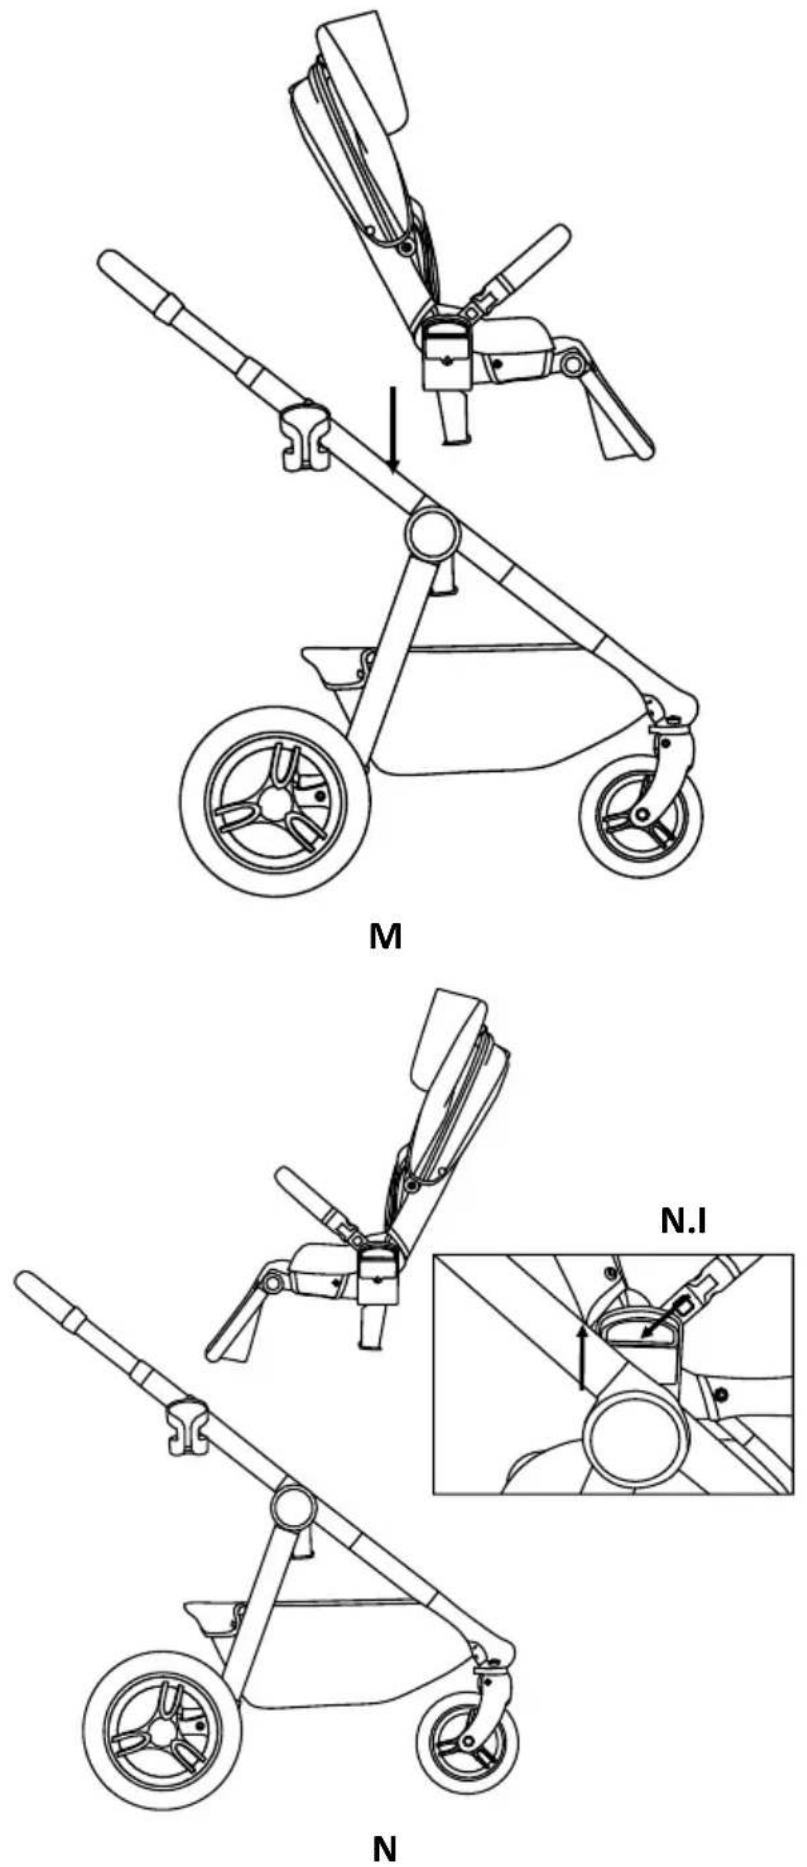
V.III SEAT To mount the seat on the stroller frame, slide it onto the frame as shown in Figure M until it clicks into place. The seat can be mounted front or rear-facing (Fig. N). To remove the seat, press the buttons on both sides of the seat and lift up (Fig. N.I). The foot cover must be fastened with the four clip fasteners on each side of the stroller (Fig. O).
V.IV CANOPY
NOTE! INSTALL THE CANOPY BEFORE USING THE BUGGY
Place the canopy in the guide in the seat frame and make sure it is installed correctly (Fig. P). To remove it, press the button on both sides of the seat frame (Fig.Z) and pull the canopy out. When mounting and dismounting the canopy, remember to fasten and unfasten the Velcro straps on the top of the canopy and the clips on the sides. The canopy can be adjusted in several positions.
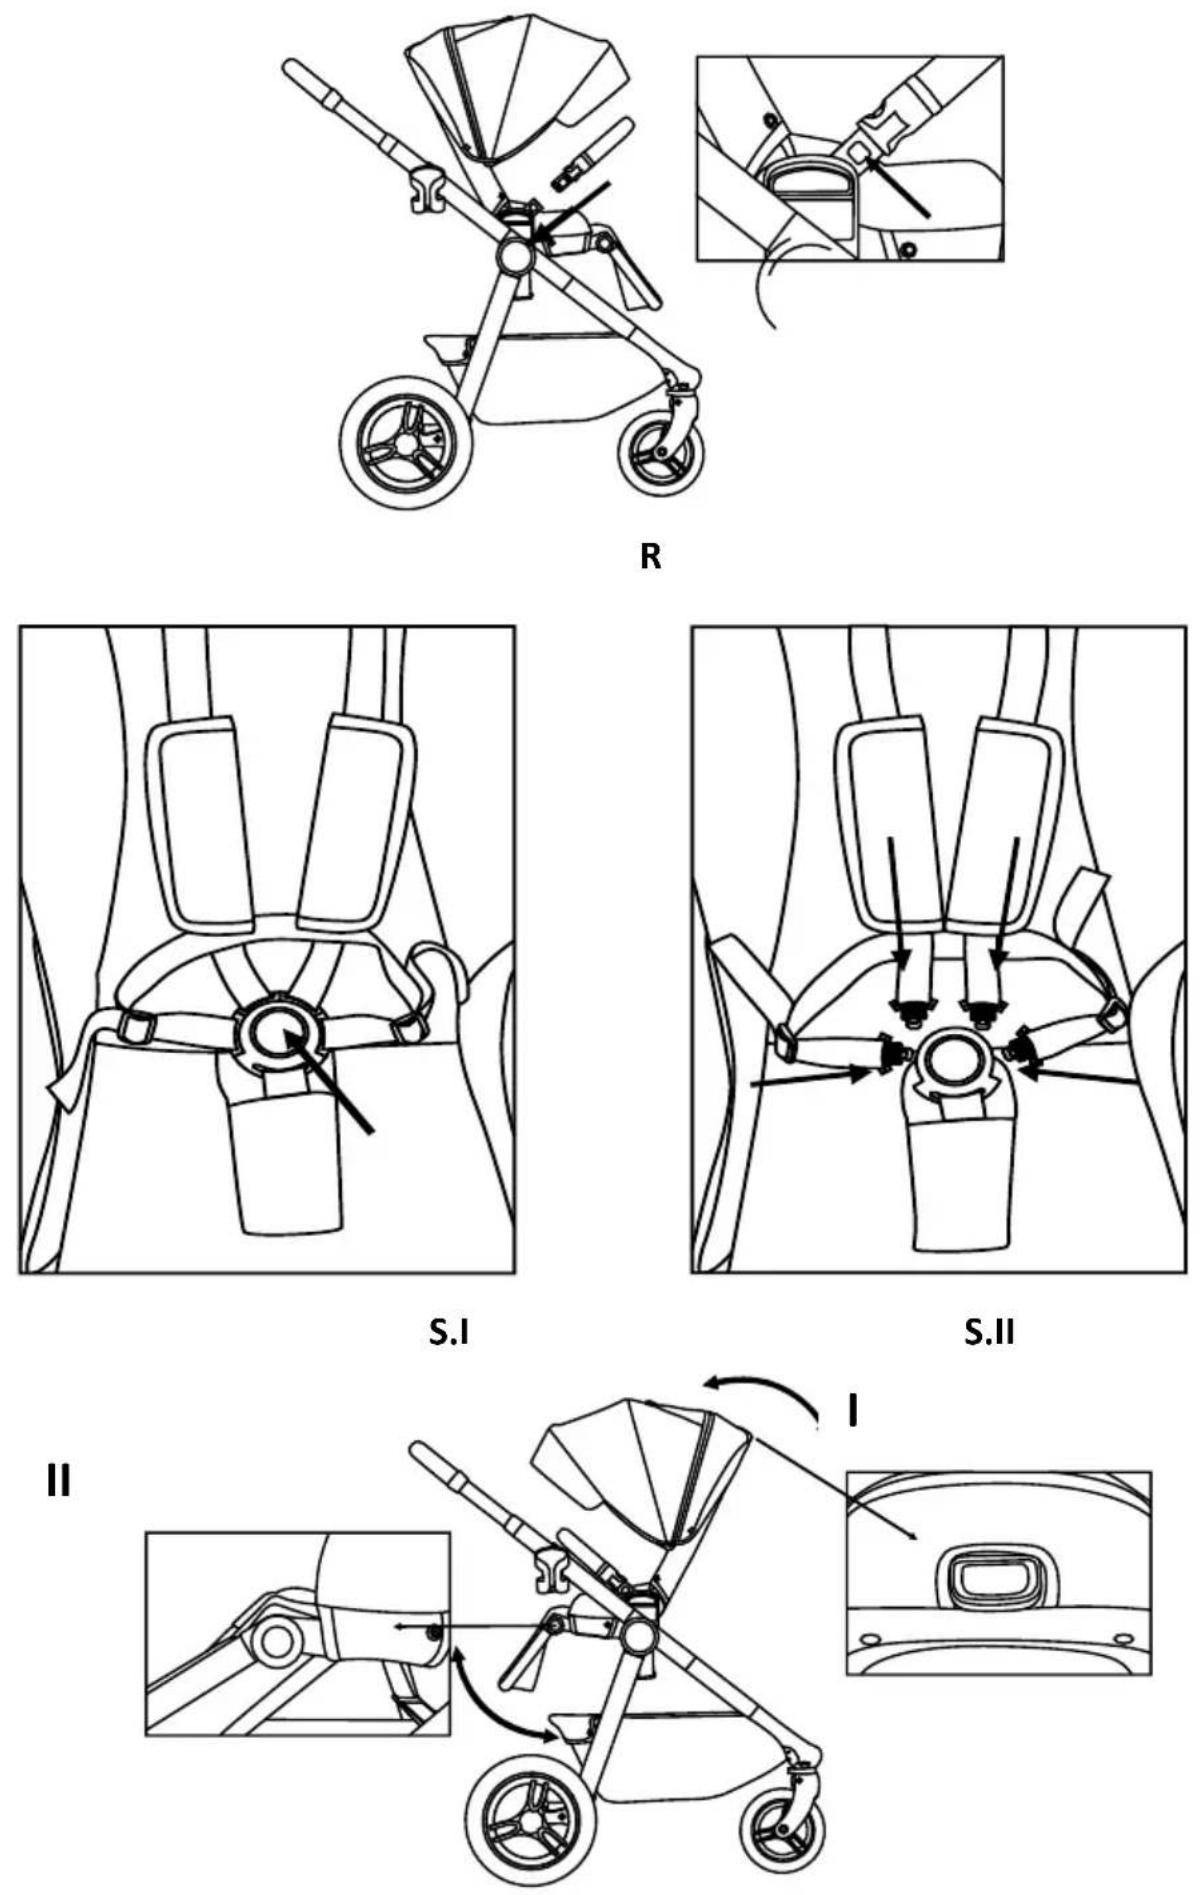
V.V SAFETY BOW To install the safety bow, slide it into the appropriate guides in the seat frame until it engages (Fig. R). To remove the component, press the release buttons on both sides of the guide and pull out the safety bow.
VI. SAFETY BELTS Press the button to open the buckle (Fig.S.I). To secure your child, slide the hip and shoulder straps into the centre buckle until they engage (Fig.S.II).
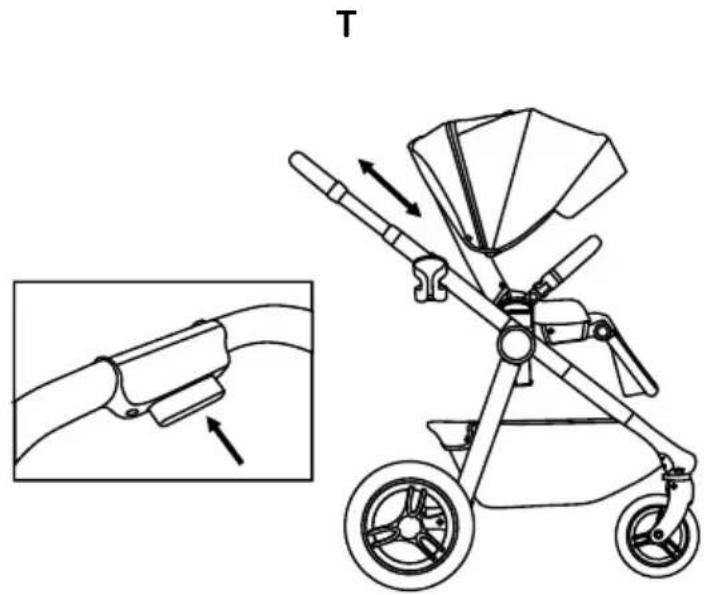
VII. SEAT POSITIONS The seat has 3 positions: lying, semi-lying and sitting, adjustable by means of the backrest adjustment lever (Fig.T.I). When the seat is mounted forward facing, the lying position can only be adjusted if the handle bar is extended in the highest position.
VIII FOOTREST ADJUSTMENT Footrest can be adjusted in one of 4 positions. Press the buttons on both sides of the footrest at the same time and adjust to the desired position (Fig.T.II).
IX PARENTS HANDLE ADJUSTMENT The stroller handle is adjusted by pressing the button in the middle of the handle and pulling the handle up or down. You can adjust the handle height to one of 2 levels (Fig.U).
X INSTALLATION OF CUP HOLDER, MOSQUITO NET, RAIN COVER, SUN COVER Fix the cup holder on a pin on the right side of the stroller frame.
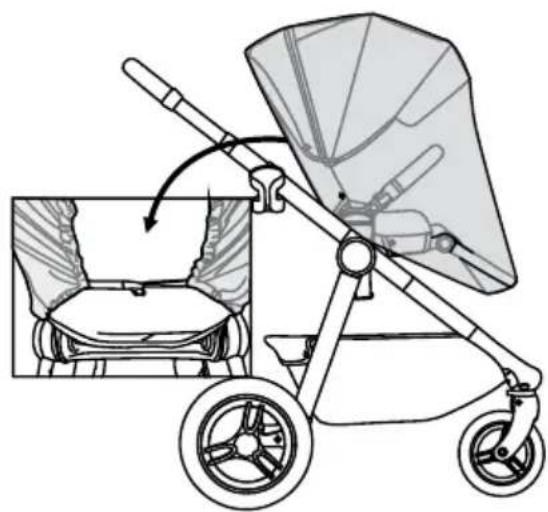
Put the mosquito net on the seat and secure it with the straps at the back of the seat (Fig.V).
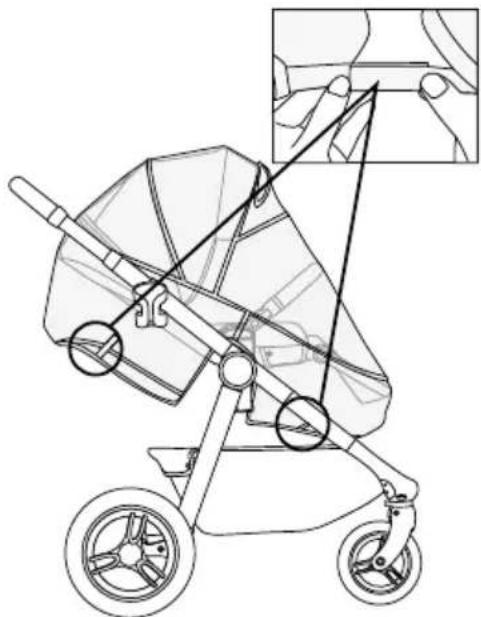
Put the rain cover on the stroller and secure with clips (Fig.W).
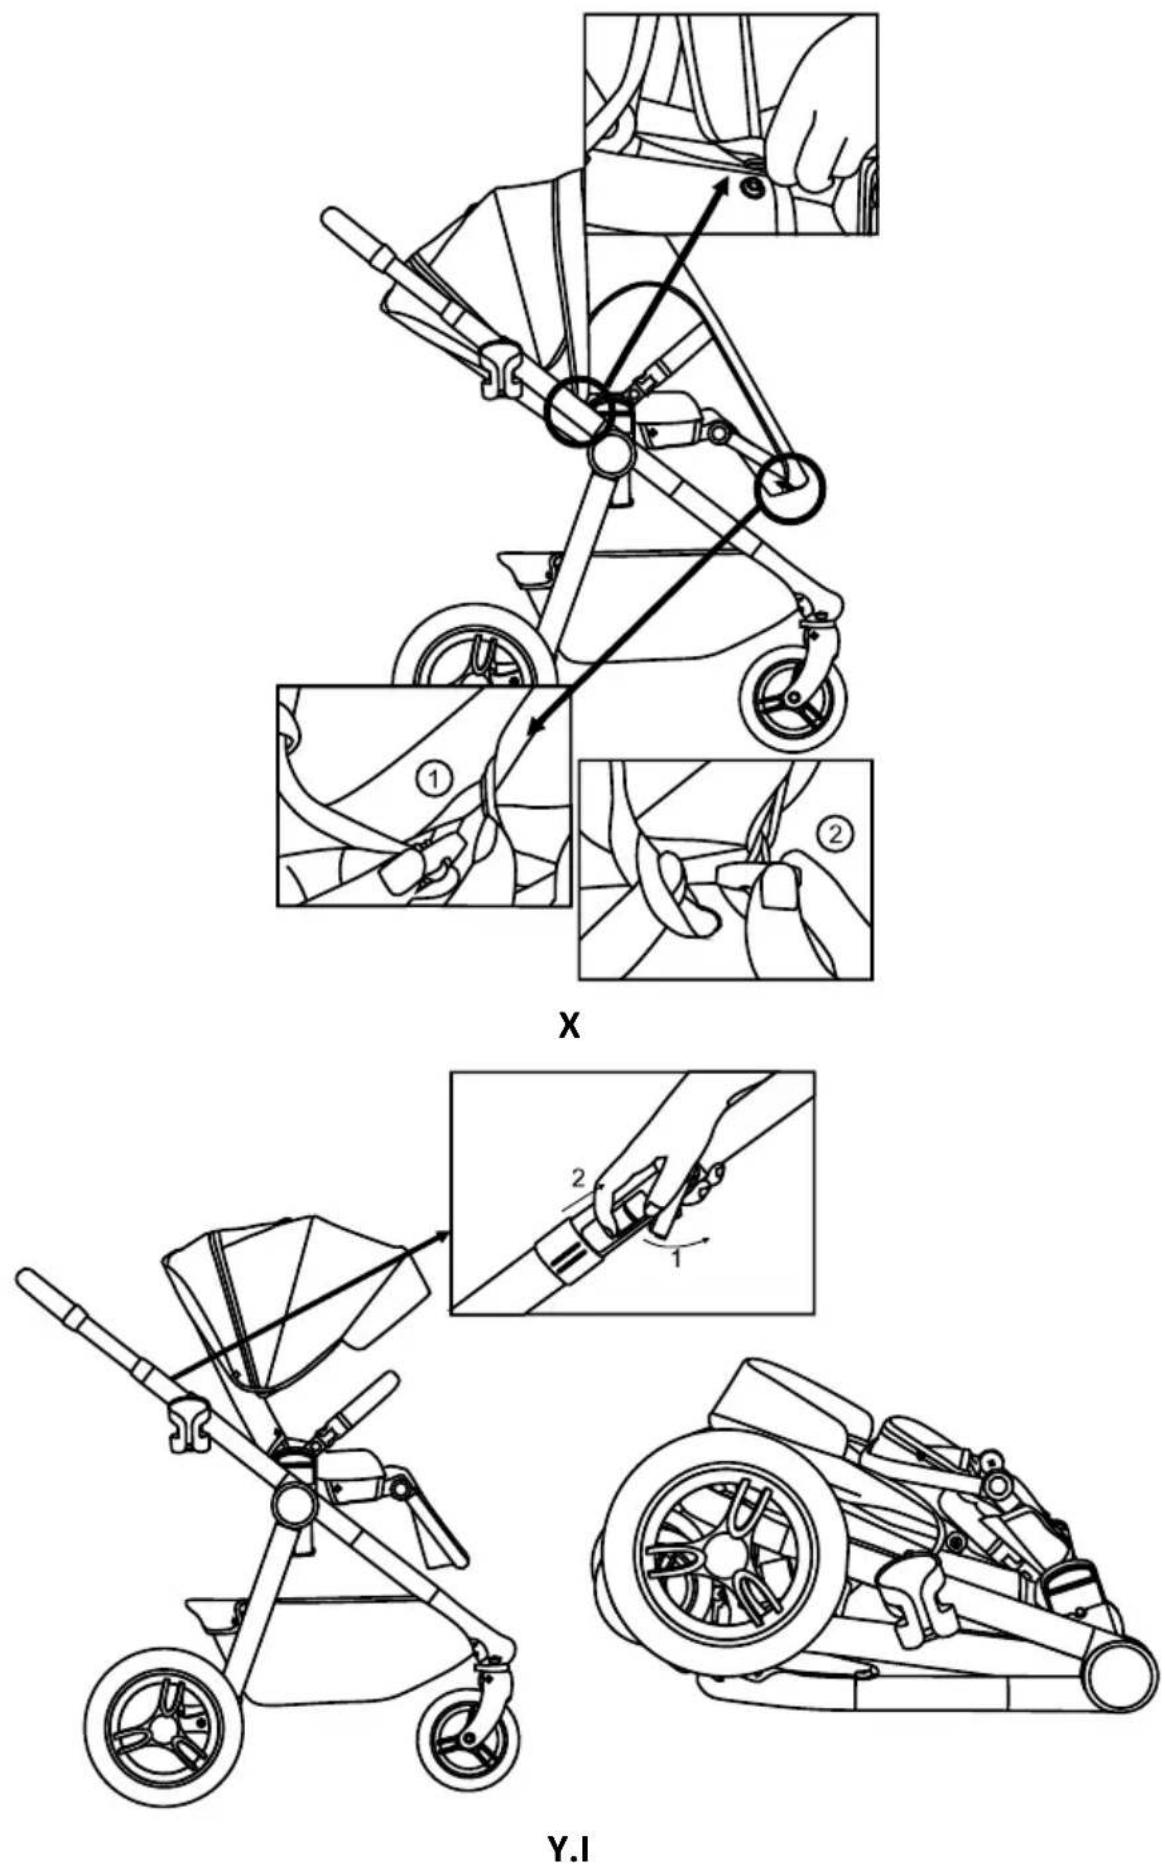
Put the sun shade on the stroller and secure with clips and straps fastening them under footrest (Fig.X).
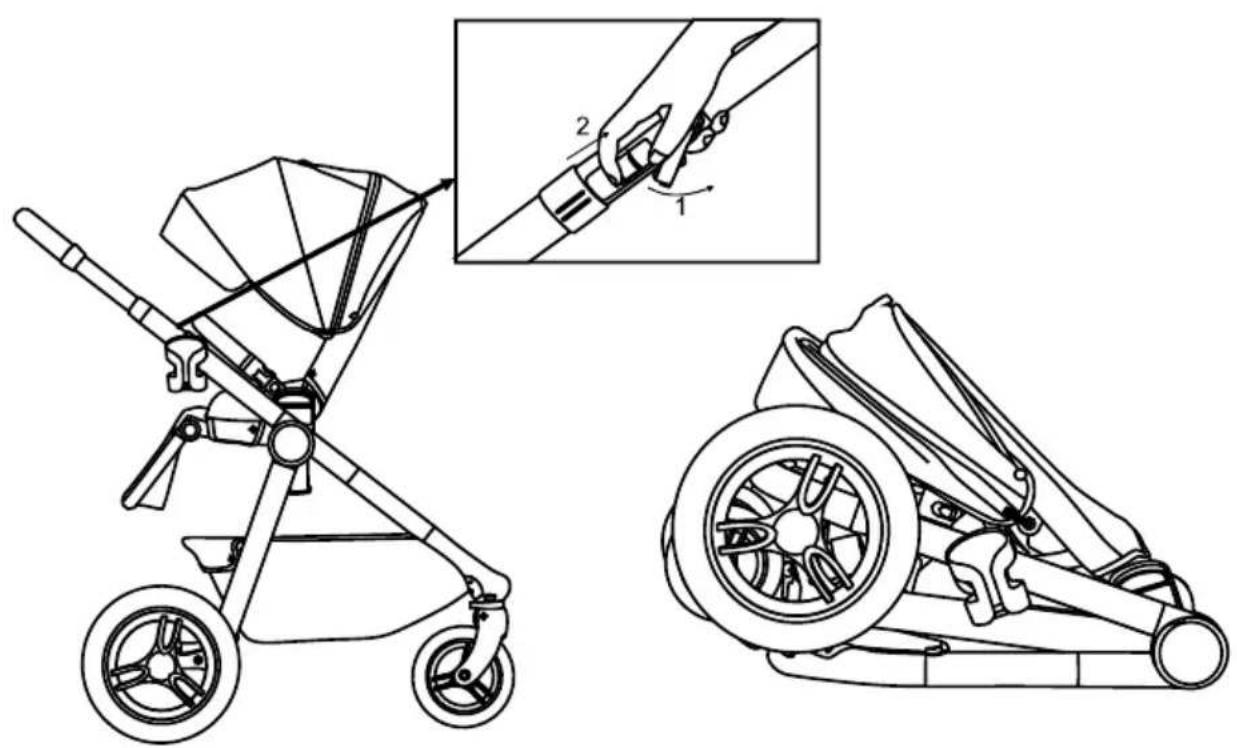
XI FOLDING BABY STROLLER Fold the canopy. At the same time, push the release button and pull both folding levers together to fold the canopy. When the stroller is completely folded, the locking element snaps in (Fig.Y). To reduce the size of the stroller when folded, lower the footrest. You can also set the backrest in the highest position for easy folding of the frame. The stroller can be folded with the front or rear-facing seat. The stroller has a standing position when folded, to do this, lock the front wheels for straight-ahead driving and set the parent's handle in the second position.
XII REMOVING THE SEAT COVER The seat cover can be removed for washing. First, remove the canopy by unlocking the hooks on both sides, disconnect the clips connecting the canopy to the cover and remove the canopy (Fig.Z). Then remove the belt on the underside of the seat, remove the Velcro on the footrest and then the four Velcro on the underside of the seat (Fig.A'). Remove the seat (Fig.B'). Remove the insert inside of the cover by first putting all shoulder and crotch straps through the holes in the insert and cover (Fig.C').
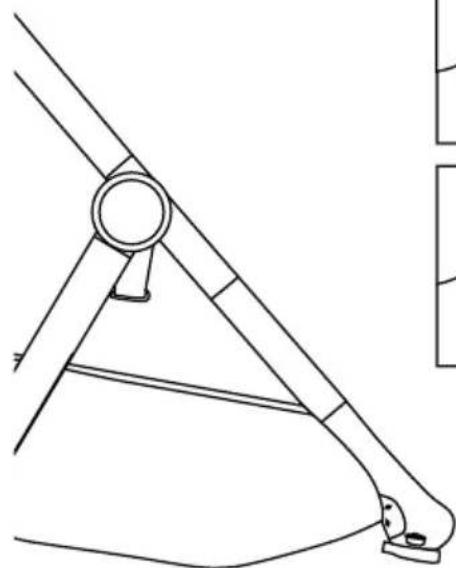
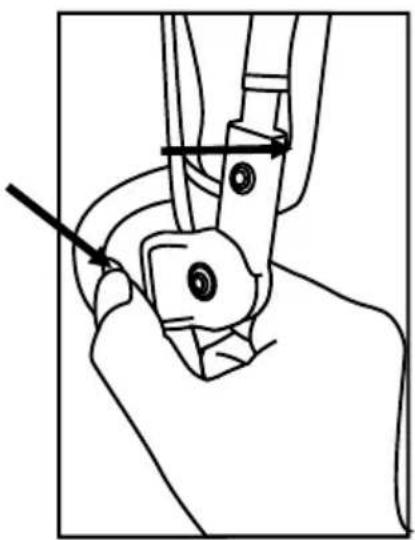
XII SUSPENSION ADJUSTMENT The suspension can be adjusted in two levels (soft "I" and hard "II") depending on the child's weight and type of surface. To adjust the suspension, move the lever on the rear axle to the desired position, as shown in Figure D'.
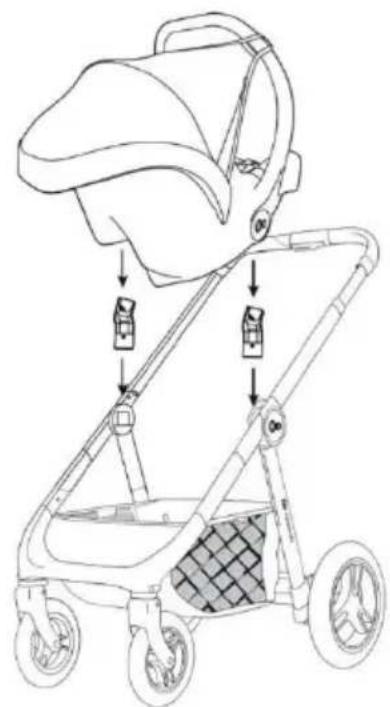
XIV CAR SEAT ASSEMBLY ON BUGGY FRAME The supplied Car seat adapters (18) are compatible with the following car seats: Kinderkraft®, Kiddy®, Maxi Cosi®, Cybex®, BeSafe®, Nuna® and they are suitable for the following models: Kinderkraft MINK, Kiddy Evoluna I-Size 2, Evolution Pro 2, Cybex Aton, Aton 2, Aton Q, Maxi Cosi Mico, Mico AP, Mico NXT, Mico Max 30, Citi, Cabrio, CabrioFix, BeSafe iZi Go, iZi Go Modular, Nuna Pipa. Place the Car seat adapters (18) on both side of the seat . When installing the car seat on the buggy frame, stick them in the designed slots, one on each side of the buggy until you hear a distinctive clock (Fig.E'). Removing the seat press the buttons on both sides and pull up. The car seat must always be fitted in such a way that the child should face the carer.
XV CARE AND MAINTENANCE The buyer is responsible for proper installation of all functional elements as well as for carrying out all required maintenance and adjustments in order to keep the buggy in good technical condition. The buggy
must be periodically checked for potential problems. Significant measures to be applied to ensure the child's safety and prevent shortening of the product life have been presented below:
- Check the strength and safety of all rivets and connections.
- Check all wheel locking equipment and tyres. If necessary, replace or repair.
- Check if all safety devices work properly, particularly the main and additional fasteners that should move freely at any time. Please stop using the buggy if there are doubts as to its proper use or a suspicion of any danger. Use only the spare parts supplied or recommended by the manufacturer. If the wheels squeak, apply a thin layer of silicone. Do not use oil or grease based products as they attract dirt, which makes it difficult for the wheels to move.
XVI CLEANING If the elements of the buggy chassis have been exposed to saltwater, rinse with tap water as soon as possible.
 | Wash at max. 30°C, gentle process. |  | Do not wash. Clean the product gently with a damp cloth and a mild detergent. |
 | Do not bleach |  | Do not iron |
 | Do not dry in a tumble dryer |  | Do not dry clean |
Do not fold or store the product when it is wet and never store it in wet conditions as it can lead to mould growth.
Seat cover, Mosquito net, Foot cover, Foot cover for pram body, Sun cover, Pram body cover, Mattress cover: Wash at max. 30°C, gentle process, Do not bleach, Do not dry in a tumble dryer, Do not iron, Do not dry clean.
Canopy, Canopy for pram body, Rain cover, Basket: Do not wash. Clean the product gently with a damp cloth and a mild detergent, Do not bleach, Do not dry in a tumble dryer, Do not iron, Do not dry clean.
XVII Warranty
- All Kinderkraft products are covered by a 24-month warranty. The warranty period starts from the date the product is handed over to the Buyer.
- The warranty is only valid in the member states of the European Union, excluding overseas territories (as currently defined, including in particular: Azores, Madeira, Canary Islands, French Overseas Departments, Åland Islands, Athos, Ceuta, Melilla, Helgoland, Büsingen am Hochrhein, Campione d'Italia and Livigno) and the territory of the United Kingdom of Great Britain and Northern Ireland excluding the British Overseas Territories (e.g. Bermuda, Cayman Islands, Falkland Islands).
- The manufacturer's warranty does not apply to countries not listed above. The conditions of the additional warranty may be determined by the Seller.
- In some countries, it is possible to extend the warranty to a limited period of 120 months (10 years). The complete terms and conditions and the warranty extension registration form are available at WWW.KINDERKRAFT.COM
- The warranty is valid only in the territory indicated in paragraph 2.
- Claims must be made by completing the form available at WWW.RMA.KINDERKRAFT.COM
- The warranty does not cover:
A. Cosmetic damage, including but not limited to: scratches, dents and cracks in plastic, unless the failure is due to a material or manufacturing defect;
B. Damage resulting from misuse or poor maintenance - including but not limited to: mechanical damage to products caused by misuse or poor maintenance;
o Refer to the instructions for use and installation of the product contained in the user manual;
C. Damage caused by improper assembly, installation or disassembly of products and/or accessories;
o Refer to the instructions for use and installation of the product contained in the user manual;
D. Damage caused by corrosion, mould or rust, resulting from improper maintenance, care and storage;
E. Damage caused by normal wear and tear or otherwise resulting from the normal passage of time;
- This includes: tears or punctures in inner tubes; tyre damage; tyre tread damage; fading of fabrics resulting from mechanical use (e.g. on joints and covering of moving parts);
F. Damage or erosion caused by sun, perspiration, detergents, storage conditions or frequent washing, etc;
G. Damage caused by accident, abuse, misuse, fire, contact with liquid, earthquake or other external causes;
H. Products that have been modified to change functionality without 4Kraft's written consent;
I. Products from which the serial number or lot number has been removed or tampered with in any way;
J. Damage caused by the use of third party components or products - including but not limited to: cup holders, umbrellas, reflectors, bells;
K. Damage caused by transport or by ground handling service providers.
- The warranty period for accessories included with the product is 6 months from the date of sale, excluding the faults described above.
- These warranty conditions are complementary to the Customer's statutory rights with respect to 4KRAFT sp. z o.o. The warranty does not exclude, limit or suspend the Customer's rights under warranty for defects in goods sold.
- The full text of the Terms and Conditions of the Warranty is available on the website WWW.KINDERKRAFT.COM
All rights to the present document belong entirely to 4Kraft Sp. z o.o. Any unauthorized use of them against their purpose, including in particular: using, copying, reproducing, making available - in whole or in part, without the consent of 4Kraft Sp. z o.o. may result in legal consequences.
ES
ESTIMADO CLIENTE!
(EN) In the interests of our Clients - we are at your disposal! If you have a problem with the product you received, contact us in the most convenient way for you!