A-Tour - Stroller Kindercraft - Free user manual and instructions
Find the device manual for free A-Tour Kindercraft in PDF.
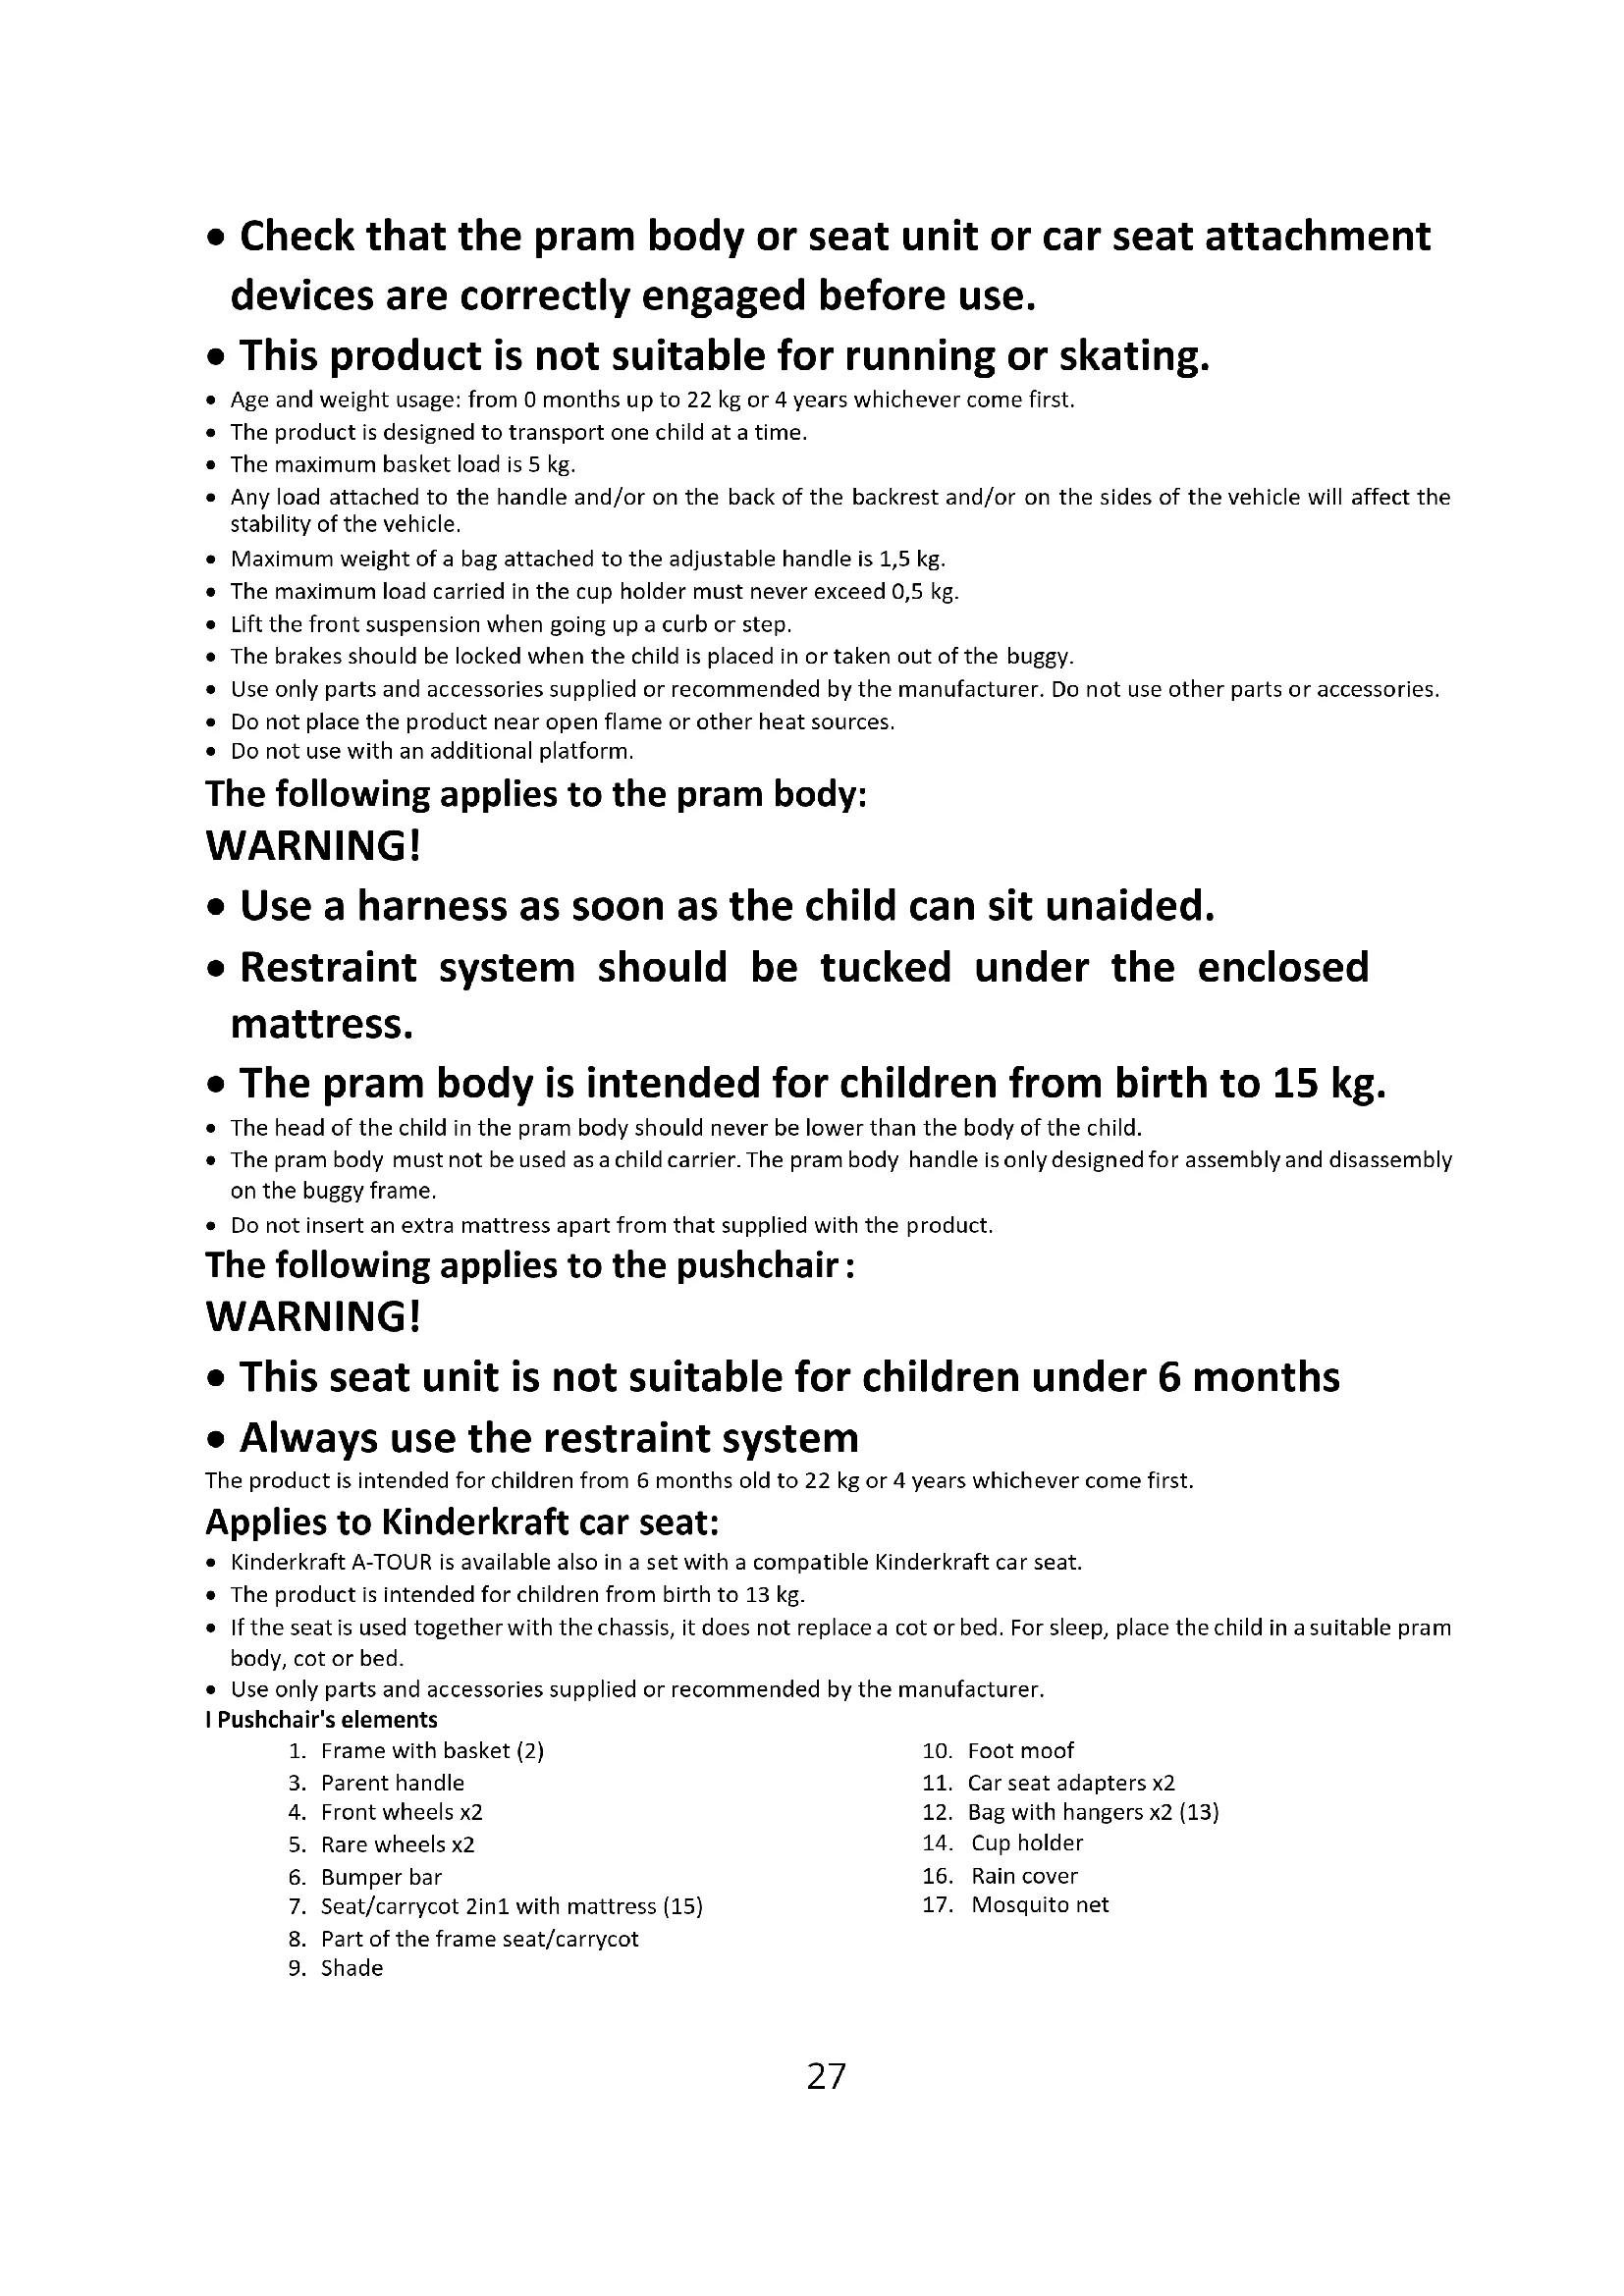
| Product Type | 2-in-1 convertible stroller (carry cot and seat) |
| Recommended Age | From birth to 4 years (up to 22 kg) |
| Maximum child weight (seat) | 22 kg |
| Maximum child weight (carry cot) | 15 kg |
| Maximum basket load | 5 kg |
| Maximum cup holder load | 0.5 kg |
| Maximum handle load (bag) | 1.5 kg |
| Wheels | 4 wheels, front swivel and lockable, inflatable |
| Brake | Foot-operated parking brake on rear axle |
| Harness | 5-point harness, height adjustable (2 shoulder positions) |
| Canopy | Extendable canopy with zipper |
| Parent handle | Height-adjustable |
| Backrest recline | 3 positions: fully reclined, semi-reclined, upright |
| Direction of travel | Reversible (rear-facing or forward-facing) |
| Included accessories | Rain cover, mosquito net, leg cover, cup holder, carrying bag, car seat adapters |
| Folding | Foldable with side lock, can be compacted |
| Maintenance | Hand or machine wash at 30-40°C depending on part, do not tumble dry |
| Warranty | 24 months, extendable up to 120 months upon registration |
| Safety standards | Compliant with current safety standards |
Frequently Asked Questions - A-Tour Kindercraft
User questions about A-Tour Kindercraft
0 question about this device. Answer the ones you know or ask your own.
Ask a new question about this device
Download the instructions for your Stroller in PDF format for free! Find your manual A-Tour - Kindercraft and take your electronic device back in hand. On this page are published all the documents necessary for the use of your device. A-Tour by Kindercraft.
USER MANUAL A-Tour Kindercraft
Available only in selected countries Details on kinderkraft.com

text_image
WATCH OUR PRODUCT FILMS!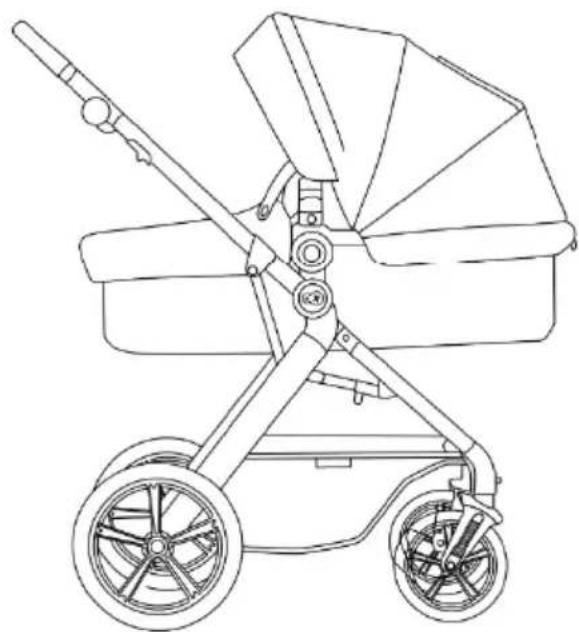
natural_image
Line drawing of a two-wheeled baby stroller with wheels and handle (no text or symbols)
kinderkraft.com

/kinderkraftufficiel

kinderkraft

@kinuerkraftefficial
(AR) عربة أطفال
(CS) Kočárek
(DE) Buggy
(EN) Stroller
(ES) Silla de paseo
(FR) Pousette
(HU) Babakocsi
(IT) Passeggino
دليل الاستخدام
NÁVOD K OBSLUZE
BEDIENUNGSANLEITUNG
USER MANUAL
MANUAL DE USARIO
GUIDE D'UTILISATION
HASZNÁLATI UTASÍTÁS
ISTRUZIONI PER UTENTE
(NL) Kinderwagen
(PL) Wózek
(PT) Carrinho de bebé
(RO) Cărucior
(RU) Прогулочная коляска
(SK) Kočík
(SV) Barnvagn
GEBRUIKSAANWIJZING
INSTRUKCJA OBSŁUGI
MANUAL DE INSTRUÇÕES
MANUAL DE UTILIZARE
natural_image
Simple line drawing of a curved mechanical component with mounting holes (no text or symbols)5
natural_image
Line drawing of a bicycle wheel with a handle and spokes (no text or symbols)
natural_image
Line drawing of a bicycle wheel with six spokes and a handle (no text or symbols)6

natural_image
Line drawing of a wheel with six spokes, no text or symbols present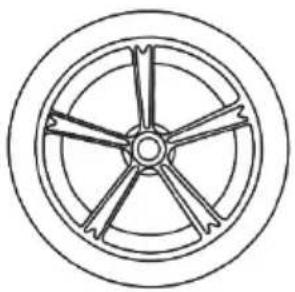
natural_image
Line drawing of a wheel with six spokes, no text or symbols present7+15
natural_image
Pure mechanical linkage diagram without any text, numbers, or symbols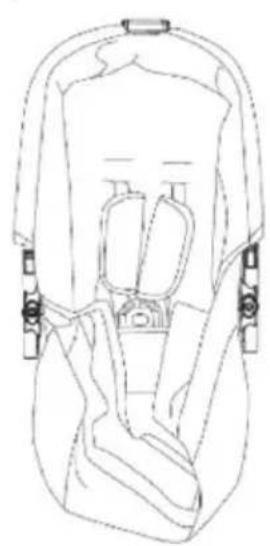
natural_image
Line drawing of a person wearing a seatbelt and arched seat (no text or symbols)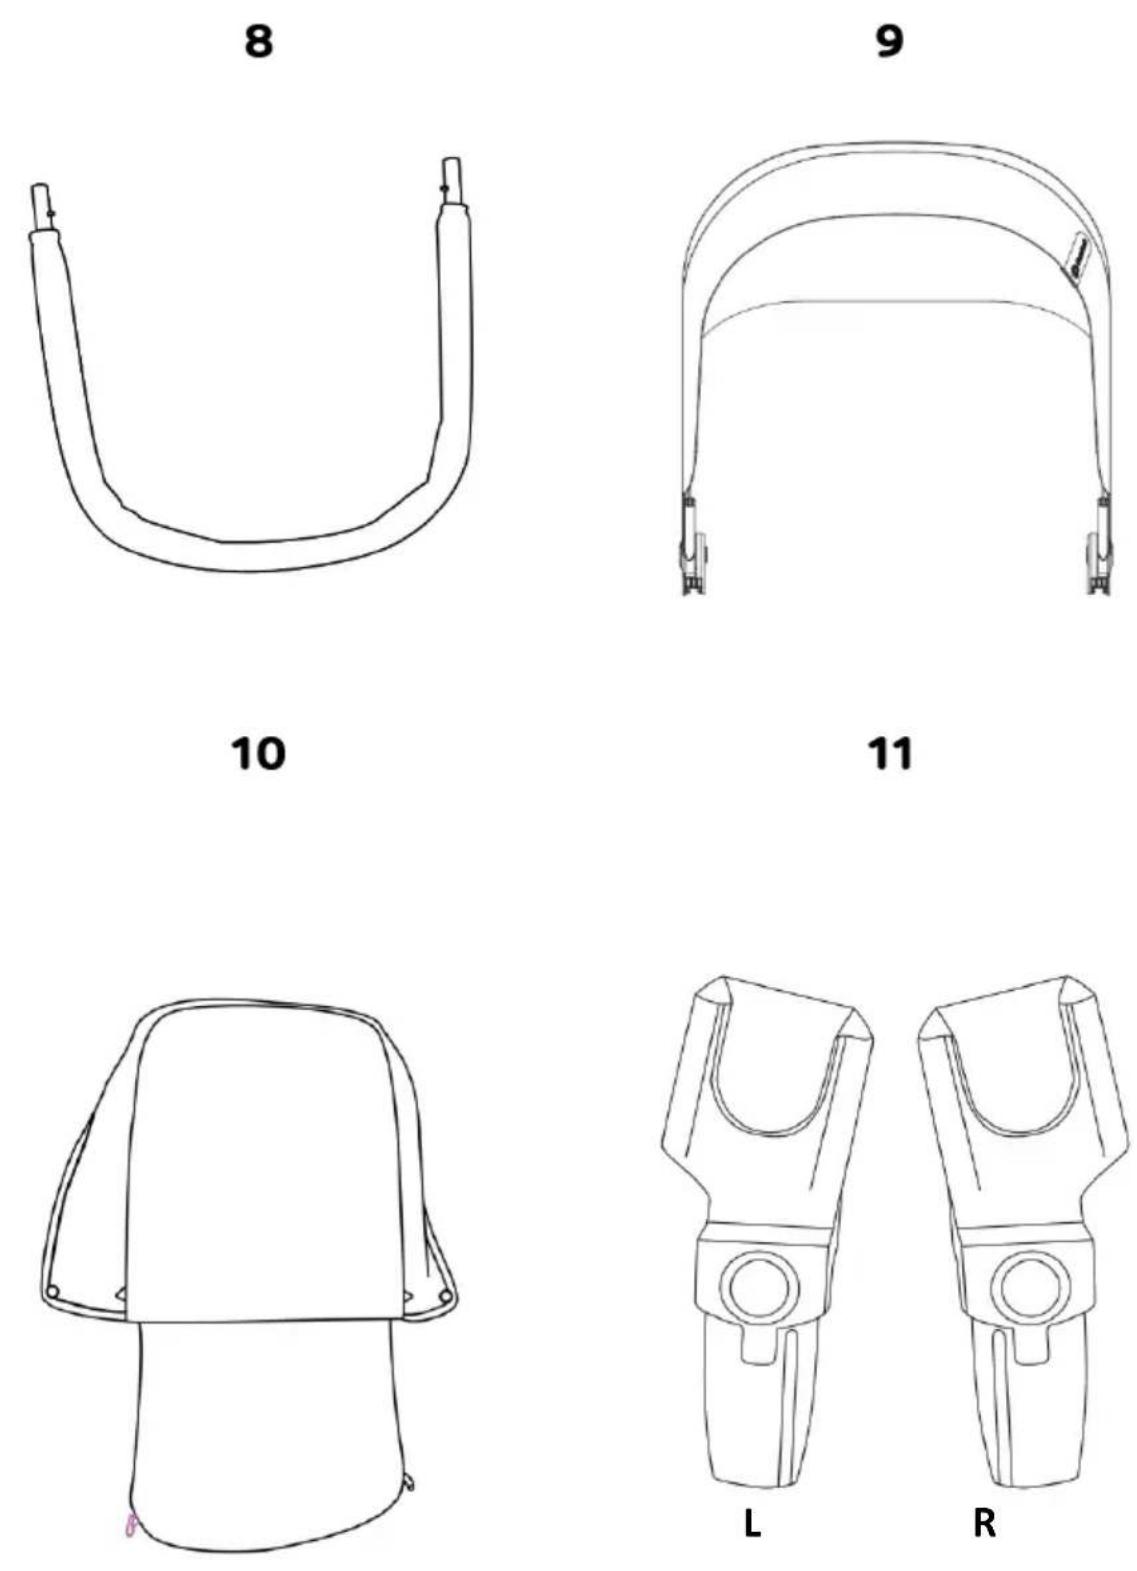
12+13
natural_image
Line drawing of a handbag with handles and two vertical test tubes (no text or symbols)14
natural_image
Line drawing of a mechanical component or bracket (no text or symbols)16
natural_image
Simple line drawing of a rectangular object with intersecting diagonal lines (no text or symbols)A
natural_image
Technical line drawing of a mechanical linkage or lever assembly with a highlighted circular component (no text or symbols)17
natural_image
Abstract geometric pattern with diagonal lines on a textured background (no text or symbols)B
text_image
CLICK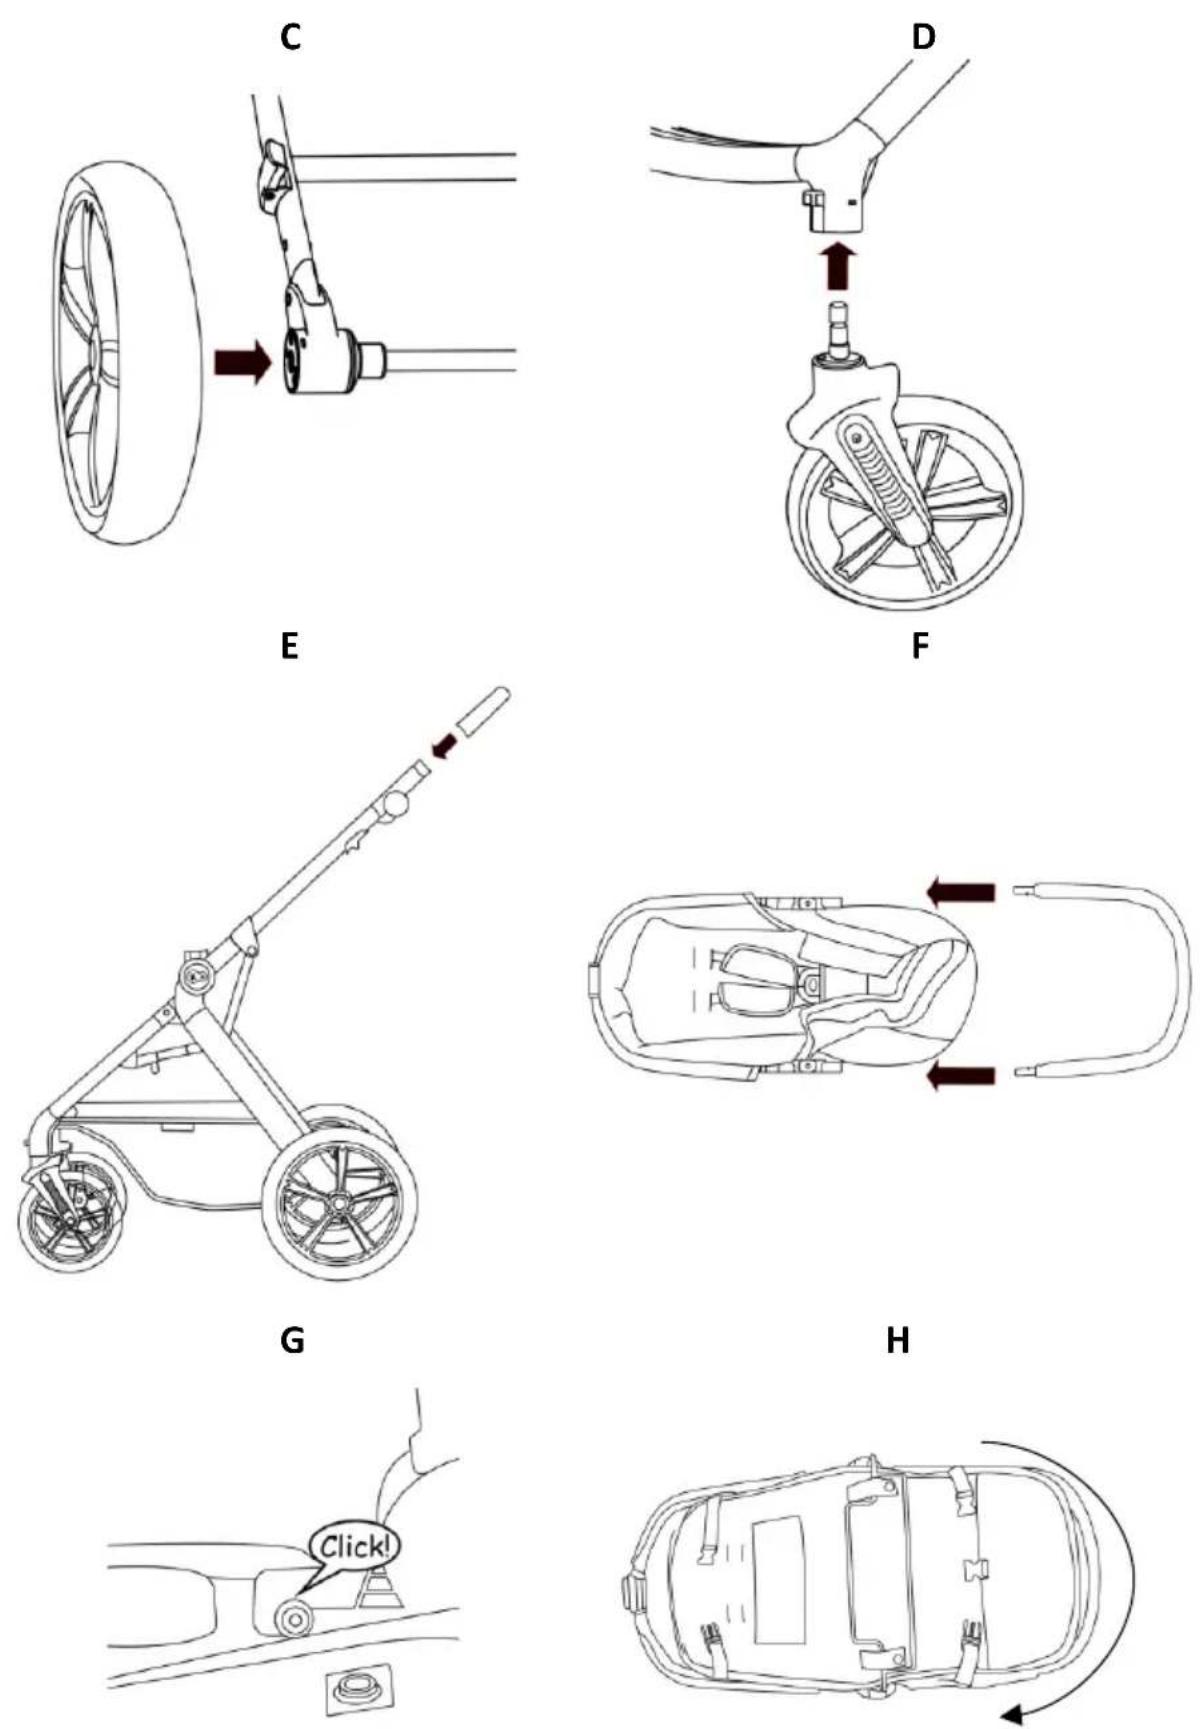
AR
Thank you for purchasing a Kinderkraft product. Our products have been designed for your child's safety and comfort. The buggy is an ideal solution for those who value quality, modernity and functionality. Please read the manual carefully and follow its recommendations.
IMPORTANT - READ CAREFULLY AND KEEP FOR FUTURE REFERENCE.
WARNING!
- Never leave the child unattended.
- Ensure that all the locking devices are engaged before use.
- To avoid injury ensure that the child is kept away when unfolding and folding this product.
-
Do not let the child play with this product.
-
Check that the pram body or seat unit or car seat attachment devices are correctly engaged before use.
-
This product is not suitable for running or skating.
-
Age and weight usage: from 0 months up to 22 kg or 4 years whichever come first.
- The product is designed to transport one child at a time.
• The maximum basket load is 5 kg. - Any load attached to the handle and/or on the back of the backrest and/or on the sides of the vehicle will affect the stability of the vehicle.
• Maximum weight of a bag attached to the adjustable handle is 1,5 kg. - The maximum load carried in the cup holder must never exceed 0,5 kg.
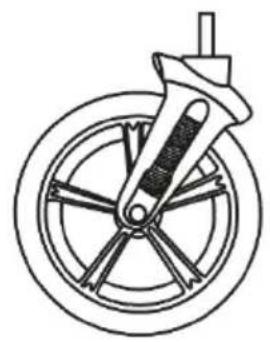
- Lift the front suspension when going up a curb or step.
- The brakes should be locked when the child is placed in or taken out of the buggy.
- Use only parts and accessories supplied or recommended by the manufacturer. Do not use other parts or accessories.
- Do not place the product near open flame or other heat sources.
- Do not use with an additional platform.
The following applies to the pram body:
WARNING!
- Use a harness as soon as the child can sit unaided.
- Restraint system should be tucked under the enclosed mattress.
-
The pram body is intended for children from birth to 15 kg.
-
The head of the child in the pram body should never be lower than the body of the child.
- The pram body must not be used as a child carrier. The pram body handle is only designed for assembly and disassembly on the buggy frame.
- Do not insert an extra mattress apart from that supplied with the product.
The following applies to the pushchair :
WARNING!
- This seat unit is not suitable for children under 6 months
- Always use the restraint system
The product is intended for children from 6 months old to 22 kg or 4 years whichever come first.
Applies to Kinderkraft car seat:
- Kinderkraft A-TOUR is available also in a set with a compatible Kinderkraft car seat.
- The product is intended for children from birth to 13 kg.
- If the seat is used together with the chassis, it does not replace a cot or bed. For sleep, place the child in a suitable pram body, cot or bed.
- Use only parts and accessories supplied or recommended by the manufacturer.
I Pushchair's elements
- Frame with basket (2)
- Parent handle
- Front wheels x2
- Rare wheels x2
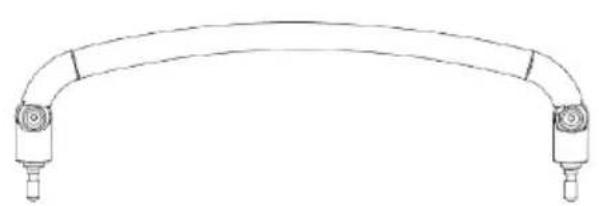
- Bumper bar
- Seat/carrycot 2in1 with mattress (15)
- Part of the frame seat/carrycot
-
Shade
-
Foot moof
- Car seat adapters x2
- Bag with hangers x2 (13)
- Cup holder
- Rain cover
- Mosquito net
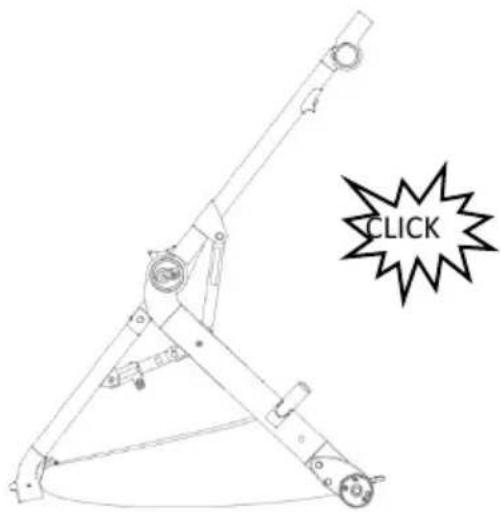
II FRAME ASSEMBLY To initially unfold the frame (1) with a basket (2), realise the hooks (PIC.A), and simultaneously pull both free ends of the frame until you hear a characteristic click of the lock (PIC. B). Slide the rear wheel axles (5) into designated slots until you hear the lock sound (PIC. C). Slide the front wheels (4) into designated slots until you hear the lock sound (PIC. D). Slide the ends of the parent handle (3) into the free ends of the frame (PIC. E). Make sure that the snap buttons are locked/secured.
WARNING! The buggy has pumped wheels. Do not exceed the maximum permissible pressure in the wheels, the value is indicated on the wheel tyres.
WARNING! Before using the buggy, make sure that all the wheels are properly installed.
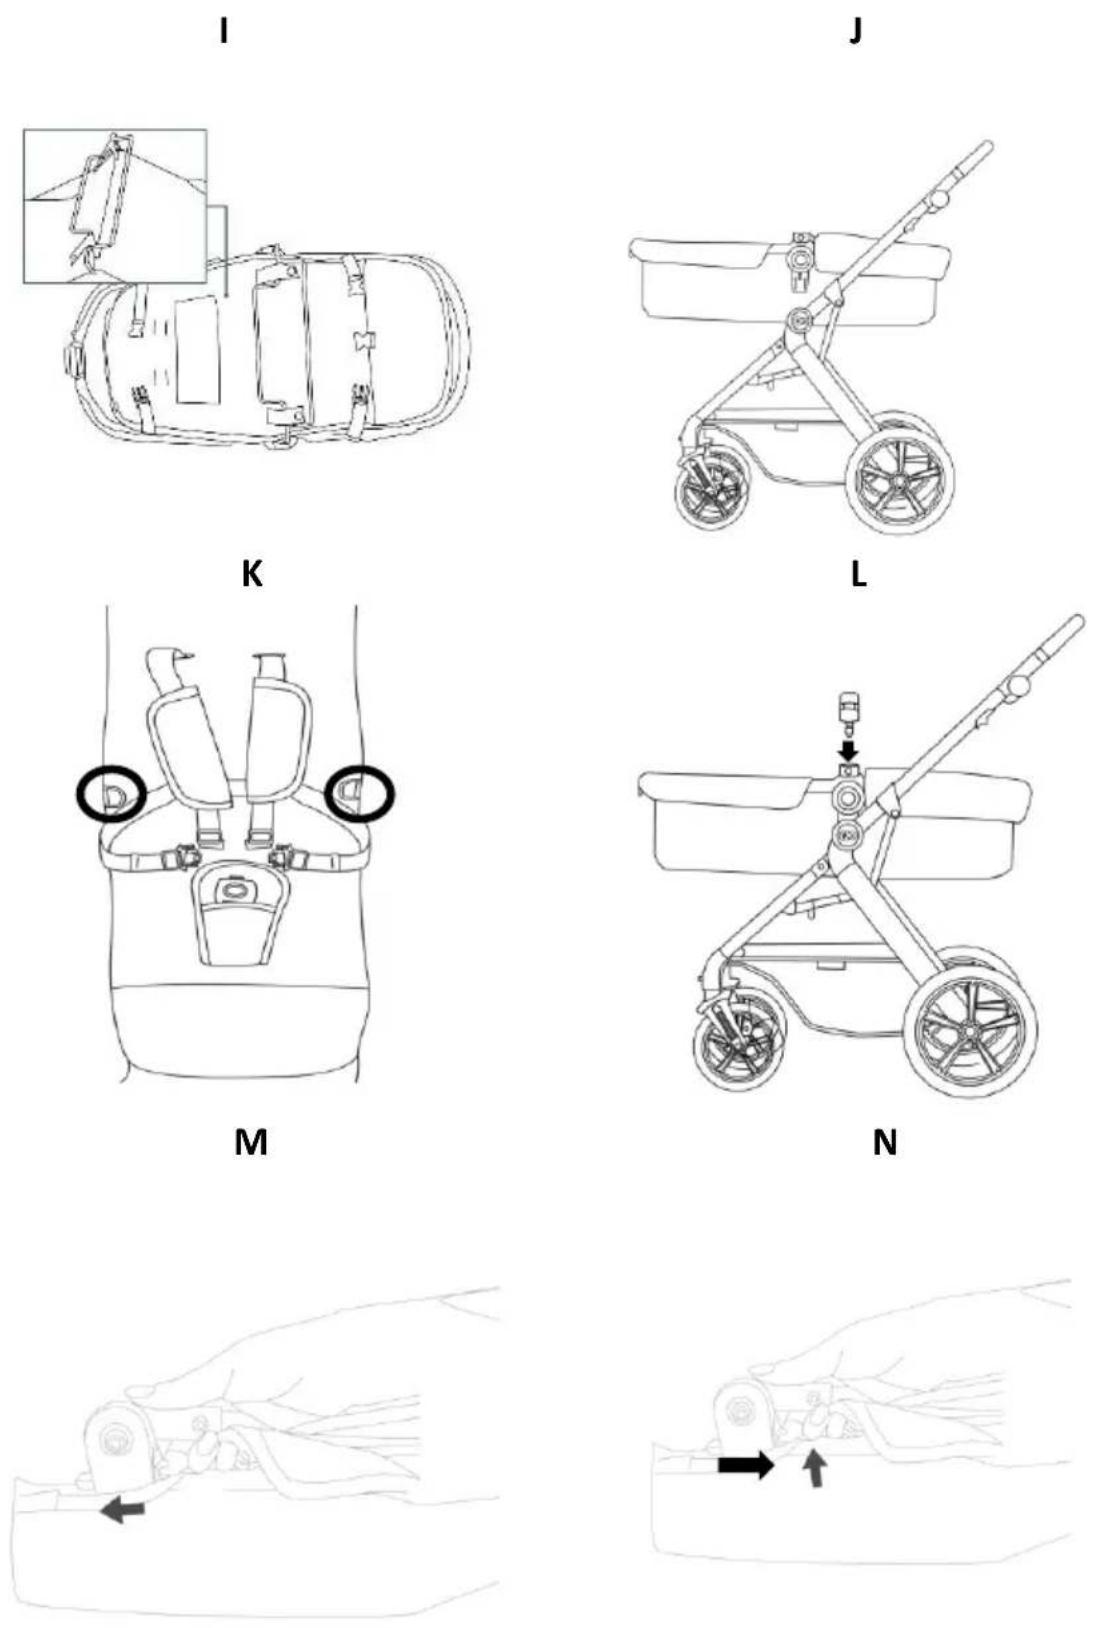
III CARRYCOT ASSEMBLY Start the assembly of the carrycot by sliding the loose part of the frame (8) into the carrycot slots (7) (PIC. F). Make sure that the snap buttons are locked (PIC.G). and zip around the perimeter of the attached part (PIC.H) (Set the position of the rod under the carrycot with the straps and secure it with the fasteners (PIC.I). Now, the carrycot can be fastened into the pushchair's frame (hear the lock sound of both sides of the pushchair) (PIC.J). The straps should be hidden under the included mattress when using the pushchair in the carrycot version. When using the carrycot version of the pushchair, the straps on the sides of the seat (2 on the left and 2 on the right) and under the footrest must remain unfastened. -CAUTION! When the child starts to sit up independently, attach an additional harness at the attachment points indicated in (PIC.K).
WARNING! THE PRAM BODY CAN ONLY BE MOUNTED FACING BACKWARDS (the child faces the person pushing the buggy).
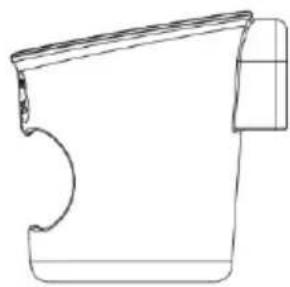
IV ASSEMBLY/DISASSEMBLY OF THE BUMPER BAR, SHADE, FOOT MOOF AND CUP HOLDER The bumper bar (6) can be used in both the carrycot and stroller versions of the pushchair. Slide the ends of the bumper bar into appropriate slots until you hear the lock sound on both sides (PIC. L). The bumper bar can be detached from the frame partly or as a whole by pressing the button on its side/sides.
NOTE! INSTALL THE CANOPY BEFORE USING THE BUGGY
Begin the assembly of the shade (9) by sliding the plastic mountings on the slideway on the frame of the carrycot/seat (PIC. M). Correct locking is signalised by a gentle click. In the end, secure the shade with hook and loop fasteners, fastening them into the carrycot/seat. To disassemble the shade, press the buttons (PIC.N) and slide out the mountings from the slideways.
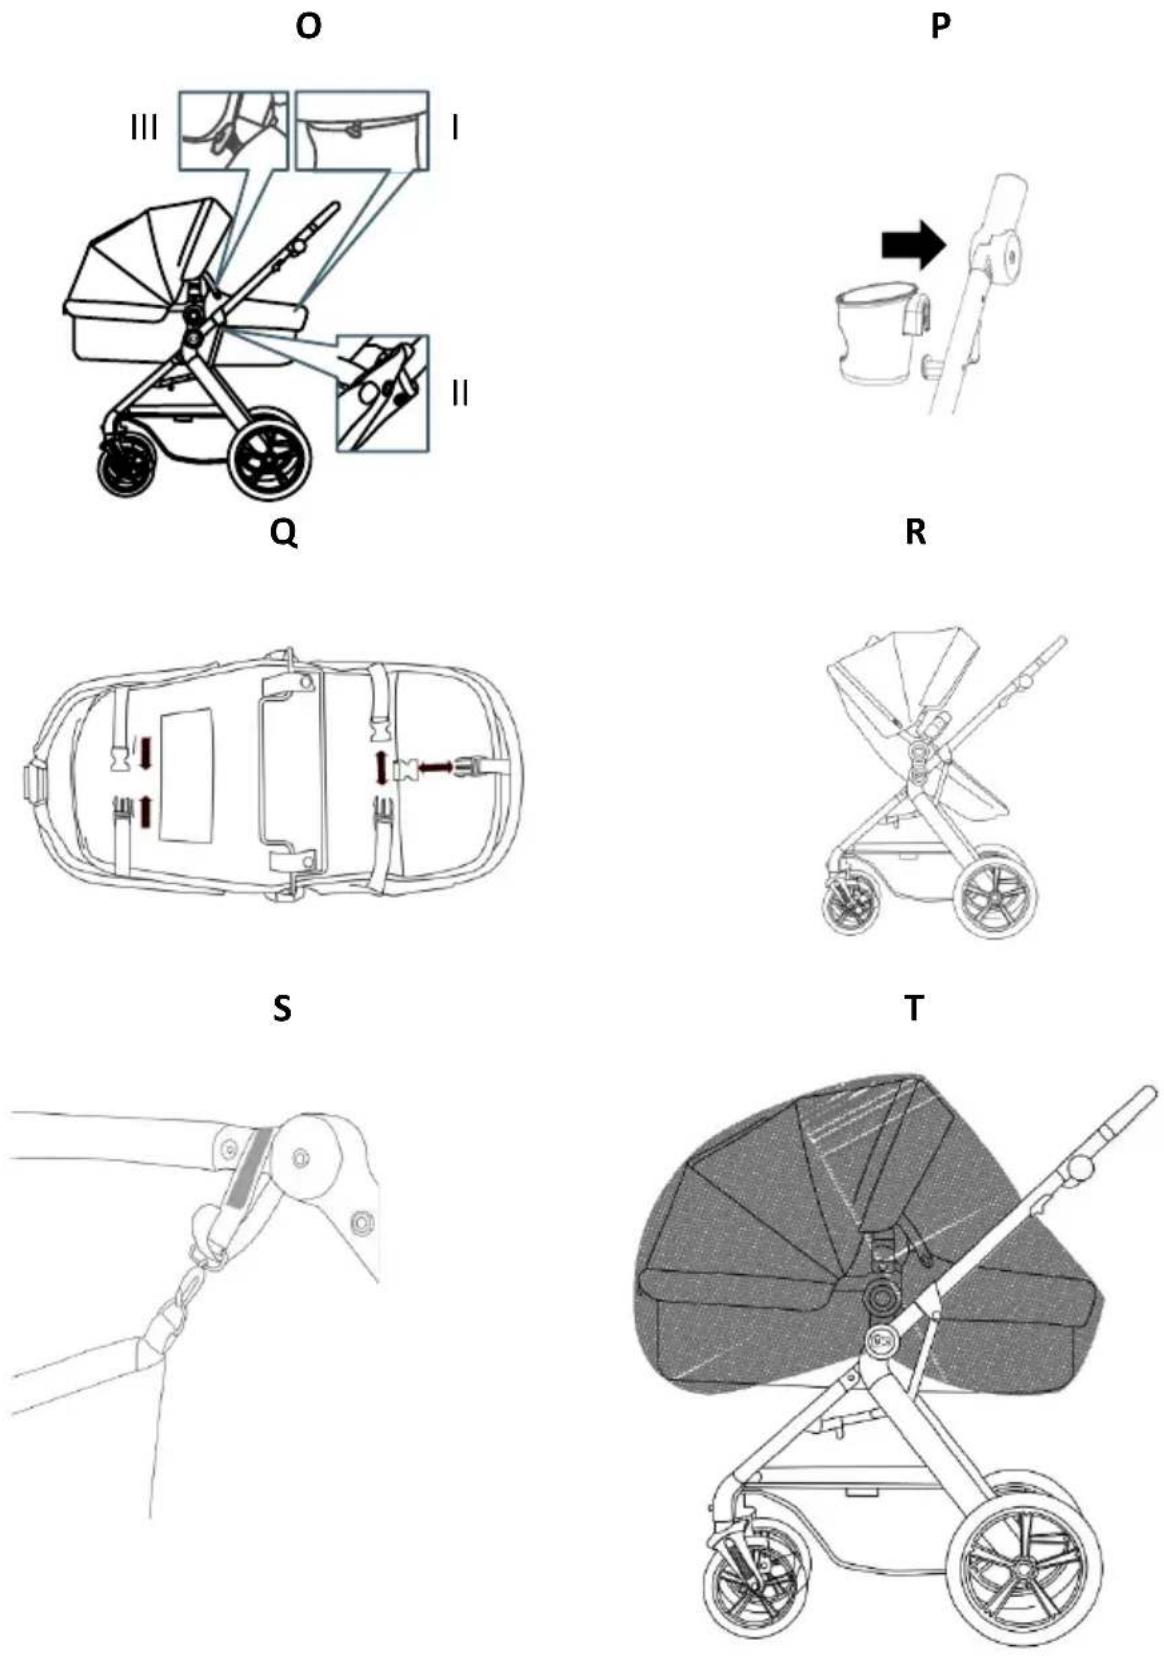
Begin the assembly of the foot moof (10) by slipping on the cover, then put the loop through the button at the bottom of the cover as shown (PIC. O-I). Attach the top part of the cover by the snaps located on both sides of the foot moof (PIC. O-II). Wrap the cover around both sides of the bar, and then insert the buttons through the loops on both sides (PIC. O-III). Assemble the cup holder (14) on the pin on the right side of the pushchair. (PIC. P).
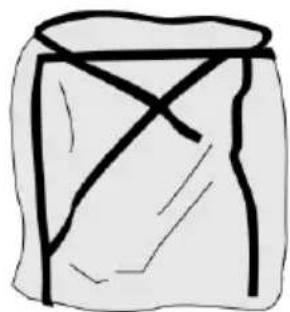
V TURNING THE CARRYCOT INTO THE SEAT To turn the carrycot into the seat, first connect the ends of the removed straps behind the backrest and under the seat and the footrest (PIC.Q). When the straps are correctly fastened, the seat should look as shown in (PIC.R), the seat can be fitted forwards or backwards (adjustment of seat angle described in section X). If you want to use the stroller with a mattress, put the shoulder, waist and crotch straps through the slots in the mattress.
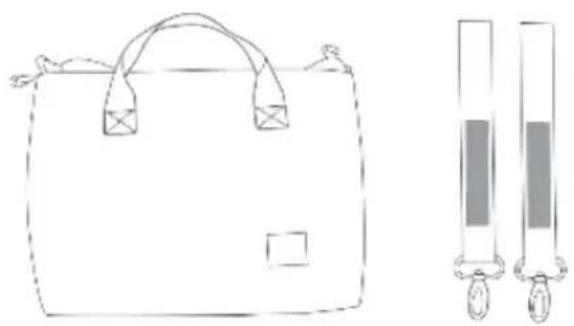
VI ASSEMBLY OF THE BAG, MOSQUITO NET, RAIN COVER
The pushchair set includes: bag (12), fabric hangers (13), rain cover (16) and a mosquito net (17). Hang the bag on the parent's handle using the hangers by pulling the strap through the metal loops and securing it with hoop and loop fasteners (PIC. S).
Place the mosquito net/ rain cover on the pushchair, secure it with a hoop and loop fasteners around the frame (PIC. T).
VII ASSEMBLY/DISASSEMBLY OF THE CAR SEAT The attached adapters (11) are compatible with car seats: Kinderkraft ^® , Kiddy ^® , Maxi Cosi ^® , Cybex ^® , BeSafe ^® , Nuna ^® and they fit, among others, for models: Kinderkraft Mink, Kiddy Evoluna i-Size 2, Kiddy Evolution Pro 2, Cybex Aton 5, Cybex Aton M, Cybex Aton M i-Size, Cybex Aton B2, Cybex Aton S2 i-Size, Cybex Cloud Z i-Size, Maxi Cosi Cabriofix i-Size, Maxi Cosi Pebble Pro, Maxi Cosi 360, Maxi Cosi Rock, Maxi Cosi Tinca, Maxi Cosi Citi, BeSafe izi Go Modular x1, Britax Romer Baby-Safe 3, Avionaut Pixel, Nuna Pipa next i-Size, Nuna Pipa lite, Nuna Pipa lite lx, Kinderkraft I-Lite
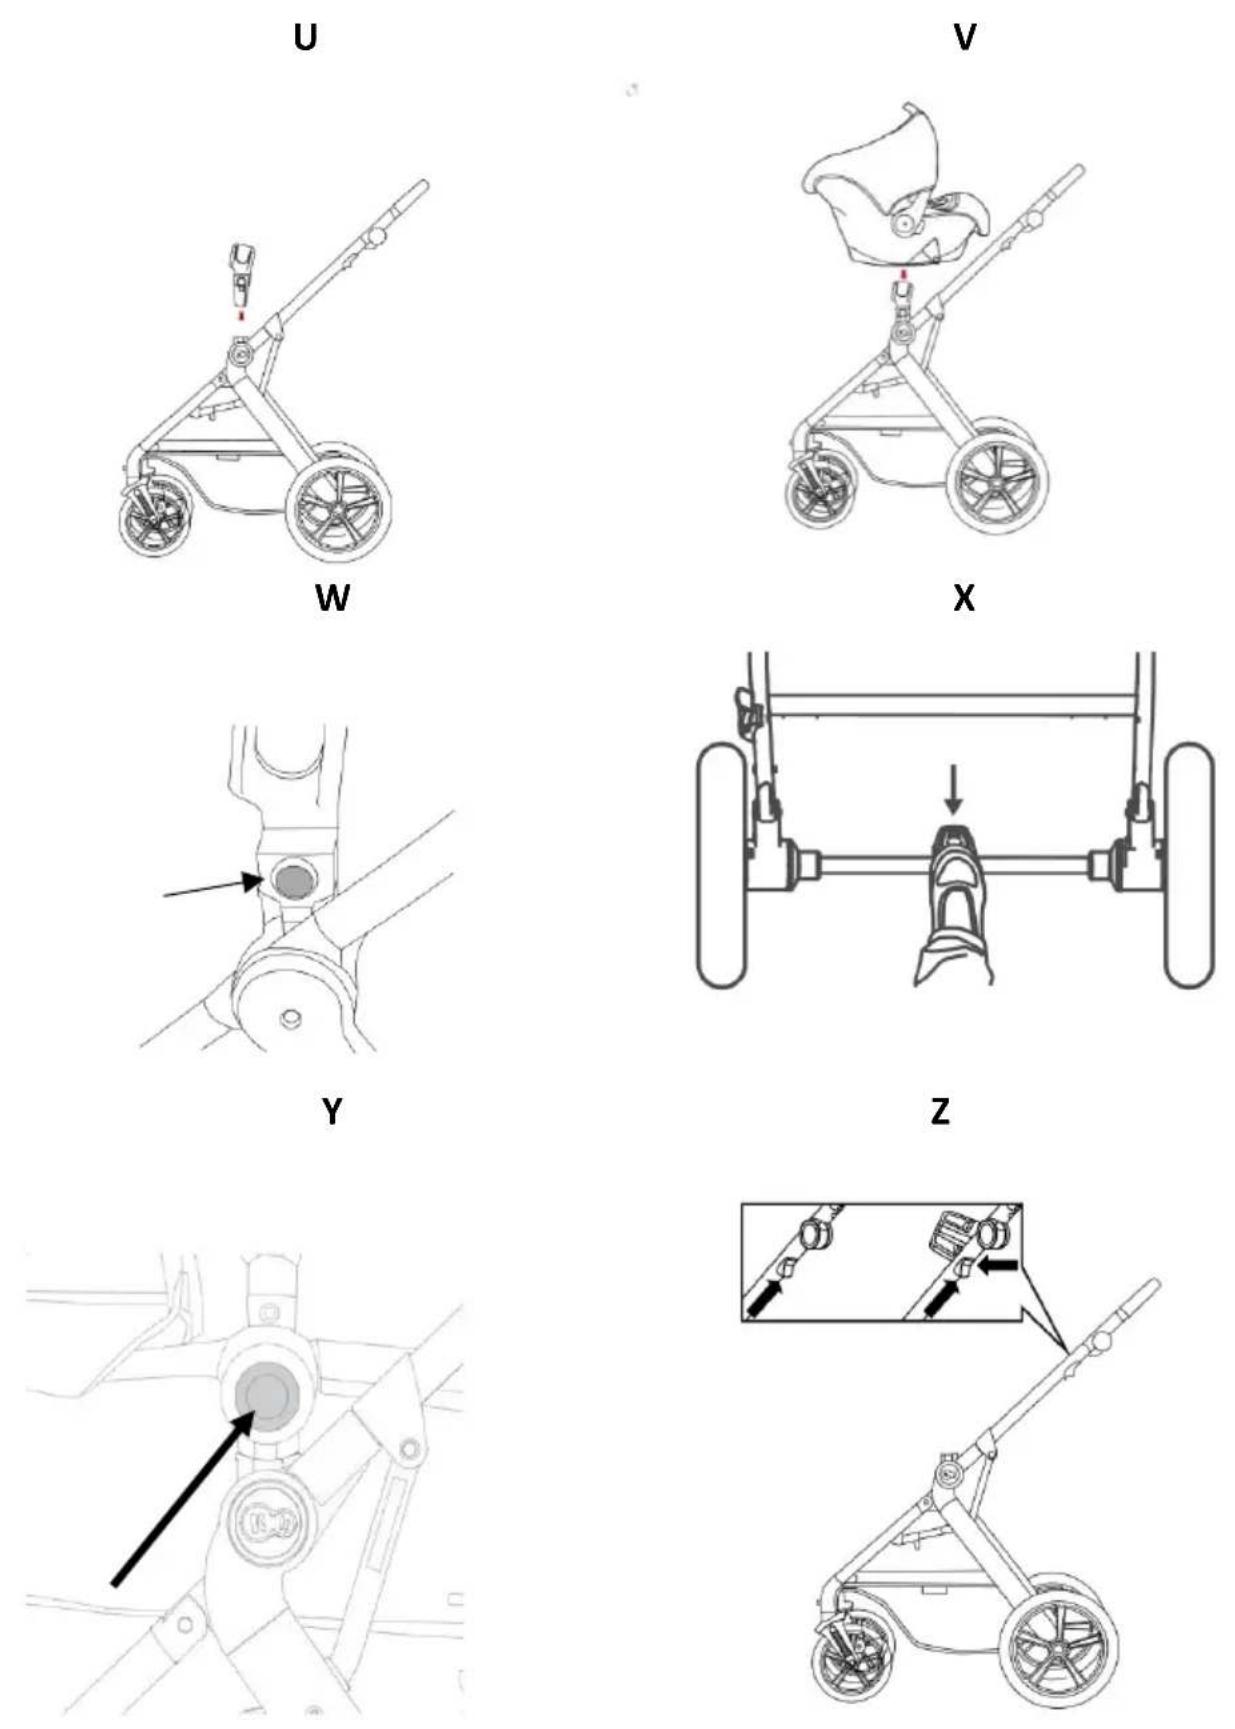
Slide the adapters into the slots in the frame until you hear the lock sound (PIC. U). Adapters shall be slightly leaned towards the parent. Slide the car seat onto the adapters and make sure it's secured correctly. The pushchair with a car
seat is shown on (PIC. V). To disassemble the adapters from the pushchair's frame, press the lock buttons on each adapter (PIC.W)
WARNING! The car seat must be always placed on the frame back to the direction of travel (the child should face the person pushing the buggy).
VIII USING THE BRAKE The pushchair is equipped with a foot brake for parking located on the rare axle. Press the brake pedal downwards to activate the brake. Unlocking the break happens by lifting the pedal upwards (PIC.X).
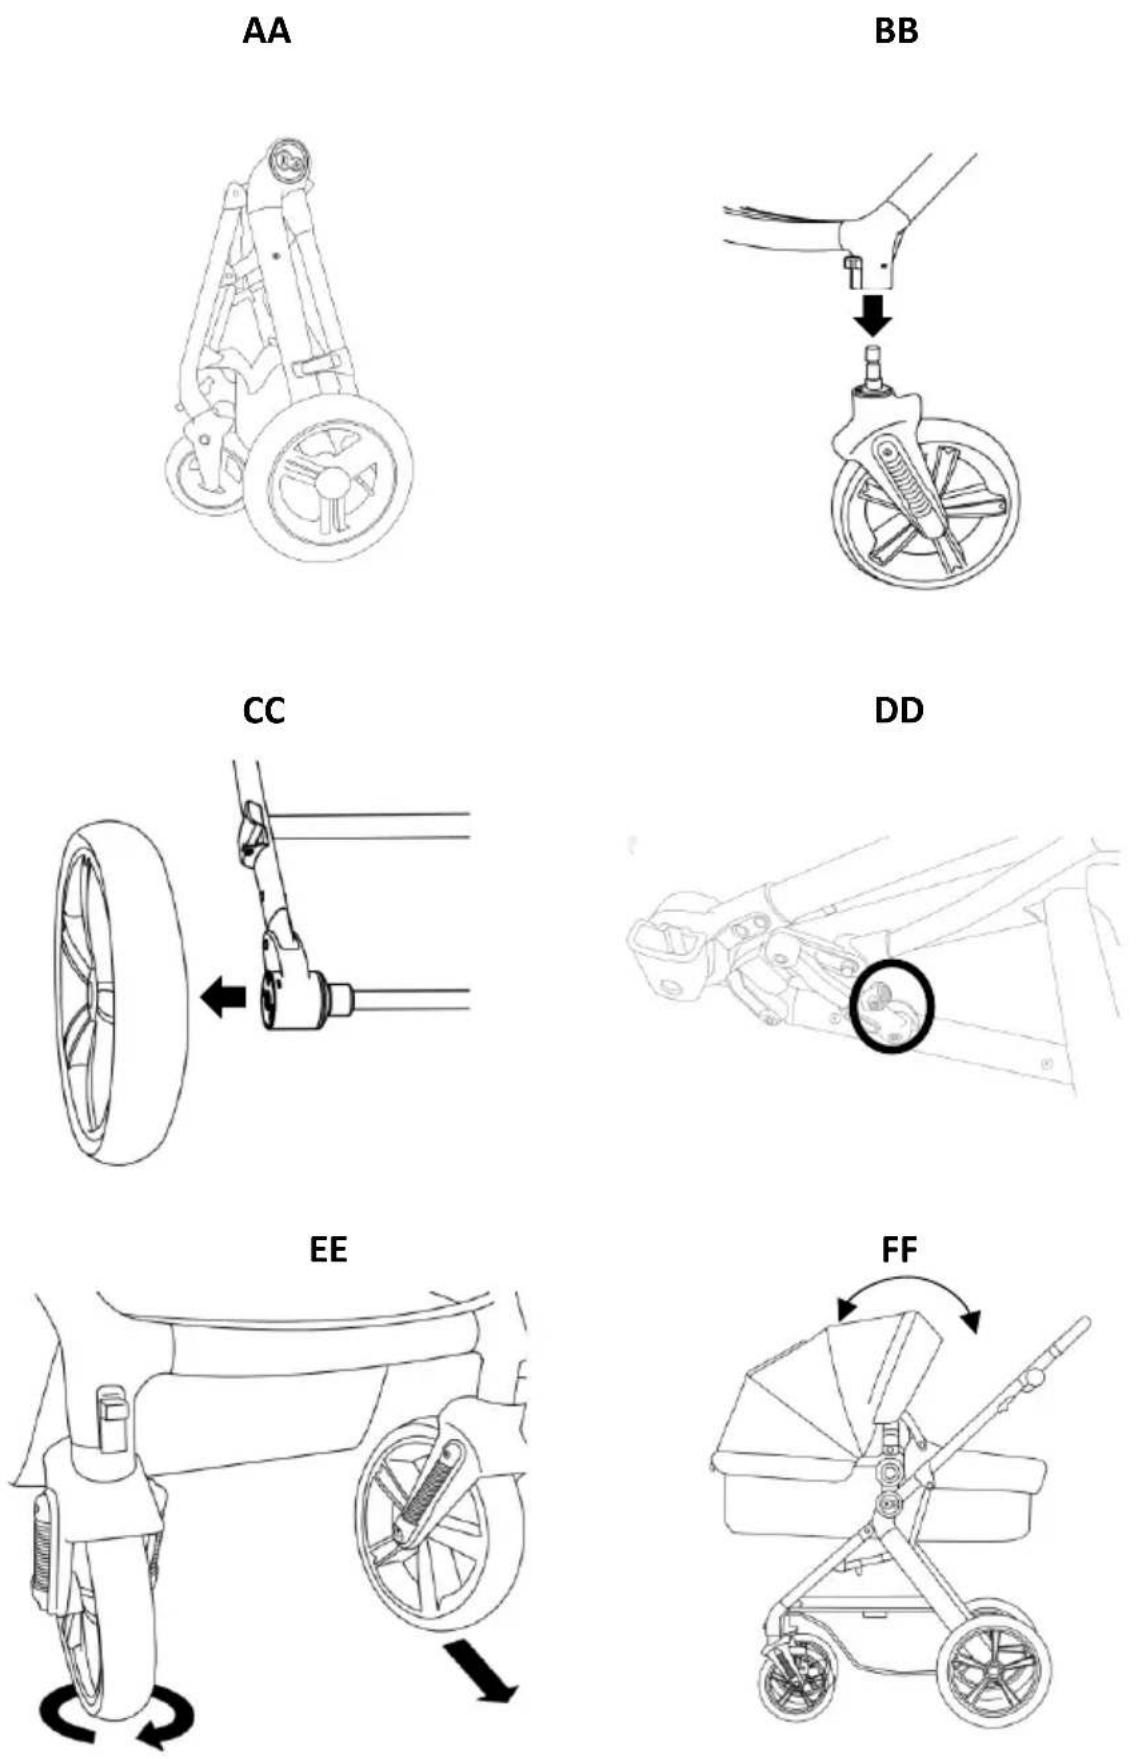
IX DISSASEMBLY OF THE PUSHCHAIR To disassemble the carrycot/seat of the frame, press the buttons located on both sides, placing your fingers at the bottom of the buttons as shown on (PIC. Y), and lift the carrycot/seat up. After removing the carrycot/seat or a car seat, turn the cup holder from your direction to the side, pressing the button and simultaneously pulling the handle on both sides of the frame, and at the end, push the parent handle downwards (PIC.Z). Correctly folded frame shall be secured with the side lock (PIC.AA): If necessary, the front (PIC.BB) and rear wheels (PIC.CC) can be detached from the frame after pressing the buttons. There is a possibility to minimise pushchair's dimensions after folding. To do so, press the buttons on both sides of the frame as shown on (PIC.DD).
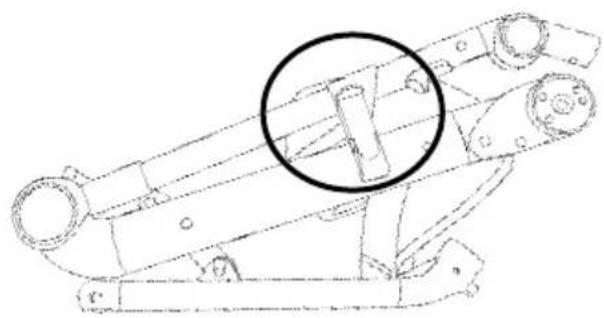
X ADJUSTING THE PUSHCHAIR Pushchair's front wheels have the possibility to be locked to ride straight. This mode is activated by lowering the lock sliders (PIC. EE).
To unlock the front wheels, pull the sliders up.
The shade can be enlarged by unzipping the zip on the outer side of the sheathing (PIC. FF).
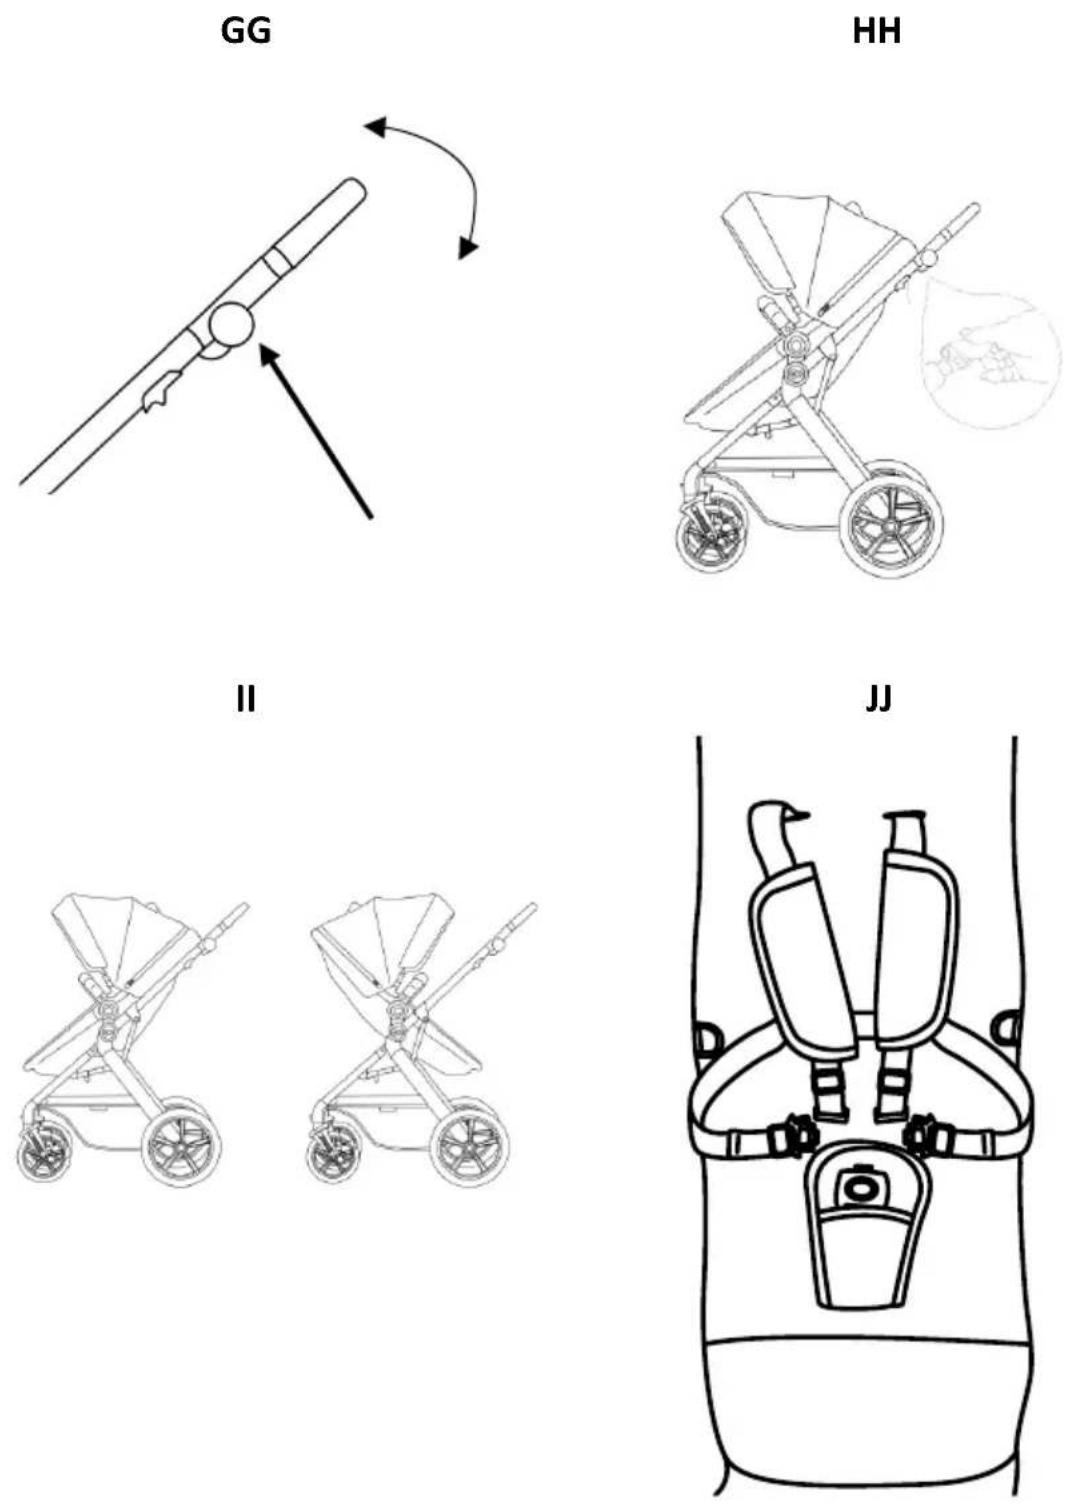
To adjust the parent handle, press the lock buttons on both sides of the pushchair and adjust the handle Aby to a comfortable height (PIC. GG)
The seat angle can be adjusted by a handle located at the top of the backrest (PIC. HH). The seat has 3 positions: lie-flat, reclining and sitting.
WARNING! For the lie-flat position of the seat, do not unbuckle the straps at the back of the backrest, this can cause the child's head to be positioned below the rest of the body
The seat is adjustable, enabling the child to face the parent or the direction of travel. To adjust the seat, press the buttons on both sides of the seat, flip it over and push it back until you hear a click (PIC.II).
XI SAFETY HARNESS To secure your child, connect the waist and shoulder strap hooks and then slide them into the central buckle till it locks (PIC. JJ). Adjust the safety harness at all times to secure your child properly.
Begin unbuckling the harness by pressing the button to open the buckle.
For smaller children who cannot independently sit up yet, the straps in the carrycot version should be hidden under the mattress. The seat/carrycot has attachment points for an additional harness.
Shoulder straps can be fixed at one of two heights.
XII CARE AND MAINTENANCE The buyer is responsible for proper installation of all functional elements as well as for carrying out all required maintenance and adjustments in order to keep the buggy in good technical condition.
The buggy must be periodically checked for potential problems. Significant measures to be applied to ensure the child's safety and prevent shortening of the product life have been presented below:
- Check the strength and safety of all rivets and connections.
- Check all wheel locking equipment and tyres. If necessary, replace or repair.
- Check if all safety devices work properly, particularly the main and additional fasteners that should move freely at any time.
Please, stop using the buggy if there are doubts as to its proper use or a suspicion of any danger.
If the wheels squeak, apply a thin layer of silicone. Do not use oil or grease based products as they attract dirt, which makes buggy movement difficult.
XIII CLEANING If the elements of the buggy chassis have been exposed to saltwater, rinse with tap water as soon as possible.
 | Do not wash. Clean the product gently with a damp cloth and a mild detergent |  | Hand wash at max. 40°. |
 | Wash at max. 30°C, gentle process |  | Do not dry in a tumble dryer |
 | Do not bleach |  | Do not dry clean |
 | Do not iron | ||
Do not fold or store the product when it is wet and never store it in wet conditions, as it can lead to mould growth. Sheathing of the carrycot/seat – Hand wash at max. 40°. Do not tumble dry. Do not clean chemically. Do not iron. Do not bleach.
Sheathing of the mattress, Mosquito net - Hand wash at max. 40°. Do not tumble dry. Do not clean chemically. Do not iron. Do not bleach.
Shade, Basket, Rain cover – Do not wash. The product can be washed gently with a damp cloth and a mild detergent. Do not tumble dry. Do not clean chemically. Do not iron. Do not bleach.
Footcover - Machine was at max. 30^ , gentle process. Do not bleach. Do not iron. Do not tumble dry. Do not clean chemically.
XIV Warranty
- All Kinderkraft products are covered by a 24-month warranty. The warranty period starts from the date the product is handed over to the Buyer.
- The warranty is only valid in the member states of the European Union, excluding overseas territories and the territory of the United Kingdom of Great Britain and Northern Ireland excluding the British Overseas Territories.
- The manufacturer's warranty does not apply to countries not listed above. The conditions of the additional warranty may be determined by the Seller.
- In some countries, it is possible to extend the warranty to a limited period of 120 months (10 years). The complete terms and conditions and the warranty extension registration form are available at WWW.KINDERKRAFT.COM
- Claims must be made by completing the form available at WWW.RMA.KINDERKRAFT.COM
- The warranty does not cover:
A. Cosmetic damage, including but not limited to: scratches, dents and cracks in plastic, unless the failure is due to a material or manufacturing defect;
B. Damage resulting from misuse or poor maintenance - including but not limited to: mechanical damage to products caused by misuse or poor maintenance. Refer to the Instructions for use and Installation of the product contained in the user manual;
C. Damage caused by improper assembly, installation or disassembly of products and/or accessories. Refer to the instructions for use and installation of the product contained in the user manual;
D. Damage caused by corrosion, mould or rust, resulting from improper maintenance, care and storage;
E. Damage caused by normal wear and tear or otherwise resulting from the normal passage of time. This includes: tears or punctures in inner tubes; tyre damage; tyre tread damage; fading of fabrics resulting from mechanical use (e.g. on joints and covering of moving parts);
F. Damage or erosion caused by sun, perspiration, detergents, storage conditions or frequent washing, etc;
G. Damage caused by accident, abuse, misuse, fire, contact with liquid, earthquake or other external causes;
H. Products that have been modified to change functionality without 4Kraft's written consent;
I. Products from which the serial number or lot number has been removed or tampered with in any way;
J. Damage caused by the use of third party components or products - including but not limited to: cup holders, umbrellas, reflectors, bells;
K. Damage caused by transport or by ground handling service providers. - The warranty period for accessories included with the product is 6 months from the date of sale, excluding the faults described above.
- These warranty conditions are complementary to the Customer's statutory rights with respect to 4KRAFT sp. z o.o. The warranty does not exclude, limit or suspend the Customer's rights under warranty for defects in goods sold.
- The full text of the Terms and Conditions of the Warranty is available on the website WWW.KINDERKRAFT.COM
ES
ESTIMADO CLIENTE!
(EN) In the interests of our Clients - we are at your disposal! If you have a problem with the product you received, contact us in the most convenient way for you!