USER MANUAL TRIG 3 Kindercraft
chemical
Simple molecular structure diagram showing two k orbitals with one k orbital
Kinderkraft
natural_image
Line drawing of a baby stroller with adjustable canopy and wheels (no text or symbols)
TRIG 3 USER GUIDE
(AR) عربة أطفال
(EN) Stroller
(CS) Kočárek
(DE) Buggy
(ES) Silla de paseo
(FR) Pousette
(HU) Babakocsi
(IT) Passeggino
(NL) Kinderwagen
(PL) Wózek
(PT) Carrinho de bebé
(RO) Cărucior
MANUAL DE INSTRUÇÕES
MANUAL DE UTILIZARE
AR....10
CS....11
DE....12
EN....14
ES....15
FR....17
HU....18
IT....20
NL 21
PL....23
PT....24
RO 26
RU....27
SK....29
SV 30
/ˌIustrace jsou pouze orientační a nepředstavují plné zobrazení produktu./Die gezeigten Bilder dienen nur als Referenz, das tatsächliche Produkt kann von der Abbildung abweichen./The illustrations are for illustration only and do not represent the product./Las ilustraciones son meramente orientativas y no constituyen una representación completa del producto./Les illustrations sont données à titre indicatif et ne constituent pas une représentation complète du produit./Az illusztrációk csak tájékoztató jellegüek és eltérhetnek a valós terméktöl./Le immagini sono inserite a scopo dimostrativo e non rispecchiano appieno le caratteristiche del prodotto./De afbeeldingen dienen uitsluitend ter illustratie en geven geen volledig beeld van het product./Ilustracje mają charakter pogladowy i nie stanowią pełnego odwzorowania produktu./As ilustrações têm uma função informativa e não são uma representação fiel do produto./ Ilustrațiile sunt doar pentru referință și nu reprezintă produsul complet./Иллюстрации приведены только для справки и не представляют весь продукт./Obrázky sluzia len na ilustraciu a nie sú uplnym predstavenim produktu./Illustrationer är endast för referens och representerar inte hela produkten.
A
natural_image
Line drawing of a mechanical cart or vehicle with wheels and a highlighted circular component (no text or symbols)
B
natural_image
Line drawing of a stroller with wheels and an upward arrow indicating motion (no text or symbols)
C
natural_image
Line drawing of a baby stroller with a speech bubble saying 'CLICK!' (no text on the diagram itself)
D
natural_image
Diagram showing a wheel and attached mechanical component with an arrow indicating direction (no text or symbols)
R
T
natural_image
Line drawing of a mechanical device with attached brackets and connectors (no text or symbols)
natural_image
Diagram of a car body with two circular indicators labeled II and I, showing structural details (no text or symbols present)
natural_image
Line drawing of a stroller with wheels and a downward arrow indicating direction (no text or symbols)
natural_image
Line drawing of a motorcycle chassis with wheels and wheel rim, no text or symbols present
U
V
AR
عميلنا العزيز،
- retirement/teffick highway
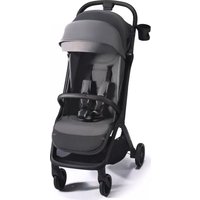
Thank you for purchasing a Kinderkraft product. Our products have been designed for your child's safety and comfort. The buggy is an ideal solution for those who value quality, modernity and functionality. Please read the manual carefully and follow its recommendations.
IMPORTANT - READ CAREFULLY AND KEEP FOR FUTURE REFERENCE.
WARNING!
• Never leave the child unattended.
- Ensure that all the locking devices are engaged before use.
- To avoid injury ensure that the child is kept away when unfolding and folding this product.
- Do not let the child play with this product.
• Always use the restraint system.
- Check that the pram body or seat unit or car seat attachment devices are correctly engaged before use.
- This product is not suitable for running or skating.
• Age and weight usage: from 0 months up to 22 kg or up to 4 years, whichever comes first.
• We recommend using lowest reclined position for newborn babies.
• This product may only be used by one child at the same time
• The parking device shall be engaged when placing and removing the children
• The maximum basket load is 3 kg.
• Do not hang any bags on the parent handle.
• Any additional load suspended from the buggy handles, backrest and sides will cause stability loss.
• Use only parts and accessories supplied or recommended by the manufacturer. Do not use other parts or accessories.
• Lift the front suspension when going up a curb or step.
• Do not place the product near open flame or other heat sources.
• Do not use with an additional platform.
- Please stop using the buggy if there are doubts as to its proper use or a suspicion of any danger.
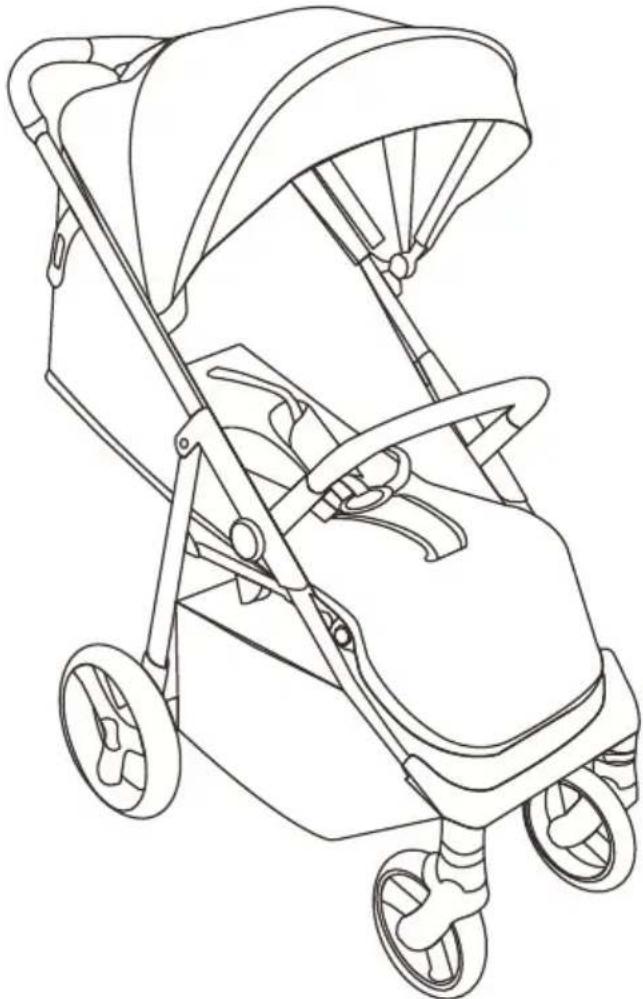
I. Elements of the wheelchair (FIG. 1)
-
frame with seat and (2) seat belts
-
front wheels
4 Rear wheels
5. safety bar
6. canopy
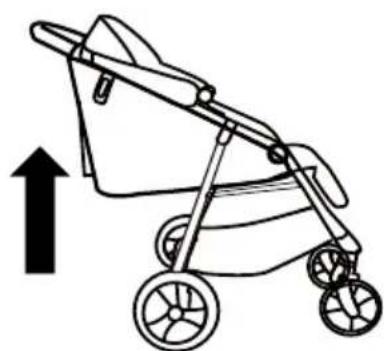
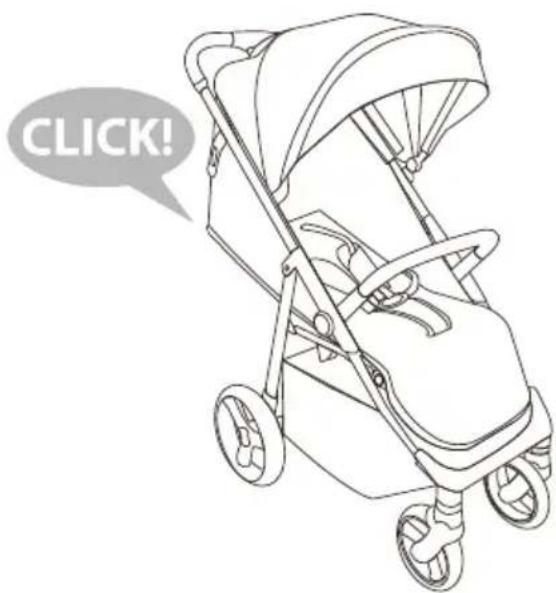
II. UNFOLDING THE FRAME OF THE PUSHCHAIR
Place the frame on a flat surface with the handle upwards. To unfold the frame, push back the lock (FIG. A) located on the right side of the pram and lift the frame up (FIG. B) until you hear the lock (FIG. C).
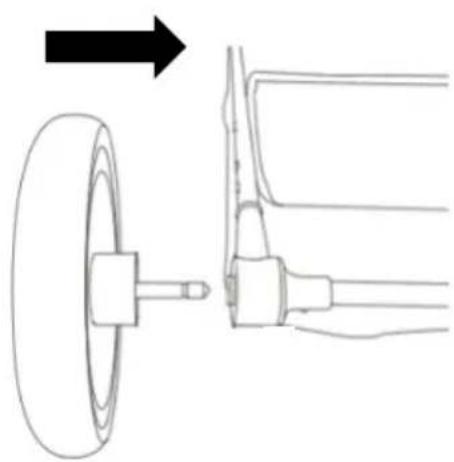
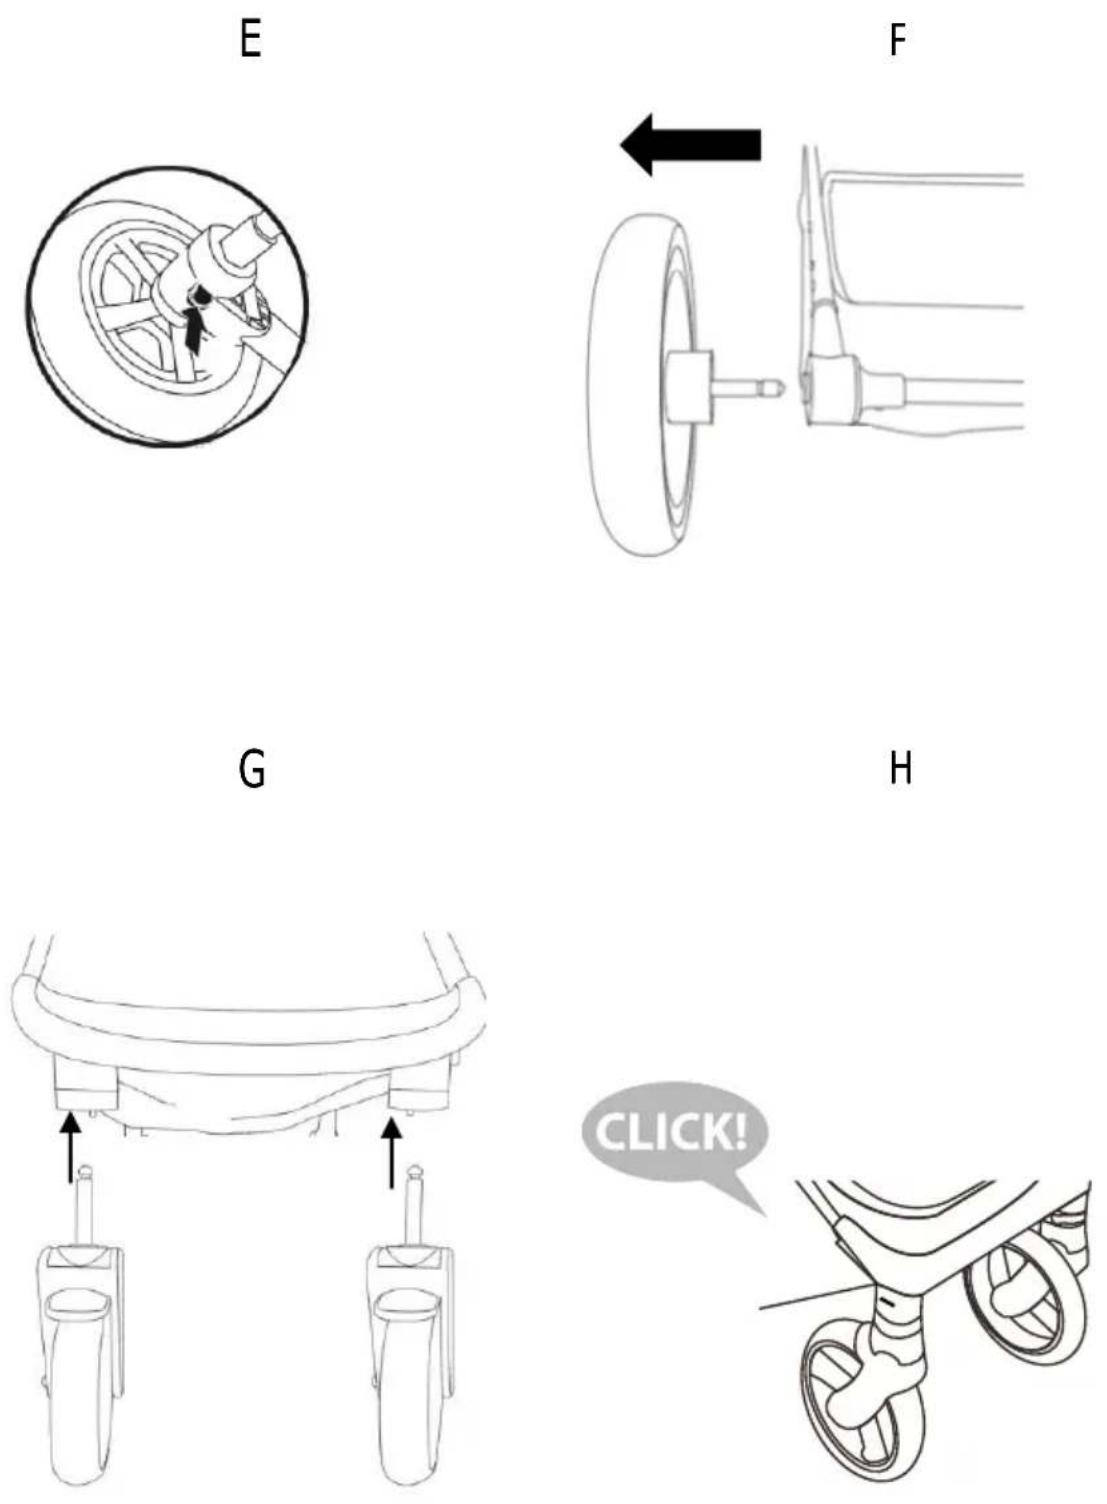
III. MOUNTING/REMOVING THE WHEELS
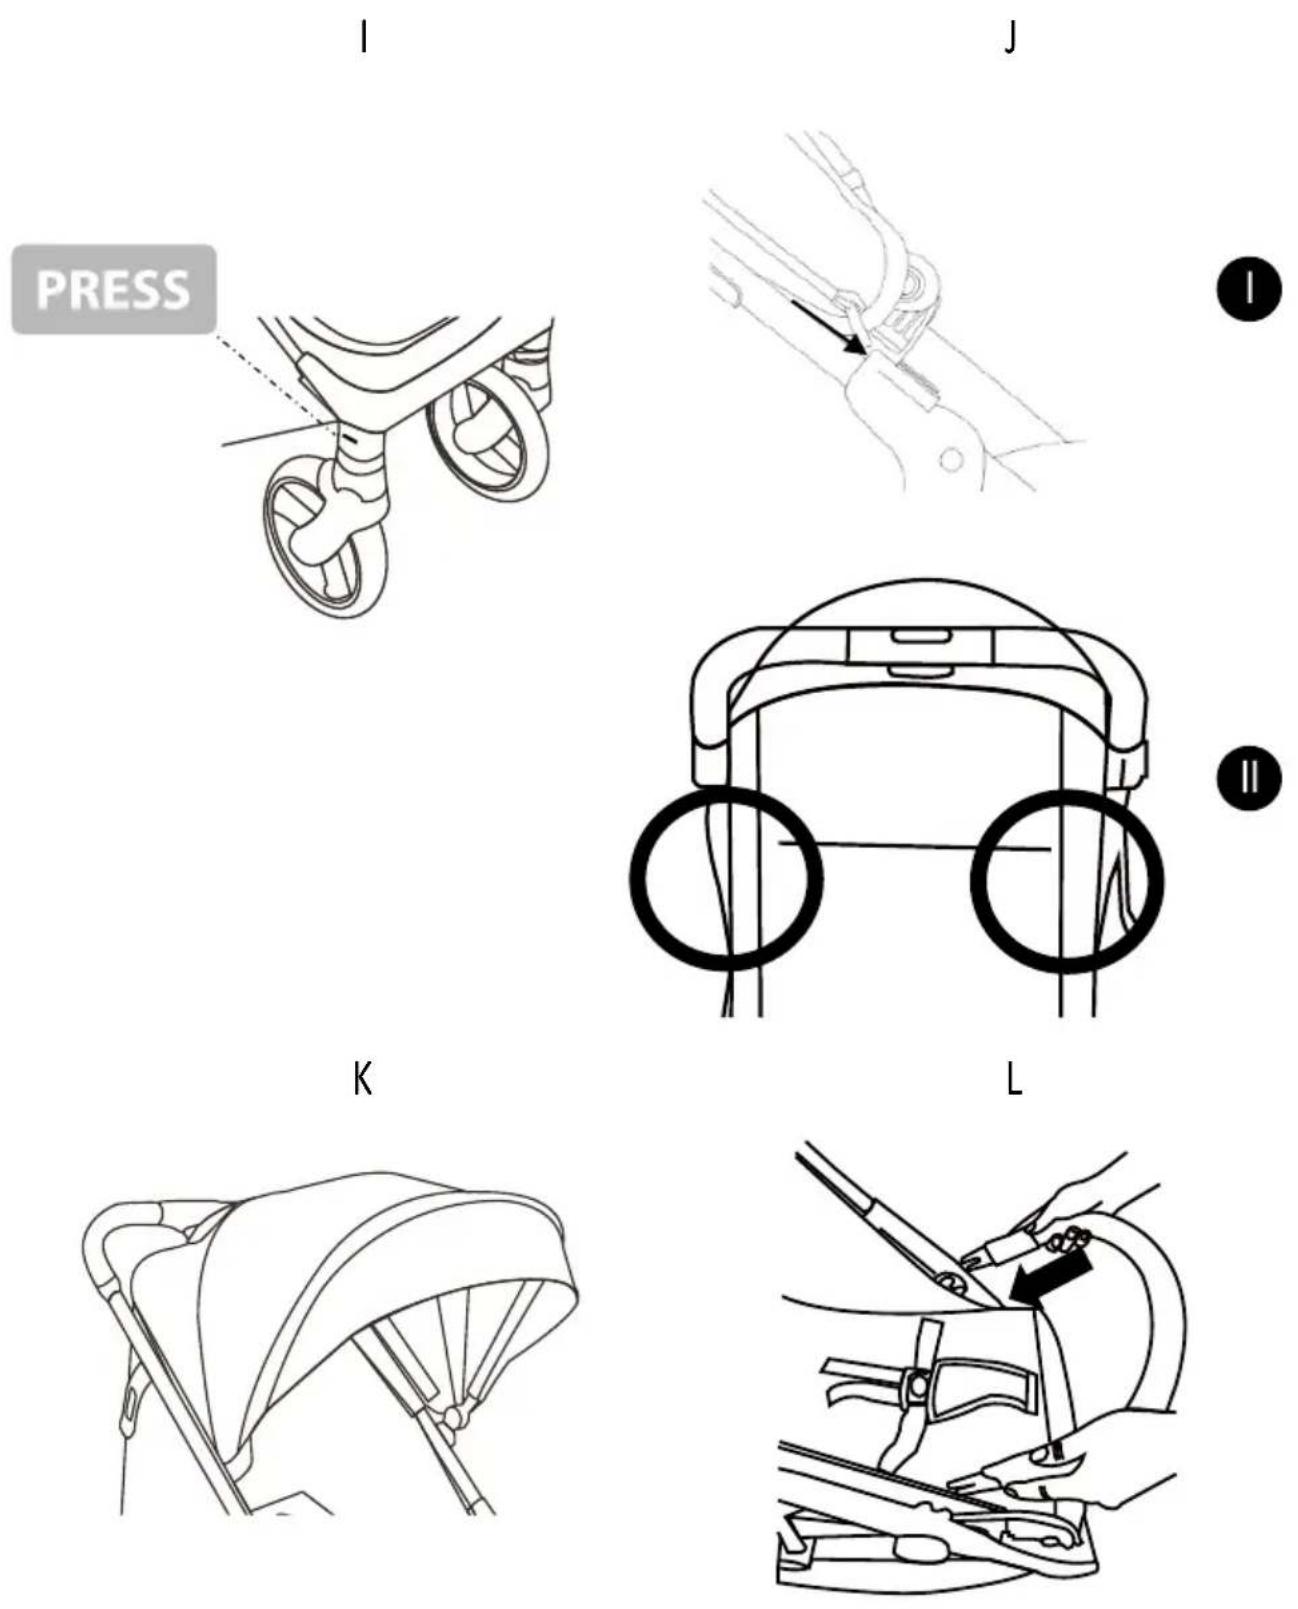
Insert the rear wheels into the hole in the rear axle until they lock completely (FIG. D). To remove the rear wheels, press the lock button located on either side of the rear axle (FIG. E) while simultaneously pulling the wheel out of the hole (FIG. F). In sert the front wheels in the front axle (FIG. G) until you hear the locking sound (FIG. H). To remove the front wheels, press the quick release button located under the footrest above each wheel (FIG. I). The wheelchair has a swivel front wheel system with the ability to lock for straight ahead travel. To lock the wheel for straight ahead driving, move the ring located above the wheel.
NOTE! Before using the buggy, make sure that all the wheels are properly installed.
IV. CANOPY INSTALLATION
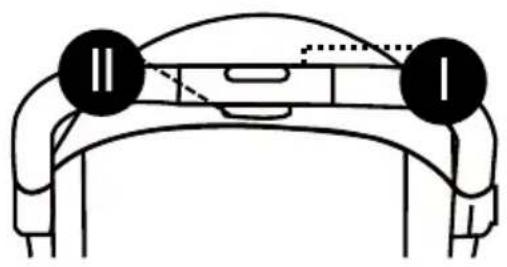
When mounting the canopy, slide the hooks into the guides on either side of the frame until they lock (FIG. J.I). And secure it with Velcro (FIG. J.II) The correctly mounted canopy is shown in FIG. K. To unfold the next layer of canopy, undo the lock on the canopy.
V. FITTING/REMOVING THE SAFETY BAR
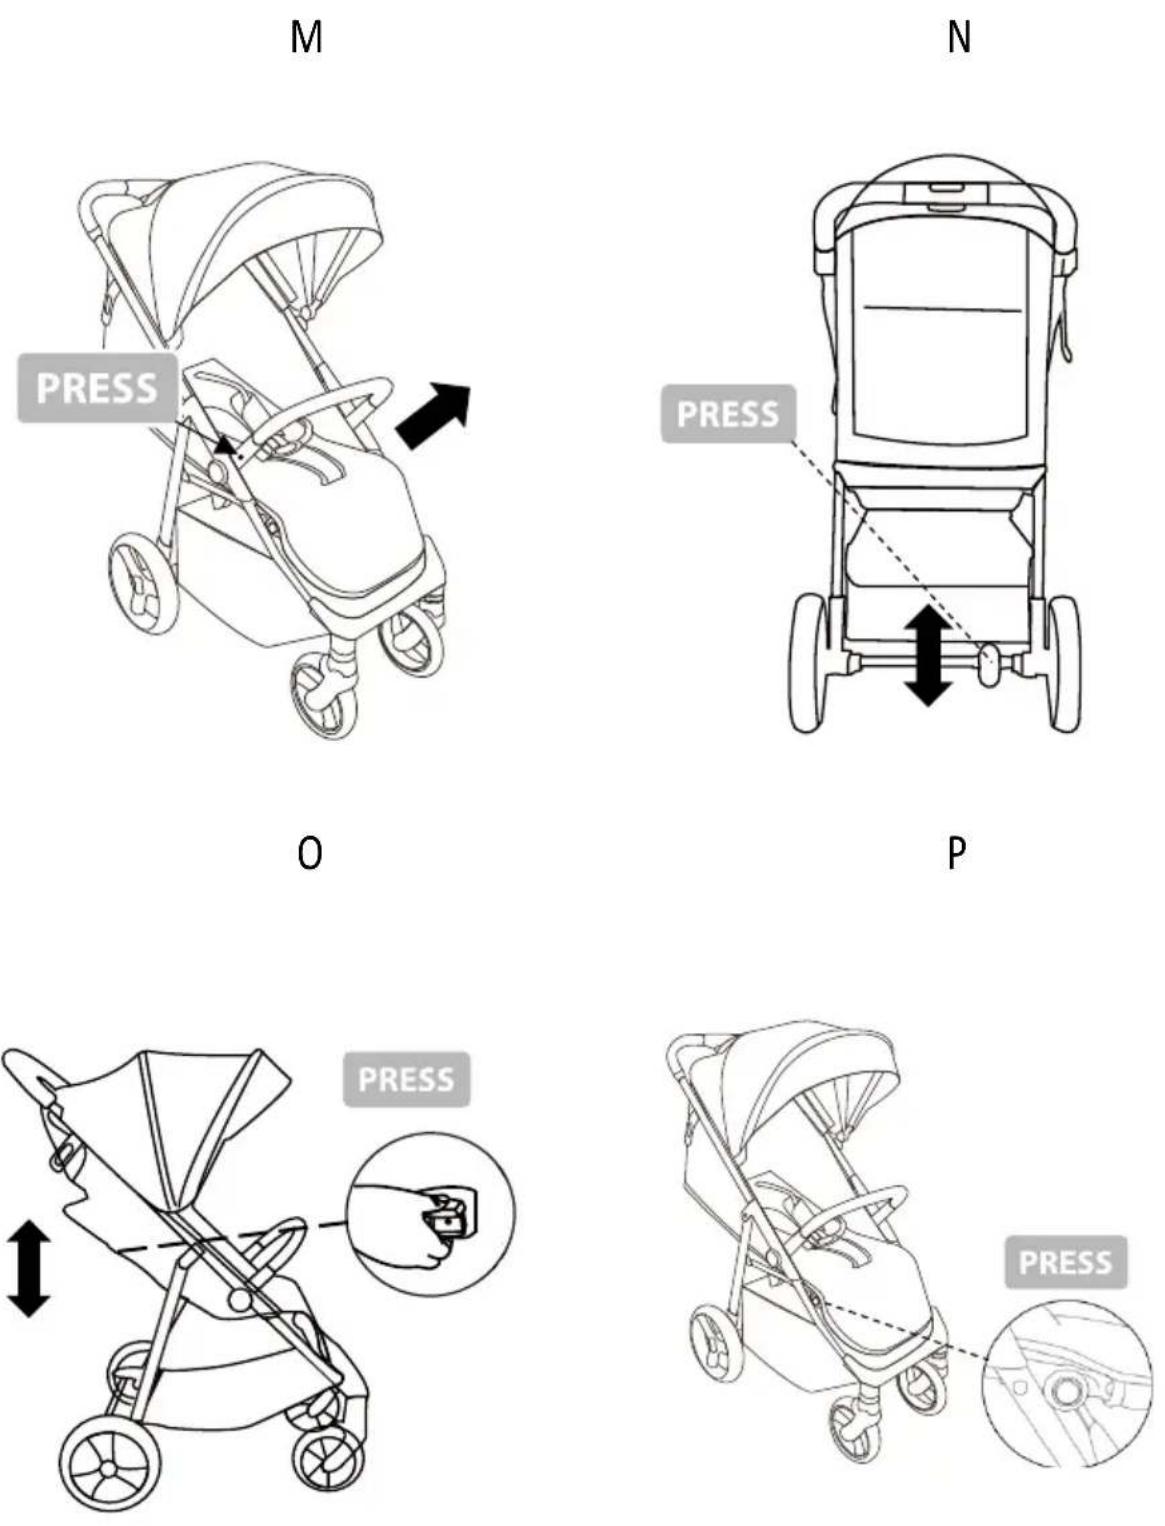
Insert the safety bar into the corresponding holes on both sides of the frame as shown in FIG. L. To remove, press the buttons on both sides and remove the bar (FIG. M).
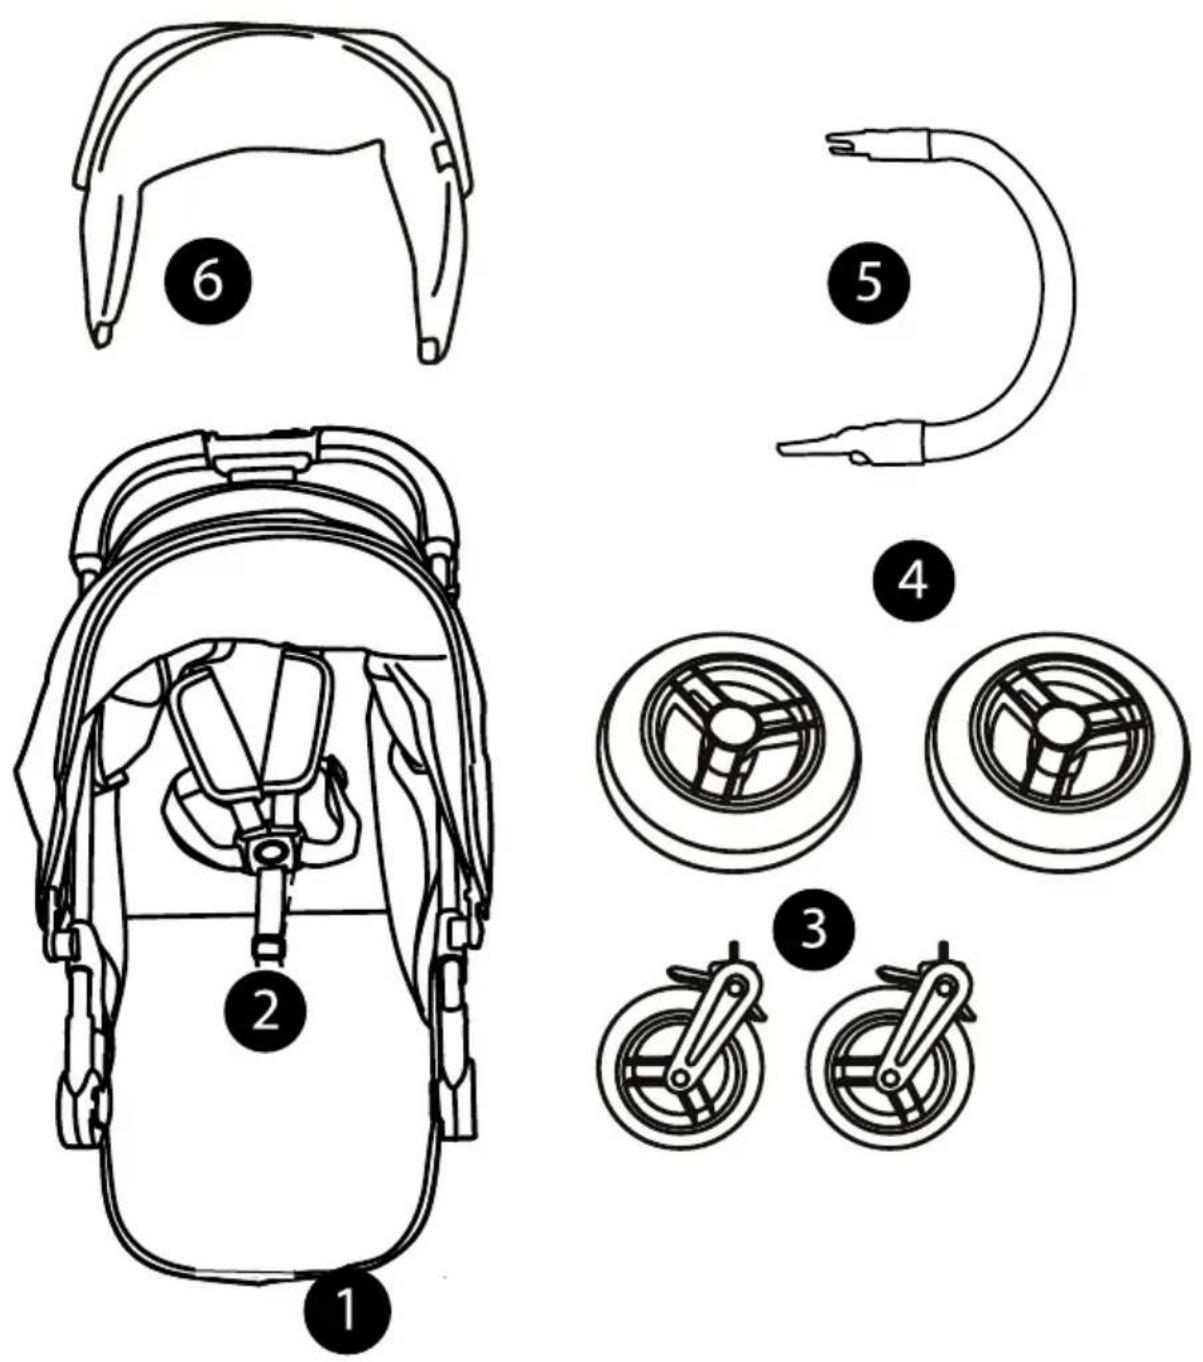
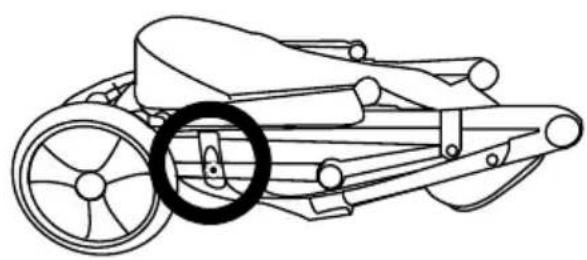
VI. USING THE BRAKE
The wheelchair is equipped with a foot parking brake located on the rear axle. Press the lower part of the brake down, when the locking sound is heard the brake is activated (FIG. N). Unlocking is achieved by pressing the top part of the brake.
The seat has three available backrest positions, adjusting the backrest from reclining to sitting position using a buckle (FIG. O). The footrest has 7 degrees of adjustment. Press the buttons on both sides (FIG P) to change the position of the footrest.
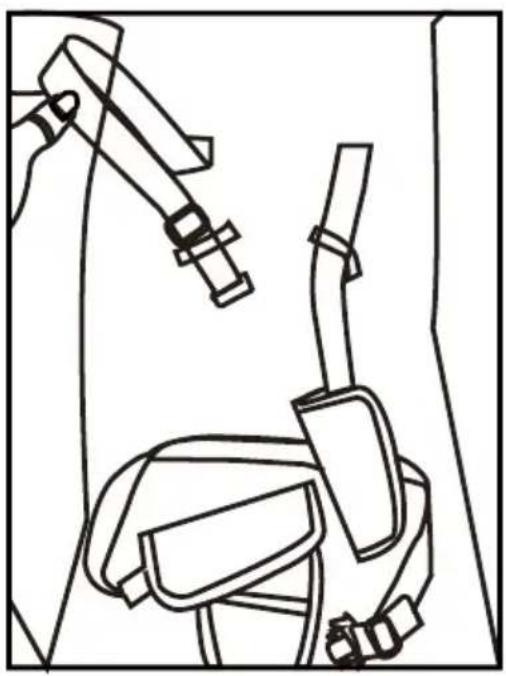
VIII. SAFETY BELTS
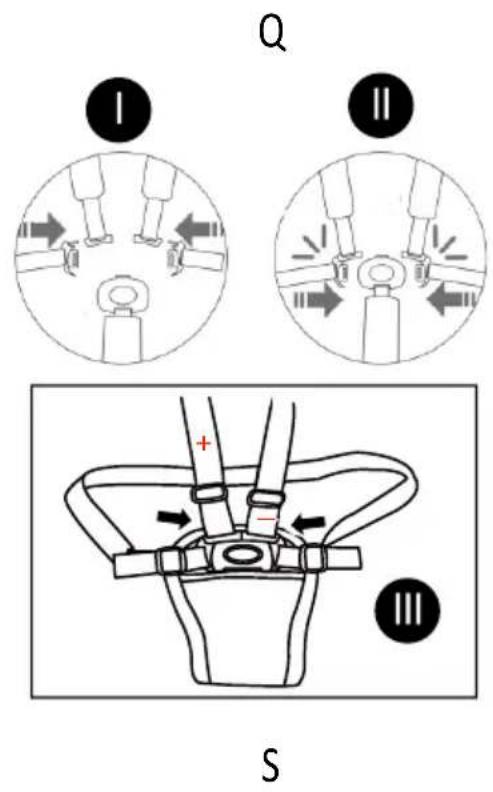
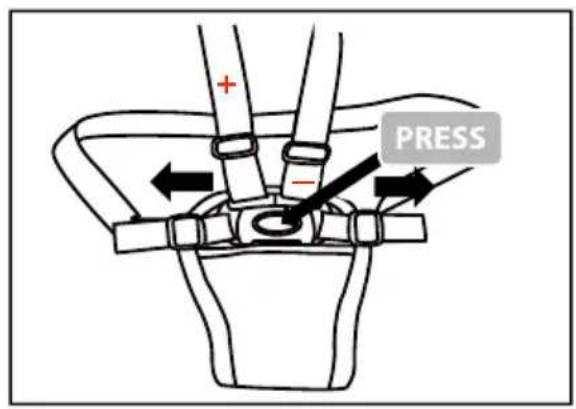
The belts of this pushchair are already adapted for newborns. Always use the buckle system. To secure your child, connect the lap and shoulder belt attachments (FIG. Q.I) and then slide them into the centre buckle (FIG. Q.II) until they lock (FIG.Q.III). Press the button to release the straps (FIG.R). The height of the shoulder straps can be fitted at one of three heights. (FIG.S). Adjust the straps each time.
IX. FOLDING THE PRAM
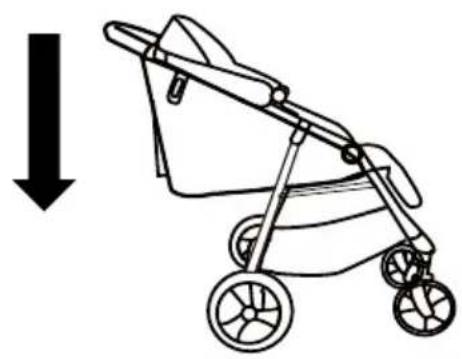
Before folding the pram, lower the backrest as much as possible. Hold the handle and push the lock button (FIG.T.I) and press the fold button (FIG.T.II) at the same time, push forward (FIG.U). Until the latch is applied to the stem (FIG.V)
X. CARE AND MAINTENANCE
The buyer is responsible for proper installation of all functional elements as well as for carrying out all required maintenance and adjustments in order to keep the buggy in good technical condition. The buggy must be periodically checked for potential problems. Significant measures to be applied to ensure the child's safety and prevent shortening of the product life have been presented below:
- Check the strength and safety of all rivets and connections.
- Check all wheel locking equipment and tyres. If necessary, replace or repair.
- Check if all safety devices work properly, particularly the main and additional fasteners that should move freely at any time.
Please stop using the buggy if there are doubts as to its proper use or a suspicion of any danger. If the wheels squeak, apply a thin layer of silicone. Do not use oil or grease based products as they attract dirt, which makes buggy movement difficult.
XI. CLEANING
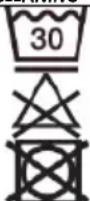
Wash at max. 30°C, gentle process.
Do not bleach
Do not dry in a tumble dryer
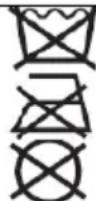
Do not wash. Clean the product gently with a damp cloth and a mild detergent.
Do not iron
Do not dry clean
If the elements of the buggy chassis have been exposed to saltwater, rinse with tap water as soon as possible.
Clean the product gently with a damp cloth and a mild detergent. Do not fold or store the product when it is wet and never store it in wet conditions, as it can lead to mould growth.
Seat covering, canopy, basket: Do not wash. Clean the product gently with a damp cloth and a mild detergent. Do not bleach. Do not dry in a tumble dryer. Do not iron. Do not dry clean.
XII. Warranty
The full text of the Terms and Conditions of the Warranty is available on the website WWW.KINDERKRAFT.COM
ES
¡ESTIMADO CLIENTE!
International contact:
support@kinderkraft.com
+44 20 4525 0748
مُنْج/VÝROBCE/HERSTELLER/MANUFACTURER/FABRICANTE/FABRICANT/GYARTÓ/FABBRICANTE/FABRIKANT/PRODUCENT/FABRICANTE/PRODUCÁTOR/ПРОИЗВОДИТЕЛЬ/VÝROBCA/TILLVERKARE: