PRIME 3 - Stroller Kindercraft - Free user manual and instructions
Find the device manual for free PRIME 3 Kindercraft in PDF.

| Product type | Stroller |
| Brand | Kindercraft |
| Model | PRIME 3 |
| Recommended age | 0 months to 4 years |
| Maximum supported weight | 22 kg |
| Maximum basket load | 5 kg |
| Maximum weight of bag on handle | 2 kg |
| Number of seats | 1 child |
| Use position | Forward facing or parent facing |
| Safety harness | 5-point, height adjustable |
| Backrest recline | 3 positions |
| Adjustable footrest | 4 positions |
| Height adjustable handle | Yes |
| Swivel front wheels | Yes, with lock for straight line |
| Parking brake | Yes, foot-operated on rear axle |
| Hood with parent window | Yes, extendable panel with mosquito net |
| Included accessories | Rain cover, mosquito net, changing bag with mat, car seat adapters |
| Bassinet compatibility | Yes, bassinet included (max child weight 9 kg) |
| Car seat compatibility | Yes, with adapters (max weight 13 kg) |
| Fabric cleaning | Hand wash max 40°C or machine wash 30°C delicate, do not tumble dry |
| Chassis cleaning | Damp cloth and mild detergent |
Frequently Asked Questions - PRIME 3 Kindercraft
User questions about PRIME 3 Kindercraft
0 question about this device. Answer the ones you know or ask your own.
Ask a new question about this device
Download the instructions for your Stroller in PDF format for free! Find your manual PRIME 3 - Kindercraft and take your electronic device back in hand. On this page are published all the documents necessary for the use of your device. PRIME 3 by Kindercraft.
USER MANUAL PRIME 3 Kindercraft
natural_image
Line drawings of two stuccoetry baby strollers, one with a full canopy and the other with a matching case (no text or symbols)PRIME 3
USER GUIDE
(AR) عربة أطفال
(CS) Kočárek
(DE) Buggy
(EN) Stroller
(ES) Silla de paseo
(FR) Pousette
(HU) Babakocsi
(IT) Passeggino
(NL) Kinderwagen
(PL) Wózek
(PT) Carrinho de bebé
(RO) Cărucion
(RU) Прогулочная коляска
(SK) Kočík
(SV) Barnvagn
دليل الاستخدام
NÁVOD K OBSLÚŽE
BEDIENUNGSANLEITUNG
USER MANUAL
MANUAL DE USARIO
GUIDE D'UTILISATION
HASZNÁLATI UTASÍTÁS
ISTRUZIONI PER UTENTE
GEBRUIKSAANWIJZING
INSTRUKCJA OBSŁUGI
MANUAL DE INSTRUÇÕES
MANUAL DE UTILIZARE
AR....21
CS....25
DE....29
EN 32
ES 36
FR....39
HU 42
IT 46
NL....49
PL 52
PT 55
RO....59
RU 62
SK....66
SV....69
/ˌʌsɪstrace jsou pouze orientační a nepředstavují plné zobrazení produktu./Die gezeigten Bilder dienen nür als Referenz, das tatsächliche Produkt kann von der Abbildung abweichen./The illustrations are for illustration only and do not represent the product./Las ilustraciones son meramente orientativas y no constituyen una representación completa del producto,/Les illustrations sont données à titre indicatif et ne constituent pas une représentation complète du produit./Az illusztraciók csak tajékoztató jellegúek és eltérhetnek a valós terméktöl./Le immagini sono inserite a scopo dimostrativo e non rispecchiano appieno le caratteristiche del prodotto./De afbeeldingen dienen uitsluitend ter illustratie en geven geen volledig beeld van het product./Ilustracje mają charakter poglądowy i nie stanowią pełnego odwzorowania produktu./As ilustrações têm uma função informativa e não são uma representação fiel do produto./ Ilustrațiile sunt doar pentru referință și nu reprezintă produsul complet./Иллюстрации приведены только для справки и не представляют весь продукт./Obrázky slúžia len na ilustráciu a nie sú úplným predstavením produktu./Illustrationer är endast för referens och representerar inte hela produkten.
A.
natural_image
Black-and-white photo of a stroller with visible wheels and a magnified inset showing a stylized eye symbol (no text or labels)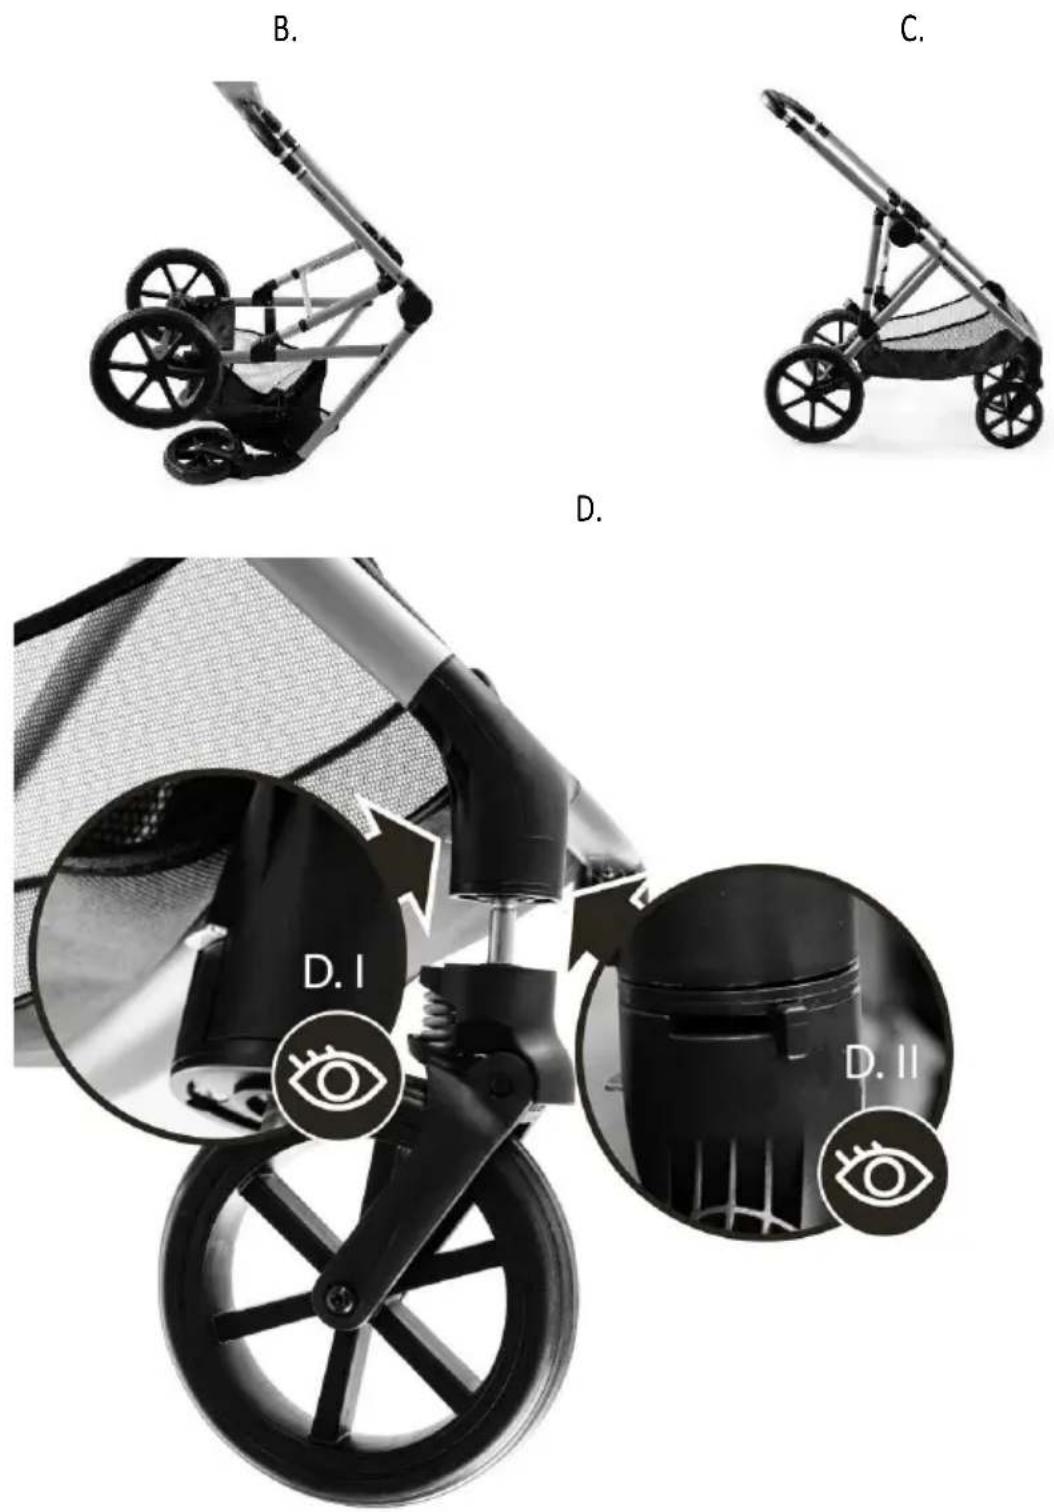

K.
L.
natural_image
Close-up of a fabric collar with a circular icon highlighting an eye symbol (no text or symbols present)
natural_image
Close-up of a black industrial engine component with grid lines and circular eye symbols (no readable text or labels)M.

natural_image
Close-up of a person wearing a safety harness with eye icons (no text or symbols visible)N.
natural_image
Close-up of a car seatbelt with visible buttons and mounting holes (no text or symbols)Q.
natural_image
Close-up of fabric with mesh texture and a circular icon featuring an eye symbol (no text or symbols present)P.
R.
natural_image
Close-up of a textured fabric surface with a black circular emblem containing an eye symbol (no readable text or symbols)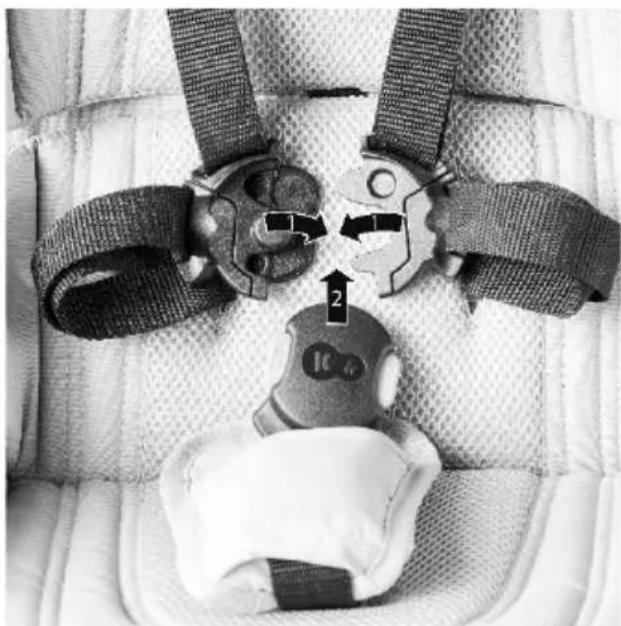
natural_image
Close-up of a car seatbelt buckle with two straps and a belt switch, no visible text or symbolsS.
natural_image
Close-up of a bicycle seatbelt with five blades, no visible text or symbolsT.
natural_image
Black-and-white illustration of a stroller with open lid and fabric, showing body positioning and eye contact (no text or symbols)U.
natural_image
Black-and-white photo of a stroller with adjustable arms and a mesh seat, showing no visible text or symbols.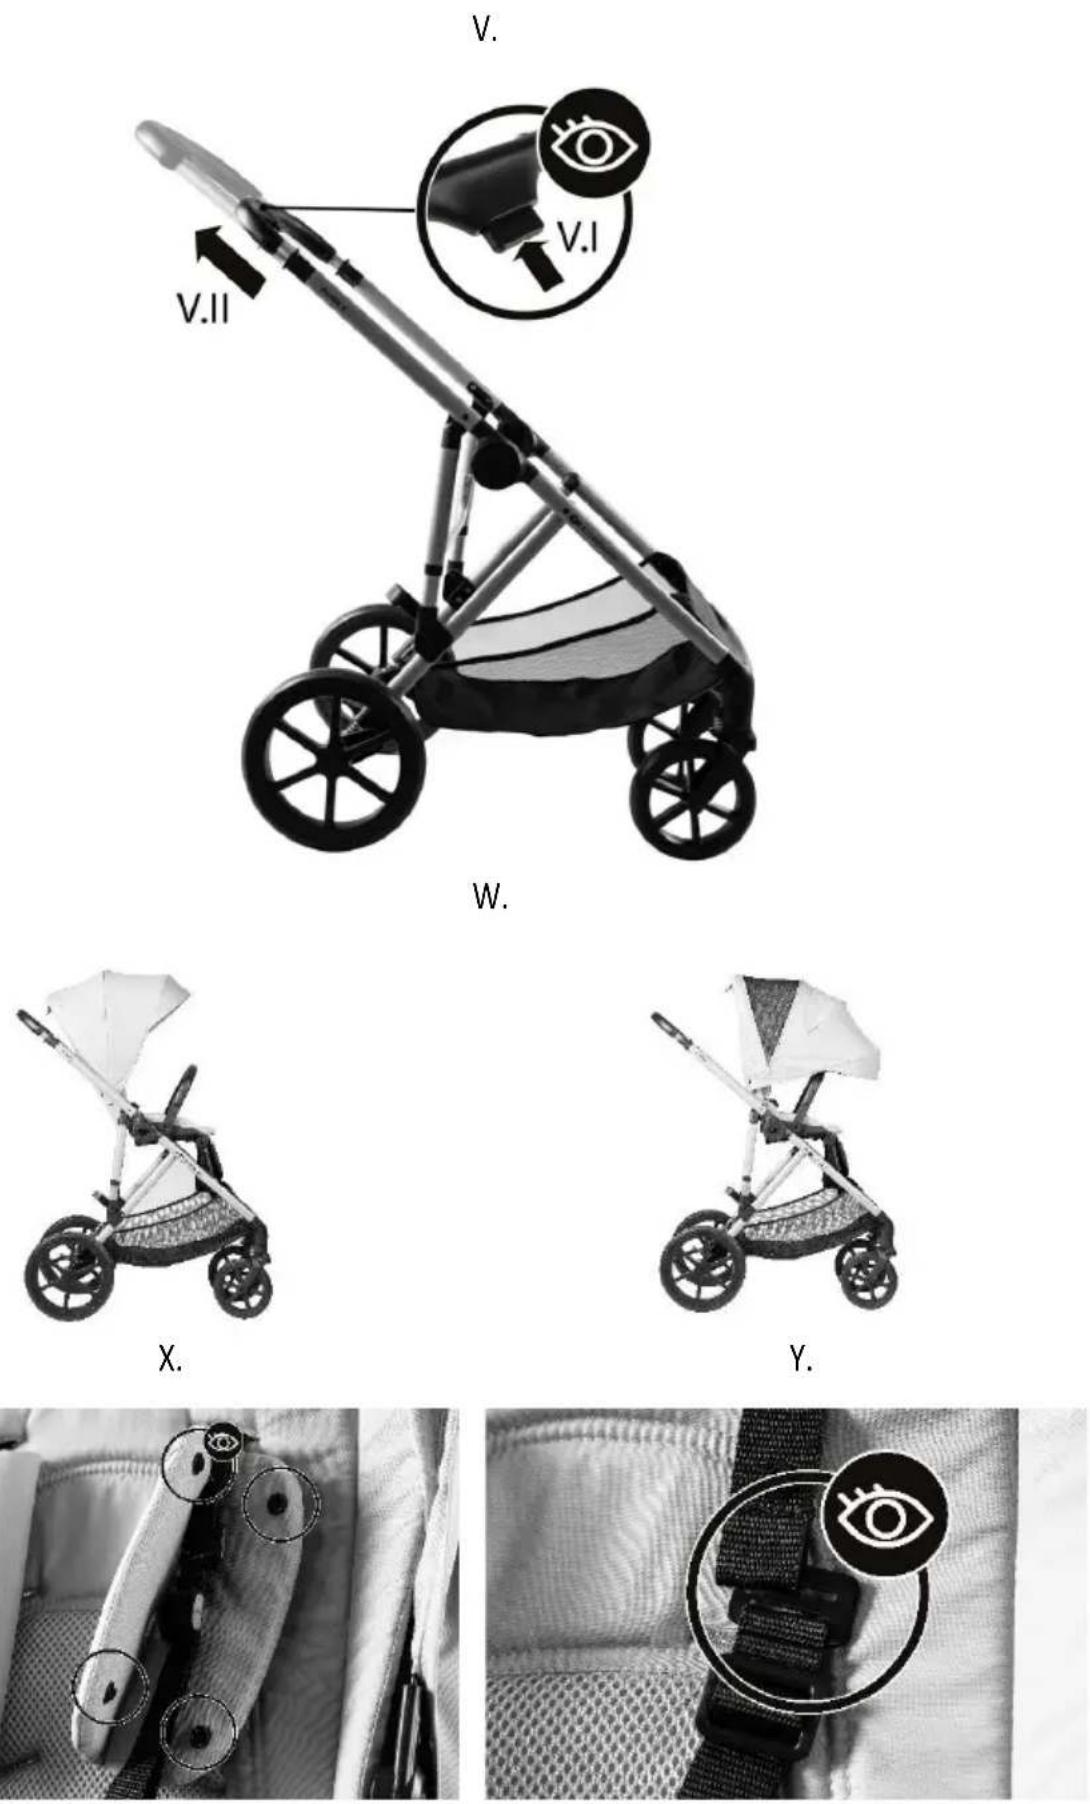
natural_image
Close-up of a car seatbelt with visible buttons and mounting points (no text or symbols)Z.
natural_image
Close-up of a textured fabric with a circular icon containing an eye symbol (no text or symbols present)BB.
natural_image
Black-and-white photo of a person's seatbelt with a circular icon showing an eye symbol (no text or symbols present)AA.
natural_image
Close-up of a car interior with a circular icon showing an eye symbol, no text or symbols present.CC.

natural_image
White ceramic basin with a black vertical rod inserted, no visible text or symbolsDD.
natural_image
Close-up of a zipper with an eye icon and a circular outline, no visible text or symbolsFF.
natural_image
Close-up of a zipper with a circular icon highlighting the eye symbol (no text or symbols present)EE.
GG.
natural_image
Simple diagram showing a device with a downward arrow and a vertical rod inserted into a container (no text or symbols)HH.
natural_image
Close-up of a hand holding a circular object with two black rectangular blocks, one containing a stylized eye icon (no text or symbols)II.
natural_image
Close-up of a person's face with a magnifying glass highlighting an eye symbol (no text or labels visible)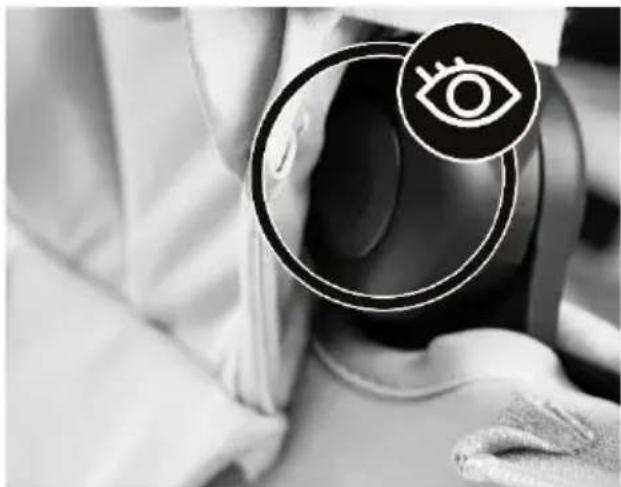
natural_image
Close-up of a person holding a large ring with an eye icon, no visible text or symbolsJJ.
natural_image
Close-up of a white golfsuit with black mesh cushion and white band (no text or symbols visible)LL.
KK.

natural_image
Close-up of a car interior with a hand holding a pen and a circular icon containing an eye symbol (no text or labels visible)MM.
natural_image
Close-up of a person's face with a circular icon highlighting the eye (no text or symbols present)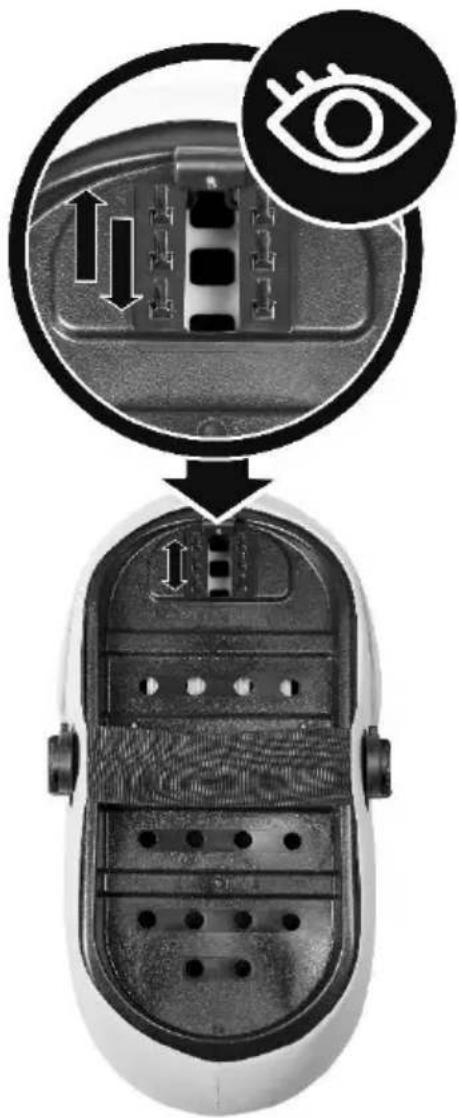
NN.
natural_image
Close-up of a satellite dish antenna mounted on a tripod, showing structural components and no visible text or symbols.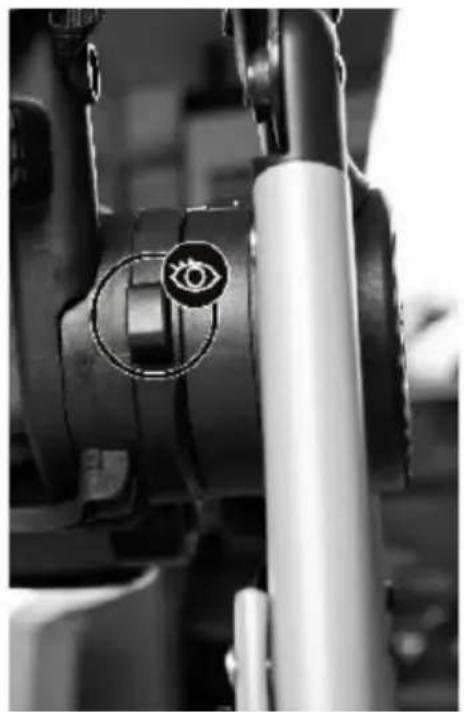
natural_image
Close-up of a mechanical component with a circular eye symbol on a shaft (no text or symbols visible)PP.
natural_image
Product diagram of a baby stroller with a canopy cover, showing part assembly and mounting bracket (no text or symbols)QQ.
natural_image
Close-up of hands holding a ring with an eye icon, no visible text or symbolsRR.
natural_image
Close-up of a finger pointing to a textured surface with an eye icon overlay (no text or symbols)SS.
natural_image
Close-up of a satellite or spacecraft with transparent cover and eye icons, no visible text or symbolsTT.
natural_image
Black-and-white illustration of a stroller with transparent cover and three circular insets showing eye symbols (no text or labels)UU.
natural_image
Black-and-white illustration of a stroller with a canopy and eye symbol, showing internal components (no text or symbols)VV.
natural_image
Black and white illustration of a stroller with a canopy cover, showing close-up details and an eye symbol (no text or labels)WW.
natural_image
Black and white photo of a baby stroller with a hand holding a pen, featuring an eye symbol on the handle (no text or symbols present)XX.
natural_image
Two stroller models with metal frame and cargo bags, shown in black and white (no text or symbols visible)YY.

natural_image
Close-up of a white stroller with black wheels and a circular head (no visible text or symbols)AR
X. MONTÁŽ A DEMONTÁŽ OCHRANNÉHO MADLA
XXII. MONTÁŽ A DEMONTÁŽ KORBIČKY NA RÁM
Thank you for purchasing a Kinderkraft product. Our products have been designed with your child's safety and comfort in mind. The pushchair is an ideal solution for those who value quality, modern design, and functionality. Please read this user manual carefully and follow its instructions.
IMPORTANT - READ CAREFULLY AND KEEP FOR FUTURE REFERENCE.
WARNING!
- Never leave the child unattended.
- Ensure that all the locking devices are engaged before use.
- To avoid injury ensure that the child is kept away when unfolding and folding this product.
- Do not let the child play with this product.
- Check that the pram body or seat unit or car seat attachment devices are correctly engaged before use.
- This product is not suitable for running or skating.
• The product is intended for children from 0 months old to 22 kg or 4 years whichever comes first.
• The product is designed to transport one child at a time.
• The maximum basket load is 5 kg.
- Any load attached to the handle and/or on the back of the backrest and/or on the sides of the vehicle will affect the stability of the vehicle.
• Maximum weight of a bag attached to the adjustable handle is 2 kg.
- Lift the front suspension when going up a curb or step.
- The brakes should be locked when the child is placed in or taken out of the buggy.
- Use only parts and accessories supplied or recommended by the manufacturer. Do not use other parts or accessories.
- Do not place the product near open flame or other heat sources.
- Do not use with an additional platform.
The following applies to the pram body:
- This product is suitable for a child who cannot sit up unaided, roll over and cannot push itself up on its hands and knees. Maximum child weight – up to 9 kg.
WARNING!
- Only use on a firm, horizontal level, flat and dry surface.
- Do not let other children play unattended near the carry cot.
- Do not use if any part of the carry cot is broken, torn or missing.
-
Never use this product on a stand.
-
The handles and the bottom of the carrycot should be checked regularly for signs of damage and wear.
- The head of the child in the carry cot should never be lower than the body of the child.
- Before carrying or lifting, make sure that the handle is in the correct position of use.
- Before carrying or lifting the base shall be adjusted in the lowest position.
- Base shall be adjusted in the lowest position for sleeping.
- Be aware of hazard of hitting the baby e.g. when putting on floor, going through doors
- Do not add another mattress on the top of the mattress provided or recommended by the manufacturer.
- Do not leave anything in the carry cot that could present a danger of suffocation e.g. non-rigid toys, pillows etc.
- Do not place the carry cot close to another product, which could present a danger of strangulation, e.g. strings, blind/curtain cords etc.
- Overheating can endanger the life of your child! Take into account the ambient temperature and the child's clothing and ensure that the child is not too cold or too warm.
- It's recommended to ask a health professional for advice on safe sleeping
The following applies to the pushchair:
WARNING!
- Always use the restraint system.
- The product is intended for children from 0 months old to 22 kg or 4 years whichever comes first.
• We recommend using lowest reclined position for newborn babies.
Regarding the Kinderkraft car seat:
The Kinderkraft PRIME 3 stroller may be offered as a set with a compatible Kinderkraft car seat.
- The product is intended for children from birth to 13 kg.
- If the car seat is used together with the chassis, it does not replace a cot or bed. For sleep, place the child in a suitable pram body, cot or bed
- Use only parts and accessories supplied or recommended by the manufacturer.
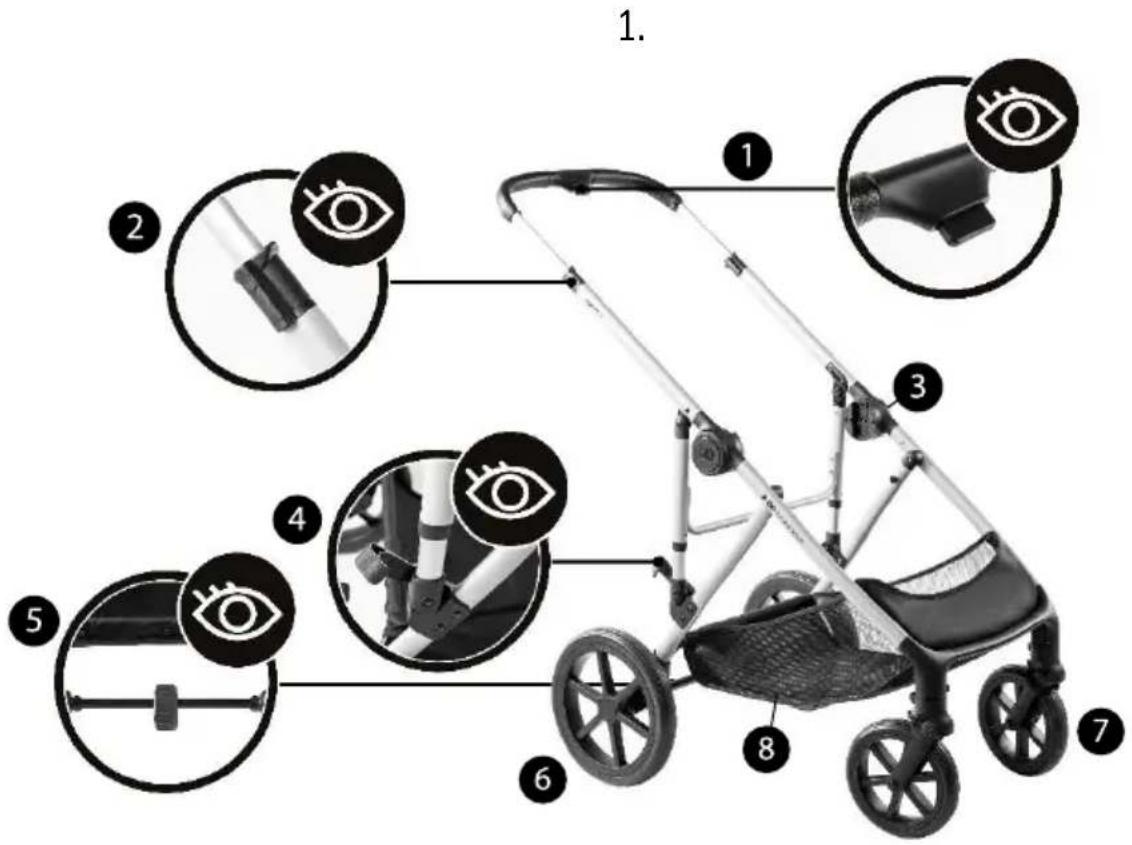
I PUSHCHAIR FRAME ELEMENTS (FIG. 1)
- Handle with adjustment button
- Folding lever
- Frame socket
- Element locking frame after folding
- Brake
- Rear wheels
- Front wheels
- Basket
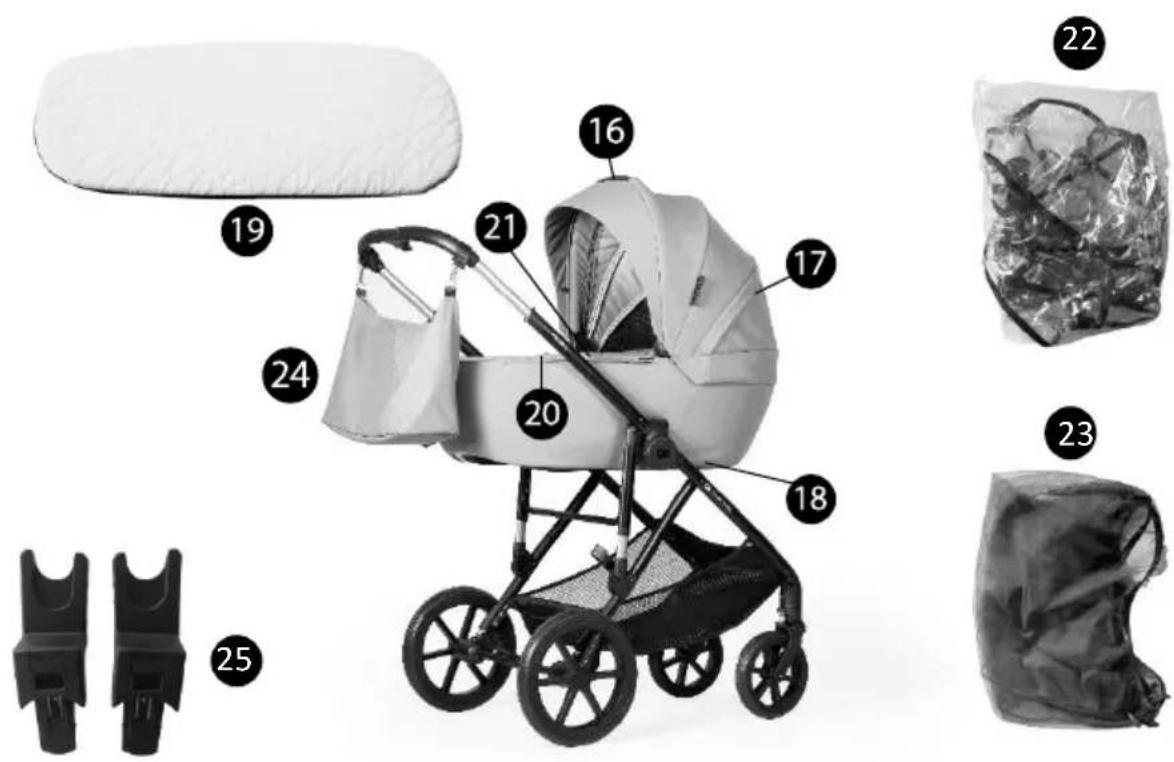
III CARRYCOT ELEMENTS (FIG. 3)
- Carrycot carry handle
- Carrycot hood
- Backrest adjustment lever
- Mattress
- Footmuff
- Carrycot lining
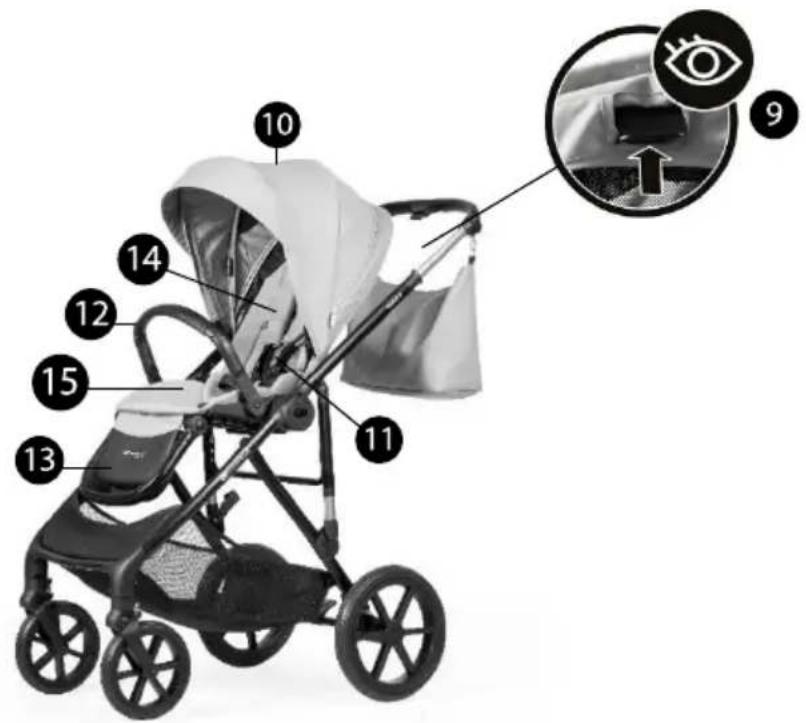
II STROLLER SEAT ELEMENTS (FIG. 2)
- Backrest adjustment lever
- Hood
- Seat with safety harness
- Bar
- Footrest
- Backrest insert
- Seat insert
IV OTHER ELEMENTS
- Universal rain cover
- Mosquito net
- Bag with hangers and changing mat
- Car seat adapters
V. UNFOLDING THE PUSHCHAIR FRAME
Release the locking element (Fig. A). While holding the frame, lift the handle (Fig. B) until you hear a characteristic lock sound. A correctly unfolded frame is shown in Fig. C.
VI. FRONT WHEELS ASSEMBLY AND DISASSEMBLY
Insert the wheels into the openings of the frame front until you hear a lock sound (Fig. D). To remove the wheels, press the release button (Fig. D.I). You can lock the wheels to ride straight by sliding the locking ring inward; unlock by sliding the ring in the opposite direction (Fig. D.II).
VII. REAR WHEELS ASSEMBLY AND DISASSEMBLY
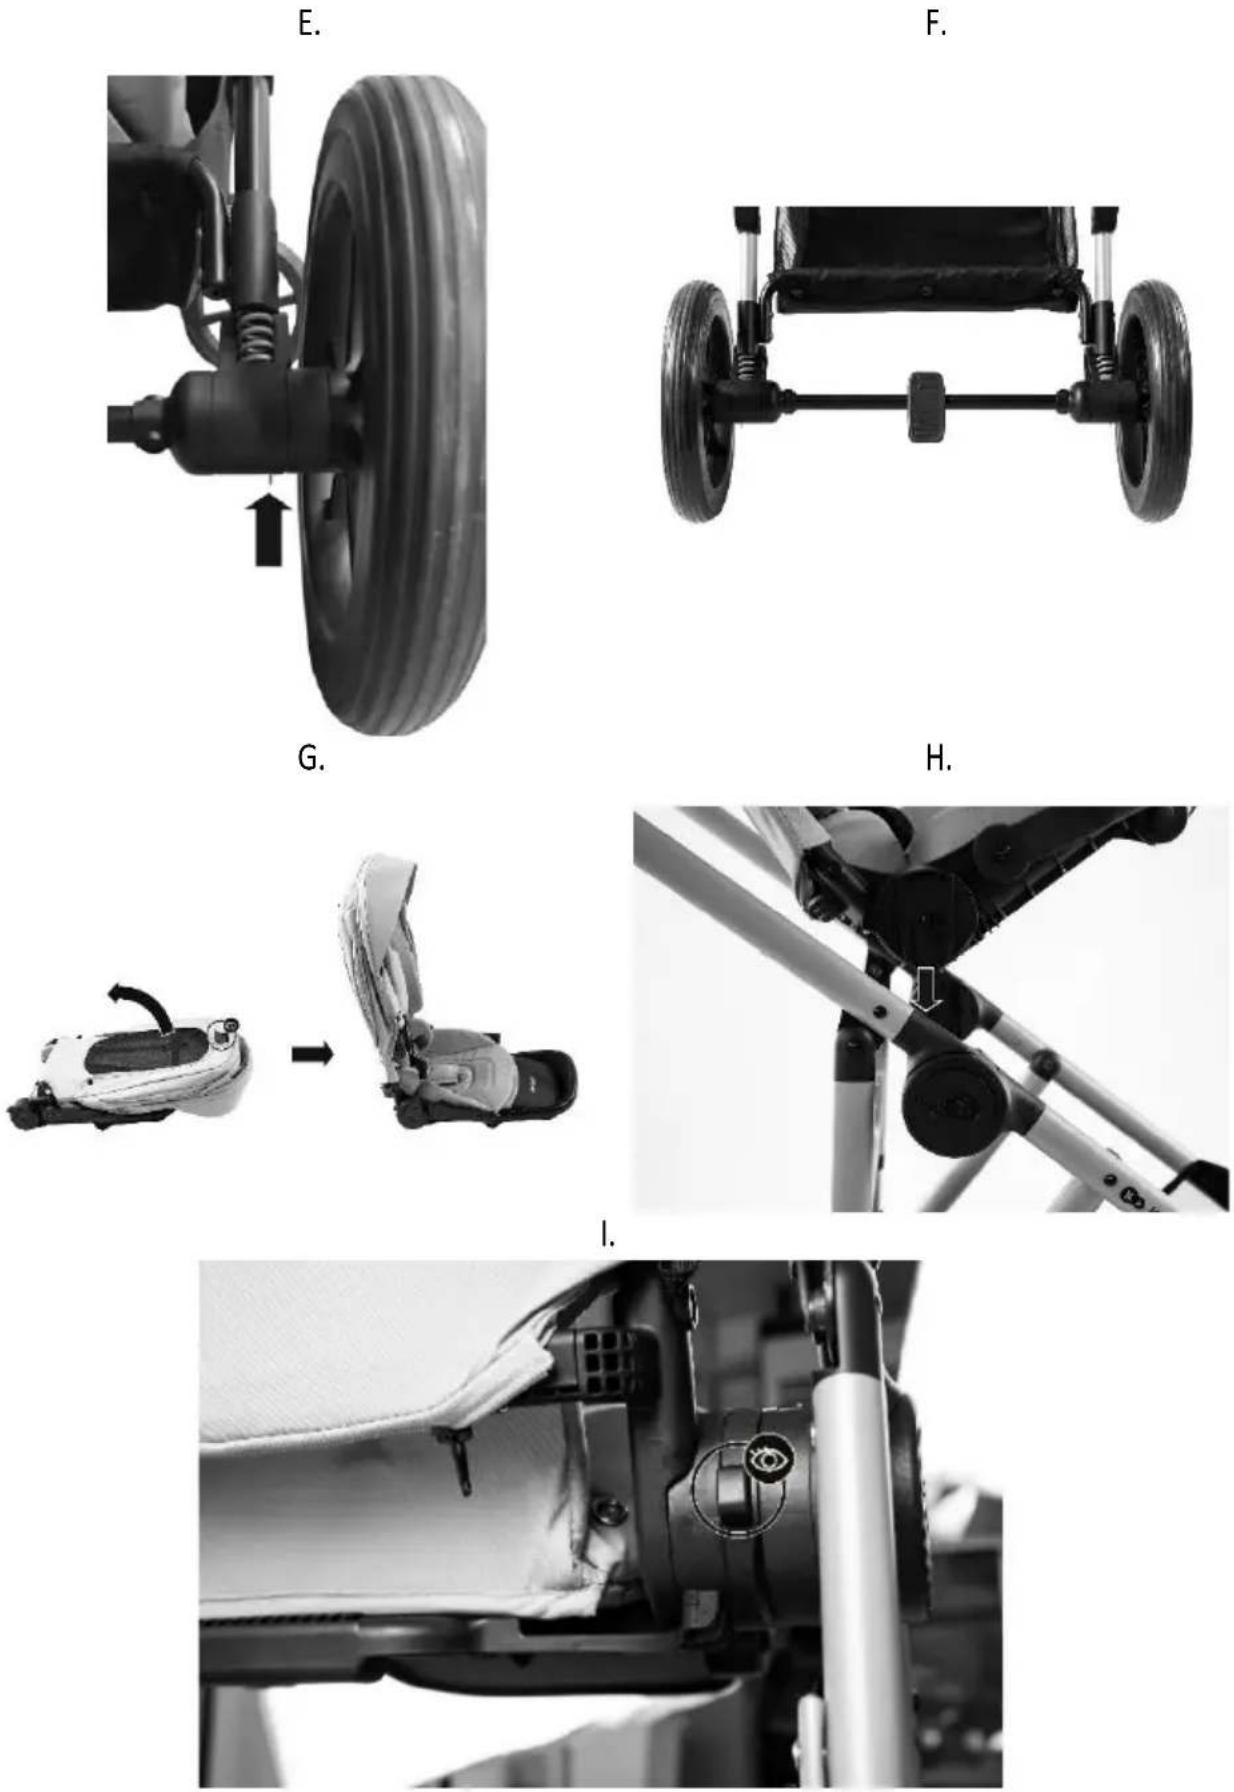
Slide the wheel pin into the designated holes in the frame until it clicks. To release the wheel, press the button and pull the wheel out (Fig. E).
CAUTION! Before you start using the pushchair, make sure all wheels are correctly installed.
VIII. BRAKE
The pushchair is equipped with a foot-operated parking brake (5) located on the rear axle. Press the brake downwards – once you hear the lock sound, the brake is activated. To release, lift it upwards (Fig. F).
IX. SEAT ASSEMBLY AND DISASSEMBLY
By using the button located on the back of the backrest, unfold the seat into a sitting position (Fig. G), then clip the seat connector into the frame socket (3) until you hear a characteristic click (Fig. H). The seat can be mounted FWF or RWF. To remove the seat, press the release buttons located on both sides of the frame and lift it up (Fig. I).
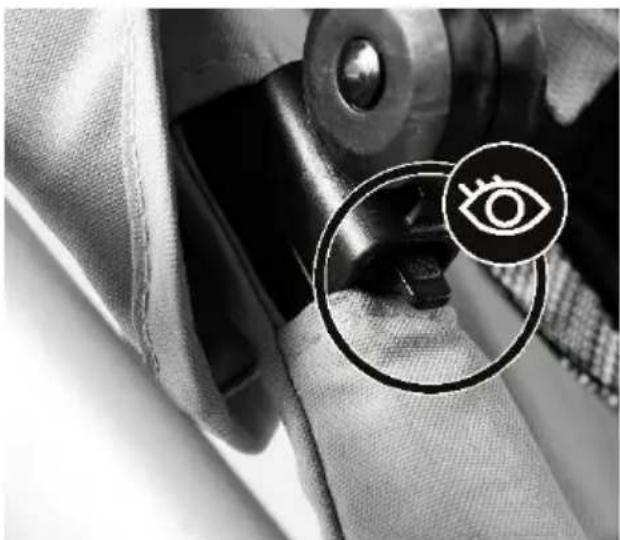
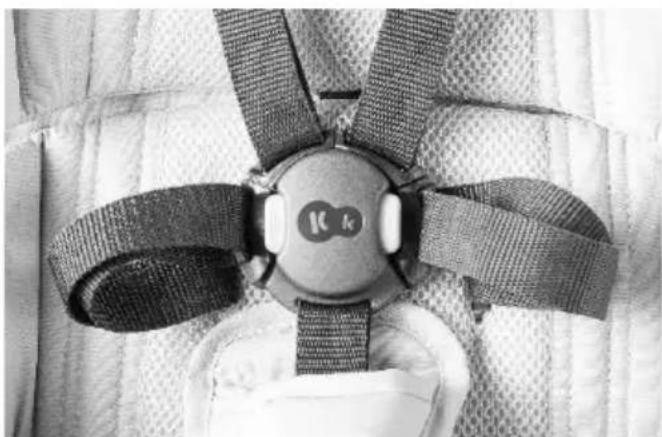
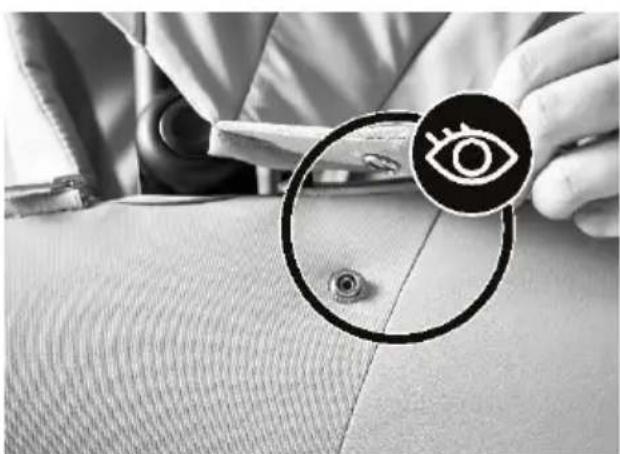
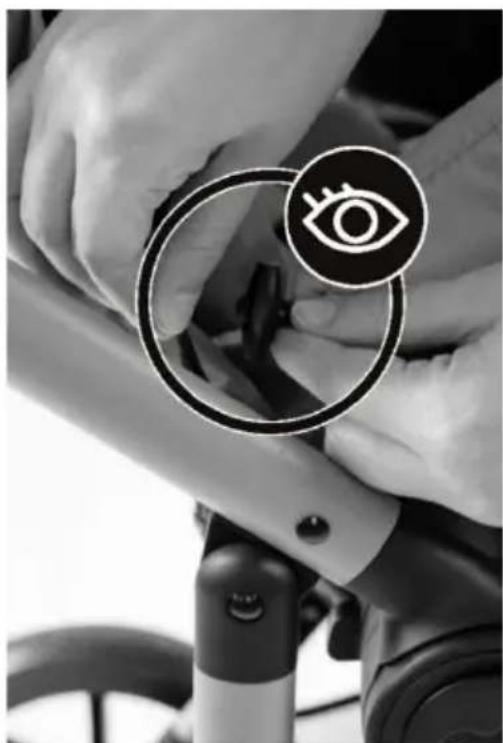
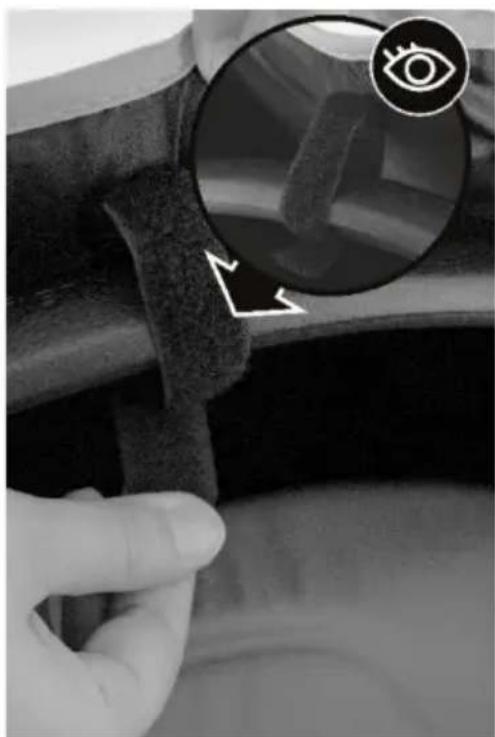
Detach the snaps and hook & loop fasteners located at the back of backrest (Figs. J.I & J.II). Then press the buttons at the base of the hood (Fig. K) to remove the hood from the guide rails. Pull the hood out and proceed with seat disassembly. To remove the seat fabric, remove the insert from the backrest according to instructions described in point XVI. Unzip the zipper at the base of the backrest (Fig. J.III), unclip the buckle dividing the harness into shoulder and hip parts, detach the hook & loop fastening connecting the seat and backrest (Fig. M), and remove the backrest fabric. Unclip the buckle under the seat (Fig. L), pull the strap through the base of the seat, including the crotch strap, and remove the seat fabric. The hip and shoulder straps are permanently attached to the backrest, so they must be washed together with all elements. To reattach the seat fabric, follow the steps in reverse order.
X. BUMPER BAR ASSEMBLY AND DISASSEMBLY
Set the pins on both sides of the seat by pulling them upward until you hear a click. Insert the bumper bar into the openings. To remove it, press the buttons on the inside and pull out the bar (Fig. N).
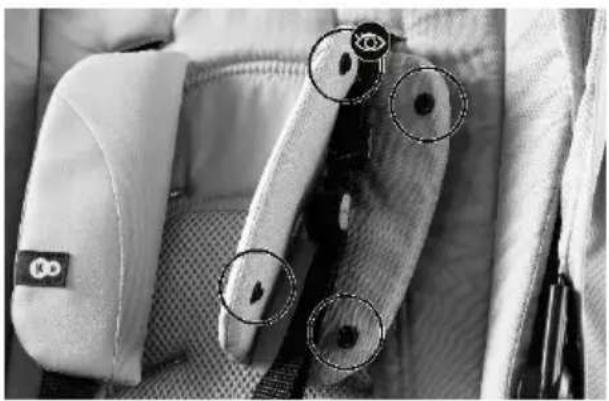
XI. SAFETY HARNESS ADJUSTMENT
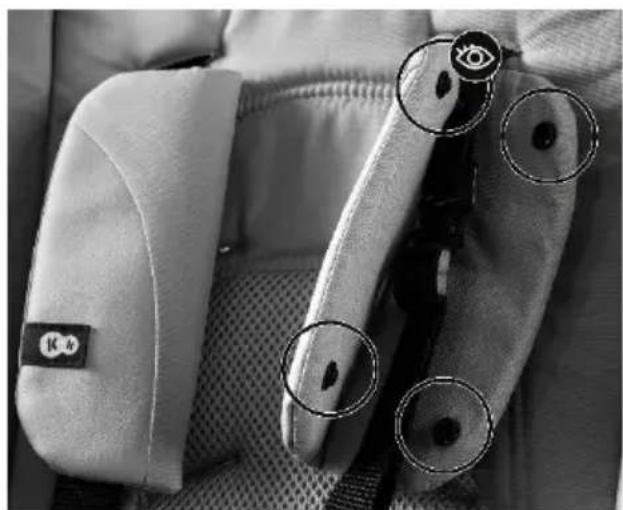
Always use the fastening system. Before each use, adjust the strap height. To secure the child, as a first, you have to match the strap's height to the child's height. Remove the shoulder pads located on the straps (Fig. O), divide the straps (Fig. P), slide the insert located on the backrest, adjust the height of the straps using the slider (Fig. Q), run the strap through the insert opening, and reconnect the straps with the connector.
To buckle the harness, first insert the hip strap buckle part into the shoulder strap buckle (Fig. R.1), then overlap the right buckle with the left buckle (Fig. R.1), and clip the middle buckle over both (Fig. R.2) until it locks. To unbuckle, press both buttons on the buckle sides (Fig. S).
XII. BACKREST ADJUSTMENT
Adjust the backrest using the button located at the back of the stroller's backrest. Press the lever and constantly holding it down, set the backrest in one of 3 positions (Fig. T).
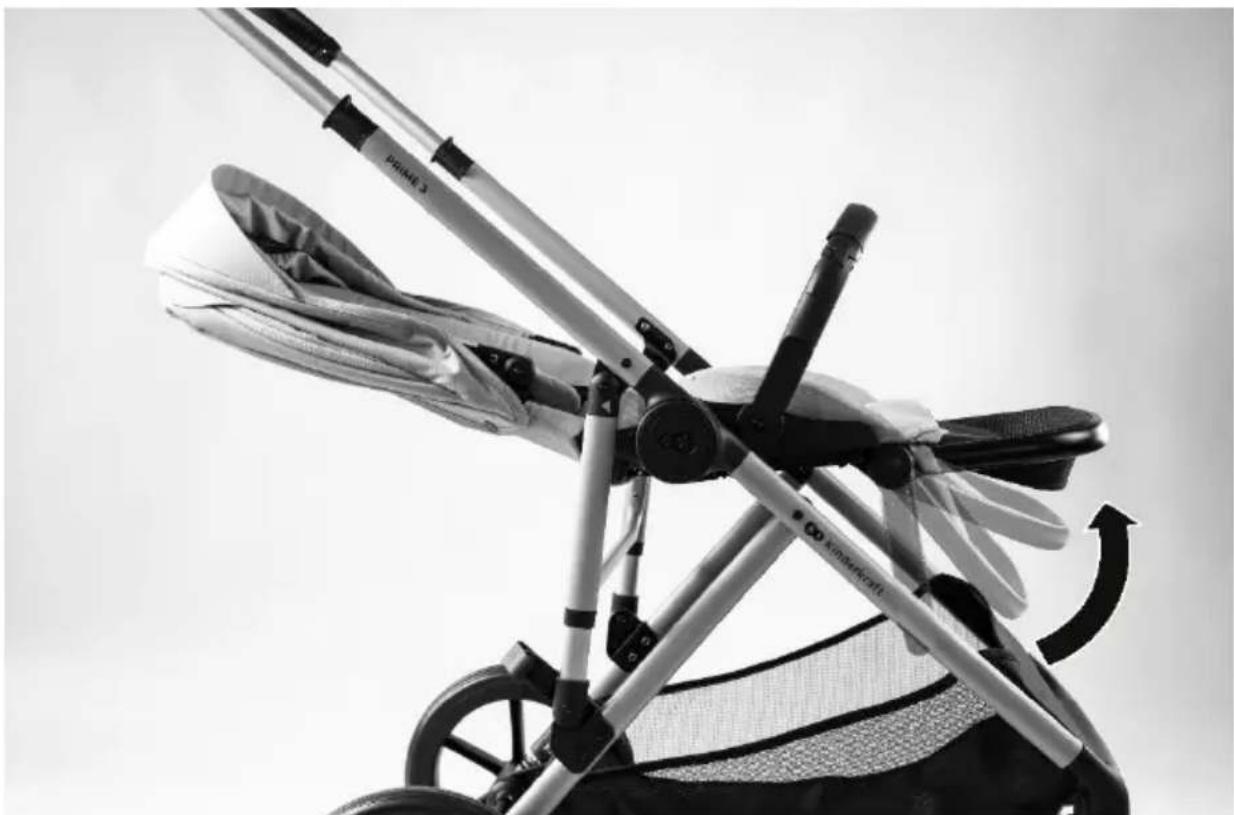
XIII. FOOTREST ADJUSTMENT
The footrest features 4 adjustment levels. Locking the footrest on a given level is indicated by a characteristic click. To move footrest position up you must lift the footrest (Fig. U). To lower the footrest, press the side buttons and lower it to the desired position.
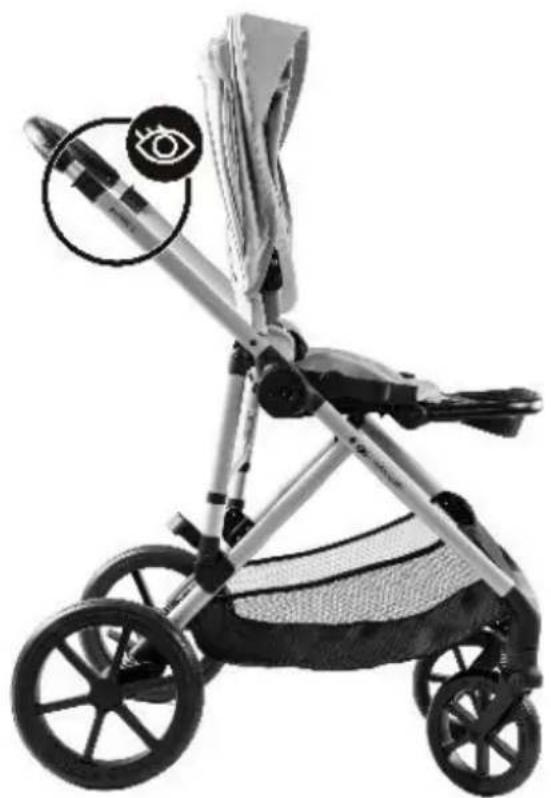
XIV. HANDLE ADJUSTMENT
Press the handle adjustment button (Fig. V.I) and set the handle in desired position (Fig. V.II).
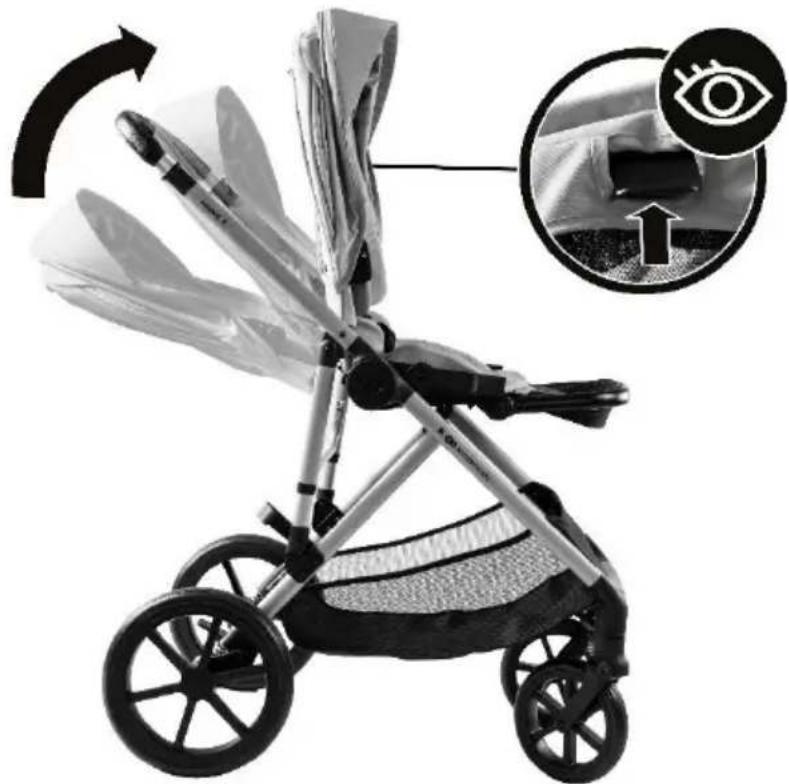
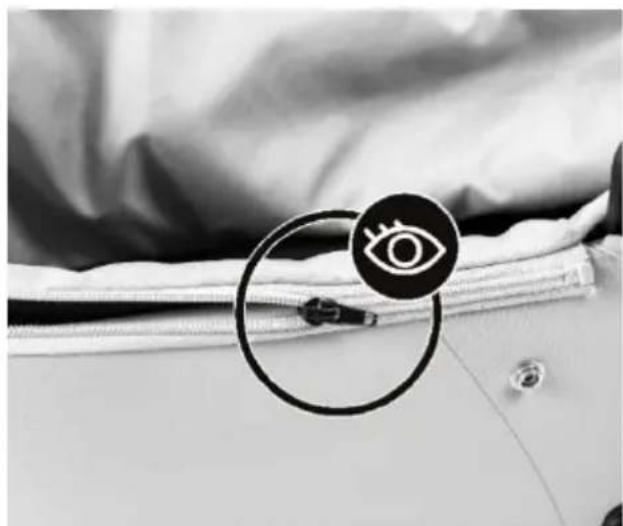
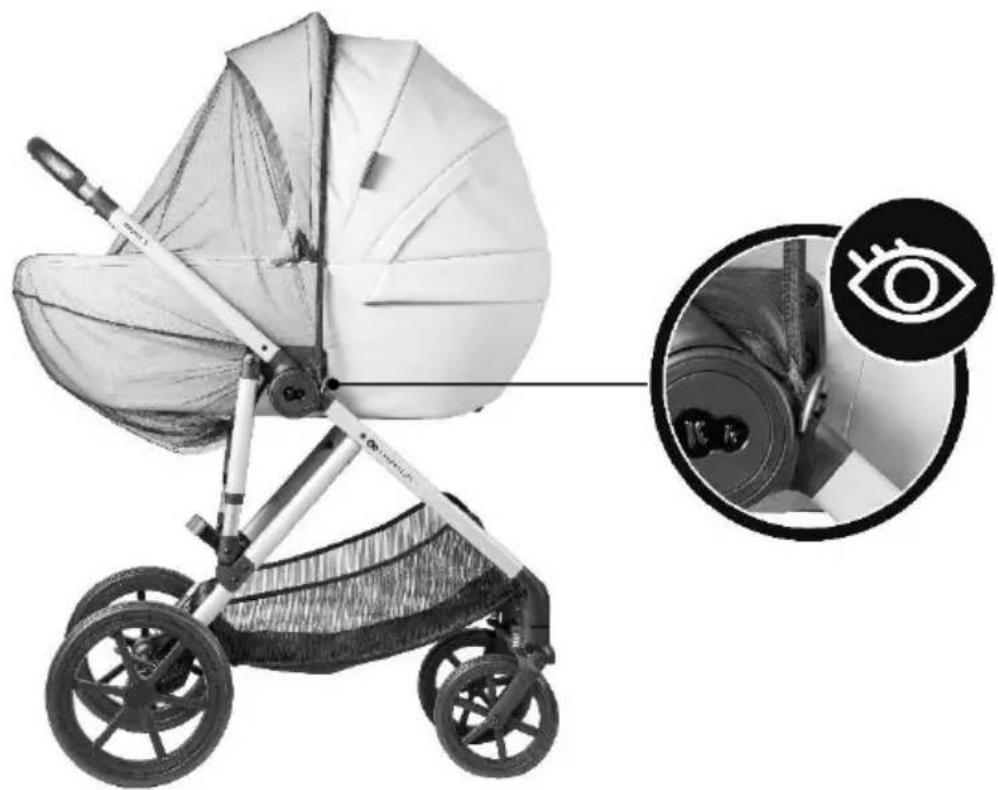
XV. HOOD ADJUSTMENT
The hood is equipped with additional mesh panel. To unfold it, unzip the zipper and stretch the hood to the maximum (Fig. W). The hood also features a window for viewing the child located under a fabric cover (Fig. X).
XVI. SUMMER SEAT
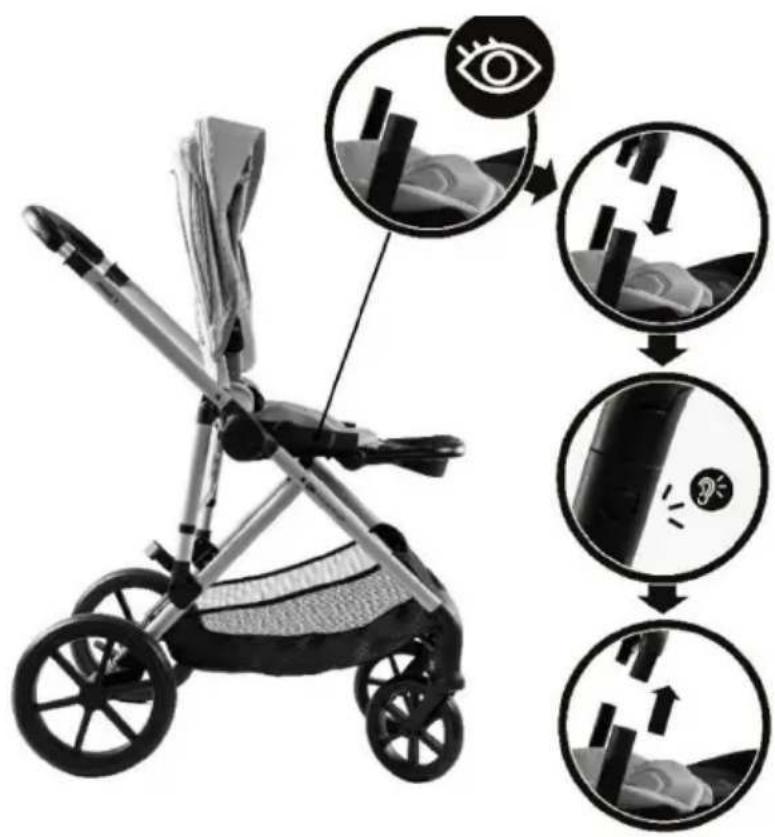
As an additional feature, you can change pushchair seat into a summer version. Remove the shoulder pads (Fig. Y), divide the straps (Fig. Z), pull out the plastic fixing pleat from the slots (Fig. AA). Another fixing pleat is located at the sea and backrest joint, and then remove insert from the backrest. Reconnect the straps and reattach the pads. To reattach the insert, follow the steps in reverse order.
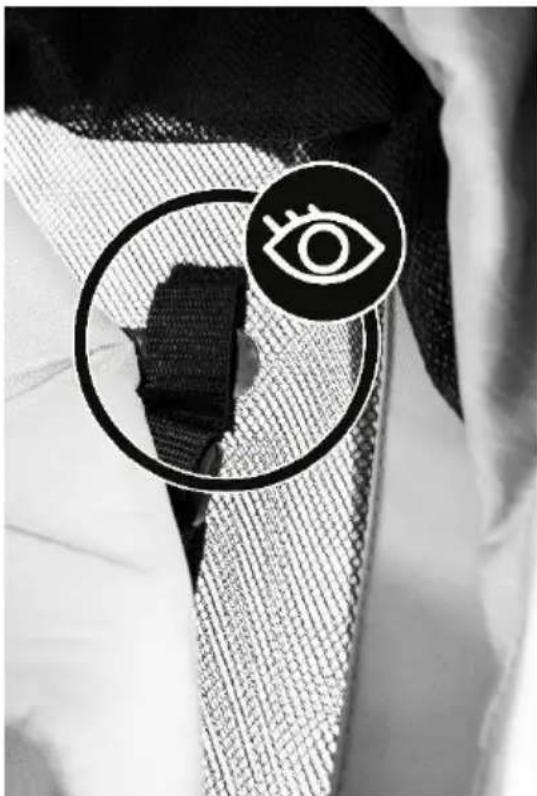
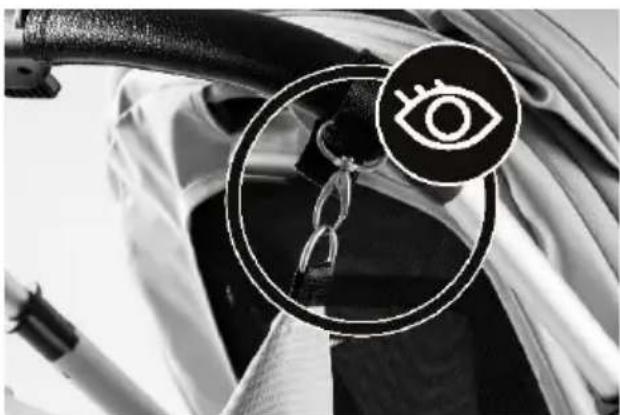
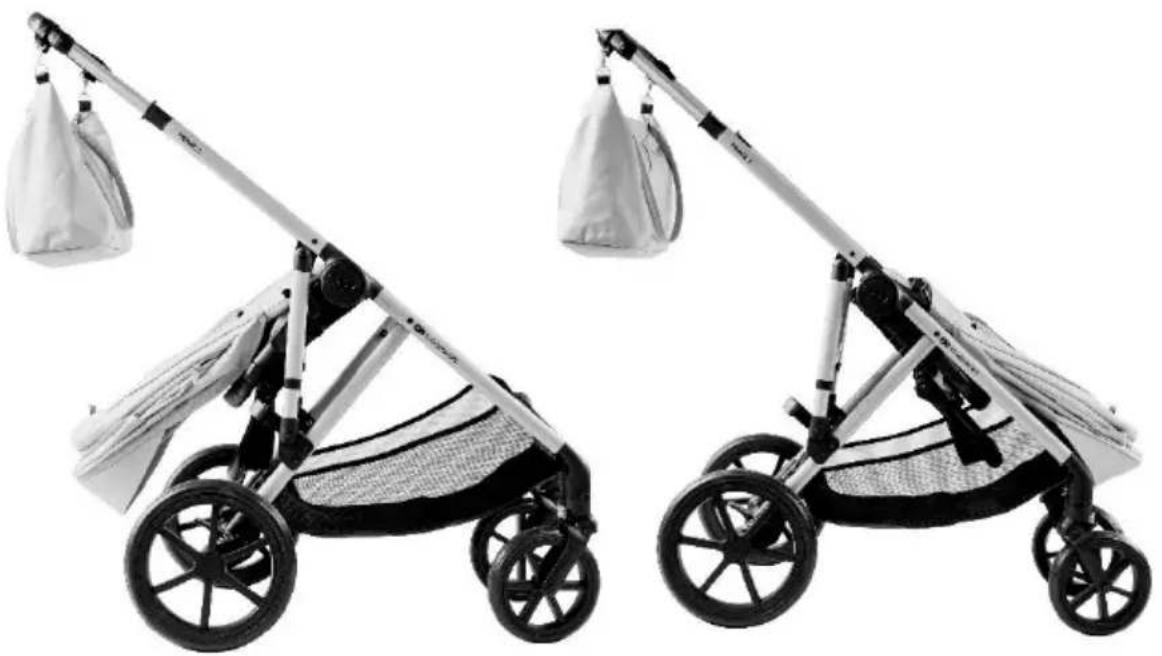
XVII. ATTACHING THE BAG
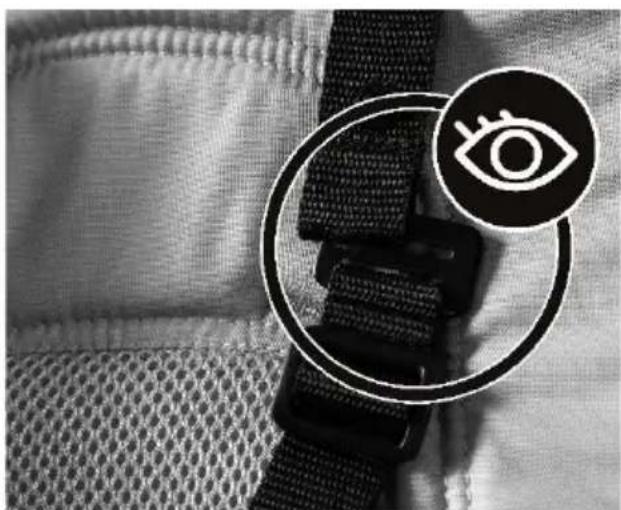
Attach the bag (31) to the handle using the straps: wrap the strap around the handle, thread it through the metal loop (Fig. BB), and secure it with hook & loop. The set also includes a changing mat.
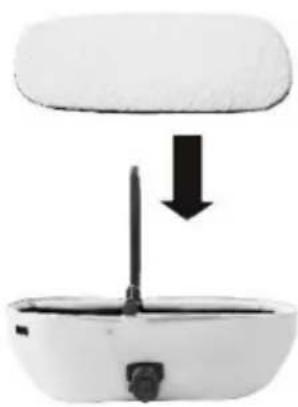
XVIII. ATTACHING THE CARRYCOT LINING
Lift the carrycot handle upward until it clicks (Fig. CC). Zip the lining into the carrycot (Fig. DD) and place the included mattress inside (Fig. EE).
XIX. CARRYCOT HOOD ASSEMBLY AND DISASSEMBLY
Place the hood on the raised carrycot bar and zip it around (Fig. FF). Attach the hood to the carrycot with rear hook & loop (Fig. GG) and side snaps (Fig. HH).
CAUTION! Install the hood before using the pushchair.
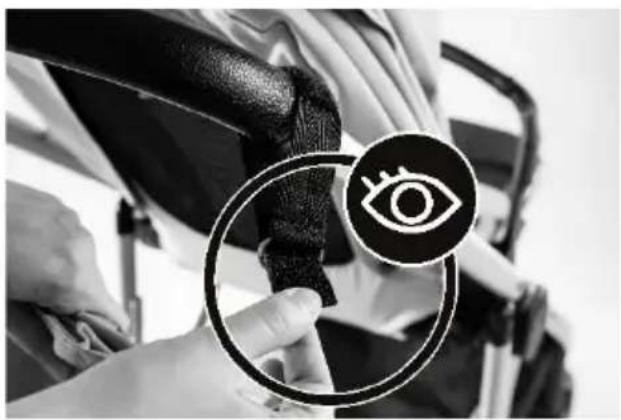
XX. HOOD ADJUSTMENT, ATTACHINNG THE FOOT MUFF
To unfold the carrycot hood, pull the handle upward until it locks. To fold the hood, press the buttons on both frame sides (Fig. II) and lower it.
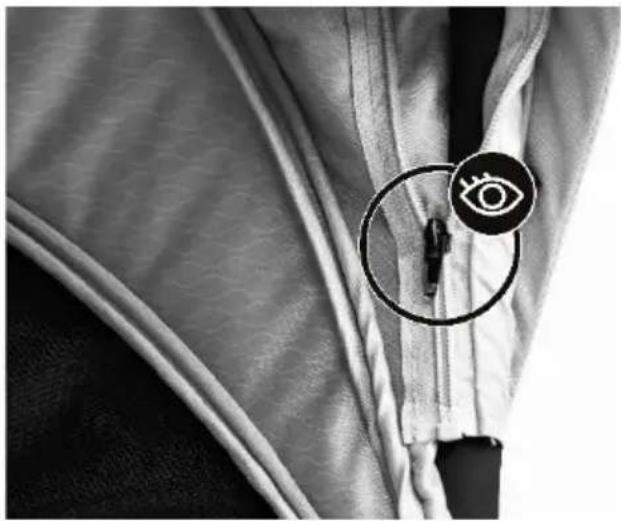
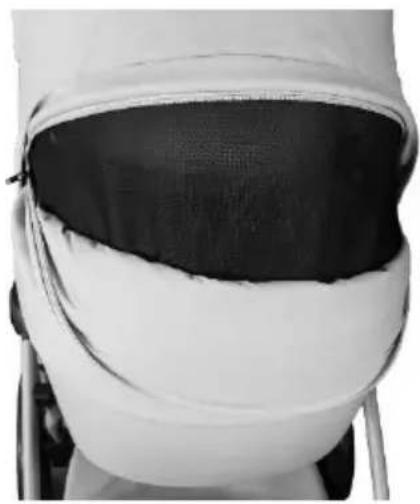
The hood features a built-in mesh panel; to reveal it, unzip the zipper located on the back of the hood and slide back
covering it fabric (Fig. JJ).
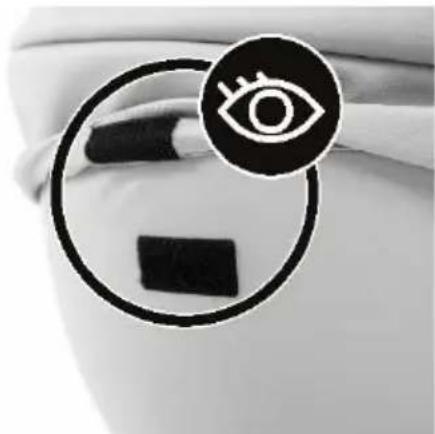
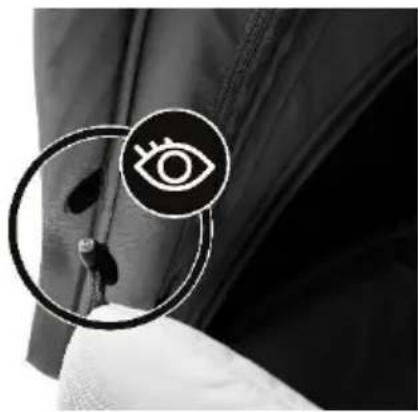
Attach the footmuff with the zipper (Fig. KK) and secure the sides by threading the button through the loop (Fig. LL).
CAUTION! The carrycot can only be mounted rear-facing (child facing the guardian pushing the pushchair).
XXI. CARRYCOT BACKREST ADJUSTMENT
Slide the lever (Fig. MM) located underneath the carrycot and lock it in desired position.
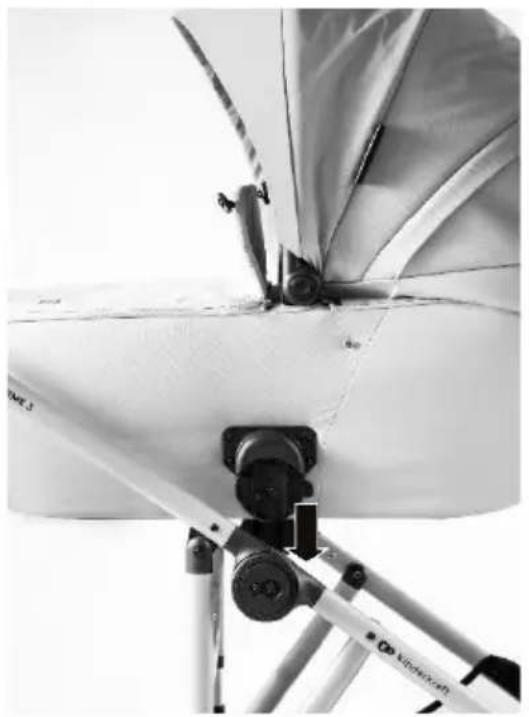
XXII. MOUNTING AND REMOVING THE CARRYCOT ON THE FRAME
Insert the carrycot connector into the frame socket (3) until you hear a characteristic click (Fig. NN). To remove the carrycot, press the buttons on both sides (Fig. OO) and lift it up.
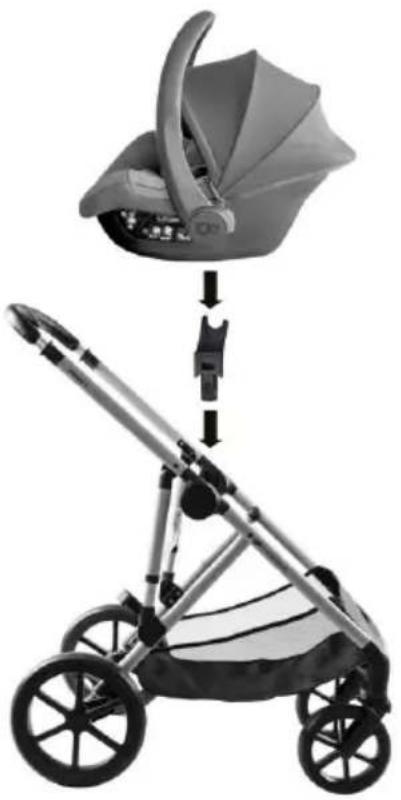
XXIII. INSTALLING THE CAR SEAT ON THE FRAME
Place the adapters into the frame (Fig. PP), then insert the car seat onto the fixed adapters until you hear a characteristic clicks (Fig. QQ). To release the adapters, pull upwards the levers on the adapters.
CAUTION! Always mount the car seat rear-facing (child facing the guardian).
XXIV. ATTACHING THE FOOTMUFF ON THE STROLLER, MOSQUITO NET, AND RAIN COVER
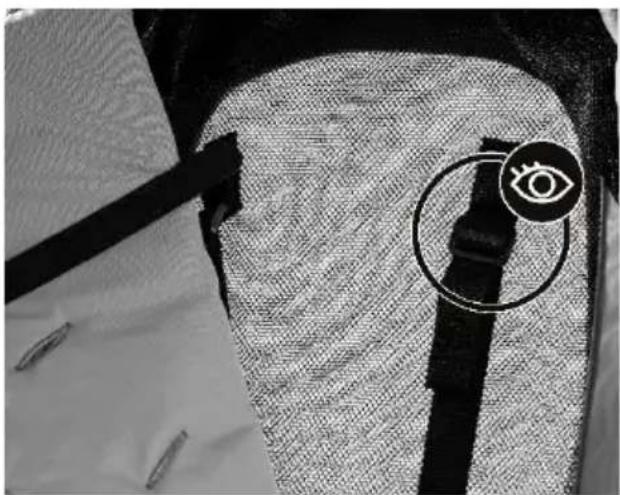
Place the footmuff on the footrest, button it up (Fig. RR) on both seat sides, and secure it to the bumper bar with hook & loop (Fig. SS).
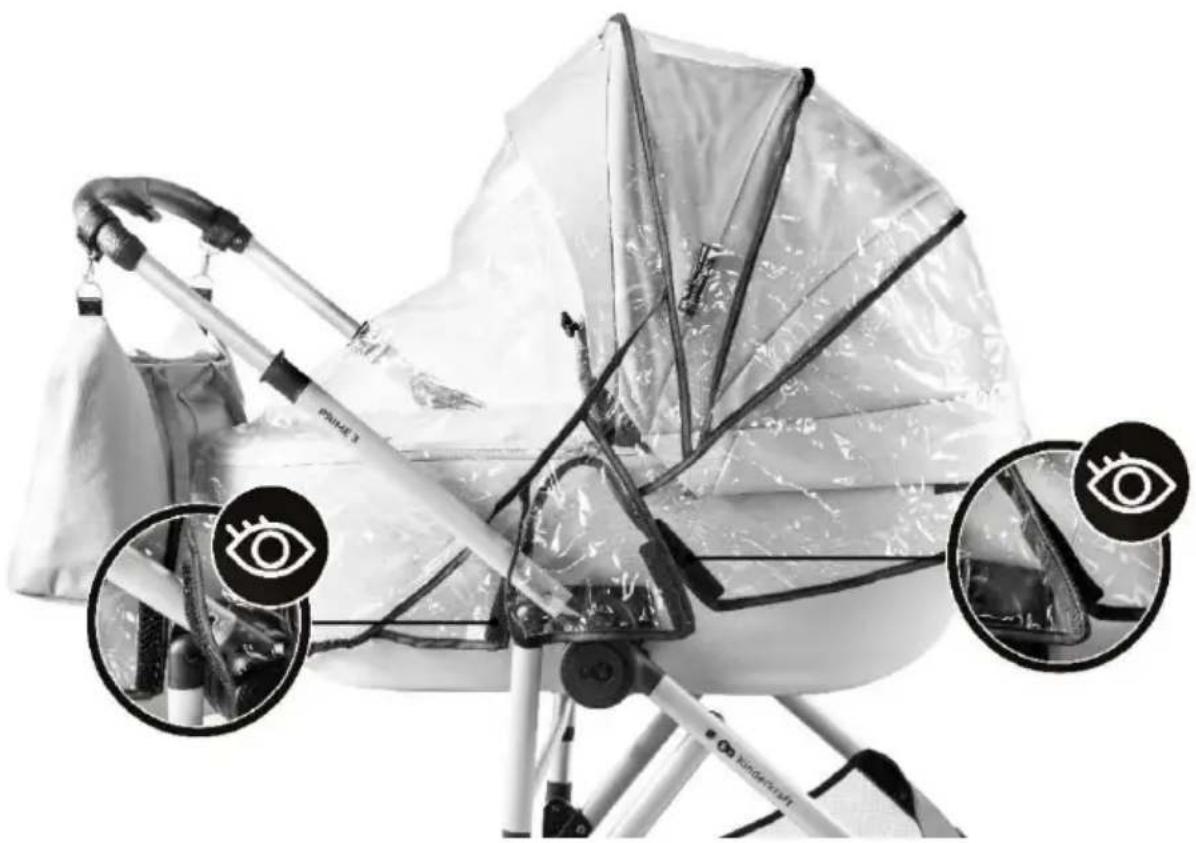
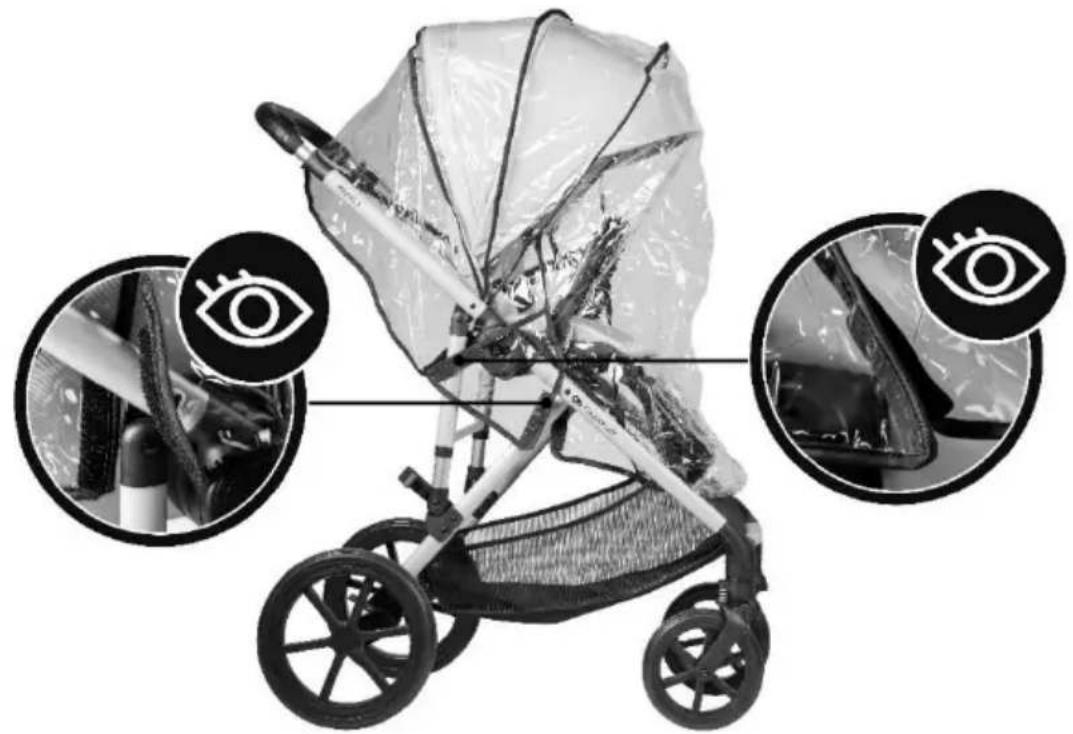
Put the rain cover over the seat (Fig. TT) or carrycot (Fig. UU) and secure with hook & loop.
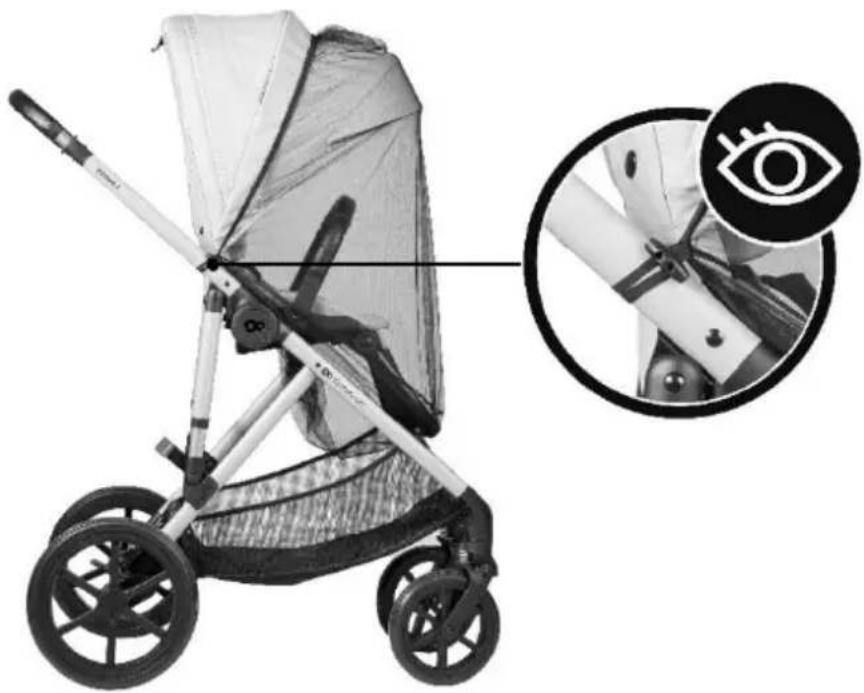
Place the mosquito net on the seat (Fig. WW) or carrycot (Fig. VV) and fasten it to the frame using the loop and button.
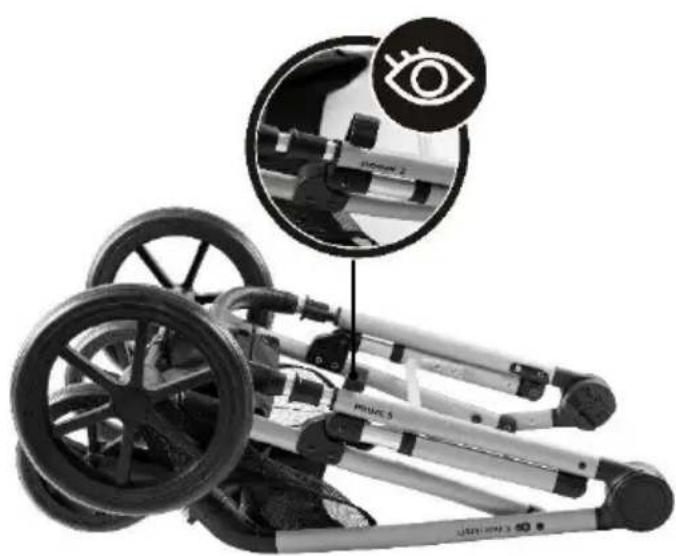
XXV. PUSHCHAIR DISASSEMBLY
Set the seat forward or rear facing. Set the backrest in the highest position. Press the brake. Fold the hood. To fold the pushchair, pull both folding levers towards simultaneously (Fig. XX). Once the pushchair is completely folded, the locking element will lock by itself (Fig. YY). The folded pushchair is shown in Fig. ZZ.
CAUTION! Do not fold the pushchair frame with the car seat or carrycot fixed to it.
XXVI. MAINTENANCE AND CARE
The buyer is responsible to ensure the correct installation of all functional components, and to carry out appropriate maintenance and adjustment procedures to keep the pushchair in good technical condition. Regularly inspect the pushchair for potential issues. Below you can find important procedures that must be carried out ensure your child's safety and prevent premature wear and tear of the product:
- Check the strength and security of all rivets and connections.
- Inspect all locking devices and wheels/tires and replace or repair as needed.
- Ensure if all safety mechanisms work properly, especially main and secondary buckles, which should move freely at all times.
We ask you kindly to stop using the pushchair if you're unsure about proper use or suspect any risk. Only use spare parts provided or recommended by the manufacturer. If the wheels squeak, lubricate the axles with a light silicone layer. Do not use oil-based or grease products, as they attract dirt and hinder movement.
XXVII. CLEANING
If pushchair suspension elements are exposed to saltwater, we recommend to rinse them with tab water as soon as possible. Do not fold or store the product when wet and never store it in damp conditions, as this can cause mold growth.
 | Do not wash. Clean the product gently with a damp cloth and a mild detergent |  | Hand wash at max. 40°. |
 | Wash at max. 30°C, gentle process |  | Do not dry in a tumble dryer |
 | Do not bleach |  | Do not dry clean |
 | Do not iron |
Bag, Seat cover: Hand wash at max. 40°C. Do not tumble dry. Do not dry clean. Do not iron. Do not bleach.
Basket, Carrycot Hood, Stroller Hood, Mattress: Do not wash. Wipe gently with a damp cloth and mild cleaning agent. Do not bleach. Do not tumble dry. Do not iron. Do not dry clean.
Stroller Footmuff, Carrycot Footmuff, Mattress Cover, Carrycot Lining: Wash at max. 30°C, gentle cycle. Wipe gently with a damp cloth and mild cleaning agent. Do not bleach. Do not tumble dry. Do not iron. Do not dry clean.
ES
Estimados clientes,
I ELEMENTE CADRU CĂRUCIOR (DES. 1)
X. MONTÁŽ A DEMONTÁŽ OCHRANNÉHO MADLA
XXII. MONTÁŽ A DEMONTÁŽ VANIČKY NA RÁM
The art of parenthood

kinderkraftofficial

kinderkraft

kinderkraftofficial
(AR) حضن مصلحة علالنا. تحن في خدستكما Malaysia للكيم أي شملكة المتنج الحستم عليه، فيجرال Increasingة بنا للétrique التي تضن phenomena.
(CS) V zájmu péče o naše klienty - jsme rádi k dispozici! Pokud jeste se setkali s néjakým problémem v souvislosti s obdrženým výrobkem, kontaktujte nás způsobem, který vám nejvice vyhovuje!
(DE) In Sorge für unsere Kunden - stehen wir gerne zu Ihrer Verfügung! Wenn Sie auf ein Problem mit dem erhaltenen Produkt treffen, treten Sie bitte mit uns in Kontakt in der bequemsten Weise für Sie!
(EN) In the interests of our Clients - we are at your disposal! If you have a problem with the product you received, contact us in the most convenient way for you!
(ES) ¡Por el bien de nuestros clientes, estamos a su disposición! Si tiene cualquier problema con el producto recibido, póngase en contacto con nosotros de forma más cómoda para usted!
(FR) Dans l'intérêt de nos clients - nous sommes à votre disposition! Si vous avez un problème avec le produit que vous avez reçu, Contactez-nous de la manière la plus pratique pour vous!
(HU) Bármikor állunk az ügyfeleink rendelkezésére! Ha az átvett termékkel kapcsolatban valamilyen problémába ütkozott, az Onnek legmegfelelobb módon vegye fel velünk a kapcsolatot!
(IT) Prendersi cura dei nostri Clienti - siamo alla Vostra disposizione! Se hai incontrato un problema con il prodotto che hai ricevuto. Contattaci nel modo più conveniente per te!
(NL) In het belang van onze klanten - staan wij ter beschikking! Als u een probleem met het ontvangen product tegenkomt, neemt contact met ons op via de manier die u het makkelijkste vindt!
(PL) W trosce o naszych Klientów - jesteśmy do dyspozycji! Jeśli napotkałeś problem dotyczący otrzymanego produktu, skontaktuj sie z nami w najbardziej dogodny dla Ciebie sposób!
(PT) Para o conforto dos nossos Clientes - estamos sempre à sua disposição! Se tiver qualquer problema com o nosso produto, entre em contacto connosco de modo mais confortável para si!
(RO) In interesul clientilor noștri - suntem la dispozitia dumneavoastră! Dacă aveți o problema cu produsul pe care l-ați primit, contactați-ne in modul cel mai convenabil pentru dvs.!
(RU) заботясь о наших клиентах, мы находимся в вашем распоряжении. Если вы столкнулись с проблемой, связанной с полученные продукто, свяжитесь с нами наиболее удобным для вас способ!
(SK) Náš zákazník je pre nás dôležitý - sme vám k dispozícii! Ak máte akýkolvek problém súvisiaci s doručeným produktom, kontaktujte nás spôsobom, ktorý vám najviac vyhovuje!
(SV) I våra kunders intresse - vi står till ditt förfogande! Om du har problem med den produkt du fick, kontakta oss på det mest praktiska sättet för dig!
International contact:
help@kinderkraft.com
(0044) 7441 476675
VÝROBCE/HERSTELLER/MANUFACTURER/FABRICANTE/FABRICANT/GYARTÓ/FABBRICANTE/FABRIKANT/PRODUCENT/FABRICANTE/PRODUCÁTOR/ПРОИЗВОДИТЕЛЬ/ÝROBCA/TILLVERKARE: