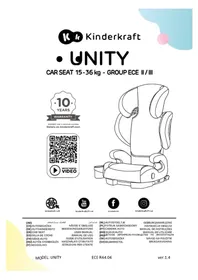
Myway - Car seat Kinderkraft - Free user manual and instructions
Find the device manual for free Myway Kinderkraft in PDF.
| Product type | Car seat |
| Brand | Kinderkraft |
| Model | Myway |
| Safety standard | UN ECE R44/04 |
| Weight groups | 0+ (0-13 kg), I (9-18 kg), II (15-25 kg), III (22-36 kg) |
| Orientation | Rear-facing (groups 0+ and I) / Front-facing (groups I, II, III) |
| Attachment | 3-point vehicle seat belt or ISOFIX + Top Tether (depending on group) |
| Harness | 5-point, height adjustable (10 headrest positions) |
| Backrest recline adjustment | 4 positions (according to group and orientation) |
| Headrest | Height adjustable, 10 positions |
| Shell material | Plastic |
| Cover | Hand wash at 30°C, do not machine dry |
| Cleaning plastic parts | Soapy water, no harsh solvents |
| Replacement parts | Available (cover, harness, shoulder pads, etc.) |
| Warranty | 24 months (extendable to 10 years upon registration) |
| Included accessories | Reducing cushion, ISOFIX guides, Top Tether strap |
Frequently Asked Questions - Myway Kinderkraft
User questions about Myway Kinderkraft
0 question about this device. Answer the ones you know or ask your own.
Ask a new question about this device
Download the instructions for your Car seat in PDF format for free! Find your manual Myway - Kinderkraft and take your electronic device back in hand. On this page are published all the documents necessary for the use of your device. Myway by Kinderkraft.
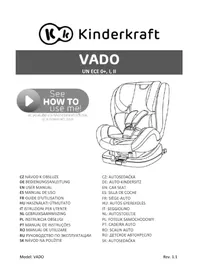
USER MANUAL Myway Kinderkraft
Available only in selected countries Details on kinderkraft.com


(AR)
(CS)AUTOSEDACKA
(DE)AUTOKINDERSITZ
(EN)CAR SEAT
(ES)SILLA DE COCHE
(FR)SIGEAUTO
(HU)AUTOS GYEREKULES
(IT)SEGGICUNO
山
NAVOD K OBSLUZE
BEDIENUNGSDANLETTUNG
USER MANUAL
MANUAL DE USO
GUIDE D'UTILISATION
HASZNALATI UTMUTATIO
ISTRUZIONI PER UTENTE
(NL)AUTOSTOELTJE
(PL)FOTELIK SAMOCHODOWY
(PT)CADEIRA AUTO
(RD)SCAUNAUTO
(RU)DETCKOE ABTOKPECIO
(SK)AUTOSEDACKA
(SV)SILBARNSTOL
GEBRUKSAANWJZING INSTRUKCJA OBSLUG: MANUAL DE INSTRUÇONES MANUAL DE UTILIZATION PYKOBOCTBO NO 3KCTUYATAL NAVOD NAPOZTE BRUKSAANVISING
AR 15
CS 23
DE 32
EN 43
ES 52
FR 62
HU. 72
IT. 82
NL 92
PL. 102
PT 111
RO 121
RU. 131
SK 141
SV 150


4.1a

4.1b

4.2a

4.2b

4.3a

4.3b

4.4a

4.4b

4.4c

4.4d

4.5

5.1a

5.1b

5.1c

5.1d
5.2a

5.2b

5.2c

5.2d

5.2e


5.2f

5.2g

5.2h

5.2i
5.3a
5.3b

5.3c

5.3d

5.4a


5.4b
5.5a
5.5b

5.5c


5.5d

6.1a
6.1b

6.1c

6.1d
6.1e

6.1f

6.1g


6.2a

6.2b
6.2c
AR
sglgsl 1
1( 1
1.05
wJl J111111111111111
(aLdAeJ)
gaioljrgaaol
()gglj
ISOFIX / 1
ISOFIX / 1
wJ1j
()aS1b2g4g0sI.23
p1j>ll sL
pJj11 b2.0 01.8
ii y1 b.v. 0c|j. g
jai jggi 1
a a a a a a a a a a a a a a a a a a a a a a a a
aai bai i y jol aojj bgsjoll daaall cysy plzwU wolo
i/1111111111 16 15 15 15 15 15
aioKo s rJrLeo gI auggul dLd
y 1 y
1gilo 1oJyI pJ> /pJ>ll o g k yI g Jabil poe eo cuiill pJ>
- i.e. x Q. x k^2 - 1
1 1
.0gj 1eab aI Llo! Jd iLwJ 1
AaJyOgDaaal 1uab y
1
. 152019 1984 Juaaiai pluai iui 1984
jjiy y jzjiai lgl aieipall 45wll j no gogall lc g q dduy abc pudciu
.105y1 220
a
Jabll Jaae aagkallg caleaill Jds gagol bai pdu
()
.
/ 1
biolng
14y1g1jz1z1z1z1z1z1z1z1z1z1z1z1z1
j 1
y 1
y jll iin no n o 511 yj.0o Jn nn nnnn nn nnnn nn nnnn nn nnnn nn nnnn nn nnnn nn nnnn nn nnnn nn nnnn nn nnnn nn nnnn nn nnnn nn nnnn nn nnnn nn nnnn nn nnnn nn nnnn nn nnnn nn nnnn nn nnnn nn nnnn nn nnnn nn nnnn nn nnnn nn nnnn nn nann
. 1
J 1
x1 = -b - ^2 - 4ac2a,x2 = -b + ^2 - 4ac2a
J 1
JbI Jaaa aaiy juiy y 1i jaiy i jaiy jaiy jaiy jaiy jaiy
y 1
wJl Jn 4.2
(14.1 K) 0sIwI plzwi yogj Jg jy Iabu pcln no dJol all ggg aJyI sIa;Je o slwI Joo
9 1 J 4.1 KJ11 13 1
4.2
aalalalalalalalalalalalalalalalalalalalalalalalalal
.8JUW JAAeip201 45JUJ 0
.5.2J) 1
.
ISOFIX/ 1aIoo (H) ISOFIX / wSgJzJzJzJzJzJzJzJzJzJzJzJzJzJzJzJzJzJzJzJzJzJzJzJzJzJzJzJzJzJzJzJzJzJzJzJzJz
(5.2 KJ) JKOJrJ (M)
.5.2K)ISOFIX/
J 1
1J 1
(5.2 K) 15
JooJIy JooJooJooJooJooJooJooJooJooJooJooJooJoo
jg jg jg jg jog k> 0o o o o o o
aaii i 15
."3"1 1
b2w b2w ola! cay daww sllj JabJ daa oolj gdu 1g :d2ylo
glal
J 5.2
1
a
(5.2Kai)
gulalglall jllr. bgluae 1 gglalw lwrj
(95.2 KJ) 1000
(5.3K)4.5g4.4jssu 1
(10518 - 0059) 1 ijgJl jn Jla bU ploU I aqnn Jla bU npaaon Jla U d
. 1
0g 1
"J! "B" no yglal jolal jolal jolal jolal jolal
(1) J_() 5.3
aeggglgagglgagglgagglgagglgagglgagglgagglgagglgagglgagglgagglgagglgagglgagglgagglgagglgagglgagglgagglgagglgagglgagglgagglgagglgagglgagglgagglgagglgagglgagglgagglgagglgagglgag
.5.3 KJ) 10
y jll iinoo g jbl ddooryo o yjwll doa o jy jol 0u
.(5.3K)wJlLdwo4gddj
(6.1 paaal jzil) JzaoJ 1j> J>
J 1
11 11 11 11 11 11 11 11 11 11 11
.0Jusu Juaa 1s Jabla Jaae
Jewi dgsjgall jyggill dlplxuwl yll bwrw g Jbll daa
(5.4KJ)
1g jyjwJ 100 (G) 4g 4g 4g 4g 4g 4g
(5.4 Kowll) "aabb" elaw no
(4.2 paaalj) jolpIgaiJl Jn
= 11
g 100000000000000000000000000000000000000000
. 4g jbl k 11 11 11 11 11 11
(36-515) 392
yIISOFIX /wSgJzIaI aIglo g bai I yj Jnol a o j
JIOIgISOFIX/psGgjBblnsslal 45
a
.0juaa aiaaa
(6.1 paaal jzil) 120 all jz> Jd, Cuiill
Jauuuii 15guljU Jn no n no jko 3 1sllw g o slwgl 5
1"1"
ISOFIX/ (\omega \omega \omega \omega \omega \omega \omega \omega \omega \omega \omega \omega \omega \omega \omega \omega \omega \omega \omega \omega \omega \omega \omega \omega \omega \omega \omega \omega \omega \omega \omega \omega \omega \omega \omega \omega \omega \omega \omega \omega \omega \omega \omega \omega \omega \omega \omega \omega \omega \omega \omega
(15.5 KJU) JKOyI Jd U (M)
·(5.5K)ISOFIX/
J 1
aai 1 aai i 1015IOFIX/ uSgjI aJxlo no gJxo J"abob" gssl oic
5(2K)JUJILYd aIgluaaogaaag
JouKJIy jI JI I aIc yI oSs lOic yI aIb JI I cA>lo n gSj Yda>yo
jg jg jg jg jg jg jg jg jg jg jg jg jg jg jg jg jg jg jg jg jg jg jg jg jg jg jg jg jg jg jg jg jg jg jg jg jg jg jg jg
.aaaii i 15
jolg jolgl 1ygl 1ygl 1ygl 1ygl 1ygl 1ygl 1ygl 1ygl
.5.5KJU
5g jyjll 1. (G) g jg jg jg jg jg jg jg jg
."ddabob" 1aw
(4.2 paaal jzil) Jabg JzjJyJyJi
J 1
i 1
aai jalal aai jai ai 1i
ISOFIX/ 5.6
P.
IISOFIX/ 1
Please carefully read the instruction manual before using the child car seat. Ensuring the safety of your child is your responsibility, and failure to read this manual may affect it.
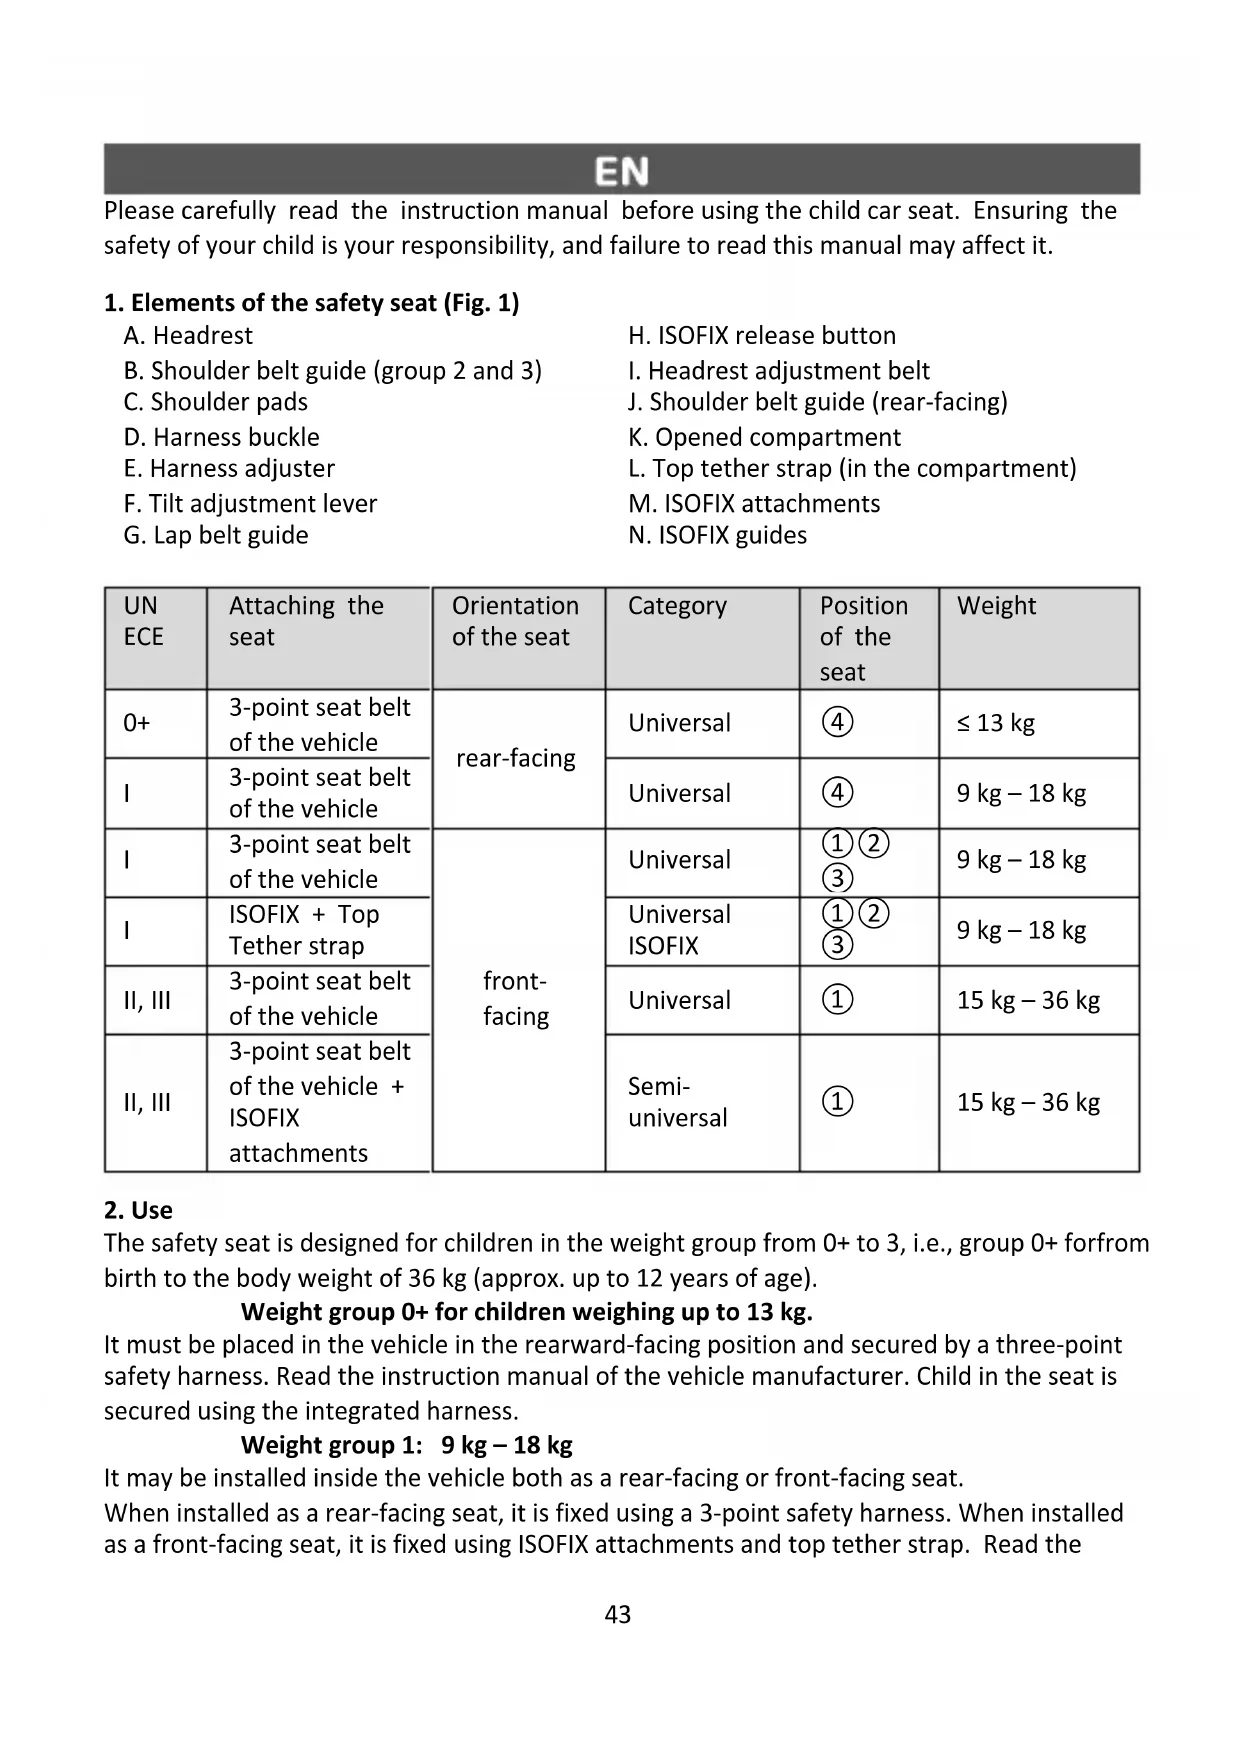
1. Elements of the safety seat (Fig. 1)
A. Headrest
B. Shoulder belt guide (group 2 and 3)
C. Shoulder pads
D. Harness buckle
E. Harness adjuster
F. Tilt adjustment lever
G. Lap belt guide
H.ISOFIX release button
I. Headrest adjustment belt
J. Shoulder belt guide (rear-facing)
K. Opened compartment
L. Top tether strap (in the compartment)
M. ISOFIX attachments
N. ISOFIX guides
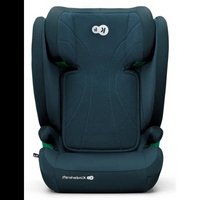
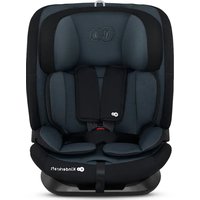
| UN ECE | Attaching the seat | Orientation of the seat | Category | Position of the seat | Weight |
| 0+ | 3-point seat belt of the vehicle | rear-facing | Universal | ④ | ≤ 13 kg |
| I | 3-point seat belt of the vehicle | Universal | ④ | 9 kg – 18 kg | |
| I | 3-point seat belt of the vehicle | front-facing | Universal | ①②③ | 9 kg – 18 kg |
| I | ISOFIX + Top Tether strap | Universal ISOFIX | ①②③ | 9 kg – 18 kg | |
| II, III | 3-point seat belt of the vehicle | Universal | ① | 15 kg – 36 kg | |
| II, III | 3-point seat belt of the vehicle + ISOFIX attachments | Semi-universal | ① | 15 kg – 36 kg |
2. Use
The safety seat is designed for children in the weight group from 0+ to 3, i.e., group 0+ forfrom birth to the body weight of 36 kg (approx. up to 12 years of age).
Weight group 0+ for children weighing up to 13kg
It must be placed in the vehicle in the rearward-facing position and secured by a three-point safety harness. Read the instruction manual of the vehicle manufacturer. Child in the seat is secured using the integrated harness.
Weight group 1: 9kg - 18kg
It may be installed inside the vehicle both as a rear-facing or front-facing seat.
When installed as a rear-facing seat, it is fixed using a 3-point safety harness. When installed as a front-facing seat, it is fixed using ISOFIX attachments and top tether strap. Read the
instruction manual of the vehicle manufacturer. Child in the seat is secured using the integrated harness.
Weight group 2: 15kg - 25kg
Weight group 3: 22kg - 36kg
In the case of children in weight groups 2 and 3 (15 kg to 36 kg), the safety harness in the car seat must be removed, and the child must be fastened using the 3-point adult safety belt or 3-point adult safety belt with additional ISOFIX attachments, see section 5.5. Read the instruction manual of the vehicle manufacturer.
3. General safety
Please take a few minutes to read this manual to ensure proper safety of the child. Many injuries are caused by reckless and inappropriate use of the seat and they are easy to avoid.
- DO NOT place the child seat in the seats fitted with an active frontal airbag, as it may be dangerous. This does not apply to side airbags.
- In the case of placing the seat on the front seat, turn the airbag off. It is recommended to use the seat in the back seats of the car only. Guidance on the suitability of the vehicle seat for use with a car seat can be found in the instruction manual of the vehicle manufacturer.
- Suitable for installation only in the approved vehicles fitted with three-point safety belts with retractor approved according to UN/ECE Regulation No. 16 or other equivalent standards.
- Note that any straps attaching the child seat to the vehicle must be tight; the restraint harness must fit the child's body and the belt/harness must not be twisted.
- The seat should be replaced if it has been subjected to violent stresses in an accident.
- The seat must not be subject to any modifications.
- The child safety seat should be protected from direct sunlight, otherwise heated parts can burn your child.
- Never leave your child in the seat unattended.
- It should be noted that any bags and other items must be sufficiently secured, in particular on the parcel shelf, as otherwise in the event of a collision this can lead to injury.
- The seat cannot be used without the cover.
- Do not use replacement covers other than those recommended by the manufacturer, since it is an integral part of the safety seat.
- It is recommended to keep the car seat instruction manual for the entire period of its use.
- Do not use other attaching points than those described in the instruction manual and marked on the child seat.
- All rigid items and plastic parts of the child seat must be located and installed in such a way to avoid, under normal operating conditions of the vehicle, blocking by a sliding seat or vehicle door.
- Regularly check the technical condition of the harness, paying special attention to the fasteners/holders, seams and adjustment elements.
-
Discontinue use of the car seat if its parts are damaged or loosened.
-
In case of an emergency, it is important to quickly unfasten the seat belts. This means that the harness release button is not fully secured; make sure that your child does not play with the buckle.
- The back of the seat must rest against the back of the car seat. Please make sure that the headrest does not create an unwanted space between the car seat backrest and back seat of the vehicle. Some car headrests may prevent proper installation of the car seat so they must be disassembled first.
- Make sure that the belt is properly placed in the guides. The safety belt buckle must be below the belt guide of the child safety seat (the buckle must not be in contact with the guide). If in doubt about this issue, contact the child seat manufacturer.
- You should give your child a good example and always fasten your belts. An adult with unfastened safety belts may also be a threat to the child.
- Before each trip by car, make sure that the seat is properly secured.
- The car seat must be protected even when not in use. Unattached seat can cause injuries to passengers even during emergency braking.
4. Securing your child
4.1 Seat cushion
The cushion improves comfort and provides additional support for very small children. We recommend using the cushion (Fig. 4.1a) until the child reaches the weight of 13kg . We recommend using the additional insert (Fig. 4.1b) until the child reaches the weight of 9kg .
4.2 Headrest height
Pull the adjustment belt of the headrest, lift or push-in the headrest to adjust its height (Fig. 4.2a, 4.2b). The headrest may be adjusted in 10 different heights.
- In case of weight group 1, set the proper shoulder strap height to make the strap entering the car seat backrest just above the child's shoulders or equally with their height. Ensure that the shoulder straps fit well to the child's shoulders.
- For weight groups 2 and 3, the shoulder belt should be positioned between the shoulder and the neck of the child. The headrest should fit well to the child's head.
4.3 Backrest tilt adjustment mechanism (Fig. 4.3a, 4.3b).
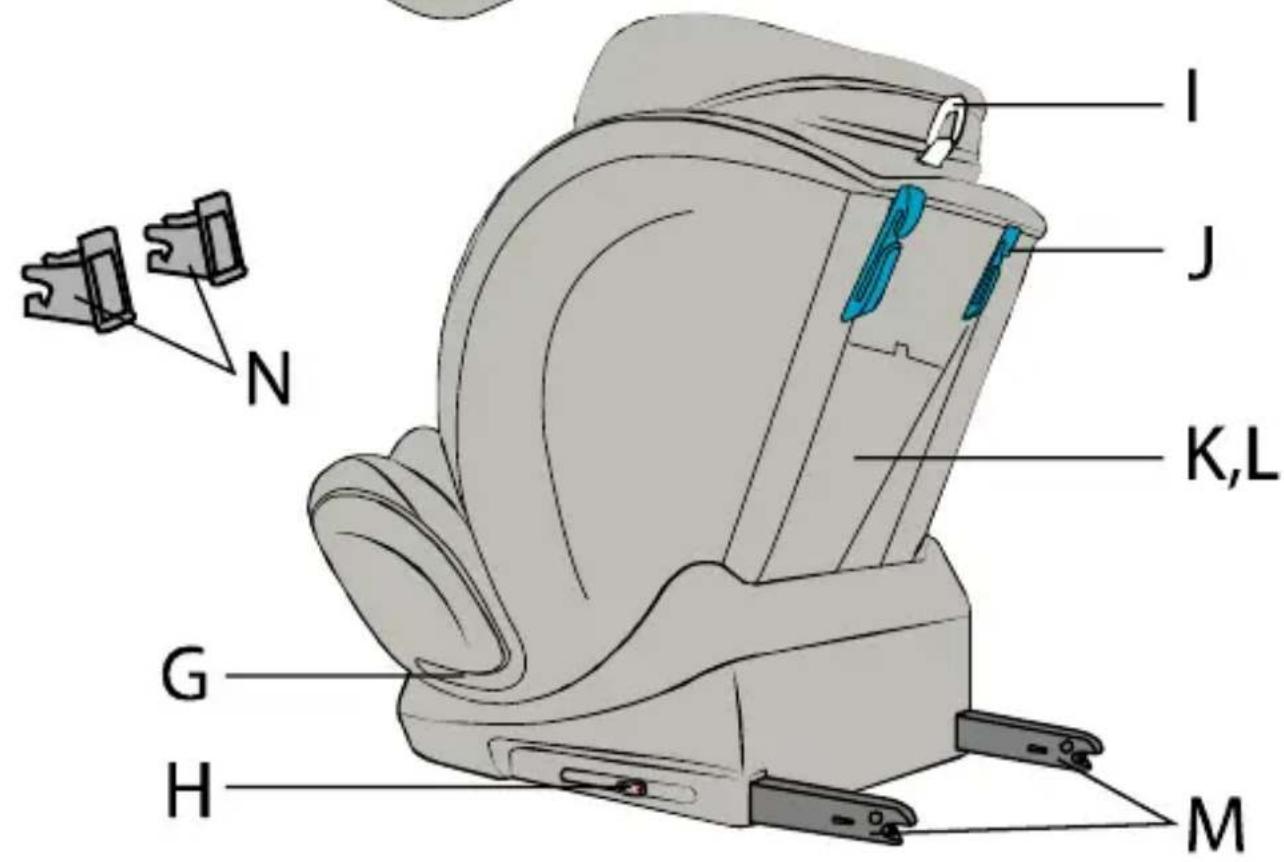
The tilt of the safety seat can be adjusted with the lever (F). Pull the lever, and then slide the seat. Release the lever in the desired position. Move the seat slightly until you hear a clearly audible "click" - the seat is secured in position.
In groups 0+ and 1 (up to 18kg ) with the rear-facing seat, use position "4".
In group 1 (9kg-18kg) with the front-facing seat, you may positions "1" to "3".
In groups II and III (15kg -36kg) with the front-facing seat, use position "1".
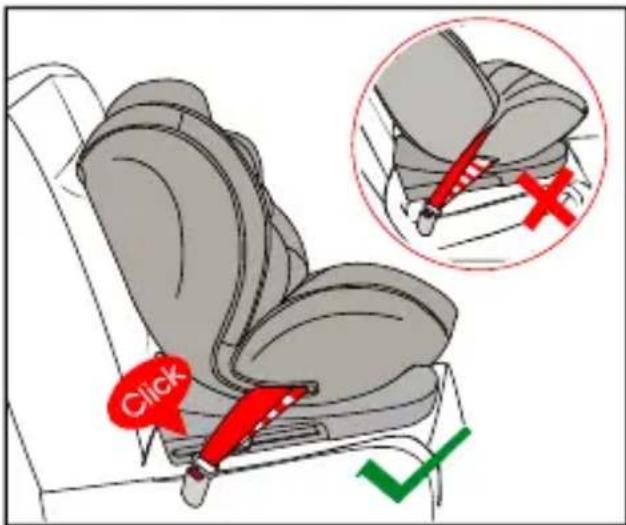
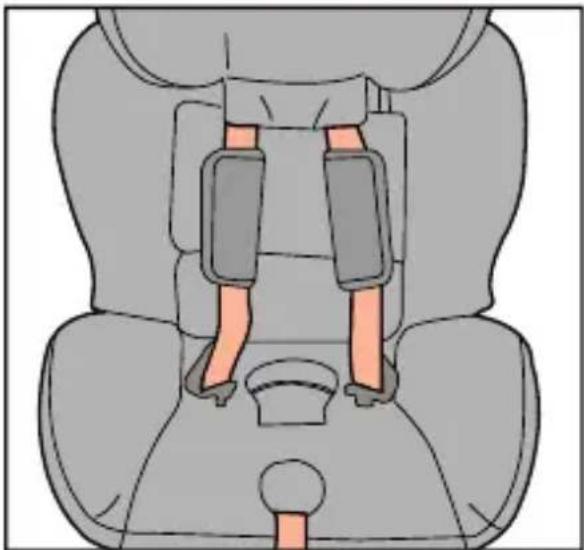
4.4 Securing your child with the harness.
- Loosen the harness straps by pressing the button (E) and pulling the harness. Remember! Do not pull the shoulder pads. Unlock the buckle (Fig. 4.4a).
- Place harness straps on the sides of the seat (Fig. 4.4b). Place your child in the seat (Fig. 4.4c).
-
Adjust the headrest to the child's height (see section 4.2).
-
Join two buckle latches to engage them and insert them into the buckle (D) until you hear a "click" (fig. 4.4d).
4.5 Tightening the harness (Fig. 4.5)
- Pull the shoulder straps to eliminate play in the hip strap so that the harness lies flat.
- Pull the harness with the harness adjustment strap, until the harness lies flat and close to the child's body. Ensure that the shoulder straps fit well to the child's shoulders. Proper tension is ensured, if you can insert one finger (approx. 1 cm) between the shoulder strap and the chest of the child.
NOTE The harnesses lap straps must be placed as low as possible on the child's hips. Make sure that the harness straps are not twisted.
5. Installation in the vehicle
In case of sudden braking or an accident, persons not using seat belts can cause damage to other passengers.
Always check the following:
- The seat backrests are locked in the vehicle (i.e., foldable back seat is locked).
- All heavy objects and sharp edges are secured (e.g., on the rear parcel shelf).
- All passengers fastened their seat belts.
- The safety seat is always protected, even if the child is not in it.
Vehicle security
Seat covers in some vehicles can be made of soft materials so the safety seat may leave some traces. They can be avoided by placing a blanket or towel under the safety seat.
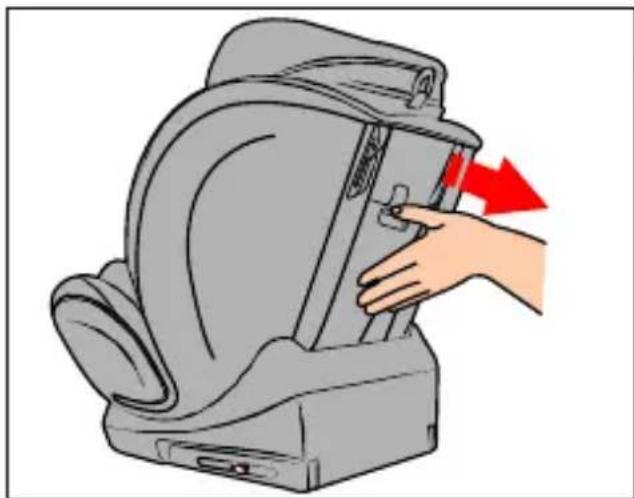
5.1 Installing the rear-facing child safety seat in weight groups 0+ and 1 (up to 18 kg) using the vehicle 3-point safety belts.
- Place the child seat on the vehicle's seat close to the backrest. The child seat must be placed in the rearward-facing position. The tilt of the backrest of the seat must be set in position "4", which is the most inclined (Fig. 5.1a).
- Pull out the safety belt as much as possible. Pull the lap strap pas through the guide slots (G) under the armrests and secure the seat belt buckles (Fig. 5.1b).
- Pull the shoulder belt over the child seat through the blue belt guide on the back of the child seat (J) (Fig. 5.1).
Note: Tighten the belt up and make sure that the car safety belt has not twisted or slipped from the guides.
- Push the baby seat to the car seat.
- Pull the lap belt towards the buckle to fasten it. Then, pull the shoulder belt to tighten the other parts of the safety belt.
NOTE: Make sure the child safety seat is fixed well and stable. Check the belt and make sure its route goes on correctly.
- Secure the child in the seat in accordance with sec. 4.4 and 4.5 (Fig. 5.1d).
5.2 Installing the child's seat in weight group 1 (9-18kg) using ISOFIX system and the top tether strap.
IMPORTANT The instruction manual of the vehicle manufacturer specifies the location of the ISOFIX attachment points and the top tether strap, and other necessary information regarding the installation of the seat in the car. The user MUST read the instruction manual of the vehicle manufacturer.
- Open the cover of the child seat compartment (Fig. 5.2a).
- Take out the strap with the hook (Fig. 5.2b), then place it on the child headrest and close the compartment.
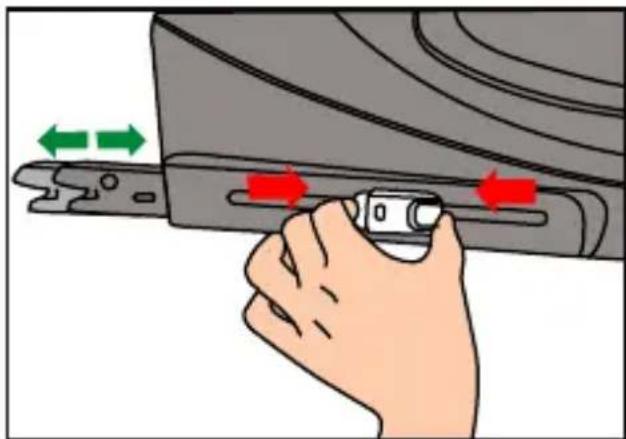
- Press on both sides of the ISOFIX release button (H) and pull out the ISOFIX attachments (M) as far as possible (Fig. 5.2c).
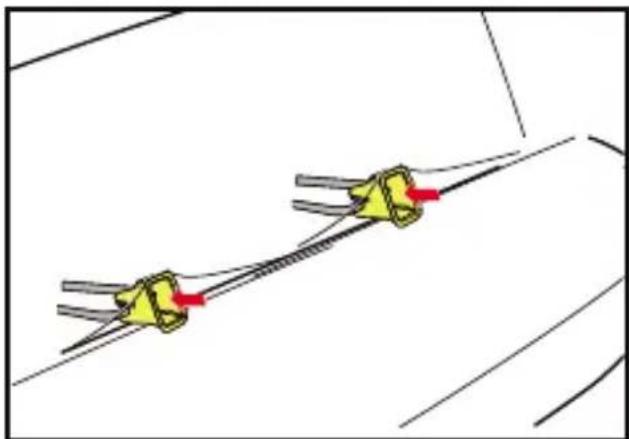
- Attach ISOFIX guides to the seat connectors (Fig. 5.2d).
- Grab the seat with both hands and push the two fixing hooks in the back seat.
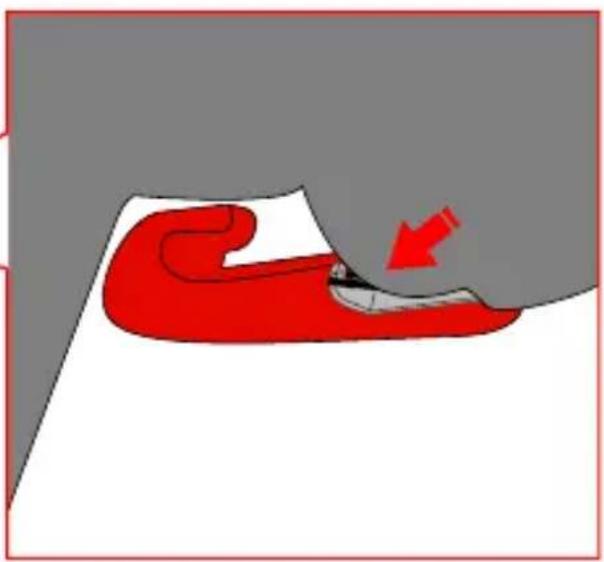
- When you hear the "click" of each ISOFIX attachments, push the seat to the back seat, strongly and evenly pressing its both sides (Fig. 5.2e) NOTE! The locking attachments are secure only when both button markers are completely green.
- Grab the child seat and make sure it is securely fastened without play. If it moves and ISOFIX attachments slip out, repeat the previous steps.
- Set the backrest of child seat in position in desired position "1" to "3". NOTE: Any change in the tilting of the child seat during its use, requires the re-adjustment of the top tether strap.
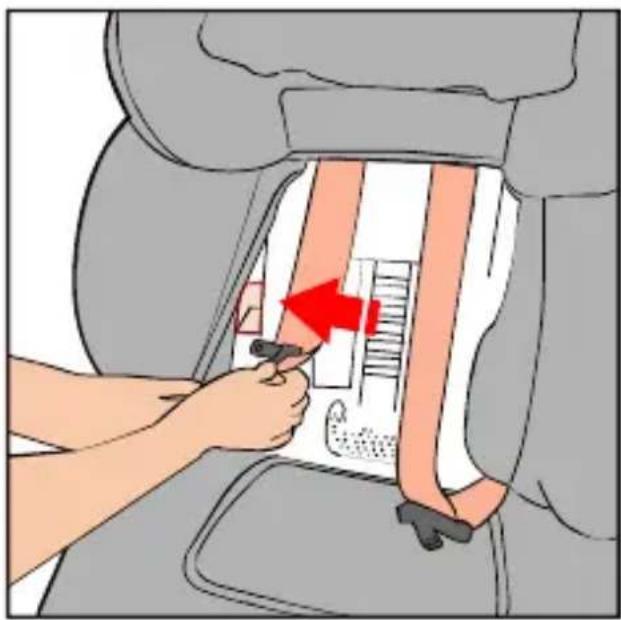
- Press the button releasing the buckle to adjust the length of the top tether strap (Fig. 5.2f). The strap must be long enough to allow placing the hook in the attachment point in the back seat.
- Place the top tether hook in the attachment point of the vehicle recommended in the instruction manual of the vehicle manufacturer (Fig. 5.2g).
- Pull the other end of the top tether strap in order to tighten it. The upper strap is properly tightened, when the green indicator in buckle is visible (fig. 5.2h).
- Secure the child in the seat in accordance with sec. 4.4 and 4.5 (Fig. 5.2i).
5.3 Installing the front-facing child safety seat in weight group 1 (9kg-18kg), using the vehicle 3-point safety belts.
- Place the child seat on the vehicle's seat close to the backrest. The child seat must be placed in the front-facing position. Set the backrest of child seat in position in desired position "1" to "3" (Fig. 5.3a).
- Pull out the car's safety belt as much as possible. Pull the lap strap pas through the guide slots (G) under the armrests and secure the seat belt buckles (Fig. 5.3b). Pull the shoulder part of the vehicle's seat belt through the child seat and under the headrest. Do not guide the strap through the headrest guide (Fig. 5.3c). Note: Make sure that the car safety belt is not twisted.
-
Push the baby seat to the car seat.
-
Pull the lap belt towards the buckle to fasten it. Then, pull the shoulder belt to tighten the other parts of the safety belt.
NOTE: Make sure the child safety seat is fixed well and stable. Check the belt and make sure its route goes on correctly.
- Secure the child in the seat in accordance with sec. 4.4 and 4.5 (Fig. 5.3d).
5.4 Installing the front-facing child safety seat in weight groups 2 and 3 (15kg-36kg), using the vehicle 3-point safety belts.
- Before installation, hide the seat harness (see section 6.1).
Remember: Store the cushion and pads in a safe place for the future use. - Set the backrest of child seat in position "1".
- Place the child seat on the vehicle seat.
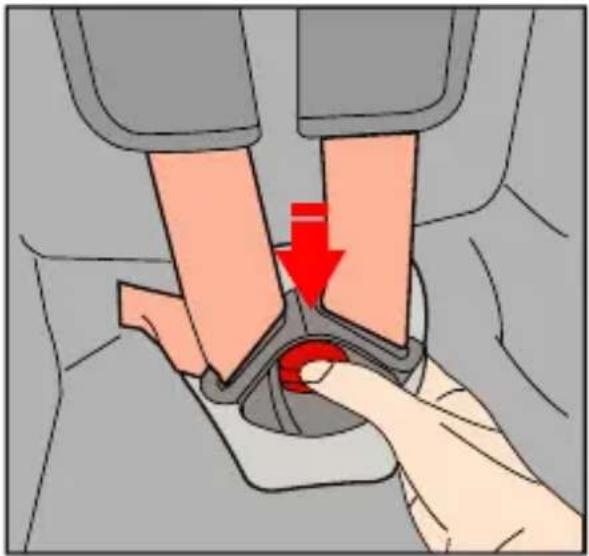
- Put the child in the child seat and pull the shoulder strap through the red guide under the headrest (Fig. 5.4a).
- Guide the vehicle's seat belt through both lap belt guides (G). Fasten the vehicle seat belt and make sure you hear a "click" (fig. 5.4b).
- Adjust the headrest to the child's height (see section 4.2).
- Tighten the vehicle seat belt by pulling the first section of the hip belt, and then the shoulder belt section.
Make sure that the hip belt is stretched as low as possible over the child's hips, placed in the guides and fixed in the buckle. The shoulder belt should be positioned between the shoulder and the neck of the child.
5.5 Installing the front-facing child safety seat in weight groups 2 and 3 (15kg-36kg), using the vehicle 3-point safety belts and additional ISOFIX attachments.
IMPORTANT The instruction manual of the vehicle manufacturer specifies the location of ISOFIX fixing points and other necessary information regarding the installation of the seat in the car. The user MUST read the instruction manual of the vehicle manufacturer.
- Before installation, hide the seat harness (see section 6.1).
Remember: Store the cushion and pads in a safe place for the future use. - Set the backrest of child seat in position "1".
- Press on both sides of the ISOFIX release button (H) and pull out the ISOFIX attachments (M) as far as possible (Fig. 5.5a).
- Attach ISOFIX guides to the seat connectors (Fig. 5.5b).
- Grab the seat with both hands and push the two fixing hooks in the back seat.
- When you hear the "click" of each ISOFIX attachments, push the seat to the back seat, strongly and evenly pressing its both sides (Fig. 5.2c)
NOTE! The locking attachments are secure only when both button markers are completely green.
- Grab the child seat and make sure it is securely fastened without play. If it moves and ISOFIX attachments slip out, repeat the previous steps.
-
Put the child in the child seat and pull the shoulder strap through the red guide under the headrest (Fig. 5.5d).
-
Guide the vehicle's seat belt through both lap belt guides (G). Fasten the vehicle seat belt and make sure you hear a "click".
- Adjust the headrest to the child's height (see section 4.2).
- Tighten the vehicle seat belt by pulling the first section of the hip belt, and then the shoulder belt section.
Make sure that the hip belt is stretched as low as possible over the child's hips, placed in the guides and fixed in the buckle. The shoulder belt should be positioned between the shoulder and the neck of the child.
5.6 Removing the seat (ISOFIX fastening system)
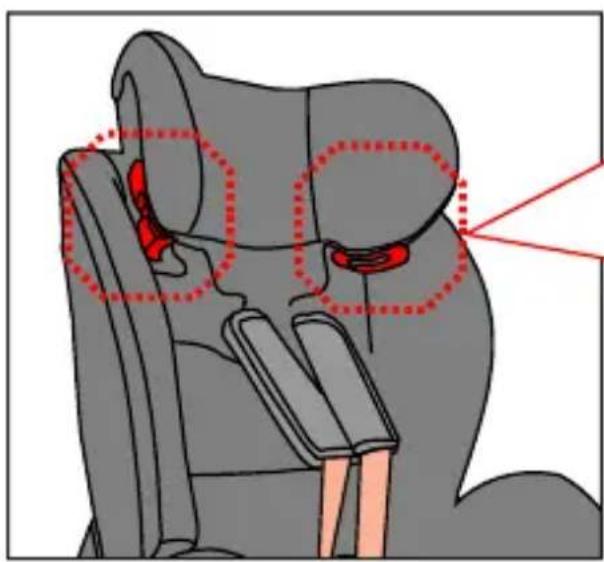
- Press both sides of ISOFIX release button (H) on each side of the child seat. The attachments are released and the colour of the markers turns red. Slide the ISOFIX arms back into the base of the seat – while reversing the arms rattling can be heard.
6.1 Hiding the 5-point harness
- Release the buckle (Fig. 6.1a), to release the harness straps and move them to sides (Fig. 6.1b).
- Detach the shoulder pad latches (C), remove them from the harness straps (Fig. 6.1c)
- D. Slide the strap securing shoulder pads from the S-shaped metal buckle shape (Fig. 6.1d-1) and pull down the left pad down (Fig. 6.1d-2).
- Lift the latches of the buckle inside storing compartments on both sides of the backrest (Fig. 6.1e). The correct position of the straps is shown in Figure 6.1f.
- Remove the fabric from the front edge of the seat, in order to reach the fixing point of the crotch strap. Detach the rubber bands and slide out the material around the harness adjustment button. Pull out the crotch strap from T-shaped slot by twisting it, as shown in Figure 6.1g.
6.2 Removing the cover
- Hide the harness and remove the cushions – if they are installed (see section 6.1).
- Detach Velcro tape sections of the cover located close to the lap belt guide (G). Remove rubber bans securing the cover to the front edge of the seat.
- Starting from one side, carefully remove the cover from the edge of child seat body (Fig. 6.2a, 6.2b). Detach rubber bands securing the headrest cover, located close to the belt guide (Fig. 6.2c) and the rubber band at the top of the headrest. Slide-off the cover from the headrest.
6.3 Installing the cover and harness
- Adjust the child seat cover. Slide the crotch strap through the slot in the seat.
- Place the cover around the adjustment button (E), stretching it over the seat and backrest. Attach rubber bans securing the cover to the front edge of the seat. Secure the cover by sliding inside seat body slots.
- Put the cover on the headrest and secure it with rubber bands.
- Place the shoulder pads (C) on the harness straps.
- Check that the harness straps are not twisted.
6.4 Cleaning
Use the original cover only, since it is essential for the safety of the seat. NOTE Do not use the seat without the cover.
- The cover may be removed and washed (hand wash at 30^ ). Observe the washing instructions on the label placed on the cover. The cover may not be spun or tumble dried (as it may result in separation of the material layers).
- Plastic parts can be cleaned with water and soap. Do not use aggressive cleaning agents (such as solvents).
- The harness may be cleaned using warm water and soap.
7. Warranty
- All Kinderkraft products are covered by a 24-month warranty. The warranty period starts from the date the product is handed over to the Buyer.
- The warranty is only valid in the member states of the European Union, excluding overseas territories (as currently defined, including in particular: Azores, Madeira, Canary Islands, French Overseas Departments, Åland Islands, Athos, Ceuta, Melilla, Helgoland, Busingen am Hochrhein, Campione d'Italia and Livigno) and the territory of the United Kingdom of Great Britain and Northern Ireland excluding the British Overseas Territories (e.g. Bermuda, Cayman Islands, Falkland Islands).
- The manufacturer's warranty does not apply to countries not listed above. The conditions of the additional warranty may be determined by the Seller.
- In some countries, it is possible to extend the warranty to a limited period of 120 months (10 years). The complete terms and conditions and the warranty extension registration form are available at www.KINDERKRAFT.COM
- The warranty is valid only in the territory indicated in paragraph 2.
-
Claims must be made by completing the form available at www.RMA.KINDERKRAFT.COM
-
The warranty does not cover:
A. Cosmetic damage, including but not limited to: scratches, dents and cracks in plastic, unless the failure is due to a material or manufacturing defect;
B. Damage resulting from misuse or poor maintenance - including but not limited to: mechanical damage to products caused by misuse or poor maintenance;
- Refer to the instructions for use and installation of the product contained in the user manual;
C. Damage caused by improper assembly, installation or disassembly of products and/or accessories;
- Refer to the instructions for use and installation of the product contained in the user manual;
D. Damage caused by corrosion, mould or rust, resulting from improper maintenance, care and storage;
E. Damage caused by normal wear and tear or otherwise resulting from the normal passage of time;
- This includes: tears or punctures in inner tubes; tyre damage; tyre tread damage; fading of fabrics resulting from mechanical use (e.g. on joints and covering of moving parts);
F. Damage or erosion caused by sun, perspiration, detergents, storage conditions or frequent washing, etc;
G. Damage caused by accident, abuse, misuse, fire, contact with liquid, earthquake or other external causes;
H. Products that have been modified to change functionality without 4Kraft's written consent;
I. Products from which the serial number or lot number has been removed or tampered with in any way;
J. Damage caused by the use of third party components or products - including but not limited to: cup holders, umbrellas, reflectors, bells;
K. Damage caused by transport or by ground handling service providers.
- The warranty period for accessories included with the product is 6 months from the date of sale, excluding the faults described above.
- These warranty conditions are complementary to the Customer's statutory rights with respect to 4KRAFT sp. z o.o. The warranty does not exclude, limit or suspend the Customer's rights under warranty for defects in goods sold.
- The full text of the Terms and Conditions of the Warranty is available on the website www.KINDERKRAFT.COM
All rights to the present document belong entirely to 4Kraft Sp. z o.o. Any unauthorized use of them against their purpose, including in particular: using, copying, reproducing, making available - in whole or in part, without the consent of 4Kraft Sp. z o.o. may result in legal consequences.
ES
(EN) In the interests of our Clients - we are at your disposal! If you have a problem with the product you received, contact us in the most convenient way for you!