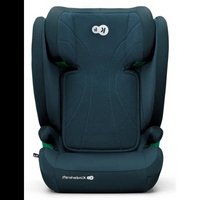
Comfort Up - Car seat Kinderkraft - Free user manual and instructions
Find the device manual for free Comfort Up Kinderkraft in PDF.
| Product type | Car seat |
| Brand | Kinderkraft |
| Model | Comfort Up |
| Weight groups | Group I: 9-18 kg, Group II: 15-25 kg, Group III: 22-36 kg |
| Recommended age | Approximately 9 months to 11 years |
| Installation | Forward-facing, secured with vehicle's 3-point seat belt |
| Integrated harness | Height-adjustable 5-point harness for Group I |
| Headrest | Height adjustable |
| Removable seat cushion | Usable alone for Group III (22-36 kg) |
| Cover material | Fabric |
| Care | Hand wash with mild detergent and warm water; do not machine wash |
| Safety standards | Compliant with ECE R16 standard |
| Side protection | Integrated |
| Fastenings | Belt guides for correct installation |
| Harness adjustment | Adjustment lever under the cover |
| Usage | Car seat only for vehicle use, not for home use |
| Warranty | 24 months, extendable to 120 months (10 years) upon registration |
| Spare parts | Covers recommended by the manufacturer |
Frequently Asked Questions - Comfort Up Kinderkraft
User questions about Comfort Up Kinderkraft
0 question about this device. Answer the ones you know or ask your own.
Ask a new question about this device
Download the instructions for your Car seat in PDF format for free! Find your manual Comfort Up - Kinderkraft and take your electronic device back in hand. On this page are published all the documents necessary for the use of your device. Comfort Up by Kinderkraft.
USER MANUAL Comfort Up Kinderkraft
Available only in selected countries Details on kinderkraft.com

kinderkraft.com

Anderkraftofficial

kinderkraft

gindneratofficial
AR
CZ: AUTOSEDACKA
DE: AUTO-KINDERSITZ
EN:CAR SEAT
ES:SILLA DE COCHE
FR: SIEGE-AUTO
HU AUTOS GYEREKULES
jbjdzjjz
NAVOD KOBSLUZE
BEDIENUNGSANLETTUNG
USERMANUAL
MANUAL DE USUARIO
GUIDE D'UTILISATION
HASZNALATI UTASITAS
IT: SEGGIOLINO
NL AUTOSTOELTJE
PL:FOTELIK SAMOCHODOWY
PT:CADEIRA AUTO
RO: SCAUN AUTO
RU DETCKOE ABTOKPECIO
SK: AUTOSEDACKA
ISTRUZIONI PER UTENTE
GEBRUIKSAANWIJZING
INSTRUKCJA OBSLUGI
MANUAL DE INSTRUÇÉS
MANUAL DE UTILIZARE
PYKOBOACTBO NO 3KCNYATAUHN
NAVOD NAPOUZITIE
MODEL: COMFORT UP
ECE R44.04
ver.1.5
AR. 10
CS. 14
DE 21
EN 28
ES 35
FR 41
HU 48
IT 55
NL 62
PL 69
PT 76
RO 83
RU. 90
SK 96


Fig. 1

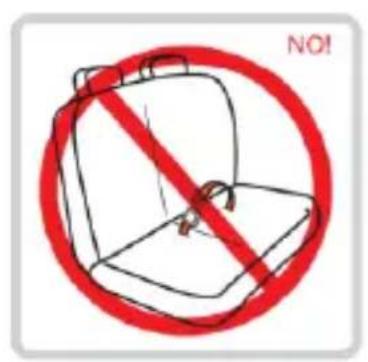
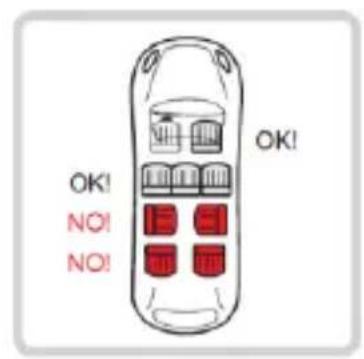
Fig. 3-1

Fig. 3-2

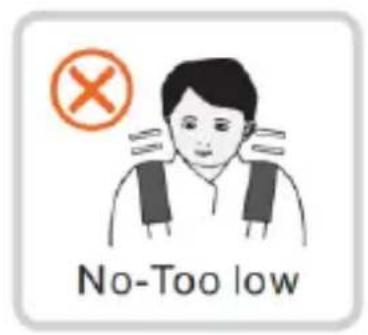

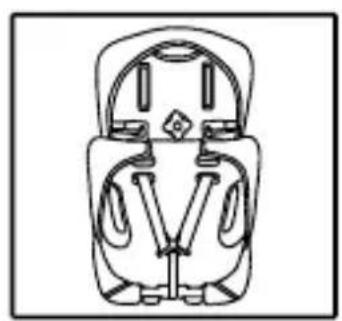
Fig. 4.1-1
Fig. 4.1-2
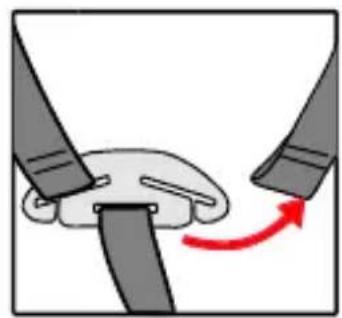
Fig. 4.1-3

Fig. 4.1-4
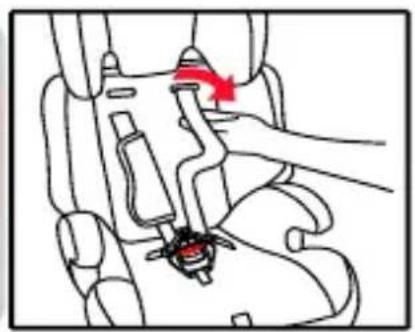
Fig. 4.1-5

Fig. 4.1-6
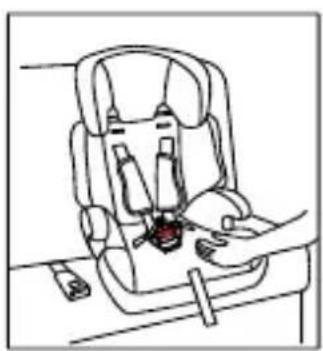
Fig. 4.2-1

Fig. 4.2-2

Fig. 4.2-3

Fig. 4.2-4
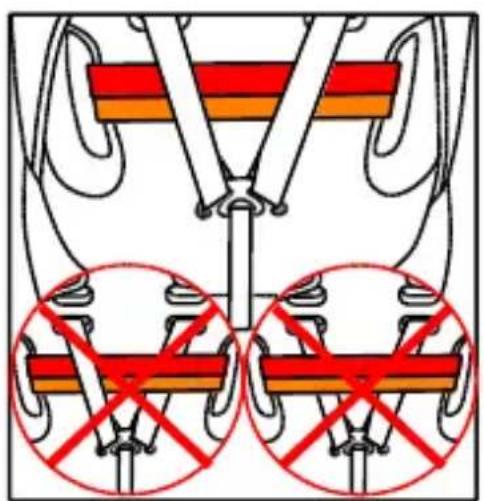
Fig. 4.2-5
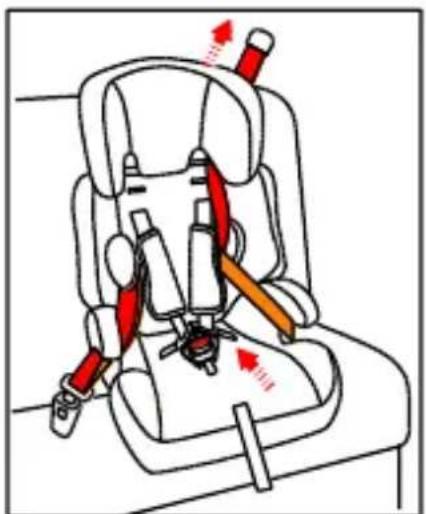
Fig. 4.2-6

Fig. 4.3

Fig. 4.4
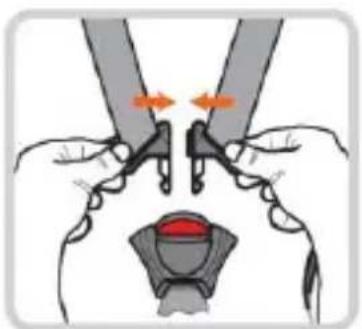
Fig. 4.4.1-1

Fig. 4.4.1-2
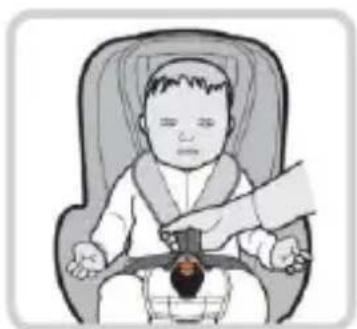
Fig. 4.4.1-3

Fig. 5.1-1

Fig. 5.1-2
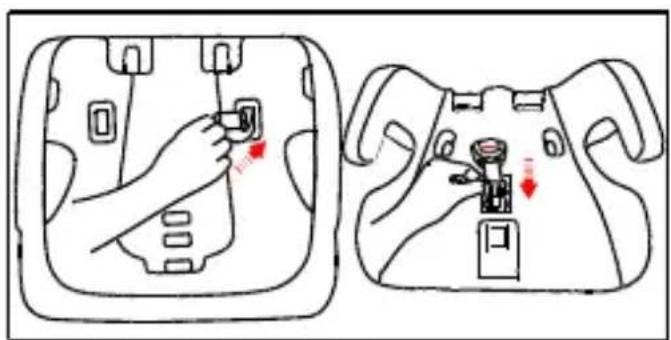
Fig. 5.1-3

Fig. 5.1-4

Fig. 5.1-5
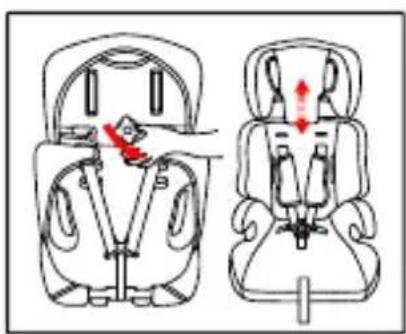
Fig. 5.2

Fig. 5.3-1
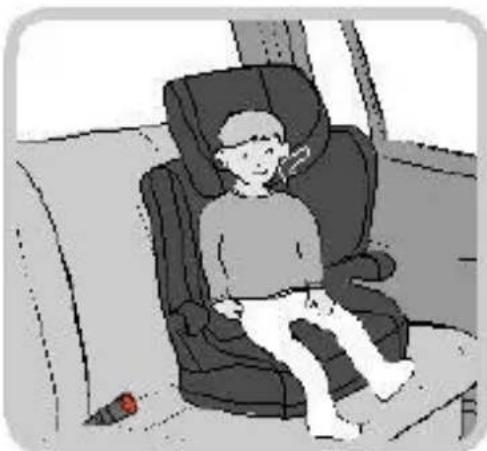
Fig. 5.3-2

Fig. 5.3-3

Fig. 5.3-4

Fig. 5.4-1
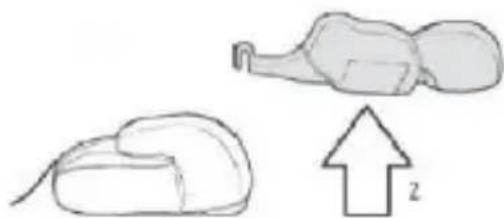
Fig. 5.4-2

Fig. 5.4-3

Fig. 5.4-4

Fig. 5.4-5

Fig. 5.4-6
AR
aLw ygws g o Jy Jy Jy S p 1
aalalalol
eaiy b
( 0,1) ( 0,2)
iJ111pJcIeIoo
l_0 : y = - 9x
shuo.g
10000000000000000000000000000
jlo1 p1 j2u o1 u
SsI1oLwg.S
S 11
wJ1i
ybjdliu.
pIjoll aai
=
jolpJg.
pIeWyI ayIaI2
9 15
11 9 536g
> S18 - > S9
2j = 1 jj = 1 ②
> S25 - > S15
:aijiljglai
> S36 - > S22
:aaJllJJgJgJg
1 1 1 1 1 1 1 1 1 1 1 1 1 1 1 1 1 1 1 1 1 1 1 1 1
aaiy iay yag aaiy gog . wgjll aylal alal alal alal alal alal alal
(1-3K) 111 (16)
000000000000000000000000000000000000000000
Lgilo jy JcJbI p
.
JKsJ no Ks y JlaabU oJyL sS
eab gaaa aaiy aaiy aia yiaia aia aia aia aia aia aia
.
J 1
=1b2+10g03jywwyS pduw wJb2
y j k 111
.
.40000000000000000000000000000000000000
J 1
J2b3Y
.00000000000000000000000000000000000000
1gabg jgjll abg bblblal y aol yulic g, ydrgyds
10 2
aagaae aee
LdA 4yIeB Jus Lg Jok
J 1
. 1
a
- a + b = 3
(1g) 1.4
a
(1-1.4KJ)Jdaiy
aaii iie 1 aie 1 1 1 1 1 1 1 1 1 1 1 1 1 1 1 1
S OBC = S COD + S_ BOC
(2-1.4K)J (3.4a:1
(3-1.4 KJ) JgJggo gJgJgJgJgJgJgJgJgJgJgJgJgJgJgJgJgJgJgJgJgJgJgJgJgJgJgJgJgJgJgJgJgJgJgJgJgJgJgJgJgJgJgJgJgJgJgJgJgJgJgJ
(4-1.4 KJJI).JUULI JUULI JUUG UUG UUGUUUUUUUUUUUUUUUUUUUUUUUUUUUUUUUUUUUUUUUUUUUUUUUUUUUUUUUUUUUUUUUUUUUUUUUUUUUUUUUUUUUUUUUUUUUUUUUUUUUUUUUUUUUUUUUUUUUUUUUUUUUUUUUUUUUUUUUUUUUUUUUUUUUUUUUUUUUUUUUUUUUUUUUUUUUUUUUUUUuuuuuuuuuuuuuuuuuuuuuuuuuuuuuuuuuuuuuuuuuuuuuuuuuuuuuuuuuuuuuuuuuuuuuuuuuuuuuuuuuuuuuuuuuuuuuuuuuuuuuuuuuuuuuuuuuuuuuuuuuuuuuuuuuuuuuuuuuuuuuuuuuuuuuuuuuuuuuuuuuuuuuuuuuuuuuuuuuuuuuuuuuuuuuuuuuuuuuuuu uu
(a) (a) (a) (a) (a) (a) (a) (a) (a) (a) (a) (a) (a) (a) (a) (a) (a) (a) (a) (a) (a) (a)
-515 00000000000000000000000000000000000000000000000
.536
olly pJ = aJ1.5
(3.4abaijbj)j
1.5-5) 1j00
1.2-()jull 3dawg jvul 3dawg no Jy
(4-1.5 KJ3-1.5 JJI) 1
(5-1.5 Kull) 12345678901234567890123456789012345678901234567890
aJyI aJooI Gse yjy pJooI ySji Juae jai
yauo aolusow y noj kO g oJg Jg jnooJpJb
2.5 wJl
j 10000000000000000000000000000000000000000000
Jlll iio 200000000000000000000000000000000000000000
JyJ 1
:wJl dinao jg
)
( 22g0) ② 2a1a2
J 1
3.5
J 1 J 1 J 1 J 1 J 1 J 1 J 1 J 1 J 1 J 1 J 1 J 1 J 1 J 1 J 1 J 1 J 1 J 1 J 1 J 1 J 1 J 1 J 1 J 1 J 1 J 1 J 1 J 1 J 1
(5-3.5KJ) 100
(4-3.5 KJ) JKOyI JdJIaJI
2-3 100000000000000000000000000000000000000
aaii 1 jai jai g jg jg jg jg jg jg jg jg jg jg jg jg jg jg jg jg jg jg jg jg jg jg jg jg jg jg jg jg jg jg jg jg jg jg jg jg jg jg jg
wJl 1sIwgl aepo cIaJI 4.5
Kwll) jbl dnnn n nn nnnn nn nnnn nn nnnn nn nnnn nn nnnn nn nnnn nn nnnn nn nnnn nn nnnn nn nnnn nn nnnn nn nnnn nn nnnn nn nnnn nn nnnn nn nnnn nn nnnn nn nnnn nn nnnn nn nnnn nn nnnn nn nnnn nn nnnn nn nnnn nn nnnn nn nnnnn nn nnnn nn nnnn nn nnnn nn nnnn nn nnnn nn nnnn nn nnnn nn nnnn nn nnnn nn nnnn nn nnnn nn nnnn nn nnnn nn nnnn nn nnnn nn nnnn nn nnnn nn
aLaaJUwS cJy CuaJIaLae 1-4.5
36 22 jg no JbS U aas
.(3-4.5K)
·(4-4.5KJI) .S
()
1 6-4.5 kJU J2I pJgKg (j)
J 1
(5-4.5 KIJI) "sLk" Cgfo gauwos
Lgilo 1
pK=1gduuugagcogkcbjueyduo
auiy aolil 6
1.6
.1.5 abai j 20000000000000000000000000000000000
.
Please read through these instructions carefully before using the child car seat for the first time. Your child's safety is your responsibility and may be affected if you do not follow these instructions.
1. Elements of car seat
A Headrest
B Backrest
C Belt Slot
D Chest Pad
E Harness
F Buckle
H Harness adjuster lever
1 Harness adjuster strap
J Seat cushion
K Height adjuster
L Head belt guide
N Adult belt route slots
O Harness connector
2. Applicability
The child car seat is suitable for groups from I to III, which means children with a body weight between 9 kg and 36 kg (approx. 9 months to children of 11 years).
Mass Group I: 9kg - 18kg
Mass Group II: 15kg - 25kg
Mass Group III: 22kg - 36kg
This child car seat can be used with its harness system for children of weight group I. It must be secured with the belt fastener on the 3-point vehicle belt.
For children of weight groups II and III (15kg to 36kg) the harness system must be removed and the vehicle's 3-point belt system used to secure the child.
3. Safety Instructions
Please invest a few minutes in your child's safety to read these Instructions. Many injuries, which are easily avoidable, are caused by carelessness and incorrect use.
- This child seat can only be installed forward facing using a three-point vehicle belt.
- Only suitable for use in the vehicle is fitted with 3-point with retractor safety-belts, approved to UN/ECE Regulation No 16 or other equivalent standards (Fig.3-1).
- Any straps holding the restraint to the vehicle should be tight; restraining the child should be adjusted to the child's body, and should not be twisted.
- The child car seat must be replaced when it has been subject to violent stresses in an accident.
- Do not change the child car seat in any way.
- Protect the child restraint system against direct sun light otherwise the high temperature will hurt your child.
- Do not leave your child unattended in the seat at any time.
- Luggage or other objects liable to cause injuries in the event of a collision shall be properly secured.
- The child car seat must not be used without the cover.
- The seat cover should not be replaced with any other than the one recommended by the manufacturer, because the cover constitutes an integral part of the restraint performance.
The Instructions can be retained with the child seat for its life period. - Not to use any load bearing contact points other than those described in the instruction and marked on the child car seat.
- Any rigid items and plastic parts of the child car seat must be so located and installed that they are not liable, during everyday use of the vehicle, to become trapped by a movable seat or in a door of vehicle.
Periodically inspect the harness, pay particular attention to attachment points, stitching and adjusting devices. - Do not continue to use the child car seat if parts have become damaged or have loosened after an accident.
In the event of an emergency it is important that the child can be released quickly. This
means that the buckle is not fully tamper proof and so your child must be taught never to play with the buckle.
- Ensure that all parts are locked in place correctly and not penned in the adjustable seats or doors.
- Do not use this child seat at home. It's not designed for home use and should only be used in your car.
We recommend using the baby car seat on the back seat of cars.
Before each journey check whether the child car seat is installed firmly. - The back rest of the child car seat system have to rest flat against the back of the vehicle seat. If necessary, adjust the head rest of the vehicle seat.
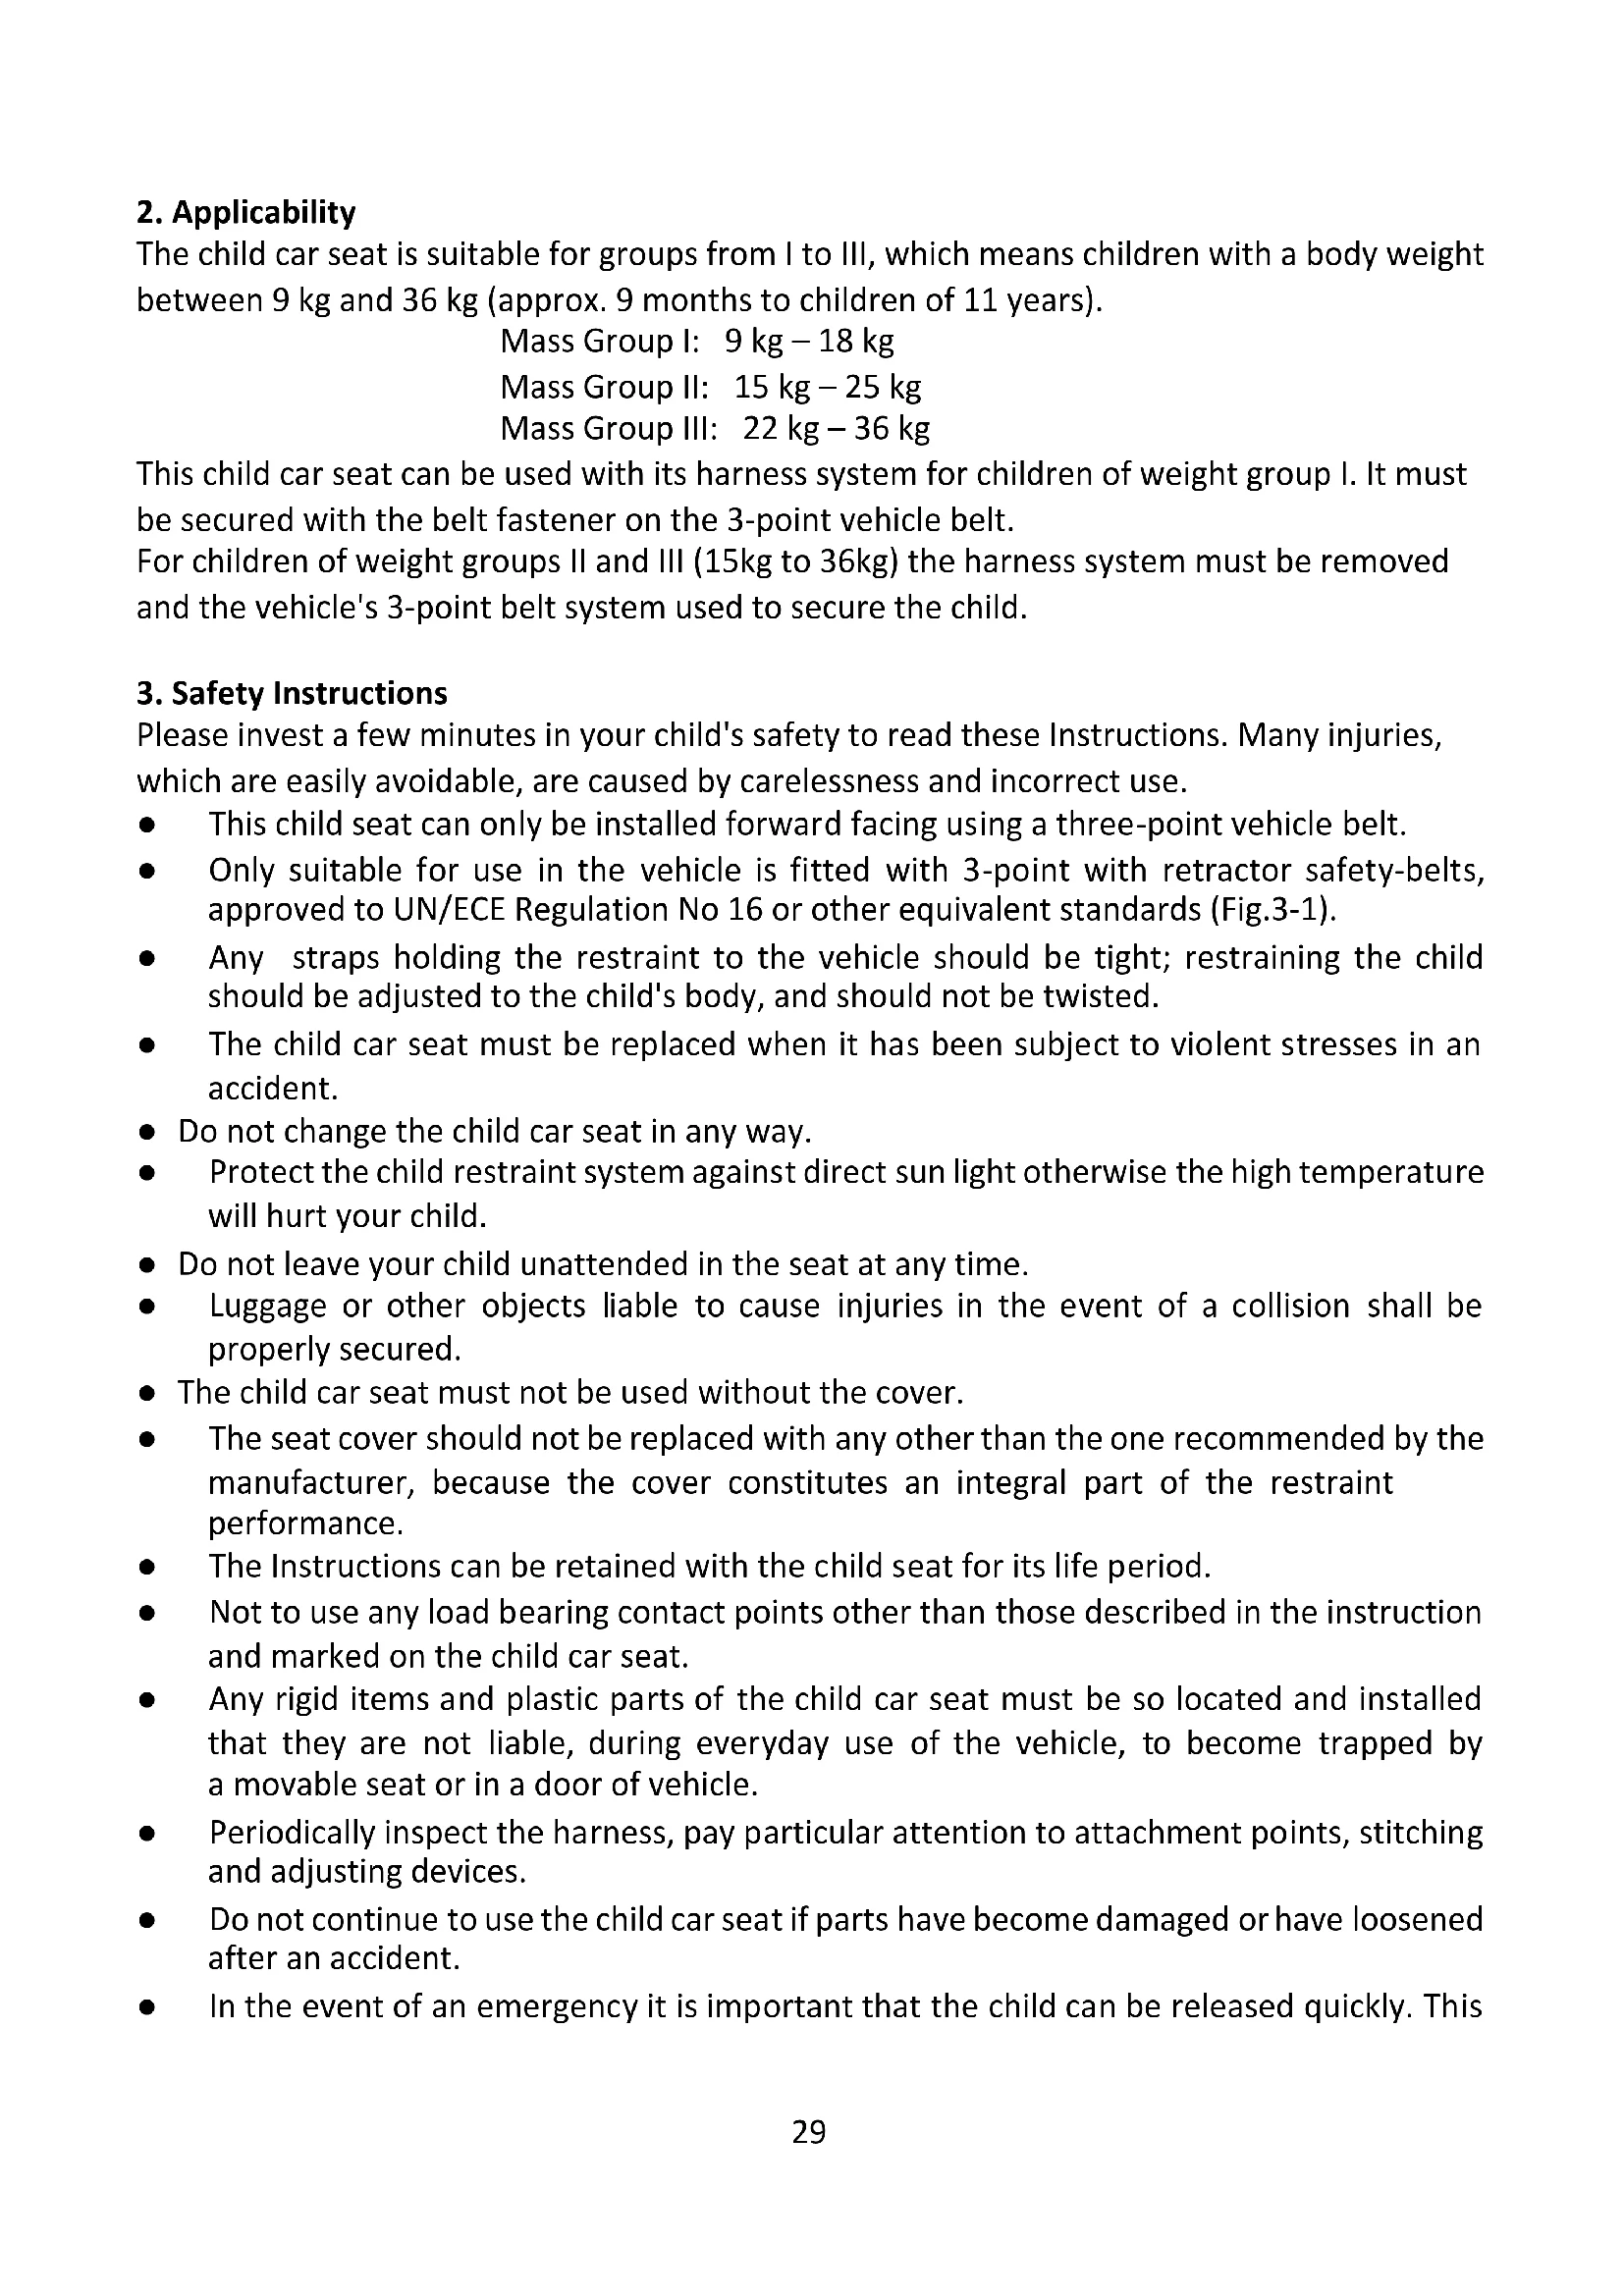
- The buckle of the safety car seat belt can't too close to the below of armrest. Please contact the child restraint manufacturer if in doubt about this point (Fig.3-2).
- When you drive without a child in the child restraint system, always secure the system with the adult belt.
4. Usage for the age group I
Use of the harness system is only permitted for children of age group I, which means from 9 kg to 18 kg (approx. 9 months to approx. 4 years).
4.1 Setting the shoulder belt height (group I)
Check whether the shoulder belts are set at the right height for your child. The shoulder belts should be fed Into the belt slots that lie at shoulder height or just above (Fig. 4.1-1).
If the height of your shoulder belts in child car seat is not fit for your child. Adjust the height of the shoulder belts, please proceed as follows:
Step 1: loosen the harness (see point 4.3) Turn the child seat to the back (Fig. 4.1-2).
Step 2: Slide both of the harness off the harness connector (Fig. 4.1-3).
Step 3: Slide the belt off the chest pad connector. (Fig. 4.1-4).
Step 4: Now you can pull both chest pads and shoulder belts forward through the belt slots carefully (Fig. 4.1-5).
Step 5: Now thread the small belts of the chest pads and harness into the corresponding belt slots (Fig. 4.1-6).
Step 6: Slide both of the chest pads in the chest pad connector, and slide the harness straps in the harness connector.
Ensure that the belt is positioned correctly in the belt slot and not twisted.
4.2 Securing the child car seat (group I)
Step 1: Place the child safety seat on the vehicle's seat which is fitted with 3-point safety belts ensuring it is firmly pressed against the car seat backrest (Fig. 4.2-1).
Step 2: Pull out the vehicle belt, thread the belt tongue (incl. vehicle belt) through the Adult belt route slot (N) to the rear and through the backrest, through the other Adult belt route slot (N) (on the buckle side) and allow it to lock in place. You will hear "click" (Fig. 4.2-2, Fig. 4.2-3).
Step 3: Place the vehicle lap belt under the armrest on both sides. Pull the vehicle diagonal belt on the vehicle buckle side through the red belt guide under the armrest (Fig. 4.2-4). Make sure adult belt has not become twisted (Fig. 4.2-5).
Step 4: Press your knee on the child car seat and pull the diagonal belt along the direction as the picture shows (Fig. 4.2-6). Make sure that belt has not loosened. Tighten the diagonal shoulder belt in the direction of the automatic roll-up as possible (Fig. 4.2-6).
The satisfactory position of the adult safety-belt relative to the child car seat is as the Fig. 4.2-6. You can contact the child car seat manufacturer if in doubt about this point.
To release your child seat following the above instructions in reverse order.
Ensure that each part of the belt is tightened as possible. Make sure all the belts' position is right and they have not become twisted. Also check that the cover is not impeding the movement or fit of the belt webbing in any way.
4.3 Loosening the harness
- The harness is slackened by pressing the lever (under the seat cover) on the front of the seat (H).
- Press down on the label marked 'Press' as you grip the two shoulder straps with your other hand. Pull the shoulder straps towards you to loosen the harness (Fig. 4.3).
4.4 Securing the child with the harness
- Firstly, adjust the shoulder belts height (see point 4.1), proceed as follows:
- Loosen the harness (see point 4.3), open the buckle (4.4.1) and place them down sideways.
- Seat your child in the child car seat. Place both shoulder belts over your child's shoulders.
- Fasten the buckle (4.4.1).
- Pull the shoulder straps upwards to remove the slack from the lap sections of the harness then pull the adjuster strap (I) until the harness is fully tightened (Fig. 4.4).
- The harness should be adjusted as tightly as possible without causing discomfort to your child.
- A loose harness can be dangerous. Check the harness adjustment and tighten each time the child is placed in the seat.
Ensure that any lap strap is worn low down, so that the pelvis is firmly engaged, the belt is not twisted.
4.4.1 Using the buckle
- Put the two metal sections of the buckle connectors together (Fig. 4.4.1-1).
- Slot the two buckle connectors into the slot in the top of the buckle until they "click" into place (Fig. 4.4.1-2).
- Check the harness is correctly locked by pulling the shoulder straps Upwards (Fig. 4.4.1-3).
To release the harness, press the red button on the buckle downwards.
5. Usage for age (group II III)
The harness system must be removed from the seat (see point 5.1) when used for these age groups 15kg - 36kg . Only the 3-point vehicle belt system can be used to buckle up the child car seat.
5.1 Removal of the harness
- Loosening the harness (see point 4.3), Turn the seat to the back.
- Slide both of the harness straps off the harness connector (Fig. 5.1-1).
- Slide the belt of the chest pads off the Chest pad connector (Fig. 5.1-2).
Pull the strap till the steel pole gets out of the soft (Fig. 5.1-3, Fig. 5.1-4). - Now you can remove the belts as well as the tongue in an upwards direction (Fig. 5.1-5).
- Installation of the harness Is carried out In reverse order to removal.
Keep harness with all parts in a safe place, to use in the future.
5.2 Height adjustment of headrest
Regularly check whether the head rest is optimally to your child. The height of the head rest is set optimally to the size of your child, when their headrest comfortably in the middle of the headrest.
- To raise or lower the head rest: pull the head rest adjustment handle (K). You may now adjust the head rest by turning the handle (Illus. 5.2).
- Make sure to lock the handle after adjusting the head rest.
5.3 Securing the child car seat with vehicle's belt
The vehicle's 3-point; belt system may only be used to buckle up children of the age groups II and III (15 kg - 36 kg).
The harness system must be removed from the seat (see point 5.1) when used for these age groups 15kg - 36kg .
Step 1: Place the child safety seat on the vehicles seat ensuring it is firmly pressed against the car seat backrest (Fig. 5.3-1).
Step 2: Seat your child In the child car seat (Fig. 5.3-2).
Step 3: Pull out the 3-point vehicle belt and place the lap belt on the opposite side of the buckle under the armrest. (make sure that the diagonal belts and the lap belt on the buckle side are under the armrest) The lap strap should be worn low down, so that the pelvis is firmly engaged and the straps should not be twisted. And allow it to the buckle in place. You will hear "click" (Fig. 5.3-3).
Step 4: Place the diagonal belt goes through the Head belt guide (L) on the side of the headrest. Make sure that the belt is not twisted. Tighten the adult belts in the direction as picture shows (Fig. 5.3-3) and the diagonal shoulder belt in the direction of the automatic roll-up as possible (Fig. 5.3-4).
The satisfactory position of the adult safety-belt buckle relative to the child car seat is as the Fig 3-2. You can contact the child car seat manufacturer if in doubt about this point
5.4 Seat Cushion Instructions
Flat the backrest, lift up backrest at the junction of the base and backrest, separate the base and the backrest (Fig. 5.4-1 and Fig. 5.4-2). Installation please reverse operation.
Seat cushion is for 22kg - 36kg children, only use with 3-point seat belts.
- Place the child seat firmly on car the seat to install (Fig. 5.4-3).
- Let the children sit on the seat, the child's hips and back against the car seat. (Fig. 5.4-4)
- Pull the car 3-point seat belt, put the lap belt under the armrest of safety car seat (while ensuring that the shoulder belt is also put under the armrest), tighten up the belt, see Fig. 5.4-6. Ensure that lap belt is worn as low down as possible, in order to make the child seat and car seat tightly fit. The seat belt can't be twisted and put it into the buckle, you will hear a sound of "click" (Fig. 5.4-5).
- Make sure the seat belt is not loose, not twisted.
Ensure that any lap strap is worn low down, so that the pelvis is firmly engaged
6. Care instructions
6.1 Removing / replacing the cover
- Remove the belt system as described in point 5.1.
- Press the backrest so far back so that it rests flat on the floor.
- Now you can remove the backrest.
- Unfasten the zipper on the headrest upholstery to remove it.
- Loosen the rubber band on the back rest to remove the upholstery.
- You can now remove the seat upholstery towards the front
To replace the cover proceed in the reverse order to removing the cover.
6.2 Cleaning the cover
Use only neutral detergent and warm water to wash. Do not wash by machine, Spin-dry or tumble dry are not recommended.
7. Warranty
- All Kinderkraft products are covered by a 24-month warranty. The warranty period starts from the date the product is handed over to the Buyer.
- The warranty is only valid in the member states of the European Union, excluding overseas territories (as currently defined, including in particular: Azores, Madeira, Canary Islands, French Overseas Departments, Åland Islands, Athos, Ceuta, Melilla, Helgoland, Busingen am Hochrhein, Campione d'Italia and Livigno) and the territory of the United Kingdom of Great Britain and Northern Ireland excluding the British Overseas Territories (e.g., Bermuda, Cayman Islands, Falkland Islands).
- The manufacturer's warranty does not apply to countries not listed above. The conditions of the additional warranty may be determined by the Seller.
- In some countries, it is possible to extend the warranty to a limited period of 120 months (10 years). The complete terms and conditions and the warranty extension registration form are available at www.KINDERKRAFT.COM
-
The warranty is valid only in the territory indicated in paragraph 2.
-
Claims must be made by completing the form available at www.RMA.KINDERKRAFT.COM.
-
The warranty does not cover:
A. Cosmetic damage, including but not limited to: scratches, dents and cracks in plastic, unless the failure is due to a material or manufacturing defect;
B. Damage resulting from misuse or poor maintenance - including but not limited to: mechanical damage to products caused by misuse or poor maintenance;
Refer to the instructions for use and installation of the product contained in the user manual;
C. Damage caused by improper assembly, installation or disassembly of products and/or accessories;
Refer to the instructions for use and installation of the product contained in the user manual:
D. Damage caused by corrosion, mould or rust, resulting from improper maintenance, care and storage;
E. Damage caused by normal wear and tear or otherwise resulting from the normal passage of time;
- This includes: tears or punctures in inner tubes; tyre damage; tyre tread damage; fading of fabrics resulting from mechanical use (e.g., on joints and covering of moving parts);
F. Damage or erosion caused by sun, perspiration, detergents, storage conditions or frequent washing, etc;
G. Damage caused by accident, abuse, misuse, fire, contact with liquid, earthquake or other external causes;
H. Products that have been modified to change functionality without 4Kraft's written consent;
I. Products from which the serial number or lot number has been removed or tampered with in any way:
J. Damage caused by the use of third-party components or products - including but not limited to: cup holders, umbrellas, reflectors, bells;
K. Damage caused by transport or by ground handling service providers.
- The warranty period for accessories included with the product is 6 months from the date of sale, excluding the faults described above.
- These warranty conditions are complementary to the Customer's statutory rights with respect to 4KRAFT sp. z o.o. The warranty does not exclude, limit or suspend the Customer's rights under warranty for defects in goods sold.
- The full text of the Terms and Conditions of the Warranty is available on the website www.KINDERKRAFT.COM
All rights to the present document belong entirely to 4Kraft Sp. z o.o. Any unauthorized use of them against their purpose, including in particular: using, copying, reproducing, making available - in whole or in part, without the consent of 4Kraft Sp. z o.o. may result in legal consequences.