USER MANUAL Oneto 3 Kinderkraft
text_image
WATCH MANUAL
VIDEO
natural_image
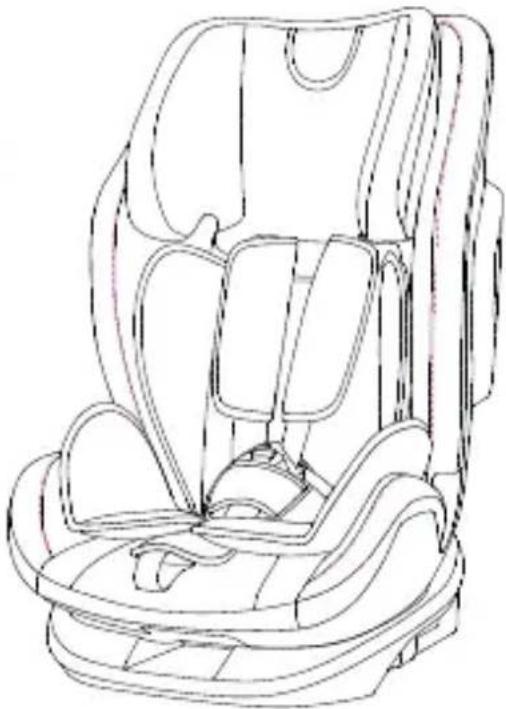
Line drawing of a car comfort seat with seats and straps (no text or symbols)

text_image
10
YEARS
WARRANTY
Available only in selected countries
Details on kinderkraft.com

kinderkraft.com

/kinderkraftofficial

kinderkraft

@kinderkraftofficial
(AR)
لطفلك سيارةمqed
خدمليل
(CS) AUTOSEDAČKA
(DE) AUTO-KINDERSITZ
(EN) CAR SEAT
(ES) SILLA DE COCHE
(FR) SIÈGE-AUTO
(HU)AUTÓS GYEREKÜLÉS
(IT) SEGGIOLINO
NÁVOD K OBSLUZE
BEDIENUNGSANLEITUNG
USER MANUAL
MANUAL DE USO
GUIDE D'UTILISATION
HASZNÁLATI ÚTMUTATÓ
ISTRUZIONI PER UTENTE
(NL) AUTOSTOELTJE
(PL)FOTELIK SAMOCHODOWY
(PT)CADEIRA AUTO
(RO) SCAUN AUTO
(RU)ДЕТСКОЕ АВТОКРЕСЛО РУКОВОДСТВО ПО ЭКСПЛУАТАЦИИ
(SK) AUTOSEDAČKA
(SV) BILBARNSTOL
GEBRUIKSAANWIJZING
INSTRUKCJA OBSŁUGI
MANUAL DE INSTRUÇÕES
MANUAL DE UTILIZARE
ПО ЭКСПЛУАТАЦИИ
NÁVOD NA POUŽITIE
BRUKSANVISNING
AR....9
CS....14
DE....21
EN....29
ES....36
FR 44
HU 52
IT....59
NL....67
PL....75
PT 82
RO....90
RU....97
SK....104
SV....112
text_image
H
A
B
C
I
D
E
F
J
K
G
text_image
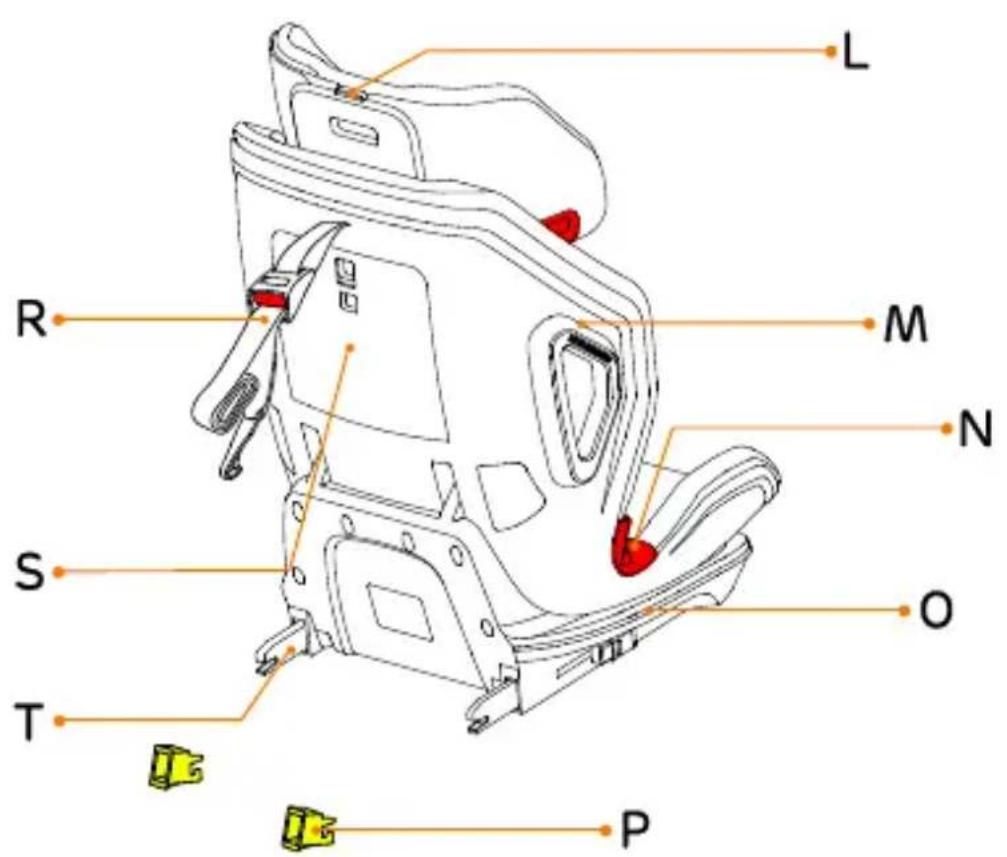
L
R
M
N
S
O
T
P
natural_image
Top-down schematic of a car intake manifold showing internal structure (no text or labels)
4.1
natural_image
Illustration of a hand using a tool to adjust or install a vehicle seatbelt (no text or symbols visible)
4.2.1
text_image
Diagram showing a person inside an elevator with red X and green V symbols indicating control or status indicators.
4.2.2
natural_image
Illustration of a person wearing a backpack with an orange arrow pointing to the chest area (no text or symbols present)
4.2.2
natural_image
Mechanical assembly diagram showing a foot and hand positioning with motion arrows (no text or symbols)
4.2.3
natural_image
Illustration of a hand using a handheld device to adjust or install a component (no text or symbols visible)
4.3
natural_image
Diagram showing mechanical components with directional arrows, no text or symbols present
4.3
natural_image
Front view of a car seat with red and orange buttons indicating seat positions (no text or symbols)
-
text_image
Illustration of a child inside a vehicle with red and green checkmarks indicating failure or rejection status.
4.3
text_image
Click
4.3
text_image
Diagram illustrating car seat replacement with a baby and hand placement, showing safety instructions and color-coded zones.
4.4
natural_image
Pure diagram of a cylindrical object with two arrows indicating direction, no text or symbols present
natural_image
Line drawing of a mechanical device with attached straps and connectors (no text or symbols)
5.1
natural_image
Diagram of a sewing machine needle with fabric and metal components, showing no text or symbols
5.1
text_image
Click
5.1
text_image
Safety warning symbol with red circle, crossed-out cross, and green checkmark indicating correct or incorrect status
[Non-Text]
natural_image
Technical line drawing of a car seatbelt device with no visible text or symbols
5.1
text_image
Diagram illustrating seatbelt usage with green and red buttons and directional arrows indicating movement or change.
5.1

natural_image
Illustration of hands adjusting a seatbelt with orange arrows indicating motion (no text or symbols)
5.1

natural_image
Line drawing of a hand holding a device with a red tool inserted (no text or symbols)
5.1
natural_image
Simple line drawing of a mechanical clamp or bracket assembly (no text or symbols)
5.1
text_image
A
B
C
5.1
natural_image
Illustration of a hand using tweezers to insert or install a device into a container, with an orange arrow indicating the process (no text or symbols present)
5.1
text_image
Safety warning symbol for USB drive with orange belt and red/green checkmark indicating failure
5.1
natural_image
Top-down line drawing of a car seat with red buttons indicating seat positions (no text or symbols)
5.2
natural_image
Illustration of hands tying a red ribbon between two orange objects (no text or symbols)
5.2
natural_image
Pure mechanical linkage diagram with orange and red components, no text or symbols present
5.2
natural_image
Illustration of a child seated in a car seat with red arrows indicating seatbelting (no text or symbols)
5.2
text_image
Click
5.2

text_image
Diagram showing a child in a car seat with red arrows indicating seatbelting and safety symbols
5.2
natural_image
Illustration of a child seated in a car seat with red safety belt (no text or symbols)
5.3
natural_image
Diagram showing directional arrows pointing to a red vertical bar on a white surface, with no text or symbols present.
natural_image
Diagram of a car seatbelt device with attached cable and belt, showing no text or symbols
5.4
text_image
Safety warning symbol showing battery hazard with red 'X' and green checkmark
text_image
5.5
natural_image
Illustration of a hand using a seatbelt to lift a car (no text or symbols)
natural_image
Technical line drawing of a mechanical assembly with an inset showing a close-up of components (no text or symbols)
natural_image
Line drawing of a car seat with straps and a seatbelt, labeled 6.1 (no text or symbols on the diagram itself)
natural_image
Technical line drawing of a mechanical component with hands and a highlighted section, labeled '6.1' (no text or symbols on the diagram itself)
text_image
6.1

natural_image
Technical illustration of a car seat assembly with labeled parts and an inset showing a close-up of the seat (no text or symbols present)
text_image
6.1
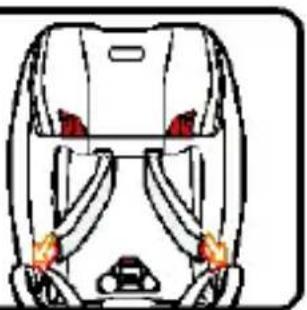
natural_image
Diagram of a car seat with orange flame indicators indicating movement or pressure zones (no text or symbols)
natural_image
Diagram of a car interior with orange arrows indicating movement or force vectors, labeled '6.3' at the bottom (no text or symbols within the diagram itself)
natural_image
Line drawing of a car seat with red connectors and blue straps, labeled '6.3' (no text or symbols on the diagram itself)
natural_image
Technical illustration of a vehicle assembly with an inset showing internal components (no text or symbols)
AR
Please read through these instructions carefully before using the child car seat for the first time. Your child's safety is your responsibility and may be affected if you do not follow these instructions.
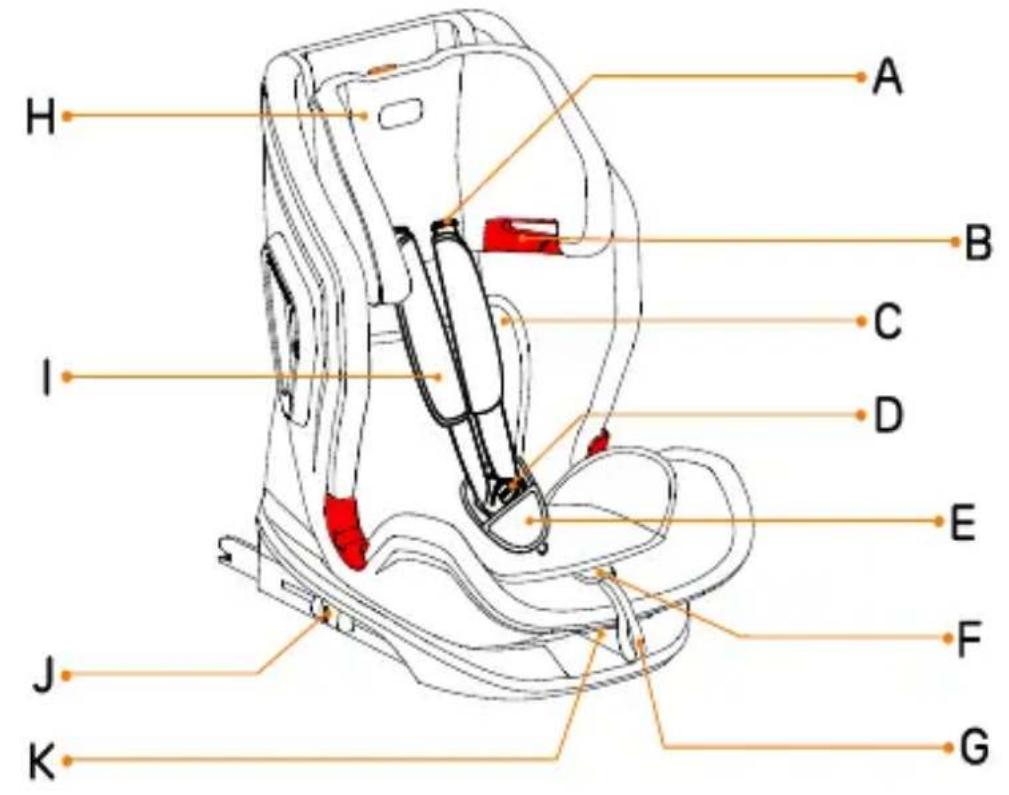
1. Elements of car seat
| A. Harness shoulder strap slits | G. Harness adjustment strap | M. Side protector system |
| B. Shoulder strap guide | H. Headrest | N. Hip strap guide |
| C. Child insert | I. Shoulder pads | O. Base |
| D. Harness buckle | J. ISOFIX release button | P. ISOFIX guides |
| E. Buckle cushion | K. Seat tilt lever | R. Top tether |
| F. Harness positioning button | L. Headrest positioning button | S. Opening compartment |
| | T. ISOFIX anchor |
2. Use
The car seat is designed for children in the weight group from 1 to 3, or with a body weight between 9 kg and 36 kg (approx. from 9 months to 11 years old).
Weight group 1: 9 kg – 18 kg
In the ISOFIX child restraint system and the top tether strap. Read the instruction manual of the vehicle manufacturer. The safety harness is designed for use only in the case of children in weight group 1.
Weight group 2: 15 kg - 25 kg
Weight group 3: 22 kg - 36 kg
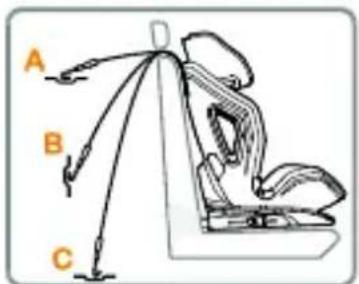
In the case of children in weight groups 2 and 3 (15 kg to 36 kg), the safety harness in the car seat must be removed, and the child must be fastened using the 3-point adult safety belt or 3-point adult safety belt with additional fastening elements, see section 5.4. Read the instruction manual of the vehicle manufacturer.
3. General safety
Please take a few minutes to read this manual to ensure proper safety of the child. Many injuries are caused by reckless and inappropriate use of the seat and they are easy to avoid.
- The seat should be only used placed opposite to the driving direction.
- DO NOT place the child seat in the seats fitted with an active frontal airbag, as it may be dangerous. This does not apply to side airbags.
- In the case of installation of the car seat on the front seat of the car, turn off the airbag or move the vehicle seat back as much as possible (check the instruction manual of the vehicle manufacturer).
- It is recommended to use the seat in the back seats of the car only.
- Guidance on the suitability of the vehicle seat for use with a car seat can be found in the instruction manual of the vehicle manufacturer.
- Suitable for installation only in the approved vehicles fitted with three-point safety belts with retractor approved according to UN/ECE Regulation No. 16 or other equivalent standards.
- Note that any straps attaching the child seat to the vehicle must be tight; the restraint harness must fit the child's body and the belt/harness must not be twisted.
- The seat should be replaced if it has been subjected to violent stresses in an accident.
- The seat must not be subject to any modifications.
- The child safety seat should be protected from direct sunlight, otherwise heated parts can burn your child.
- Never leave your child in the seat unattended.
- It should be noted that any bags and other items must be sufficiently secured, in particular on the parcel shelf, as otherwise in the event of a collision this can lead to injury.
- The seat cannot be used without the cover.
- Do not use replacement covers other than those recommended by the manufacturer, since it is an integral part of the safety seat.
- It is recommended to keep the car seat instruction manual for the entire period of its use.
- Do not use anchorages other than those described in the instruction manual and marked in the child seat.
- All rigid items and plastic parts of the child seat must be located and installed in such a way to avoid, under normal operating conditions of the vehicle, blocking by a sliding seat or vehicle door.
- Regularly check the technical condition of the harness, paying special attention to the fasteners/holders, seams and adjustment elements.
- Discontinue use of the car seat if its parts are damaged or loosened after an accident.
- In case of an emergency situation, it is important to quickly unfasten the seat belts. This means that the harness release button is not fully secured; make sure your child knows that s/he is not allowed to play with the buckle.
- Do not use the seat at home. It is not suitable for home use and it should only be used when travelling by car.
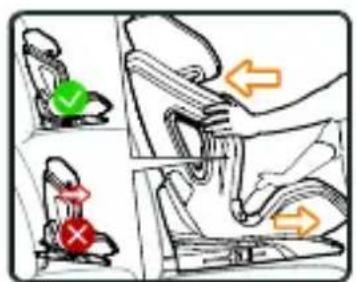
- The back of the seat must rest flat against the back of the car seat. Please make sure that the headrest dues not create an unwanted space between the car seat backrest and back seat of the vehicle. Some car headrests constitute an obstacle to the installation of a car seat and must therefore be disassembled first.
- The adult safety belt buckle must not be located too close to the bottom of the child seat armrest. If in doubt about this issue, contact the child seat manufacturer.
- You should give your child a good example and always fasten your belts. An adult with unfastened safety belts may also be a threat to the child.
- Before each trip by car, make sure that the seat is properly secured.
- The car seat must be protected even when not in use. Unattached seat can cause injuries to passengers even during emergency braking.
4. Securing your child
4.1 Seat cushion
NOTE The seat cushion (C) should be used for very small children. The cushion improves comfort and provides additional support for very small children.
4.2.1 Adjusting the straps
Loosen the harness straps by pressing the release button (F) and pulling the harness as much as possible.
Remember! Do not pull the shoulder pads.
4.2.2 Headrest height
Press the colour button located on the top of the headrest.
- For weight group I, the headrest has six different height positions not requiring removal of the shoulder straps.
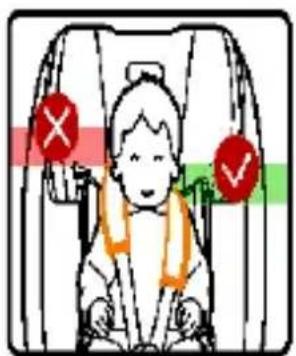
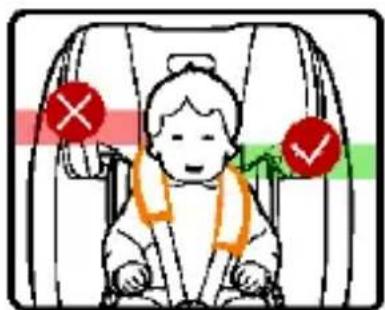
ATTENTION: The appropriate shoulder strap height should see the strap enter the backrest just above the child's shoulders. Make sure that the shoulder straps are appropriately adjusted to the child's shoulders.
- The remaining four positions for weight groups II and III can be set after the shoulder straps are removed and the harness is hidden (see point 6.1).
ATTENTION: The shoulder strap should run between the child's shoulder and neck. The headrest should be appropriately adjusted to the child's head.
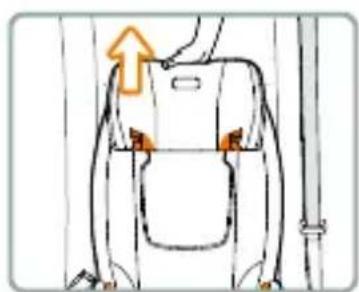
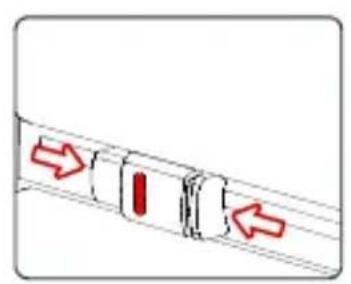
4.2.3 Backrest tilt mechanism
The backrest tilt can be adjusted with the lever (K). Pull the lever and slide the seat. Release the lever in the desired position. Gently move the seat around until you hear a clear “clicking” sound – this means that the seat in secured in the selected position.
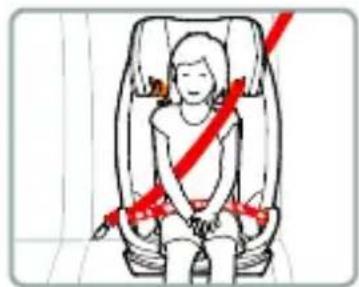
4.3 Securing the child with the harness
- Loosen the harness straps as much as possible by pressing (F) and pulling the harness straps. Never pull by the shoulder pads!
- Release the buckle (D) and place the harness straps on the sides of the seat. Place your child in the seat.
- Adjust the headrest to the child's height (see point 4.2.2).
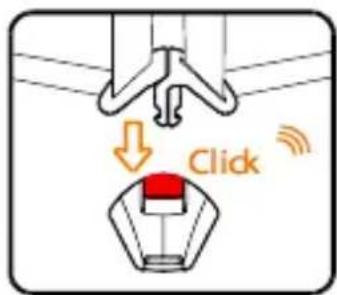
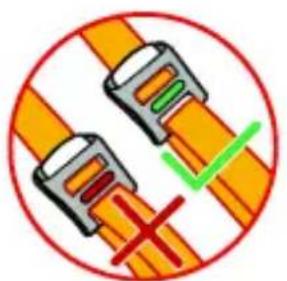
- Match both harness buckles and insert them into the buckle (D) until you hear a clear "clicking" sound.
4.4 Tightening the harness
- Pull the shoulder straps to tighten the hip segment and flatten the harness.
- Tighten the harness with the adjustment strap (G) until the harness is flat on and close to the child's body. Pull the adjustment strap straight out (not upwards or downwards).
ATTENTION: The straps of the hip segment must be positioned possibly low on the child's hips. Make sure that the harness straps are not twisted.
5. Installing in the vehicle
In the event of hard braking or an accident, people not strapped in with seatbelts may injure other passengers.
Always make sure that:
- the vehicle's backrests are locked in place (i.e. that the lock of the folding back seat is in place).
- all heavy and sharp objects are secured (e.g. on the rear ledge).
- all passengers are strapped in with seatbelts.
- the booster seat is always secured, even when it is empty.
Securing the vehicle
In certain vehicles, the seat fabric may be made of frail materials, which the booster seat may ruin. You can avoid this by placing a blanket or towel under the booster seat.
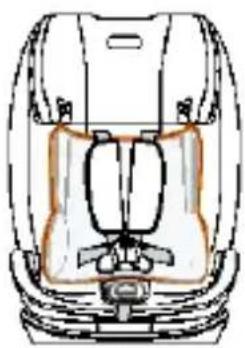
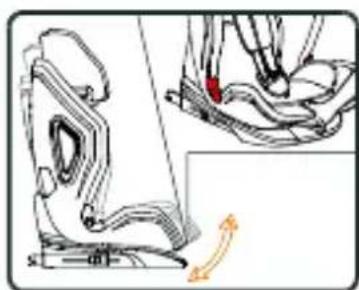
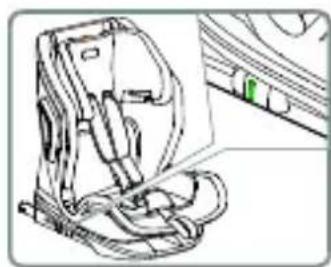
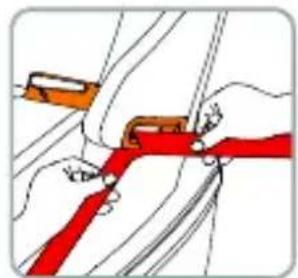
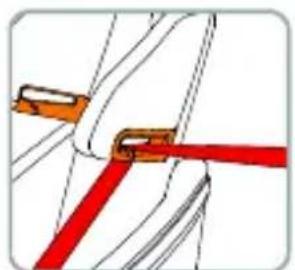
5.1 Installing the booster seat for children in weight group I (9-18 kg) with ISOFIX system and top tether).
IMPORTANT: You will find the locations of ISOFIX and top tether points and other important information concerning installation of the booster seat in your vehicle in the vehicle's instruction manual. You MUST read the manual.
ATTENTION: Make sure that the 5-point harness is appropriately installed.
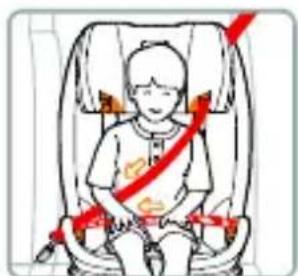
5.2 Installing the booster seat for children in weight group II (15-25 kg).
- Hide the booster seat harness before installation (see point 6.1).
Remember: always keep the child insert and protective cushions in a safe place for future use.
- Adjust the headrest appropriately to the child's height (see point 4.2.2).
- Place the booster seat on the car seat.
- Slide the shoulder strap through the red guide under the headrest.
- Place the child in the booster seat and run the car seat belt through the hip strap guide (N).
- Lock the car seat belt to hear a characteristic "click".
- Tighten the car seat belt by pulling first the hip strap segment and then the shoulder strap segment.
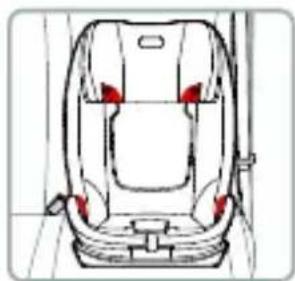
Make sure that the hip strap stretches possibly low above the child's hips, fits in the guides, and is locked with the buckle. The shoulder strap should run between the child's shoulder and neck.
5.3 Installing the booster seat for children in weight group III (22-36 kg).
- Adjust the headrest appropriately to the child's height (see point 4.2.2).
- Follow the same directions as for weight group II.
5.4 Installing the booster seat for children in weight groups II/III with the safety belt and additional harnesses.
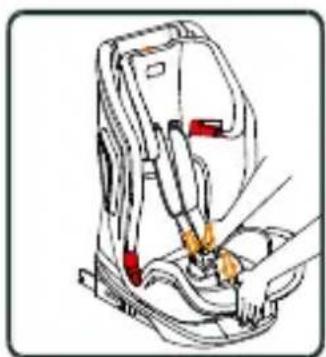
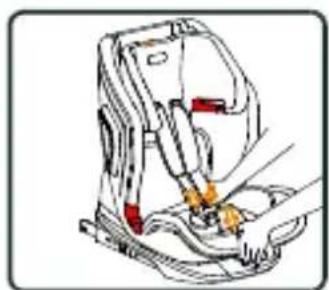
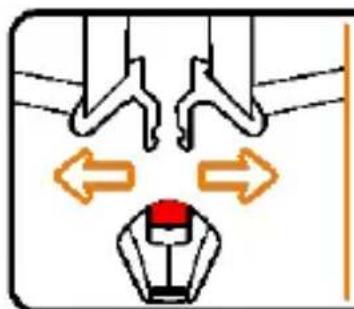
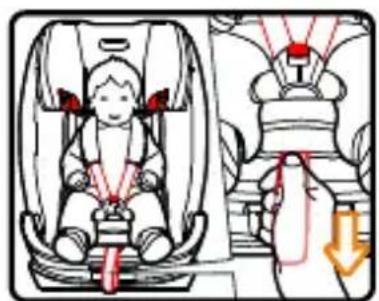
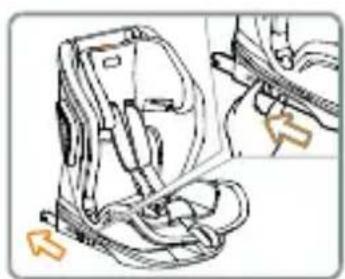
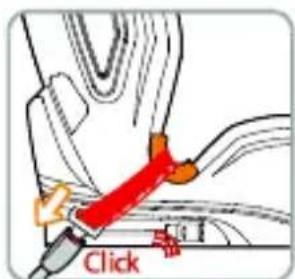
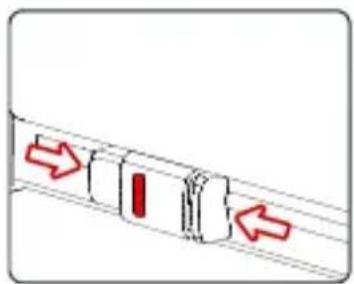
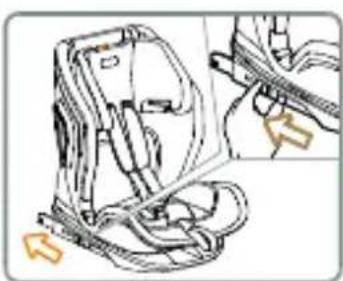
- Press the ISOFIX release button (J) and slide out the ISOFIX tethers (T) as far as possible.
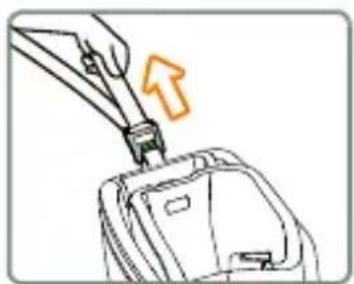
- Grab the booster seat with both hands and slide both tethers into the anchors of the car seat.
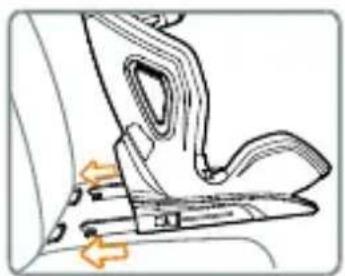
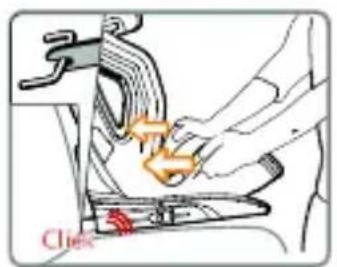
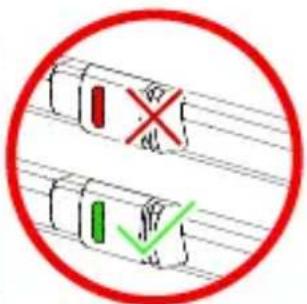
- After both ISOFIX tethers “click”, push the booster seat to the car seat backrest applying even and strong pressure on both sides.
- Grab the booster seat and check if it is not loose. If it moves and the ISOFIX tethers come out, repeat the steps presented above.
- Buckle the child in with the car seat belt. For details, please see the part covering the booster seat installation for weight groups II and III (points 5.2 and 5.3).
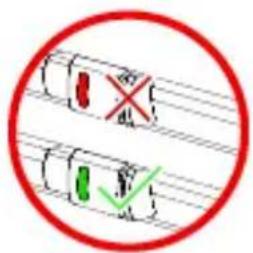
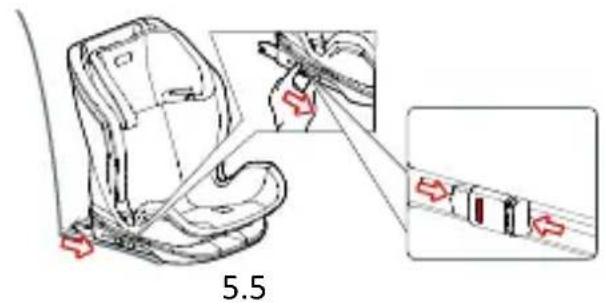
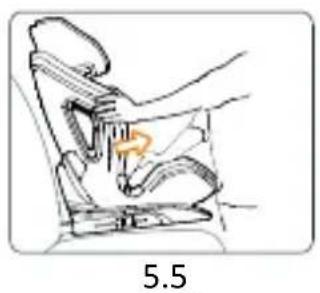
5.5 Removing the booster seat (ISOFIX)
- Press the ISOFIX release button (J) on both ISOFIX arms (T). The tethers will be released and the marker colour will change to red. Reinsert the ISOFIX arms into the seat base – you should hear no rattling as you move the arms back.
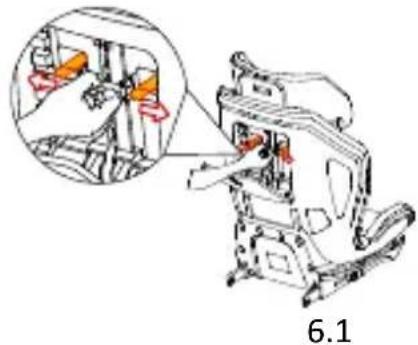
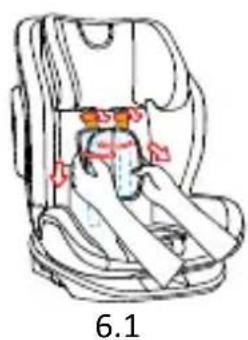
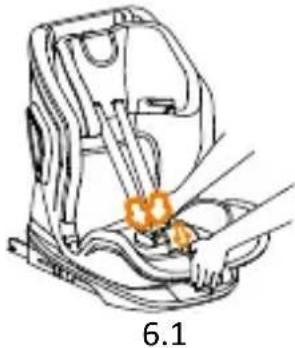
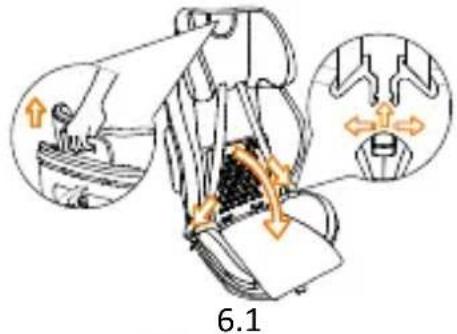
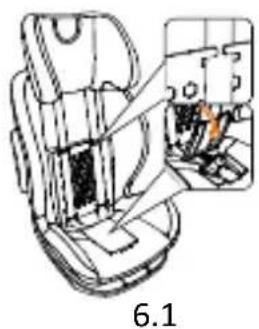
6.1 Hiding the 5-point harness
- Open the compartment in the back of the booster seat (S). Slide off the shoulder pad straps from the metal bar through the narrow gap created between the end of the metal bar and the casing of the booster seat. This step will be made somewhat easier if you press the headrest positioning button (L).
-
Unlock the fasteners of the shoulder pads (I) and remove them from the booster seat's harness straps.
-
Loosen the harness by pressing the positioning button (F) and pull the harness straps straight out as far as possible.
- Press the lever (L) in the top part of the headrest and raise the headrest to the highest position. Unlock the buckle and place the shoulder straps of the harness on the sides of the booster seat. Run the buckle (D) through its cushion (E) and the slit in the base cover. Unlock the cover fasteners on the booster seat's backrest to reveal plastic elements.
- Open the compartment on the bottom of the booster seat base (under the cover). Lock in the harness buckle (D) and hide it in the compartment.
- Close the compartment. Run the shoulder straps back through the guides in the plastic element of the booster seat's backrest.
6.2 Removing the cover
- Hide the harness and remove the insert – if installed (see point 6.1). Raise the headrest to the highest position. Carefully remove the cover starting from one side. Release the fasteners on the main cover element and remove them.
6.3 Installing the cover
- Adjust the cover appropriately to the fixing points of the chair, put the cover on around the positioning button (F), and stretch it out on the seat and backrest.
- Put the shoulder pads (I) on the harness straps.
- Open the compartment in the back of the booster seat (S). Slide the straps of the shoulder pads through the slits in the backrest (A) and put on the metal bar.
Make sure that the harness straps are not twisted.
6.4 Cleaning
Use only the genuine cover, which constitutes an important element of the booster seat's safety.
ATTENTION: Never use the booster seat without the cover.
- You can remove the cover and machine wash it in mild detergent at a low setting (30°C).
Always obey the washing directions on the cover's tag. Washing in temperature exceeding 30^ may cause the colours to fade. The cover should not be spin-dried in a drum dryer (which may lead to the material delaminating).
- You can clean plastic elements with soapy water. Do not use aggressive cleaning agents (like solvents).
- You can clean the harness in warm water with soap.
Attention! Never remove the metal fasteners from the straps.
7. Warranty
- All Kinderkraft products are covered by a 24-month warranty. The warranty period starts from the date the product is handed over to the Buyer.
- The warranty is only valid in the member states of the European Union, excluding overseas territories (as currently defined, including in particular: Azores, Madeira, Canary Islands, French Overseas Departments, Åland Islands, Athos, Ceuta, Melilla, Helgoland, Büsingen am Hochrhein, Campione d'Italia and Livigno) and the territory of
the United Kingdom of Great Britain and Northern Ireland excluding the British Overseas Territories (e.g. Bermuda, Cayman Islands, Falkland Islands).
-
The manufacturer's warranty does not apply to countries not listed above. The conditions of the additional warranty may be determined by the Seller.
-
In some countries, it is possible to extend the warranty to a limited period of 120 months (10 years). The complete terms and conditions and the warranty extension registration form are available at WWW.KINDERKRAFT.COM
-
The warranty is valid only in the territory indicated in paragraph 2.
-
Claims must be made by completing the form available at WWW.RMA.KINDERKRAFT.COM
-
The warranty does not cover:
A. Cosmetic damage, including but not limited to: scratches, dents and cracks in plastic, unless the failure is due to a material or manufacturing defect;
B. Damage resulting from misuse or poor maintenance - including but not limited to: mechanical damage to products caused by misuse or poor maintenance;
- Refer to the instructions for use and installation of the product contained in the user manual;
C. Damage caused by improper assembly, installation or disassembly of products and/or accessories;
- Refer to the instructions for use and installation of the product contained in the user manual;
D. Damage caused by corrosion, mould or rust, resulting from improper maintenance, care and storage;
E. Damage caused by normal wear and tear or otherwise resulting from the normal passage of time;
- This includes: tears or punctures in inner tubes; tyre damage; tyre tread damage; fading of fabrics resulting from mechanical use (e.g. on joints and covering of moving parts);
F. Damage or erosion caused by sun, perspiration, detergents, storage conditions or frequent washing, etc;
G. Damage caused by accident, abuse, misuse, fire, contact with liquid, earthquake or other external causes;
H. Products that have been modified to change functionality without 4Kraft's written consent;
I. Products from which the serial number or lot number has been removed or tampered with in any way;
J. Damage caused by the use of third party components or products - including but not limited to: cup holders, umbrellas, reflectors, bells;
K. Damage caused by transport or by ground handling service providers.
-
The warranty period for accessories included with the product is 6 months from the date of sale, excluding the faults described above.
-
These warranty conditions are complementary to the Customer's statutory rights with respect to 4KRAFT sp. z o.o. The warranty does not exclude, limit or suspend the Customer's rights under warranty for defects in goods sold.
- The full text of the Terms and Conditions of the Warranty is available on the website WWW.KINDERKRAFT.COM
All rights to the present document belong entirely to 4Kraft Sp. z o.o. Any unauthorized use of them against their purpose, including in particular: using, copying, reproducing, making available - in whole or in part, without the consent of 4Kraft Sp. z o.o. may result in legal consequences.
ES
(EN) In the interests of our Clients - we are at your disposal! If you have a problem with the product you received, contact us in the most convenient way for you!