Aeroccino 4 - Milk frother NESPRESSO - Free user manual and instructions
Find the device manual for free Aeroccino 4 NESPRESSO in PDF.

| Product type | Electric milk frother |
| Brand | Nespresso |
| Model | Aeroccino 4 |
| Foam capacity | 120 ml (max foam level) |
| Hot milk capacity | 240 ml (max milk level) |
| Functions | Latte Macchiato (dense hot foam), Cappuccino (airy hot foam), Hot milk, Cold Macchiato (light cold foam) |
| Power supply | 220-240 V, 50-60 Hz |
| Power (EU) | 410-490 W |
| Power (Australia/New Zealand) | 380-450 W |
| Jug material | Stainless steel with non-stick coating |
| Included accessories | Whisk with spring, lid with seal |
| Power base | With magnetic connector |
| Jug cleaning | Dishwasher up to 70 °C or hand washing |
| Base cleaning | Damp cloth, do not immerse |
| Maintenance | Detach spring from whisk for cleaning, dry all parts |
| Safety | Automatic shut-off after 9 minutes, lid mandatory during operation |
| Warranty | 2 years |
| Dimensions (approx.) | Height approx. 20 cm, diameter approx. 10 cm |
| Weight (approx.) | Approx. 0.8 kg |
| Intended use | Household and similar (offices, staff kitchens) |
| Important instructions | Do not add syrup or powder directly into the jug, use fresh refrigerated semi-skimmed milk |
Frequently Asked Questions - Aeroccino 4 NESPRESSO
User questions about Aeroccino 4 NESPRESSO
0 question about this device. Answer the ones you know or ask your own.
Ask a new question about this device
Download the instructions for your Milk frother in PDF format for free! Find your manual Aeroccino 4 - NESPRESSO and take your electronic device back in hand. On this page are published all the documents necessary for the use of your device. Aeroccino 4 by NESPRESSO.
USER MANUAL Aeroccino 4 NESPRESSO
natural_image
Assorted coffee and beverage drinks including glasses, cream, chocolate sauce, and a coffee cup with swirl frosting (no text or symbols visible)http://www.nespresso.com/ultimate-coffee-creations
EN - FR 2-18
DE - IT 20-35
ES - PT 36-51
PL - RU 52-67
TR - CZ 68-83
HU - NL 84-99
GR - FI 100-117
NO - SE 118-133
DK - RO 134-149
MORE RECIPES ON

text_image
QR code image with a central logo, likely linking to a digital resource or website.
text_image
Labeled diagram of a smart water heater with numbered parts for identificationEN AEROCCINO4
CONTENT
SAFETY PRECAUTIONS 02
OVERVIEW 05
PREPARATION 06
CLEAN DIRECTLY AFTER EVERY USE.... 07
TROUBLESHOOTING....08
SPECIFICATIONS 08
WARRANTY 09
SAFETY PRECAUTIONS
These instructions are part of the appliance. Read all instructions and all safety instructions before operating the appliance. Save these instructions and pass them on to any subsequent owner.
Avoid risk of fatal electrical shock and fire
- Only plug the base into a suitable, earthed power socket. Make sure that the voltage of the power source is the same as that specified on the rating plate.
• The appliance is only to be used with the base provided. - The use of accessory attachments not recommended for the appliance may result in fire, electric shock or injury to persons.
- To disconnect the appliance, stop any preparation, then remove plug from power socket.
- Disconnect by pulling out the plug and not pulling the cable itself, as
this may damage the cable.
- Do not pull the cable over sharp edges, clamp it or allow it to hang down. Keep the cable away from heat and moisture.
- To avoid hazards, never place the appliance on or beside hot surfaces, for example, radiators, stove tops, gas burners or similar.
- Do not operate appliance with a damaged cord or plug or if it has malfunctioned, been dropped or is damaged in any manner.
A damaged cord, plug or appliance can cause electric shocks, burns and fire. Return appliance to the nearest authorized service facility for examination, repair, or electrical or mechanical adjustment. - Short power-supply cords reduce risks resulting from becoming entangled in or tripping over a long cord.
- Longer (or detachable) cords may be used if care is exercised in their use, and:
1) the marked electrical rating is at least as great as the electrical rating of the appliance
2) a grounding-type 3-wire cord is used
3) cord (s) is arranged so that it will not drape over the counter top or
table top, where it can be pulled on or tripped over by anyone.
- If an extension lead is required, use only an earthed cable with a conductor cross-section of at least 1.5 ~mm^2 / 0.06 in^2 .
Avoid possible harm when operating the appliance
- Do not touch hot surfaces. Use handles, protected surfaces or knobs.
• Always keep the lid closed during preparation. - Scalding may occur if the lid is removed during the brewing cycles.
- Extreme caution must be used when moving an appliance containing hot liquids.
Cleaning
- Unplug appliance when not in use for a long period and before cleaning. Allow to cool down before putting on or taking off parts, and before cleaning the appliance. Remove the appliance from the base before cleaning.
- Please make sure the bottom of the Aeroccino and area underneath the base is dry, especially the connector area, prior to use. Electricity and water together can cause a fatal electric shock.
- Never immerse the base neither the Aeroccino in water. Electricity and water together can cause a fatal electric shock.
- The Aeroccino 4 jug is dishwasher safe, but cannot be washed at a temperature higher than 70^ C / 158^ F .
- Never leave the appliance unattended during operation. Keep it out of the reach of children. The appliance is only for use by persons who have sufficient experience and knowledge and are physically, sensory, and mentally able to operate the machine safely in accordance with these instructions.
- This appliance is intended to be used in households and similar applications only such as: staff kitchen areas in shops, offices and other working environments, farm houses.
- This appliance can be used by children 8 years old and older, as well as persons with reduced physical, sensory, mental capabilities
or lack of experience, only if they have been given supervision and instruction concerning the use of the appliance in a safe way and understand the hazards involved. Children shall not play with the appliance.
- Cleaning and user maintenance shall not be made by children unless they are older than 8 and supervised. Keep the appliance and its cord out of reach of children under the age of 8 years old.
- Do not use outdoors.
- Do not use the appliance for anything other than its intended use.
- The appliance is intended to prepare beverages according to these instructions. No liability is accepted for other purposes, faulty operation or non-professional repairs. Guaranteed services are also excluded in such cases.
- Do not open the appliance. Hazardous voltage inside.
Disposal
Your appliance contains materials which can be recovered or recycled. Separation of the remaining waste products into
different types facilitates the recycling of raw materials. You can obtain information on disposal from your local authority.
SAVE THESE INSTRUCTIONS
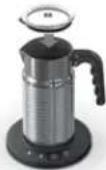
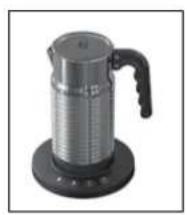
oVeRVIeW

natural_image
Exterior view of a modern office building (no signage)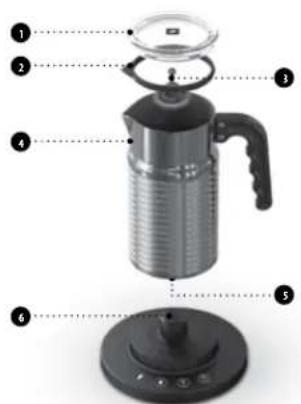
text_image
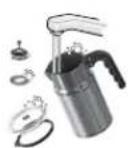
Labeled diagram of a kettle with numbered parts for identification1 Lid
Seal
● Whisk for all preparations
- Jug or Aeroccino
5 Bottom connector
6 Base connector
7 Cold macchiato (Cold and soft milk foam)
Hot milk
● Cappuccino (Warm and airy milk foam)
Latte macchiato (Warm and dense milk foam)

natural_image
Close-up of a mechanical component with coiled spring and mounting holes (no text or symbols visible)
PRePARAtlon
⚠ WARnInG: Risk of electrical shock and fire! Make sure the under side of the milk frother and area underneath the base is dry.
tIPS: For optimal milk froth, use cold semi skimmed milk at refrigerated temperature (about 4–6 °C). To guarantee hygiene conditions, use heat treated milk (pasteurized), refrigerated & freshly opened only. Milk which has been frozen will not froth. To ensure hygienic conditions and proper maintenance of the equipment, it is highly recommended to not use special enriched milks, powdered reconstituted milks nor flavoured milks.
CAUton: Syrup, sugar, chocolate powder or any other additives should not be added directly in the jug. This may damage the coating during the preparation.

- Clean before the first use and after each use according to the cleaning instructions. Place the whisk in the jug.

text_image
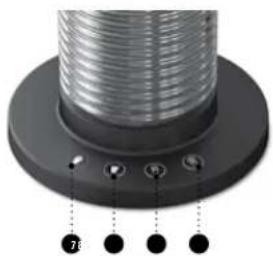
Maximum foam Maximum milk- Fill milk frother up to one of the two «Max» level indicators: Lowest «Max foam» level indicator (120 ml) is for milk froth preparations. Highest «Max milk» level indicator (240 ml) is for hot milk preparations.
- Put the lid on the Aeroccino. Make sure the connector is dry before you plug the Aeroccino to the base. The 4 buttons are steady on.
CAUtlon: Make sure the frothing spring is not removed from the whisk. Risk of burning the coating.
-
Choose your milk preparation by pressing the dedicated button to start. Button pressed blinks during preparation and become steady on when the preparation is ready.
-
Pour the milk preparation in the cup. Use only a non-metal spoon to collect the foam in the jug. For hot and cold milk froth, preparation takes approx. 80 sec. For hot milk, preparation takes approx. 150 sec. Preparation can be stopped at any time by pressing the button or removing the Aeroccino from the base.
-
Aeroccino turns off automatically after 9 minutes of non-use. Press any of the 4 buttons to switch ON the Aeroccino.
note: The milk froth volume depends on the kind of milk that is used and its temperature.
CLEAN DIRECTLY AFTER EVERY USE
EN
⚠️ CAUTION: Ensure the jug is cold before removing it from the base. Or, if removing with care, rinse with cold water immediately to cool down the jug and avoid burning risks.
CAUTION: In case the base needs to be cleaned unplug it first and use only a damp cloth. Make sure the connector is dry before operation. Do not immerse the base in water neither put in the dishwasher.
1234a4b


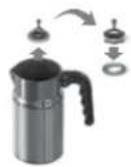

- Remove the jug from the base.
- Remove seal from lid.
- Remove the whisk, and the spring from the whisk.
⚠️ CAUTION: Only use non-abrasive cleaning materials. Do not use abrasives, sharp objects, brushes: risk of scratches and harm to the jug coating.
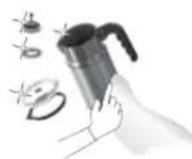
4 a. Hand washing: wash inner jug, seal, lid, whisk and spring with detergent and rinse with warm/hot water. Do not use abrasive material that might damage the surface of the equipment. Don't immerse in water.
4 b. Dishwashing: put all parts except the base in the dishwasher at maximum 70°C/158°F.
- Dry all Aeroccino parts with a fresh and clean towel, cloth or paper and reassemble all parts.
⚠️ CAUTION: Do not immerse neither the jug nor the base in the water.
⚠️ CAUTION: Do not place directly over the dishwasher pin as it may cause damage to inner coating.
⚠️ CAUTION: If the bottom part of the jug is wet, dry it before putting it back in contact with the base connector.

tRoUBleSHootInG
SPeCIFICAtlonS
| Aeroccino does not start. | → Be sure to position the jug correctly on the base and the whisk is attached correctly in the jug.The Aeroccino will start only if the connectors are dried. |
| Quality milk froth not up to standard or milk burnt. | → For optimal milk froth, use cold milk or semi skimmed milk at refrigerated temperature (about 4-6°C). To guarantee hygiene conditions, use heat treated milk (pasteurized), refrigerated & freshly opened only.Milk which has been frozen will not froth.Syrup, sugar, chocolate powder or any other additives should not be added directly in the jug. This may damage the coating during the preparation.→ Be sure the jug and the whisk are clean.→ It is highly recommended to not use special enriched milks, powdered reconstituted milks nor flavoured milks. |
| Fast red lights blinking on the 4 buttons (Aeroccino error). | → a) The appliance is too hot: clean the jug under cool water. Be sure the whisk is attached correctly in the jug.→ b) Not enough milk: fill milk frother up to one of the two «max» level. All the 4 buttons blink rapidly (3 red and 1 blue).→ c) Clean Aeroccino and check that there is no water on the base.→ d) If no change, then please call the Nespresso Club. |
| Milk overflows. | → Check the corresponding indicator level. |
AeRoCCIno4
4192

eUR: 220-240 V, 50-60 Hz, 410-490 W

AUS/nZ: 220-240 V, 50-60 Hz, 380-450 W
WARRAntY
Nespresso warrants this product against defects in materials and workmanship for a period of two years from the date of purchase. During this period, Nespresso will either repair or replace, at its discretion, any defective product at no charge to the owner. Replacement products or repaired parts will be guaranteed for only the unexpired portion of the original warranty or six months, whichever is greater.
This limited warranty does not apply to any defect resulting from accident, misuse, improper maintenance, or normal wear and tear. Except to the extent allowed by applicable law, the terms of this limited warranty do not exclude, restrict or modify, and are in addition to, the mandatory statutory rights applicable to the sale of the product to you. If you believe your product is defective, contact Nespresso for instructions on where to send or take it for repair.
Please visit our website at www.nespresso.com to discover more about Nespresso.


AEROCCINO4
SOMMAIRE
CONSIGNES DE SÉCURITÉ 10
VUE D'ENSEMBLE 13
PRÉPARATION.... 15
NETTOYAGE IMMÉDIAT APRÈS UTILISATION.... 16
DÉPANNAGE....17
SPÉCIFICATIONS.... 17
GARANTIE 18
CONSIGNES DE SÉCURITÉ
natural_image
Exterior view of a modern office building (no signage)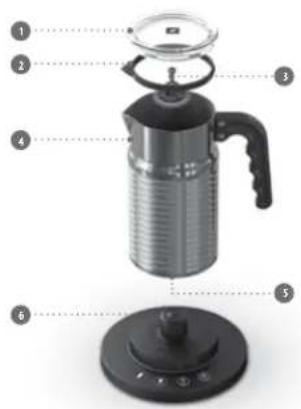
text_image
Labeled diagram of a coffee maker with numbered parts for identificationnatural_image
Close-up of a coiled cable or hose component with mounting points and a numbered marker (74) below, no visible text or symbols.PRéPARAtlon
natural_image
Exterior view of a modern office building (no signage)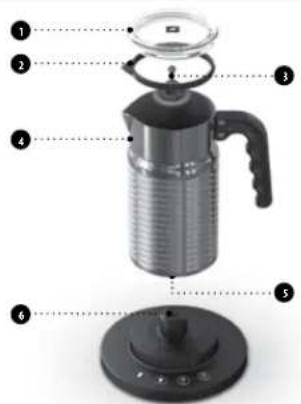
text_image
Labeled diagram of a kettle with numbered parts for identificationnatural_image
Close-up of a coiled cable or hose component with three labeled buttons (75, 80, 85) on a circular base (no text or symbols beyond labels)
ZUBeReItUnG
text_image
Labeled diagram of a kettle with numbered parts for identificationnatural_image
Close-up of a coiled cable or hose component with three control buttons and a numbered indicator (no text or symbols on the main subject)
PRePARAZlone
text_image
Labeled diagram of a kettle with numbered parts for identificationnatural_image
Close-up of a coiled cable or hose component with three labeled buttons and a numbered marker (76) at the base (no text or symbols on the main subject)
PRePARACIÓN
text_image
Illustration showing a kitchen presser's cleaning process with labeled steps and component diagramsnatural_image
Exterior view of a modern office building (no signage)
text_image
Labeled diagram of a portable water heater with numbered parts for identification
natural_image
Close-up of a black circular component with coiled wire and three control buttons (no text or symbols visible)
PRePARAção
natural_image
Exterior view of a modern office building (no signage)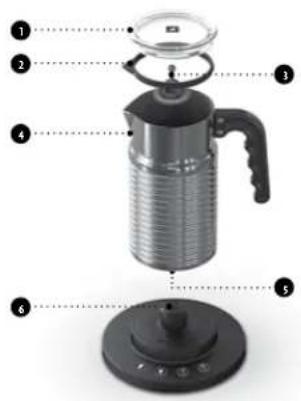
text_image
Labeled diagram of a portable water heater with numbered parts for identificationZACHOWAJ NINIEJSZA INSTRUKCJE
natural_image
Close-up of a coiled cable or hose component with three labeled buttons and a numbered marker (78) at the base (no text or symbols on the main subject)
PRZYGotoWAnle
natural_image
Exterior view of a modern office building (no signage)
text_image
Labeled diagram of a portable coffee maker with numbered parts for identification
Утилизация
natural_image
Close-up of a mechanical component with coiled spring and mounting holes (no text or symbols visible)RU
ПРИГОТОВЛЕНИЕ
natural_image
Exterior view of a metallic kettle with handle and base (no text or symbols visible)
text_image
Labeled diagram of a kettle with numbered parts for identificationnatural_image
Close-up of a coiled cable or hose component with three control buttons and a numbered indicator (76) at the base, no visible text or symbols on the main body.
HAZIRIAmA
USCHOVEJTE TYTO POKYNY

PoPIS
natural_image
Exterior view of a metallic kettle with handle and base (no text or symbols visible)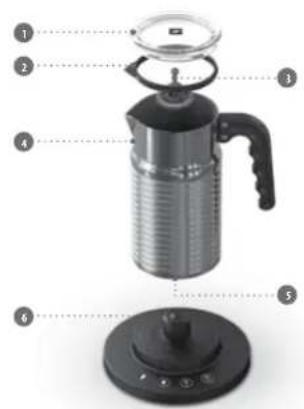
text_image
Labeled diagram of a portable water heater with numbered parts for identificationnatural_image
Close-up of a coiled cable or hose component with three control buttons and a numbered indicator (no text or symbols on the main subject)
text_image
Labeled diagram of a kettle with numbered parts for identificationnatural_image
Close-up of a coiled cable or hose component with three control buttons and a numbered indicator (no text or symbols visible)HU
ELKÉSZÍTÉS
natural_image
Exterior view of a metallic kettle with handle and base (no text or symbols visible)
text_image
Labeled diagram of a portable water heater with numbered parts for identificationnatural_image
Close-up of a coiled cable or hose component with three control buttons and a numbered indicator (no text or symbols on the main subject)
BeReldInG
text_image
Labeled diagram of a portable water heater with numbered parts for identificationnatural_image
Close-up of a coiled cable or hose component with mounting points and a numbered indicator (78) below, no visible text or symbols on the main body.ΠρόεΤόιμαΣια
text_image
Illustration showing a multi-step cooking process for a steamer, with labeled steps and a magnified view of the final step.natural_image
Exterior view of a metallic kettle with handle and base (no text or symbols visible)
text_image
Labeled diagram of a kettle with numbered parts for identificationnatural_image
Close-up of a coiled cable or hose component with three control buttons and a numbered indicator (no text or symbols on the main subject)
VAImIStUS
natural_image
Exterior view of a modern office building (no signage)
text_image
Labeled diagram of a kettle with numbered parts for identification1 Lokk
Forsegling
3 Visp for alle tilberedninger
- Kanne eller Aeroccino
5 Bunntilkobling
6 Basetilkobling
7 Kald Macchiato (kaldt og lett melkeskum)
Vammelk
9 Cappuccino (varmt og luftig melkeskum)
- Latte Macchiato (varmt og tykt melkeskum)
natural_image
Close-up of a coiled cable or hose component with three control buttons and a numbered indicator (76) at the base (no text or symbols on the main subject)
tllBeRednInG
text_image
Maks. skum Maks. melk-
Fyll melkeskummer opp til en av de to «max» nivåindikatorene: Laveste indikator: «Max foam» (120 ml) er beregnet for tilberedelse av melkeskum. Høyeste indikator: «Max milk» (240 ml) er beregnet for tilberedelse av varm melk.
-
Hell den tilberedte melken i koppen. Bruk ikke metallskje for å ta ut melkeskummet av kannen. Tilberedningstiden for varmt og kaldt melkeskum er ca. 80 sek. Tilberedningstiden for varm melk er ca. 150 sek. Du kan stoppe tilberedelsen ved å trykke på knappen, eller fjerne kannen fra basen.

-
Sett lokket på melkeskummeren. Sørg for at koblingen er tørr før du kobler melkeskummeren til basen. De 4 knappene lyser stabilt.
-
Melkeskummeren slår seg automatisk av etter 9 minutter uten bruk. Trykk på en av de fire knappene for å slå PÅ melkeskummeren.
text_image
Labeled diagram of a kettle with numbered parts for identificationnatural_image
Close-up of a coiled cable or hose component with three control buttons and a numbered indicator (no text or symbols on the main subject)
tlllAGnInG
natural_image
Exterior view of a modern office building (no signage)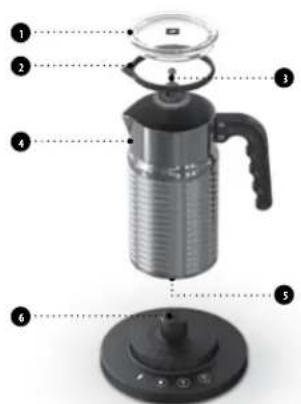
text_image
Labeled diagram of a kettle with numbered parts for identificationnatural_image
Close-up of a coiled cable or hose component with three control buttons and a numbered indicator (76) at the base (no text or symbols on the main subject)
tllBeRednInG
text_image
Labeled diagram of a kettle with numbered parts for identificationnatural_image
Close-up of a coiled cable or hose component with three control buttons and a numbered indicator (no text or symbols on the main subject)
PRePARARe
natural_image
Close-up of a coiled cable or hose component with mounting points and a numbered label (78) at the base (no readable text or symbols beyond basic markings)الفطاء
الحاجز المطاطى
text_image
Labeled diagram of a portable water heater with numbered parts for identification
text_image
Labeled diagram of a portable water heater with numbered parts for identification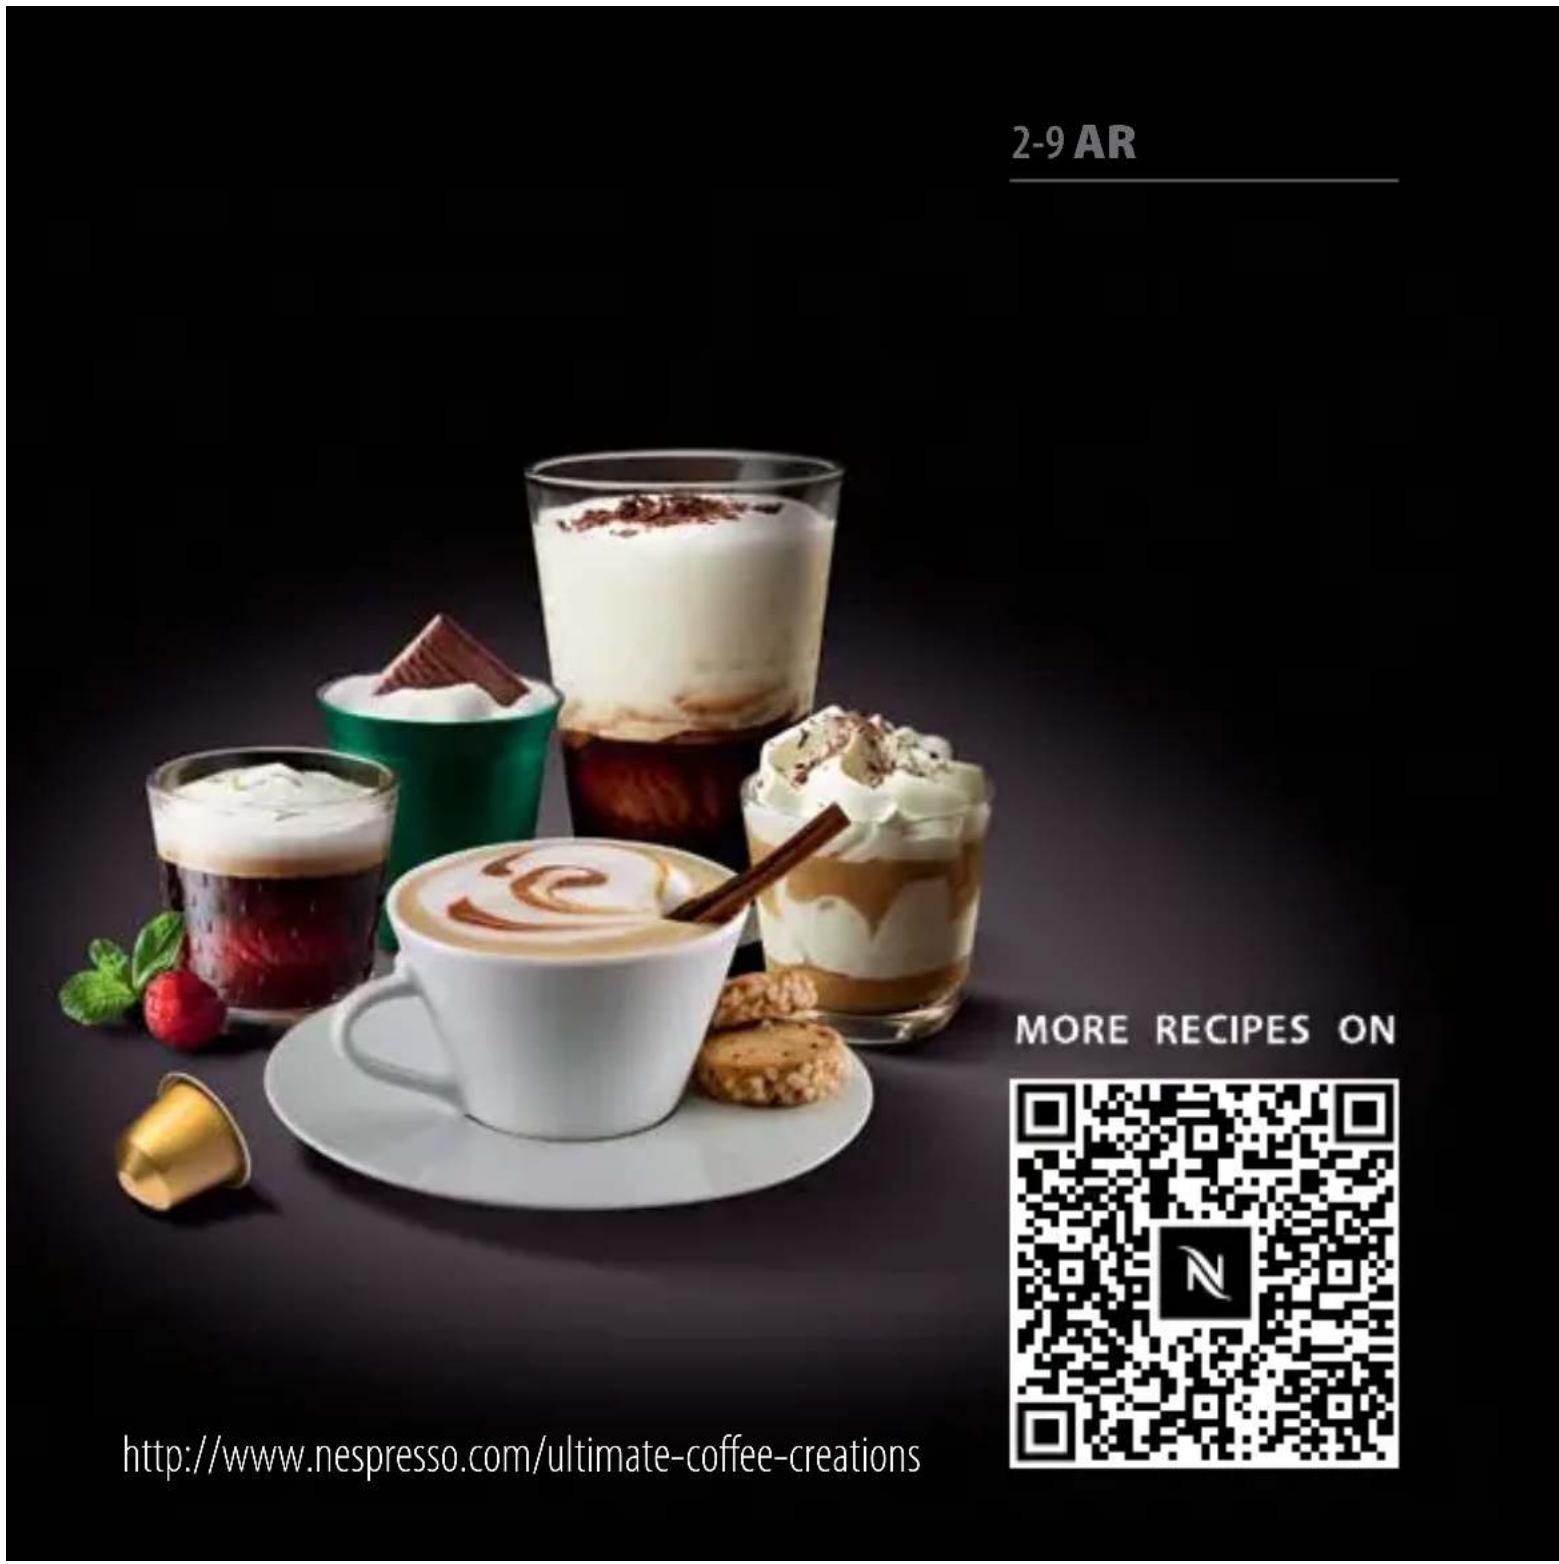
text_image
2-9 AR MORE RECIPES ON http://www.nespresso.com/ultimate-coffee-creations2-9 AR
MORE RECIPES ON

text_image
QR code with central logo containing stylized 'N' symbol