
Contour Cordless 24V - Grass trimmer FLYMO - Free user manual and instructions
Find the device manual for free Contour Cordless 24V FLYMO in PDF.
User questions about Contour Cordless 24V FLYMO
0 question about this device. Answer the ones you know or ask your own.
Ask a new question about this device
Download the instructions for your Grass trimmer in PDF format for free! Find your manual Contour Cordless 24V - FLYMO and take your electronic device back in hand. On this page are published all the documents necessary for the use of your device. Contour Cordless 24V by FLYMO.
USER MANUAL Contour Cordless 24V FLYMO
natural_image
Technical line drawing of a mechanical clamp or lever device (no text or symbols)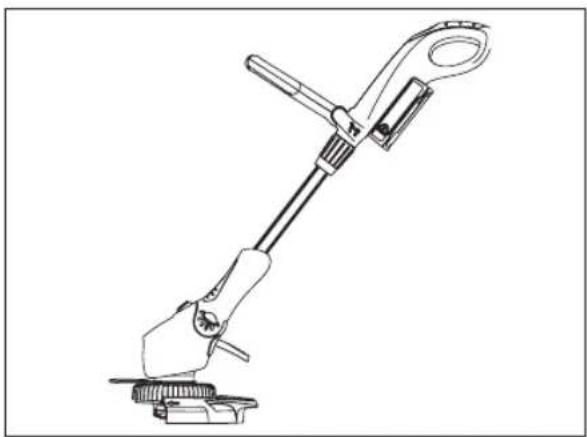
natural_image
Technical line drawing of a mechanical clamp or lever assembly (no text or symbols)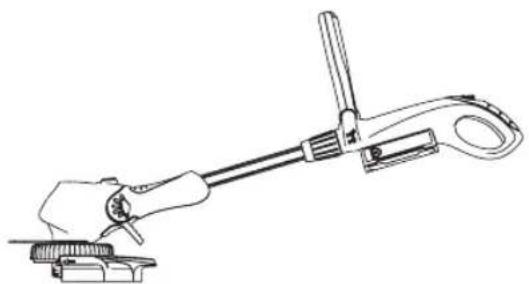
natural_image
Line drawing of a hand using a wrench to lift a tool, no text or symbols presentGB Original Instructions
Read before use and retain for future reference
DE WICHTIGE INFORMATION
| GB-CARTON CONTENTS | NL- INHOUD VAN DE | 8. Ylempi varsi | 7. Barra inferior |
| 1. Battery Pack | DOOS | 9. Tukikahva | 8. Barra superior |
| 2. Battery Charger | 1. Accu | 10.Turvakatkaisin | 9. Mango fijo |
| 3. Guard | 2. Acculader | 10. Interruptor de seguridad lock-off | |
| 4. Wheel | 3. Beveiliging | SE-FÖRPACKNINGENS | |
| 5. Plant Guard | 4. Loopwerk | INNEHÄLL | |
| 6. Instruction Manual | 5. Gewasbeschermer | 1. Batteri | |
| 7. Lower Shaft | 6. Gebruiksaanwijzing | 2. Batteriladdare | PT-CONTEÚDO DA EMBALAGEM |
| 8. Upper Shaft | 7. Onderste houder | 3. Sköld | |
| 9. Steady Handle | 8. Bovenste houder | 4. Hjul | 1. Conjunto de pilhas |
| 10. Safety Lock-off Switch | 9. Stabiliteitshandvat | 5. Växtsköld | 2. Carregador das pilhas |
| 10.Veiligheidsschakelaar | 6. Bruksanvisning | 3. Proteção | |
| 7. Nedre skaft | 4. Roda | ||
| DE-LIEFERUMFANG | |||
| 1. Akku | NO-KARTONGENS | 8. Övre skaft | 5. Proteção de plantas |
| 2. Akkuladegerät | INNHOLD | 9. Stödhandtag | 6. Manual de instruções |
| 3. Schutzabdeckung | 1. Batteripakke | 10.Stoppreglage | 7. Eixo inferior |
| 4. Laufrad | 2. Batterilader | 8. Eixo superior | |
| 5. Pflanzenschutzbügel | 3. Vakt | DK-ÆSKENS INDHOLD | 9. Punho fixo |
| 6. Bedienungsanleitung | 4. Hjul | 1. Batterienhed | 10. Interruptor de bloqueio de segurança |
| 7. Unterer Schaft | 5. Fabrikk-vakt | 2. Batterioplader | |
| 8. Oberer Schaft | 6. Instruksjonshåndbok | 3. Afskærmning | |
| 9. Führungsgriff | 7. Nedre skaft | 4. Hjul | |
| 10.Einschaltspere | 8. ∅vre skaft | 5. Planteafskærmning | IT-CONTENUTO DELLA CONFEZIONE |
| 9. Händstøtte | 6. Brugsanvisning | ||
| 7. Skaftets nederste del | 1. Batterie | ||
| FR- CONTENU DU CARTON | 10.Sikkerhets-avkoblings-bryter | 8. Skaftets øverste del | 2. Caricabatterie |
| 9. Stabiliserende håndtag | 3. Protezione | ||
| 1. Bloc batterie | 10.Sikkerheds-slukknap | 4. Ruota | |
| 2. Chargeur de batterie | FI-PAKKAUKSEN | 5. Archetto di protezione per le piante | |
| 3. Protection | SISÄLTÖ | ES-CONTEÚDO DA EMBALAGEM | 6. Manuale d'istruzioni |
| 4. Roue | 1. Akkuyksikkö | 7. Parte inferiore dell'asta | |
| 5. Protecteur de plantes | 2. Laturi | 1. Batería | 8. Parte superiore dell'asta |
| 6. Notice d'instructions | 3. Suojus | 2. Cargador de batería | 9. Manico fisso |
| 7. Tige inférieure | 4. Pyörä | 3. Guarda | |
| 8. Tige supérieure | 5. Koneistosuojus | 4. Collar | 10. Interruttore per il bloc-caggio del dispositivo di sicurezza |
| 9. Poignée stable | 6. Käyttöohje | 5. Guarda-plantas | |
| 10. Interrupteur de sécurité | 7. Alempi varsi | 6. Manual de instrucciones | |
HU-A DOBOZ TARTALMA
natural_image
Mechanical component diagram showing two curved, segmented parts with no visible text or symbols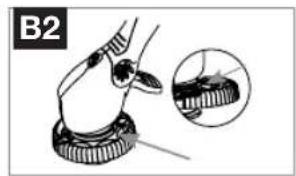
natural_image
Illustration of a hand holding a circular object with a magnified inset showing a small object (no text or symbols)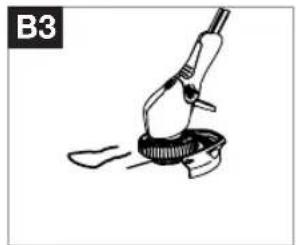
natural_image
Simple line drawing of a hand holding a tool with a circular base and a curved handle (no text or symbols)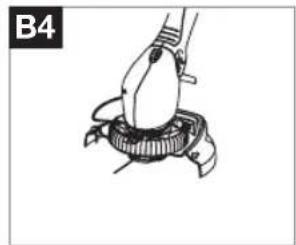
natural_image
Illustration of a robotic arm gripping a mechanical component (no text or symbols)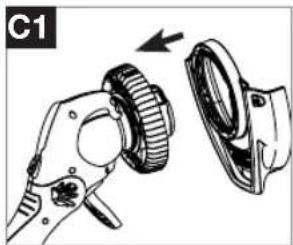
natural_image
Diagram of a mechanical device showing a gear assembly and housing (no text or symbols)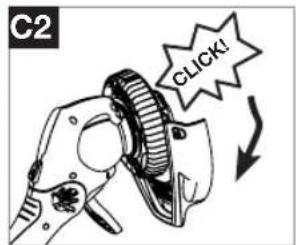

natural_image
Illustration of a microscope tool interacting with a ruler, showing no text or symbols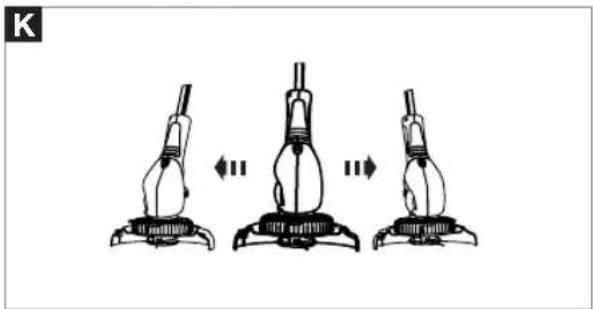
natural_image
Three sequential illustrations of a vacuum cleaner with three legs, showing motion changes (no text or symbols)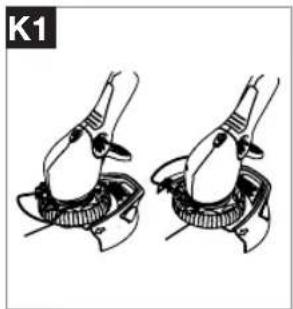
natural_image
Two identical illustrations of a hand gripping a circular object, labeled K1 (no text or symbols on the objects themselves)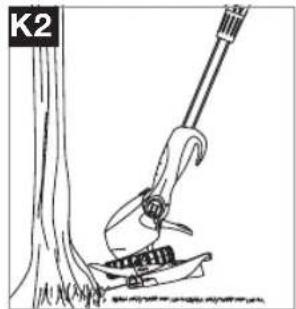
natural_image
Illustration of a climbing tool interacting with a tree trunk (no text or symbols)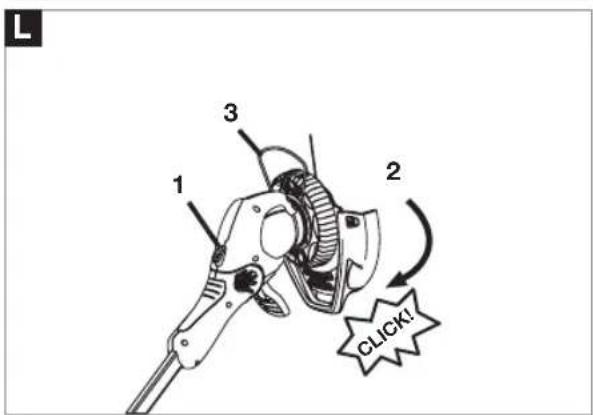

natural_image
Technical line drawing of a mechanical clamp or tool assembly (no text or symbols)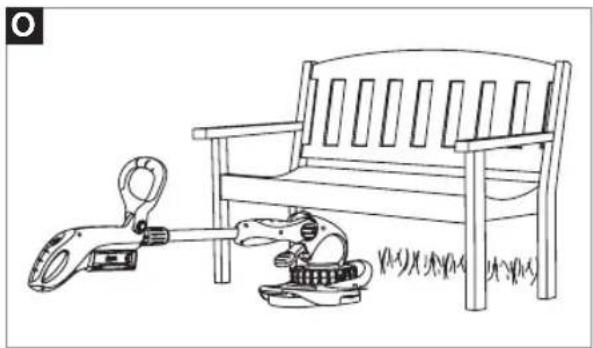
natural_image
Cartoon illustration of a dog using a handheld device next to a bench, no text or symbols present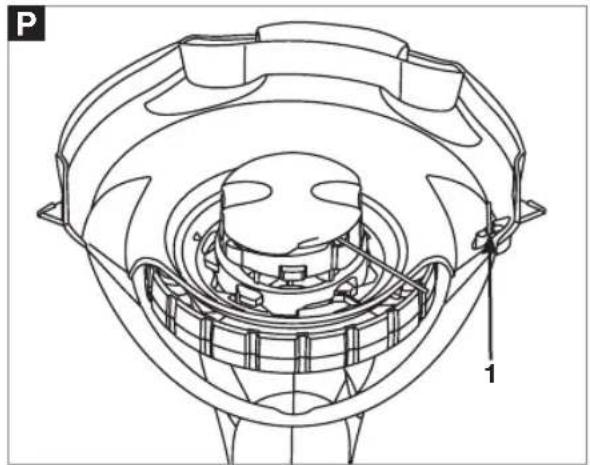
natural_image
Technical line drawing of a mechanical component with labeled parts (P and 1), no readable text or symbols beyond labels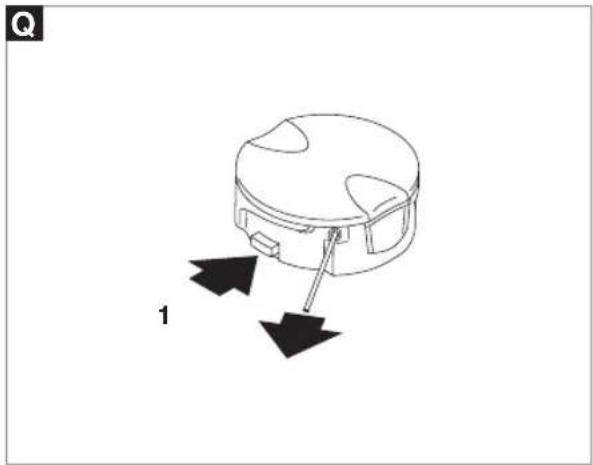
natural_image
Diagram of a device with two arrows pointing to a circular component (no text or symbols)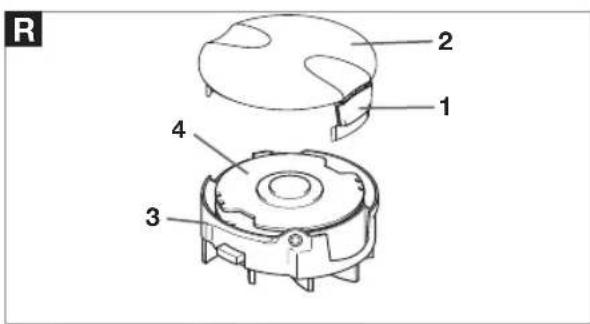
natural_image
Line drawing of a hand inserting a component into a mechanical housing (no text or symbols)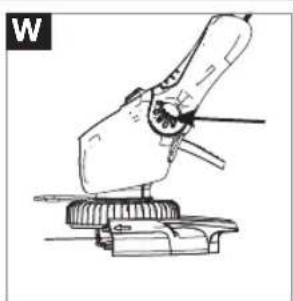
natural_image
Technical line drawing of a robotic arm operating a mechanical component (no text or symbols)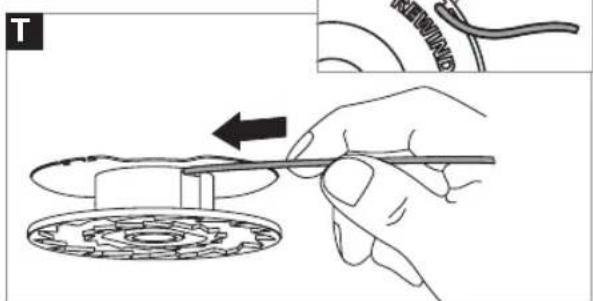
natural_image
Illustration of a hand using a tool to adjust a mechanical component, showing a circular base and ring (no text or symbols)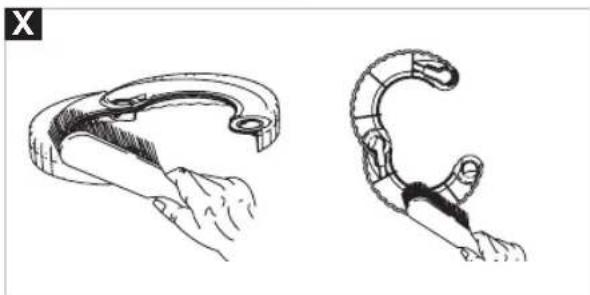
natural_image
Technical line drawings of two mechanical components, one with a curved handle and the other a curved bracket (no text or symbols)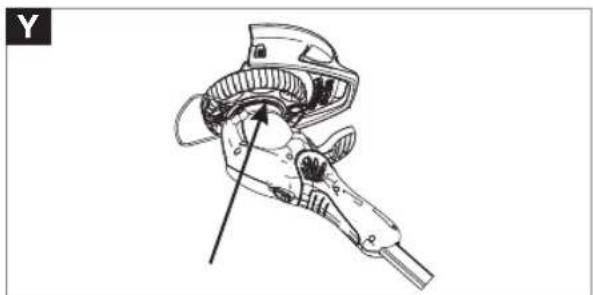
natural_image
Technical line drawing of a mechanical component with an arrow indicating direction (no text or symbols)| GB DO NOT use liquids for cleaning. | ES NO utilice líquidos para la limpieza. | HR NEMOJTE koristiti tekućine za čišćenje. |
| DE Zur Reinigung KEINE Flüssigkeitenverwenden. | PT NÃO use líquidos para limpar. | LT Nenaudokite skysčių valymui. |
| FR NE PAS utiliser de produit liquidepour le nettoyage. | IT NON usare liquidi per la pulizia. | RU HE используйте жидкости для очистки. |
| NL Voor het reinigen NOOIT vloeistoffen gebruiken. | HU NE használjon folyadékokat tisztításra. | EE ÄRGE kasutage puhastami-seks vedelikke. |
| NO Flytende midler MÅ IKKE brukes til rengjøring. | PL NIE używać płynów do czy-szczenia. | LV Tirišanai NEIZMANTOJIET škídrumus. |
| FI ÄLÄ käytä nesteitä puhdistamiseen. | CZ K čištění NEPOUŽÍVEJTE kapaliny. | RO NU utilizați pentru curățire lichide. |
| SE ANVÄND INTE vätskor för rengöring. | SK NEPOUŽÍVAJTE na čistenie tekuté materiály. | TR Temizleme için sivilar KULLANMAYIN. |
| DK BRUG IKKE væske til rengøring. | SI NE uporabljajte raznih tekočin za čišćenje. | GR MHN καθαρίζετε με υγρὰ. |
GB For further advice or repairs, contact your local dealer.
WARNING. When using the product the safety rules must be followed. For your own safety and that of bystanders please read these instructions before operating the product. Please keep the instructions safe for later use.
Explanation of Symbols on the product
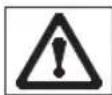
Warning

Read the user instructions carefully to make sure you understand all the controls and what they do.
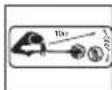
Keep others, including children, pets and bystanders outside the 10 metre hazard zone. Stop the trimmer immediately if you are approached.
General
-
This product may be used under supervision, or if instruction regarding the safe use of the product has been provided and the resulting dangers have been understood, by children aged 8 and above, as well as by persons with physical, sensory or mental disabilities or a lack of experience and knowledge. Children must not be allowed to play with the product. Cleaning and user maintenance must not be performed by children without supervision. The use of this product by young people under the age of 16 is not recommended.
-
Never allow children or people unfamiliar with the instructions to use the machine.
- Stop using the machine while people, especially children, or pets are nearby.
- Only use the trimmer in the manner and for the functions described in these instructions.
- Never operate the trimmer when you are tired, ill or under the influence of alcohol, drugs or medicine.
- The operator or user is responsible for accidents or hazards occurring to other people or their property.
Battery
Cordless Battery Powered Products require special care.
- AVOID ACCIDENTAL STARTING. KEEP HANDS AND FINGERS AWAY FROM THE SWITCH LEVER WHILE CARRYING THE TRIMMER.
- Always charge the product indoors and store in a cool dry place – out of the reach of children.
- Use only the charger provided with your unit. Use of any other charger could permanently damage the battery and the trimmer.
- Use the charger with standard domestic household electrical outlets only.
- Do not abuse the charger or charger cord.
- Do not use the charger if the charger or charger cord is damaged.
- Use the charger indoors only.
- Do not use the charger outdoors.

Wear eye protection
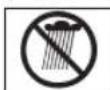
To avoid the possibility of electric shock, do not use in damp or wet conditions.
Switch off! Remove battery pack before adjusting or cleaning.
Warning: The cutting line continues to rotate after the machine has been switched off.
- Store and charge this unit in a cool, dry well ventilated location and out of the reach of children.
- Do not charge the battery or use the unit in an explosive or corrosive environment. Avoid areas where flammable liquids or gases are present to avoid creating a fire or explosion.
- Do not attempt to repair the unit including the battery. Nylon line replacement and cleaning the unit are the only items suitable for user maintenance.
- Do not insert any object into the motor area. Keep free of debris to avoid overheating.
- Do not incinerate or mutilate the battery. Batteries contain hazardous chemicals. Dispose of properly.
Preparation
- While using your product always wear eye protection, substantial footwear and long trousers. Do not operate the equipment when barefoot or wearing open sandals.
- Before using the machine and after any impact, check for signs of wear or damage and repair as necessary.
- Inspect the area to be cut before each use. Remove all objects such as stones, broken glass, nails, wire, string etc, which can be thrown or become entangled in the trimmer head.
- Before use, inspect the area for wildlife, especially hedgehogs.
- Check that the cutting head, spool and cap are fitted correctly.
Use
- Use the trimmer only in daylight or good artificial light.
- Avoid operating your trimmer in wet grass, where feasible.
- Take care in wet grass, you may lose your footing.
- On slopes, be extra careful of your footing and wear non-slip footwear.
- Do not walk backwards when trimming, you could trip. Walk, never run.
- Never operate the trimmer with damaged guards or without guards in place.
- Never fit metal cutting elements.
- Keep hands and feet away from the cutting means at all times and especially when switching on the motor.
- Keep cutting head below waist level.
- Do not lean over the trimmer guard whilst trimming or edging - objects may be thrown by the cutting line.
- Beware of cut-off pieces of nylon line ejected during use.
- If you hit an object, do not use your trimmer until you are sure that the entire trimmer is in a safe operating condition.
- If the trimmer starts to vibrate abnormally, check immediately. Excessive vibration can cause injury.
Maintenance and storage
- Keep all nuts, bolts and screws tight to be sure the trimmer is in safe working condition.
- Replace worn or damaged parts for safety.
ENGLISH - 1
- Only use the replacement cutting line specified for this product.
- Only use replacement parts and accessories recommended by Husqvarna UK Ltd.
- After any maintenance in dealing with the cutting line, always return the product to its normal operating position before switching on.
-
To avoid the risk of injury keep fingers and hands clear of the line cutter on the leading edge of the guard.
-
Clean unit with a dry cloth. Never use metal objects to clean the unit.
- Inspect and maintain the trimmer regularly. Any repairs must be carried out by an authorised repairer.
- Store the product in a cool, dry place and out of reach of children. Do not store the product outdoors.
- Allow the product to cool for at least 30 minutes before storing.
Battery Pack
Battery Pack Care
- If over a period of time the Battery Pack quickly runs down after a full 6 hour charging period, a replacement Battery Pack is needed.
- There will be some charge present in the Battery Pack but to ensure maximum running time, charge your Battery Pack for 6 hours before first use.
- To prevent permanent Battery Pack damage, never store in a discharged condition.
- Contact your local approved service centre/dealer/distributor for a replacement Battery Pack and for safe disposal of your old Battery Pack.
5.Battery
24 Volt 1.6 AmpHour "High Power" Sealed for Life No maintenance required
• IMPORTANT DISPOSE OF YOUR OLD BATTERY PACK SAFELY DO NOT CUT OPEN, BURN OR INCINERATE.
Winter Storage
- Fully charge for 6 hours before winter storage.
- Re-charge the Battery Pack every 3 to 4 months for a full 6 hour charging period to top up the battery charge during winter storage.
- Avoid extended storage without re-charge.
- Store in a cool dry place.
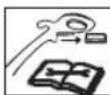
For further information on Battery Pack replacement contact your local dealer.
Assembly Instructions
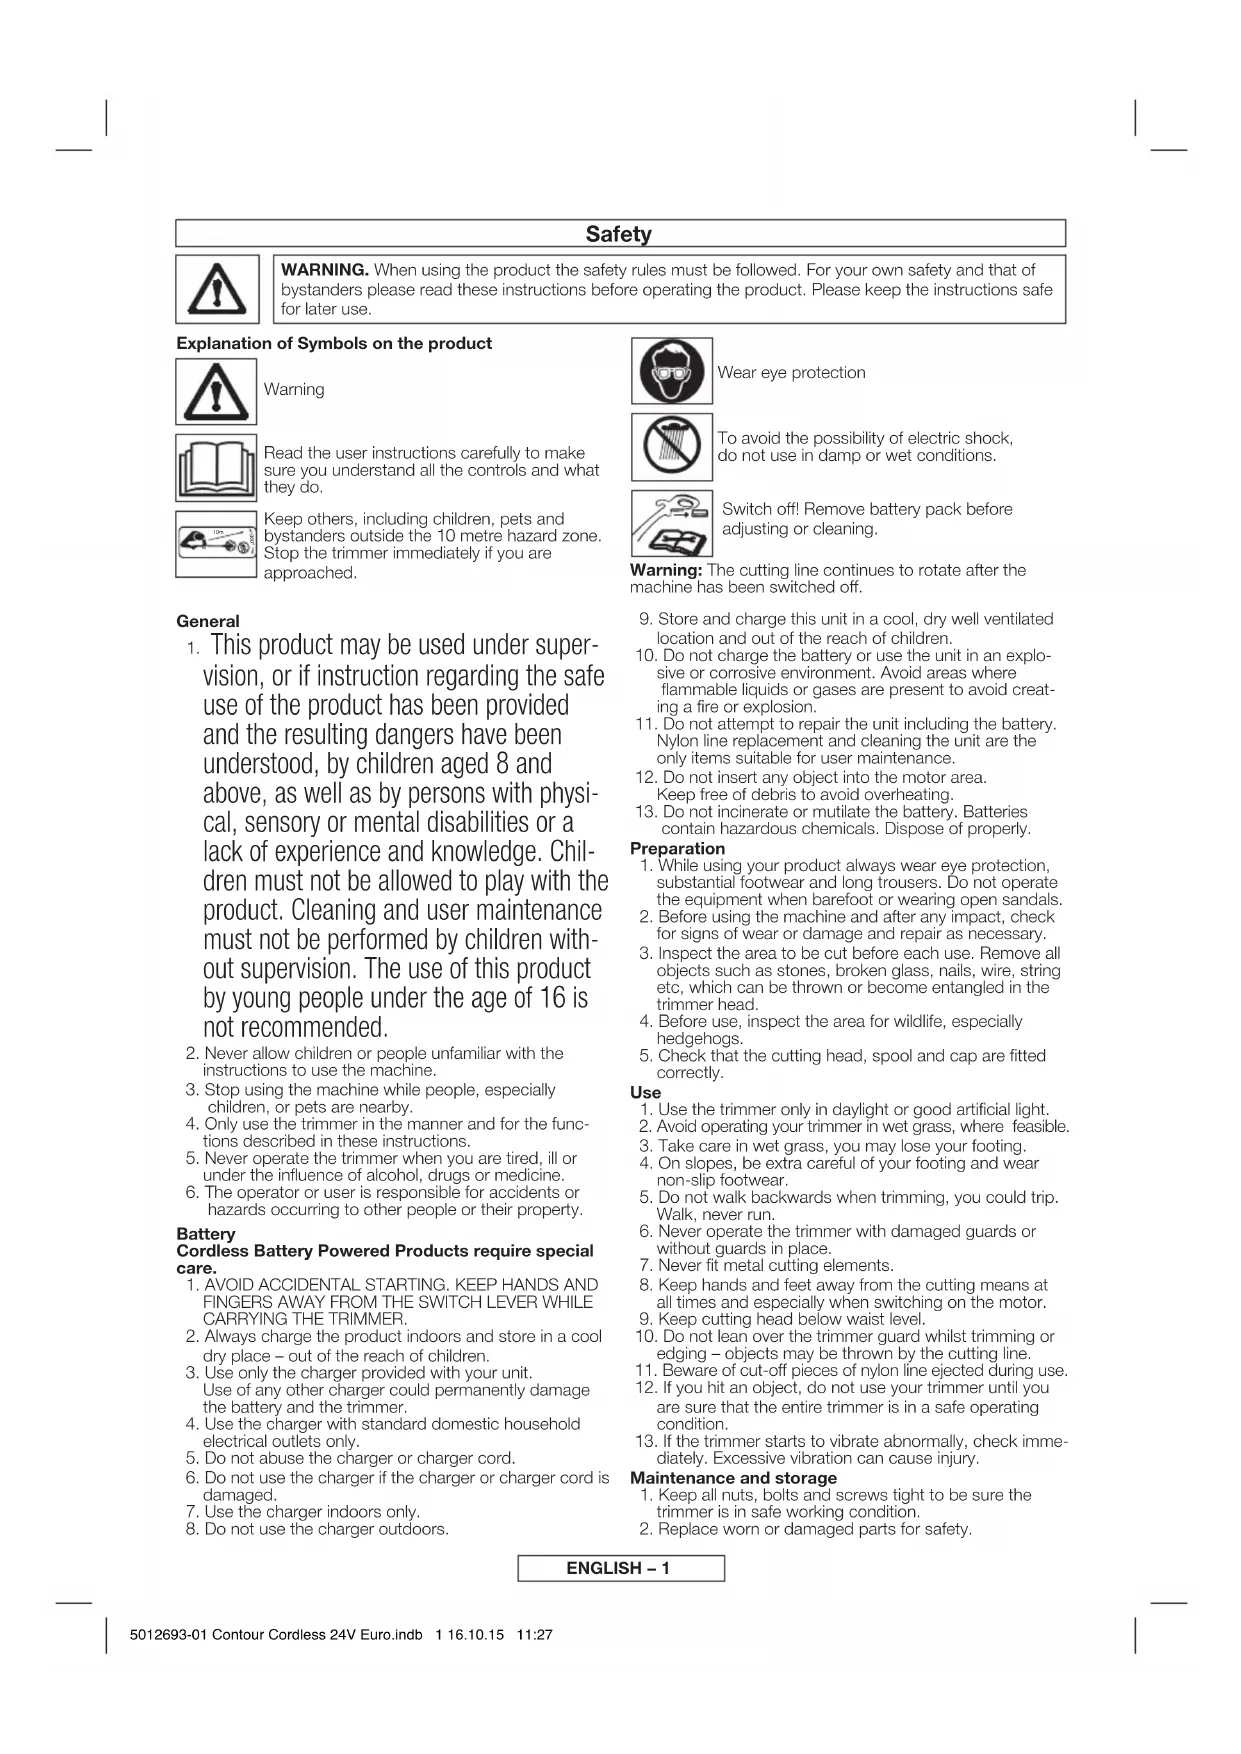
Assembly of Switch Handle to Tube (A1)
- Ensure that the internal cable is not twisted.
- Insert the tube into the switch handle.
- Push until it clicks into position.
- ENSURE THAT THE TUBE IS FULLY LOCATED BY ATTEMPTING TO REMOVE IT.
Assembly of Trimmer Head to Tube (A2)
- Ensure that the internal cable is not twisted.
- Insert the tube into the trimmer head.
- Push until it clicks into position.
- ENSURE THAT THE TUBE IS FULLY LOCATED BY ATTEMPTING TO REMOVE IT.
Wheel Assembly (B1) & (B2)
- Attach the wheel to the trimmer making sure that it is located into the BOTTOM groove on the trimmer head as illustrated in Fig B1.
- Clip the wheel together on each side making sure it is secure (B2).
- The wheel should turn freely.
Plant Guard Assembly (B3) & (B4)
- Open the plant guard as illustrated in Fig B3 and place into the TOP groove on the trimmer head. Rotate the plant guard clockwise until it CLICKS into its parked position (B4).
Safety Guard Assembly (C1) & (C2)
-
Locate the safety guard over the cutting head. Ensure the nylon line is fed through the hole in the safety guard as illustrated in Fig C1.
-
Push into location and turn safety guard in the direction illustrated in Fig C2, until a click is heard and the safety guard is securely locked in position.
- ENSURE THE SAFETY GUARD IS SECURELY IN PLACE BY ATTEMPTING TO TWIST GUARD.
Steady Handle Assembly (D)
- Pull the steady handle release lever towards the handle grip.
- Depress the two buttons on the side of the steady handle.
- Locate the buttons into the main handle and release the lever.
- Adjust the steady handle to the most comfortable operating position by pulling the release lever and moving the handle.
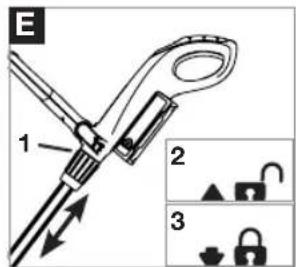
Height Adjustment (E)
- Turn height adjuster (E1) in the direction indicated to un-lock (E2).
- Adjust the length of the tube to the most comfortable operating position.
- Turn height adjuster in the opposite direction to lock (E3).
• ENSURE THAT THE TUBE IS FULLY SECURED.
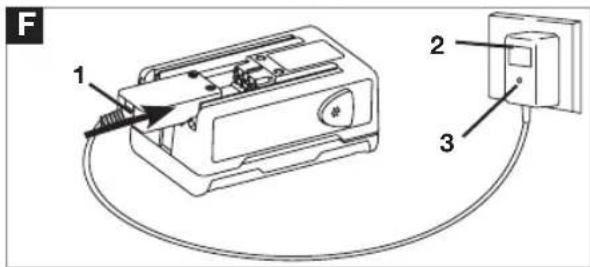
Charging the Battery Pack
Initial Charging Procedure
- Use the charger indoors only.
- Ensure the charger is not exposed to moisture. Keep the charger and the Battery Pack dry at all times. Keep the charger well ventilated during charging.
- Attach the charger connector (F1) to the Battery Pack.
- Plug the charger (F2) into a suitable household electrical wall socket and switch on.
- The red indicator lamp (F3) glows continuously during charging.
- Full charge will be achieved in 3 hours after which the indicator lamp on the charger (F3) will turn to green. During charging the charger becomes warm. This is normal and means the charger is operating correctly.
Re-Charging the Battery Pack
- Re-charge the Battery Pack as soon as the cutting power of your trimmer begins to die and slow down
- Avoid running the Battery Pack into "deep" discharge, i.e. avoid flattening the Battery Pack completely.
- Follow the procedure outlined in the Initial Charging Procedure.
- Charging the Battery Pack according to these instructions should ensure maximum battery life.
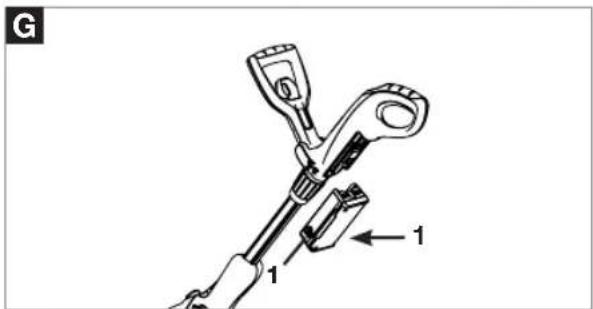
Battery Pack Assembly (G)
- Attach the Battery Pack as illustrated in Fig G, ensuring that it clicks into position and is located firmly.
- To remove, press the two buttons (G1) on either side of the Battery Pack and slide off.
ENGLISH - 2
How to trim and edge
• WARNING
- The use of eye protection is recommended. Do not lean over the trimmer whilst trimming or edging, objects may be thrown by the cutting line. Do not allow cutting head to rest on the ground. Do not overload your trimmer. Overloading can be avoided by making sure the motor speed does not drop unduly. REMOVE THE BATTERY PACK BEFORE ATTEMPTING ANY MAINTENANCE OR ADJUSTMENT.
- BEFORE USE
Make sure that the line is fed out.
- Make sure motor is up to full speed before trimming or edging.
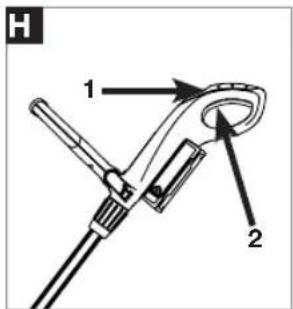
How to trim
- Hold as illustrated in Fig H.
- To start, squeeze the safety lock-off (H1) and then the switch lever (H2).
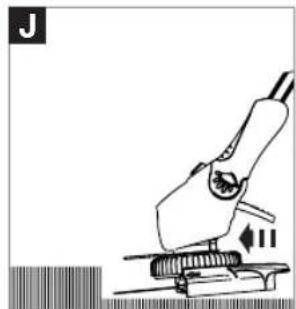
- Cut with nylon line at an angle using the tip (J)
- Swing trimmer in and out of the cutting area taking small cuts (K).
- Line is fed out automatically every time the trimmer head stops rotating and returns to operating speed.
- Extra line can be fed out manually as described in Manual line feed
- To stop your trimmer release the switch lever. The cutting head will stop in approximately one second.
Using the Plant & Tree Guard
The Plant and Tree guard allows the trimming of grass close to plants and trees without damaging them with the cutting line.
- Rotate the guard into it's forward position as illustrated in Fig K1.
- Use the trimmer around trees (K2) and near plants.
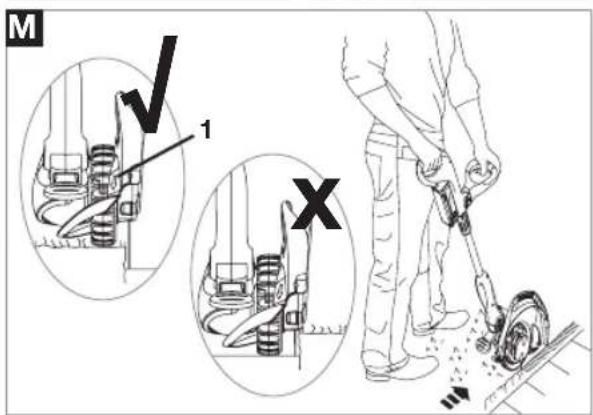
How to edge
- Ensure the plant guard is in the PARK position.
- To convert to edging mode, press button (L1) and twist head (L2). An audible "click" will confirm that the head is locked.
- Hold as illustrated in Fig H.
- To start, squeeze the safety lock-off (H1) and then the switch lever (H2).
- Rest edger on wheel for extra stability and line up the edge of the lawn. Edge in direction indicated in Fig M.
- To stop your trimmer release the switch lever.
- To return to trimming mode, press button and twist head back the opposite way. An audible "click" will confirm that the head is locked.
- When edging, ensure that the edging wheel is always resting on the grass (and not on the path/driveway).
Using the Shrubbing position
- By pressing the lever (N1) with your foot, the handle can be lowered into three different positions to enable the use of the product under shrubs and low obstacles (O).
Auto Line Feed System
How the automatic line feed works (P)
- When initially switching on the trimmer, a small length of line is fed out.
- A 'clattering' noise will be heard when the nylon line hits the line cutter (P1). DO NOT BE ALARMED this is quite normal. After approximately 5 seconds the line will be cut to the correct length and the noise will reduce as the motor reaches full speed.
-
Make sure the motor is up to full speed before trimming or edging.
-
If the noise of the nylon line being cut cannot be heard, more line will need to be fed out.
- To feed more line, it is first necessary to allow the motor to stop completely, then re-start, allowing the motor to reach full speed.
- Repeat step 4. until you hear the line hitting against the cutter. (Do not repeat this procedure more than 6 times.)
- If problems are experienced with the automatic line feed refer to Fault Finding Chart.
Manual line feed
To manually feed the nylon line (Q)
- If required line can be fed out manually.
-
To operate, press and release manual line feed button (Q1), whilst gently pulling on the line until it reaches the line cutter.
-
If the line extends past the line cutter, too much line has been fed out.
- If too much line is fed out, remove the spool cap and click spool anti-clockwise until the line is at the desired length.
Cutting Head
To remove spool cap
- Press and hold in the two cap release latches (R1).
- Pull cap away from the spoolholder (R3).
When refitting the spool cap (R2)
- Keep all areas of the cap (R2) and spoolholder (R3) clean. Failure to do so may prevent the cap being securely located in the spoolholder.
- Replace the cap, pressing firmly DOWN towards the spoolholder to ensure cap is fully located.
- Check that the cap is correctly fitted by trying to remove it without depressing the two latches.
To replace nylon line
For your convenience it is recommended you buy spool (R4) and line complete. Nylon line only is also available. Both are available from your local dealer.
To fit spool and line complete:
- Remove old spool (R4).
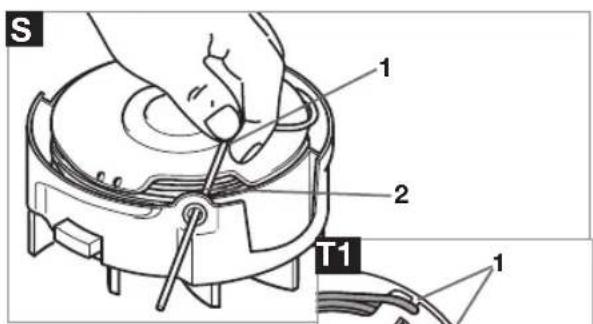
-
Place new spool into spoolholder (R3) with cut out area of the spool (S1) in line with eyelet as shown in Fig S2.
-
Release line from cleat (T1) and feed line through eyelet (S).
-
Ensure spool (R4) is fully located by gently rotating it during fitment, whilst keeping the spoolholder (R3) steady.
- Refit the cap (R2).
To fit nylon line only:
- Remember! Your product is designed to use only nylon line with a maximum diameter of 1.5mm. Use only genuine Flymo nylon line.
- Take approximately 10 metres of line. Insert 15mm of line into the hole in the spool (T) and wind line in the direction of the arrows on the top of the spool. Leave approximately 100mm of line unwound and place into cleat as illustrated in Fig T1.
- Care should be taken to ensure that the line is neatly coiled on the spool. Failure to do so will impair the efficiency of the automatic line feed.
- Then fit spool as described in 'To fit spool and line complete', section above.
Always return the product to its normal operating position before switching on.
ENGLISH - 3
Maintenance
• WARNING
Remove the Battery Pack, before attempting any maintenance or adjustment. Cutting head con tinues to rotate after the trimmer has been switched off. Keep fingers and hands clear of the line cutter on leading edge of guard.
Caring for your Contour
After you have finished using your Flymo Contour follow the procedure below:
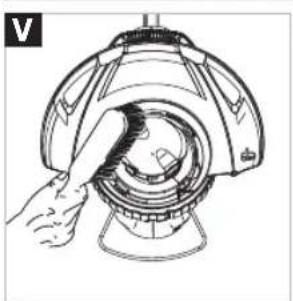
- Never clean your trimmer with water, cleaning fluids, or solvents, just remove debris with a suitable tool, a soft brush or dry cloth.
-
Using a soft brush, clean around the inside of the safety guard, the cutting head (V) and the motor housing air vents (W).
-
Remove the wheel by pressing one of the buttons. Clean the wheel (X) and groove (Y) on the trimmer head with a soft brush.
- Attach wheel as described in Wheel Assembly.
- Inspect the trimmer carefully, especially the parts of the cutting head.
- If your trimmer is damaged in any way contact your local Husqvarna service centre.
- Never use a damaged trimmer.
Storage
- Store in a cool, dry place and out of reach of children. Do not store outdoors.
- Allow the product to cool for at least 30 minutes before storing.
Fault Finding Chart
WARNING: Remove the Battery Pack before attempting any maintenance or adjustment.
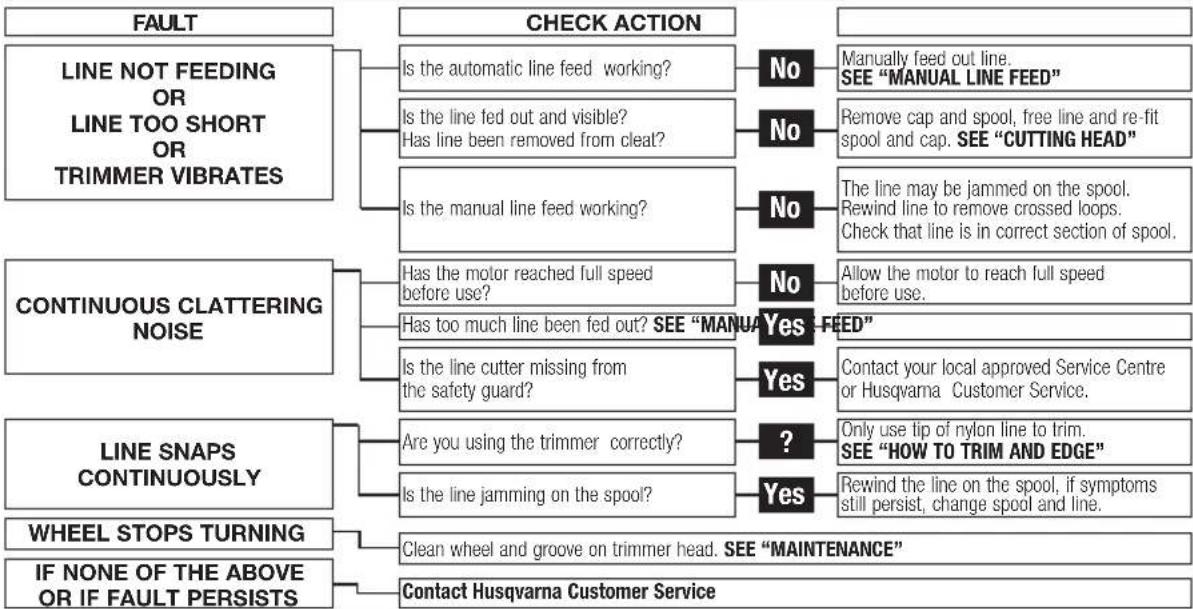
flowchart
graph TD
    A["FAULT"] --> B["LINE NOT FEEDING OR LINE TOO SHORT OR TRIMMER VIBRATES"]
    B --> C["Is the automatic line feed working?"]
    C --> D{No}
    D --> E["Manually feed out line. SEE "MANUAL LINE FEED""]
    B --> F["Is the line fed out and visible? Has line been removed from cleat?"]
    F --> G{No}
    G --> H["Remove cap and spool, free line and re-fit spool and cap. SEE "CUTTING HEAD""]
    B --> I["Is the manual line feed working?"]
    I --> J{No}
    J --> K["The line may be jammed on the spool. Rewind line to remove crossed loops. Check that line is in correct section of spool."]
    A --> L["CONTINUOUS CLATTERING NOISE"]
    L --> M["Has the motor reached full speed before use?"]
    M --> N{No}
    N --> O["Allow the motor to reach full speed before use."]
    L --> P["Has too much line been fed out? SEE "MANUAL LINE FEED""]
    P --> Q{Yes}
    Q --> R["Contact your local approved Service Centre or Husqvarna Customer Service."]
    L --> S["Is the line cutter missing from the safety guard?"]
    S --> T{Yes}
    T --> U["Only use tip of nylon line to trim. SEE "HOW TO TRIM AND EDGE""]
    L --> V["Are you using the trimmer correctly?"]
    V --> W{?}
    W --> X["Rewind the line on the spool, if symptoms still persist, change spool and line."]
    L --> Y["Is the line jamming on the spool?"]
    Y --> Z{Yes}
    Z --> AA["Rewind the line on the spool, if symptoms still persist, change spool and line."]
    A --> AB["WHEEL STOPS TURNING"]
    AB --> AC["Clean wheel and groove on trimmer head. SEE "MAINTENANCE""]
    AB --> AD["IF NONE OF THE ABOVE OR IF FAULT PERSISTS"]
    AD --> AE["Contact Husqvarna Customer Service"]
Environmental Information
- Awareness of the environment must be considered when disposing of 'end-of-life' product.
- If necessary, contact your local authority for disposal information.
BATTERY DISPOSAL
- The battery must be removed from the product before disposal (See Battery Replacement Section)
- This product contains a NiMH battery and should not be discarded with normal household waste at the end of its life.
- The battery should be taken to an Authorised Service Centre or your local Recycling Station.
- Do NOT dispose of battery to water.
- NiMH batteries can be harmful and should be disposed of through the recognised recycling facility in accordance with European Regulations.
- Do NOT incinerate.

The symbol — on the product or on its packaging indicates that this product may not be treated as household waste. Instead it shall be handed over to the applicable collection point for the recycling of electrical and electronic equipment.
By ensuring this product is disposed of correctly, you will help prevent potential negative consequences for the environment and human health, which could otherwise be caused by inappropriate waste handling of this product.
For more detailed information about recycling of this product, please contact your local council office, your household waste disposal service or the shop where you purchased the product.
Service Recommendations
- Your product is uniquely identified by a silver and black product rating label.
• We strongly recommend that your product is serviced at least every twelve months, more often in a professional application.
ENGLISH - 4
Replacement Parts
Spool and Line
Reference no.: FLY047 Part no.: 510747890
Guarantee & Guarantee Policy
If any part is found to be defective due to faulty manufacture within the guarantee period, Husqvarna UK Ltd., through its Authorised Service Repairers will effect the repair or replacement to the customer free of charge providing:
(a) The fault is reported directly to the Authorised Repairer.
(b) Proof of purchase is provided.
(c) The fault is not caused by misuse, neglect or faulty adjustment by the user.
(d) The failure has not occurred through fair wear and tear.
(e) The machine has not been serviced or repaired, taken apart or tampered with by any person not authorised by Husqvarna UK Ltd..
(f) The machine has not been used for hire.
(g) The machine is owned by the original purchaser.
(h) The machine has not been used commercially.
* This guarantee is additional to, and in no way diminishes the customers statutory rights.
Failures due to the following are not covered, therefore it is important that you read the instructions contained in this Operator's Manual and understand how to operate and maintain your machine:
Failures not covered by guarantee
* Replacing Nylon Line.
* Failures as a result of not reporting an initial fault.
* Failures as a result of sudden impact.
* Failures as a result of not using the product in accordance with the instructions and recommendations contained in this Operator's Manual.
* Machines used for hire are not covered by this guarantee.
* The following items listed are considered as wearing parts and their life is dependent on regular maintenance and are, therefore not normally subject to a valid warranty claim: Nylon Line, Spool and Line.
\* Caution!
Husqvarna UK Ltd. does not accept liability under the warranty for defects caused in whole or part, directly or indirectly by the fitting of replacement parts or additional parts that are not either manufactured or approved by Husqvarna UK Ltd., or by the machine having been modified in any way.
EC Declaration of Conformity
Husqvarna AB, S-561 82, Huskvarna, Sweden
Declare under our sole responsibility that the product(s);
Designaion Lawn Trimmer
Designation of Type(s)..... CCTE25
Identification of Series......See Product Rating Label
Year of Construction......See Product Rating Label
Conforms to the essential requirements & provisions of the following EC Directives:
2006/42/EC, 2006/95/EC, 2004/108/EC, 2000/14/EC, 2011/65/EU
based on the following EU harmonized standards applied:
EN 60335-1, EN 60335-2-91, EN 60335-2-29, EN 62233, EN 55014-1, EN 55014-2
The maximum A weighted sound pressure level L_pA at the operator's position, measured according to EN 60335-2-91 is given in the table.
The maximum hand / arm vibration weighted value a measured according to EN 60335-2-91 on a sample of the above product(s) is given in the table.
2000/14/EC: The Measured Sound Power L_WA & Guaranteed Sound Power L_WA values are according to the tabulated figures.
Conformity Assessment Procedure......Annex VI
Notified Body.... Intertek, Davy Avenue,
Knowlhill,
Milton Keynes,
Bucks, MK5 8NL,
England
Ulm, 05.11.2013
P. Lameli
Chief Technical Officer
Keeper of technical documentation


| Type | CCTE25 |
| Width of Cut (cm) | 25 |
| Speed of Rotation of Cutting Device (rpm) | 8,500 |
| Measured Sound Power L_WA (dB(A)) | 82 |
| Guaranteed Sound Power L_WA (dB(A)) | 96 |
| Sound pressure L_pA (dB(A)) | 74.4 |
| Uncertainty K_pA (dB(A)) | 2.5 |
| Hand/arm vibration a_h (m/s ^2 ) | 1.8 |
| Uncertainty K_ah (m/s ^2 ) | 1.5 |
| Weight (Kg) | 3.2 |
ENGLISH - 5
Sicherheit

Aangemelde instantie ....Intertek, Davy Avenue, Knowlhill, Milton Keynes, Bucks, MK5 8NL, England
Ulm, 05.11.2013
P. Lameli
Technisch Directeur
Diagram for Fault Finding
2006/42/EY, 2006/95/EY, 2004/108/EY, 2000/14/EY, 2011/65/EU
Director General Técnico
2006/42/WE, 2006/95/WE, 2004/108/WE, 2000/14/WE, 2011/65/UE
2006/42/ES, 2006/95/ES, 2004/108/ES, 2000/14/ES, 2011/65/EU
Montiranje kolesa (B1) in (B2)
- Pritrdite kolo na motorno koso, tako da bo nameščeno v SPODNJEM utoru na glavi motorne kose, kot je prika-zano na sl. B1.
- Polovici kolesa na obeh straneh sprite, da bosta varno pritrjeni (B2).
- Kolo se mora prosto vrteti.
2006/42/ES, 2006/95/ES, 2004/108/ES, 2000/14/ES, 2011/65/EU
Priglašeni organ....Intertek, Davy Avenue, Knowlhill, Milton Keynes, Bucks, MK5 8NL, England
Ulm, 05.11.2013
P. Lameli
Glavni inženir
2006/42/EK, 2006/95/EK, 2004/108/EK, 2000/14/EK, 2011/65/ES,
Organism notificat....Intertek, Davy Avenue, Knowlhill, Milton Keynes, Bucks, MK5 8NL, England
Ulm, 05.11.2013
P. Lameli
Inginer şef
2006/42/EK, 2006/95/EK, 2004/108/EK, 2000/14/EK, 2011/65/EE
(C1428ARP) Buenos Aires
Phone: (+54) 11 5194 5000
info.gardena@
ar.husqvarna.com
Armenia
Garden Land Ltd.
61 Tigran Mets
0005 Yerevan
Australia
Husqvarna Australia Pty. Ltd.
Locked Bag 5
Central Coast BC
NSW 2252
Phone: (+61) (0) 2 4352 7400
customer.service@
husqvarna.com.au
GARDENA Belgium NV/SA
Brampton, Ontario L6T 4X3
Phone: (+1) 905 79293 30
info@gardenacanada.com
Chlle
Maguinarias Agroforestales
Ltda. (Maga Ltda.)
Santiago, Chile
Avda. Chesterton
# 8355 comuna Las Condes
Phone: (+56) 2 202 4417
Dalton@maga.cl
Zipcode: 7560330
Tamuco, Chile
Avda. Valparaíso # 01466
Phone: (+56) 45 222 126
Zipcode: 4780441
China
Husqvarna (China) Machinery
Manufacturing Co., Ltd.
No. 1355, Jia Xin Rd.
Ma Lu Zhen, Jia Ding Dist.,
Shanghai
201801
Phone: (+86) 21 59159629
Domestic Sales
www.gardena.com.cn
Colombia
Husqvarna Colombia S.A.
Calle 18 No. 68 D-31, zona
Industrial de Montevideo
Bogotá, Cundinamarca
Tel. 571 2922700 ext. 105
jairo.salazan@
husqvarna.com.co
Costa Rica
Compania Exim
Euroiberoamericana S.A.
Consumer Outdoor Products
Consumer Outdoor Products
Kesk tee 10, Aaviku Kula
Rae valid
Harju maakond
75305 Estonia
kontakt.etj@husqvarna.ee
Finland
Oy Husqvarna Ab
Consumer Outdoor Products
Lautatarhankatu 8 B / PL 3
00581 HELSINKI
info@gardena.fi
France
Husqvarna France
Aycliffe Industrial Park
Newton Aycliffe
County Durham
DL5 6UF
info.gardena@
husqvama.co.uk
Greece
Π.ΠΑΠΑΔΟΠΟΥΛΟΣ ΑΕΒΕ
Λεωφ. Αθηνών 92
Αθήνο
T.K.104 42
Ελλάδα
Tηλ. (+30) 210 5193100
info@papadopoulos.com.gr
Hungary
Aycliffe Industrial Park
Newton Aycliffe
County Durham
DL5 6UP
info.gardena@
husqvama.co.uk
Italy
23868 VALMADRERA (LC)
Phone: (+39) 0341.203.111
info@gardenaitalia.it
Japan
KAKUICHI Co. Ltd.
Sumitomo Realty &
Development Kojimachi
BLDG., 8F
5-1 Nibanncyo
Chiyoda-ku
Tokyo 102-0084
Phone: (+81) 33 264 4721
m_ishihara@kaku-ichi.co.jp
Kazakhstan
LAMED Ltd.
155/1, Tazhibayevoi Str.
050060 Almaty
IP Schmidt
Abayavenue 3B
110 005 Kostanay
Korea
Kyung Jin Trading CO.,LTD.
107-4, SunDuk Bld.
YangJae-dong,
Seocho-gu
Seoul, (zipcode: 137-891)
Phone: (+82) (0)2 574-6300
Kyrgyzstan
Alye Maki
av. Moladaya Guardir J 3
720014
Bishkek
Latvia
Husqvarna Latvija
Consumer Outdoor Products
Bākūžu iela 6
LV-1024 Rīga
info@husqvama.lv
Lithuania
UAB Husqvarna Lietuva
Consumer Outdoor Products
Ateities pl. 77C
LT-52104 Kaunas
centras@husqvarna.lt
Luxembourg
Magasins Jules Neuberg
Husqvarna New Zealand Ltd.
PO Box 76-437
Manukau City 2241
Phone: (+64) (0) 9 9202410
support.nz@husqvarna.co.nz
Norway
GARDENA
Husqvarna Consumer