
NightmatIQ Plus - Switch STEINEL - Free user manual and instructions
Find the device manual for free NightmatIQ Plus STEINEL in PDF.
| Product type | Connected twilight switch (NightmatIQ Plus) |
| Brand | Steinel |
| Model | NightmatIQ Plus |
| Power supply | 220–240 V, 50/60 Hz |
| Power consumption | < 0.5 W |
| Trigger threshold adjustment range | From 1 to 1000 lux |
| Detection technology | Phototransistor |
| Temperature range | From -20 °C to +40 °C |
| Protection rating | IP54 |
| Switching capacity (incandescent/halogen lamps) | 1000 W |
| Switching capacity (LED/ECG) | 250 W (50 pcs, c ≤ 88 μF) |
| Connectivity | Bluetooth mesh (2.4–2.48 GHz, 4 dBm) |
| Features via app | Threshold adjustment, timer programming, networking |
| Status LED | Initialization (on), normal (off), identification (flashing slowly), update (flashing quickly) |
| Mounting | Indoor/outdoor wall, flush or surface-mounted |
| Connection | 3-conductor cable (L, N, PE), diameter 5–10 mm |
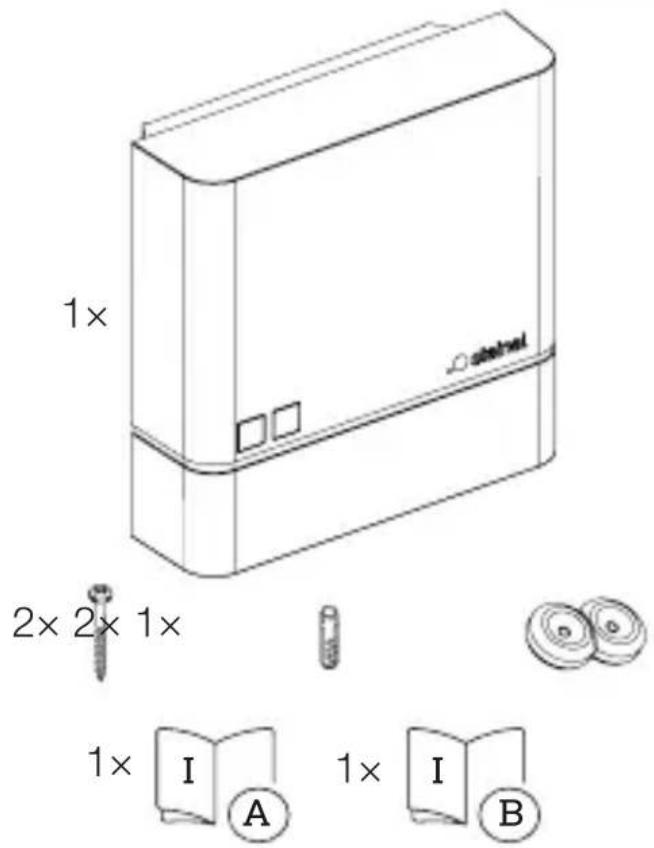
| Package contents | Device, 2 screws, 2 wall plugs, 1 cap, safety card, quick start guide |
| Manufacturer warranty | 3 years |
| Maintenance | Dry cleaning, no detergent |
| Safety | Installation by qualified electrician, compliance with standards (NF C-15100, etc.) |
| Recycling | Electrical device, do not dispose of with household waste |
Frequently Asked Questions - NightmatIQ Plus STEINEL
User questions about NightmatIQ Plus STEINEL
0 question about this device. Answer the ones you know or ask your own.
Ask a new question about this device
Download the instructions for your Switch in PDF format for free! Find your manual NightmatIQ Plus - STEINEL and take your electronic device back in hand. On this page are published all the documents necessary for the use of your device. NightmatIQ Plus by STEINEL.
USER MANUAL NightmatIQ Plus STEINEL
natural_image
Exterior view of a modern gray rectangular device with a small square button and 'steinel' logo on the front (no additional text or symbols visible)DE
Inhalt
text_image
Safety warning symbol and electrical circuit diagram showing lightning bolt and switch mechanism
text_image
N N ↓ L ⊕ L N L N N PE ⊙text_image
Safety warning symbol and electrical circuit diagram showing lightning bolt and switch mechanism
natural_image
Technical line drawing of a device casing with mounting holes and directional arrows indicating motion (no text or symbols)natural_image
Technical line drawing of a mechanical device with internal components and alignment indicators (no text or symbols)text_image
Two triangular warning symbols: a lightning bolt symbol and a water drop symbol, commonly used in safety or hazard prevention.
text_image
Ø 6 mmnatural_image
Technical line drawing of a mechanical assembly with no visible text or symbolsmax. 1 Nm
natural_image
Technical line drawing of an electrical switchgear assembly with a screwdriver inserted (no text or symbols)natural_image
Technical line drawing of a mechanical device with internal components and a base component (no text or symbols)text_image
Technical diagram of a mechanical device with labeled components and directional arrows indicating motion or assembly.natural_image
Technical line drawing of a device casing with mounting holes and directional arrows indicating movement (no text or symbols)• Abdeckung anschrauben.
5.11


text_image
I Otext_image
Safety warning symbol and electrical switch diagram showing lightning bolt and switch mechanism
text_image
1. 2. 3. 4.natural_image
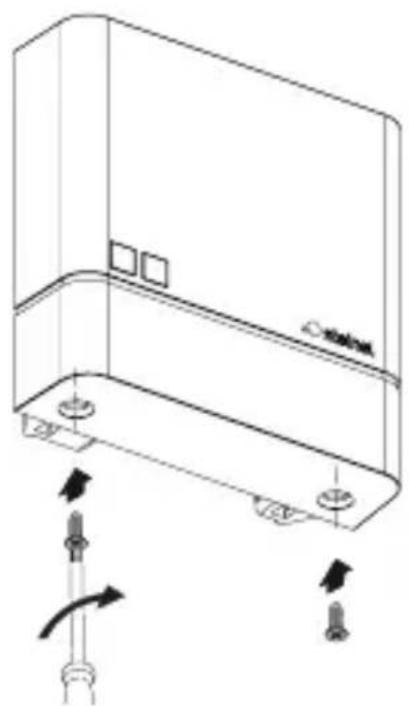
Technical line drawing of a server rack with two screws and a label 'stakini' on the cover (no text or symbols beyond label)• Abdeckung anschrauben.
6.4
text_image
I Otext_image
Attention! New App!Android iOS

text_image
QR code image containing encoded data, no visible human-readable text
text_image
QR code image containing encoded data, no visible human-readable text- About this document 30
- General safety precautions 30
- System description 31
- Electrical connection 36
- Installation 37
- Function 46
- Cleaning and maintenance 51
- Disposal 51
- Manufacturer's warranty 52
- Technical specifications 54
- Troubleshooting 55
1. About this document
- Under copyright. Reproduction either in whole or in part only with our consent.
– Subject to change in the interest of technical progress.
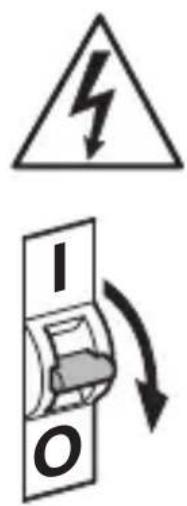
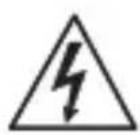
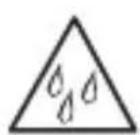
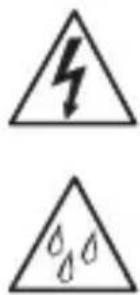
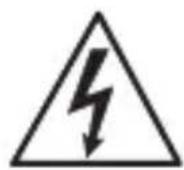
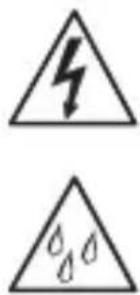
Hazard warning!

Warning of hazards from electricity!
Warning of hazards from water!
2. General safety precautions

Failure to observe these operating instructions presents hazards!
These instructions contain important information on the safe use of this product. Particular attention is drawn to potential hazards. Failure to observe this information may lead to death or serious injuries.
- Read instructions carefully.
- Follow safety advice.
-
Keep instructions within easy reach.
-
Working with electrical current may produce hazardous situations. Touching live parts can result in electrical shock, burns or death.
- Work on mains voltage must only be performed by qualified, skilled personnel.
- National wiring regulations and electrical operating conditions must be observed (e.g. DE: VDE 0100, AT: ÖVE-ÖNORM E8001-1, CH: SEV 1000).
- Only use genuine replacement parts.
- Repairs must only be carried out by companies qualified to do so.
3. System description
Proper use - NighmatIQ
- Photo-cell controller, suitable for wall mounting indoors and outdoors.
– Twilight setting function can be selected by potentiometer - Can be used as a standalone sensor.
Proper use - NighmatIQ Plus
- Photo-cell controller, suitable for wall mounting indoors and outdoors.
- Functions can be set via the Steinel Connect app.
- Can be used as a standalone sensor or interconnected with Bluetooth.
Operating principle
- The photo-cell controller detects ambient light level by means of the
light sensor and compares this with the light-level threshold selected. - If ambient brightness is below the light-level threshold, the connected load is switched ON.
- If ambient brightness is above the light-level threshold, the connected load is switched OFF.
Package contents - NightmatIQ / NightmatIQ Plus
3.1
NightmatIQ product components
3.3
text_image
A B C D E FA Cover
B Twilight setting potentiometer
C Photo-cell controller housing
D Light-level sensor
E Connecting terminal
F Optional inlet for surface wiring
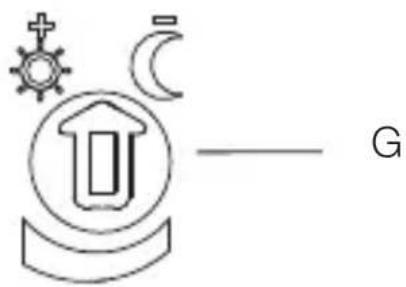
3.4
text_image
GG Detail: twilight setting potentiometer
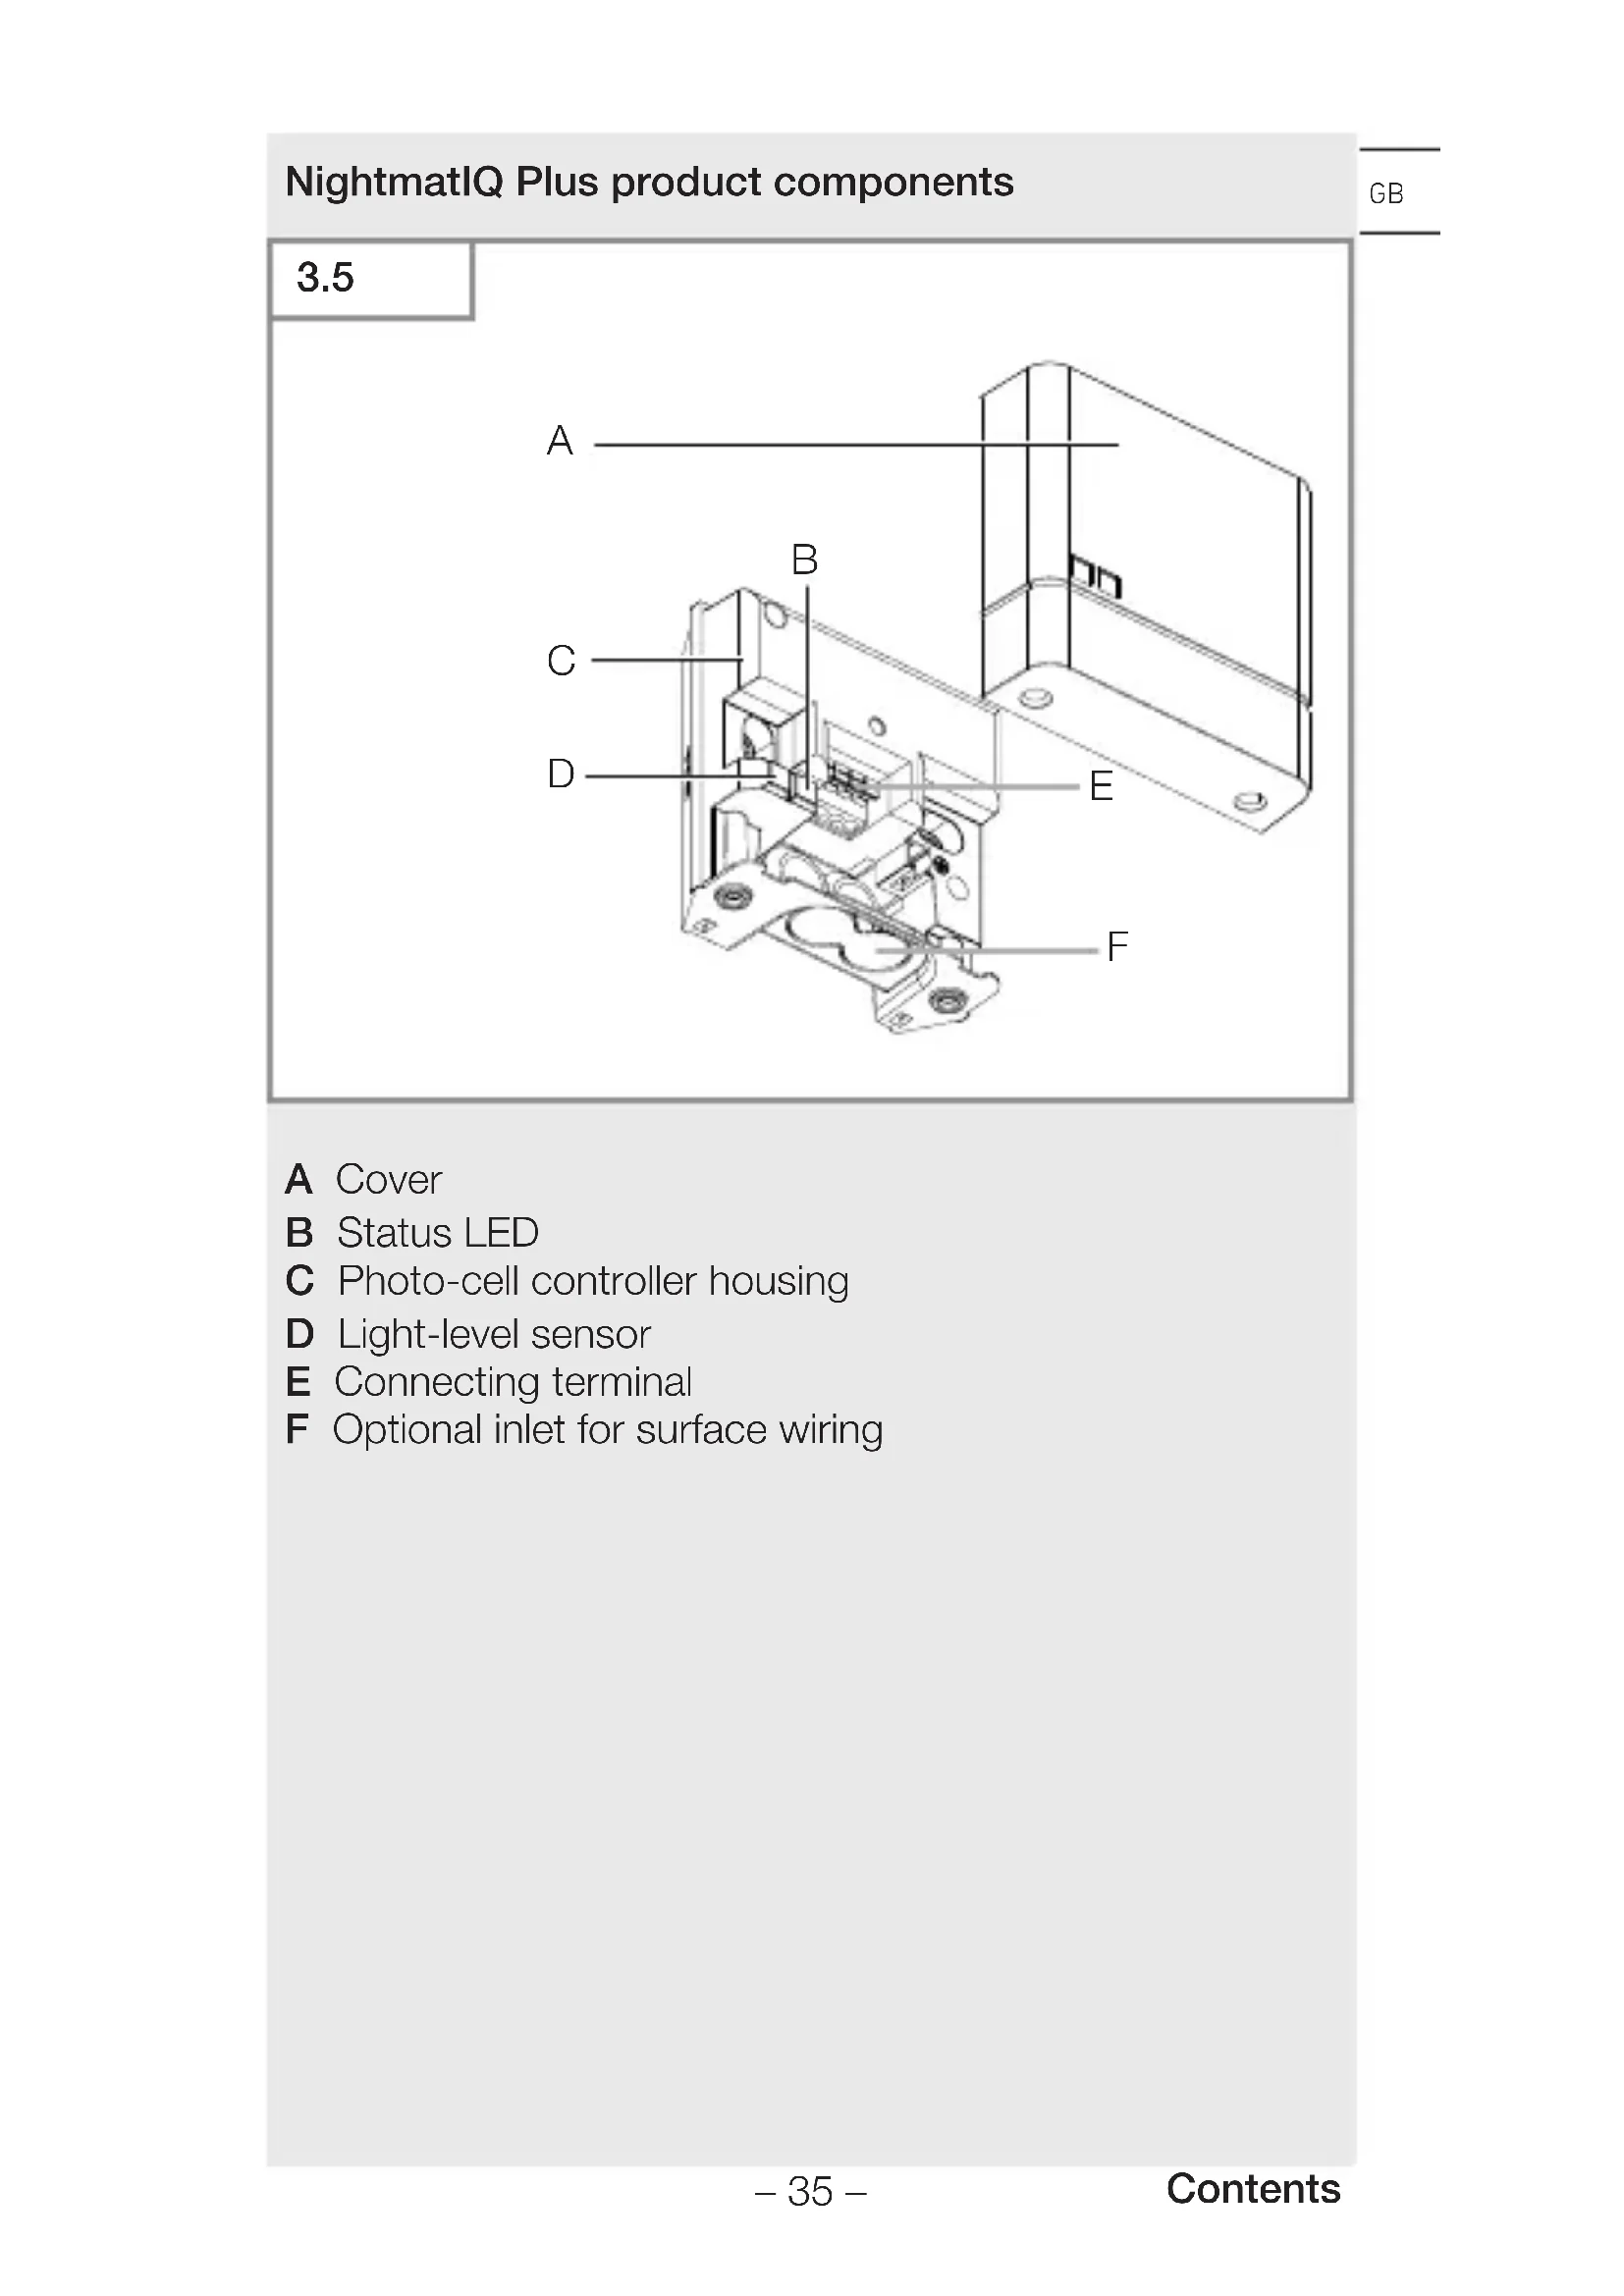
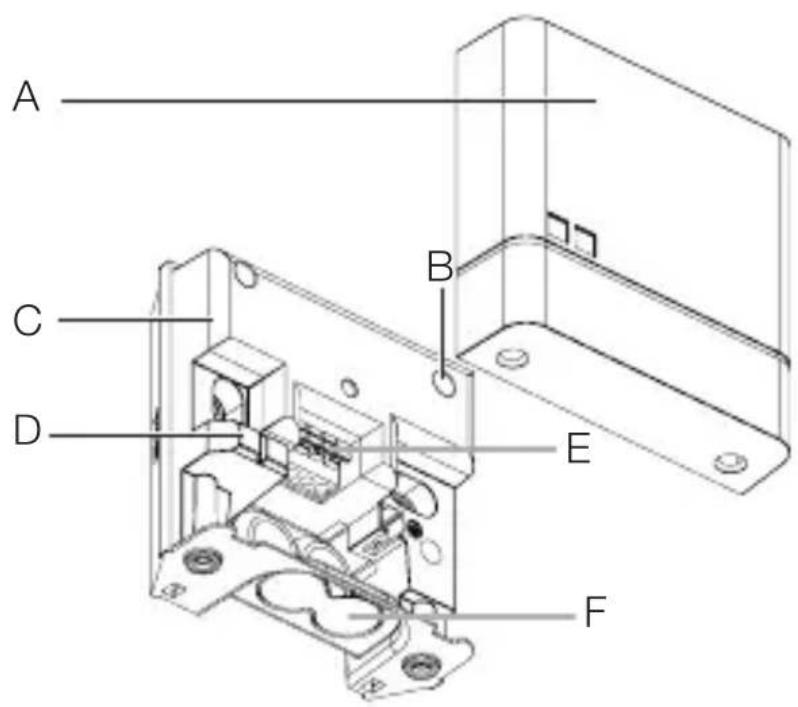
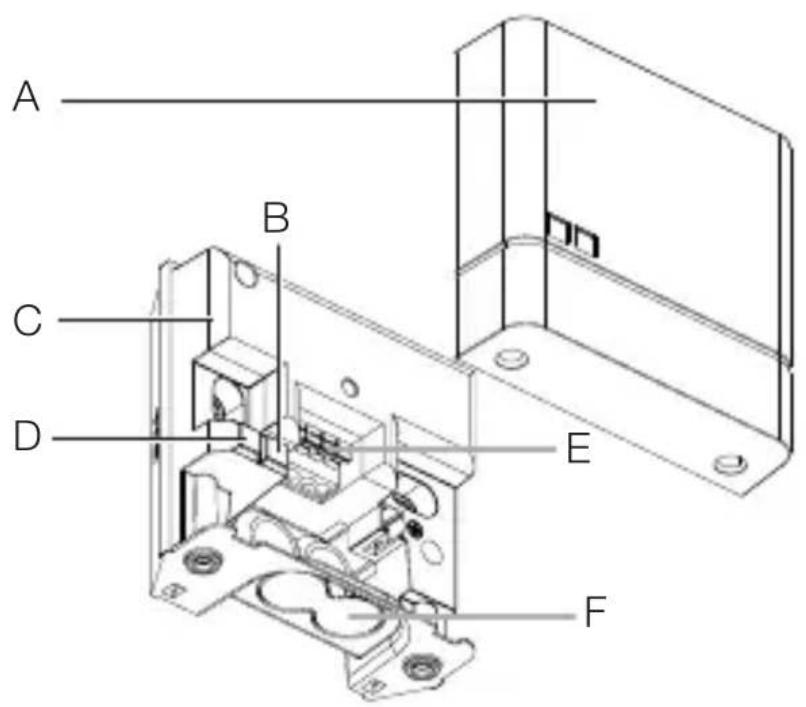
NightmatIQ Plus product components
GB
3.5
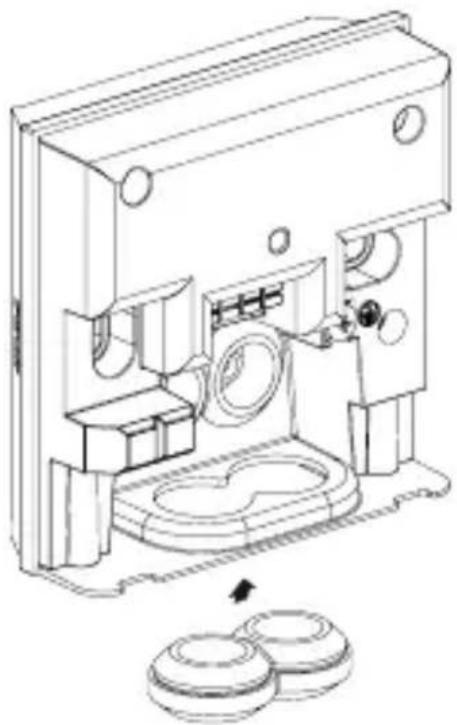
text_image
A B C D E FA Cover
B Status LED
C Photo-cell controller housing
D Light-level sensor
E Connecting terminal
F Optional inlet for surface wiring
4. Electrical connection
Circuit diagram
4.1
text_image
Safety warning symbol and electrical circuit diagram showing lightning bolt and switch mechanism
text_image
N N ↓ L ⊕ L N L N N PE ⊙The mains power supply lead is a 3-core cable:
L = Phase conductor (usually black, brown or grey)
N = Neutral conductor (usually blue)
PE = protective-earth conductor (green / yellow)
The floodlight can also be connected to the power supply downstream of a mains switch if it is ensured that the mains switch is left ON all the time.
The sealing plugs provided are intended for a mains supply lead with an outer diameter of 5–10 mm.
5. Installation
Hazard from electrical power.
Touching live parts can result in electrical shock, burns or death.
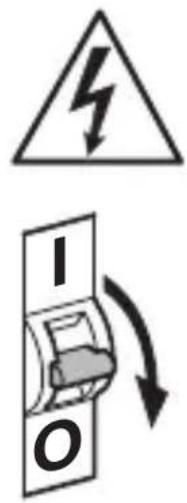
- Switch OFF power and interrupt power supply.
- Using a voltage tester, check to make sure that the power supply is disconnected.
• Make sure power supply remains interrupted.
Risk of damage to property!
Mixing up connection leads may produce a short circuit.
• Identify connection leads.
- Connect the leads correctly.
Preparing for installation
- Check all components for damage. Do not use the floodlight if it is damaged.
- Select an appropriate site to install the product.
-Vibration-free.
-Not in explosive atmospheres.
-Not on normally flammable surfaces.
–The unit must not be influenced by light from the connected load.
Mounting procedure
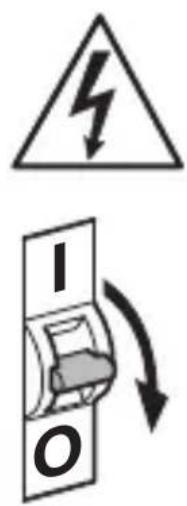
5.1
text_image
Safety warning symbol and electrical switch diagram showing lightning bolt and switch mechanism
natural_image
Technical line drawing of a device casing with mounting holes and directional arrows indicating motion (no text or symbols)- Switch OFF power supply.
- Check to make sure the power supply is switched OFF.
- Unscrew and detach cover.
5.2
natural_image
Technical line drawing of a mechanical device with no visible text or symbols- Mark drill holes.
5.3

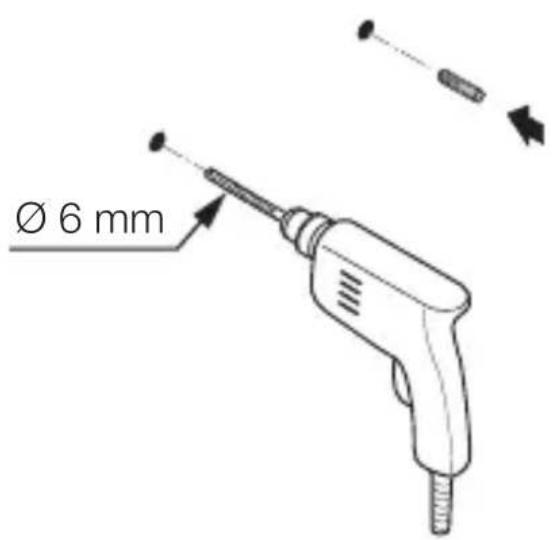
text_image
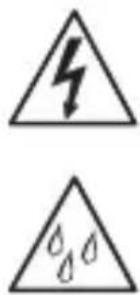
Two triangular warning symbols: a lightning bolt symbol and a water drop symbol, likely indicating electrical hazard or accident risk.
text_image
6 mm ØGB
- Drill holes (∅ 6 mm) and fit wall plugs.
Concealed version
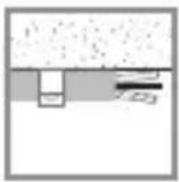
5.4


natural_image
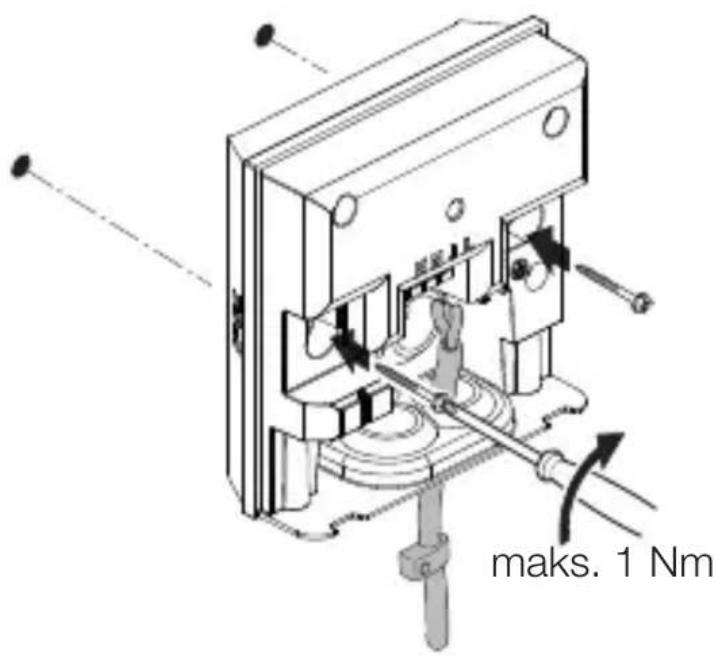
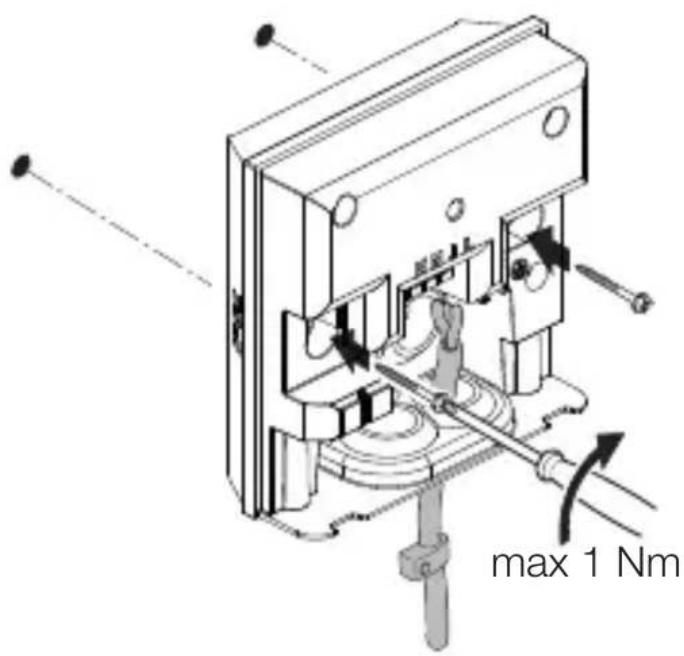
Technical diagram of a mechanical device with labeled parts and directional arrows (no readable text or symbols)max. 1 Nm
- Route cable through the unit.
- Fit unit, tightening screws with a torque of no more than 1 Nm.
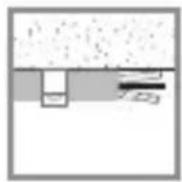
Surface-mounted installation
GB
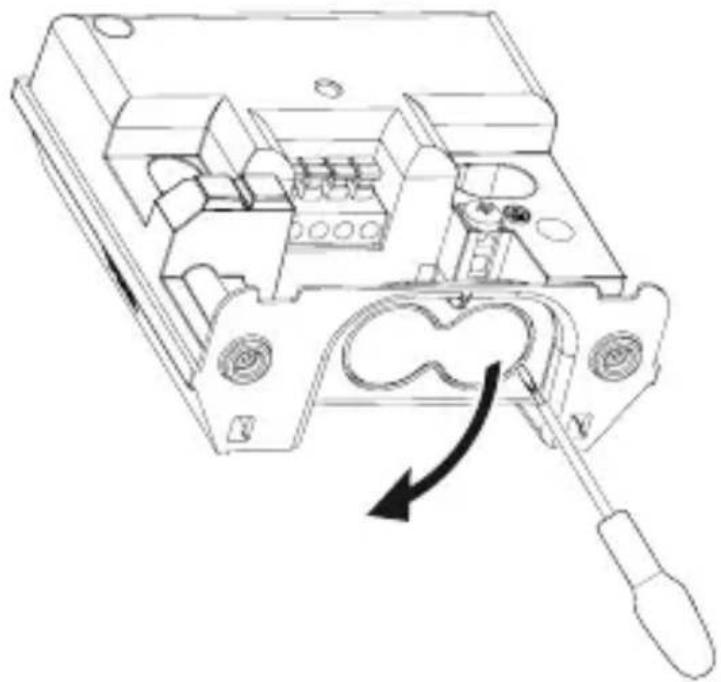
5.5


natural_image
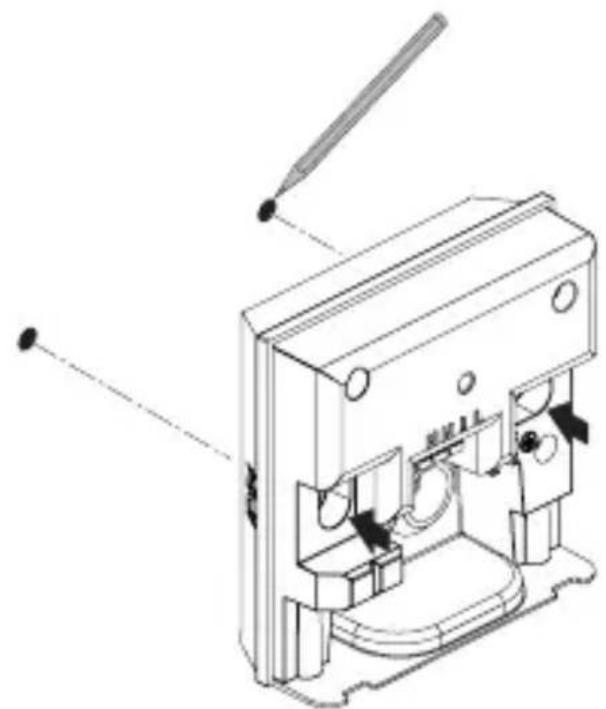
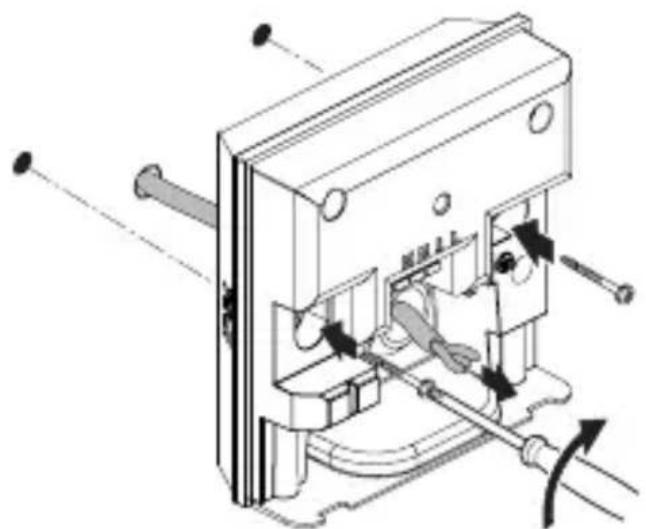
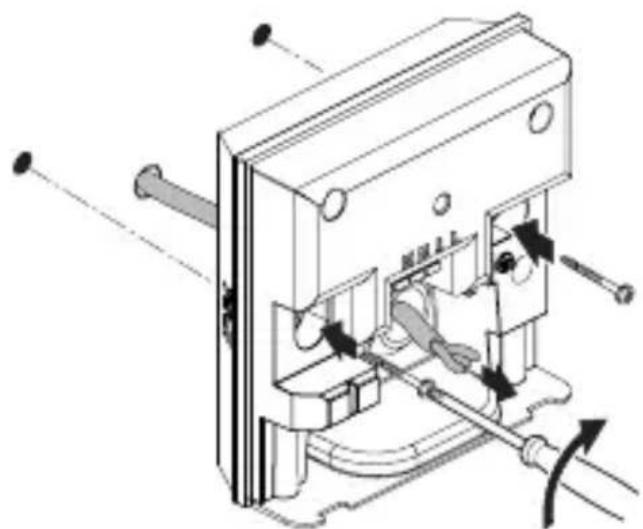
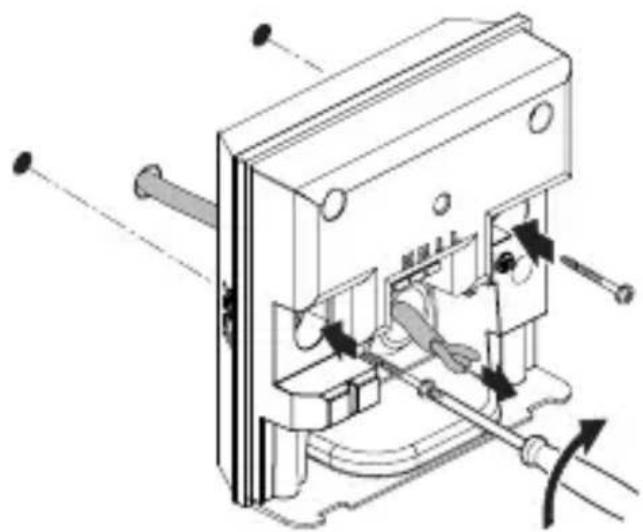
Technical line drawing of an electrical switchgear assembly with a screwdriver inserted (no text or symbols)- Using a screwdriver, carefully prise out the optional inlet for surface wiring.
5.6
natural_image
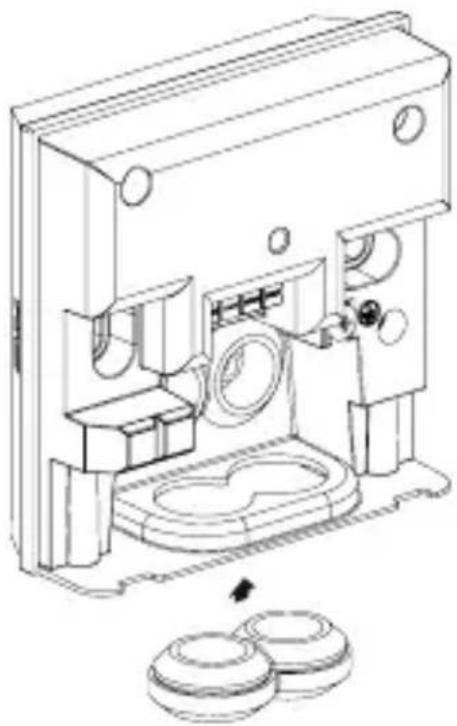
Technical line drawing of a mechanical device with internal components and a close-up view of two circular components (no text or symbols)- Fit sealing plug.
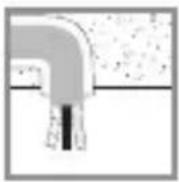
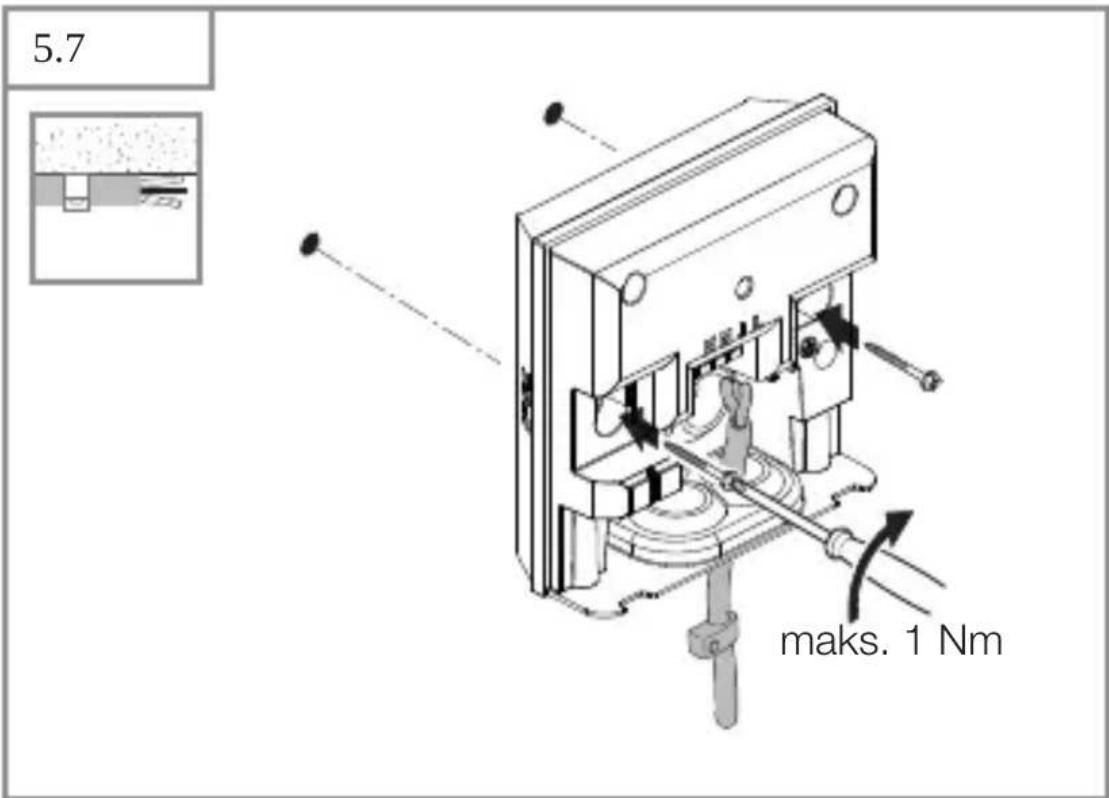
5.7

text_image
max. 1 Nm- Route cable through the unit.
- Fit unit, tightening screws with a torque of no more than 1 Nm.
5.8
text_image
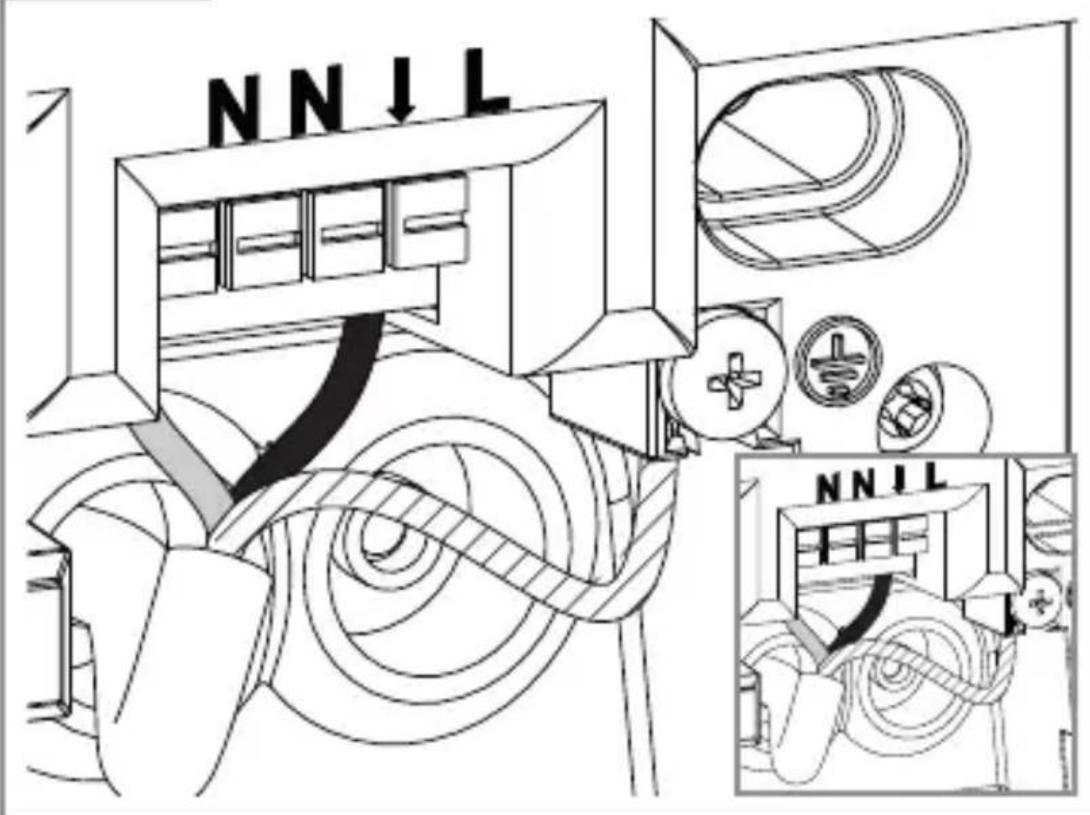
NNIL NNILGB
- Connect mains power supply lead as shown in the wiring diagram.
→“4. Electrical connection”
5.9
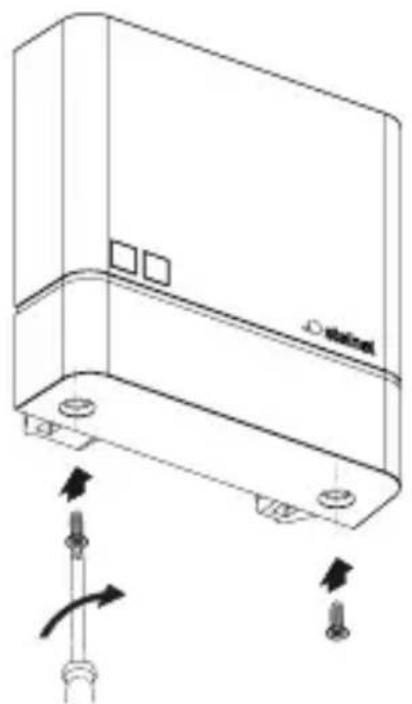
natural_image
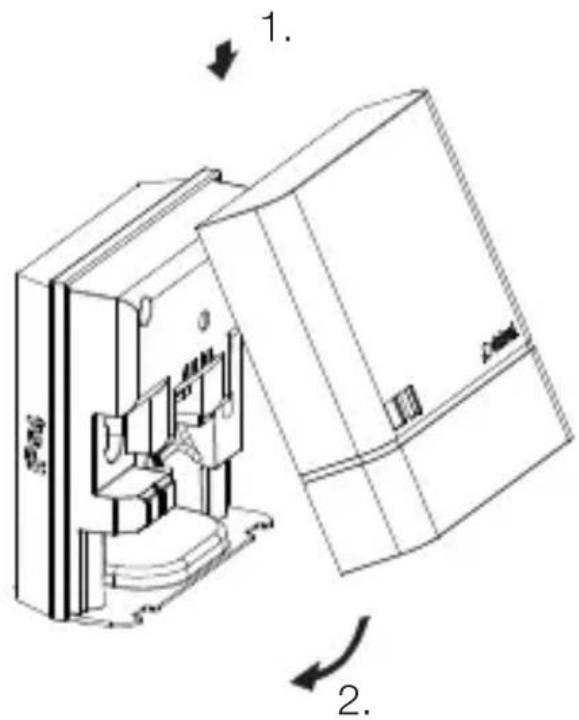
Technical line drawing of a mechanical device with internal components and directional arrows (no text or symbols)- Fit cover.
5.10
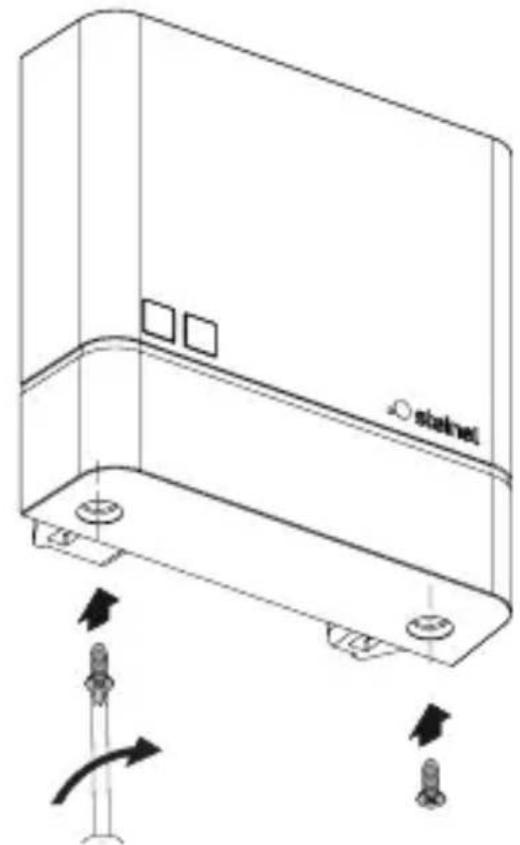
natural_image
Technical line drawing of a mechanical component with arrows indicating motion or assembly (no text or symbols)- Screw on cover.
5.11

text_image
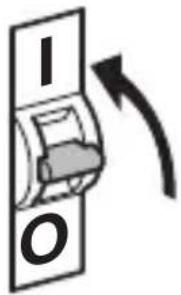
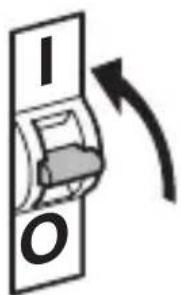
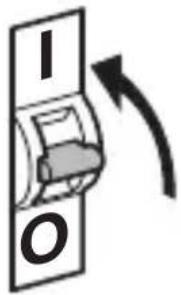
I OGB
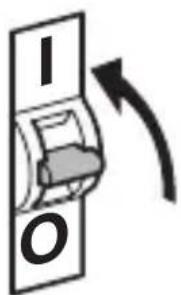
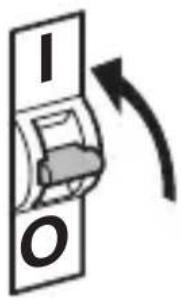
- Switch ON power supply.
- Setting functions.
→“6. Function”
6. Function
NightmatIQ
On the NightmatIQ, the twilight setting is selected by hand at the twilight setting potentiometer.

Hazard from electrical power.
Touching live parts can result in electrical shock, burns or death.
- Switch OFF power and interrupt power supply.
- Using a voltage tester, check to make sure that the power supply is disconnected.
• Make sure power supply remains interrupted.
- Factory settings
– Twilight level: 75 lux
Twilight setting (G)
The response threshold (twilight) can be infinitely varied from approx. 1 to 75 lux.
- ⚙ = Twilight operating mode (approx. 75 lux) - Ⓞ = twilight operating mode / night-time operating mode (approx. 1 lux)
Manual twilight setting for NightmatIQ
GB
6.1
text_image
Safety warning symbol and electrical switch diagram showing lightning bolt and switch mechanism
text_image
1. 2. 3. 4.- Switch OFF power supply.
- Check to make sure the power supply is switched OFF.
- Unscrew cover.
6.2
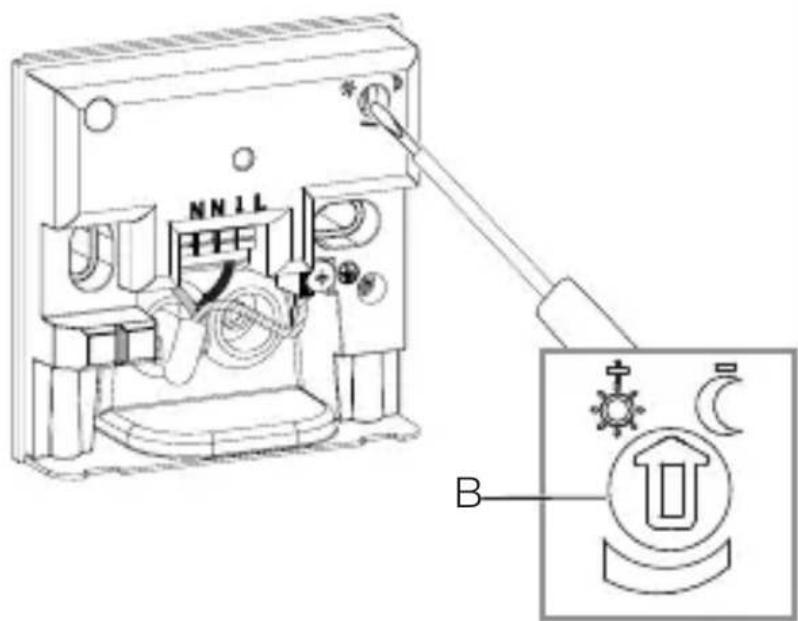
text_image
NN11 B- Using the screwdriver, set the response twilight threshold to any chosen level.
6.3
natural_image
Technical line drawing of a server rack with two screws and a label 'stakini' on the cover (no text or symbols beyond labels)- Screw on cover.
6.4


text_image
I O- Switch ON power supply.
NightmatIQ Plus
NightmatIQ Plus functions are set via the Steinel Connect app.
Steinel Connect app
To configure the unit via smartphone or tablet, you must download the STEINEL Connect app from your app store. You will need a Bluetooth-capable smartphone or tablet.

text_image
Attention! New App!Android iOS

text_image
QR code image containing encoded data, no visible human-readable text
text_image
QR code image containing encoded data, no visible human-readable textFunctions that can be set via the Steinel Connect app: – Twilight setting.
Note:
To rule out malfunctioning, a minimum distance of 3 m must be allowed from the Wi-Fi router and the access points.
LED function
Initialisation: LED permanently lights up.
Normal mode: LED OFF.
Identification: LED slowly flashes.
Firmware update: LED rapidly flashes.
Error: LED rapidly flashes.
Factory settings
– Twilight level: 1,000 lux
Twilight setting
The response threshold (twilight) can be infinitely varied from approx. 1 to 1,000 lux.
- ⚙ = twilight operating mode (approx. 1,000 lux)
- ℃= twilight operating mode / night-time operating mode (approx. 1 lux)
Bluetooth interconnection (Bluetooth mesh)
The sensor switch complies with the Bluetooth mesh standard. It can be interconnected with all products complying with the Bluetooth mesh standard.
The sensor switch is configured by Steinel Connect app.
Appropriate network keys are saved on the smartphone or tablet the first time a connection is made between sensor switch and Steinel Connect app. The key rules out any unauthorised access to the sensor.
The network key must be shared for access via another smartphone or tablet.
Switching times
Besides setting the twilight level, the app can also be used for selecting times at which connected loads are switched ON or OFF.
The NightmatlQ plus receives the current time of day via the Bluetooth connection with a smartphone / tablet, and uses this for future switching operations.
Any interruption in the power supply to the NightmatIQ plus will result in the memorised time of day being lost.
The NightmatIQ plus determines an approximate time of day on the basis of the sun's angle of incidence from the past few days. To restore the exact time of day, you must reconnect to the app.
7. Cleaning and maintenance
The tool requires no maintenance.

Hazard from electrical power.
Contact between water and live parts can result in electrical shock, burns or death.
- Only clean tool in a dry state.
Risk of damage to property!
Using the wrong cleaning product can damage the light.
- Clean tool with a moist cloth without detergent.
8. Disposal
Electrical and electronic equipment, batteries, accessories and packaging must be recycled in an environmentally compatible manner.
Do not dispose of batteries or electrical and electronic equipment as domestic waste.
EU countries only:
Under the current European Directive on Waste Electrical and Electronic Equipment and its implementation in national law, batteries and electrical and electronic equipment no longer suitable for use must be collected separately and recycled in an environmentally compatible manner.
9. Manufacturer's warranty
Manufacturer's warranty of STEINEL GmbH, Diesel-strasse 80-84, DE-33442 Herzebrock-Clarholz, Germany
All STEINEL products meet the highest quality standards. For this reason, we, the manufacturer, are pleased to provide you, the consumer, with a warranty under the following terms and conditions:
The warranty covers the absence of deficiencies which are proven to be the result of a material defect or fault in manufacturing and which are reported to us immediately after detection and within the warranty period. The warranty shall apply to all STEINEL products sold and used in Germany - excluding STEINEL Professional products.
You can opt for warranty cover in the form of repair or replacement which will be provided free of charge (if applicable, in the form of a successor model of the same or higher quality) or in the form of a credit note.
The warranty period for the STEINEL product you have purchased is 3 years (5 years for products from the XLED home range) in each case from the date on which the product was purchased.
We shall bear the shipping costs but not the transport risks involved in return shipment.
Statutory rights accruing from defects, gratuitousness
The warranty cover described here shall be applicable in addition to the statutory rights of warranty – including special consumer protection provisions – and shall not restrict or replace them. Exercising your statutory rights in the event of defects is gratuitous.
Exemptions from the warranty
All replaceable lamps are expressly excluded from this warranty. In addition to this, the warranty shall not cover:
– any wear resulting from use or any other natural wear of product parts or any deficiencies in the STEINEL product that are attributable to wear caused by use or other natural wear,
– any improper or non-intended use of the product or any failure to observe the operating instructions,
– any unauthorised additions, alterations or other modifications to the product or any deficiencies attributable to the use of accessory,
– supplementary or replacement parts which are not genuine STEINEL parts,
– any maintenance or care of products that is not carried out in accordance with the operating instructions,
– any attachment or installation that is not in accordance with STEINEL’s installation instructions,
– any damage or loss occurring in transit.
Application of German law
The warranty shall be governed by German law excluding the United Nations Convention concerning the International Sale of Goods (CISG).
Making claims
If you wish to make a warranty claim, please send your product complete and carriage paid with the original receipt of purchase, which must show the date of purchase and product designation, either to your retailer or directly to us at STEINEL (UK) Ltd. – 25 Manasty Road, Axis Park, Orton Southgate, GB- Peterborough Cambs PE2 6UP United Kingdom.
For this reason, we recommend that you keep your receipt of purchase in a safe place until the warranty period expires.
10. Technical specifications
- Dimensions (H × W × D): 95 × 95 × 38 mm
- Power supply: 220–240 V, 50/60 Hz
- Power consumption: NightmatIQ < 0.7 W
NightmatIQ plus < 0.5 W
– Twilight setting: NightmatIQ: 1 – 75 Lux
NightmatIQ plus: 1 – 1,000 lux - Sensor system: phototransistor
- Temperature range: -20 to +40 °C
- Bluetooth frequency (NightmatIQ plus only): 2.4–2.48 GHz
- Bluetooth transmission power (NightmatIQ plus only): 4 dBm / 2.5 mW
- IP rating: IP 54
Switching capacity
- Incandescent / halogen lamp load: 1,000 W
- LED / ECG load: 250 W (50 pcs. c < 88 μF)
11. Troubleshooting
Unit without power.
- Fuse not switched ON or faulty.
- Switch ON fuse.
- Change faulty fuse.
- Break in wiring.
- Check wiring with voltage tester.
– Short circuit in mains power supply lead.
- Check connections.
- Any mains switch OFF
- Switch ON mains switch.
Unit does not switch ON.
– Wrong twilight setting selected.
- Reset twilight setting.
- Mains switch OFF.
- Turn on mains switch.
- Fuse not switched ON or faulty.
- Switch ON fuse.
- Change faulty fuse.
– Rapid movements being suppressed to minimise malfunctioning, or detection zone too small or incorrectly defined.
- Check and adjust detection zone.
– Light source faulty.
FR
Sommaire
text_image
Safety warning symbol and electrical circuit diagram showing lightning bolt and switch mechanism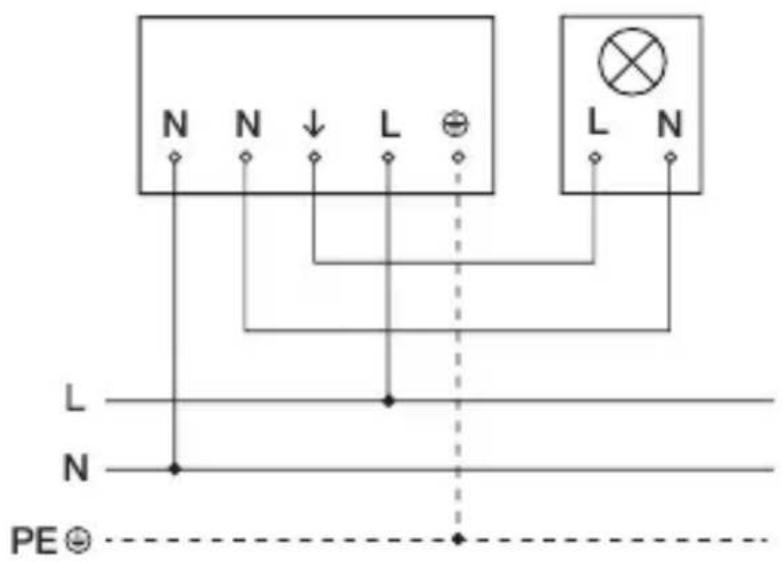
text_image
N N ↓ L ⊕ L N L N N PE ⊙text_image
Safety warning symbol and electrical switch diagram with lightning bolt and 'I' label
natural_image
Technical line drawing of a device casing with mounting holes and directional arrows indicating motion (no text or symbols)FR
natural_image
Technical line drawing of a mechanical device with no visible text or symbolstext_image
Two triangular warning symbols: a lightning bolt symbol and a water drop symbol, commonly used in safety or hazard prevention.
text_image
Ø 6 mmnatural_image
Technical diagram of a mechanical assembly with directional arrows indicating movement or force (no text or symbols present)max. 1 Nm
natural_image
Technical line drawing of an electrical switchgear assembly with a screwdriver inserted (no text or symbols)natural_image
Technical line drawing of a mechanical device with internal components and a close-up view of two circular components (no text or symbols)text_image
Technical diagram of a mechanical device with labeled components and directional arrows indicating motion or assembly.- Poser le cache.
5.10

natural_image
Technical line drawing of a device casing with mounting holes and directional arrows indicating movement (no text or symbols)- Visser le cache.
FR
5.11


text_image
I Otext_image
Safety warning symbol and electrical switch diagram showing lightning bolt and switch mechanism
text_image
1. 2. 3. 4.natural_image
Technical line drawing of a server rack with two screws and a label 'stakini' on the cover (no text or symbols beyond labels)FR
- Visser le cache.
6.4

text_image
I Otext_image
Attention! New App!Android iOS

text_image
QR code image containing encoded data, no visible human-readable text
text_image
QR code image containing encoded data, no visible human-readable text- Dimensions (H × I × P) : 95 × 95 × 38 mm
text_image
Safety warning symbol and electrical circuit diagram showing lightning bolt and switch mechanism
text_image
N N ↓ L ⊕ L N L N N PE ⊙text_image
Safety warning symbol and electrical switch diagram showing lightning bolt and switch mechanism
natural_image
Technical line drawing of a device casing with mounting holes and directional arrows indicating motion (no text or symbols)natural_image
Technical line drawing of a mechanical device with no visible text or symbols• Boorgaten aftekenen.
5.3

text_image
Ø 6 mmNL
- Gaten boren (∅ 6 mm) en pluggen inbrengen.
Inbouwvariant
5.4

natural_image
Technical diagram of a mechanical device with labeled parts and directional arrows (no readable text or symbols)max. 1 Nm
natural_image
Technical line drawing of an electrical switchgear assembly with a screwdriver inserted (no text or symbols)NL
natural_image
Technical line drawing of a mechanical device with internal components and a close-up view of two circular components (no text or symbols)text_image
Technical diagram of a mechanical device with labeled components and directional arrows indicating motion or assembly.natural_image
Technical line drawing of a device casing with mounting holes and directional arrows indicating movement (no text or symbols)text_image
Safety warning symbol and electrical switch diagram showing lightning bolt and switch mechanism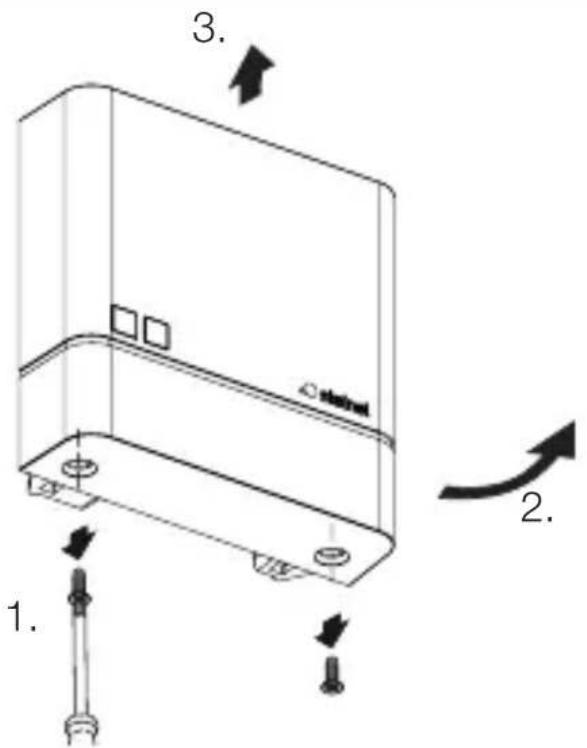
text_image
1. 2. 3. 4.natural_image
Technical line drawing of a server rack with two screws and a label 'stakini' on the cover (no text or symbols beyond label)text_image
Attention! New App!Android iOS

text_image
QR code image containing encoded data, no visible human-readable text
text_image
QR code image containing encoded data, no visible human-readable textFirmware update: led knippert snel.
Fout: led knippert snel.
Fabrieksinstellingen
- Schemerinstelling: 1.000 lux
Schemerinstelling
text_image
Safety warning symbol and electrical circuit diagram showing lightning bolt and switch mechanism
text_image
N N ↓ L ⊕ L N L N N PE ⊙text_image
Diagram illustrating electrical hazard warning and safety instructions for a device, including warning symbol, switch, and circuit breaker.natural_image
Technical line drawing of a mechanical device with no visible text or symbols- Segnare i fori.
5.3
text_image
Ø 6 mmnatural_image
Technical diagram of a mechanical device with labeled parts and directional arrows (no readable text or symbols)max. 1 Nm
natural_image
Technical line drawing of an electrical switchgear assembly with a screwdriver inserted (no text or symbols)natural_image
Technical line drawing of a mechanical device with internal components and a close-up view of two circular components (no text or symbols)natural_image
Technical line drawing of a mechanical device with internal components and directional arrows (no text or symbols)natural_image
Technical line drawing of a mechanical component with arrows indicating motion or assembly (no text or symbols)text_image
Technical diagram showing a device with warning symbols and labeled parts, including a warning triangle and directional arrows.natural_image
Technical line drawing of a server rack with two screws and a label 'stakini' on the cover (no text or symbols beyond labels)text_image
Attention! New App!Android iOS

text_image
QR code image containing encoded data, no visible human-readable text
text_image
QR code image containing encoded data, no visible human-readable texttext_image
Safety warning symbol and electrical circuit diagram showing lightning bolt and switch mechanism
text_image
N N ↓ L ⊕ L N L N N PE ⊙ES
text_image
Diagram illustrating electrical warning and safety symbols for a device, including a warning symbol, switch, and battery.ES
natural_image
Technical line drawing of a mechanical device with internal components and alignment indicators (no text or symbols)text_image
Two triangular warning symbols: a lightning bolt symbol and a water droplet symbol, indicating electrical hazard or accident.
text_image
Ø 6 mmnatural_image
Technical diagram of a mechanical device with labeled parts and directional arrows (no readable text or symbols)máx. 1 Nm
natural_image
Technical line drawing of an electrical switchgear assembly with a screwdriver inserted (no text or symbols)natural_image
Technical line drawing of a mechanical device with internal components and a close-up view of two circular components (no text or symbols)text_image
Technical diagram of a mechanical device with labeled components and directional arrows indicating motion or assembly.natural_image
Technical line drawing of a device casing with mounting holes and directional arrows indicating movement (no text or symbols)text_image
Technical diagram showing electrical warning symbols and component labels in a device, including a warning symbol, switch, and electrical components.natural_image
Technical line drawing of a server rack with two screws and a label 'stakini' on the cover (no text or symbols beyond labels)text_image
Attention! New App!Android iOS

text_image
QR code image containing encoded data, no visible human-readable text
text_image
QR code image containing encoded data, no visible human-readable texttext_image
Safety warning symbol and electrical circuit diagram showing lightning bolt and switch mechanism
text_image
N N ↓ L ⊕ L N L N N PE ⊙text_image
Diagram illustrating electrical hazard warning and safety instructions for a device, including warning symbol, switch, and circuit breaker.natural_image
Technical line drawing of a mechanical device interior with no visible text or symbols- Marque os furos.
5.3
text_image
Two triangular warning symbols: a lightning bolt symbol and a water droplet symbol, indicating electrical hazard or accident.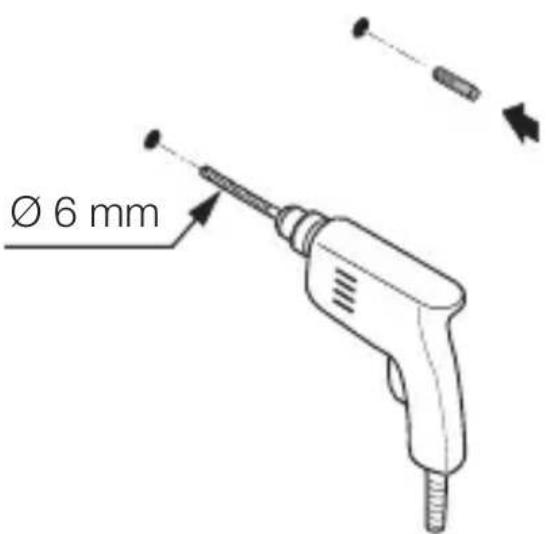
text_image
Ø 6 mmnatural_image
Technical diagram of a mechanical device with labeled parts and directional arrows (no readable text or symbols)máx. 1 Nm
natural_image
Technical line drawing of an electrical switch or fuse assembly with a screwdriver inserted (no text or symbols present)natural_image
Technical line drawing of a mechanical device with internal components and a base component (no text or symbols)• Coloque o bucim vedante.
5.7


text_image
máx. 1 Nmtext_image
Technical diagram of a mechanical device with labeled components and directional arrows indicating motion or assembly.natural_image
Technical line drawing of a device casing with mounting holes and directional arrows indicating movement (no text or symbols)- Aparafuse a tampa.
5.11

text_image
I Otext_image
Safety warning symbol and electrical switch diagram showing lightning bolt and switch mechanism
text_image
1. 2. 3. 4.text_image
Technical diagram of an electrical switch with labeled components and a magnified view showing terminal connections and switches.natural_image
Technical line drawing of a server rack with two screws and a label 'stakini' on the cover (no text or symbols beyond labels)- Aparafuse a tampa.
6.4


text_image
I Otext_image
Attention! New App!PT
Android iOS

text_image
QR code image containing encoded data, no visible human-readable text
text_image
QR code image containing encoded data, no visible human-readable texttext_image
Safety warning symbol and electrical circuit diagram showing lightning bolt and switch mechanism
text_image
N N ↓ L ⊕ L N L N N PE ⊙text_image
Safety warning symbol and electrical switch diagram showing lightning bolt and switch mechanism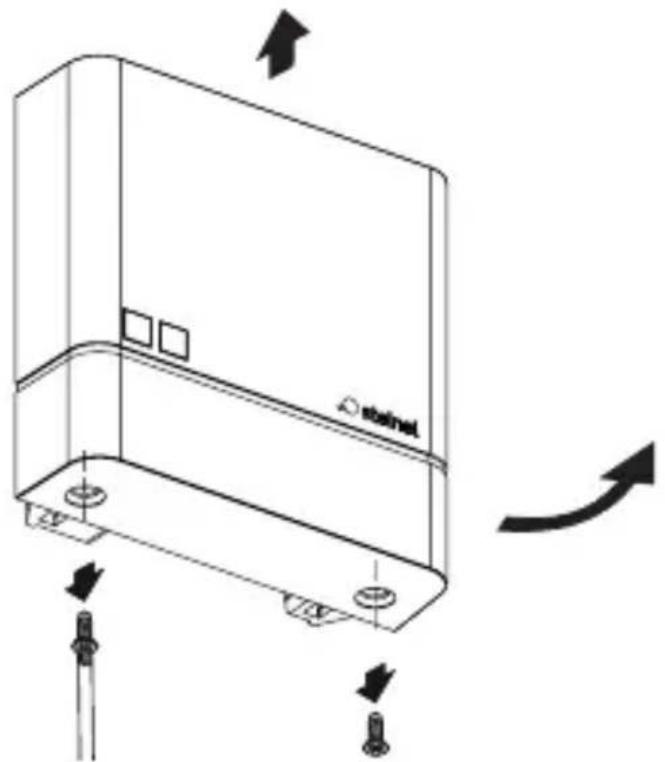
natural_image
Technical line drawing of a device casing with mounting holes and directional arrows indicating motion (no text or symbols)natural_image
Technical line drawing of a mechanical device with no visible text or symbols- Markera borrhålen.
5.3
text_image
Two triangular warning symbols: a lightning bolt symbol and a water drop symbol, commonly used in safety or hazard prevention.
text_image
Ø 6 mmSE
natural_image
Technical diagram of a mechanical device with labeled parts and directional arrows (no readable text or symbols)max. 1 Nm
natural_image
Technical line drawing of an electrical switchgear assembly with a screwdriver inserted (no text or symbols)SE
natural_image
Technical line drawing of a mechanical device with internal components and a close-up view of two circular components (no text or symbols)text_image
Safety warning symbol and electrical switch diagram showing lightning bolt and switch mechanism
text_image
1. 2. 3. 4.natural_image
Technical line drawing of a server rack with two screws and a label 'stakini' on the cover (no text or symbols beyond labels)text_image
Attention! New App!SE
Android iOS

text_image
QR code image containing encoded data, no visible human-readable text
text_image
QR code image containing encoded data, no visible human-readable texttext_image
Safety warning symbol and electrical circuit diagram showing lightning bolt and switch mechanism
text_image
N N ↓ L ⊕ L N L N N PE ⊙DK
text_image
Safety warning symbol and electrical switch diagram showing lightning bolt and switch mechanism
natural_image
Technical line drawing of a device casing with mounting holes and directional arrows indicating motion (no text or symbols)natural_image
Technical line drawing of a mechanical device with no visible text or symbolstext_image
Two triangular warning symbols: a lightning bolt symbol and a water drop symbol, commonly used in safety or hazard prevention.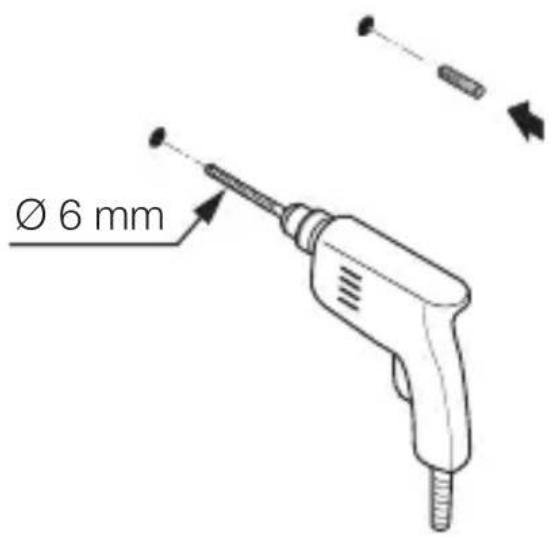
text_image
Ø 6 mmnatural_image
Technical diagram of a mechanical assembly with tool and component labels (no readable text or symbols)maks. 1 Nm
natural_image
Technical line drawing of an electrical switchgear assembly with a screwdriver inserted (no text or symbols)natural_image
Technical line drawing of a mechanical device with internal components and a close-up view of two circular components (no text or symbols)natural_image
Technical line drawing of a mechanical device with internal components and directional arrows (no text or symbols)- Sæt kappen på.
5.10
natural_image
Technical line drawing of a rectangular electronic device with mounting holes and a curved arrow indicating rotation (no text or symbols)- Skru kappen på.
DK
5.11


text_image
I Otext_image
Safety warning symbol and electrical switch diagram showing lightning bolt and switch mechanism
text_image
1. 2. 3. 4.natural_image
Technical line drawing of a server rack with two screws and a label 'stakini' on the cover (no text or symbols beyond label)DK
- Skru kappen på.
6.4

text_image
I O- Slå strømforsyningen til.
NightmatIQ Plus
text_image
Attention! New App!Android iOS

text_image
QR code image containing encoded data, no visible human-readable text
text_image
QR code image containing encoded data, no visible human-readable texttext_image
N N ↓ L ⊕ L N L N N PE ⊙FI
text_image
Safety warning symbol and electrical switch diagram showing lightning bolt and switch mechanism
natural_image
Technical line drawing of a device casing with mounting holes and directional arrows indicating motion (no text or symbols)natural_image
Technical line drawing of a mechanical device with no visible text or symbols- Merkitse reiät.
5.3

text_image
Two triangular warning symbols: a lightning bolt symbol and a water drop symbol, commonly used in safety or hazard prevention.
text_image
Ø 6 mmnatural_image
Technical diagram of a mechanical device with labeled parts and directional arrows (no readable text or symbols)enint. 1 Nm
natural_image
Technical line drawing of an electrical switch or relay component with a screwdriver inserted (no text or symbols present)natural_image
Technical line drawing of a mechanical device with internal components and a base component (no text or symbols)text_image
Technical diagram of a mechanical device with labeled components and directional arrows indicating motion or assembly.natural_image
Technical line drawing of a device casing with mounting holes and directional arrows indicating movement (no text or symbols)- Kiinnitä suojus.
5.11


text_image
I Otext_image
Safety warning symbol and electrical switch diagram showing lightning bolt and switch mechanism
text_image
1. 2. 3. 4.natural_image
Technical line drawing of a server rack with two screws and a label 'stakini' on the cover (no text or symbols beyond labels)- Kiinnitä suojus.
6.4

text_image
I Otext_image
Attention! New App!Android iOS

text_image
QR code image containing encoded data, no visible human-readable text
text_image
QR code image containing encoded data, no visible human-readable texttext_image
Safety warning symbol and electrical circuit diagram showing lightning bolt and switch mechanism
text_image
N N ↓ L ⊕ L N L N N PE ⊙NO
text_image
Safety warning symbol and electrical switch diagram showing lightning bolt and switch mechanism
natural_image
Technical line drawing of a device casing with mounting holes and directional arrows indicating motion (no text or symbols)natural_image
Technical line drawing of a mechanical device with no visible text or symbols- Tegn borehull
NO
5.3

text_image
Two triangular warning symbols: a lightning bolt symbol and a water drop symbol, commonly used in safety or hazard prevention.
text_image
Ø 6 mmnatural_image
Technical diagram of a mechanical device with internal components and directional arrows (no text or symbols)maks. 1 Nm
NO
• Før kabelen gjennom apparatet.
- Skru fast apparatet med et dreiemoment på maks.1 Nm.
Åpen variant
5.5
natural_image
Technical line drawing of an electrical switchgear assembly with a screwdriver inserted (no text or symbols)natural_image
Technical line drawing of a mechanical device with internal components and a close-up view of two circular components (no text or symbols)text_image
Technical diagram of a mechanical device with labeled components and directional arrows indicating motion or assembly.- Sett på dekselet.
NO
5.10

natural_image
Technical line drawing of a mechanical component with arrows indicating motion or assembly (no text or symbols)- Skru fast dekselet.
5.11


text_image
I Otext_image
Safety warning symbol and electrical switch diagram showing lightning bolt and switch mechanism
text_image
1. 2. 3. 4.natural_image
Technical line drawing of a server rack with two screws and a label 'stakini' on the cover (no text or symbols beyond label)- Skru fast dekselet.
6.4
natural_image
Simple diagram of a device with an arrow indicating rotation or change, no text or symbols present.text_image
Attention! New App!Android iOS

text_image
QR code image containing encoded data, no visible human-readable text
text_image
QR code image containing encoded data, no visible human-readable texttext_image
N N ↓ L ⊕ L N L N PE ⊙text_image
Safety warning symbol and electrical switch diagram showing lightning bolt and switch mechanism
natural_image
Technical line drawing of a device casing with mounting holes and directional arrows indicating motion (no text or symbols)natural_image
Technical line drawing of a mechanical device with no visible text or symbolstext_image
Two triangular warning symbols: a lightning bolt symbol and a water drop symbol, commonly used in safety or hazard prevention.
text_image
Ø 6 mmnatural_image
Technical diagram of a mechanical device with labeled parts and directional arrows (no readable text or symbols)μέγ. 1 Nm
natural_image
Technical line drawing of an electrical switchgear assembly with a screwdriver inserted (no text or symbols)natural_image
Technical line drawing of a mechanical device with internal components and a close-up view of two circular components (no text or symbols)text_image
Technical diagram of a mechanical device with labeled components and directional arrows indicating motion or assembly.natural_image
Technical line drawing of a device casing with mounting holes and directional arrows indicating movement (no text or symbols)natural_image
Technical line drawing of a server rack with two screws and a label 'stakini' on the cover (no text or symbols beyond labels)text_image
Attention! New App!Android iOS

text_image
QR code image containing encoded data, no visible human-readable text
text_image
QR code image containing encoded data, no visible human-readable texttext_image
Safety warning symbol and electrical circuit diagram showing lightning bolt and switch mechanism
text_image
N N ↓ L ⊕ L N L N N PE ⊙text_image
Safety warning symbol and electrical switch diagram showing lightning bolt and switch mechanism
natural_image
Technical line drawing of a device casing with mounting holes and directional arrows indicating motion (no text or symbols)natural_image
Technical line drawing of a mechanical device with no visible text or symbolstext_image
Two triangular warning symbols: a lightning bolt symbol and a water drop symbol, commonly used in safety or hazard prevention.
text_image
Ø 6 mmnatural_image
Technical diagram of a mechanical device with labeled parts and directional arrows (no readable text or symbols)maks. 1 Nm
natural_image
Technical line drawing of an electrical switchgear assembly with a screwdriver inserted (no text or symbols)natural_image
Technical line drawing of a mechanical device with internal components and a close-up view of two circular components (no text or symbols)natural_image
Technical line drawing of a mechanical device with internal components and directional arrows (no text or symbols)- Kapağı oturtun.
5.10

natural_image
Technical line drawing of a mechanical component with mounting holes and directional arrows indicating motion (no text or symbols)- Kapağı vidalayın.
5.11


text_image
I Otext_image
Safety warning symbol and electrical switch diagram showing lightning bolt and switch mechanism
text_image
1. 2. 3. 4.natural_image
Technical line drawing of a server rack with two screws and a label 'stakini' on the cover (no text or symbols beyond labels)- Kapağı vidalayın.
TR
6.4

natural_image
Simple diagram of a device with labeled terminals and an arrow indicating rotation (no text or symbols)text_image
Attention! New App!Android iOS

text_image
QR code image containing encoded data, no visible human-readable text
text_image
QR code image containing encoded data, no visible human-readable texttext_image
Safety warning symbol and electrical circuit diagram showing lightning bolt and switch mechanism
text_image
N N ↓ L ⊕ L N L N N PE ⊙text_image
Safety warning symbol and electrical switch diagram showing lightning bolt and switch mechanism
natural_image
Technical line drawing of a device casing with mounting holes and directional arrows indicating motion (no text or symbols)natural_image
Technical line drawing of a mechanical device with no visible text or symbolstext_image
Two triangular warning symbols: a lightning bolt symbol and a water drop symbol, commonly used in safety or hazard prevention.
text_image
Ø 6 mmnatural_image
Technical diagram of a mechanical device with labeled parts and directional arrows (no readable text or symbols)max. 1 Nm
natural_image
Technical line drawing of an electrical switch or relay component with a screwdriver inserted (no text or symbols present)natural_image
Technical line drawing of a mechanical device with internal components and a base component (no text or symbols)text_image
Technical diagram of a mechanical device with labeled components and directional arrows indicating motion or assembly.natural_image
Technical line drawing of a device casing with mounting holes and directional arrows indicating movement (no text or symbols)text_image
Safety warning symbol and electrical switch diagram showing lightning bolt and switch mechanism
text_image
1. 2. 3. 4.natural_image
Technical line drawing of a server rack with two screws and a label 'stakini' on the cover (no text or symbols beyond labels)text_image
Attention! New App!Android iOS

text_image
QR code image containing encoded data, no visible human-readable text
text_image
QR code image containing encoded data, no visible human-readable texttext_image
Safety warning symbol and electrical circuit diagram showing lightning bolt and switch mechanism
text_image
N N ↓ L ⊕ L N L N N PE ⊙text_image
Safety warning symbol and electrical switch diagram showing lightning bolt and switch mechanism
natural_image
Technical line drawing of a device casing with mounting holes and directional arrows indicating motion (no text or symbols)natural_image
Technical line drawing of a mechanical device with no visible text or symbolstext_image
Two triangular warning symbols: a lightning bolt symbol and a water drop symbol, commonly used in safety or hazard prevention.
text_image
Ø 6 mm- Vyvrtat otvory (∅ 6 mm) a vložit hmoždinky.
Varianta pod omítku
5.4

natural_image
Technical diagram of a mechanical assembly with tool and component labels (no readable text or symbols)max. 1 Nm
natural_image
Technical line drawing of an electrical switch or relay component with a screwdriver inserted (no text or symbols)natural_image
Technical line drawing of a mechanical device with internal components and a base component (no text or symbols)text_image
Technical diagram of a mechanical device with labeled components and directional arrows indicating motion or assembly.- Nasadit kryt.
5.10

natural_image
Technical line drawing of a device casing with mounting holes and directional arrows indicating movement (no text or symbols)- Našroubovat kryt.
5.11


text_image
I Otext_image
Safety warning symbol and electrical switch diagram showing lightning bolt and switch mechanism
text_image
1. 2. 3. 4.natural_image
Technical line drawing of a server rack with two screws and a label 'stakini' on the cover (no text or symbols beyond labels)- Našroubovat kryt.
6.4


text_image
I Otext_image
Attention! New App!Android iOS

text_image
QR code image containing encoded data, no visible human-readable text
text_image
QR code image containing encoded data, no visible human-readable texttext_image
Safety warning symbol and electrical circuit diagram showing lightning bolt and switch mechanism
text_image
N N ↓ L ⊕ L N L N N PE ⊙text_image
Safety warning symbol and electrical switch diagram showing lightning bolt and switch mechanism
natural_image
Technical line drawing of a device casing with mounting holes and directional arrows indicating motion (no text or symbols)natural_image
Technical line drawing of a mechanical device with no visible text or symbols- Naznačte diery na vrtanie.
SK
5.3
text_image
Two triangular warning symbols: a lightning bolt symbol and a water droplet symbol, commonly used in safety or hazard prevention.
text_image
Ø 6 mm- Vyvrtajte diery (∅ 6 mm) a vložte hmoždinky.
Variant montáže pod omietku
5.4

natural_image
Technical diagram of a mechanical device with labeled parts and directional arrows (no readable text or symbols)max. 1 Nm
- Kábel prevedte cez zariadenie.
- Zariadenie priskrutkujte krútiacim momentom max. 1 Nm.
Variant montáže na omietku
5.5


natural_image
Technical line drawing of an electrical switchgear assembly with a screwdriver inserted (no text or symbols)natural_image
Technical line drawing of a mechanical device with internal components and a close-up view of two circular components (no text or symbols)text_image
Technical diagram of a mechanical device with labeled components and directional arrows indicating motion or assembly.- Nasadte kryt.
5.10

natural_image
Technical line drawing of a device casing with mounting holes and directional arrows indicating movement (no text or symbols)- Naskrutkujte kryt.
SK
5.11


text_image
I Otext_image
Safety warning symbol and electrical switch diagram showing lightning bolt and switch mechanism
text_image
1. 2. 3. 4.natural_image
Technical line drawing of a server rack with two screws and a label 'stakini' on the cover (no text or symbols beyond labels)• Naskrutkujte kryt.
6.4


text_image
I Otext_image
Attention! New App!Android iOS

text_image
QR code image containing encoded data, no visible human-readable text
text_image
QR code image containing encoded data, no visible human-readable texttext_image
Safety warning symbol and electrical circuit diagram showing lightning bolt and switch mechanism
text_image
N N ↓ L ⊕ L N L N N PE ⊙text_image
Two triangular warning symbols: a lightning bolt symbol and a water drop symbol, commonly used in safety or hazard prevention.
text_image
Ø 6 mmnatural_image
Technical diagram of a mechanical assembly with tool and component labels (no readable text or symbols)maks. 1 Nm
natural_image
Technical line drawing of an electrical switchgear assembly with a screwdriver inserted (no text or symbols)natural_image
Technical line drawing of a mechanical device with internal components and a close-up view of two circular components (no text or symbols)natural_image
Technical line drawing of a mechanical device with internal components and directional arrows (no text or symbols)- Założyć pokrywę.
5.10

natural_image
Technical line drawing of a mechanical component with mounting holes and directional arrows indicating motion (no text or symbols)text_image
Electrical hazard symbol and electrical switch diagram with labels I and O
text_image
1. 2. 3. 4.natural_image
Technical line drawing of a server rack with two screws and a label 'stakini' on the cover (no text or symbols beyond labels)text_image
Attention! New App!Android iOS

text_image
QR code image containing encoded data, no visible human-readable text
text_image
QR code image containing encoded data, no visible human-readable texttext_image
Safety warning symbol and electrical circuit diagram showing lightning bolt and switch mechanism
text_image
N N ↓ L ⊕ L N L N N PE ⊙text_image
Safety warning symbol and electrical switch diagram showing lightning bolt and switch mechanism
natural_image
Technical line drawing of a device casing with mounting holes and directional arrows indicating motion (no text or symbols)natural_image
Technical line drawing of a mechanical device with no visible text or symbolstext_image
Two triangular warning symbols: a lightning bolt symbol and a water drop symbol, commonly used in safety or hazard prevention.
text_image
Ø 6 mmnatural_image
Technical diagram of a mechanical device with labeled parts and directional arrows (no readable text or symbols)max. 1 Nm
natural_image
Technical line drawing of an electrical switchgear assembly with a screwdriver inserted (no text or symbols)natural_image
Technical line drawing of a mechanical device with internal components and a close-up view of two circular components (no text or symbols)natural_image
Technical line drawing of a mechanical device with internal components and directional arrows (no text or symbols)- Montați masca.
5.10

natural_image
Technical line drawing of a mechanical component with arrows indicating motion or assembly (no text or symbols)text_image
Safety warning symbol and electrical switch diagram showing lightning bolt and switch mechanism
text_image
1. 2. 3. 4.natural_image
Technical line drawing of a server rack with two screws and a label 'stakini' on the cover (no text or symbols beyond label)text_image
Attention! New App!Android iOS

text_image
QR code image containing encoded data, no visible human-readable text
text_image
QR code image containing encoded data, no visible human-readable textUpdate firmware: LED-ul clipeşte rapid.
text_image
Safety warning symbol and electrical circuit diagram showing lightning bolt and switch mechanism
text_image
N N ↓ L ⊕ L N L N N PE ⊙text_image
Safety warning symbol and electrical switch diagram showing lightning bolt and switch mechanism
natural_image
Technical line drawing of a device casing with mounting holes and directional arrows indicating motion (no text or symbols)- Izklopite oskrbo z energijo.
- Preverite, ali je dovod napetosti izklopljen.
- Pokrov odvijačite in odvzemite.
5.2

natural_image
Technical line drawing of a mechanical device with no visible text or symbolstext_image
Two triangular warning symbols: a lightning bolt symbol and a water drop symbol, likely indicating electrical hazard or safety warning.
text_image
Ø 6 mmnatural_image
Technical diagram of a mechanical device with labeled parts and directional arrows (no readable text or symbols)maks. 1 Nm
- Napeljite kabel skozi napravo.
- Privijte napravo z vrtilnim navorom najv. 1 Nm.
Nadometna različica
5.5


natural_image
Technical line drawing of an electrical switchgear assembly with a screwdriver inserted (no text or symbols)natural_image
Technical line drawing of a mechanical device with internal components and a close-up view of two circular components (no text or symbols)• Vstavite tesnilne čepke.
SI
text_image
5.7 maks. 1 Nm• Napeljite kabel skozi napravo.
- Privijte napravo z vrtilnim navorom najv. 1 Nm.

text_image
5.8 NNILtext_image
Technical diagram of a mechanical device with labeled components and directional arrows indicating motion or assembly.- Namestite pokrov.
5.10

natural_image
Technical line drawing of a device casing with mounting holes and directional arrows indicating movement (no text or symbols)- Pokrov privijačite.
5.11


text_image
I Otext_image
Safety warning symbol and electrical switch diagram showing lightning bolt and switch mechanism
text_image
1. 2. 3. 4.- Izklopite oskrbo z energijo.
- Preverite, ali je dovod napetosti izklopljen.
- Pokrov odvijačite.
6.2

text_image
NN11L Bnatural_image
Technical line drawing of a server rack with two screws and a label 'stakini' on the cover (no text or symbols beyond labels)- Pokrov privijačite.
6.4


text_image
I O• Vklopite oskrbo z energijo.
NightmatIQ Plus
Pri NightmatlQ Plus se funkcije nastavljajo prek aplikacije Steinel Connect.
Aplikacija Steinel Connect
Za konfiguracijo naprave s pametnim telefonom ali tablico morate s svojega AppStore sneti aplikacijo STEINEL Connect. Potreben je za Bluetooth primeren pametni telefon ali tablični računalnik.

text_image
Attention! New App!Android iOS

text_image
QR code image containing encoded data, no visible human-readable text
text_image
QR code image containing encoded data, no visible human-readable texttext_image
Safety warning symbol and electrical circuit diagram showing lightning bolt and switch mechanism
text_image
N N ↓ L ⊕ L N L N N PE ⊙Mrežni vod sastoji se od trožilnog kabela:
L = faza (većinom crna, smeda ili siva)
N = neutralni vodič (većinom plavi)
PE = zaštitni vodič (zeleno / žuti)
text_image
Safety warning symbol and electrical switch diagram showing lightning bolt and switch mechanism
natural_image
Technical line drawing of a device casing with mounting holes and directional arrows indicating motion (no text or symbols)natural_image
Technical line drawing of a mechanical device with no visible text or symbols- Označite rupe.
5.3

text_image
Two triangular warning symbols: a lightning bolt symbol and a water drop symbol, likely indicating electrical hazard or accident risk.
text_image
Ø 6 mm- Izbušite rupe (∅ 6) i umetnite učvrsnice.
HR
Podžbukna varijanta
5.4


natural_image
Technical diagram of a mechanical device with internal components and directional arrows (no text or symbols)maks. 1 Nm
• Provedite kabel kroz uređaj.
- Uređaj pritegnite okretnim momentom od maks. 1 Nm.
Nadžbukna varijanta
5.5

natural_image
Technical line drawing of an electrical switchgear assembly with a screwdriver inserted (no text or symbols)natural_image
Technical line drawing of a mechanical device with internal components and a close-up view of two circular components (no text or symbols)- Umetnite brtveni čep.
HR
5.7

text_image
maks. 1 Nm• Provedite kabel kroz uređaj.
- Uređaj pritegnite okretnim momentom od maks. 1 Nm.

text_image
5.8 NNILtext_image
Technical diagram of a mechanical device with labeled components and directional arrows indicating motion or assembly.- Stavite poklopac.
5.10

natural_image
Technical line drawing of a device casing with mounting holes and directional arrows indicating movement (no text or symbols)- Navrnite poklopac.
5.11


text_image
I Otext_image
Safety warning symbol and electrical switch diagram showing lightning bolt and switch mechanism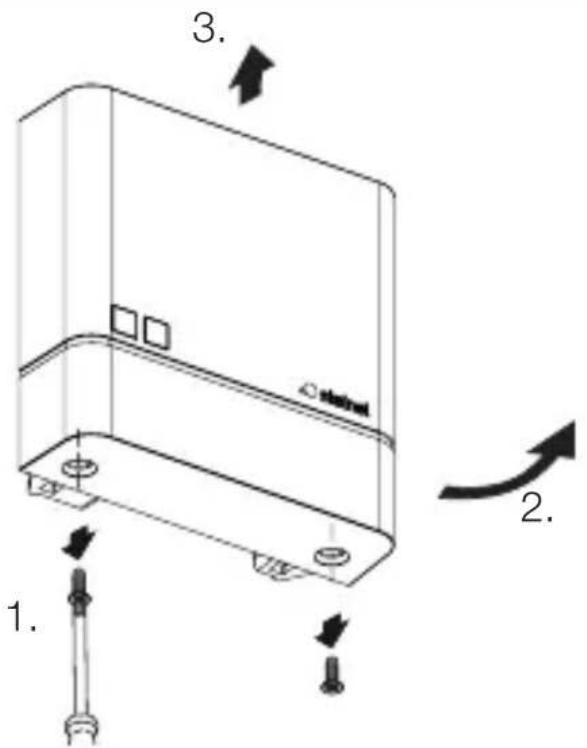
text_image
1. 2. 3. 4.text_image
Technical diagram of an electrical switch with labeled components and a magnified view showing terminal connections and switches.- Željeni prag aktiviranja kod podešavanja svjetlosnog praga izvodi se kontinuirano pomoću izvijača.
HR
6.3

natural_image
Technical line drawing of a server rack with two screws and a label 'stakini' on the cover (no text or symbols beyond label)- Navrnite poklopac.
6.4

text_image
I Otext_image
Attention! New App!Android iOS

text_image
QR code image containing encoded data, no visible human-readable text
text_image
QR code image containing encoded data, no visible human-readable textFunkcije koje se mogu podesiti pomoću aplikacije Steinel Connect su:
text_image
Safety warning symbol and electrical circuit diagram showing lightning bolt and switch mechanism
text_image
N N ↓ L ⊕ L N L N N PE ⊙text_image
Safety warning symbol and electrical switch diagram showing lightning bolt and switch mechanism
natural_image
Technical line drawing of a device casing with mounting holes and directional arrows indicating motion (no text or symbols)natural_image
Technical line drawing of a mechanical device with no visible text or symbolstext_image
Two triangular warning symbols: a lightning bolt symbol and a water drop symbol, likely indicating electrical hazard or accident risk.
text_image
Ø 6 mmnatural_image
Technical diagram of a mechanical device with labeled parts and directional arrows (no readable text or symbols)max 1 Nm
natural_image
Technical line drawing of an electrical switch or fuse assembly with a screwdriver inserted (no text or symbols present)natural_image
Technical line drawing of a mechanical device with internal components and a close-up view of two circular components (no text or symbols)• Paigaldage tihenduskorgid.
EE
5.7

text_image
max 1 Nmtext_image
Technical diagram of a mechanical device with labeled components and directional arrows indicating motion or assembly.- Pange kate peale.
5.10

natural_image
Technical line drawing of a device casing with mounting holes and directional arrows indicating movement (no text or symbols)• Kruvige kate kinni.
5.11


text_image
I Otext_image
Safety warning symbol and electrical switch diagram showing lightning bolt and switch mechanism
text_image
1. 2. 3. 4.natural_image
Technical line drawing of a server rack with two screws and a label 'stakini' on the cover (no text or symbols beyond label)• Kruvige kate kinni.
6.4
text_image
I O• Lülitage voolutoide sisse.
NightmatIQ Plus
text_image
Attention! New App!Android iOS

text_image
QR code image containing encoded data, no visible human-readable text
text_image
QR code image containing encoded data, no visible human-readable texttext_image
Safety warning symbol and electrical circuit diagram showing lightning bolt and switch mechanism
text_image
N N ↓ L ⊕ L N L N N PE ⊙text_image
Safety warning symbol and electrical switch diagram showing lightning bolt and switch mechanism
natural_image
Technical line drawing of a device casing with mounting holes and directional arrows indicating motion (no text or symbols)natural_image
Technical line drawing of a mechanical device with no visible text or symbolstext_image
Two triangular warning symbols: a lightning bolt symbol and a water drop symbol, likely indicating electrical hazard or accident risk.
text_image
Ø 6 mmnatural_image
Technical diagram of a mechanical device with internal components and directional arrows (no text or symbols)maks. 1 Nm
natural_image
Technical line drawing of an electrical switchgear assembly with a screwdriver inserted (no text or symbols)natural_image
Technical line drawing of a mechanical device with internal components and a close-up view of two circular components (no text or symbols)text_image
Technical diagram of a mechanical device with labeled components and directional arrows indicating motion or assembly.• Dangtelio uždéjimas.
5.10

natural_image
Technical line drawing of a device casing with mounting holes and directional arrows indicating movement (no text or symbols)text_image
Safety warning symbol and electrical switch diagram showing lightning bolt and switch mechanism
text_image
1. 2. 3. 4.natural_image
Technical line drawing of a server rack with two screws and a label 'stakini' on the cover (no text or symbols beyond labels)text_image
Attention! New App!Android iOS

text_image
QR code image containing encoded data, no visible human-readable text
text_image
QR code image containing encoded data, no visible human-readable texttext_image
Safety warning symbol and electrical circuit diagram showing lightning bolt and switch mechanism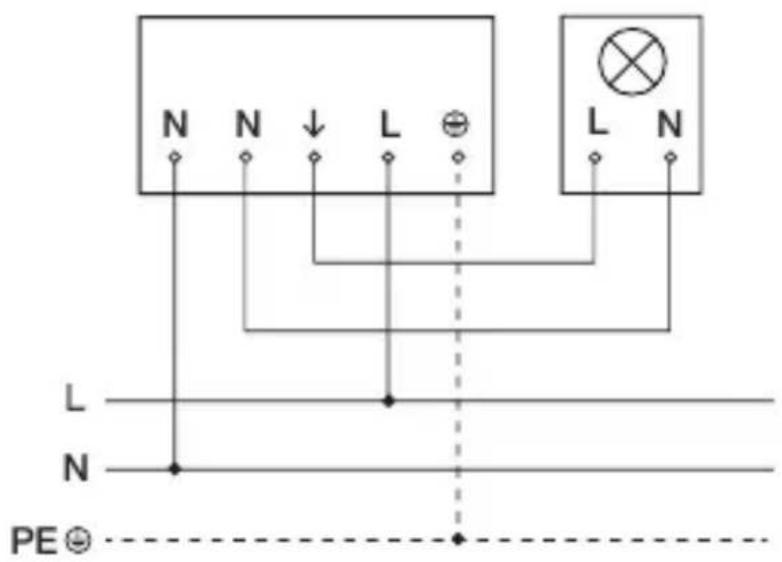
text_image
N N ↓ L ⊕ L N L N N PE ⊙text_image
Safety warning symbol and electrical switch diagram showing lightning bolt and switch mechanism
natural_image
Technical line drawing of a device casing with mounting holes and directional arrows indicating motion (no text or symbols)natural_image
Technical line drawing of a mechanical device with no visible text or symbolstext_image
Two triangular warning symbols: a lightning bolt symbol and a water drop symbol, commonly used in safety or hazard prevention.
text_image
Ø 6 mm- Izurbiet caurumus (∅ 6 mm) un ievietojiet dībelus.
LV
Zemapmetuma variants.
5.4

natural_image
Technical diagram of a mechanical device with internal components and directional arrows (no text or symbols)maks. 1 Nm
natural_image
Technical line drawing of an electrical switchgear assembly with a screwdriver inserted (no text or symbols)natural_image
Technical line drawing of a mechanical device with internal components and a close-up view of two circular components (no text or symbols)natural_image
Technical line drawing of a mechanical device with internal components and directional arrows (no text or symbols)- Uzlieciet nosegu.
5.10

natural_image
Technical line drawing of a mechanical component with arrows indicating motion or assembly (no text or symbols)text_image
Safety warning symbol and electrical switch diagram with lightning bolt and 'I' label
text_image
1. 2. 3. 4.natural_image
Technical line drawing of a server rack with two screws and a label 'stakini' on the cover (no text or symbols beyond labels)text_image
Attention! New App!Android iOS

text_image
QR code image containing encoded data, no visible human-readable text
text_image
QR code image containing encoded data, no visible human-readable texttext_image
N N ↓ L ⊕ L N L N PE ⊙text_image
Safety warning symbol and electrical switch diagram showing lightning bolt and switch mechanism
natural_image
Technical line drawing of a device casing with mounting holes and directional arrows indicating motion (no text or symbols)natural_image
Technical line drawing of a mechanical device with internal components and alignment indicators (no text or symbols)text_image
Two triangular warning symbols: a lightning bolt symbol and a water drop symbol, likely indicating electrical hazard or accident risk.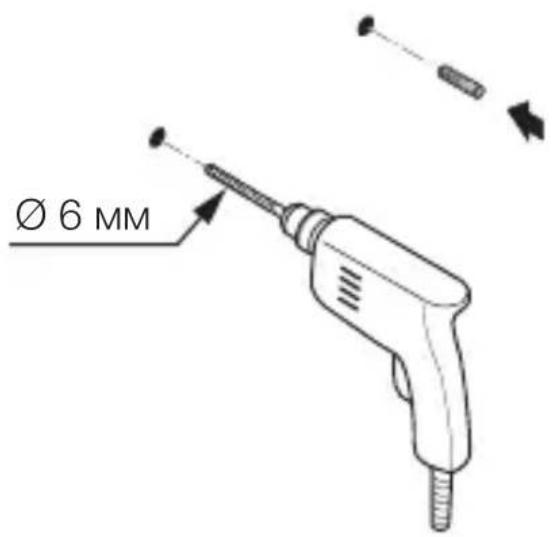
text_image
Ø 6 MMnatural_image
Technical diagram of a mechanical device with labeled parts and directional arrows (no readable text or symbols)макс. 1 Nm
natural_image
Technical line drawing of an electrical switchgear assembly with a screwdriver inserted (no text or symbols)natural_image
Technical line drawing of a mechanical device with internal components and a close-up view of two circular components (no text or symbols)natural_image
Technical line drawing of a mechanical device with internal components and directional arrows (no text or symbols)natural_image
Technical line drawing of a device casing with mounting holes and directional arrows indicating movement (no text or symbols)text_image
Safety warning symbol and electrical circuit diagram showing lightning bolt and switch mechanism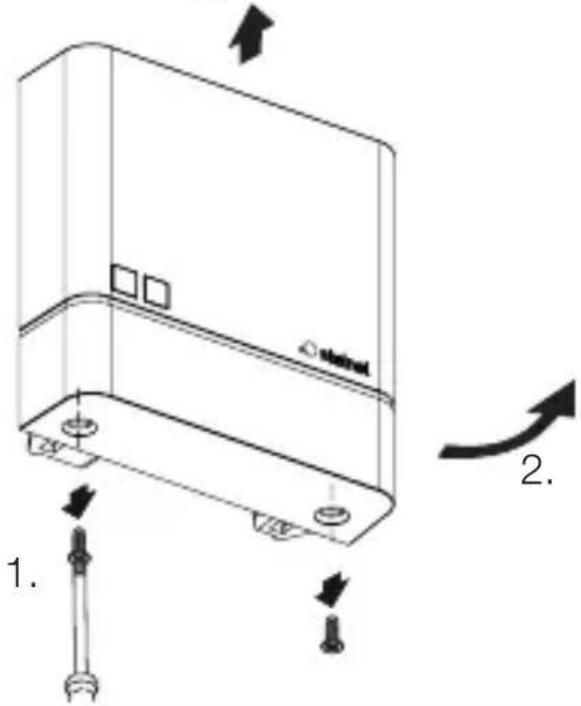
text_image
Technical diagram of a device with labeled components and directional arrows indicating motion or assembly.natural_image
Technical line drawing of a server rack with two screws and a label 'stakini' on the cover (no text or symbols beyond label)text_image
Attention! New App!Android iOS

text_image
QR code image containing encoded data, no visible human-readable text
text_image
QR code image containing encoded data, no visible human-readable texttext_image
N N ↓ L ⊕ L N L N PE ⊕电源供电线由一根三芯电缆构成:
natural_image
Technical line drawing of a device casing with mounting holes and directional arrows indicating motion (no text or symbols)natural_image
Technical line drawing of a mechanical device with no visible text or symbols- 标记钻孔。
5.3
text_image
Two triangular warning symbols: a lightning bolt symbol and a water drop symbol, likely indicating electrical hazard or accident risk.
text_image
Ø 6 mmnatural_image
Technical diagram of a mechanical assembly with labeled parts and directional arrows (no readable text or symbols)最大为 1 Nm
natural_image
Technical line drawing of an electrical switchgear assembly with a screwdriver inserted (no text or symbols)- 用螺丝刀小心地打开明线选装开孔。
5.6
natural_image
Technical line drawing of a mechanical device with internal components and a base component (no text or symbols)- 插入密封塞。
CN
5.7

text_image
最大为 1 Nmnatural_image
Technical line drawing of a mechanical device with internal components and directional arrows (no text or symbols)- 盖上盖板。
5.10

natural_image
Technical line drawing of a device casing with mounting holes and directional arrows indicating movement (no text or symbols)- 拧上盖板的螺栓。
5.11


text_image
I Otext_image
Safety warning symbol and electrical circuit diagram showing lightning bolt and switch mechanism
text_image
1. 2. 3. 4.natural_image
Technical line drawing of a server rack with two screws and a label 'stakini' on the cover (no text or symbols beyond labels)- 拧上盖板的螺栓。
6.4


text_image
I O- 接通电源。
NightmatIQ Plus
text_image
Attention! New App!安卓

text_image
QR code image containing encoded data, no visible human-readable textiOS

text_image
QR code image containing encoded data, no visible human-readable texttext_image
N N ↓ L ⊕ L N L N N PE ⊙text_image
Safety warning symbol and electrical switch diagram showing lightning bolt and switch mechanism
natural_image
Technical line drawing of a device casing with mounting holes and directional arrows indicating motion (no text or symbols)natural_image
Technical line drawing of a mechanical device with no visible text or symbolstext_image
Two triangular warning symbols: a lightning bolt symbol and a water droplet symbol with 'd' symbols.
text_image
Ø 6 MMnatural_image
Technical diagram of a mechanical device with labeled parts and directional arrows (no readable text or symbols)макс. 1 Нм
natural_image
Technical line drawing of an electrical switch or fuse assembly with a screwdriver inserted (no text or symbols present)natural_image
Technical line drawing of a mechanical device with internal components and a close-up view of two circular components (no text or symbols)text_image
Technical diagram of a mechanical device with labeled components and directional arrows indicating motion or assembly.- Надеть плафон.
5.10

natural_image
Technical line drawing of a device casing with mounting holes and directional arrows indicating movement (no text or symbols)text_image
Safety warning symbol and electrical switch diagram showing lightning bolt and switch mechanism
text_image
1. 2. 3. 4.natural_image
Technical line drawing of a server rack with two screws and a label 'stakini' on the cover (no text or symbols beyond labels)text_image
Attention! New App!Android iOS

text_image
QR code image containing encoded data, no visible human-readable text