P56500 - Smoke detector Emos - Free user manual and instructions
Find the device manual for free P56500 Emos in PDF.
| Product type | Photoelectric smoke detector |
| Brand | Emos |
| Model | P56500 (GS558) |
| Standard | ČSN EN 14604:2006 + rev. 1:2008 |
| Lifespan | 10 years |
| Dimensions | 120 × 120 × 35.5 mm |
| Weight | 120 g |
| Power supply | 2 AA alkaline batteries 1.5 V |
| Standby consumption | < 170 μA |
| Alarm consumption | < 80 mA |
| Sound level | > 85 dB at 3 m |
| Protection rating | IP20 |
| Operating temperature | 0 °C to +40 °C |
| Humidity | 5 % to 90 % (non-condensing) |
| Wireless range | 20 m (open space) |
| Radio frequency | 433 MHz, 10 mW e.r.p. max. |
| Max. number of paired units | 30 |
| Functions | Smoke and temperature detection (54-70 °C), test, silence, wireless pairing, low battery and end-of-life indication |
| Maintenance | Clean at least once a month with a vacuum cleaner. Do not paint. Do not use solvents. |
| Installation | On ceiling or wall, at least 50 cm from corners and 10 cm from walls. Do not install in kitchen, bathroom, garage. |
| Warranty and after-sales service | Repair by qualified professional. Contact the dealer or EMOS after-sales service. |
Frequently Asked Questions - P56500 Emos
User questions about P56500 Emos
0 question about this device. Answer the ones you know or ask your own.
Ask a new question about this device
Download the instructions for your Smoke detector in PDF format for free! Find your manual P56500 - Emos and take your electronic device back in hand. On this page are published all the documents necessary for the use of your device. P56500 by Emos.
USER MANUAL P56500 Emos
This manual contains important safety information regarding the installation and operation of the detector. Carefully read this manual and store it safely for future use. Familiarise other residents of the building with the operation of the detector.
Create an evacuation plan in case of fire and perform a drill every month. All residents of the building should be familiar with the detector signals in order to be able to immediately react to them.
The detector allows the detection of a slow burning flames accompanied by thick black smoke. These flames can take hours before they turn into a large fire.
Note:
If construction work is taking place in the area which causes a large amount of dust, you should dismount the detector from the mounting plate to protect the detector. If you cannot for some reason, cover the openings of the detector for the duration of the work, by e.g. a plastic bag.
A covered detector will not detect fire or smoke. Uncover it every day after work is finished.
Technical information
Sensor type: photoelectric cell
In accordance with standard EN 14604:2005/AC:2008
Service life: 10 years
Operating temperature and humidity: 0 °C to +40 °C, 5 % to 90 % (without condensation)
Protection rating: IP20
Acoustic signalisation: > 85 dB at a range of 3 m
Wireless module range: 20 m
Transmission frequency: 433 MHz, 10 mW e.r.p. max.
Number of paired units: max. 30
Power supply: 2× 1.5 V AA
Power consumption: < 170 μA standby mode, < 80 mA alarm mode
Wireless module consumption:
Receiver mode: < 5 mA, transmitter mode: < 10 mA
Temperature detection sensitivity: 54 °C to 70 °C
Smoke detection sensitivity: 0.122 to 0.189 dB/m
Size: 120 × 120 × 35.5 mm
Weight: 120 g
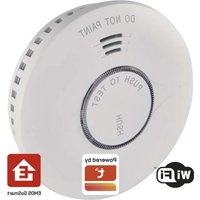
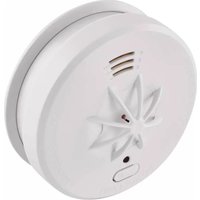
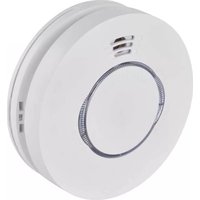
Detector Description
Front part
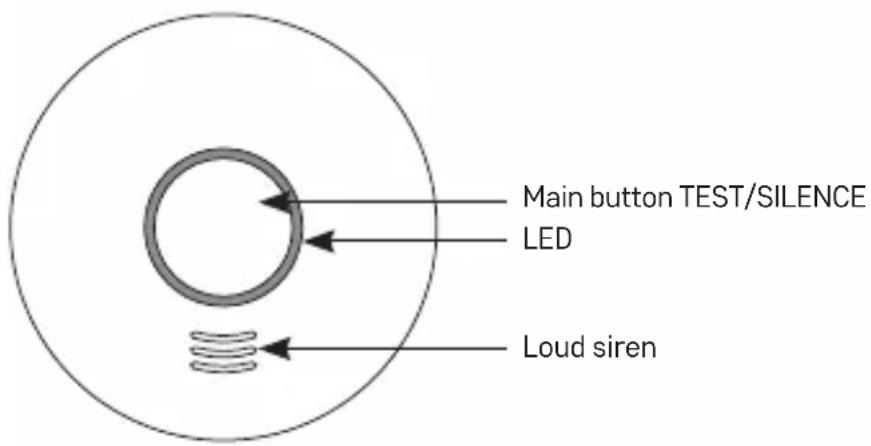
Rear part
Mounting plate installation Insertion of batteries
natural_image
Technical diagram showing a circular device with internal components and a side view of its internal structure (no text or symbols present)Installation
The installation must be performed by a qualified person.
The person performing the installation is responsible for installing the product in accordance with valid regulations.
When in doubt, leave the installation to a qualified professional.
The detector is not designed for use in camper vans.
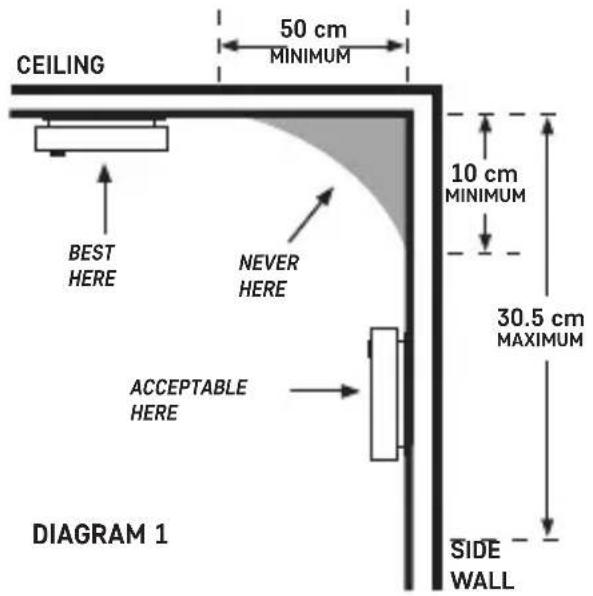
Ideally, a smoke detector should be installed in every room of the house with the exception of kitchens, bathrooms and garages. Each floor of the house, including the stairs, should have at least one smoke detector installed.
The smoke detector should be located in a place where you can hear it even when you're sleeping, e.g. in the hall in front of the bedroom.
Install the detector on the ceiling of each bedroom and hall in front of the bedroom. If the hall is longer than 9 m, install a detector on both ends.
If you have a multi-storey house, install the detector in the same manner on each floor.
You will be protected even against smoke rising up the stairs from the bottom floor.
In the cellar, install the detector on the ceiling at the bottom of the stairs.
Do not install the detector in bathrooms or kitchens; the steam from water or food could cause false alarms. In the garage, the alarm could be triggered by the exhaust from your car.
The ventilation openings of the warning device must not be covered up.
Do not spray aerosol agents in the vicinity or onto the warning device.
Do not paint the warning device.
Note:
National regulations vary in terms of the number and location of smoke detectors.
When in doubt, contact e.g. the fire brigade.
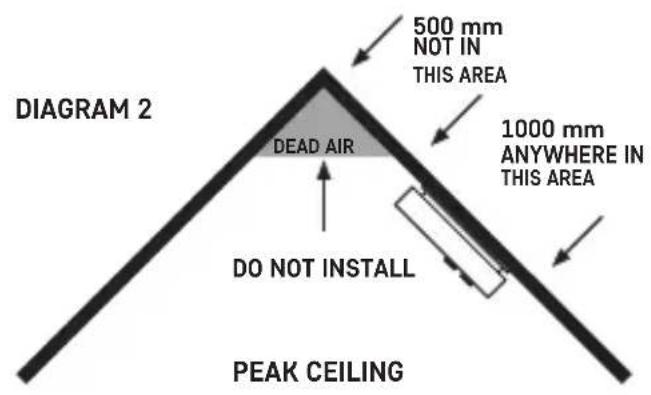
Diagram for proper placement of a detector
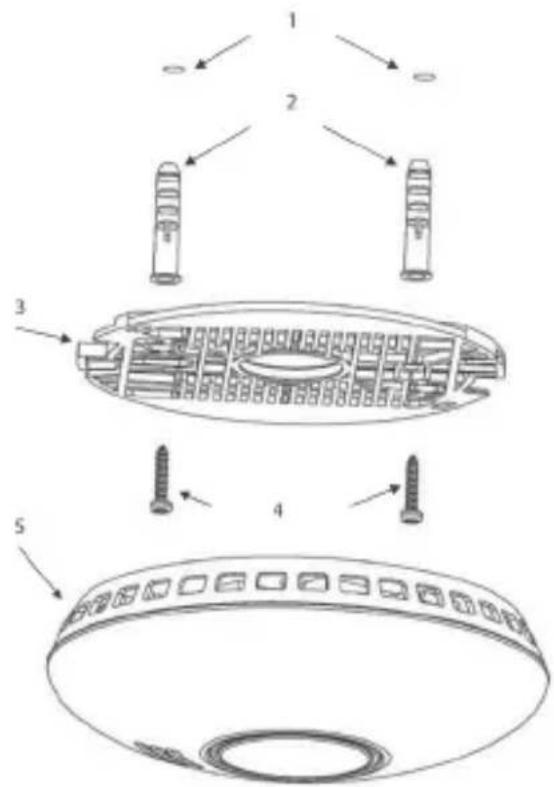
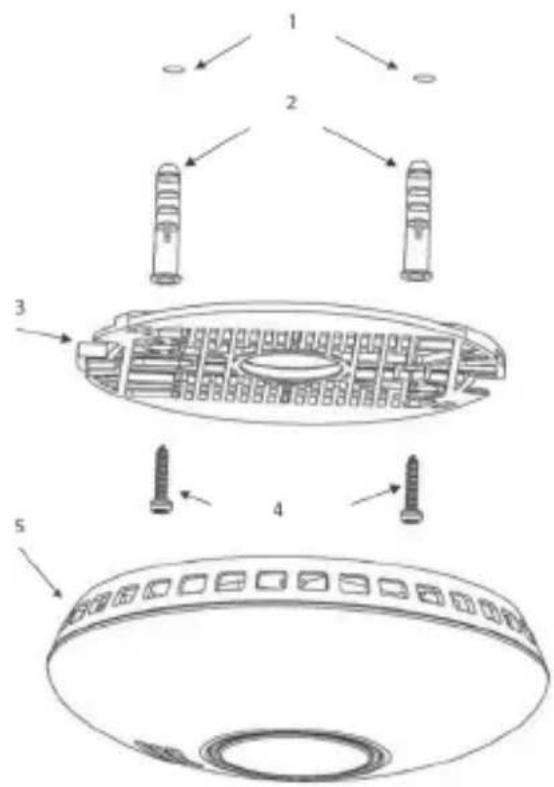
Installing the device onto a wall
Drill two holes (ø 5 mm) into the wall; the distance between the holes should be 60 mm.
Insert the attached wall plugs into the openings, place the mounting plate and attach it to the wall with screws.
Put batteries into the detector and test its functionality, see Testing Mode.
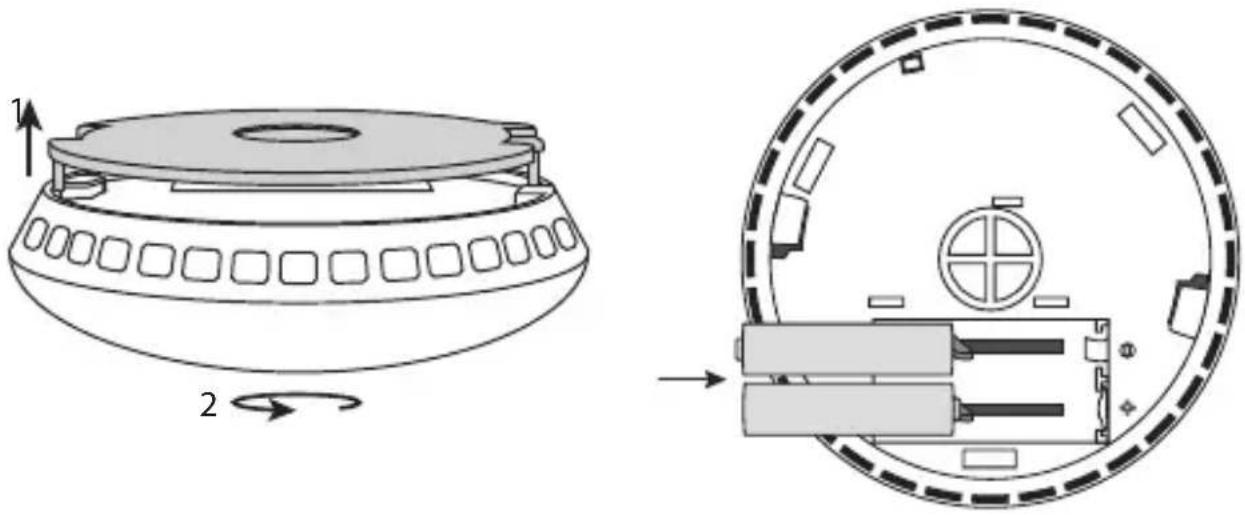
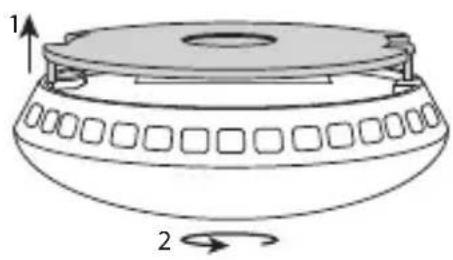
If the detector is operational, place the rear side of the detector onto the mounting plate into the two mounting pegs and turn in the direction of the arrows, see figure Mounting plate installation.
Mounting plate installation
natural_image
Diagram of a cylindrical object with a flanged top and side panels, labeled with arrows 1 and 2 (no text or symbols on the object itself)| 1. Holes in the wall |
| 2. Wall plugs |
| 3. Mounting platea |
| 4. Screws |
| 5. Detector |

Putting into operation
Insert batteries (2× 1.5 V AA) into the battery compartment on the back.
Only use alkaline batteries of the same type, never use rechargeable batteries.
When inserting batteries into the area with plastic clips, be careful to insert the battery properly!
See figure Insertion of batteries.
After inserting the batteries, a red LED will flash.
The LED will then flash red every 40 seconds, indicating the detector is functional.
Warning:
The assembly cover cannot be shut unless all batteries are in place!
The plastic clip in the battery compartment prevents the mounting of the assembly cover.
It is necessary to always have all batteries inserted and the mounting plate in place to prevent the batteries from falling out of the battery compartment.
Testing mode
Whenever needed or during every battery replacement, you can test the functionality of the detector. Long-press the main button for ca 5 seconds; the detector will beep 3× in a row (then a 1.5 second pause will follow) and a red LED will flash.
If the detector does not emit an acoustic signal, check the batteries and assembly.
Do not hold the main button for more than 12 seconds, or the detector will switch to mode for pairing with other units.
It is possible that other paired alarms will also begin beeping during testing (if you are using multiple alarms in the residential space).
After releasing the main button, the other alarms should stop beeping within 1 minute.
Use testing mode 1× a week to make sure the alarm is operational.
Note:
The acoustic and optical alarm during testing is only used as indication that the detector is operational. It does not mean that the presence of smoke has been detected.
Fault state
If the detector is in fault state, it is not functional.
The fault state is indicated every 40 seconds by 1 beep and 20 seconds after the beep by 1 flash of red LED.
Immediately replace the batteries and check that the detector is undamaged; clean the openings of the detector by e.g. a vacuum cleaner. Perform a functionality test.
If the fault state persists even after batteries have been replaced, contact the service centre.
Flat batteries
Flat batteries in the alarm are indicated by simultaneous beeping + flashing of red LED 1× every 40 seconds.
Immediately replace batteries. Use alkaline batteries only, not rechargeable ones.
Perform a functionality test.
It is recommended to replace batteries 1× a year as a precaution.
Manual silencing of acoustic signal for flat batteries
If needed, the acoustic signal can be temporarily silenced.
Press the main button during alarm mode; the acoustic signal will be silenced for 8 hours (the red LED will flash every 8 seconds).
End of service life of the detector
The detector has a service life of 10 years since production.
After expiration, the detector must no longer be used and must be replaced with a new device.
The replacement date for the detector is listed on the label on the back, next to „Replace device“. If you are using multiple detectors, remember to check their replacement dates!
Alarm warning
If smoke is detected, the detector will start emitting an acoustic + optical signal.
Simultaneously, the detector will beep + the red LED will flash repeatedly 3 times followed by 1.5 seconds of silence.
The duration of one beep + flash is 0.5 seconds.
The detector will beep + the red LED will flash constantly and rapidly if increased temperature (fire) is detected.
The duration of one beep + flash in this case is 0.2 seconds.
If several detectors are wirelessly interconnected and one of the detectors enters an alarm state, other paired detectors will also begin emitting an acoustic + optical signal in the form of 2 rapid beeps followed by 1.2 seconds of silence.
If an alarm triggers, immediately evacuate the building and make sure all other people have left as well.
Do not stop to call help or pick up your things.
Contact the corresponding emergency service.
Manual silencing of alarm during alarm trigger
The acoustic signal of the alarm can be temporarily silenced.
Press the main button; the acoustic signal will be silenced for 10 minutes.
The silencing will be indicated by 1 flash of red LED every 8 seconds.
Only use the silence function in cases of false alarms caused, for instance, by steam, vapour from cooking or burned food. Wait until the air clears.
If you have multiple paired detectors in alarm state, you will have to silence each detector separately.
Do not remove the batteries to stop the alarm state – this will deactivate the alarm!
Wireless connection between detectors
Smoke detectors GS558 can be wirelessly interconnected with one another. This interconnection allows the loud acoustic alarm (85 dB) to spread among the devices if one of the detectors detects smoke. This feature is especially useful for larger, multi-storey buildings.
Warning: Since the detector is fitted with wireless connection, do not mount the detector(s) onto a metal base. Doing so may decrease wireless range.
To pair additional detectors, do the following:
Pairing detectors
- Long-press the main button for 12 seconds on the first detector. The red LED will light up – the detector is ready for pairing (this mode lasts for 30 seconds, then the detector switches to standard mode!).
Note: If you wish to cancel pairing mode prematurely, short-press the main button; the red LED will switch off.
- Press and hold the main button for 1–2 seconds on the second detector. The red LED will flash rapidly several times on both the first and second detector simultaneously – both detectors are interconnected.
If you wish to pair additional detectors, proceed again from step 2. Using this process, you can pair a maximum of 30 detectors. Remember that maximum wireless range is 20 m. In busy areas, the range can decrease to up to 1/3rd.
Erasing memory of paired detectors
- Long-press the main button for 16 seconds on the detector.
- Wait until the red LED begins flashing rapidly – let go of the main button.
- Then, press the main button quickly 2× – a beep will sound upon the second press and the red LED will stop flashing – the memory of the detector is erased.
You can repeat the process for other detectors to erase their memory.
Testing paired detectors
Press and hold the main button of the detector for max. ca 45 seconds.
Gradually, all other paired detectors will start beeping.
This allows you to check that the detectors have been paired correctly.
You can cancel the alarm mode for beeping detectors by pressing the main button.
The detectors will switch to manual alarm silence for 10 minutes.
Then, they automatically switch to standard mode.
Care and Maintenance
The product is designed to provide trouble-free service for many years if used appropriately. Some advice for proper operation:
- Read the manual carefully before using this product.
- The product must be replaced with a new one after 10 years – see replacement date on the back.
- Regularly clean the product – at least 1× a month.
- Carefully clean dirt and dust from ventilation openings of the product with a vacuum cleaner.
- The product must not be painted.
- Do not expose the product to direct sunlight, extreme cold and moisture, and sudden changes in temperature. This would reduce accuracy of detection.
- Do not place the product in locations prone to vibration and shocks – these may cause damage.
- Do not expose the product to excessive force, impacts, dust, high temperatures or humidity – these may cause malfunction, shorter battery life, damage to batteries and deformation of plastic parts.
- Do not expose the product to rain or high humidity, dropping or splashing water.
- Do not place any open flame sources on the product, e.g. a lit candle, etc.
- Do not place the product to places with inadequate air flow.
- Do not insert any objects in the product vents, do not cover up the product.
- Do not tamper with the internal electric circuits of the product – doing so may damage the product, which will automatically void the warranty. The product should only be repaired by a qualified professional.
- To clean the product, use a slightly moistened soft cloth. Do not use solvents or cleaning agents – they could scratch the plastic parts and cause corrosion of the electric circuits.
- Do not immerse the product in water or other liquids.
- In the event of damage or defect of the product, do not perform any repairs by yourself. Have it repaired where you purchased the product.
- This device is not intended for use by persons (including children) whose physical, sensory or mental disability or lack of experience and expertise prevents them from safe use of the device, if they are not supervised or if they have not been instructed regarding the use of this appliance by a person responsible for their safety. It is necessary to supervise children to ensure they do not play with the device.

Do not dispose with domestic waste. Use special collection points for sorted waste. Contact local authorities for information about collection points. If the electronic devices would be disposed in landfill, dangerous substances may reach groundwater and subsequently food chain, where it could affect human health.
Service centre:
Siterwell Electronics CO., limited No.666 Qingfeng Road, Jiangbei District, Ningbo, Zhejiang Province, China
Hereby, EMOS spol. s r.o. declares that the radio equipment type GS558 is in compliance with Directive 2014/53/EU. The full text of the EU declaration of conformity is available at the following internet address: http://www.emos.eu/download.
CZ | Detektor kouře
natural_image
Technical diagram showing a circular device with internal components and a side view of its internal structure (no text or symbols present)Instalace
natural_image
Diagram of a cylindrical object with a flanged top and side panels, labeled with arrows 1 and 2 (no text or symbols on the object itself)Uvedení do provozu
Siterwell Electronics CO., limited No.666 Qingfeng Road,
Jiangbei District, Ningbo, Zhejiang Province, China
natural_image
Technical diagram showing a circular device with internal components and a side view of its internal structure (no text or symbols present)Inštalácia
natural_image
Diagram of a cylindrical object with a flanged top and side panels, labeled with arrows 1 and 2 (no text or symbols on the object itself)Siterwell Electronics CO., limited No.666 Qingfeng Road, Jiangbei District, Ningbo, Zhejiang Province, China
natural_image
Technical diagram showing a circular device with internal components and a side view of its internal structure (no text or symbols present)Instalacja
natural_image
Diagram of a mechanical component with labeled parts 1 and 2, showing a circular top and rectangular side features (no text or symbols beyond labels)Siterwell Electronics CO., limited No.666 Qingfeng Road,
Jiangbei District, Ningbo, Zhejiang Province, China
natural_image
Technical diagram showing a circular device with internal components and a side view of its internal structure (no text or symbols present)Felszerelés
natural_image
Diagram of a cylindrical object with a flanged top and side handles, showing rotational motion (no text or symbols)Üzembe helyezés
Siterwell Electronics CO., limited No.666 Qingfeng Road, Jiangbei District, Ningbo, Zhejiang Province, China
natural_image
Technical diagram showing a circular device with internal components and a side view of its internal structure (no text or symbols present)Instalacija
natural_image
Diagram of a cylindrical object with a flanged top and side pattern, labeled with arrows 1 and 2 (no text or symbols on the object itself)Aktiviranje naprave
Bateriji (2× 1,5 V AA) vstavite v prostor za baterije na zadnji strani naprave.
Siterwell Electronics CO., limited No.666 Qingfeng Road,
Jiangbei District, Ningbo, Zhejiang Province, China
natural_image
Technical diagram showing a circular device with internal components and a side view of its internal structure (no text or symbols present)Ugradnja
natural_image
Diagram of a cylindrical object with a flanged top and side panels, labeled with arrows 1 and 2 (no text or symbols on the object itself)| 1. Rupe u zidu |
| 2. Usadnice |
| 3. Montažna ploča |
| 4. Vijci |
| 5. Detektor |
Puštanje u rad
Umetnite baterije (2 AA od 1,5 V) u odjeljak za baterije na poledini uređaja.
Upotrebljavajte isključivo alkalne baterije iste vrste, nemojte upotrebljavati baterije koje se mogu puniti.
Siterwell Electronics CO., limited No.666 Qingfeng Road,
Jiangbei District, Ningbo, Zhejiang Province, Kina
EMOS spol. s r.o. ovime izjavljuje da je radijska oprema tipa GS558 u skladu s Direktivom 2014/53/EU. Cjeloviti tekst EU izjave o sukladnosti dostupan je na sljedećoj internetskoj adresi: http://www.emos.eu/download.
DE | Rauchmelder
natural_image
Technical diagram showing a circular device with internal components and a side view of its internal structure (no text or symbols present)Einbau
natural_image
Diagram of a cylindrical object with a flanged top and side holes, labeled with arrows 1 and 2 (no text or symbols on the object itself)Inbetriebnahme
Siterwell Electronics CO., limited No.666 Qingfeng Road,
Jiangbei District, Ningbo, Zhejiang Province, China
natural_image
Technical diagram showing a mechanical component with two views: top view with rotation arrow and bottom view with internal components (no text or symbols)Установка
natural_image
Diagram of a cylindrical object with a flanged top and side panels, labeled with arrows 1 and 2 (no text or symbols on the object itself)Пуск в експлуатацію
Siterwell Electronics CO., limited No.666 Qingfeng Road,
Jiangbei District, Ningbo, Zhejiang Province, China
Regim receptor: < 5 mA, regim emițător: < 10 mA
Sensibilitatea detectiei temperaturii: 54 °C la 70 °C
Sensibilitatea detectiei fumului: 0,122 la 0,189 dB/m
Dimensiuni: 120 × 120 × 35,5 mm
Greutatea: 120 g
Partea din spate
Modul de ataşare a capacului de monta Modul de introducere a bateriilo

natural_image
Technical diagram showing a circular device with internal components and a side view of its internal structure (no text or symbols present)Instalarea
natural_image
Diagram of a cylindrical object with a flanged top and side holes, showing rotational motion (no text or symbols)Siterwell Electronics CO., limited No.666 Qingfeng Road,
Jiangbei District, Ningbo, Zhejiang Province, China
natural_image
Technical diagram showing a circular device with internal components and a side view of its internal structure (no text or symbols present)Montavimas
natural_image
Diagram of a cylindrical object with a central hole and two directional arrows labeled 1 and 2, no text or symbols present.Veiklos pradėjimas
Siterwell Electronics CO., limited No.666 Qingfeng Road,
Jiangbei District, Ningbo, Zhejiang Province, Kinija
natural_image
Technical diagram showing a circular device with internal components and a side view of its internal structure (no text or symbols present)Uzstādīšana
natural_image
Diagram of a cylindrical object with a flanged top and side holes, labeled with arrows 1 and 2 (no text or symbols on the object itself)Darbības uzsākšana
Siterwell Electronics CO., limited No.666 Qingfeng Road,
Jiangbei District, Ningbo, Zhejiang Province, Kīna
natural_image
Technical diagram showing a circular device with internal components and a side view of its internal structure (no text or symbols present)Paigaldamine
natural_image
Diagram of a cylindrical object with a flanged top and side panels, labeled with arrows 1 and 2 (no text or symbols on the object itself)Sisselülitamine
Sisestage patareid (2× 1,5 V AA) anduri tagaküljel olevasse patareilahtrisse.
Siterwell Electronics CO., limited No.666 Qingfeng Road, Jiangbei District, Ningbo, Zhejiang Province, Hiina
natural_image
Technical diagram showing a circular device with internal components and a side view of its internal structure (no text or symbols present)Монтиране
natural_image
Diagram of a mechanical component with labeled parts 1 and 2, showing a circular top and rectangular side panels (no text or symbols beyond labels)Siterwell Electronics CO., limited No.666 Qingfeng Road, Jiangbei District, Ningbo, Zhejiang Province, China
natural_image
Technical diagram showing a circular device with internal components and a side-view view of its internal structure (no text or symbols present)Installation
Siterwell Electronics CO., limited No.666 Qingfeng Road,
Jiangbei District, Ningbo, Zhejiang Province, Chine
natural_image
Technical diagram showing a circular device with internal components and a side view of its internal structure (no text or symbols present)Installazione
natural_image
Diagram of a cylindrical object with a flanged top and side slots, labeled with arrows 1 and 2 (no text or symbols on the object itself)Messa in servizio
Siterwell Electronics CO., limited No.666 Qingfeng Road,
Jiangbei District, Ningbo, Zhejiang Province, China
natural_image
Technical diagram showing a circular device with internal components and a side view of its internal structure (no text or symbols present)Instalación
natural_image
Diagram of a cylindrical object with a flanged top and side slots, labeled with arrows 1 and 2 (no text or symbols on the object itself)Puesta en marcha
Siterwell Electronics CO., limited No.666 Qingfeng Road, Jiangbei District, Ningbo, Zhejiang Province, China
Voeding: 2× 1,5 V AA
Verbruik: < 170 μA standby modus, < 80 mA alarm modus
natural_image
Technical diagram showing a circular device with internal components and a side view of its internal structure (no text or symbols present)Installatie
natural_image
Diagram of a cylindrical object with a flanged top and side panels, showing rotational motion (no text or symbols)| 1. Gaatjes in de muur |
| 2. Pluggen |
| 3. Montagepad |
| 4. Schroeven |
| 5. Melder |
Inbedrijfstelling
Siterwell Electronics CO., limited No.666 Qingfeng Road, Jiangbei District, Ningbo, Zhejiang Province, China