P56450 - Smoke detector Emos - Free user manual and instructions
Find the device manual for free P56450 Emos in PDF.
| Product type | Gas detector |
| Brand | Emos |
| Model | P56450 |
| Sensor type | Semiconductor |
| Detected gases | Natural gas, methane, propane, butane |
| Standard | EN 50194-1:2009 |
| Device lifespan | 5 years |
| Acoustic signaling | >85 dB at 1 m |
| Power consumption | <4 W |
| Detection sensitivity | 6% LEL (lower explosive limit) |
| Power supply | 230 V mains |
| Dimensions (W × H × D) | 117 × 77.4 × 36.3 mm |
| Weight | 239 g |
| Operating temperature | -10 °C to +40 °C |
| Operating humidity | 0% to 95% (non-condensing) |
| Protection rating | IPX2D |
| Installation | Wall-mounted, about 30 cm from ceiling |
| Test / mute button | TEST/HUSH button |
| Cleaning | Monthly gentle vacuuming of vents |
| Maintenance | Do not paint, do not obstruct vents |
| End-of-life indication | 3 beeps every 30 seconds + yellow LED on |
| Repairability | Not user-serviceable, contact customer service |
| Warranty | Not specified (estimated: 2 years) |
Frequently Asked Questions - P56450 Emos
User questions about P56450 Emos
0 question about this device. Answer the ones you know or ask your own.
Ask a new question about this device
Download the instructions for your Smoke detector in PDF format for free! Find your manual P56450 - Emos and take your electronic device back in hand. On this page are published all the documents necessary for the use of your device. P56450 by Emos.
USER MANUAL P56450 Emos
1
2
GB | Gas Detector
The detector indicates leaks of flammable gasses (natural gas, methane, propane, butane) in households.
This manual contains important safety information regarding the installation and operation of the detector. Carefully read this manual and store it safely for future use. Familiarise other residents of the building with the functioning of the detector so that they can properly respond to its signals.
Technical information:
Sensor type: semi-conductor
• In accordance with standard EN 50194-1:2009
• Service life: 5 years
• Detection: natural gas, methane, propane, butane
- Operating temperature and humidity: -10 °C to +40 °C, 0 to 95 % (without condensation)
- Enclosure: IPX2D
• Acoustic signalisation: > 85 dB at a distance of 1 m
Power supply: 220–240 V/50–60 Hz
Power consumption: < 4 W
Detection sensitivity: 6 % LEL (lower explosive limit)
Dimensions: 36.3 × 117 × 77.4 mm
Weight: 239 g
Detector States Overview
| State Note | Green LED Yellow | LED Red LED | Siren | ||
| Self-testing mode | Upon connection to mains | lit for ca. 2 seconds | lit for ca. 2 seconds | lit for ca. 2 seconds | 1× beep |
| Adaptation mode | Ca. 180 seconds after connection to mains | flashing off | off inactive | ||
| Stand-by mode | Normal gas detector state | lit off off | inactive | ||
| Functionality test | Long-press the TEST/HUSH button | lit off flashing | intermittent beeping | ||
| Alarm mode Gas detected lit off flashing | intermittent beeping | ||||
| Alarm hush | Press the TEST/ HUSH button | lit off flashing inactive | |||
| Faulty gas sensor | Replace the detector | lit lit off | beeps 1× every 30 seconds | ||
| End of detector service life | Replace the detector | lit lit off | beeps 3× every 30 seconds | ||
| Detector is off | Power cable unplugged from mains | off off off inactive | |||
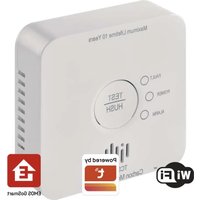
Detector Description See fig. 1
1 - Loud siren
2 - LEDs
POWER - green colour
FAULT - yellow colour
ALARM - red colour
3 - TEST/HUSH button
Used for testing the functioning of the detector or silencing an alarm
4 – End date of detector service life
Installation
The installation must be performed by a qualified person.
The person performing the installation is responsible for installing the product in accordance with valid regulations.
When in doubt, leave the installation to a qualified professional.
Ideally, the detector should be installed in a room where the risk of gas leaks is the greatest, e.g. the kitchen.
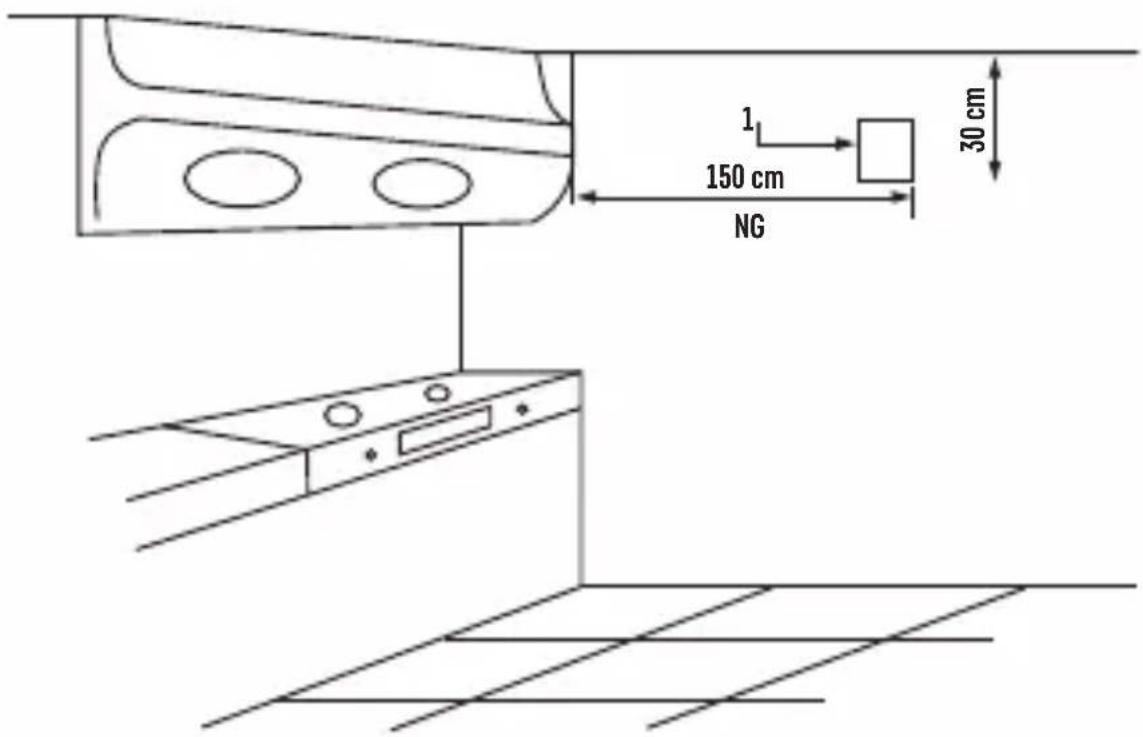
Natural gas is lighter than air and has the tendency to rise up and fill the space above the leak site. The detector should be installed above the likely place of leakage, ca. 30 cm from the ceiling. Do not install the detector in a place where air flow is hindered by furniture and other equipment. The detector should be installed in an accessible place so that the user is able to push the TEST/HUSH button in the event of an alarm.
The detector should be installed in a place from which an alarm will be easy to hear.
Do not install the detector:
- Directly above kitchen appliances
- Outside the building
• In an enclosed space (e.g. a cabinet) - Directly above the sink
- Next to a window or door
- Next to a fan
- In a place where the temperature is not between -10^ and +40^
- In a place where the vents of the detector might get dirty or clogged
- In a humid place
Example of Detector Placement See fig. 2
1 - Gas detector
Installing the Detector onto a Wall
Before mounting, turn off the power for the room.
Make sure there are no wires or pipes in the place you intend to mount the detector.
Use the mounting plate to mark 2 drill holes, see fig. 2.
Drill the two holes (ø 5 mm) in the wall.
Insert the attached wall plugs into the openings, place the mounting plate and attach it to the wall with screws.
Fit the back of the detector firmly onto the fixing projections on the mounting plate.
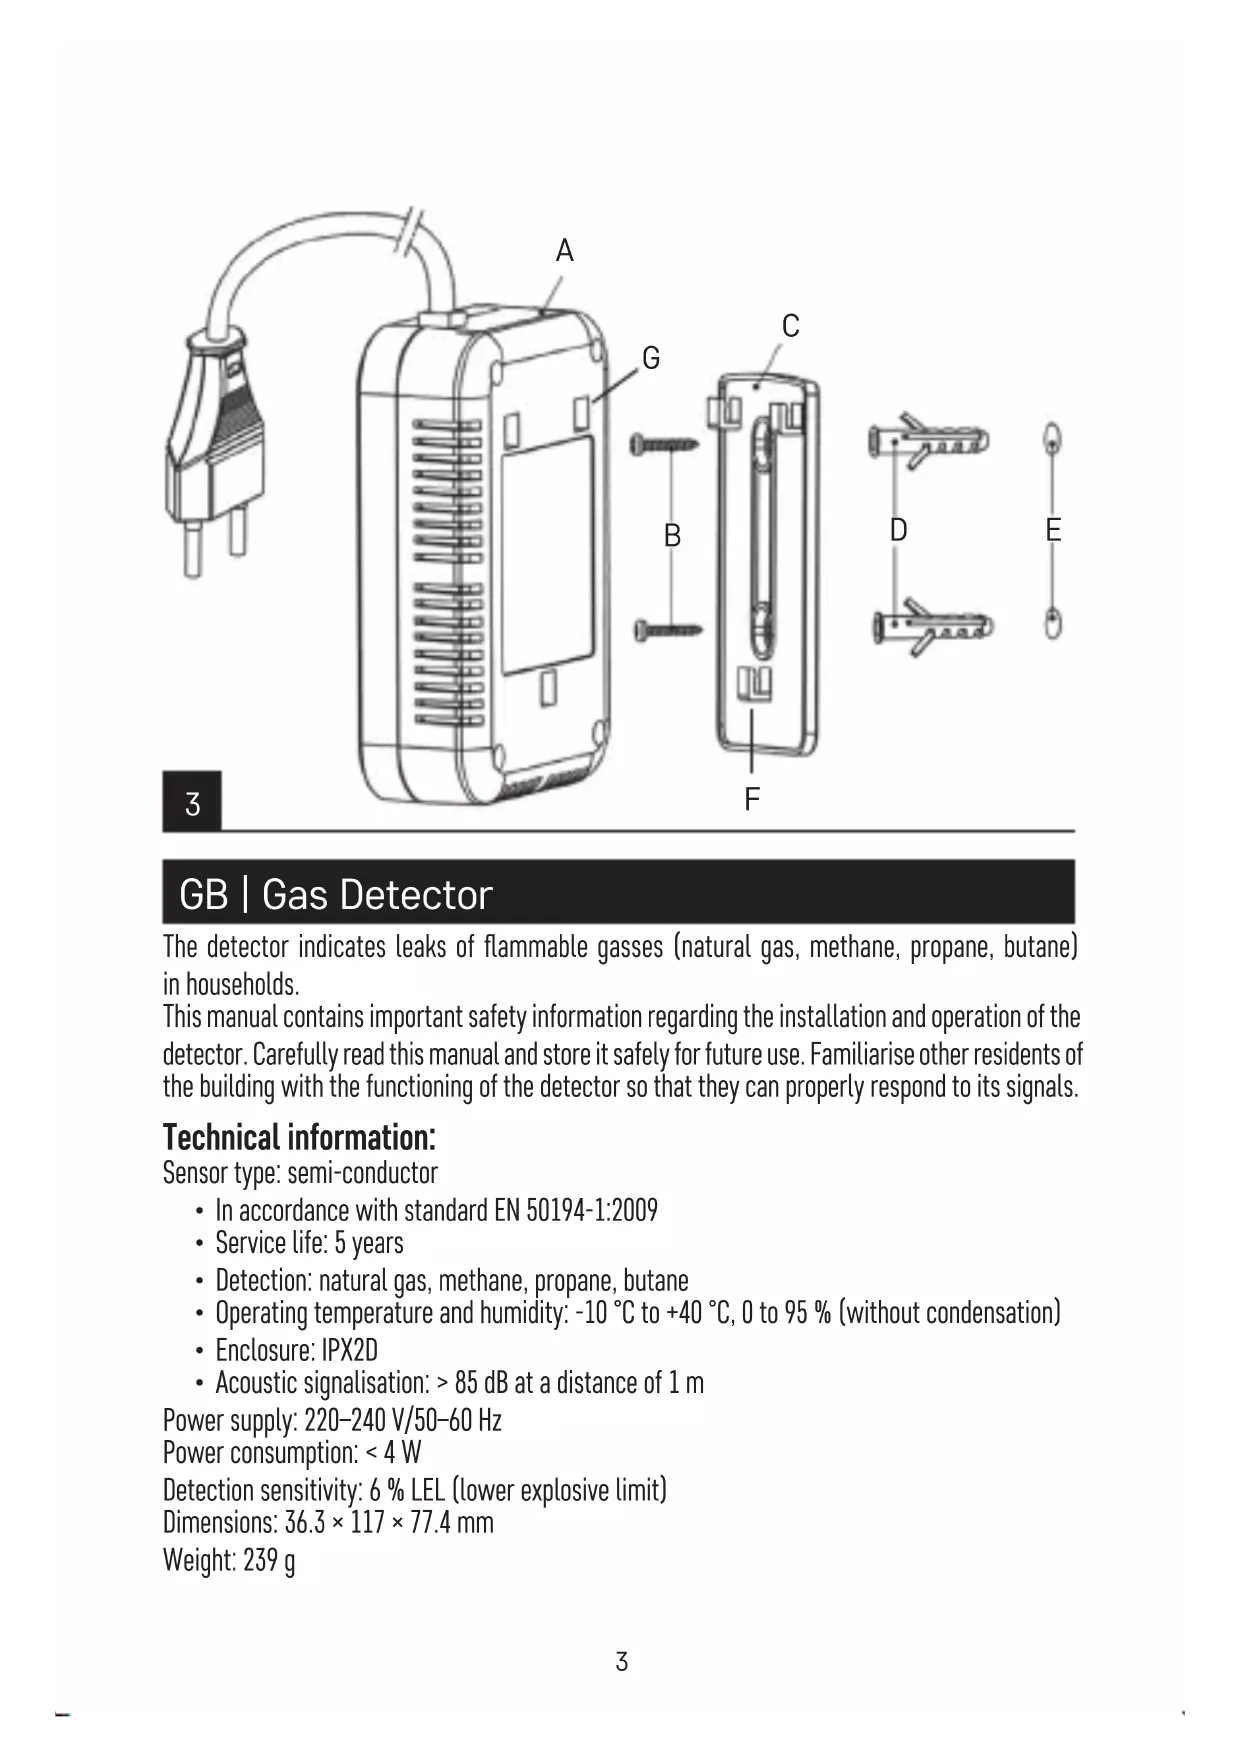
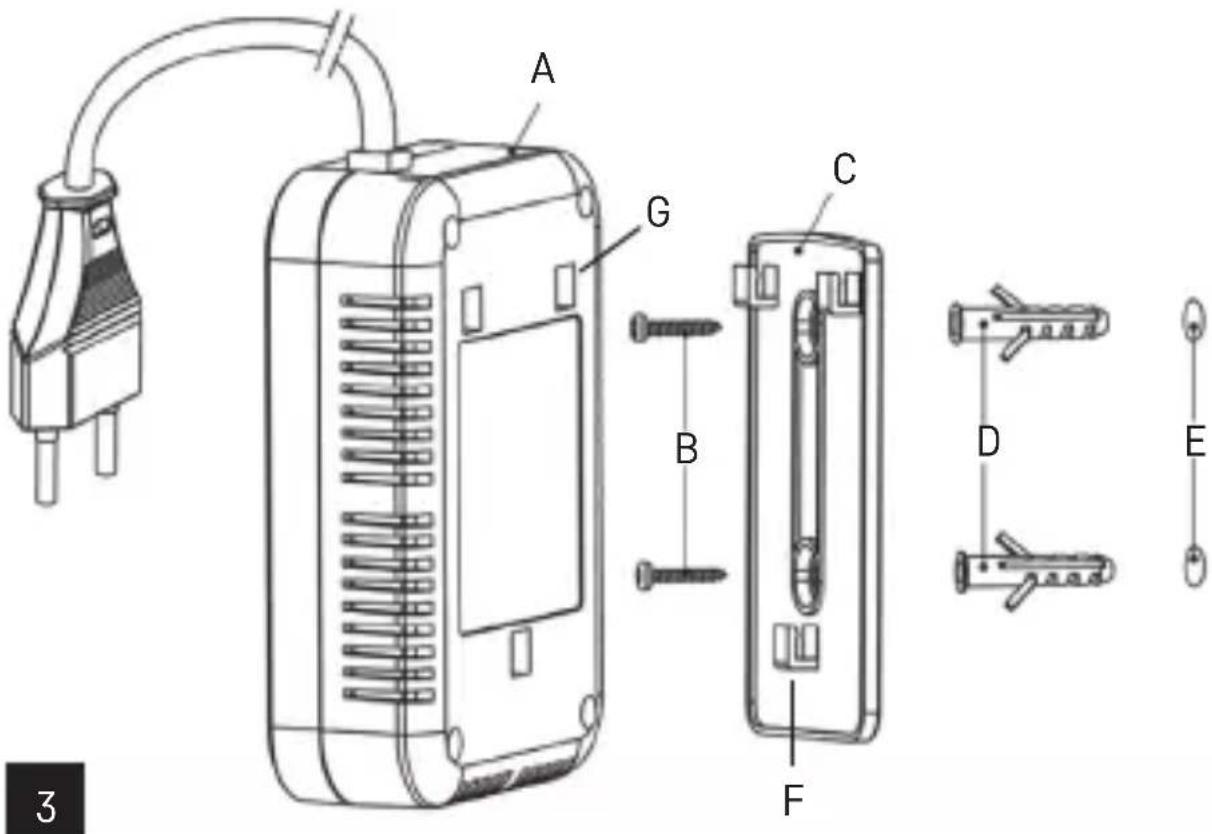
See fig. 3
| A – detector | E – holes in the wall |
| B – screws | F – fixing projections |
| C – mounting plate | G – holes for hanging |
| D – wall plugs |
START-UP
After installation is complete, connect the detector to 230 V mains. The detector will take approx. 3 minutes to adapt and the green LED will be flashing.
Once the green LED stops flashing and remains lit up, the detector is ready for use.
Note: in order for the detector to work faultlessly, it is necessary for oxygen concentration in the room to be at least 21 %.
TEST MODE
If needed, you can check the functioning of the detector.
Long-press the TEST/HUSH button.
The green LED will light up, the red LED will be flashing and the alarm will be beeping.
Use test mode 1× a week.
FAULT STATE
If the detector is in fault state, it is not functional.
Fault state is indicated by 1 beep every 30 seconds and the green and yellow LED will be lit up.
Disconnect the detector from the mains and reconnect it after a few moments.
Perform a functionality test.
If the detector still does not work, contact a service centre.
END OF DETECTOR SERVICE LIFE
The detector has a service life of 5 years since production.
After expiration, the detector must no longer be used and must be replaced with a new device.
The date for replacing the detector is listed on the front of the detector under the TEST/HUSH button.
If you are using multiple detectors, remember to check their replacement dates!
ALARM WARNING
If gas is detected, the green LED will light up and the red LED will be flashing.
A siren will be beeping at the same time.
To silence the siren, press the TEST/HUSH button; the siren will be silenced for 5 minutes.
Then the alarm siren will reactivate.
In the event of an alarm, proceed as follows.
Extinguish all open flames.
Turn off all gas appliances.
Do not turn any electrical appliances on or off, including the detector itself.
Shut off the gas supply and the main shutoff valve.
Open the windows and doors.
Do not use a mobile phone while in the building where the gas leak is likely to have occurred.
Inform people in the vicinity (do not ring the bell to alert your neighbours, only knock).
If the alarm is still active and the cause of the gas leak has not been found, leave the building and immediately contact the gas supplier's emergency breakdown service. Or contact the fire brigade or the police.
Upkeep and Maintenance
The product is designed to serve reliably for many years if used properly. Here are some tips for proper operation:
- Read the manual carefully before using this product.
- The product must be replaced with a new one after 5 years – see replacement date on the front.
- Regularly clean the product – at least 1× a month.
- Carefully clean any dirt and dust from ventilation openings of the product with a vacuum cleaner.
• The product must not be painted.
- Do not expose the product to direct sunlight, extreme cold and humidity, and sudden changes in temperature. This would reduce accuracy of detection.
- Do not place the product in locations prone to vibration and shocks – these may cause damage.
- Do not expose the product to excessive force, impacts, dust, high temperatures or humidity – these may cause the product to malfunction or deform its plastic parts.
- Do not expose the product to frost, rain or humidity, dripping or splashing water. The following substances may cause a false alarm or damage the sensor: silicone gasses, hydrogen sulphide, sulphur oxides, gaseous chlorine, hydrogen chloride, alkali metals, water, products with alcohol content, isobutane, isopropanol, ethylene, ethyl acetate, benzene, toluene, paints, diluents, solvents, glues, hair spray, perfumes, aftershaves.
- Do not place any open flame sources on the product, e.g. a lit candle, etc.
- Do not place the product in places with inadequate air flow.
- Do not insert any objects in the product vents, do not cover up the product.
- Do not tamper with the internal electric circuits of the product – doing so may damage the product and will automatically void the warranty. The product should only be repaired by a qualified professional.
- To clean the product, use a slightly moistened soft cloth. Do not use solvents or cleaning agents – they could scratch the plastic parts and cause corrosion of the electric circuits.
- Do not immerse the product in water or other liquids.
- In the event of damage or defect on the product, do not perform any repairs by yourself. Have it repaired in the shop where you bought it.
- This device is not intended for use by persons (including children) whose physical, sensory or mental disability or lack of experience and expertise prevents safe use, unless they are supervised or instructed in the use of the appliance by a person responsible for their safety. Children must always be supervised and must never play with the device.
Do not dispose with domestic waste. Use special collection points for sorted waste. Contact local authorities for information about collection points. If the electronic devices would be disposed on landfill, dangerous substances may reach groundwater and subsequently food chain, where it could affect human health.
CZ | Detektor plynu
UPOZORNENIE NA ALARM
KONIEC ŻYWOTNOŚCI DETEKTORA
Alimentare: 220–240 V/50–60 Hz
Consum: < 4 W
Sensibilitatea detectiei: 6 % SMV (limita inferioară de explozie)
Dimensiuni: 36,3 × 117 × 77,4 mm
Greutate: 239 g
Strāvas padeve: 220–240 V/50–60 Hz
Toide: 220–240 V/50–60 Hz
Energiatarbimine: < 4 W
Alimentation : 220–240 V/50–60 Hz
Voeding: 220–240 V/50–60 Hz
Verbruik: < 4 W